Cameo Communications SHS-2000 SMART HOME NETWORKING SERVICE User Manual user manual
Cameo Communications Inc SMART HOME NETWORKING SERVICE user manual
Manual

User Manual
SMART HOME NETWORKING SERVICE
Specifications Statement
SPECIFICATIONS
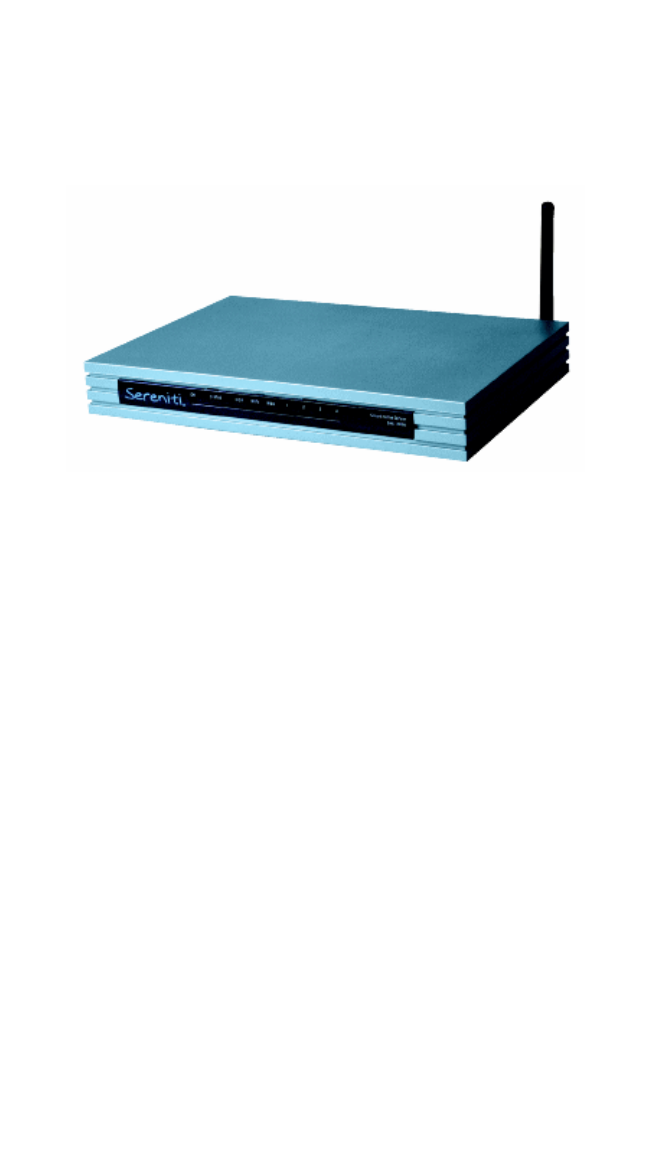
Model: SHS-2000
Description: Smart Home Server
Radio: 802.11g, 802.11b compatible
Ports: WAN: One 10/100 RJ-45 port
LAN: Four 10/100 RJ-45 ports
LEDs: On, Status, Disk, WiFi, WAN, LAN (1,2,3,4)
Power: External 12V DC, 1.5A
Dimensions: 9.25”W
6.38” D
1.38” H
Weight: 1.4 Lbs.

SMART HOME
NETWORKING SERVICE
USER MANUAL
While every effort has been made to ensure this document is correct and current, Sereniti
reserves the right to revise this document without notice. You can download the latest
version of this manual at www.sereniti.com/download/documentation.

COPYRIGHT
This book and the computer programs to which it relates are original,
proprietary materials, the copyright of which is owned by Sereniti Inc.
All exclusive rights under the copyright laws are expressly reserved,
except to the extent of express license granted to persons acquiring the
copyrighted material from Sereniti Inc. In particular, attention is drawn
to section 109 of the Copyright Statute, which prohibits the rental, lease,
or lending of copyrighted computer programs.
Copyright © 2006 by Sereniti Inc. All rights reserved.
UM-(v1.0.0.1)
Published January, 2006.
Printed in the United States of America.
While every effort has been made to ensure this document is correct and
current, Sereniti reserves the right to revise this document without
notice. The customer is responsible for compliance with all applicable
local, state, and federal laws and regulations in connection with
customer use of this product.
Sereniti Inc.
111 Pavonia Ave., Suite 700
Jersey City, NJ 07310
www.sereniti.com

Sereniti Smart Home Networking Service | i
. . . . .
. . . . . . . . . . . . . . . . . . . . . . . .
C
ONTENTS
1 Introduction............................................................ 1
Welcome............................................................................................. 1
Command Center ................................................................................ 1
Overview of the Manual ..................................................................... 3
2 Using the Command Center ................................. 7
Overview............................................................................................. 7
Tray Icon............................................................................................. 8
Logging In and Out............................................................................. 9
Logging In ..................................................................................................9
Logging Out..............................................................................................11
Change Login Accounts ................................................................... 12
Launch Options................................................................................. 13
Main Menu........................................................................................ 14
Home Page........................................................................................ 17
Network Map............................................................................................17
Dashboard.................................................................................................19
To Do List......................................................................................... 21
Open the To Do List .................................................................................21
Understanding Alerts................................................................................22
Responding to Alerts ................................................................................23
3 Connecting PCs to Your Network ...................... 27
Overview........................................................................................... 27
Network Map .................................................................................... 28
Device Information Page .................................................................. 29
Device Information...................................................................................29

CONTENTS
ii | User Manual (v1.0.0.1)
Current Status ...........................................................................................30
Connection Detail .....................................................................................31
Device Management Page................................................................. 32
Security Summary Page.................................................................... 34
Backup Status Page........................................................................... 35
Manage Firewall Page ...................................................................... 37
Set a PC to Auto Login ..................................................................... 37
Change a PC’s Name ........................................................................ 39
Change a PC’s Type ......................................................................... 39
Change a PC’s Icon........................................................................... 39
Connect the PC to Another Wireless Network ................................. 40
4 Connecting Non-PC Devices to Your
Network.................................................................43
Overview........................................................................................... 43
Wireless Devices ......................................................................................43
Network Map............................................................................................44
Other Pages...............................................................................................44
Register a Device .............................................................................. 45
Set a Device to Auto login ................................................................ 46
Open Ports for a Device.................................................................... 47
5 User Accounts......................................................49
Overview........................................................................................... 49
Types of Accounts ............................................................................ 49
Privileged Accounts..................................................................................50
Non-Privileged Accounts .........................................................................50
User Name and Password Guidelines............................................... 51
User Name Guidelines..............................................................................51
Password Guidelines ................................................................................52
Create a User Account ...................................................................... 52
View a List of Existing Accounts ..................................................... 54

CONTENTS
Sereniti Smart Home Networking Service | iii
Modify a User Account..................................................................... 55
Delete a User Account ...................................................................... 58
Set Up User Notifications ................................................................. 58
6 Parental Controls.................................................61
Overview........................................................................................... 61
Choose a Content Filter .................................................................... 62
Available Filters....................................................................................... 62
Bar Graph................................................................................................. 62
Create Allowed and Restricted Sites Lists........................................ 64
Set a User’s Time Filter .................................................................... 65
Create a Time Filter Override........................................................... 67
Unblock a Site................................................................................... 68
Blocked by Content Filter........................................................................ 68
Blocked by Time Filter ............................................................................ 70
7 Backup and Restore ............................................71
Overview........................................................................................... 71
Scheduled Backups.................................................................................. 72
Customize the Backup Schedule.............................................................. 73
How Backups are Stored................................................................... 73
Versions ................................................................................................... 73
Example ................................................................................................... 74
Set the Backup Schedule................................................................... 77
Time and Frequency ................................................................................ 77
Set the Schedule....................................................................................... 77
Select Folders for Backup................................................................. 79
Select Common Folders........................................................................... 79
Select Other Folders (this PC only) ......................................................... 80
Track the Status of Scheduled Backups............................................ 81
Perform an Unscheduled Backup...................................................... 82
View the Contents of the Most Recent Backup ................................ 83
Display the Folders and Files .................................................................. 83

CONTENTS
iv | User Manual (v1.0.0.1)
Understanding the Display .......................................................................84
Restore Files and Folders.................................................................. 85
Restore All Files and Folders in the Most Recent Backup.......................86
Restore Specific files and Folders in the Most Recent Backup................87
Restore an Old Version of a File or Folder ..............................................89
Clean Up Old Backups ..................................................................... 90
Monitor Disk Usage .................................................................................91
Clean Up Unneeded folders......................................................................92
Open Ports for Backups .................................................................... 94
8 Shared Server Drives and Network Devices .....97
Overview........................................................................................... 97
Sereniti Shared Drive ...............................................................................97
USB Ports .................................................................................................98
Use the Sereniti Shared Drive........................................................... 99
Windows Explorer....................................................................................99
Internet Explorer.......................................................................................99
External Storage Devices................................................................ 100
Connect the Device.................................................................................100
Rename the Device.................................................................................101
Monitor Disk Usage ...............................................................................101
View the Contents of the Device Using the Command Center ..............102
View the Contents of the Device Using the Windows Explorer
or Internet Explorer ................................................................................102
Repair a Hard Drive................................................................................102
Reformat a Hard Drive ...........................................................................103
Remove the Device.................................................................................103
Network Printers ............................................................................. 103
Connect the Printer .................................................................................104
Change the Printer’s Name.....................................................................109
9 Folder and Printer Sharing................................111
Overview......................................................................................... 111
Folder Sharing ........................................................................................111
Printer Sharing........................................................................................111

CONTENTS
Sereniti Smart Home Networking Service | v
Workgroups ........................................................................................... 112
Folder Sharing................................................................................. 113
Create a Shared Folder........................................................................... 113
Unshare a Folder.................................................................................... 115
Access a Shared Folder from the Command Center.............................. 116
Access a Shared Folder from a Browser................................................ 116
Printer Sharing ................................................................................ 117
Create a Shared Printer .......................................................................... 117
Connect a PC to a Shared Printer........................................................... 120
Disconnect a Printer from a PC ............................................................. 120
10 Port Forwarding .................................................121
Overview........................................................................................ 121
Ports ....................................................................................................... 121
Port Forwarding ..................................................................................... 122
Enable Universal Plug and Play..................................................... 122
Select a System Defined Rule......................................................... 124
Create a User Defined Rule ............................................................ 125
Delete a Rule................................................................................... 126
11 Monitoring Network Security............................129
Overview......................................................................................... 129
Check the Security Summary Page................................................. 130
Understanding the Security Summary Page ................................... 131
Resolving a Problem ....................................................................... 132
What the Page Shows ............................................................................ 132
How to Resolve a Problem .................................................................... 133
Using the To Do List....................................................................... 133
12 Managing the Smart Home Server ................... 135
Overview......................................................................................... 135
Check the Wired Settings................................................................ 135

CONTENTS
vi | User Manual (v1.0.0.1)
WAN IP and MAC Addresses................................................................136
LAN IP and MAC Addresses .................................................................137
Check the Wireless Settings ........................................................... 137
Wireless Settings ....................................................................................138
Attached Wireless Devices.....................................................................139
Change the Wireless Channel ......................................................... 139
Monitor Disk Usage........................................................................ 140
Change the Time Zone and Workgroup.......................................... 141
Change the Time Zone ...........................................................................141
Change the Workgroup...........................................................................141
Manage an External Storage Device............................................... 142
Rename Network Printers ............................................................... 143
13 Managing Your PC .............................................145
Overview......................................................................................... 145
View a PC Inventory....................................................................... 145
Defragment the Hard Drive ............................................................ 146
Repair Connectivity Problems ........................................................ 148
14 Error Messages ..................................................151
Overview......................................................................................... 151
Antivirus Messages......................................................................... 152
Antispyware Messages ................................................................... 154
Firewall Messages........................................................................... 157
Backup and Restore Messages........................................................ 159
Sereniti Shared Drive Message....................................................... 160
Multiple Connection Message ........................................................ 160
Appendices
Appendix A: About IP Addresses................................................ 163
Appendix B: Backing Up Microsoft Outlook.............................. 169

CONTENTS
Sereniti Smart Home Networking Service | vii
Appendix C: Resolving DNS Problems....................................... 171
Index......................................................................... 175
FCC Interference Statement...................................183

CONTENTS
viii | User Manual (v1.0.0.1)

Sereniti Smart Home Networking Service | ix
. . . . .
. . . . . . . . . . . . . . . . . . . . . . . .
L
IST
OF
F
IGURES
2 Using the Command Center
FIGURE 2-1 Login Fields ................................................................... 10
FIGURE 2-2 Welcome Message .......................................................... 10
FIGURE 2-3 Blocked Access Message ................................................ 11
FIGURE 2-4 Change Login Account Button ....................................... 12
FIGURE 2-5 User Name/Password Dialog .......................................... 13
FIGURE 2-6 Command Center Main Menus ....................................... 14
FIGURE 2-7 Network Map .................................................................. 17
FIGURE 2-8 Device Information Page (Wireless PC)......................... 19
FIGURE 2-9 Dashboard ....................................................................... 20
FIGURE 2-10 To Do List ....................................................................... 22
3 Connecting PCs to Your Network
FIGURE 3-1 Device Information Page ............................................... 29
FIGURE 3-2 Device Management Page (Sereniti Enabled PCs) ......... 33
FIGURE 3-3 Device Settings Page....................................................... 33
FIGURE 3-4 Security Summary Page .................................................. 34
FIGURE 3-5 Backup Status Page......................................................... 35
FIGURE 3-6 Manage Firewalls Page ................................................... 37
FIGURE 3-7 Auto Login Page ............................................................. 38
4 Connecting Non-PC Devices to Your Network
FIGURE 4-1 Device Management Page (Non-PC Devices) ............... 44
FIGURE 4-2 Manage Firewalls Page (Unknown Device) ................... 45
FIGURE 4-3 Device Registration Page ................................................ 45

x | User Manual (v1.0.0.1)
FIGURE 4-4 Auto Login Page.............................................................. 47
5 User Accounts
FIGURE 5-1 Add User Page ................................................................ 53
FIGURE 5-2 Users List......................................................................... 55
FIGURE 5-3 User Settings Page........................................................... 56
FIGURE 5-4 Notifications Page ........................................................... 59
6 Parental Controls
FIGURE 6-1 Parental Controls Page ................................................... 64
FIGURE 6-2 Content Filter Settings Page............................................ 65
FIGURE 6-3 Time Filter Settings Page ................................................ 66
FIGURE 6-4 Start and Stop Fields and Time Filter Override .............. 67
FIGURE 6-5 Blocked Access Message (Content Filter) ...................... 68
FIGURE 6-6 Unblock Requests List .................................................... 69
FIGURE 6-7 Blocked Access Message (Time Filter) .......................... 70
7 Backup and Restore
FIGURE 7-1 Backup Status Page ........................................................ 78
FIGURE 7-2 Backup Settings Page ...................................................... 78
FIGURE 7-3 Select Additional Folders Window ................................. 80
FIGURE 7-4 Backed Up Folders Window ........................................... 84
FIGURE 7-5 Restore Page.................................................................... 86
FIGURE 7-6 Select Folders to Restore Window .................................. 88
FIGURE 7-7 Backup Disk Usage Page (Totals)................................... 91
FIGURE 7-8 Backup Disk Usage Page (Folders)................................. 92
FIGURE 7-9 Backup Cleanup Page...................................................... 93
FIGURE 7-10 Backup Cleanup Details Page ......................................... 93

Sereniti Smart Home Networking Service | xi
8 Shared Server Drives and Network Devices
FIGURE 8-1 Attached USB Devices Page .......................................... 101
FIGURE 8-2 Printers and Faxes Window............................................. 104
FIGURE 8-3 Add Printer Wizard (1).................................................... 105
FIGURE 8-4 Add Printer Wizard (2).................................................... 106
FIGURE 8-5 Add Printer Wizard (3).................................................... 106
FIGURE 8-6 Add Printer Wizard (4).................................................... 107
FIGURE 8-7 Add Printer Wizard (5).................................................... 108
FIGURE 8-8 Add Printer Wizard (6).................................................... 108
9 Folder and Printer Sharing
FIGURE 9-1 Folder Sharing Page ....................................................... 114
FIGURE 9-2 Folder Sharing Wizard (1)............................................... 114
FIGURE 9-3 Folder Sharing Wizard (2)............................................... 115
FIGURE 9-4 Printer Sharing Page........................................................ 118
FIGURE 9-5 Printer Sharing Wizard (1) .............................................. 118
FIGURE 9-6 Printer Sharing Wizard (2) .............................................. 119
FIGURE 9-7 Printer Sharing Wizard (3) .............................................. 119
10 Port Forwarding
FIGURE 10-1 Manage Firewalls Page .................................................. 123
FIGURE 10-2 Firewall Settings Page..................................................... 123
FIGURE 10-3 Add Firewall Rules Page................................................. 124
FIGURE 10-4 Port Forwarding Rules Page............................................ 125
11 Monitoring Network Security
FIGURE 11-1 Security Summary Page ................................................. 130
FIGURE 11-2 Device Security Page ...................................................... 132

xii | User Manual (v1.0.0.1)
12 Managing the Smart Home Server
FIGURE 12-1 Smart Home Server Status Page ..................................... 136
FIGURE 12-2 Wireless Settings Page .................................................... 138
FIGURE 12-3 Smart Home Server Settings Page .................................. 141
FIGURE 12-4 Attached USB Devices Page ........................................... 142
13 Managing Your PC
FIGURE 13-1 PC Inventory .................................................................. 146
FIGURE 13-2 PC Status Page ................................................................ 147
FIGURE 13-3 Windows Disk Defragmenter.......................................... 148
FIGURE 13-4 Connectivity Manager ..................................................... 149

Sereniti Smart Home Networking Service | xiii
. . . . .
. . . . . . . . . . . . . . . . . . . . . . . .
L
IST
OF
T
ABLES
1 Introduction
TABLE 1-1 User Manual Chapters .................................................... 3
2 Using the Command Center
TABLE 2-1 Tray Icon Menu Options ................................................ 8
TABLE 2-2 Command Center Options .............................................. 16
TABLE 2-3 Dashboard Options ......................................................... 20
TABLE 2-4 Alert Fields .................................................................... 22
6 Parental Controls
TABLE 6-1 Content Filters ................................................................ 63
14 Error Messages
TABLE 14-1 Antivirus Messages ........................................................ 152
TABLE 14-2 Antispyware Messages ................................................... 154
TABLE 14-3 Firewall Messages .......................................................... 157
TABLE 14-4 Backup and Restore Messages ....................................... 159

xiv | User Manual (v1.0.0.1)

Sereniti Smart Home Networking Service | 1
. . . . .
. . . . . . . . . . . . . . . . . . . . . .
I
NTRODUCTION
1
. . . . . . . . . . . . . . . . . . . . . . . . . . . . . . . . . . . . . . . . . . .
WELCOME
Congratulations. You have chosen to subscribe to the Sereniti Smart
Home Networking Service. Our unique combination of hardware,
software and around-the-clock technical support can help you overcome
the complexities and frustrations that all too frequently accompany the
installation and management of a home network.
. . . . . . . . . . . . . . . . . . . . . . . . . . . . . . . . . . . . . . . . . . .
COMMAND CENTER
The User Manual explains how to operate the Sereniti Command
Center. The Command Center is an easy to use home network
management program that you can install on any PC in your network
running the Microsoft Windows XP operating system.
The Command Center does two things:
Manages the network The Command Center helps you set up and
manage a Smart Home Network. Using the Command Center, you can:
• Create user accounts so that others can log into the network,
use its broadband connection to access the Internet, send and
receive email, chat with friends, etc.
• Set up parental controls to restrict the types of web sites your
children can access and the hours of the day they can access
them

INTRODUCTION
Command Center
2 | User Manual (v1.0.0.1)
1
• Ensure antivirus, antispyware and firewall programs are
installed on each PC, and are enabled and up to date
• Create a backup schedule to automatically back up key files
and folders on each PC
• Share folders and printers among network users
Improves network usability In addition to helping you manage your
network, installing the Command Center on a PC serves another
purpose – it makes it much easier to:
• Log the user into the network
• Apply the appropriate parental controls
• Monitor the antivirus, antispyware and firewall programs
• Ensure key files are backed upon on a regular basis
• Connect to the two Sereniti shared drives, any printers or
storage devices connected to the Smart Home Server, and all
other shared printers and folders
For these reasons, we recommend you install the Command Center on
all PCs in your household, as well as any PCs that will connect to the
network on a regular basis, such as laptops you bring home from the
office, a college student returning home for vacations, etc. Complete
installation instructions can be found in the Installation Manual.
To get the benefits of the Command Center, the program does not have
to be open, only installed and running. The only thing the user will
notice is a small icon in the Windows system tray.
Tip: If a user will not be using the Command Center to manage the
network, you can set the user’s PC to auto login. The user will
then be logged in automatically when the PC is started and need
never open the Command Center. Parental controls will still
apply. For details, see Chapter 3.
INTRODUCTION
Overview of the Manual
Sereniti Smart Home Networking Service | 3
. . . . . . . . . . . . . . . . . . . . . . . . . . . . . . . . . . . . . . . . . . .
OVERVIEW OF THE MANUAL
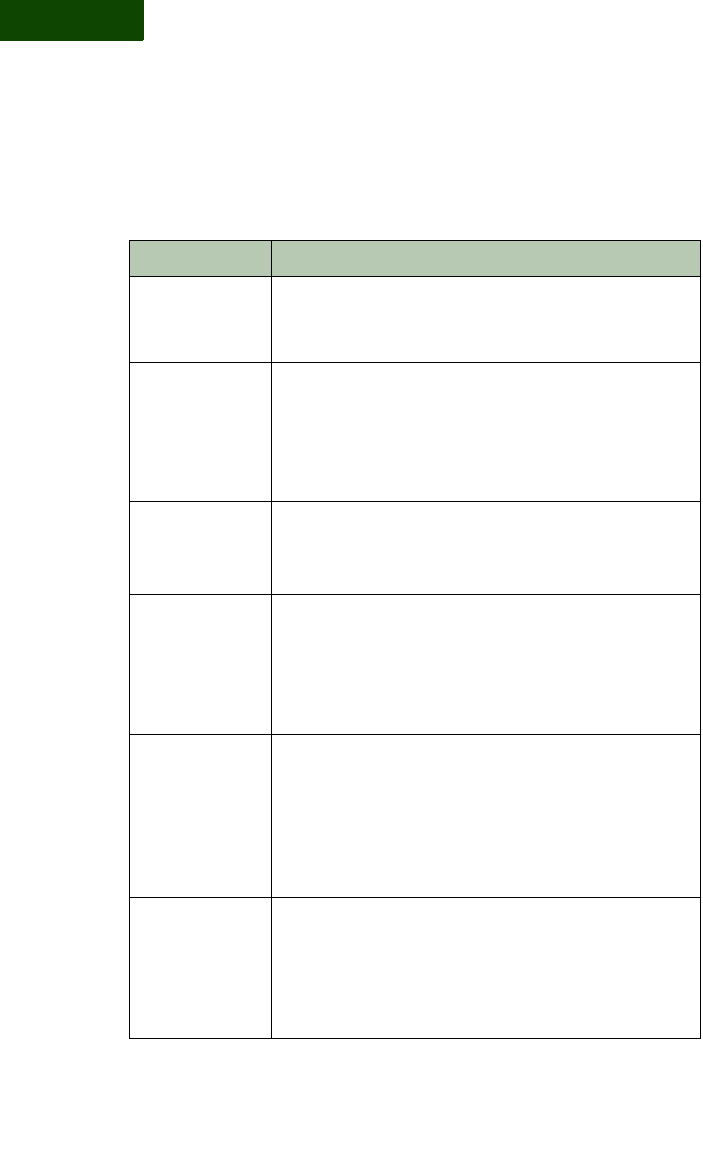
TABLE 1-1 briefly summarizes the contents of each chapter in the User
Manual.
TABLE 1-1 User Manual Chapters
This chapter... Explains how to...
Chapter 2. Using the
Command Center
• Use the Command Center’s tray icon
• Log in and out of the Command Center
• Change login accounts
• Set the Command Center’s launch options
• Use the Command Center’s Main Menu
• Use the Network Map and Dashboard, which
are found on the Command Center’s Home
page
• Use the To Do List, which shows all alerts
issued by the system
Chapter 3. Connecting
PCs to Your Network
• Find a newly connected PC in the Network Map
and other Command Center pages
• Use the Network Map and Device Management
page to track the PC’s status and respond to
security and backup problems
• Use the Security Summary page to track the
status of the antivirus, antispyware and firewall
programs running on the PC
• Use the Backup Status page to track the status
of scheduled backups on the PC
• Use the Manage Firewalls page to track the port
forwarding rules in effect for the PC
• Set the PC to auto login
• Change the PC’s settings (name, type, icon)
• Connect the PC to another wireless network

INTRODUCTION
Overview of the Manual
4 | User Manual (v1.0.0.1)
1
Chapter 4. Connecting
Non-PC Devices to
Your Network
• Register a non-PC device
• Set a non-PC device to auto login
• Open firewall ports for non-PC devices
Chapter 5. User
Accounts
• Create privileged and non-privileged user
accounts
• View a list of existing user accounts
• Modify the details of a user account
• Delete a user account
• Set up user notifications
Chapter 6. Parental
Controls
• Choose a content filter to assign to a user
• Create Allowed and Restricted Sites Lists
• Set a user’s time filter
• Create a time filter override
• Unblock a web site
Chapter 7. Backup and
Restore
• Set the backup schedule
• Select folders for backup
• Track the status of scheduled backups
• Perform an unscheduled backup
• View the contents of the most recent backup
• Restore files and folders
• Clean up old backups
• Open ports for backups
TABLE 1-1 User Manual Chapters (Continued)
This chapter... Explains how to...
INTRODUCTION
Overview of the Manual
Sereniti Smart Home Networking Service | 5
Chapter 8. Shared
Server Drives and
Network Devices
• Access the Sereniti Shared Drive (S: drive)
• Connect an external storage device to the Smart
Home Server
• Rename an external storage device
• Access, monitor, format, repair and remove an
external storage device
• Connect a network printer to the Smart Home
Server
• Rename the printer
Chapter 9. Folder and
Printer Sharing
• Create and access shared folders
• Create and print to shared printers
Chapter 10. Port
Forwarding
• Enable Universal Plug and Play (UPnP)
• Select a system defined port forwarding rule
• Create a user defined port forwarding rule
• Delete a port forwarding rule
Chapter 11. Monitoring
Network Security
• Identify and evaluate the severity of any
problems with the security programs running on
any of your network PCs
• Take action to resolve the problems
• Use the To Do List to identify and resolve
problems
Chapter 12. Managing
the Smart Home Server
• Check the Smart Home Server’s wired and
wireless settings
• Change the wireless channel
• Monitor hard disk usage on the Smart Home
Server
• Change the Smart Home Server’s time zone and
workgroup
• Manage external storage drives
• Rename network printers
TABLE 1-1 User Manual Chapters (Continued)
This chapter... Explains how to...
INTRODUCTION
Overview of the Manual
6 | User Manual (v1.0.0.1)
1
Chapter 13. Managing
Your PC
• Display an inventory of a PC’s hardware and
software resources
• Defragment a PC’s hard drive
• Resolve connectivity problems
Chapter 14. Error
Messages
• Respond to Antivirus error messages
• Respond to Antispyware error messages
• Respond to Firewall error messages
• Respond to Backup and restore error messages
• Respond to Sereniti shared drive messages
• Respond to Multiple connection message
TABLE 1-1 User Manual Chapters (Continued)
This chapter... Explains how to...

Sereniti Smart Home Networking Service | 7
. . . . .
. . . . . . . . . . . . . . . . . . . . . .
U
SING
THE
C
OMMAND
C
ENTER
2
. . . . . . . . . . . . . . . . . . . . . . . . . . . . . . . . . . . . . . . . . . .
THIS CHAPTER
Explains how to:
• Use the Command Center’s tray icon
• Log in and out of the Command Center
• Change login accounts
• Set the Command Center’s launch options
• Use the Command Center’s Main Menu
• Use the Network Map and Dashboard, which are found on the
Command Center’s Home page
• Use the To Do List, which shows all alerts issued by the system
. . . . . . . . . . . . . . . . . . . . . . . . . . . . . . . . . . . . . . . . . . .
OVERVIEW
The Command Center interface provides subscribers of the Smart Home
Networking Service with a powerful set of tools to set up and manage
their Smart Home Network. It consists of:
• A tray icon to represent the Command Center
• Launch options to determine how the Command Center opens
• A Main Menu to access the Command Center pages you need
to set up and manage the network
• A Home page with a Network Map showing at a glance all
devices connected to the network and a Dashboard to help
manage the PC you are currently using

USING THE COMMAND CENTER
Tray Icon
8 | User Manual (v1.0.0.1)
2
• A To Do List showing all outstanding alerts and the actions
needed to resolve them
. . . . . . . . . . . . . . . . . . . . . . . . . . . . . . . . . . . . . . . . . . .
TRAY ICON
When the Command Center is installed on a PC, it places an icon in the
Windows system tray. The system tray is usually located at the bottom
right of the screen.
The appearance of the icon depends on whether or not the user is logged
into the Command Center.
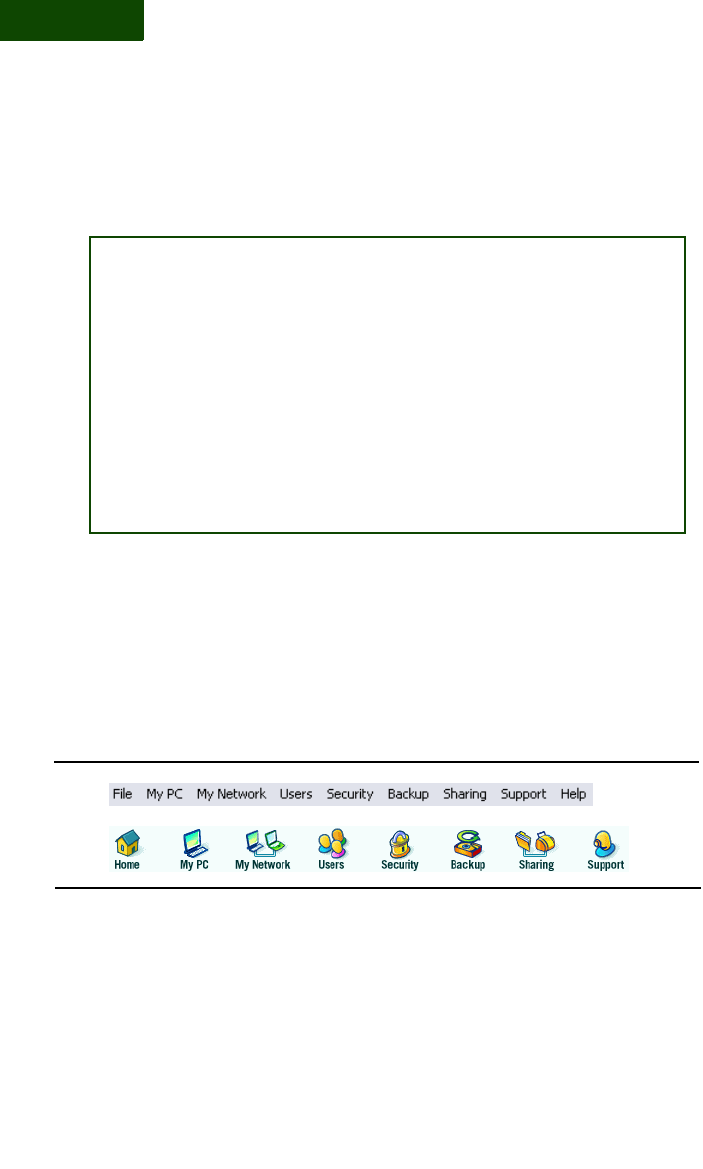
Right-clicking on the tray icon pops up a menu with seven options.
TABLE 2-1 explains what each option does.
TABLE 2-1 Tray Icon Menu Options
Option What it does...
Go to Sereniti.com If you are logged in, it opens the Sereniti home
page in a browser.
If you are not logged in, it is grayed out because
login is required for Internet access.
Command Center If you are logged in, it brings the Command Center
to the front of the screen.
If you are not logged in, it opens the Command
Center so you can log in.
Reset to Default
Settings
Resets the Command Center software to the
default settings. Select this option whenever you
connect to a new Smart Home Server.
Help Launches the on-line help window
= Logged in
= Not logged in

USING THE COMMAND CENTER
Logging In and Out
Sereniti Smart Home Networking Service | 9
. . . . . . . . . . . . . . . . . . . . . . . . . . . . . . . . . . . . . . . . . . .
LOGGING IN AND OUT
To connect to your home network and use your broadband Internet con-
nection, all users must log in. Users attempting to access the Internet
without logging in will be blocked by the Smart Home Server and asked
to login.
Users remain logged in until they log out (or until exiting the Command
Center or turning off the PC). Users can change login accounts without
logging out (see “Change Login Accounts” below).
Note: PCs can be set to auto login so that the user is logged in
automatically when the PC is turned on. For additional
information, see Chapter 3.
LOGGING IN
Users can log in through the Command Center or through a browser.
Logging in through the Command Center To log in through the
Command Center, follow the steps below:
1The Command Center should open automatically when your PC starts.
If it does not, right-click the tray icon and select Sign In.
About Displays the version of the Command Center
software currently installed
Sign Out/Sign In Signs you in and out of the Command Center.
Signing in opens the Command Center and allows
you to log in.
Signing out logs you out of the Command Center
but leaves the Command Center running.
Exit Closes the Command Center
TABLE 2-1 Tray Icon Menu Options (Continued)
Option What it does...
USING THE COMMAND CENTER
Logging In and Out
10 | User Manual (v1.0.0.1)
2
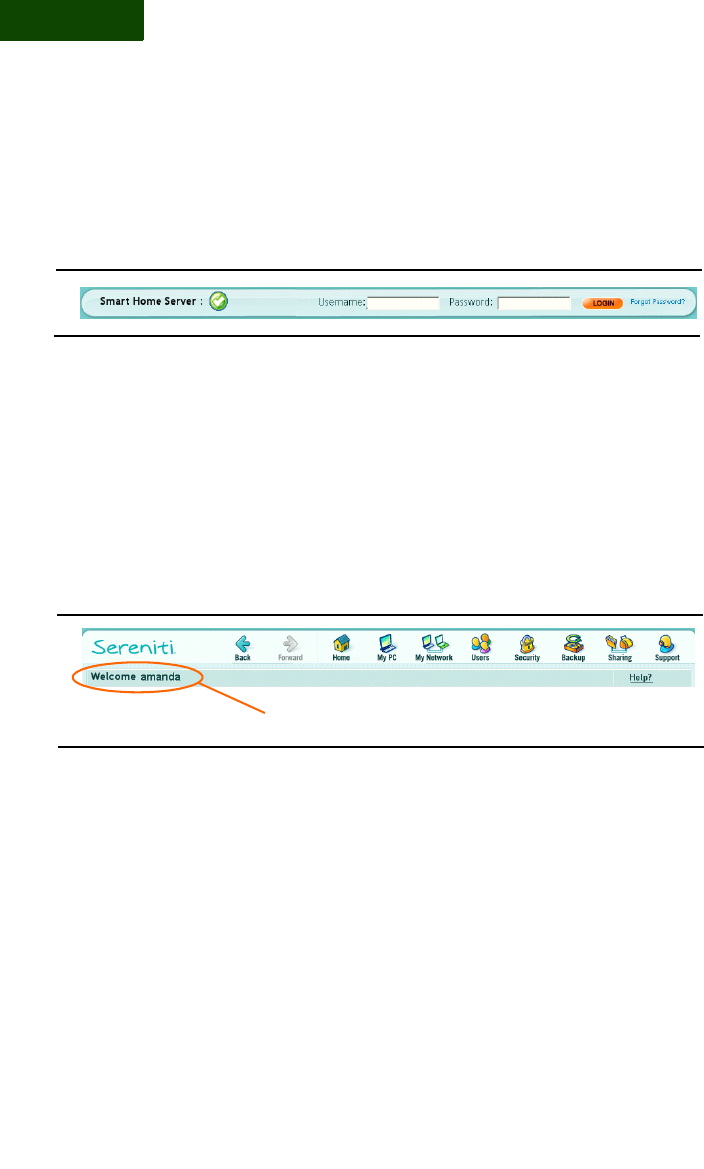
2When the Command Center is open and the Home page displayed, type
a user name and password in the Username and Password fields
(FIGURE 2-1).
Note: The Username and Password fields appear at the bottom of
every Command Center page. Users can log in and out from any
page.
3Click LOGIN. A message pops up indicating you are being logged in.
In addition, a welcome message with your user name appears on the
upper left of every page (FIGURE 2-2) and the LOGIN button becomes a
LOGOUT button.
Logging in through a browser To log in through a browser, follow
the steps below:
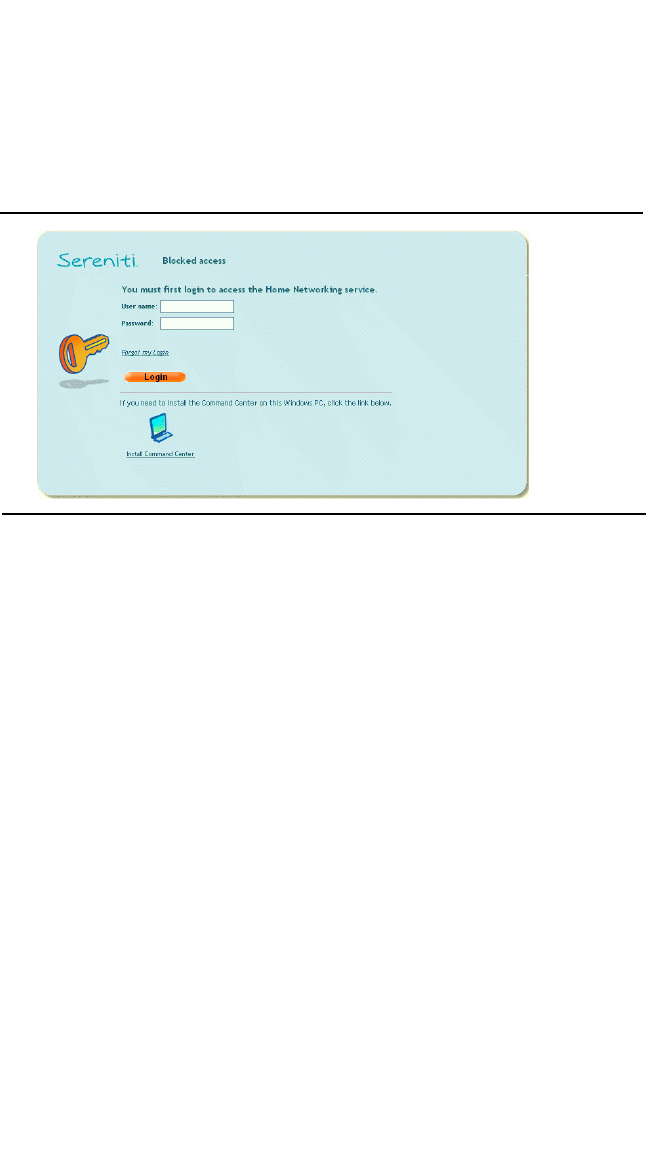
1Open a browser such as the Internet Explorer. The browser attempts to
connect to the Internet and then displays a Blocked Access message
(FIGURE 2-3).
FIGURE 2-1 Login Fields
FIGURE 2-2 Welcome Message
Welcome message
USING THE COMMAND CENTER
Logging In and Out
Sereniti Smart Home Networking Service | 11
2Type your user name and password in the User name and Password
fields.
3Click LOGIN. The browser now connects to the Internet and displays
the browser's home page.
LOGGING OUT
Users can log out through the Command Center or through a browser.
Logging out through the Command Center If you logged in
through the Command Center, there are two ways to log out:
1Click the LOGOUT button at the bottom right of any Command Center
page.
or
2Right-click the tray icon and select Sign Out.
Logging out through a browser If you logged in through a browser
such as Internet Explorer, you have to logout through the browser:
1Open the browser and enter logout.sereniti.com in the Address field.
FIGURE 2-3 Blocked Access Message
USING THE COMMAND CENTER
Change Login Accounts
12 | User Manual (v1.0.0.1)
2
2Click Go. When you are logged out, a Blocked Access message appears
in the browser window. To log back in, enter your user name and
password and click the LOGIN button.
. . . . . . . . . . . . . . . . . . . . . . . . . . . . . . . . . . . . . . . . . . .
CHANGE LOGIN ACCOUNTS
Sometimes it is necessary to change accounts and log in as a different
user. To do this:
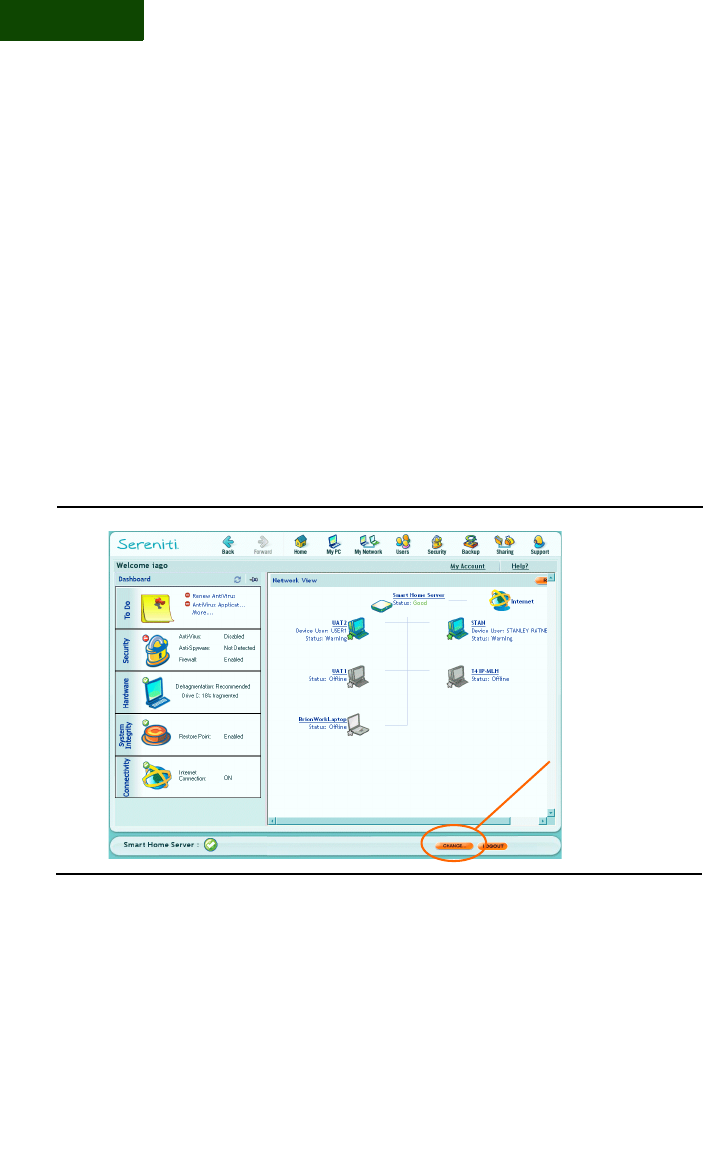
1Click the CHANGE button. It is found at the bottom right of every
Command Center page (FIGURE 2-4).
FIGURE 2-4 Change Login Account Button
CHANGE button
USING THE COMMAND CENTER
Launch Options
Sereniti Smart Home Networking Service | 13
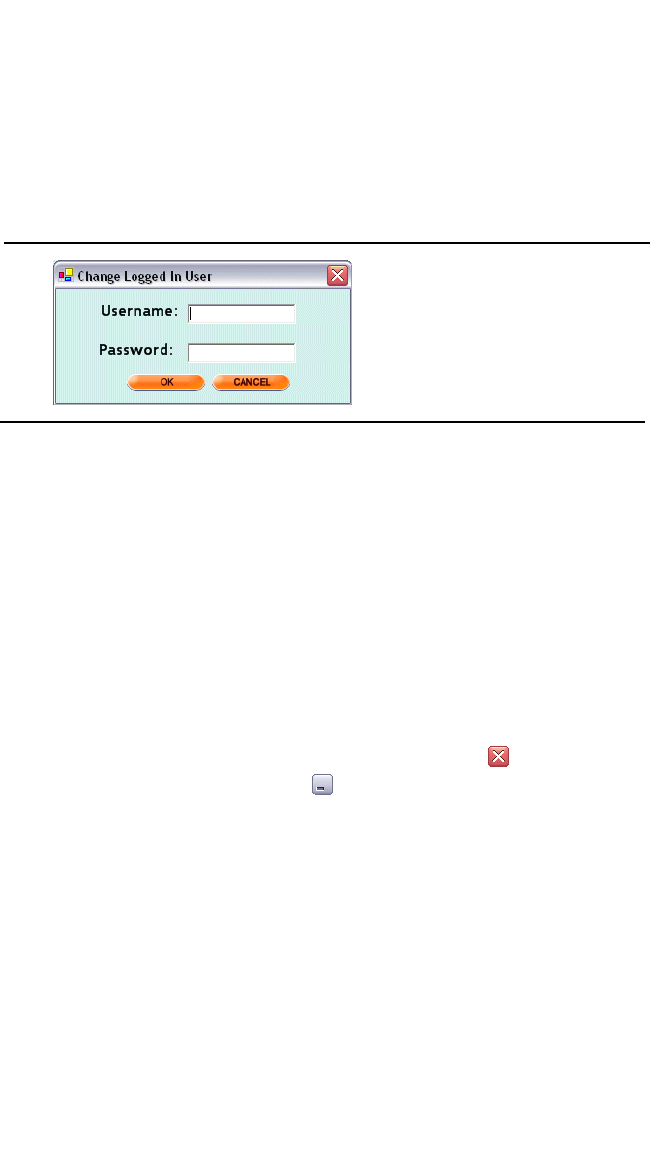
2A dialog box pops up and prompts you for a user name and password
(FIGURE 2-5).
3Enter a user name and password in the Username and Password fields.
4Click OK. The login account is immediately changed. Any parental
controls associated with the new account now apply to you.
. . . . . . . . . . . . . . . . . . . . . . . . . . . . . . . . . . . . . . . . . . .
LAUNCH OPTIONS
The Command Center is set to launch automatically every time you start
your PC. If you do not intend to use the Command Center, you can close
the Command Center window by clicking this icon or minimize the
window by clicking this icon . In either case, the Command Center
remains running, just not visible, and the icon still appears in the Win-
dows system tray.
If you logged in before you closed or minimized the window, you
remain logged in even though the Command Center is not visible. The
tray icon shows you are logged in (see “Tray Icon” above).
If you did not log in before closing or minimizing the window, the tray
icons shows you are not logged in. If you attempt to connect to the Inter-
net, you will be prompted to log in. Once you do, the tray icon will
change. If you re-open the Command Center, you will not have to log in
again.
FIGURE 2-5 User Name/Password Dialog
USING THE COMMAND CENTER
Main Menu
14 | User Manual (v1.0.0.1)
2
Note: To turn the Command Center off, so that it is not running at all,
right-click the tray icon and select Exit.
. . . . . . . . . . . . . . . . . . . . . . . . . . . . . . . . . . . . . . . . . . .
MAIN MENU
Every Command Center page has a horizontal Main Menu across the
top. The menu appears twice, once as text and once as icons
(FIGURE 2-6).
The two versions are essentially the same. These are the primary simi-
larities and differences:
File menu The text version has a File menu that is not found in the
icon version. The File menu enables you to:
SOLUTION: How do I turn off auto launch?
If you would rather not have the Command Center launch automati-
cally every time you start your PC:
1. Go to the text Main Menu (see “Main Menu” below).
2. Click File.
3. Select Options.
4. Select Auto Launch Sereniti Command Center.
Now, when you start your PC, the Command Center will not launch,
but the icon will appear in the system tray. To open the Command
Center, right-click the icon and select Command Center.
FIGURE 2-6 Command Center Main Menus

USING THE COMMAND CENTER
Main Menu
Sereniti Smart Home Networking Service | 15
• Return to the Home page from any other Command Center
page (the icon version has a Home option that does the same
thing)
• Auto launch Sereniti wireless. This auto launch feature is
automatically turned on when you set a PC up to connect to the
Smart Home Server wirelessly. You can turn this feature off by
selecting it. You only need to do this when you connect to a
different wireless network.
• Auto launch the Command Center. This auto launch feature is
turned on by default. This means the Command Center opens
automatically when the PC starts. You can turn this feature off
by selecting it.
• Exit the Command Center
Help menu The text version has a Help menu that is not found in the
icon version. The Help menu enables you to:
• Launch a window that shows the version of the Command
Center software currently running on this PC
• Access the Sereniti web site to view the company’s copyright
information, privacy policy and home page, and to contact the
company for support
Support menu The icon version has a Support menu that is not
found in the text version. The Support menu enables you to:
• Access the Sereniti support portal
• Contact a Sereniti support agent by chat or email
• Diagnose and repair connectivity problems
Command Center menu The primary portion of the two Main
Menus are the six Command Center options. These are the same on both
menus. They enable you to set up and manage your network. TABLE 2-2
explains what each option does.
USING THE COMMAND CENTER
Main Menu
16 | User Manual (v1.0.0.1)
2
TABLE 2-2 Command Center Options
Option What it does...
My PC Helps manage the PC you are currently using. Lets you
check its status, defragment its hard drive, set up restore
points and repair connectivity problems.
My Network Helps monitor the PCs in the network. Lets you check
the status of their security programs and backups, set
auto login and repair connectivity problems.
Also helps manage the Smart Home Server, check its
status and settings and monitor its hard disk usage.
Users Helps manage access to your network. Lets you create,
modify and delete user accounts.
Also lets you set up parental controls.
Security Helps manage network security. Lets you monitor the
security programs on each PC and resolve any
problems.
Also lets you open ports on the network firewall and set
up parental controls.
Backup Helps protect against information loss. Lets you create a
backup schedule, choose the folders to be backed up,
perform unscheduled backups and restore old backed up
files.
Also lets you monitor backup disk usage and clean up
unneeded backup files.
Sharing Helps make network resources available to all users.
Lets you set up folder and printer sharing.
Also lets you view the contents of the Sereniti Shared
Drive (S: drive) and manage any external storage
devices and printers attached to the Smart Home Server.
USING THE COMMAND CENTER
Home Page
Sereniti Smart Home Networking Service | 17
. . . . . . . . . . . . . . . . . . . . . . . . . . . . . . . . . . . . . . . . . . .
HOME PAGE
The Home page is the first page that appears after you log into the Com-
mand Center. You can return to the Home page from any Command
Center page by clicking Home in the Main Menu.
The Home page consists of a Network Map and a Dashboard.
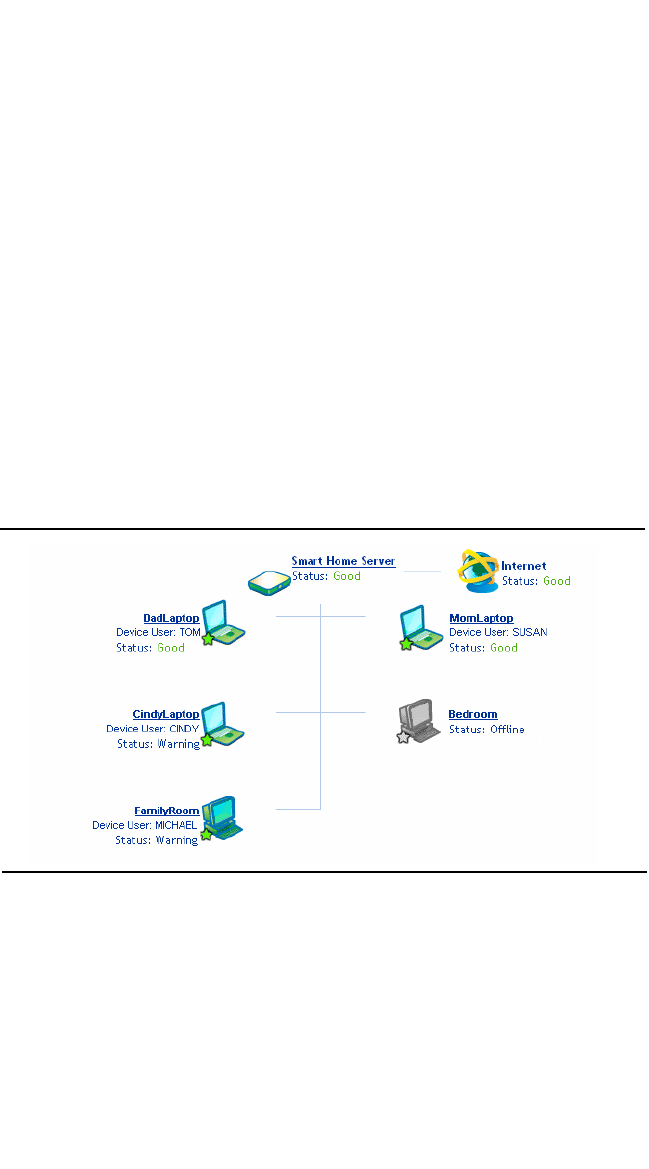
NETWORK MAP
The Network Map shows all the PCs and other devices connected to
your network. The devices do not have to be powered on to show up on
the Network Map.
FIGURE 2-7 shows a typical network map.
Note: You can also display the Network Map by clicking My
Networks and then clicking the Network Map icon.
FIGURE 2-7 Network Map
USING THE COMMAND CENTER
Home Page
18 | User Manual (v1.0.0.1)
2
On or offline The appearance of the icon tells you if the device is
online or offline. If the device is online, the icon appears in full color, as
shown below:
The green star only appears on PCs running the Command Center. It
indicates the Command Center is up and connected to the Smart Home
Server. If the PC is not connected to the Smart Home Server, a red star
appears.
If the device is offline, the icon appears grayed out, as shown below:
IP and MAC addresses To display the IP and MAC addresses of a
device, rest your mouse cursor on the icon. The IP and MAC addresses
pop up, as shown below:
Additional device information To view additional information about
a device, click the device’s name to display the Device Information page
(FIGURE 2-8).
USING THE COMMAND CENTER
Home Page
Sereniti Smart Home Networking Service | 19
If the device is a PC running the Command Center, the page warns you
if the PC is experiencing security or backup problems (see FIGURE 2-8),
and provides links to the Device Security and Backup Status pages so
you can resolve them.
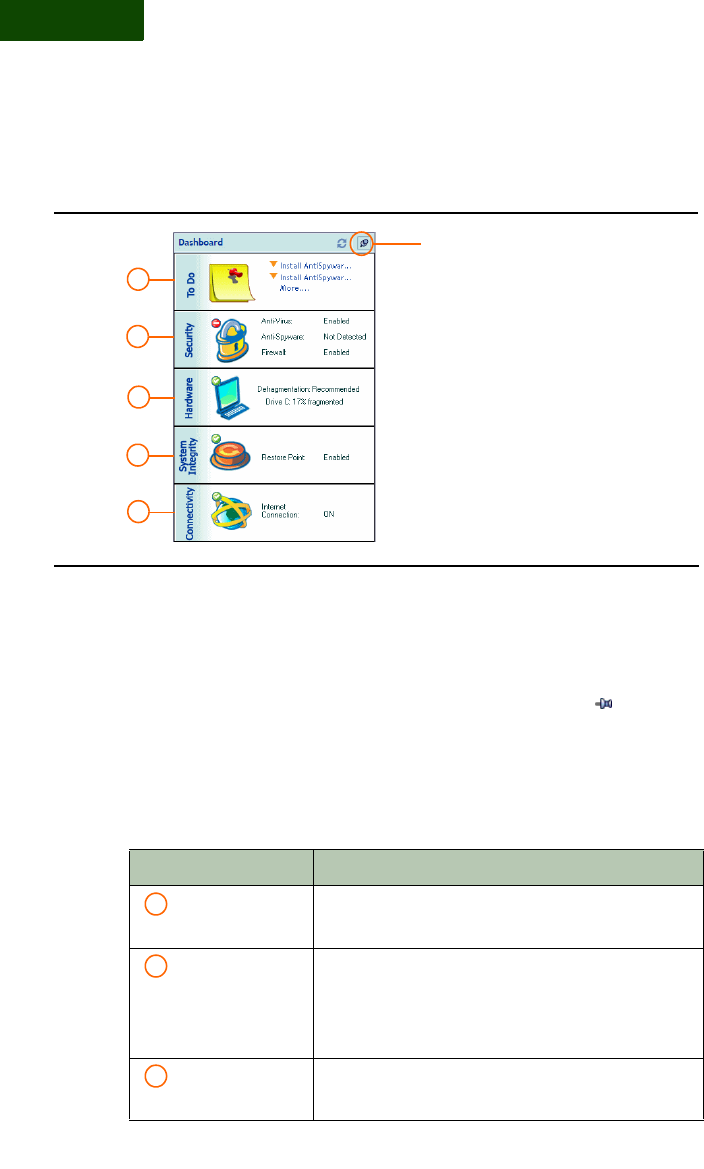
DASHBOARD
The Dashboard appears along the left side of the Home page (FIGURE 2-
9). It lets you open the To Do List and provides links to Command Cen-
ter pages to help you manage and troubleshoot the PC you are currently
using.
FIGURE 2-8 Device Information Page (Wireless PC)
Security and backup status
USING THE COMMAND CENTER
Home Page
20 | User Manual (v1.0.0.1)
2
Note: The Dashboard is detachable. You can separate the Dashboard
from the Command Center and pin it to the desktop so it can be
accessed more easily. To do this, click the pin icon at the top-
right of the Dashboard (see FIGURE 2-9). To unpin it, click the pin
icon a second time.
TABLE 2-3 explains what each Dashboard option does.
TABLE 2-3 Dashboard Options
Option What it does...
To Do Opens the To Do List (see “To Do List” below for
a description and explanation).
Security Displays the Device Security page for the PC you
are currently using. This page shows the status of
the security programs and helps you resolve any
problems.
Hardware Displays the PC Status page, which lets you
defragment the PC’s hard disk
FIGURE 2-9 Dashboard
Pin to detach
1
2
3
4
5
1
2
3

USING THE COMMAND CENTER
To Do List
Sereniti Smart Home Networking Service | 21
. . . . . . . . . . . . . . . . . . . . . . . . . . . . . . . . . . . . . . . . . . .
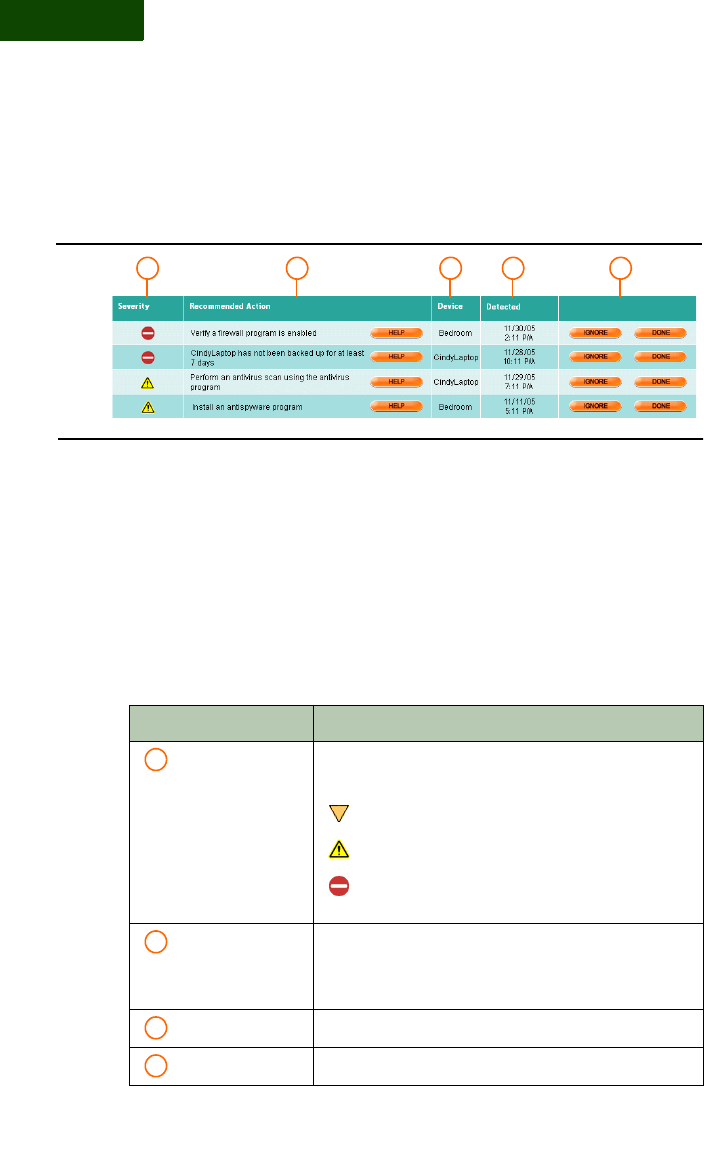
TO DO LIST
When an event occurs that could cause a problem, the Command Center
issues an alert. Two things then happen:
• An Alert Box pops up near your system tray and warns you of
the problem.
• An entry is placed in the To Do List, where it remains until you
remove it.
Examples of events that can trigger an alert are:
• New device connected to your network
• No firewall, antivirus or antispyware programs installed or
enabled on a specific PC
• New definitions available for the antivirus and antispyware
programs
• A PC has not been backed up for at least seven days
For each alert, the To Do List recommends action to resolve the issue.
OPEN THE TO DO LIST
To open the To Do List, follow the steps below:
1Click Home to display the Dashboard.
System Integrity Displays the Restore Point page, which lets you
create new restore points and perform restore
operations
Connectivity Displays an icon page that lets you repair
connectivity problems and perform a new setup on
the Smart Home Server and this PC
TABLE 2-3 Dashboard Options (Continued)
Option What it does...
4
5
USING THE COMMAND CENTER
To Do List
22 | User Manual (v1.0.0.1)
2
2Click the To Do icon in the Dashboard to display the To Do List
(FIGURE 2-10).
UNDERSTANDING ALERTS
The To Do List lists each outstanding alert in chronological order, start-
ing with the most recent alert. Each alert consists of four fields of infor-
mation and two action buttons.
Fields The fields are explained in TABLE 2-4.
TABLE 2-4 Alert Fields
Field What it means...
Severity The seriousness of the problem triggering the alert.
Expressed by these icons.
Recommended
Action
The action to take to resolve the issue that
triggered the alert. For assistance, click HELP
next to the action.
Device The device experiencing the problem
Detected The date and time the problem was first detected
FIGURE 2-10 To Do List
1 2 3 4 5
1
= Warning – potential problem identified
= Major – problem identified, act soon
= Critical – serious problem identified, act
immediately
2
3
4
USING THE COMMAND CENTER
To Do List
Sereniti Smart Home Networking Service | 23
Buttons At the far right of each alert are two action buttons.
•IGNORE If an alert does not represent a security threat or
cannot be addressed, click IGNORE to mark it as ignored and
remove it from the list.
•DONE If the problem that caused an alert has been resolved,
click DONE to mark the alert as resolved and remove it from
the list.
RESPONDING TO ALERTS
The Recommended Action column tells you what to do to resolve the
problem that caused the alert. The following lists some of the more com-
mon recommended actions and explains how to carry them out.
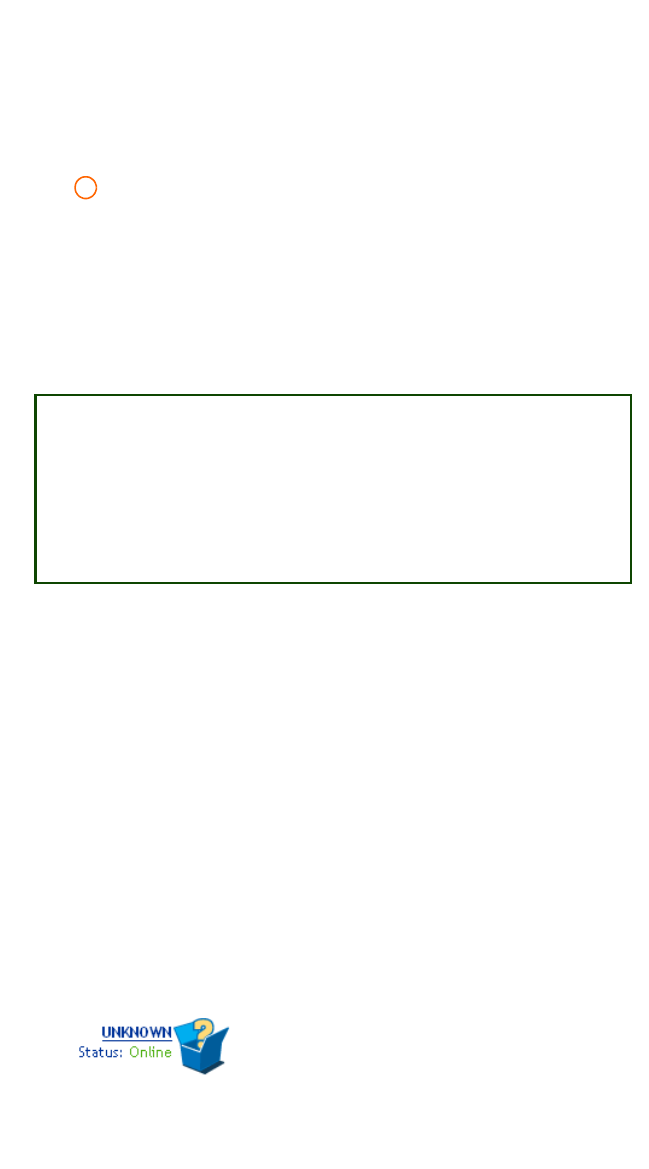
Unknown device detected Whenever the Smart Home Server detects
a device it cannot identify, it issues an alert. This happens when you
connect a new device to your network. You should register the device.
To do this, follow the steps below:
1Click Home to display the Home page.
2Locate the unknown device on the Network Map. It should look like
this:
5
SOLUTION: When should I ignore an alert?
Here is an example of an alert that can be ignored. You connect a
device to the network and then disconnect it without registering it. An
alert is issued instructing you to register the device, but since the
device is no longer connected to the network, it cannot be registered.
Click IGNORE to remove the alert from the To Do List.

USING THE COMMAND CENTER
To Do List
24 | User Manual (v1.0.0.1)
2
3Click the device to display the Device Registration page (see Chapter 4,
FIGURE 4-3).
4In the Device Name field, replace UNKNOWN with a name of your
choice. Use only letters, numbers, a hyphen (-) or an underscore (_). Do
not use spaces.
5In the Device Type field, select the type of device from the drop-down
list.
6In the Icon field, click CHANGE to open a pop-up window showing
other available icons.
7Select an icon and click Select to close the window and return to the
Device Registration page. The new icon appears in the Icon field.
8Click SUBMIT.
Install a firewall/antivirus/antispyware program To protect your
PCs, each PC should be running personal firewall, antivirus and antispy-
ware programs. Whenever the Smart Home Server detects a PC that is
missing one or more of these programs, it issues an alert. You should
install the missing program(s).
The Serenity Security Suite, which is provided free of charge with the
Smart Home Networking Service, contains all three programs, as well as
a pop-up blocker. To install the suite, click Security and then click the
Install Security Suite icon.
Enable a firewall/antivirus/antispyware program To protect your
PCs, the personal firewall, antivirus and anti-spyware programs running
on them should be enabled at all times. Whenever the Smart Home
Server detects a PC with one or more of these programs disabled, it
issues an alert. You should enable the program(s).
Most security programs put an icon in the Windows system tray that can
be used to enable and disable them. If you are not sure how to enable
your security programs, consult the documentation that comes with the
software.

USING THE COMMAND CENTER
To Do List
Sereniti Smart Home Networking Service | 25
Download and install new antivirus/antispyware definitions To be
effective, antivirus and antispyware programs should be equipped with
the latest definitions and signatures. Whenever the Smart Home Server
detects a program lacking the latest definitions and signatures, it issues
an alert.
Most antivirus and antispyware programs put an icon in the Windows
system tray that can be used to download and install the latest defini-
tions and signatures. If you are not sure how to do this, consult the docu-
mentation that comes with the software.
PC has not been backed up for at least seven days To protect
important information, your PCs should be backed up on a regular basis.
Whenever the Smart Home Server detects a PC that has not been backed
up in seven days, it issues an alert.
You should check to see why the scheduled backups have been failing.
The most common reason is that the PC is turned off when the backups
are scheduled. To check the backup schedule:
1Click Backup and then click the View Backup Status icon to display
the Backup Status page.
2Locate the PC and click EDIT to display the Backup Settings page (see
Chapter 7, FIGURE 7-2).
3Check the scheduled time. If the PC tends to be off at that time, select a
time when you can leave it on.
4Click SUBMIT.
Since the PC has not been backed up in at least a week, as a precaution
you might also want to perform an unscheduled backup. The unsched-
uled backup will not affect the backup schedule.
To perform an unscheduled backup:
1Click Backup and then click the View Backup Status icon to display
the Backup Status page (see Chapter 7, FIGURE 7-1).
2Locate the PC and click BACKUP.

USING THE COMMAND CENTER
To Do List
26 | User Manual (v1.0.0.1)
2

Sereniti Smart Home Networking Service | 27
C
ONNECTING
PC
S
TO
. . . . .
. . . . . . . . . . . . . . . . . . . . . .
Y
OUR
N
ETWORK
10 3
. . . . . . . . . . . . . . . . . . . . . . . . . . . . . . . . . . . . . . . . . . .
THIS CHAPTER
Explains how to:
• Find a newly connected PC in the Network Map and other
Command Center pages
• Use the Network Map and Device Management page to track
the PC’s status and respond to security and backup problems
• Use the Security Summary page to track the status of the
antivirus, antispyware and firewall programs running on the
PC
• Use the Backup Status page to track the status of scheduled
backups on the PC
• Use the Manage Firewalls page to track the port forwarding
rules in effect for the PC
• Set the PC to auto login
• Change the PC’s settings (name, type, icon)
• Connect the PC to another wireless network
. . . . . . . . . . . . . . . . . . . . . . . . . . . . . . . . . . . . . . . . . . .
OVERVIEW
To connect a new PC to your Smart Home Network, follow the
instructions in Chapter 3 of the Installation Manual. They explain how
to install the Command Center software and establish the wired or
wireless connection.
CONNECTING PCS TO YOUR NETWORK
Network Map
28 | User Manual (v1.0.0.1)
3
Once the connection is established, the Smart Home Server detects the
presence of the new PC and passes this information to the Command
Center. By opening specific Command Center pages, you can monitor
the PC’s security programs and backups, and open ports when required.
Note: If you connect a PC that does not have the Command Center
installed, the Smart Home Server treats it the same way it treats a
non-PC device. See Chapter 4 for details.
. . . . . . . . . . . . . . . . . . . . . . . . . . . . . . . . . . . . . . . . . . .
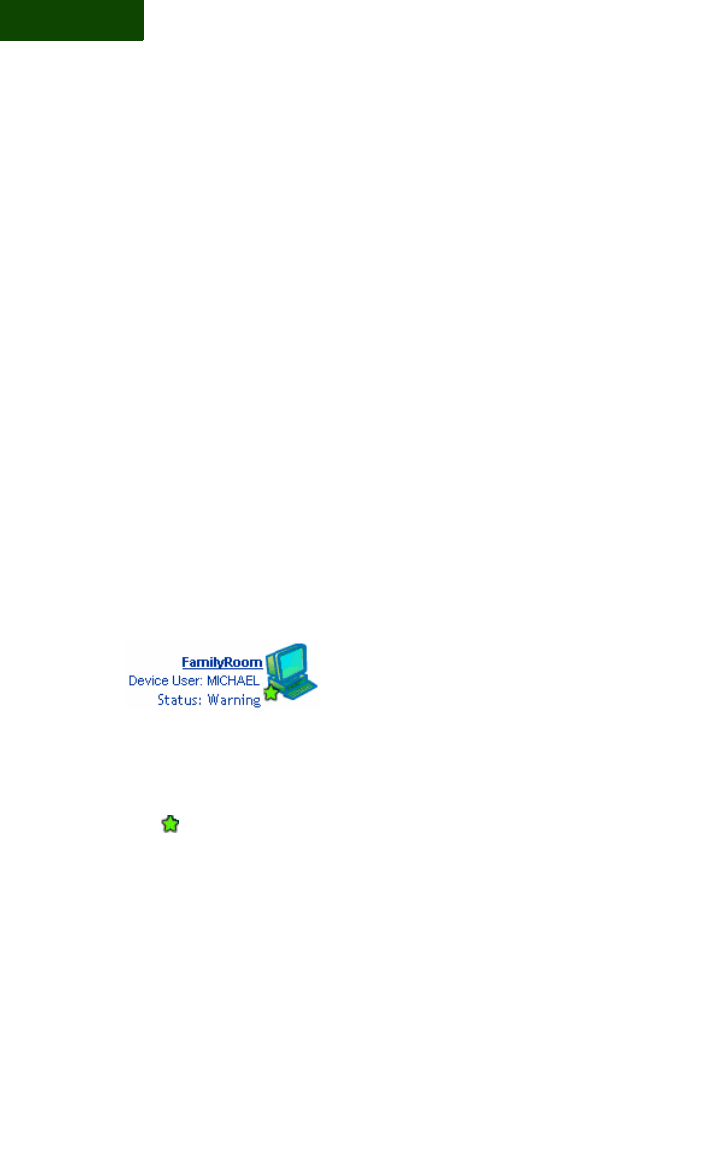
NETWORK MAP
Log into the Command Center from the PC. There should be an entry
for the PC in the Network Map on the Home page. The entry appears as
a desktop computer icon. Next to the icon are the PC’s name, the
Windows user name and a status message. The following shows what a
typical entry looks like:
In the example above, FamilyRoom is the name of the PC, MICHAEL
is the Windows user name, and the status message is Warning,
indicating a problem with the security programs on the PC. The green
star indicates the Command Center is connected to the Smart Home
Server. If it were not connected, the star would be red.
Note: To find out the name of a computer, click Start on the Windows
taskbar, right-click My Computer and select Properties. The
Computer Name tab shows the computer name and allows you
to change it.
If you pass the mouse cursor over the icon, the IP and MAC addresses of
the PC pop up.
CONNECTING PCS TO YOUR NETWORK
Device Information Page
Sereniti Smart Home Networking Service | 29
. . . . . . . . . . . . . . . . . . . . . . . . . . . . . . . . . . . . . . . . . . .
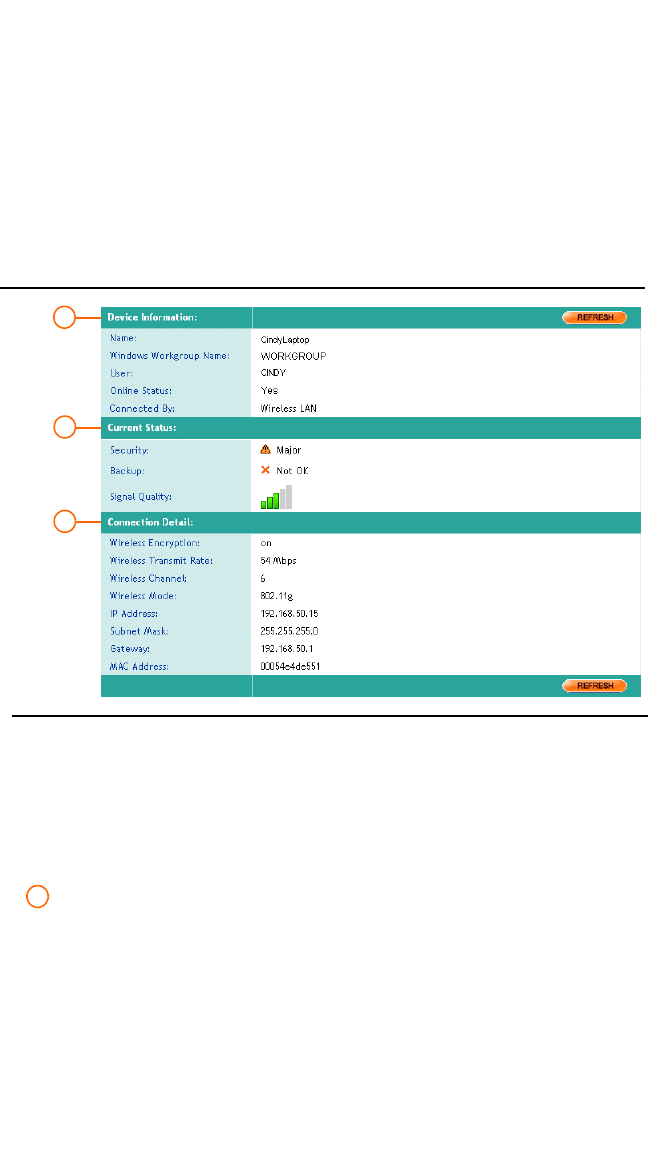
DEVICE INFORMATION PAGE
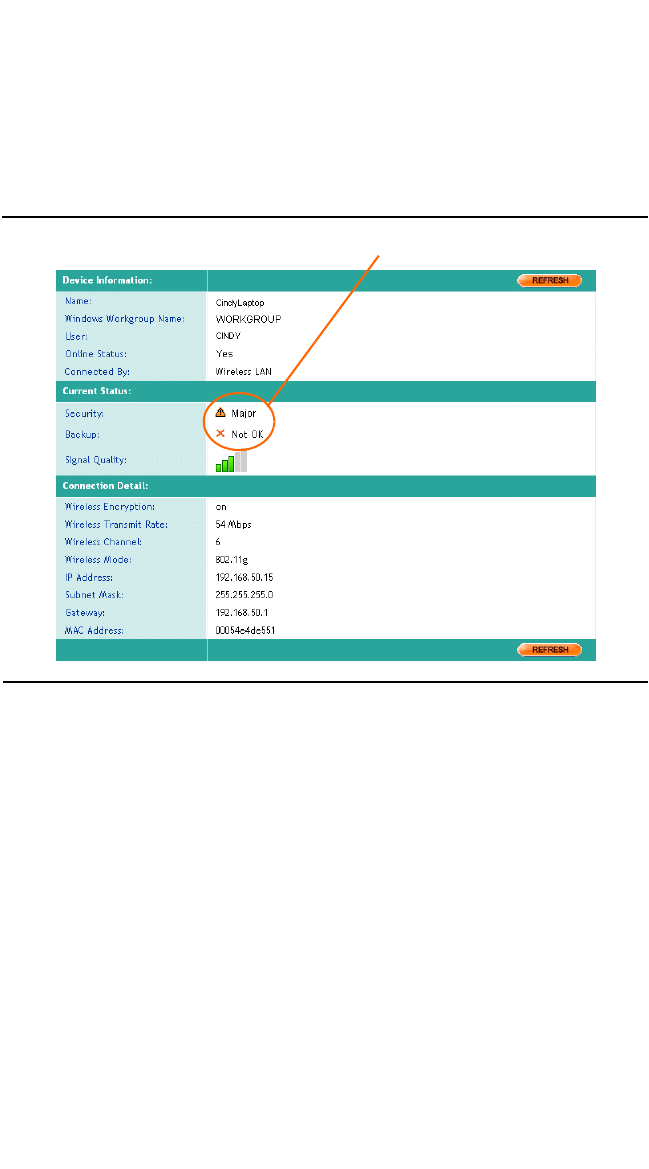
If you click the PC name or icon in the Network Map, the Device
Information page displays (FIGURE 3-1).
This page shows provides basic device information, shows the current
status of the device, and gives some basic connection details. The
following explains:
DEVICE INFORMATION
Device information includes:
•Name
The full computer name of the PC. To view and change the
name on the PC, click Start in the Windows taskbar, right-click
My Computer and select Properties. Click the Computer
Name tab in the Properties window and then click the Change
button.
FIGURE 3-1 Device Information Page
1
2
3
1
CONNECTING PCS TO YOUR NETWORK
Device Information Page
30 | User Manual (v1.0.0.1)
3
•Windows Workgroup Name
The workgroup to which the PC belongs. The Smart Home
Server and all PCs must be in the same workgroup to share
folders and printers. To change the workgroup, click Start,
right-click My Computer and select Properties. Click the
Computer Name tab and then click the Change button.
•User
The user account currently logged in. To view the user
accounts on a PC, and add or change an account, click Start
and select Control Panel. Then, double-click the User
Accounts entry in the Control Panel.
•Online Status
Yes = PC currently online
No = PC currently offline
•Connected By
Wired LAN or Wireless LAN
CURRENT STATUS
Current status information includes:
•Security
Indicates the status of the antivirus, antispyware and firewall
programs using these symbols:
If Warning, Major or Critical appears, click Security and then
click the Security Summary icon to display the Security
Summary page. This page shows the security problems on each
network PC and helps you resolve them. See Chapter 11 for
details.
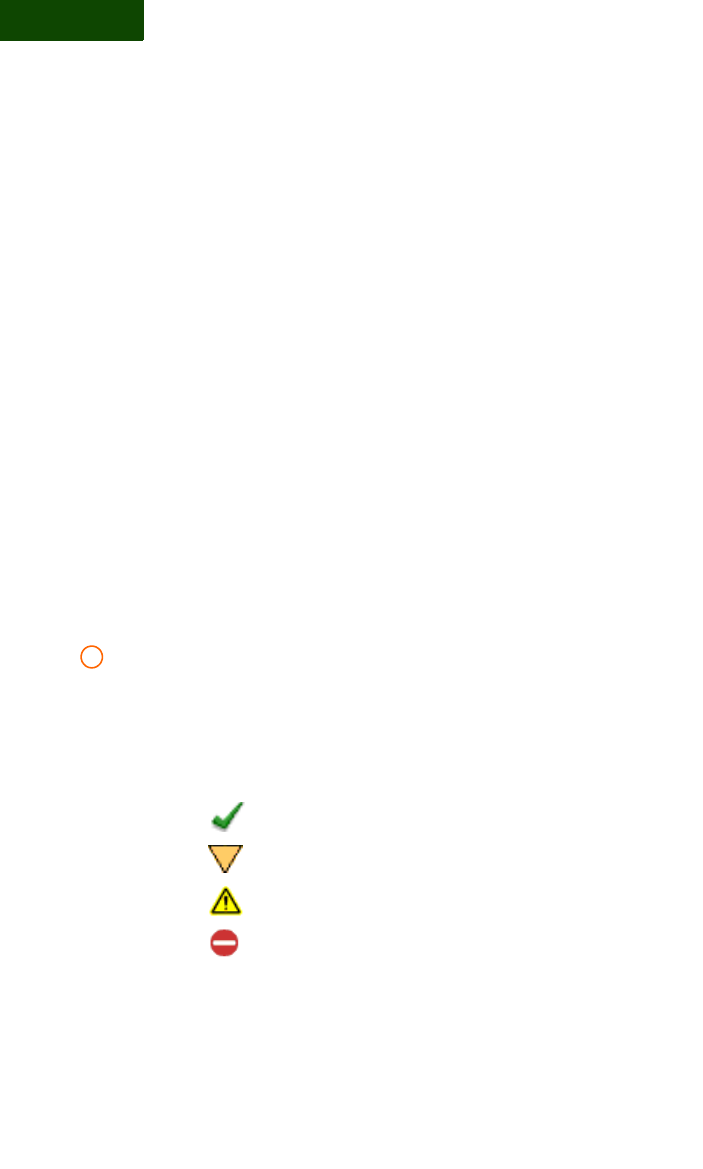
= Good – no action required
= Warning – potential problem identified
= Major – problem identified, act soon
= Critical – serious problem identified, act
immediately
2
CONNECTING PCS TO YOUR NETWORK
Device Information Page
Sereniti Smart Home Networking Service | 31
•Backup
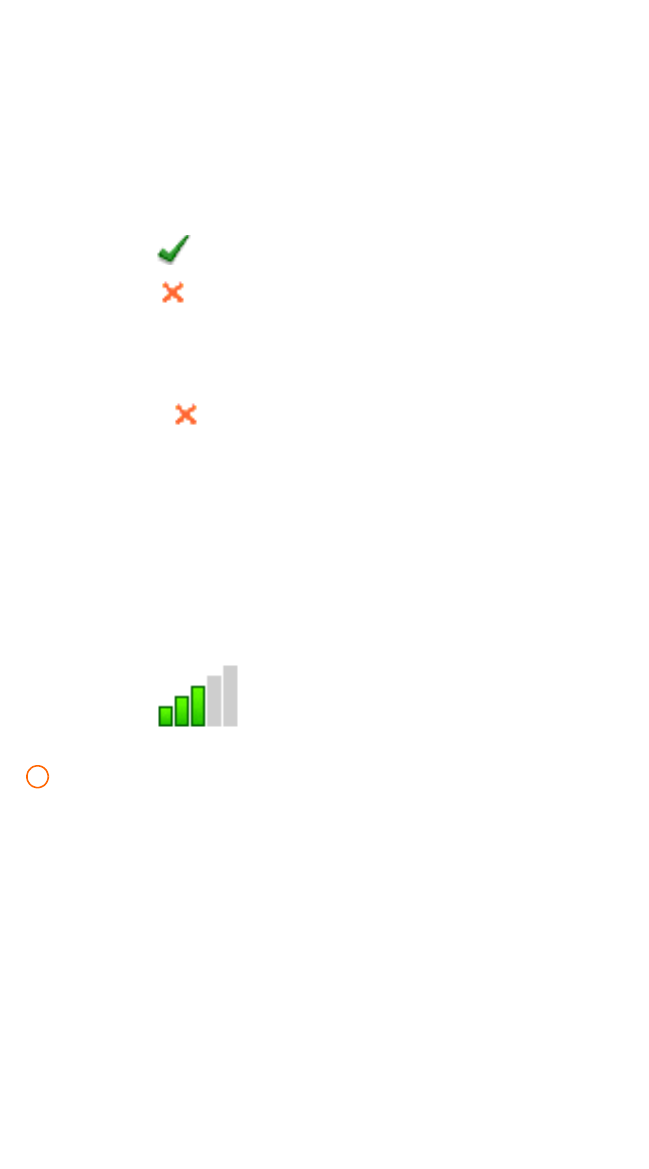
Indicates the status of the last backup using these symbols:
If the last backup was unsuccessful, click Backup and then
click the View Backup Status icon to display the Backup
Status page. Locate the PC and position the mouse cursor on
the icon. The cause of the failure will pop up (e.g., PC was offline
when backup started). You can fix the cause and then either wait for
the next scheduled backup or perform an unscheduled backup. See
Chapter 7 for details.
•Signal Quality (wireless PCs only)
The strength of the Smart Home Server's radio signal. No green
bars means no signal. One green bar is the weakest; five green
bars is the strongest. The icon below shows three green bars,
which represents good signal quality.
CONNECTION DETAIL
Connection detail information includes:
•Wireless Encryption (wireless PCs only)
Should always be on. You were instructed to create an
encryption key when this PC was initially set up using the
Quick Install CD. All wireless PCs connecting to your network
need this key. To identify your WEP key, click Security and
then click the Wireless Settings icon to display the Wireless
Settings page. See Chapter 12 for details.
•Wireless Transmit Rate (wireless PCs only)
Your current transmission speed. If your wireless mode is
802.11g, the maximum speed is 54 mbps. If it is 802.11a or b,
maximum speed is less.
= Last backup successful
= Last backup unsuccessful
3

CONNECTING PCS TO YOUR NETWORK
Device Management Page
32 | User Manual (v1.0.0.1)
3
• Wireless Channel (wireless PCs only)
The channel the radio transmitter in the Smart Home Server is
using to broadcast. By default, it broadcasts on channel 6.
•Wireless Mode (wireless PCs only)
The wireless protocol. The Sereniti system is compatible with
802.11a, b or g. Most newer devices use 802.11g.
•IP Address
The IP address of the PC. This is assigned by the Smart Home
Server, and is usually 192.168.50.X, where X depends on the
number of devices in your network.
•Subnet Mask
A number that the Smart Home Server uses with the IP address
to help identify the various devices connected to your network.
•Gateway
The IP address of the Smart Home Server. By default, the
address is 192.168.50.1. The Smart Home Server is your
gateway to the Internet.
•MAC Address
The MAC address of the wireless card in the PC. The MAC
address is a unique number that is burned into all Internet
devices at the factory.
. . . . . . . . . . . . . . . . . . . . . . . . . . . . . . . . . . . . . . . . . . .
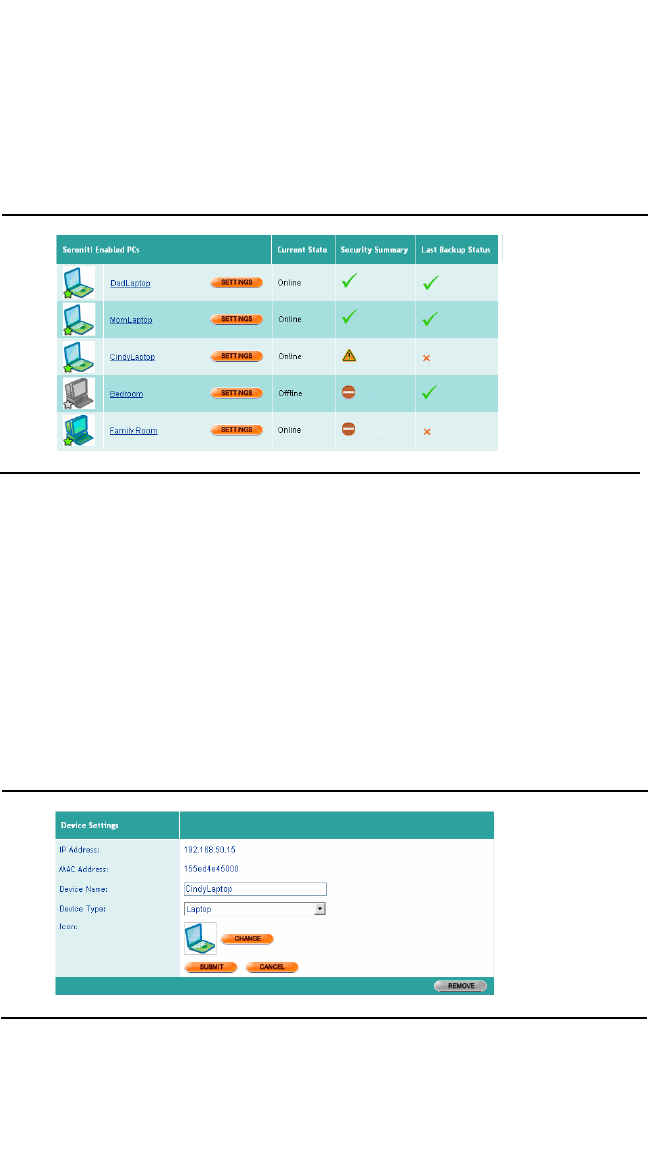
DEVICE MANAGEMENT PAGE
In addition to the Network Map and Device Information page, an entry
is also placed in the Device Management page under the heading Seren-
iti Enabled PCs. Click My Network and then click the Device List
icon to display this page (FIGURE 3-2).
CONNECTING PCS TO YOUR NETWORK
Device Management Page
Sereniti Smart Home Networking Service | 33
You can do the following from this page:
•Display the Device Information page
Click the name of any PC to display the Device Information
page for that PC (FIGURE 3-1).
•Display the Device Settings page
Click the SETTINGS button to the right of any PC to display
the Device Settings page (FIGURE 3-3) You can change the PC’s
name, device type or icon from this page.
•Display the Device Security page
This page uses the same icons as the Device Management page
FIGURE 3-2 Device Management Page (Sereniti Enabled PCs)
FIGURE 3-3 Device Settings Page
CONNECTING PCS TO YOUR NETWORK
Security Summary Page
34 | User Manual (v1.0.0.1)
3
to represent security program problems (see page 30). Click the
icon in the Security Summary column for any PC to display
the Device Security page (Chapter 11, FIGURE 11-2). This page
provides a closer look at the status of the PC’s personal
firewall, antivirus and antispyware programs. See Chapter 11
for details.
•Display the Backup Status page
This page uses the same icons as the Device Management page
to represent backup problems (see page 31). Click the icon in
the Last Backup Status column for any PC to display the
Backup Status page. This page show the status of the last
backup for each PC and allows you to perform a number of
backup-related functions. See Chapter 7 for details.
. . . . . . . . . . . . . . . . . . . . . . . . . . . . . . . . . . . . . . . . . . .
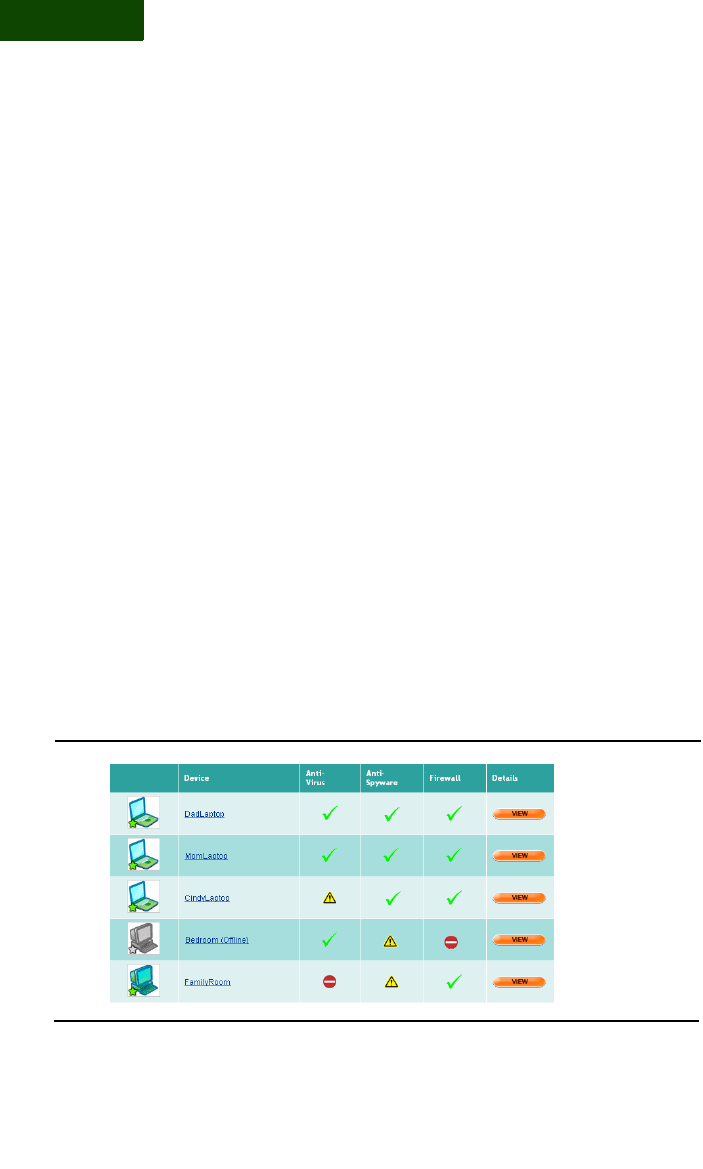
SECURITY SUMMARY PAGE
An entry for the new PC also appears in the Security Summary page.
Click Security and then click the Security Summary icon to display
this page (FIGURE 3-4).
FIGURE 3-4 Security Summary Page
CONNECTING PCS TO YOUR NETWORK
Backup Status Page
Sereniti Smart Home Networking Service | 35
This page shows the status of the antivirus, antispyware and personal
firewall programs running on each PC. It uses the same icons as the
Device Information page (see page 30).
If any PC has a problem, Click VIEW in the Details column to display
the Device Security page for that PC. This page spells out the nature of
the problem and provides links to help you solve it. See Chapter 11 for
details.
You can also click the name of any PC to display the Device Information
page for that PC (FIGURE 3-1).
. . . . . . . . . . . . . . . . . . . . . . . . . . . . . . . . . . . . . . . . . . .
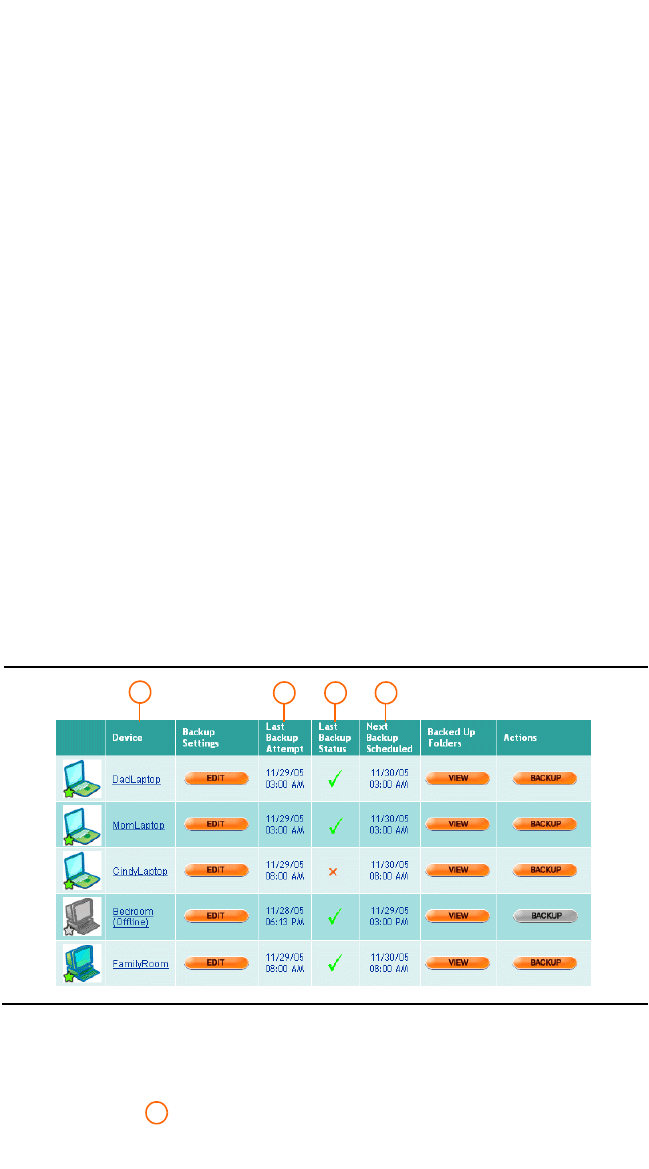
BACKUP STATUS PAGE
An entry for the new PC appears in the Backup Status page. Click
Backup and then click the View Backup Status icon to display this
page (FIGURE 3-5).
For each PC, this page shows:
The PC name
FIGURE 3-5 Backup Status Page
12 3 4
1
CONNECTING PCS TO YOUR NETWORK
Backup Status Page
36 | User Manual (v1.0.0.1)
3
The date and time of the last backup attempt
The outcome of that attempt
If the backup was unsuccessful, position the mouse
cursor on the . A box will pop up and give the reason
the backup failed.
The date and time of the next scheduled backup
You can do the following from this page:
•Display the Backup Settings page
Click EDIT for any PC to display the Backup Settings page for
that PC. This page allows you to change the PC’s backup
schedule and select the folders to be backed up. See Chapter 7
for details.
•View the last successful backup
Click VIEW for any PC to look at the folders in this PC’s last
successful backup.
•Perform an unscheduled backup
Click BACKUP for any PC to perform an unscheduled backup
right now.
2
3
= Backup successful
= Backup unsuccessful
4
CONNECTING PCS TO YOUR NETWORK
Manage Firewalls Page
Sereniti Smart Home Networking Service | 37
. . . . . . . . . . . . . . . . . . . . . . . . . . . . . . . . . . . . . . . . . . .
MANAGE FIREWALLS PAGE
An entry for the new PC appears in the Manage Firewalls page. Click
Security and then click Network Firewall Settings to display this page
(FIGURE 3-6).
For each device in your network, this page indicates if Universal Plug
and Play (UPnP) is enabled and shows any port forwarding rules in
effect for the device.
Click EDIT for any device to display the Firewall Settings page for that
device. This pages allows you to enable Universal Plug and Play (UPnP)
and select or create additional rules. See Chapter 10 for details.
. . . . . . . . . . . . . . . . . . . . . . . . . . . . . . . . . . . . . . . . . . .
SET A PC TO AUTO LOGIN
When the Command Center is installed on a PC, users have to log into
the Command Center to obtain Internet access. If they do not do this,
they are blocked and prompted to enter their user name and password.
You have the option of setting the PC to auto login to avoid this. When a
PC is set to auto login, login takes place automatically as soon as the PC
FIGURE 3-6 Manage Firewalls Page
CONNECTING PCS TO YOUR NETWORK
Set a PC to Auto Login
38 | User Manual (v1.0.0.1)
3
is turned on. The user does not have to enter a user name and password.
This is especially useful for young children.
When you set up auto login, you have to enter a user account. The
parental controls associated with the account are in effect for auto login,
and apply to everyone who uses the PC.
To set a PC to auto login, follow the steps below:
1Click My Network and then click the Device Auto Login to display the
Auto Login page (FIGURE 3-7).
2Locate the PC.
3Select a user account from the drop-down list in the Auto Login
Account field. All parental controls associated with the account will
apply to whoever uses this PC to access the Internet.
Note: In addition to showing all existing user accounts, the drop-down
list also has an entry called Non-PC Device. This entry is
intended for game consoles, media servers and other non-PC
devices. It is the equivalent of a non-privileged user with
unlimited Internet access.
4Click SUBMIT.
FIGURE 3-7 Auto Login Page

CONNECTING PCS TO YOUR NETWORK
Change A PC’s Name
Sereniti Smart Home Networking Service | 39
. . . . . . . . . . . . . . . . . . . . . . . . . . . . . . . . . . . . . . . . . . .
CHANGE A PC’S NAME
All new PCs are identified by their internal computer name. You can
change the name to something more easily recognizable. The new name
replaces the old name wherever it appears in the Command Center.
Note: Changing a PC’s name only changes the name that appears in the
Command Center. The PC’s internal computer name remains the
same. This can only be changed on the PC itself.
To change the name, follow these steps:
1Click My Network and then click the Device List icon to display the
Device Management page (FIGURE 3-2).
2Locate the PC and click SETTINGS to display the Device Settings page
(FIGURE 3-3).
3Type a new name in the Device Name field.
4Click SUBMIT.
. . . . . . . . . . . . . . . . . . . . . . . . . . . . . . . . . . . . . . . . . . .
CHANGE A PC’S TYPE
New PCs are always identified as PCs, regardless of whether they are
desktop or laptop units. To change the type to laptop, follow these steps:
1Click My Network and then click the Device List icon to display the
Device Management page (FIGURE 3-2).
2Locate the PC and click SETTINGS to display the Device Settings page
(FIGURE 3-3).
3Select Laptop from the drop-down list in the Device Type field.
4Click SUBMIT.

CONNECTING PCS TO YOUR NETWORK
Change A PC’s Icon
40 | User Manual (v1.0.0.1)
3
. . . . . . . . . . . . . . . . . . . . . . . . . . . . . . . . . . . . . . . . . . .
CHANGE A PC’S ICON
New PCs are always assigned an icon that depicts a desktop PC. You
can change the icon to a laptop, a PC with flat panel display, or a tower
PC. The new icon replaces the old icon wherever it appears in the
Command Center.
To change the icon, follow these steps:
1Click My Network and then click the Device List icon to display the
Device Management page (FIGURE 3-2).
2Locate the PC and click SETTINGS to display the Device Settings page
(FIGURE 3-3).
3Click CHANGE in the Icon field to open a pop-up window showing
other available icons.
4Select an icon and click Select to close the window and return to the
Devices Settings page. The new icon appears in the Icon field.
5Click SUBMIT.
CONNECT THE PC TO ANOTHER
. . . . . . . . . . . . . . . . . . . . . . . . . . . . . . . . . . . . . . . . . . .
WIRELESS NETWORK
If your PC was set up to connect to your home network wirelessly (see
Chapter 3 of the Installation Manual), the Sereniti wireless agent was
turned on. The agent instructs the wireless adapter in the PC to look for
the Smart Home Server and connect to it.
When you take your PC out of your home and attempt to connect to
another wireless network, such as your office network or a public
hotspot, you will need to turn the Sereniti wireless agent off. This allows
the Windows wireless agent to take over and search for available
networks to connect to.

CONNECTING PCS TO YOUR NETWORK
Connect the PC to Another Wireless Network
Sereniti Smart Home Networking Service | 41
To turn the Sereniti wireless agent off:
1Go to the text Main Menu (see Chapter 2 for an explanation of the two
Main Menus).
2Click File.
3Select Options.
4Select Auto Launch Sereniti wireless.
This option was turned on when the PC was configured for wireless.
Selecting it now turns it off. When you return home and want to
reconnect to you Smart Home Server, repeat the procedure above. This
turns the wireless agent back on.

CONNECTING PCS TO YOUR NETWORK
Connect the PC to Another Wireless Network
42 | User Manual (v1.0.0.1)
3

Sereniti Smart Home Networking Service | 43
C
ONNECTING
N
ON
-PC
. . . . .
. . . . . . . . . . . . . . . . . . . . . .
D
EVICES
TO
Y
OUR
N
ETWORK
4
. . . . . . . . . . . . . . . . . . . . . . . . . . . . . . . . . . . . . . . . . . .
THIS CHAPTER
Explains how to:
• Register a non-PC device
• Set a non-PC device to auto login
• Open firewall ports for non-PC devices
. . . . . . . . . . . . . . . . . . . . . . . . . . . . . . . . . . . . . . . . . . .
OVERVIEW
Many types of non-PC devices can be connected to your Smart Home
Network. The following lists a few of the more common ones:
• Personal data assistants (PDAs)
• Game consoles
• Digital video recorders
• Print and media servers
Note: PCs that do not have the Command Center installed are treated
as non-PC devices.
WIRELESS DEVICES
If the device is wireless, make sure its wireless adapter is enabled and it
is configured to connect to the Smart Home Server. This may require
you to enter your network’s SSID and WEP key. These can be found by
clicking My Networks and then clicking the Wireless Settings icon.
(For help in configuring a device, refer to the documentation that comes
with it.)
CONNECTING NON-PC DEVICES TO YOUR NETWORK
Overview
44 | User Manual (v1.0.0.1)
4
NETWORK MAP
Log into the Command Center. The non-PC device you just connected
appears on the Home page in the Network Map. The entry for the device
appears as an unknown device icon. The name of the device is also
UNKNOWN, and the status is simply “online.” The following shows
what such an entry looks like:
Tip: It is not a good idea to connect several devices at the same time,
because each device shows up as UNKNOWN and it is some-
times difficult to tell which device is which. A better approach is
to connect one and register it (see below) so that it has a name to
identify it, and then connect and register another, etc.
OTHER PAGES
In addition to the Network Map, UNKNOWN entries are also placed in
the Device Management page (see Chapter 3, FIGURE 3-2) and the Man-
age Firewalls page (see Chapter 10, FIGURE 10-1).
Device Management Page The entry in the Device Management
page appears under the heading Non-Enabled PCs and Other Devices.
Click My Network and then click the Device List icon to display this
page (FIGURE 4-1).
FIGURE 4-1 Device Management Page (Non-PC Devices)
CONNECTING NON-PC DEVICES TO YOUR NETWORK
Register a Device
Sereniti Smart Home Networking Service | 45
Manage Firewalls page To display the Manage Firewalls page, click
Security and then click the Network Firewall Settings icon
(FIGURE 4-2).
. . . . . . . . . . . . . . . . . . . . . . . . . . . . . . . . . . . . . . . . . . .
REGISTER A DEVICE
To give the device a name and icon so that you can more easily identify
it in the Command Center, you have to register it. To register a device,
follow the steps below:
1Locate the device in the Network Map and click the name or icon to
display the Device Registration page (FIGURE 4-3).
Note: You can also display the Device Registration page by clicking
UNKNOWN or SETTINGS in the Device Management page.
FIGURE 4-2 Manage Firewalls Page (Unknown Device)
FIGURE 4-3 Device Registration Page

CONNECTING NON-PC DEVICES TO YOUR NETWORK
Set a Device to Auto login
46 | User Manual (v1.0.0.1)
4
2In the Device Name field, replace UNKNOWN with a name of your
choosing. Use only letters, numbers, a hyphen (-) or an underscore (_).
Do not use spaces.
3In the Device Type field, select the type of device from the drop-down
list.
4In the Icon field, click CHANGE to open a pop-up window showing
other available icons.
5Select an icon and click Select to close the window and return to the
Devices Registration page. The new icon appears in the Icon field.
6Click SUBMIT.
. . . . . . . . . . . . . . . . . . . . . . . . . . . . . . . . . . . . . . . . . . .
SET A DEVICE TO AUTO LOGIN
Non-PC devices that have to access the Internet must be set to auto
login. This is because they do not have a login screen where you can
enter a user name and password.
When setting a device to auto login, you have to select either Non-PC
Device or a specific user account which serves as the auto login account:
•Non-PC DeviceGives the device unlimited Internet access
(but not privileged status).
•User Account Limits the device’s Internet access, based on
the content and time filters associated with the account
SOLUTION: When should I select a user account?
Select a user account instead of Non-PC Device when
you want to restrict Internet access. For example, if you
do not want your children to use a game console after 10
pm, create an account with a time filter that blocks
access from 10 pm until 10 am the following morning.
CONNECTING NON-PC DEVICES TO YOUR NETWORK
Open Ports for a Device
Sereniti Smart Home Networking Service | 47
To set a device to auto login, follow the steps below:
1Click My Network and then click the Device Auto Login to display the
Auto Login page (FIGURE 4-4). It shows each device.
2Locate the device.
3Select Non-PC Device or a user account from the drop-down list in the
Auto Login Account field. All restrictions associated with the account
will apply to the device.
4Click SUBMIT.
. . . . . . . . . . . . . . . . . . . . . . . . . . . . . . . . . . . . . . . . . . .
OPEN PORTS FOR A DEVICE
The Smart Home Server creates a firewall between your network and
the Internet. Many non-PC devices have to communicate with other
devices on the Internet and exchange two-way traffic with them. The
firewall prevents incoming traffic from reaching your device, unless you
open the appropriate ports to let the traffic through.
FIGURE 4-4 Auto Login Page

CONNECTING NON-PC DEVICES TO YOUR NETWORK
Open Ports for a Device
48 | User Manual (v1.0.0.1)
4
There are three ways to open firewall ports:
•Enable Universal Plug and Play (UPnP) This works for
devices that support the UPnP protocol.
•Select a port forwarding rule Port forwarding rules open
firewall ports. The Command Center provides system defined
rules for many popular devices and applications.
•Create a port forwarding rule If no system defined rule
exists for a device, it is possible to create one yourself. This
requires some networking knowledge. You can contact Sereniti
technical support for assistance.
For a more detailed discussion of port forwarding, including step-by-
step instructions for enabling UPnP, selecting a rule and creating a rule,
see Chapter 10.

Sereniti Smart Home Networking Service | 49
. . . . .
. . . . . . . . . . . . . . . . . . . . . .
U
SER
A
CCOUNTS
5
. . . . . . . . . . . . . . . . . . . . . . . . . . . . . . . . . . . . . . . . . . .
THIS CHAPTER
Explains how to:
• Create privileged and non-privileged user accounts
• View a list of existing user accounts
• Modify the details of a user account
• Delete a user account
• Set up user notifications
. . . . . . . . . . . . . . . . . . . . . . . . . . . . . . . . . . . . . . . . . . .
OVERVIEW
To protect your network from unauthorized access, the Smart Home
Networking Service requires users to enter a user name and password in
order to log into your network. If they do not enter a correct user name
and password, they cannot connect to the network and use your
broadband connection to access the Internet.
To provide a user with a user name and password, you have to create a
user account. In addition to setting up the user name and password, the
account defines the user’s privileged status (see below) and determines
the content and time filters, if any, that apply to the user.
. . . . . . . . . . . . . . . . . . . . . . . . . . . . . . . . . . . . . . . . . . .
TYPES OF ACCOUNTS
There are two types of user accounts:

USER ACCOUNTS
Types of Accounts
50 | User Manual (v1.0.0.1)
5
• Privileged accounts
• Non-privileged accounts
PRIVILEGED ACCOUNTS
Privileged accounts can log into the Command Center and perform all
administrative functions. Privileged accounts can do all of the follow-
ing, which non-privileged accounts cannot do:
• Log into the Command Center remotely
• Create, edit and delete user accounts
• Set up parental controls to determine which web sites other
users can access
• Monitor the security software running on network PCs and
access the To Do List
• Create a backup schedule, perform unscheduled backups and
restore old backups
• Reset and upgrade the Smart Home Server
More than one user can log into the Command Center at the same time
using the same account. For this reason, you need to decide how many
privileged accounts to create.The more privileged accounts you create,
the harder it is to control access to the Command Center.
NON-PRIVILEGED ACCOUNTS
Non-privileged users can log into your network, access shared resources
such as folders and printers, and use your broadband connection to
access the Internet. If their email programs are configured properly, they
can send and receive email.
Non-privileged users can also log into the Command Center (not
remotely) and perform certain minimal functions that involve their own
PCs.

USER ACCOUNTS
User Name and Password Guidelines
Sereniti Smart Home Networking Service | 51
USER NAME AND PASSWORD
. . . . . . . . . . . . . . . . . . . . . . . . . . . . . . . . . . . . . . . . . . .
GUIDELINES
User accounts specify the user name and password the user must enter to
log in. When creating user names and passwords, there are certain
guidelines you must follow. If you do not follow these guidelines, the
Command Center will reject the account and prompt you to enter the
user name or password again.
USER NAME GUIDELINES
When entering user names, follow these guidelines:
Valid name s User names must be unique across all users of the
Sereniti Smart Home Networking Service. This means that when you
assign a name to a new user, this name cannot be in use anywhere in the
Sereniti system. If it is, you will receive an error message requesting you
to enter another name.
The reason for this is that Sereniti allows privileged users to access and
manage their networks remotely by logging in with a browser. To
prevent an unauthorized user with the same user name from logging into
your network, your user name must be unique.
If your first choice for a name is already taken, you can try to create
other variations or you can add a numeric suffix. For example if
john.adams is already taken, try one of the following:
j.adams
jadams
john.q.adams
jqadams
adamsj
john.adams123

USER ACCOUNTS
Create a User Account
52 | User Manual (v1.0.0.1)
5
Valid characters User names can contain between 3 and 30 charac-
ters. All the following characters are valid:
• a-z (uppercase letters are converted to lowercase)
•0-9
•Period (.)
• Hyphen (-)
• Underscore (_)
Spaces are NOT permitted. User names are NOT case-sensitive.
"John.Adams" is treated the same as "john.adams."
PASSWORD GUIDELINES
Passwords do NOT have to be unique across the entire Sereniti system.
Passwords can contain between 5 and a 30 characters. All the following
characters are valid:
•a-z
•A-Z
•Period (.)
• Hyphen (-)
• Underscore (_)
Spaces are NOT permitted. Passwords ARE case-sensitive. It matters
how the user enters the password. If the password was created with
capital letters, the user must capitalize the same letters to log in.
. . . . . . . . . . . . . . . . . . . . . . . . . . . . . . . . . . . . . . . . . . .
CREATE A USER ACCOUNT
To add a new user account, follow the steps below:
USER ACCOUNTS
Create a User Account
Sereniti Smart Home Networking Service | 53
1Click Users and then click the Add User icon to display the Add User
page (FIGURE 5-1).
2Go to User Detail and type a name in the User Name field. This is
the name the user enters to log into your network.
3Type a password in the Password field. This is the password the user
enters to be authenticated.
Note: The Command Center will reject user names and passwords that
are not formulated correctly. See “User Name and Password
Guidelines” above.
4Type the password again in the Confirm Password field. Passwords are
case-sensitive, so be sure to capitalize the same letters each time you
type the password.
5To make this account a privileged user, click the Is this a Privileged
User? check box.
FIGURE 5-1 Add User Page
1
2
3
1

USER ACCOUNTS
View a List of Existing Accounts
54 | User Manual (v1.0.0.1)
5
Note: For an explanation of the types of user accounts, see “Types of
Accounts” above.
6Go to Parental Controls and select the appropriate content filter for
the user. Your choices are:
• Child (under 12)
• Young teen (ages 13-15)
• Mature teen (ages 16-17)
• Adult (no restrictions)
Note: For help in selecting a content filter, See Chapter 6, TABLE 6-5
for a more detailed description of the contents filters.
7Go to User Security and select a security question from the drop-
down list in the Question field.
8Enter an answer to the security question in the Answer field. Users who
forget their password will have to provide this answer to obtain a new
password.
9Click SUBMIT.
. . . . . . . . . . . . . . . . . . . . . . . . . . . . . . . . . . . . . . . . . . .
VIEW A LIST OF EXISTING ACCOUNTS
To display a list of the user accounts that have been created to date,
follow the steps below:
1Click Users and then click the Users List icon.
2
3
USER ACCOUNTS
Modify a User Account
Sereniti Smart Home Networking Service | 55
2The Users List appears (FIGURE 5-2). Accounts that have a check mark
in the Privileged column are privileged accounts.
. . . . . . . . . . . . . . . . . . . . . . . . . . . . . . . . . . . . . . . . . . .
MODIFY A USER ACCOUNT
You can change any of the details in a user account except the user
name. To change a user name, you have to delete the account and create
a new one.
To modify the details of a user account, follow the steps below:
1Click Users and then click the Users List icon to display the Users List
(see FIGURE 5-2).
FIGURE 5-2 Users List
Privileged
accounts
USER ACCOUNTS
Modify a User Account
56 | User Manual (v1.0.0.1)
5
2Locate the user account and click the user's name or click EDIT in the
Action column to display the User Settings page (FIGURE 5-3).
3All new user accounts are automatically assigned this icon:
This icon appears to the left of the account in the Users List. To change
the icon:
aIn the Image field, click EDIT to display a selection of other icons.
bClick the radio button under the icon you want to select it.
cClick SUBMIT. You are returned to the User Settings page. The
icon you selected is displayed.
4To change the user’s password, type a new password in the Password
field, and then type it again in the Confirm Password field. Capitalize
the same letters each time.
FIGURE 5-3 User Settings Page

USER ACCOUNTS
Modify a User Account
Sereniti Smart Home Networking Service | 57
Note: The Command Center will reject user names and passwords that
are not formulated correctly. See “User Name and Password
Guidelines” above.
5To change the user’s privileged status, select or unselect the check box
in the Is this a Privileged User? field. Selecting the check box gives the
user privileged status and unselecting it removes privileged status. You
cannot change the privileged status on your own account.
Note: For an explanation of privileged accounts, see “Types of
Accounts” above.
6To change the content filter:
aLocate the Content Filter Bar Graph and click EDIT. This displays
the Content Filter Settings page (see Chapter 6, FIGURE 6-2).
bSelect a new content filter from the four offered.
Note: See Chapter 6 for a more detailed description of the content
filters.
cClick SUBMIT. You are returned to the User Settings page.
7To change the time filter:
aLocate the Time Filter Bar Graph and click EDIT. This displays the
Time Filter Settings page (see Chapter 6, FIGURE 6-3).
bSelect a period of time by entering start and stop dates and times in
the Start and Stop fields under the weekly time grid.
cClick BLOCK to block Internet access during the selected time
period, or click ALLOW to allow access.
dRepeat Steps b – c until the time grid is what you want.
eClick SUBMIT. You are returned to the User Settings page.
8To change the security question, select a new question from the drop-
down list in the Question field, and then type the answer in the Answer
field.
9When you have finished making changes, click SUBMIT. You are
returned to the Users List.

USER ACCOUNTS
Delete a User Account
58 | User Manual (v1.0.0.1)
5
. . . . . . . . . . . . . . . . . . . . . . . . . . . . . . . . . . . . . . . . . . .
DELETE A USER ACCOUNT
User accounts that are no longer needed should be deleted. You cannot
delete a user account that is currently logged in.
To delete a user account, follow the steps below.
1Click Users and then click the Users List icon to display the Users List
(FIGURE 5-2).
2Locate the user and click DELETE in the Action column. A dialog box
pops up and asks you if you are sure you want to delete this user.
3Click OK to confirm the deletion and close the pop-up. When the
deletion is complete, a second dialog box pops up and tells you the user
account has been successfully deleted.
4Click OK to close the pop-up. You are returned to the Users List. The
deleted user is no longer on the list.
. . . . . . . . . . . . . . . . . . . . . . . . . . . . . . . . . . . . . . . . . . .
SET UP USER NOTIFICATIONS
You can enter up to three email addresses and telephone numbers for
Sereniti support staff to contact you. To do this, follow the steps below:
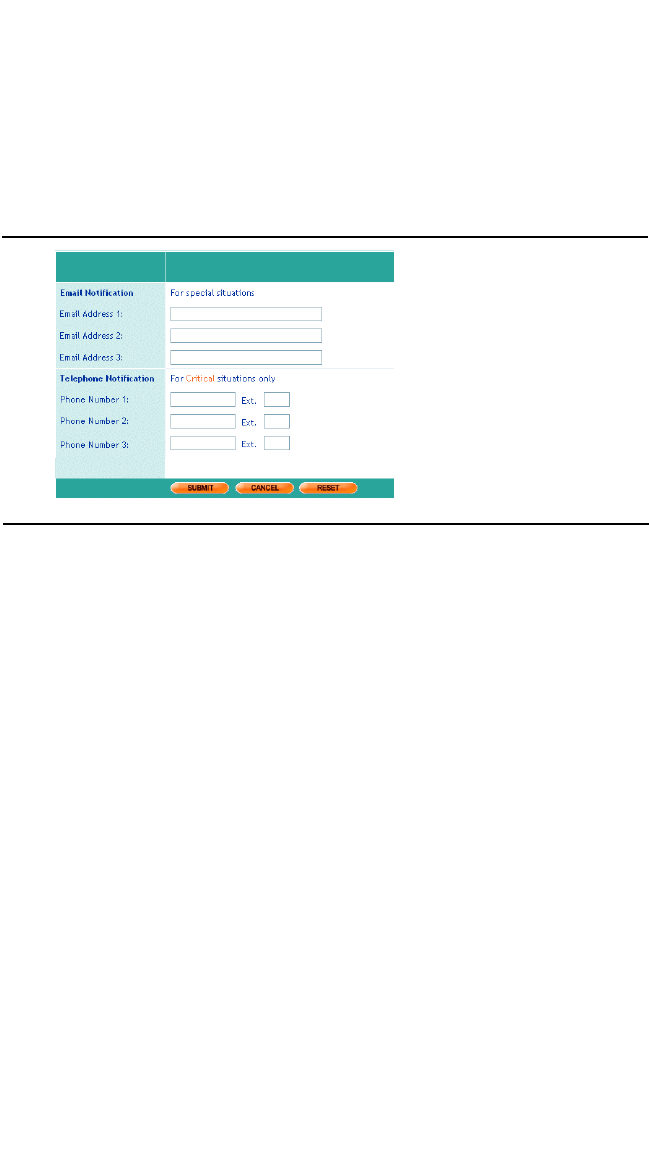
USER ACCOUNTS
Set Up User Notifications
Sereniti Smart Home Networking Service | 59
1Click Users and then click the Setup Notifications icon to display the
Notifications page (FIGURE 5-4).
2In the Email Notification field, enter up to three email addresses in the
standard
myname@myaddress.com
format. Sereniti will send an email to each address when special
situations arise.
3In the Telephone Notification field, enter up to three telephone
numbers (including area code). If a critical situation is detected, Sereniti
will call you at these numbers, starting with the first one you enter.
4Click SUBMIT.
FIGURE 5-4 Notifications Page

USER ACCOUNTS
Set Up User Notifications
60 | User Manual (v1.0.0.1)
5

Sereniti Smart Home Networking Service | 61
. . . . .
. . . . . . . . . . . . . . . . . . . . . .
P
ARENTAL
C
ONTROLS
6
. . . . . . . . . . . . . . . . . . . . . . . . . . . . . . . . . . . . . . . . . . .
THIS CHAPTER
Explains how to:
• Choose a content filter to assign to a user
• Create Allowed and Restricted Sites Lists
• Set a user’s time filter
• Create a time filter override
• Unblock a web site
. . . . . . . . . . . . . . . . . . . . . . . . . . . . . . . . . . . . . . . . . . .
OVERVIEW
Many parents believe that much of the content on the Internet is
inappropriate for their children. In addition, they often feel that time
spent on the Internet is time not spent on more important activities, such
as schoolwork, reading and athletics.
For these and other reasons, parents believe it is their responsibility to
supervise their children's Internet experience to ensure their children do
not visit offensive web sites or spend too much time aimlessly surfing
the web or chatting with friends.
To provide parents with the means to fulfill their responsibilities, the
Smart Home Networking Service provides a powerful set of Internet
filtering tools to control the sites users can visit and the time of day they
can access the Internet.
PARENTAL CONTROLS
Choose a Content Filter
62 | User Manual (v1.0.0.1)
6
. . . . . . . . . . . . . . . . . . . . . . . . . . . . . . . . . . . . . . . . . . .
CHOOSE A CONTENT FILTER
Once the Smart Home Networking Service is installed, no one is
permitted to access the Internet without a user account. When you create
the user account, you have to assign it a content filter. The content filter
determines the sites the user can visit and the hours the user can access
the Internet.
AVAILABLE FILTERS
There are four content filters to choose from. They are described in
TABLE 6-5 on the next page.
Each user is assigned one of these four filters when the user 's account is
created. If the user tries to visit a site that is blocked by the filter, a
Blocked Access message appears and the user is refused permission to
land on the site.
Note: See Chapter 5 for instructions on creating a user account and
assigning a content filter. Chapter 5 also explains how to change
a user’s content filter.
BAR GRAPH
The Command Center provides a Content Filter Bar Graph. It gives an
approximation of the percentage of web sites blocked by a user’s
content filter. You can use these to compare content filters.
The bar graph appears on the Parental Controls (FIGURE 6-1), Control
Filter Settings (FIGURE 6-2), and User Settings (Chapter 5, FIGURE 5-3)
pages.
The following is an example of a typical Content Filter Bar Graph:
Orange represents the percentage of sites blocked and white the
percentage of sites allowed. The above example shows the graph for the
mature teen filter.
PARENTAL CONTROLS
Choose a Content Filter
Sereniti Smart Home Networking Service | 63
TABLE 6-5 Content Filters
Filter Intended For Does this
Child Children under 12 • Only allows access to sites known
to be safe for children
• Blocks Internet access at all times
(you must modify the time filter to
allow access)
Young Teen Children 13-15 • Allows access to much of the
Internet, but blocks much
inappropriate content, including
sites dealing with:
• Allows Internet access during
daytime hours
Mature Teen Children 16-17 • Allows access to most sites, except
for hate sites and sites dealing with
extremely violent or sexual content
• Allows Internet access at all times
Adult Over 18 • No restrictions
• Abortion
• Alcohol
•Criminal
skills
• Cult
• Drugs
• Gambling
• Hacking
•Hate
•Nudism
• Occult
• Personals
and dating
• Pornography
• Sexual advice
• Sexual
orientation
• Tobacco
• Chat
•Gaming
•Sex
education
• Suicide
• Violence
• Weapons

PARENTAL CONTROLS
Create Allowed and Restricted Sites Lists
64 | User Manual (v1.0.0.1)
6
CREATE ALLOWED AND RESTRICTED
. . . . . . . . . . . . . . . . . . . . . . . . . . . . . . . . . . . . . . . . . . .
SITES LISTS
To complement the content filters, the Smart Home Networking Service
provides two lists you can also use to control Internet access:
•Allowed Sites List — a collection of URLs that all users can
access, regardless of their content filter
•Restricted Sites List — A collection of URLs that only adult
users can access
When you first install the Command Center, these lists are empty. You
can add URLs to them as you see fit. To add a URL to either list, follow
the steps below:
1Click Users or Security and then click the Parental Controls icon to
display the Parental Controls page (FIGURE 6-1).
2Select a user and click EDIT to the right of the Content Filter Bar
Graph. It does not matter which user you select because the two lists
apply to all users. The Content Filter Settings page displays
(FIGURE 6-2).
FIGURE 6-1 Parental Controls Page
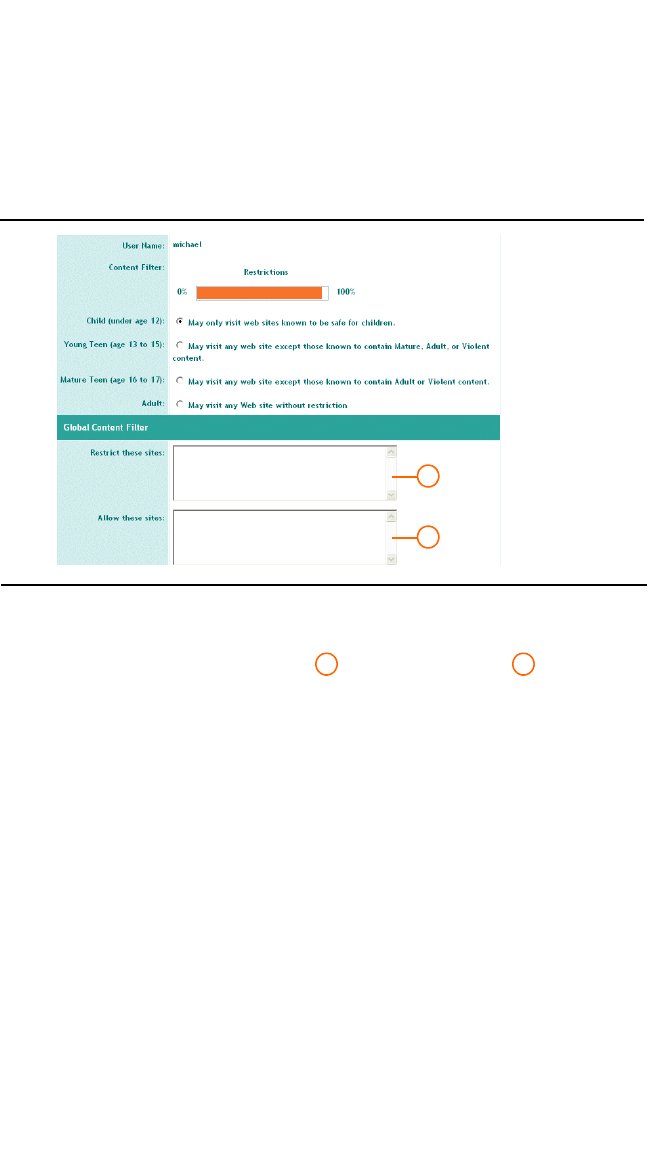
PARENTAL CONTROLS
Set a User’s Time Filter
Sereniti Smart Home Networking Service | 65
3Go to the Restrict these sites or Allow these sites panels and
enter the URLs. Enter one URL per line. (To remove a URL, select it
and delete it).
4When you are finished entering URLs, click SUBMIT. You are taken to
the User Settings page for this user.
Note: If a user has made a request to unblock a web site, a third panel is
shown with the request in it. When working with the Allowed
and Restricted Site Lists, you may ignore this panel. See
“Unblock a Site” below.
. . . . . . . . . . . . . . . . . . . . . . . . . . . . . . . . . . . . . . . . . . .
SET A USER’S TIME FILTER
The content filter also determines when the user can access the Internet
(see TABLE 6-5). However, you can modify this part of the content filter
FIGURE 6-2 Content Filter Settings Page
1
2
1 2
PARENTAL CONTROLS
Set a User’s Time Filter
66 | User Manual (v1.0.0.1)
6
– called the time filter – and customize it to suit you and your user’s
needs.
To set a user’s time filter, follow the steps below:
1Click Users or Security and then click the Parental Controls icon to
display the Parental Controls page (FIGURE 6-1).
2Locate the user, and then click EDIT to the right of the Time Filter Bar
Graph to display the Time Filter Settings page (FIGURE 6-3).
This page is a grid showing all the hours of the week. Hours shown in
orange are blocked – Internet access is denied. Hours shown in white are
unblocked – access is permitted.
FIGURE 6-3 Time Filter Settings Page
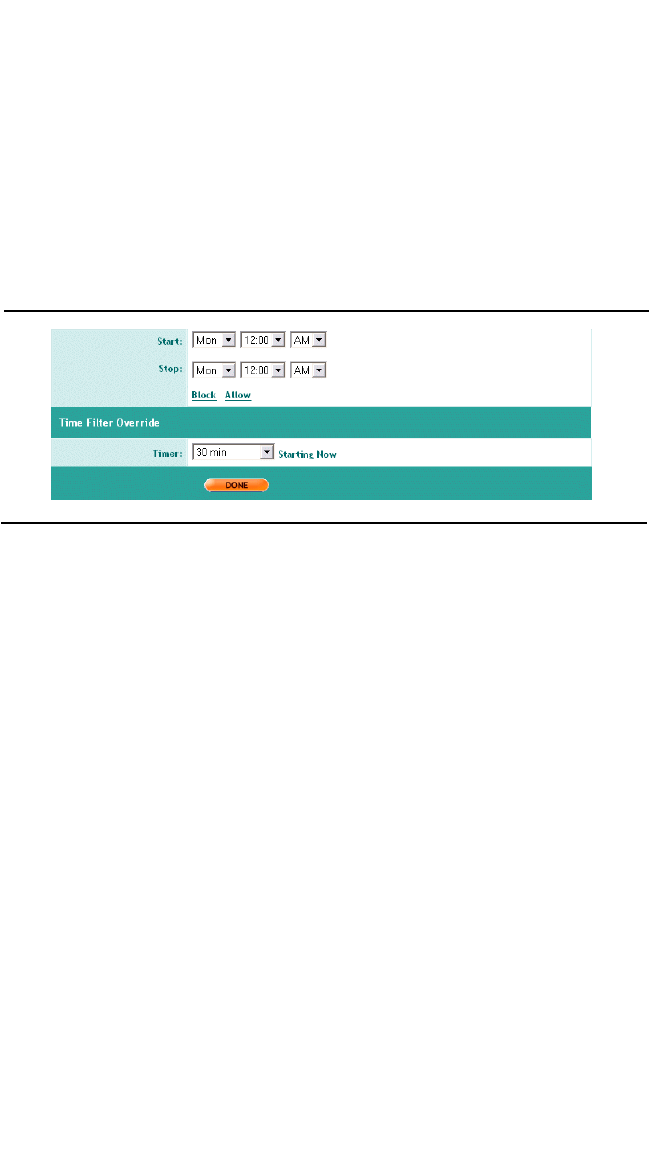
PARENTAL CONTROLS
Create a Time Filter Override
Sereniti Smart Home Networking Service | 67
3To block or unblock a period of time:
aGo to the Start and Stop fields (FIGURE 6-4) under the weekly time
grid and select a period of time by entering start and stop dates and
times.
bClick BLOCK to block Internet access during the selected time
period, or click ALLOW to allow access.
cRepeat Steps a – b until the time grid is what you want.
4Click DONE. You are taken to the User Settings page for the user you
selected.
. . . . . . . . . . . . . . . . . . . . . . . . . . . . . . . . . . . . . . . . . . .
CREATE A TIME FILTER OVERRIDE
If a user has to access the Internet during a period of time blocked by the
user’s time filter, you can create a time filter override to give the user
temporary permission to access the Internet. The override lasts for a
specified period of time (up to 24 hours) and then expires.
To create a time filter override, follow the steps below:
1Click Users or Security and then click the Parental Controls icon to
display the Parental Controls page (FIGURE 6-1).
FIGURE 6-4 Start and Stop Fields and Time Filter Override
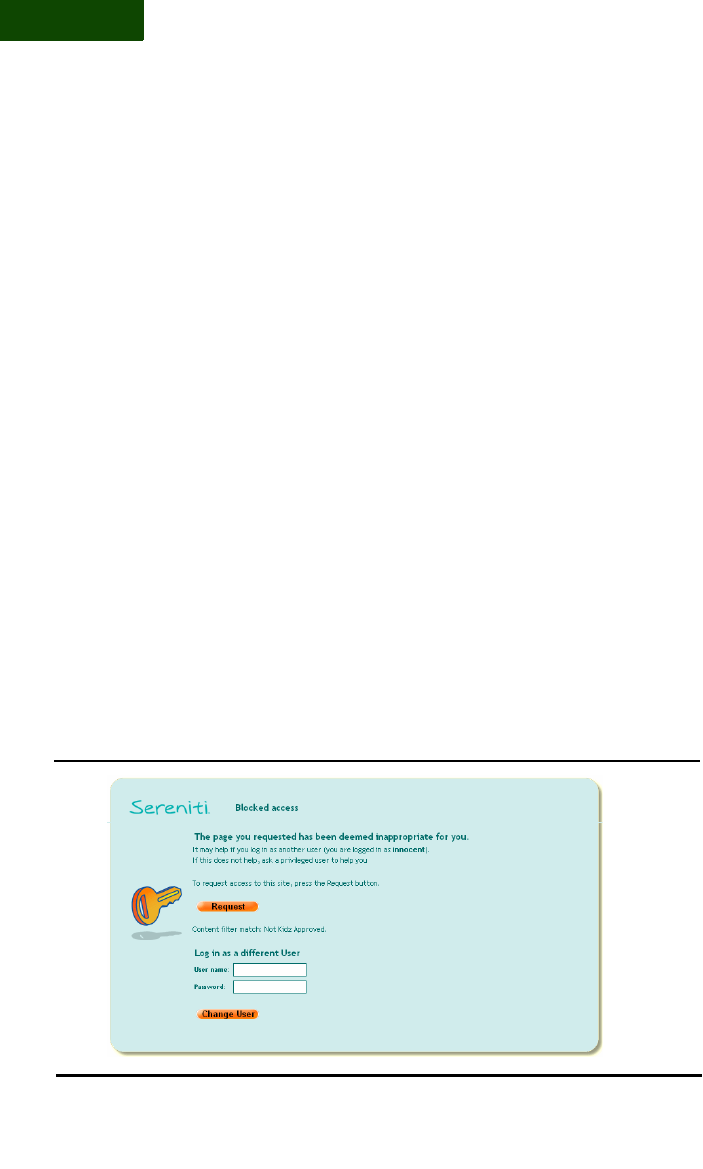
PARENTAL CONTROLS
Unblock a Site
68 | User Manual (v1.0.0.1)
6
2Locate the user requesting the override and click EDIT to the right of
the Time Filter Bar Graph. The Time Filter Settings page displays
(FIGURE 6-3).
3Go to the Timer field at the bottom of the page (see FIGURE 6-4) and
select a period of time from the drop-down list. You can select from 30
minutes to 24 hours.
4Click DONE. You are taken to the User Settings page for the user you
selected. Permission to access the Internet begins now and ends when
the override expires.
. . . . . . . . . . . . . . . . . . . . . . . . . . . . . . . . . . . . . . . . . . .
UNBLOCK A SITE
A user’s access to the Internet can be blocked by the content filter or the
time filter.
BLOCKED BY CONTENT FILTER
When a user attempts to browse to a web site blocked by the content
filter, a message appears in the browser indicating the site has been
blocked (FIGURE 6-5).
FIGURE 6-5 Blocked Access Message (Content Filter)

PARENTAL CONTROLS
Unblock a Site
Sereniti Smart Home Networking Service | 69
The user has two choices:
• Enter a different user name and password and click Change
User. This only works if the user knows a user name and
password with a less restrictive content filter.
•Click Request to submit a request to unblock the site. The
request is emailed to the addresses you entered on the
Notifications page (see Chapter 5). The user has to wait until
the request is granted.
Respond to a request To respond to a request to unblock a web site,
follow the steps below:
1Click User or Security and then click the Parental Controls icon to
display the Parental Controls page (FIGURE 6-1).
2Select any user – the user does not matter – and click EDIT to the right
of the Content Filter Bar Graph. This displays the Content Filter
Settings page, which now contains an Unblock Requests List along with
the Allowed and Restricted Sites Lists (FIGURE 6-6).
The Unblock Requests List contains the blocked URL.
3To allow the request, select the URL and click Allow . This moves
the URL to the Allowed Sites List. It can now be accessed by all users.
FIGURE 6-6 Unblock Requests List
12 3
1
2
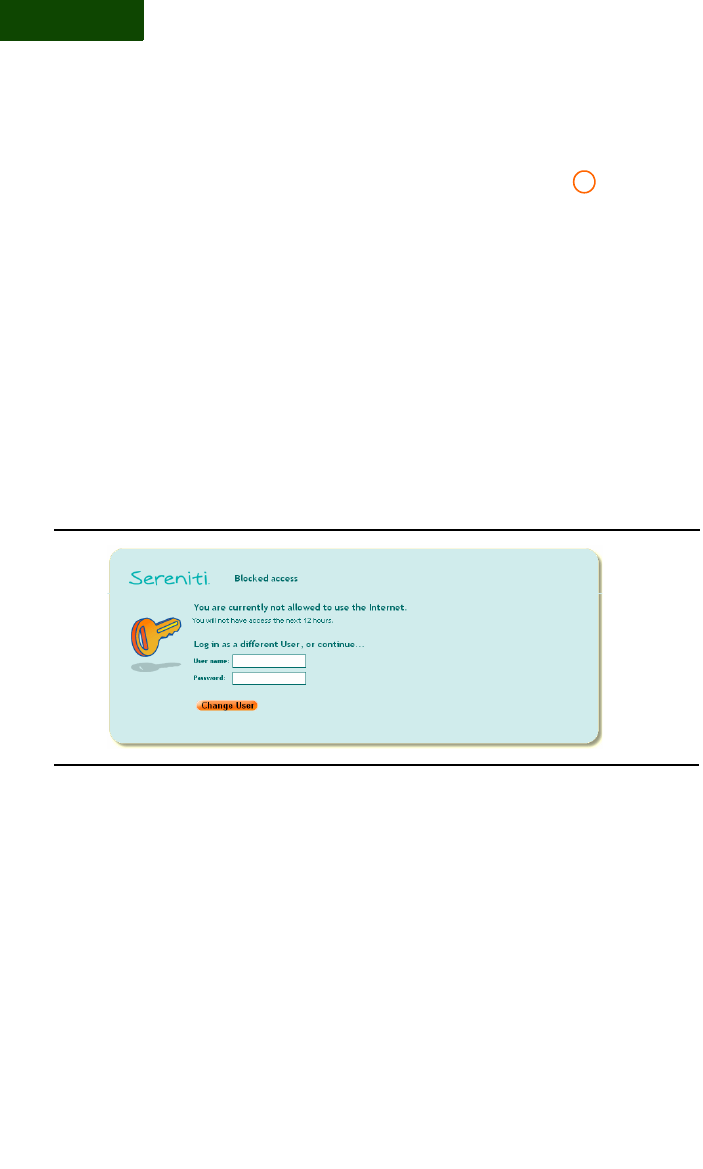
PARENTAL CONTROLS
Unblock a Site
70 | User Manual (v1.0.0.1)
6
4To disallow the request, select the URL and click Block . This moves
the URL to the Restricted Sites List. Only adult users can now access
this site.
5Click SUBMIT.
Note: The Unblock Requests List only shows when there are
outstanding requests. When all requests have been cleared –
either allowed or blocked – the List is removed.
BLOCKED BY TIME FILTER
When a user attempts to browse to a web site during a period of time
blocked by the time filter, a message appears in the browser indicating
the site has been blocked (FIGURE 6-7).
The user has two choices:
• Enter a different user name and password and click Change
User. This only works if the user knows a user name and
password with a less restrictive time filter.
• Contact a privileged user and ask for a time filter override
(see“Create a Time Filter Override” above).
3
FIGURE 6-7 Blocked Access Message (Time Filter)

Sereniti Smart Home Networking Service | 71
. . . . .
. . . . . . . . . . . . . . . . . . . . . .
B
ACKUP
AND
R
ESTORE
7
. . . . . . . . . . . . . . . . . . . . . . . . . . . . . . . . . . . . . . . . . . .
THIS CHAPTER
Explains how to:
• Set the backup schedule
• Select folders for backup
• Track the status of scheduled backups
• Perform an unscheduled backup
• View the contents of the most recent backup
• Restore files and folders
• Clean up old backups
• Open ports for backups
. . . . . . . . . . . . . . . . . . . . . . . . . . . . . . . . . . . . . . . . . . .
OVERVIEW
All the information you have accumulated using the PCs in your
network is stored in folders located on each PC's hard drive. The folders
may contain information that someone in your family has created – for
example, correspondence, financial records, school work, digital
photographs, etc. – or they may contain content that has been obtained
elsewhere, such as digital music that has been purchased and
downloaded from an Internet site.
In either case, the information is susceptible to loss. Folders and hard
disks can become damaged and unreadable. Files can be mistakenly
deleted, overwritten or corrupted in other ways. If any of this happens,

BACKUP AND RESTORE
Overview
72 | User Manual (v1.0.0.1)
7
you and your family could lose valuable information that cannot be
easily replaced.
For these and other reasons, it is critically important that you back up
your essential files onto an external device on a regular basis. Copying
the files to another folder on the same PC can prevent some information
loss, but it cannot ensure that your files are protected in the event of hard
disk or other catastrophic failure.
SCHEDULED BACKUPS
The Smart Home Networking Service automatically backs up the com-
mon folders on all PCs running the Command Center at 3 am every
morning…unless you choose to change the folders or the schedule. The
common folders are:
My Documents The My Documents folder is a convenient location to
store important files, especially files you need to access frequently.
When you open the Windows Explorer, the My Documents folder
always appears as the first folder under your desktop. This makes it easy
to locate. In addition, key Windows programs, such as WordPad and
Paint, automatically save files to this folder (unless you instruct the
programs otherwise).
Favorites The Favorites folder stores all the favorite web sites that
you flagged using the Internet Explorer (by opening the Favorites menu
at the top of Explorer window and selecting Add to List). Since these
web sites are presumably important to you, it is a good idea to regularly
back this folder up.
Email The Email folder stores all your saved email messages. If this
folder is selected, the Sereniti system will automatically back up the
Microsoft Outlook file that contains your email (see Appendix B for
details) – providing you did not change the default folder in which
Outlook file is stored.
If you changed the default, or if you are using a mail program other than
Outlook, selecting the Email folder will not back up your email. You

BACKUP AND RESTORE
How Backups are Stored
Sereniti Smart Home Networking Service | 73
need to select the specific folder where the email is stored using the
Command Center’s select additional folders feature (see “Select Folders
for Backup” below)
Desktop The Desktop folder stores all files, folders and icons found
on the desktop (which is actually the c:\Documents and Settings\<user
name>\Desktop directory).
CUSTOMIZE THE BACKUP SCHEDULE
There are three changes you can make to the backup schedule:
Time and frequency You can change the time of day the backups
take place and the number of times each week the backups are
performed. You can set different schedules for different PCs, so that
some are backed up at different times and more frequently than others.
Folders You do not have to back up all the common folders. You can
remove any or all of them from the backups. You can also back up other
folders in addition to the common folders. You can back up a different
selection of folders on each PC.
Turn scheduled backups off If you unselect all the common folders
and select no additional folders for a PC, that PC will not be backed up
automatically. This is not recommended.
. . . . . . . . . . . . . . . . . . . . . . . . . . . . . . . . . . . . . . . . . . .
HOW BACKUPS ARE STORED
The folders that you select for backup are copied onto the hard disk on
the Smart Home Server. The complete contents of each folder is copied,
so you have a backup of each subfolder and file in the folder.
VERSIONS
Backups are stored on the Smart Home Server by date. You can take a
look at the backups for any PC in your network, and you will see them
listed by date. Here is how the folders are stored:
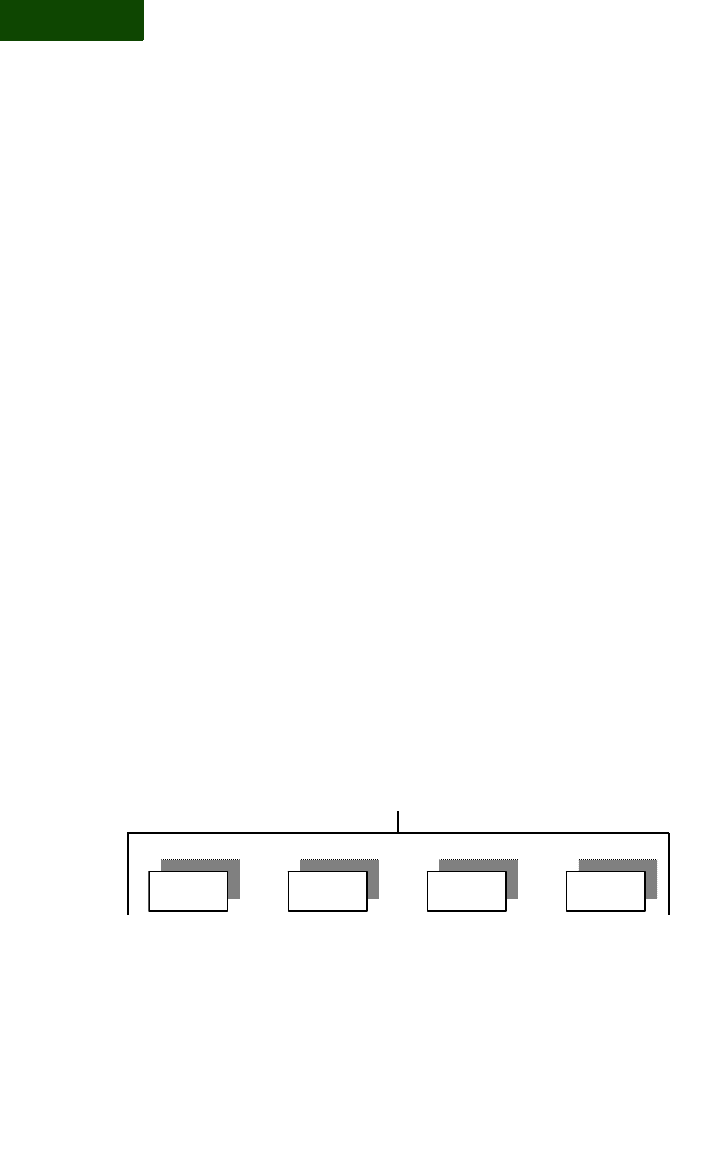
BACKUP AND RESTORE
How Backups are Stored
74 | User Manual (v1.0.0.1)
7
• The first time a folder is backed up, it is copied in its entirety to
the Smart Home Server, so that one copy of each file is stored.
• After that, the individual files in the folder are only copied to
the Smart Home Server when they change. If they do not
change, the most recent version of the file is moved from the
previous backup to the current backup.
• The Smart Home Server can store up to eight versions of a file.
If a file never changes, only one version is stored. Each time a
backup is performed, this version is moved from the previous
backup to the current backup.
• If eight versions of a file are stored, and the file changes again,
the oldest version is dropped and the new version stored. This
process continues with each subsequent change.
EXAMPLE
To make this clearer, let’s consider a specific example:
1Young Johnny creates a folder called Projects for school assignments.
He then prepares first drafts of English, history, science and Spanish
papers, and saves them as files in the Projects folder. On the morning of
Nov. 1, the folder is backed up for the first time. This is what the backup
looks like:
2That night, Johnny makes changes to the English and History files, but
does nothing to the Science and Spanish files. On Nov. 2 the next
backup is performed. This is what the backups now look like:
English History SpanishScience
Ver. 1 Ver. 1 Ver. 1 Ver. 1
ProjectsBackup: Nov. 1
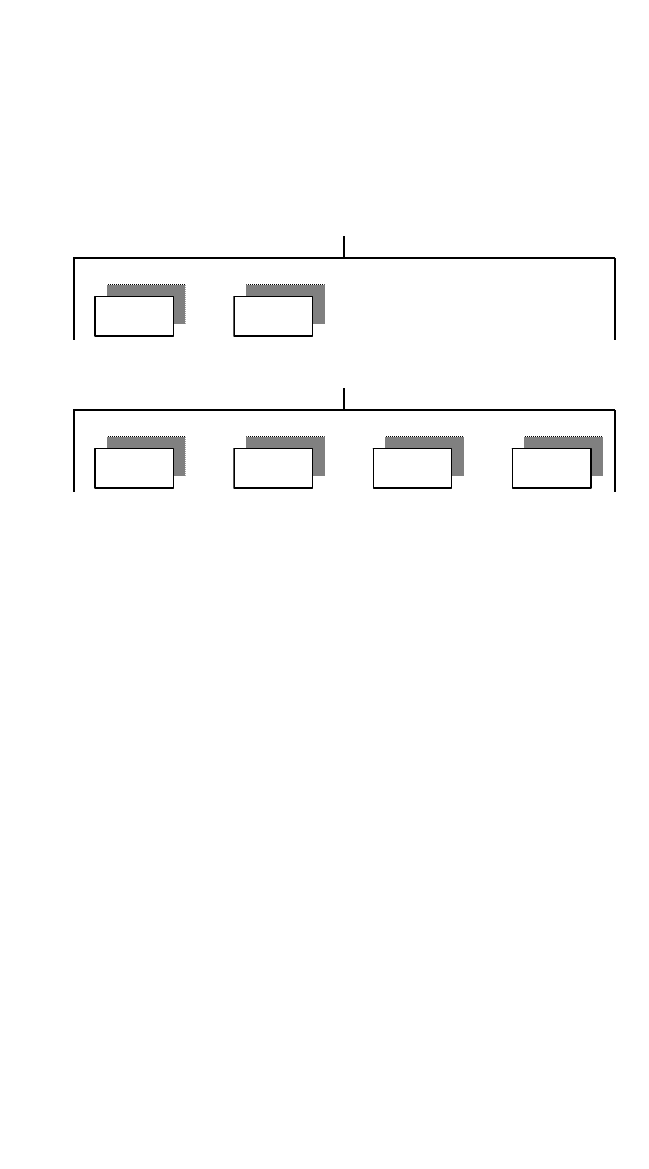
BACKUP AND RESTORE
How Backups are Stored
Sereniti Smart Home Networking Service | 75
The Nov. 2 backup contains the new versions of the English and History
files and the old versions of the Science and Spanish files. The Nov. 1
backup retains the first versions of the English and History files, but no
longer contains the first versions of the Science and Spanish files,
because these files did not change and were moved to the Nov. 2
backup.
At this point, the Smart Home Server is storing two versions of the
English and History files and one version of the Science and Spanish
files.
3That night, Johnny makes changes to the History and Spanish files, but
leaves the other two alone. On Nov. 3 the next backup is performed.
This is what the backups now look like:
English History
Ver. 1 Ver. 1
ProjectsBackup: Nov. 1
English History SpanishScience
Ver. 2 Ver. 2 Ver. 1 Ver. 1
ProjectsBackup: Nov. 2

BACKUP AND RESTORE
How Backups are Stored
76 | User Manual (v1.0.0.1)
7
The Nov. 3 backup contains the new versions of the History and Spanish
files and the old versions of the English and Science files. The versions
that did not change were moved from the previous backup.
At this point, the Smart Home Server is storing three versions of the
History File, two versions of the English and Spanish files and one
version of the Science file.
4This process continues as Johnny’s school year progresses. If a file is
stored eight times, and then changes again, the most recent version is
backed up and the oldest deleted.
By storing up to eight versions of a file, the Smart Home Networking
Service allows users like Johnny to go back and recover earlier versions
of files, should that ever be necessary.
English History
Ver. 1 Ver. 1
ProjectsBackup: Nov. 1
English History SpanishScience
Ver. 2 Ver. 3 Ver. 1 Ver. 2
ProjectsBackup: Nov. 3
History Spanish
Ver. 2 Ver. 1
ProjectsBackup: Nov. 2

BACKUP AND RESTORE
Set the Backup Schedule
Sereniti Smart Home Networking Service | 77
. . . . . . . . . . . . . . . . . . . . . . . . . . . . . . . . . . . . . . . . . . .
SET THE BACKUP SCHEDULE
By default, the Smart Home Networking Service automatically backs up
each PC running the Command Center at 3 am every morning. The only
requirements are that the PCs are turned on and connected to the
network at the time of backup.
TIME AND FREQUENCY
You can change the backup time and frequency for any PC from the PC
you are currently using.
• You can schedule the backups for any hour of the day or night
• You can schedule the backups to take place once a day, once
every three days or once a week
Tip: When setting backup time, select an hour when the PC is most
likely to be online. And prioritize your backups – back up PCs
containing vital files every day, while backing up other PCs once
every three days or even once a week.
SET THE SCHEDULE
To set the backup schedule for a PC, follow the steps below:
1Click Backup and then click the View Backup Status icon to display
the Backup Status page (FIGURE 7-1).
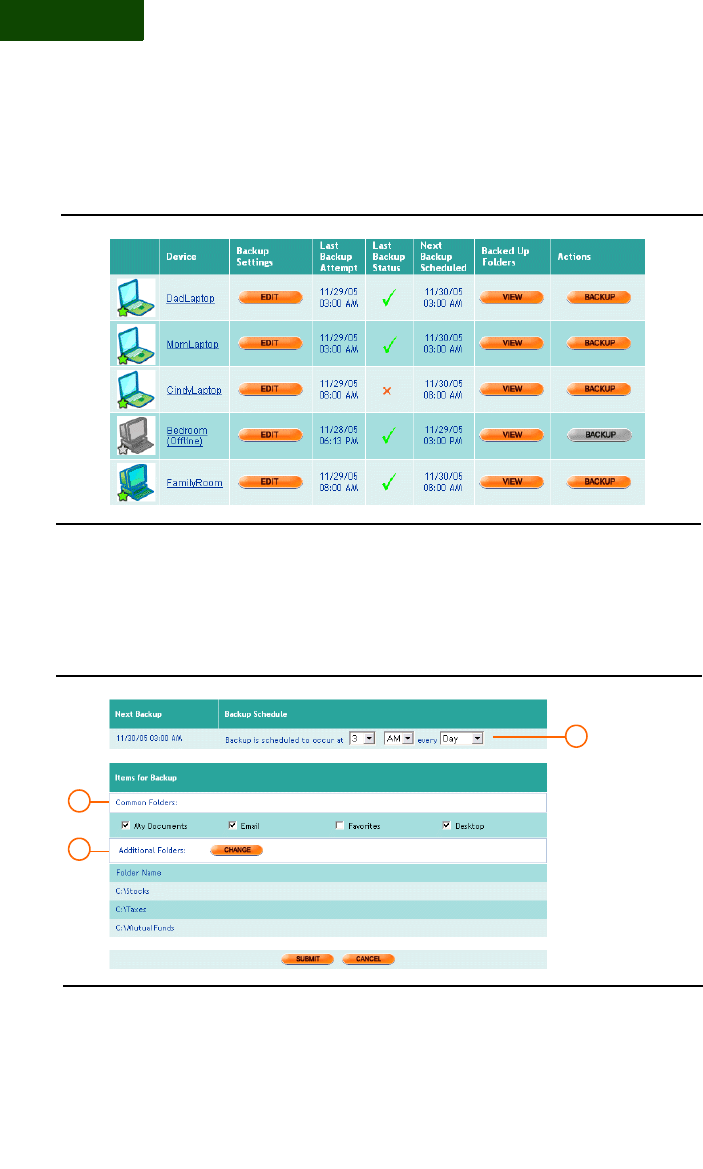
BACKUP AND RESTORE
Set the Backup Schedule
78 | User Manual (v1.0.0.1)
7
2Locate the PC you want to schedule and click EDIT to display the
Backup Settings page (FIGURE 7-2).
Tip: If you are backing up the PC you are using, you can click
Backup and then click the Edit Backup Settings icon to go
directly to the Backup Settings page.
FIGURE 7-1 Backup Status Page
FIGURE 7-2 Backup Settings Page
1
2
3

BACKUP AND RESTORE
Select Folders for Backup
Sereniti Smart Home Networking Service | 79
3In the Backup Schedule field , go to the first drop-down list and
select the hour of the day.
4Go to the second drop-down list and select AM or PM.
5Go to the third drop-down list and select the frequency. Your choices are
once a day, once every three days or once a week.
6Click SUBMIT. You are returned to the Backup Status page. The time
and frequency you entered are reflected in the entry in the Next Backup
Scheduled field.
. . . . . . . . . . . . . . . . . . . . . . . . . . . . . . . . . . . . . . . . . . .
SELECT FOLDERS FOR BACKUP
By default, the Smart Home Networking Service backs up the four
common folders on each PC (see “Overview” above for a description of
each common folder).
You can change this. You can remove some, or even all, of the common
folders, and you can add other folders. However, these rules apply:
• You can change the common folders on any PC in your
network from the PC you are currently using
• You can only add other folders to the backup on the PC you are
currently using. To do this on another PC, you have to log into
the Command Center on that PC.
SELECT COMMON FOLDERS
To select common folders for backup, follow the steps below:
1Click Backup and then click the View Backup Status icon to display
the Backup Status page (FIGURE 7-1).
2Locate the PC to be backed up and click EDIT to display the Backup
Settings page (FIGURE 7-2).
1
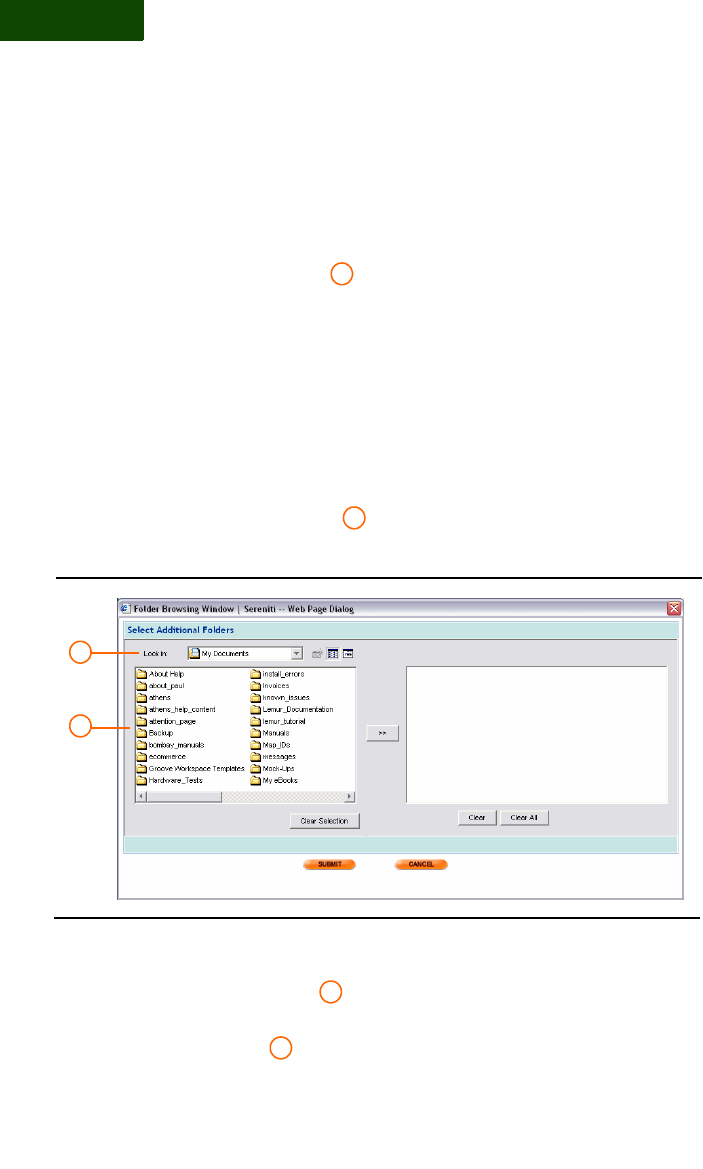
BACKUP AND RESTORE
Select Folders for Backup
80 | User Manual (v1.0.0.1)
7
Tip: If you are backing up the PC you are using, you can click
Backup and then click the Edit Backup Settings icon to go
directly to the Backup Settings page.
3Go to Common Folders and uncheck any folders you do not want
to back up. Leave those to be backed up checked.
4Click SUBMIT. You are returned to the Backup Status page.
SELECT OTHER FOLDERS (THIS PC ONLY)
To select other folders for backup, follow the steps below:
1Click Backup and then click the Edit Backup Settings icon to display
the Backup Settings page (FIGURE 7-2).
2Go to Additional Folders and click CHANGE to display a Select
Additional Folders window (FIGURE 7-3).
3Go to the Look in field and select the drive containing the folders
you want to back up. The folders are shown in the pane directly below
the Look in field . Only folders are shown, not files.
4Select the folders you want to back up. You cannot select individual
files.
2
3
FIGURE 7-3 Select Additional Folders Window
1
2
1
2

BACKUP AND RESTORE
Track the Status of Scheduled Backups
Sereniti Smart Home Networking Service | 81
• To open a folder so that you can select a subfolder, double-
click the folder.
• To select a single folder, click it once.
• To select multiple folders, hold down the [CTRL] key and click
each folder once, or hold down the [SHIFT] key and select two
folders. Those two folders and all folders in between are
selected.
Note: To unselect all files selected in the left pane, click Clear
Selection.
5When you have made your selection, click the arrow button
between the two panes to copy the folders to the right pane. These are
the folders that will be backed up.
Note: To remove a single file from the right pane, click the file to select
it and click Clear. To remove all the files, click Clear All.
6When you have selected all the folders to be backed up, click SUBMIT.
You are returned to the Backup Settings page. The full path of each
folder you selected appears in the Folder Name field.
7Click SUBMIT again to save the selection. You are taken to the Backup
Status page.
TRACK THE STATUS OF SCHEDULED
. . . . . . . . . . . . . . . . . . . . . . . . . . . . . . . . . . . . . . . . . . .
BACKUPS
Scheduled backups can fail to take place. The two most common
reasons are:
• The PC was not turned on and connected to the Internet when
the backup was scheduled.
• The network was experiencing connectivity problems when the
backup was scheduled, and the PC could not communicate with
the Smart Home Server.
BACKUP AND RESTORE
Perform an Unscheduled Backup
82 | User Manual (v1.0.0.1)
7
The Smart Home Networking Service issues an alert whenever a PC has
not been backed up for seven straight times. This means:
• If the backup schedule is set for once a day, you will be alerted
after seven backups fail
• If the schedule is set for once every three days, you will be
alerted after the third failure
• If the backup schedule is set for one a week, you will be alerted
after the first failure
However, you do not have to wait for an alert to check on the status of a
scheduled backup. To do this, follow the steps below:
1Click Backup and then click the View Backup Status icon to display
the Backup Status page (FIGURE 7-1).
2Locate the PC and look in the Last Backup Status column:
= Backup successful
= Backup NOT successful
If the backup was not successful, you can find out why by resting the
mouse cursor on the icon. A box will pop up with the reason the
backup failed (e.g., “PC was offline when backup started”).
3Look in the Last Backup Attempt column. When a backup fails, this
shows the date and time the unsuccessful backup was attempted.
4Look in the Next Backup Scheduled column. This indicates the date
and time of the next scheduled backup. If the backup is taking place
now, the column will say In Progress.
. . . . . . . . . . . . . . . . . . . . . . . . . . . . . . . . . . . . . . . . . . .
PERFORM AN UNSCHEDULED BACKUP
Although your PCs are backed up automatically, sometimes it is
necessary to perform an unscheduled backup. Performing an
unscheduled backup has no effect on regularly scheduled backups.

BACKUP AND RESTORE
View the Contents of the Most Recent Backup
Sereniti Smart Home Networking Service | 83
You can back up any PC in your network from the PC you are currently
using. Just make sure the PC you are backing up is turned on and
connected to the network.
To perform an unscheduled backup, follow the steps below:
1Click Backup and then click the View Backup Status icon to display
the Backup Status page (FIGURE 7-1).
2Locate the PC to be backed up and click BACKUP. A dialog box pops
up and warns you that the backup could take a while if many files are
backed up.
Tip: Before starting the backup, make sure the correct folders have
been selected. If you are not sure, click EDIT.
3Click OK to continue. You may resume your work while the backup is
in progress.
Another pop-up notifies you when the backup is complete. The date and
time of the backup should then appear in the Last Backup Completed
column on the Backup Status page.
Note: When a backup begins, a STOP button is inserted in the Actions
column. If for any reason you need to terminate the backup
before it completes, click this button.
VIEW THE CONTENTS OF THE MOST
. . . . . . . . . . . . . . . . . . . . . . . . . . . . . . . . . . . . . . . . . . .
RECENT BACKUP
You can take a look at the folders and files in the most recent backup of
any PC in your network from the PC you are currently using.
DISPLAY THE FOLDERS AND FILES
To display the contents of the most recent backup, follow the steps
below:
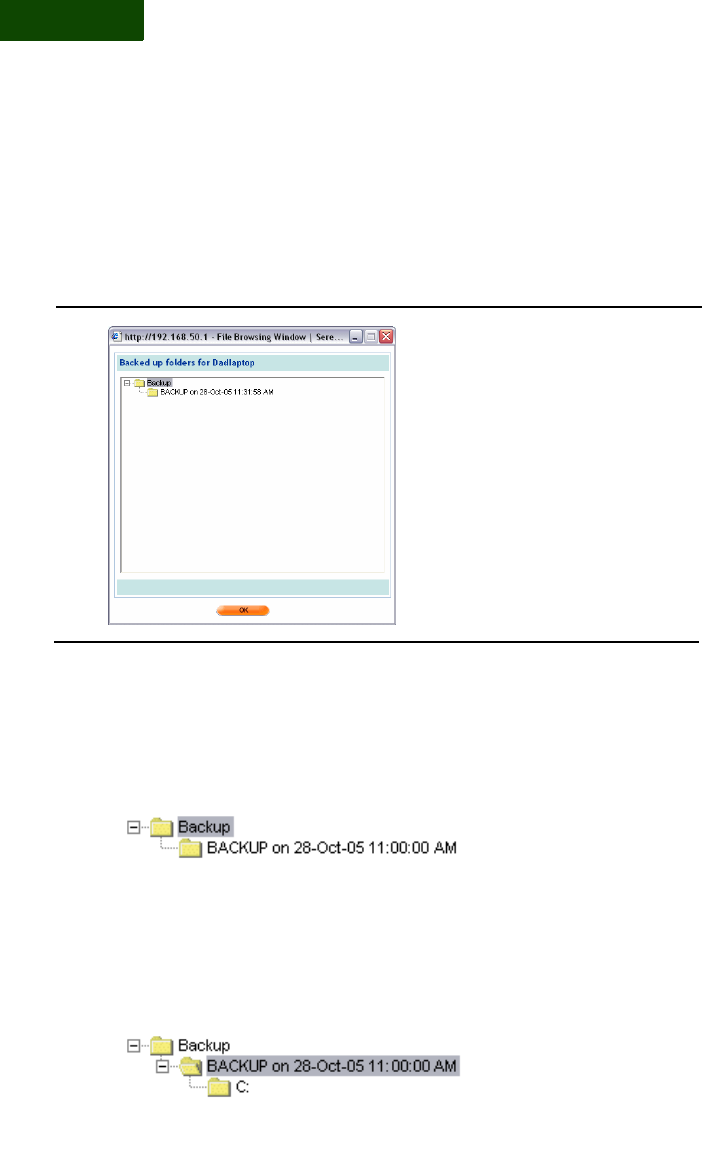
BACKUP AND RESTORE
View the Contents of the Most Recent Backup
84 | User Manual (v1.0.0.1)
7
1Click Backup and then click the View Backup Status icon to display
the Backup Status page (FIGURE 7-1).
2Locate the PC and click VIEW to display a Backed Up Folders window
(FIGURE 7-4).
UNDERSTANDING THE DISPLAY
The following is a close-up of the display in FIGURE 7-4. All backups
look like this when first viewed.
As you can see, the first entry indicates that this is a backup and the
second entry gives the date and time of the backup. In the above
example, the backup took place on October 28, 2005 at 11:00 am.
Double-click the date and time to display the disk drive(s) that were
backed up. This is what the display looks like:
FIGURE 7-4 Backed Up Folders Window
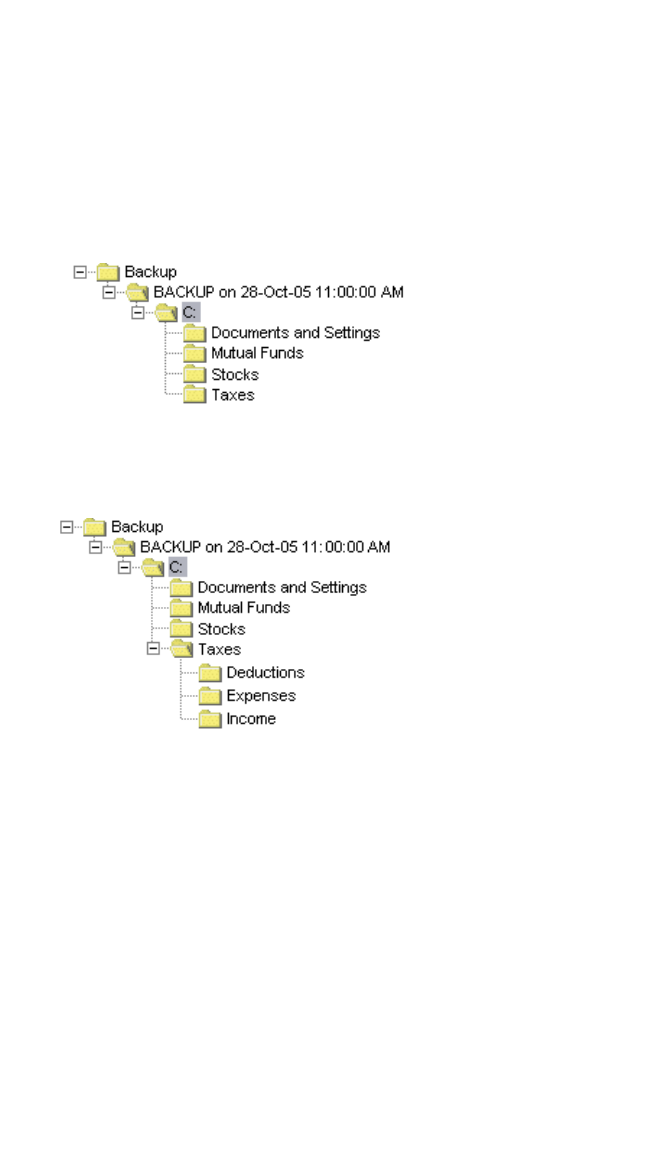
BACKUP AND RESTORE
Restore Files and Folders
Sereniti Smart Home Networking Service | 85
Only the C: drive was backed up. To display the folders that were
backed up from the C: drive, double-click C:. This is what the display
now looks like:
Four folders were backed up from the C: drive. To display the contents
of one of these folders, double-click the folder icon or name. This is
what the display now looks like if the Taxes folder is double-clicked.
All backups adhere to this format. To display other folders or subfolders,
double-click them and they will open.
. . . . . . . . . . . . . . . . . . . . . . . . . . . . . . . . . . . . . . . . . . .
RESTORE FILES AND FOLDERS
If a file or folder becomes lost or corrupted, or you need an earlier
version of it, you can locate the version you want in one the backups on
the Smart Home Server and restore it. You can restore complete folders,
or you can restore specific files.
You can restore a file that was originally backed up from any PC in your
network, but you can only restore it to the PC you are currently using.
You can restore the file to its original location or to a new location.
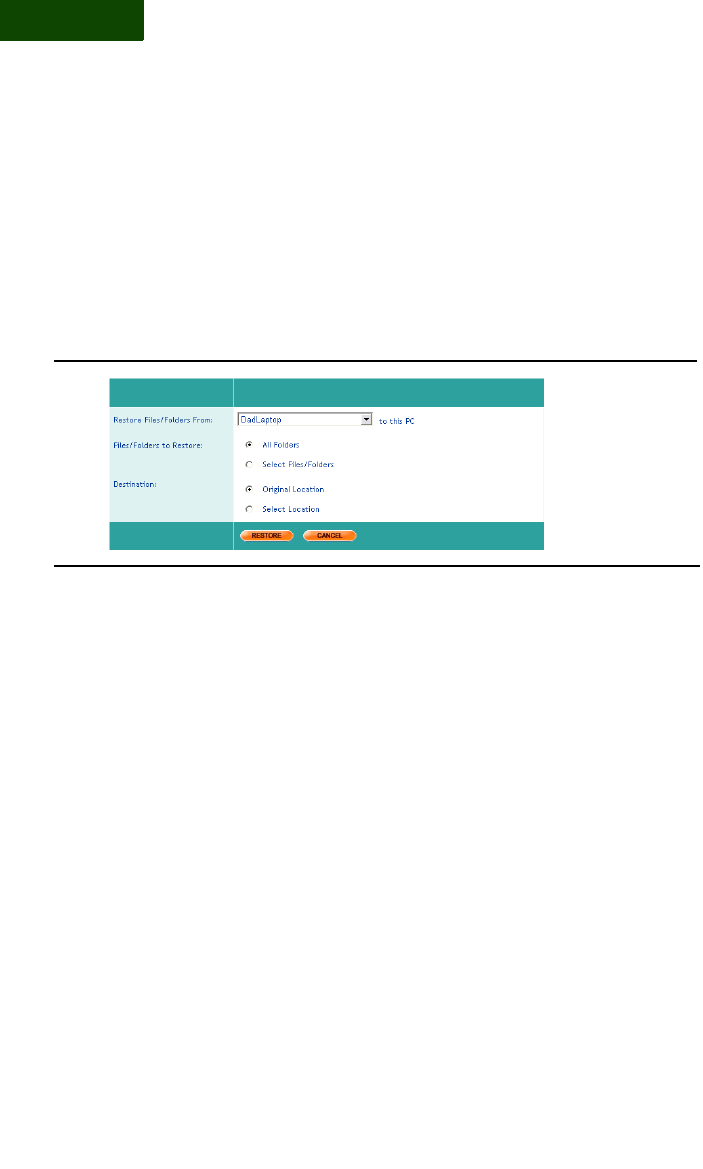
BACKUP AND RESTORE
Restore Files and Folders
86 | User Manual (v1.0.0.1)
7
RESTORE ALL FILES AND FOLDERS IN THE MOST RECENT
BACKUP
You can restore all the folders in the most recent backup. This restores
all subfolders and files as well. To do this, follow the steps below:
1Click Backup and then click the Restore Backed Up Files icon to
display the Restore page (FIGURE 7-5).
2In the Restore Files/Folders From field, select a PC from the drop-
down list. This is the PC from which these files and folders were
originally backed up. You can select any PC in the network.
3Go the Files/Folders to Restore field and click All Folders.
4Go to the Destination field and select a location on your PC’s hard drive
to put the restored files and folders. Click Original Location or Select
Location.
• If you clicked Original Location, the files and folders are
restored to the location from which they were originally backed
up. If they were originally backed up from another PC, make
sure the same location exists on your PC.
• If you clicked Select Location, a CHOOSE button appears.
Click it to display a browse window and select the location to
put the restored files and folders. The location is displayed to
the right of the CHOOSE button on the Restore page.
5Click RESTORE. A window pops up and prompts you to confirm the
restore.
FIGURE 7-5 Restore Page

BACKUP AND RESTORE
Restore Files and Folders
Sereniti Smart Home Networking Service | 87
6Click OK. The Restore starts. While the restore operation is taking
place, you cannot perform a back up or clean up backed up files on the
Smart Home Server.
RESTORE SPECIFIC FILES AND FOLDERS IN THE MOST
RECENT BACKUP
You can restore specific files and folders in the most recent backup.
Restoring a folder restores all the subfolders and files in it.
To select specific files and folders and restore them, follow the steps
below:
1Click Backup and then click the Restore Backed Up Files icon to
display the Restore page (FIGURE 7-5).
2In the Restore Files/Folders From field, select a PC from the drop-
down list. This is the PC from which these files and folders were
originally backed up. You can select any PC in the network.
3Go the Files/Folders to Restore field and click Select File/Folders. A
CHOOSE button appears.
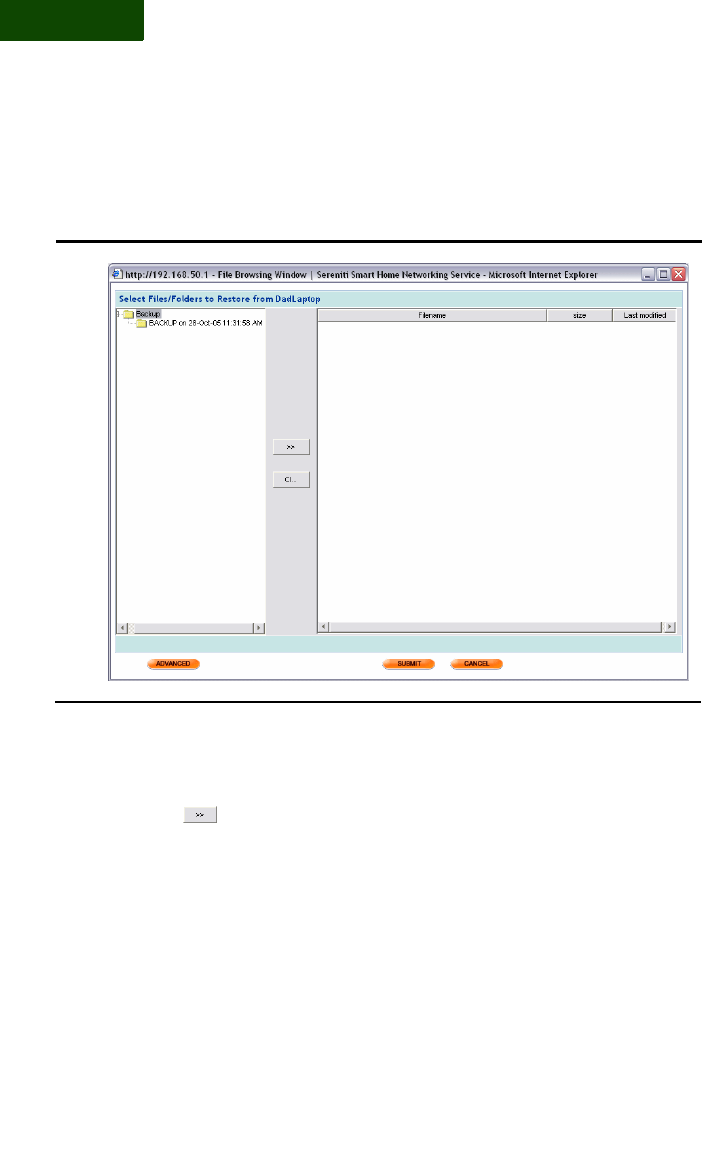
BACKUP AND RESTORE
Restore Files and Folders
88 | User Manual (v1.0.0.1)
7
4Click CHOOSE to display a Select Folders for Restore window
(FIGURE 7-6). The most recent backup is shown in the left pane.
5Select a file or folder from the most recent backup and click the arrow
button between the two panes to copy it to the right pane. Repeat
until all files and folders to be restored are in the right pane.
Note: For help in expanding the most recent backup and locating
specific files and folders, see “View the Contents of the Most
Recent Backup” above. To remove a file or folder from the right
pane, click it to select it and click the Clear button between the
two panes.
6Go to the Destination field and select a location on your PC’s hard drive
to put the restored files and folders. Click Original Location or Select
Location.
FIGURE 7-6 Select Folders to Restore Window

BACKUP AND RESTORE
Restore Files and Folders
Sereniti Smart Home Networking Service | 89
• If you clicked Original Location, the files and folders are
restored to the location from which they were backed up. If
they were originally backed up from another PC, make sure the
same location exists on your PC.
• If you clicked Select Location, a CHOOSE button appears.
Click it to display a browse window and select the location to
put the restored files and folders. The location is displayed to
the right of the CHOOSE button on the Restore page.
7Click RESTORE. A window pops up and prompts you to confirm the
restore.
8Click OK. The Restore starts. While the restore operation is taking
place, you cannot perform a back up or clean up backed up files on the
Smart Home Server.
RESTORE AN OLD VERSION OF A FILE OR FOLDER
You can restore old versions of files and folders. To do this, follow the
steps below.
1Click Backup and then click the Restore Backed Up Files icon to
display the Restore page (FIGURE 7-5).
2In the Restore Files/Folders From field, select a PC from the drop-
down list. This is the PC from which these files and folders were
originally backed up. You can select any PC in the network.
3Go the Files/Folders to Restore field and click Select File/Folders. A
CHOOSE button appears.
4Click CHOOSE to display a Select Folders for Restore window
(FIGURE 7-6). This window shows the most recent backup.
5Click ADVANCED. Up to eight previous backups for each folder and
file are shown in the left pane.
6Select a file or folder from one of the backups and click the arrow button
between the two panes to copy it to the right pane. Repeat until all
files and folders to be restored are in the right pane.

BACKUP AND RESTORE
Clean Up Old Backups
90 | User Manual (v1.0.0.1)
7
Note: For help in expanding old backups and locating specific files and
folders, see “View the Contents of the Most Recent Backup”
above. To remove a file or folder from the right pane, click it to
select it and click the Clear button between the two panes.
7Go to the Destination field and select a location on your PC’s hard drive
to put the restored files and folders. Click Original Location or Select
Location.
• If you clicked Original Location, the files and folders are
restored to the location from which they were backed up. If
they were originally backed up from another PC, make sure the
same location exists on your PC.
• If you clicked Select Location, a CHOOSE button appears.
Click it to display a browse window and select the location to
put the restored files and folders. The location is displayed to
the right of the CHOOSE button on the Restore page.
8Click RESTORE. A window pops up and prompts you to confirm the
restore.
9Click OK. The Restore starts. While the restore operation is taking
place, you cannot perform a back up or clean up backed up files on the
Smart Home Server.
. . . . . . . . . . . . . . . . . . . . . . . . . . . . . . . . . . . . . . . . . . .
CLEAN UP OLD BACKUPS
You should keep an eye on the amount of space on the Smart Home
Server’s hard disk used to store backups, and the amount of space
remaining for future backups. If the Smart Home Server runs out of
space, future backups will fail.
Note: The amount of space used to store documents on the Sereniti
Shared Drive (S: drive) also affects the amount of space
available for backups. The less space taken up by the S: drive,
the more space available for backups. To determine the amount
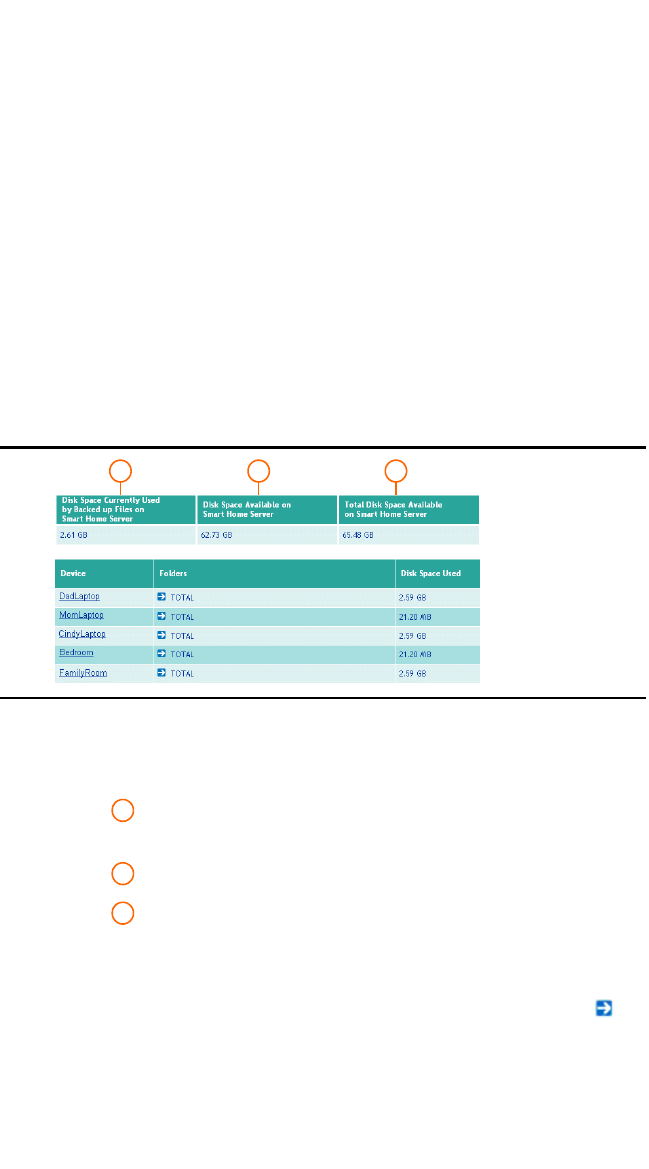
BACKUP AND RESTORE
Clean Up Old Backups
Sereniti Smart Home Networking Service | 91
of space used by the S: drive, click My Network and then click
the View Smart Home Server Status icon to display the Smart
Home Server Status page (see Chapter 12, FIGURE 12-1).
MONITOR DISK USAGE
To obtain a snapshot of the amount of space currently used by backups,
and the amount of space available, follow the steps below:
1Click Backup and then click the View Backup Disk Usage icon to
display the Backup Disk Usage page (FIGURE 7-7).
2The three fields across the top of the page show, from left to right:
The amount of disk space currently used by all backed up
folders
The amount of disk space available for future backups
The total amount of disk space available on the hard disk
3Underneath these three fields, the page lists each PC in your network
and shows the total amount of space used to back up each PC’s files and
folders. To break the totals down by folder, click the arrow icons
next to the totals. FIGURE 7-8 shows what this page now looks like,
FIGURE 7-7 Backup Disk Usage Page (Totals)
1 2 3
1
2
3
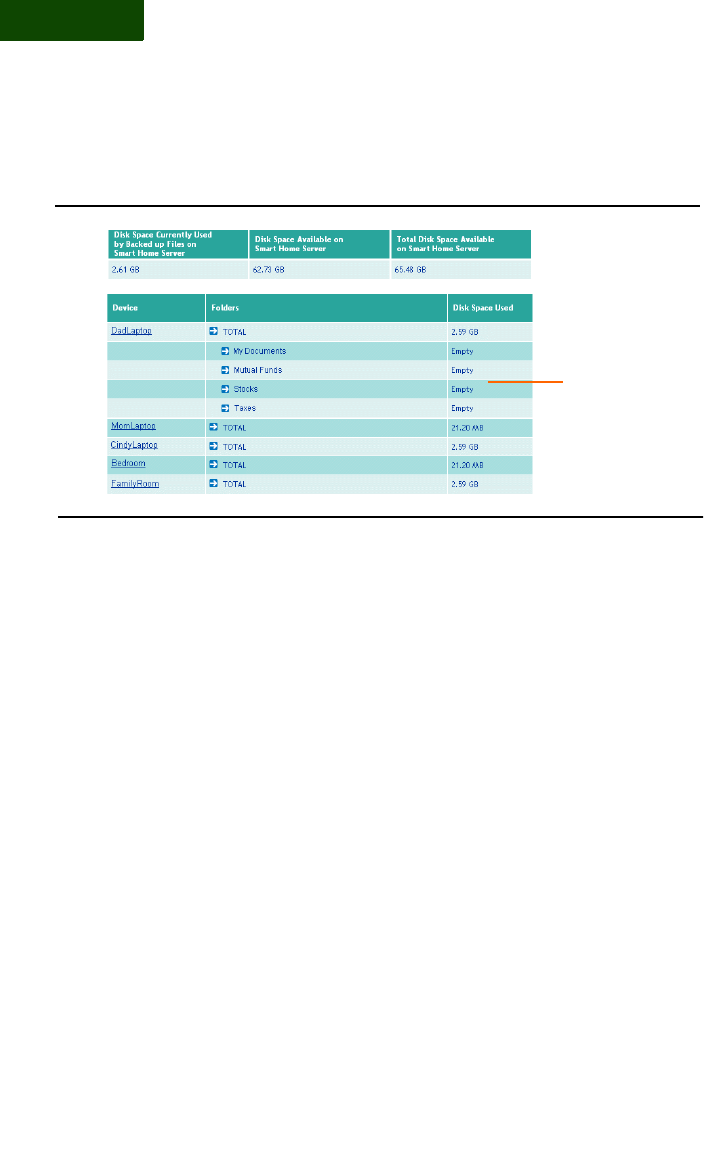
BACKUP AND RESTORE
Clean Up Old Backups
92 | User Manual (v1.0.0.1)
7
CLEAN UP UNNEEDED FOLDERS
If the hard disk on the Smart Home Server does not have enough space
to store the next backup, the backup will not take place. In such a
situation, you need to "clean up" the hard disk by removing enough old
folders to create space for future backups. You can only remove folders,
not individual files.
Tip: Before selecting folders for cleanup, take a look at the size of the
folders you have backed up and the amount of space available for
future backups. This can help you decide which folders to
remove. You might also consider eliminating unneeded files
from future backups to avoid facing this problem in the future.
To clean up old backup folders:
1Click Backup and then click the Clean Up Historical Backups icon to
display the Backup Cleanup page (FIGURE 7-9).
FIGURE 7-8 Backup Disk Usage Page (Folders)
Show totals
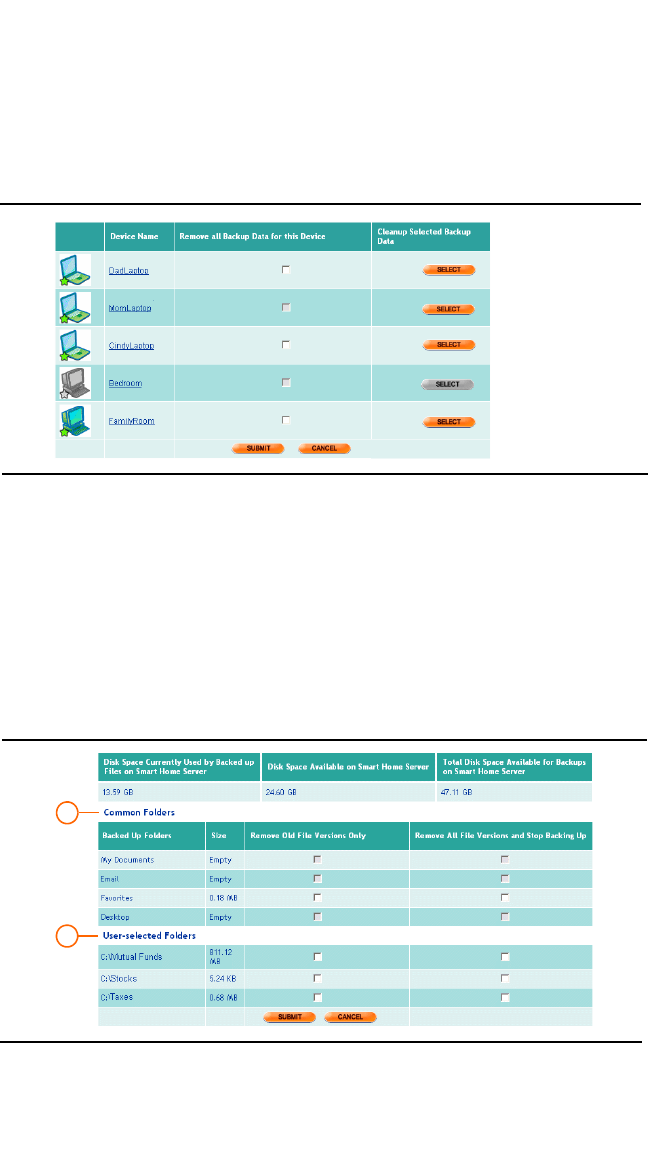
BACKUP AND RESTORE
Clean Up Old Backups
Sereniti Smart Home Networking Service | 93
2Locate the PC whose backed up folders you want to clean up.
3To clean up all the backed up folders for this PC, click the check box in
the Remove all Backed Up Data for this Device column.
4To clean up specific backed up folders, click SELECT in the Cleanup
Selected Backed Up Data column. This displays the Backup Cleanup
Details page (FIGURE 7-10).
FIGURE 7-9 Backup Cleanup Page
FIGURE 7-10 Backup Cleanup Details Page
1
2

BACKUP AND RESTORE
Open Ports for Backups
94 | User Manual (v1.0.0.1)
7
5On the Backup Cleanup Details page:
aDecide if you want to remove any common folders. If you do, go to
Common Folders and click one of the two check boxes next to
the folders you want to remove. For each folder, you have two
choices:
•Click Remove Old File Versions Only to remove existing
backups of this folder, but continue to include the folder in
future backups.
•Click Remove All File Versions and Stop Backing Up to
remove existing backups, but drop the folders from future
backups.
bDecide if you want to remove any of the other backed up folders. If
you do, go to User Selected Folders and follow the same
procedure described in Step a.
cClick SUBMIT. A message pops up and asks you to confirm the
cleanup.
dClick OK. A message pops up telling you that the cleanup has
begun.
eClick OK. You are returned to the Backup Cleanup page.
. . . . . . . . . . . . . . . . . . . . . . . . . . . . . . . . . . . . . . . . . . .
OPEN PORTS FOR BACKUPS
If one of your PCs is running a personal firewall other than the
Windows firewall, you may get a message that a backup failed because
the personal firewall on the PC blocked access to TCP ports 873 and
6001.
You need to open these ports. If you do not know how to do this, consult
the manuals and other documentation that come with the firewall you
are using.
1
2

BACKUP AND RESTORE
Open Ports for Backups
Sereniti Smart Home Networking Service | 95
Note: Do not confuse opening ports in a personal firewall running on a
PC with creating a port forwarding rule to open ports in the
network firewall in the Smart Home Server. These are two
different firewalls.

BACKUP AND RESTORE
Open Ports for Backups
96 | User Manual (v1.0.0.1)
7

Sereniti Smart Home Networking Service | 97
S
HARED
S
ERVER
D
RIVES
. . . . .
. . . . . . . . . . . . . . . . . . . . . .
AND
N
ETWORK
D
EVICES
8
. . . . . . . . . . . . . . . . . . . . . . . . . . . . . . . . . . . . . . . . . . .
THIS CHAPTER
Explains how to:
• Access the Sereniti Shared Drive (S: drive)
• Connect an external storage device to the Smart Home Server
• Rename an external storage device
• Access, monitor, format, repair and remove an external storage
device
• Connect a network printer to the Smart Home Server
• Rename the printer
. . . . . . . . . . . . . . . . . . . . . . . . . . . . . . . . . . . . . . . . . . .
OVERVIEW
The Smart Home Server is equipped with an internal hard disk and two
USB ports. You can use the hard disk to store files and exchange infor-
mation with other network users, and you can use the USB ports to con-
nect storage devices and printers to the network.
SERENITI SHARED DRIVE
When the Smart Home Server is installed, an area on its hard disk is set
aside as a shared drive that you and other members of your family can
use to store files and exchange information.

SHARED SERVER DRIVES AND NETWORK DEVICES
Overview
98 | User Manual (v1.0.0.1)
8
You can use the S: drive as you would any other disk drive on your PC.
Note: The Smart Home Server’s hard disk is also used to store backup
files. Therefore, the more files stored on the S: drive, the less
space available for backups.
USB PORTS
You can connect external storage devices (such as hard drives and flash
drives) and printers to the two USB ports on the back of the Smart Home
Server. You can connect two storage devices, two printers or one of
each. You can connect devices supporting either USB 2.0 or USB 1.1.
Error: System Failed to Map to S: Drive on <PC Name>
If you already have an S: drive on your PC, an Alert Box will pop
up when you log into the Command Center and tell you that the
system failed to map the Sereniti Shared Drive to the S: drive. To
allow the system to map the Sereniti Shared Drive to the S: drive,
you have to remap your existing S: drive to another letter. To do
this:
1. Close the Command Center.
2. Open the Windows Explorer.
3. Click Tools and select Map Network Drive.
4. In the Drive field, click the drop-down list and select an unused
letter.
5. In the Folder field, click Browse and select the folder currently
mapped to the S: drive.
6. Click Finish. This maps the folder to the drive letter you
selected in Step 4.
7. Right-click the S: drive and select Disconnect. This unmaps the
drive from the old letter.
8. Open the Command Center. The drive should now map properly.
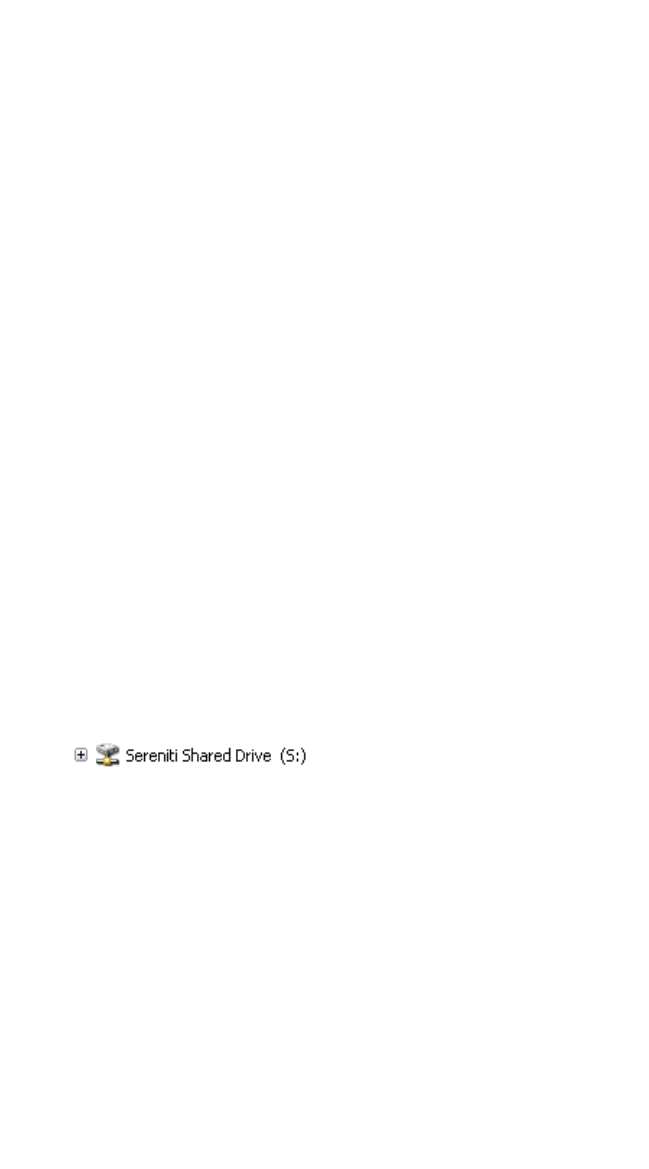
SHARED SERVER DRIVES AND NETWORK DEVICES
Use the Sereniti Shared Drive
Sereniti Smart Home Networking Service | 99
. . . . . . . . . . . . . . . . . . . . . . . . . . . . . . . . . . . . . . . . . . .
USE THE SERENITI SHARED DRIVE
The hard disk on the Smart Home Server is divided into two parts:
• Backups
• Sereniti Shared Drive (S: drive)
The backups are not a drive and are not accessible through the Windows
or Internet Explorers. You have to use the Command Center to view and
restore backup files. See Chapter 7 for details.
The S: drive is accessible through the Windows and Internet Explorers.
WINDOWS EXPLORER
To view files or folders stored on the S: drive in the Windows Explorer,
follow the steps below:
1Log into the network.
2Open the Windows Explorer.
3In the Folders panel on the left, find My Computer and click it to
expand it.
4Scroll down until you come to this entry:
INTERNET EXPLORER
To view files or folders stored on the S: drive in the Internet Explorer,
follow the steps below:
1Log into the network.
2Open the Internet Explorer.
3In the Address field, type
\\<pc name>
where <pc name> is the name of your PC.
4Click Go.
SHARED SERVER DRIVES AND NETWORK DEVICES
External Storage Devices
100 | User Manual (v1.0.0.1)
8
5Click the drop-down list in the Address field and look for this entry:
. . . . . . . . . . . . . . . . . . . . . . . . . . . . . . . . . . . . . . . . . . .
EXTERNAL STORAGE DEVICES
You can connect up to two external storage devices to the USB ports on
the back of the Smart Home Server. Two popular types of storage
devices are hard drives and flash drives. The devices give you:
• Extra space to store files (if you have large files, such as video,
this can be very useful)
• Another way to exchange data among network users
CONNECT THE DEVICE
To connect a storage device to the Smart Home Server, follow the steps
below:
Note: Make sure the device is formatted before you connect it. If it is
not, you will get an error message and you will have to format it
through the Command Center.
1Connect the storage device to one of the USB ports on the back of the
Smart Home Server.
2Log into the Command Center.
3Click Sharing and then click the Setup External Hard Drive icon to
display the Attached USB Devices page (FIGURE 8-1). The device you

SHARED SERVER DRIVES AND NETWORK DEVICES
External Storage Devices
Sereniti Smart Home Networking Service | 101
just connected is shown – if it is the first device connected, it is named
EXT_HDD_1 (the second is named EXT_HDD_2).
RENAME THE DEVICE
To give the device a more easily recognizable name:
1Type a new name in the Name field.
2Click SAVE.
MONITOR DISK USAGE
To keep track of the amount of space available on an external storage
device, follow the steps below:
1Log into the Command Center.
2Click Sharing and then click the Setup External Hard Drive icon to
display the Attached USB Devices page (FIGURE 8-1).
3Locate the device. The following information is shown:
• Total amount of space on the device
• Amount of space currently in use
• Amount of space currently available for use
• Percentage of space currently in use
FIGURE 8-1 Attached USB Devices Page

SHARED SERVER DRIVES AND NETWORK DEVICES
External Storage Devices
102 | User Manual (v1.0.0.1)
8
VIEW THE CONTENTS OF THE DEVICE USING THE
COMMAND CENTER
To use the Command Center to view the files and folders stored on the
device, follow the steps below:
1Log into the Command Center.
2Click Sharing and then click the Setup External Hard Drive icon to
display the Attached USB Devices page (FIGURE 8-1).
3Click VIEW. The files and folders in the drive are shown in an Internet
Explorer window.
VIEW THE CONTENTS OF THE DEVICE USING THE
WINDOWS EXPLORER OR INTERNET EXPLORER
To use the Windows Explorer or Internet Explorer to view the files and
folders stored on the device, follow the steps below:
1Log into the PC.
2Open the Windows Explorer or Internet Explorer.
3In the Address field, type:
\\SERENITISHS\<device name>
where <device name> is the name of the hard disk.
4Click Go. The files and folders in the drive are shown in the Explorer
window.
REPAIR A HARD DRIVE
To repair a hard drive without causing loss of data, follow the steps
below.
1Log into the Command Center.
2Click Sharing and then click the Setup External Hard Drive icon to
display the Attached USB Devices page (FIGURE 8-1).
3Click REPAIR. A message pops up and prompts you to confirm the
repair operation.
4Click OK to proceed or CANCEL to terminate.

SHARED SERVER DRIVES AND NETWORK DEVICES
Network Printers
Sereniti Smart Home Networking Service | 103
REFORMAT A HARD DRIVE
To reformat a hard drive, follow the steps below:
WARNING: Reformatting a hard drive erases all files and folders.
1Log into the Command Center.
2Click Sharing and then click the Setup External Hard Drive icon to
display the Attached USB Devices page (FIGURE 8-1).
3Click FORMAT. A message pops up and warns you that all data on the
disk will be erased if you proceed with the format operation.
4Click OK to proceed or CANCEL to terminate.
REMOVE THE DEVICE
To remove a device’s records from the Command Center, follow the
steps below:
WARNING: Disconnecting a device without first removing it from the
Command Center's records could damage the device and
cause loss of data.
1Log into the Command Center.
2Click Sharing and then click the Setup External Hard Drive icon to
display the Attached USB Devices page (FIGURE 8-1).
3Click REMOVE. A message prompts you to confirm the remove
operation.
4Click OK to proceed or CANCEL to terminate.
5Disconnect the drive from the USB port on the back of the Smart Home
Server.
. . . . . . . . . . . . . . . . . . . . . . . . . . . . . . . . . . . . . . . . . . .
NETWORK PRINTERS
You can connect up to two printers to the USB ports on the back of the
Smart Home Server. These become network printers, and anyone who
can log into your network can print to them.

SHARED SERVER DRIVES AND NETWORK DEVICES
Network Printers
104 | User Manual (v1.0.0.1)
8
WARNING: Do not connect a multi-function printer to the Smart Home
Server. A multi-function printer is a printer that also scans,
faxes and copies. These printers will not work because they
require two way communication with the Internet.
CONNECT THE PRINTER
To connect a printer to one of the USB ports on the Smart Home Server,
follow the steps below:
1Using a USB cable, connect the printer to a USB ports on the back of the
Smart Home Server.
2Log into your PC, click Start on the Windows task bar and select
Printers and Faxes. This displays the Windows Printers and Faxes
window (FIGURE 8-2).
FIGURE 8-2 Printers and Faxes Window
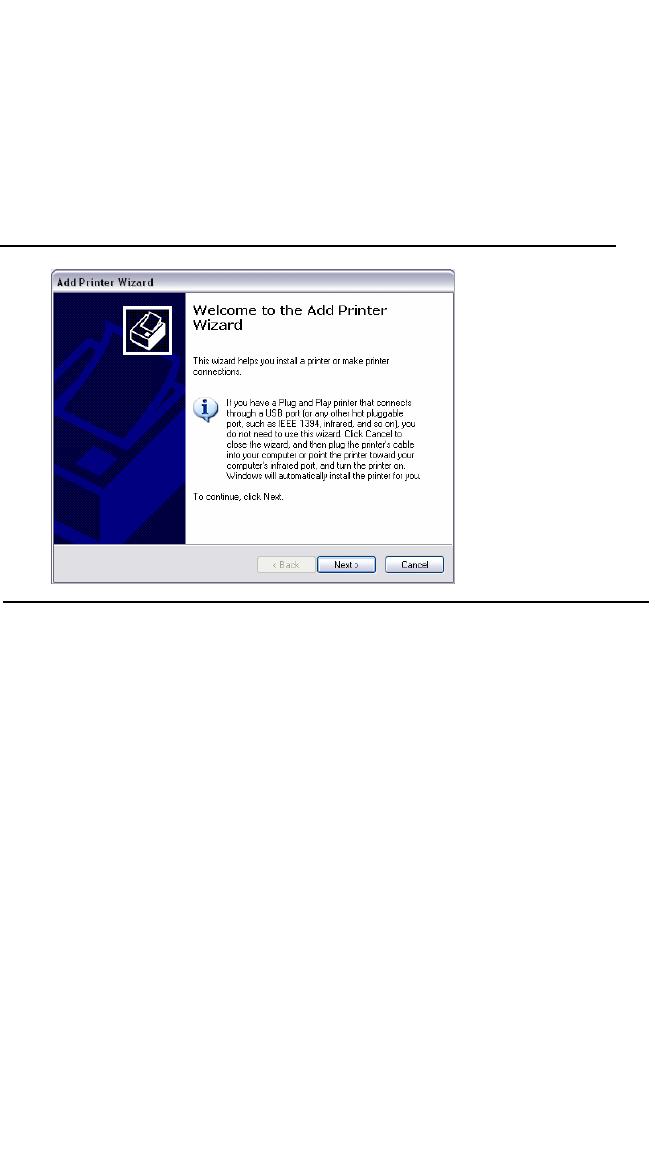
SHARED SERVER DRIVES AND NETWORK DEVICES
Network Printers
Sereniti Smart Home Networking Service | 105
3Click File and select Add Printer. This launches the Add Printer wizard
(FIGURE 8-3).
4Read the text on the opening Wizard screen and click Next to display
the next Wizard window (FIGURE 8-4).
FIGURE 8-3 Add Printer Wizard (1)
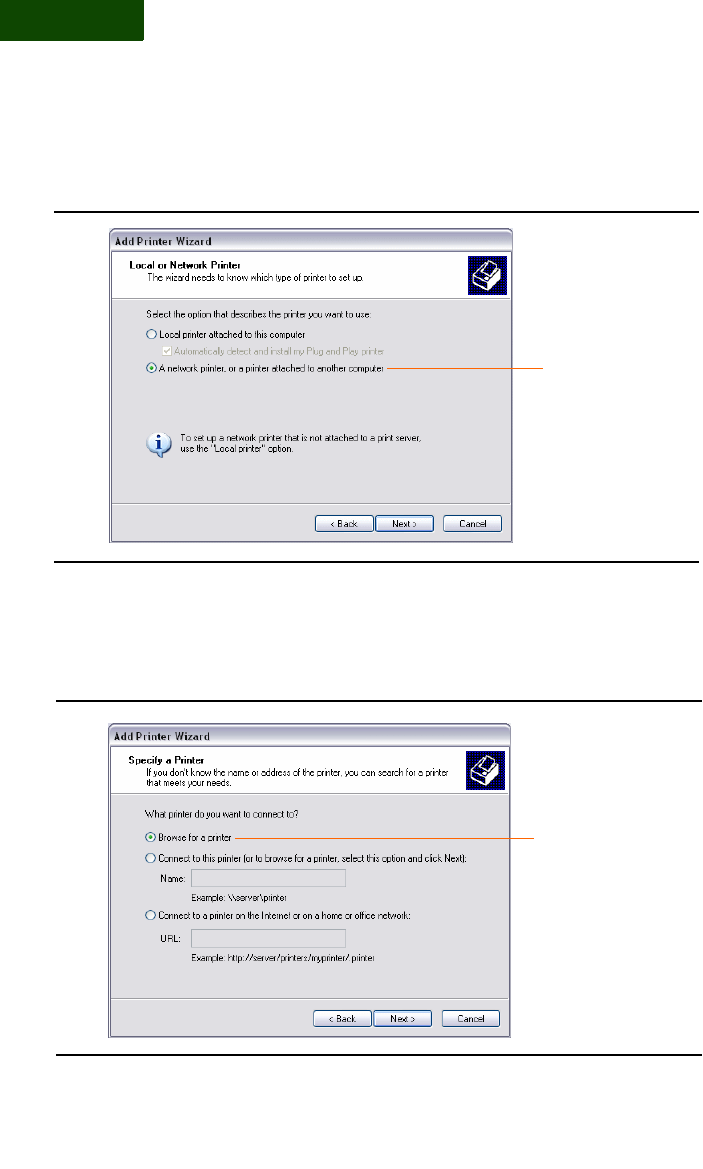
SHARED SERVER DRIVES AND NETWORK DEVICES
Network Printers
106 | User Manual (v1.0.0.1)
8
5You have to indicate the type of printer. Select Network Printer (not
local) and click Next to display the next Wizard screen (FIGURE 8-5).
FIGURE 8-4 Add Printer Wizard (2)
Network printer
FIGURE 8-5 Add Printer Wizard (3)
Browse for a printer

SHARED SERVER DRIVES AND NETWORK DEVICES
Network Printers
Sereniti Smart Home Networking Service | 107
6You now need to identify the printer. Select Browse for a printer and
click Next to display the next Wizard window (FIGURE 8-6).
7This Wizard window shows all available printers. Locate the Smart
Home Server’s workgroup (WORKGROUP if you did not change the
default) and look for SERENITISHS.
8Double-click SERENITISHS to display the printer you just connected.
9Select the printer and click Next. The Wizard will prompt you to select a
driver for the printer. Follow the on-screen instructions. When the driver
has been installed, the Wizard will prompt you to make the new printer
the default printer (FIGURE 8-7).
FIGURE 8-6 Add Printer Wizard (4)
SERENITISHS
SHARED SERVER DRIVES AND NETWORK DEVICES
Network Printers
108 | User Manual (v1.0.0.1)
8
10 It this is the printer you will be using most of the time, click Yes .
Otherwise, click No. Then click Next to display the final Wizard
window (FIGURE 8-8).
FIGURE 8-7 Add Printer Wizard (5)
FIGURE 8-8 Add Printer Wizard (6)

SHARED SERVER DRIVES AND NETWORK DEVICES
Network Printers
Sereniti Smart Home Networking Service | 109
11 This window shows the printer settings. If they are acceptable, click
Finish to close the wizard. You can now select this printer from any
application and print to it.
CHANGE THE PRINTER’S NAME
The Command Center identifies any printers connected to the Smart
Home Server by vendor and model. You can change this to a more easily
recognizable name, such as “upstairs” or “photos.” To do this, follow the
steps below:
1Log into the Command Center.
2Click Sharing and then click the Setup Network Printer icon to
display the Attached USB Devices page (FIGURE 8-1). The printer you
just connected is shown.
3Type a new name in the Name field.
4Click Save.

SHARED SERVER DRIVES AND NETWORK DEVICES
Network Printers
110 | User Manual (v1.0.0.1)
8

Sereniti Smart Home Networking Service | 111
F
OLDER
AND
P
RINTER
. . . . .
. . . . . . . . . . . . . . . . . . . . . .
S
HARING
9
. . . . . . . . . . . . . . . . . . . . . . . . . . . . . . . . . . . . . . . . . . .
THIS CHAPTER
Explains how to:
• Create and access shared folders
• Create and print to shared printers
. . . . . . . . . . . . . . . . . . . . . . . . . . . . . . . . . . . . . . . . . . .
OVERVIEW
You can use the Command Center to turn folders and printers into
shared folders and printers, so that other members of your household
can make use of them.
FOLDER SHARING
Folder sharing is a way to take a folder that has been saved on one PC
and allow other network users to view the folder on their PCs, open files
stored in the folder, and put files of their own in the folder.
Note: Shared folders are not to be confused with the Sereniti Shared
Drive (S: drive) that is made available on the Smart Home
Server. See Chapter 8 for a description of this drive.
PRINTER SHARING
Printer sharing is a way to take a printer that is connected to one PC and
allow other network users to print to it, so long as the PC is turned on
and connected to the network.
FOLDER AND PRINTER SHARING
Overview
112 | User Manual (v1.0.0.1)
9
Printer sharing is especially useful if you have more users than printers,
or if you have different kinds of printers – for example, a laser printer
and a photo quality inkjet printer – and want users to be able to print to
both.
Tip: Before sharing a printer, consider connecting it directly to the
Smart Home Server and making it a network printer. This allows
all users to print to it at any time. See Chapter 8 for instructions.
WORKGROUPS
For folder and printer sharing to work properly, all the PCs and the
Smart Home Server must be in the same Windows workgroup.
The Smart Homer Server is initially assigned to the workgroup
“WORKGROUP.” This is the same workgroup that all PCs running
Windows XP Professional are initially assigned to. However, PCs
running Windows XP Home Edition are assigned to the MSHOME
workgroup.
If you attempt to set up folder or printer sharing, and your PC belongs to
a different workgroup than the Smart Home Server, you will see the
message shown below:
You need to change one of the workgroups.
Change the Smart Home Server workgroup To change the Smart
Home Server’s workgroup:
1Click My Network and then click the Edit Smart Home Server
Settings icon. The Smart Home Server Settings page appears (see
Chapter 12, FIGURE 12-3).
2Type a new workgroup in the Windows Workgroup Name field.

FOLDER AND PRINTER SHARING
Folder Sharing
Sereniti Smart Home Networking Service | 113
3Click SUBMIT.
Change the PC’s workgroup To change a PC’s workgroup:
1Click Start on the Windows taskbar, right-click My Computer and
select Properties. The System Properties window appears.
2Click the Computer Name tab. The workgroup name is shown in the
middle of the window.
3To change the workgroup name, click Change, enter a new workgroup
in the Workgroup field, and click OK twice to save the new workgroup
and close the System Properties window.
4When instructed, restart your PC for the new workgroup to take effect.
. . . . . . . . . . . . . . . . . . . . . . . . . . . . . . . . . . . . . . . . . . .
FOLDER SHARING
To create a shared folder and, if necessary, unshare it, you must be using
the PC on which the folder is saved. To access a shared folder, you can
be using any PC that is logged into the network.
CREATE A SHARED FOLDER
To share a folder so that other users can access it from their PCs, follow
the steps below:
1Click Sharing and then click the Folder Sharing icon to display the
Folder Sharing page (FIGURE 9-1). This page shows each PC in your
network and the shared folders on each PC. For each shared folder, it
gives the share name and the full path to the folder.
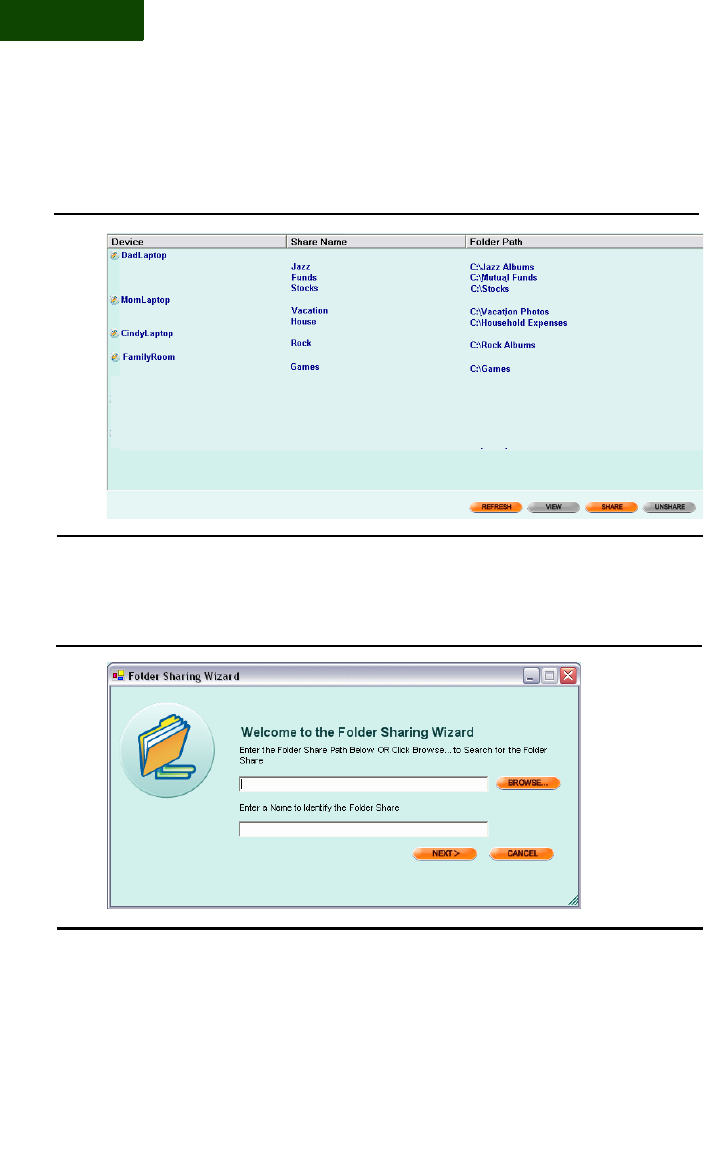
FOLDER AND PRINTER SHARING
Folder Sharing
114 | User Manual (v1.0.0.1)
9
2Click Share to launch the Folder Sharing Wizard (FIGURE 9-2).
3Type the complete path to the shared folder in the first field of the
opening Wizard screen, or click Browse, find the folder and select it.
FIGURE 9-1 Folder Sharing Page
FIGURE 9-2 Folder Sharing Wizard (1)
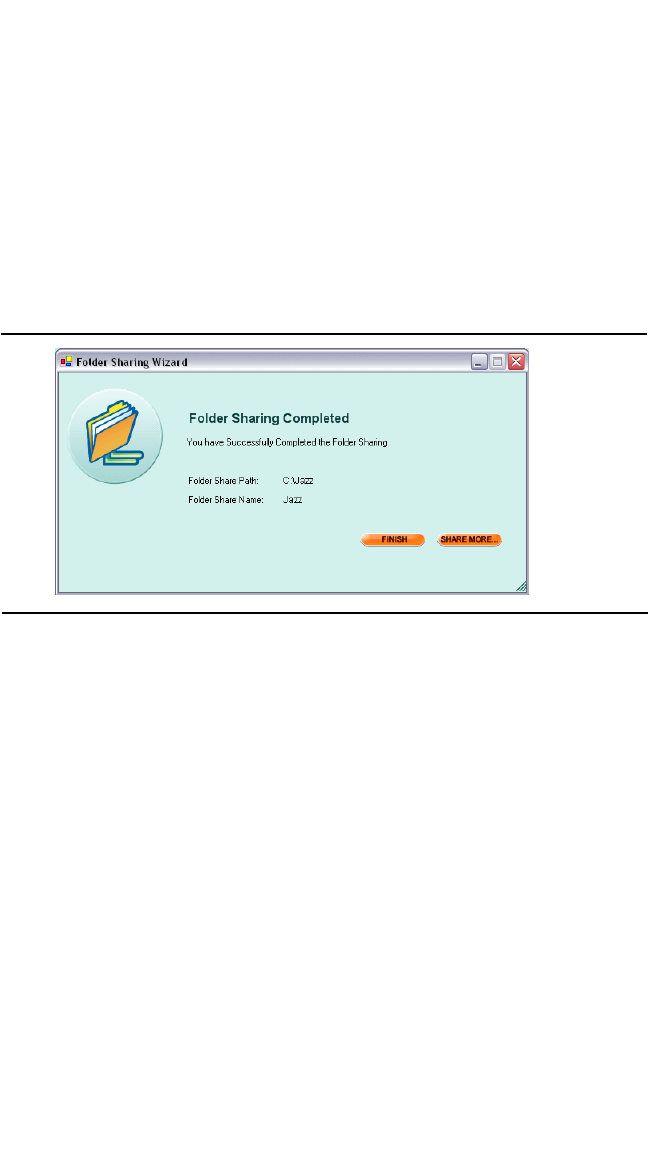
FOLDER AND PRINTER SHARING
Folder Sharing
Sereniti Smart Home Networking Service | 115
4The folder name is automatically copied into the second field. This is
the share name users will look for when accessing the folder. You can
leave it or replace it with another, more recognizable name.
5Click Next. The next page of the Wizard shows the path and share name
you just entered (FIGURE 9-3).
6If you want to share additional files, click SHARE MORE to return to
the first Wizard screen.
Otherwise, click Finish. You are returned to the Folder Sharing page.
The shared folder you just created is shown next to the PC on which it is
saved.
UNSHARE A FOLDER
If you no longer want to share a folder with other users, you can unshare
it. The folder still exists on the PC where it is saved, but it can no longer
be accessed by the other PCs in the network.
To unshare a folder, you must be using the PC on which the folder is
saved. Follow the steps below:
1Click Sharing and then click the Folder Sharing icon to display the
Folder Sharing page (FIGURE 9-1).
FIGURE 9-3 Folder Sharing Wizard (2)

FOLDER AND PRINTER SHARING
Folder Sharing
116 | User Manual (v1.0.0.1)
9
2Locate the PC on which the folder is saved, and click the folder to select
it.
3Click Unshare. A box pops up and tells you the folder is unshared.
4Click OK. The shared file no longer is shown on the Folder Sharing
page.
ACCESS A SHARED FOLDER FROM THE COMMAND
CENTER
Users running the Command Center can access a shared file without
leaving the Command Center. To do this, follow the steps below:
1Click Sharing and then click the Folder Sharing icon to display the
Folder Sharing page (FIGURE 9-1).
2Locate the PC on which the folder is saved and click the folder to select
it.
3Click VIEW. The Windows Explorer opens and shows the subfolders
and files in the shared folder.
ACCESS A SHARED FOLDER FROM A BROWSER
Users not running the Command Center can access a shared folder from
a browser. To do this, follow the steps below:
1Open the Internet Explorer or a compatible browser.
2In the Address field, enter
\\<computer_name>\<share_name>
where <computer_name> is the name of the PC on which the folder is
saved and <share_name> is the share name you gave this folder when
you made it a shared folder (see “Create a Shared Folder” above).
Tip: You can also access a shared folder from the Windows Explorer.
Go to My Network Places → Entire Network Microsoft →
Windows Network and look for the PC. Its shared folders
should be listed under it.

FOLDER AND PRINTER SHARING
Printer Sharing
Sereniti Smart Home Networking Service | 117
. . . . . . . . . . . . . . . . . . . . . . . . . . . . . . . . . . . . . . . . . . .
PRINTER SHARING
Sharing a printer with other users is a two step process. First, you have
to make the printer a shared printer. This can only be done from the PC
to which the printer is connected.
Then, you have to connect the other PCs that will be using the printer to
the printer. This has to be done from the various PCs. Once the
connection is made, users can print to the shared printer.
To print to a shared printer, you have to have the printer’s driver
installed on the PC you are using. The printer driver can be found on the
CD that comes with the printer or by downloading it from the printer
vendor’s web site.
Tip: An easy way to install a printer driver is to physically connect the
PC to the printer and follow the on-screen instructions.
CREATE A SHARED PRINTER
To create a shared printer, follow the steps below:
1Click Sharing and then click the Printer Sharing icon to display the
Printer Sharing page (FIGURE 9-4).It shows each PC in your network and
the shared folders on each PC. For each printer, it gives the share name
and the full path to the folder.
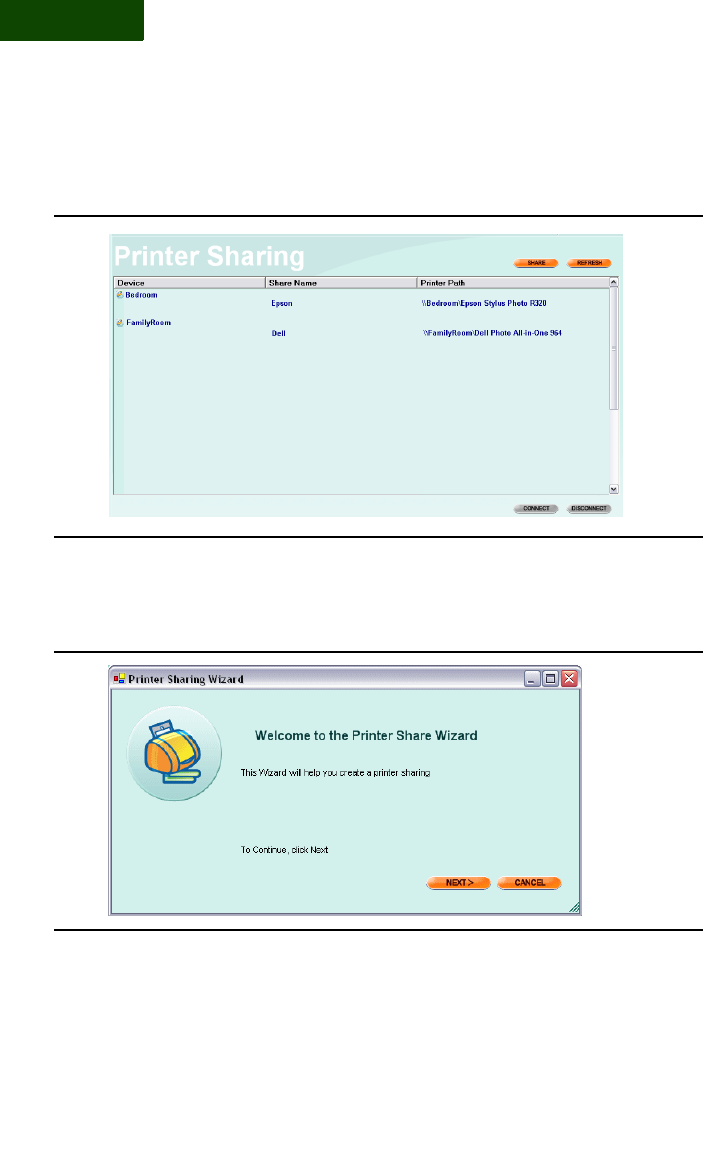
FOLDER AND PRINTER SHARING
Printer Sharing
118 | User Manual (v1.0.0.1)
9
2Click Share to launch the Printer Sharing Wizard (FIGURE 9-5).
FIGURE 9-4 Printer Sharing Page
FIGURE 9-5 Printer Sharing Wizard (1)
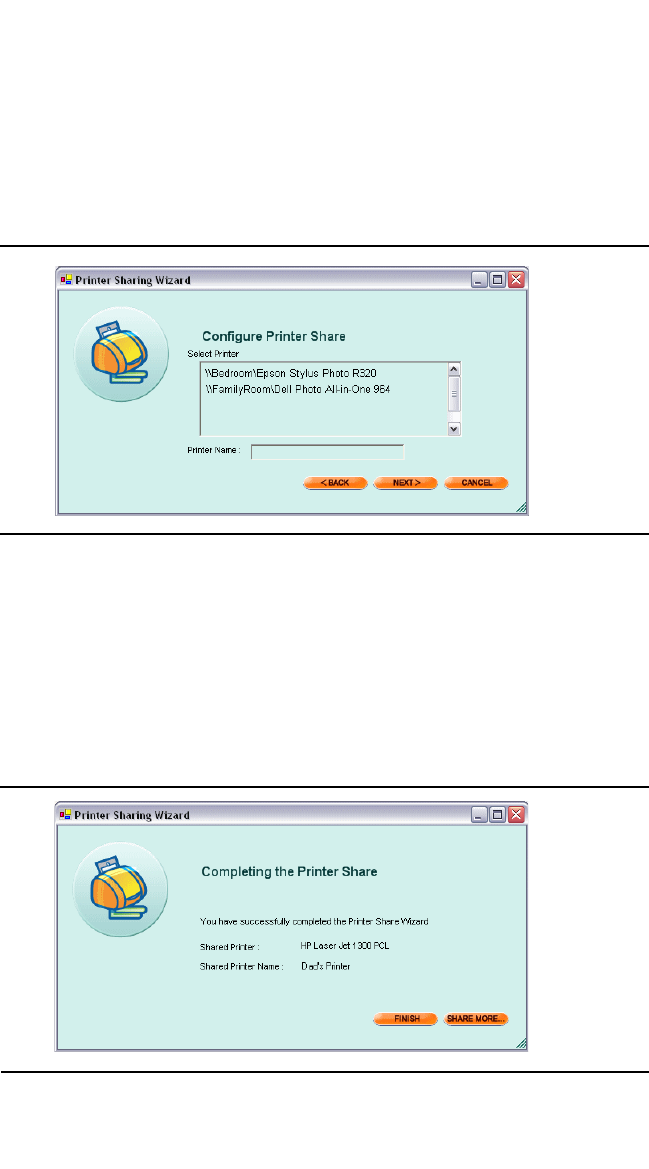
FOLDER AND PRINTER SHARING
Printer Sharing
Sereniti Smart Home Networking Service | 119
3The Wizard will help you create a shared printer. Click Next to display a
Wizard screen showing the printers available to share.
4Click a printer to select it. The name of the printer is copied to the
Printer Name field. This is the shared printer name users will look for
to print to it. You can leave it or replace it with another, more
recognizable name.
5Click Next. The next page of the Wizard shows the printer name and
share name you just entered (FIGURE 9-3).
FIGURE 9-6 Printer Sharing Wizard (2)
FIGURE 9-7 Printer Sharing Wizard (3)

FOLDER AND PRINTER SHARING
Printer Sharing
120 | User Manual (v1.0.0.1)
9
6If you want to share additional printers, click SHARE MORE to return
to the first Wizard screen.
Otherwise, click FINISH. You are returned to the Printer Sharing page.
The shared printer you just created is shown next to the PC to which it is
connected.
CONNECT A PC TO A SHARED PRINTER
To print to a shared printer, you first have to connect the user’s PC to the
printer. To do this, follow the steps below:
1Click Sharing and then click the Printer Sharing icon to display the
Printer Sharing page (FIGURE 9-4).
2Locate the PC to which the printer is connected, find the printer and
click the printer to select it.
3Click CONNECT. A message pops up when the connection is
established.
4Click OK to dismiss the message. You should now be able to print to the
printer.
DISCONNECT A PRINTER FROM A PC
If you no longer want to share a printer with other users, you can
disconnect it from their PCs. To do this, follow the steps below:
1Click Sharing and then click the Printer Sharing icon to display the
Printer Sharing page. It shows every shared printer in your network.
2Find the printer and click it to select it.
3Click DISCONNECT. This disconnects the PC from the printer.

Sereniti Smart Home Networking Service | 121
. . . . .
. . . . . . . . . . . . . . . . . . . . . .
P
ORT
F
ORWARDING
10
. . . . . . . . . . . . . . . . . . . . . . . . . . . . . . . . . . . . . . . . . . .
THIS CHAPTER
Explains how to:
• Enable Universal Plug and Play (UPnP)
• Select a system defined port forwarding rule
• Create a user defined port forwarding rule
• Delete a port forwarding rule
. . . . . . . . . . . . . . . . . . . . . . . . . . . . . . . . . . . . . . . . . . .
OVERVIEW
The Smart Home Server creates a firewall between your network and
the Internet. To protect your network, the firewall closes all ports on the
Server to incoming traffic. This does not affect your ability to access the
Internet, send and receive email, download files, etc., but it does prevent
intruders from penetrating your network from the outside.
PORTS
When a program running on one computer attempts to communicate
with a program running on another computer, it does so by connecting
to a port on that computer. A port is a logical connection point that
allows two computers to "talk" to each other.
Ports are identified by number. A computer has more than 65,000 ports,
but most common Internet applications use a very small subset of these
ports – specifically those numbered 0-1023. These are referred to as
"well known ports."

PORT FORWARDING
Enable Universal Plug and Play
122 | User Manual (v1.0.0.1)
10
Perhaps the most well known port is port 80, the default port for the
HTTP protocol (the basis for all Internet traffic). Whenever you visit a
web site, your browser is connecting to the web site through port 80.
PORT FORWARDING
Some programs and devices have to receive incoming traffic from the
Internet in order to work. Devices such as game consoles and VoIP
telephones, and programs such as instant messaging and remote access
applications, all need open ports to receive incoming traffic.
There are three ways to open ports for incoming traffic:
Enable Universal Plug and Play UPnP is a protocol that enables a
device to configure itself for the Internet and communicate with other
UPnP devices on the Internet. You should always enable UPnP on the
non-PC devices you connect to your network. If they support UPnP, they
will tell the firewall to open the necessary ports, and you will not have to
use a port forwarding rule.
Select a system defined rule In cases where UPnP is not supported,
you have to provide the firewall with a port forwarding rule telling it
which ports to open for a specific program or device.
The Command Center provides port forwarding rules for a number of
popular programs and devices. These are called system defined rules.
Check to see if one exists for the program or device you are using. If it
does, select it and the ports will be opened.
Create a user defined rule In situations where no system defined
rules exist, you have to create the rules. These are called user defined
rules. You should only attempt this if you are familiar with networking
and firewalls. If not, contact Sereniti technical support for assistance.
. . . . . . . . . . . . . . . . . . . . . . . . . . . . . . . . . . . . . . . . . . .
ENABLE UNIVERSAL PLUG AND PLAY
To turn on UPnP, follow the steps below:
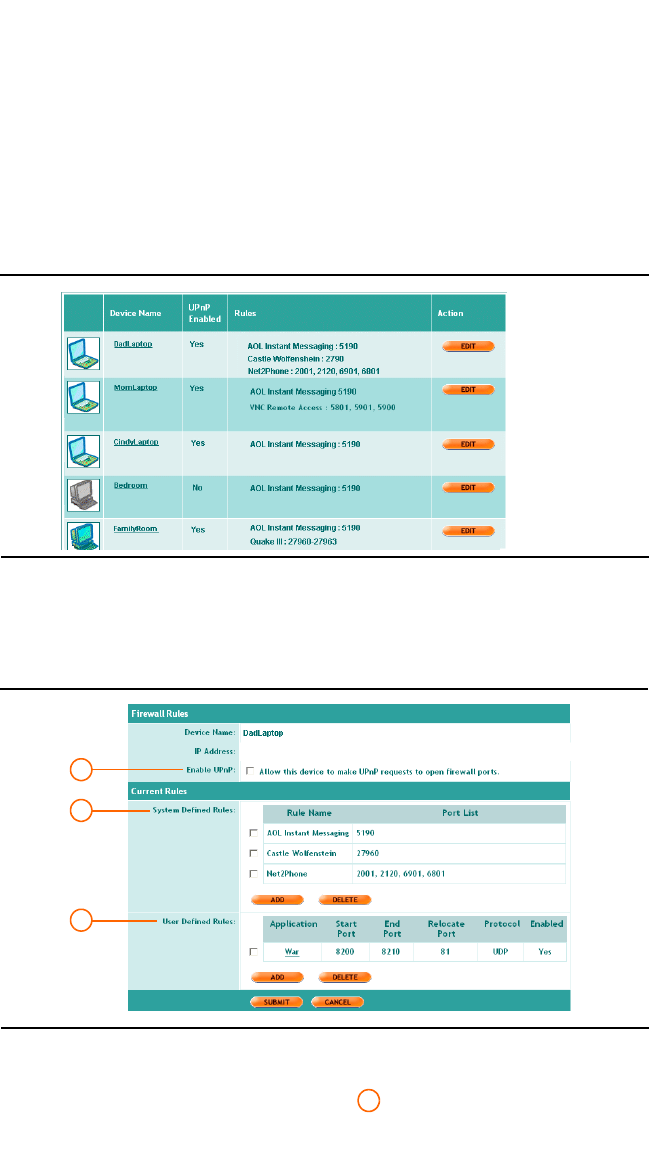
PORT FORWARDING
Enable Universal Plug and Play
Sereniti Smart Home Networking Service | 123
1Click Security and then click the Network Firewall Settings icon to
display the Manage Firewalls page (FIGURE 10-1). It shows each PC in
your network and the port forwarding rules in effect.
2Locate the device that needs the open ports and click EDIT to display
the Firewall Settings page (FIGURE 10-2).
3Click the Enable UPnP check box .
FIGURE 10-1 Manage Firewalls Page
FIGURE 10-2 Firewall Settings Page
1
2
3
1
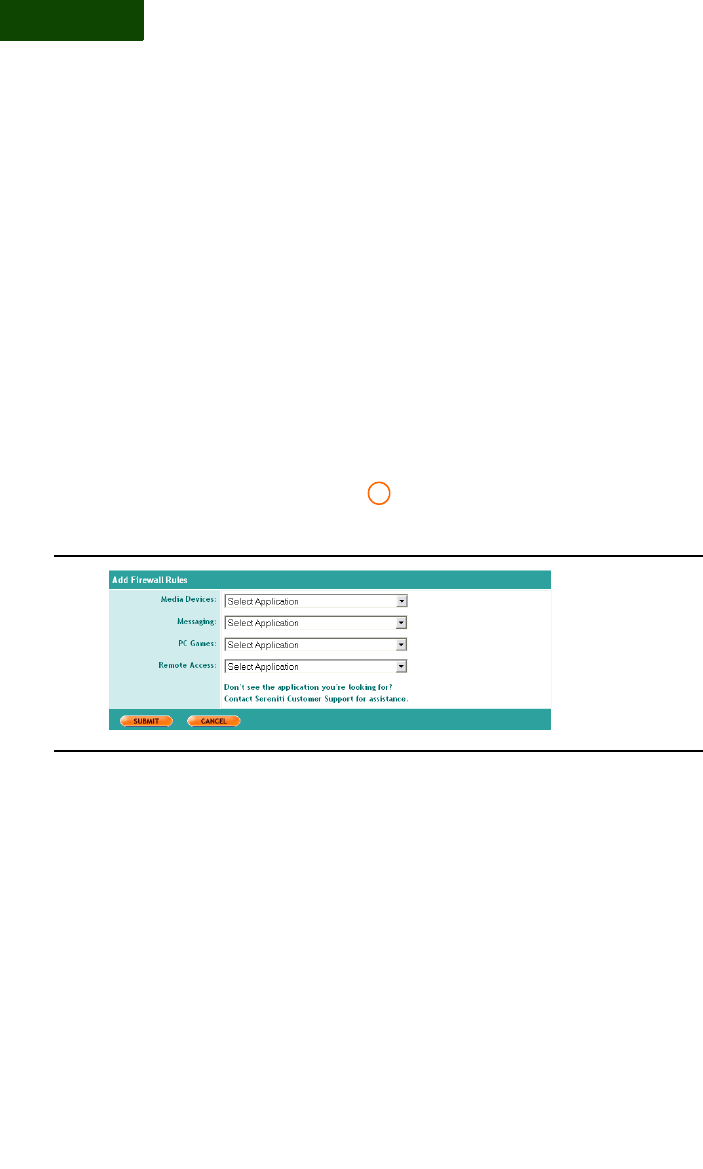
PORT FORWARDING
Select a System Defined Rule
124 | User Manual (v1.0.0.1)
10
4Click SUBMIT. You are returned to the Manage Firewalls page.
. . . . . . . . . . . . . . . . . . . . . . . . . . . . . . . . . . . . . . . . . . .
SELECT A SYSTEM DEFINED RULE
To select a system defined port forwarding rule, follow the steps below:
1Click Security and then click the Network Firewall Settings icon to
display the Manage Firewalls page (FIGURE 10-1).
2Locate the device that needs the open ports and click EDIT to display
the Firewall Settings page (FIGURE 10-2).
3Go to System Defined Rules and click ADD. The Add Firewall
Rules page displays (FIGURE 10-3).
This page contains four drop-down lists of rules for these types of
programs and devices:
• Media devices
• Messaging applications
• PC games
• Remote access programs
4Go to the appropriate drop-down list and select a rule. You can select
rules in more than one drop-down list.
2
FIGURE 10-3 Add Firewall Rules Page
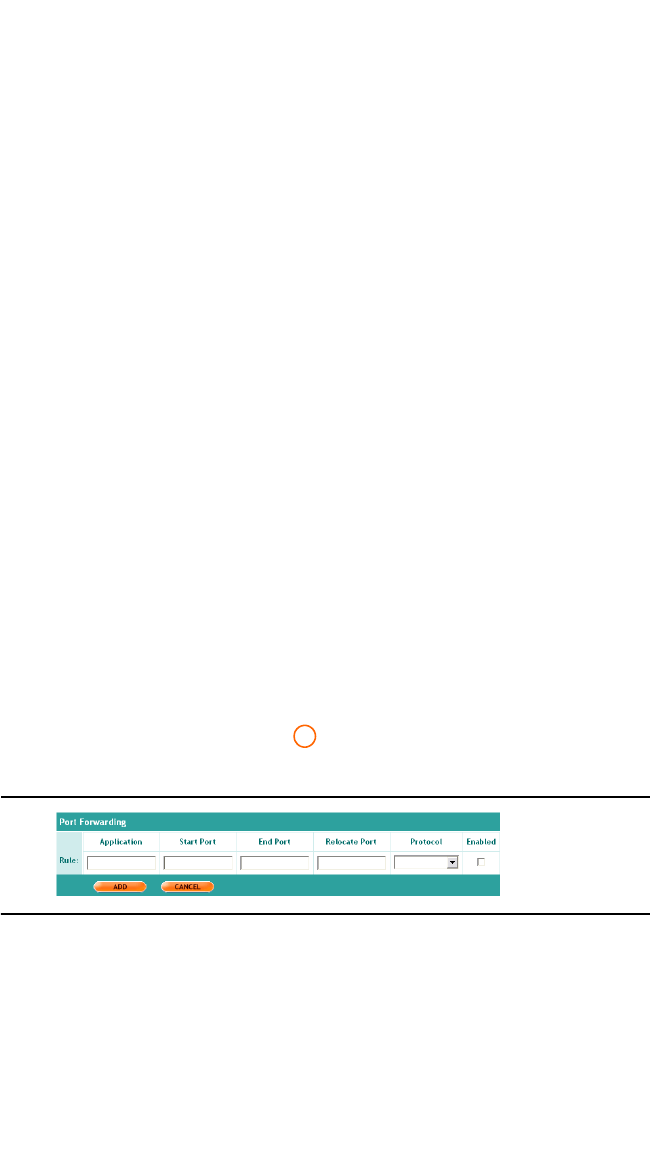
PORT FORWARDING
Create a User Defined Rule
Sereniti Smart Home Networking Service | 125
Note: To select two or more rules in the same list, select them one at a
time. Select one rule and click SUBMIT. Return to this page and
repeat as often as necessary.
5Click SUBMIT. You are returned to the Firewall Settings page. The rule
you selected is displayed, along with the numbers of the ports that have
been opened.
. . . . . . . . . . . . . . . . . . . . . . . . . . . . . . . . . . . . . . . . . . .
CREATE A USER DEFINED RULE
Do not attempt this unless you are familiar with networking and
firewalls. If you need help, contact Sereniti technical support for
assistance.
To create a user defined port forwarding rule, follow the steps below:
1Click Security and then click the Network Firewall Settings icon to
display the Manage Firewalls page (FIGURE 10-1).
2Locate the device that needs the open ports and click EDIT to display
the Firewall Settings page (FIGURE 10-2).
3Go to User Defined Rules and click ADD. The Port Forwarding
Rules page displays (FIGURE 10-4).
4In the Application field, type a name to help you identify the program
or device in need of open ports.
5In the Start Port and End Port fields, type the numbers of the ports to
be opened. If you only need to open one port, enter the number in both
fields.
3
FIGURE 10-4 Port Forwarding Rules Page

PORT FORWARDING
Delete a rule
126 | User Manual (v1.0.0.1)
10
Note: Refer to the documentation that comes with the program or
device, or contact their support personnel, to determine which
ports have to be opened.
6In the Relocate Port field, type a number only if you want to redirect
incoming traffic to a different port on a PC. This field is optional and is
rarely used in home networks.
Note: If this rule is opening a single port, all traffic on that port will be
redirected to the relocate port. If this rule is opening a range of
ports, traffic on the first port in the range will be redirected to the
relocate port. Traffic on other ports in the range will be redi-
rected to the following sequence of ports. For example, if you
enter a port range of 80 – 85 and a relocate port of 90, incoming
traffic on ports 80-85 will be redirected to ports 90-95.
7In the Protocol field, select either TCP or UDP from the drop-down
list.
Note: TCP (Transmission Control Protocol) and UDP (User Datagram
Protocol) are protocols for exchanging data on the Internet. Refer
to the documentation that comes with the program or device, or
contact their support personnel, to determine which protocol is
used.
8In the Enabled field, click the check box if you want the rule to take
effect immediately. If not, leave the box unchecked and return to it when
you need to activate the rule.
9Click ADD to save the rule. You are returned to the Firewall Settings
page. The rule you created is displayed.
. . . . . . . . . . . . . . . . . . . . . . . . . . . . . . . . . . . . . . . . . . .
DELETE A RULE
You should delete any rules you no longer need. You can delete both
system and user defined rules. If you delete a system defined rule and

PORT FORWARDING
Delete a rule
Sereniti Smart Home Networking Service | 127
discover you subsequently need it, you can select it again. If you delete a
user defined rule you later need, you have to re-create it.
To delete a port forwarding rule, follow the steps below:
1Click Security and then click the Network Firewall Settings icon to
display the Manage Firewalls page (FIGURE 10-1).
2Locate the device for which the rule was written and click EDIT to
display the Firewall Settings page (FIGURE 10-2).
3Locate the rules you want to delete and click the check boxes to their
left. You can select either system defined rules or user defined rules (but
not both at the same time).
4Click DELETE. The rules are removed from the Firewall Settings page.

PORT FORWARDING
Delete a rule
128 | User Manual (v1.0.0.1)
10

Sereniti Smart Home Networking Service | 129
M
ONITORING
. . . . .
. . . . . . . . . . . . . . . . . . . . . .
N
ETWORK
S
ECURITY
11
. . . . . . . . . . . . . . . . . . . . . . . . . . . . . . . . . . . . . . . . . . .
THIS CHAPTER
Explains how to:
• Identify and evaluate the severity of any problems with the
security programs running on any of your network PCs
• Take action to resolve the problems
• Use the To Do List to identify and resolve problems
. . . . . . . . . . . . . . . . . . . . . . . . . . . . . . . . . . . . . . . . . . .
OVERVIEW
Your home network is a valuable and highly personal resource. It repre-
sents a sizable investment on your part in terms of money and time.
Depending on how you use it and what information you store on it, it
can reveal as much about your family's life and habits as your wallet, tax
returns or intimate correspondence.
For these reasons and more, you need to install these three types of
security programs on each PC in your network:
•Personal firewall program Prevents hackers, intruders and
other unwelcome visitors from gaining access to the PC
•Antivirus program Prevents viruses, worms, Trojan horses
and other malicious software from infecting the PC
•Antispyware program Prevents spyware in all its forms
from gathering and distributing personal information about
you, your family and your Internet browsing habits
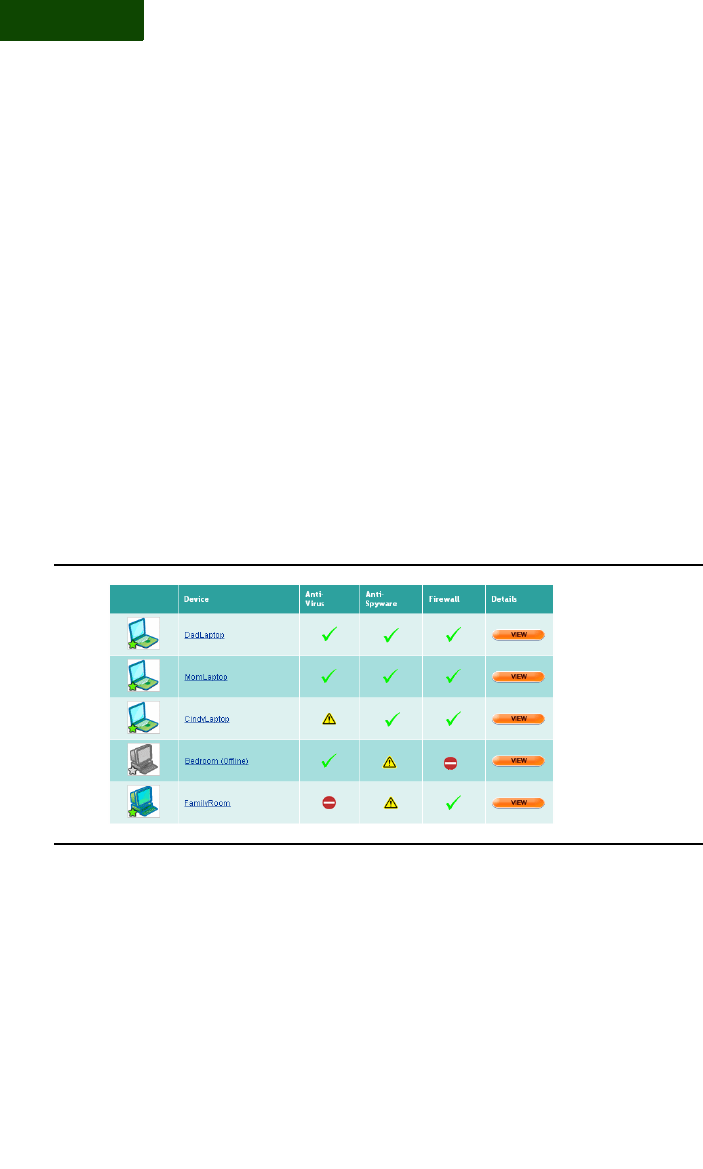
MONITORING NETWORK SECURITY
Check the Security Summary Page
130 | User Manual (v1.0.0.1)
11
The Serenity Security Suite, which is provided free of charge with the
Smart Home Networking Service, contains these three programs, as well
as a pop-up blocker. To install any of the programs in the suite, click
Security and then click the Install Security Suite icon.
CHECK THE SECURITY SUMMARY
. . . . . . . . . . . . . . . . . . . . . . . . . . . . . . . . . . . . . . . . . . .
PAGE
The Security Summary page lists each PC in your network and shows
the status of the three security programs running on each PC.
To display the page, click Security and then click the Security Sum-
mary icon (FIGURE 11-1).
FIGURE 11-1 Security Summary Page

MONITORING NETWORK SECURITY
Understanding the Security Summary Page
Sereniti Smart Home Networking Service | 131
UNDERSTANDING THE SECURITY
. . . . . . . . . . . . . . . . . . . . . . . . . . . . . . . . . . . . . . . . . . .
SUMMARY PAGE
For each security program, the Security Summary page tells you if there
are any problems. If there are, it indicates the seriousness of the prob-
lem, using the icons shown below:
You should see a green check next to each program, indicating the
program is installed, enabled and up to date. Anything other than a green
check indicates a problem. The degree of seriousness should dictate how
quickly you react.
No problems. No action is required on your part.
Minor problem. For example, new definitions are available for
the antispyware program on a PC, or an antispyware scan has
not been performed in the last seven days. Immediate action is
not required.
More serious problem. For example, new definitions are
available for the antivirus program on a PC, or an antivirus scan
has not been performed in the last seven days. You need to act
soon to prevent additional, more serious problems.
Critical problem. For example, an antivirus program is not
installed or enabled on a PC. The security of the PC is in
danger. You need to act immediately.
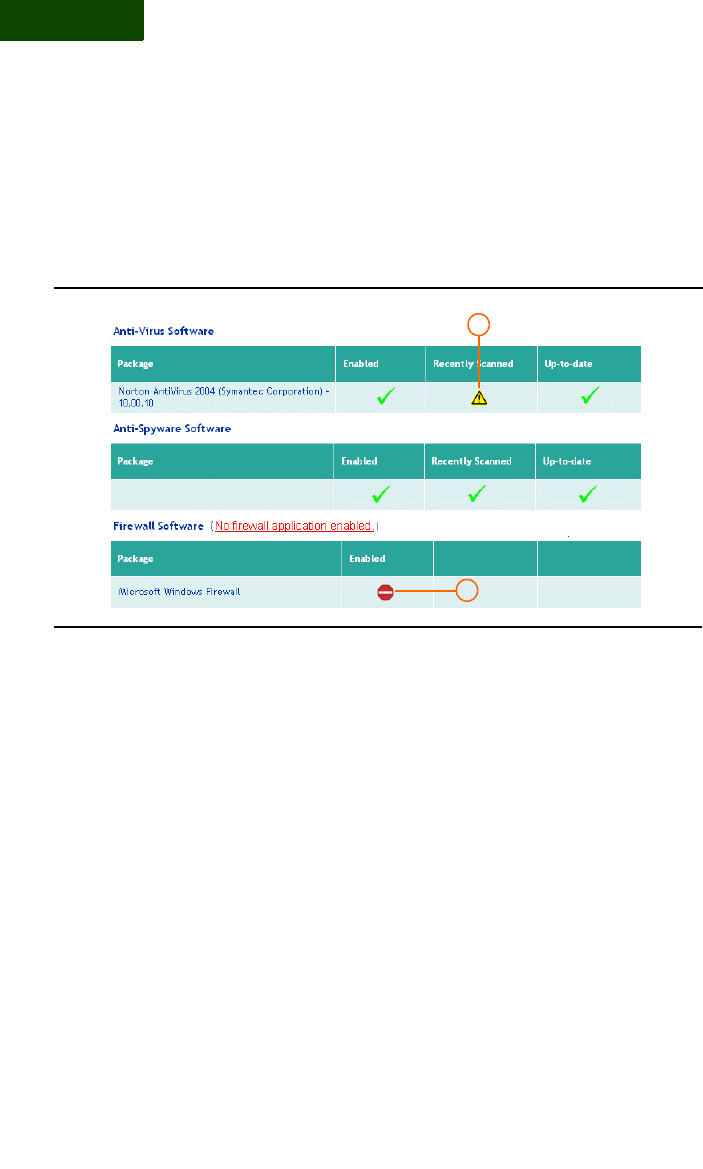
MONITORING NETWORK SECURITY
Resolving a Problem
132 | User Manual (v1.0.0.1)
11
. . . . . . . . . . . . . . . . . . . . . . . . . . . . . . . . . . . . . . . . . . .
RESOLVING A PROBLEM
If any PC has a security problem, click VIEW to display the Device
Security page (FIGURE 11-2).
Tip: You can display the Device Security page for the PC you are
currently using by clicking Security and then clicking the My
PC icon, or directly from the Dashboard by clicking Security.
WHAT THE PAGE SHOWS
The Device Security page provides a closer look at the three security
programs. For the antivirus and antispyware programs, it shows:
• The current status of the program (enabled or disabled)
• The date and time the last scan was performed
• The update status of the program (are there new antivirus or
antispyware definitions that need to be downloaded and
installed?)
For the firewall program, this page indicates whether or not the firewall
is currently enabled.
FIGURE 11-2 Device Security Page
1
2

MONITORING NETWORK SECURITY
Using the To Do List
Sereniti Smart Home Networking Service | 133
HOW TO RESOLVE A PROBLEM
In the example in FIGURE 11-2, the PC shown has two problems:
No antivirus scan has been performed recently
and
The personal firewall program is currently disabled.
To resolve either problem click the appropriate icon. The system will
either resolve the problem for you, or provide information explaining
how to resolve it.
. . . . . . . . . . . . . . . . . . . . . . . . . . . . . . . . . . . . . . . . . . .
USING THE TO DO LIST
Security problems also cause alerts to be issued and placed in the To Do
List. First, an Alert Box pops up near the tray icon and warns you of the
problem.
Then, if you open the To Do List, you will see a related alert. For exam-
ple, if the antivirus program on one of your network PC is out of date,
you will see this alert:
Download and install new anti-virus definitions from
your vendor's website
Similarly, if no antispyware program were installed, this message would
appear:
Install an anti-spyware program
To resolve the problem, open the Security Summary page and follow the
procedure described in “Resolving a Problem” above.
For additional details about the To Do List, see Chapter 2.
1
2

MONITORING NETWORK SECURITY
Using the To Do List
134 | User Manual (v1.0.0.1)
11

Sereniti Smart Home Networking Service | 135
M
ANAGING
THE
S
MART
. . . . .
. . . . . . . . . . . . . . . . . . . . . .
H
OME
S
ERVER
12
. . . . . . . . . . . . . . . . . . . . . . . . . . . . . . . . . . . . . . . . . . .
THIS CHAPTER
Explains how to:
• Check the Smart Home Server’s wired and wireless settings
• Change the wireless channel
• Monitor hard disk usage on the Smart Home Server
• Change the Smart Home Server’s time zone and workgroup
• Manage external storage drives
• Rename network printers
. . . . . . . . . . . . . . . . . . . . . . . . . . . . . . . . . . . . . . . . . . .
OVERVIEW
The Smart Home Server was installed and configured for wired and
wireless operation when you set up the Sereniti Home Networking
Service (see the Installation Manual for details).
. . . . . . . . . . . . . . . . . . . . . . . . . . . . . . . . . . . . . . . . . . .
CHECK THE WIRED SETTINGS
To display a page showing the device name, software version and wired
settings of the Smart Home Server, click My Network and then click
the View Smart Home Server Status icon to display the Smart Home
Server Status page (FIGURE 12-1).
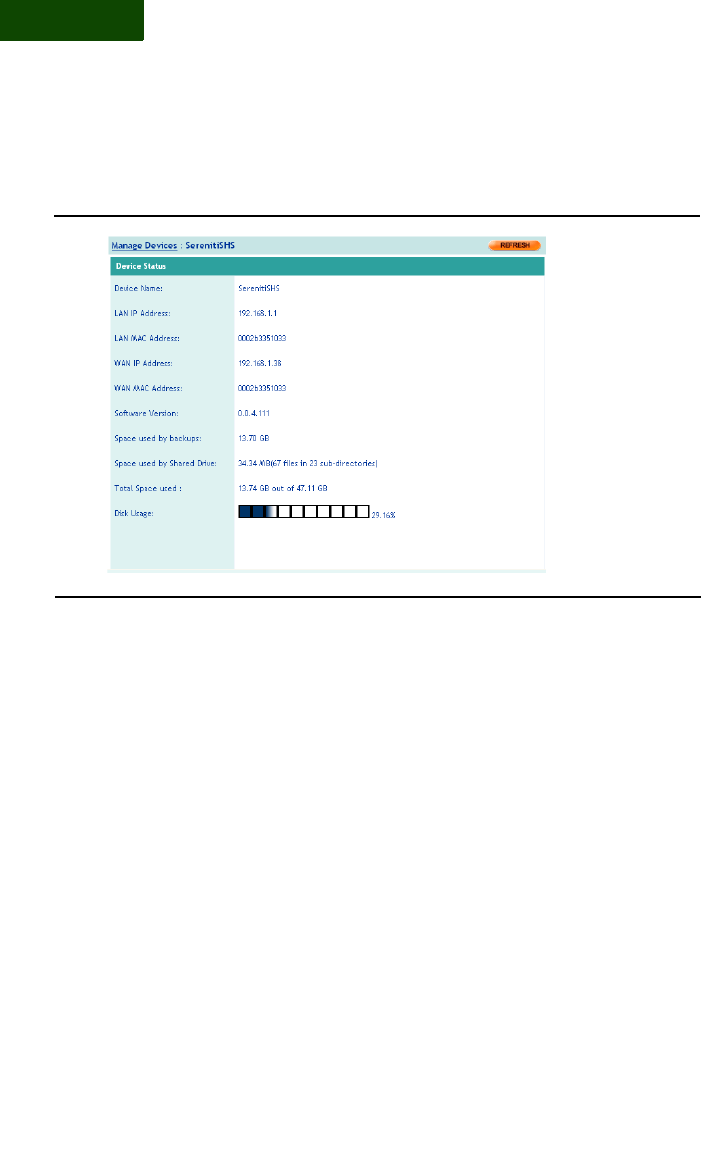
MANAGING THE SMART HOME SERVER
Check the Wired Settings
136 | User Manual (v1.0.0.1)
12
This page shows the Smart Home Server’s name (SerenitiSHS) and the
version of the software running on the Smart Home Server. It also shows
its two IP and MAC addresses. The reason the Smart Home Server has
two such addresses is because it connects to both the Internet and your
home network.
WAN IP AND MAC ADDRESSES
The IP and MAC addresses of the Internet connection are referred to as
the WAN (Wide Area Network) addresses. The Ethernet port on the
back of the Smart Home Server labeled WA N is the port that connects
the Smart Home Server to the Internet via your broadband modem.
The WAN IP address is assigned by your Internet service provider. The
MAC address is burned into the WAN port’s network interface card
(NIC).
FIGURE 12-1 Smart Home Server Status Page

MANAGING THE SMART HOME SERVER
Check the Wireless Settings
Sereniti Smart Home Networking Service | 137
LAN IP AND MAC ADDRESSES
The IP and MAC addresses of the home network connection are referred
to as the LAN (Local Area Network) addresses. The Ethernet ports on
the back of the Smart Home Server labeled 1 - 4 are the LAN ports.
These are the ports that connect PCs and other devices to the Smart
Home Server. These ports have a single IP and MAC address. The IP
address is set to 192.168.50.1.
The Smart Home Server automatically assigns all devices that connect
to the network an IP address. The IP addresses will be on the same
subnet as the LAN IP address. The first device that connects will be
given the IP address 192.168.50.10, the second 192.168.50.11, and so
on.
. . . . . . . . . . . . . . . . . . . . . . . . . . . . . . . . . . . . . . . . . . .
CHECK THE WIRELESS SETTINGS
The Smart Home Server is equipped with a radio transmitter that
enables wireless PCs and other devices to connect to your network
without using an Ethernet cable.
To display a page showing the wireless settings and the wireless devices
currently connected to your network, click My Network and then click
the Wireless Settings icon to display the Wireless Settings page
(FIGURE 12-2).
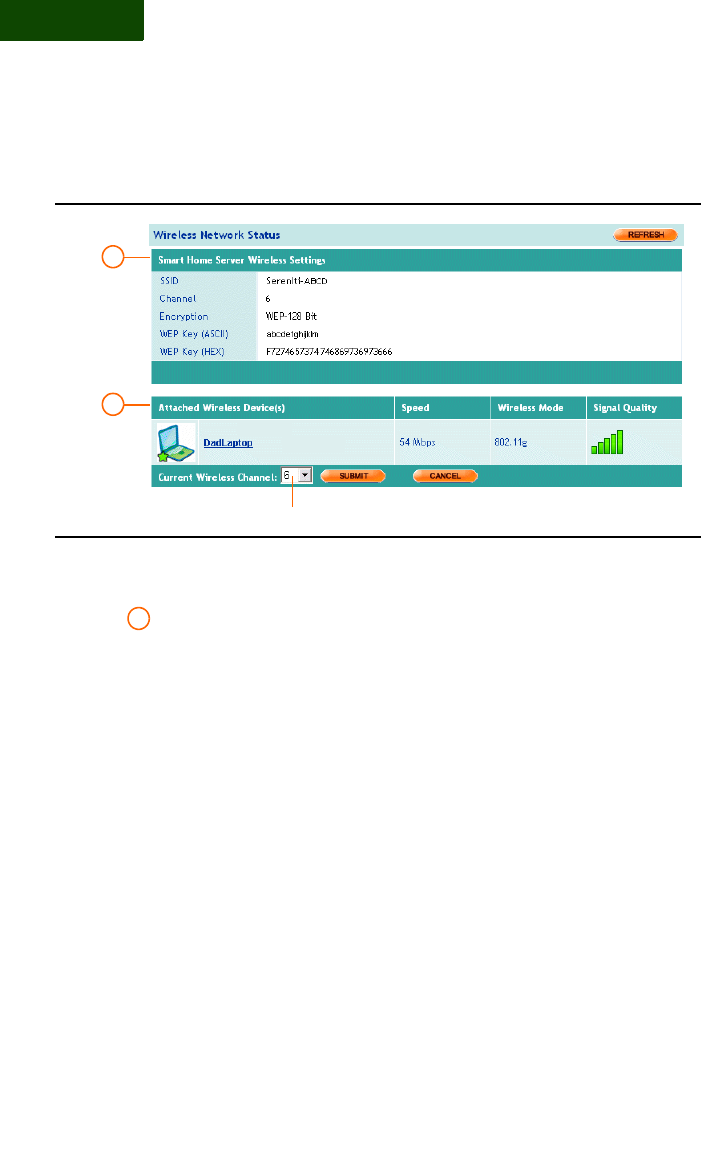
MANAGING THE SMART HOME SERVER
Check the Wireless Settings
138 | User Manual (v1.0.0.1)
12
WIRELESS SETTINGS
The Wireless Settings page shows the following settings:
SSID Your network's Service Set Identifier. The SSID is a string of
characters that identifies your network. Wireless devices use this
identifier to connect to your network.
Channel The channel the radio transmitter is using to broadcast its
wireless signal. By default, the Smart Home Server broadcasts on
channel 6. You can change the channel by selecting a different one in the
Current Wireless Channel field (see FIGURE 12-2) and clicking
SUBMIT.
Encryption The encryption strength. The Smart Home Server
provides 128-bit encryption, which is the most difficult to break.
WEP Key (ASCII) The ASCII version of the WEP key. When you
installed the Smart Home Server, you were asked to enter a WEP key.
Wireless devices attempting to connect to your network must know this
key to connect. When setting up wireless devices, you will have to enter
this key. Most devices accept the 13 character ASCII version of the key.
FIGURE 12-2 Wireless Settings Page
Change channel
1
2
1

MANAGING THE SMART HOME SERVER
Change the Wireless Channel
Sereniti Smart Home Networking Service | 139
WEP Key (HEX) The hexadecimal version of the WEP key. Some
older wireless devices can only accept the hexadecimal version of the
WEP key. If you are configuring such a device, enter the hexadecimal
value shown.
ATTACHED WIRELESS DEVICES
The Wireless Settings page also shows each wireless device currently
connected to your network. For each device, it shows:
Connection speed 54 Mbps is the maximum wireless connection
speed. Your actual speed may be less.
Wireless mode WiFi version. It can be 802.11 a/b or g. Most new
devices are 802.11g.
Signal strength The quality of the signal. It is expressed graphically,
as shown below.
. . . . . . . . . . . . . . . . . . . . . . . . . . . . . . . . . . . . . . . . . . .
CHANGE THE WIRELESS CHANNEL
The Smart Home Server is designed to broadcast on channel 6. If you
are experiencing weak signals – possibly because nearby networks are
2
= No signal
= Poor signal
= Weak signal
= Good signal
= Excellent signal
= Strongest signal

MANAGING THE SMART HOME SERVER
Monitor Disk Usage
140 | User Manual (v1.0.0.1)
12
also broadcasting on channel 6 – you may want to consider changing
channels to see if this helps.
To change the channel the Smart Home Server is broadcasting on,
follow the steps below:
1Click My Network and then click the Wireless Settings icon to display
the Wireless Settings page (FIGURE 12-2).
2Go to the Current Wireless Channel field and select a new channel
from the drop-down list.
3Click SUBMIT.
. . . . . . . . . . . . . . . . . . . . . . . . . . . . . . . . . . . . . . . . . . .
MONITOR DISK USAGE
The hard disk on the Smart Home Server is used for two purposes:
• To store backups of all the PCs in your network running the
Command Center
• To provide space for the Sereniti Shared Drive (S: drive),
which network users can access and use to store and exchange
files (see Chapter 8 for additional details).
To monitor hard disk usage, click My Network and then click the View
Smart Home Server Status icon to display the Smart Home Server
Status page (FIGURE 12-1). This page shows:
• Status of the drive (formatted or not formatted)
• Total capacity of the drive
• Amount of space currently in use
• Amount of space currently available
• Percentage of disk space in use
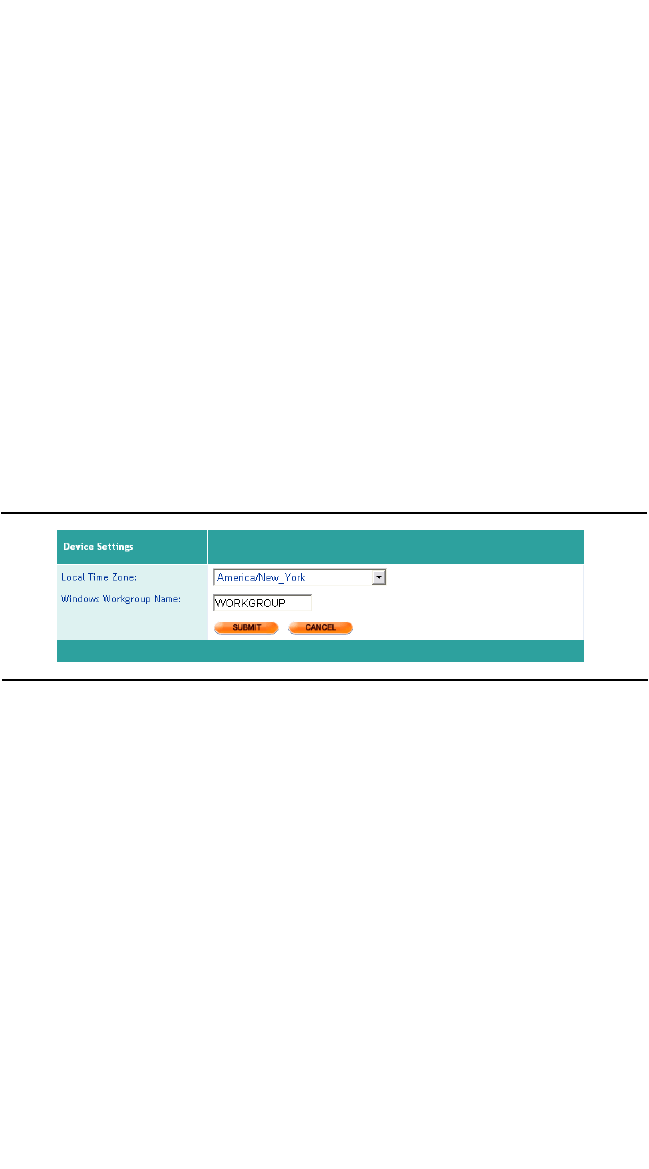
MANAGING THE SMART HOME SERVER
Change the Time Zone and Workgroup
Sereniti Smart Home Networking Service | 141
CHANGE THE TIME ZONE AND
. . . . . . . . . . . . . . . . . . . . . . . . . . . . . . . . . . . . . . . . . . .
WORKGROUP
When the Smart Home Server was initially set up, its internal clock
detected the time zone and it was assigned to the workgroup called
“WORKGROUP.”
CHANGE THE TIME ZONE
To change the Smart Home Server’s time zone, follow the steps below:
1Click My Network and then click the Edit Smart Home Server
Settings icon to display the Smart Home Server Settings page (FIGURE
12-3).
2Select a new time zone from the drop-down list in the Local Time Zone
field.
3Click SUBMIT.
CHANGE THE WORKGROUP
Be careful when changing the Windows workgroup. For folder sharing
to work, all PCs sharing folders must be in the same workgroup, along
with the Smart Home Server.
To change the Smart Home Server’s workgroup, follow the steps below:
1Click My Network and then click the Edit Smart Home Server
Settings icon to display the Smart Home Server Settings page (FIGURE
12-3).
2Type a new workgroup in the Windows Workgroup Name field.
FIGURE 12-3 Smart Home Server Settings Page
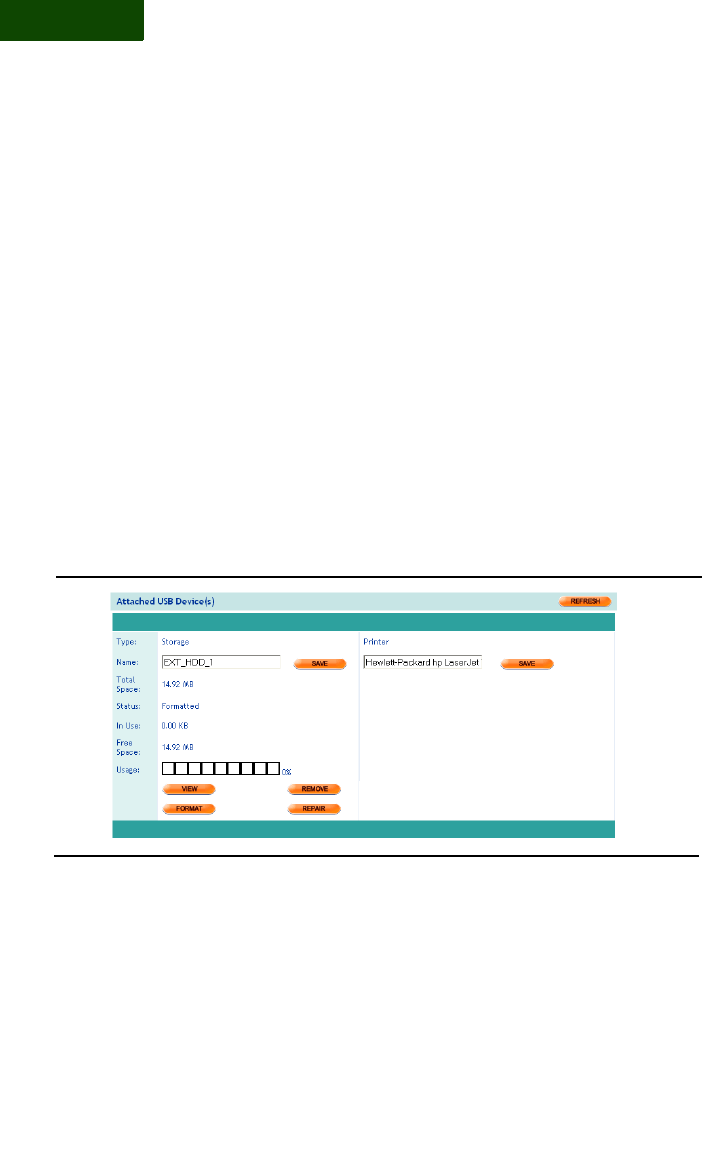
MANAGING THE SMART HOME SERVER
Manage an External Storage Device
142 | User Manual (v1.0.0.1)
12
3Click SUBMIT.
MANAGE AN EXTERNAL STORAGE
. . . . . . . . . . . . . . . . . . . . . . . . . . . . . . . . . . . . . . . . . . .
DEVICE
You can connect up to two external storage devices (hard drives, flash
drives, etc.) to the USB ports on the back of the Smart Home Server.
Once they are connected, all network users can access them.
The external drives can be viewed and managed from the Attached USB
Devices page. To do this, follow the steps below:
1Click Sharing and then click the Setup External Hard Drive icon to
display the Attached USB Devices page (FIGURE 12-4).
2For each external drive, it shows:
• Status of the drive (formatted or not formatted)
• Total capacity of the drive
• Amount of space currently in use
• Amount of space currently available
• Percentage of disk space in use
FIGURE 12-4 Attached USB Devices Page

MANAGING THE SMART HOME SERVER
Rename Network Printers
Sereniti Smart Home Networking Service | 143
3The hard drives are initially named “EXT_HDD_1” and
“EXT_HDD_2.” To change either name, type a new name in the Name
field and click SAVE.
4To view the contents of a drive, click VIEW. The files and folders stored
on the drive are displayed in the Windows Explorer.
5To fix a drive with formatting problems, click REPAIR. This attempts
to repair the problem without causing data loss.
6If the drive cannot be repaired, you may have to reformat it. Do this only
as a last resort because it erases all files and folders stored on the drive.
To reformat a drive, click FORMAT.
7To disconnect a drive, first remove it from the Command Center’s
records to avoid damage or data loss. Click REMOVE, and then when
the Command Center indicates the drive has been removed, disconnect
it.
. . . . . . . . . . . . . . . . . . . . . . . . . . . . . . . . . . . . . . . . . . .
RENAME NETWORK PRINTERS
You can connect up to two printers to the USB ports on the back of the
Smart Home Server. These become network printers. Once they are
connected, all network users can print to them.
The Smart Home Server has the ability to detect the printer’s vendor and
model and use this as the printer name. To change the printer name to
something more recognizable (for example, “upstairs” or “photos”),
follow the steps below:
1Click Sharing and then click the Setup Network Printer icon to
display the Attached USB Drive page (FIGURE 12-4).
2Type a new name for the printer in Printer field.
3Click SAVE.

MANAGING THE SMART HOME SERVER
Rename Network Printers
144 | User Manual (v1.0.0.1)
12

Sereniti Smart Home Networking Service | 145
. . . . .
. . . . . . . . . . . . . . . . . . . . . .
M
ANAGING
Y
OUR
PC
13
. . . . . . . . . . . . . . . . . . . . . . . . . . . . . . . . . . . . . . . . . . .
THIS CHAPTER
Explains how to:
• Display an inventory of a PC’s hardware and software
resources
• Defragment a PC’s hard drive
• Resolve connectivity problems
. . . . . . . . . . . . . . . . . . . . . . . . . . . . . . . . . . . . . . . . . . .
OVERVIEW
The Command Center provides a number of tools to help Smart Home
Network users manage their own PCs and diagnose and resolve
problems. These tools are available from the My PC option in the Main
Menu.
. . . . . . . . . . . . . . . . . . . . . . . . . . . . . . . . . . . . . . . . . . .
VIEW A PC INVENTORY
A PC inventory is a window that shows all of a PC’s software resources,
hardware components and security programs. To launch this window,
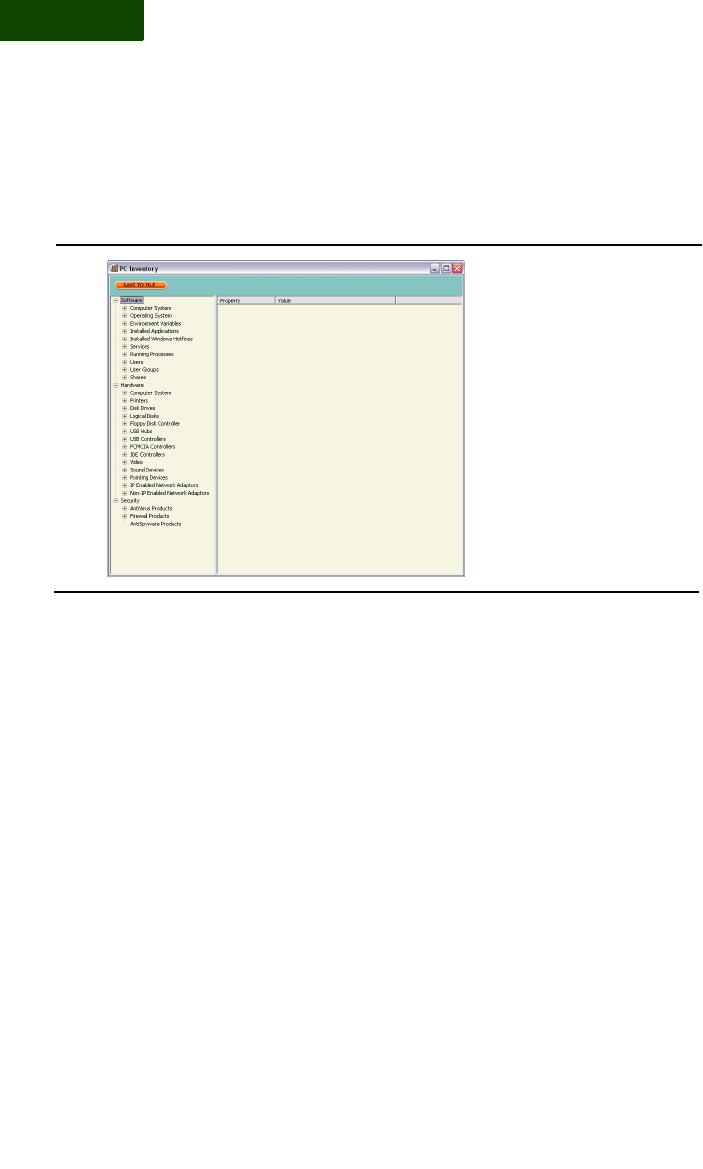
MANAGING YOUR PC
Defragment the Hard Drive
146 | User Manual (v1.0.0.1)
13
click My PC and click the View Detailed PC Inventory icon. FIGURE
13-1 shows a typical PC Inventory.
To save the inventory in a file, click Save to File. It is saved as an xml
file
PCInv.xml
in the directory
c:\Documents and Settings\<user name>\Application
Data\Sereniti\Smart Client\Data
. . . . . . . . . . . . . . . . . . . . . . . . . . . . . . . . . . . . . . . . . . .
DEFRAGMENT THE HARD DRIVE
Files are not always stored in one place on a PC's hard disk. If necessary,
they are divided into pieces and stored on separate segments of the disk.
If the files on the disk become too fragmented, the PC may slow down.
FIGURE 13-1 PC Inventory
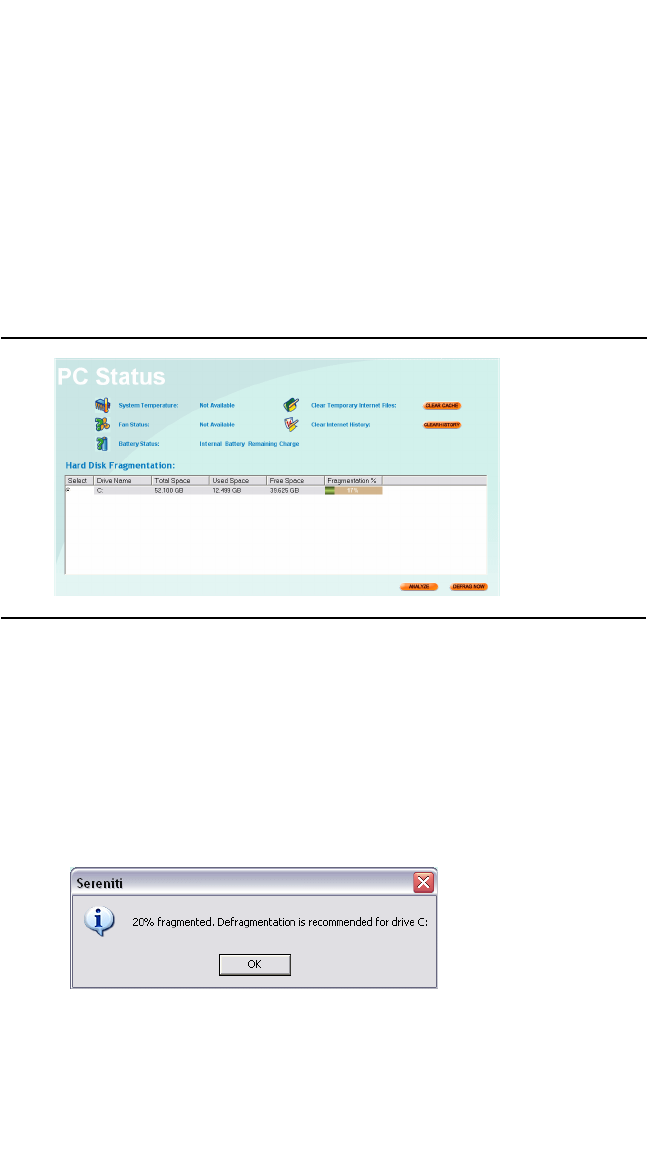
MANAGING YOUR PC
Defragment the Hard Drive
Sereniti Smart Home Networking Service | 147
To avoid this, you should periodically analyze the storage patterns on
the disk and, if necessary, perform a defragmentation. This can be done
directly from the Command Center. Follow the steps below:
1Click My PC and then click the Manage PC Hardware icon to display
the PC Status page.
Tip: You can also get to the PC Status page directly from the
Dashboard by clicking the Hardware icon.
2Click ANALYZE to determine whether the disk needs to be defrag-
mented now. A message like the one below will pop up and show the
percentage of fragmentation and indicate whether you should perform a
defragmentation now.
FIGURE 13-2 PC Status Page
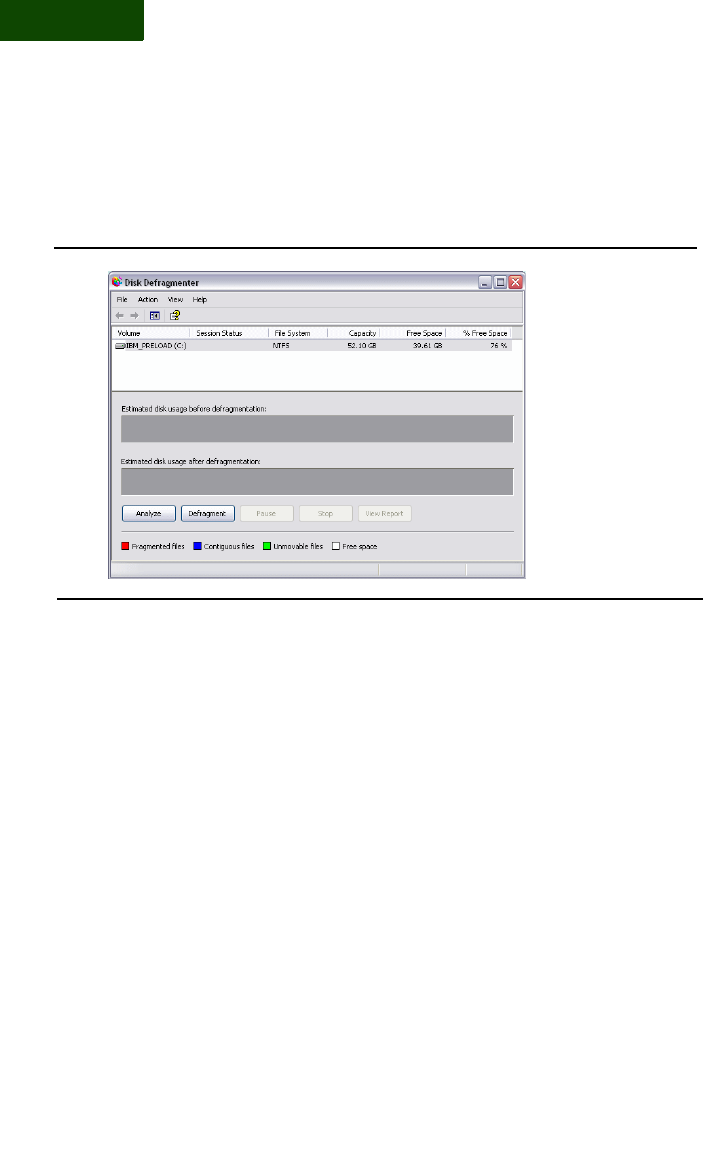
MANAGING YOUR PC
Repair Connectivity Problems
148 | User Manual (v1.0.0.1)
13
3To perform a defragmentation, click DEFRAG NOW to launch the
Windows Disk Defragmenter.
4Click Defragmentation to begin defragmenting the hard disk. You can
stop the defragmentation at any time by clicking Stop on the Windows
Disk Defragmenter.
. . . . . . . . . . . . . . . . . . . . . . . . . . . . . . . . . . . . . . . . . . .
REPAIR CONNECTIVITY PROBLEMS
If your PC is having trouble connecting to the Internet, you can repair
many connectivity problems directly from the Command Center. Follow
the steps below:
FIGURE 13-3 Windows Disk Defragmenter
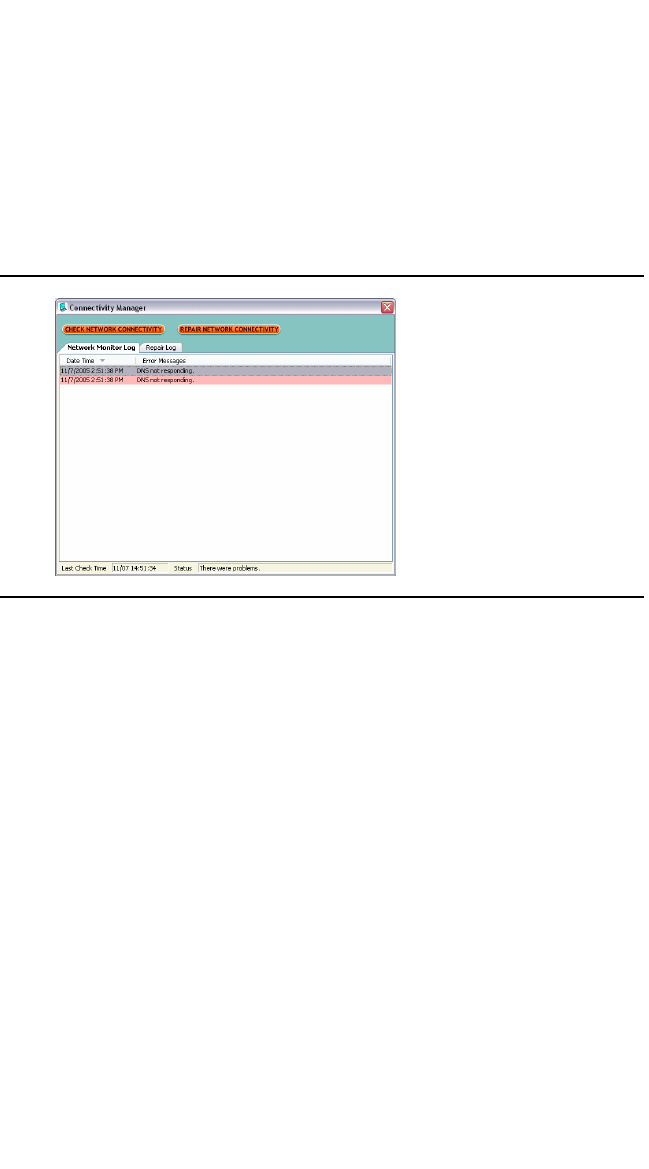
MANAGING YOUR PC
Repair Connectivity Problems
Sereniti Smart Home Networking Service | 149
1Click My PC, click the Troubleshoot and Repair icon, and then click
the Repair Network Connection icon to display the Connectivity
Manager (FIGURE 13-4).
2Click Check Network Connectivity to check connectivity status.
3If there is a connectivity problem, click Repair Network Connectivity.
The Connectivity Manager will run a number of diagnostic tests and
make any necessary repairs. The results are displayed in the Repair Log
tab on the Connectivity Manager.
FIGURE 13-4 Connectivity Manager

MANAGING YOUR PC
Repair Connectivity Problems
150 | User Manual (v1.0.0.1)
13

Sereniti Smart Home Networking Service | 151
. . . . .
. . . . . . . . . . . . . . . . . . . . . .
E
RROR
M
ESSAGES
14
. . . . . . . . . . . . . . . . . . . . . . . . . . . . . . . . . . . . . . . . . . .
THIS CHAPTER
Explains how to respond to:
• Antivirus error messages
• Antispyware error messages
• Firewall error messages
• Backup and restore error messages
• Sereniti shared drive messages
• Multiple connection message
. . . . . . . . . . . . . . . . . . . . . . . . . . . . . . . . . . . . . . . . . . .
OVERVIEW
When the Command Center detects certain problems on the PCs
connected to your network (and running the Command Center), it
displays an error message to make you aware of the problem and point
you toward a solution. These problems include:
• Security program problems
• Backup and restore problems
• Sereniti Shared Drive problems
• Multiple connection problems
This chapter lists the most common error messages in each category and
explains what you should do to resolve the problem that caused the
message to appear.
ERROR MESSAGES
Antivirus Messages
152 | User Manual (v1.0.0.1)
14
. . . . . . . . . . . . . . . . . . . . . . . . . . . . . . . . . . . . . . . . . . .
ANTIVIRUS MESSAGES
TABLE 14-1 lists the error messages that apply to antivirus programs and
explains how to respond to them.
TABLE 14-1 Antivirus Messages
Message Do this...
Antivirus program not
installed
Install an antivirus program
The Sereniti Security Suite, which is provided free
of charge with your subscription to the Smart
Home Networking Service, contains an antivirus
program. To install the program, click Security
and then click the Install Security Suite icon.
Multiple antivirus
programs installed
Uninstall the extra antivirus programs
Running more than one antivirus program on the
same PC can cause problems. Decide which one
you want to keep and remove the rest.
1. Open the Windows Control panel.
2. Select Add or Remove Programs.
3. Follow the on-screen instructions to remove the
program.
Antivirus program not
enabled
Enable the antivirus program
Pass your cursor over the tray icon. This should
indicate if the antivirus program is enabled. If not,
1. Right-click the icon and enable it, or
2. Open the program console and enable it from
there.
Multiple antivirus
programs enabled
Disable the extra antivirus programs
Enabling more than one antivirus program on the
same PC can cause problems. Decide which one
you want to enable and disable the rest.
1. Right-click the tray icon.
2. Select Disable from the pop-up menu, or
3. Open the program console and disable it from
there.
ERROR MESSAGES
Antivirus Messages
Sereniti Smart Home Networking Service | 153
Antivirus definitions
out of date
Update the antivirus program
New antivirus definitions are available
1. Right-click the tray icon.
2. Open the program console.
3. Perform an update.
Antivirus scan
overdue
Scan the hard disk for viruses
1. Right-click the tray icon.
2. Open the program console
3. Perform a scan of the hard disk.
4. If viruses are found, follow up and delete or
quarantine them
Sereniti cannot verify
the product vendor for
your antivirus
package
Sereniti cannot
determine whether
your antivirus
package is enabled
Sereniti cannot
determine when your
antivirus program was
last updated
Sereniti cannot
determine when the
last antivirus scan was
performed
Sereniti cannot
determine if the
definitions for your
antivirus package
were received
These messages appear if your PC is running an
antivirus program that is NOT supported by the
Smart Home Networking Service
In all cases, consider installing the antivirus
program that is included in the Sereniti Security
Suite, which is provided free of charge with your
subscription to the Smart Home Networking
Service. To install the program, click Security and
then click the Install Security Suite icon.
TABLE 14-1 Antivirus Messages (Continued)
Message Do this...

ERROR MESSAGES
Antispyware Messages
154 | User Manual (v1.0.0.1)
14
. . . . . . . . . . . . . . . . . . . . . . . . . . . . . . . . . . . . . . . . . . .
ANTISPYWARE MESSAGES
TABLE 14-2 lists the error messages that apply to antispyware programs
and explains how to respond to them.
TABLE 14-2 Antispyware Messages
Message Do this...
Antispyware program
not installed
Install an antispyware program
The Sereniti Security Suite, which is provided free
of charge with your subscription to the Smart
Home Networking Service, contains an
antispyware program. To install the program, click
Security and then click the Install Security Suite
icon.
Multiple antispyware
programs installed
Uninstall the extra antispyware programs
Running more than one antispyware program on
the same PC can cause problems. Decide which
one you want to keep and remove the rest.
1. Open the Windows Control panel.
2. Select Add or Remove Programs.
3. Follow the on-screen instructions to remove the
program.
Antispyware program
not enabled
Enable the antispyware program
Pass your cursor over the tray icon. This should
indicate if the antispyware program is enabled. If
not,
1. Right-click the icon and enable it, or
2. Open the program console and enable it from
there.
ERROR MESSAGES
Antispyware Messages
Sereniti Smart Home Networking Service | 155
Multiple antispyware
programs enabled
Disable the extra antispyware programs
Enabling more than one antispyware program on
the same PC can cause problems. Decide which
one you want to enable and disable the rest.
1. Right-click the tray icon.
2. Select Disable from the pop-up menu, or
3. Open the program console and disable it from
there.
Antispyware
definitions out of date
Update the antispyware program
New antispyware definitions are available
1. Right-click the tray icon.
2. Open the program console.
3. Perform an update.
Antispyware scan
overdue
Scan the hard disk for spyware
1. Right-click the tray icon.
2. Open the program console
3. Perform a scan of the hard disk.
4. If spyware is found, follow up and delete or
quarantine it.
TABLE 14-2 Antispyware Messages (Continued)
Message Do this...

ERROR MESSAGES
Antispyware Messages
156 | User Manual (v1.0.0.1)
14
Sereniti cannot verify
the product vendor for
your antispyware
package
Sereniti cannot
determine whether
your antispyware
package is enabled
Sereniti cannot
determine when your
antispyware program
was last updated
Sereniti cannot
determine when the
last antispyware scan
was performed
Sereniti cannot
determine if the
definitions for your
antispyware package
were received
These messages appear if your PC is running an
antispyware program that is NOT supported by the
Smart Home Networking Service
In all cases, consider installing the antispyware
program that is included in the Sereniti Security
Suite, which is provided free of charge with your
subscription to the Smart Home Networking
Service. To install the program, click Security and
then click the Install Security Suite icon.
TABLE 14-2 Antispyware Messages (Continued)
Message Do this...
ERROR MESSAGES
Firewall Messages
Sereniti Smart Home Networking Service | 157
. . . . . . . . . . . . . . . . . . . . . . . . . . . . . . . . . . . . . . . . . . .
FIREWALL MESSAGES
TABLE 14-3 lists the error messages that apply to firewall programs and
explains how to respond to them.
TABLE 14-3 Firewall Messages
Message Do this...
Firewall program not
enabled
Enable the firewall program
Pass your cursor over the tray icon. This should
indicate if the firewall program is enabled. If not:
1. Right-click the icon and enable it, or
2. Open the program console and enable it from
there.
Firewall program not
installed
Install a firewall program
The Sereniti Security Suite, which is provided free
of charge with your subscription to the Smart
Home Networking Service, contains a firewall
program. To install the program, click Security
and then click the Install Security Suite icon.
Multiple firewall
programs installed
Uninstall the extra firewall programs
Running more than one firewall program on the
same PC can cause problems. Decide which one
you want to keep and remove the rest.
1. Open the Windows Control panel.
2. Select Add or Remove Programs.
3. Follow the on-screen instructions to remove the
program.

ERROR MESSAGES
Firewall Messages
158 | User Manual (v1.0.0.1)
14
Multiple firewall
programs enabled
Disable the extra firewall programs
Enabling more than one firewall program on the
same PC can cause problems. Decide which one
you want to enable and disable the rest.
1. Right-click the tray icon.
2. Select Disable from the pop-up menu, or
3. Open the program console and disable it from
there.
The Windows XP operating system includes a
personal firewall. This program is enabled by
default. To disable it:
1. Click Start on the Windows task bar
2. Select Control Panel.
3. On the Control Panel, locate Windows
Firewall and double-click it.
4. Click Off
5. Click OK.
Sereniti cannot
determine whether
your firewall program
is enabled
This message only occurs when your PC is running
a firewall program that is not supported by the
Smart Home Networking Service.
Consider installing the firewall program that is
included in the Sereniti Security Suite, which is
provided free of charge with your subscription to
the Smart Home Networking Service.To install the
suite, click Security and then click the Install
Security Suite icon.
TABLE 14-3 Firewall Messages (Continued)
Message Do this...
ERROR MESSAGES
Backup and Restore Messages
Sereniti Smart Home Networking Service | 159
. . . . . . . . . . . . . . . . . . . . . . . . . . . . . . . . . . . . . . . . . . .
BACKUP AND RESTORE MESSAGES
TABLE 14-4 lists the error messages that apply to the backup and restore
features and explains how to respond to them.
TABLE 14-4 Backup and Restore Messages
Message Do this...
Backup failed as the
Smart Home Server
was powered cycled.
A backup failed because the Smart Home Server
was turned off and on during the backup.
You have two choices. You can wait for the next
scheduled backup, or you can perform an
unscheduled backup.
Directory does not
exist on the host
The Sereniti system could not find a folder that had
been selected for backup.
Open the Windows Explorer and verify that the
folder named in the message does, in fact, exist. It
is possible it could have been moved or deleted.
Network failure
during restore
You lost network connectivity while trying to
restore a previously backed up file, and as a result
the restore failed.
Check to determine the cause of the failure. Make
sure the broadband modem and any installed
routers are running properly, and all cables are
connected.
When connectivity is returned, perform the restore
again.
PC was offline when
backup started
A backup failed because the PC being backed up
was not online.
Make sure the PC is turned on and connected to the
network. Then, you can either wait fort the next
scheduled backup, or you can perform an
unscheduled backup.

ERROR MESSAGES
Sereniti Shared Drive Message
160 | User Manual (v1.0.0.1)
14
. . . . . . . . . . . . . . . . . . . . . . . . . . . . . . . . . . . . . . . . . . .
SERENITI SHARED DRIVE MESSAGE
The following message applies to the Sereniti Shared Drive:
System failed to map to S: drive
Your PC cannot connect to the S: drive on the Smart
Home Server. Check to make sure you are logged into
the Command Center and connected to the Smart Home
Server.
Make sure the S: drive is not already in use. If it is, you will have to
remap it to another letter. For instructions, see the Error box on page 98.
. . . . . . . . . . . . . . . . . . . . . . . . . . . . . . . . . . . . . . . . . . .
MULTIPLE CONNECTION MESSAGE
If you have a PC connected to the Smart Home Server, and also
connected to another networking device such as a router or modem, you
will get an error message.
It does not matter if the connections are wired or wireless. In either case,
the Command Center will not work properly if another network
connection is active. To resolve this problem, you have to disable the
connection to the other networking device.
Please free up more
space on your Smart
Home Server
There is not enough space available on the Smart
Home Server to back up your folders. You need to
delete some backed up files to free up space on the
Server's hard disk. See Chapter 7 for details.
You also might consider looking at the folders you
are backing up with an eye toward reducing the
number of folders so that your backups occupy less
space on the Server.
TABLE 14-4 Backup and Restore Messages (Continued)
Message Do this...

ERROR MESSAGES
Multiple Connection Message
Sereniti Smart Home Networking Service | 161
To disabled a wired connection, remove the Ethernet cable from the
Ethernet port on the PC.
To disabled a wireless connection:
1Click Start on the Windows taskbar, select Connect to and then select
Wireless Network Connection. The Wireless Network Connect Status
window appears.
2Click Disable to disable the connection and close the window.
Note: To re-enable the connection, click Start → Connect to →
Wireless Network Connection again.

ERROR MESSAGES
Multiple Connection Message
162 | User Manual (v1.0.0.1)
14

Sereniti Smart Home Networking Service | 163
. . . . .
. . . . . . . . . . . . . . . . . . . . . .
A
PPENDIX
A
. . . . . . . . . . . . . . . . . . . . . . . . . . . . . . . . . . . . . . . . . . .
ABOUT IP ADDRESSES
WHAT IS AN IP ADDRESS?
Every device that connects to the Internet must have an Internet
Protocol (IP) address. This address enables the device to contact other
devices on the Internet, establish a connection with those devices, and
pass information back and forth.
FORMAT
An IP address consists of four numbers (each containing from one to
three digits) separated by decimal points, which are usually referred to
as "dots." The numbers below are all examples of IP addresses:
204.171.64.20
165.113.245.2
111.22.3.444
SUBNET MASK
Every IP address consists of two parts:
•Network part Identifies the network that the device belongs
to
•Host part Identifies the device itself
Both parts are determined by a third number called a subnet mask.
When one PC attempts to contact another – for example, when you visit
a web site – the subnet mask tells the routers that establish the
connection:
• Which numbers in the IP address represent the network

About IP Addresses
164 | User Manual (v1.0.0.1)
• Which numbers represent the PC itself.
A USEFUL ANALOGY
One way of understanding IP addresses is to think of them as the
Internet's version of telephone numbers. Every telephone has a unique
number that identifies it; without this number, it cannot make or receive
calls.
Like an IP address, a telephone number consists of multiple parts: a
network part (called the area code), a subnetwork part (the exchange),
and a device part that indicates the specific telephone to be rung.
The switches that perform the same function that routers perform on the
Internet use the number to find a distant telephone and set up a
connection to it.
HOW DOES A PC OBTAIN AN IP ADDRESS?
A PC can obtain an IP address in one of two ways:
•Static IP address A network administrator can assign the PC
a specific IP address. This is called a static IP address because
it does not change from day to day.
•Dynamic IP address A program called DHCP (Dynamic
Host Configuration Protocol) can "lease" the PC an IP address
whenever it connects to the Internet. This is called a dynamic
IP address because it can change from day to day.
DHCP is the more common method. The usual procedure is for a
household's Internet Service Provider (ISP) to include DHCP as part of
the package. All you have do is make sure all household PCs are
configured to use DHCP.
CONFIGURE A PC TO USE DHCP
To check to see if a PC is configured to use DHCP, and to configure it if
it is not, follow the steps below:
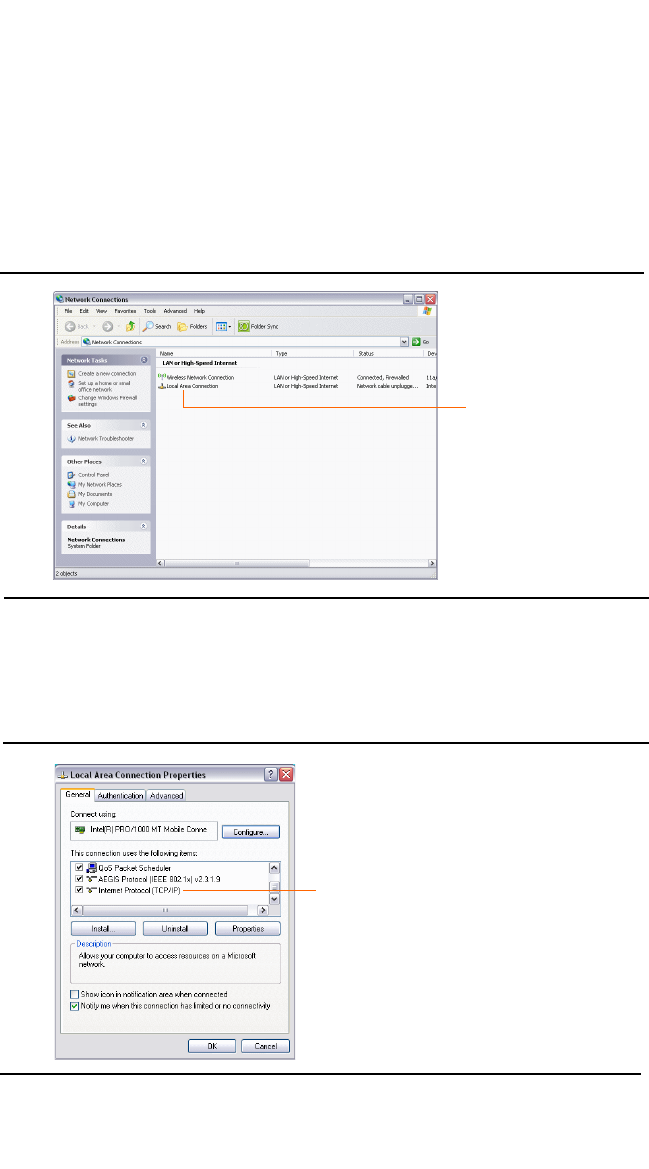
About IP Addresses
Sereniti Smart Home Networking Service | 165
1Click Start on the Windows task bar, select Connect to, and then select
Show all connections. The Network Connections window displays
(FIGURE A-1).
2Locate the local area connection and double-click it to display the Local
Area Connections Properties window (FIGURE A-2).
FIGURE A-1 Network Connections Window
Double-click
FIGURE A-2 Local Area Connections Properties Window
Internet Protocol (TCP/IP)
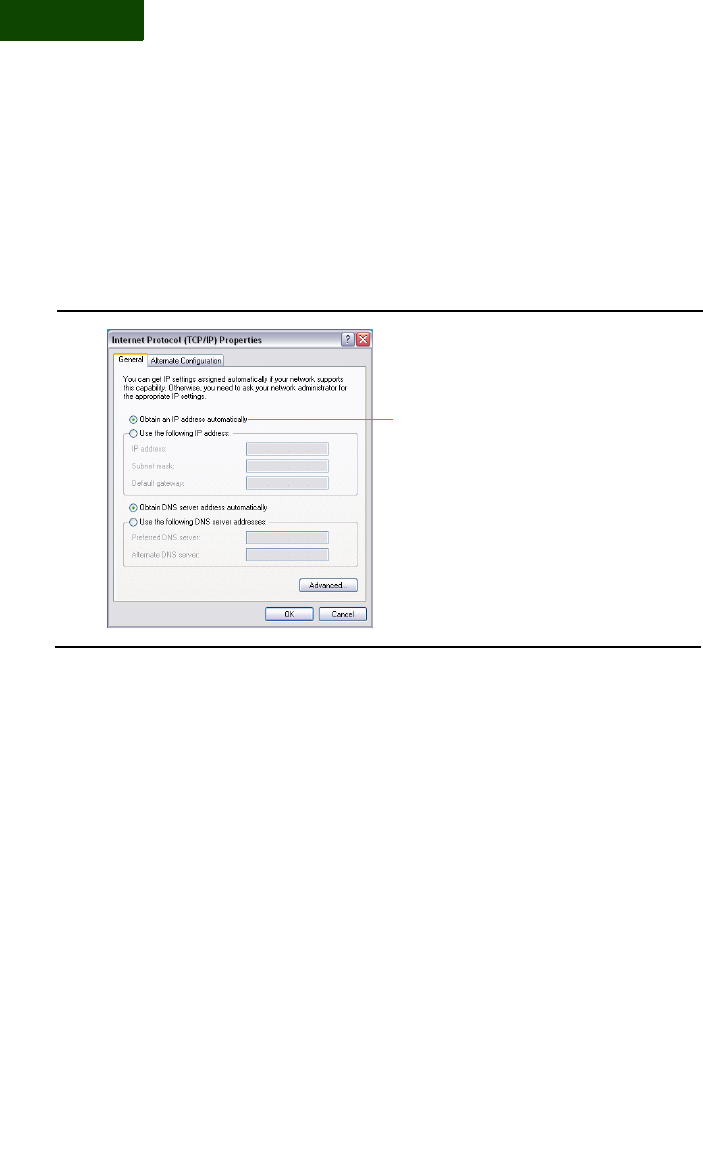
About IP Addresses
166 | User Manual (v1.0.0.1)
3Go to the panel labeled This connection uses the following items and
scroll down until you come to Internet Protocol (TCP/IP).
4Select Internet Protocol (TCP/IP) and click Properties. The Internet
Protocol (TCP/IP) Properties window displays (FIGURE A-3).
5Find the radio button labeled Obtain an IP address automatically.
This button enables DHCP. It should be selected. If it is not, select it.
6Click OK twice to return to the Network Connections window, and then
close the Network Connections window.
WHY DON'T I HAVE TO KNOW A WEBSITE'S IP ADDRESS?
By now you may have noticed that in one important respect IP addresses
differ from telephone numbers. To call someone, you have to know that
person's telephone number. You cannot simply enter the person's name
and expect the telephone system to identify it. But to contact a web site,
you can enter the site's name. For example, to connect to Amazon's web
site, you can enter
http://www.amazon.com
FIGURE A-3 Internet Protocol (TCP/IP) Properties Window
Obtain an IP address automatically

About IP Addresses
Sereniti Smart Home Networking Service | 167
The reason for this is a program called DNS (Domain Name System).
DNS is like a large telephone directory that contains the name and
telephone number of all telephone users. When you enter the name of a
website in the Address field of a browser and click GO, your PC
contacts a computer called a DNS server and "looks up" the IP address
of the website you entered. It then uses this address to find and connect
to the computer running the website you are interested in.

About IP Addresses
168 | User Manual (v1.0.0.1)

Sereniti Smart Home Networking Service | 169
. . . . .
. . . . . . . . . . . . . . . . . . . . . .
A
PPENDIX
B
. . . . . . . . . . . . . . . . . . . . . . . . . . . . . . . . . . . . . . . . . . .
BACKING UP MICROSOFT OUTLOOK
Microsoft Outlook is a personal information and communications
management program that is included in all editions of the Microsoft
Office suite. The program allows users to send and receive email and
maintain a to do list, a calendar of appointments, and a directory of key
business and personal contacts. Outlook is a very popular program, and
many home network users employ this program to handle their email
and other tasks.
OUTLOOK FILES
All your Outlook data is stored in a personal folders file. This is a file
with a .pst extension. If you have not changed the default name, this file
is called "Outlook.pst" and is found in this folder on your PC:
C:\Documents and Settings\<user name>\Local Settings\Application
Data\Microsoft\Outlook
where <user name> is your Windows user account name.
In addition to this file, Outlook places an Archive.pst file in the same
folder. This file contains all the old Outlook data that you have archived.
BACKING UP THE FILES
To back up both the Outlook.pst and Archive.pst files, select Email as
one of the common folders to be included in each backup. See
Chapter 7 for details.

Backing Up Microsoft Outlook
170 | User Manual (v1.0.0.1)

Sereniti Smart Home Networking Service | 171
. . . . .
. . . . . . . . . . . . . . . . . . . . . .
A
PPENDIX
C
. . . . . . . . . . . . . . . . . . . . . . . . . . . . . . . . . . . . . . . . . . .
RESOLVING DNS PROBLEMS
WHAT IS DNS?
The Domain Name System (DNS) converts domain names into IP
addresses. Whenever you enter a domain name such as amazon.com
into a browser, the name is sent to a DNS server, which looks up its IP
address. Without DNS, you would have to know the IP address of every
web site you want to visit.
For the Sereniti system to work properly, each PC in your network must
use the Smart Home Server for its DNS server. To make this happen,
you need to configure the PCs to obtain their DNS server addresses
automatically. This ensures that the PCs ask the Smart Home Server for
a DNS address, and the Server gives its own.
WHAT CAN GO WRONG?
Problems arise if a PC is given a fixed DNS address instead of
configured to obtain its DNS address automatically. This can happen for
two reasons:
•You deliberately entered a fixed DNS address
Some users may need to enter a fixed DNS address; for
example, to connect to a network in their work environment. If
this is the case, the Sereniti system will reconfigure the PC to
obtain its DNS address automatically when you bring it home
and connect it to your home network. However, you will have
to reconfigure the PC when you return to your office. The
procedure below explains how to do this.
•The PC became misconfigured
For a variety of technical reasons, it is possible that a PC can
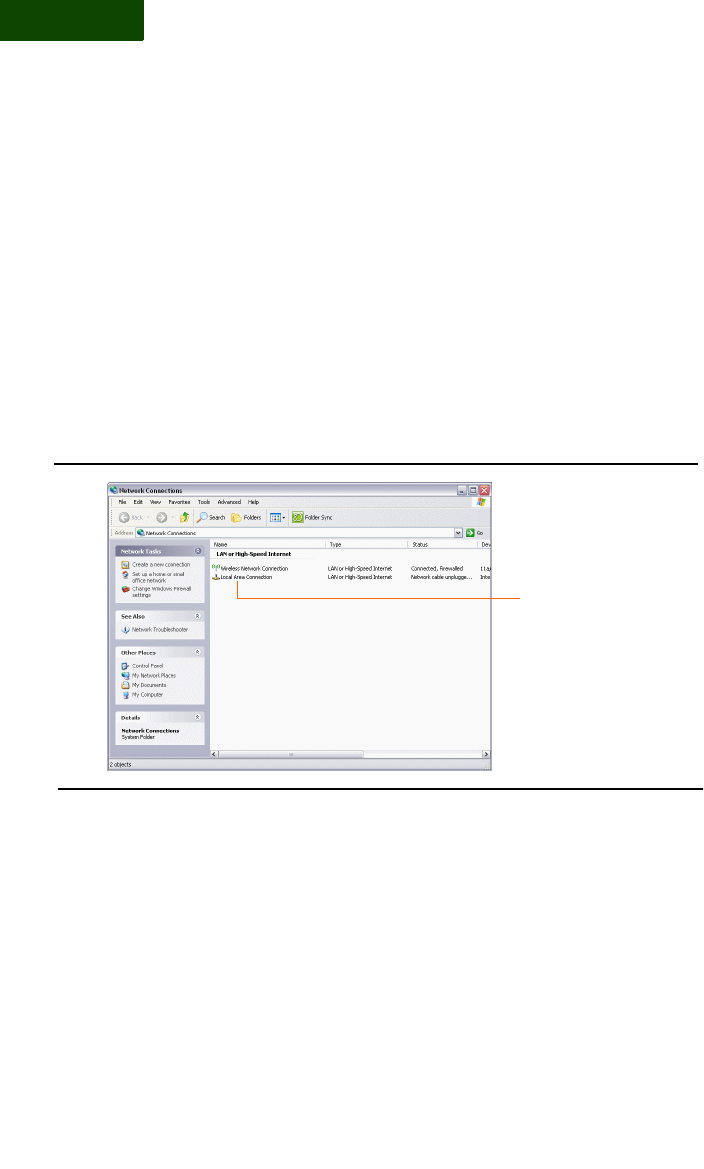
Resolving DNS Problems
172 | User Manual (v1.0.0.1)
be set to obtain its DNS address automatically, but become
misconfigured and given a fixed DNS address instead. When
this happens, the Sereniti system displays a message indicating
it has detected the problem, and then automatically corrects the
problem. No action on your part is required.
RECONFIGURE A PC TO USE A FIXED DNS ADDRESS
To reconfigure a PC to use a fixed DNS address, follow the steps below:
1In the Windows taskbar, click Start, right-click My Network Places
and select Properties. This displays the Network Connections window.
2Right-click the active network connection and select Properties. This
displays the Local Area Connection Properties window.
FIGURE C-1 Network Connections Window
Double-click
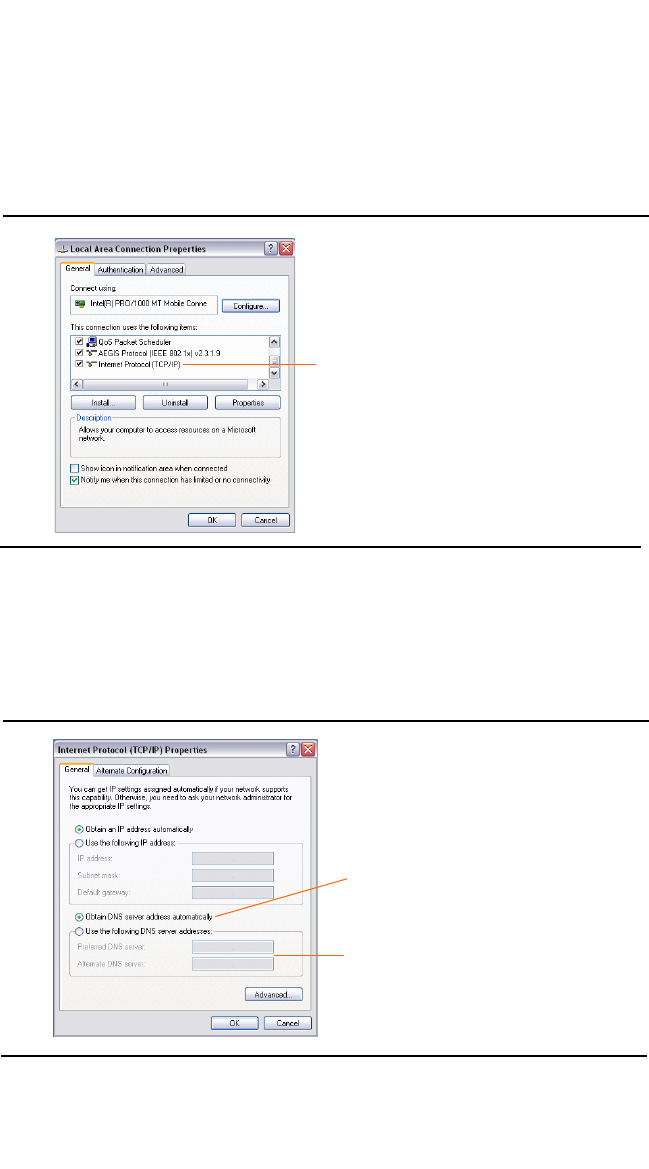
Resolving DNS Problems
Sereniti Smart Home Networking Service | 173
3Scroll down until you come to Internet Protocol (TCP/IP). Click it
once to select it, and then click the Properties button. This displays the
Internet Protocol (TCP/IP) Properties window.
FIGURE C-2 Local Area Connections Properties Window
Internet Protocol (TCP/IP)
FIGURE C-3 Internet Protocol (TCP/IP) Properties Window
Use the following DNS Server
addresses
Enter up to two DNS addresses

Resolving DNS Problems
174 | User Manual (v1.0.0.1)
4Click the button labeled Use the following DNS server addresses, and
then enter up to two DNS addresses in the fields below.
5Click OK twice to close the two Properties windows, and then close the
Network Connections window.

Sereniti Smart Home Networking Service | 175
. . . . .
. . . . . . . . . . . . . . . . . . . . . . . .
I
NDEX
A
Add Firewall Rules Page 124
Add User Page 53
Allowed Sites List 64–65
Antispyware Program 129
Antivirus Program 129
Attached USB Devices Page 101, 142
Attached Wireless devices 139
Auto Launch
Command Center 13
Sereniti Wireless 41
Auto Login 37–38, 46–47
Auto Login Page 38
B
Back Up Microsoft Outlook 169
Backed Up Folders Window 84
Backup Settings Page 78
Backup Status Page 35–36, 78
Backups 71–85
How they are Stored 73–76
Scheduled 72–73, 77
Select Folders 79
Unscheduled 82
View the Contents 82
C
Change
Content Filter 57
Login Accounts 12
PC Icon 39, 56
PC Name 39
PC Type 39
PC Workgroup 113

INDEX
176 | User Manual (v1.0.0.1)
Privileged Status 57
Security Question 57
Smart Home Server Workgroup 112
Time Filter 57
User Password 56
Wireless Channel 139
Channel (Wireless) 138, 140
Clean Up Old Backups 90–94
Clean Up Unneeded folders 92
Command Center
Launch Options 13
Main Menu 14
Tray Icon 8
Common Folders 72
Connect a PC to a Shared Printer 120
Connect External Storage Device 142
Connect the PC to Another Wireless Network 40
Connectivity Manager 149
Content Filter 57, 62–63
Content Filter Settings Page 65
Create
Shared Folder 113
Shared Printer 117
User Accounts 52–54
User Defined Port Forwarding Rule 48, 125–126
D
Dashboard 19–21
Defragment the Hard Drive 146
Delete
Port Forwarding Rule 126
User Account 58
Desktop Folder 73
Device Information Page 29
Device Management Page 32–34, 44
Device Security Page 132
Device Settings Page 33
DHCP 164–166
Disconnect a Printer from a PC 120
Dynamic IP Address 164

INDEX
Sereniti Smart Home Networking Service | 177
E
Email Folder 72
Email Notifications 58, 59
Enable Universal Plug and Play (UPnP) 122
Encryption 138
Error Messages 151–160
Antispyware Messages 154
Antivirus Messages 152
Backup and Restore Messages 159
Firewall Messages 157
Sereniti Shared Drive Messages 160
External Storage Device 142
F
Favorites Folder 72
Firewall Program 129
Firewall Settings Page 123
Folder Sharing 113–116
Access A Shared Folder from a Browser 116
Access a Shared Folder from the Command Center 116
Connect a PC to a Shared Printer 120
Create Shared Folder 113
Disconnect a Printer from a PC 120
Unshare a Folder 115
Folder Sharing Page 114
H
Home Page 17–21
I
Install Security Suite 24
IP Address
Dynamic 164
Format 163
Static 164
Subnet Mask 163
L
Launch Options 13
Logging In 9, 10

INDEX
178 | User Manual (v1.0.0.1)
Through a Browser 10
Through the Command Center 9
Logging Out 11
Through a Browser 11
Through the Command Center 11
M
S: Drive Failed to Map 98
Main Menu 14
Manage Firewall Page 37, 123
Manage Firewalls Page 45
Map a Network Drive 98
Modify User Accounts 55–57
Monitor Disk Usage 91
Monitor Network Security 129–133
Firewall Program 129
Resolve a Problem 132
Monitor Network SecurityAntivirus Program 129
My Documents Folder 72
N
Network Map 17–19, 44
Network Printer 143
Non-Privileged Accounts 50
Notifications
Email 58, 59
Telephone 58, 59
P
Parental Controls 61–68
Allowed Sites List 64–65
Content Filter 62–63
Restricted Sites List 64–65
Time Filter 65–67
Time Filter Override 67
Unblock a Web Site 68
Parental Controls Page 64
Password 52
PC Icon 39, 56
PC Inventory 145

INDEX
Sereniti Smart Home Networking Service | 179
PC Name 39
PC Status Page 147
PC Type 39
Personal Firewall Program
Port Forwarding 121–127
Create User Defined Rule 125
Delete a Rule 126
Relocate Port 126
Select System Defined Rule 124
Port Forwarding Rule 48
System Defined Rule 48
User-Defined Rule 48
Port Forwarding Rules Page 125
Printer Sharing 117–120
Create a Shared Printer 117
Printer Sharing Page 118
Privileged Accounts 50
R
Register a Device 45–46
Relocate Port 126
Rename a Network Drive 101
Rename a Network Printer 143
Repair Connectivity Problems 148
Restore Files and Folders 85–90
Restore All Files and Folders in the Most Recent Backup 86
Restore an Old Version of a File or Folder 89
Restore Specific files and Folders in the Most Recent Backup 87
Restore Page 86
Restricted Sites List 64–65
S
Security Question 57
Security Summary Page 34–35, 130
Select a System Defined Port Forwarding Rule 48, 124
Select Additional Folders Window 80
Select Folders to Restore Window 88
Sereniti Security Suite 24
Sereniti Shared Dive 98
Sereniti Wireless Agent 40, 41

INDEX
180 | User Manual (v1.0.0.1)
Set the Backup Schedule 77
Smart Home Server 135–143
Disk Usage 140
IP Address (LAN) 137
IP Address (WAN) 136
MAC Address (LSN) 137
MAC Address (WAN) 136
Time Zone 141
Wired Settings 135
Wireless Settings 137
Workgroup 141
Smart Home Server Settings Page 141
Smart Home Server Status Page 136
SSID 138
Static IP Address 164
Subnet Mask 163
System Defined Port Fowarding Rule 48
T
Telephone Notifications 58, 59
Time Filter 57, 65–67
Time Filter Override 67
Time Filter Settings Page 66
Time Zone 141
To Do List 21–25, 133
Tray Icon 8
Turn off
Command Center Auto Launch 14
Sereniti Wireless Agent 41
U
Unblock a Web Site 68
Universal Plug and Play (UPnP) 48, 122
Unshare a Folder 115
User Accounts 49–58
Create 52
Delete 58
Modify 55–57
Non-Privileged Accounts 50
Privileged Accounts 50

INDEX
Sereniti Smart Home Networking Service | 181
View 54
User Icon 56
User Name 51–52
Valid Characters 52
Valid Names 51
User Settings Page 56
User-Defined Port Forwarding Rule 48
Users List 55
V
View User Accounts 54
W
WEP Key (ASCII) 138
WEP Key (HEX) 139
Wired Settings 135
Wireless Devices 43
Wireless Settings 137
Authentication 140
Change Channel 139
Channel 140
SSID 138
Wireless settings
Channel 138
Encryption 138
WEP Key (ASCII) 138
WEP Key (HEX) 139
Wireless Settings Page 138
Wireless Signal Strength 139
Workgroups 112, 141

INDEX
182 | User Manual (v1.0.0.1)

Sereniti Smart Home Networking Service | 183
FEDERAL COMMUNICATIONS COMMISSION
INTERFERENCE STATEMENT
This equipment has been tested and found to comply with the limits for
a Class B digital device, pursuant to Part 15 of the FCC Rules. These
limits are designed to provide reasonable protection against harmful
interference in a residential installation. This equipment generate, uses
and can radiate radio frequency energy and, if not installed and used in
accordance with the instructions, may cause harmful interference to
radio communications. However, there is no guarantee that interference
will not occur in a particular installation. If this equipment does cause
harmful interference to radio or television reception, which can be
determined by turning the equipment off and on, the user is encouraged
to try to correct the interference by one of the following measures:
• Reorient or relocate the receiving antenna.
• Increase the separation between the equipment and receiver.
• Connect the equipment into an outlet on a circuit different from
that o which the receiver is connected.
• Consult the dealer or an experienced radio/TV technician for
help.
This device complies with Part 15 of the FCC Rules. Operation is
subject to the following two conditions: (1) This device may not cause
harmful interference, and (2) this device must accept any interference
received, including interference that may cause undesired operation.
FCC Caution: Any changes or modifications not expressly approved by
the party responsible for compliance could void the user's authority to
operate this equipment.

FCC INTERFERENCE STATEMENT
184 | User Manual (v1.0.0.1)
IMPORTANT NOTE: FCC RADIATION EXPOSURE
STATEMENT:
This equipment complies with FCC radiation exposure limits set forth
for an uncontrolled environment. This equipment should be installed
and operated with minimum distance 20cm between the radiator & your
body.
This transmitter must not be co-located or operating in conjunction with
any other antenna or transmitter.
We declare that the product is limited in CH1~CH11 by specified
firmware controlled in the USA.