Canon DS508152 Wireless File Transmitter User Manual
Canon Inc Wireless File Transmitter Users Manual
Canon >
User Manual Updated

Wireless File Transmitter
WFT-E1A
E
INSTRUCTION MANUAL
2
Thank you for purchasing a Canon product.
Wireless File Transmitter WFT-E1A enable your EOS digital camera to send the captured
images to an FTP server via a wireless or wired LAN.
It works with IEEE 802.11b and IEEE 802.11g wireless LANs and 100 Base-TX Ethernet
wired LANs.
EOS digital cameras compatible with the WFT-E1A are listed on Canon’s Web site. Or
you can inquire at a Canon Service Center.
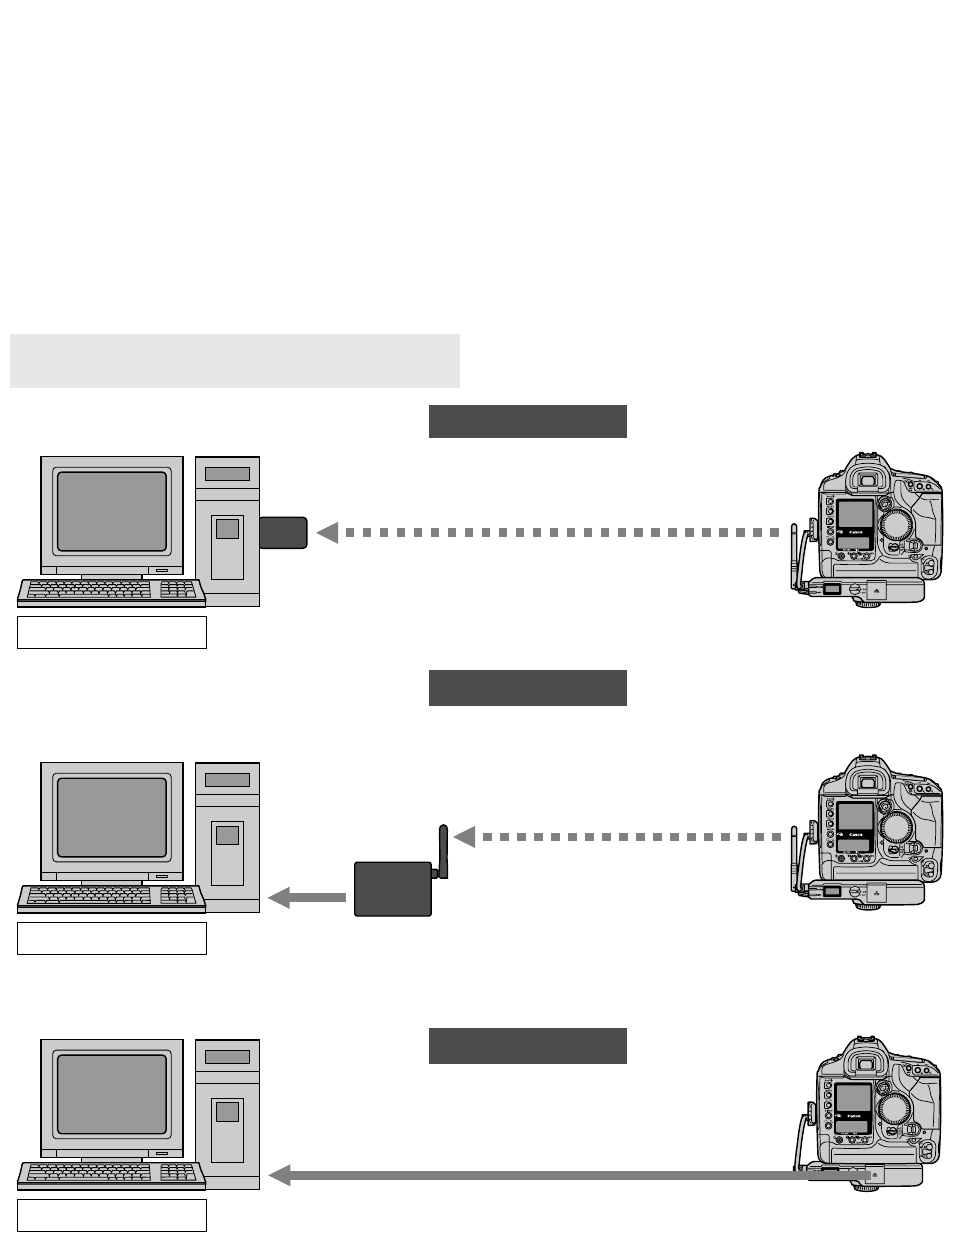
Image Transfer Overview
FTP server
FTP server
FTP server
Wireless LAN adapter
(Commercially available)
Wireless LAN access point
(Commercially available)
Ethernet port
Ethernet port
Wireless LAN-1
Images are directly transmitted (ad hoc) to
an FTP server equipped with a wireless
LAN adapter.
Wired LAN
The camera is connected via a LAN cable
to transmit images to the FTP server.
Wireless LAN-2
Images are transmitted (infrastructure) to
an FTP server via a wireless LAN access
point.

3
Introduction
Check that all the following items have been included with the WFT-E1A. If anything is
missing, contact your dealer.
* Battery Pack and Battery Charger are not included. If necessary, purchase them separately
(p.18).
* Be careful not to lose any of the items included with the WFT-E1A.
¡Canon and EOS are trademarks of Canon Inc.
¡Windows is a trademark or registered trademark of Microsoft Corporation in the United States and
other countries.
¡Macintosh is a registered trademark of Apple Corporation in the United States and other countries.
¡All other corporate names and trademarks mentioned in this manual are the property of their
respective owners.
Item Check List
¢Wireless File Transmitter WFT-E1A
¢Normal Antenna NA-E1
¢Interface Cable IFC-15D4
Cable approx. 15 cm/0.5 ft long (dust- and water-resistant) to connect to the IEEE 1394
port. Used when the WFT-E1A is attached to the camera’s tripod socket.
¢Interface Cable IFC-150D4
Cable approx. 1.5 m/4.9 ft long (dust- and water-resistant) to connect to the IEEE 1394 port.
Used when the WFT-E1A is placed some distance away from the camera.
¢Tripod socket (with anti-rotation rubber pad)
Used when the WFT-E1A is attached to the camera’s tripod socket.
¢Case
Case for the WFT-E1A. Can be mounted on a belt. Strap also provided.
¢WFT-E1/ WFT-E1A Utility Disk
Contains the instruction manual (what you are reading now) and software for creating the
settings file.
¢Warranty card

4
¡The instructions in this manual assume that the proper settings for the wireless LAN or
wired LAN and FTP server have been completed. For details on how to set these
settings, consult the manufacturer of the respective equipment.
¡The menu screens are based on the EOS-1Ds Mark II’s.
¡Terms in brackets [ ] indicate the button name, icon name, camera menu item, etc.
¡The number in parentheses indicate the number of the page where you can find more
information.
¡This manual assumes that you have read the camera’s instruction manual and are
familiar with camera operation procedures.
¡This manual uses the following alert symbols:
: The Caution symbol indicates a warning to prevent mishaps.
: The Note symbol gives supplemental information.
¡In this manual, “Windows XP” refers to Windows XP Home Edition/Professional, and
“Windows 2000” refers to Windows 2000 Professional.
Conventions Used in this Manual

5
1
2
3
4
5
Introduction
Item Check List .......................................................................................................................3
Conventions Used in this Manual ............................................................................................ 4
Safety Warnings ......................................................................................................................7
Handling Precautions .............................................................................................................. 8
1Creating the Settings File 9
TCP/IP Settings .....................................................................................................................10
FTP Settings .........................................................................................................................11
Wireless LAN Settings ..........................................................................................................12
Saving the Settings ...............................................................................................................14
2Setting Up the WFT-E1A 15
Nomenclature ........................................................................................................................ 16
Installing and Removing the Battery ..................................................................................... 18
Using a Household Power Outlet .......................................................................................... 20
Attaching the Antenna ........................................................................................................... 21
Attaching to the Camera .......................................................................................................22
Setting the LAN ..................................................................................................................... 23
Selecting the LAN Type ........................................................................................................25
Checking the Connection Status ........................................................................................... 26
3Transferring Images 29
Automatic Image Transfer After Each Shot ........................................................................... 30
Image Batch Transfer After Shooting .................................................................................... 32
Transferring RAW+JPEG Images ......................................................................................... 36
4Changing the LAN Settings with the Camera 37
Setting TCP/IP ......................................................................................................................38
Setting the DNS Server .........................................................................................................39
Setting the FTP Server .......................................................................................................... 40
Setting Wireless LAN ............................................................................................................43
Protecting and Saving the Settings ....................................................................................... 44
5Reference 45
Troubleshooting Guide ..........................................................................................................46
Error Number Description ..................................................................................................... 48
Specifications ........................................................................................................................ 49
Index .....................................................................................................................................50
Contents

6
.
Model DS508152
For use of original antenna (NA-E1)
For body worn operation, this Model DS508152 has been tested and meets the FCC RF exposure
guidelines when used with the Canon accessories supplied or designated for this product. Use of
other accessories may not ensure compliance with FCC RF exposure guidelines.
For use of option antenna (ERA-E1)
This equipment complies with FCC radiation exposure limits set forth for uncontrolled equipment
and meets the FCC radio frequency (RF) Exposure Guidelines in Supplement C to OET65. This
equipment should be installed and operated with at least 20cm and more between the radiator and
person's body (excluding extremities: hands, wrists, feet and legs).
This device complies with Part 15 of the FCC Rules. Operation is subject
to the following two conditions: (1) This device may not cause harmful
interference, and (2) this device must accept any interference received,
including interference that may cause undesired operation.
Note:This equipment has been tested and found to comply with the limits for class B digital
devices, pursuant to Part 15 of the FCC Rules.These limits are designed to provide
reasonable protection against harmful interference in a residential installation.This
equipment generates, uses and can radiate radio frequency energy and, if not installed and
used in accordance with the instructions, may cause harmful interference to radio
communications. However, there is no guarantee that interference will not occur in a
particular installation. If this equipment does cause harmful interference to radio or television
reception, which can be determined by turning the equipment off and on, the user is
encouraged to try to correct the interference by one or more of the following measures:
- Reorient or relocate the receiving antenna.
- Increase the separation between the equipment and receiver.
-Connect the equipment into an outlet on a circuit different from that to which the receiver is
connected.
- Consult the dealer or an experienced radio/TV technician for help.
The cable with the ferrite core provided with the digital camera must be used with this equipment
in order to comply with Class B limits in Subpart B of Part 15 of the FCC rules.
Do not make any changes or modifications to the equipment unless otherwise specified in the
manual. If such changes or modifications should be made, you could be required to stop operation
of the equipment.
This transmitter must not be co-located or operating in conjunction with any other antenna or
transmitter.
Canon U.S.A. Inc.
One Canon Plaza, Lake Success, NY 11042, U.S.A.
Tel No. (516)328-5600
This Class B digital apparatus complies with Canadian ICES-003.
Cet appareil numérique de la classe B est conforme à la norme NMB-003 du Canada.

7
Introduction
Follow these safeguards and use the equipment properly to prevent injury, death, and material damage.
Preventing Serious Injury or Death
• To prevent fire, excessive heat, chemical leakage, and explosions, follow the safeguards below:
- Do not use any batteries, power sources, and accessories not specified in this booklet. Do not use any
home-made or modified batteries.
- Do not short-circuit, disassemble, or modify the battery pack. Do not apply heat or apply solder to the
battery pack or back-up battery. Do not expose the battery pack or back-up battery to fire or water. And
do not subject the battery pack or back-up battery to strong physical shock.
- Do not install the battery pack in reversed polarity (+ –).
- Do not recharge the battery pack outside the allowable ambient temperature range of 0°C - 40°C (32°F -
104°F). Also, do not exceed the recharging time.
- Do not insert any foreign metallic objects into the electrical contacts of the WFT-E1A, accessories,
connecting cables, etc.
• When disposing of a battery pack, insulate the electrical contacts with tape to prevent contact with other
metallic objects or batteries. This is to prevent fire or an explosion.
• If excessive heat, smoke, or fumes are emitted during battery pack recharging, immediately unplug the
battery charger from the power outlet to stop the recharging and prevent a fire.
• If the battery pack or back-up battery leaks, changes color, deforms, or emits smoke or fumes, remove it
immediately. Be careful not to get burned in the process.
• Prevent any battery leakage from contacting your eyes, skin, and clothing. It can cause blindness or skin
problems. If the battery leakage contacts your eyes, skin, or clothing, flush the affected area with lots of
clean water without rubbing it. See a physician immediately.
• During the recharging, keep the equipment away from the reach of children. The cord can accidentally
choke the child or give an electrical shock.
• Do not leave any cords near a heat source. It can deform the cord or melt the insulation and cause a fire or
electrical shock.
• When the WFT-E1A is not in use, disconnect the power plug and remove the battery pack. This is to
prevent electrical shock, heat generation, and fire.
• Do not use the equipment where there is flammable gas. This is to prevent an explosion or fire.
• If you drop the equipment and the casing breaks open to expose the internal parts, do not touch the
internal parts due to the possibility of electrical shock.
• Do not disassemble or modify the equipment. High-voltage internal parts can cause electrical shock.
• Do not store the equipment in dusty or humid places. This is to prevent fire and electrical shock.
• Before using the camera inside an airplane or hospital, check if it is allowed. Electromagnetic waves
emitted by the camera may interfere with the plane’s instruments or the hospital’s medical equipment.
• To prevent fire and electrical shock, follow the safeguards below:
- Always insert the power plug all the way in.
- Do not handle a power plug with wet hands.
- When unplugging a power plug, grasp and pull the plug instead of the cord.
- Do not scratch, cut, or excessively bend the cord or put a heavy object on the cord. Also do not twist or tie
the cords.
- Do not connect too many power plugs to the same power outlet.
- Do not use a cord whose insulation has been damaged.
• Occasionally unplug the power plug and use a dry cloth to clean off the dust around the power outlet. If the
surrounding is dusty, humid, or oily, the dust on the power outlet may become moist and short-circuit the
outlet to cause a fire.
• Be careful not to poke the tip of the antenna into someone’s eyes. It can cause visual impairment.
Preventing Injury or Equipment Damage
• Do not leave equipment inside a car under the hot sun or near a heat source. The equipment may become
hot and cause skin burns.
• Do not cover or wrap the battery-recharging apparatus with a cloth. Doing so may trap heat within and
cause the casing to deform or catch fire.
• If you drop the camera in water or if water or metal fragments enter inside the camera, promptly remove the
battery pack and back-up battery. This is to prevent fire and electrical shock.
• Do not use or leave the battery pack in a hot environment. Doing so may cause battery leakage or a shorter
battery life. The battery pack can also become hot and cause skin burns.
• Do not use paint thinner, benzene, or other organic solvents to clean the equipment. Doing so may cause
fire or a health hazard.
If the product does not work properly, requires repair, or is damaged, contact your
dealer or your nearest Canon Service Center.
Safety Warnings

8
Product Care and Storage
¡
The WFT-E1A is a precision instrument. Do not drop it or subject it to physical shock.
¡
The WFT-E1A is not waterproof and cannot be used underwater. If it gets wet, detach
the battery and promptly consult your nearest Canon Service Center. Wipe off any
water droplets with a clean, dry cloth. If the WFT-E1A has been exposed to salty air,
wipe with a well-wrung wet cloth.
¡
Never leave the WFT-E1A near anything having a strong magnetic field such as a
magnet or electric motor.
¡
Do not leave the WFT-E1A in excessive heat such as in a car in direct sunlight. High
temperatures can cause the WFT-E1A to malfunction.
¡
Do not use cleaners that contain organic solvents to clean the WFT-E1A. For stubborn
dirt, take the WFT-E1A to a Canon Service Center.
¡
If the WFT-E1A will not be used for an extended period, remove the battery and store
the WFT-E1A in a cool, dry, well-ventilated location.
¡
Avoid storing the WFT-E1A where there are corrosive chemicals such as a darkroom or
chemical lab.
LCD Panel Care
At low temperatures, the liquid-crystal display response may become slower. And at high
temperatures, the display may blacken. In either case, the display will return to normal at
room temperature.
Operation Restrictions
¡
Use the WFT-E1A only with a compatible EOS digital camera. Using it with an
incompatible product may result in malfunction, accident, etc., not covered by the
product warranty.
¡
Use the WFT-E1A only for image transfers via wireless LAN or wired LAN devices. If
you use the WFT-E1A for any other purpose, Canon cannot be held liable for any
damage or injury that may occur.
¡
The WFT-E1A can only be used in the following countries: Japan, USA, Canada,
France, Italy, Germany, Great Britain, Belgium, the Netherlands, Luxembourg, Ireland,
Denmark, Greece, Spain, Portugal, Austria, Finland, Sweden, Poland, Hungary, Czech,
Slovakia, Slovenia, Estonia, Latvia, Lithuania, Cyprus, Malta, Iceland, Norway,
Switzerland, Australia, and New Zealand.
For other countries, inquire through Canon’s Customer Service Center.
¡
In France, using the WFT-E1A outdoors is prohibited.
¡
In Italy, if used outside of own premises, general authorization is required.
¡
This device may experience signal interference caused by other devices emitting radio
waves (microwave ovens, Bluetooth appliances, etc.). Keep the device away from such
devices or do not use the devices at the same time.
¡
The performance of this transmitter is guaranteed only when used with the Canon
antenna (NA-E1 or ERA-E1)
Handling Precautions

9
1
1
Creating
the Settings File
First you must create the settings file to enable image transfers from
the WFT-E1A to the FTP server or wireless LAN access point (or
wireless LAN adapter).
Then you load the settings file in the camera with a memory card.
Although this chapter uses Windows XP screenshots, the procedure
is the same for Windows 2000 and the Mac OS X.
10
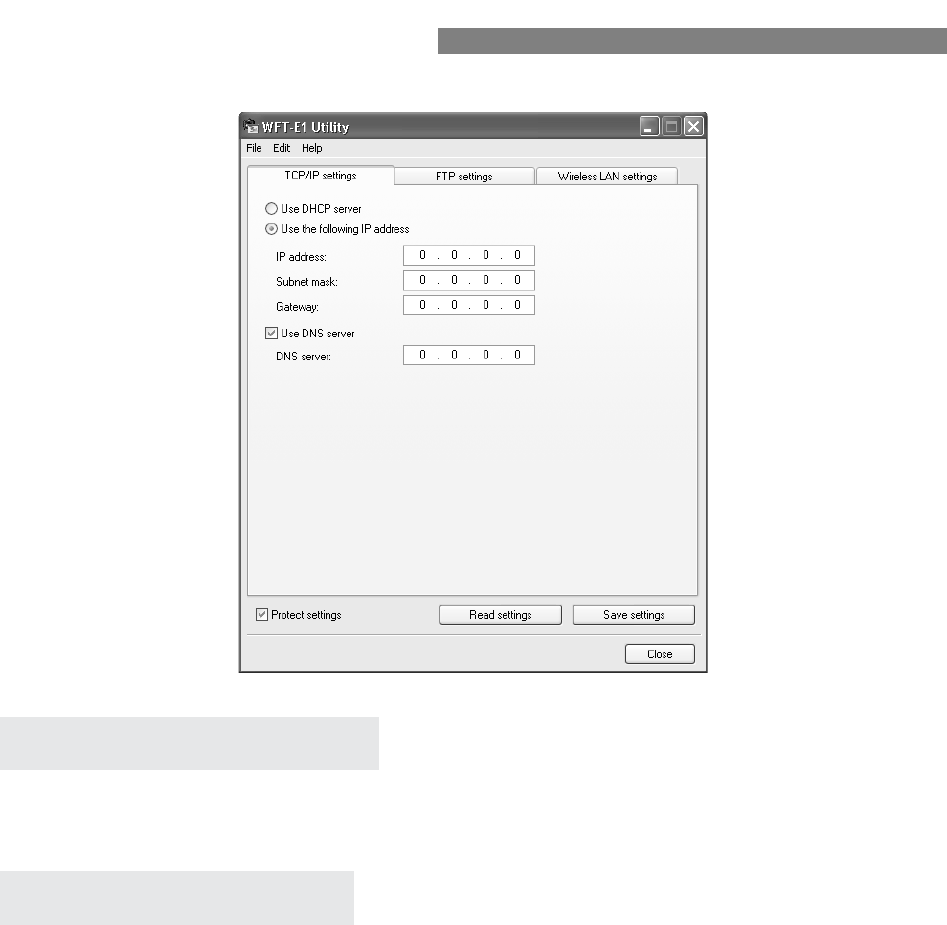
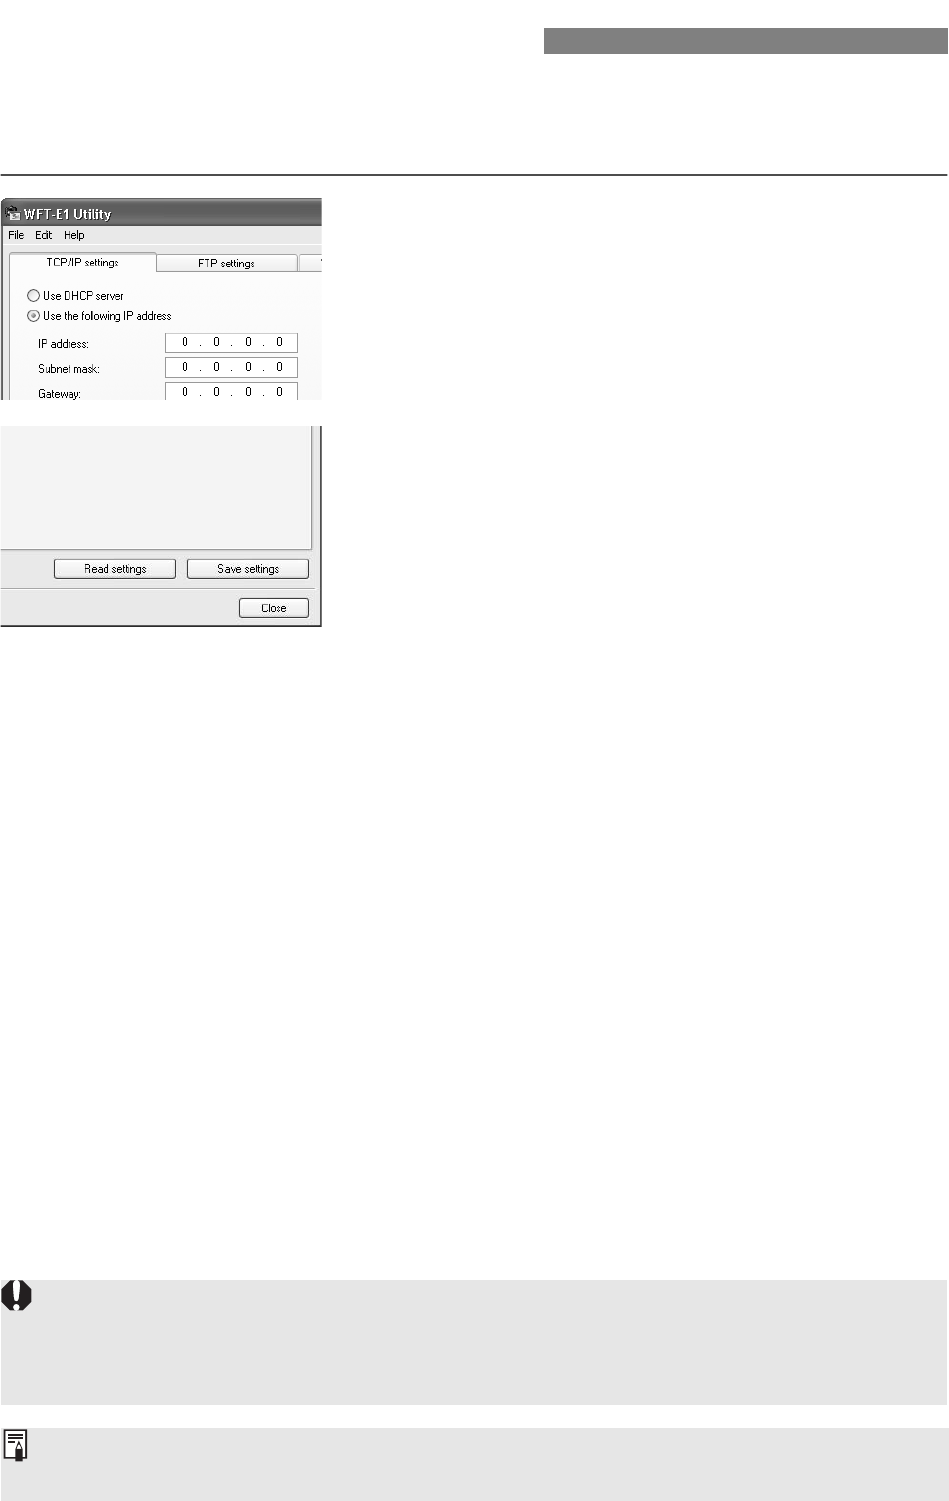
¡If you will not use a DHCP server, select [Use below IP address] and enter the [IP
address], [Subnet mask], and [Gateway] text fields.
¡If you will use a DNS server, checkmark the [¢Use DNS server] box and enter the
DNS server address.
¡If you use a DHCP server, the DNS server address acquired automatically from the
DHCP server will override any other address.
TCP/IP Settings
DHCP Server Setting
DNS Server Setting
11
1
Creating the Settings File
¡
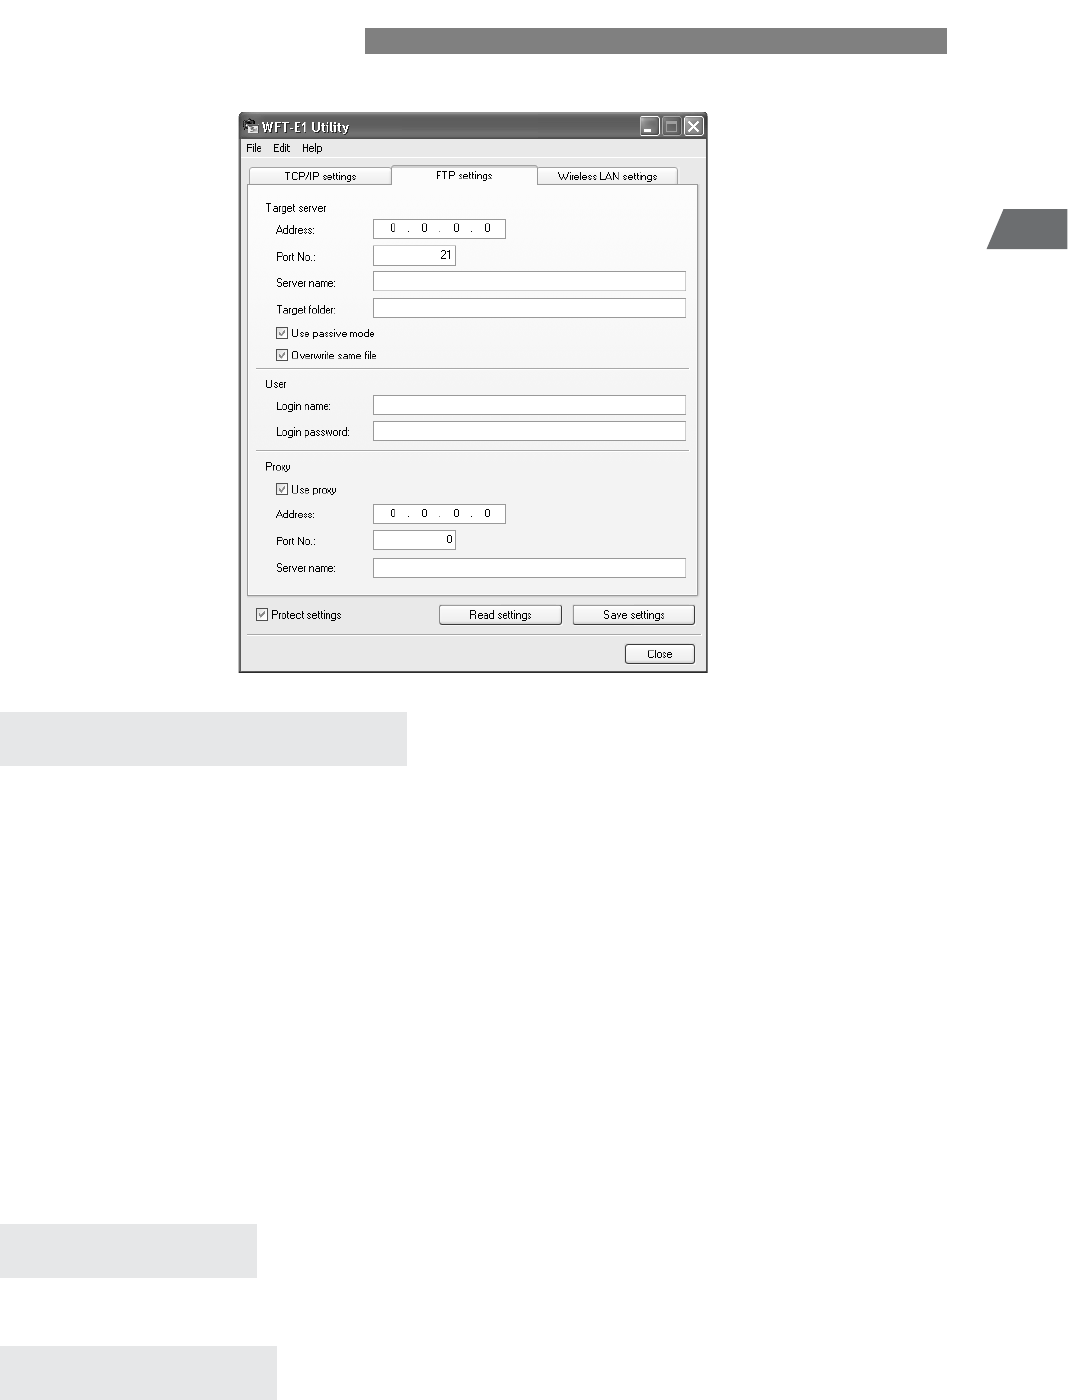
Enter the target FTP server’s [Address] or [Server name] and [Port No.]. If you enter both
the [Address] and [Server name], the [Address] will override the [Server name].
¡Enter the name of the target FTP server’s [Target folder]. If this is left blank, the
images will be saved in the root folder set by the FTP server. The same DCIM/
100EOS1D folder hierarchy as in the memory card will be created automatically.
If the camera has two memory card slots and the CF card is selected to save the
images, the A/DCIM/100EOS1D folder hierarchy will be created automatically to save
the images. If the SD card is selected to save the images, the B/DCIM/100EOS1D
folder hierarchy will be created automatically to save the images. (CF card images will
be in folder A, while SD card images will be in folder B.)
¡If you want to use the passive mode, checkmark the [¢Use passive mode] box.
¡To allow an image file in the target folder to be overwritten by a file having the same
name, checkmark the [¢Overwrite same file] box.
¡Enter the [Login name] and [Login password] required by the FTP server.
¡If you will use a proxy, enter the proxy server’s [Address] or [Server name] and [Port
No.]. If you enter both the [Address] and [Server name], the [Address] will override
the [Server name].
FTP Settings
Target Server Settings
User Settings
Proxy Settings
12
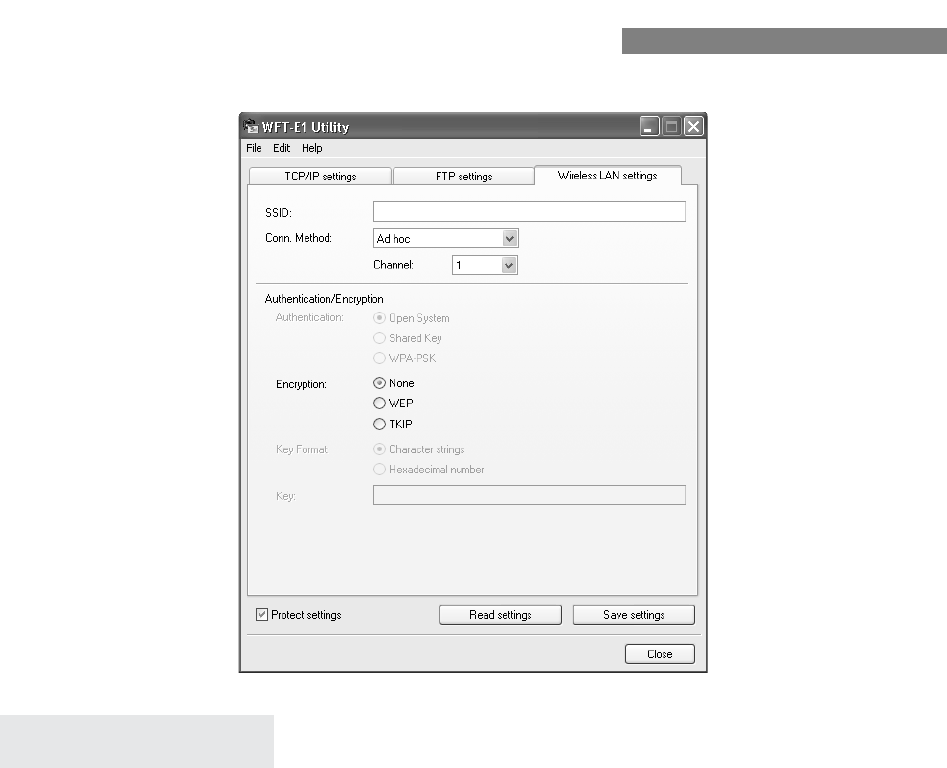
[SSID]
¡Enter the SSID (or ESS-ID) that has been set for the wireless LAN access point or
wireless LAN adapter. If the wireless LAN access point is set to ANY connection, set
the SSID for the wireless LAN access point.
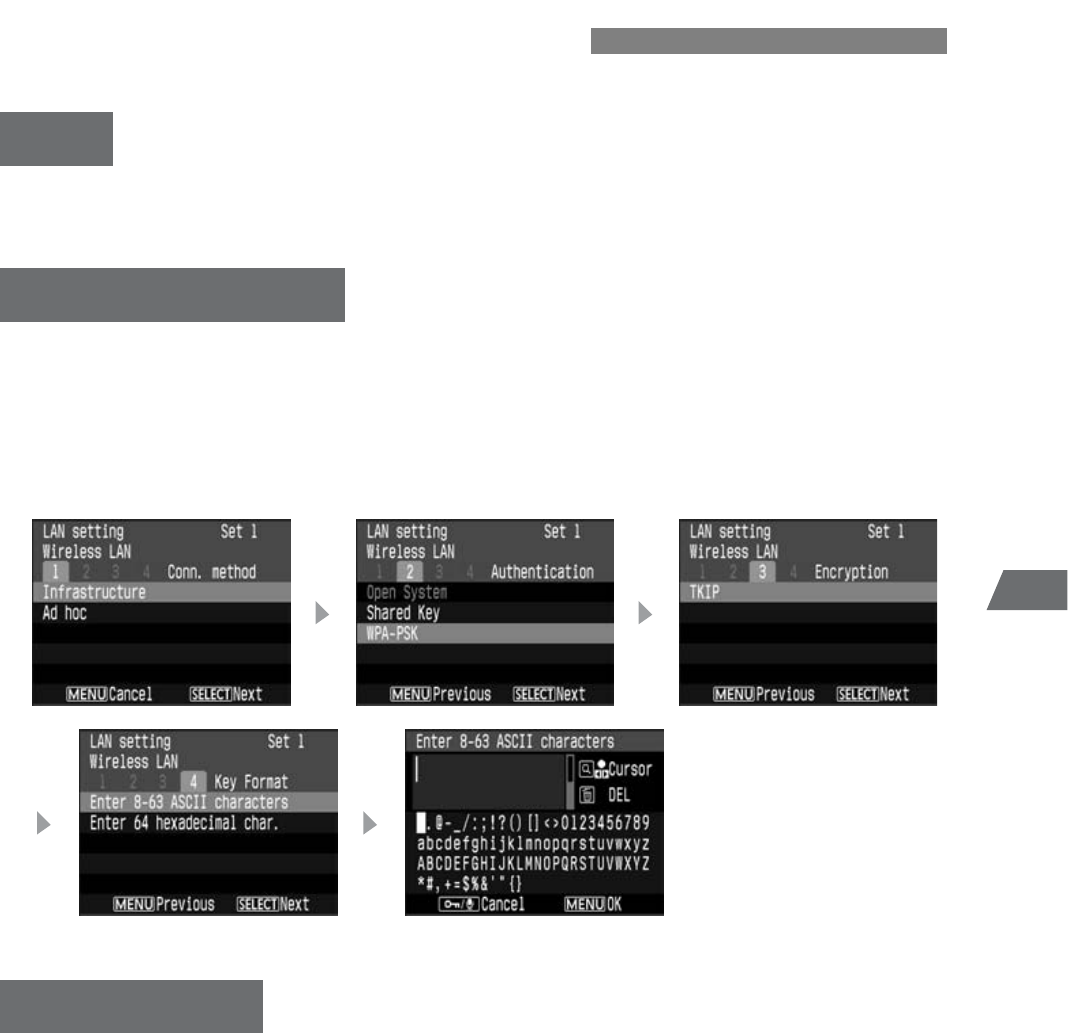
[Conn. Method]
¡Select either [Infrastructure] or [Ad hoc] for the connection.
¡If you will use IEEE 802.11g, select [Infrastructure]. [Ad hoc] does not enable image
transfers.
[Channel]
¡With [Infrastructure], the channel is set automatically.
¡With [Ad hoc], the same channel as for the wireless LAN adapter will be set.
Wireless LAN Settings
Basic Settings
13
1
Creating the Settings File
Wireless LAN Settings
Set the [Authentication], [Encryption], and [Key Format] to the same settings as for the
wireless LAN access point or wireless LAN adapter.
The possible settings will vary depending on the combination as shown below.
To prevent the camera from changing the LAN settings, put a checkmark. You can also
enable/disable the [Protect settings] with the camera’s menu screen (p.44).
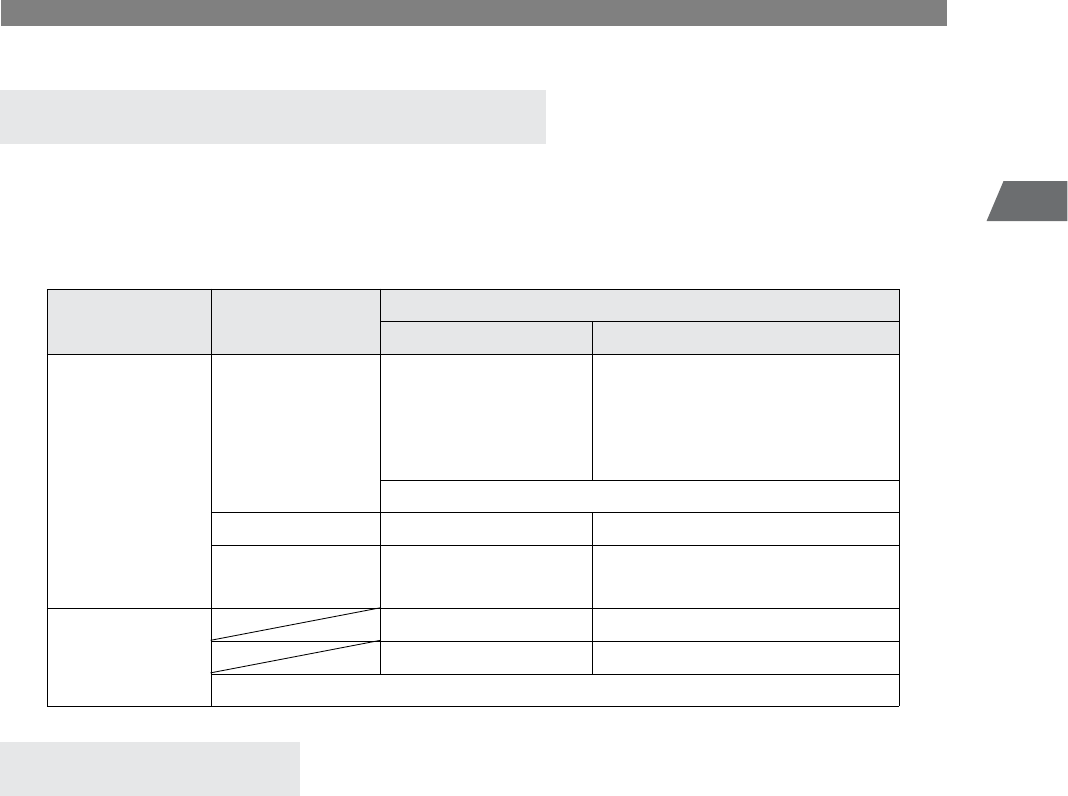
Authentication and Encryption
Conn. Method Authentication Encryption
Encryption Method Key Format
Infrastructure
Open System WEP
• Enter 10 hexadecimal char.
• Enter 26 hexadecimal char.
• Enter 5 ASCII characters
• Enter 13 ASCII characters
None
Shared key WEP See WEP settings above.
WPA-PSK TKIP • Enter 64 hexadecimal char.
• Enter 8-63 ASCII characters
Ad hoc
WEP See WEP settings above.
TKIP See TKIP settings above.
None
Settings Protect
14
You must now save the settings file to a memory card. Have a memory card on hand to
save data.
1Select the [TCP/IP] tab.
2Click the [Save settings] button.
aThe Save dialog box will appear.
3Save without changing the file name.
¡If you save the file with a different file name, the
camera will not be able to read the file.
¡Select the drive where the memory card is
inserted, then open the memory card (in the
root directory) and save the file to the memory
card.
¡To load the settings file into the camera, see
page 23.
Saving the Settings
¡Save the settings file while the memory card is open. If you save the file by putting it inside
the memory card folder, the camera will not be able to read the file from the memory card.
¡Do not save more than one settings file in the memory card. If there are multiple settings
files, the camera will not be able to read the file.
By clicking the [Read settings] button, you can read the settings file saved in the memory card
or hard disk.

15
2
2
Setting Up the WFT-E1A
This chapter explains the WFT-E1A’s nomenclature and preparatory
steps for image transfers.
16
For detailed information, reference page numbers are provided in parentheses (p.**).
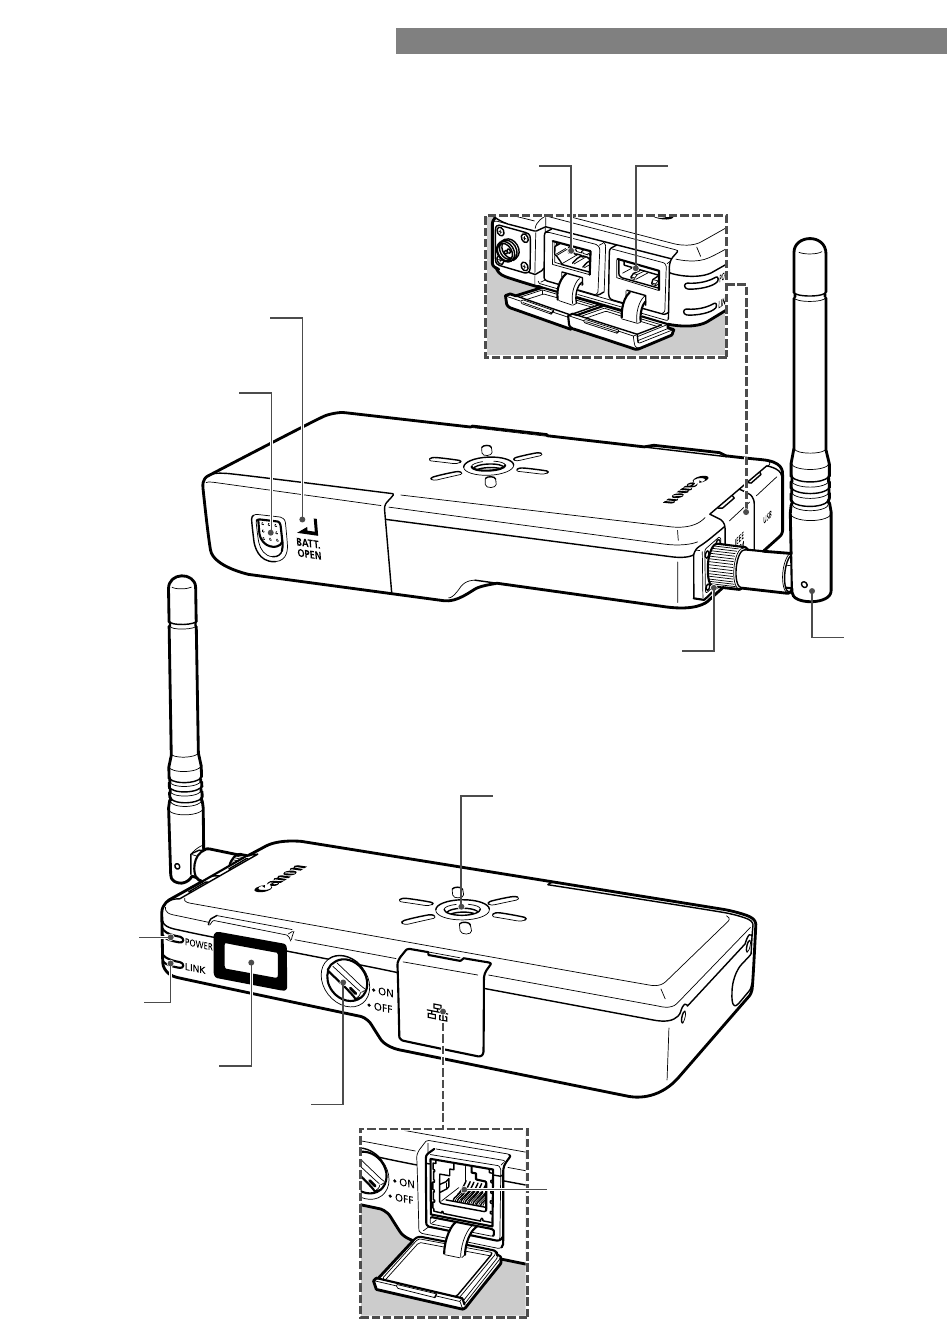
Nomenclature
USB port (p.22)
IEEE 1394 port (p.22)
Battery compartment
cover (p.18)
Battery compartment
cover release lever
(p.18)
Antenna socket (p.21)
Power lamp
(p.22)
LINK lamp
(p.26)
LCD panel (p.17)
Power switch (p.22)
Antenna
(p.21)
Tripod screw hole
Ethernet RJ-45 port
17
2
Setting Up the WFT-E1A
Nomenclature
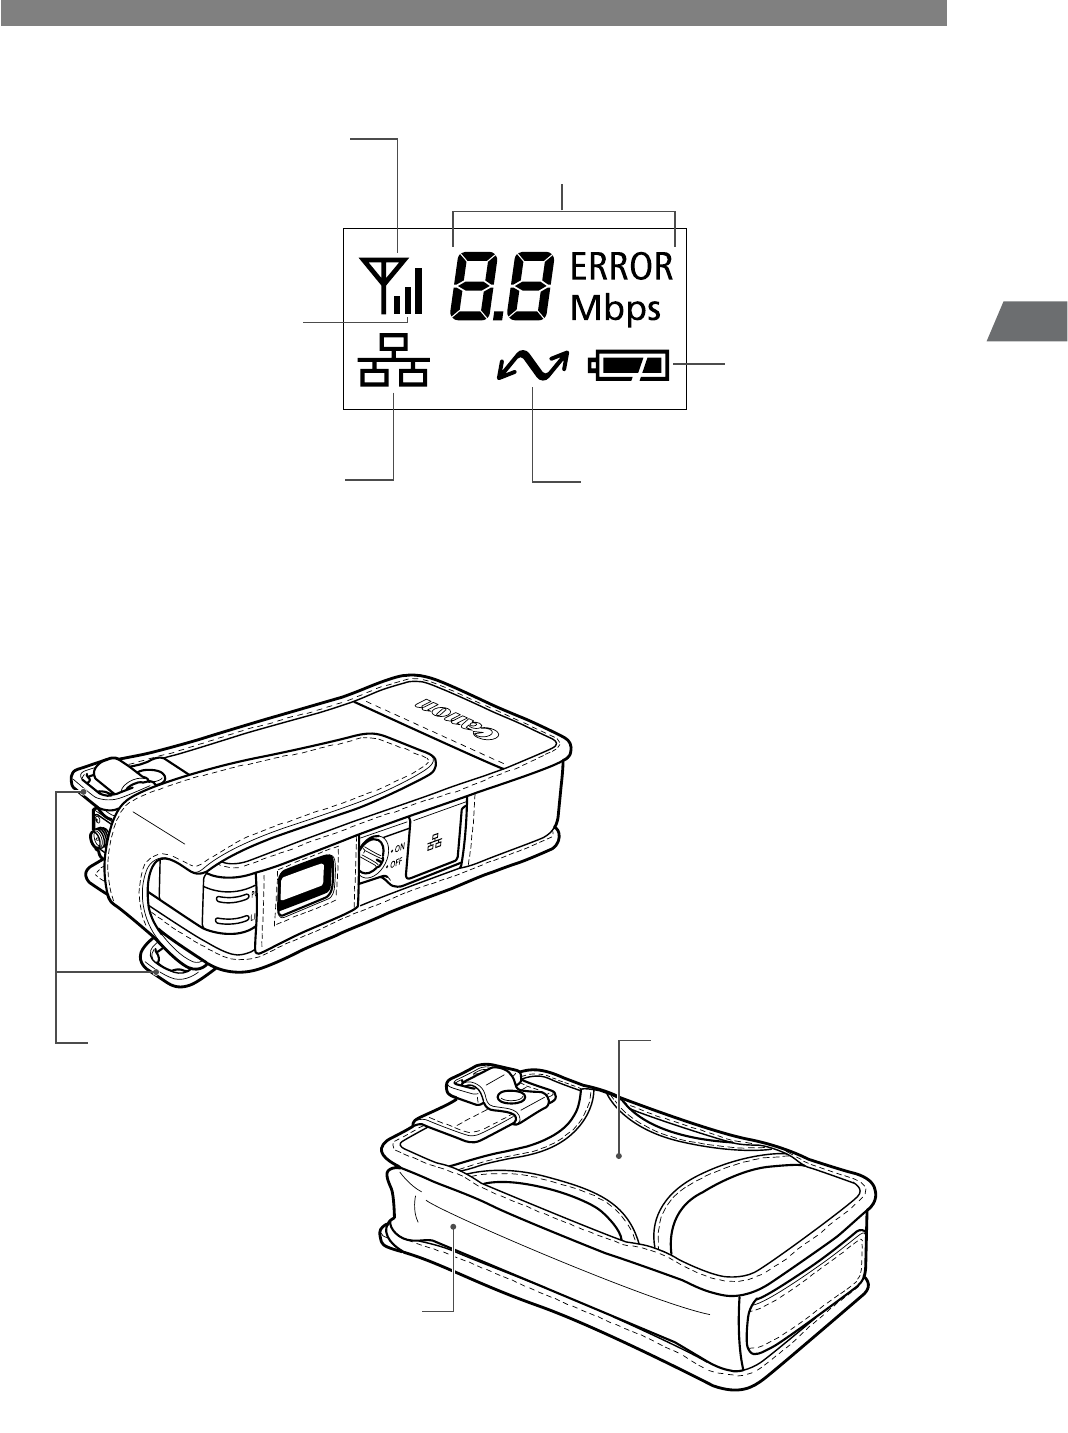
LCD Panel
Case
Link speed (** Mbps)
Error number (** ERROR)
Wi
re
l
ess
LAN
connection status
Wireless signal strength
Wired LAN connection status
Battery check
P Q S
Camera connection status
Strap (commercially available)
mounts
Belt holder
Normal antenna pocket
18
The WFT-E1A can be powered by Battery Pack BP-511A, BP-514, BP-511, or BP-512.
The battery pack and Battery Charger CB-5L or CG-580 do not come with the WFT-E1A.
Purchase them separately if necessary.
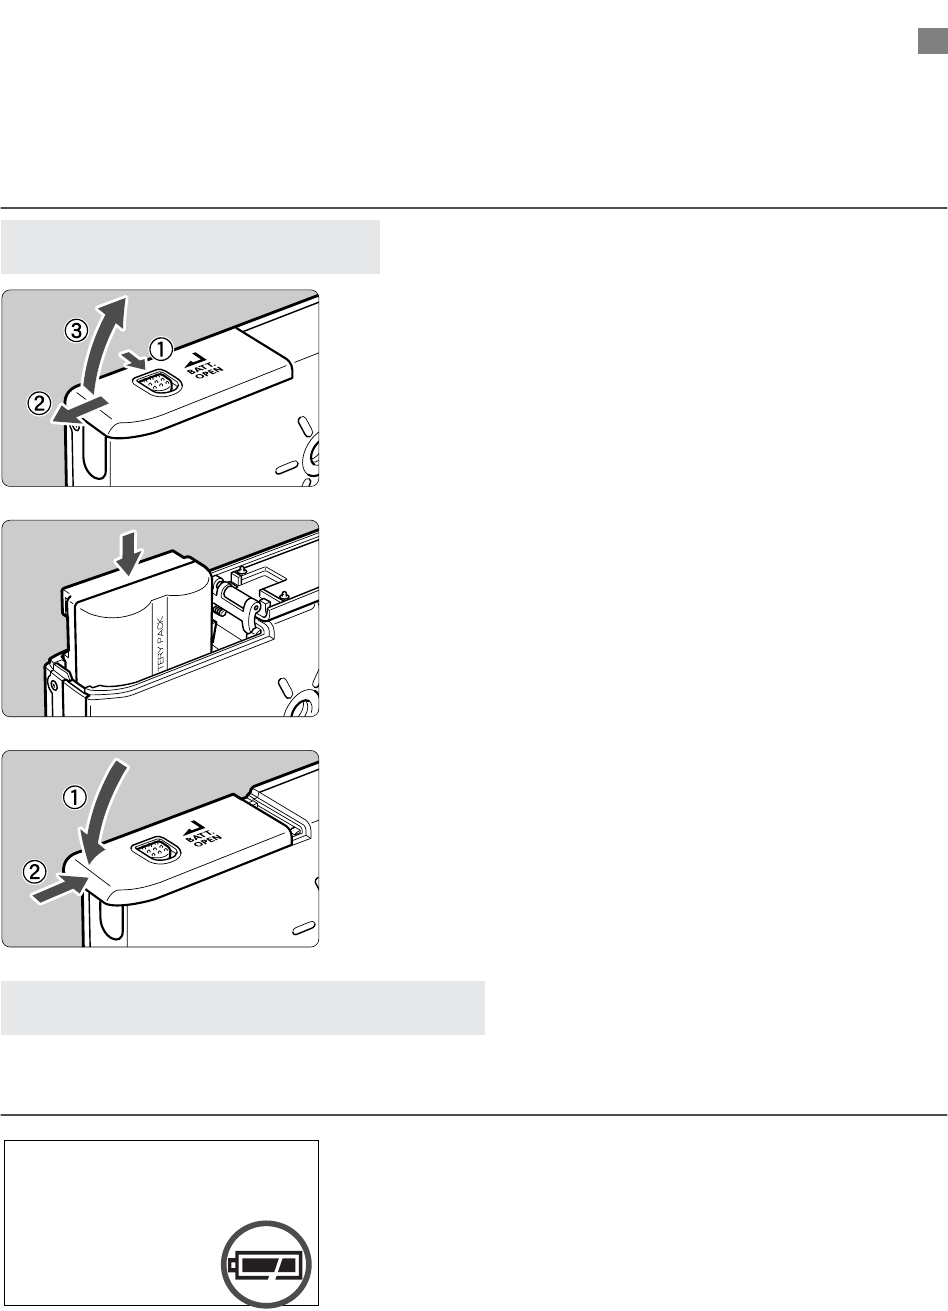
1Open the battery compartment cover.
¡Push down the release lever and slide the cover
to the left.
2Insert the battery.
¡The battery contacts must face upward. Insert it
all the way in until it locks in place.
3Close the cover.
¡Close the cover, then slide it to the right.
When you turn on the power switch (1), the battery power level is indicated in one of
three levels.
P: Battery level OK.
Q: Battery level is low.
S: Battery must be recharged.
Installing and Removing the Battery
Installing the Battery
Checking the Battery Level
19
2
Setting Up the WFT-E1A
Installing and Removing the Battery
Battery Life
¡The battery life is based on Canon’s testing standards. The actual battery life may be
shorter than the figures above depending on the operating conditions.
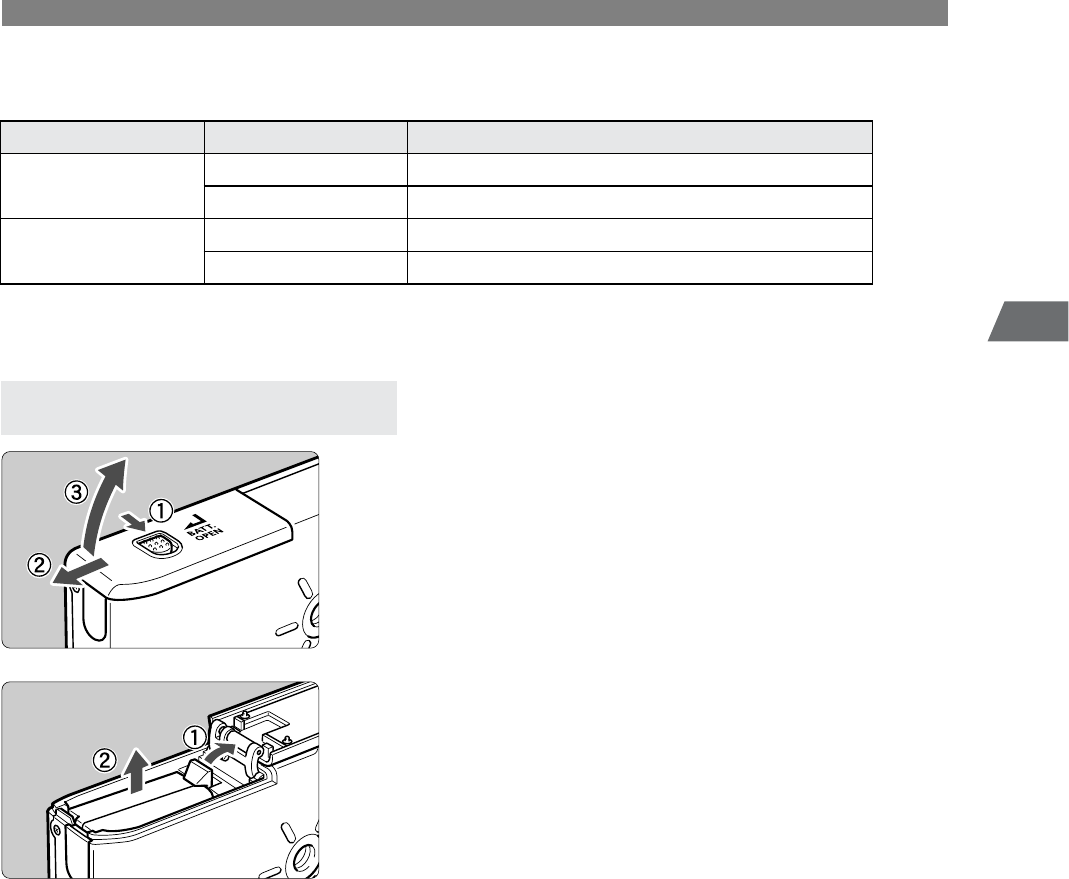
1Open the battery compartment cover.
¡Push down the release lever and slide the cover
to the left.
2Remove the battery.
¡Push the battery lock lever as shown by the
arrow to unlock it, then take out the battery.
LAN type Temperature Continuous Image Transfer Time [minutes]
Wireless LAN At 20°C / 68°F 180
At 0°C / 32°F 120
Ethernet At 20°C / 68°F 270
At 0°C / 32°F 180
Removing the Battery
20
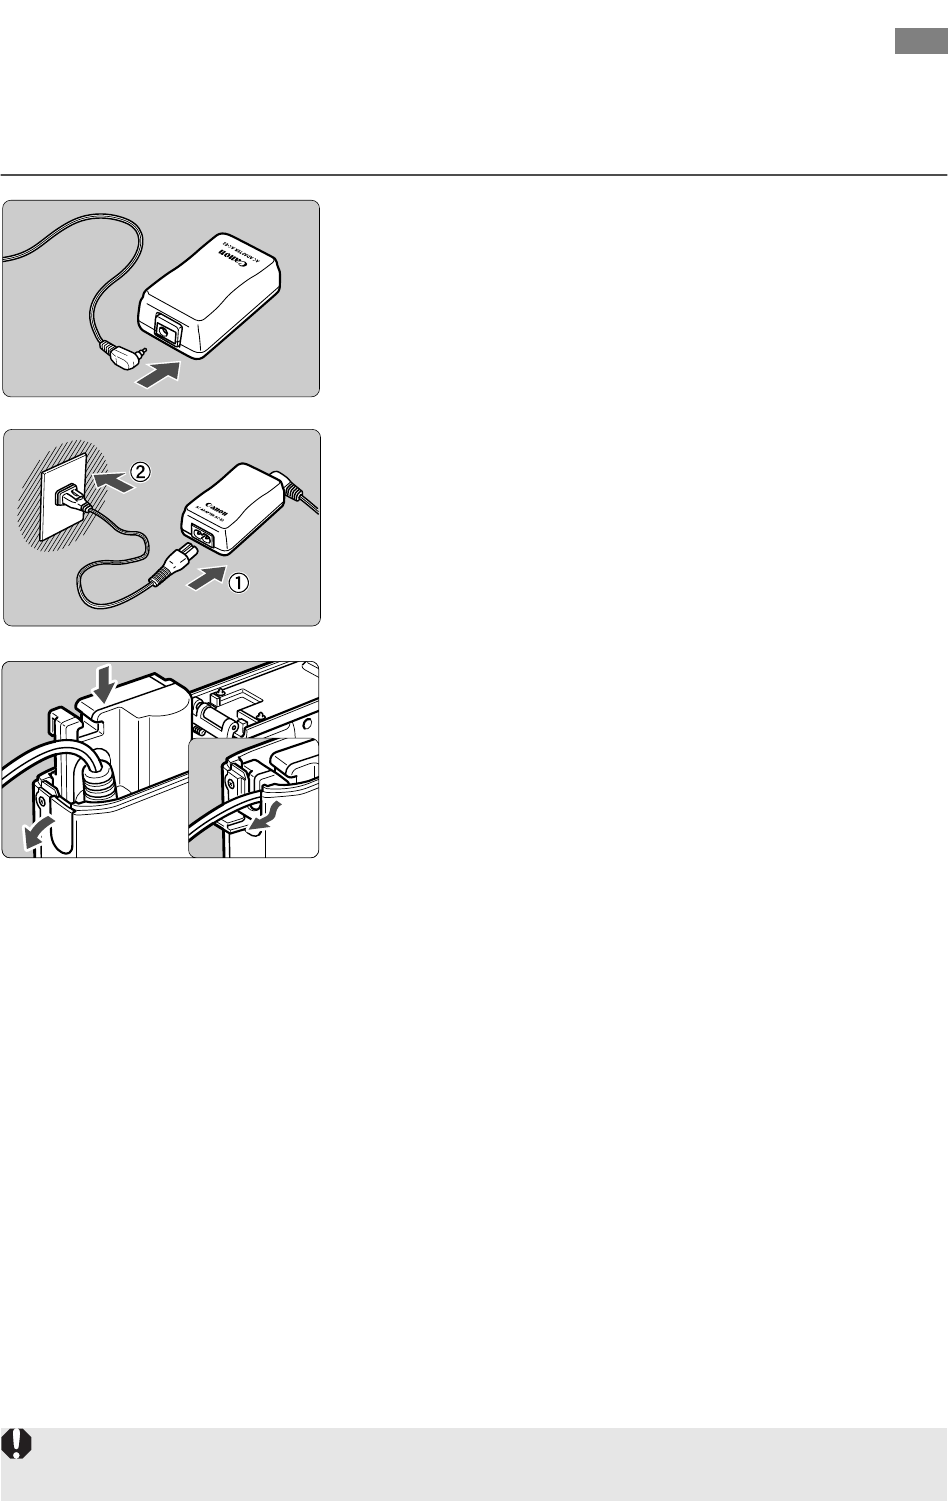
With the AC Adapter Kit ACK-E2 (optional), the WFT-E1A can be powered by a
household power outlet.
1Connect the DC coupler.
¡Connect the DC coupler’s plug to the AC
adapter’s socket.
2Connect the power cord.
¡Connect the power cord to the AC adapter.
¡Insert the plug into a power outlet.
¡When you are finished, disconnect the plug
from the power outlet.
3Insert the DC coupler.
¡Open the battery compartment cover and open
the DC Coupler cord notch cover.
¡Insert the DC Coupler until the lock position and
put the cord through the notch.
¡Close the cover.
Using a Household Power Outlet
Be sure to turn off the WFT-E1A’s power switch before connecting/disconnecting the power
cord.
21
2
Setting Up the WFT-E1A
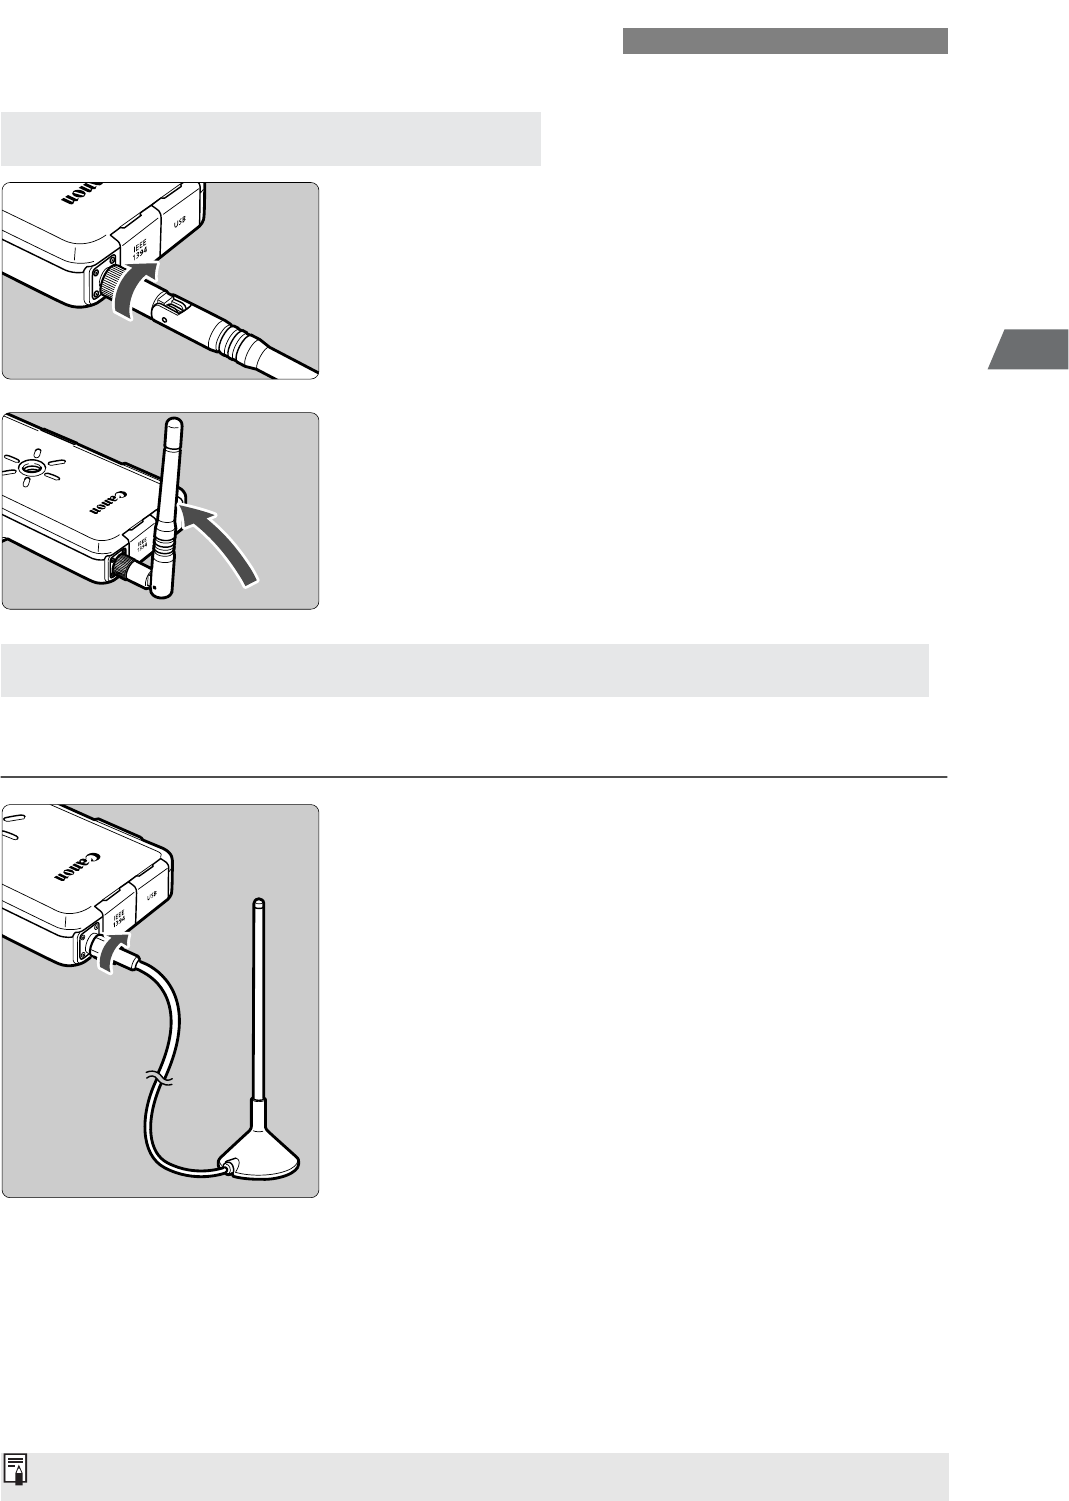
1Attach the antenna.
¡Turn the antenna’s base to screw it in.
2Adjust the antenna’s direction.
¡To maximize the signal strength for transferring
images, set the antenna so that it is
perpendicular to the ground.
This is a high-performance antenna useful if the normal antenna is unable to send an
adequate signal.
¡Turn the antenna cable’s base to screw it in.
¡The antenna’s stand has a tripod socket.
Position it so it has a clear line of sight with the
wireless LAN access point.
¡Before transferring images, position the
antenna so that it is perpendicular to the ground
to maximize the signal strength.
Attaching the Antenna
Attaching the Normal Antenna
Attaching the Extended Range Antenna ERA-E1 (optional)
If you use a wired LAN, you need not attach the antenna.
22
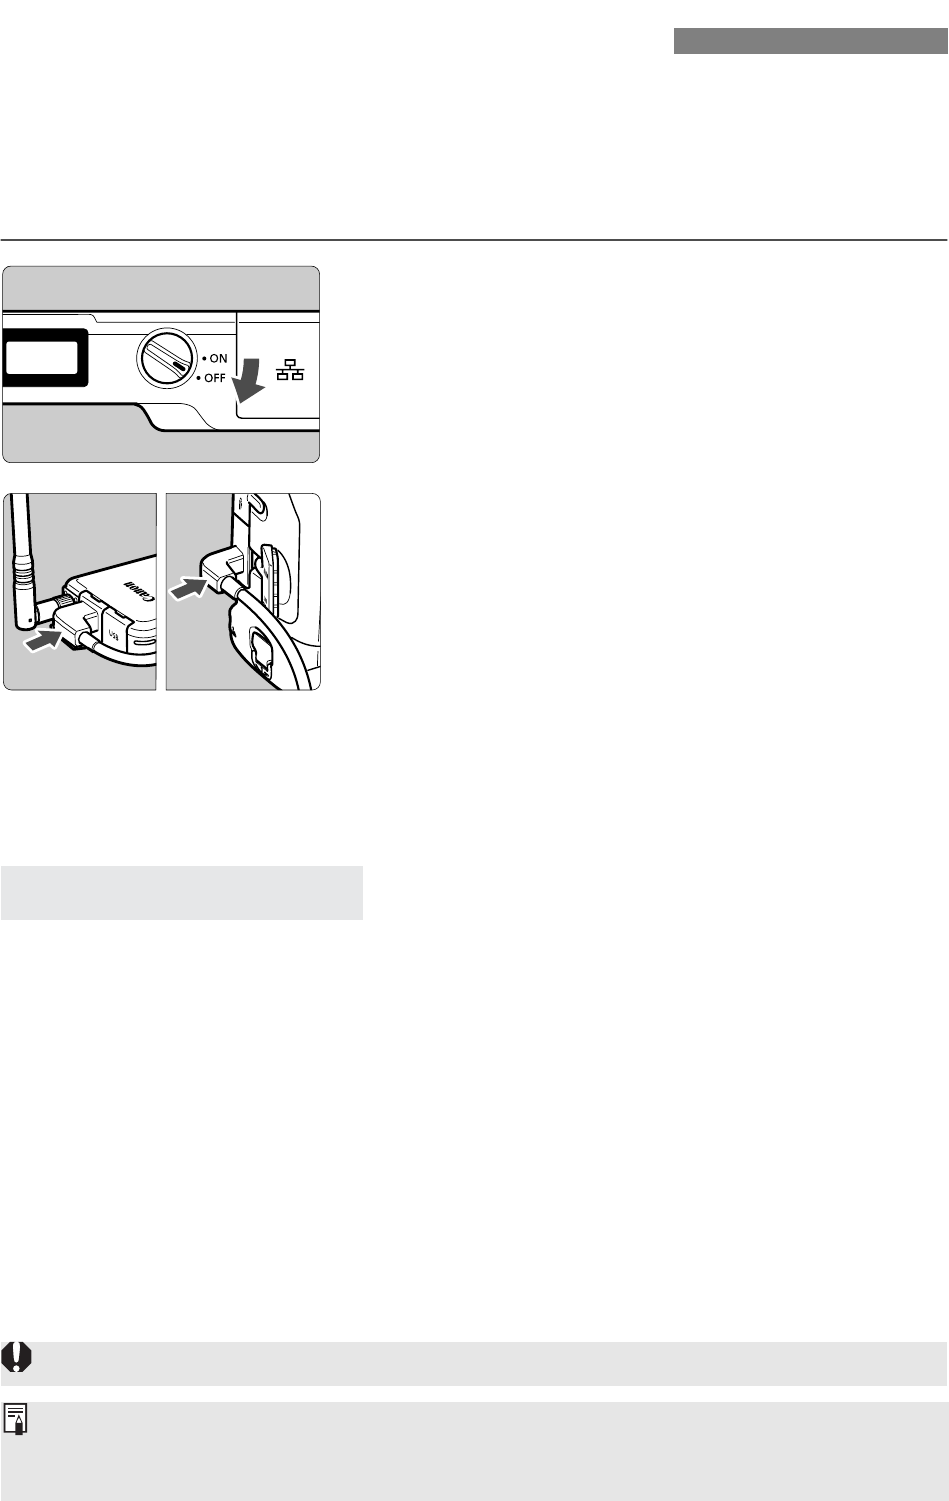
The WFT-E1A has an IEEE 1394 port and USB port for connecting to the camera.
Use an interface cable that suits your camera or use the interface cable that came with
the camera. If you have an EOS-1D-series camera, use the IEEE 1394 port. Images
cannot be transferred via the USB port.
1Turn off the WFT-E1A and camera.
2Connect the WFT-E1A and camera.
¡Connect the cable plug to the WFT-E1A and
camera’s <a> port.
¡
Use the 15 cm/0.5 ft cable (water- and dust-
resistant) that came with the WFT-E1A when the
WFT-E1A is attatched to the camera’s tripod socket
.
3Turn on the WFT-E1A and camera.
aThe WFT-E1A’s <3> lamp will light and
<D> will be displayed on the WFT-E1A’s LCD
panel.
To conserve battery power while the WFT-E1A is not being used, three power
management levels are provided:
Power save mode
If you do not use the WFT-E1A for a set period of time, the power save mode takes effect
(p.28).
Standby mode
When the camera turns off, the WFT-E1A enters the standby mode. The standby mode is
canceled when the camera turns on again. During the standby mode, only the <P>
icon is displayed on the WFT-E1A. The <3> lamp and <4> lamp will be off.
Auto power off
If the standby mode continues for four hours, the WFT-E1A will turn off. The power turns
on again when you set the WFT-E1A’s power switch to <2>/<1>.
Attaching to the Camera
Power Management
Before disconnecting the cable, turn off both the WFT-E1A and camera.
¡If the camera has a USB port, connect it with the USB cable that came with the camera.
¡If the WFT-E1A’s <3> lamp blinks, it means that the WFT-E1A and camera are not
properly connected. Check the connection.
23
2
Setting Up the WFT-E1A
With the settings file you created in Chapter 2, you will enable the camera to be
connected to the LAN.
Although the sample menu screens shown are from the EOS-1Ds Mark II, other EOS
digital cameras also use the same menu terminology.
For the menu operation procedure, refer to your camera’s instruction manual.
1Insert the memory card containing the
settings file.
2Connect the WFT-E1A and camera and
turn on both.
3Display the menu screen.
¡Select the Setup menu category.
4Select [Image transfer (LAN) settings].
¡[Image transfer (LAN) settings] will not be
displayed if the WFT-E1A and camera are not
connected and turned on.
5Select [LAN setting].
¡English will be displayed for any language that
the WFT-E1A is not compatible with.
Setting the LAN
Loading the Settings File to the Camera
24
Setting the LAN
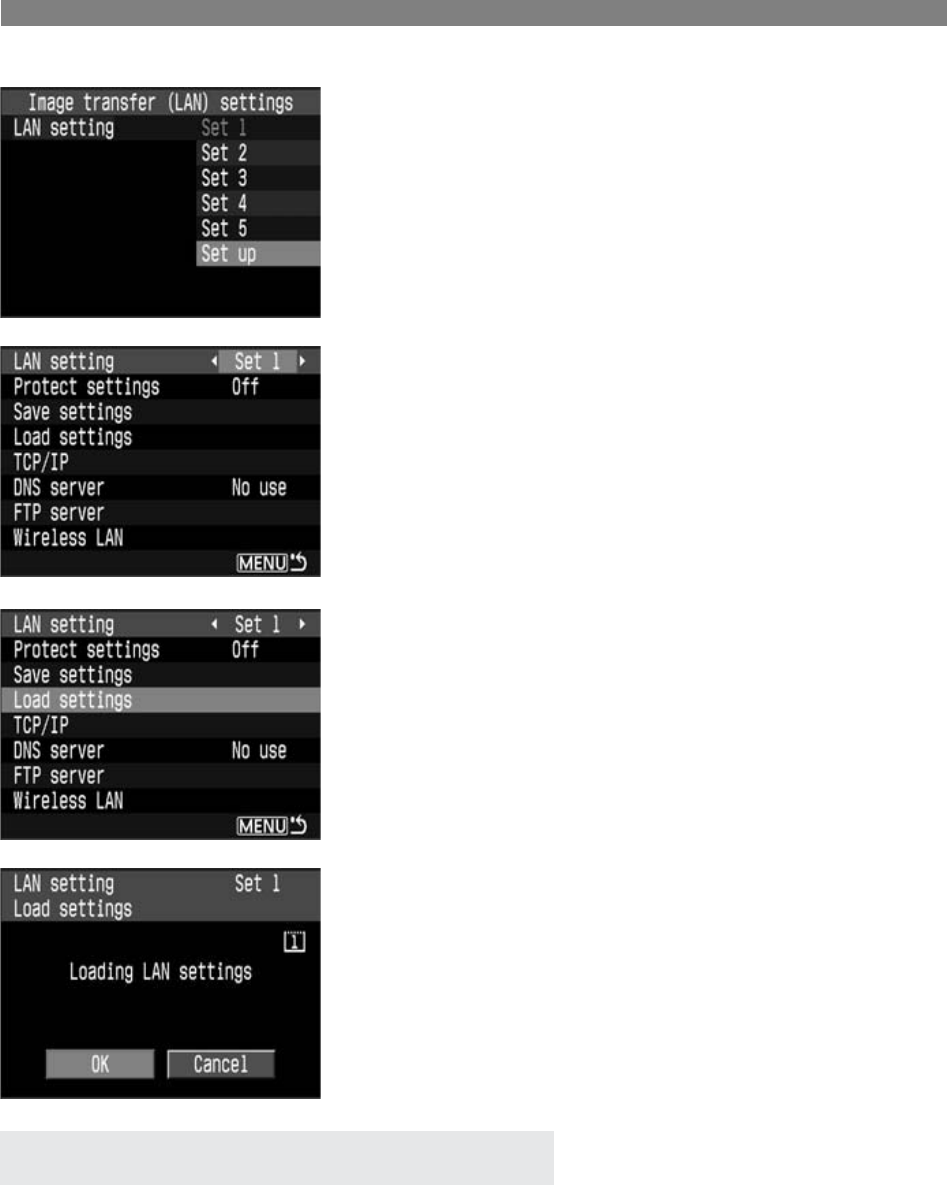
6Select [Set up].
7Select the Set No. of the settings file
you want to load.
¡You can have up to five settings from [Set 1] to
[Set 5].
8Select [Load settings].
9Select [OK].
aThe settings file will be loaded into the selected
Set No.
Do steps 2 to 5 on page 23.
In step 6, select the Set No. that suits the LAN environment you are using.
Selecting the Settings (Set No.)
25
2
Setting Up the WFT-E1A
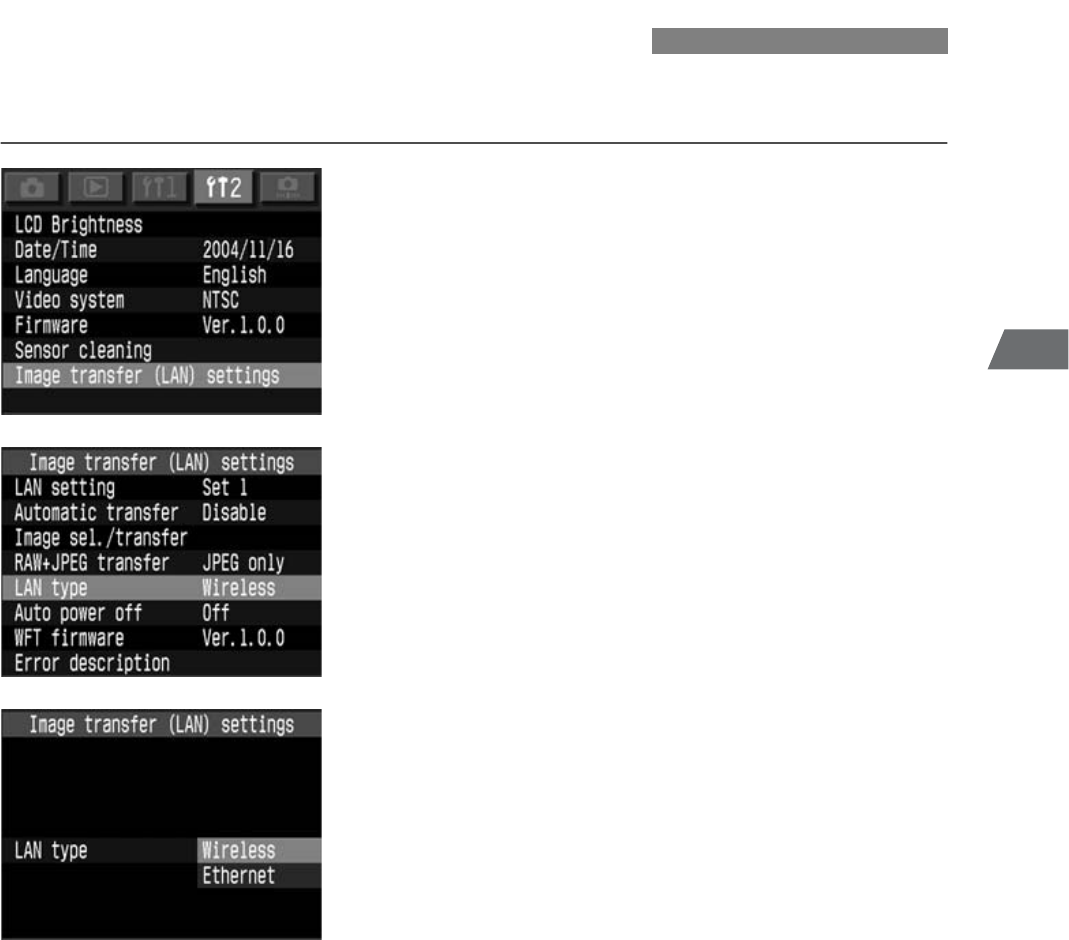
Set the image transfer for the wireless LAN or wired LAN.
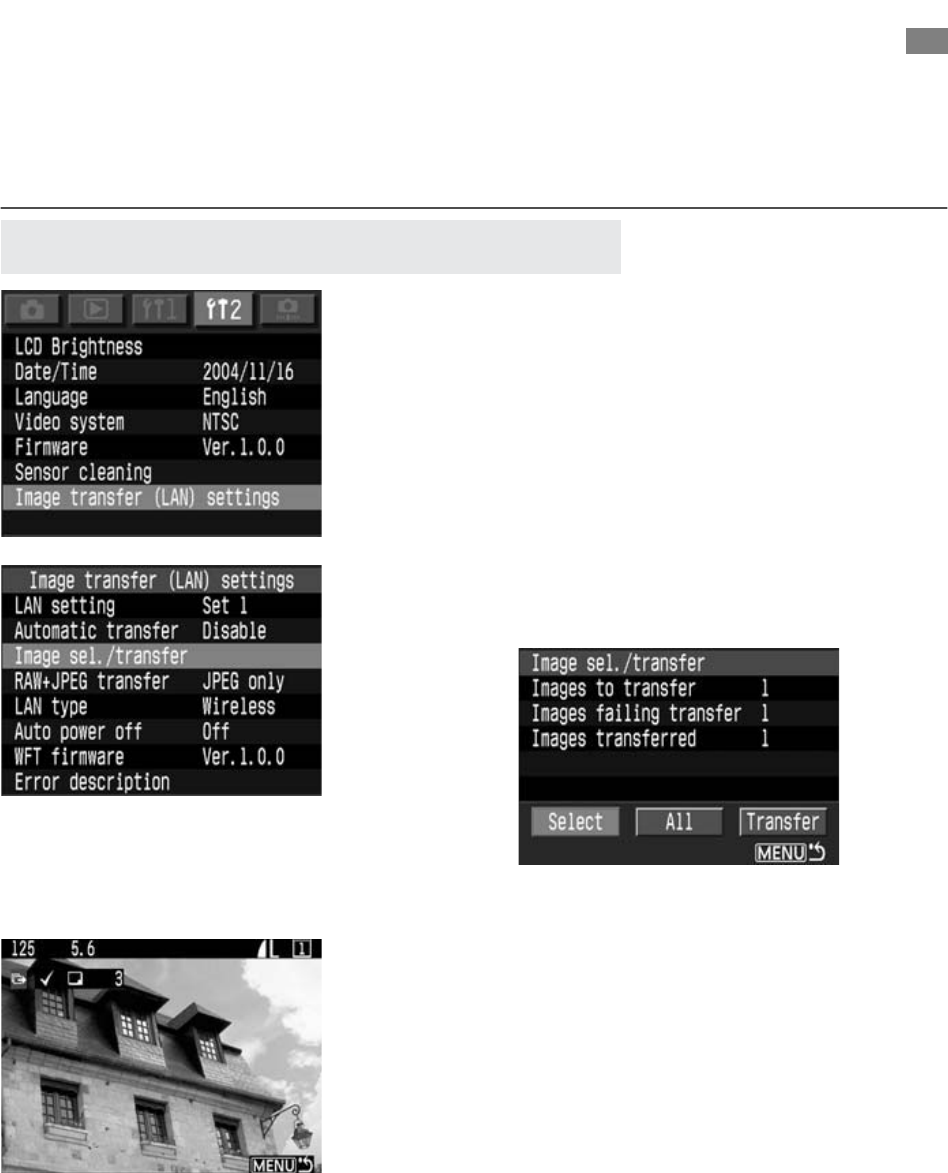
1Select [Image transfer (LAN) settings].
¡[Image transfer (LAN) settings] will not be
displayed if the WFT-E1A and camera are not
connected and turned on.
2Select [LAN type].
¡English will be displayed for any language that
the WFT-E1A is not compatible with.
3Select the LAN type to be used.
Selecting the LAN Type
26
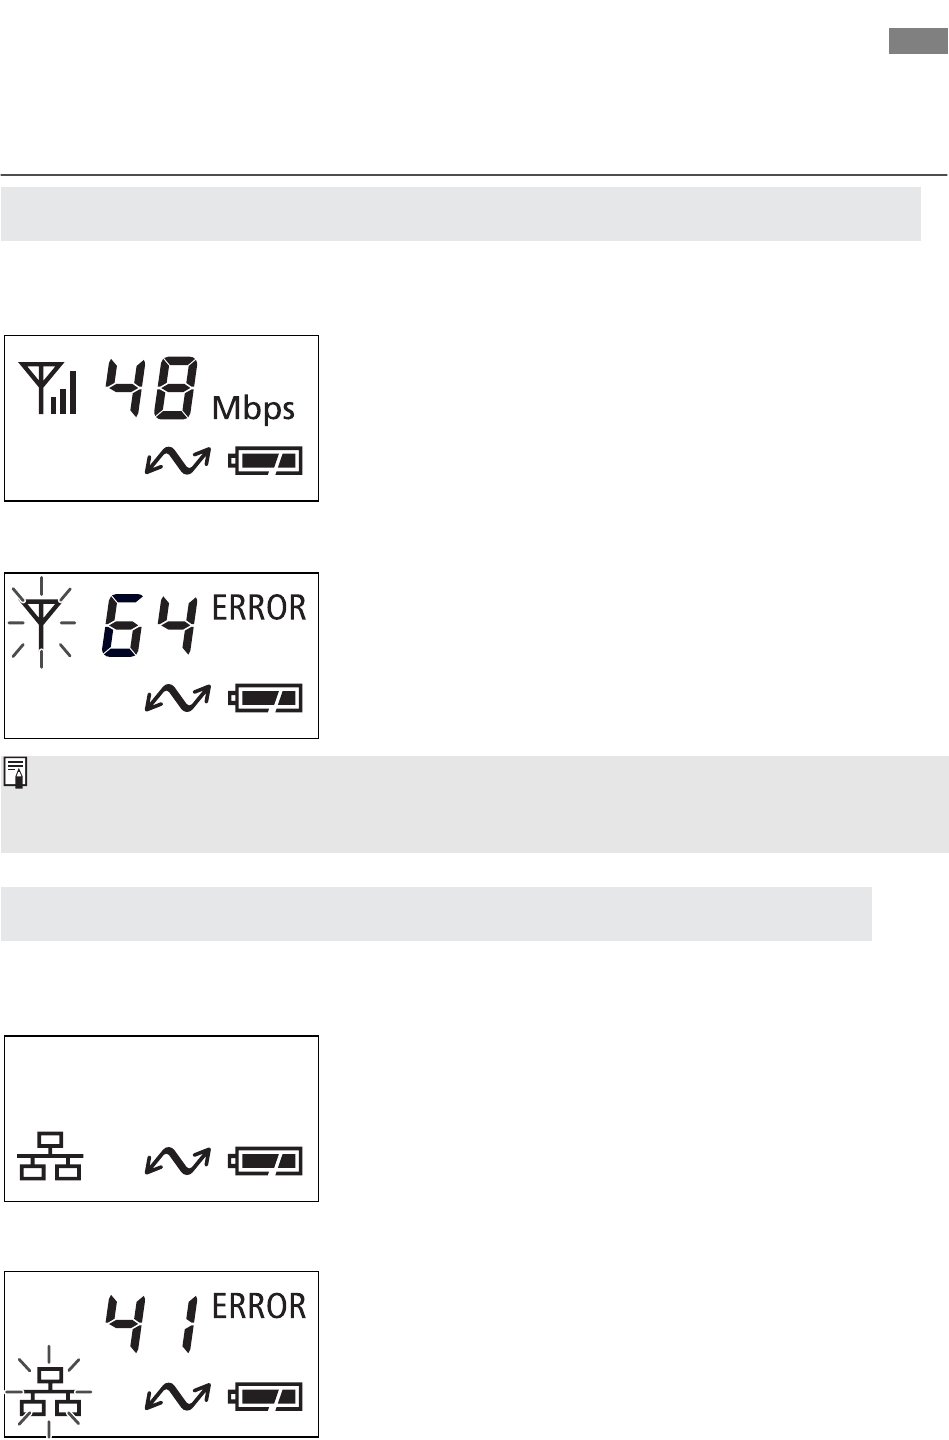
You can check the status of the connection between the WFT-E1A and camera with the
WFT-E1A’s LCD panel and lamp.
Check the connection right near the wireless LAN access point (or wireless LAN adapter).
Successful connection display
¡The LCD panel, <3> lamp, and <4>
lamp will light.
¡The number indicates the link speed.
Failed connection display
¡The LCD panel will show <E> and the
error number. The <B> and <3> lamps
will also blink.
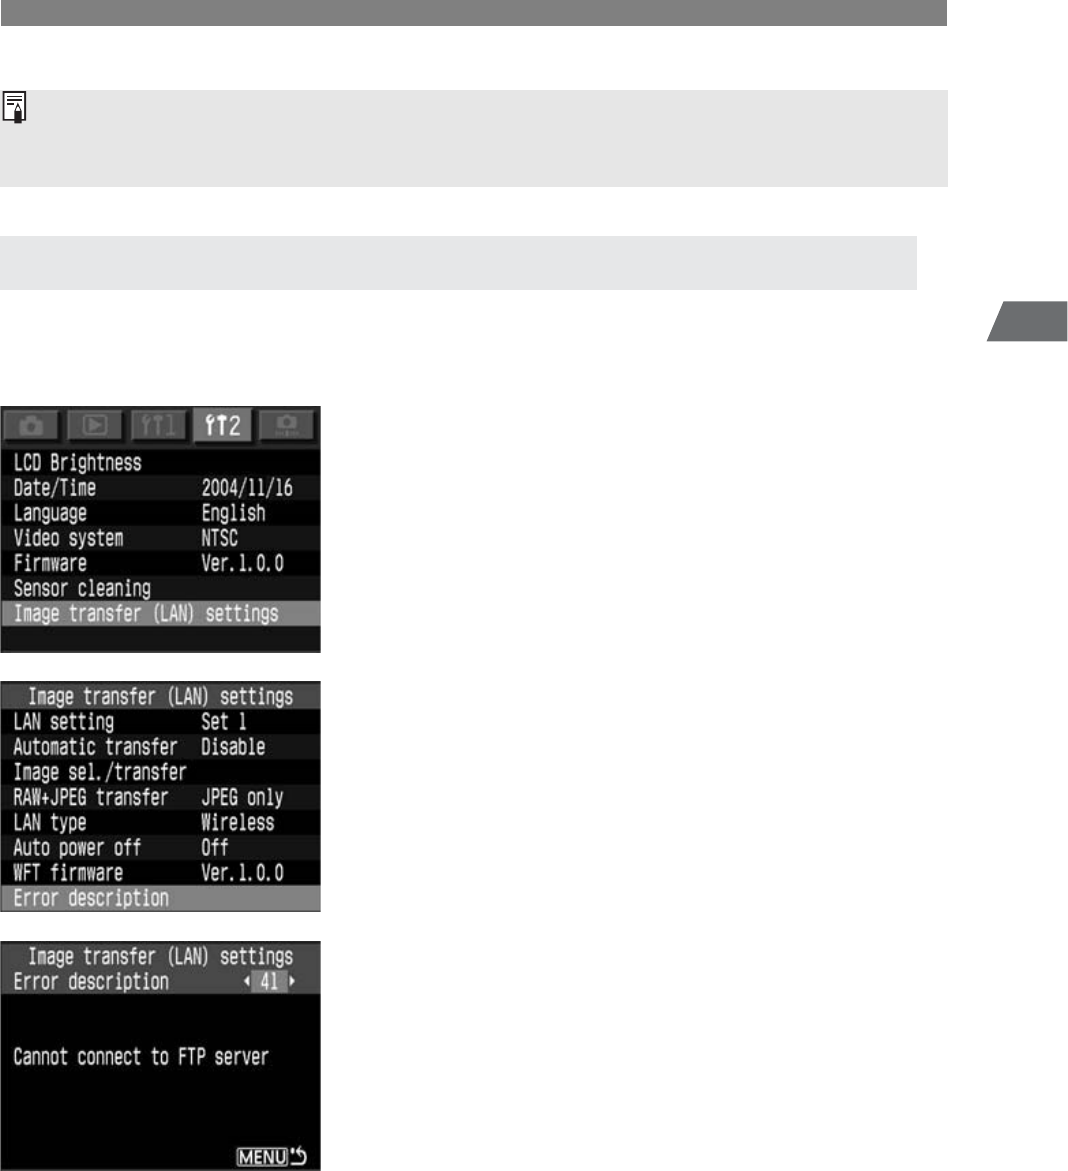
First connect the WFT-E1A and FTP server with a LAN cable.
Successful connection display
¡The LCD panel, <3> lamp, and <4>
lamp will light.
Failed connection display
¡The LCD panel will show <E> and the
error number. The <C> and <3> lamps
will also blink.
Checking the Connection Status
Checking the Connection Status of the Wireless LAN
Checking the Connection Status of the Wired LAN
¡The more <A> bars there are, the more stable the image transfer will be.
¡The greater the link speed number, the faster the image transfer will be (the actual image
transfer speed will be different).
27
2
Setting Up the WFT-E1A
Checking the Connection Status
If an error occurs, follow the procedure below to identify the error (p.48) and take suitable
steps to resolve the error. To resolve an error, you must be knowledgeable about the
wireless LAN, wired LAN, and FTP server.
1Select [Image transfer (LAN) settings].
2Select [Error description].
3Select the error No. displayed on the
LCD panel.
aThe respective error description will be
displayed.
Identifying an Error No. Displayed on the Display Panel
¡Use a category 5 or higher LAN cable.
¡If you are connecting directly to a personal computer without any router or hub, use a cross
cable.
28
Checking the Connection Status
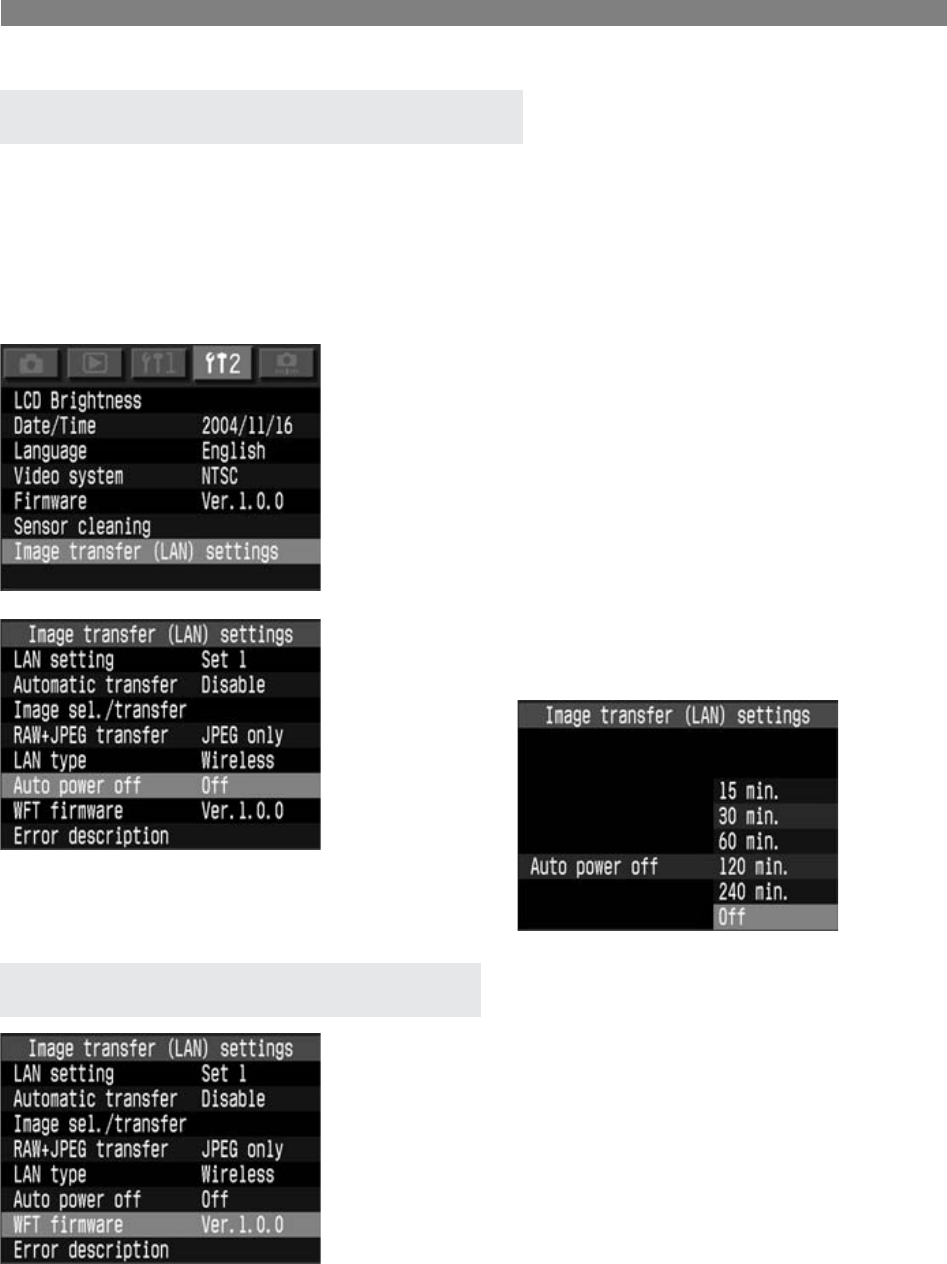
The WFT-E1A enters the power save mode if do not use the WFT-E1A for a set period of
time. When you start shooting again, the power save mode will be canceled automatically
and images will be transferred.
During the power save mode, only the <D> and <P> icons will be displayed on the
WFT-E1A’s display panel. The <4> lamp will be off.
1Select [Image transfer (LAN) settings].
2Select [Power saving].
¡Select the desired time.
Select this when you want to update the WFT-
E1A’s firmware. For any new firmware and update
procedures, check Canon’s Web site.
Setting the Power Save Mode
About [WFT-E1A firmware]

29
3
3
Transferring Images
Besides transferring images automatically as you shoot, you can
also send images in a batch after shooting.
Also, when you shoot in the RAW+JPEG mode, you can send only
the JPEG image or RAW image or both images.
This chapter assumes that the WFT-E1A is already connected to an
FTP server.

30
You can transfer the image automatically to an FTP server right after it is taken. You can
continue shooting even while an image is being transferred.
Be sure to insert the memory card in the camera when shooting.
1Select [Image transfer (LAN) settings].
2Select [Automatic transfer].
¡Select [Enable].
3Take the picture.
aThe captured image will be transferred to the
FTP server.
¡During the image transfer, the <4> lamp
will blink.
Automatic Image Transfer After Each Shot
¡Images cannot be transferred if the memory card is not inserted.
¡During the image transfer, do not turn off the camera’s power switch. Doing so will interrupt
the image transfer. If there is any image whose transfer failed or was interrupted, you can
transfer it later in a batch.
¡During continuous shooting, the images will be transferred in the order they were captured.
¡The captured images will also be stored in the memory card.
31
3
Transferring Images
Automatic Image Transfer After Each Shot
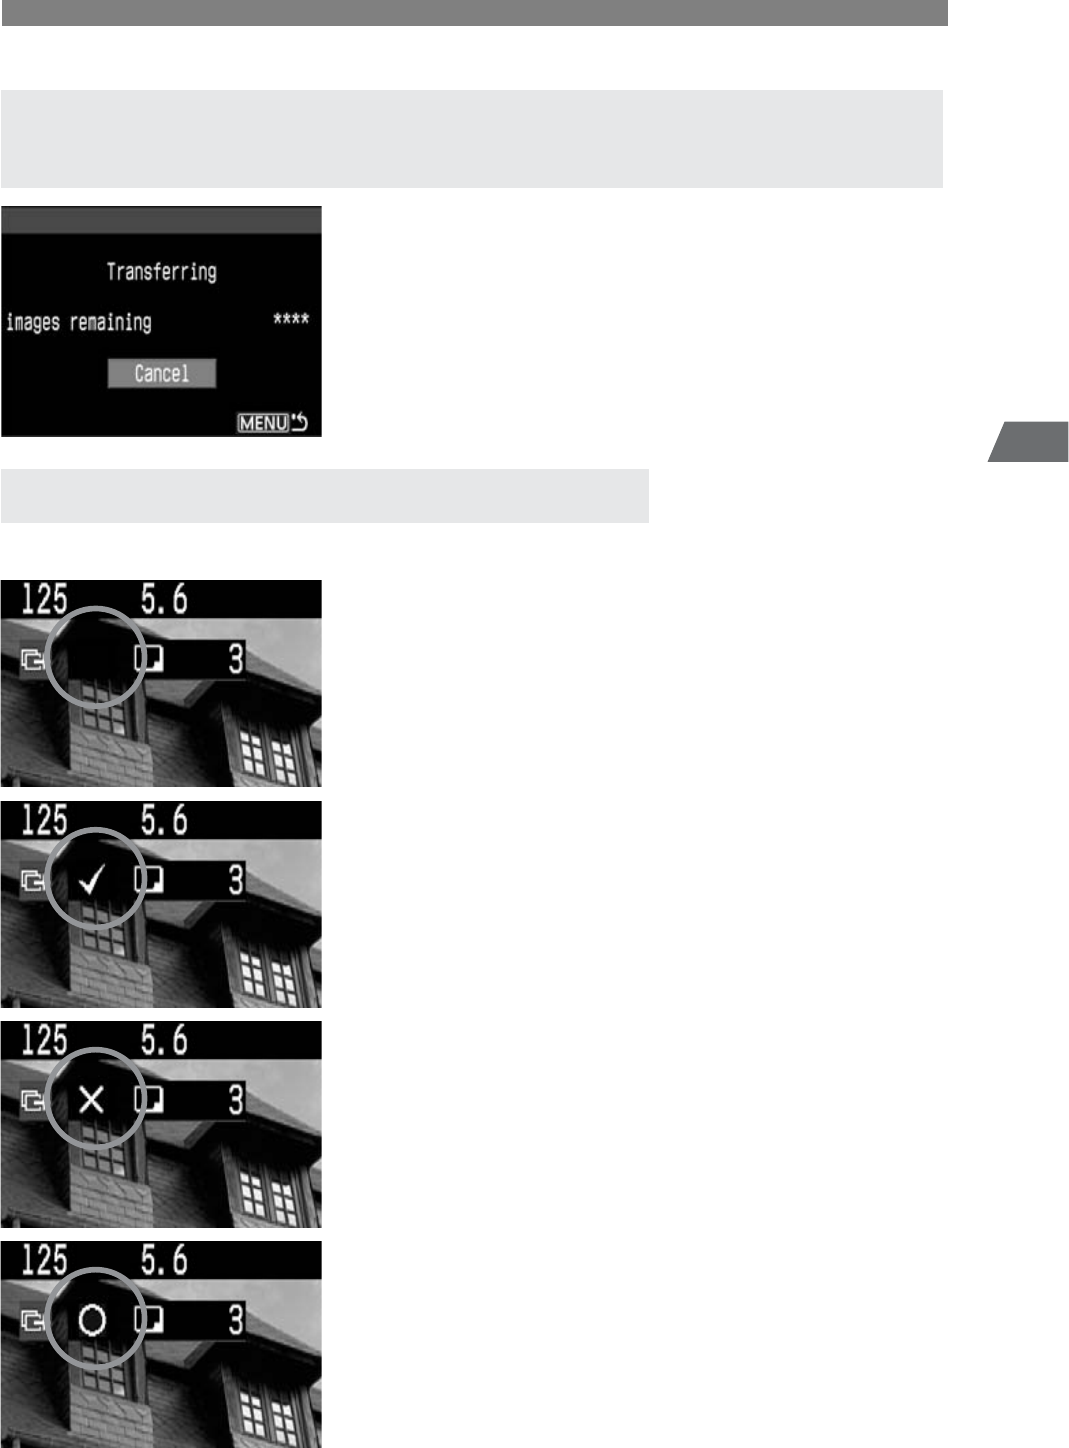
During continuous shooting, you can check how
many images are remaining to be transferred.
Select [Image transfer (LAN) settings] on the
menu and the number remaining will be displayed.
If you select [Cancel], the transferring and transfer
standby images will be cancelled.
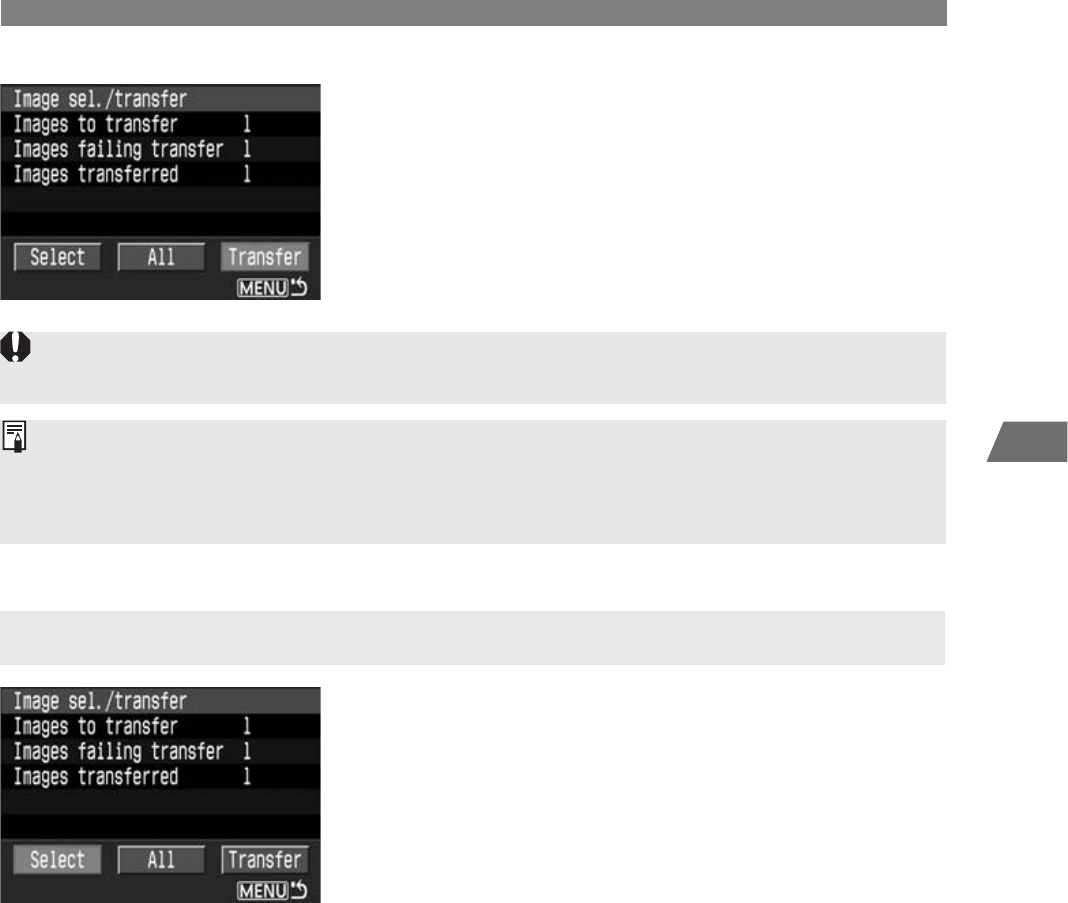
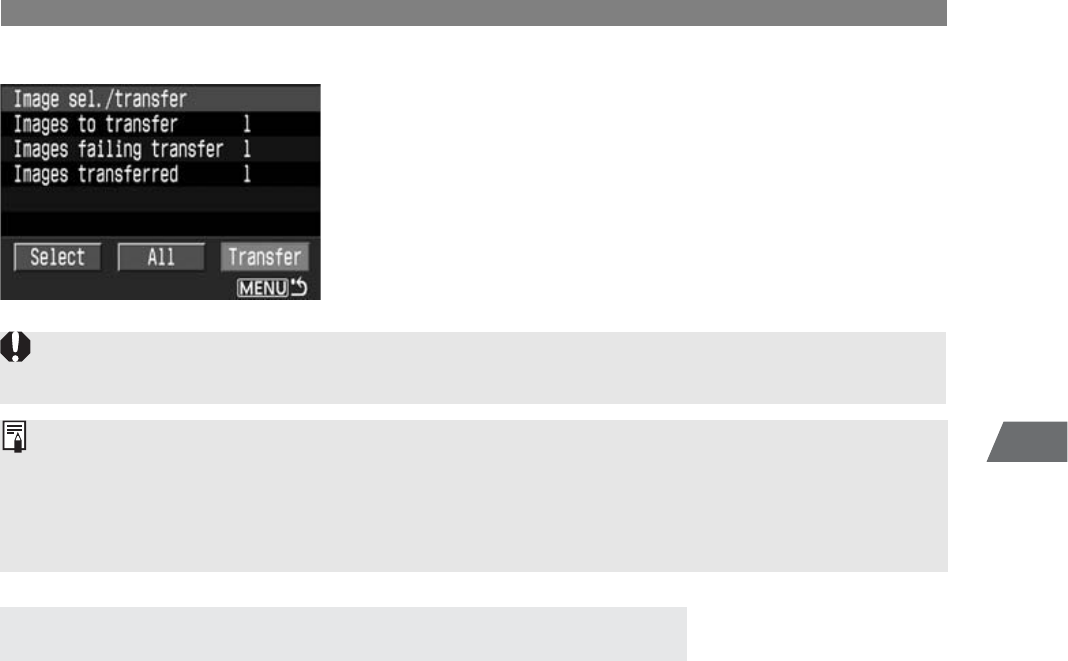
If you select [Select] with [Image sel./transfer], you can check its image transfer history
(p.32).
Image not selected for transfer (No
icon)
Images to transfer
Image selected for transfer
Images failing transfer
Image failed to transfer (error)
Images transferred
Image transferred successfully
Checking the Remaining Images to be Transferred and
Canceling the Image Transfer
Checking the Image Transfer History
32
After you finish shooting, you can select the best images and transfer them in a batch. Or
you can send images which have not been transferred or which failed transfer.
You can continue shooting even while an image is being transferred.
1Select [Image transfer (LAN) settings].
2Select [Image sel./transfer].
¡Select [Select].
aThe image will be displayed.
3Select the image to be transferred.
¡Select the image in the same way as for image
playback.
¡When using a camera with <b> button,
turn the <c> while holding down the
<b> button to display <j> on the upper
left of the image to be transferred.
When using a camera with <g> button, press
the <g> button to display <j> on the upper
left of the image to be transferred.
You can select up to 9999 images.
¡After selecting the images to be transferred,
press the <e> button.
Image Batch Transfer After Shooting
Selecting Images to be Transferred
33
3
Transferring Images
Image Batch Transfer After Shooting
4Transfer the images.
¡Select [Transfer].
¡During the image transfer, the <4> lamp
will blink.
With the left screen displayed in step 2, you can
check the number of images to be transferred as
well as the image transfer history like the number
of images in the selected folder or card that failed
to transfer or that completed the transfer.
Checking the Image Transfer History for a Folder or Memory Card
During the image transfer, do not turn off the camera’s power switch. Doing so will interrupt the
image transfer.
¡In step 3, if you set it to the index display, three thumbnail images will be displayed. To return
to the normal view, magnify the image view.
¡See page 31 for “Checking the Remaining Images to be Transferred and Canceling the
Image Transfer.”

34
Image Batch Transfer After Shooting
1Select [Image transfer (LAN) settings].
2Select [Image sel./transfer].
¡Select [All].
3Select the desired option.
¡You can select the images in a folder or
memory card which have not been transferred
or which failed the transfer.
¡If your camera cannot select folders, the folder
options will not appear.
About [Folder…]
¡You can select “images not transferred” or “images failed transfer” in the selected
folder.
About [Card…]
¡You can select “images not transferred” or “images failed transfer” in the selected
memory card.
¡After selecting the desired option, press the <e> button.
Transferring Images in a Batch
35
3
Transferring Images
Image Batch Transfer After Shooting
4Transfer the images.
¡Select [Transfer].
¡During the image transfer, the <4> lamp
will blink.
You can use the menu even during image transfers. However, the following menu
operations cannot be done during image transfers since it may interfere with the image
transfer (your camera might not have all these operations):
• Protect images • Rotate • Erase • Print Order • Format
• Firmware • Sensor cleaning
• Save camera settings • Loading camera setting
Menu Operation During Image Transfer
During the image transfer, do not turn off the camera’s power switch. Doing so will interrupt the
image transfer.
¡See page 31 for “Checking the Remaining Images to be Transferred and Canceling the
Image Transfer.”
¡If you select [Clear transfer history], the status of all the images in the folder or memory
card will be set to “not transferred.” Then you can resend all the images in the folder or
memory card by selecting [Images not transferred].
36
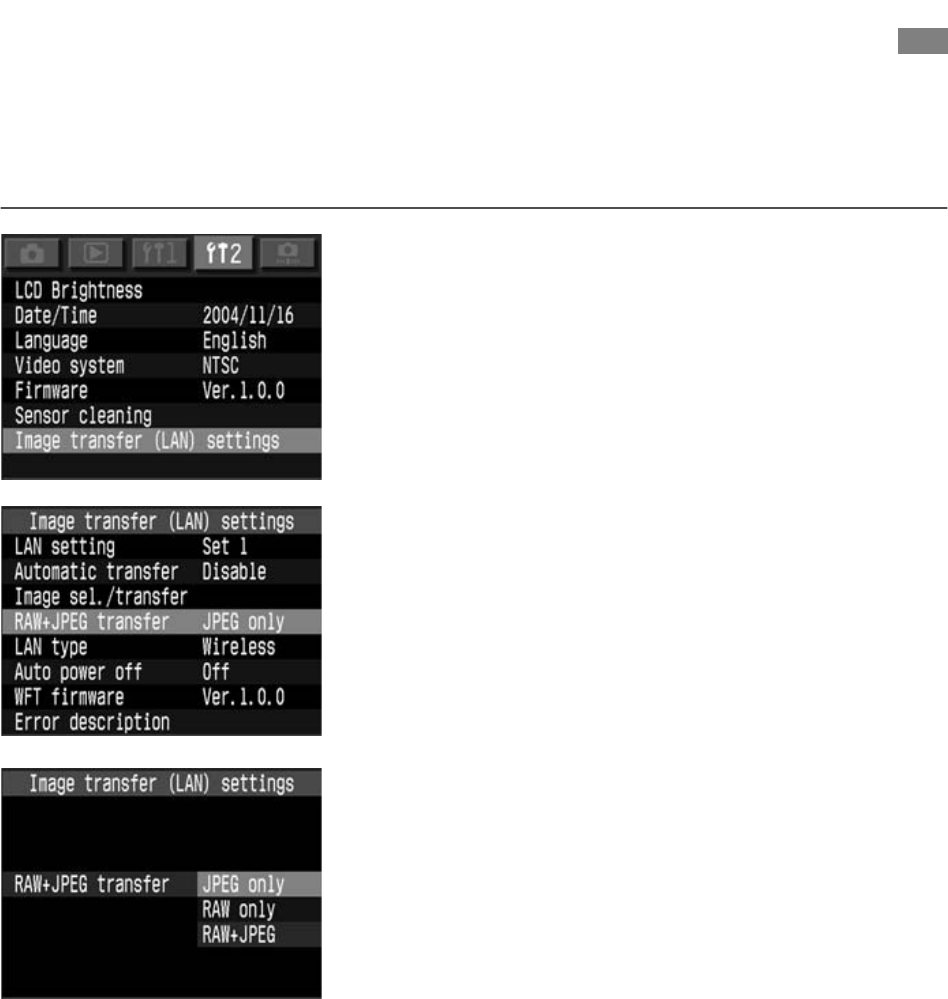
For RAW+JPEG images, you can select which image format to transfer. This option is
convenient when you want to first send only the JPEG images that have a smaller file
size.
1Select [Image transfer (LAN) settings].
2Select [RAW+JPEG transfer].
3Select the desired option.
Transferring RAW+JPEG Images

37
4
4
Changing the LAN Settings
with the Camera
The settings file loaded in the camera can be modified using the
menu screen. (Some settings cannot be modified depending on the
camera.)
However, using the camera to modify the settings file may be
cumbersome due to the settings being deep in the menu hierarchy.
Using the software explained in Chapter 2 is recommended to
modify the settings file.
This chapter explains the menu structure centering on the menu
options that appear on the menu screens.

38
[Image transfer (LAN) settings]/ [LAN setting]/ [Set up]/ [TCP/IP]/ [DHCP
server]: Select Use or No use.
[Image transfer (LAN) settings]/ [LAN setting]/ [Set up]/ [TCP/IP]/ [IP
address]: Enter number
¡Enter the number in the same way as for the [Date/Time].
[Image transfer (LAN) settings]/ [LAN setting]/ [Set up]/ [TCP/IP]/ [Subnet
mask]: Enter the number.
¡Enter the number in the same way as for the [Date/Time].
[Image transfer (LAN) settings]/ [LAN setting]/ [Set up]/ [TCP/IP]/ [Gateway]:
Enter the number.
¡Enter the number in the same way as for the [Date/Time].
Setting TCP/IP
DHCP Server
IP Address
Subnet Mask
Gateway

39
4
Changing the LAN Settings with the Camera
[Image transfer (LAN) settings]/ [LAN setting]/ [Set up]/ [DNS server]/ [DNS
server]: Select Use or No use.
[Image transfer (LAN) settings]/ [LAN setting]/ [Set up]/ [DNS server]/
[Address]: Enter the number.
¡Enter the number if you use a DNS server.
¡Enter the number in the same way as for the [Date/Time].
Setting the DNS Server
DNS Server
Address

40
[Server name]
[Image transfer (LAN) settings]/ [LAN setting]/ [Set up]/ [FTP server]/ [Target
server]/ [Server name]: Enter server name or address.
[Port No.]
[Image transfer (LAN) settings]/ [LAN setting]/ [Set up]/ [FTP server]/ [Target
server]/ [Port No.]: Enter a number less than 65535.
You can enter the server name using the following
method.
Moving the cursor:
Hold down the <k> button and turn the <c> dial.
Deleting a character in the entry field:
Press the <d> button and the cursor will delete the character on its left.
Selecting a keyboard character and entering it:
Hold down the <b> button and turn the <c> dial to select a character. When you
let go of the button, the character will be entered at the cursor’s position.
Exiting the entry screen:
Press the <e> button. The entries will be registered and the previous screen will
reappear.
Canceling the entry:
Press the <f> button and no changes will be made to the entry. The previous screen
will reappear.
Setting the FTP Server
Target Server
Virtual Keyboard Operation
With EOS-1D-Series Cameras

41
4
Changing the LAN Settings with the Camera
Setting the FTP Server
Switching between the entry field and keyboard:
Press the <h> button to switch between the entry field and keyboard.
Moving the cursor in the entry field:
Turn the <c> dial.
Deleting a character in the entry field:
Press the <d> button and the cursor will delete the character on its left.
Selecting a keyboard character and entering it:
Turn the <c> dial to select a character. Press the <g> button to enter the character at
the cursor’s position.
Exiting the entry screen:
Press the <e> button. The entries will be registered and the previous screen will
reappear.
Canceling the entry:
Press the <i> button and no changes will be made to the entry. The previous screen
will reappear.
[Image transfer (LAN) settings]/ [LAN setting]/ [Set up]/ [FTP server]/ [Login
name]: Enter your login name.
[Image transfer (LAN) settings]/ [LAN setting]/ [Set up]/ [FTP server]/ [Login
password]: Enter your login password.
[Image transfer (LAN) settings]/ [LAN setting]/ [Set up]/ [FTP server]/ [Target
folder]: Enter the save folder.
With Cameras Other than EOS-1D-Series
Login name
Login password
Target folder

42
Setting the FTP Server
[Image transfer (LAN) settings]/ [LAN setting]/ [Set up]/ [FTP server]/
[Passive mode]: Select Use or No use.
[Proxy]
[Image transfer (LAN) settings]/ [LAN setting]/ [Set up]/ [FTP server]/ [Proxy]
/ [Proxy]: Select Use or No use.
[Address]
[Image transfer (LAN) settings]/ [LAN setting]/ [Set up]/ [FTP server]/ [Proxy]
/ [Address]: Enter number
¡Enter the number in the same way as for the [Date/Time].
[Port No.]
[Image transfer (LAN) settings]/ [LAN setting]/ [Set up]/ [FTP server]/ [Proxy]
/ [Port No.]: Enter a number less than 65535.
[Image transfer (LAN) settings]/ [LAN setting]/ [Set up]/ [FTP server]/
[Overwrite same file]: Select Yes or No.
Passive Mode
Proxy
Overwrite Same File
43
4
Changing the LAN Settings with the Camera
[Image transfer (LAN) settings]/ [LAN setting]/ [Set up]/ [Wireless LAN]/
[SSID]: Enter the SSID.
You can set the connection method, authentication method, encryption, etc.
[Image transfer (LAN) settings]/ [LAN setting]/ [Set up]/ [Wireless LAN]/
[Advanced settings]: If you enter the settings for the wireless LAN access point (or
wireless LAN adapter), the following screens will be displayed automatically.
The settings which can be set will vary automatically depending on the configuration.
[Image transfer (LAN) settings]/ [LAN setting]/ [Set up]/ [Wireless LAN]/
[MAC address]: The MAC address will be displayed
Setting Wireless LAN
SSID
Advanced settings
MAC Address

44
[Image transfer (LAN) settings]/ [LAN setting]/ [Set up]/ [Protect settings]:
Select On or Off.
¡Select [On] to prevent the LAN settings from being modified inadvertantly.
¡Select [Off] if you want to change the LAN settings with the camera.
[Image transfer (LAN) settings]/ [LAN setting]/ [Set up]/ [Save settings]/
[OK]: The settings will be saved in the memory card.
Protecting and Saving the Settings
Protect Settings
Save Settings

45
5
5
Reference

46
If you think there is a problem with the WFT-E1A, first read the probable causes below.
Also read the troubleshooting section in your camera’s instruction manual.
¡Your personal computer does not meet the software’s operating requirements.
aUse a personal computer that meets the software’s operating requirements.
¡The battery is exhausted.
aRecharge the battery.
¡The battery is not installed properly.
aInstall the battery properly (p.18).
¡The battery is not fully charged.
aRecharge the battery fully.
¡The battery’s service life has ended.
aReplace the battery with a new one.
¡Auto power off is in effect.
aTurn on the <5> switch again or disable the auto power off function (p.28).
¡The battery is almost exhausted.
aRecharge the battery.
Troubleshooting Guide
Software
The software does not startup.
Power Source
The <3> lamp does not turn on when you turn on the <5>
switch.
The battery becomes exhausted quickly.
The power turns off by itself.
<R> blinks on the LCD panel.

47
5
Reference
Troubleshooting Guide
¡The WFT-E1A is not connected to the camera and both are not turned on.
aThe LAN menu options will appear only if the WFT-E1A is connected to the camera
and both are turned on (p.23).
¡You selected an interface language not compatible with LAN menus.
aEnglish will be displayed for languages not compatible with the LAN menus (p.25).
¡The WFT-E1A is not securely connected to the camera.
aCheck whether the cable is securely connected to the WFT-E1A and camera (p.22).
¡The WFT-E1A is connected to the EOS-1D-series camera with a USB cable.
aTo connect an EOS-1D-series to the WFT-E1A (p.22), use an IEEE 1394 cable.
¡The correct [LAN type] setting (wireless LAN/wired LAN) in the menu has not
been selected.
aSet the correct LAN type (p.25).
¡You are trying to connect to the IEEE 802.11g wireless LAN access point via
ad hoc.
aFor the wireless LAN setting, set it to infrastructure instead (p.12).
Menu Functions
LAN menu options do not appear.
LAN menu options are in English.
LAN Functions
The <3> lamp blinks and images cannot be transferred.
Although there is no <E> displayed, images cannot be
transferred.

48
If there is a problem with the LAN connection, one of the error numbers below will be
displayed on the WFT-E1A’s display panel. You can also check the error number with the
camera’s menu screen (p.27).
Error Number Description
Error Number Description
01 Problem with camera cable connection
21 No address assigned by DHCP server
22 No response from DNS server
23 Duplicate IP address
24 No response from proxy server
25 Other terminal has set the same IP address
41 Cannot connect to FTP server
42 FTP server rejected connection
43 Cannot connect to FTP server.
Error code received from server.
44 Cannot disconnect FTP server.
Error code received from server.
45 Cannot login to FTP server.
Error code received from server.
46 For the data session, error code received from FTP server
47 Image file transfer completion not confirmed by FTP server
61 Same SSID wireless LAN terminal not found
62 No response from wireless LAN terminal
63 Wireless LAN authentication failed
64 Cannot connect to wireless LAN terminal
65 Wireless LAN connection lost
81 Wired LAN connection lost

49
5
Reference
• Type
Type: Image transfer accessory compatible with IEEE 802.11b/IEEE 802.11g
wireless LAN and Ethernet
• Wireless LAN
Standards Compliance:
ARIB STD-T66 (data transmission system)
IEEE 802.11b/IEEE 802.11g (wireless LAN standard protocol)
Transmission Method:
DS-SS modulation (IEEE 802.11b), OFDM modulation (IEEE 802.11g),
half duplex
Transmission range: 60 m / 197 ft (with normal antenna)
150 m / 492 ft (with extended range antenna)
* Link speed IEEE 802.11b: 1 Mbps, IEEE 802.11g: 6 Mbps
* With no obstructions between the transmitting and receiving antennas
and no radio interference.
* With the high-performance, large antenna attached to the wireless LAN
access point.
Transmission frequency:
2412 MHz - 2462 MHz (Central frequency, total 11 channels)
Link speed: 1/2/5.5/6/9/11/12/18/24/36/48/54 Mbps
Connection method: Infrastructure or ad hoc (IEEE 802.11b only)
Security: Authentication method: Open, shared key, WPA-PSK
Encryption: WEP, TKIP
Current consumption:
During standby: Max. 70 mA (7.4 V)
During transfer: Max. 450 mA (7.4 V)
Power consumption: Max. approx. 3.5 W
• Wired LAN
Standards Compliance:
IEEE 802.3u (Ethernet 100BASE-TX)
• Interface
Camera connection: IEEE 1394 port (6-pin), USB 2.0 port (Type A)
Personal computer connection:
RJ-45 for Ethernet
• Power Source
Battery: Battery Pack BP-511A/514/511/512
AC power: AC Adapter Kit ACK-E2
• Dimensions and Weight
Dimensions (W x H x D):
140 x 26.3 x 65 mm / 5.5 x 1.0 x 2.6 in
Weight: Approx. 165 g / 5.82 oz (including normal antenna. excluding battery)
• Operating Environment
Working temperature range:
0°C - 45°C / 32°F - 113°F
Working
humidity: 85% or less
• Extended Range Antenna ERA-E1 (optional)
Max. diameter x length:
60 x 191 mm / 2.36 x 7.52 in
Weight: Approx. 100 g / 3.53 oz
Cable length: 1.5 m / 4.92 ft
¡All the specifications above are based on Canon’s testing standards.
¡The camera’s specifications and physical appearance are subject to change without notice.
Specifications

50
A
AC Adapter ............................................20
Ad hoc ......................................... 2,12,13
Address ..................................... 11,39,42
Advanced settings .................................43
Antenna ........................................... 16,21
ANY connection.....................................12
ASCII .....................................................13
Authentication........................................13
Automatic transfer .................................30
B
Battery ...................................................18
Battery Charger .....................................18
Battery check.........................................18
Battery Life ............................................19
C
Camera connection status.....................17
Cancel ...................................................31
Case ......................................................17
Channel .................................................12
Clear transfer history .............................35
Conn. Method ........................................12
D
DHCP Server................................... 10,38
DNS Server ..................................... 10,39
E
Encryption..............................................13
Error................................................. 27,48
Error description ....................................27
Error number ................................... 17,26
Ethernet ...................................................2
Ethernet RJ-45 port ...............................16
Extended Range Antenna .....................21
F
Firmware................................................28
FTP........................................................11
FTP Server ........................................ 2,40
G
Gateway...........................................10,38
H
Hexadecimal ......................................... 13
I
IEEE 1394 port ................................16,22
IEEE 802.11g........................................ 12
Image not selected for transfer ............. 31
Image sel./transfer ..................... 31,32,34
Image Transfer History ....................31,33
Images failing transfer ......... 31,32,33,34
Images not transferred.....................32,34
Images to transfer................................. 31
Images transferred...........................31,33
Infrastructure................................ 2,12,13
IP Address .......................................10,38
K
Key Format ........................................... 13
L
LAN setting ........................................... 23
LAN type ............................................... 25
LCD Panel .......................................16,17
LINK lamp ........................................16,26
Link speed .......................................17,26
Load settings ........................................ 24
Login name ......................................11,41
Login password................................11,41
M
MAC Address........................................ 43
Menu Operation .................................... 35
N
Normal Antenna.................................... 21
O
Open System ........................................ 13
Overwrite Same File ........................11,42
Index

51
5
Reference
Index
P
Passive Mode .................................. 11,42
Port No. ..................................... 11,40,42
Power lamp...................................... 16,26
Power switch ................................... 16,22
Protect Settings ............................... 13,44
Proxy ............................................... 11,42
R
RAW+JPEG Images..............................36
Read settings.........................................14
S
Save Settings .................................. 14,44
Select.....................................................31
Server name .................................... 11,40
Settings File................................. 9,14,23
Shared key ............................................13
SSID ................................................ 12,43
Subnet Mask.................................... 10,38
T
Target folder .................................... 11,41
Target Server................................... 11,40
TCP/IP ............................................. 10,38
TKIP.......................................................13
Transfer .................................................33
Transferring Images in a Batch .......32,34
U
USB port .......................................... 16,22
V
Virtual Keyboard ....................................40
W
WEP ......................................................13
Wired LAN connection status ................17
Wireless LAN.........................................12
Wireless LAN access point......................2
Wireless LAN adapter..............................2
Wireless LAN connection status............17
Wireless signal strength........................ 17
WPA-PSK ............................................. 13

CT1-1285-000 © CANON INC. 2004
CANON INC. 30-2, Shimomaruko 3-chome, Ohta-ku, Tokyo 146-8501, Japan
U.S.A. CANON U.S.A. INC.
For all inquiries concerning this camera, call toll free in the U.S.
1-800-OK-CANON or write to: Customer Relations, Canon U.S.A., Inc.
One Canon Plaza, Lake Success, N.Y. 11042-1198
CANADA CANON CANADA INC. HEADQUARTERS
6390 Dixie Road, Mississauga, Ontario L5T 1P7, Canada
CANON CANADA INC. MONTREAL BRANCH
5990, Côte-de-Liesse, Montréal Québec H4T 1V7, Canada1010
CANON CANADA INC. CALGARY OFFICE
2828, 16th Street, N.E. Calgary, Alberta T2E 7K7, Canada
For all inquiries concerning this camera, call toll free in Canada
1-800-OK-CANON
EUROPE, CANON EUROPA N.V.
AFRICA & Bovenkerkerweg 59-61, P.O. Box 2262, 1180 EG Amstelveen, The Netherlands
MIDDLE EAST CANON COMMUNICATION & IMAGE FRANCE S.A.
102, Avenue du Général de Gaulle 92257 La Garenne-Colombes Cedex, France
CANON UK LTD.
Woodhatch Reigate Surrey RH2 8BF, United Kingdom
CANON DEUTSCHLAND GmbH
Europark Fichtenhain A10, 47807 Krefeld, Germany
CANON ITALIA S.p.A.
Via Milano 8 I-20097 San Donato Milanese, Milano, Italy
CANON Schweiz AG
Geschäftsbereich Wiederverkauf, Industriestrasse 12, CH-8305 Dietlikon,
Switzerland
CANON G. m. b. H.
Oberlaaerstrasse 233, 4th floor, 1100 Wien, Austria
CANON España, S. A.
C/Joaquín Costa, 41, 28002 Madrid, Spain
SEQUE Soc. Nac. de Equip., Lda.,
Praça da Alegria, 58, 2°, 1269-149 Lisboa, Portugal
CENTRAL & CANON LATIN AMERICA, INC. DEPTO DE VENTAS
SOUTH AMERICA 703 Waterford Way Suite 400 Miami, FL 33126 U.S.A.
CANON LATIN AMERICA, INC. CENTRO DE SERVICIO Y REPARACION
Apartado 2019, Zona Libre de Colón, República de Panam
ASIA CANON HONGKONG CO., LTD.
9/F, The Hong Kong Club Building, 3A Chater Road, Central, Hong Kong
CANON SINGAPORE PTE. LTD.
79 Anson Road #09-01/06 Singapore 079906
OCEANIA CANON AUSTRALIA PTY. LTD.
1 Thomas Holt Drive, North Ryde, N.S.W. 2113, Australia
CANON NEW ZEALAND LTD.
Akoranga Business Park, Akoranga Drive, Northcote, Auckland, New Zealand
JAPAN CANON SALES CO., INC.
16-6, Kohnan 2-chome, Minato-ku, Tokyo 108-8011, Japan
This Instruction Manual booklet is current as of September 2004. For information on using the
WFT-E1A with accessories introduced after this date, contact your nearest Canon Service
Center.