Capital Prospect HU100 Alert System User Manual 15 HU 100 UserMan
Capital Prospect Ltd Alert System 15 HU 100 UserMan
15_HU-100 UserMan.pdf
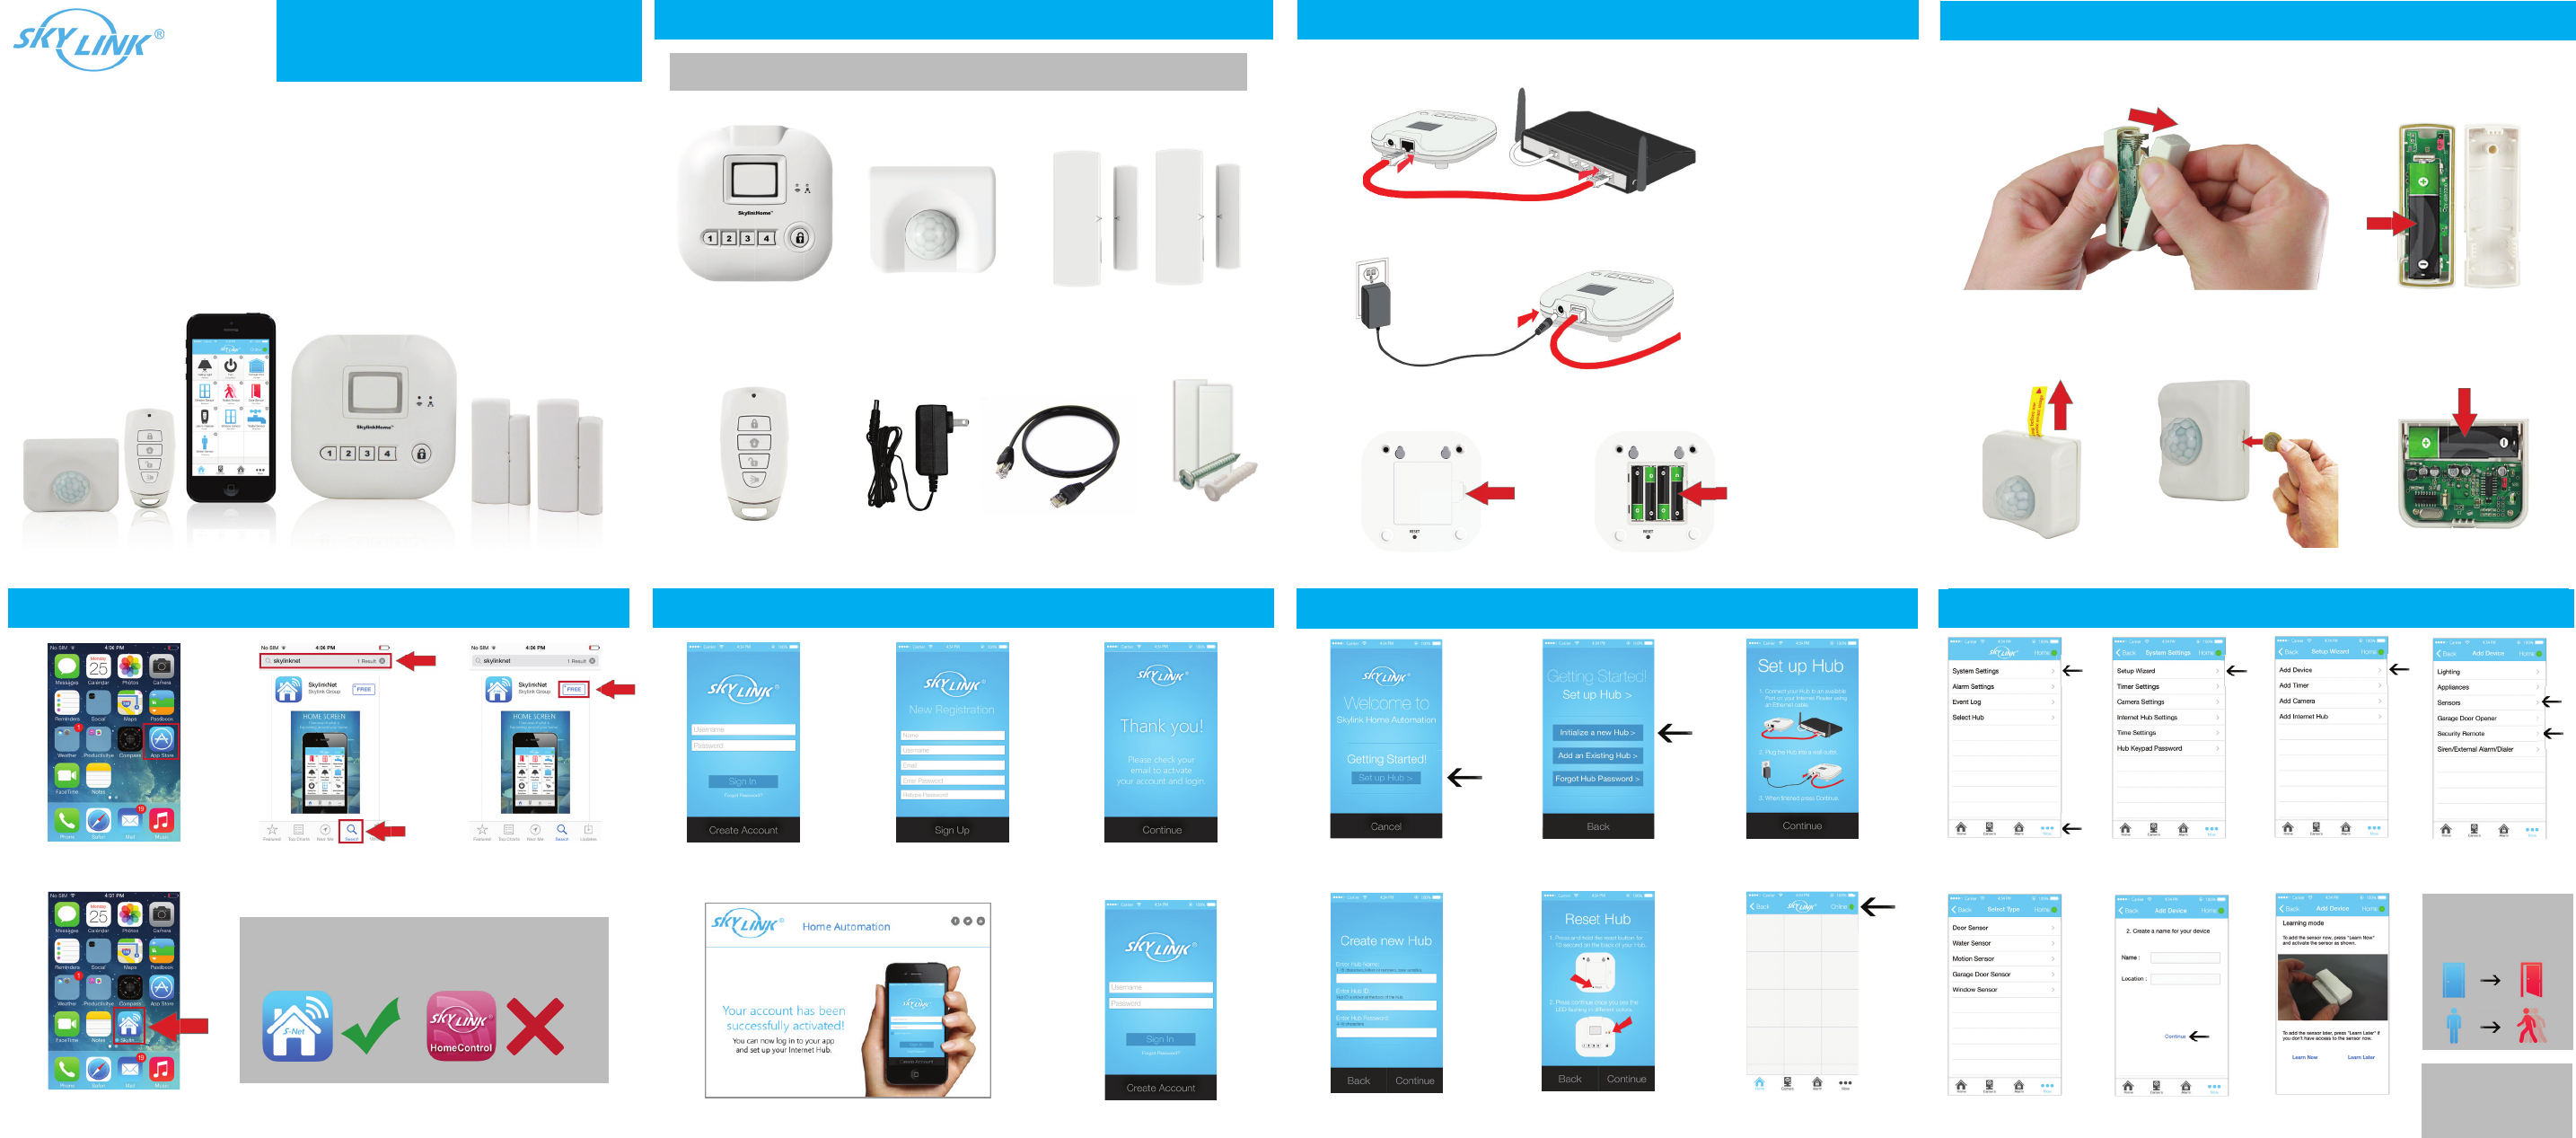
Alarm System Starter Kit
iPhone not included.
Protect your Home the Smart Way!
Quick Guide 1. What’s Included 2. Setup the Hub 3. Insert Batteries for Sensors
4. Download the SkylinkNet App
.
Internet Hub Motion Sensor 2 x Window/Door Sensor
Keychain Remote Mounitng
Accessories
Power Adapter Ethernet Cable
1. Connect your Hub to an available Port on your Internet Router using the Ethernet cable.
2. When finished press Continue.
3. Insert 4 x AAA-Batteries in the Hub for backup power in case of power outage. (Optional)
1. Push the both side in and open the cover of the Window/Door Sensor and insert a AAA-Battery.
NOTE: 6 x AAA- and 1 x AA-Batteries required to setup the SkylinkNet Alarm System.
1. Pull the “Tag Isolator” or use a coin to open the Motion Sensor and insert a AA-Battery.
1. Tap on App Store 2. Tap on Search Icon and
search for “Skylinknet”
3. Tap on Free Button
to download the App.
4. When download is completed,
it will show on your HomeScreen.
NOTE: Only the “SkylinkNet” App will work with
the Internet Hub.
5. Create & Activate the Hub
1. Open the SkylinkNet App
and tap on “Create Account”.
2. Enter your information
and tap on “Sign Up”.
3. Check your email to activate
your account and tap on “Continue”
to log in.
4. Click on the link from the email to activate your account. 5. Now you are ready to
login to your account.
6. Setup the Hub
1. Tap on “Set up Hub >”. 2. Tap on “Initialize a
new Hub >”.
3. Follow the instruction on screen
to connect the Internet Hub.
5. Follow the instruction on
screen to reset the Internet
Hub and tap “Continue”.
4. Enter your information
and tap on “Continue”.
6. Hub is added and you will
see a green or red dot indicating
if it’s connected to the Hub.
7. Add Sensors and Keychain Remote
1. Go to “More” and tap
on “System Settings”.
2. Tap on “Setup Wizard”. 4. Tap on “Sensors” or
“Security Remote”.
3. Tap on “Add Device”.
5. Select the type of
sensor you want to add.
6. Name your sensor and
location and tap “Continue”.
7. Tap the “Learn Now”
button and follow the video
to activate the sensor.
(If you select Security Remote, skip to Step 6)
8. Now trigger the sensors
to test if the SkylinkNet App
is showing the sensor status
correctly.
NOTE: If motion is detected, a red
led light inside the sensor will flash.
Sensor will not be triggered by new
motion unless no motion has been
detached for 15 seconds.
FCC ID: KUTHU100
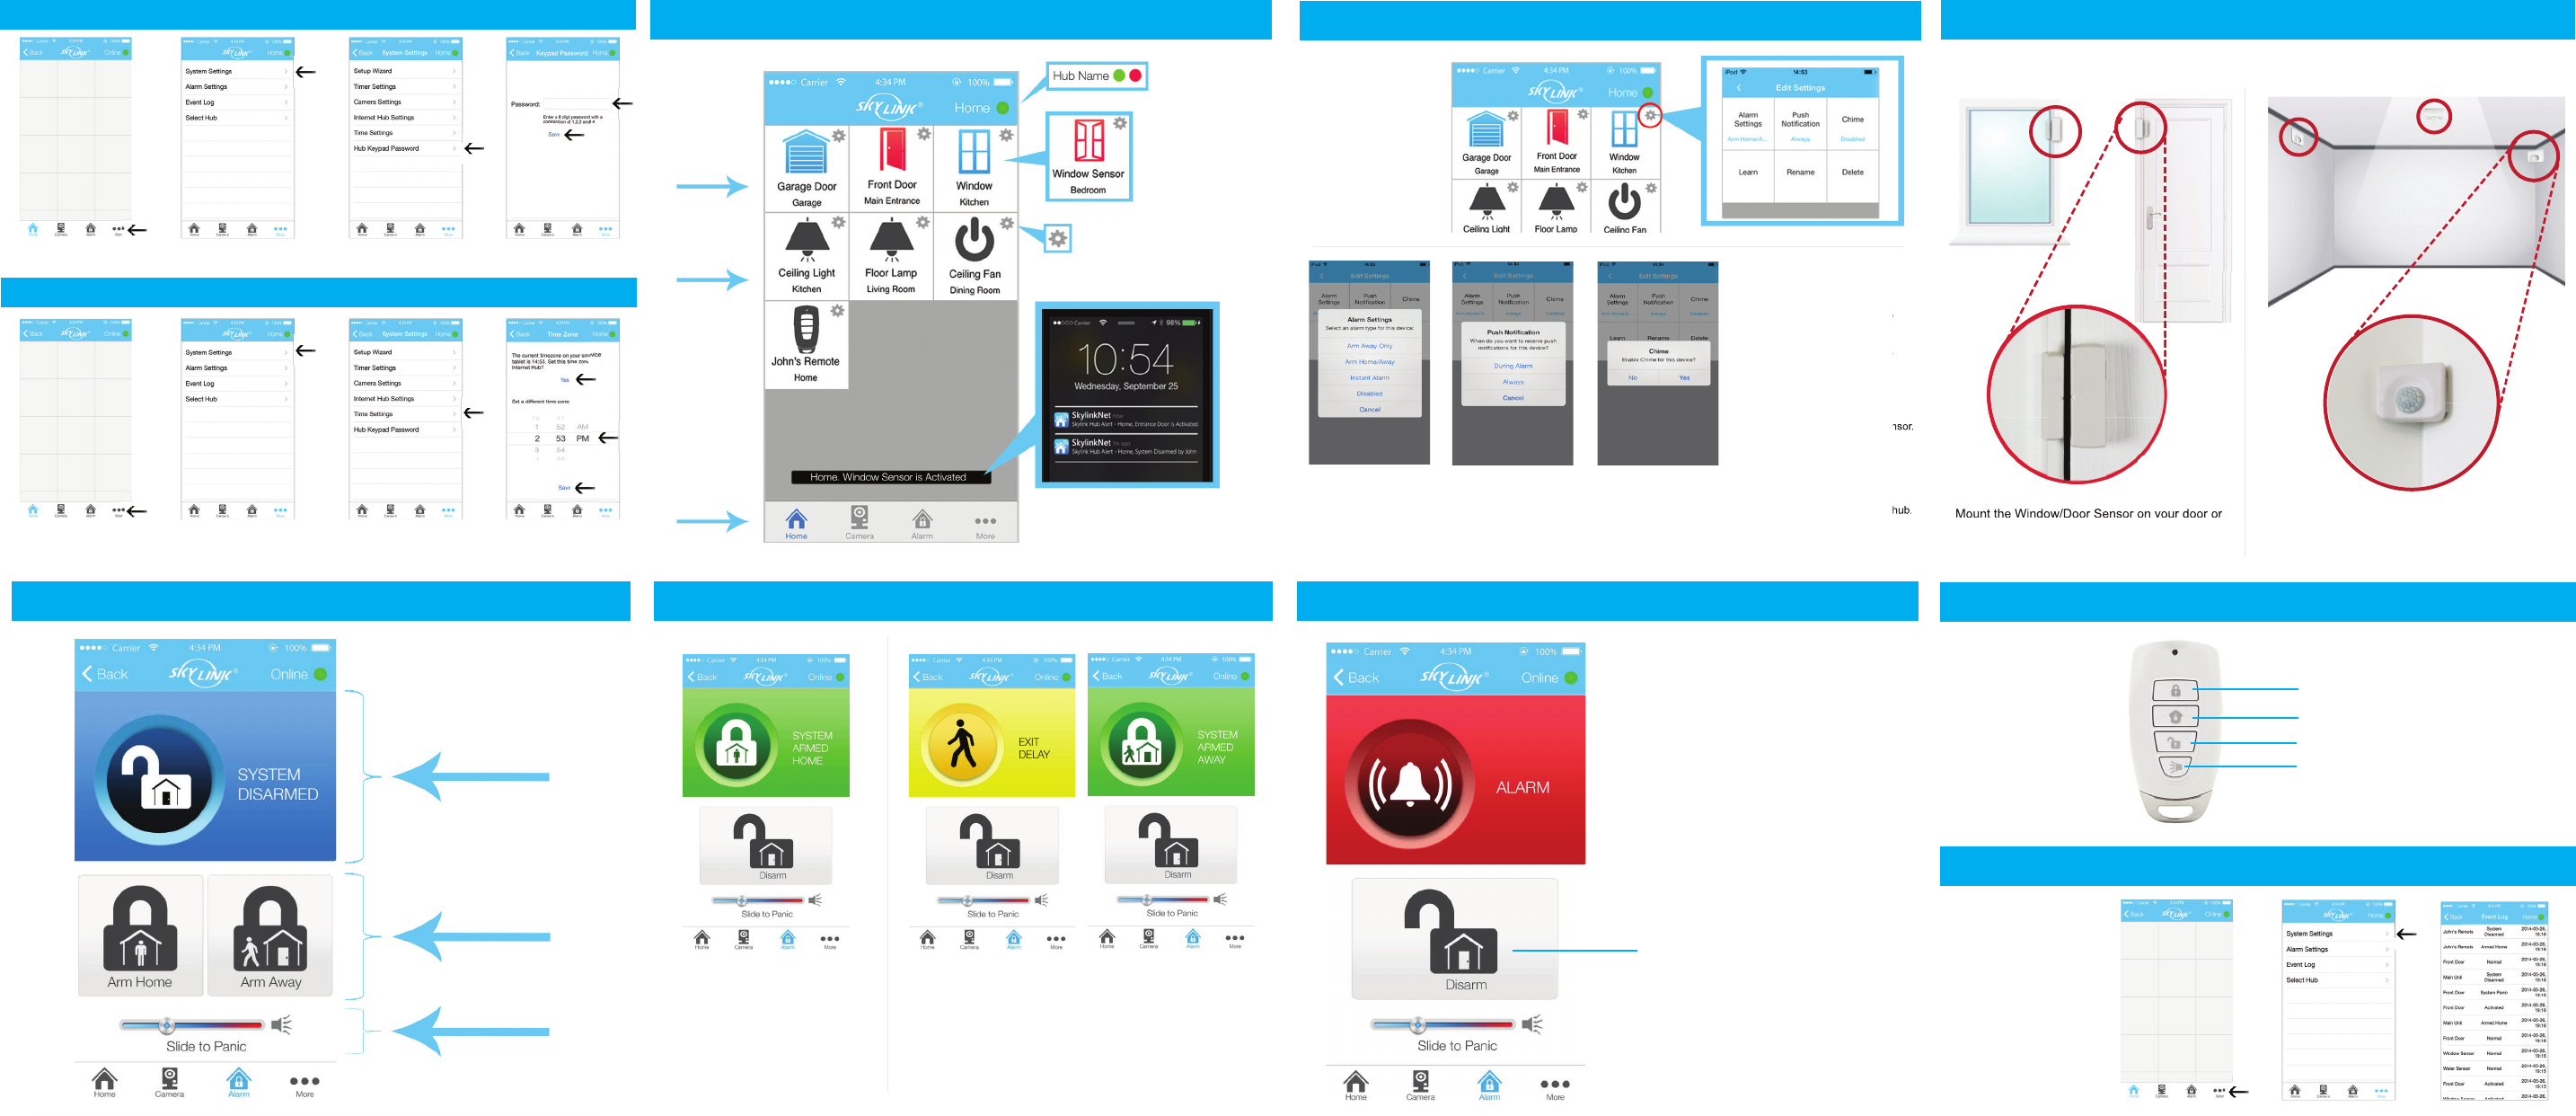
13. Arm Home / Arm Away 14. Disarm Alarm System 15. Keychain Remote
8. Setup Hub Keypad Password
1. Go to “More”. 2. Tap on “System Settings”. 4. Enter Passcode
and tap on “Save”.
3. Tap on ”Hub Keypad
Password”.
1. Go to “More”. 2. Tap on “System Settings”. 4. Set your time zone
and tap on “Save.”
3. Tap on “Time Settings”.
9. Home Screen Overview 10. Sensor Settings 11. Place the Sensors
Settings
Push Notication
Online/Oine
Sensors
Receivers
Menu Bar
Sensor activation
The blue sensor icons will
turn red if its activated.
Receive push notification anytime a
new activity takes place.
Settings for individual sensor,
remote or receiver.
Shows the hub name
and connection.
Choose between
different screens.
.
Sensors icons
are blue/red.
Push icons are
black.
Alarm Settings Push Notification Chime
Learn
Rename
Delete
Select when this sensor
should activate an alarm.
Select if you want to
receive a push notification
during an alarm only or always
when a sensor is activated.
If enabled, the internet hub.
will sound an alert chime when
this sensor is activated.
Learn the sensor with the
internet hub.
Change the name of this sensor.
Delete this sensor from the hub.
Tap on the gear
icon to edit the
settings of this
specific sensor.
Arm Home Arm Away / Exit Away
Select “Arm Away” to protect your home when your away.
This mode activates or triggers the alarm after a
default set of time, giving you enough time to get in and out of
your house to arm/disarm the alarm system.
Select “Arm Home” to protect while
you’re at home. This mode deactivates
motion sensors but leaves other
sensors activated.
When an alarm is activated, a
push notification will be sent to
all users and your smartphone will
play an alarm sound.
Status of the
Alarm System
Armed Home,
Armed Away
Slide to activate
the hub siren in
emergency.
(Learn the sensor if you have selected
“Learn Later” in Step 7 of “Add Sensors
and Keychain Remote).
4. Setup Hub Keypad Password / Time Zone
5. Setup Time Zone
12. Alarm Screen Overview
See all the recent
actvities of the
Alarm System
on the Event Log.
16. Event Log
4. Tap on “Event Log”4. Tap on “System Settings”4. Go to “More”:
Arm and disarm
the alarm system
with a keychain
remote.
Arm Away
Arm Home
Disarm
Panic Button
Press and hold the Panic Button
for 5 sec. to activate it.
Place each of the device in the appropriate locations (see example below).
Tap the “Disarm” Button to
disarm the alarm system.
The motion sensor can be mounted with a
double-sidetapes or screws in a corner,
straight wall, ceiling or stand freely by itself.
Mount the Window/Door Sensor on your door or
window with a double-sided tape or screws. It can
be also installed to monitor or protect
cabinets and safes.
Learn the sensor with the
Change the name of this sensor.
Delete this sensor from the hub.
“Learn Later” in Step 7 of “Add Sensors
Mount the Window/Door Sensor on your door or
NOTE: This equipment has been tested and found to comply with the limits for a
Class B digital device, pursuant to part 15 of the FCC Rules. These limits are
designed to provide reasonable protection against harmful interference in a
residential installation. This equipment generates uses and can radiate radio
frequency energy and, if not installed and used in accordance with the instructions,
may cause harmful interference to radio communications. However, there is no
guarantee that interference will not occur in a particular installation. If this
equipment does cause harmful interference to radio or television reception, which
can be determined by turning the equipment off and on, the user is encouraged to
try to correct the interference by one or more of the following measures:
- Reorient or relocate the receiving antenna.
- Increase the separation between the equipment and receiver.
-Connect the equipment into an outlet on a circuit different from that to which the
receiver is connected.
-Consult the dealer or an experienced radio/TV technician for help
Changes or modifications not expressly approved by the party responsible for compliance
could void the user's authority to operate the equipment. This device complies with Part
15 of the FCC Rules. Operation is subject to the following two conditions:
(1) this device may not cause harmful interference, and
(2) this device must accept any interference received, including interference that may
cause undesired operation.
This device complies with Industry Canada licence-exempt RSS
standard(s). Operation is subject to the following tow conditions:
(1)this device may not cause interference, and(2) this device must
accept any interference, includinginterference that may cause
undesired operation of the device.
Le présent appareil est conforme aux CNR d'Industrie Canada
applicables auxappareils radio exempts de licence. L'exploitation
est autorisée aux deux conditions suivantes :(1) l'appareil ne doit
pas produire de brouillage, et(2) l'utilisateur de l'appareil doit
accepter tout brouillage radioélectrique subi, même si le brouillage
est susceptible d'en compromettre lefonctionnement.