Capital Prospect MR318 LIGHTING REMOTE CONTROL User Manual mMR318
Capital Prospect Ltd LIGHTING REMOTE CONTROL mMR318
User manual
1.INTRODUCTION
On/OffReceiverModule
On/OffReceiver
Module
ModelMR-318
Screwsand Accessories
Thank you for your purchase of a Skylink lighting receiver, On/Off
Receiver Module Model MR-318. This On/Off Receiver Module allows you
to wirelessly turn on and off different lighting fixtures with the Skylink
lighting transmitters.
The On/Off Receiver Module MR-318 can communicate with up to 8
transmitters, so user has the option to add more transmitters to the system,
such as more remote controls, or motion sensors etc.
All wireless signal communications within the Skylink lighting system
are based on rolling code technology to ensure highest security is used.
Screws and Accessories
Installation is required and enclosed instructions must be followed carefully
to all steps and notes. If you are uncertain or uncomfortable performing this
installation, please consult a qualified electrician. This manual should also
be retained for future reference.
Home
Home
Home
The following items are included in this package:
On/Off Receiver Module
TM
TM
TM
-
-
CAUTION
2.INSTALLATION
BeforeInstallation
Live
(UsuallyBlack)
Load
Live
(Usually
Black)
Neutral
(UsuallyWhite)
Neutral
(Usually
White)
(White)
(Red)
(Black)
TM
ON
OFF
Remote
Works
RemoteDoes
NotWork
“PROG”switch
Pressthe
desired
button
1. Turn off power to the circuit at the circuit breaker of the lighting fixture
that you plan on installing the On/Off Receiver Module to. Remove the
lighting fixture so the Live and Neutral wires are exposed.
WARNING:
Failuretoturnoffpoweratthecircuitbreakercanresultinelectrical
shockcausingsevereorfatalinjury.
Note:LightingLoad
TheOn/OffReceiverModuleisdesignedtooperatemaximumloadof
900Wat120VAC.Donotconnectloadingthatexceedsthis
maximumrating.
2.FollowthediagramsbelowtoinstalltheOn/OffReceiverModulewith
the3wires:Neutral,LiveandLoad.Usetheprovidedscrewsto
securetheOn/OffReceiverModule.
3. Afterallthewiresareconnected,ensurethatallofthewireconnectors
areattachedsecurelyandthereshouldbenoexposedcopperwiring.
Straightentheantenna.
4.SecuretheMR-318toaflatsurfaceby2screwsoryoumayplaceit
insidethelightingfixture.Installthelightingfixturebacktotheoriginal
configuration.
5. Turnthecircuitbreakerbackonandturnonthewallswitchthatis
usedtooperatethislightingfixture.
6. Thelightwillbeonandyoushouldhearasinglebeep. TheOn/Off
ReceiverModuleisinstalledproperlyandyoucanbeginprogramming
transmitterstotheOn/OffReceiverModule.
3.PROGRAMMINGTRANSMITTERS
In order to operate the On/Off Receiver Module remotely with a transmitter,
it must be programmed to the On/Off Receiver Module. Each On/Off
Receiver Module can be operated by up to 16 different transmitters (or
16 different command signals).
To program a transmitter into the On/Off Receiver Module, follow the
instructions below.
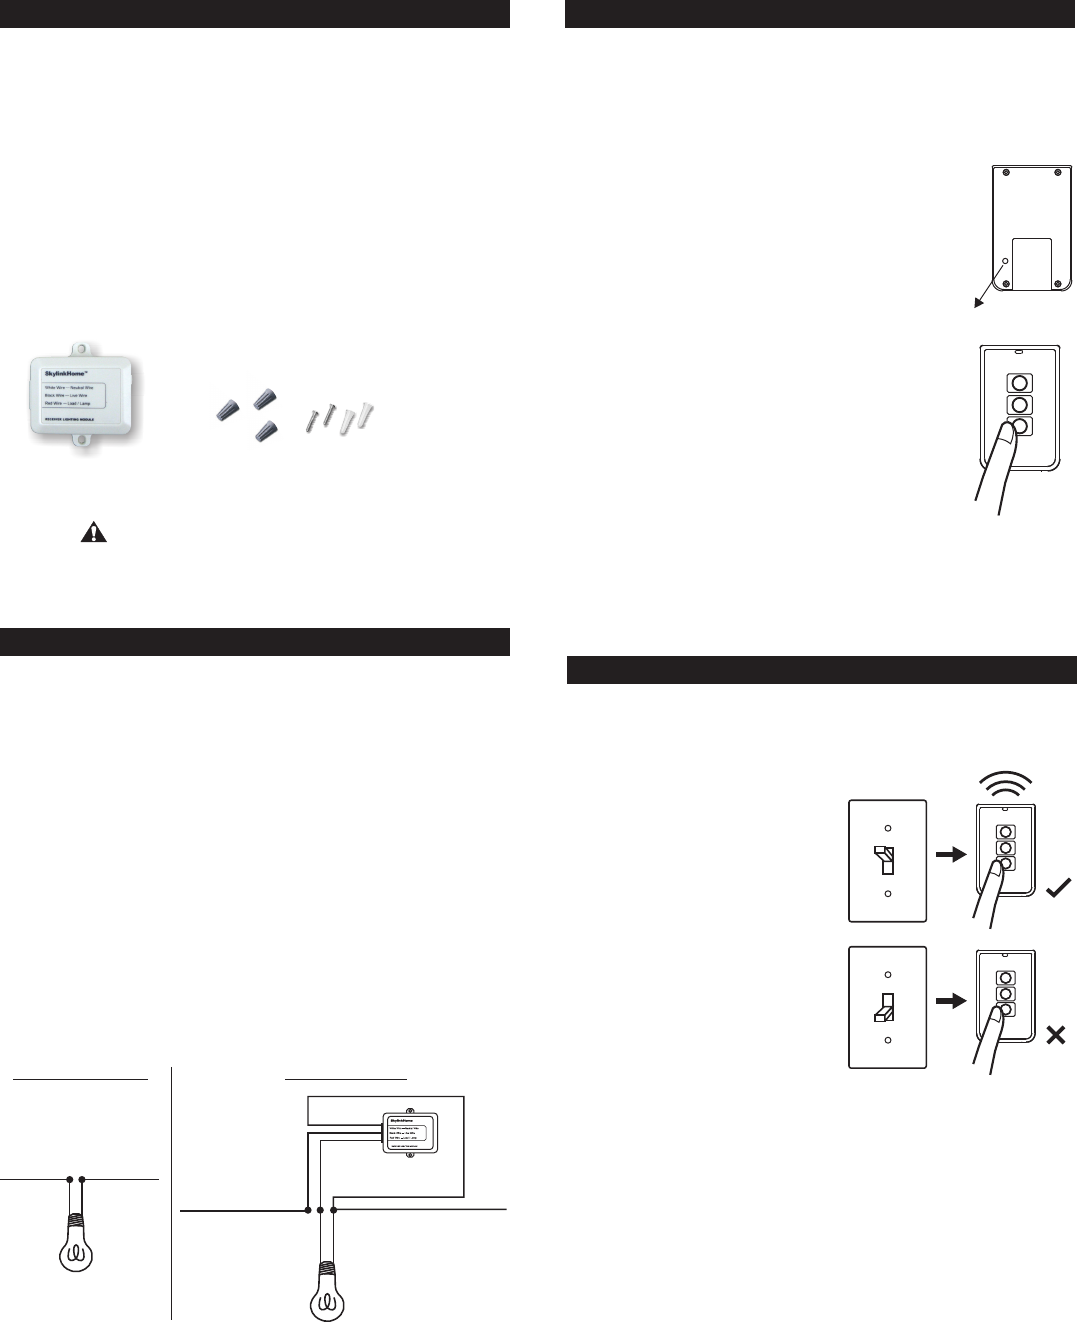
1. The On/Off Receiver Module should be power off
initially. This can be done by switching off the wall
switch or circuit breaker of the lighting fixture.
2. Power on the On/Off Receiver Module by switching
on the wall switch . You will hear
beeping from the On/Off Receiver Module and the
light connected to the module should be on.
The beeping indicates the On/Off Receiver Module
is now in programming mode and it will stay in this
mode for 20 seconds.
3. Press the PROG button on the back of the
transmitter with a sharp object.
4. Press the button on the transmitter that you would
like to program into the On/Off Receiver Module.
5. Once the transmitter is programmed, the light will
be off, indicating you have successfully programmed
the transmitter to the On/Off Receiver Module.
6. You may operate the light with the programmed
transmitter.
You may follow the same instructions to program additional transmitters
or sensors to operate the On/Off Receiver Module.
or circuit breaker
Note: To program other transmitters/sensors (besides TC transmitter),
please refer to the instructions of the transmitters/sensors.
4.ON/OFFOPERATION
TheMR-318On/OffReceiverModuleallowson/offoperation,whenthe
programmedbuttonisactivate,itwilltransmitasignaltotoggleitscurrent
status.Forexample,ifasignalisreceivedwhenthelightisoff,thatsignal
willturnonthelight.
Note:
IftheOn/OffReceiverModuleis
installedon aceilinglightingfixture,
youcanusethetransmitterto
operatethelightremotelyonlyif
thewallswitchisintheONposition.
Ifthewallswitchis off,nopower
isprovidedtotheOn/OffReceiver
Moduleandtherefore,itcannot
operatethelight.
Incasethetransmitterismisplaced,
youcan stilloperatethelighting
fixturewiththewallswitchnormally.
Note:
WhenusedwithCompactFluorescentLight,ifthereisflickeringwhen you
switchoffthelight,itisrecommendedyoureplaceadifferent Compact
FluorescentLightwithhigherquality.
On/OffOperation-OriginalWallSwitch
PowerOn-LightOn
Thereisafunction"PowerOn-LightOn"built-intothereceivermodule.
Thismeanswhenthepowersupplytothereceivermodulechangefrom
offtoon,thiswillturnthelighton. Thisfunctionallowsyoutooperatethe
lightwithoriginalwallswitch.
Whenthewallswitchisintheoffposition,switchingitonwillturnonthe
light.Oncetheswitchison,youmayusetheremotecontroltooperate
thelight.
Ifthewallswitchisswitchedfromontooff,thelightwillbeoff. Atthe
sametime,theremotecontrolcannotoperatethelightcausethereisno
powersuppliedtothereceivermodule.
AfterInstallation

6. ERASINGTCTRANSMITTERSFROMTHE
ON/OFFRECEIVERMODULE
Youmayerasea TCtransmitterfromtheOn/OffReceiverModule,but
youcannoteraseaspecificdevice,youmusteraseallthewireless
devices,then programtheonesyouwanttokeep.Followtheinstructions
belowtoeraseprogrammed TCtransmitters.
1.Poweroffthelightingreceiver.(Switchoffthewallswitch)
2.PressthePROGbuttononthebackofthe TCtransmitter.
3.Pressandholdtheprogrammedbuttononthe TCtransmitterforat
least2seconds.Donotreleasethisbuttonuntilstep5.
4.Powerupthelightingreceiver ,youwillhear
beepingandthelightwillbeon.
5. Youmayreleasethebuttononthetransmitter.
6.Whenthebuttonisrelease,thelightattachedtotheOn/OffReceiver
Moduleshouldbeoff,indicatingyouhavesuccessfullyerasedallthe
devicesfromthelightingreceiver.
Toeraseothertransmittersorsensors,pleaserefertotheinstructionsof
thetransmitters/sensors.
(Switchoffthewallswitch)
InputVoltage:120VAC,60Hz
MaximumLoad:600Wat120AVC
OperatingFrequency:318MHz
Wiring:Neutral,Live,Load(18 AWG)
7. TECHNICAL SPECIFICATIONS
8.FCC
TheRemoteControlisapprovedbytheFCCanditcomplieswithPart15ofthe
FCCRules.Itsoperationissubjecttothefollowingtwoconditions:
1. Thisdevicemaynotcauseharmfulinterference.
2. Thisdevicemustacceptanyinterferencethatmaycauseundesiredoperation.
Changesormodificationstothisunitnotexpresslyapprovedbythepartyresponsible
ofcompliancecouldvoidtheuser’sauthoritytooperatetheequipment.
WARNING:
9.CUSTOMERSERVICE
IfyouwouldliketoorderSkylink’sproductsorhavedifficultygettingthemtowork
ordownloadlatestinformationandusermanual,please:
1.visitourFAQsectionat ,or
2.emailusat ,or
3.callourtollfreeat1-800-304-1187fromMondaytoFriday,9amto5pmEST.
Fax(800)286-1320
www.skylinkhome.com
support@skylinkhome.com
CUSTOMERSERVICE
17Sheard Avenue,Brampton,Ontario,CanadaL6Y 1J3
Email:support@skylinkhome.com
http://www.skylinkhome.com
P/N.101Z698
PatentPending
©2010SKYLINKGROUP
10. ACCESSORIES
5.ZONEOPERATION(AVAILABLEWITH10-BUTTON/
14-BUTTONDELUXETRANSMITTERONLY)
A ZoneCommandallowsyoutooperatemultiplelightsatthesametime
inthesamezone.Forinstance,youmayassignzone1tothe3lighting
fixturesinthefamilyroom(eachlighthasitsownreceivermodule).
Toactivatethezonecommand,simplypress“ZoneOn”or“ZoneOff”,
thenthezonenumber,i.e.[ZoneOn]+[1]meansZone1On.
Enter[ZoneOn]+[ZoneNumber]duringstep4oftheprogramming
sequenceSection3,theZoneCommandsignalwouldbeprogrammed.
Repeatthisstepforallthereceivermodulesinthesamezone.
To
setthisup,refertotheDeluxe Transmitteruser’sinstructions.
Incaseyoudonotwanttooperatethelightwiththeoriginalwallswitch,
youcandisablethisPowerOn-LightOnfeatureanduseonlyremote
controltooperatethelight.Oneincidentthatthelightmaybeturnedon
byaccidentisafterapowerfailure.Ifyouleavethewallswitchon,but
turnoffthelightwitharemotecontrol.Whenpowercomesbackon,the
lightwillbeon. Therefore,thereisanoptionnottoturnthelightsonwhen
powerissuppliedtothereceivermodule. Thewaytodisablethisfeature
istore-programatransmitter(button)thatisalreadyprogrammedtothe
receivermodule(i.e.programatransmittertwice). Thiswilldisablethis
feature. Youmayre-programitagaintotogglethesettingbetween
enablinganddisablingthisfeature.
IfthePowerOn-LightOnfeatureisdisabled,thelightwillnotbeturned
onundermostcircumstances,i.e.powercomesbackupafterpower
failure,ormanuallyturningonthewallswitch.However,youcanstillturn
onthelightbythewallswitchwithaspecificpowerupsequence,thatis
toturnonthewallswitchtwicewithin2seconds.Soincasetheremote
controlislost,thelightcanstillbeturnedon.
4.ON/OFFOPERATION(CONT)
ProgrammingZoneCommand
TheSkylink LightingSystemconsistsofmanyotherdevicesfrom
multiplebuttontransmitters,MotionSensor,variousreceiverssuchas
WallSwitchReceiver,Plug-inReceiverwithRepeater,OutdoorReceiver,
DimmerModuleetc.PleasevisitSkylinkwebsiteat
formoreinformation.
www.skylinkhome.com
HomeTM