Capital Prospect SA001 WIRELESS SIREN User Manual SA 103 manual
Capital Prospect Ltd WIRELESS SIREN SA 103 manual
User manual
Wireless External Alarm Model: SA-001A/SA-001S Preliminary Manual
1. Introduction
Congratulations on purchasing the Skylink Wireless External Alarm SA-001 Series. The SA-001
Series provide you with a piercing siren and powerful features yet ease to use. You will find the
installation to be simple and be able to get the unit up and running easily.
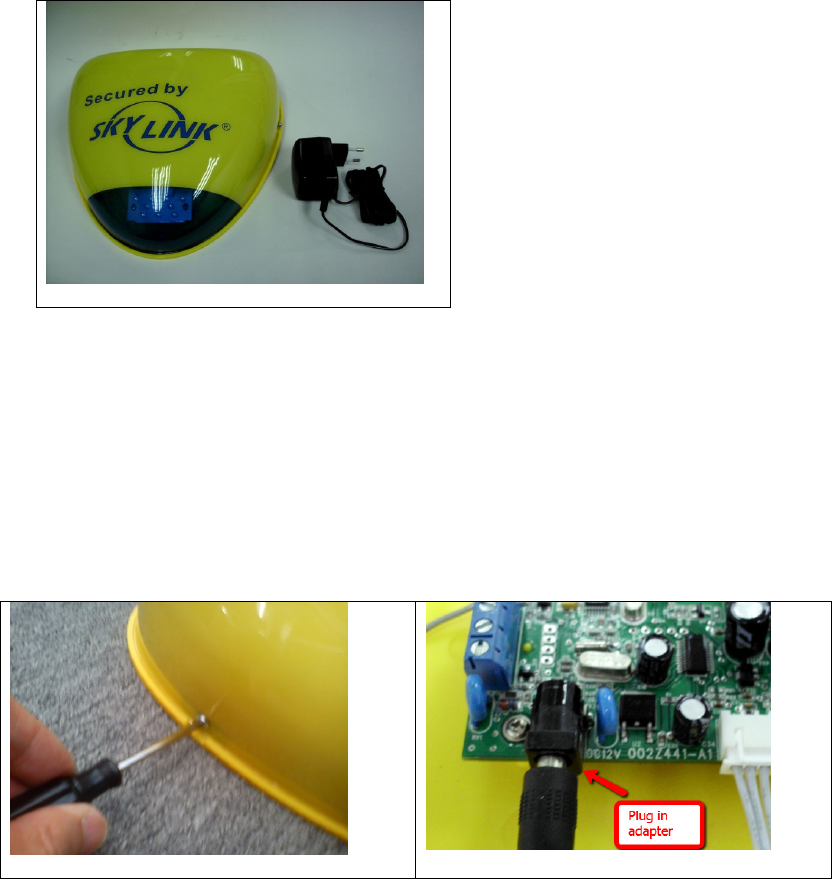
The following items are included in this package:
- One Wireless External Alarm
- AC adapter
- Battery (Optional)
- User’s Instructions
2. Power Up
- Remove the cover of the Wireless External Alarm as shown.
- Insert 3 AA batteries or rechargeable batteries (not included) to the unit, its Learn/Set
LED will turn on for 1 second and then off. The PWR LED will keep flashing.
- Plug in the AC adapter to an AC outlet and the other end into the “DC 12V” jack on the
Wireless External Alarm. The PWR LED indication will stay on steadily.
3. Setup – Learn remote or sensors or control panel
In order for the remote or sensor or control panel to communicate with the Wireless External
Alarm properly, the remote or sensor or control panel must be programmed to the Wireless
External Alarm. Follow the brief instructions below to program the remote or sensor or control
panel to the Wireless External Alarm.
Before proceeding, ensure you have both the Wireless External Alarm and the remote or sensor
or control panel next to you.
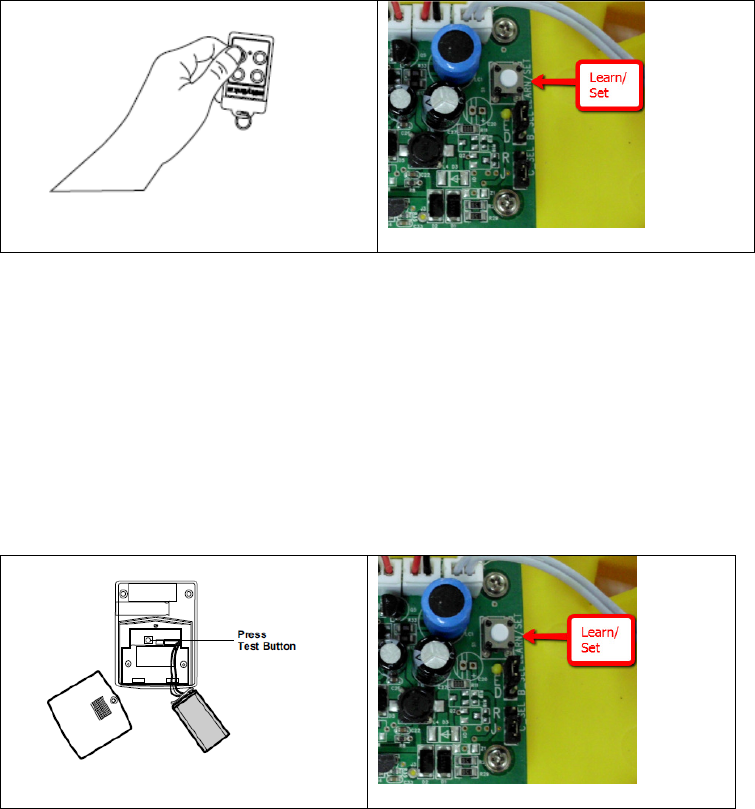
3A – Learn remote to the Wireless External Alarm:
- Press and hold the Learn button on the Wireless External Alarm for 2 seconds and then
release. The Learn/Set LED will flash.
- Activate the remote by pressing any one of the buttons.
- You will hear 2 beeps and the LEDs will flash twice indicating the remote is now
programmed to the Wireless External Alarm.
3B – Learn motion sensor to the Wireless External Alarm:
- Press and hold the Learn button on the Wireless External Alarm for 2 seconds and then
release. The Learn/Set LED will flash.
- Activate the motion sensor by pressing the “Test/Set” button on the motion sensor. This
“Test/Set” button can usually find inside the battery compartment.
- You will hear 2 beeps and the LEDs will flash twice indicating the sensor is now
programmed to the Wireless External Alarm.
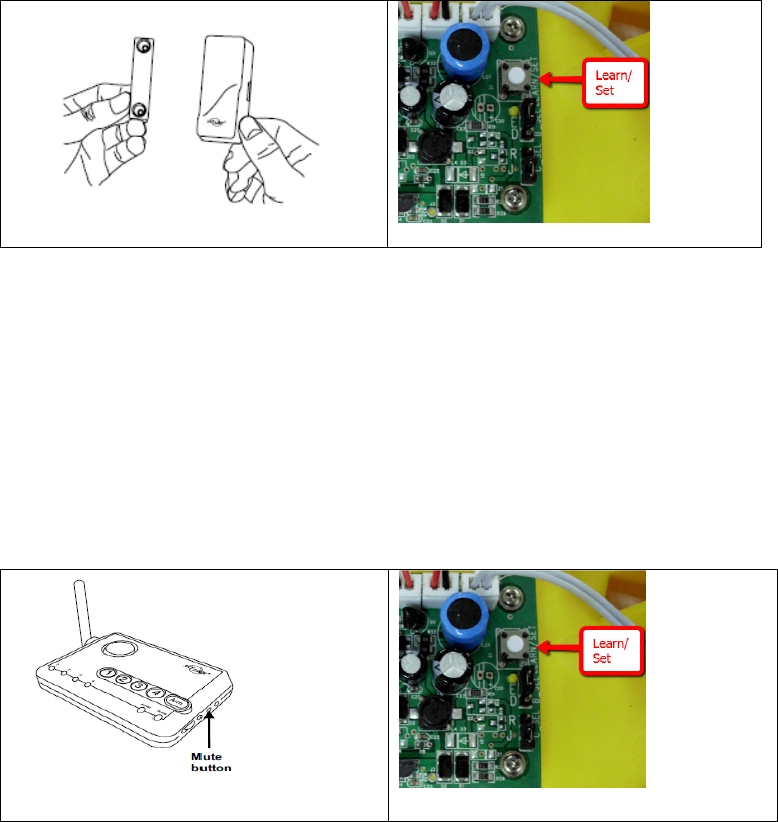
3C – Learn door/window sensor to the Wireless External Alarm:
- Press and hold the Learn button on the Wireless External Alarm for 2 seconds and then
release. The Learn/Set LED will flash.
- Activate the remote by separating the magnet from the sensor unit.
- You will hear 2 beeps and the LEDs will flash twice indicating the sensor is now
programmed to the Wireless External Alarm.
3D – Learn control panel to the Wireless External Alarm:
- Press and hold the Learn button on the Wireless External Alarm for 2 seconds and then
release. The Learn/Set LED will flash.
- Activate the control panel by pressing and hold the Mute button on the side of the control
panel for 3 seconds.
- You will hear 2 beeps and the LEDs will flash twice indicating the control panel is now
programmed to the Wireless External Alarm.
4. Setup – Erase remote or sensors or control panel from the Wireless External Alarm
To erase unwanted remote(s) or sensor(s) or control panel(s) from the Wireless External Alarm
will erase all learned devices from the Wireless External Alarm.
- Press and hold the Learn/Set button on the Wireless External Alarm for 5 seconds. All
the LEDs will turn on.
- While holding the Learn/Set button on the Wireless External Alarm until all the LEDs turn
off. You may release the Learn/Set button when the Learn/Set LED stay on.
- Press and hold the Learn/Set button on the Wireless External Alarm for 2 seconds until it
emits 2 beeps and all the LEDs flash twice. Now you may release the ‘Learn’ button.
- All the learned devices have been erased.
5. Setup – Alarm sound duration
User can customize the alarm period from 30 seconds up to 10 minutes. The factory default of
the alarm period is 30 seconds.
- Press and hold the Learn/Set button on the Wireless External Alarm for 5 seconds, you
may release the Learn/Set button while all the LEDs turn on.
- While the PWR and Learn/Set LED stay on, press the Learn/Set button once on the
Wireless External Alarm, the LEDs flash once indicating the alarm period is set to 30
seconds.
- If you would set the other alarm period, continue to press the Learn/Set button. Refer to
the table below for the alarm period. The LEDs will flash corresponding to the number
you pressed the Learn/Set button.
1- 30 seconds
2- 60 seconds
3- 3 minutes
4- 5 minutes
5- 10 minutes
- Press and hold the Learn/Set button to confirm your setting. You will hear 2 beeps and
the LEDs will flash twice indicating the alarm period is now programmed to the Wireless
External Alarm.
6. Setup – Arming Sequence
The Wireless External Alarm can be programmed to react 2 arming sequences when it receives
the signal from the sensor. In order to arm the Wireless External Alarm, the remote (optional)
must be programmed to the Wireless External Alarm. You may arm the Wireless External Alarm
in 2 different sequences:
6A – Arm Home Sequence:
This setting is used when you wish to secure the area but will be at home and moving around
within the armed area. In Arm Home setting, any motion sensor will not respond to any
movement. Alarm will sound instantly if any of the sensors (e.g. door/window sensor) is
activated (except motion sensor).
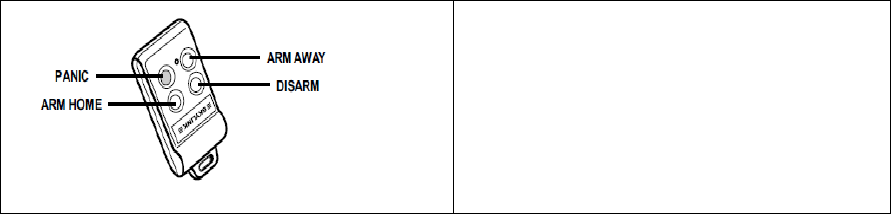
- Pressing the ARM HOME button on the remote will arm the Wireless External Alarm in
Home mode.
- You will hear 2 beeps and the LEDs will flash twice indicating the Wireless External
Alarm in Home mode.
6B – Arm Away Sequence:
This setting is used when you are the last one to leave the premises. By arming the Wireless
External Alarm in Away mode, you will have 30 seconds to leave the premises after arming.
After 30 seconds, all sensors in the premises are armed. Activating these sensors in Arm Away
mode will result in 30 seconds delay. The alarm will sound if not disarm during the 30 seconds
period.
- Pressing the ARM AWAY button on the remote will arm the Wireless External Alarm in
Away mode.
- You will hear 1 beep and the LEDs will flash once indicating the Wireless External Alarm
is being counted to Away mode.
- After 30 seconds, you will hear 2 beeps and the LEDs will flash twice indicating the
Wireless External Alarm in Away mode.
6C – Disarm
- Pressing the DISARM button on the remote will disarm the Wireless External Alarm
instantly.
- You will hear 2 beeps and the LEDs will flash twice indicating the Wireless External
Alarm is disarmed.
6D - Panic
- Pressing the Panic button on the remote will cause siren instantly.
Note:
- The Wireless External Alarm cannot be armed if there are triggered sensors. Make sure
all sensors are in closed position, i.e. (close all doors, windows, no movement should be
detected and etc).
- The Wireless External Alarm can be armed if there are sensors with low battery or failure
warning.
- During the Arm Away mode, you will have 30 seconds to leave the premises, this is
called the exit delay. When the exit delay expires, the Wireless External Alarm is armed.
- If a sensor is triggered while the Wireless External Alarm is armed, such as entering the
premises, an entry delay will be triggered. User is allowed to disarm the Wireless
External Alarm during the 30 seconds entry delay. You will hear beeping every 5
seconds during the entry delay interval. The beeping rate will change from slow to fast in
last few seconds. If the Wireless External Alarm is not disarmed within 30 seconds,
alarm will sound immediately.
7. Operating the Skylink Security Control Panel
The Wireless External Alarm is designed to work with the Skylink security control panel such as
AM-001, ML-001 and SC-001. Put the control panel that you plan to program into programming
mode. Refer to the User’s Instructions of that control panel.
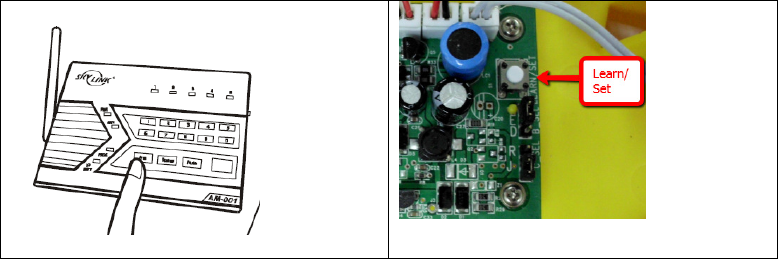
7A – Learn control panel AM-001 or ML-001 to the Wireless External Alarm:
- Press and hold the Learn button on the Wireless External Alarm for 2 seconds and then
release. The Learn/Set LED will flash.
- Activate the control panel AM-001 or ML-001 by pressing [ARM] and then enter your
current Master PIN (MPIN) [factory default 1 2 3 4].
- You will hear 2 beeps and the LEDs will flash twice indicating the control panel is now
programmed to the Wireless External Alarm.
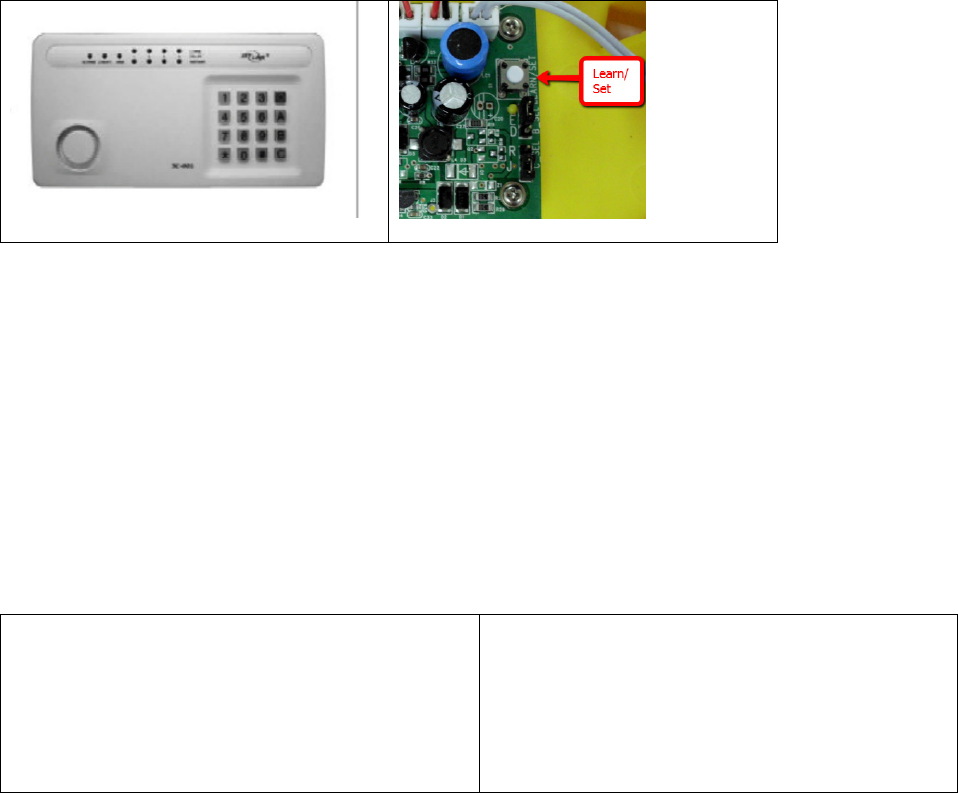
7B – Learn control panel SC-001 to the Wireless External Alarm:
- Press and hold the Learn button on the Wireless External Alarm for 2 seconds and then
release. The Learn/Set LED will flash.
- Activate the control panel SC-001 by entering your current Master PIN (MPIN) [factory
default 0 0 0], then enter [B], [B].
- You will hear 2 beeps and the LEDs will flash twice indicating the control panel is now
programmed to the Wireless External Alarm.
Installation (Only applicable to SA-001S)
The Wireless External Alarm model SA-001S built-in with a Solar Panel, this solar panel is
mounted on the top of the housing to maintain a charge to the rechargeable batteries during the
daylight interval. During darkness, an insignificant amount of energy is released from the
rechargeable battery to operate the Wireless External Alarm.
The Wireless External Alarm should be installed to the outside of your house or building in a
position to gather as much sunlight as possible. Avoid any shadows cast by walls, trees and
roof overhangs to the Wireless External Alarm. Ideally to install the Wireless External Alarm
facing due south optimize for solar exposure.
Photo to show a house and SA-001S point to
south orientation.
BATTERY
When the battery power is being reduced, the Wireless External Alarm will beep every 30
seconds, it is time to replace the battery.
The Wireless External Alarm is powered by 3 AA Alkaline batteries as the backup purpose.
Follow the instructions below to replace the batteries;
1. Remove the cover of the Wireless External Alarm as shown.
2. Remove the old battery. Insert 3 new AA Alkaline batteries to the battery compartment.
Beware of the battery polarity.
3. Install the cover. The red LED on the front of the unit will be on for 1 second and the
LCD will turn on.
Caution: Risk of explosion if battery is replaced by an incorrect type. Dispose of used batteries
according to the instructions.
FCC
This device complies with Part 15 of the FCC Rules. Operation is subject to the
following two conditions: (1) This device may not cause harmful interference, and (2)
This device must accept any interference received, including interference that may
cause undesired operation.
WARNING:
Changes or modifications to this unit not expressly approved by the party responsible
for compliance could void the user’s authority to operate the equipment.
NOTE: This equipment has been tested and found to comply with the limits for a Class B digital
device, pursuant to Part 15 of the FCC Rules. These limits are designed to provide reasonable
protection against harmful interference in a residential installation. This equipment generates, uses
and can radiate radio frequency energy and, if not installed and used in accordance with the
instructions, may cause harmful interference to radio communications.
However, there is no guarantee that interference will not occur in a particular installation. If this
equipment does cause harmful interference to radio or television reception, which can be
determined by turning the equipment off and on, the user is encouraged to try to correct the
interference by one or more of the following measures:
- Reorient or relocate the receiving antenna.
- Increase the separation between the equipment and receiver.
- Connect the equipment into an outlet on a circuit different from that to which the receiver is
connected.
- Consult the dealer or an experienced radio/TV technician for help.
IC
Le présent appareil est conforme aux CNR d'Industrie Canada applicables aux appareils radio
exempts de licence. L'exploitation est autorisée aux deux conditions suivantes : (1) l'appareil ne
doit pas produire de brouillage, et (2) l'utilisateur de l'appareil doit accepter tout brouillage
radioélectrique subi, même si le brouillage est susceptible d'en compromettre le fonctionnement.
CE
Declaration of Conformity
This equipment complies with the requirements relating to electromagnetic compatibility, EN
300220-2, EN301489-3, EN61058-1, EN50371. This equipment conforms to the essential
requirement of the Directive (1999/5/EC) of the European Parliament and of the Council.

WARRANTY
If, within one year from date of purchase, this product should become defective (except battery),
due to faulty workmanship or materials, it will be repaired or replaced, without charge. Proof of
purchase and a Return Authorization are required.
CUSTOMER SERVICE
If you would like to
- find out the up-to-date specifications
- know more about features and applications
- download documents, i.e. user’s instructions
- order Skylink products
or if you have difficulty getting products to work, please:
1. visit our FAQ section at www.skylinkhome.com, or
2. email us at support@skylinkhome.com
CUSTOMER SERVICE
Rm 1303, Block B, Veristrong Industrial Centre,
36 Aupuiwan Street, Fotan, N.T. Hong Kong.
Email:sales@skylinkhome.com
http://www.skylinkhome.com
©2012 SKYLINK GROUP
CUSTOMER SERVICE
17 Shread Avenue,
Brampton, Ontario,
Canada L6Y 1J3
Email:sales@skylinkhome.com
http://www.skylinkhome.com
©2012 SKYLINK GROUP
.