Capital Prospect WB6X0 Remote Transmitter User Manual
Capital Prospect Ltd Remote Transmitter Users Manual
User Manual
WB-660 Series
INSTALLATION INSTRUCTIONS
Wireless Wall Control
Model : WB-630
Congratulations on your purchase of the Skylink
Wireless Wall Control model WB-660. This Wall Control
is designed to operate the Skylink Atoms Garage Door
Opener series. You will find the installation to be simple
and be able to get the system up and running with little
effort.
ONE YEAR WARRANTY
This product is guaranteed to be free of defects in
materials and workmanship for 1 year from the date of
purchase. If this product is defective, call
1-800-304-1187 for repair or replacement parts.
Guarantee does not include normal wear and tear or
batteries.
If you have any questions, problems or missing parts,
please call Skylink Customer Support: 9:00am – 5:00pm
EST, Monday-Friday.
1-800-304-1187
Or e-mail us at support@skylinkhome.com
CUSTOMER SERVICE
17 Sheard Avenue, Brampton, Ontario, Canada L6Y 1J3
www.skylinkhome.com
P/N:101Yxxx Rev0
SAFETY INFORMATION
This device complies with Part 15 of the FCC Rules.
Operation is subject to the following two conditions: (1)
This device may not cause harmful interference, and (2)
This device must accept any interference received,
including interference that may cause undesired
operation.
WARNING:
Changes or modifications to this unit not expressly
approved by the party responsible for compliance
could void the user’s authority to operate the
equipment.
This device complies with Industry Canada
license-exempt RSS standard(s). Operation is subject to
the following two conditions: (1) this device may not
cause interference, and (2) this device must accept any
interference, including interference that may cause
undesired operation of the device.
Cet appareil est conforme aux CNR exempts de licence
d'Industrie Canada. Le fonctionnement est soumis aux
deux conditions suivantes:
(1) Cet dispositif ne peut causer des interférences; et
(2) Cet appareil doit accepter toute interférence, y
compris les interférences qui peuvent causer un
mauvais fonctionnement de l'appareil.
Package Contents
Parts
Description
Quantity
A
Wall Control
1
B
Mounting Accessories
1
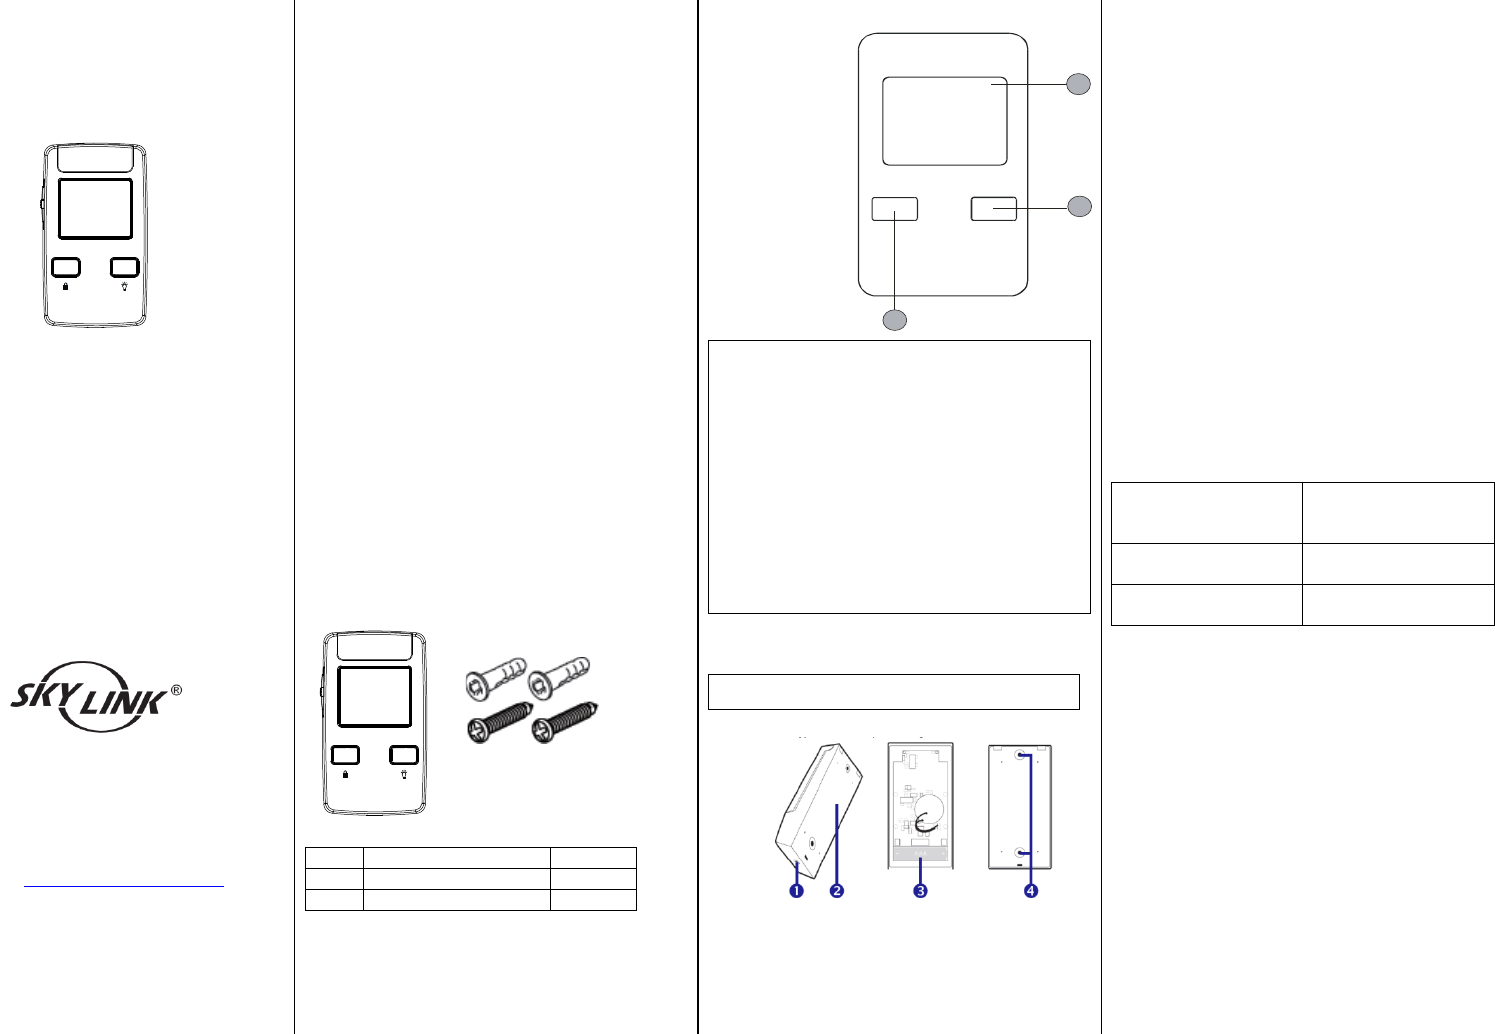
Section 1- Overview
1 – Open/Close
Garage Door
Button
2- Light On/Off
Button
3 – Remote
Lock Button
WARNING:
- Wall Control must be installed within sight of
the garage door, out of reach of children, at a
minimum height of 5 feet (1.5m), and away
from all moving parts of door.
- Be sure power is not connected before
installing the Wall Control.
- Wall Control should only be activated when
door can be seen clearly, is properly adjusted
and there ae no obstructions to door travel.
- Always keep garage door in sight until
completely closed. Never permit anyone to
cross path of closing garage door.
Section 2- Installation of the Wall Control
Note: Battery for the Wall Control is included.
[Pix for reference only]
1. Pry off the back plate from the Wall Control.
2. Insert two AAA batteries (1.5V Alkaline Type).
3. Mount the back plate with the mounting
accessories.
4. Attach the Wall Control on the back plate.
Section 3 – Programming the Wall Control
1. Put the opener/receiver that you plan to
program into programming mode. Refer to
the User’s Instructions of that
opener/receiver unit.
2. Once the opener/receiver is in programming
mode, press the Garage Button (1) on the
Wall Console to transmit the signal.
3. Once the Wall Console is programmed, the
opener/receiver will quit from programming
mode.
4. The Wall Console is ready to be used now to
operate that opener/receiver.
Section 4 - Operation of the Wall Console
1. To open/close the Garage Door, press the
Garage Door button (1) once. The LED flashes
quickly.
2. To toggle the light on/off, press the Light
On/Off button (2). The LED flashes quickly.
3. Remote Lock Button (3) – Press and hold the
button for 6 seconds to enable/disable the
lock function. The opener will ignore all the
remote radio signals when Lock function is
enabled.
Section 4 – LED light Indication
Garage Door LED
flashes once every 5
seconds
Wall Console in
Operating mode
Garage Door LED
flashes quickly
Wall Console transmit
signal
Lock LED flash every 5
seconds.
Remote Lock Enabled
2
1
3
WB-660 Series
INSTALLATION INSTRUCTIONS
Wireless Wall Control
Model : WB-660
Congratulations on your purchase of the Skylink
Wireless Wall Control model WB-660. This Wall Control
is designed to operate the Skylink Atoms Garage Door
Opener series. You will find the installation to be simple
and be able to get the system up and running with little
effort.
ONE YEAR WARRANTY
This product is guaranteed to be free of defects in
materials and workmanship for 1 year from the date of
purchase. If this product is defective, call
1-800-304-1187 for repair or replacement parts.
Guarantee does not include normal wear and tear or
batteries.
If you have any questions, problems or missing parts,
please call Skylink Customer Support: 9:00am – 5:00pm
EST, Monday-Friday.
1-800-304-1187
Or e-mail us at support@skylinkhome.com
CUSTOMER SERVICE
17 Sheard Avenue, Brampton, Ontario, Canada L6Y 1J3
www.skylinkhome.com
P/N:101Yxxx Rev0
SAFETY INFORMATION
This device complies with Part 15 of the FCC Rules.
Operation is subject to the following two conditions: (1)
This device may not cause harmful interference, and (2)
This device must accept any interference received,
including interference that may cause undesired
operation.
WARNING:
Changes or modifications to this unit not expressly
approved by the party responsible for compliance
could void the user’s authority to operate the
equipment.
This device complies with Industry Canada
license-exempt RSS standard(s). Operation is subject to
the following two conditions: (1) this device may not
cause interference, and (2) this device must accept any
interference, including interference that may cause
undesired operation of the device.
Cet appareil est conforme aux CNR exempts de licence
d'Industrie Canada. Le fonctionnement est soumis aux
deux conditions suivantes:
(1) Cet dispositif ne peut causer des interférences; et
(2) Cet appareil doit accepter toute interférence, y
compris les interférences qui peuvent causer un
mauvais fonctionnement de l'appareil.
Package Contents
Parts
Description
Quantity
A
Wall Control
1
B
Mounting Accessories
1
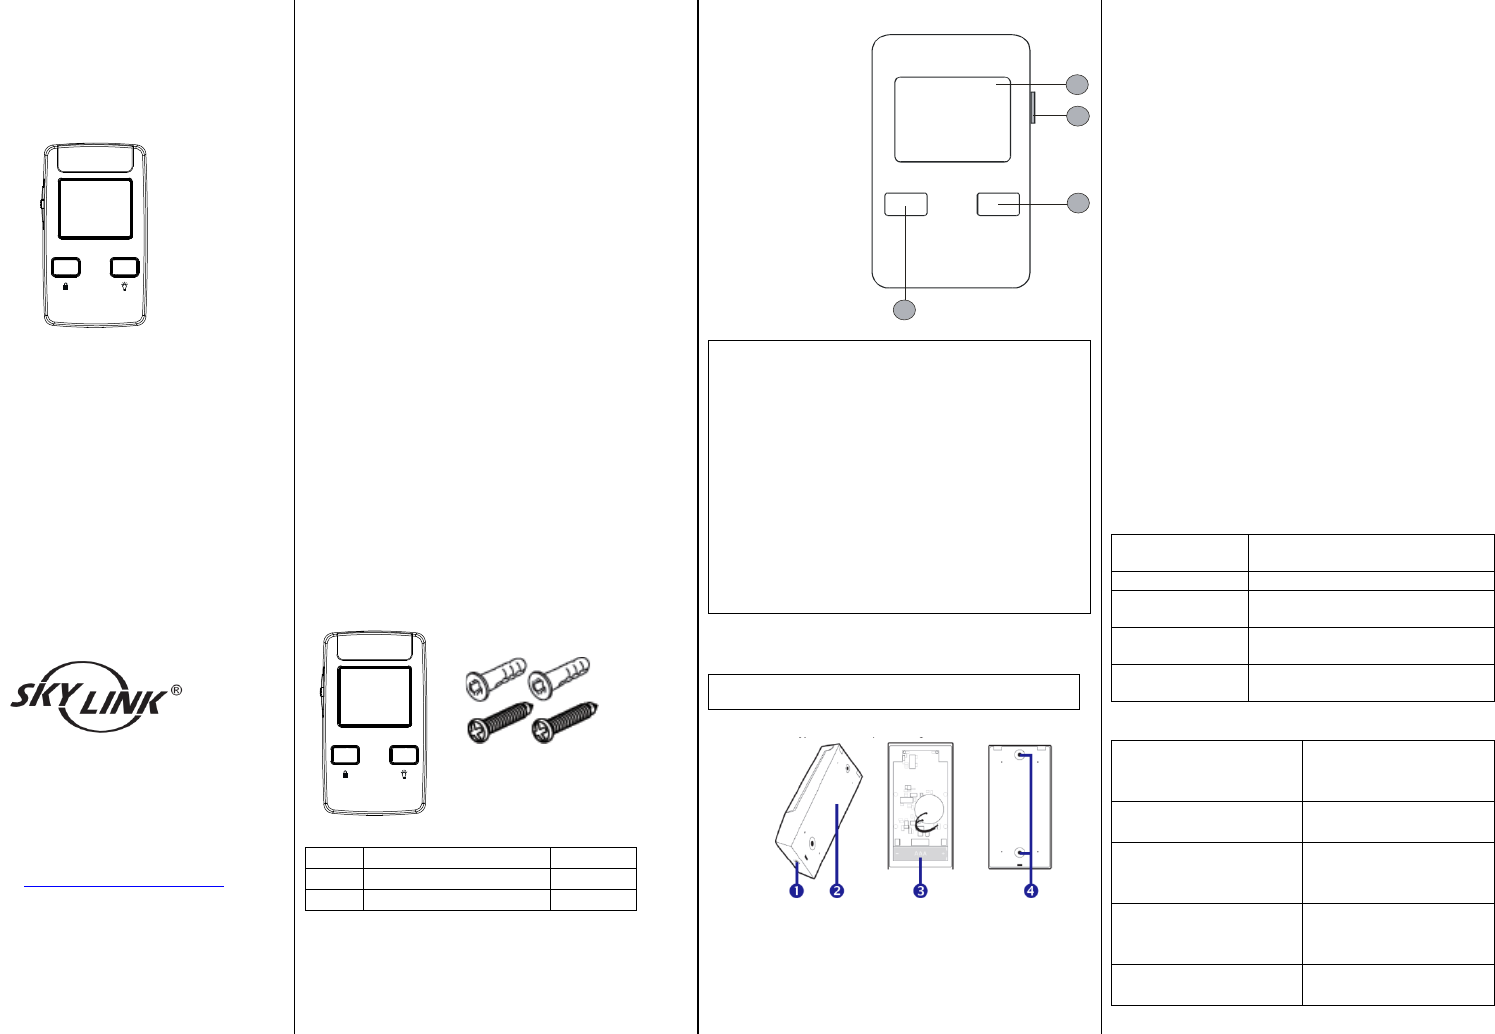
Section 1- Overview
1 – Open/Close
Garage Door
Button
2 – Light On/Off
Button
3 – Remote Lock
Button
4 – Auto Closer
Timer Setting
Switch
WARNING:
- Wall Control must be installed within sight of
the garage door, out of reach of children, at a
minimum height of 5 feet (1.5m), and away
from all moving parts of door.
- Be sure power is not connected before
installing the Wall Control.
- Wall Control should only be activated when
door can be seen clearly, is properly adjusted
and there ae no obstructions to door travel.
- Always keep garage door in sight until
completely closed. Never permit anyone to
cross path of closing garage door.
Section 2- Installation of the Wall Control
Note: Battery for the Wall Control is included.
[Pix for reference only]
1. Pry off the back plate from the Wall Control.
2. Insert two AAA batteries (1.5V Alkaline Type).
3. Mount the back plate with the mounting
accessories.
4. Attach the Wall Control on the back plate.
Section 3 – Programming the Wall Control
1. Put the opener/receiver that you plan to
program into programming mode. Refer to
the User’s Instructions of that
opener/receiver unit.
2. Once the opener/receiver is in programming
mode, press the Garage Button (1) on the
Wall Console to transmit the signal.
3. Once the Wall Console is programmed, the
opener/receiver will quit from programming
mode.
4. The Wall Console is ready to be used now to
operate that opener/receiver.
Section 4 - Operation of the Wall Console
1. To open/close the Garage Door, press the
Garage Door button (1) once. The LED flashes
quickly.
2. To toggle the light on/off, press the Light
On/Off button (2). The LED flashes quickly.
3. Remote Lock Button (3) – Press and hold the
button for 6 seconds to enable/disable the
lock function. The opener will ignore all the
remote radio signals when Lock function is
enabled.
4. Door Closer Timer switch (4) – The opener has
the option to program how long until the door
closes automatically after it has been opened.
To change the setting of this timer, simply
slide the switch to the desired position.
Slide switch
position
Function
0
Door Closer Timer Disabled.
3
The door will close
automatically after 3 minutes.
10
The door will close
automatically after 10 minutes
30
The door will close
automatically after 10 minutes
Section 5 – LED light Indication
Garage Door LED
flashes once every 5
seconds
Wall Console in
Operating mode
Garage Door LED
flashes quickly
Wall Console transmit
signal
Garage Door LED
flashes once every 5
seconds
Closer Timer disabled
Garage Door LED
flashes twice every 5
seconds
Closer Timer enabled
Lock LED flash every 5
seconds.
Remote Lock Enabled
2
1
4
3