CaptionCall 67T Telephone with WiFi User Manual
CaptionCall, LLC Telephone with WiFi Users Manual
Users Manual
CaptionCall 67T Phone
User Guide
CaptionCall Support 1-877-557-2227 Page 3
Contents
Welcome ....................................................................................... 7
How CaptionCall Works ......................................................... 9
Phone Features .......................................................................... 9
Key Parts of Your CaptionCall Phone ................................. 11
The Back of Your CaptionCall Phone .................................. 12
Touchscreen ............................................................................ 14
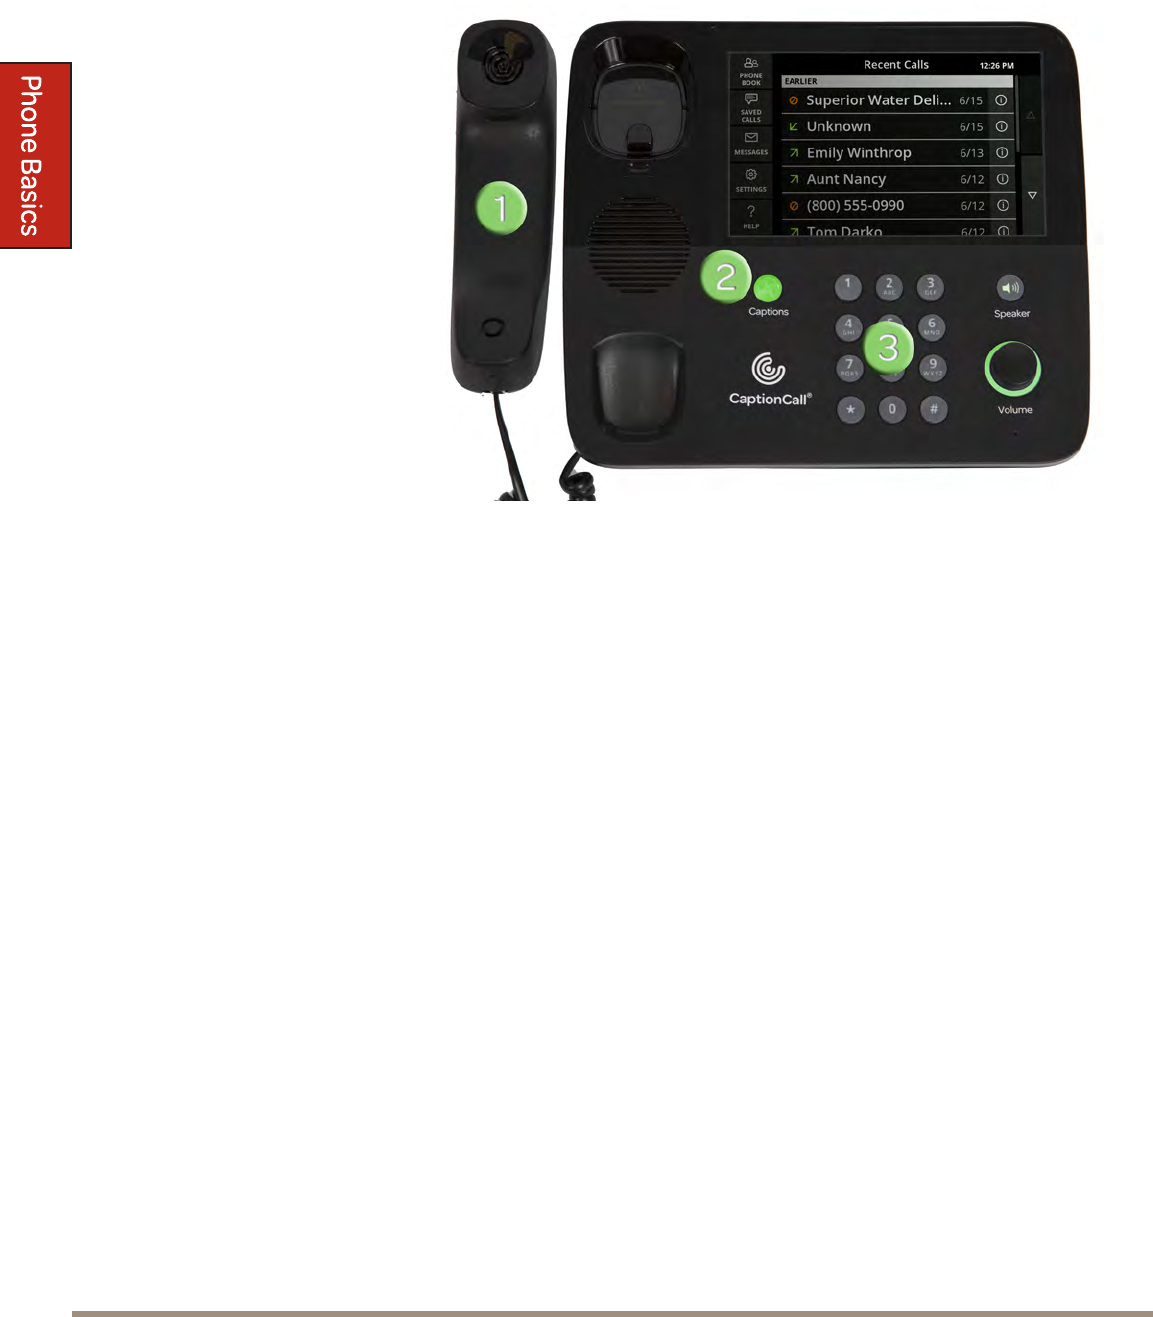
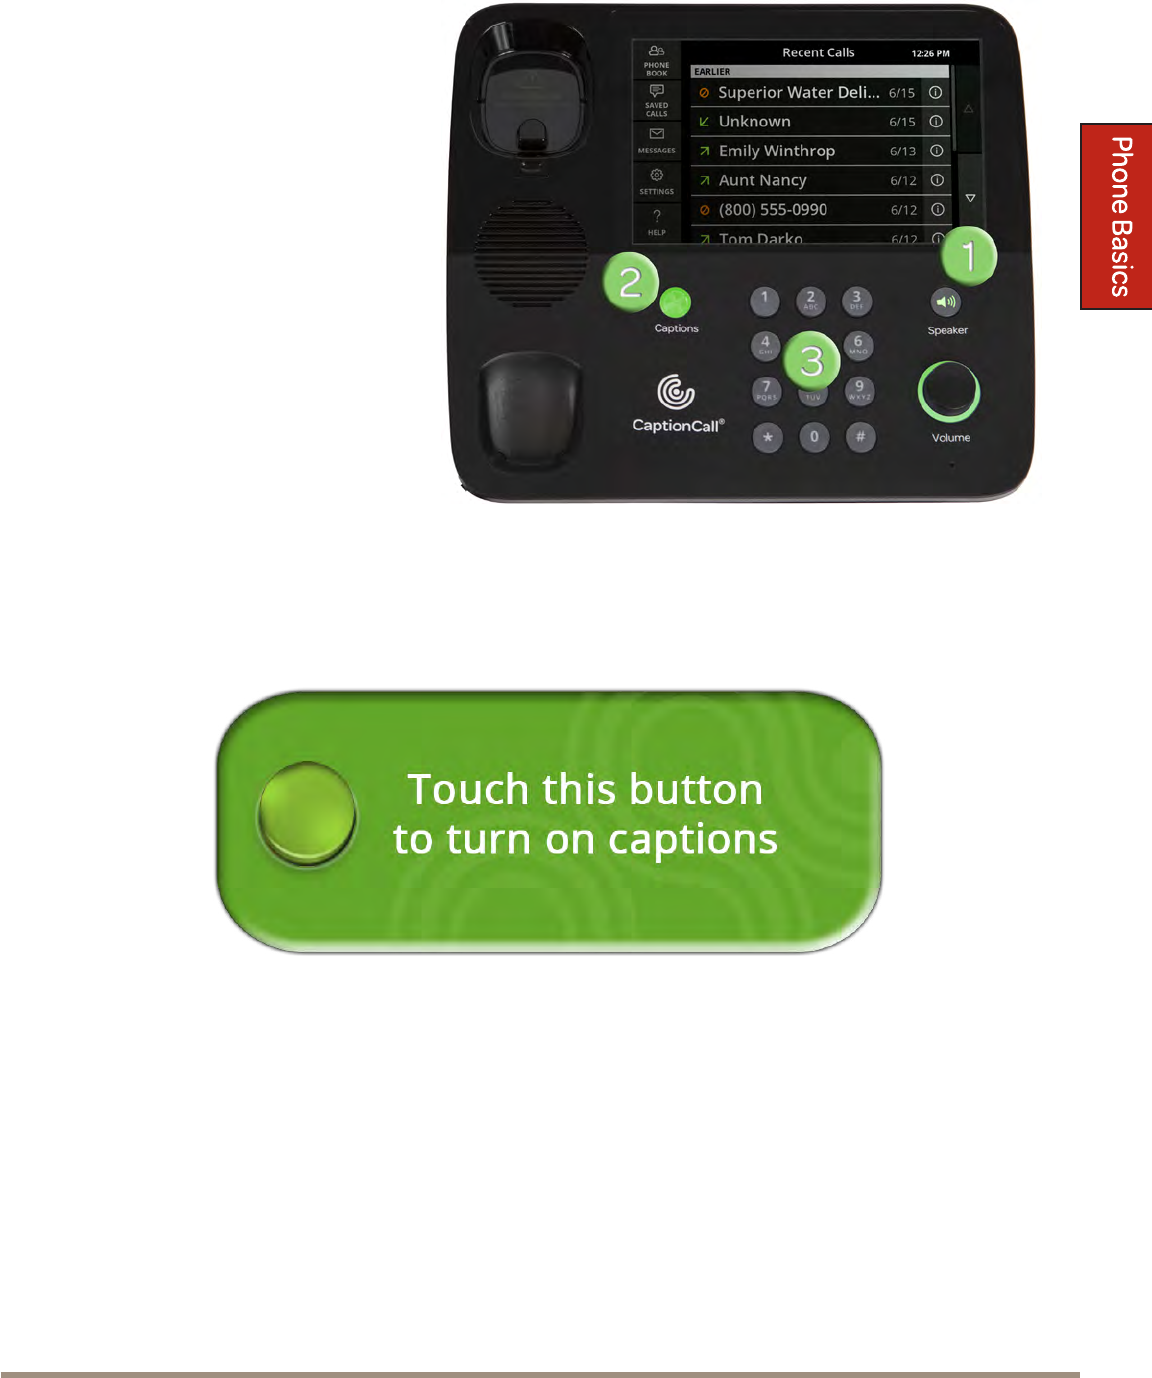
Phone Basics .............................................................................. 17
Turn Captions On ................................................................... 18
Make Captioned Calls ........................................................... 18
Make Captioned Speakerphone Calls ................................. 19
Answer Calls ........................................................................... 20
Return a Call ........................................................................... 21
Adjust Handset/Speaker Volume ........................................ 22
In Call Options Menu ............................................................ 24
Mute a Call .............................................................................. 25
Help Screens ............................................................................ 26
Back Buon .............................................................................. 27
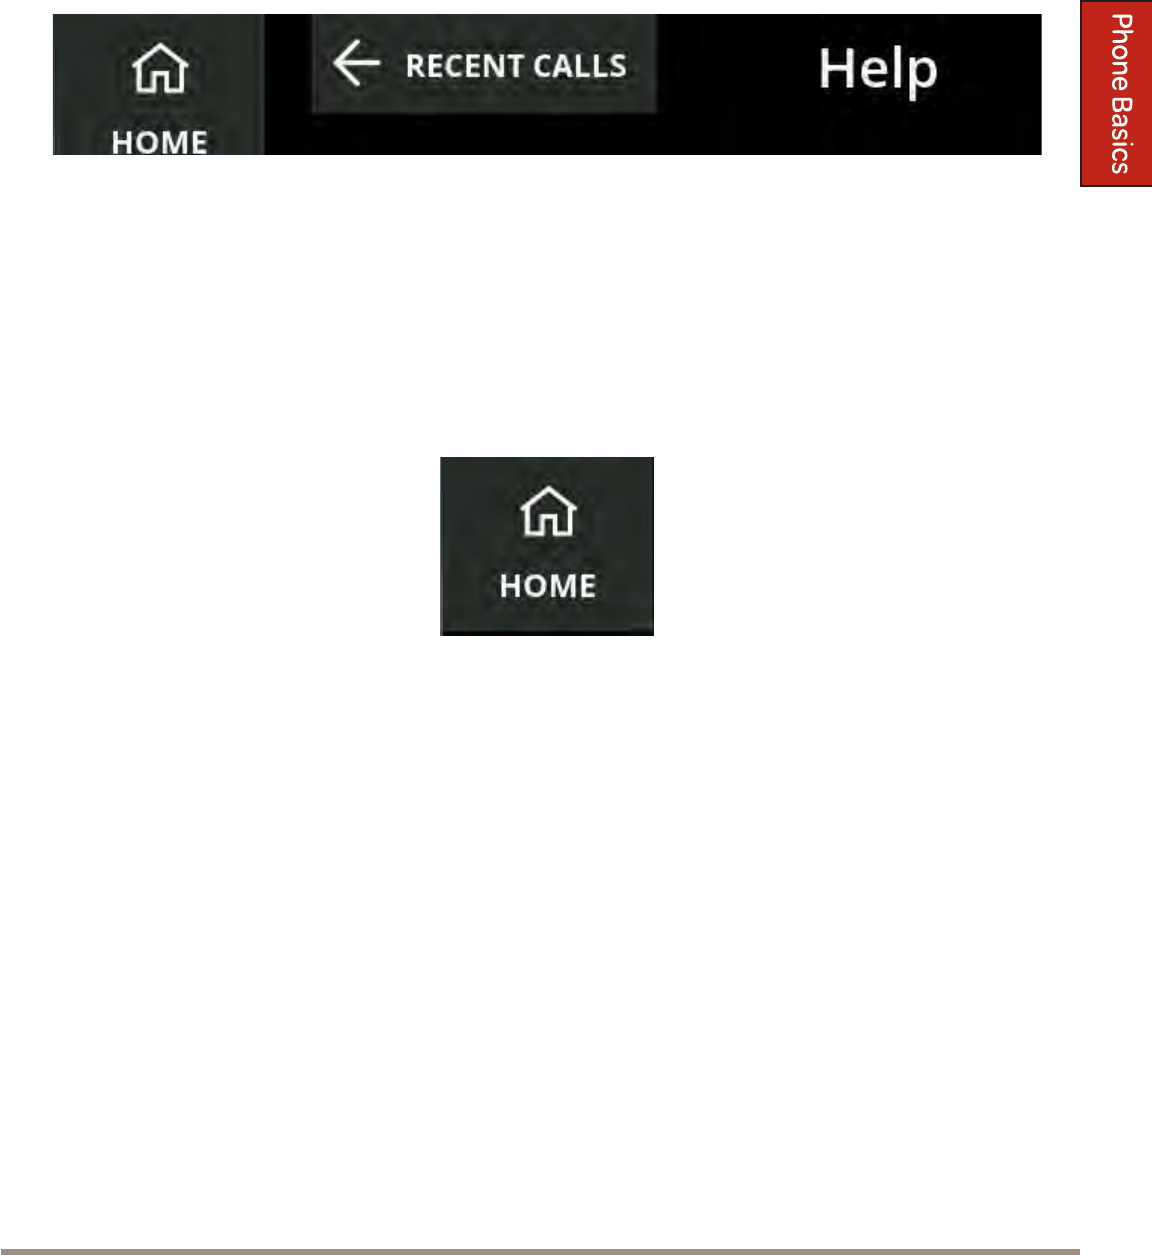
Home Buon ........................................................................... 27
Recent Calls ............................................................................... 29
View Recent Calls ................................................................... 30
Call Detail ................................................................................ 31
Phone Book ............................................................................... 35
View the Phone Book ............................................................. 36
Call a Contact .......................................................................... 37
Create a Favorites List ........................................................... 39
Edit a Contact .......................................................................... 40
Delete a Contact ...................................................................... 41
Adding Contacts Online ........................................................ 42
CaptionCall 67T PhonePage 4
Saved Calls ................................................................................ 47
Saving Conversations ............................................................ 48
Viewing Saved Conversations .............................................. 49
Messages .................................................................................... 53
Seing Up Voicemail Defaults ............................................. 55
Caption Voicemail .................................................................. 56
Captioning Answering Machine Messages ........................ 57
Seings ....................................................................................... 59
Call Defaults ............................................................................ 60
Display Seings ...................................................................... 61
Adjust the Ringer.................................................................... 62
Amplication Seings ........................................................... 64
Network ................................................................................... 66
Recent Calls ............................................................................. 71
Time Zone ................................................................................ 72
Voicemail ................................................................................. 73
About ........................................................................................ 73
Troubleshooting ...................................................................... 75
Technical Specications ......................................................... 76
Copyright & Trademarks ...................................................... 78
Important Safety Instructions ............................................... 79
CaptionCall Support 1-877-557-2227 Page 5


Welcome
WelcomePage 8

CaptionCall Support 1-877-557-2227 Page 9
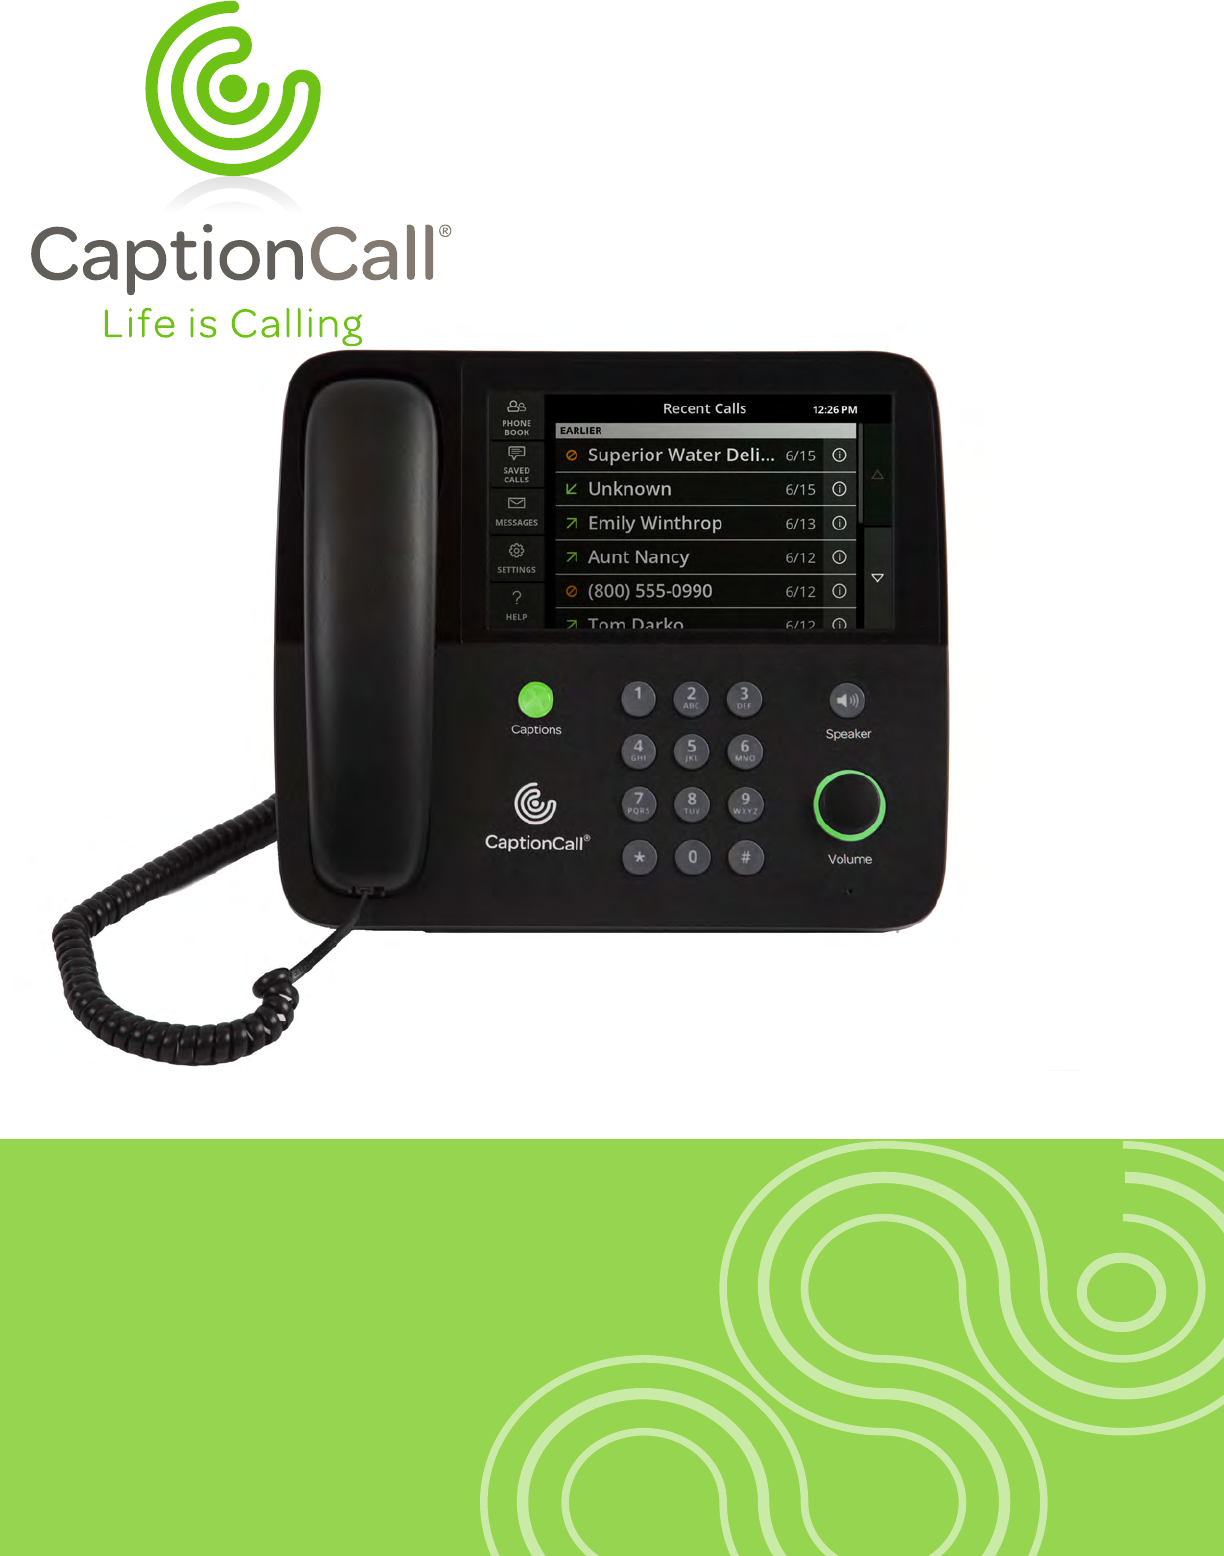
Welcome to your new CaptionCall® Phone. This phone features a large, easy-
to-read screen that displays wrien captions of what callers say to reinforce
anything you might miss. The CaptionCall phone is also amplied, allowing
you to increase the decibels to a level you are comfortable hearing.
How CaptionCall Works
Similar to captioned television, but only available to people with hearing loss,
CaptionCall uses advanced technology and a communications assistant to
quickly provide wrien captions of what callers say on a large, easy-to-read
screen. It works like a regular telephone – simply dial and answer calls as usual
– speak and listen using a phone handset like always.
Phone Features
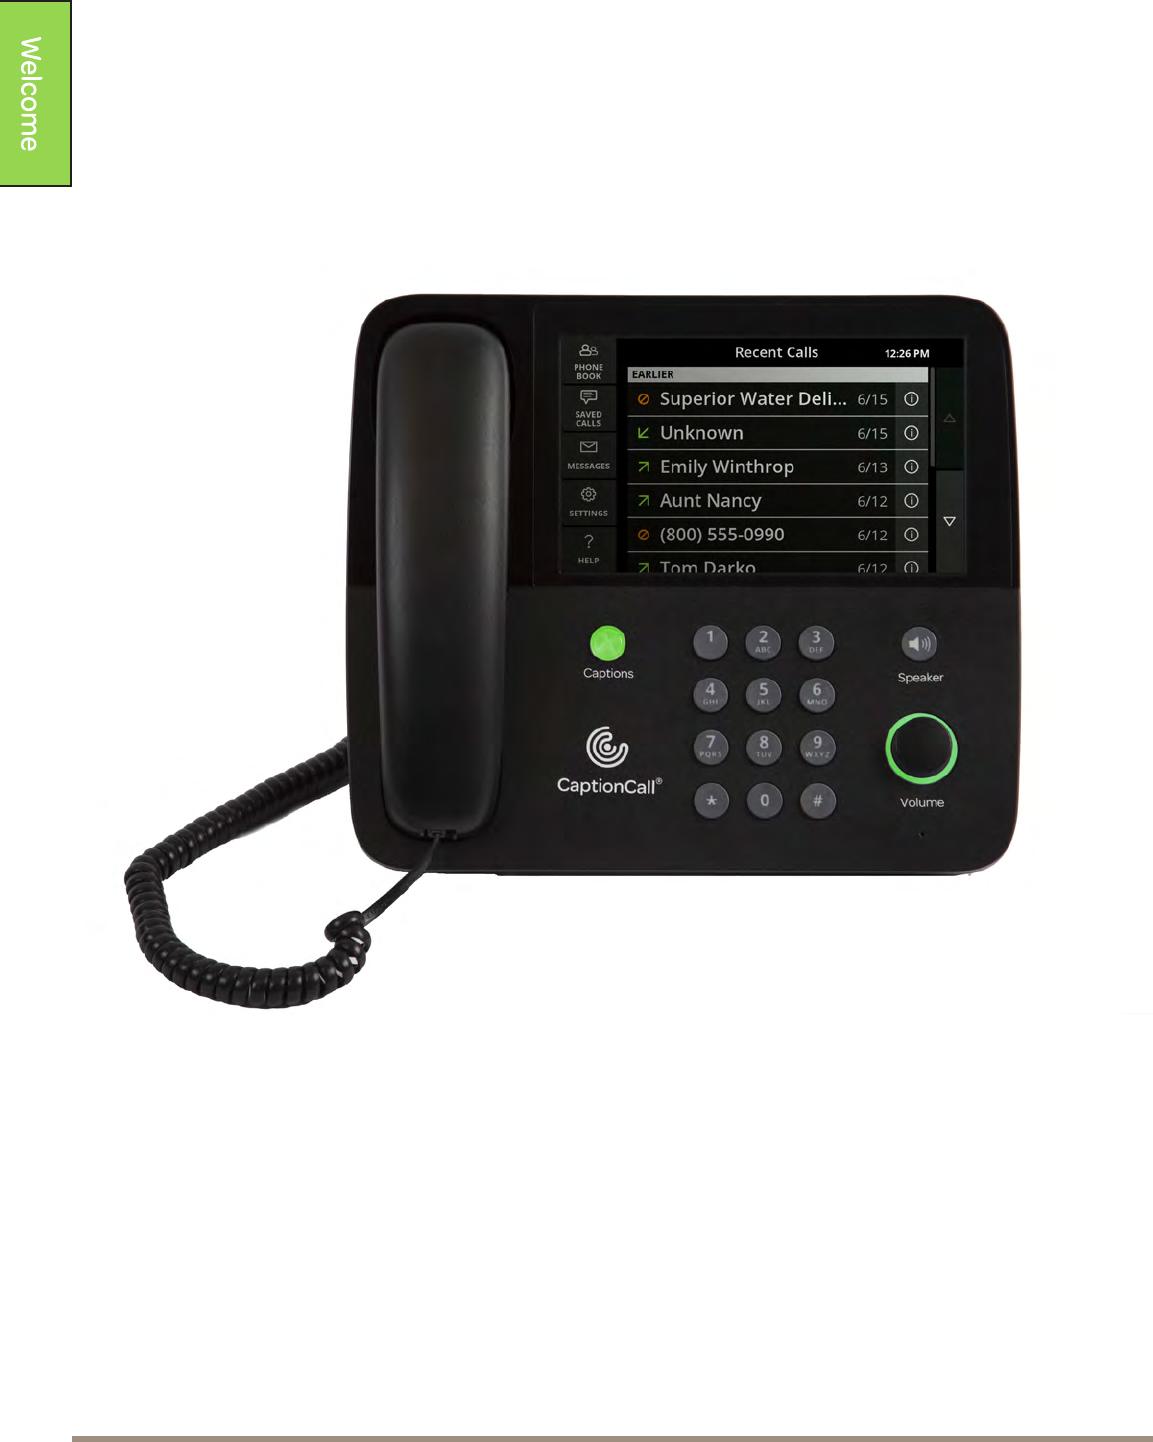
Your CaptionCall phone is like a regular telephone and a touchscreen phone
all in one. The touchscreen display is a unique and powerful feature of the
CaptionCall Phone. The most important use of the display is to show the text of
your captioned telephone calls. Other uses for the display are:
• To show you a list of your Recent Calls
• To allow you to create and manage a list of Contacts
• To display your Saved Calls
• To caption your Voicemail and/or Answering Machine messages
• To allow you to change the phone’s Seings
• To display built-in Help text for the current screen
The CaptionCall phone also features manual controls for turning on and o
captions, speakerphone, volume control, and a large back-lit keypad.
WelcomePage 10
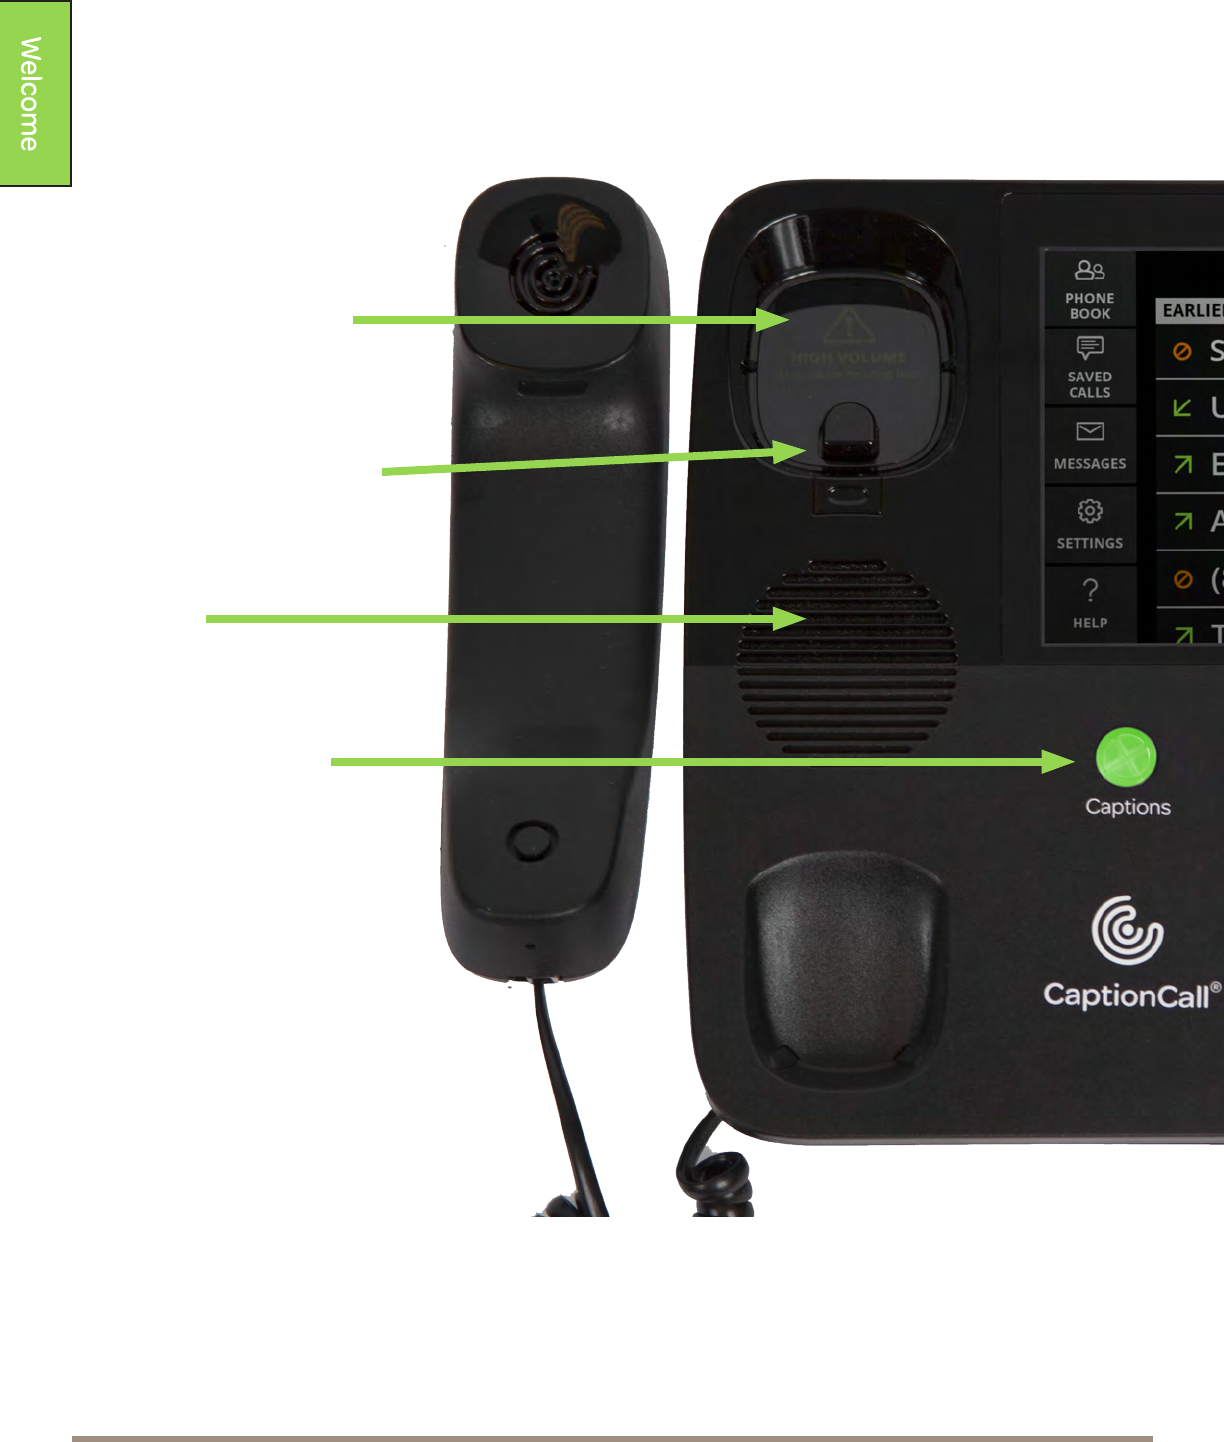
Handset
High Volume Alert
Displays when phone
volume could be harmful to
residual hearing.
Switch Hook button
Press to hang up a call.
Speaker
For use with the
speakerphone feature.
Captions Button
Press to turn captioning on
or o. The buon glows
green when captioning is
turned on.
CaptionCall Support 1-877-557-2227 Page 11
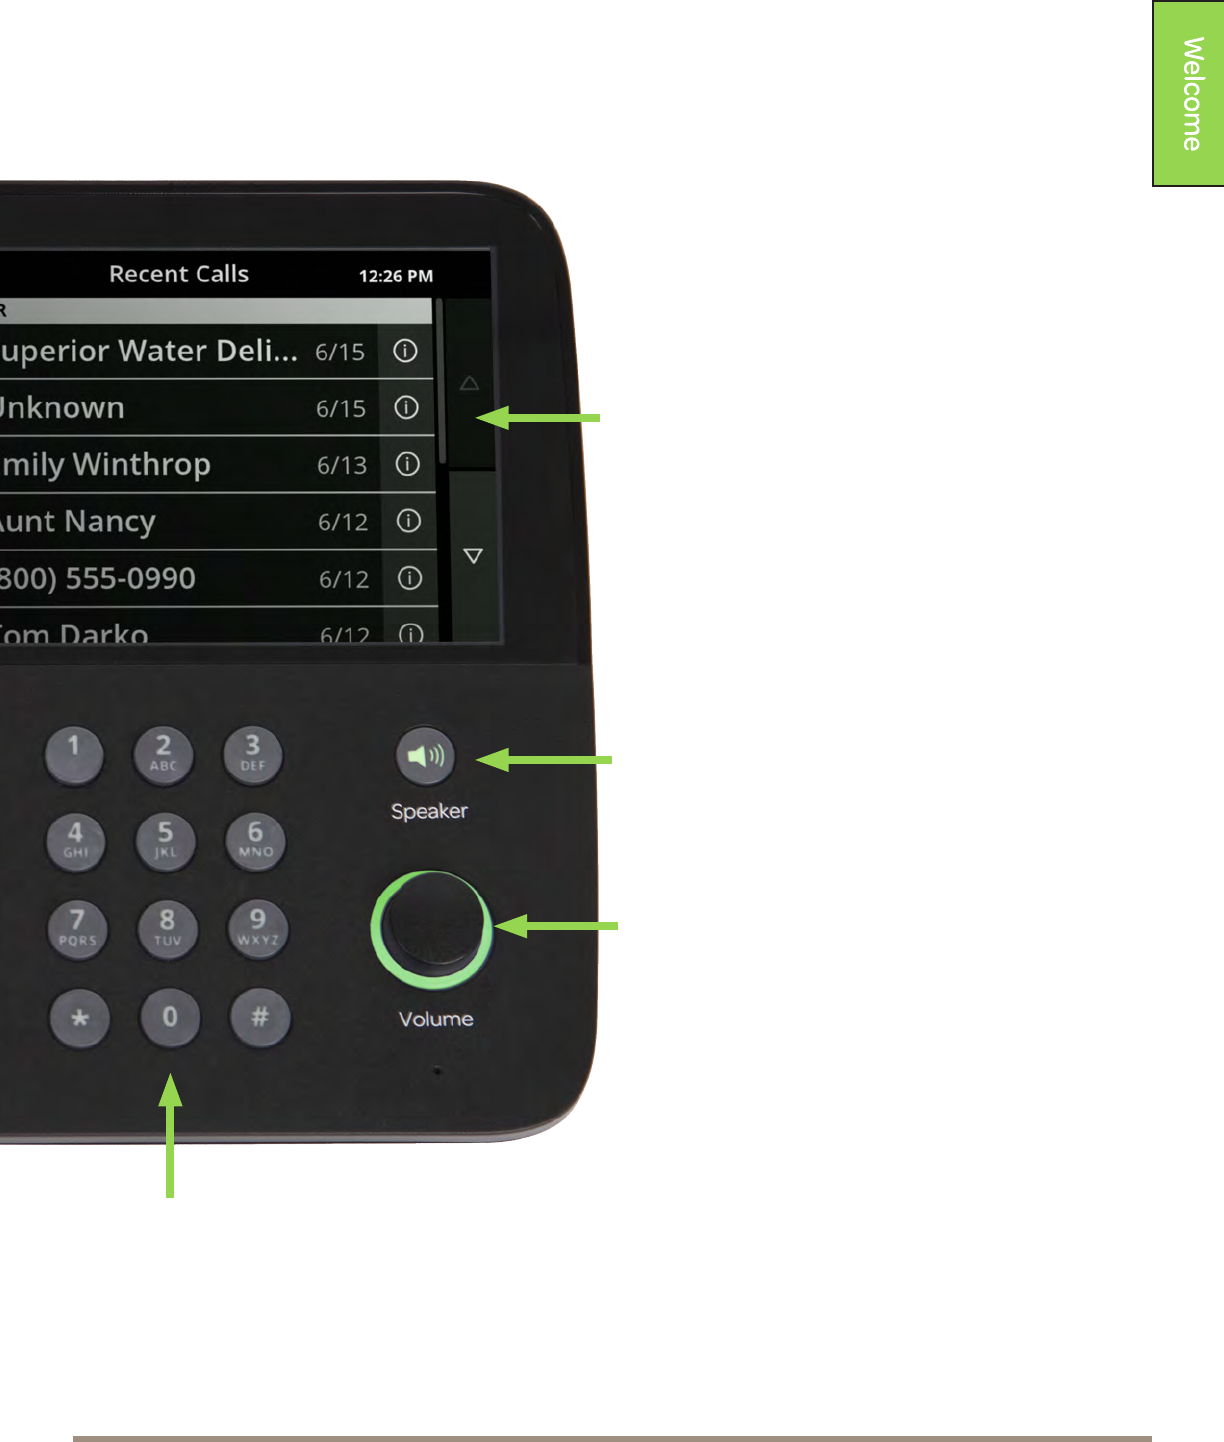
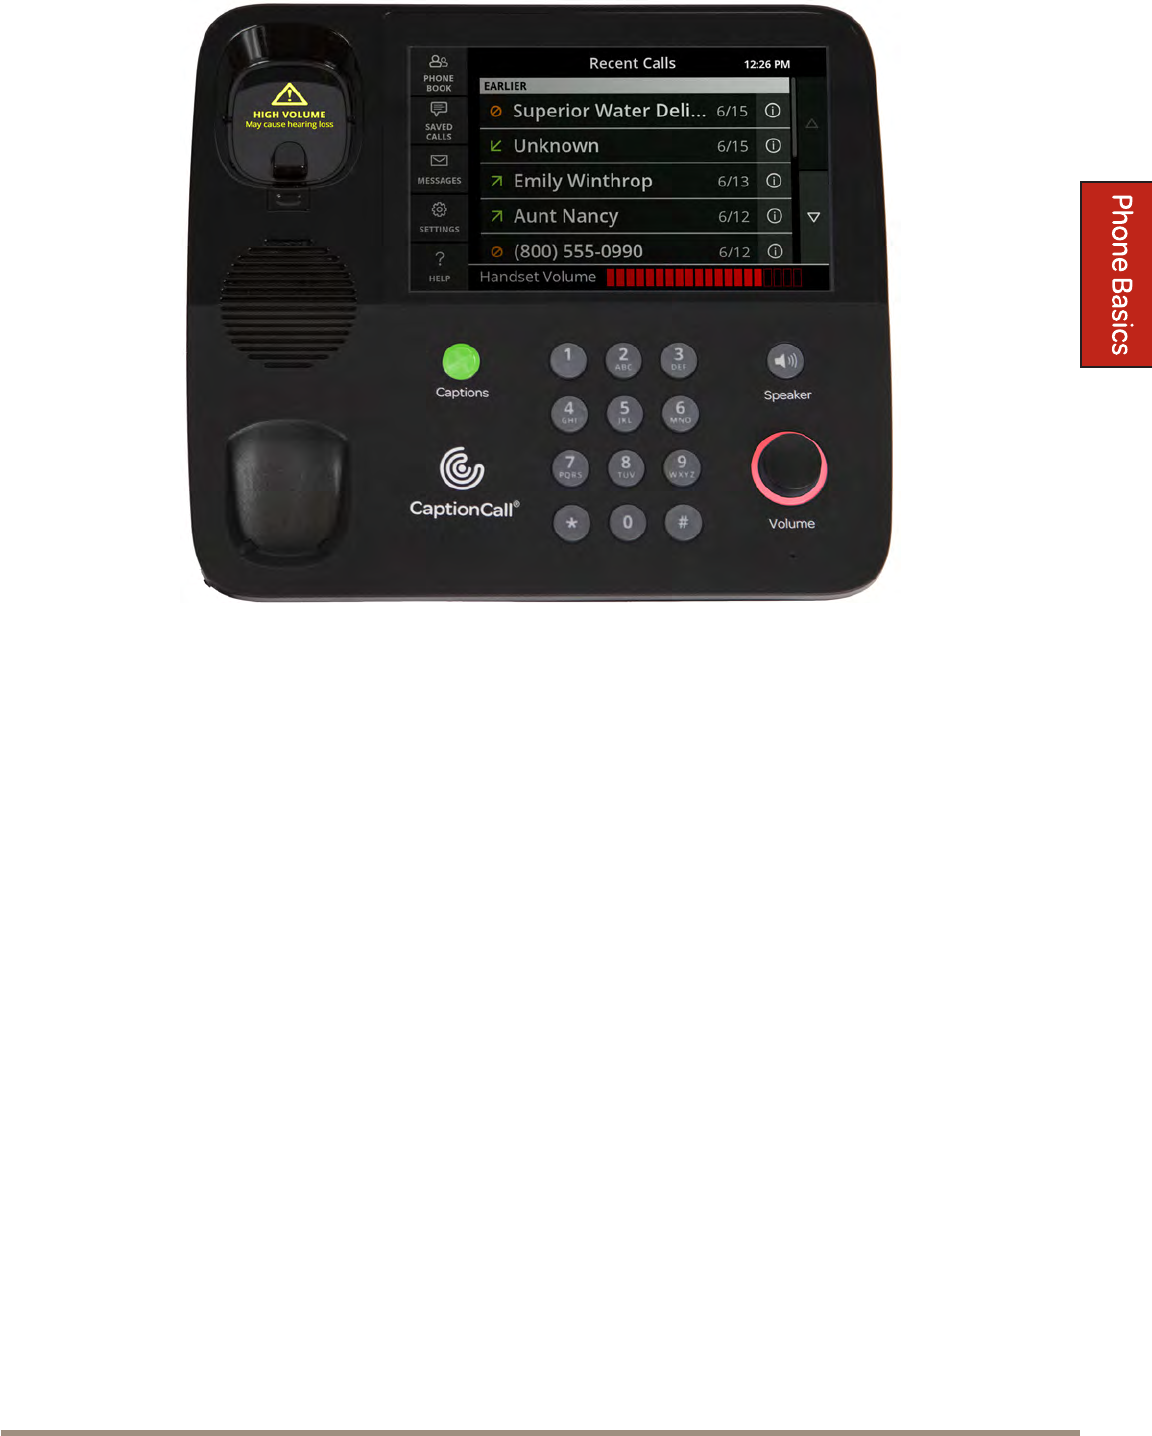
Key Parts of Your CaptionCall Phone
Touchscreen Display
Shows captions and lets you interact with
the phone interface.
Speakerphone Button
Press to turn on speakerphone, even when
the handset is still in its cradle
Volume Control Knob
Controls both call volume and ringer
volume. Rotate clockwise to increase
volume and counter-clockwise to decrease
volume. Dial light will change from green,
to amber, to red as volume increases.
Telephone Keypad
WelcomePage 12
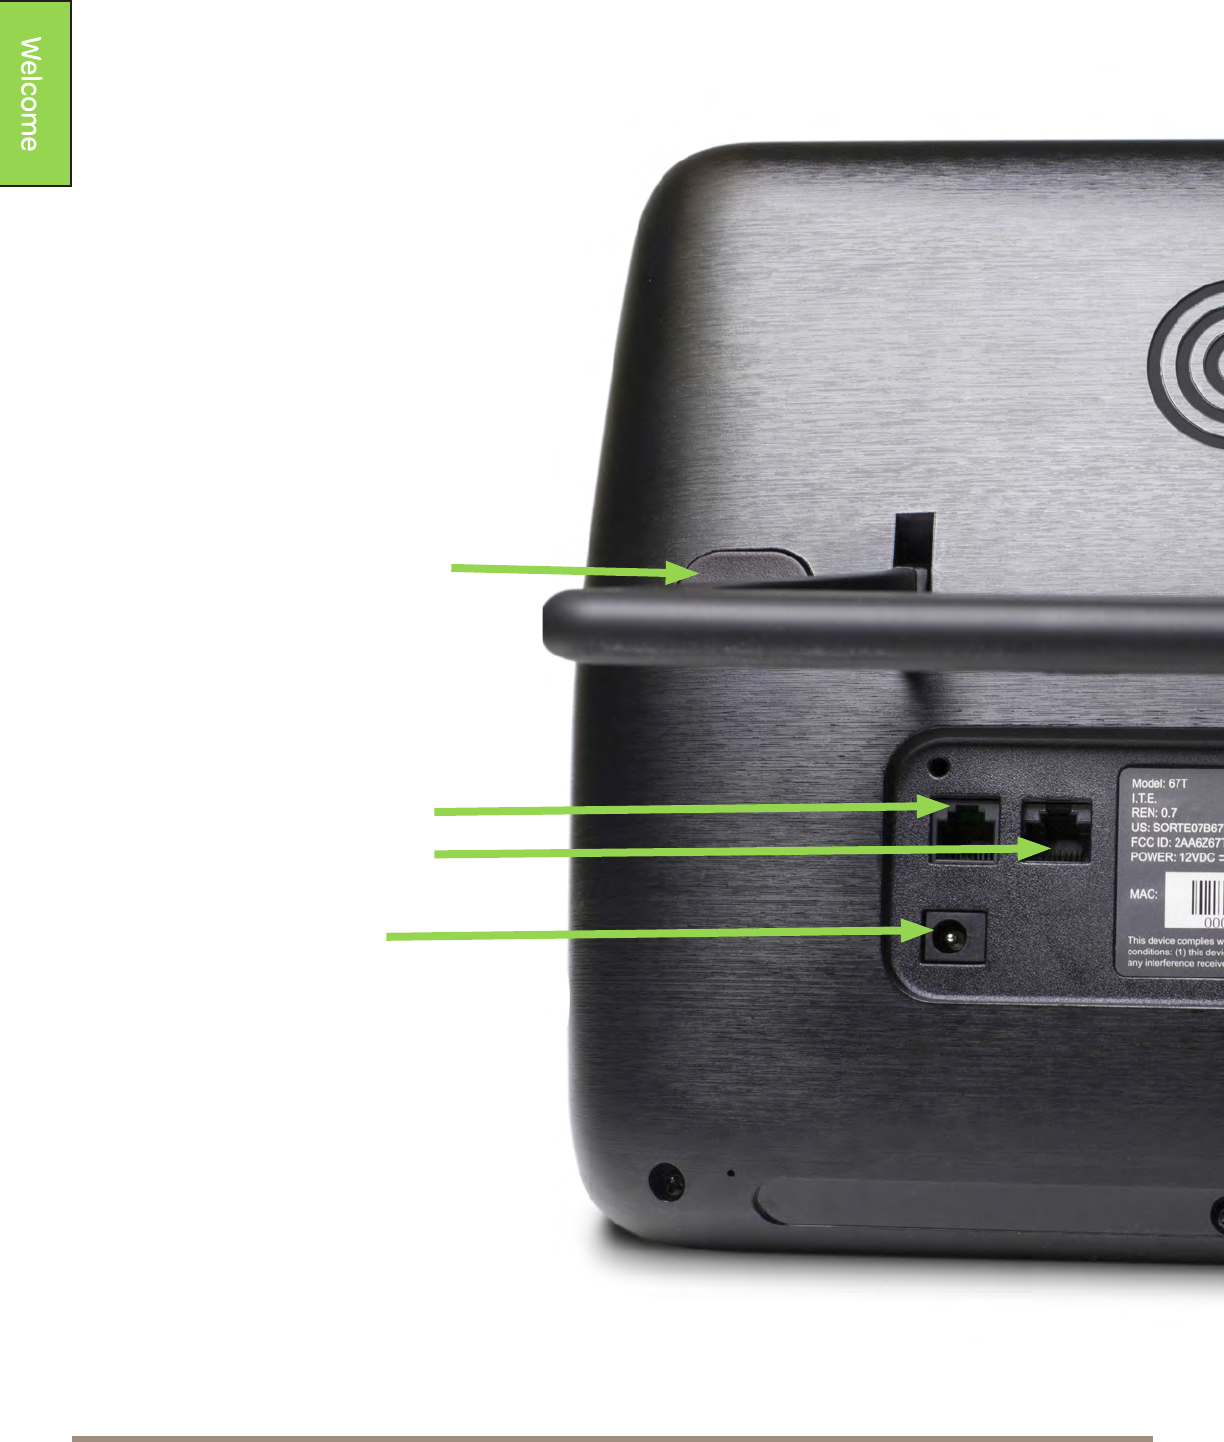
The Back of Your CaptionCall Phone
Stand Release Button
Press this buon to adjust the
angle of your stand.
Telephone Line Port
Ethernet (LAN) Port
Power Cable Port
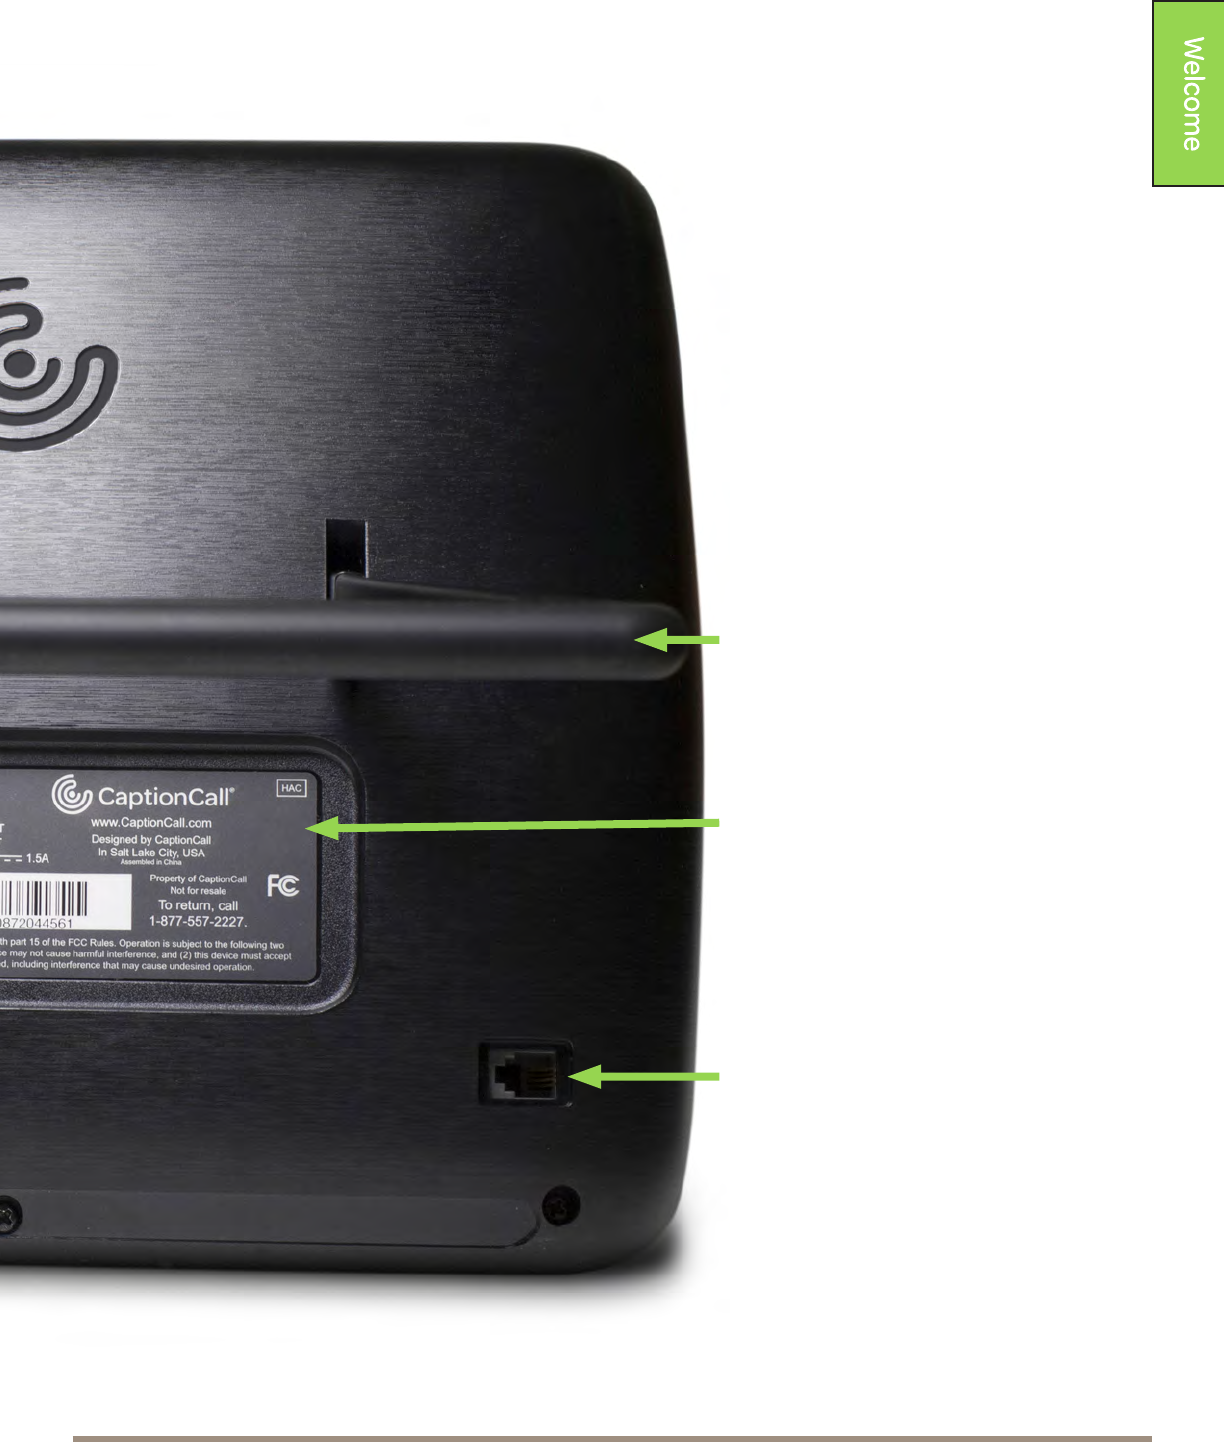
CaptionCall Support 1-877-557-2227 Page 13
Adjustable Stand
CaptionCall Phone
Identification and Return
Information
Handset Port
WelcomePage 14
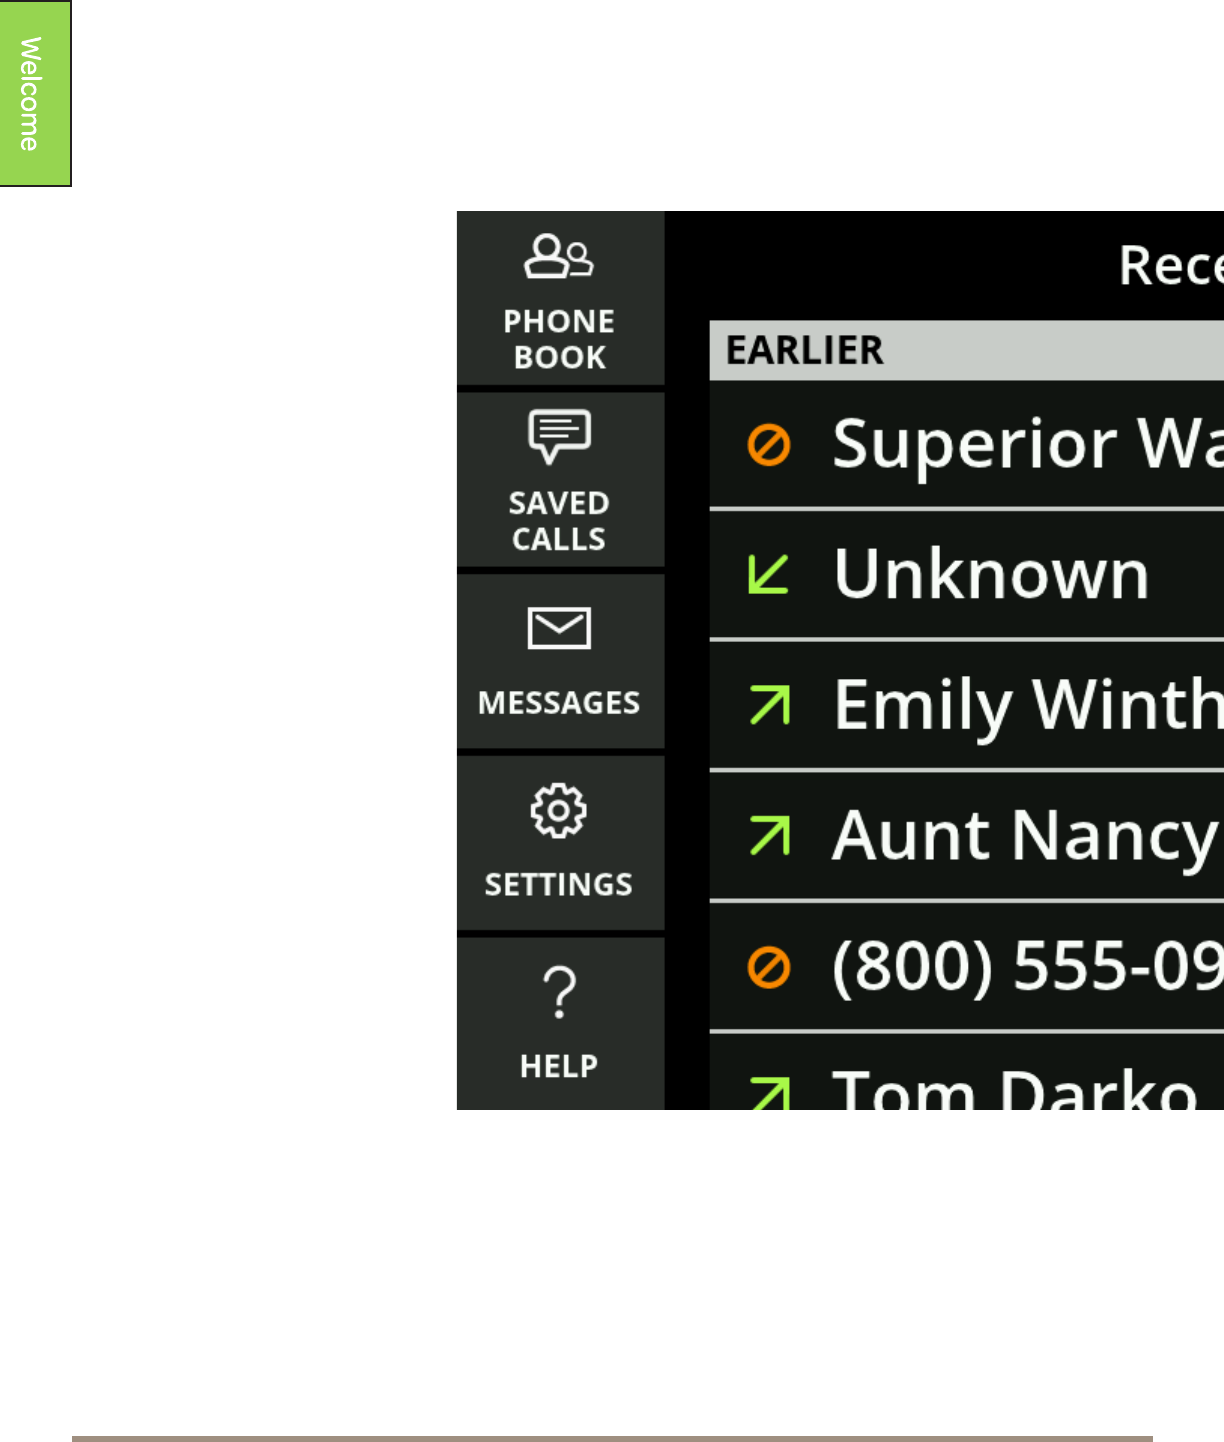
Touchscreen
Phone Menu
Gives you access to all of
your phone’s features.
Phone Book
Save and store Contacts.
Saved Calls
Access Previous
Captioned Calls.
Messages
Captioned Voicemail
or Answering Machine
Messages.
Settings
Controls for your
CaptionCall phone.
Help
Use this buon to
guide you through the
various functions of your
CaptionCall phone.
CaptionCall Support 1-877-557-2227 Page 15
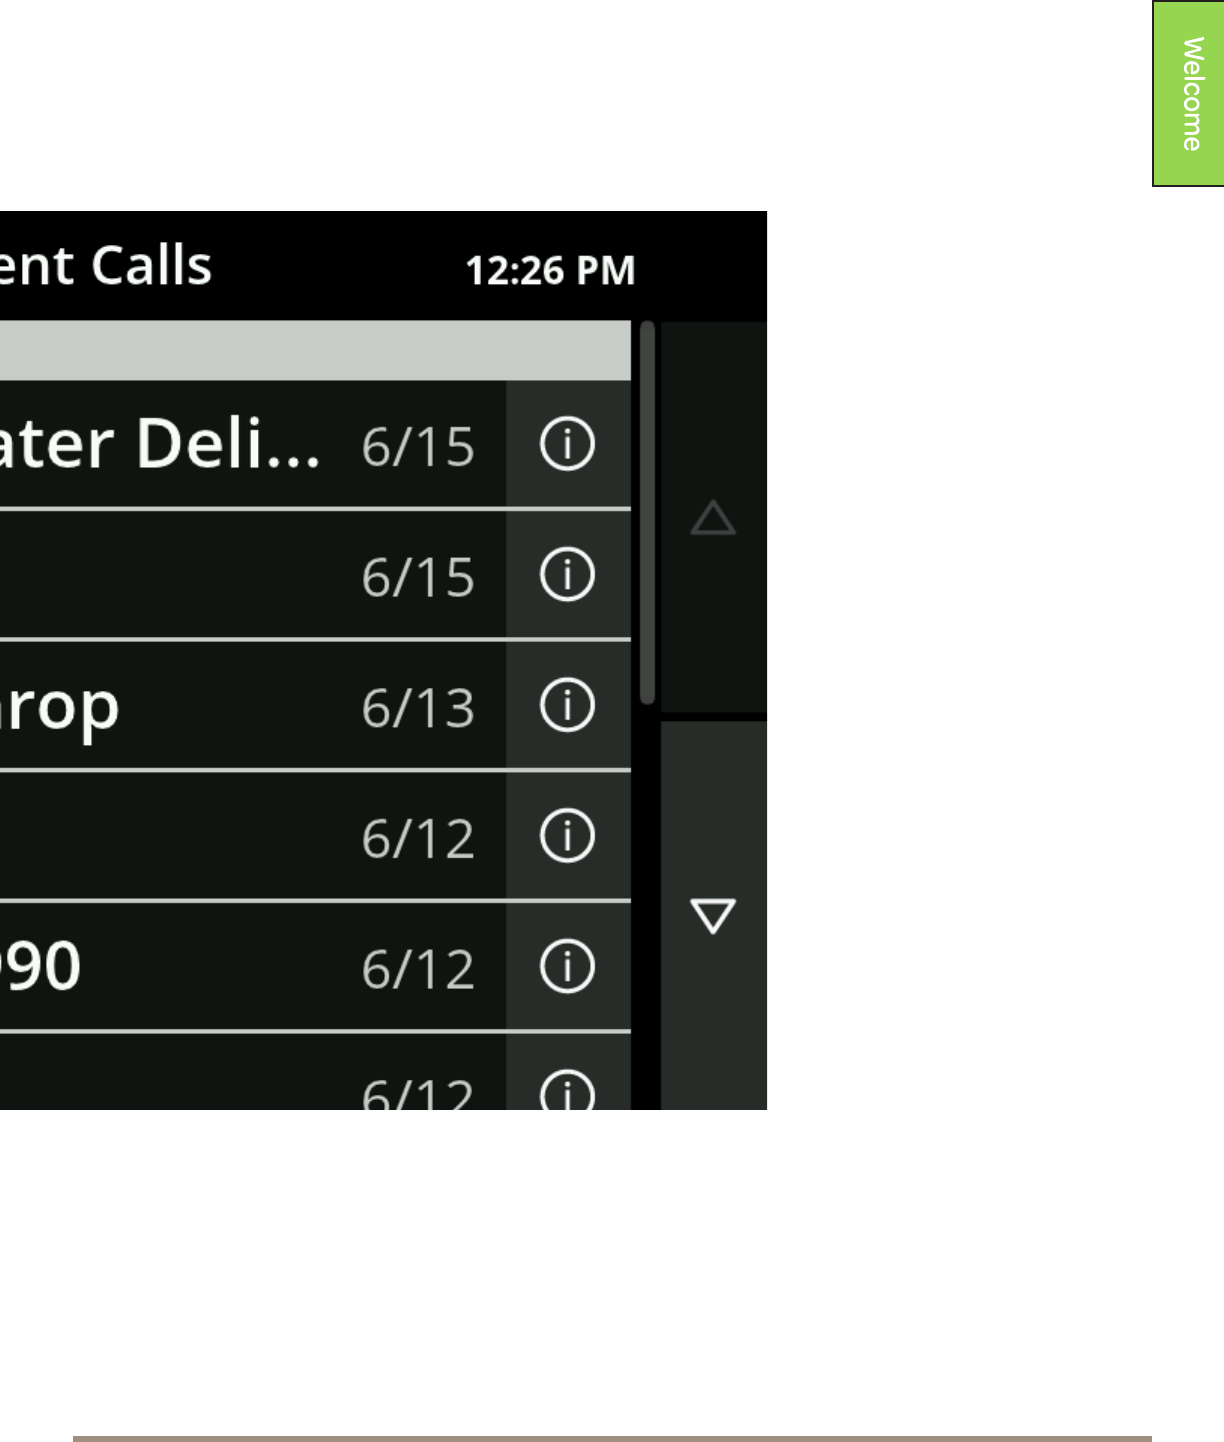
Scroll Buttons
Scrolling can be
performed by either
sliding your nger up and
down the screen, or by
touching these buons.


Phone Basics
CaptionCall Phone BasicsPage 18
Turn Captions On
When answering calls:
1. Pick up the handset to
answer the incoming
call.
2. Press the Captions
buon.
When making calls:
1. Pick up the handset.
2. Press the Captions
buon.
3. Dial your call using
the keypad.
Green Captions buon = Captions ON
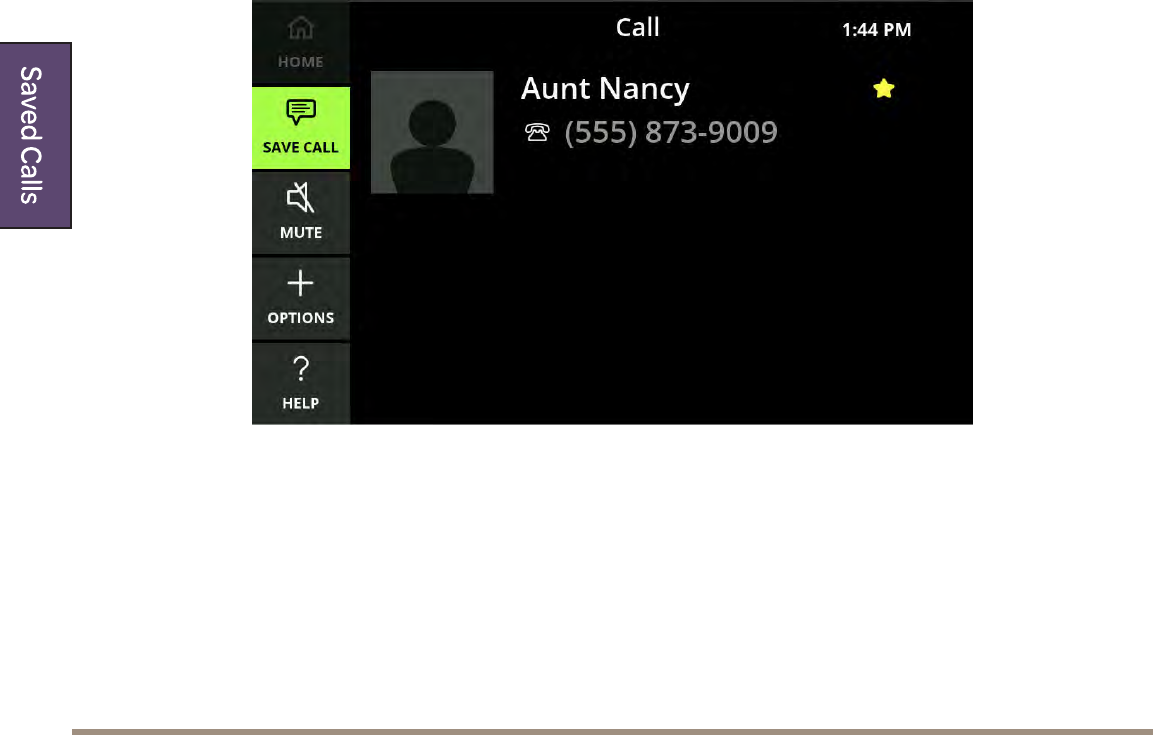
Make Captioned Calls
1. Pick up the handset.
2. Press the Captions buon.
3. Dial the number you want to call using the keypad.
Your call will now be captioned.
CaptionCall Support 1-877-557-2227 Page 19
Make Captioned Speakerphone Calls
1. Press the Speakerphone
buon.
The buon will light up in
green and a dial tone will
sound.
2. Press the Captions buon.
3. Dial your call using the
keypad.
Helpful Hints
Other ways to turn captions ON:
• Touch the Turn on Captions buon during the call.
• Set “Captions Always On” using the Call Defaults menu (see “Call Defaults”
on page 60).
Other ways to make captioned calls:
• Return a call using the Recent Calls list (see “Set “Captions Always On”
using the Call Defaults menu (see “Call Defaults” on page ).” on page
19“View Recent Calls” on page 30).
• Call someone using the Phone Book (see “Call a Contact” on page 37).
CaptionCall Phone BasicsPage 20
Answer Calls
When the phone rings:
1. Press the Captions buon to start captions.
2. Pick up the handset.
3. Speak into the handset and listen to it as you normally would.
You can start captions at any time during the call.
Helpful Hints
Other ways to turn captions ON:
• Touch the Turn on Captions buon during the call.
• Set “Captions Always On” using the Call Defaults menu (see “Call Defaults”
on page 60).
CaptionCall Support 1-877-557-2227 Page 21
Return a Call
1. Pick up the handset OR press the Speakerphone buon.
2. The Captions buon will display. Touch to enable captions. The buon will
close, and you will see your recent calls list --You will not be able to see your
recent calls list until you touch this buon.
3. A list of your Recent Calls will display on the touchscreen.
4. Touch the call that you want to return. The call will be immediately made.
Helpful Hints
Use your nger to swipe up and down the list as needed to view all recent calls.
Other ways to turn captions ON:
• Press the Captions buon on the phone before picking up the handset.
• Set “Captions Always On” using the Call Defaults menu (see “Call Defaults”
on page 60).
CaptionCall Phone BasicsPage 22
Adjust Handset/Speaker Volume
While in a call, you can adjust the volume on your handset or speakerphone to
a level you are comfortable hearing.
1. Pick up the handset or press the speakerphone buon.
2. Turn the Volume knob to adjust call volume.
• Clockwise increases call volume.
• Counter-clockwise decreases call volume.
As you increase the volume level, the color of the Volume meter and the ring
surrounding the Volume knob will change from green, to amber, to red.
WARNING
Do not set the volume level higher than is necessary for you to hear calls.
Excessive volume can cause hearing damage.
The Volume meter and knob light will turn to red when the volume exceeds a
safe volume. Also a warning will display in the handset cradle.
CaptionCall Support 1-877-557-2227 Page 23
Helpful Hints
When the volume is set to high, but not dangerous levels, the volume will stay
the same for all subsequent calls. However, when the volume is increased to
dangerous levels, the volume will return to a nominal level for the next call.
To set the volume level at the same level for all calls, use the Override Volume
Reset feature on the Call Defaults screen (see “Call Defaults” on page 60).
CaptionCall Phone BasicsPage 24
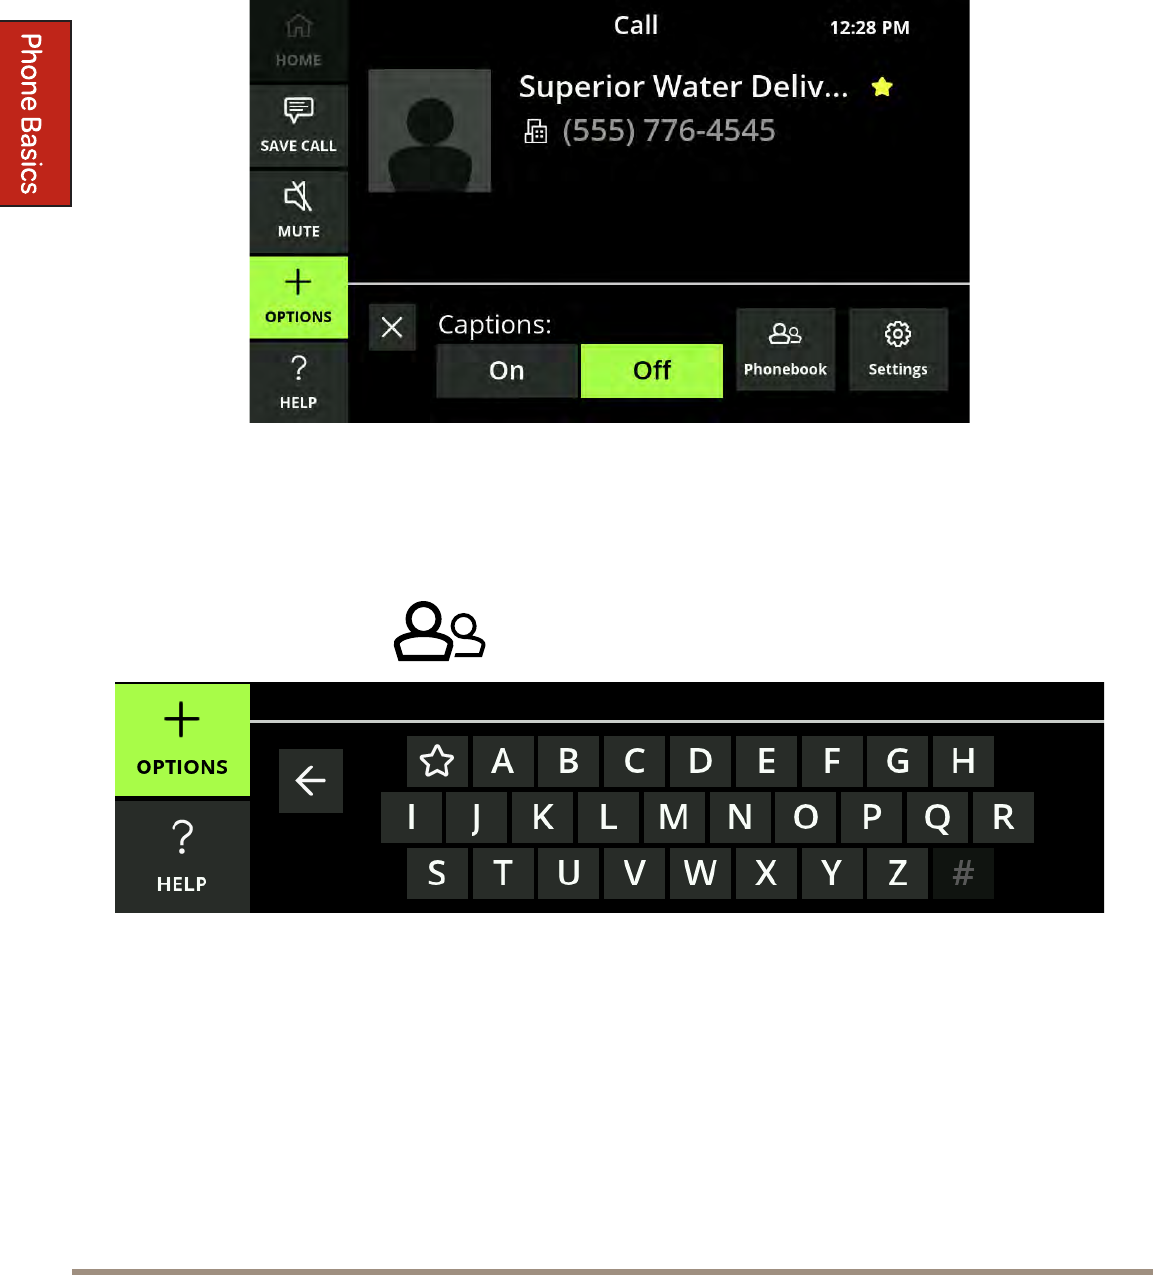
In Call Options Menu
When in a call, the Call Options Menu allows you to turn o Captioning, access
your Phone Book and adjust seings for this call.
Turn captions o by touching O.
To access your Phone Book while on a call to look up a contact:
1. Select Options.
2. Select Phone Book. A keypad will display.
3. Select either the leer of the rst name of the contact (last name if you’ve
re-orcdred your contacts by last name in Seings -- see”Display Seings” on
page 61) or the star to pull up your Favorites.
4. Use your nger to scroll through the contacts.
CaptionCall Support 1-877-557-2227 Page 25
5. Select a contact to display their contact information.
To adjust your text size or your screen brightness while on a call:
1. Select Options.
2. Select Seings. The available seings will display.
3. Adjust your seings as needed.
Helpful Hints
• Close the Options window by touching the X in the top left of the function.
• Options will close after 15 seconds if it is not used.
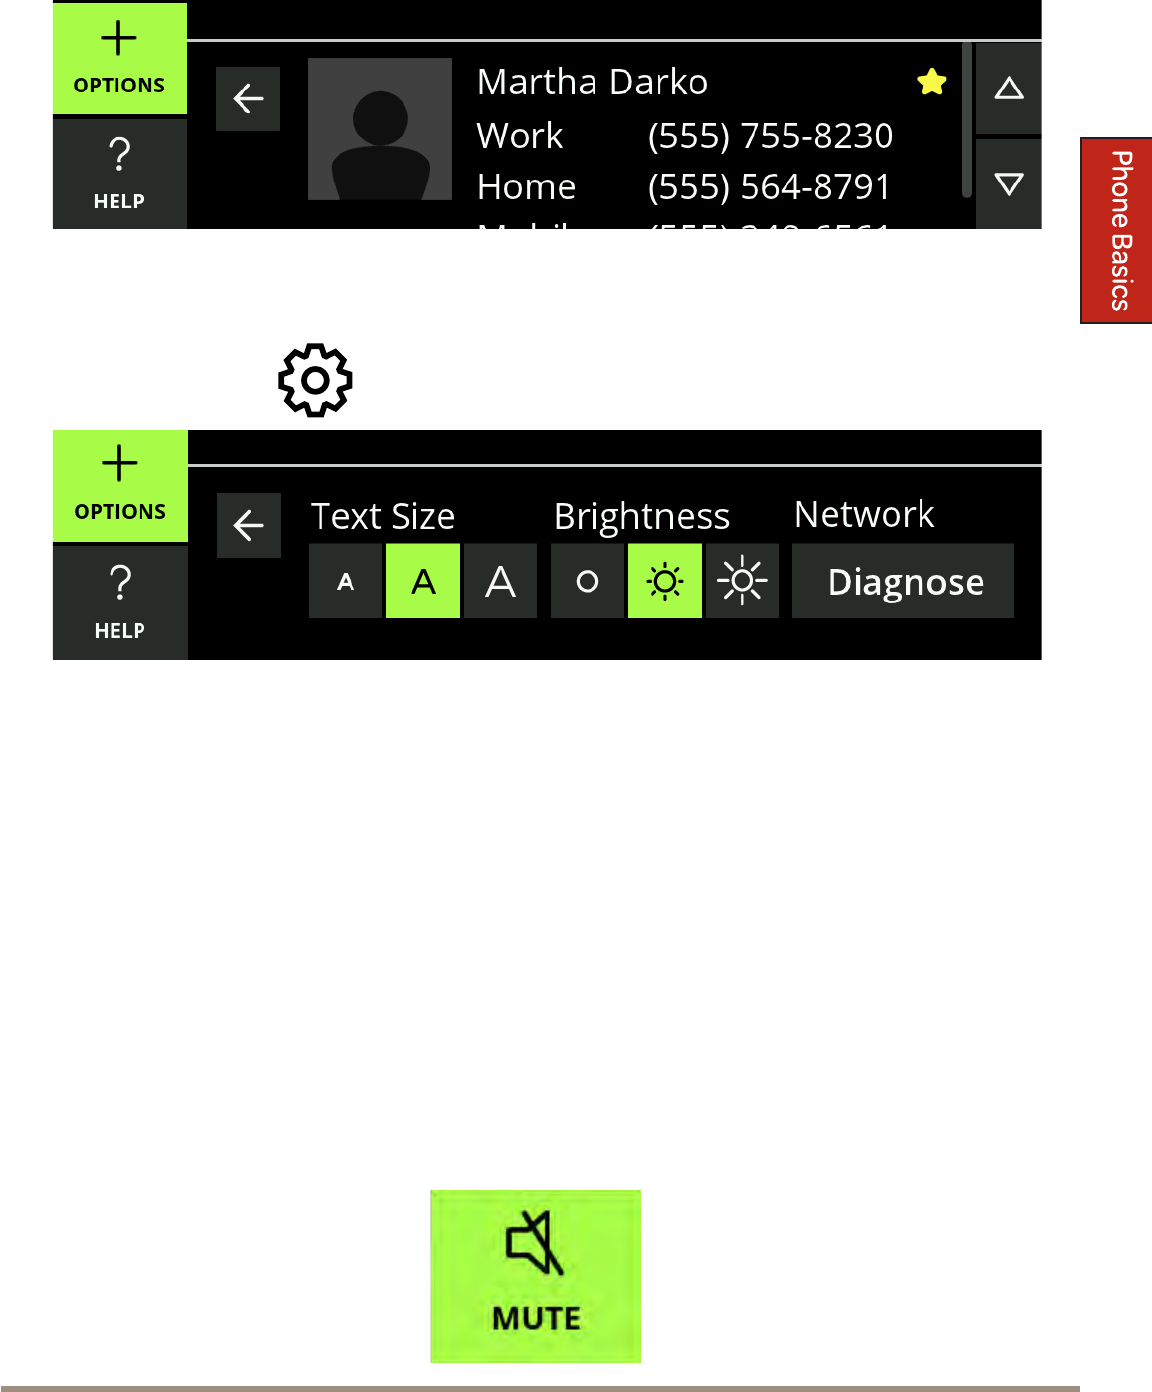
Mute a Call
You can Mute your side of a call at any time by touching the Mute buon while
on a call. This will only mute your voice and your caller will still be heard and
captioned.

CaptionCall Phone BasicsPage 26
Help Screens
Any time you see the Help buon in the lower left corner of the phone, you can
touch it to view a Help screen for the function you’re currently using.
Touch the Help buon to display the help screen for the page.
Helpful Hints
Use your nger to swipe up and down the screen as needed to view all the
information.
CaptionCall Support 1-877-557-2227 Page 27
Back Button
The back buon will display at the top of screens that are part of an overall
function (like Phone Book, Help, or Seings). The buon displays an arrow
pointing to the left and the name of the screen you were on prior to this one.
Touch the Back Buon to return to your previous screen.
Home Button
The Home buon displays in the top left of all the screens, with the exception of
Recent Calls.
Touch the Home buon to return to the Recent Calls screen.


Recent Calls

Recent CallsPage 30
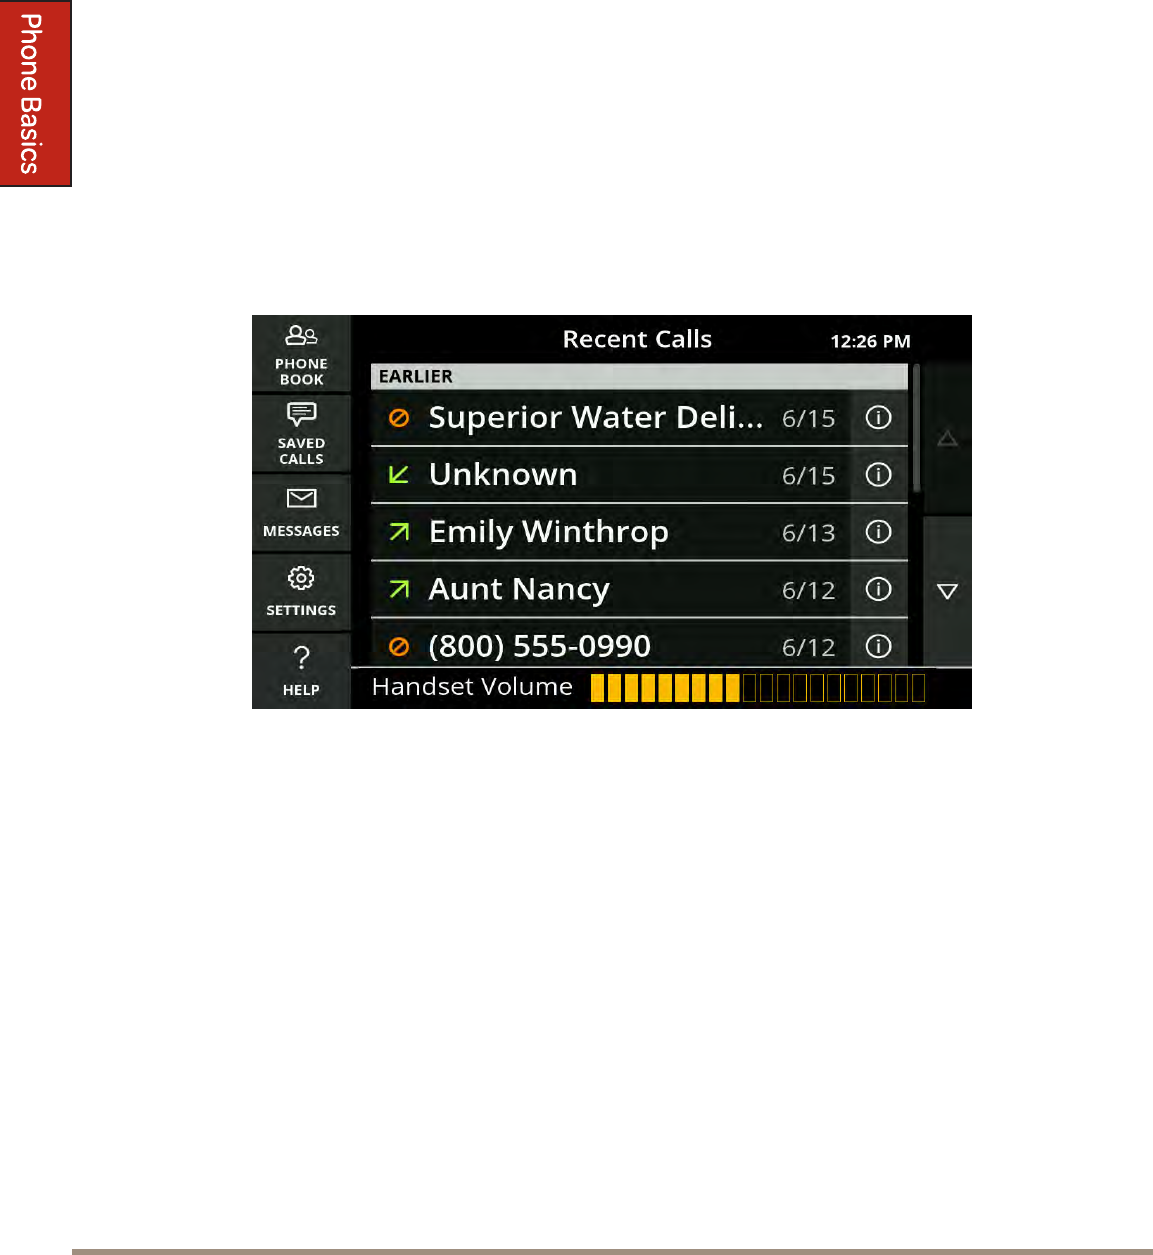
Your Home screen for the CaptionCall phone is your Recent Calls screen. This
screen displays your most recent calls and stores them for 30 days.
• Calls marked with the indicate calls that were made to you that you
received (answered).
• Calls marked with the indicate calls that you made.
• Calls marked with the indicate calls you missed.
Helpful Hints
Use your nger to swipe up and down the list as needed to view all recent calls.
View Recent Calls
1. Touch the Main screen.
2. The Recent Calls list displays.
3. To redial a call, touch the name or phone number. This will automatically
redial the call. If captions are not turned on, you will be prompted during
the call to activate them. You can start captions at any time during the call.
CaptionCall Support 1-877-557-2227 Page 31
4. To review a recent call to see the details, touch the icon on the right of the
call. The Call Detail screen will display.
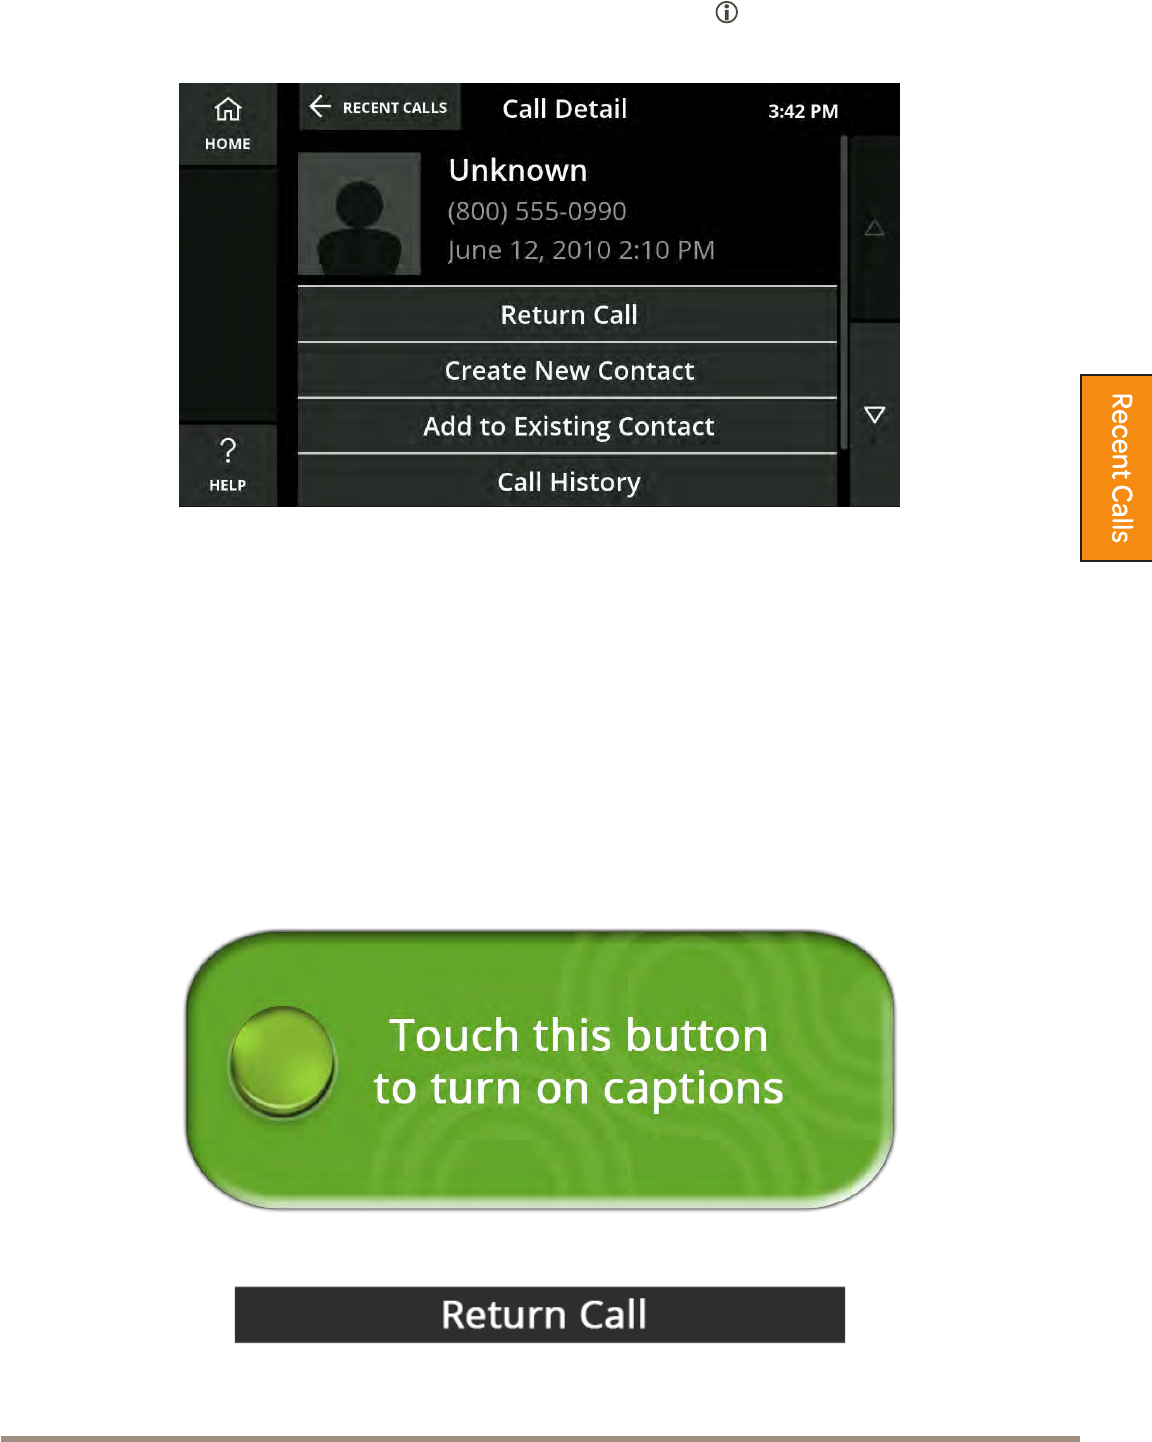
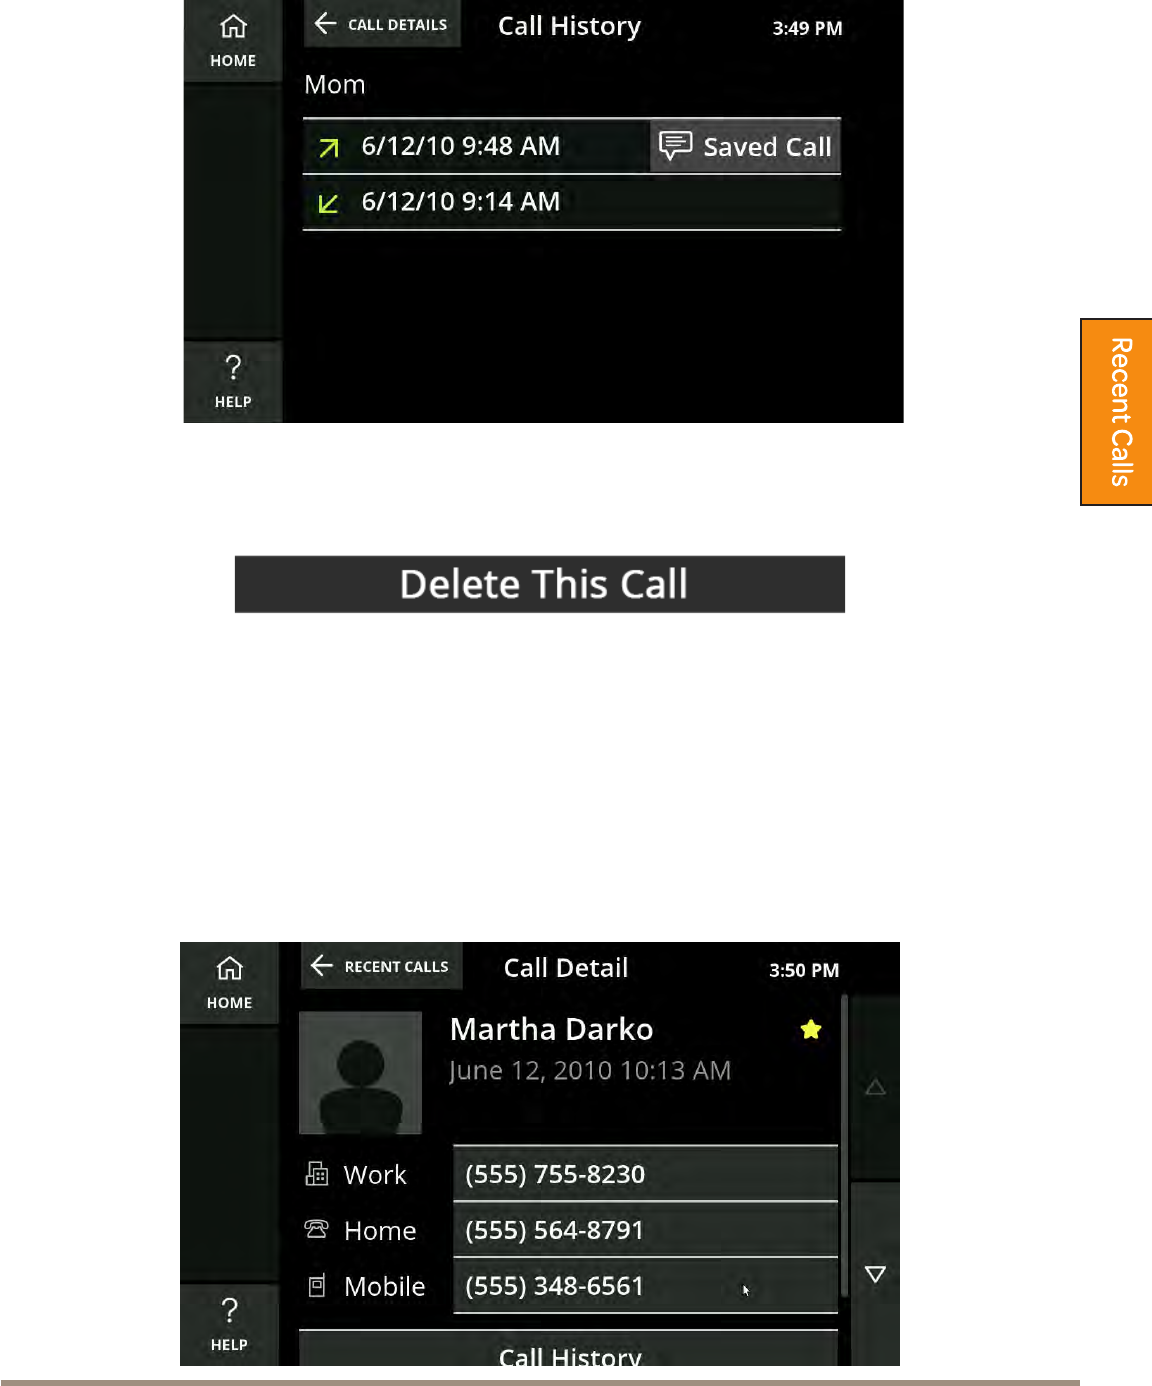
Call Detail
The Call Detail screen displays the contact information, phone number, and the
date and time of a recent call.
To call a contact from this screen:
1. Pick up the handset to immediately call the number.
2. Turn on captions by pressing the Captions buon on the CaptionCall phone
or by touching the captions buon displayed on the screen.
3. Touch the Return Call buon to dial the phone number.
Recent CallsPage 32
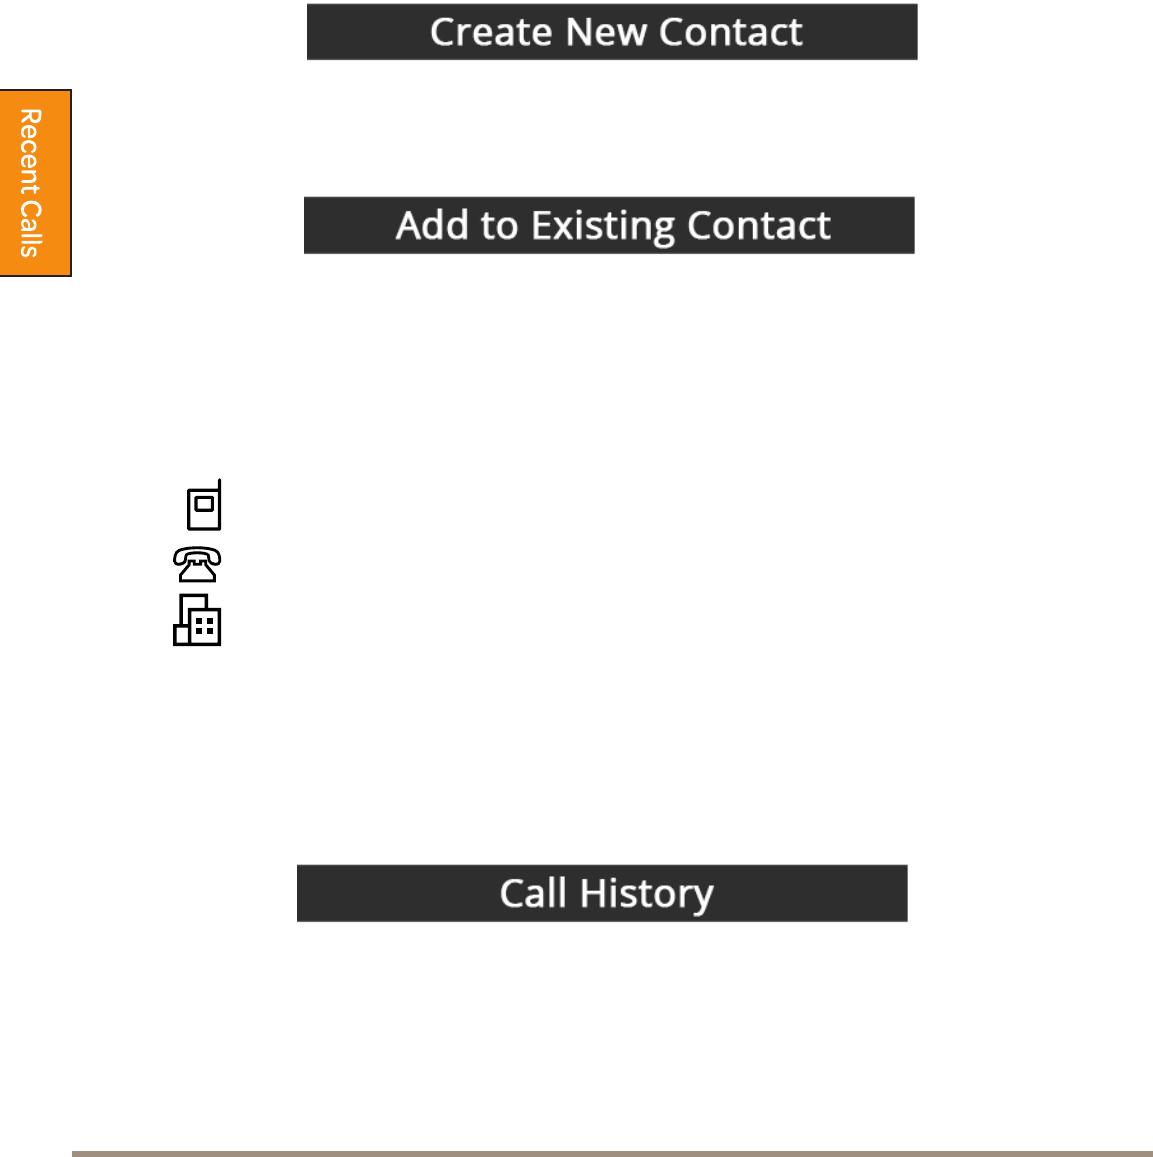
You can save the number from the recent call to your Phone Book, by either
adding the number to an existing contact or create a new contact from the
number.
• Touch the Create New Contact buon to create a new contact for this caller
in your Phone Book (see “Add a Contact” on page 37).
• Touch the Add to Existing Contact buon to assign the phone number for
this call to an existing contact in your Phone Book.
1. Scroll up/down your Contacts list to locate whom you would like to add
the selected phone number.
2. Touch that contact to add the selected phone number. The Edit Contact
Screen will display with the selected phone number already added to the
rst available phone number eld
3. You can assign a phone type for this number in this contact, to help you
remember which phone type it is.
Mobile
Home
Work
4. Touch the Save buon to save the new phone number for this contact.
• Touch the Call History buon to display all the calls made to and received
from this number.
• Touching the dates will call the number.
CaptionCall Support 1-877-557-2227 Page 33
• Touching Saved Call will display the captions from the call.
• Touch Delete This Call to delete the call from the Call History list. You will
be promted to conrm you want to delete the call.
Deleting a call will not delete a saved contact from your Phone Book.
Note
If your caller is already a contact in your Phone Book, instead of seeing the
Return Call, Create New Contact and Add to Existing Contact buons, you will
see the caller’s phone numbers, Call History and Delete This Call.
You can save the number from the recent call to your Phone Book, by either
adding the number to an existing contact or create a new contact from the
number.
• Touch the Create New Contact buon to create a new contact for this caller
in your Phone Book (see “Add a Contact” on page 37).
• Touch the Add to Existing Contact buon to assign the phone number for
this call to an existing contact in your Phone Book.
1. Scroll up/down your Contacts list to locate whom you would like to add
the selected phone number.
2. Touch that contact to add the selected phone number. The Edit Contact
Screen will display with the selected phone number already added to the
rst available phone number eld
3. You can assign a phone type for this number in this contact, to help you
remember which phone type it is.
Mobile
Home
Work
4. Touch the Save buon to save the new phone number for this contact.
• Touch the Call History buon to display all the calls made to and received
from this number.
• Touching the dates will call the number.


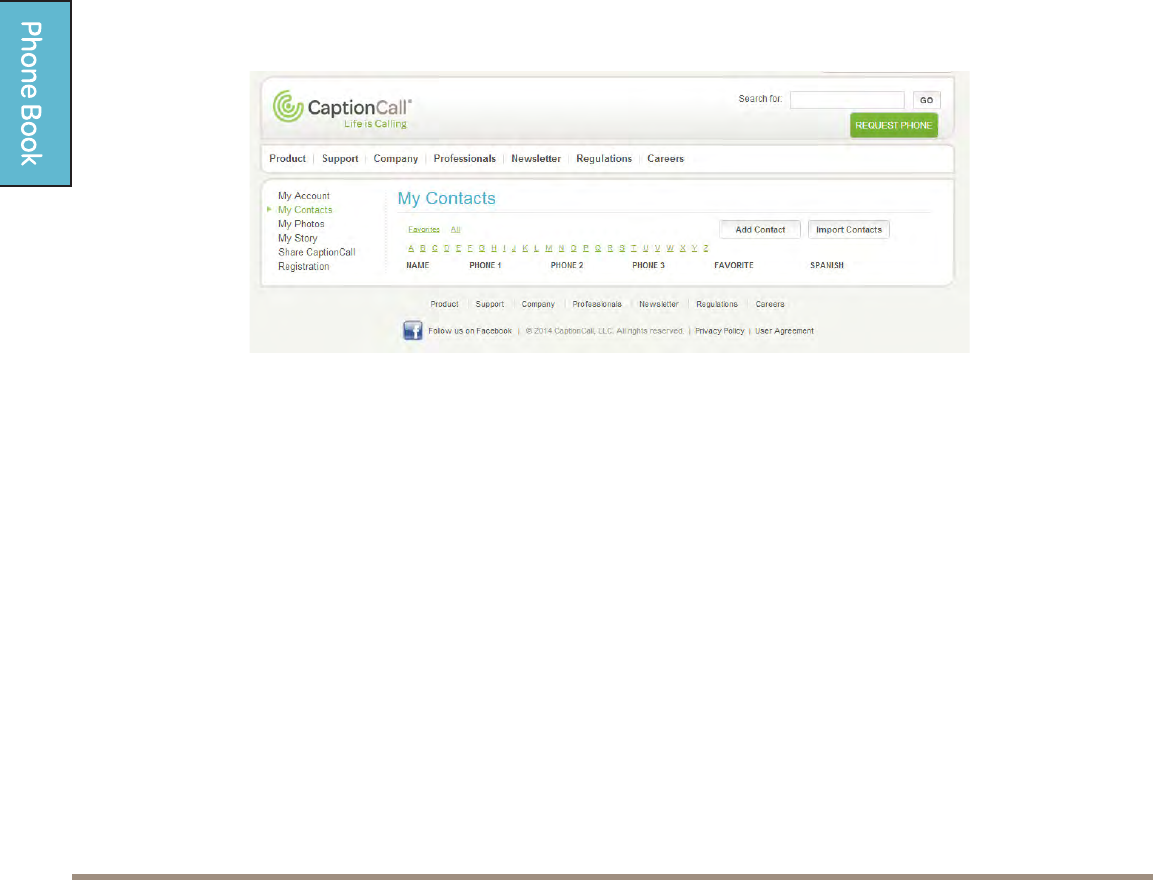
Phone Book

Phone BookPage 36
The Phone Book feature lets you save contacts on your phone for easy redialing.
You can save multiple numbers for each contact, and use CaptionCall’s online
service to assign a photo or image for this contact.
View the Phone Book
1. Touch the main screen.
2. Select the Phone Book buon.
3. Your list of contacts displays.
Use your nger to scroll up and down the list as needed to locate a contact.
Helpful Hints
• Use your nger to scroll up and down in the Phone Book as needed to view
all of your contacts.
• Touch a contact to view the name and phone number information for that
contact.
• Touch Home to return to the main screen (recent calls)

CaptionCall Support 1-877-557-2227 Page 37
Call a Contact
1. Touch Phone Book, the Phone Book displays.
2. Touch the desired contact in the list that you want to call.
3. Touch the phone number you want to dial.
4. Lift the handset or push the Speakerphone buon.
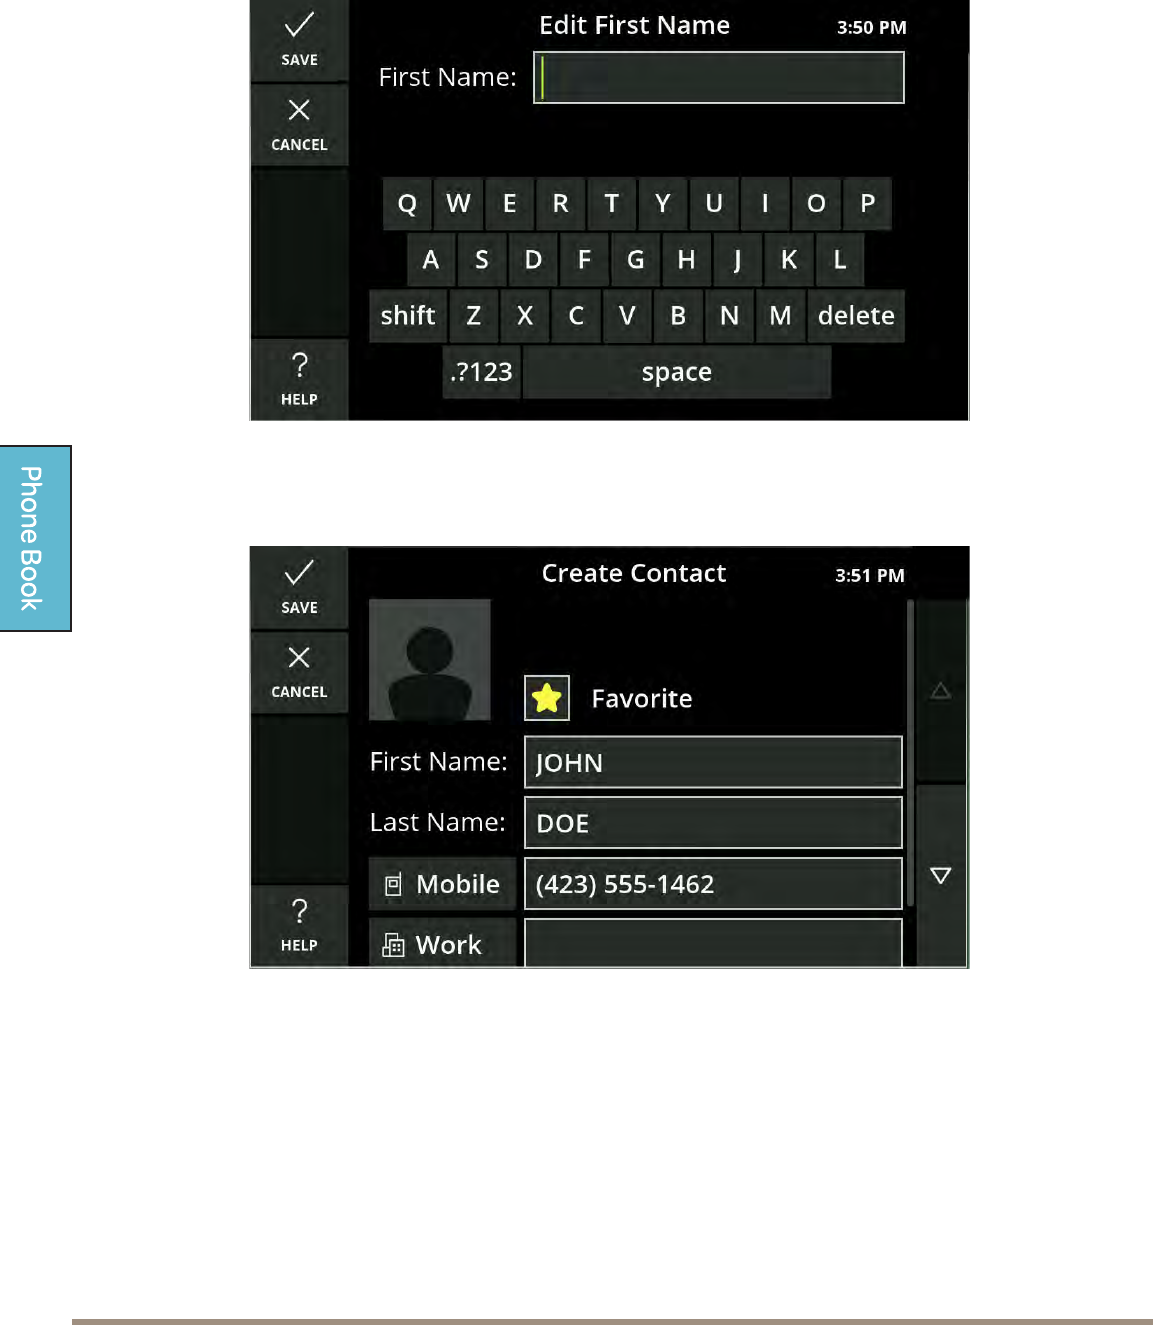
Add a Contact
1. Touch the main screen.
2. Select the Phone Book buon, the Phone Book displays.
3. Touch the Add Contact buon, the Create Contact screen displays.
Phone BookPage 38
4. Touch the First Name eld on the screen to view the keyboard and type
in their rst name, touch Save, and then repeat this for their last name and
phone numbers.
5. Touch the Save buon after completing each eld to save it.
6. When nished, touch the Save buon on the Create Contacts screen.
7. The new contact will now display in the Phone Book.
Helpful Hints
• The default for text is all caps. You can change to lower case by touching the
Shift key on the keyboard.
• Selecting Favorite allows sorting a smaller list of contacts.
CaptionCall Support 1-877-557-2227 Page 39
• You can also create a new contact using the Recent Calls list (see “You can
save the number from the recent call to your Phone Book, by either adding
the number to an existing contact or create a new contact from the number.”
on page 32). Touch the Create New Contact buon on the Call Details
screen, and follow the previous steps for Adding a Contact.
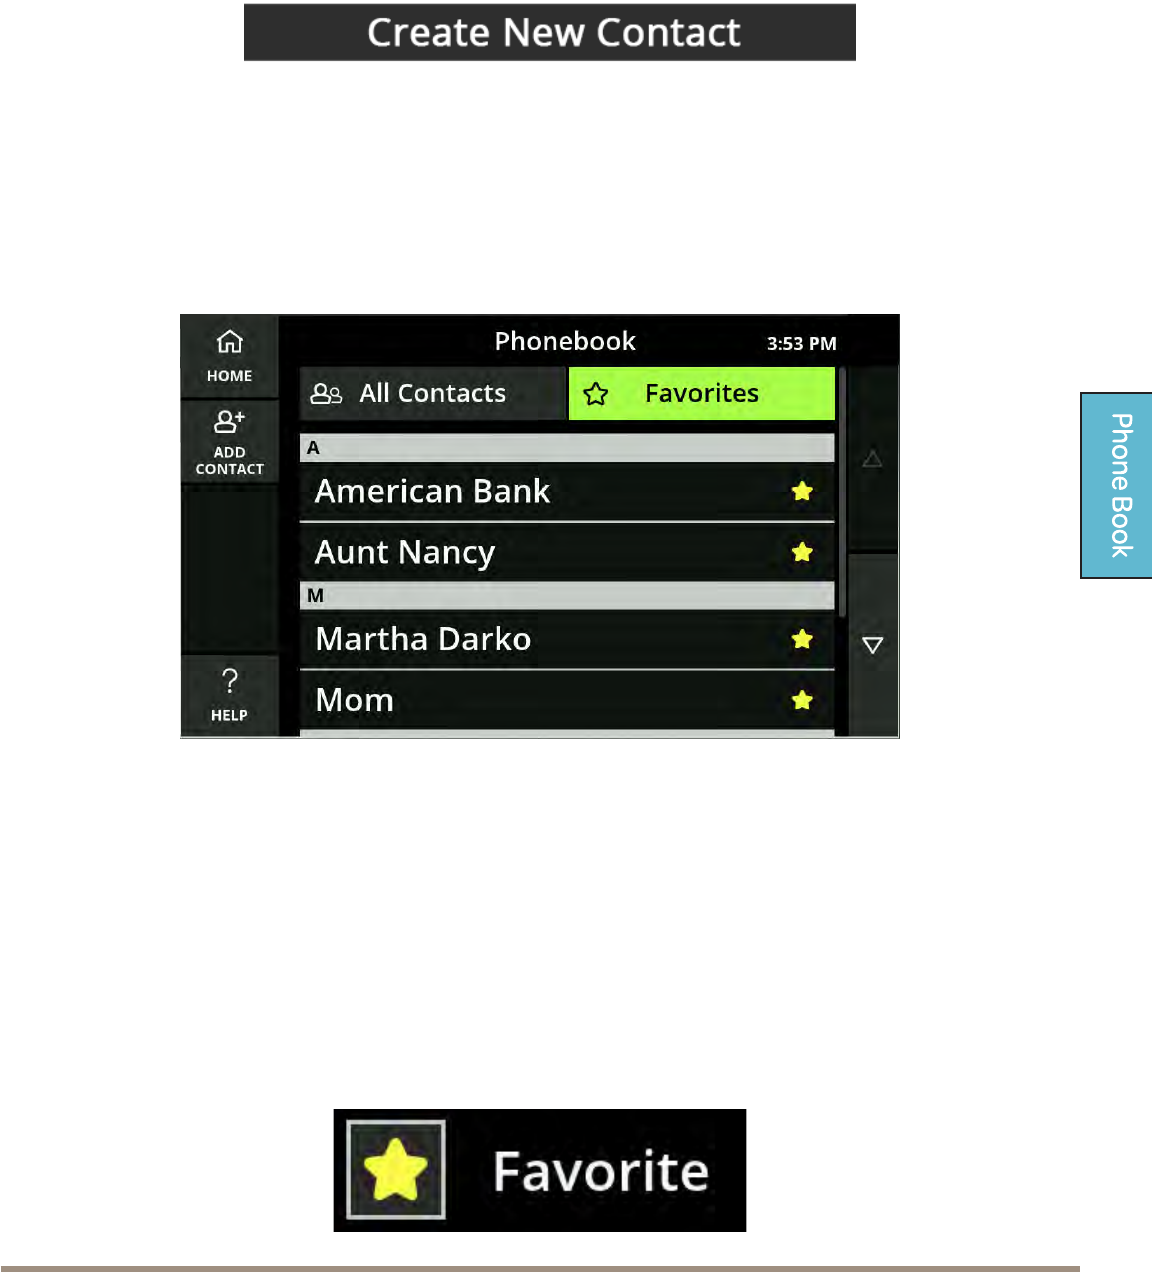
Create a Favorites List
Your Favorites list allows you to select frequent contacts for quick access.
To see your Favorites list, touch the Favorites buon at the top right of the
Phone Book screen.
To add a contact to favorites:
1. Open the Phone Book and select the contact you want to add to favorites.
Touch the contact so the Contact Detail screen displays.
2. Touch the Edit buon on the left. The Edit Contact screen displays.
3. Touch the Star on the right-side of a contact to add that contact to your list
of Favorites. The star will change to a yellow color to indicate the contact has
been added to Favorites.
Phone BookPage 40
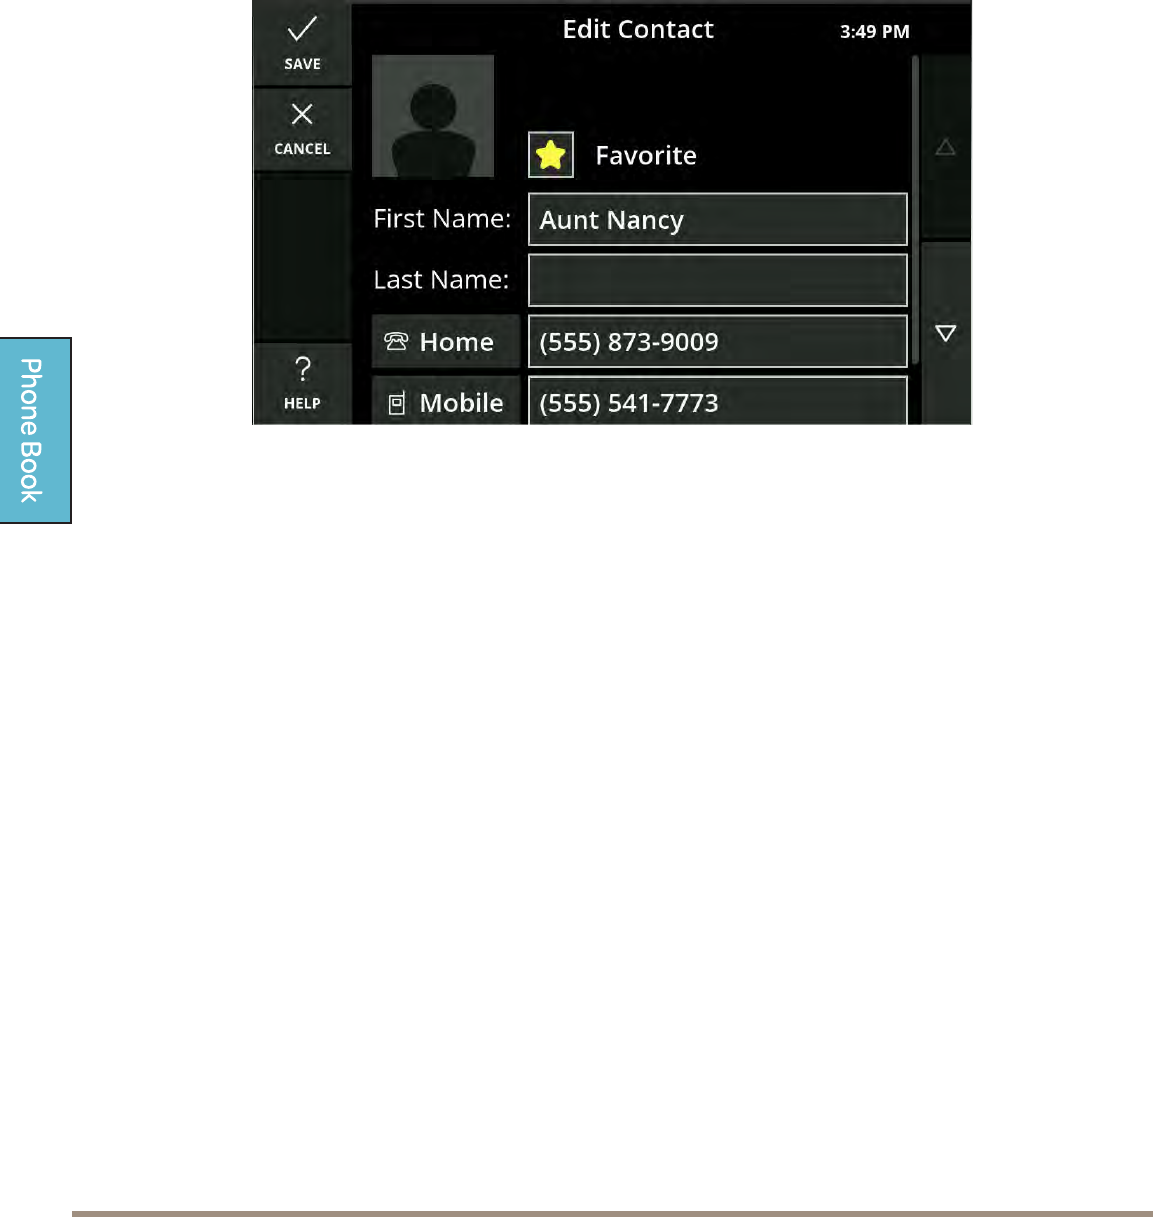
Edit a Contact
1. Open the Phone Book and select the contact you want to edit. Touch the
contact so the Contact Detail screen displays.
2. Touch the Edit buon on the left. The Edit Contact screen displays.
3. Touch the elds you want to change. The keyboard will display to allow you
to make edits.
4. Touch the Save buon.
5. When nished, touch the Save buon on the Edit Contact screen.
CaptionCall Support 1-877-557-2227 Page 41
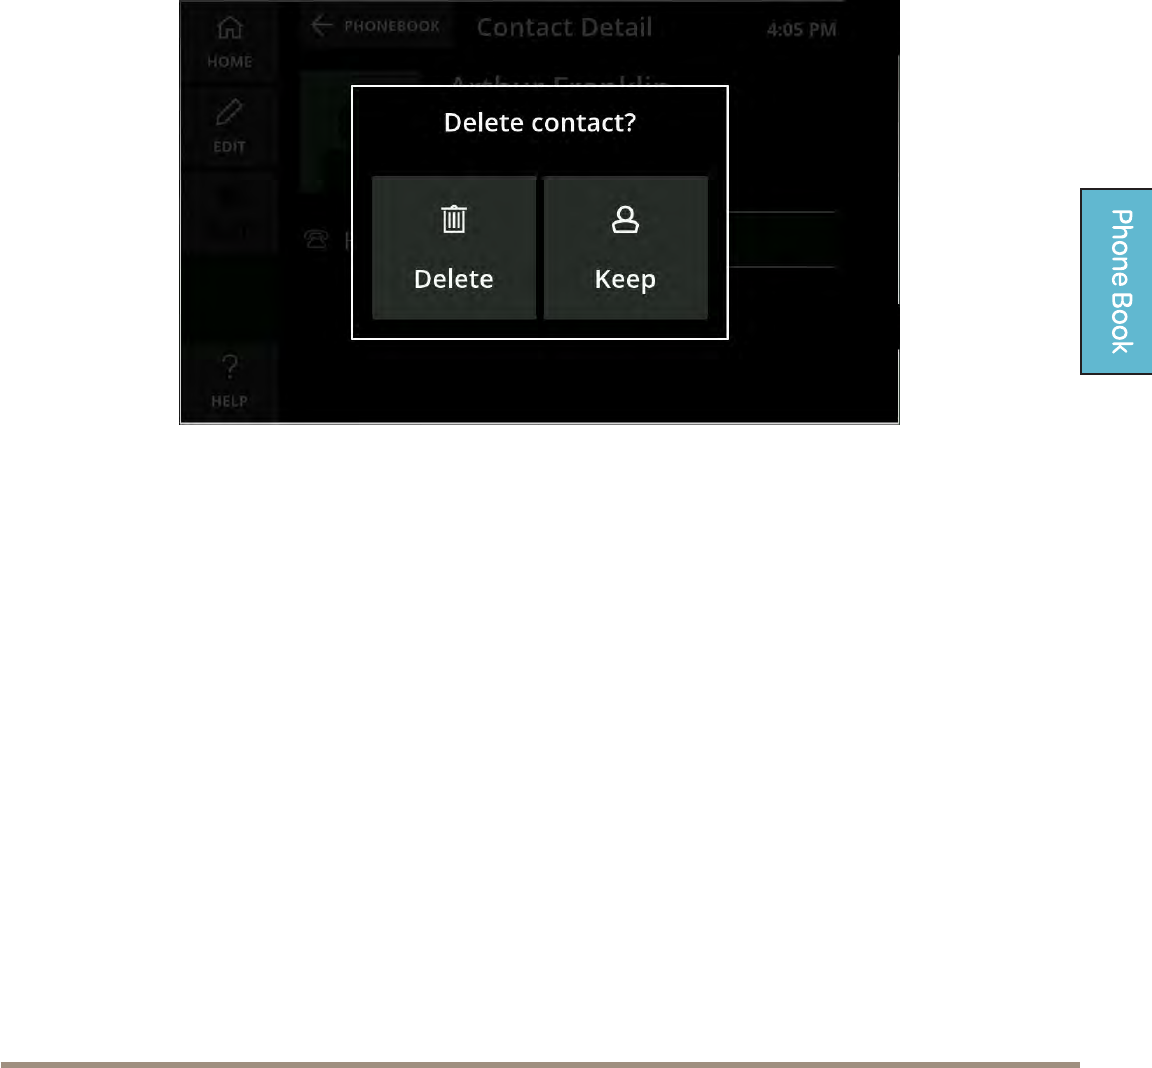
Delete a Contact
1. Open the Phone Book and select the contact you want to delete. Touch the
contact so the Contact Detail Screen displays.
2. Touch Delete.
3. A conrmation window displays to verify whether you want to delete the
contact or keep them.
4. Touch Delete to remove the contact from your CaptionCall phone.
Phone BookPage 42
Adding Contacts Online
You can easily add contacts via your online CaptionCall account. Once a contact
is created online, it will be automatically available on your CaptionCall phone.
You can also add photos to your contacts online.
To view and add contacts online:
1. Go to www.captioncall.com and log in to your account at the top of the
screen. You will have been given your user name and password when your
CaptionCall phone was installed. If you have any trouble remembering your
user name or password, the online system can help you nd/update that
information.
2. Once you have successfully logged in, click “My Account” at the top. Your
Account screen will display.
3. Click My Contacts in the column on the left. Your Contacts screen will
display.
From here you can manage and edit any existing contacts or add new ones.
There are two methods for adding contacts. You can either add them
individually, or upload a contact list from your computer.
CaptionCall Support 1-877-557-2227 Page 43
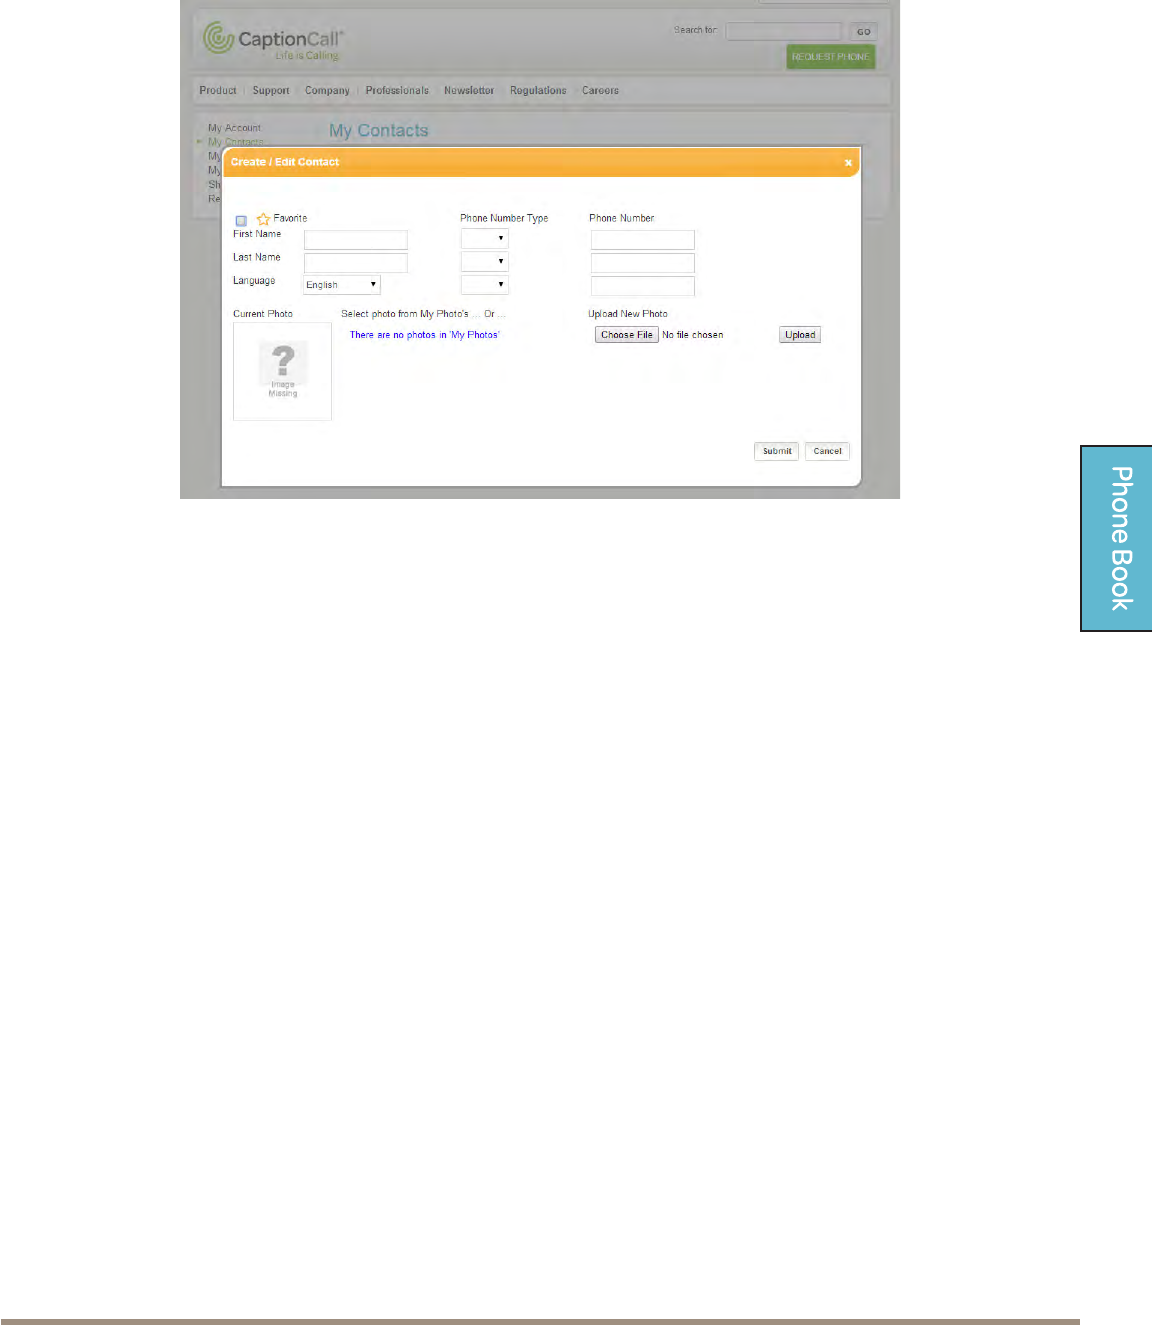
Add Individual Contacts
1. Click the Add Contact buon. The Add Contact window will display.
2. Enter your contact information in each of the elds provided.
• Enter their rst name and last name.
• Phone number types are available to identify the type of phone the
number will dial. The types are: Home, Oce and Mobile.
• Enter the phone numbers.
• Check the box at the top left to add this contact immediately to your
favorites list, or leave it blank to just add it as a regular contact.
• If you have already uploaded photos to the CaptionCall website, they
will be displayed below, and you can select one of those photos for your
contact.
• If you don’t have a photo of your contact uploaded, click “Choose File”
to select an image from your computer. A window will open that will let
you explore your computer for the correct photo. Once you have found it,
select it, and click “Open” the window will close and the name of the le
will display next to “Choose File.”
• Once the image has been selected, click the “Upload” buon to add the
image to the contact.
3. Click Submit to save your contact.
Phone BookPage 44
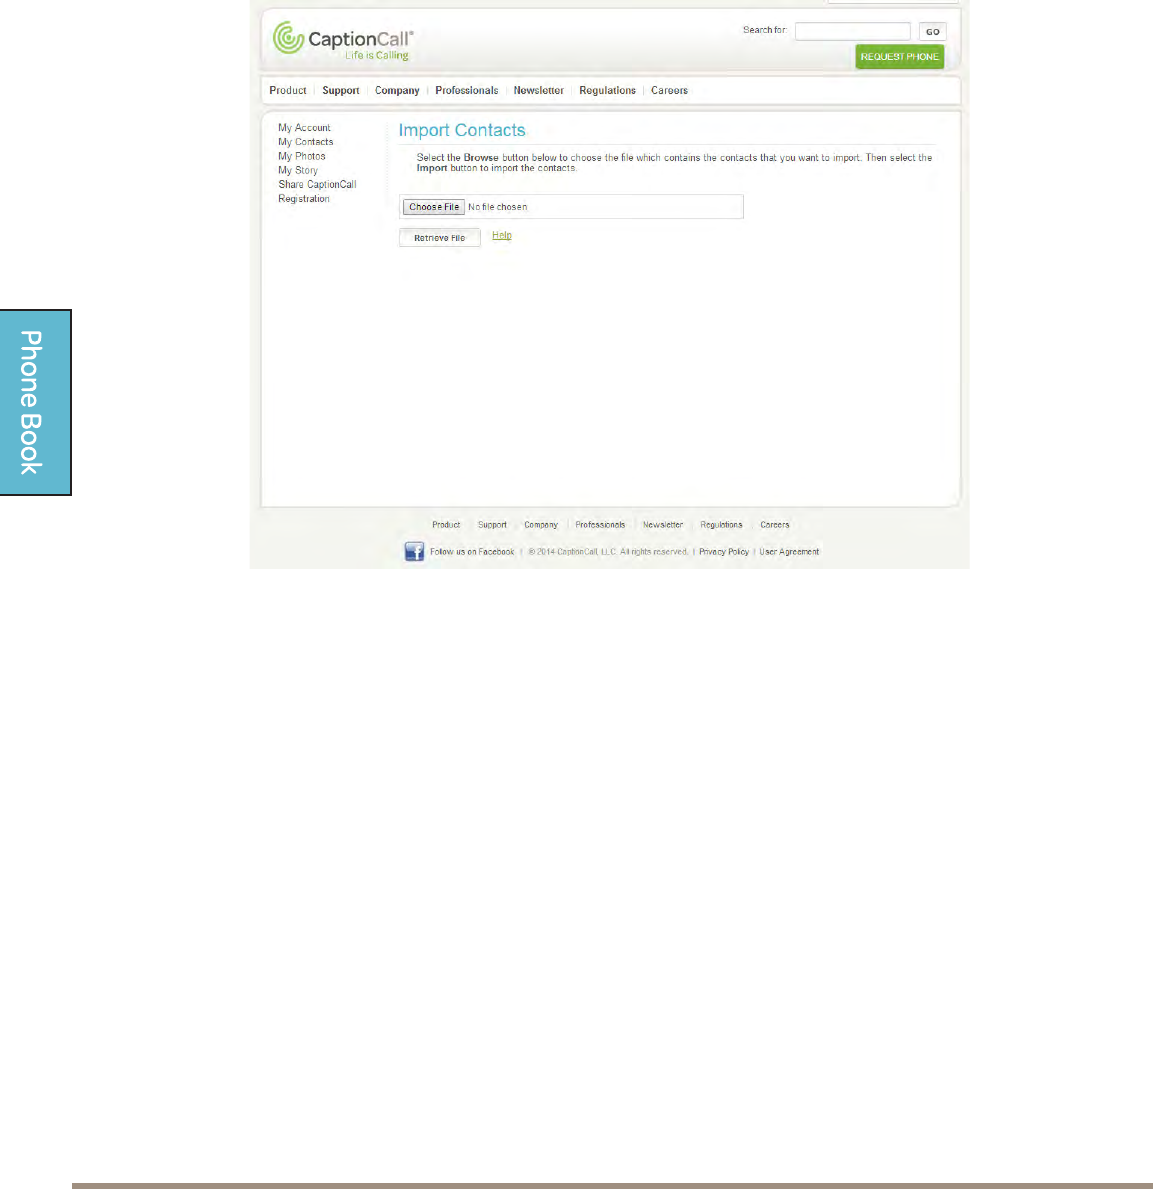
Import Contacts
Contacts can be imported from a directory you already have on your computer.
These must be VCF les in order for the system to import the list. To import
contacts:
1. Click “Import Contacts.” The Import Contacts screen will display.
2. Click “Choose File.” A window will open that will let you explore your
computer. Browse for the VCF le you wish to import. Select it and click
“Open.”
3. Click “Retrieve File”. Your contacts will be imported.
Helpful Hints
You can edit/delete your contacts using the online system.
• Scroll to the contact, or use the leers to nd them alphabetically.
• Click the “Edit” buon to edit the contact. The same window you used to
create the contact will display with their information already loaded.
• Update their information and click “Submit.”
• To delete a contact, click the “X” buon. A window will display to verify
that you want to delete this contact. Click “Yes” to complete deletion.
CaptionCall Support 1-877-557-2227 Page 45
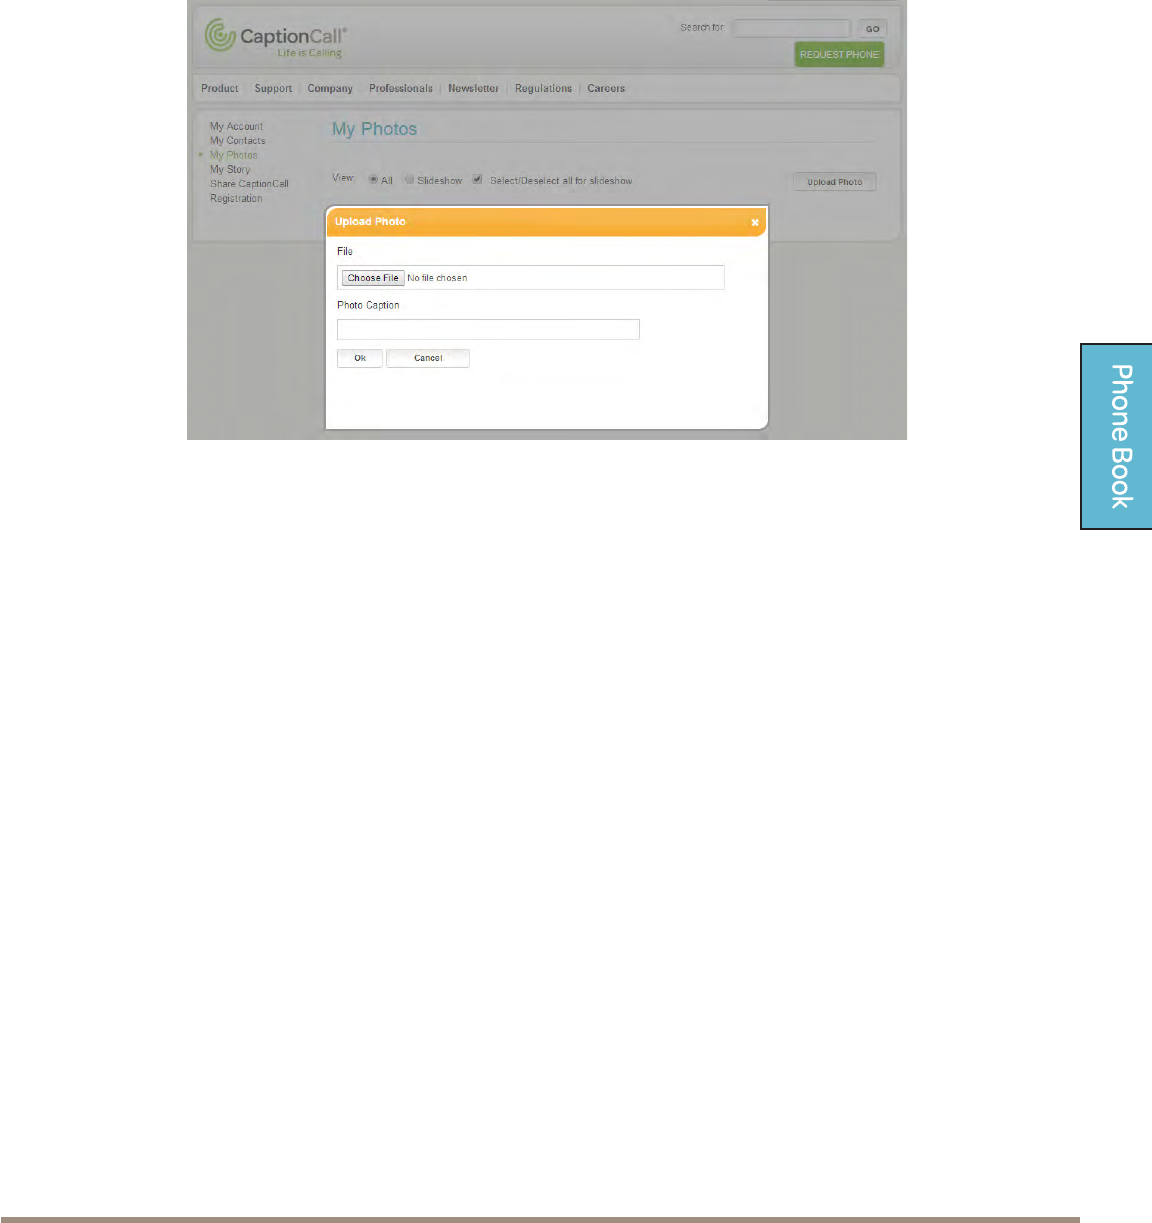
Upload Photos
You can also upload photos only. This allows you to have a group of photos in
place as you create your contacts. To upload a photo:
1. Click “Upload Photo.” The Upload Photo window will display.
2. Click “Choose File” and browse to the photo you wish to upload.
3. You can add a photo caption to the image to help remind you of who or
what is in the image.
4. Click “OK” to upload the photo.
Helpful Hints
Once a photo is uploaded, you can add it to a contact by clicking on the add
to contact buon under the image. A window will display with a list of your
contacts. Select one and add the photo.


Saved Calls
Saved CallsPage 48
Saving Conversations
Saved Conversations are any captioned calls that you choose to save on your
CaptionCall phone. These conversations are saved until you choose to delete
them. Some reasons to save captioned calls include:
• Saving an important conversation from a family member.
• Capturing price quotes.
• To view the captions at a later time.
Captioning must be active before you can save a conversation.
1. Make a captioned call as you normally would (see “Set “Captions Always
On” using the Call Defaults menu (see “Call Defaults” on page ).” on page
19 for instructions).
2. Touch the Save Call buon to save this conversation.
3. The Save Call buon will turn green (to indicate that you are saving this
conversation).
Helpful Hints
• After the Save Conversation buon turns green, do not touch it again before
you hang up. Otherwise the conversation will not be saved.
• You can also save the captions from Voicemail messages (see “Caption
Voicemail” on page 56).
CaptionCall Support 1-877-557-2227 Page 49
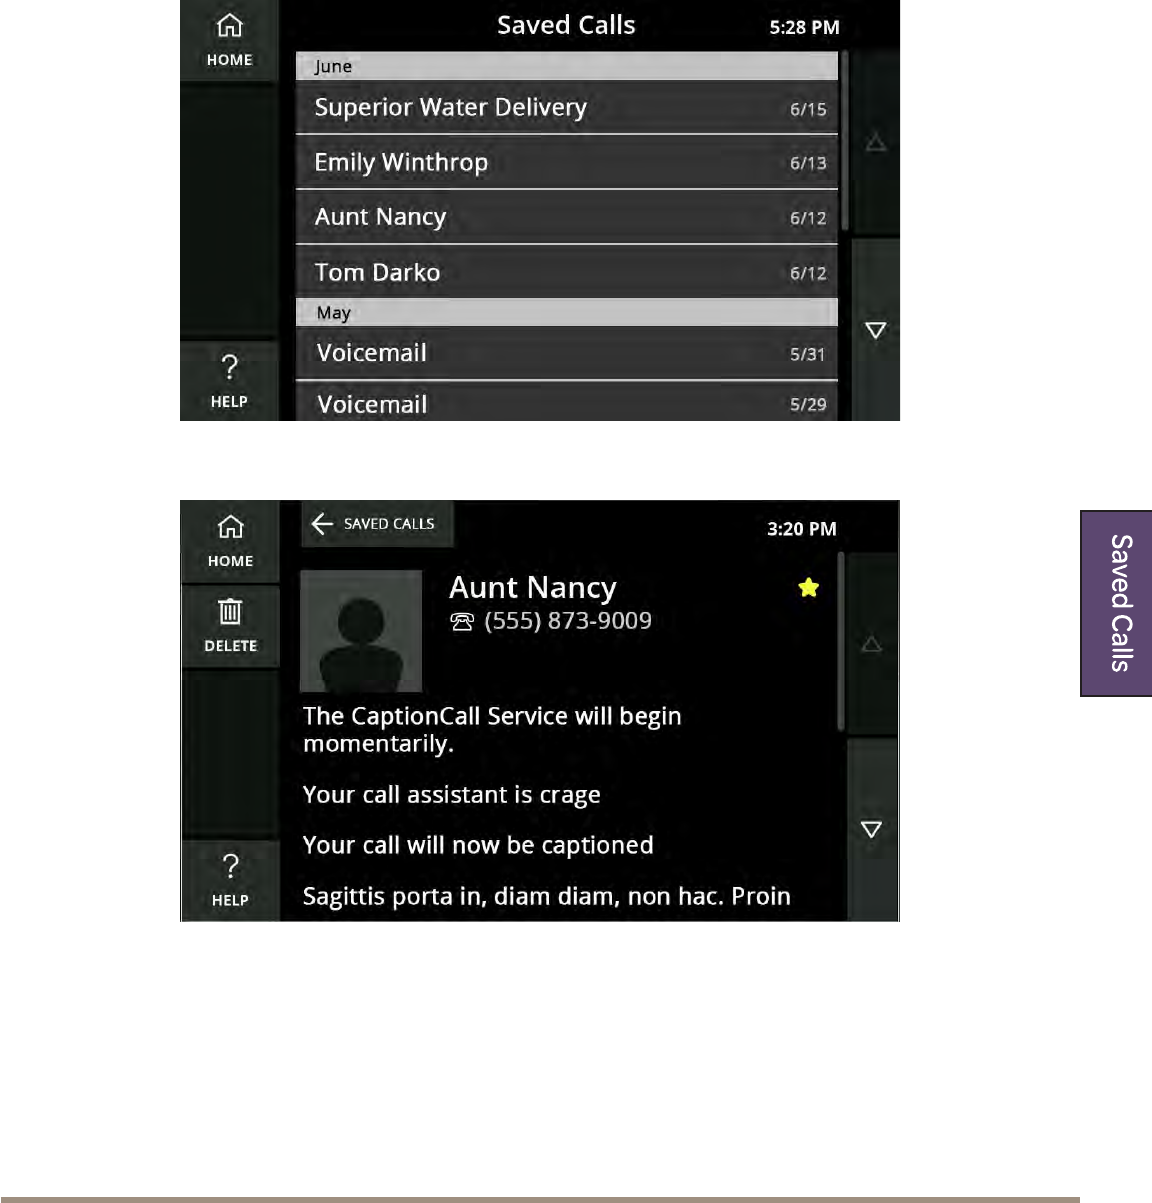
Viewing Saved Conversations
Viewing the captions of your saved conversations is easy.
1. Touch the screen.
2. Touch the Saved Calls buon. The Saved Calls screen will display.
3. Touch the conversation that you want to view on the Saved Calls screen.
4. The saved captions for that conversation will display on the screen.
5. Use your nger to scroll up and down the screen as needed to view the
entire conversation.
6. When you are nished, touch the Home buon at the top to return to the
main screen.

Saved CallsPage 50
Helpful Hints
• Your saved conversations remain available until you delete them.
• While the Saved Call is open, touch the Delete buon to delete the current
conversation.

CaptionCall Support 1-877-557-2227 Page 51


Messages
VoicemailPage 54
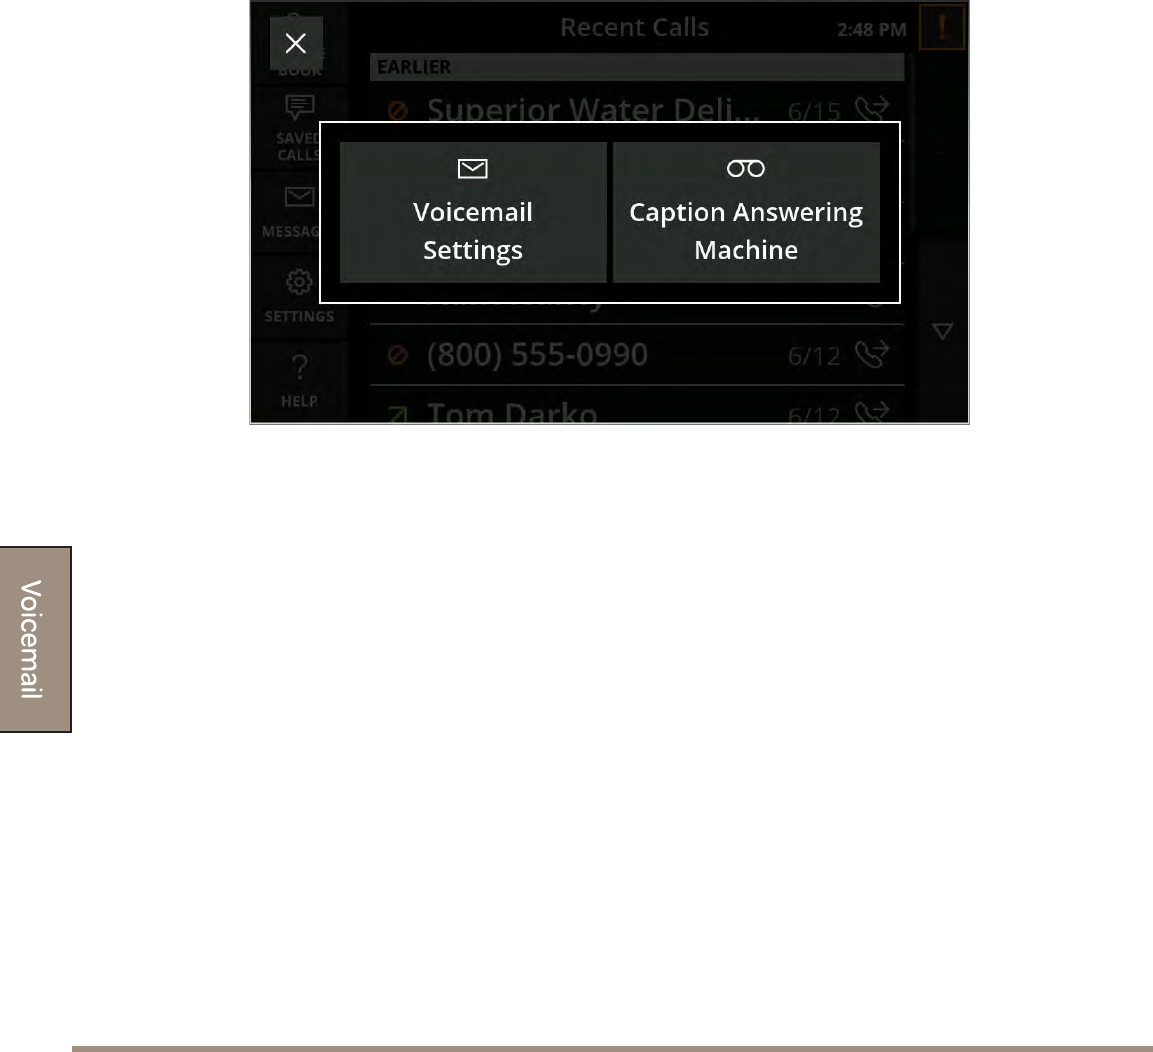
The Messages buon allows you to caption voicemail or answering machine
messages. These messages can be saved to your Saved Calls list, and designated
as either Voicemail or Answering Machine.
When you rst touch the Messages buon in the main menu, a prompt will
display. Select the type of messaging you want captioned.
• Voicemail is used to capture messages left on your voicemail service, often
provided by your telephone company.
• Answering Machine is used to capture a seperate machine you use to record
your missed calls.
Helpful Hints
• Touch the X in the upper left to clear any prompts like the one displayed
above.
• You can also permanently enter your Voicemail seings. See “Voicemail” on
page 73 for details.
CaptionCall Support 1-877-557-2227 Page 55
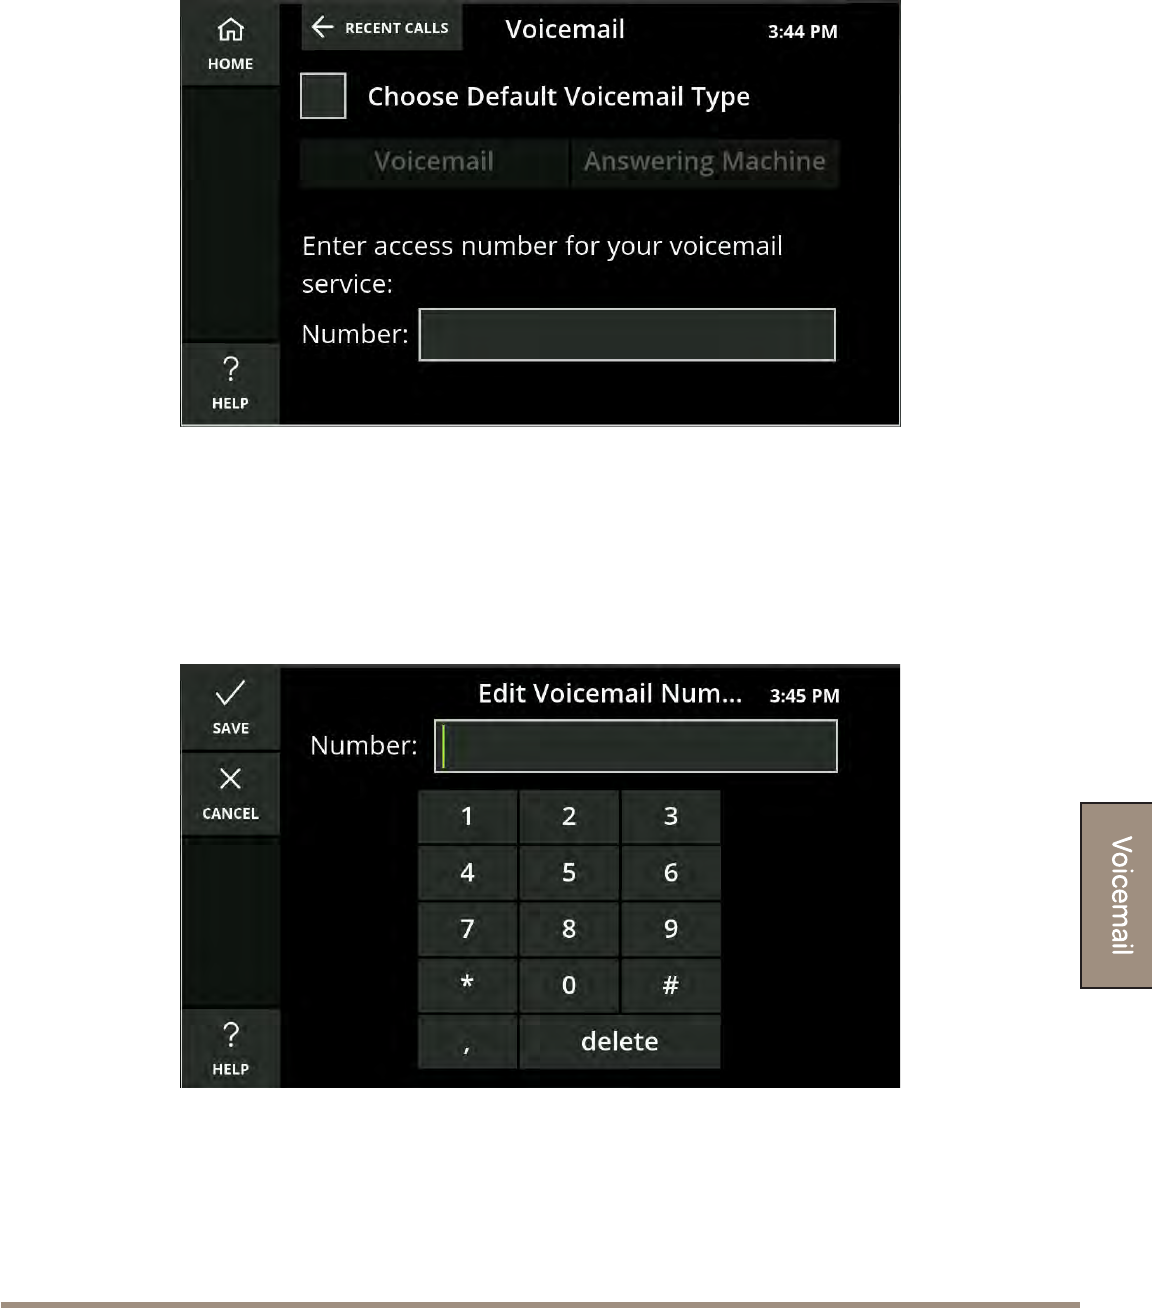
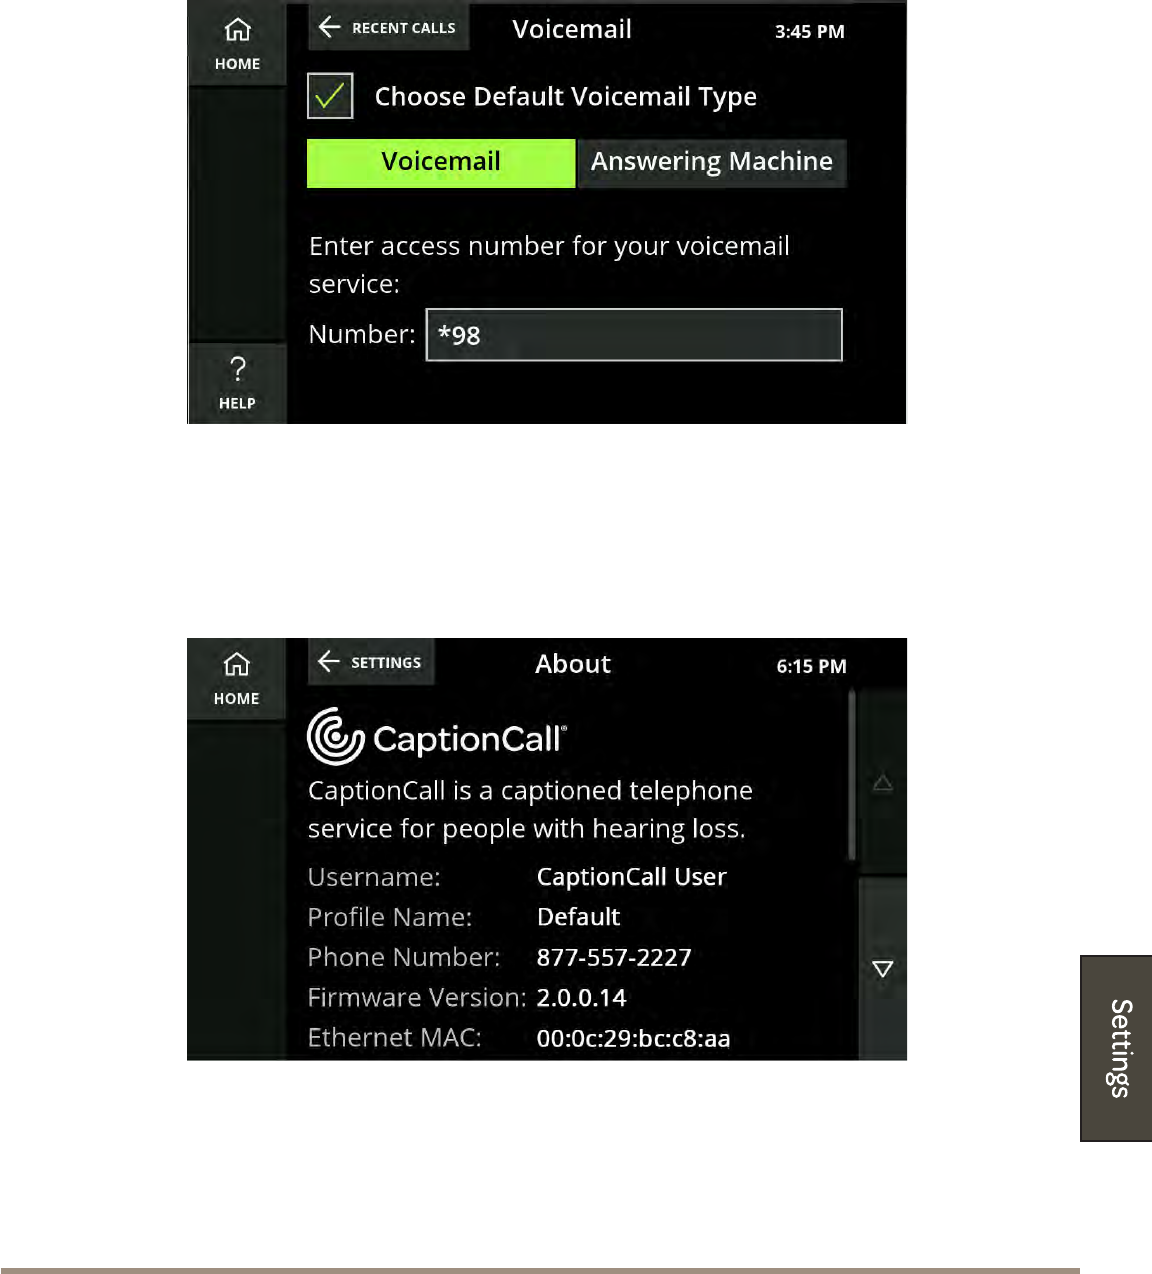
Setting Up Voicemail Defaults
1. Select Voicemail Seings. The Voicemail setup screen will display.
2. Touch the rst eld to place a checkmark in the box. The Voicemail or
Answering Machine buons will become available.
3. Touch voicemail.
4. Touch the number eld. The number keyboard will display.
5. Enter the number and touch Save.
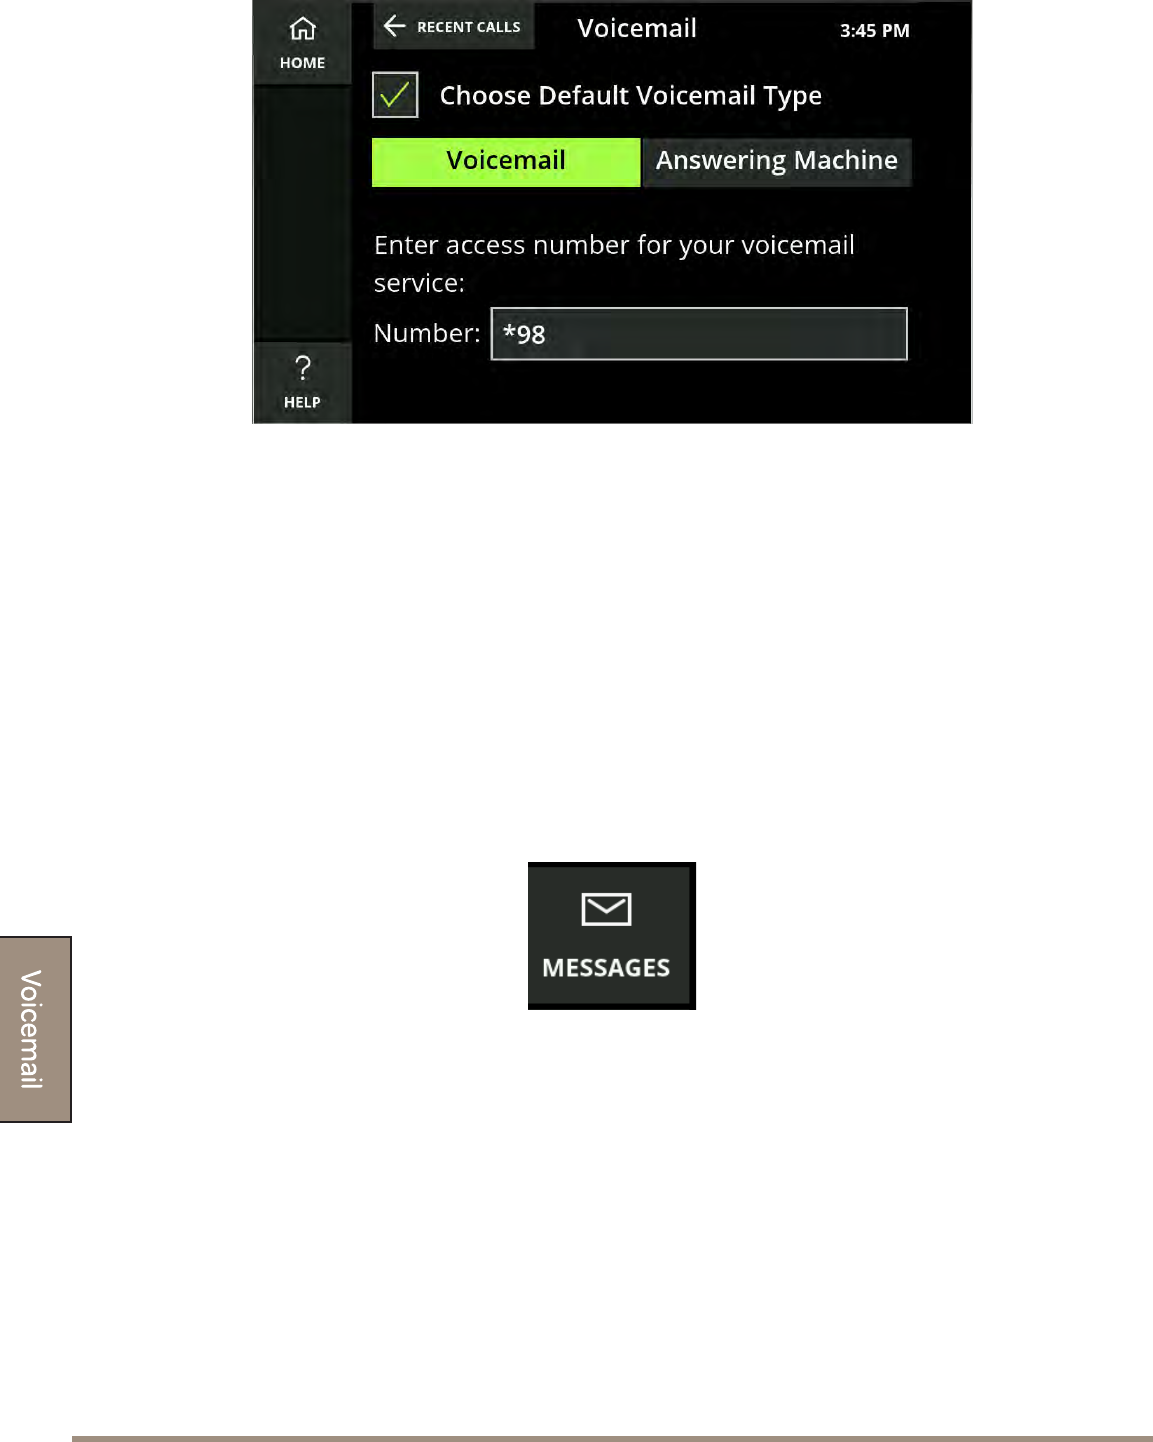
VoicemailPage 56
6. Your voicemail is now ready. The “Messages” buon on the main screen will
change to read “Voicemail”.
Caption Voicemail
1. Pick up the handset.
2. Turn on captions by either pressing the Captions buon, or by touching the
Captions prompt on the screen.
3. Touch Messages or Voicemail.
4. As your voicemail is played, the messages will be captioned.
CaptionCall Support 1-877-557-2227 Page 57
5. Touch Save Call to save your voicemail to your Saved Calls.
Captioning Answering Machine Messages
1. Pick up the handset and place it near the answering machine speaker.
2. Touch the Messages Buon and select Answering Machine.
3. Begin playing your answering machine messages.
4. The captioning will begin.
5. Touch save call to save to your Saved Calls.
6. Hang up the receiver when done to stop the call.


Settings
SettingsPage 60
Seings will let you set your phone’s defaults and you can troubleshoot and
control many of your CaptionCall phone’s functions.
Helpful Hints
Touch the Home Buon to return to the recent calls screen.
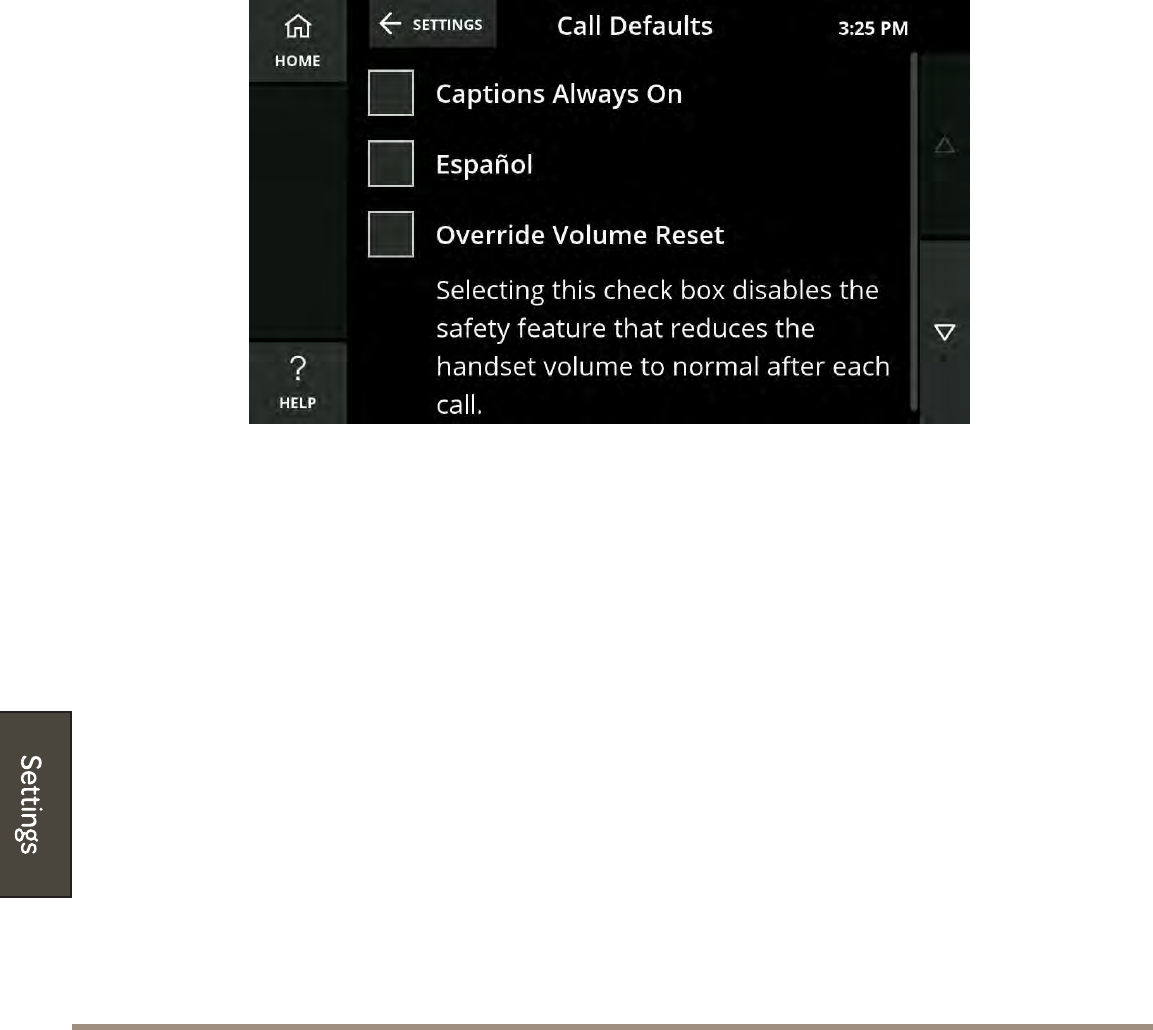
Call Defaults
Call Defaults lets you permanently set captions, override the volume reset and
select your preferred captions language.
Captions Always On
If this is selected, you will rst be prompted to accept the legal notice.
If captions are set as always on, they can still be turned o for a call by pressing
the Captions buon, but will be on by default for all other calls.
Español
Selecting this check box will set Spanish as the captioning default for all calls. If
it is not selected, English will be the captioning default.
Override Volume Reset
Selecting this check box disables the safety feature that reduces the handset
volume to normal after each call made at a dangerous volume level.
CaptionCall Support 1-877-557-2227 Page 61
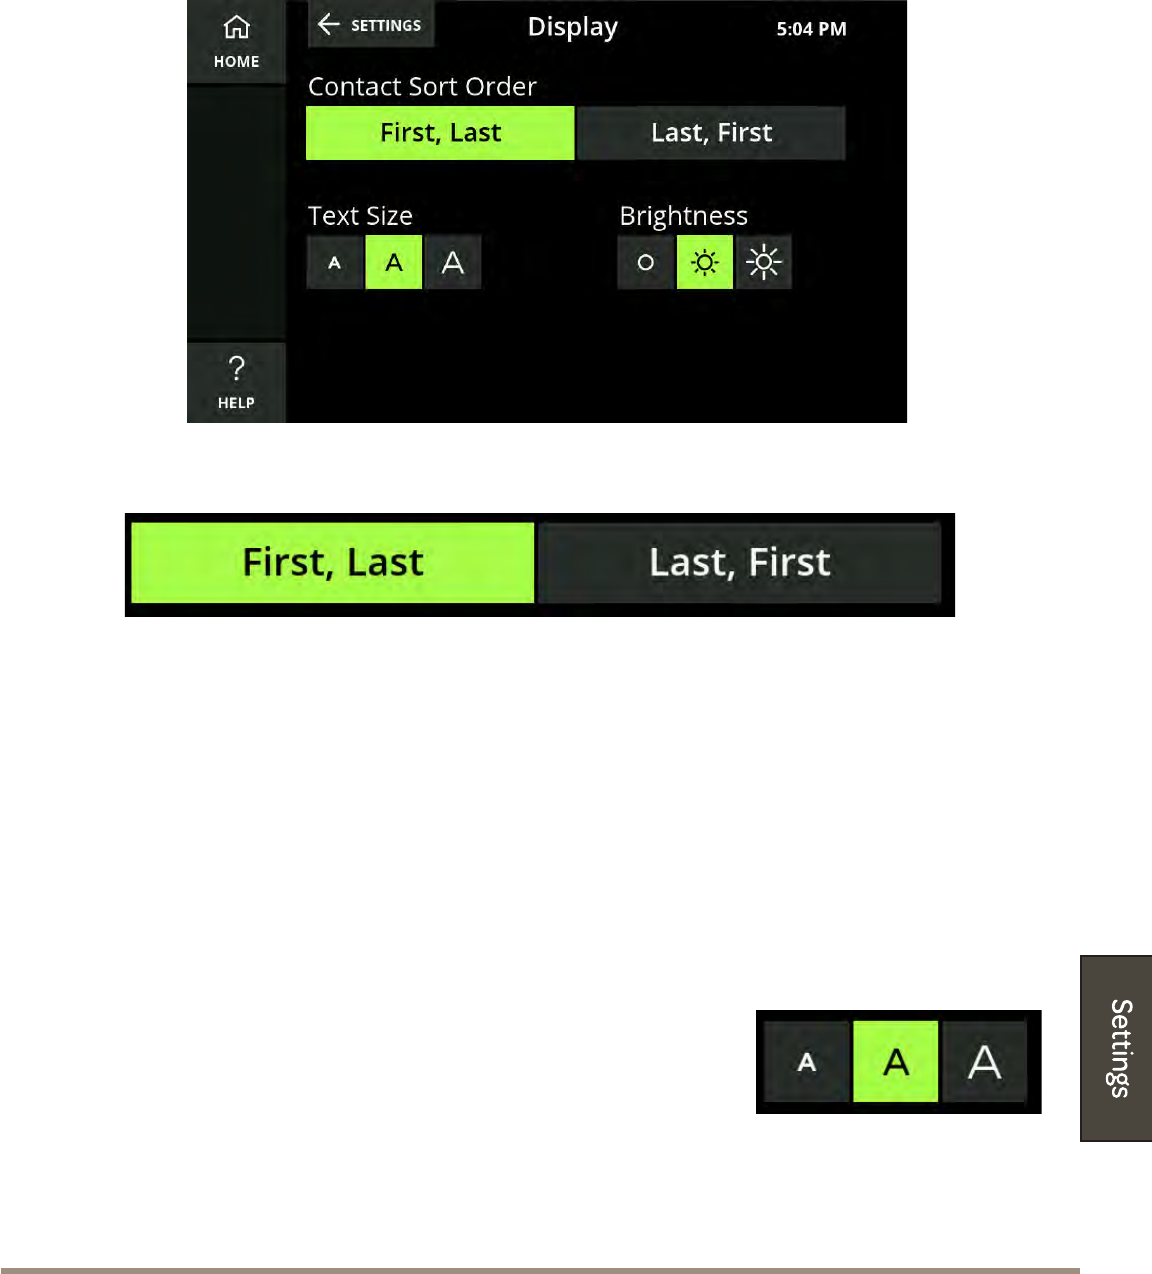
Display Settings
Display Seings allow you to control the sort order of your contact list, the text
size of captions, and brightness of the display.
Sort Order
The Contact Sort Order seing lets you specify the alphabetical order in which
your contacts are displayed in your Phone Book.
• Touch either “First, Last” or “Last, First” to change the sort order in the
Phone Book.
• Changing the Sort Order will change the leer a contact is sorted under in
the Phone Book. For example, by selecting “Last, First” Arthur Franklin
would be changed to Franklin, Arthur and sorted under F instead of A.
Text Size
The Text Size seing lets you permanently specify the
size of the text that appears on the display. There are
three text size seings: Normal,. Large, and Extra Large.
Touch one of the Text Sizes to select your default text size. This size can be
increased during a call.
SettingsPage 62
Brightness
The Brightness seing lets you increase or decrease the
brightness of the display. There are three brightness
seings: Normal, Bright, and Extra Bright.
Touch one of the Brightness buons to select your default brightness seing.
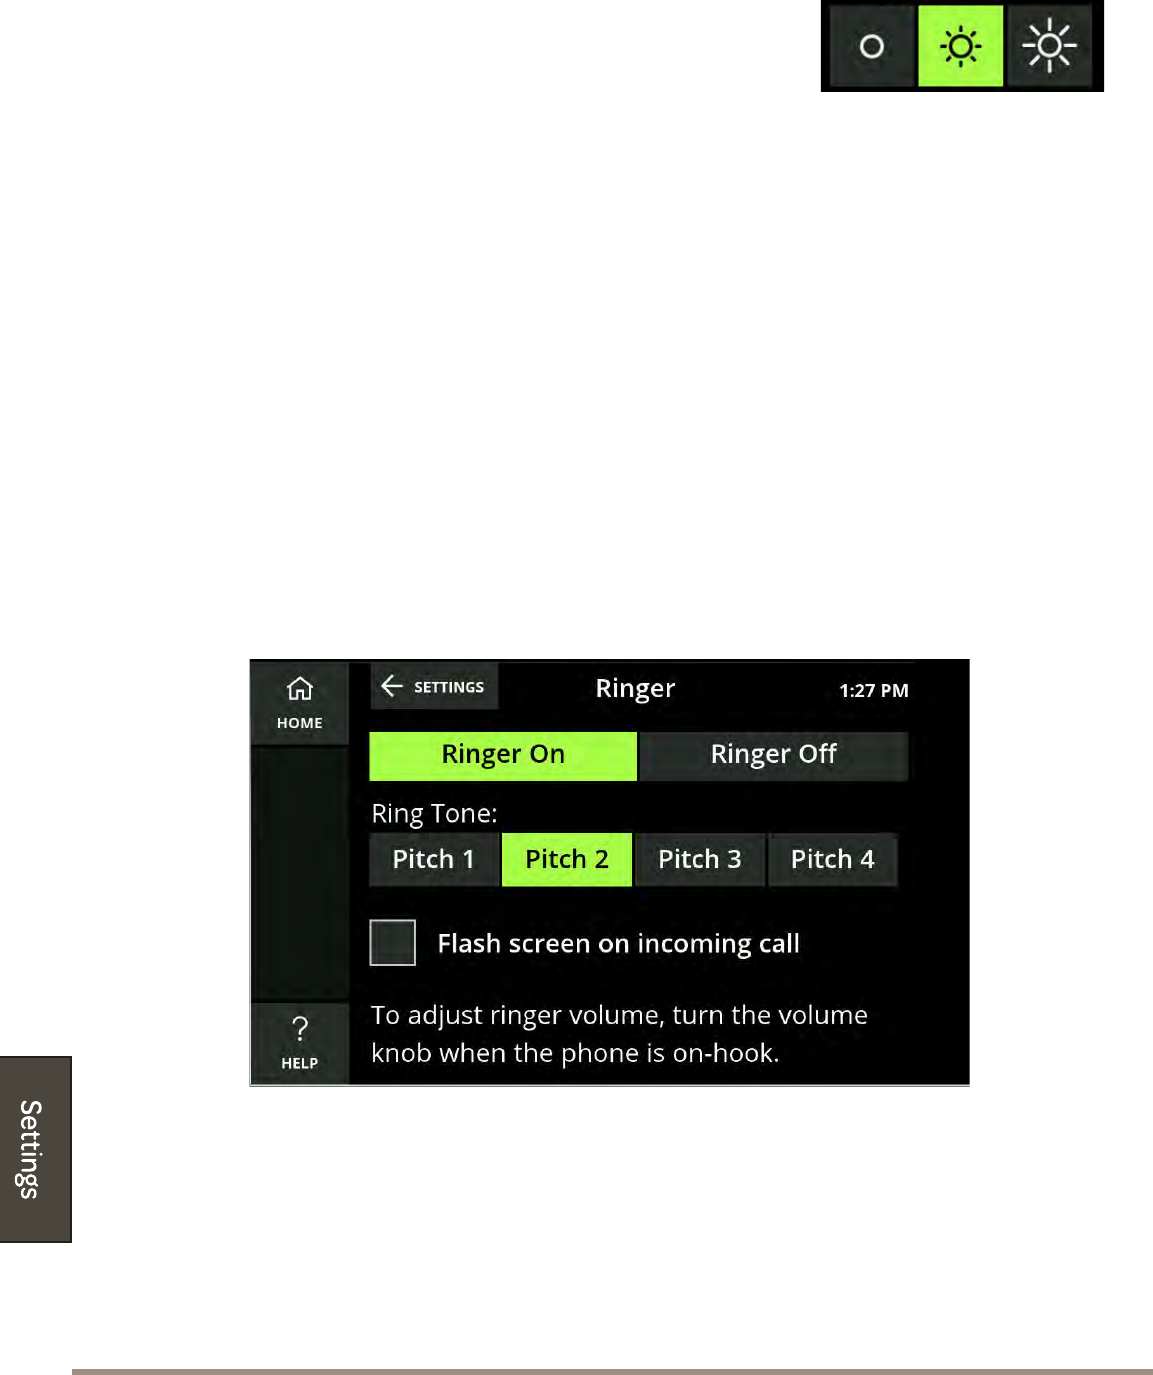
Adjust the Ringer
Ringer seings allow you to select a ring tone and set how loud the CaptionCall
phone rings when you receive calls.
To adjust ringer seings:
1. Touch the screen.
2. Touch the Seings buon.
3. Touch the Ringer buon.
4. Touch the Ring Tone eld and select a ring tone from the list.
Ring tones include: Pitch 1, Pitch 2, Pitch 3, and Pitch 4.
When you select a ring tone, it will briey play so you can hear it.

CaptionCall Support 1-877-557-2227 Page 63
Helpful Hints
• You can turn your ringer o, by touching Ringer O. No sound will play
while the ringer is set to o.
• You can also set your phone’s screen to ash on an incoming call.
Touch the box next to “Flash screen on incoming call” to place a checkmark
in it, and activate this feature.
Adjust Ringer Volume
With the phone on the hook, turn the volume control knob until the phone
rings at the desired volume level.
• Turn clockwise to increase the volume.
• Turn counter-clockwise to decrease the volume.
The knob light will change from green, to amber, to red as you increase the
volume level.
SettingsPage 64
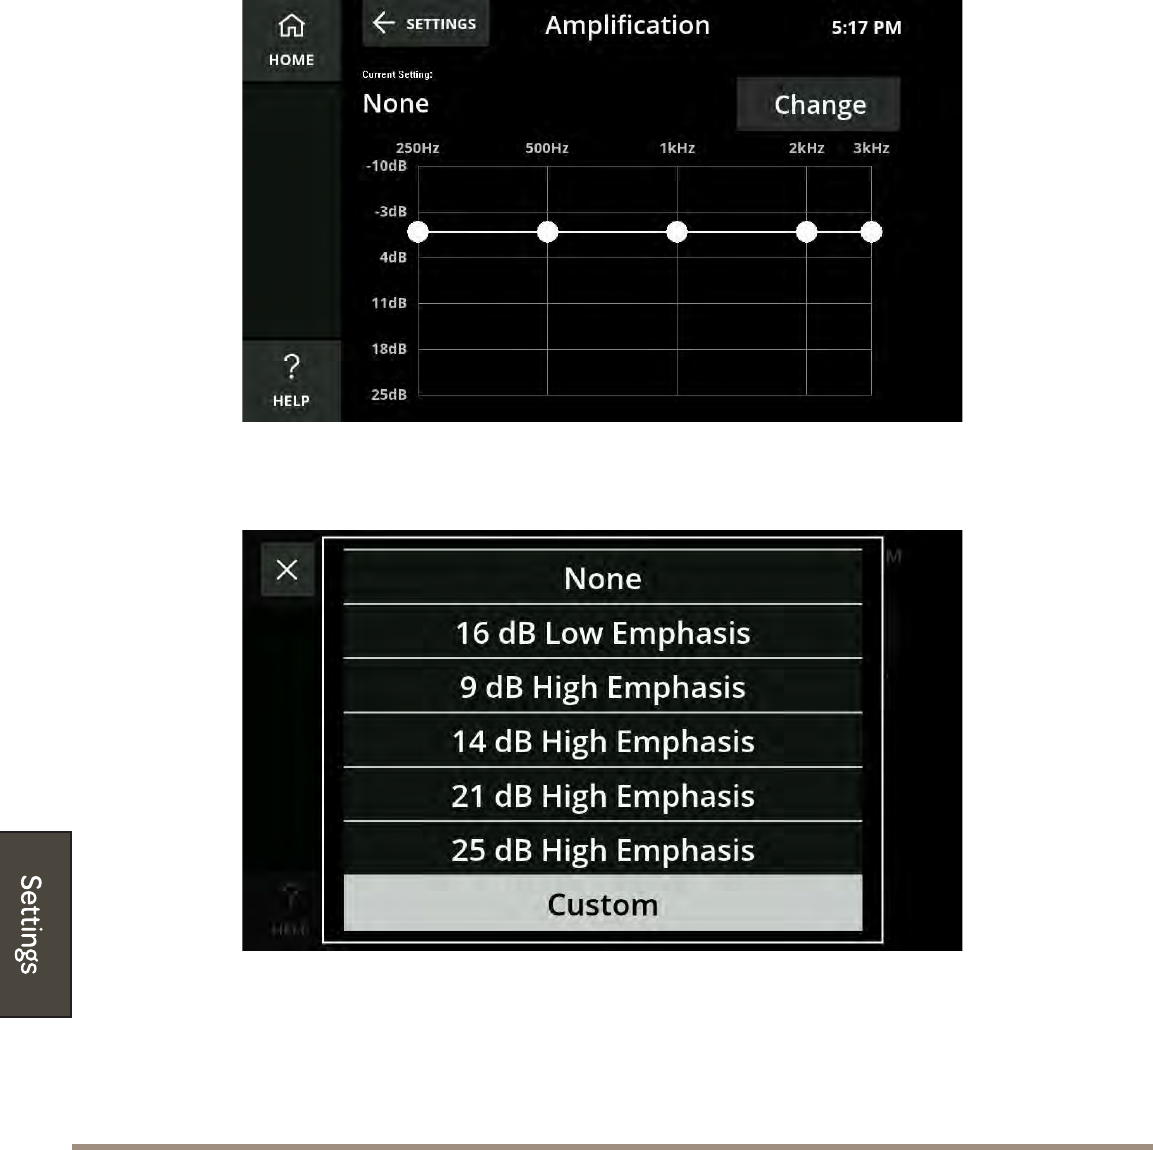
Amplication Settings
The Amplication Seings screen lets you select from a list of audiogram
seing options for increasing the overall volume of the handset/speakerphone
or to boost the volume of specic frequencies.
1. Touch Amplication on the Seings menu. The current amplication seing
displays.
2. Touch Change to choose from a list of dierent decibel level seings.
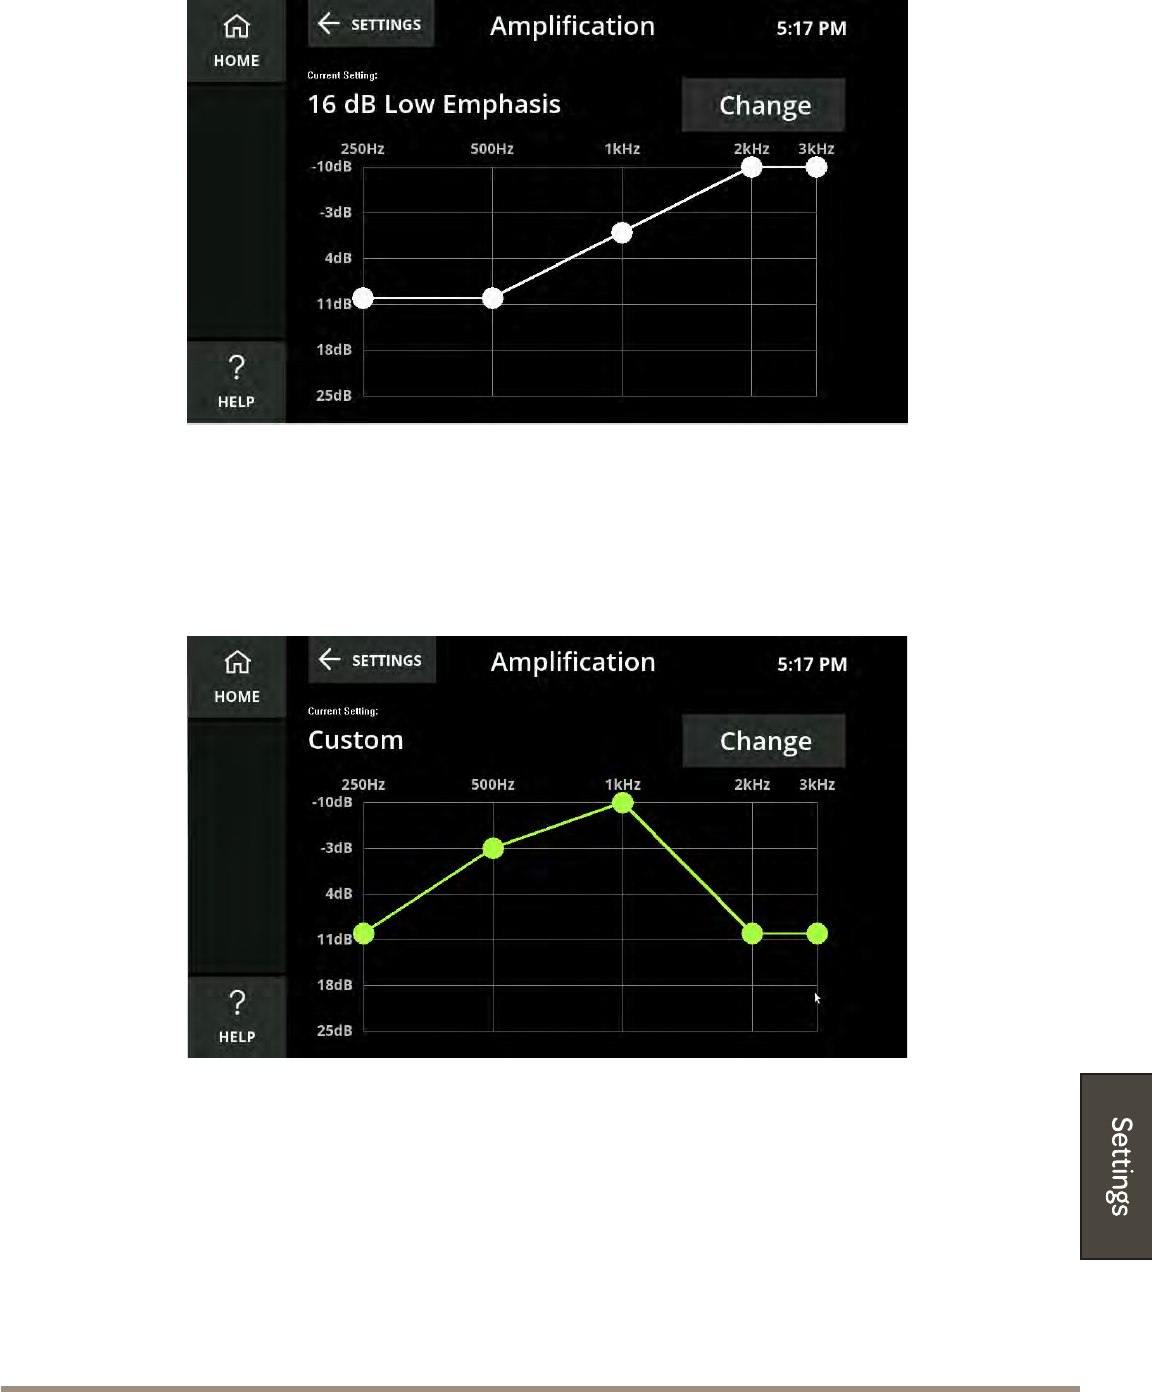
CaptionCall Support 1-877-557-2227 Page 65
Select one of the options from the menu to view its audiogram.
You can also select Custom and using the touch screen drag the amplication to
the levels that you prefer.
The custom option will remain as you set it, until it is changed or switched to
one of the preset levels.
SettingsPage 66
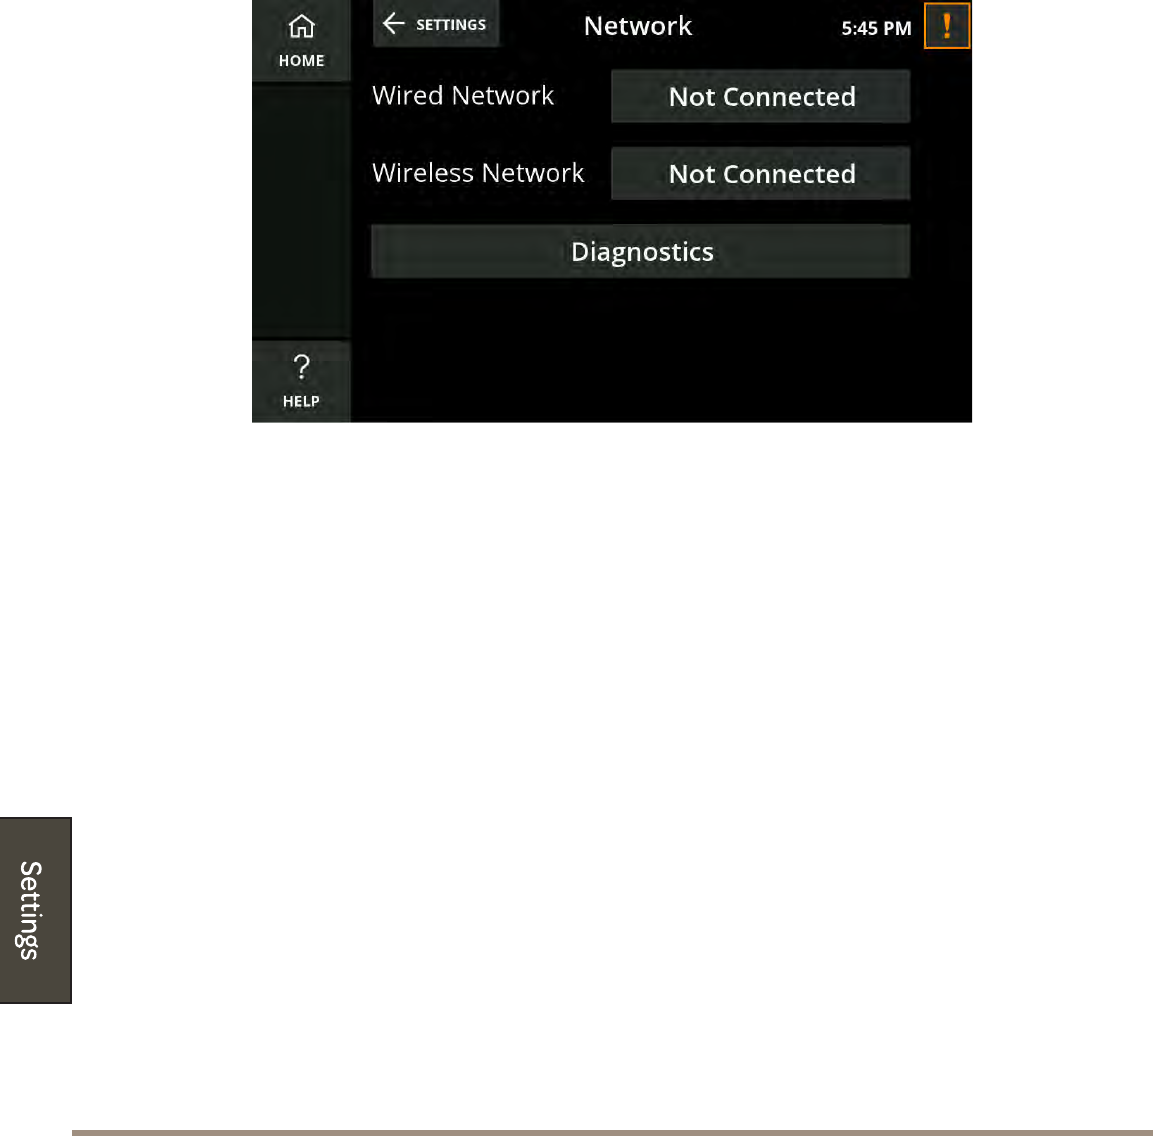
Network
The Network Seings Screen displays the connection status of your CaptionCall
phone to your wired and/or wireless network.
To check/adjust/update Network Seings:
1. Touch Network in the Seings menu. The current network seings display.
2. Look at the text in the buon next to both Wired Network and Wireless
Network. If either are oine, the buon will read Not Connected.
3. If needed, touch the buon for either network type to congure the network
seings.
WARNING
You should not change any wired or wireless network seings unless you have
the technical knowledge required to do so. Changing any wired or wireless
network seings may prevent your CaptionCall phone from working properly.
CaptionCall Support 1-877-557-2227 Page 67
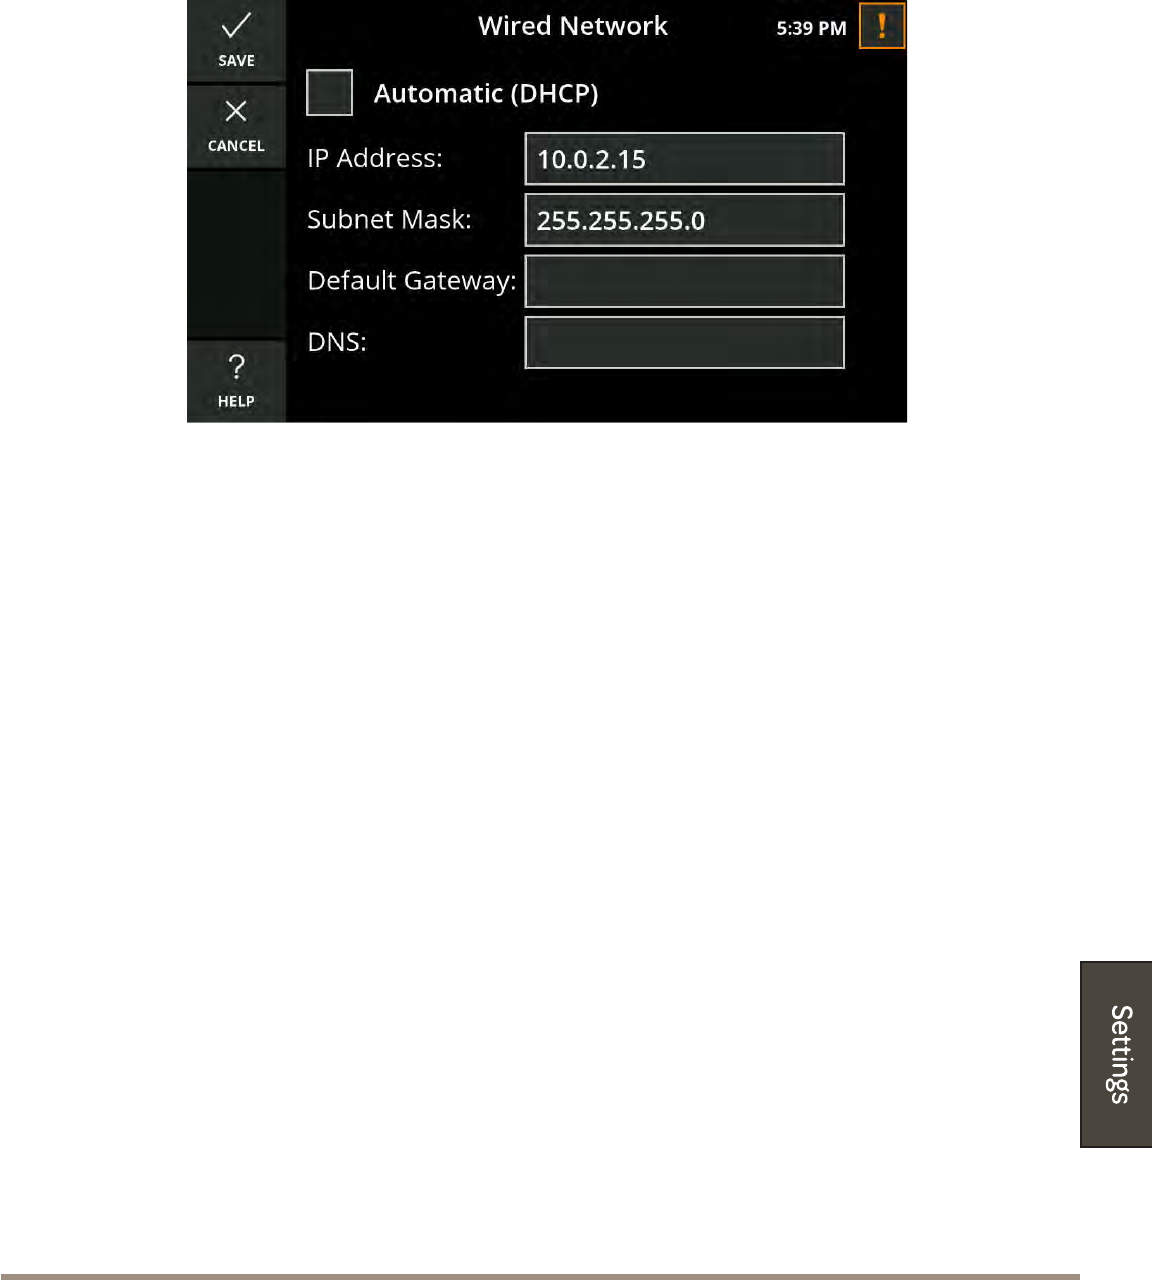
Wired Network Settings
The Wired Network Seings screen displays the current wired network seings
of your CaptionCall phone and lets you congure these seings.
The DHCP (Dynamic Host Control Protocol) network seing is enabled by
default. DHCP automatically assigns network seings to your CaptionCall
phone, including:
• IP Address
• Subnet Mask
• Default Gateway
• DNS (Domain Name Server)
WARNING
You should not disable DHCP or change any wired network seings unless you
have the technical knowledge required to do so.
If DHCP is not enabled on your network, or if you wish to manually enter
your Network Seings:
1. Touch to remove the check from Automatic DHCP and the network seings
elds below it will become active.
2. Touch the eld for the seing you want to change.
3. Use the keypad and enter the correct information.
4. Touch save as you complete each item, then touch Save on the Wired
Network screen to save the network seing.
SettingsPage 68
5. Look at the Wired Network buon on the Network Seings screen. If the
buon reads “Connected,” your network seings changes are valid. If the
buon reads “Not Connected,” one or more of your changes are invalid
and you will need to modify them (or re-enable DHCP) to connect your
CaptionCall phone to your wired network.
Wireless Network Settings
The Wireless Network Seings screen lets you select a wireless network to use
with your CaptionCall phone.
Note: If your CaptionCall phone is already connected to a wireless network,
the name of the network will be displayed in green leers.
If you are connecting to a wireless network, touch Not Connected next to
Wireless Network.
1. Touch the Enable Wireless check box to enable wireless networking. A green
check mark will display in the box.
2. A list of availble wireless networks will display. If more than one wireless
network is detected, they will be listed in order based on signal strength:
= Strong Signal = Weak Signal
A signal strength icon will also display at the top of every screen when your
CaptionCall phone is connected to a wireless network.
3. Select the wireless network you want to use from the list. You will need the
correct network key (password) to connect to the network.

CaptionCall Support 1-877-557-2227 Page 69
4. The Network Key screen will display. Use the on-screen keyboard to enter
the correct password for the network.
5. Touch the Save buon to save the password.
6. The CaptionCall phone will then aempt to connect to the selected wireless
network.
7. When the CaptionCall phone successfully connects to the selected wireless
network, the name of the network will be displayed in green leers.
Other Options
The Advanced Wireless Seings screen displays the current wireless network
seings of your CaptionCall phone and lets you change them if needed.
WARNING
You should not change any wireless network seings unless you have the
technical knowledge required to do so. Invalid wireless network seings may
prevent your CaptionCall phone from working properly.
To change wireless network seings:
1. Touch the SSID buon. A list of available networks will be displayed in
order of signal strength. Select the wireless network you want to use from
the list.
2. Touch the Network Type buon and select the type of security used by the
wireless network you have selected.
3. Touch the Encryption buon and select the type of encryption used by the
wireless network you have selected.
4. Touch the Network Key buon Use the on-screen keyboard to enter the
password (key) required by the wireless network you have selected.
5. Touch the Save buon to save the password.
6. Touch the save buon to save all changes. The CaptionCall phone will then
aempt to connect to the selected wireless network.
SettingsPage 70
7. Look at the list of wireless networks on the Wireless Seings screen. If
the name of the wireless network you congured is shown in green, your
wireless network seings changes are valid. If the name is shown in white,
this means there is no saved information for this SSID. If your changes are
invalid, the name will display with the word FAILED in orange.
You can also manually congure the DHCP seings for wireless networks. See
page 67 for instructions on manually conguring DHCP.
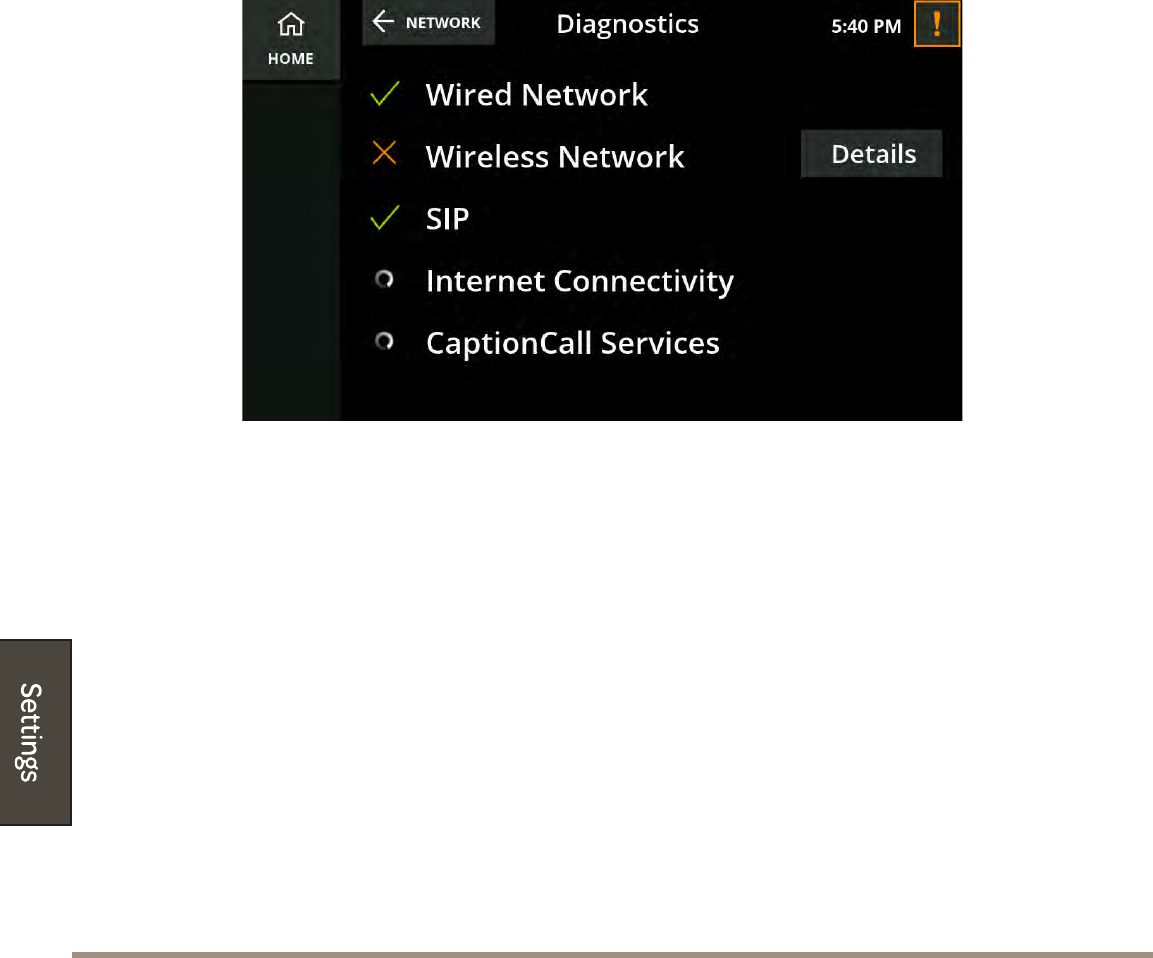
Run Diagnostics
Touch the Network Diagnostics buon if you are experiencing network
problems with your phone, or if you are asked to do so by CaptionCall
Technical Support.
If any of the diagnostics fail, they will be marked with a red X and a Details
buon will display on the right. Touch the buon for more information on why
the diagnostic failed.

CaptionCall Support 1-877-557-2227 Page 71
Recent Calls
The Recent Calls seing allows you to delete all of your recent calls from
memory at once.
1. Touch Delete All Recent Calls
2. A prompt will display to ensure you want to delete all recent calls.
3. Touch “Delete” to complete deletion or “Keep” to cancel deletion.
SettingsPage 72
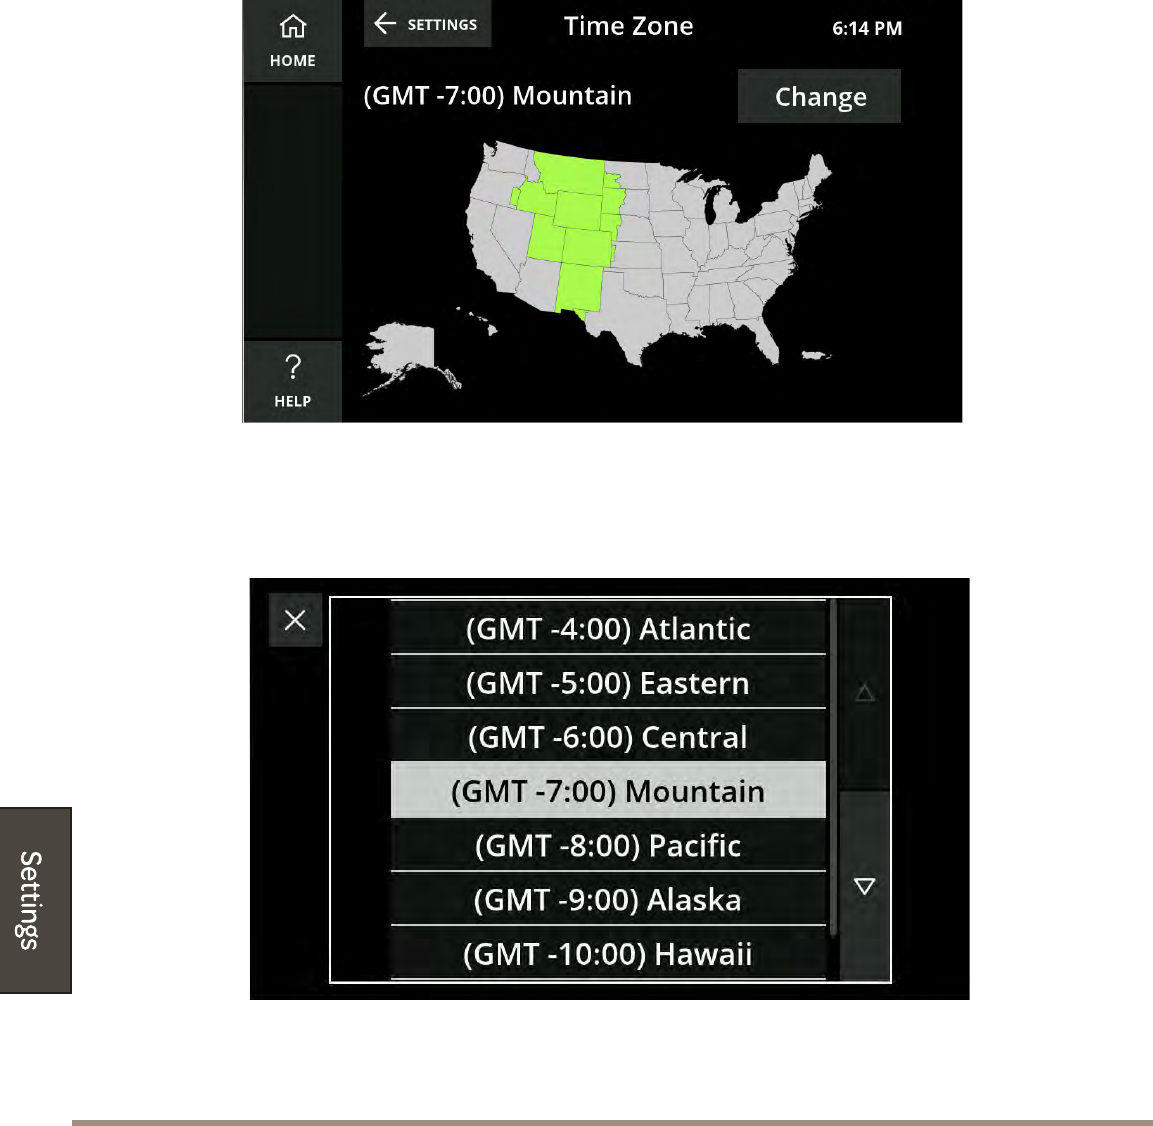
Time Zone
The Time Zone screen displays a map of time zones and lets you select the
correct time zone for your location.
To select your time zone using the Time Zone map:
1. Touch the state you live in on the displayed map. The time zone for that
state will change to green on the map.
To select your time zone from a list:
1. Touch the Change buon. A time zone list will display. Scroll up and down
to see all available time zones.
2. Select the correct time zone.
Your time zone will now update to the new, selected time zone
CaptionCall Support 1-877-557-2227 Page 73
Voicemail
This is your permanent Voicemail seing for your phone. Use the instructions
on page page 55 to setup your permanent Voicemail.
About
There are no seings on this screen, only a list of information about your
CaptionCall phone.

SettingsPage 74

CaptionCall Support 1-877-557-2227 Page 75
Troubleshooting
If your CaptionCall phone loses connection to the network, your telephone line
is disconnected, or when there is a problem with your CaptionCall account, you
will be prompted with an alert and an alert buon will display in the top right
corner of the touch screen
• Touch the alert buon to read your alerts.
• Touch the X in the top left of an alert to close it.
Network Alerts
Often network errors are simply connectivity issues. See “Network” on
page 66 for assistance. If you are unable to resolve the error, please call
CaptionCall Customer Support at 1-877-557-2227.
Telephone Line Problem
This error displays when your CaptionCall phone is not connected the
telephone line.
Check that the telephone line is connected in the back of the phone (see
“The Back of Your CaptionCall Phone” on page 12). If the telephone line is
connected, contact your Telephone provider for more assistance.
Account Error
Contact CaptionCall Customer Support at 1-877-557-2227.

The Fine PrintPage 76
Technical Specications
This device complies with part 15 of the FCC rules. Operation is subject to the
following two conditions: (1) This device may not cause harmful interference,
and (2) this device must accept any interference received, including interference
that may cause undesired operation. Any changes or modications not
expressly approved by manufacturer could void the user’s authority to operate
the equipment.
IMPORTANT! Any changes or modications not expressly approved by the
party responsible for compliance could void the user’s authority to operate this
equipment.
For a Class B digital device or peripheral, the instructions furnished the user
shall include the following or similar statement, placed in a prominent location
in the text of the manual:
NOTE: This equipment has been tested and found to comply with the limits
for a Class B digital device, pursuant to part 15 of the FCC Rules. These limits
are designed to provide reasonable protection against harmful interference
in a residential installation. This equipment generates, uses and can radiate
radio frequency energy and, if not installed and used in accordance with
the instructions, may cause harmful interference to radio communications.
However, there is no guarantee that interference will not occur in a particular
installation. If this equipment does cause harmful interference to radio or
television reception, which can be determined by turning the equipment o
and on, the user is encouraged to try to correct the interference by one or more
of the following measures:
—Reorient or relocate the receiving antenna.
—Increase the separation between the equipment and receiver.
—Connect the equipment into an outlet on a circuit dierent from that to which
the receiver is connected.
—Consult the dealer or an experienced radio/ TV technician for help.
This equipment complies with Part 68 of the FCC rules and the requirements
adopted by the ACTA. On the base of this equipment is a label that
contains, among other information, a product identier in the format
US:AAAEQ##TXXXX. If requested, this number must be provided to the
telephone company.
This telephone connects to the telephone network using an RJ11 connector.

CaptionCall Support 1-877-557-2227 Page 77
A plug and jack used to connect this equipment to the premises wiring and
telephone network must comply with the applicable FCC Part 68 rules and
requirements adopted by the ACTA. A compliant telephone cord and modular
plug is provided with this product. It is designed to be connected to a
compatible modular jack that is also compliant. See installation instructions for
details.
The REN is used to determine the number of devices that may be connected to
a telephone line. Excessive RENs on a telephone line may result in the devices
not ringing in response to an incoming call. In most but not all areas, the sum
of RENs should not exceed ve (5.0). To be certain of the number of devices
that may be connected to a line, as determined by the total RENs, contact the
local telephone company. The REN for this product is part of the product
identier that has the format US:AAAEQ##TXXX. The digits represented by ##
are the REN without a decimal point (e.g., 03 is a REN of 0.3).
If this CaptoinCall phone causes harm to the telephone network, the telephone
company will notify you in advance that temporary discontinuance of service
may be required. But if advance notice isn’t practical, the telephone company
will notify the customer as soon as possible. Also, you will be advised of your
right to le a complaint with the FCC if you believe it is necessary.
The telephone company may make changes in its facilities, equipment,
operations or procedures that could aect the operation of the equipment. If
this happens, the telephone company will provide advance notice in order for
you to make necessary modications to maintain uninterrupted service.
If trouble is experienced with this CaptionCall phone, for repair or warranty
information, please contact CaptionCall LLC, 1-877-557-2227, or support@
captioncall.com. If the equipment is causing harm to the telephone network,
the telephone company may request that you disconnect the equipment until
the problem is resolved.
CaptionCall does not contain any customer serviceable components.
Connection to party line service is subject to state taris. Contact the
state public utility commission, public service commission or corporation
commission for information.
This equipment is hearing aid compatible.

The Fine PrintPage 78
WHEN PROGRAMMING EMERGENCY NUMBERS AND (OR) MAKING
TEST CALLS TO EMERGENCY NUMBERS:
1. Remain on the line and briey explain to the dispatcher the reason for the
call.
2. Perform such activities in the o-peak hours, such as early morning or late
evenings.
Copyright & Trademarks

CaptionCall Support 1-877-557-2227 Page 79
Important Safety Instructions
• When using your telephone equipment, basic safety precautions should
always be followed to reduce the risk of re, electric shock and injury to
persons, including the following:
• Do not use this product near water for example, near a bathtub, washbowl,
kitchen sink or laundry tub, in a wet basement or near a swimming pool.
• Avoid using a telephone (other than a cordless type) during an electrical
storm. There may be a remote risk of electric shock from lightning.
• Do not use the telephone to report a gas leak in the vicinity of the leak.
• Use only the power adaptor provided with this device.
SAVE THESE INSTRUCTIONS
