Cardionet 1008 C3 Sensor User Manual 3
Cardionet C3 Sensor Users Manual 3
Contents
- 1. Users Manual 1
- 2. Users Manual 2
- 3. Users Manual 3
- 4. Users Manual 4
- 5. Users Manual 5
Users Manual 3

3
USING THE Monitor
In this Chapter:
• How to Turn your Monitor On and Off
• How to Record an Event
• How to Change Monitor Options
• How to Check Battery Power
• How to Check Cell Phone Coverage
• Receiving Messages from CardioNet
• How to Read a Text Message
31 2
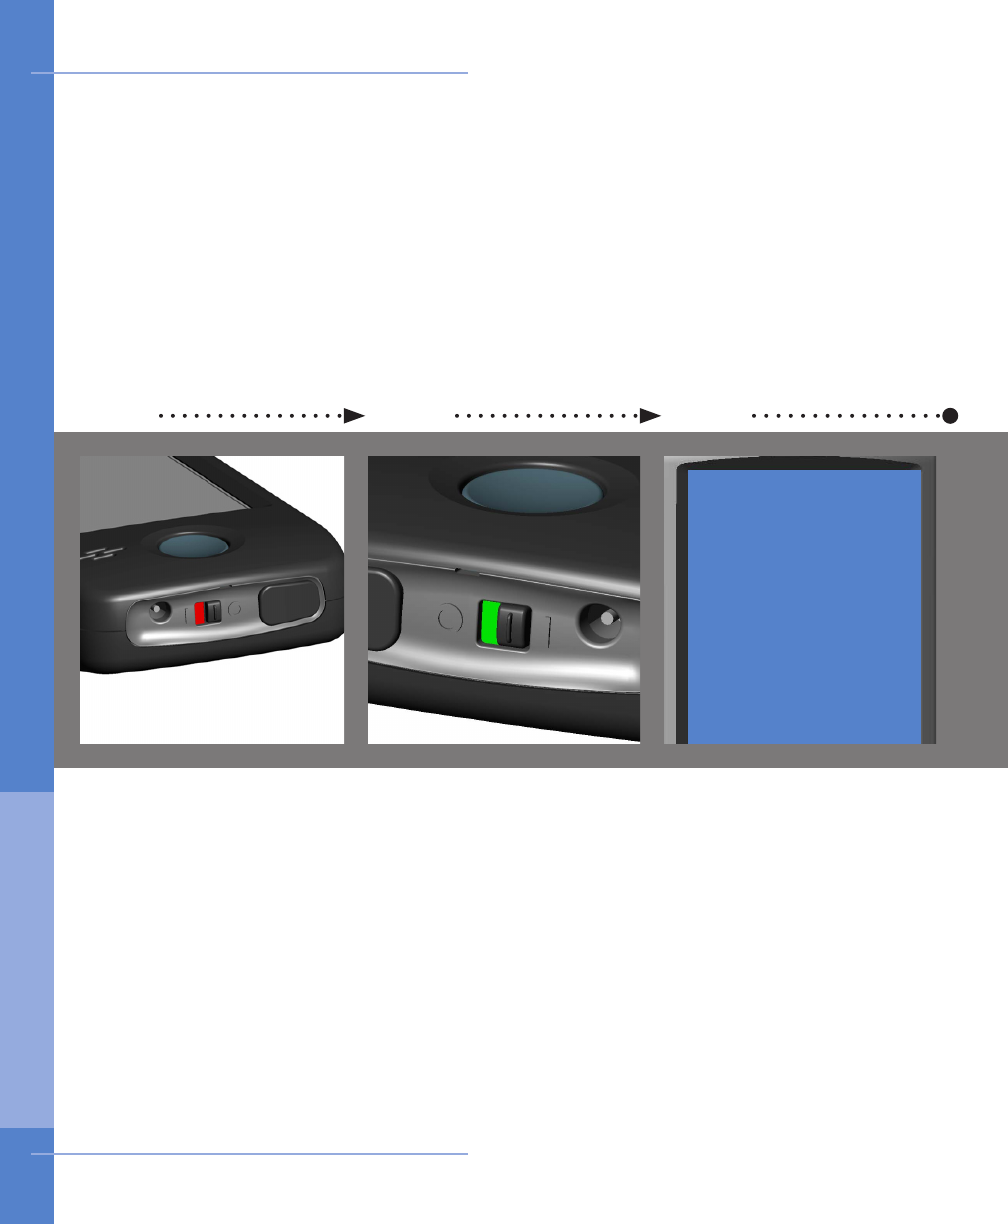
With your monitor on,
loocate the black toggle
switch on the bottom of
the device. It show green.
Move it to the left. It will
show red.
The “Good bye...” screen
will appear.
With your monitor off,
loocate the black toggle
switch on the bottom of
the device. It show red.
Move it to the right. It will
show green.
You will hear a start up
sound and the CardioNet
“C” logo will appear. When
the touch screen displays
the Main Menu, the monitor
is on and awake.
The “Good bye” screen
indicates that your device
is shutting down. Do not
move to toggle switch until
the screen is blank and the
device is completely off.
The only times you will
need to turn the monitor
off are when you change
the sensor battery, change
your electrodes, or take a
shower or bath.
OFF: Flip switch to red Powering DownON: Flip switch to green
28 Using the Monitor
Good bye...
How to Turn Your Monitor On and Off
3. US I NG T H E Mon itor
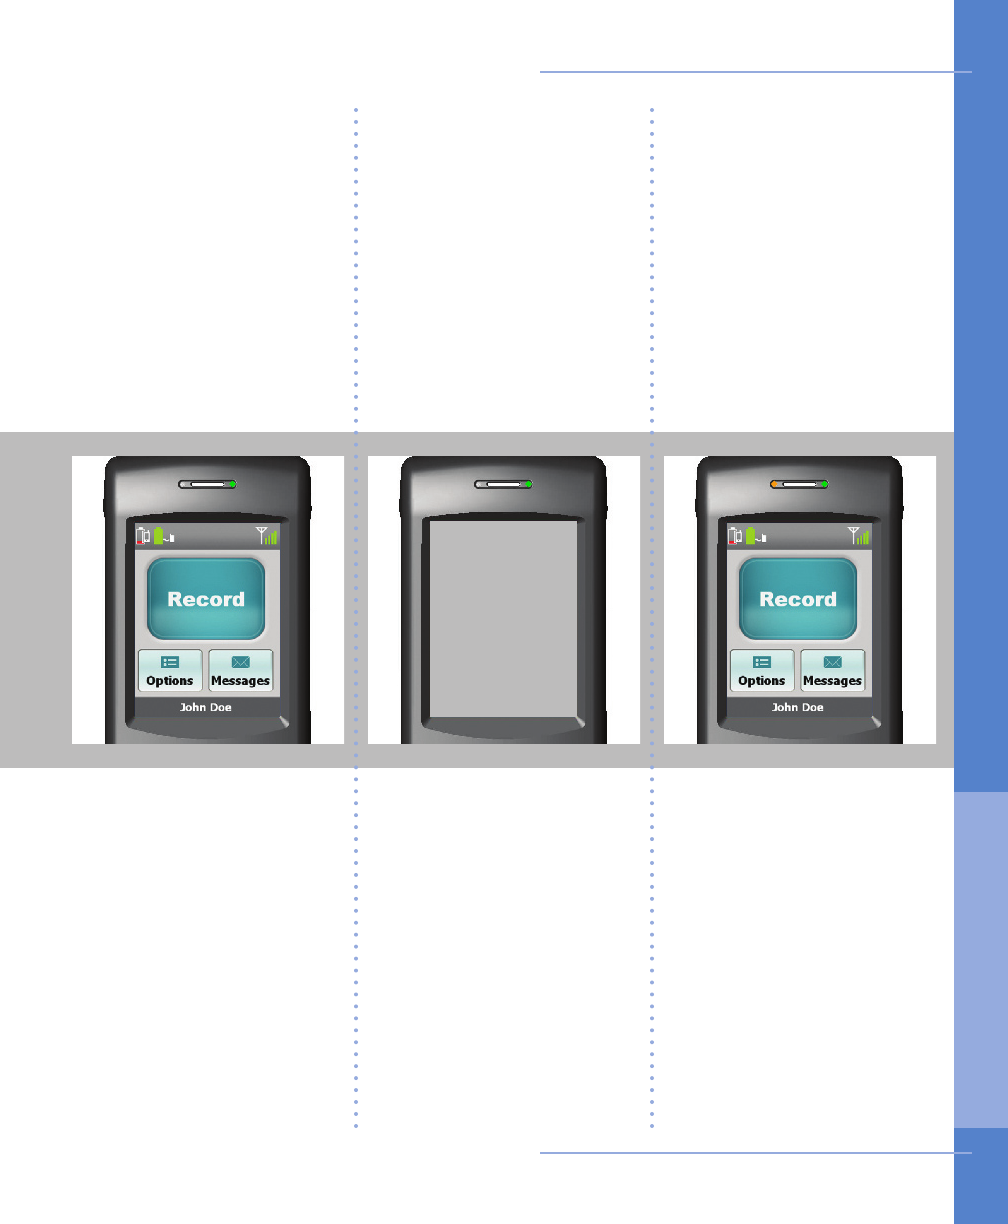
On &
Awake
On &
Asleep Charging
When the monitor is
asleep, the touch screen
is blank and not lit.
The LED light at the top
right side of the monitor
is on and blinking red or
green.
Sleeping helps the moni-
tor save battery power
while you are not using
the touch screen.
When the monitor is
charging, the LED light
at the top left side of the
monitor will illuminate
in orange. The monitor
battery icon, located on
the Main Menu in the
uper left corner will blink
and will change colors as
it recharges.
Always leave your monitor
on, even when charging.
When the monitor is awake,
the touch screen is lit and
the LED light at the top
right side of the monitor
blinks red or green.
A green blinking LED light
means you are being
monitored.
A red blinking LED light
means you are not being
monitored.
Using the Monitor 29
How to Turn Your Monitor On and Off
3. US I NG T H E Mon itor
31 2
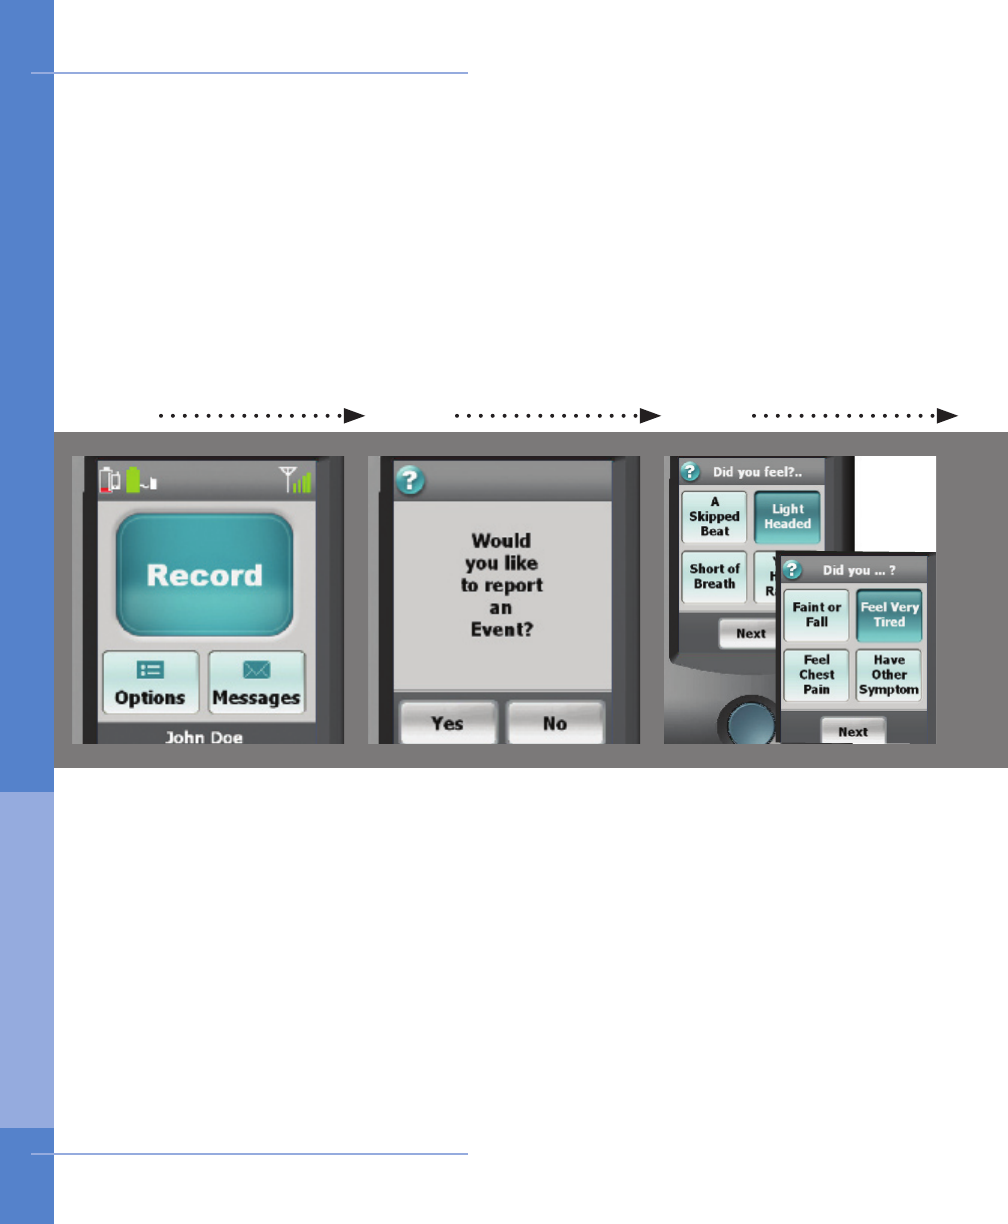
Follow these steps if you
are experiencing any
symptoms.
Ensure that your monitor
is on and awake.
On the Main Menu touch
the Record button.
The rst of two symptom
screens appears.
Select each symptom that
you feel. The button will
depress and change to a
dark blue color.
Touch Next and repeat
for the second symptom
screen.
When you are finished,
touch Next.
On the monitor’s touch
screen, a confirmation
screen will appear.
Touch the Yes buton to
continue to step 3.
If you have touched the
Record button by accident
and do not wish to record
an event, touch No and
you will return to the Main
Menu.
Touch Record Event Touch Yes to conrm Touch symptoms
30 Using the Monitor
How to Record an Event
3. US I NG T H E Mon itor
4 5 6
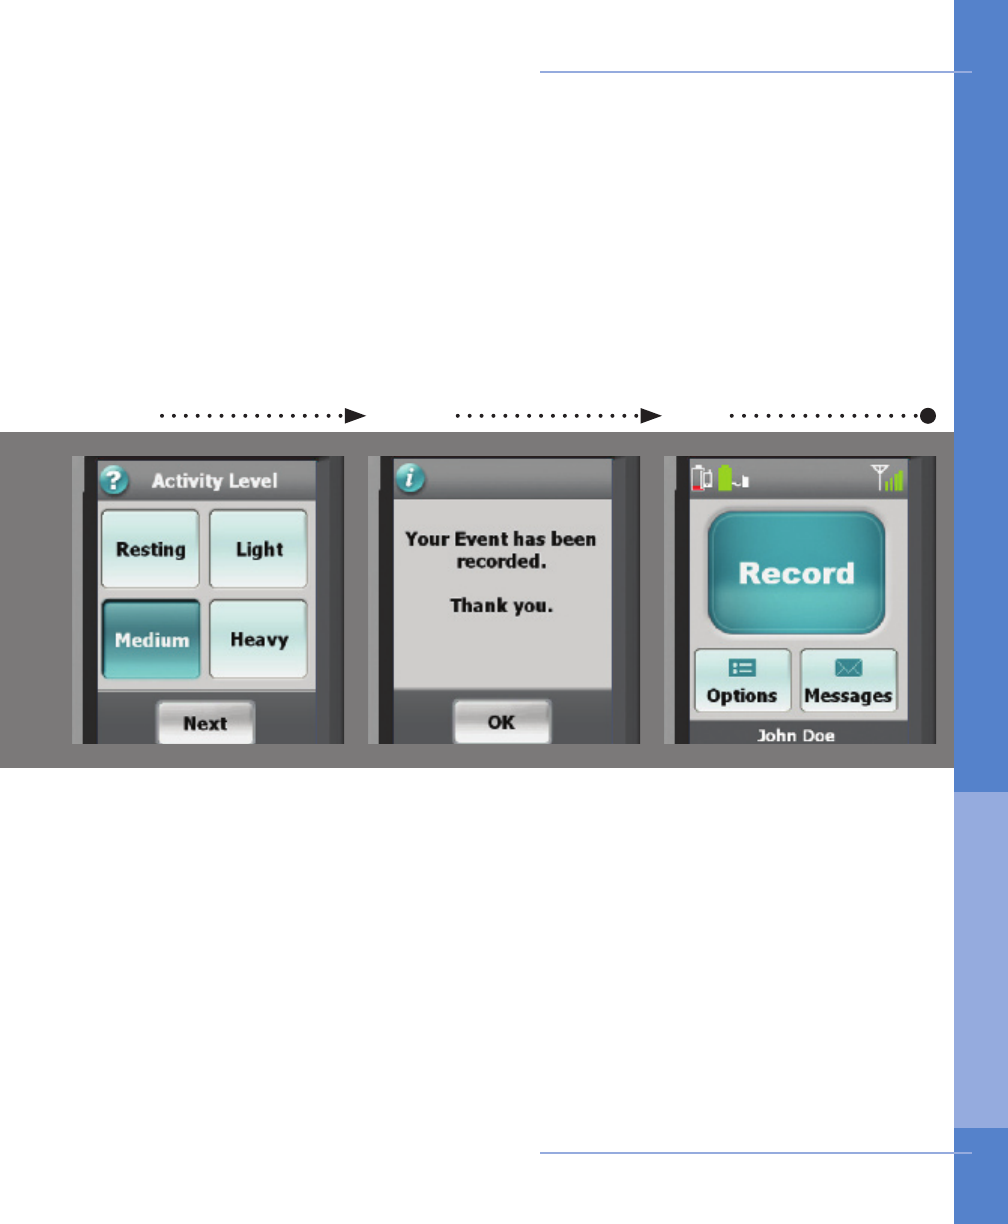
Your event information
has been recorded and
stored. The monitor will
then attempt to contact
and transmit the data to
the CardioNet Monitoring
Center.
Touch OK to return to the
Main Menu.
Choose the activity level
that best reects your level
of exertion when you felt
your symptom.
When you are finished,
touch Next.
Touch activity level Event recorded
Using the Monitor 31
Main menu
When you wish to record
another event, press the
Record button.
How to Record an Event
3. US I NG T H E Mon itor
31 2
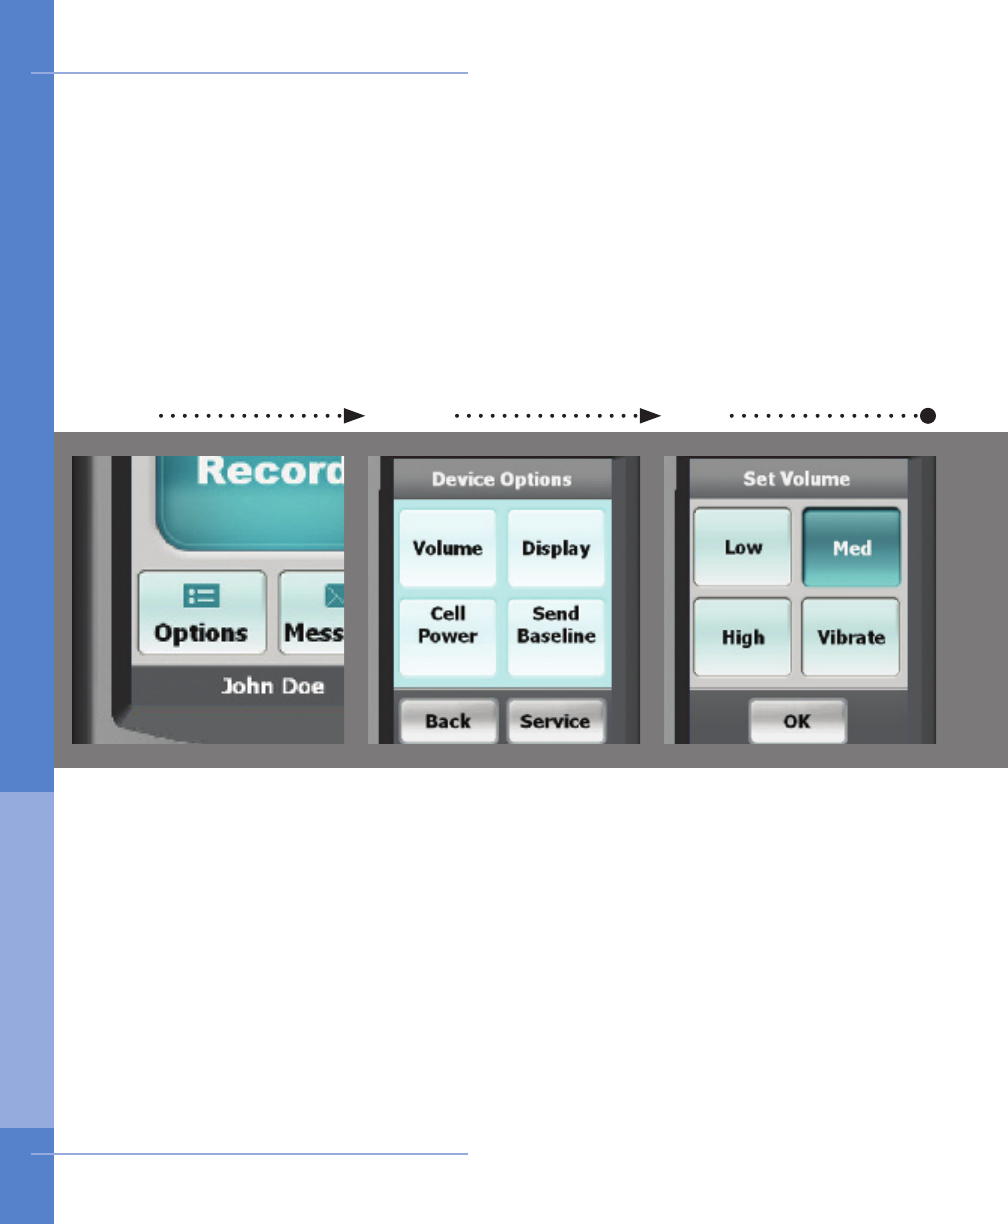
Ensure the monitor is on
and awake.
From the Main Menu, touch
the Options button.
Choose a desired volume.
Touching High, Medium
or Low places a check
mark next to your selec-
tion. You will hear a tone
for the volume you have
chosen. Vibrate disables
the audio sounds and
you will feel the monitor
vibrating.
Touch Conrm to save.
Touch the button labeled
Volume.
Touch View Options Touch Volume Choose desired volume
32 Using the Monitor
Volume
How to Change Monitor Options
3. US I NG T H E Mon itor
1 2 3
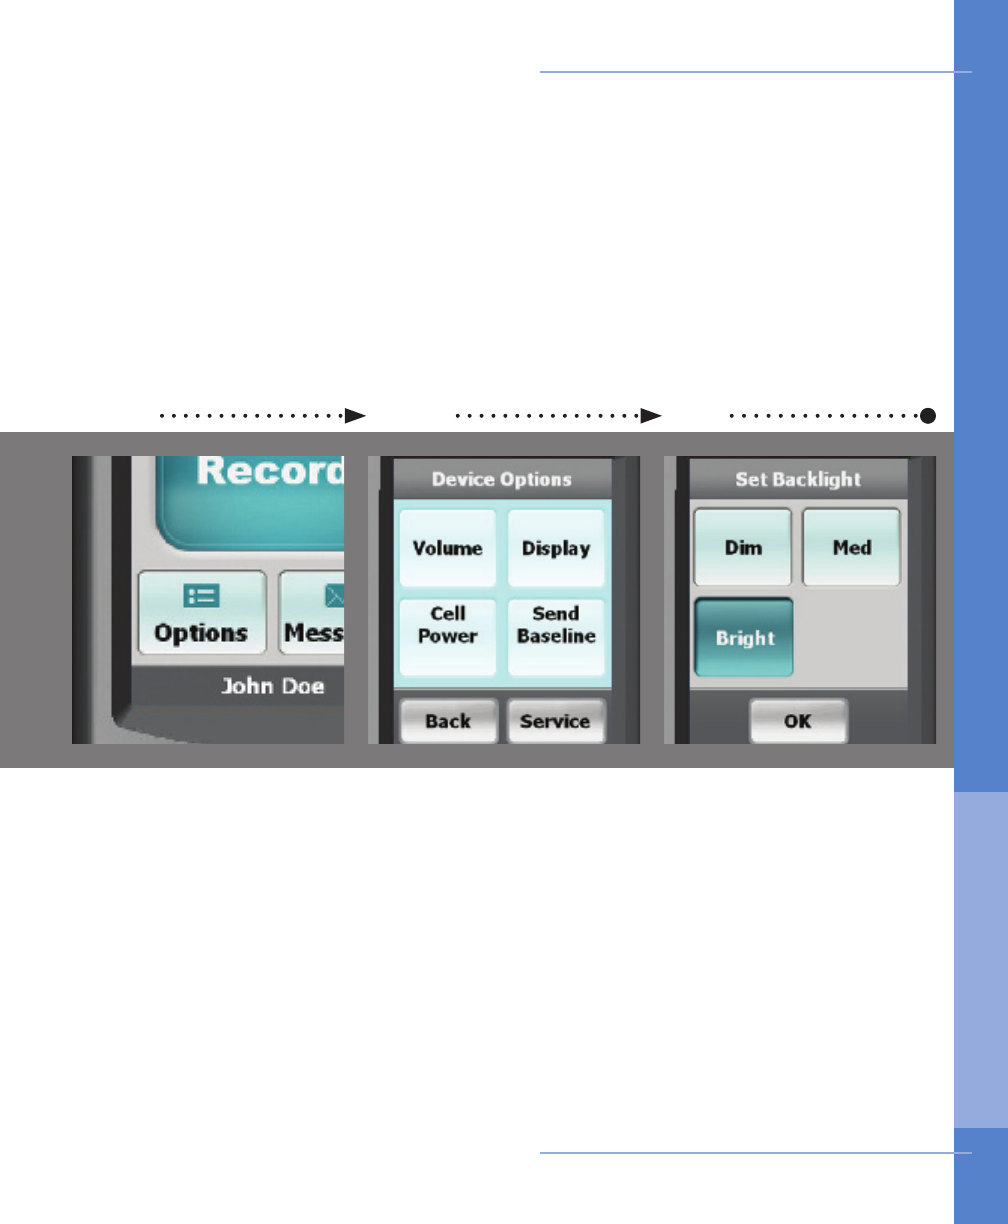
Touch the button labeled
Display.
Choose a desired brightness
for the screen.
Touching the Bright,
Medium or Dim button
adjusts the LCD screen
brightness and you will see
the new setting you have
chosen.
Touch OK to save.
Ensure the monitor is on
and awake.
From the Main Menu, touch
the Options button.
Touch View Options Touch Display Choose desired brightness
Using the Monitor 33
Display
How to Change Monitor Options
3. US I NG T H E Mon itor
31 2
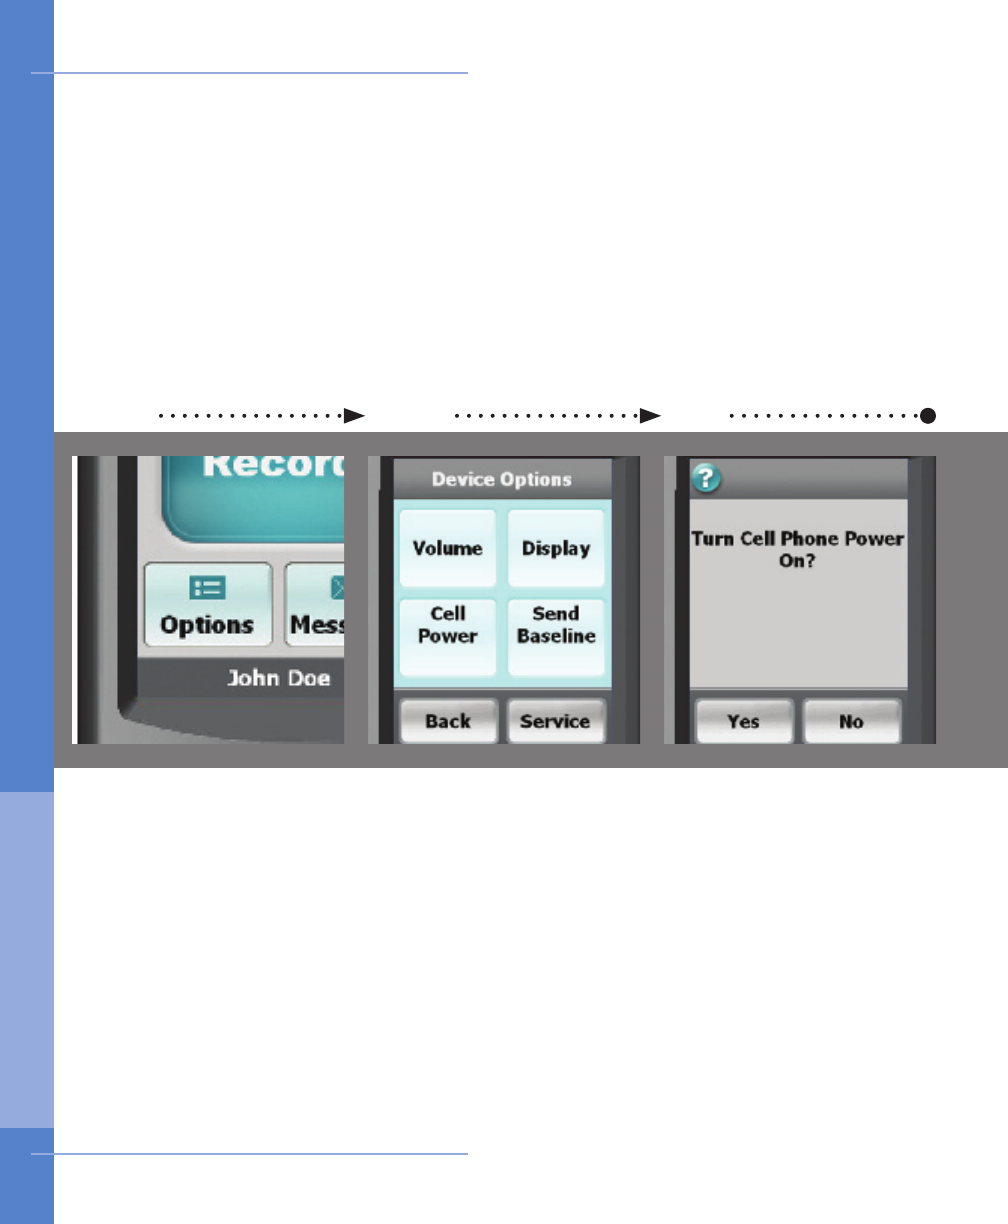
Ensure the monitor is on
and awake.
From the Main Menu, touch
the Options button.
Choose either Yes or
No.
When the cell phone is off,
monitoring continues, but
no data can be sent unless
the monitor is in the base
or the cell phone is turned
back on.
The cell icon on the
Main Menu now displays
“OFF”.
Touch the button labeled
Cell Power.
Touch Options Touch Cell Phone Choose On or Off
34 Using the Monitor
Cell Phone
Never turn off your cell phone. e cell phone
off feature is ONLY for use when flying.
How to Change Monitor Options
3. US I NG T H E Mon itor
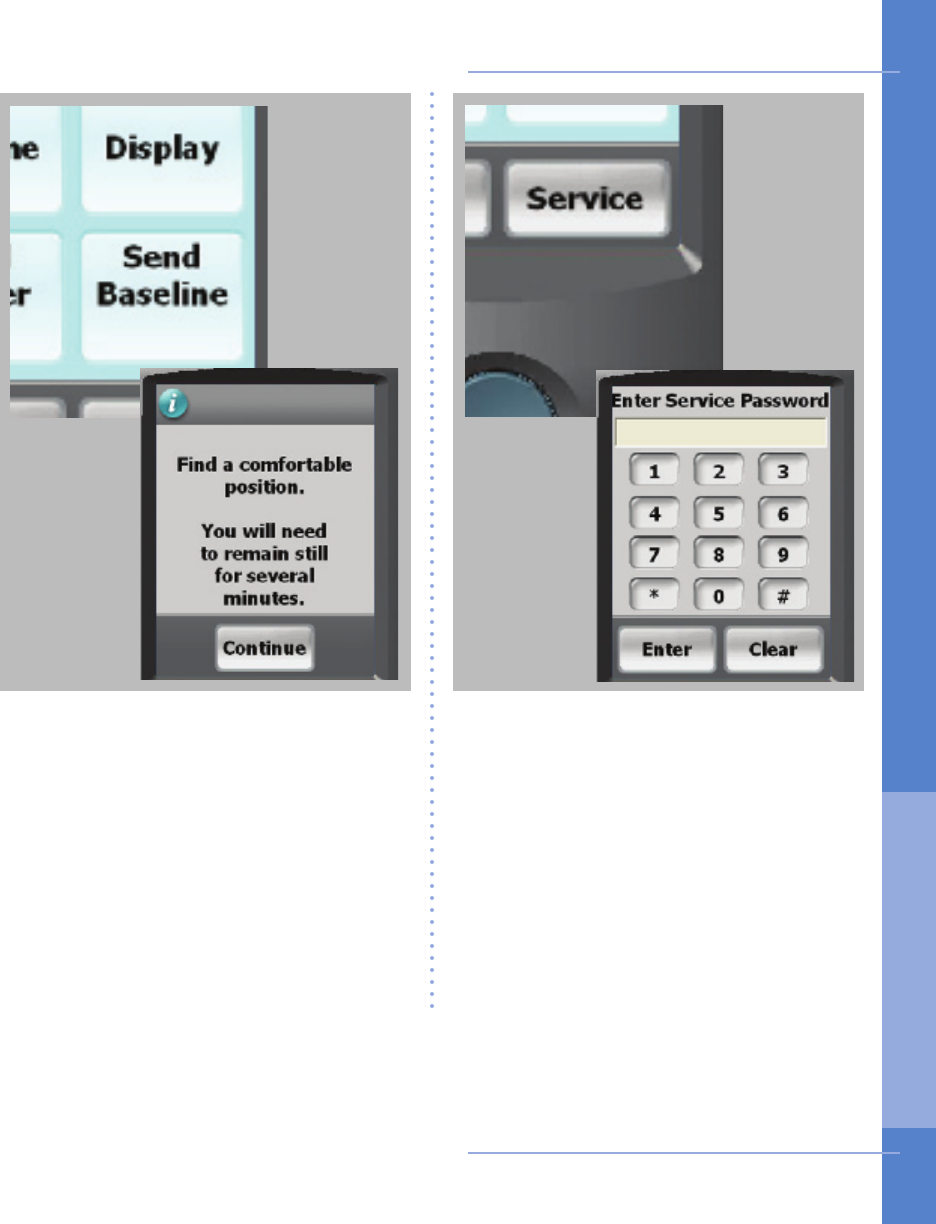
Pressing the Service button will display
a password screen. This screen allows
Cardionet personel to troubleshoot
your monitor. These screen can only
be accessed while you are speaking
with an authorized CardioNet Customer
Service Representative.
If you enter this screen by accident, exit
by touching Enter, then OK and you
will return to the Options Menu.
Using the Monitor 35
Service or Send...
Pressing the Record Baseline button
will display the first screenin this
process. You should only proceed when
speaking with an authorized CardioNet
Customer Service Representative.
If you enter this screen by accident, exit
by touching Back you will return to the
Options Menu.
How to Change Monitor Options
3. US I NG T H E Mon itor
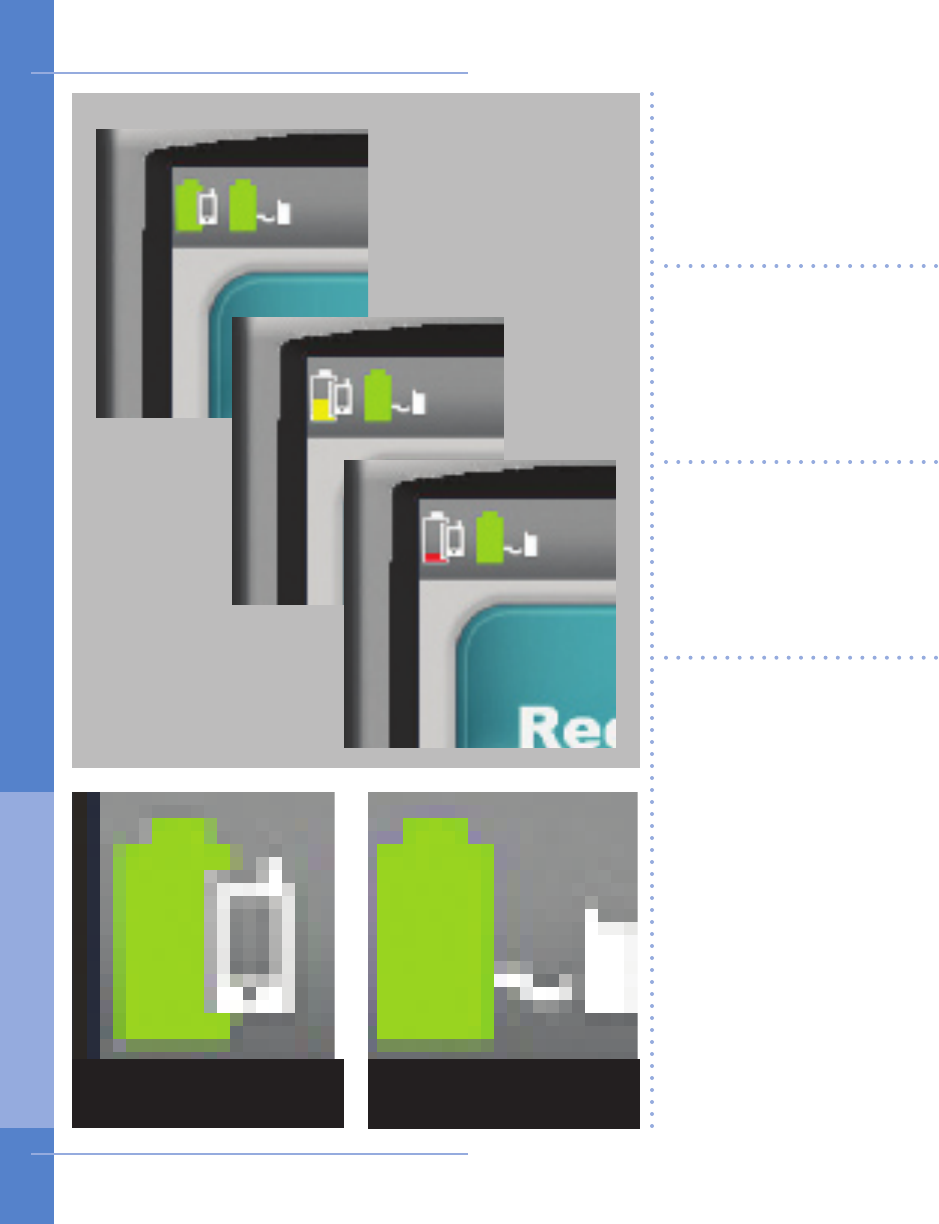
A battery icon that is lled
with a green color indicates
your monitor and / or
sensor have full power.
A battery icon that is
partially filled with a
yellow color indicates a
low battery in either your
monitor or sensor.
A battery icon that is
minimally lled with a red
color indicates either your
monitor or sensor battery
is empty.
The monitor’s rechargeable
battery provides 16 hours
of use for every 4 hours of
recharging.
The sensor AA battery
should be replaced at the
same time every day.
If your monitor or sensor
battery icon are red in
color you, should recharge
or replace the battery
immediately.
36 Using the Monitor
Monitor
Battery Icon
Sensor
Battery Icon
How to Check Battery Power
3. US I NG T H E Mon itor
Using the Monitor 37
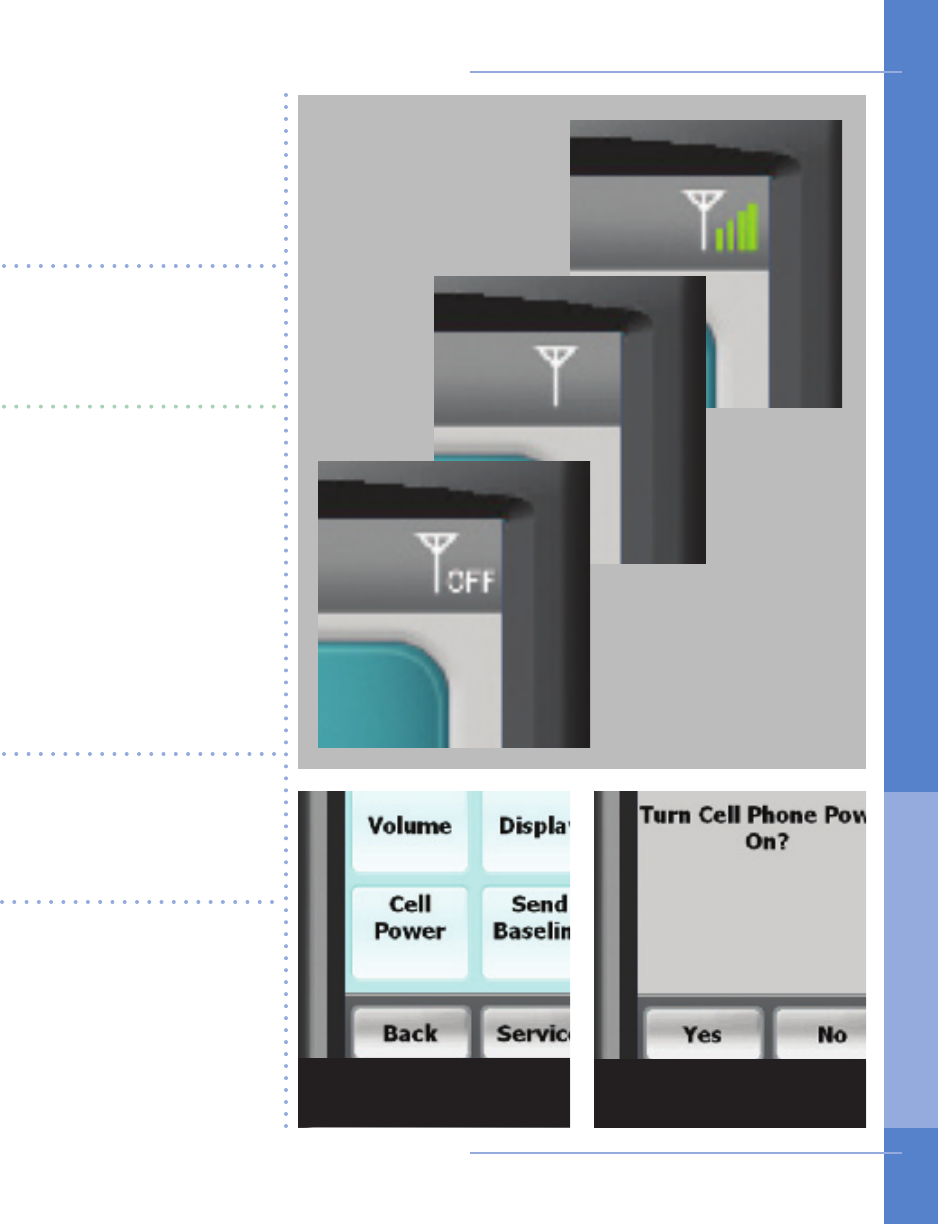
Four green bars located to
the right of the cell icon
indicate a very strong cell
signal.
No bars to the right of the
cell icon indicates no cel-
lular signal.
The word OFF to the right
of the cell signal indicates
your cell phone has been
turned off. To turn back
on, touch the Options
button on the Main Menu,
select Cell Power, then
select Yes. Please re-
member, the cell phone
off feature is only for use
when ying.
You can’t change your
cell strength unless you
change your current loca-
tion.
If the icon indicates no
cellular coverage and the
monitor is not in the base,
your data will be stored
until the monitor has a
cellular connection or is
placed in the base. Options Menu Yes for Cell Power
How to Check Cell Phone Coverage
3. US I NG T H E Mon itor
About Text Messages
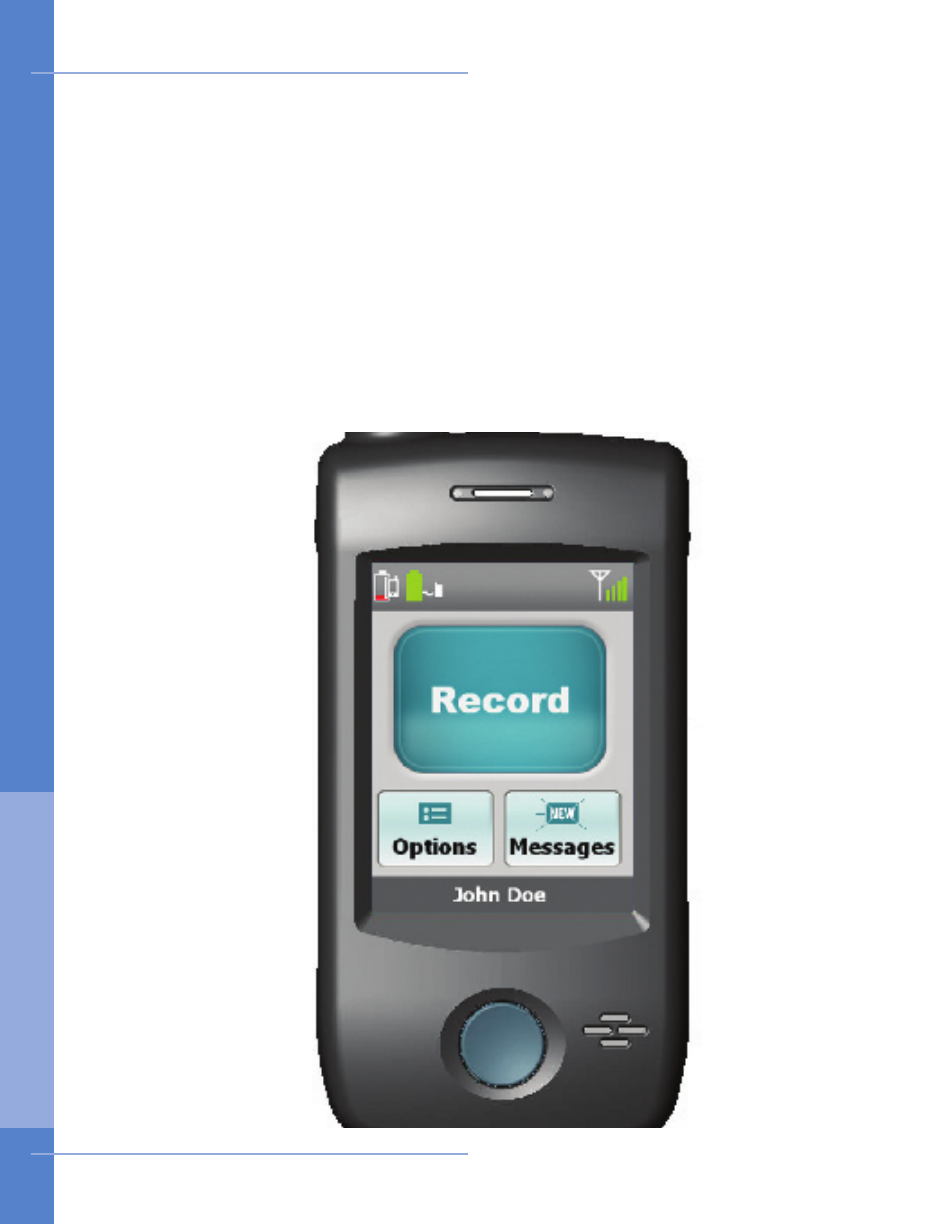
There are times when CardioNet may want to send you a message regarding your
monitoring. If you see the blue envelope on the Messages button with the word
“NEW” blinking on it, you have received a text message. In order to read the mes-
sage, touch the Messages button and your message will appear on the screen.
When you are done reading and responding to the message, touch OK to return
to the Main Menu. The blue envelope will remain on the button and you can read
your message again at any time by pressing the button. If you receive another
message, the word “NEW” will appear and blink on your envelope. You will need
to touch the button again to read your new message.
38 Using the Monitor
Receiving Messages From CardioNet
3. US I NG T H E Mon itor
31 2
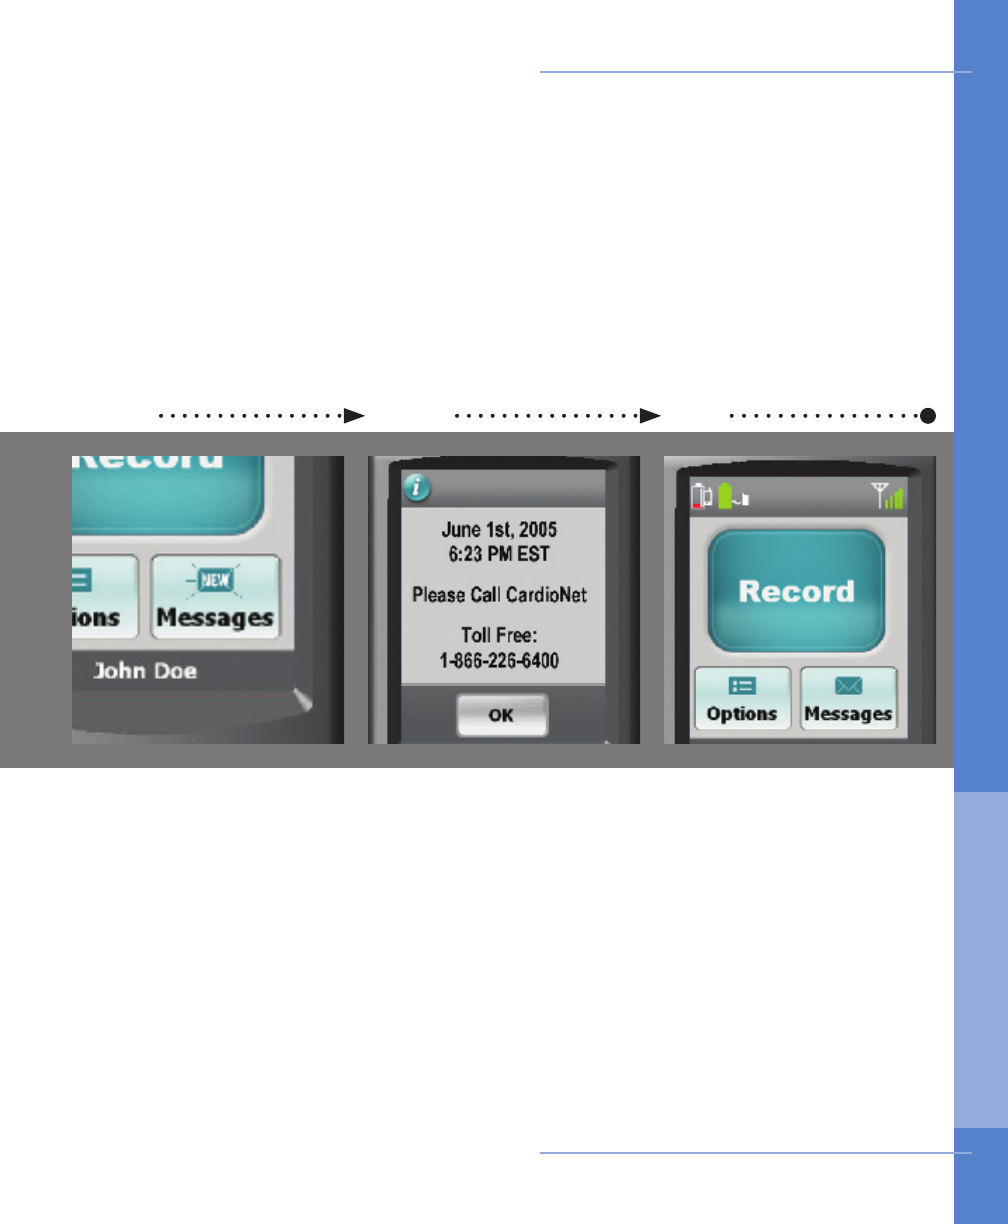
Ensure the monitor is on
and awake.
If you have received a new
text message, an envelope
will blink “NEW”.
From the Main Menu, touch
the “Messages” button
located at the bottom right
corner of the screen.
The envelope icon no
longer reads “NEW”. You
can regain access to the
text message by touching
the “Messages” button.
If you receive another text
message, the envelope
icon will change and blink
“NEW” again.
The date and time the text
message was sent to you
is displayed.
Read the text message
and follow any instructions
provided.
When you have nished,
touch OK to return to the
Main Menu.
Touch Messages button Read text message Return to Main Menu
Using the Monitor 39
How to Read a Text Message
3. US I NG T H E Mon itor

4
SENSOR CARE
In this Chapter:
• Tips for Changing Electrode Pads
• How to Change Electrodes and Attach Sensor
• Remove Before Showering or Bathing
• How to Change the Sensor AA Battery