Cardo Systems AWHS01 Bluetooth Headset User Manual Manual avi fh9
Cardo Systems, Inc. Bluetooth Headset Manual avi fh9
Manual

CARDO SYSTEMS INC.
Headset Manual
Version 2.1
™
1. Introduction…………………………….........................................................
Features..............................................................................................................
Comfort/Style…………………………..................................................................
2. Safety………………………….............................................................................
3. Package Contents………………………........................................................
4. Before Using………………………………......................................................
4.1 Charging Batteries..................................................................................
5. Getting Started with the allways™ Headset......................................................
5.1 Turn on/off....................................................................................................
5.2 Pairing...........................................................................................................
5.3 Linking Headset to Paired Phone..................................................................
5.4 Wearing the Headset....................................................................................
5.4.1 EAR-CLIP: Attaching the ear clip to the Headset...................................
Fitting the ear clip with the Headset to the ear.........................................
5.4.2 EYE-GLASS CLIP: Attaching the eyeglass clip to the Headset..................
Fitting the eyeglass clip to the Eye- or Sunglasses...............................
6. Handling Calls with the allways™ Headset....................................................
6.1 Answering Calls......................................................................................
6.2 Placing Calls...............................................................................................
6.3 Ending Calls...............................................................................................
6.4 Voice Dialing...............................................................................................
6.6 Volume Control...........................................................................................
6.7 Mute/Set.....................................................................................................
6.8 Transfer audio from Headset to phone or from phone to Headset..........
7. Reading Indicators of the Headset.................................................................
7.1 Visual............................................................................................................
7.2 Audio..........................................................................................................
7.3 Explanatory Chart.........................................................................................
8. Using/Getting Started with the allways™ BT Adapter & Headset.................
9. Handling Calls with the allways™ BT Adapter & Headset.............................
9.1 Normal Mode...................................................................................
10. Reading Indicators with the allways™ BT Adapter & Headset........................
11. FAQ’s.........................................................................................................
12. Limited Warranty..........................................................................................
TABLE OF CONTENTS
4
4
5
6
7
9
10
10
11
11
12
12
12
13
14
14
14
15
15
15
16
16
16
16
17
18
18
18
18
19
21
22
24
25
27
13. Troubleshooting..........................................................................................
14. Technical Specifications..............................................................................
15. FCC Notice.................................................................................................
16. European CE Notice..........................................................................................
17. Industry Canada Notice............................................................................
18. CONTACT INFORMATION.............................................................................
19. SERVICE………………………………………….........................................
20. TRADEMARK …………..............…………...............................................
30
32
33
33
33
33
33
34

1. Introduction
Congratulations and thank you for
purchasing allways™, the latest
technology in mobile phone accessories
and the most complete state-of-the-art
technology in Bluetooth™ wireless hands-
free cellular Headsets. You can now talk
hands-free on your Bluetooth‘ enabled
mobile phone, made possible by the short-
range wireless connection between your
cell phone or smart PDA and your allways‘
Headset. In case you prefer to use a
standard mobile phone which has no built-
in Bluetooth™ technology, you can still
enjoy the Headset’s advantages by
connecting our BT Adapter to your mobile
phone˙ (enables non-Bluetooth™ cell
phones to become interoperable with the
Bluetooth™ technology of our allways™
Headset),
Whenever this manual refers to both
Headset and Adapter, the term
“product(s)” is used. Otherwise, the
manual refers specifically to each device.
You will become accustomed to operating
and wearing your allways™ Headset by
reading this manual. For our customers
who have also purchased the BT Adapter,
this manual will also describe the necessary
operating instructions in section 8.
Features
The following is a list of the features
offered by your allways™ hands free
cellular Headset:
• No wires needed to connect your
Headset to your mobile phone.
• Lightweight and comfortable to use and
wear. The allways‘ Headset weighs less
than 3/4 of an ounce (18 grams).
• Clear reception and good quality sound.
• Extended talk time of up to 6 hours and
up to 120 hours standby time.
• While using your Headset you may be
up to 30 feet or 10 meters apart from
Overview
allways™ Headset Manual Guide
4 †Headset Manual

your phone.
• Adjustable Eye/Sun glass clip or flexible
ear loop allow you to wear your Headset
on the right or left side.
• Rechargeable high-capacity Li-Polymer
batteries.
• If you have purchased our universal BT
Adapter you will find that its 2.5mm
Headset jack works with most mobile
phones.
Additional Headset Features:
• Calls can be answered and terminated
from either the Headset or from your
mobile phone.
• Calls can be initiated from your mobile
phone; audio will be heard on the Headset.
• The Headset supports voice dialing with
phones equipped with this feature.
• The allways‘ Headset allows transfer of
audio from the Headset to the phone and
vice versa.
• 1-year Limited Warranty.
Overview
Headset Manual 5
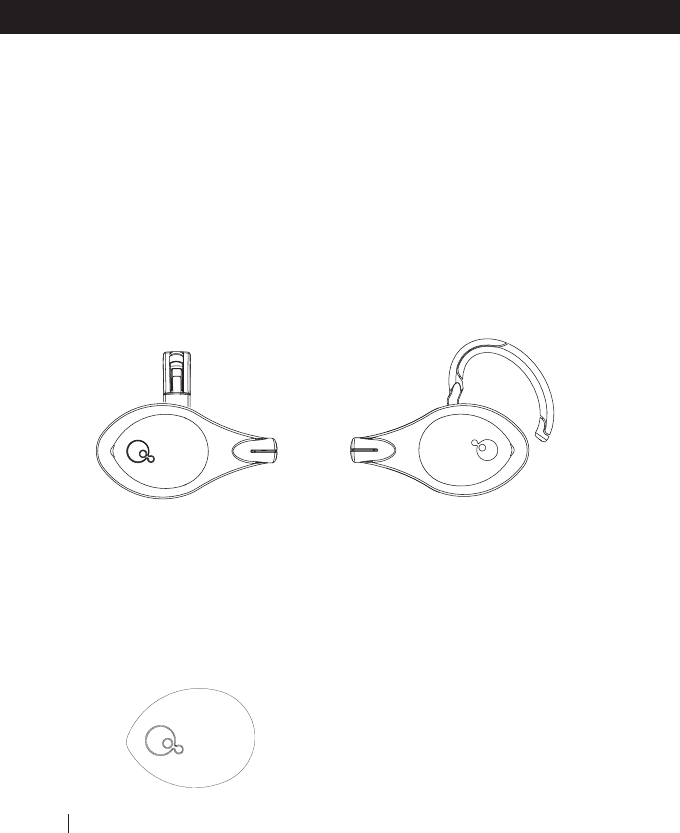
Comfort and Style
Your allways™ Headset has several unique
features, some of which are patent
protected and cannot be found in other
Bluetooth™ Headsets, e.g. our proprietary
mechanism to attach the Headset either
to your Eye/Sun-glasses or loop it around
your ear.
In a matter of seconds you can replace
the eyeglass-clip with the ear-loop and
vice versa.
• Exchangeable designer panels.
You can change the appearance of your
Headset by replacing its color panels with
a design of your choice. The box contains
three alternative default panels (one of
which is already attached to the Headset).
Additional designer panels can be
purchased separately.
• Background noise cancellation and
Mute button
To add convenience and privacy when
handling calls, your allways™ Headset is
equipped with a mute button. Quality
sound and background noise cancellation
are provided by advanced circuit design
and a high-quality unidirectional
microphone, embedded in a very short
boom. In addition, all audio passing
through the microphone is being filtered
to allow transfer only of signals in the
desired frequency band.
Overview
6 †Headset Manual

2. Important Safety Information
Please maintain basic safety precautions
when using your hands free cellular
Headset. This will reduce the risks of fire,
electric shock and injury to users. Among
others you should comply with the
following recommendations:
1. Carefully read and understand the
instructions in this manual.
2. Follow all instructions and warnings
labeled and marked in this manual.
3. Use a damp cloth to clean your Headset
or the BT Adapter. DO NOT use liquid or
aerosol cleaners.
4. Use caution when using your Headset
near water such as bathtubs, kitchen sinks
or swimming pools.
5. Do not expose you Headset or Adapter
to extreme temperature, moisture or high
voltage.
6. Your Headset and Adapter are rugged,
but can be damaged or broken if not
handled with care.
7. Do not spill liquids in or place heavy
objects on the allways™ Headset or
Adapter.
8. Use your personal carry box to protect
your Headset.
9. Do not disassemble the product or any
of its components for any reason. Do not
open the product’s casing, as this will void
the warranty and may damage the
electronic circuits. If assistance is needed,
contact the store from which you have
purchased the product or contact us via
e-mail at:
techsupport@allwayscardo.com
To reach us via phone, please call:
In the USA and Canada toll-free 1-800
488-0363 or 412 788-4533
In Europe: +49 89 4445-1513
For additional Service Centers near you,
please visit our website at
http://www.allwayscardo.com/
techsupport
Note: Prior to contacting us, make sure
you have a valid warranty card available.
9. Discontinue the use of your Headset
if:
a. Your Headset is damaged.
b. Liquid has been spilled on or into the
Headset.
c. Your Headset has been dropped and
the case has been damaged.
d. Your Headset exhibits a distinct change
in performance.
e. Your Headset does not operate normally
and adjusting the controls does not resolve
the issue.
10. Unplug your Bluetooth‘ Adapter unit
from your mobile phone if:
a. The Adapter unit is damaged.
b. Liquid has been spilled into the Adapter
or your mobile phone.
c. The Adapter is not operating normally
after following the instructions to pair it
with your mobile phone or the on/off,
volume controls or other functions do not
operate properly.
d. You have dropped and damaged the
Adapter’s casing
e. The Adapter exhibits a change in
Overview
Headset Manual 7

performance.
11. Unplug your Wall Charger from the
Headset or Adapter if:
a. Either the cord or the Audio Connector
have been damaged.
b. Liquid has been spilled into the charger,
Adapter, Headset or mobile phone.
c. The Wall Charger does not operate
normally after following the operating
instructions.
d. Your Wall Charger has been dropped
and the case has been damaged.
e. The Wall Charger exhibits a change in
performance.
Automobile Travel
Please be mindful that certain activities
such as automobile travel require your
complete attention and concentration.
Check the rules and regulations regarding
the use of wireless Headsets in the area
where you drive and obey the laws at all
times. Pull to the side of the road and
park before making or answering a call if
driving conditions require it. Do not initiate
calls, perform pairing, linking or similar
operations while driving.
Most electronic equipment is shielded
from RF signals. However, certain electronic
equipment may not be shielded against
the RF signals emanating from your
wireless equipment.
Pacemakers
The Health Industry Manufacturers
Association recommends that a minimum
separation of about 16 cm or 6.0 inches
to be maintained between a mobile phone
or a Headset and a pacemaker to avoid
potential interference with the pacemaker.
Be sure not to interfere with the
functionality of personal medical devices.
Hearing Aids
Some digital Headsets may interfere with
some hearing aids. In the event of such
interference, you should consult your
hearing aid manufacturer to discuss
alternatives.
Other Medical Devices
If you use any other personal medical
device, consult the manufacturer of your
device and/or your doctor to determine
if it is adequately shielded from inter-
ference from external RF energy. Your
physician may be able to assist you in
obtaining this information.
Overview
8 †Headset Manual
User Manual – allwaysTM Headset
CAUTION
RISK OF EXPLOSION IF BATTERY IS REPLACED BY AN INCORRECT TYPE
DISPOSE OF USED BATTERIES ACCORDING TO THE INSTRUCTIONS.
ALERTE
Risque d'explosion si la batterie est remplacée par un model qui ne convient pas. Il faut traiter les
batteries usées selon les instructions
NOTE: This equipment has been tested and found to comply with the limits for a Class
B digital device, pursuant to part 15 of the FCC Rules. These limits are designed to provide
reasonable protection against harmful interference in a residential installation.
This equipment generates, uses and can radiate radio frequency energy and, if not installed
and used in accordance with the instructions, may cause harmful interference to radio
communications. However, there is no guarantee that interference will not occur
in a particular installation. If this equipment does cause harmful interference to
radio or television reception, which can be determined by turning the equipment off and
on, the user is encouraged to try to correct the interference by one or more of the following
measures:
—Reorient or relocate the receiving antenna.
—Increase the separation between the equipment and receiver.
—Connect the equipment into an outlet on a circuit different from that to which the receiver is connected.
—Consult the dealer or an experienced radio/ TV technician for help.
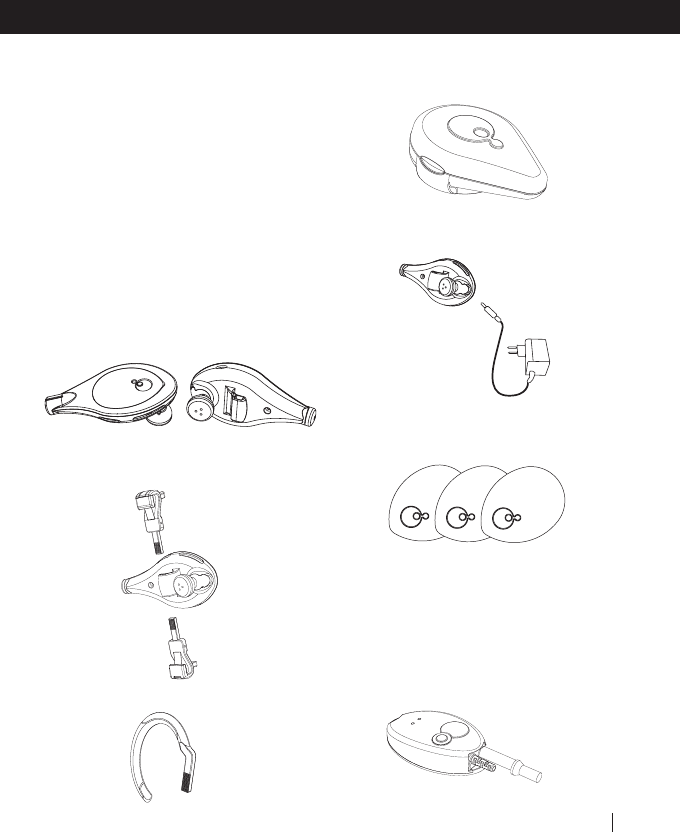
3. Package Contents
Your Headset is offered in two alternative
sets:
Set 1 for users who intend to connect the
Headset to a Bluetooth equipped phone
Set 2 for users with a non-Bluetooth
mobile phone who have also purchased
our universal BT Adapter. Components h)
and i) are included only in Set 2.
a. allways™ Headset
b. Eye/Sun-glass clip
c. Ear loop
d Personal carrying case
e. Wall charging unit
f. 3 exchangeable designer panels
(including the one on the Headset)
g) Manual and Warranty Card;
h) Optional BT Adapter* (separately
purchased);
Overview
Headset Manual 9
i) 2 Velcro pads to attach the Adapter
to your mobile phone
* The Adapter’s 2.5 mm jack works with
most mobile phones, but if your mobile
phone uses a different socket, you will
have to purchase the suitable mechanical
Audio Connector. Such Audio Connectors
can either be ordered directly from Cardo
Systems, Inc. or from appropriate retail
stores.
4. Before Using
Read and familiarize yourself with all
instructions and components of your
allways™ Headset prior to use and in
particular before driving. Safety first!!!
4.1 Charging Batteries
Make sure the equipment (Headset and/or
Adapter) is fully charged prior to initial
use. Allow 4 hours for a full charge before
using for the first time. Thereafter, it will
require approximately 2-3 hours to
complete a full charge.
Charge the Headset (and if applicable the
Adapter unit) using the included charger
by plugging into a standard 110/220V-
wall socket. You must fully charge your
equipment prior to initial use
(approximately 2.5 hours for a full charge).
The light indicator will remain red until
your allways™ Headset or Adapter is fully
charged; when fully charged, the light
indicator will turn to steady blue. You may
also leave the unit connected after
completion as there is no risk of damage
to the battery as a result of overcharging.
Note: For customers who have purchased
the Headset and the BT Adapter, the wall
charger will have a bifurcated cord to
supply simultaneous charge for both
devices.
Overview
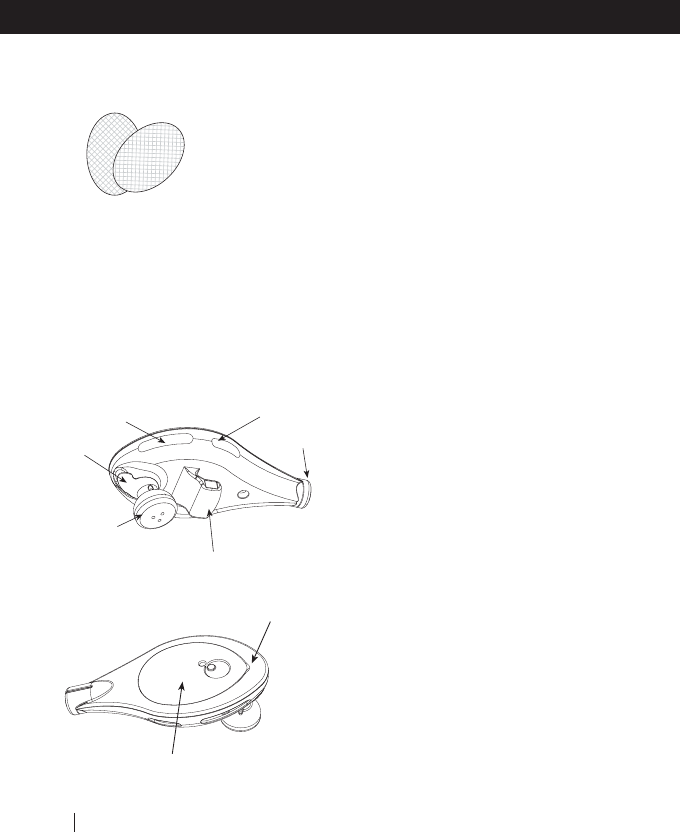
10 †Headset Manual
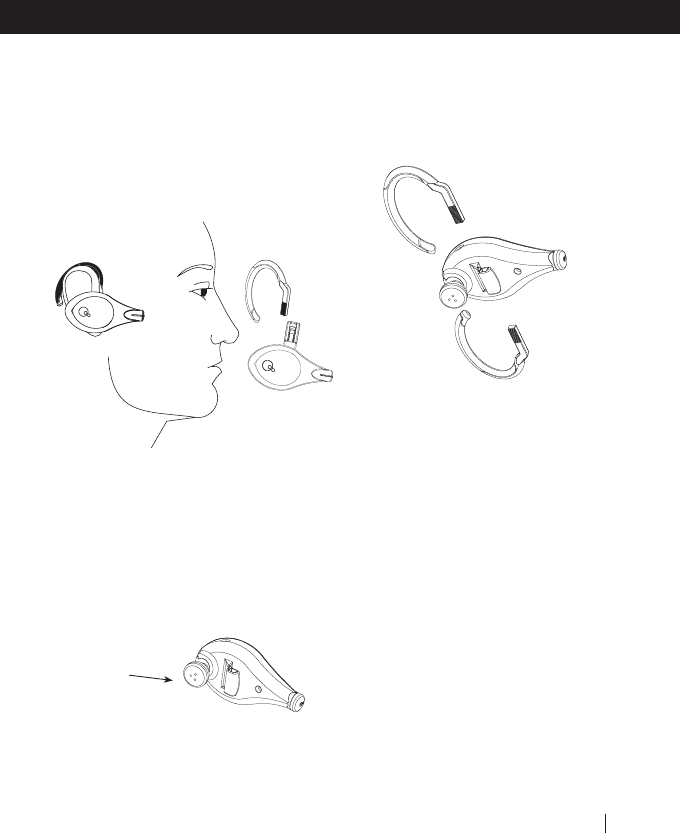
Holding Duct
Light Indicator
Set/Mute button
Volume Control
Front Panel/Control Button (CTRL)
Charging
Socket
(here shown
withclosed
lid)
Microphone
Pointed tip to
exchange color
panel
Speaker

5.Getting Started with the
allways™ Headset
Turn On/Off
Press and hold the CONTROL button
(CTRL) for at least 3 seconds until the blue
light indicator flashes and an alert tone is
heard. Release the button. If you have not
completed pairing, and this is the first
time you have turned ON the Headset,
the blue light indicator will start flashing
rapidly (2 times per second), indicating
that the device is in pairing mode. Please
read the pairing mode instructions below
for more details.
If the Headset is already paired, the blue
light indicator will start flashing slowly
(one flash every 5 seconds), indicating
that the device is in standby mode. To
turn off, press and hold the CTRL button
for at least 3 seconds until the red light
indicator flashes and an alert tone is heard.
Quickly release the button.
Pairing
Pairing is a required process in which the
allways™ Headset and your Bluetooth™
enabled mobile phone become acquainted
with each other for the first time. At the
end of this process both devices retain
information about each other, so that
every time you turn one of them on, it
will look for the other device and will be
able to operate automatically with it.
Pairing is required only the first time for
a specific allways™ Headset and a specific
mobile phone. Please refer to the Pairing
section of your mobile phone’s manual
prior to initiating the process.
Perform Pairing
1. Turn on the Headset and mobile phone.
2. Press and hold the CTRL button of the
Headset for at least 8 seconds until the
blue light indicator light starts flashing
rapidly (3 flashes per second). Release the
button.
NOTE: While pressing the CTRL button,
the red light indicator will flash after 3
seconds. Do not release the button yet;
wait for the blue light indicator to flash.
• Activate the Bluetooth‘ function on your
phone and initiate the search mode for
other Bluetooth‘ devices or Headsets.
Your phone should now find the allways™
Headset and the name "All Ways" should
appear on your screen.
• When prompted, select the allways‘
Headset and enter 0000 as the PIN code
(4 zeros) on your phone’s keypad.
• If successful, your allways™ Headset
should start blinking in blue every 5
seconds (slow blinking).
Congratulations! You have now
successfully completed your Bluetooth‘
pairing process and are able to use your
allways™ Headset in conjunction with
your mobile phone.
Getting Started
Headset Manual 11
5.3 Linking the allways™ Headset to
a paired phone
Although you may have previously paired
your Headset to your phone, each time
you turn one of them off, you may need
to reestablish the link. Linking may also
be necessary when your Headset and
phone have lost the radio signal because
the distance between them is greater than
30 feet or 10 meters. After you have
turned on your Headset and mobile
phone, there are three methods to
reestablish the link:
• With some mobile phones you need to
re-establish the link to your Headset by
using your phone’s menu. Please refer to
your mobile phone manual for operating
instructions.
• Assuming your mobile phone enables
voice activation, press briefly the CTRL
button on your allways™ Headset. This
will activate your voice dial function on
the phone, indicating that the link is
established.
• Do nothing. Once a call is received,
answer by pressing the CTRL button.
Note: Most available Bluetooth™ phones
still do not support this method.
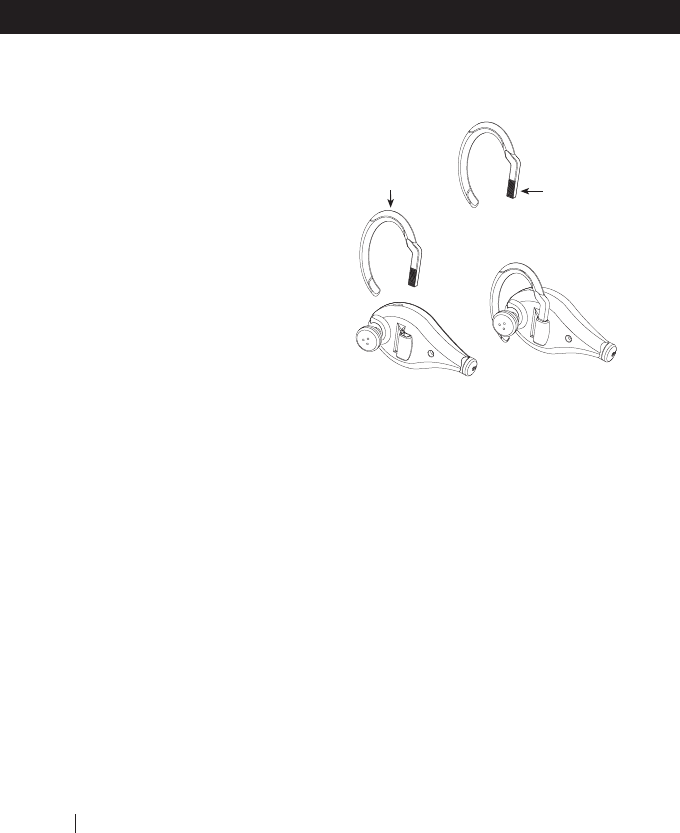
5.4 Wearing the Headset
Using the ear-loop
FIG. a
Because every user has a differently shaped
ear, it is important to initially adjust the
ear loop's curvature to comfortably fit
your particular ergonomic preference. The
ear loop is flexible but retains a rigid and
stable posture after adjustment. Thus, you
may chose to adjust the loop as a close
fit around the ear, or you may prefer a
more loose application. You may even
need to adjust the ear-loop's exact
curvature several times until you find the
most comfortable shape, so that the
speaker hovers exactly above the ear
channel. Some users find it convenient to
straighten the loop entirely and bend it
around the ear every time they put on the
device.
curving ratchet
Getting Started
12 †Headset Manual
• Insert the ear loop ratchet into the
holding duct on the back of the Headset
(Fig a.)
• Determine the height of the loop by
adjusting the depth to which you insert
the ratchet into the holding duct (FIG. a).
with the objective to insert speaker into
the outer part of your ear channel.
(Fig b and c.)
.
• Hold the headset as shown in FIG.b and
push with your pointing finger against
the flexible curvature to create an opening
between ear-loop and speaker as shown
in FIG c. While continuing to push against
the curvature
• place the ear-loop around your ear as
shown in FIG d. and fasten it to achieve
a steady and comfortable grip.
• Insert the speaker into the ear, just as
deep as you feel comfortable with.
Alternatively, you may also choose to bend
open the loop and then strap it around
your ear until you accomplish a
comfortable fit as shown in FIG. e and f.
FIG. g
• You can wear the Headset on the left
of the right side of your head by inserting
the ratchet accordingly (FIG g).
Note: The location of the control buttons
changes relative to the side of the head you
have chosen to wear the Headset. If you use
your left ear, the volume and Mute/Set buttons
will be on the bottom part of the Headset.If
you use your right ear, the volume and Mute/Set
buttons will be on the upper part of the Headset.
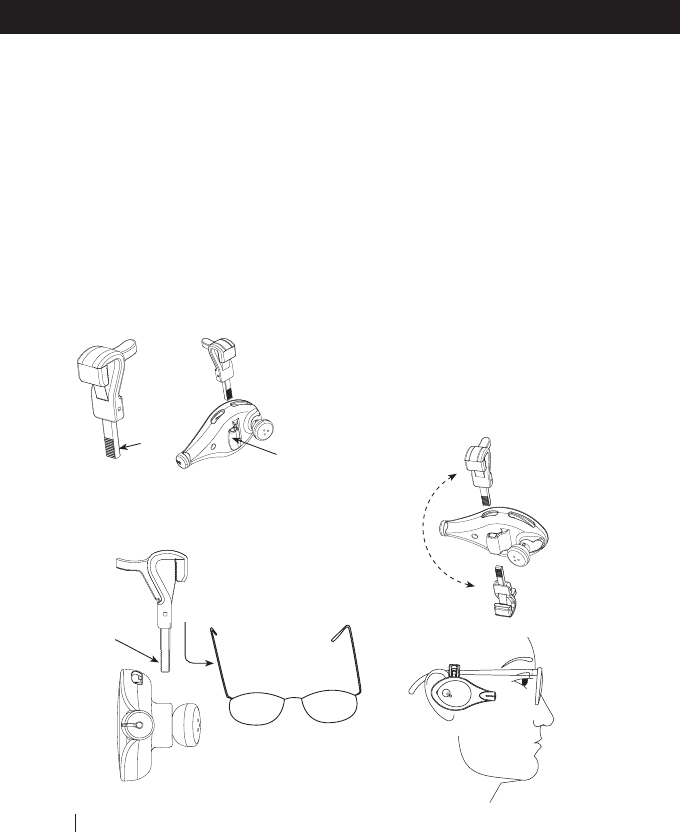
5.4.1 The Eye/Sun-glass attachment
The Eye/Sun-glass attachment (the "Clip")
fits a wide range of arms. The optimal
location to attach the Clip on the arm of
your Eye/Sun-glasses is where it positions
Speaker
Headset Manual 13
Getting Started
the Headset’s speaker so it protrudes
exactly into your the ear-channel.
5.4.2 The Eye/Sun-glass attachment
The position of the Eye/Sun-glass
attachment, or "Clip" should be fixed
on the arm of the glasses, so it allows the
Headset’s speaker to protrude slightly into
the ear-channel (FIG d).
• Insert the Clip’s ratchet into the holding
duct on the back of the Headset (FIG a)
FIG a
• Determine the height of the Headset
relative to the glasses by adjusting the
depth to which you insert the ratchet into
the holding duct (FIG a).
• Once you have inserted the Clip into
the holding duct, attach the entire Headset
by sliding the Clip from front to back
along the arm of the Eye/Sun-glasses until
the speaker hovers above the inner cavity
of your ear (FIG c). Then insert the speaker
slightly into the ear-channel to achieve a
comfortable fit.
Placing the Headset on the left or on
the right side
You can wear the Headset on the left or
the right side of your head by inserting
the ratchet accordingly (FIG b)
1. Insert ratchet
into holding
duct
2. Push lever and snap open Clip
onto the arm
3. Slide open clip
alongside the arm
Getting Started
14 †Headset Manual
ratchet
Holding duct
FIG b
FIG d
FIG c

Exchanging the color panels
It is easy to replace the color panel. Just
insert your fingernail or a pencil into the
small tri-angular opening at the pointed
tip of panel and pull it out gently. Then
press the chosen panel firmly over
opening.
Protecting the headset while not in
use
Your allways Headset is sturdy and reliable.
To protect it from scratches and similar
impacts while tossed among other objects
in your briefcase or pocket, you may want
to use our fashionable personal carry case.
The case is designed to allow storing the
Headset with ear-loop or Eye/Sun-glass
clip attached.
6. Handling Calls with the
allways™ Headset
6.1 Answering Calls
When your mobile phone is ringing you
will hear the ring tone either directly on
the Headset or from the phone. To answer
the call from the Headset, press briefly
the CTRL button.
Note: Wait several seconds after pressing
the CTRL button until you hear a sound
on the Headset. Pressing the CTRL button
again too soon might disconnect the call.
Alternatively you may answer the call by
using your mobile phone keys. Audio
connection between Headset and phone
will automatically be established. In some
mobile phone models the connection
might be slightly delayed.
6.2 Placing Calls
You can dial by using the mobile phone's
keys. If your mobile phone supports voice
activation, you may also place your call
accordingly as described in the Voice
Dialing section below. If you are initiating
a call by using the phone's keypad, your
call will most likely be automatically
transferred to the Headset.
NOTE: Some mobile phones need prior
configuration. Yet other phones may
require that you press the CTRL button
on the Headset after making the call, to
Getting Started
Headset Manual 15

transfer audio to the Headset. Besides trial
and error attempts, you may wish to visit
our website to find out how best to
configure your particular mobile phone.
6.3 Terminating Calls
To terminate a call, press briefly the CTRL
button. A sound will be heard, confirming
the disconnection. Wait at least three
seconds before you can press the CTRL
button again to place a new call.
Alternatively, you can terminate a call by
using the END key of your mobile phone.
Doing so, will automatically terminate the
audio connection between the Headset
and mobile phone. If the other party
terminates the call, no further action on
your part is required.
6.4 Voice Dialing
This feature is only available with mobile
phones equipped with voice activation
technology. To use voice activation you
must first assign voice tags to the desired
parties listed as your contacts in your
mobile phone (if you are not familiar with
this procedure, please refer to the manual
of your mobile phone).
While your phone is ON but no call is in
progress and the phone is not ringing,
press the CTRL button briefly and a short
beep will be heard. After the beep,
pronounce the name of the party you
wish to call and wait for feedback from
the phone. The type of feedback depends
on your phone (voice confirmation or no
confirmation).
6.5 Volume Control
You can adjust the volume on the
allways™ Headset by pressing the left or
right volume buttons to increase/decrease
volume. Every press - followed by a short
beep - changes the audio level. When
volume is at the maximum/minimum,
beeps are not heard. Continuous pressing
on the volume button will continuously
increase/decrease the volume.
6.7 Mute Function
While a call is in progress, press briefly
the MUTE/SET button. You will hear a
tone indicating that you are in Mute mode,
during which you continue to hear the
other party, but your voice will not be
heard on the other end. Press the
MUTE/SET button again to cancel Mute
mode.
Getting Started
16 †Headset Manual
Volume
Control
Mute/Set
Button

Getting Started
Headset Manual 17
6.8 Transfer audio from Headset to
phone or from phone to Headset
The allways‘ Headset allows transfer of
calls from the Headset to the phone and
vice versa. While a call is in progress use
your phone’s key pad (refer to your mobile
phone manual) to transfer audio and voice
from the phone to the Headset).
Alternatively, some phones transfer calls
to the Headset by pressing once the CTRL
button on the Headset.

Low Battery
allways™ is in pairing mode
allways™ is paired to a mobile phone. Same
indication is shown even if the other device is
turned off.
allways™ is being charged and battery is not
yet fully charged.
allways™ is connected to charger and battery
is fully charged.
Every depression of the Control button will
generate a brief sound to be heard on the
Headset.Every increase/decrease on the volume
button is followed by a short beep. If volume can
not be further increased/ decreased, no beeps will
be heard.
Indicates that Headset is being turned on
Indicates that Headset is being turned off
Two beeps are sounded when activating
Mute/Set option, i.e. the other party will not
hear you until you cancel Mute/Set.
The mobile phone releases ringing tones which
are transferred to the Headset. Different ringing
tones will be heard subject to the model and
setting of the mobile phone.
While performing voice dialing, the phone
prompts you by means of a sound, indicating
that you ought to pronounce the name of party
you wish to call. Please refer to your mobile
phone manual for more information.
7. Understanding the Indicators of the allways™ Headset
Visual Indicators
Light indicator blinks red and blue
(every 3-5 seconds)
Light indicator flashes rapidly in blue
Light indicator flashes slowly in blue
Light indicator shows steady red
Light indicator shows steady blue
Audio Signals from the Headset
Increasing tones
Decreasing tones
Two short beeps
Ringing tones
Other audio tones
VISUAL INDICTORS
18 †Headset Manual

This section is only applicable for
users who have purchased
theuniversal BT Adapter
8.Getting started with the
allways™ BT Adapter and Headset
Turning On/Off
Press and hold the CONTROL (CTRL)
button for at least 3 seconds until the
blue light indicator flashes and an alert
tone is heard. Release the button. If you
have not completed pairing and this is
the first time you have turned ON the
device, the blue light indicator will start
flashing rapidly (3 times per second),
indicating that the device is in pairing
mode. Please read the pairing mode
section 5.2 for further details.
If the device is already paired, the blue
light indicator will start flashing slowly
(one flash every 5 seconds), indicating that
the device is in standby mode.
To turn off, press and hold the CTRL button
for at least 3 seconds until the red light
indicator flashes and an alert tone is heard.
Release the button.
Pairing the Adapter and Headset
Pairing is a required process in which the
allways™ Headset and BT Adapter
become acquainted with each other for
the first time. At the end of this process
both devices retain information about
each other, so the next time you turn one
of them on, it will look for the other
device and will be able to operate
automatically with it. Pairing is required
only the first time for a specific allways™
Headset and BT Adapter.
Pairing Headset and BT Adapter
• Turn on the Headset and BT Adapter.
• Press and hold the CTRL button of the
Headset for at least 8 seconds until the
Blue light indicator starts flashing rapidly
(3 flashes per second). Release the button.
Note: As you press the CTRL button while
performing the above procedure you will
notice that the light indicator turns red
after 3 seconds. Do not release button
yet, and wait until the blue light indicator
flashes rapidly.
• Upon successful completion of the
procedure, your allways™ Headset & BT
Adapter should start blinking in blue every
5 seconds (slow blinking). Now, as your
pairing process is complete, you are able
to use your allways™ Headset in
conjunction with your BT Adapter.
Linking Headset to a Paired BT Adapter
If you have already paired your Headset
to a BT Adapter before and you have
subsequently lost radio link between the
units (due to distance in excess of 30 ft.
or 10m, or because either the Headset or
Headset Manual 19
Adapter

the BT Adapter was turned off), then you
should perform the following procedure
in the exact sequence as described:
Initially both devices should be turned off
• First: Turn on your allways™ Headset.
• Second: Turn on your allways™ BT
Adapter.
• Wait up to 20 seconds.
• Once the units have re-established
connection, your allways™ BT Adapter
will start blinking in blue every 5 seconds
(slow blinking). If the procedure has failed,
the BT Adapter will start blinking in red.
In such case, please turn off both devices
and perform the procedure again.
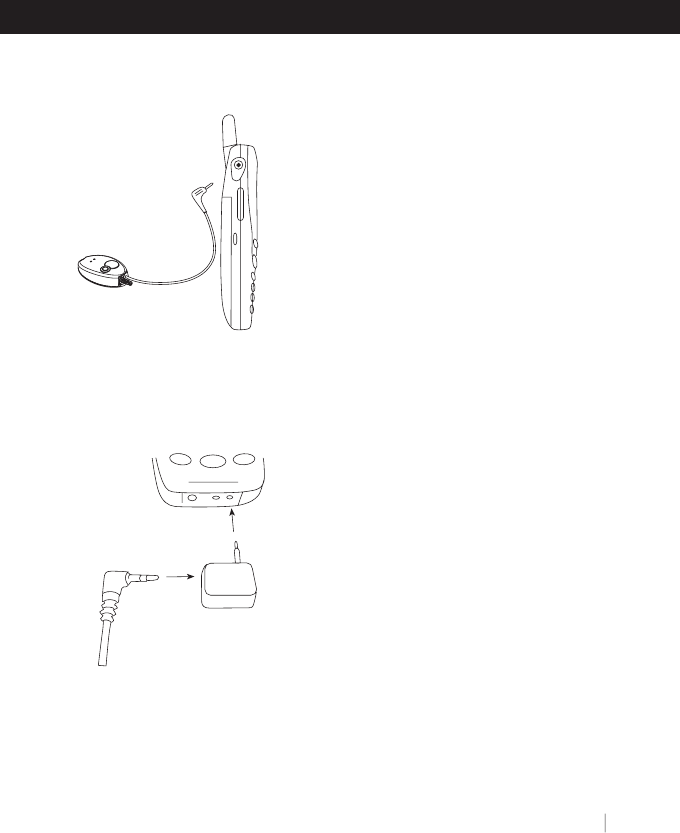
Connecting and setting the BT Adapter
to work with your Mobile Phone
Connect the allways™ BT Adapter to your
mobile phone by inserting the jack of the
Adapter’s cord into the appropriate audio
socket of your mobile phone. The cord’s
2.5 mm jack fits the sockets of most
mobile phones. However, if your mobile
phone uses a different socket, you will
have to purchase a suitable mechanical
Audio Connector. Such Audio Connectors
can either be ordered directly from Cardo
Systems, Inc. or be purchased at
appropriate retail stores (FIG b).
To obtain a reference list of vendors or to
order online, please visit:
http://www.allwayscardo.com/purchase
Note: Your BT Adapter can be configured
to work with almost every mobile phone
in the market. Its default configuration is
set to make it work with virtually all types
of mobile phones except for certain
NOKIA™ phones.
Important: It is imperative that you first
turn on the Adapter, then connect the
audio cable to the audio connector and
only thereafter insert the connector into
the mobile phone. If you do not follow
this sequence of steps, your setup is likely
to fail. If you have a Nokia model from
among the 51xx/61xx/62xx/63xx line, you
will require a 2.5 mm Audio Connector.
The male part of the Audio Connector
should be inserted into the socket of the
mobile phone, while the jack of the
Adapter is inserted into the Audio
Connector’s socket.
Note: For all Nokia models above you
need to press and hold the Mute/Set
button on the BT Adapter for 5 seconds
until red light Indicattor starts flashing in
once. To toggle between Nokia mode and
all other modes, press and hold the
Mute/Set button on the BT Adapter for 5
seconds. Thereafter the red light indicator
will flash once indicating that your device
in now in Nokia mode; two red flashes
indicate that you are set in the mode
suitable for other mobile phones.
20 †Headset Manual
Adapter
9. Handling calls with the
allways™ BT Adapter & Headset
FIG a
Receiving and placing calls
Two options for answering and placing
calls are supported by the allways™ BT
Adapter and Headset: Normal mode and
FIG b
Advanced mode. The default mode of
your Headset and BT Adapter is the
Normal mode, and handling of all calls
will be conducted as described below in
Section 9.1. For selected mobile phone
models, the Advanced mode can be set
(see more details in the Advance mode
section). If you are using the 2.5mm audio
Audio Connector for Nokia phones and
you have already set your BT Adapter as
described in chapter 8, your BT Adapter
is set to Advanced mode, and handling
of all calls will be conducted as described
below in Section 9.2.
9.1 Normal Mode
Each time you wish to use the Headset
you need to “connect” it to the mobile
phone by pressing briefly the CTRL button
on the Headset. To terminate the
connection you need to disconnect the
link by pressing again the CTRL button.
To answer calls, end calls, or perform voice
dialing, use the keypad of your phone.
Answering a Call
While the mobile phone is ringing, press
once the Headset's CTRL button to create
a link between the Headset and the mobile
BT Adapter. You should now hear the
ringing tone on the Headset. To answer
the call, press the appropriate SEND or
Talk button of your mobile phone.
Placing a Call
While the phone is not ringing and no
call is in progress, press once the Headset’s
CTRL button to create a link between
Headset and BT Adapter. Dial the desired
Adapter
Headset Manual 21

number using the mobile phone's keypad,
and press the SEND or Talk button of your
mobile phone.
Ending a Call
While a call is in progress, press the END
button of your mobile phone. To end the
link between the allways™ Headset and
BT Adapter, press the Headset’s CTRL
button, followed by a brief sound.
IMPORTANT: Terminating the link is very
important, because otherwise the batteries
of the Headset and the Adapter will be
drained. Even if the other party terminates
the call you still need to terminate the link
between Headset and BT Adapter by
pressing the Headset's CTRL button
followed by a brief decreasing tone.
Voice Dialing
While no call is in progress and the phone
is not ringing, press once the Headset’s
CTRL button to create a link between
Headset and BT Adapter. To perform voice
dialing, press the appropriate button on
you mobile phone. Voice dialing is a
feature supported by selected mobile phone
models. Please refer to your mobile phone
manual for more information. Some mobile
phones allow you to initiate voice dialing
by pressing the Headset’s MUTE/SET button.
TIP: Some mobile phones allow you to
answer calls from the Headset by pressing
the MUTE/SET button of your Headset.
Mute
The Mute feature is not supported in
NORMAL mode.
Adjusting the Volume
Press the left or right volume buttons to
increase/decrease volume. Every distinct
press adjusts the audio level further and
is followed by a short beep. When the
volume has reached the
maximum/minimum level, no further
beeps are heard. Continuous pressing on
the volume button will continuously
increase/decrease the volume.
Transferring Audio from Headset to
the mobile phone and vice versa
Connect or disconnect your Adapter from
your mobile phone (via audio jack). Do
not forget to terminate the link between
the allways™ Headset and BT Adapter by
pressing the Headset's CTRL button.
Terminating the link is very important,
because otherwise the battery charge of
your device will be significantly shortened.
9.1 ADVANCED MODE
This method is supported by certain phone
brands, such as Ericsson and Nokia and
others, but not by many other available
models. The Advanced mode is very
intuitive to operate and easy to use. Please
refer to our web site at:
www.allwayscardo.com/techsupport
to find out if you can set your BT Adapter
to the Advanced mode.
Adapter
22 †Headset Manual

Main Features
•Call can be answered and terminated
either from Headset or from phone.
Audio is heard from the Headset. The
link between the Adapter and the
Headset is closed automatically.
• Call can be initiated from the phone;
audio is heard from the Headset.
•Supports voice dialing with phones that
equipped accordingly.
Setting the Advanced mode
To set your Headset to the Advanced
mode, press and hold the Mute/Set button
on the Headset for 5 seconds until the
red light indicator starts flashing once. To
toggle between Normal and Advanced
mode, press & hold the Mute/Set button
on the Headset for 5 seconds again. When
the red light indicator flashes once, you
are in Advanced mode, two red flashes
indicate Normal mode. Each additional
pressure of the Mute/Set button toggles
between the two modes.
Answering a Call
When your mobile phone is ringing you
will hear the ring tone either directly on
the Headset or from the phone. To answer
the call from the Headset, press the CTRL
button briefly. IMPORTANT: After pressing
the CTRL button, wait a few seconds until
you hear a sound on the Headset. Pressing
the CTRL button briefly again will
disconnect the call. Alternatively you can
answer the call by using the keypad of
your mobile phone. Audio connection
between Headset and phone will
automatically be established.
Terminating a Call
To terminate a call, press briefly the CTRL
button. A sound will be heard, confirming
the disconnection. Wait at least three
seconds before you press the CTRL button
again. Alternatively, you can terminate a
call by using the keys of your mobile
phone. Audio connection between the
Headset and phone will automatically
be disconnected. No further action on
your part is required if the other party
terminates the call.
Voice Dialing / Initiating a Call
This feature is only available with mobile
phones equipped with voice activation
technology. To use voice activation you
must first assign voice tags to the desired
parties among your contacts (if you are
not familiar with this procedure, please
refer to the manual of your mobile phone).
While your phone is ON but idle and not
ringing, press briefly the CTRL button
followed by a short beep. After the beep,
pronounce the name of the party you
wish to call and wait for feedback from
the phone. The type of feedback depends
on your phone (voice confirmation or no
confirmation). Alternatively you can initiate
a call by using the keypad of your mobile
phone. Audio connection between
Adapter
Headset Manual 23

Headset and phone will automatically be
established.
Mute Mode
While a call is in progress, press briefly
the MUTE/SET button. You will hear a
tone indicating that you are in Mute mode,
during which you continue to hear the
other party, but your voice will not be
heard on the other end. Press the
MUTE/SET button again to cancel Mute
mode.
Volume Increase and Decrease
Press the volume buttons to increase/
decrease volume. Every distinct press
changes the audio level. Every increase/
decrease is followed by a short beep.
When the volume has reached the
maximum/minimum level, no further
beeps are heard. Continuous pressing on
the volume button will continuously
increase/decrease the volume.
Transferring audio from Headset to
phone and vice versa
If you disconnect your Adapter from your
mobile phone (by pulling the audio jack),
the link between the allways™ Headset
and BT Adapter will be automatically
disconnected.
10. Reading indicators with the
allways™ BT Adapter & Headset
Visual Indicators
Light Indicator flashes red and blue
(every 3-5 seconds)
Low Battery indicator
Blue Light Indicator flashes rapidly
allways™ device is in pairing mode
Light Indicator flashes slowly red and
blue
allways™ device is paired to another
device. Same indication is shown even if
the other device is turned off
Light Indicator is steady red
allways™ charging is in progress and not
yet completed
Blue steady Light Indicator
allways™ is connected to charger and
battery is fully charged
Red Light Indicator of BT Adapter flashes
BT Adapter failed to perform pairing
Audio Indicators (at Headset side only)
Short beeps
Every increase/decrease in volume is
followed by a short beep. If volume can
not be further increased/decreased, no
beeps will be heard.
Adapter
24 †Headset Manual

Increasing tones
Indicates that Headset is being turned on
Decreasing tones
Indicates that Headset is being turned off
Two short beeps Two beeps are sounded
when activating Mute option, i.e. the
other party will not hear you until you
press Mute again.
Ringing tones
The mobile phone releases ringing tones
which are transferred to the Headset.
Different ringing tones will be heard
subject to the model and setting of the
mobile phone.
11. FAQs
What is the Cardo allways™ Headset?
The allways™ wireless Headset is a
comfortable, stylish and easy to use
accessory to a Bluetooth™ mobile phone
or smart-PDA that enables you to hear
and speak without holding your mobile
phone near to your ear.
Do I need an Adapter if I already have a
Bluetooth™ enabled cell phone?
No. Your allways™ device communicates
with most Bluetooth™ phones.
How does the allways™ Headset work?
Once, the allways™ Headset is “paired”
to your Bluetooth™ enabled mobile
phone, the two devices communicate
wirelessly using Bluetooth™ technology.
If I want to keep my non-Bluetooth™
mobile phone, can I still use the allways™
wireless Headset with my mobile phone?
You can hold on to your non-Bluetooth™
mobile phone and still enjoy the benefits
of the allways™ Headset, if you also
purchase our Bluetooth Adapter. The
allways™ BT Adapter plugs directly into
the Headset jack of most non-Bluetooth™
phones, thereby enabling that phone to
communicate wirelessly with your
Headset. Some mobile phones require a
Audio Connector to provide the suitable
bridge between the Adapter and the audio
jack of your mobile phone (see section 8)
What is the difference between the
allways™ Headset and the allways™
Headset with the Adapter?
Bluetooth™ enabled phones do not require
an Adapter to communicate with the
allways™ Headset, while non-Bluetooth™
phones need the Adapter attached to the
non-Bluetooth phone.
Is it possible to pair my Bluetooth™ phone
with more than one allways™ Headset?
Yes, but not simultaneously. Once your
allways™ Headset is paired to one phone
or BT Adapter, these two devices are
specifically connected. If you wish your
Headset to be paired to another phone,
you need to perform pairing between the
allways™ Headset and that phone. Only
FAQs
Headset Manual 25

then will your Headset communicate with
that particular mobile phone.
Is the battery removable?
The battery is not removable and you
should never try to open the Headset. Let
only authorized Service Centers maintain
or service your device. Please refer to our
website for instructions at the end of your
battery life.
What if I am having trouble hearing?
The allways™ Headset comes with volume
control adjustable to suit your preferred
volume level.
i. What if I need more help?
Please access our website at :
www.allwayscardo.com/
Do I need to turn my Headset off when
it is recharging?
No. Your Headset will stay on during the
charging process. When the unit is
removed from the charger, it is auto-
matically turned off.
When I turn on my cell phone, do I
need to pair or link my cell phone and
Headset again?
Once your cell phone and allways™
Headset are paired, you will not have to
pair it again. You will only need to
implement the simple steps of linking your
cell phone and Headset each time either
or both are turned off or are moved more
than approximately 30 feet (10 meters)
from each other. Please to section 5.3 for
further details.
Will other Bluetooth™ phones
interfere with my allways™ Headset ?
Can they eavesdrop?
NO. Once you are paired, your identity is
known only to the mobile phone you use
and no other Bluetooth™ phone can hear
your audio signals.
Can allways™ cause interference with
my car radio?
No, the Bluetooth™ standard does not
interfere with car radios.
Can I wear allways™ in the rain?
Keep in mind that allways™ is not
waterproof.
Will allways™ work with more than
one Bluetooth™ phone?
Yes, your
allways™
Headset can be paired
with other Bluetooth™ phones, one at a
time.
Does the Headset terminate calls
without my involvement?
Yes, in one instance only: To avoid draining
of the battery in case you forgot to
terminate the call, the Headset will
terminate a call if the party you are talking
to does not speak or emit a sound during
twenty minutes.
FAQs
26 †Headset Manual

12. Limited warranty
Your
allways™
Headset is covered with a
One-Year Limited product warranty from
the date of original purchase. Please retain
the retail sales receipt for proof of purchase
date.
What this limited warranty covers and
for how long?
Cardo Systems, Inc. (the “Company”)
warrants the allways™ Headset, charger
and Adapter units against defects in
material and workmanship under normal
use and service for a period of one (1)
year from date of purchase (proof of
purchase and registration required).The
Company at its sole discretion, will at no
charge either repair, replace or refund the
purchase price of the product to the
original purchaser during the warranty
period, provided the product has not
been damaged or tampered with and has
been returned in accordance with the
terms of this warranty to an authorized
Company Repair Center. Repair, at the
Company’s option, may include the
replacement of parts, boards or batteries
with functionally equivalent reconditioned
or new parts.
Warranty Conditions
This express limited warranty is extended
by Cardo Systems, Inc. solely to the original
purchaser and is not assignable or
transferable to others. This is the complete
warranty for your allways™ Headset,
Adapter and charger. The Company
assumes no obligation or liability for
additions or modifications to this warranty
unless made in writing and signed by an
officer of Cardo Systems. Batteries are
warranted only if the battery capacity falls
below 70% of rated capacity or if the
battery develops leakage.
This warranty becomes void if:
a. any of the seals on the case or battery
are broken or device or battery show signs
of tampering.
b. The battery is used in equipment other
than the equipment for which it was
intended.
The Company disclaims all responsibility
for any equipment not furnished by Cardo
Systems Inc., which is attached to or used
in connection with the allways™ Headset
or Adapter. Furthermore, the Company is
not responsible for any damage to any
part of the allways™ Headset or Adapter
resulting from the use of ancillary
equipment not furnished by Cardo
Systems, Inc. for use with the Product.
What this warranty does not cover?
1. Defects or damage resulting from the
use of this product in other than its normal
and customary manner.
2. Defects or damage from misuse,
accident or neglect.
3. Defects caused by improper operation,
WARRANTY
Headset Manual 27

maintenance, installation, adjustment or
modification of any kind.
4. Products opened, disassembled or
repaired by non-authorized parties.
5. Defects or damage due to exposure to
excessive temperatures, adverse weather
conditions, external impacts or spills of
food or liquid.
6. All plastic surfaces and all other externally
exposed parts that are scratched or
damaged by customer.
WARRANTY SERVICE
To receive warranty service, your product
must be registered. Use either the attached
registration card or register online at
www.allwayscardo.com/registration.
Please present the product , alongf with
your registration number, bill of sale
(receipt) at any authorized Service Center
or at the store from which you have
purchased the product. Returns to the
Company pursuant to the limited warranty
can only be accepted with a Return
Authorizations number obtained from
Cardo’s customer service department.
GENERAL PROVISONS
This warranty is given in lieu of all other
express or implied warranties, including
without limitation, implied warranties of
merchantability and fitness for a particular
purpose. Cardo System’s obligations under
this section are limited to the duration of
this limited warranty.
a. Certain limited-life components that
are subject to normal wear and tear, such
as eyeglass clips, ear clips, decorative
finishes, batteries or other accessories, are
exempt from any warranty.
b. Cardo Systems, Inc. is not liable for any
incidental or consequential damages
arising from the use or misuse of any of
the Company’s products.
c. The user should never attempt to
perform service, adjustments or repairs of
the Product by him/herself. Doing so will
void all warranties. During the term of
the warranty, all products must be returned
to the point of purchase or the authorized
service center for all necessary work.
d. The Company is not responsible for
any loss or damage incurred during
shipping. All repair work on allways‘
products by parties not explicitly authorized
by the Company will void any and all
warranties.
e. The information in this Manual is
furnished strictly for informational
purposes and is subject to change without
notice. Cardo Systems, Inc. assumes no
liability or responsibility for any errors or
inaccuracies that may appear in this
Manual or Quick Guide.
Note: Look for appropriate displays as shown
below to verify that you are being serviced by
an Authorized Cardo Dealer or Service Center
Cardo Systems, Inc. retains the right to
amend and change its products, manuals
and specifications at any time without notice.
WARRANTY
28 †Headset Manual

STATE LAW RIGHTS
Some states do not allow the exclusion
or limitation of incidental or consequential
damages or limitations on how long an
implied warranty lasts. Therefore
depending on where you use the Headset,
certain of the above limitations or
exclusions may not apply to you. This
warranty gives you specific legal rights
and you may be entitled to other rights,
which vary from state to state.
Headset Manual 29
WARRANTY

Problem
Pairing fails
Can’t answer phone calls or
perform voice dialing (assuming
your mobile phone supports this
feature)
Battery does not provide 5-6
hours talk time.
Action
1. Turn off both devices IMPORTANT!
2. Turn on Headset
3. Activate pairing mode at Headset
4. Turn on mobile phone (and BT Adapter if used)
5. Activate pairing mode at mobile phone (and
BT Adapter if used)
6. When asked by mobile phone to replace existing
Headset, select YES.
1. Make sure your
allways™
Headset is turned
ON and in standby mode while the blue light
indicator flashes slowly.
2. Verify that the Bluetooth™ function on your
phone is set to ON.
3. Verify that the
allways™
Headset is the correctly
paired Headset to your mobile phone (refer to
phone manual)
4. Link the Headset to the phone as described
above
5. Check Definitions or Settings on your mobile
phone.
6. Perform pairing process and check again.
1. Make sure your allways™ Headset is fully
charged. Charging time is up to 3 hours for an
empty battery. When fully charged and charger
is connected to Headset, the light indicator emits
steady blue light.
2. When not wearing the
allways™
Headset,
make sure the CTRL button is not pressed.
3. When used with the BT Adapter in Normal
Mode, make sure you close the connection by
pressing the CTRL button after every call.
13. Troubleshooting
TROUBLESHOOTING
30 †Headset Manual

Problem
Light indicator does not light
steady (red or blue) when charger
is connected.
Call in progress terminates after
20 Minutes
Action
1. Make sure DC jack is firmly plugged in
2. Disconnect DC jack, wait a few seconds and
plug it back in.
1. There is a nearby interference signal
2. If you have a GSM phone and your Headset
is to close to phone (0-30 cm), noises may be
heard
3. Headset and mobile phone are more than
30ft (10m) apart or there are obstacles between
Headset and mobile phone (e.g. concrete walls
or similar)
4. If you have a GSM phone and you are using
BT Adapter attached it to your mobile phone,
place the Adapter on the back of the phone
in a position that the Light Indicators are at the
bottom side (see figure 16).
To avoid draining of the battery because
you forgot to terminate the call by pressing
the CTRL button, the Headset is set to
terminate a call after 20 minutes if the
party you are talking to does not speak or
emit a sound during twenty minutes.
TROUBLESHOOTING
Headset Manual 31

14. Technical Specifications
allways™ headset
Description Parameters
Technology Compliant with Bluetooth™ ver 1.1
Maximum power 2.5 dbm
Maximum link distance 30 feet or 10 meters
Typical talk time up to 6 hours
Typical standby time up to 130 hours
Typical charging time 2 hours
Power Source Li Polymer battery
Weight 0.6oz or 18gr
Approvals FCC Part 15, CE, cETLus, Bluetooth
allways‘ Adapter
Description Parameters
Phone Interface 2.5mm Audio Connector, (list other
Adapters)
Technology Compliance with Bluetooth™ ver 1.1
Maximum power 2.5 dbm
Maximum link distance 30 feet or 10 meters
Typical talk time 5-6 hours
Typical standby time 90-110 hours
Typical charging time 2 hours
Power Source Li Polymer battery
Weight 0.5oz or 15gr
Approvals FCC Part 15, CE, cETLus, Bluetooth™
Wall Charger 110/220 VOLT
Input Voltage 110 ~220 Volts AC Input
Output Voltage 9 Volts DC Output
Approvals cULus & CB
Note: Design and specifications are subject to change without notice
TECHNICAL SPECIFICATIONS
32 †Headset Manual

15. FCC Regulations
This equipment complies with Part 15 of
the FCC Rules. Operation is subject to
the following two conditions: (1) this
device may not cause harmful interference,
and (2) this device must accept any
interference received, including
interference that may cause undesired
operation.
Warning: Changes or modifications to
this unit not expressly approved by the
party responsible for compliance could
void the User’s authority to operate the
equipment. Use only approved batteries
and chargers. This equipment has been
tested and found to comply with Part 15
of the FCC rules. These limits are designed
to provide reasonable protection against
harmful interference in a residential
installation. This equipment generates and
can radiate radio frequency energy, and
if not installed and used in accordance
with the instructions, may cause harmful
interference to radio communications.
However, there is no guarantee that
interference will not occur in a particular
installation.
Your allways‘ Headset is designed to
operate at the maximum strength allowed
by the FCC. This means that your Headset
and or base unit can communicate only
over a certain distance subject on the
location of the cell phone, base unit and
Headset, your vehicle, the construction
and layout of your home or office.
Weather conditions can also affect
performance.
16. European CE Notice
17. Industry Canada Notice
18. Contact Information
Cardo Systems, Inc.,
100 High Tower Blvd., Pittsburgh, PA
15205 (USA)
www.allwayscardo.com
In the USA and Canada, call toll-free:
1 800 488-0363 or 412 788-4533,
Fax: 412 788-0270
In Europe, call: +49 (89) 4445-1513,
Fax: +49 (89) 404-817
19. Service
In the USA and Canada, call toll-free:
1 800 488-0363 or 412 788-4533
In Europe, call: +49 (89) 4445-1513
between Monday and Friday 08:30 –
17:00, Saturdays 10:00 – 13:00
Service is provided under limited warranty.
Cardo Systems, Inc. will only accept devices
returned in compliance with our Warranty
Provisions and submitted with a Return
Authorization Number issued by a Cardo
authorized service department. The
Company retains the right to return all
shipments not in compliance with our
Warranty Provisions.
TECHNICAL SPECIFICATIONS
Headset Manual 33

20. Patent, Copyright, Trademark Information
U.S. and Worldwide Patent Pending; © 2002 Cardo Systems Inc.; Made in China
Bluetooth‘ is a trademark owned by Bluetooth SIG, Inc., Ericsson is a trademark of
Ericsson, Inc. Motorola is a trademark of Motorola, Inc. Nokia is a trademark of the
Nokia Corporation. Samsung is a trademark of the Samsung Corporation. All other
trademarks are the property of their owners. allways‘ is a trademark owned by
Cardo Systems, Inc.
All rights reserved by Cardo Systems, Inc.
34 †Headset Manual
FAQs