Carnegie Robotics 00068 Platform Module User Manual 56091197a English indd
Carnegie Robotics LLC Platform Module 56091197a English indd
UserManual.wiki
>
Carnegie Robotics
>
00068 User Manual
>
Operator Manual Part 1
Contents
1.
Operator Manual Part 1
2.
Operator Manual Part 2
Operator Manual Part 1
Navigation menu
Upload a User Manual
Namespaces
Wiki Guide
HTML
PDF
Info
Views
User Manual
Discussion / Help
Navigation


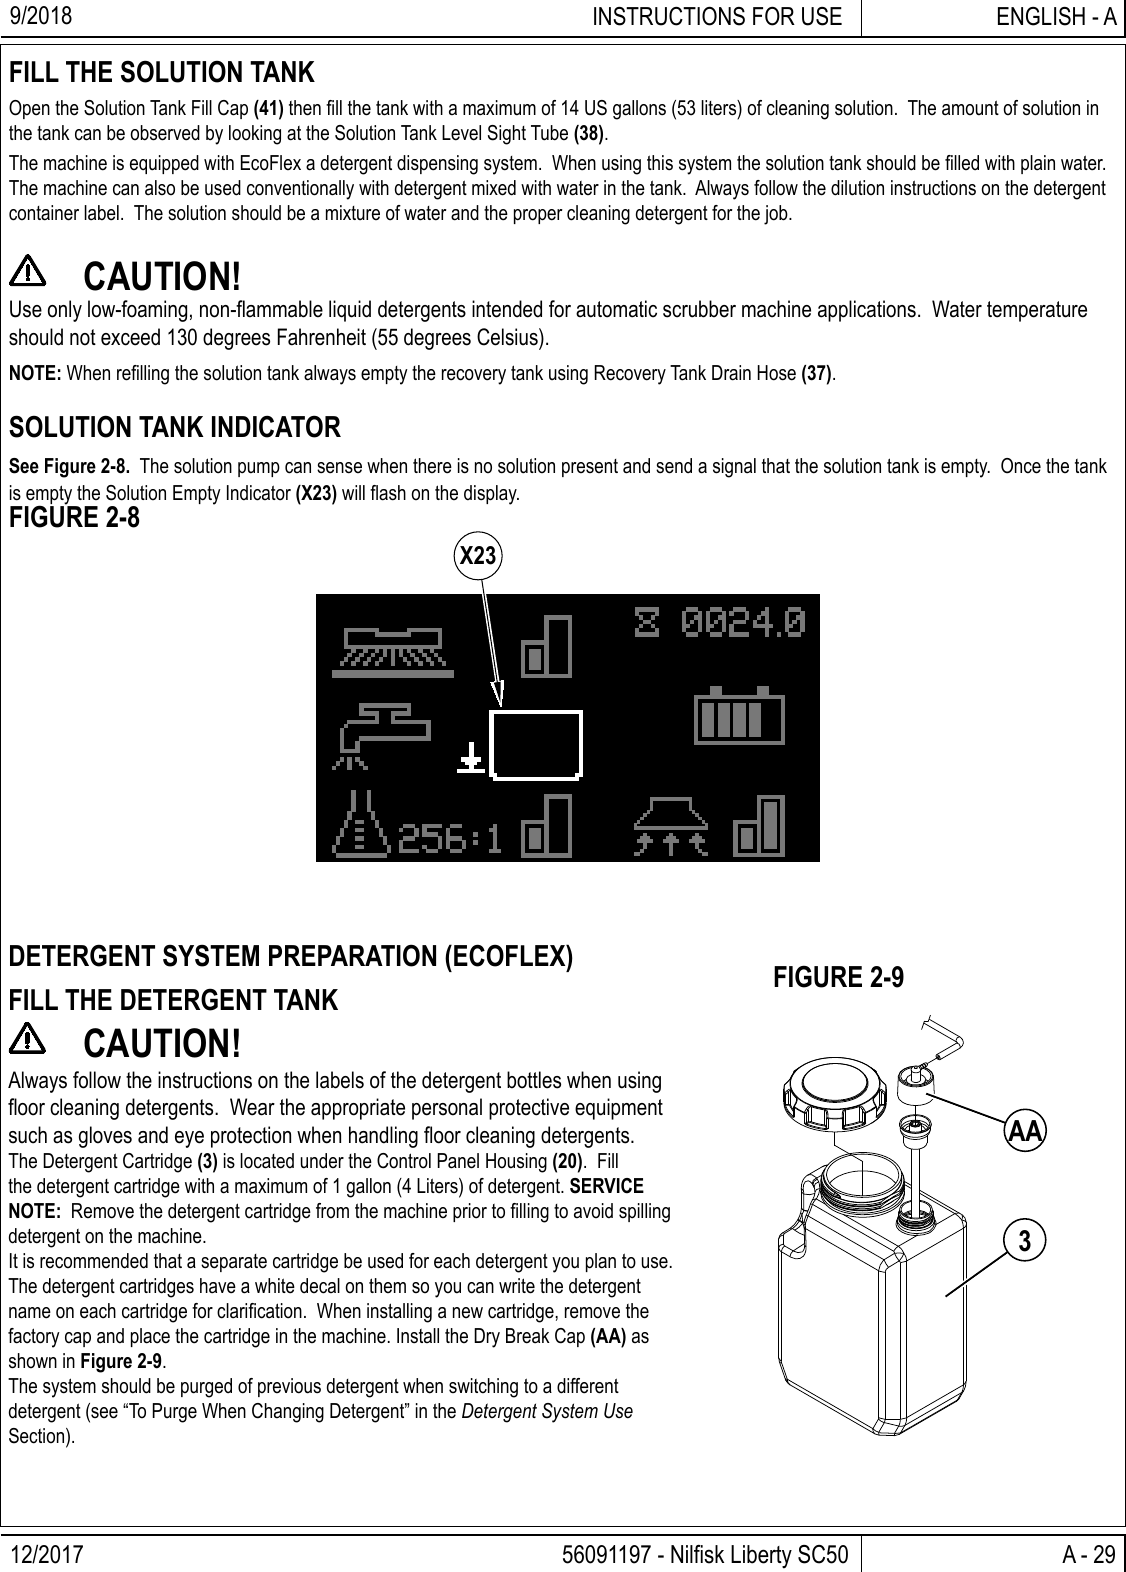
![12/2017 A - 11 56091197 - Nilfi sk Liberty SC50ENGLISH - AINSTRUCTIONS FOR USE9/2018CONTROL PANEL - CONTINUEDX1 Hour Meter (Drive Hours) [see page 13]X2 Active Fault Codes [see page 48]X3 Battery Charge Indicator [see page 43] X3a = Battery Charge Full X3b = Battery Charge LowX4 Vacuum IndicatorX5 Vacuum Indicator Bar Graph FIRST = Quiet Mode SECOND = Regular Mode NONE = OffX6 Detergent IndicatorX7 Detergent Ratio/Percentage IndicatorX8 Detergent Indicator Bar Graph FIRST = Detergent Low Mode SECOND = Detergent High Mode NONE = OffX9 Solution Flow IndicatorX10 Solution Flow Rate Bar Graph FIRST = Low SECOND = Medium THIRD = High NONE = OffX11 Scrub Pressure IndicatorX12 Scrub Brush Pressure Bar Graph FIRST = Regular SECOND = Heavy NONE = OffX13 Battery Low Voltage IndicatorX14 Critical Fault IndicatorX15 Fault Code (Critical)X44 Date Display (Year/Month/Day)X45 Time Display (Local)X46 Time Display (Coordinated Universal Time)X1X2X5X4X8X7X6X10X12X11X9X15X14X3X3aX3bX13X44X45X46](https://usermanual.wiki/Carnegie-Robotics/00068.Operator-Manual-Part-1/User-Guide-4054486-Page-11.png)
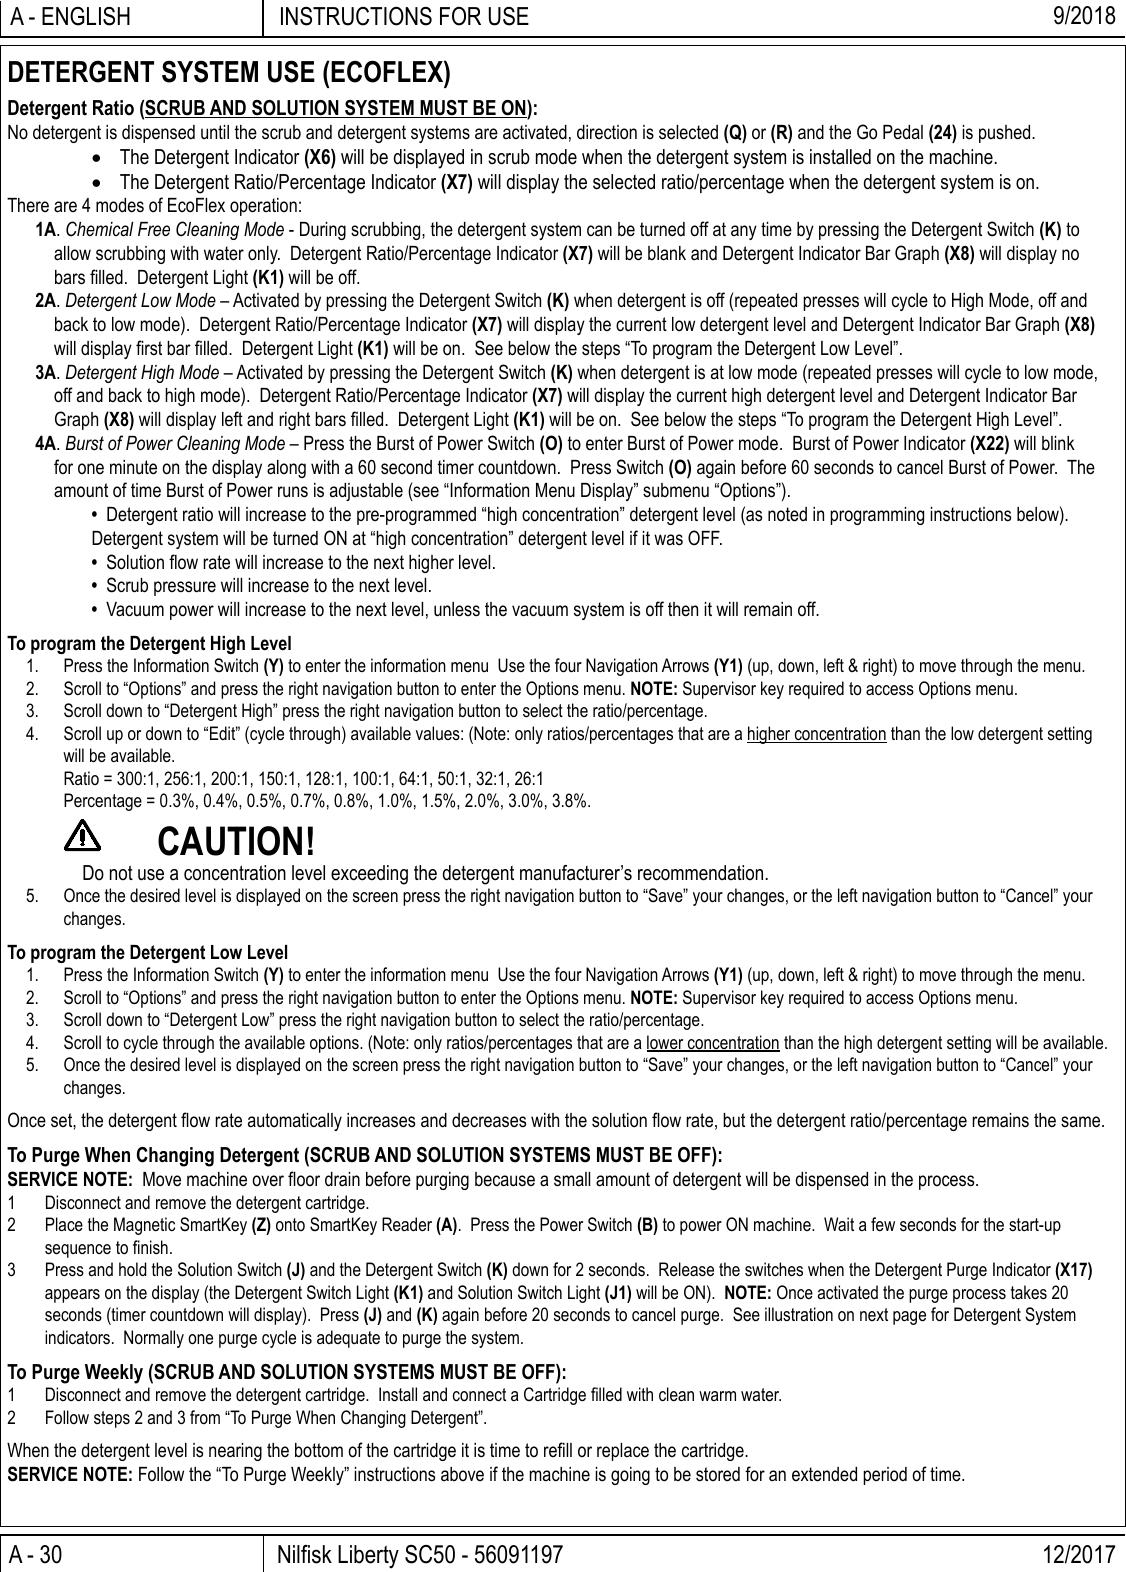
![A - 12 Nilfi sk Liberty SC50 - 56091197 12/2017INSTRUCTIONS FOR USEA - ENGLISH 9/2018CONTROL PANEL - CONTINUEDX16 Recovery Tank Full IndicatorX17 Purge IndicatorX18 Emergency Stop Activated IndicatorX19 No Key IndicatorX20 Key Read Error Indicator [see Troubleshooting]X21 Restricted User Key Indicator [see Troubleshooting]X22 Burst of Power IndicatorX23 Solution Tank Empty IndicatorX24 Impact Lockout IndicatorX25 Autonomous IndicatorX26 Countdown TimerX27 Go To Home Position IndicatorX28 Advancing Lines (machine in Training or Playback)X29 Playback Available IndicatorX30 Spinning Arrows / Computer ProcessingX31 No Home Position Set IndicatorX32 Machine On A Plan IndicatorX33 Resume Plan Available IndicatorX38 Remove Key IndicatorX39 Save Plan IndicatorX40 Delete Plan IndicatorX26X22X19X20X21X23X17 X18X16X24X25X27 X28 X29X30 X31 X32 X33X38X39X40](https://usermanual.wiki/Carnegie-Robotics/00068.Operator-Manual-Part-1/User-Guide-4054486-Page-12.png)
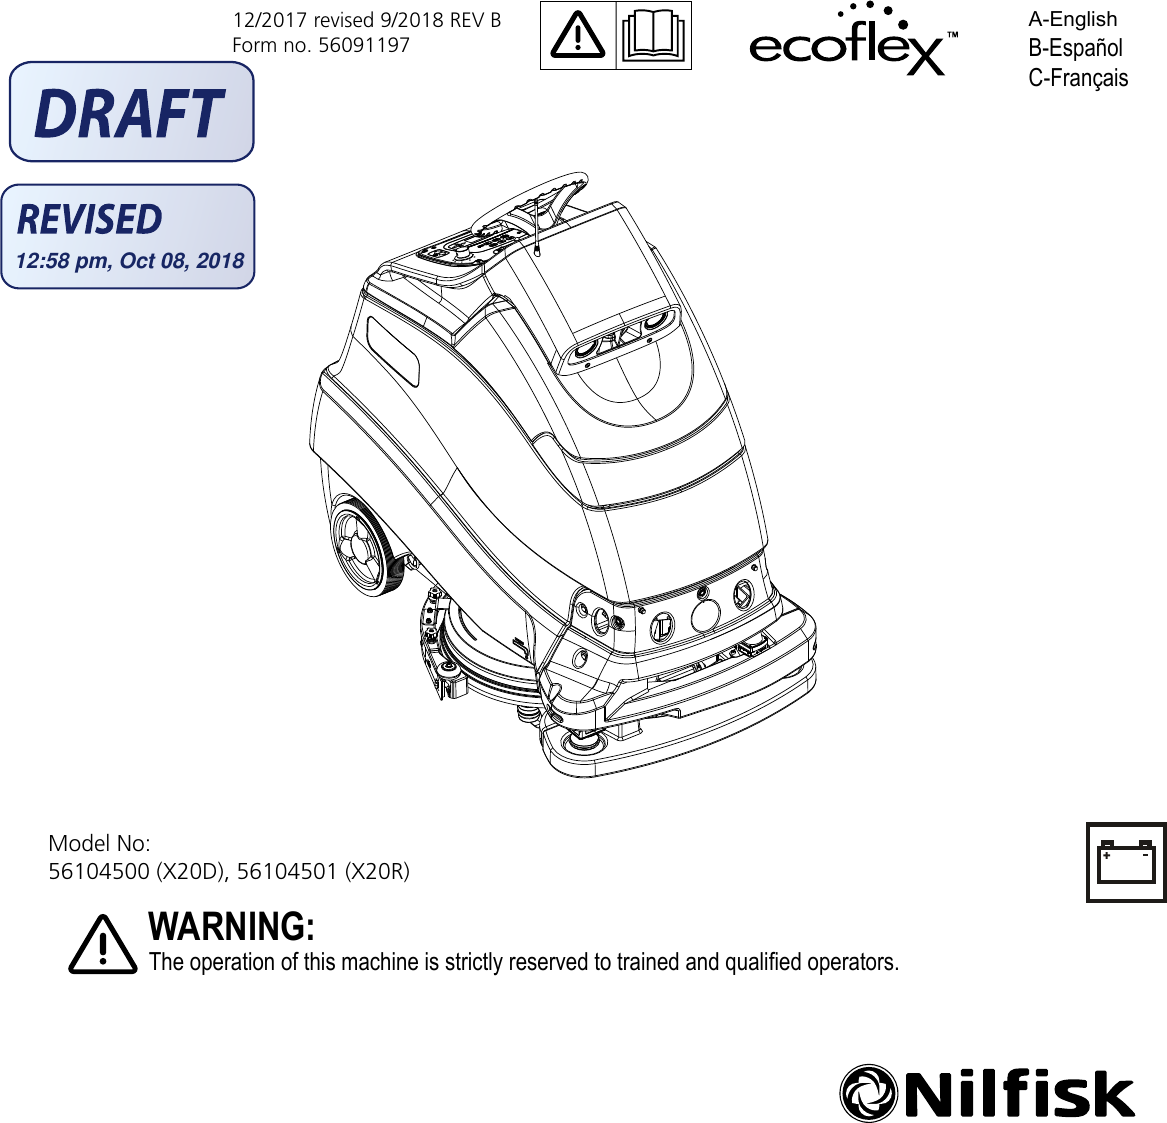
![12/2017 A - 17 56091197 - Nilfi sk Liberty SC50ENGLISH - AINSTRUCTIONS FOR USE9/2018AUTONOMOUS MENU (INFORMATIONAL MESSAGES)Pressing the Autonomous Mode / Autonomous Menu Switch (S) will bring up a menu of information and/or actions the operator can take at that particular point in time (menu will vary depending upon what the machine is currently doing, where it’s located and what is allowed). Use the four Navigation Arrows (Y1) (up, down, left & right) to move through the menu and the information switch to exit the menu. The table below shows informational messages, the table on the next page shows actions that can be taken directly from the menu.SMachine State Appears on Display Autonomous MenuDuring startup (X25) & (X26) Autonomy is booting up …[countdown timer]Manual mode availableAfter startup, autonomy has failed to boot up.Active Fault Code Autonomy UnavailableAutonomy not respondingManual mode onlyWhile operator is training a CopyCat plan(X25) &(X28) Training a copycatPress n or to endPress yy to pauseWhile operator is training a Fill-In plan(X25) & (X28) Training a fi ll-inPress n or to endPress yy to pauseWhile machine is playing back a CopyCat plan(X25) & (X28) Playing back a copycatPress n to stopPress yy to pauseWhile machine is playing back a Fill-In plan(X25) & (X28) Playing back a fi ll-inPress n to stopPress yy to pauseAfter training a new plan, machine needs time to compile/save the plan(X25) & (X30) Autonomy compiling a planIf you move the machine, itwill become lost and need to see a tag when doneAt the start of a plan (X29) At start: yy to replayWithin the resume area of a paused plan (X33) Continue: yy to resumeNot on a trained plan Manual Mode Display No plan: make new planAt the start of a plan but unable to play the plan (X13) LOW BATTERYNo Autonomy functions](https://usermanual.wiki/Carnegie-Robotics/00068.Operator-Manual-Part-1/User-Guide-4054486-Page-17.png)