Carnegie Robotics 00068 Platform Module User Manual 56091197a English indd
Carnegie Robotics LLC Platform Module 56091197a English indd
Contents
- 1. Operator Manual Part 1
- 2. Operator Manual Part 2
Operator Manual Part 1
WARNING:
The operation of this machine is strictly reserved to trained and qualifi ed operators.
Model No:
56104500 (X20D), 56104501 (X20R)
Nilfi sk Liberty SC50
Instructions for use Instructions for Use
Original Instructions
Instrucciones de uso
Mode d’ emploi
12/2017 revised 9/2018 REV B
Form no. 56091197
A-English
B-Español
C-Français
12:58 pm, Oct 08, 2018

A - 2 Nilfi sk Liberty SC50 - 56091197 12/2017
INSTRUCTIONS FOR USEA - ENGLISH 9/2018
INTRODUCTION
This manual will help you get the most from your Nilfi sk Scrubber. Read it thoroughly before operating the machine.
Note: Bold numbers in parentheses indicate an item illustrated on pages A-8 – A-12.
This machine is only suitable for commercial use, for example in hotels, schools, hospitals, factories, shops, offi ces and rental businesses. The
Nilfi sk Liberty SC50 is a battery powered fl oor cleaning machine.
WARNING:
The operation of this machine is strictly reserved to trained and qualifi ed operators.
TABLE OF CONTENTS
Introduction ................................................................................. 2
Parts and Service ...................................................................... 3
Modifi cations ............................................................................. 3
Name Plate ................................................................................ 3
Uncrate the Machine ................................................................. 3
Transporting the Machine .......................................................... 3
Cautions and Warnings.............................................................. 4
Know Your Machine.................................................................... 8
Control Panel ........................................................................... 10
Information Menu Display ........................................................ 13
Autonomous Menu (Informational Messages) ......................... 17
Autonomous Menu (Actions/Commands) ................................ 18
Understanding Autonomy ........................................................ 19
Remote .................................................................................... 20
Prepare the Machine for Use ................................................... 21
Batteries .................................................................................. 21
Install the Batteries .................................................................. 21
Location Tag ............................................................................ 22
Home Position ......................................................................... 23
Magnetic Smartkey™ .............................................................. 24
Install the Brush (Disc System) ............................................... 25
Install the Pad (REV System) .................................................. 26
Install the Squeegee ................................................................ 27
Clean Sensor Lenses .............................................................. 28
Fill the Solution Tank ............................................................... 29
Solution Tank Indicator ............................................................ 29
Detergent System Preparation (Ecofl ex) ................................. 29
Detergent System Use (Ecofl ex) ............................................. 30
Operating the Machine ............................................................. 32
Starting the Machine ............................................................... 32
Stopping the Machine .............................................................. 33
Training the Machine for Autonomous Mode ........................... 34
Playback of Recorded Plan, Autonomous Mode ..................... 37
Operating the Machine Manual Mode ..................................... 40
LED Status Bar Operation ....................................................... 42
Speaker Operation .................................................................. 42
After Use ................................................................................. 43
Maintenance .............................................................................. 43
Maintenance Schedule ............................................................ 43
Lubricating the Machine .......................................................... 44
Electromagnetic Brake ............................................................ 44
Charging GEL/AGM (VRLA) Batteries .................................... 45
Squeegee Maintenance .......................................................... 47
Squeegee Adjustment ............................................................. 47
Remote Battery Replacement ................................................. 48
Troubleshooting ....................................................................... 49
General Machine Troubleshooting ..........................................49
Autonomous Mode Troubleshooting ........................................ 50
Remote Troubleshooting ......................................................... 50
Fault Code Display .................................................................. 51
Fault Code History ................................................................... 56
Specifi cations ........................................................................... 57
Accessories / Options .............................................................. 57
Material Composition and Recyclability ................................... 57
Solution Flow Rates ................................................................ 57
Technical Specifi cations .......................................................... 58

12/2017 A - 3 56091197 - Nilfi sk Liberty SC50
ENGLISH - AINSTRUCTIONS FOR USE
9/2018
PARTS AND SERVICE
Repairs, when required, should be performed by Nilfi sk, Inc., who employs factory trained service personnel, and maintains an inventory of Nilfi sk
original replacement parts and accessories.
Call NILFISK, INC. for repair parts or service. Please specify the Model and Serial Number when discussing your machine.
MODIFICATIONS
Modifi cations and additions to the cleaning machine which affect capacity and safe operation shall not be performed by the customer or user
without prior written approval from Nilfi sk, Inc. Unapproved modifi cations will void the machine warranty and make the customer liable for any
resulting accidents.
NAME PLATE
The Model Number and Serial Number of your machine are shown on the Nameplate, located on the inside of the battery compartment.
Date of Manufacture “Date Code” is marked on the nameplate. Date Code: A17, means January 2017.
This information is needed when ordering repair parts for the machine. Use the space below to note the Model Number and Serial Number of your
machine for future reference.
MODEL NO. ___________________________________________________________
SERIAL NO. ___________________________________________________________
UNCRATE THE MACHINE
When the machine is delivered, carefully inspect the shipping packaging and the machine for damage. If damage is evident, save the shipping
carton (if applicable) so that it can be inspected. Contact the Nilfi sk Customer Service Department immediately to fi le a freight damage claim.
Refer to the unpacking instruction sheet included with the machine to remove the machine from the pallet.
TRANSPORTING THE MACHINE
CAUTION!
Before transporting the machine on an open truck or trailer, make sure that . . .
• All tanks are empty.
• Recovery tank cover is latched securely.
• The machine is tied down securely - see Tie Down Locations (6) in Know Your Machine. Only use locations designated as “Tie Down
Locations” to secure the machine during transport. Using any other location of the machine to tie down the machine may cause damage or
injury.
• The machine’s electromagnetic brake is engaged (not manually overridden), see Electromagnetic Brake section if necessary.
This product contains the chemical DOTE (2-ethyihexyl 10-ethyl-4,4-dioctyl-7-oxo-8-oxa-3,5-dithia-4-stannatetradecanoate; CAS
number: 15571-58-1) which is listed on the candidate list of the EU REACH Regulation (1907/2006/EC).
A - 4 Nilfi sk Liberty SC50 - 56091197 12/2017
INSTRUCTIONS FOR USEA - ENGLISH 9/2018
CAUTIONS AND WARNINGS
SYMBOLS
Nilfi sk uses the symbols below to signal potentially dangerous conditions. Always read this information carefully and take
the necessary steps to protect personnel and property.
DANGER!
Is used to warn of immediate hazards that will cause severe personal injury or death.
WARNING!
Is used to call attention to a situation that could cause severe personal injury.
CAUTION!
Is used to call attention to a situation that could cause minor personal injury or damage to the machine or other property.
Read all instructions before using.
GENERAL SAFETY INSTRUCTIONS
Specifi c Cautions and Warnings are included to warn you of potential danger of machine damage or bodily harm.
This machine is for commercial use, for example in hotels, schools, hospitals, factories, shops and offi ces other than
normal residential housekeeping purposes.
WARNING!
• This machine shall be used only by properly trained and authorized persons.
• The operation of this machine is strictly reserved to trained and qualifi ed operators.
• This machine is not intended for use by persons (including children) with reduced physical, sensory or mental
capabilities, or lack of experience and knowledge.
• While on ramps or inclines, avoid sudden stops. Avoid abrupt sharp turns. Use low speed down ramps.
• Observe the Gross Vehicle Weight, GVW, of the machine when loading, driving, lifting or supporting the machine.
• Keep sparks, fl ame and smoking materials away from batteries. Explosive gases are vented during normal operation.
• Charging the batteries produces highly explosive hydrogen gas. Charge batteries only in well-ventilated areas, away
from open fl ame. Do not smoke while charging the batteries.
• Remove all jewelry when working near electrical components.
• Turn the machine power OFF and disconnect the batteries before servicing electrical components.
• Never work under a machine without safety blocks or stands to support the machine.
• Do not dispense fl ammable cleaning agents, operate the machine on or near these agents, or operate in areas where
fl ammable liquids exist.
• Do not clean this machine with a pressure washer.
• Only use the brushes or pad driver provided with the appliance or those specifi ed in the instruction manual. The use
of other brushes may impair safety.
• Do not look at the laser beams used by the machine. Permanent eye damage could result. Lasers are eye-safe if
viewed briefl y, such as to determine that they are functioning. Do not look directly into lasers or stare at them without
wearing protective laser safety glasses.
• Safety Lasers work to detect the presence of individuals in the area of an operating machine. Safety Lasers function
only in the Autonomous Operating Mode.

12/2017 A - 5 56091197 - Nilfi sk Liberty SC50
ENGLISH - AINSTRUCTIONS FOR USE
9/2018
CAUTIONS AND WARNINGS - CONTINUED
CAUTION!
• This machine is not approved for use on public paths or roads.
• This machine is not suitable for picking up hazardous dust.
• Do not use scarifi er discs and grinding stones. Use only pads or brushes intended for fl oor cleaning. Nilfi sk will not
be held responsible for any damage to fl oor surfaces caused by using the wrong or improper pads or brushes.
• When operating this machine, ensure that third parties, particularly children, are not endangered.
• Before performing any service function, carefully read all instructions pertaining to that service task.
• After use do not leave the machine unattended where it can be accessed by others without fi rst powering the machine
off at the power switch.
• Power the machine OFF at the power switch and remove the magnetic SmartKey, before changing the brushes, and
before opening any access panels.
• Take precautions to prevent hair, jewelry, or loose clothing from becoming caught in moving parts.
• Use caution when moving this machine in below freezing temperature conditions. Any water in the solution, recovery
or detergent tanks or in the hose lines could freeze, causing damage to valves, pumps and fi ttings. Flush with low-
temperature windshield washer fl uid.
• The batteries must be removed from the machine before the machine is scrapped. The disposal of the batteries
should be safely done in accordance with your local environmental regulations.
• Do not use on surfaces having a gradient exceeding that marked on the machine.
• All doors and covers are to be positioned as indicated in the instruction manual before using the machine.
• This machine should only be used and stored indoors.
• The machine’s magnetic SmartKey has a built-in magnet. Do not place objects having magnetic bands (such as
credit cards, electronic keys, phone cards) near the key. The built-in magnet can damage or erase the data stored on
the magnetic bands.
• Only use locations designated as “Tie Down Locations” to secure the machine during transport. Using any other
location of the machine to tie down the machine may cause damage or injury.

A - 6 Nilfi sk Liberty SC50 - 56091197 12/2017
INSTRUCTIONS FOR USEA - ENGLISH 9/2018
CAUTIONS AND WARNINGS - CONTINUED
CAUTION!
• Do not operate the machine in an environment exceeding 104°F (40°C).
• Do not operate the machine without the Bumper (18) in place.
• Avoid driving the machine onto stairways or escalators, into open elevator shafts, or into any area where there is a
signifi cant drop in elevation. Serious machine damage may result if it falls down stairs, escalators, or open shafts.
The machine cannot climb stairs. Machine is designed for use only on fl at surfaces (less than 2 degree incline). Place
safety cone in front of escalators to prevent machine entry.
• While driving the machine manually, to develop navigational maps as part of training the autonomous function, it is
the Operator’s responsibility to avoid contact with obstacles. The machine will not avoid them in the manual operating
mode. There are no autonomous safety functions operating in the manual mode.
CAUTIONS FOR 2-D MAPPING LASER (14)
CLASS 1 LASER PRODUCT
The 2-D Laser Scanner corresponds to laser class 1 (eye-safe).
The laser beam is not visible to the human eye.
CAUTION!
• The use of controls, or adjustments or performance of procedures other than those specifi ed herein may result in
hazardous radiation exposure.
• Do not open the housing (opening the housing will not switch off the laser).
• Pay attention to the laser safety regulations as per IEC 60825-1 (latest version).

12/2017 A - 7 56091197 - Nilfi sk Liberty SC50
ENGLISH - AINSTRUCTIONS FOR USE
9/2018
CAUTIONS AND WARNINGS - CONTINUED
CAUTION!
CAUTIONS FOR 2-D SAFETY LASER (17)
Read the following guidelines for correct use of the 2-D Safety Laser (17) hence referred to as the UAM. Proper handling
and usage will ensure the UAM to operate accordingly.
GENERAL PRECAUTIONS
• UAM is designed to protect human begins or systems by monitoring the hazardous area. It is not designed for the
protection from high speed objects or the electromagnetic radiation.
• Perform pre operation tests in order to verify the performance of UAM.
• Do not modify or disassemble UAM. Such modifi cations will affect the detection capability leading to injuries or death.
• Do not modify or disassemble UAM to maintain its housing rating. Such modifi cations will void the warranty.
• The person in charge should be qualifi ed to operate UAM. The person must be trained, on safety requirements with
necessary cautions for handling the device.
• The person in charge should train the user with correct installation, operation, inspection and maintenance
procedures.
• The person in charge is responsible to ensure the proper working environment for UAM.
• The person in charge is responsible for the compliance with the local safety requirements, standards, rules and
regulations, laws of respective nations, states or districts when UAM is used in a safety related system.
• UAM has been manufactured and shipped under the strict quality control. If you fi nd any defect in the product contact
the nearest distributor or sales representative.
• Hokuyo cannot be held responsible for the damages or failure due to misuse of the product.
• User should prepare test pieces for detection capability verifi cation. The test piece should emulate the smallest object
that is intended to be detected during the operation.
• Maximum level of homogeneous pollution for UAM to operate normally is under 30%. UAM will report error if the
pollution exceeds the stated limit. Always keep the optical window in clean condition to avoid the error.
• Before resetting the interlock of UAM, user must ensure the surrounding is safe especially the protected area.
• Apply suffi cient measures to ensure safety of the protected area when decommissioning UAM. Protective materials
such as guards or light curtain should be used to prevent the passage to the hazardous area.
• UAM including its accessories are subject to change without prior notice for the improvement.
• UAM should be disposed as industrial waste or in accordance with the local disposal directives.
SAVE THESE INSTRUCTIONS
A - 8 Nilfi sk Liberty SC50 - 56091197 12/2017
INSTRUCTIONS FOR USEA - ENGLISH 9/2018
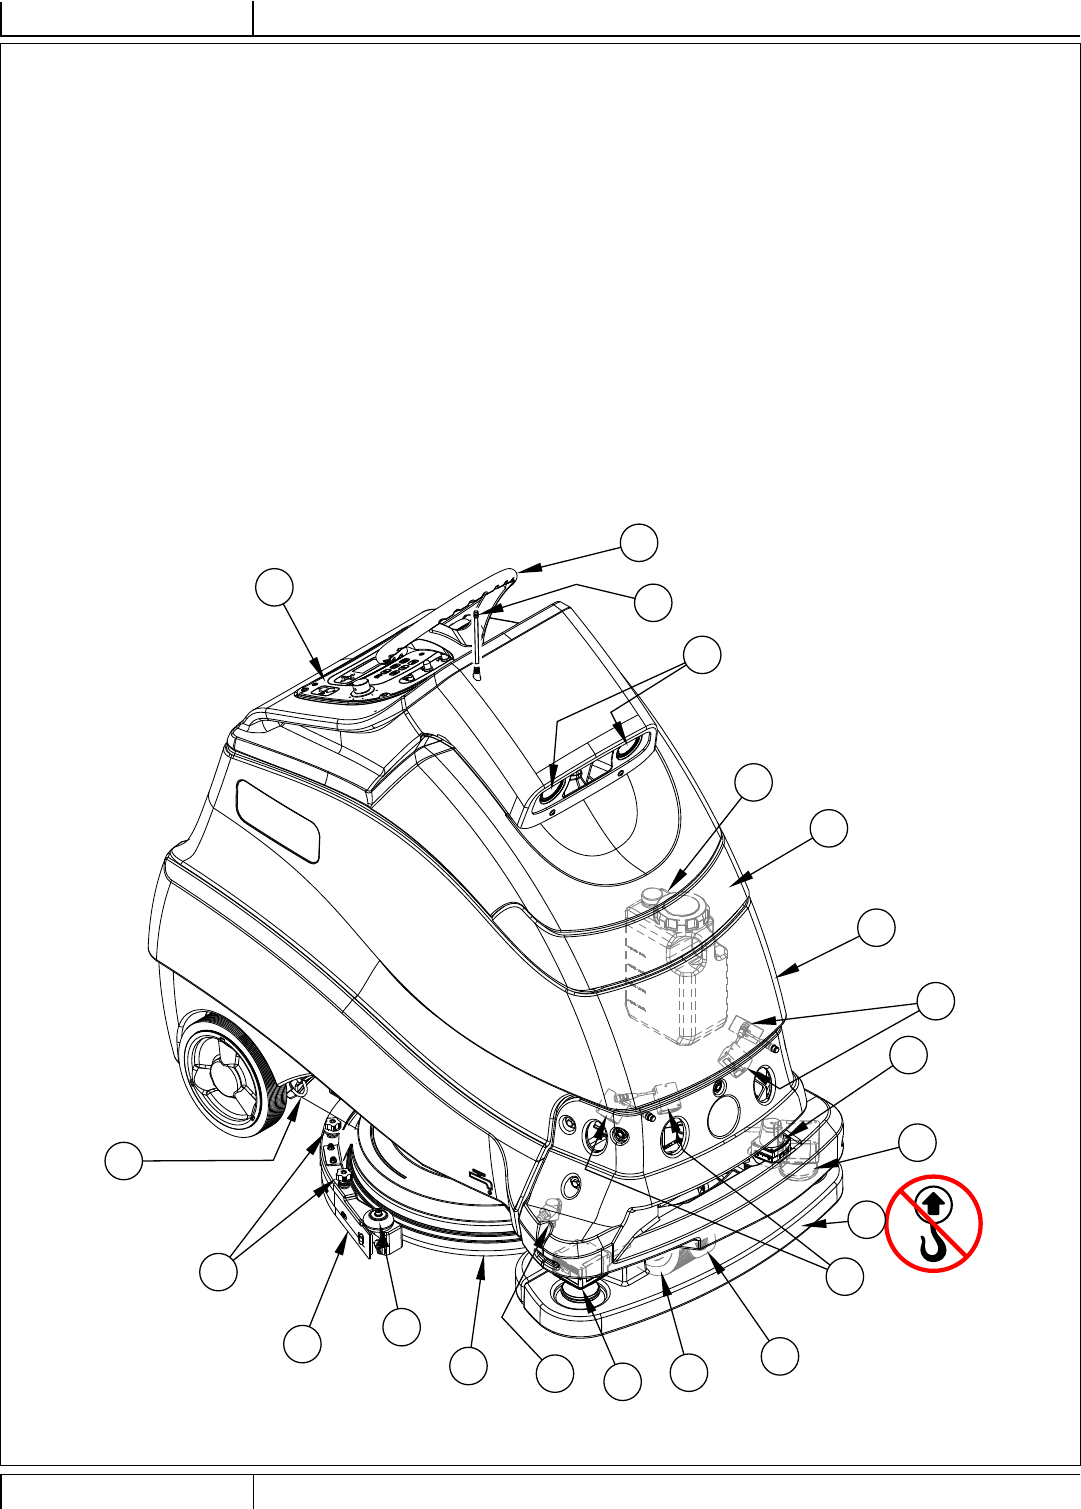
KNOW YOUR MACHINE
As you read this manual, you will occasionally run across a bold number or letter in parentheses - example: (2). These numbers refer to an item
shown on these pages unless otherwise noted. Refer back to these pages whenever necessary to pinpoint the location of an item mentioned in the
text. NOTE: Refer to the service manual for detailed explanations of each item illustrated on the next 4 pages.
1 Control Panel
2 Steering Wheel
3 Detergent Cartridge
4 LED Status Bar
5 Solution Tank
6 Tie Down Locations (3)
7 Drive Wheel
8 Solution Drain Valve
9 Scrub Deck
1
2
3
4
5
6
7
9
10
11
6
12
8
17
14
13
16
16
15
17
18
10 Squeegee Roller
11 Squeegee Assembly
12 Squeegee Cover Knobs (4)
13 Antenna
14 2-D Mapping Laser
15 3-D Camera Lenses
16 Drop-Off Safety Laser (4)
17 2-D Safety Laser (2)
18 Bumper (NOT a lifting or tie down point)
12/2017 A - 9 56091197 - Nilfi sk Liberty SC50
ENGLISH - AINSTRUCTIONS FOR USE
9/2018
KNOW YOUR MACHINE
20 Control Panel Housing / Recovery Tank Cover
21 Recovery Tank Full Float
22 Recovery Tank
23 Debris Catch Tray
24 Go Pedal
25 Operator Presence Pedal
26 Platform
27 Recovery Tank Lift Handles (2)
28 Vacuum Motor Fan Inlet Screen
29 Rear Wheel (2)
30 Rear Squeegee Blade Removal Latch
31 Battery Charger
32 Solution Solenoid Valve
33 Solution Filter
34 Solution Shutoff Valve
35 Solution Pump
36 Latch
37 Recovery Tank Drain Hose
38 Solution Tank Level Sight Tube
39 Prop Rod
40 On-Board Charger Power Cord
41 Solution Tank Fill Port
42 Fuse Holder Boot (Main Fuse 100 Amp)
43 Machine Battery Connector
44 Location Tag
20
21
22
23
24
25
26
29
30 31
32
33
34
36
38
39
35
41
37
40
28
27
43
42
44
A - 10 Nilfi sk Liberty SC50 - 56091197 12/2017
INSTRUCTIONS FOR USEA - ENGLISH 9/2018
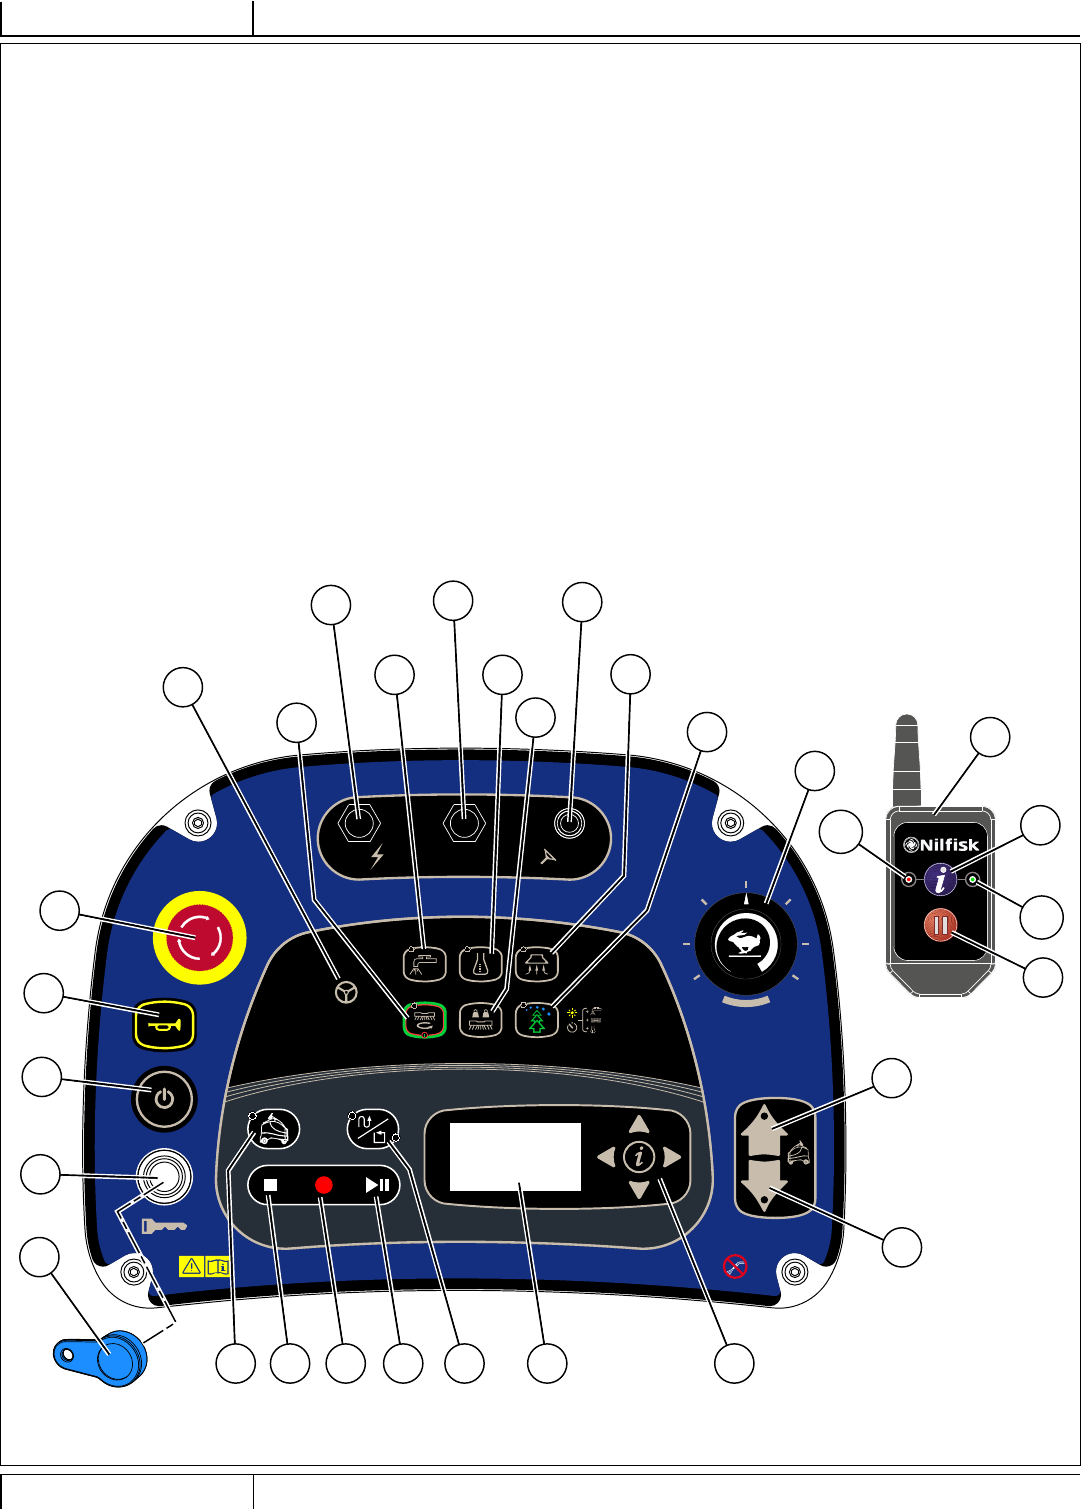
CONTROL PANEL
A SmartKey™ Reader
B Power Switch
C Horn Switch
D Emergency Stop
E Control Circuit Breaker (5 Amp)
F Circuit Breaker (K1) (5 Amp)
G Steering Motor Circuit Breaker (15 Amp)
H Manual Operation Indicator
J Solution Flow Adjustment Switch
K Detergent Switch
L Vacuum Switch
M One-Touch™ Scrub ON/OFF Switch
N Extra Pressure Switch
O Burst of Power Switch
P Speed Adjustment Knob
Q Forward Drive Switch
R Reverse Drive Switch
S Autonomous Mode / Autonomous Menu Switch
T Stop Switch
U Record Switch
V Play/Pause Switch
W CopyCat™/Fill-In Switch
X Display (see Control Panel-Continued)
Y Information Switch & Navigation Switches
Z Magnetic SmartKey™
-Blue = User
-Yellow = Supervisor
AA Remote
AB Remote Status Request Button
Remote Status Indicators
AC1 - Red LED = Machine Alarm State
AC2 - Green LED = Machine Functioning Normally
AD Remote Pause Button
CB2
5A
CB3
15A
CB1
5A K1
E
K
H
M
A
D
S T U V W
R
X
Q
P
J
G
L
Y
F
B
C
O
N
AD
AB
AC2
Z
AA
AC1
12/2017 A - 11 56091197 - Nilfi sk Liberty SC50
ENGLISH - AINSTRUCTIONS FOR USE
9/2018
CONTROL PANEL - CONTINUED
X1 Hour Meter (Drive Hours) [see page 13]
X2 Active Fault Codes [see page 48]
X3 Battery Charge Indicator [see page 43]
X3a = Battery Charge Full
X3b = Battery Charge Low
X4 Vacuum Indicator
X5 Vacuum Indicator Bar Graph
FIRST = Quiet Mode
SECOND = Regular Mode
NONE = Off
X6 Detergent Indicator
X7 Detergent Ratio/Percentage Indicator
X8 Detergent Indicator Bar Graph
FIRST = Detergent Low Mode
SECOND = Detergent High Mode
NONE = Off
X9 Solution Flow Indicator
X10 Solution Flow Rate Bar Graph
FIRST = Low
SECOND = Medium
THIRD = High
NONE = Off
X11 Scrub Pressure Indicator
X12 Scrub Brush Pressure Bar Graph
FIRST = Regular
SECOND = Heavy
NONE = Off
X13 Battery Low Voltage Indicator
X14 Critical Fault Indicator
X15 Fault Code (Critical)
X44 Date Display (Year/Month/Day)
X45 Time Display (Local)
X46 Time Display (Coordinated Universal Time)
X1
X2
X5
X4
X8X7
X6
X10
X12
X11
X9
X15
X14
X3
X3a
X3b
X13
X44
X45
X46
A - 12 Nilfi sk Liberty SC50 - 56091197 12/2017
INSTRUCTIONS FOR USEA - ENGLISH 9/2018
CONTROL PANEL - CONTINUED
X16 Recovery Tank Full Indicator
X17 Purge Indicator
X18 Emergency Stop Activated Indicator
X19 No Key Indicator
X20 Key Read Error Indicator [see Troubleshooting]
X21 Restricted User Key Indicator [see Troubleshooting]
X22 Burst of Power Indicator
X23 Solution Tank Empty Indicator
X24 Impact Lockout Indicator
X25 Autonomous Indicator
X26 Countdown Timer
X27 Go To Home Position Indicator
X28 Advancing Lines (machine in Training or Playback)
X29 Playback Available Indicator
X30 Spinning Arrows / Computer Processing
X31 No Home Position Set Indicator
X32 Machine On A Plan Indicator
X33 Resume Plan Available Indicator
X38 Remove Key Indicator
X39 Save Plan Indicator
X40 Delete Plan Indicator
X26
X22
X19
X20
X21
X23
X17 X18
X16
X24
X25
X27 X28 X29
X30 X31 X32 X33
X38
X39
X40
12/2017 A - 13 56091197 - Nilfi sk Liberty SC50
ENGLISH - AINSTRUCTIONS FOR USE
9/2018
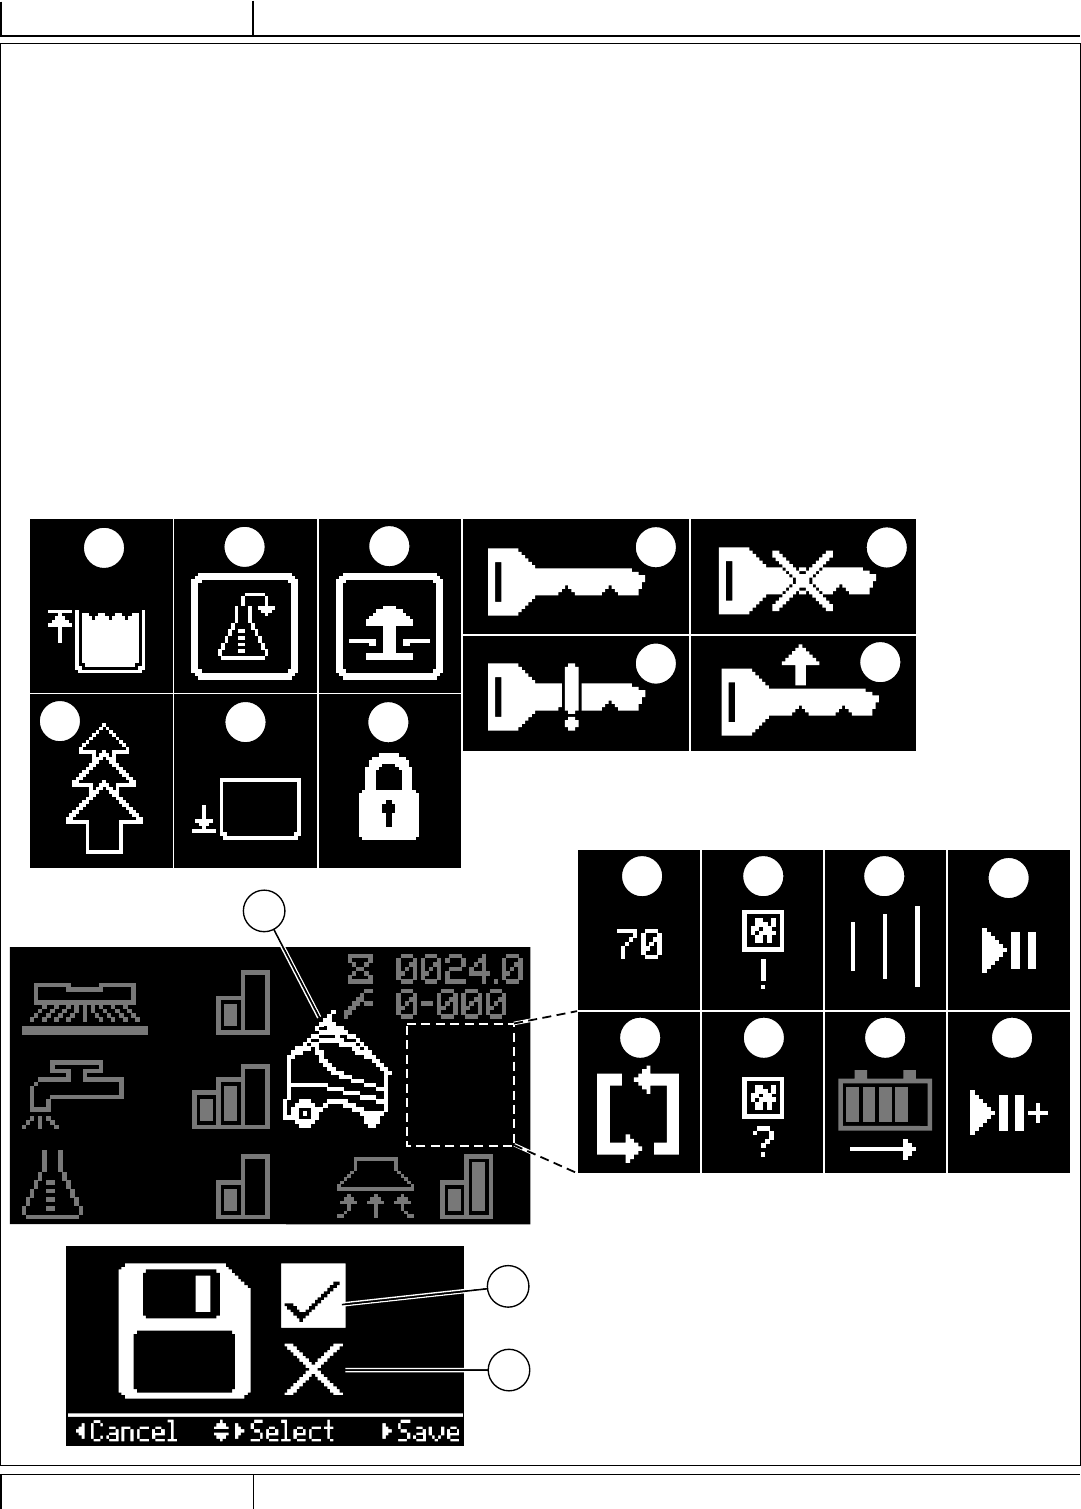
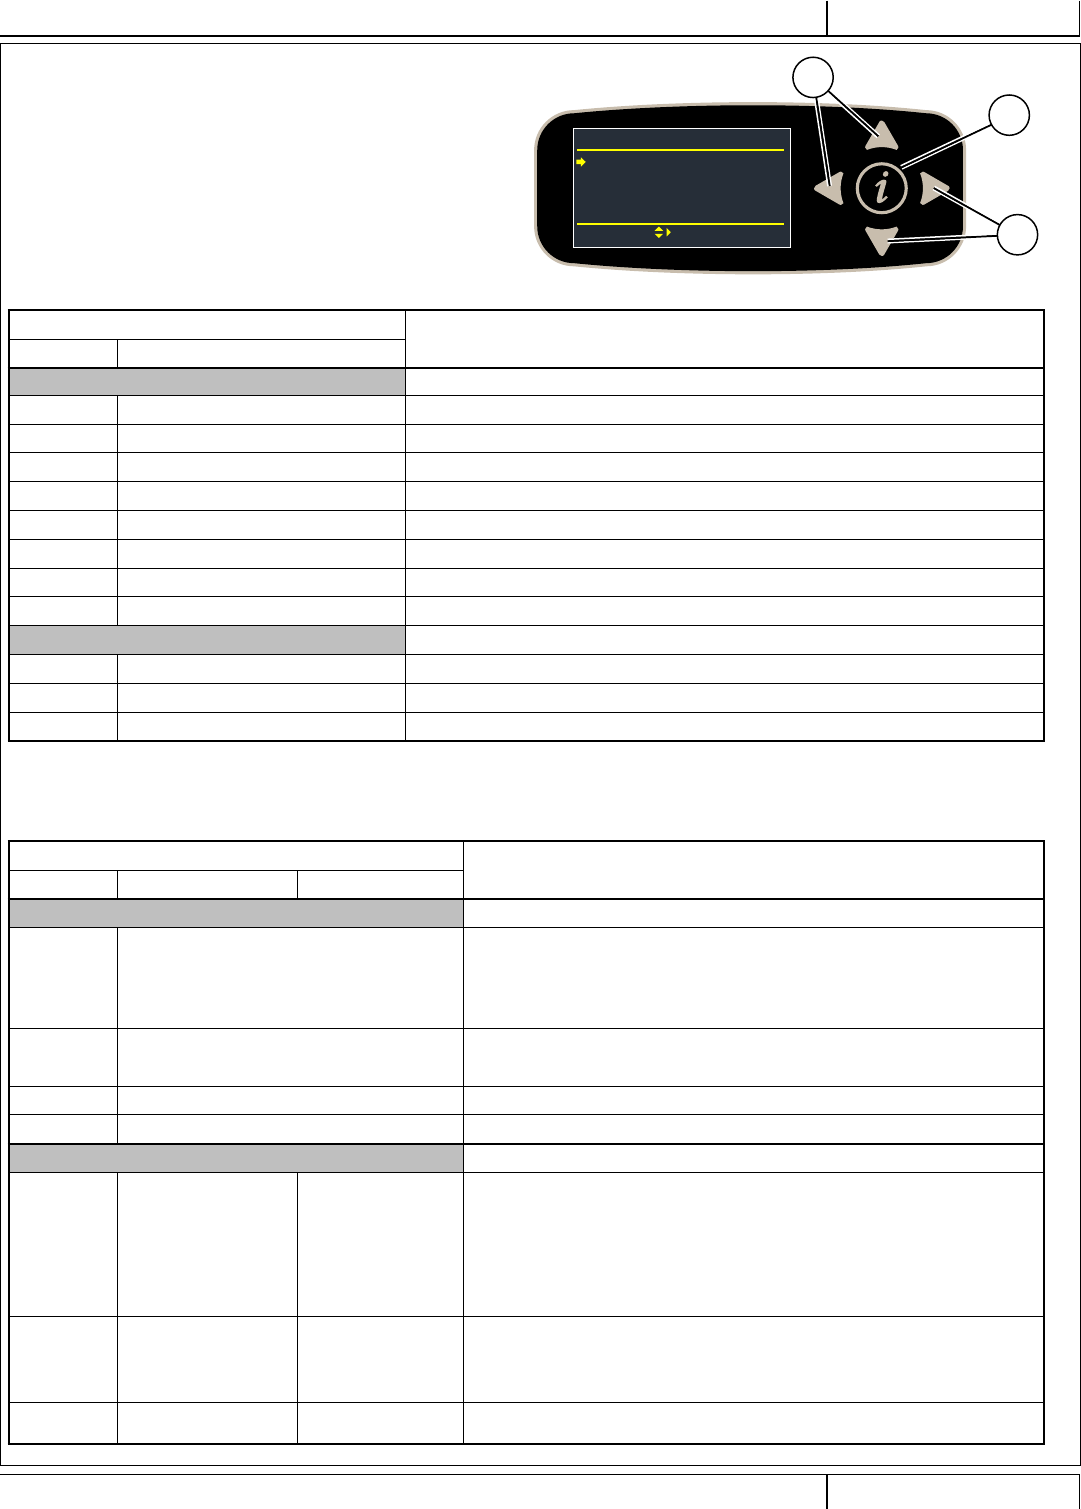
INFORMATION MENU DISPLAY
Menu Display
Pressing the Information Switch (Y) will bring up the menu
shown below which allows the operator to change machine
settings and gather machine information. Use the four
Navigation Arrows (Y1) (up, down, left & right) to move through
the menu and the information switch to exit the menu.
Menu visible with either blue (User) or yellow (Supervisor) SmartKey.
Menu Level Notes
12
Hours Displays various system hours
On Time Displays Power ON hours
Drive Time Displays drive (non-neutral) hours
Scrub Time Displays scrub/brush ON hours
CopyCat Teach Displays hours spent training CopyCat plans
Fill-In Teach Displays hours spent training Fill-In plans
CopyCat Replay Displays hours spent playing back CopyCat plans
Fill-In Replay Displays hours spent playing back Fill-In plans
Recovery Time Displays recovery/vacuum ON hours
Faults**
Active Faults Displays list of active faults w/ timestamp and description
Fault History Displays list of fault history w/ timestamp and description
Clear Autonomy History*** Clear autonomy fault history list
**See Fault Code Display
***Supervisor and Technician Only
Menu visible only with yellow (Supervisor) SmartKey.
Menu Level Notes
12 3
Keys
Read Key
Read the key serial number, family and type for key inserted into holder
- if user key, allows supervisor to add to key list
- if key is of appropriate type, allows supervisor and technician to program a
supervisor key
Key List Display the current approved user key list
supervisor can also remove selected key from list
Add Key
Clear Key List
Options Supervisor selectable options
Language
English*
Italiano
Deutsch
Portuguese
Français
Español
Menu display language
Scrub Startup
Light
Heavy
Last Used*
Scrub level at start
Scrub Max Light
Heavy* Maximum scrub level allowed
*Default setting
Y
Menu
Hours
Faults
Keys
Options
iExit Select Y1
Y1
A - 14 Nilfi sk Liberty SC50 - 56091197 12/2017
INSTRUCTIONS FOR USEA - ENGLISH 9/2018
INFORMATION MENU DISPLAY – CONTINUED
Menu visible only with yellow (Supervisor) SmartKey.
Menu Level Notes
12 3
Options Supervisor selectable options
Solution SmartFlow* (proportional to speed)
Fixed Adjust solution fl ow to speed, or fi xed fl ow
Solution In Rev No*
Yes Leave solution on in reverse?
Warning Beep
Backup Beep*
Beep On
Beep Off
Beep when backing up, beep always on when
moving, beep off
Autonomy Beep
Beep Off*
Beep Low
Beep Medium
Beep High
Beep when scrubbing autonomously – off, low,
medium, high volume
Other Sounds
Normal
Quiet
Off
Volume of sounds (apart from horn, starting
autonomy beep, and backup beep)
Manual Light
On to Scan*
Always On
Always Off
“On to Scan” means the LED strip will be white
with blue corners when the camera is attempting
to read a Location Tag or a QR Code.
Obstacle Color Red
Orange
Color of “Obstacle” chasing lights displayed on
LED status bar when an obstacle is encountered
Detergent Low
(300,256,200,150,128,100,64,50,32,26):1
– ratio cannot be > Detergent High
(0.3, 0.4, 0.5, 0.7, 0.8, 1.0, 1.5, 2.0, 3.0, 3.8)%
– percentage cannot be > Detergent High
Set detergent ratio for detergent low level
Detergent High
(300,256,200,150,128,100,64,50,32,26):1
– ratio cannot be < Detergent Low
(0.3, 0.4, 0.5, 0.7, 0.8, 1.0, 1.5, 2.0, 3.0, 3.8)%
– percentage cannot be < Detergent Low
Set detergent ratio for detergent high level
Detergent shown as xxx:1
x.x% Ratio or percentage
Neutral Delay (s)
min = 0.5*
max = 5.0
step = 0.5
Time to keep brushes on when in neutral
(seconds)
Vac Off Delay (s)
min = 15*
max = 25
step = 1
Time to keep vacuum on after turning off scrub
system (seconds)
Vac Startup
Full
Quiet
Last Used*
Vacuum level at start
Burst Of Power (s)
min = 60*
max = 300
step = 60
Burst-of-power (BOP) time span (seconds)
Fwd Speed Max (%)
min = 50%
max = 100%*
step = 10
Maximum forward speed as percentage of
maximum available speed in manual mode
Inactivity Time (min)
min = 5
max = 60
step = 5
default = 15
Inactivity time before putting machine in sleep
mode (minutes)
*Default setting
12/2017 A - 15 56091197 - Nilfi sk Liberty SC50
ENGLISH - AINSTRUCTIONS FOR USE
9/2018
INFORMATION MENU DISPLAY – CONTINUED
Menu visible only with yellow (Supervisor) SmartKey.
Menu Level Notes
12 3
Options Supervisor selectable options
User
Replay Only*
Replay/Train
Replay/Train/Delete
User key plan permissions -- only replay; replay and train; replay, train,
and delete plans
No Add/Delete Tags*
Add Tags
Add/Delete Tags
User key location tag permissions -- no permissions, can add tags, can
add and delete tags
Delete ALL PLANS? Yes/No Deletes all plans
Delete ALL TAGS? Yes/No Delete all tags (and plans)
Ignore water meter? Yes/No
Ignore water meter and do constant fl ow with no feedback loop. Allows
operator to keep cleaning in autonomous or manual mode with a broken
fl ow meter.
OvrCurProt. Enabled? Yes/No Over Current Protection can be disabled for using the machine on certain
rubber fl ooring where current draw is higher than expected
Impact Action Log Only*
Log & Lock
Impact detection status
Log Only – Impact is recorded
Log & Lock – Impact is recorded and User is locked out of scrub functions
(Display shows (X24)) until machine is reset with a Supervisor key.
Impact Level High*
Low
Impact detection sensitivity level. If nuisance tripping occurs (i.e. driving
over a fl oor transition), adjust setting to low.
Impact Log User ID? Yes/No Whether to record the User ID in the impact log
Date/Time/Timezone Set the date, time and timezone
Timezone Choose timezone that matches machine’s location
Hour Set current time, hours in 24-hour format
Minute Set current time minutes
Second Set current time seconds
Year Set current year
Month Set current month
Day Set current day
*Default setting
A - 16 Nilfi sk Liberty SC50 - 56091197 12/2017
INSTRUCTIONS FOR USEA - ENGLISH 9/2018
INFORMATION MENU DISPLAY – CONTINUED
Menu visible with either blue (User) or yellow (Supervisor) SmartKey.
Menu Level Notes
12
System
A1 Firmware Rev Display current fi rmware revision
A8 Charger F/W Display current charger fi rmware revision
A1 Serial Number Display PCB serial number from factory
A5 Compute Display current autonomy Compute box fi rmware
A5 Platform Display current autonomy Platform box fi rmware
A5 Safety Display current autonomy Safety box fi rmware
E5 Camera Display current Camera fi rmware
2D Map Laser Display current Mapping Laser fi rmware
Impact Log** Display list of impact events with max value, timestamp and user id (only if enabled)
- single item view will show max values for each axis (x,y,z)
CRL Wireless Update** Go to menu for wireless update of autonomy fi rmware
Network Status Is network up, or down (down includes an error number)
IP Address IP Address of machine, shown as 123.456.789.666
QR String QR string scanned in from “Scan QR Code” menu command
Autonomy
Create Location Tag*** Creates the fi rst locatoin tag
Scan new locatoin tag*** Adds a new location tag
Delete current tag #NNN*** Deletes the current tag NNN (deletes all plans)
Delete next seen tag*** Deletes the next tag scanned
Delete this plan*** Deletes the plan the machine is currently on
Change Location Tag Forget the current tag and scan for a known tag
**Only visible with yellow (Supervisor) SmartKey.
***Only visible to blue User key if permission is granted by Supervisor.
12/2017 A - 17 56091197 - Nilfi sk Liberty SC50
ENGLISH - AINSTRUCTIONS FOR USE
9/2018
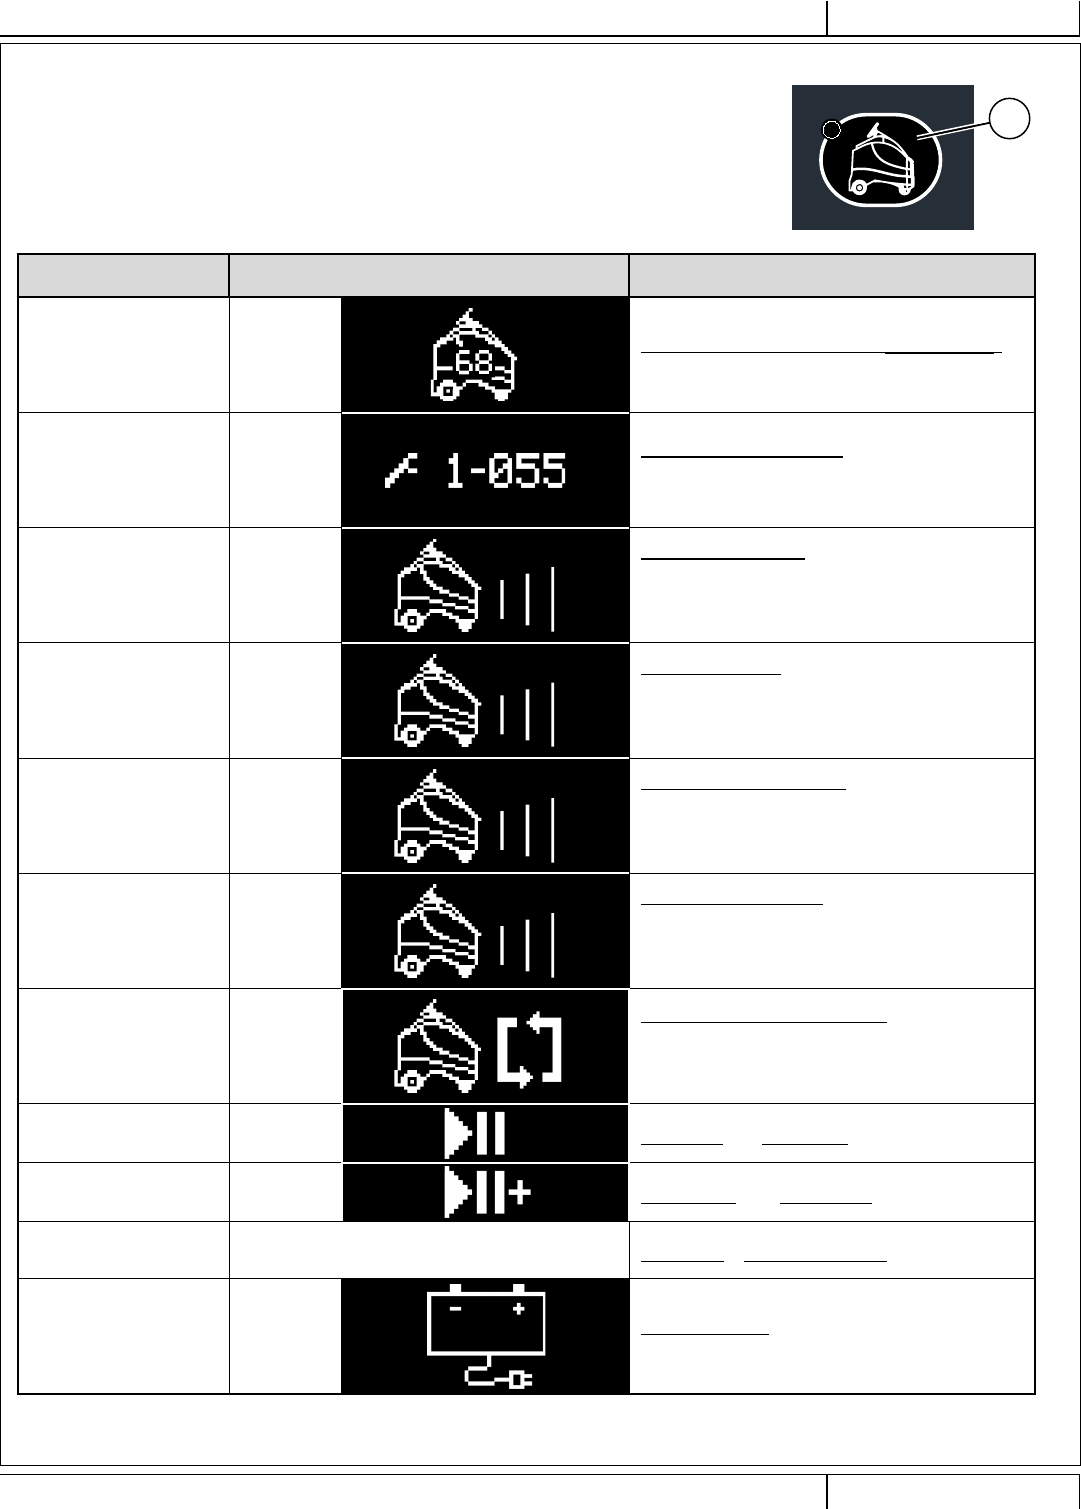
AUTONOMOUS MENU (INFORMATIONAL MESSAGES)
Pressing the Autonomous Mode / Autonomous Menu Switch (S) will bring up a menu of information and/
or actions the operator can take at that particular point in time (menu will vary depending upon what the
machine is currently doing, where it’s located and what is allowed). Use the four Navigation Arrows (Y1)
(up, down, left & right) to move through the menu and the information switch to exit the menu. The table
below shows informational messages, the table on the next page shows actions that can be taken directly
from the menu.
S
Machine State Appears on Display Autonomous Menu
During startup (X25) &
(X26)
Autonomy is booting up …[countdown timer]
Manual mode available
After startup, autonomy
has failed to boot up.
Active Fault
Code
Autonomy Unavailable
Autonomy not responding
Manual mode only
While operator is training
a CopyCat plan
(X25) &
(X28)
Training a copycat
Press n or to end
Press yy to pause
While operator is training
a Fill-In plan
(X25) &
(X28)
Training a fi ll-in
Press n or to end
Press yy to pause
While machine is playing
back a CopyCat plan
(X25) &
(X28)
Playing back a copycat
Press n to stop
Press yy to pause
While machine is playing
back a Fill-In plan
(X25) &
(X28)
Playing back a fi ll-in
Press n to stop
Press yy to pause
After training a new plan,
machine needs time to
compile/save the plan
(X25) &
(X30)
Autonomy compiling a plan
If you move the machine, it
will become lost and need
to see a tag when done
At the start of a plan (X29) At start: yy to replay
Within the resume area of
a paused plan (X33) Continue: yy to resume
Not on a trained plan Manual Mode Display No plan: make new plan
At the start of a plan but
unable to play the plan (X13)
LOW BATTERY
No Autonomy functions
A - 18 Nilfi sk Liberty SC50 - 56091197 12/2017
INSTRUCTIONS FOR USEA - ENGLISH 9/2018
AUTONOMOUS MENU (ACTIONS/COMMANDS)
Pressing the Autonomous Mode / Autonomous Menu Switch (S) will bring up a menu of information and/
or actions the operator can take at that particular point in time (menu will vary depending upon what the
machine is currently doing, where it’s located and what is allowed). Use the four Navigation Arrows (Y1)
(up, down, left & right) to move through the menu and the information switch to exit the menu. The table
below shows actions that can be taken directly from the menu, the table on the previous page shows
S
informational messages.
Machine State Appears on Display Autonomous Menu
No home tag set (X31)
Need to set home tag!
Create home tag
Back Select Tag:0 . . *
Machine is disoriented (X27)
Lost, show me a tag! .
Set new home tag
Delete next seen tag
Back Select Tag:0 . . *
On a trained plan (X25) &
(X32)
On plan: make new plan
Delete this plan
Back Select
Not on a trained plan Manual Mode Display
No plan: make new plan
Set new home tag
Delete current tag #4**
Delete next seen tag
Become lost
Back Select Tag:4**
*Tag: 0 . . moving “0” indicates that machine is actively scanning for a location tag.
**Tag: “x” where “x” is the location tag ID number.
12/2017 A - 19 56091197 - Nilfi sk Liberty SC50
ENGLISH - AINSTRUCTIONS FOR USE
9/2018
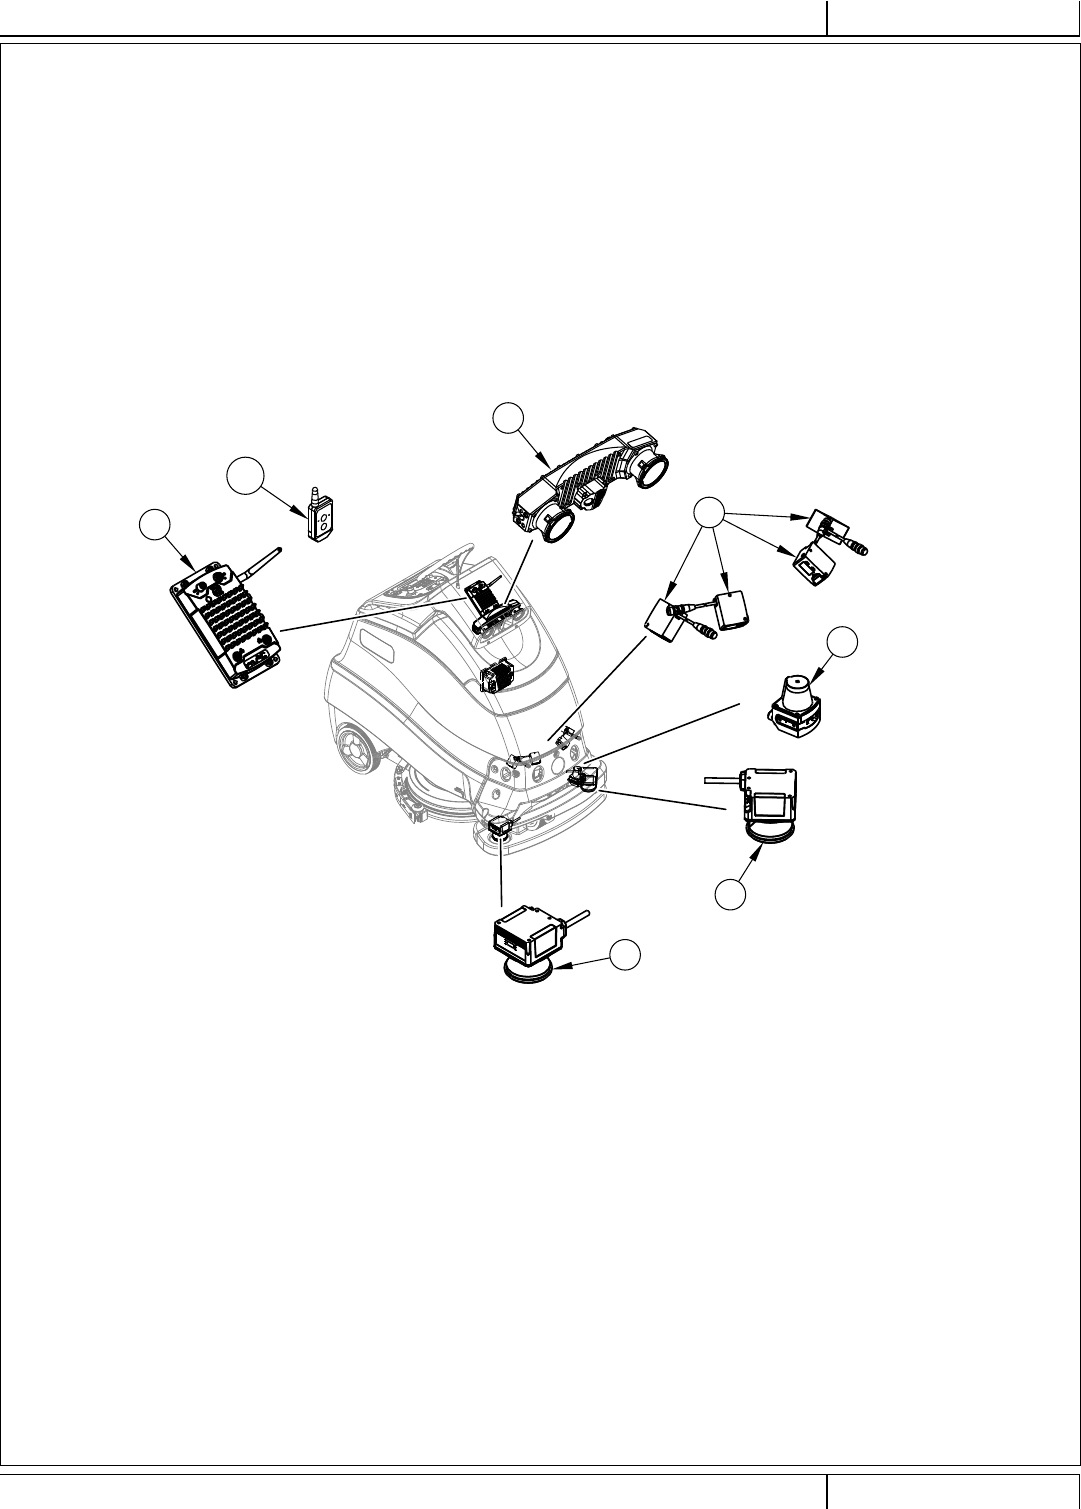
UNDERSTANDING AUTONOMY
The Nilfi sk Liberty SC50 can function autonomously meaning that it functions (operates) on its own, without operator involvement. The machine
can be trained to clean an area independently and actively maneuver around certain obstacles.
Components that make up the Autonomy system, and their basic function, include the following (shown in Figure 1-1):
• 3-D Camera (45) - provides a three-dimensional image of the area in front of the machine.
• 2-D Mapping Laser (14) - provides detection of obstacles in front of and to the left of the machine.
• Drop-off Safety Lasers (16) - detect drop-offs, or major changes in fl oor elevation.
• 2-D Safety Lasers (17), located at front corners of machine – aides in collision prevention and presence detection in the area of an
operating machine.
• Remote (AA). This allows the exchange of status information between the operator and the machine.
• Autonomy Box (46). This is the primary computer for safety during operation.*
• Computer software Interface, (not shown). Defi nes how the autonomous control system interfaces with machine control software and
control system.
FIGURE 1-1
16
17
14
46
17
45
AA
*NOTE
This equipment is approved for this application by the Federal Communications Commission (FCC). FCC ID: 2AMDR00068. This equipment has
been tested and found to comply with the limits for a Class A digital device, pursuant to part 15 of the FCC Rules. These limits are designed to
pro-vide reasonable protection against harmful interference when the equipment is operated in a commercial environment. This equipment
generates, uses, and can radiate radio frequency energy and, if not installed and used in accordance with the instruction manual, may cause
harmful interference to radio communications. Operation of this equipment in a residential area is likely to cause harmful interference in which
case the user will be required to correct the interference at his own expense.
*NOTE
This equipment has been tested and found to comply with the limits for a Class B digital device, pursuant to part 15 of the FCC Rules. These
limits are designed to provide reasonable protection against harmful interference in a residential installation. This equipment generates uses and
can radiate radio frequency energy and, if not in-stalled and used in accordance with the instructions, may cause harmful interference to radio
communications. However, there is no guarantee that interference will not occur in a particular installation. If this equipment does cause harmful
interference to radio or television reception, which can be determined by turning the equipment off and on, the user is encouraged to try to correct
the interference by one or more of the following measures:
—Reorient or relocate the receiving antenna.
—Increase the separation between the equipment and receiver.
—Connect the equipment into an outlet on a circuit different from that to which the receiver is connected.
—Consult the dealer or an experienced radio/ TV technician for help.
A - 20 Nilfi sk Liberty SC50 - 56091197 12/2017
INSTRUCTIONS FOR USEA - ENGLISH 9/2018
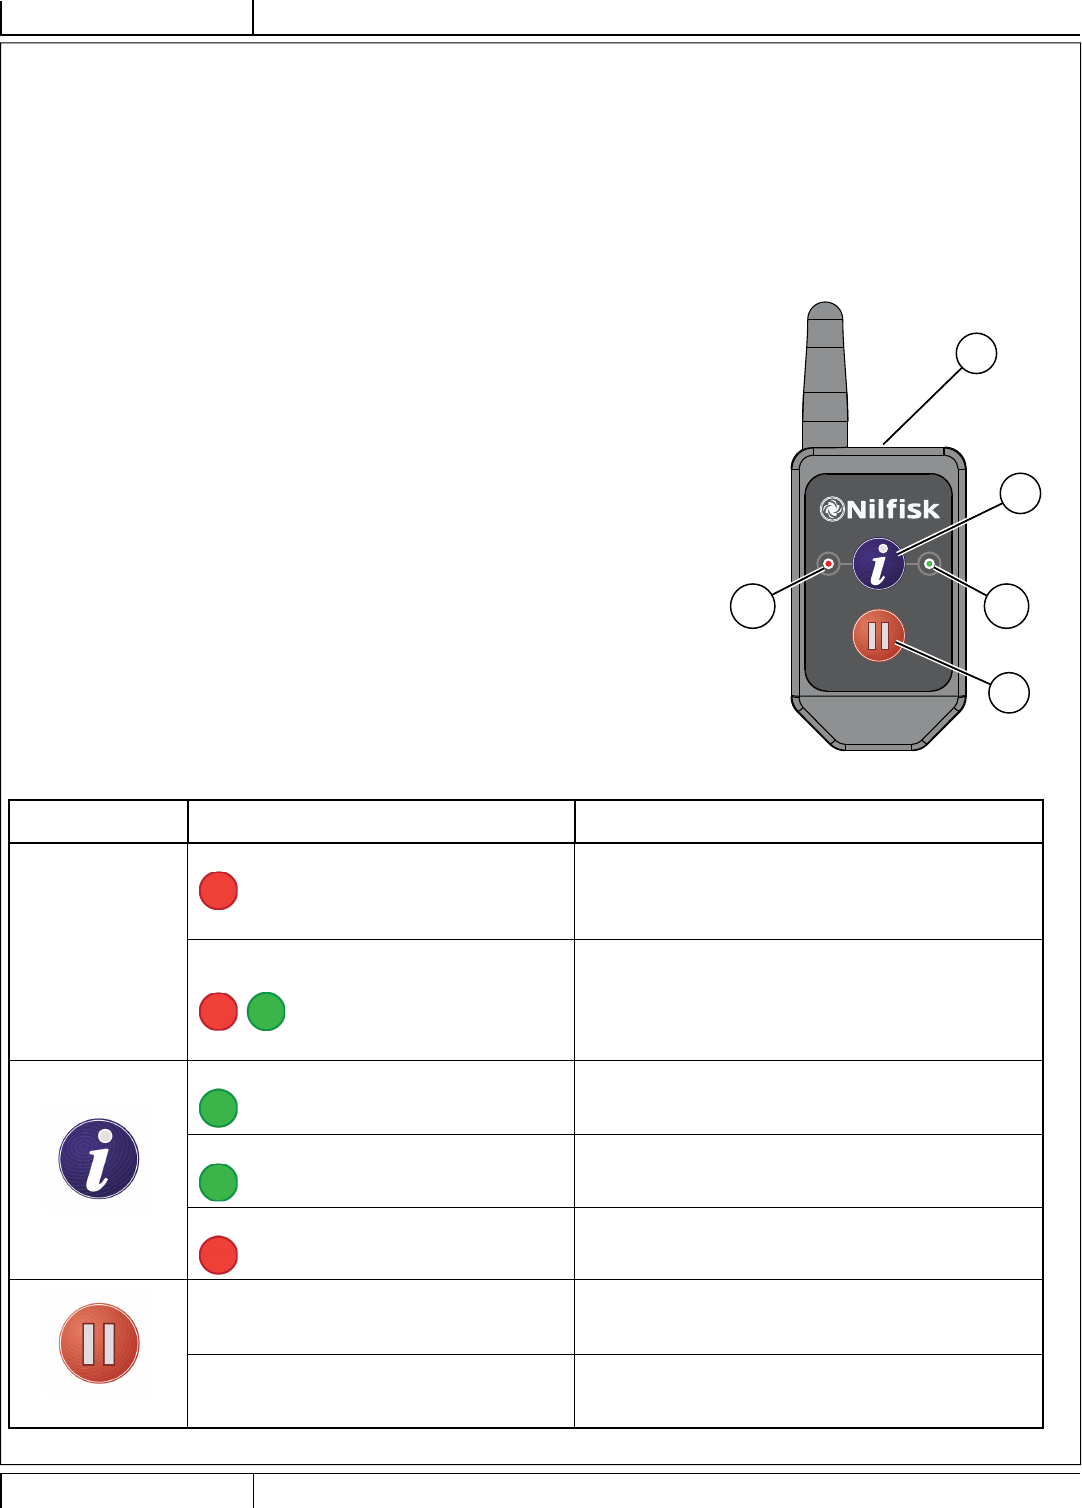
REMOTE
The battery-powered Remote (AA) (shown in Figure 1-2) is a hand-held device that provides two-way communication when the machine is
operating autonomously. Normally it is used when the machine is operating some distance from the operator, and they cannot see or hear it.
NOTE
Remote is approved for this application by the Federal Communications Commission (FCC). FCC ID: 2AMDR00069. This device complies with
part 15 of the FCC rules. Operation is subject to the following two conditions: (1) This device may not cause harmful interference, and (2) this
device must accept any interference received, including interference that may cause undesired operation.
Changes or modifi cations to this device, not expressly approved by the party responsible for compliance, could void the user’s authority to operate
the equipment.
AD
AB
AC2AC1
AA
Start-up Check
1. Remote will fl ash both LEDs (AC1 & AC2) and beep, when the machine is powered
ON to indicate machine and remote are properly paired together.
While the machine is operating in autonomous mode there are three interactions the
operator can have with the machine through the remote.
1- The remote can communicate to the operator by sending alerts using the LEDs
and audible beeps
2- User can request machine status information.
3- User can use the remote to pause the playback of a plan while operating
autonomously.
Remote Status Guide
Button Pressed Response Seen Machine Mode
N/A
Flashes red (left LED) (AC1)
Beeps
Unexpected exit out of autonomy
Flashes red & green (left & right LED) (AC1 &
AC2)
)
Beeps
Plan playback is complete
(AB)
Green fl ash when pressed (AC2) Remote is transmitting
Machine is off or out of range if no response is seen within 5
seconds of press
Solid green, 5 seconds after pressed (AC2) Signal received, in Autonomous
Solid red, 5 seconds after pressed (AC1) Signal received, in Manual
(AD)
Machine stops Machine has been paused in autonomous mode
- Machine playback cannot be restarted via the remote. Return
to the machine with SmartKey to restart.
Beeping stops Machine was in alarm mode, alarms have now been turned
off
- Return to the machine with SmartKey and clear the error.
FIGURE 1-2
12/2017 A - 21 56091197 - Nilfi sk Liberty SC50
ENGLISH - AINSTRUCTIONS FOR USE
9/2018
PREPARE THE MACHINE FOR USE
BATTERIES
If this machine shipped with batteries installed do the following:
• Check that the batteries are connected to the machine.
• Press the Power Switch (B) to power ON machine and check the Battery Indicator (F8). If the gauge is completely fi lled the batteries are ready for use. If the
gauge is less than full the batteries should be charged before use. See the “Charging the Batteries” section.
• IMPORTANT!: IF YOUR MACHINE HAS AN ONBOARD BATTERY CHARGER REFER TO THE OEM PRODUCT MANUAL FOR INSTRUCTIONS
REGARDING SETTING THE CHARGER FOR BATTERY TYPE.
If this machine shipped without batteries installed do the following:
• Consult an Authorized Nilfi sk dealer for recommended batteries.
• Install the batteries by following the instructions below.
• IMPORTANT!: THIS MACHINE HAS AN ONBOARD BATTERY CHARGER REFER TO THE OEM PRODUCT MANUAL FOR INSTRUCTIONS
REGARDING SETTING THE CHARGER FOR BATTERY TYPE.
INSTALL THE BATTERIES
WARNING !
Use extreme caution when working with batteries. Sulfuric acid in batteries can cause severe injury if allowed to contact the skin
or eyes. Explosive hydrogen gas is vented from inside the batteries through openings in the battery caps. This gas can be ignited
by any electrical arc, spark or fl ame. If battery acid makes contact with your skin or eyes, fl ush the affected area with water for 5
minutes and seek medical attention.
When Servicing Batteries...
• Remove all jewelry to avoid accidental shorts.
• Do not smoke.
• Wear safety glasses, a rubber apron and rubber gloves.
• Work in a well-ventilated area.
• Do not allow tools to touch more than one battery terminal at a time.
• ALWAYS disconnect the negative (ground) cable fi rst when replacing batteries to prevent sparks.
• ALWAYS connect the negative cable last when installing batteries.
CAUTION !
Electrical components in this machine can be severely damaged if the batteries are not installed and connected properly. Batteries
should be installed by Nilfi sk or by a qualifi ed electrician.
Only batteries approved for use in this machine by Nilfi sk shall be installed.
24V
255A/H-20HR-RATE
1 Empty the Recovery Tank (22) using the Recovery Tank Drain Hose (37).
2 Press the Power Switch (B) to power OFF machine and remove the magnetic
SmartKey. Unlatch (36) then swing open the Recovery Tank Cover (20) and set the
Prop Rod (39).
3 Tip the Recovery Tank (22) back towards the operator’s platform to expose the
battery compartment. Note: The recovery tank can be removed for complete access
to the batteries if desired. See service manual for recovery tank removal steps.
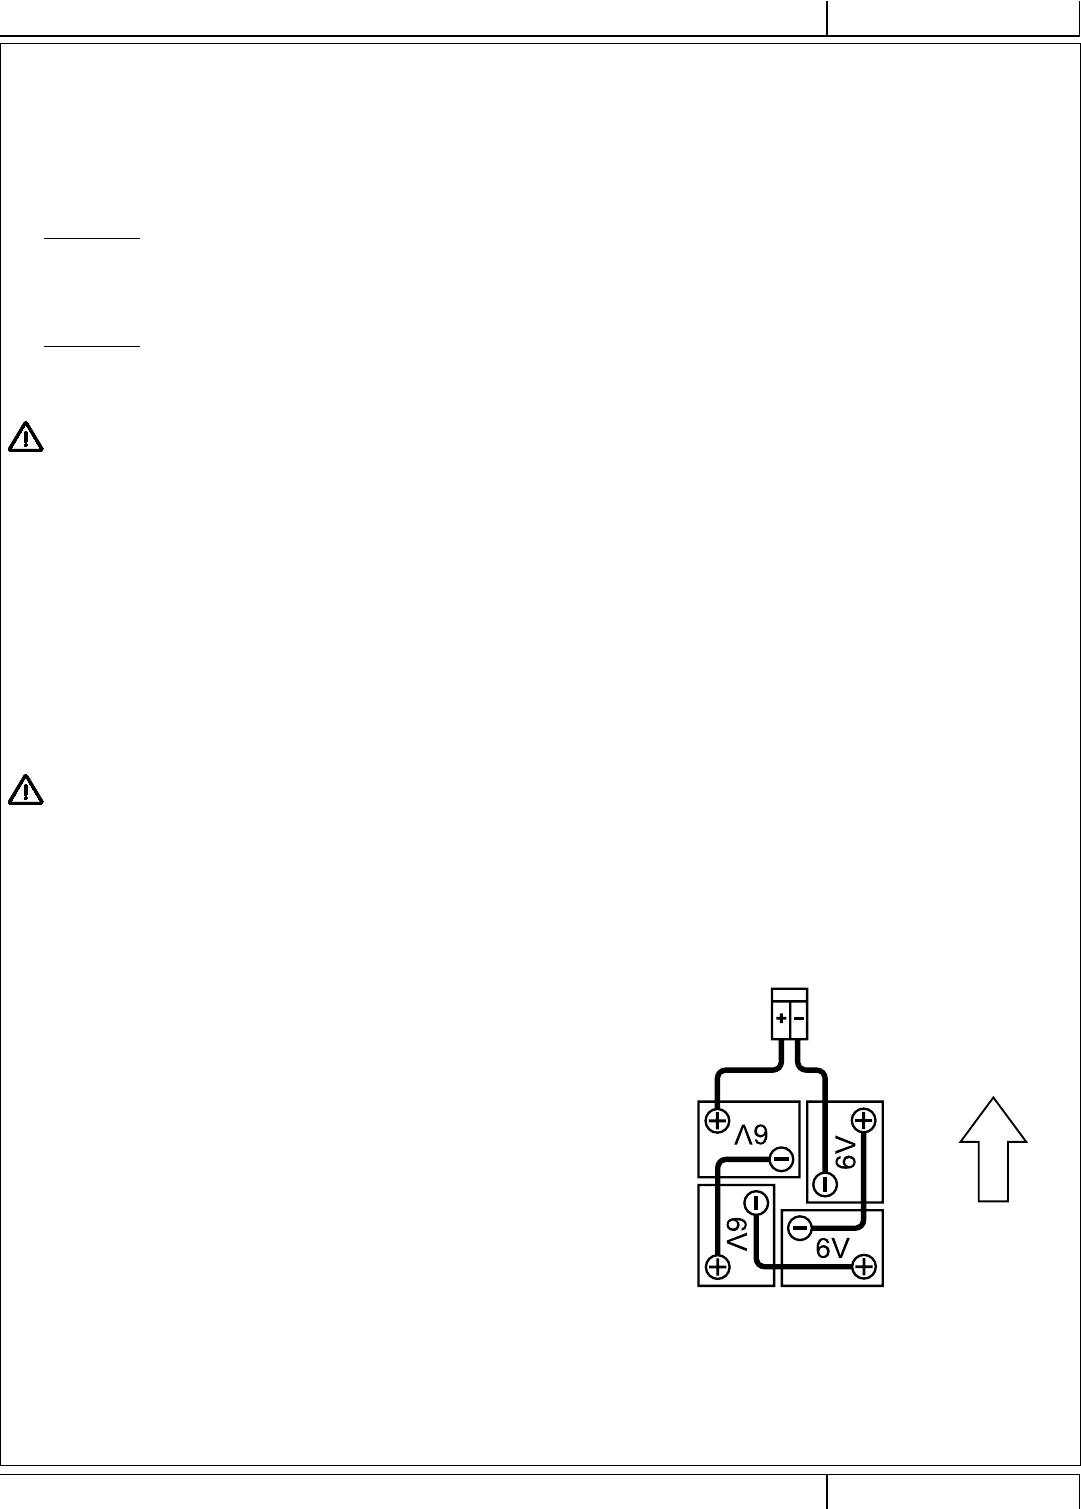
4 Using (2) people and an appropriate lifting strap, carefully lift the batteries into the
compartment tray exactly as shown. Refer to the molded diagram on the underside
of the Recovery Tank Cover.
5 See Figure 2-1. Install battery cables as shown and carefully tighten the nut in
each battery terminal until the battery cable will not rotate. Do not over-tighten the
terminals, or they will be very diffi cult to remove for future service.
6 Install the battery boots and secure tightly to the battery cables with the supplied tie
straps.
7 Connect the machine’s main power cables to the batteries. Close the recovery tank
cover.
When changing batteries or the charger, please contact a local authorized
service center for correct battery, charger and machine settings to prevent
battery damage.
FIGURE 2-1
FRONT
A - 22 Nilfi sk Liberty SC50 - 56091197 12/2017
INSTRUCTIONS FOR USEA - ENGLISH 9/2018
LOCATION TAG
The machine uses a Location Tag to identify its “Home Position” within the building.
IMPORTANT! No plans can be created until the location tag has been installed and identifi ed by the machine.
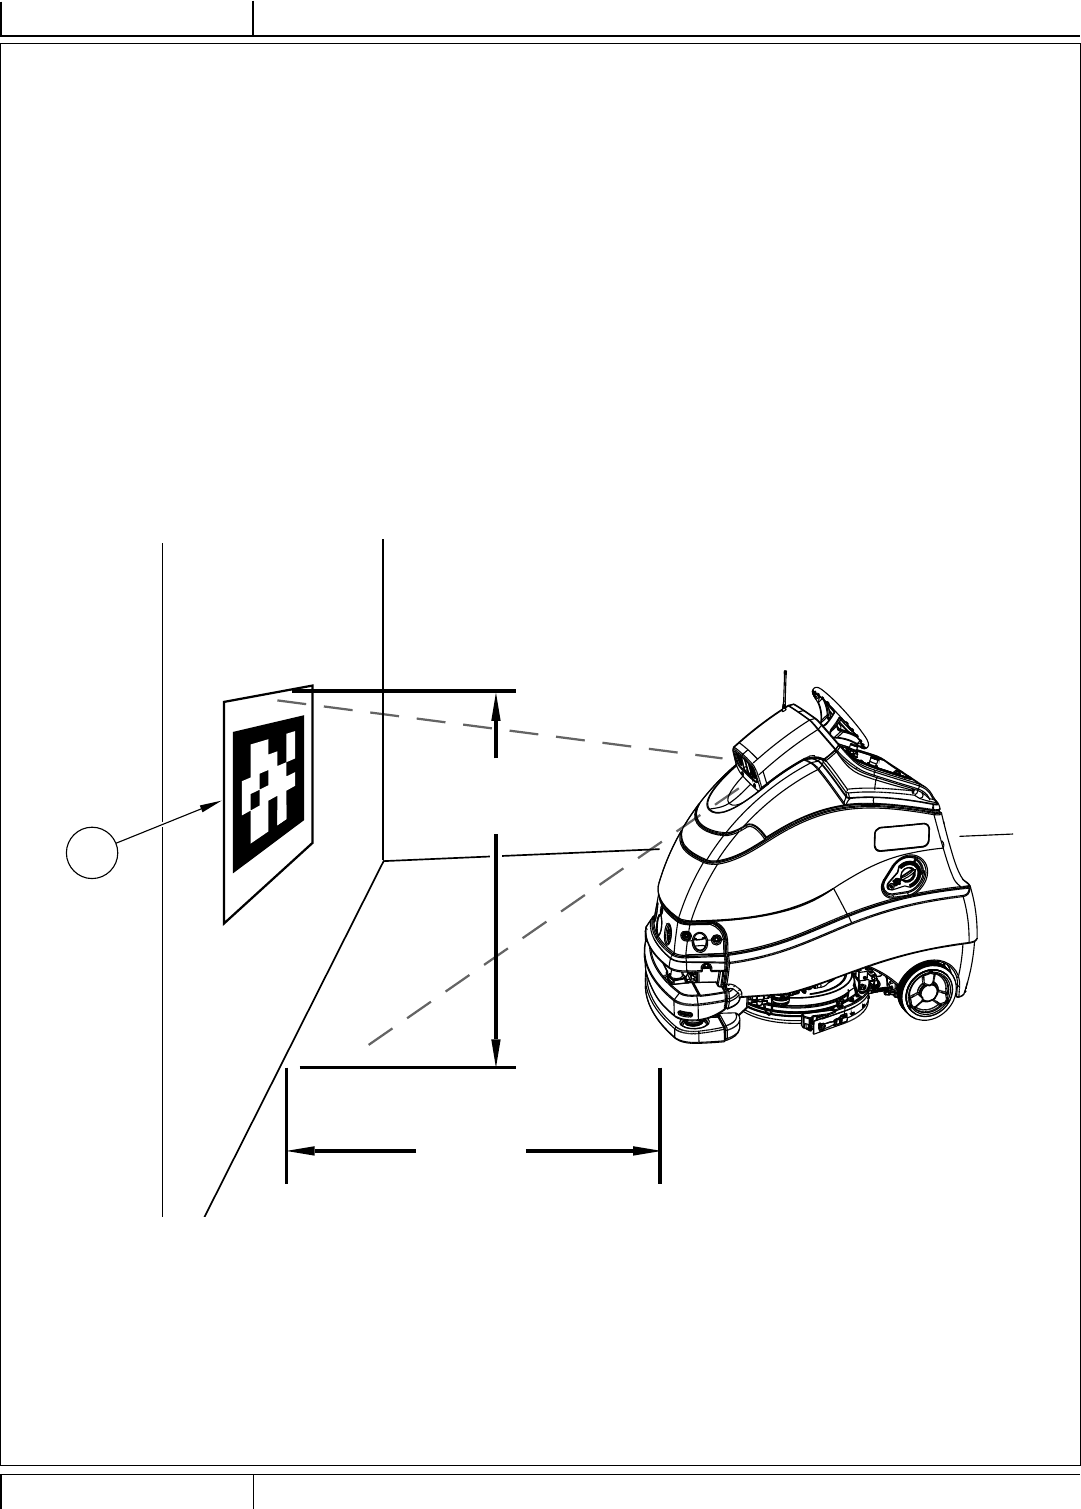
1 See Figure 2-2. The Location Tag (44) should be mounted permanently on a wall where the machine will have an unobstructed view of it,
preferably near where the machine will be charged every day.
2 Place the location tag in an area where there are not movable objects (i.e. garbage cans or other equipment). The machine records
information when setting the home position, if there are new obstacles each time within the vicinity of the location tag, the recorded plan will
shift.
3 Mount the Location Tag to the wall at a maximum height of 4’ (1.2 m). This ensures the tag will be within view of the machine’s 3-D camera
(3-D camera cannot see above the height of the steering wheel). The machine must be driven to the location tag and parked perpendicular to
the wall to properly read the tag. Park the machine about 3’ (1m) away from the tag.
4 The top edge of the Location Tag must be level with the fl oor.
5 If a machine is operated on multiple fl oors of a building, it will need a unique location tag for each fl oor. In a building with four fl oors, four
different Location Tags would be required; one for each fl oor.
6 If the area to be cleaned is very large more than one location tag may be needed per fl oor. Have a location tag within 10-20m of the path
start if at all possible.
7 If a machine is operated in multiple buildings, it will need a unique location tag for each fl oor of each building.
FIGURE 2-2
Max. 4'
(1.2 m)
~3'
(1 m)
44
12/2017 A - 23 56091197 - Nilfi sk Liberty SC50
ENGLISH - AINSTRUCTIONS FOR USE
9/2018
HOME POSITION
• Uncrating the machine for the fi rst time
Follow the steps under “Location Tag” section of this manual to properly affi x a location tag (44) to the wall.
1 When the machine is uncrated for the fi rst time the Home Position will need to be established.
2 The machine prompts operator to Drive to Home Position by displaying the “No Home Set” icon (X31).
3 Drive the machine so the location tag is within view of the machine’s 3-D camera.
4 Press Autonomy Switch (S) to enter menu.
a. Press right arrow to choose “Create home tag”
Need to set home tag!
Create home tag
Back Select Tag:0 . . *
b. Press up or down arrow to highlight “Yes”
c. Press right arrow to “Save”
d. Display will change and machine will begin actively scanning for a location tag.
e. After tag is scanned, machine will emit a two tone ascending sound and the display will show location
tag ID # (xx).
• Go To Home Position
1 Each time the machine is powered ON the home position will need to be reestablished. The machine
prompts operator to Drive to Home Position by displaying the “Go to Home” icon (X27).
2 Drive the machine so the location tag is within view of the machine’s 3-D camera.
3 Machine processes Location Tag (LED Status Bar will be white with blue corners when attempting to read
location tag).
a. If the Location Tag is recognized the machine will;
load the existing map associated with the tag or create a new map if there is no map
associated with it.
emit a two tone ascending sound.
The “Go to Home” icon will disappear from the screen.
b. If Location Tag is not recognized or trying to add as a new a tag that is already recognized the
machine will;
indicate it failed by displaying a fault code
emit a slightly longer low sound.
4 Machine resumes mapping and returns to normal operation.
5 Ideally park the machine facing the location tag. That way when the machine goes through its boot up
process, it will automatically fi nd the location tag and be ready to operate.
• Machine transported to a new site or becomes disoriented
1 Under normal circumstances, the machine will not lose its orientation except under certain circumstances such as:
Being newly uncrated following shipment.
2-D Mapping Laser (14) is covered or requires cleaning.
Being transported to a new location, such as from one building to another.
Moving to a different fl oor where another Location Tag controls the scrubbing operation (transported via elevator).
Being bumped/moved while the machine is turned off (transported via trailer).
Being pushed, towed, or moved by an Operator or spectator while scrubbing autonomously.
2 The machine will prompt the operator to “Go to Home” Position by displaying (X27) on the screen.
3 Follow the steps in “Go To Home Position” section to scan the location tag and reestablish home position.
NOTE: If machine becomes disoriented happens while in autonomous scrub mode the machine will stop scrubbing and send an alert to the
operator via the remote.
X27
X31
S
A - 24 Nilfi sk Liberty SC50 - 56091197 12/2017
INSTRUCTIONS FOR USEA - ENGLISH 9/2018
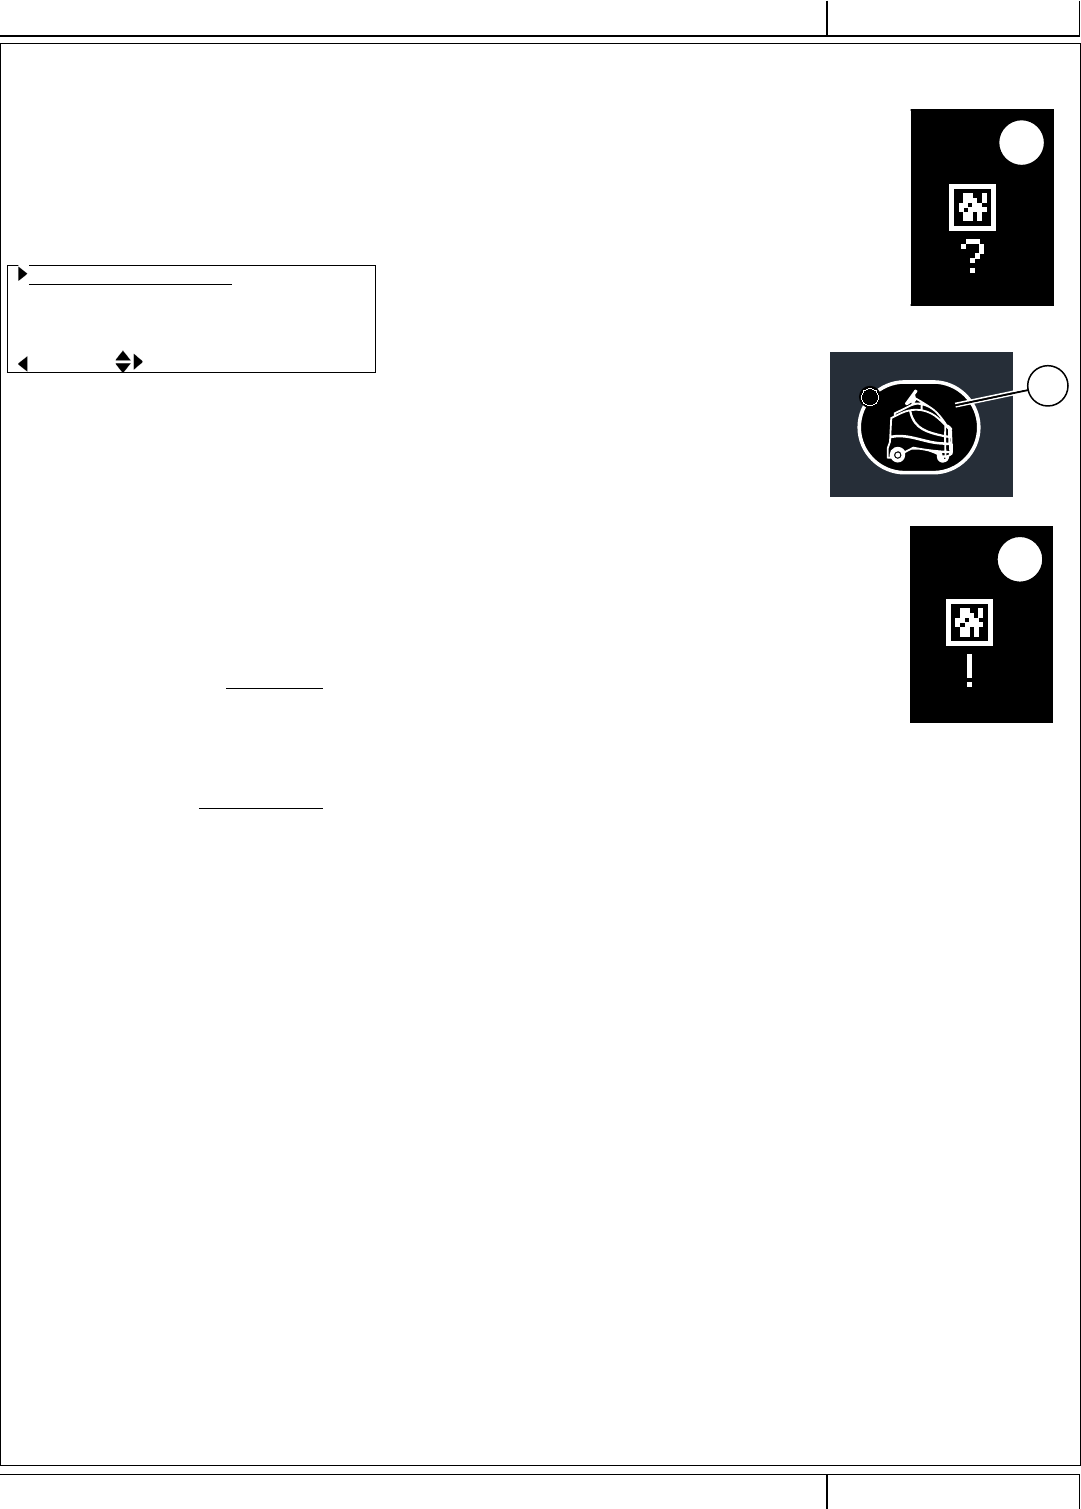
MAGNETIC SMARTKEY™
The use of a Magnetic SmartKey™ (Z) is required to operate this machine. Pressing the power switch without a key in place on the SmartKey
Reader (A) will cause the machine to momentarily turn on and display No Key Indicator (X19) before turning off.
a. The key is required at machine startup. If the operator steps off the machine and removes the key, it must be placed back on the reader
before machine operation is allowed.
b. The key can be removed at any time after initial machine start up, but must be removed from the reader before autonomous playback can
begin.
There are two different Magnetic SmartKeys (Z).
1. The “User” (blue) key allows a basic level of access to the information menu (press Information Switch (Y).
2. The “Supervisor” (yellow) key allows an additional level of access.
3. Additional access is available as a “Technician”. The service menu allows observing operational and user parameters. The
confi guration menu allows adjusting machine settings. See Service Manual for more details.
FIGURE 2-3
A
Y
Z
X19
12/2017 A - 25 56091197 - Nilfi sk Liberty SC50
ENGLISH - AINSTRUCTIONS FOR USE
9/2018
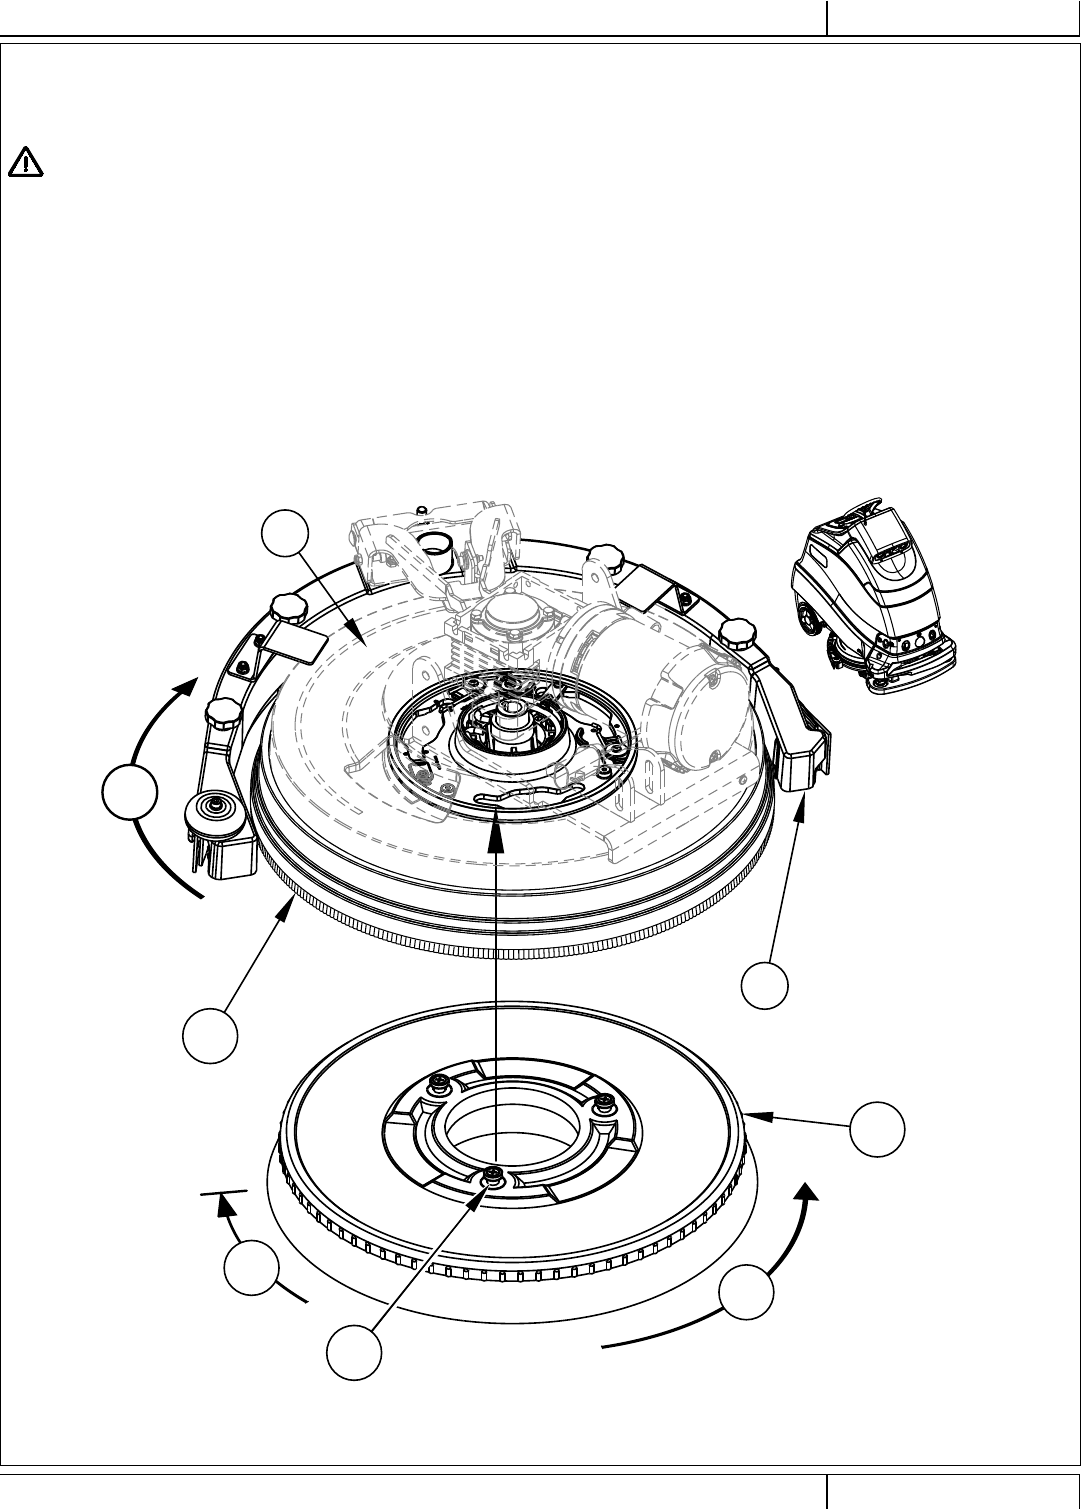
INSTALL THE BRUSH (DISC SYSTEM)
1 Verify which brush or pad is appropriate for the fl oor surface to be cleaned.
2 Make sure the Scrub Deck (8) is in the RAISED position. Make sure the Power Switch (B) is off.
CAUTION !
Turn the machine OFF at the power switch and remove the SmartKey, before changing the brush.
3 See Figure 2-4. From the right side of the machine, rotate the Squeegee Assembly (10) towards the left side of the machine to create better
access to the brush, (AA).
4 Lift the Scrub Deck Skirt (AB) up and slide the brush under the scrub deck.
5 If using a pad, install the pad on the pad holder. It uses a central locking device.
6 To mount the Brush (AC) (or pad holder) lift the brush and align the Lugs (AD) on the brush with the holes on the mounting plate then turn to
lock in place (from the right side of the machine, turn the outside edge of brush towards the rear of machine as shown (AE)). NOTE: During
operation the brush should rotate in direction (AF).
FIGURE 2-4
AC
AA
AB
10
8
AE AF
AD

A - 26 Nilfi sk Liberty SC50 - 56091197 12/2017
INSTRUCTIONS FOR USEA - ENGLISH 9/2018
INSTALL THE PAD (REV SYSTEM)
1 Make sure the Scrub Deck is in the RAISED position. Make sure the Power Switch (B) is off.
CAUTION !
Turn the machine OFF at the power switch and remove the SmartKey, before changing the pad.
2 See Figure 2-5. From the right side of the machine, rotate the Squeegee Assembly (10) towards the left side of the machine to create better
access to the pad, (AA).
3 Daily Scrubbing: Slide a daily scrubbing pad (AE) or Microfi ber Pad (AB) under the pad driver, center it on the fi xed pad driver (AC) and lift
it upwards and press it onto the harpoon face of the pad driver.
4 Floor Finish Removal: Install a new red pad (AE) to the pad driver (AC) as described in step 3 above. If using the optional double sided
Velcro (AF), attach it to the center of maroon SPP pad (AD) and slide this assembly under the red pad and center it and then press upwards
to attach this assembly to the red pad. If the optional double sided Velcro is not used, install a new red as described in step 3 above and
place a new maroon SPP pad on the fl oor centered on the red pad. Lower the deck to the fl oor on top of the maroon SPP pad and check that
it is centered.
NOTE: Never attach a maroon SPP pad directly to the pad driver, damage to the pad driver will result requiring replacement.
FIGURE 2-5
AF
AB
10
AD
8
AC
AE
AA
12/2017 A - 27 56091197 - Nilfi sk Liberty SC50
ENGLISH - AINSTRUCTIONS FOR USE
9/2018
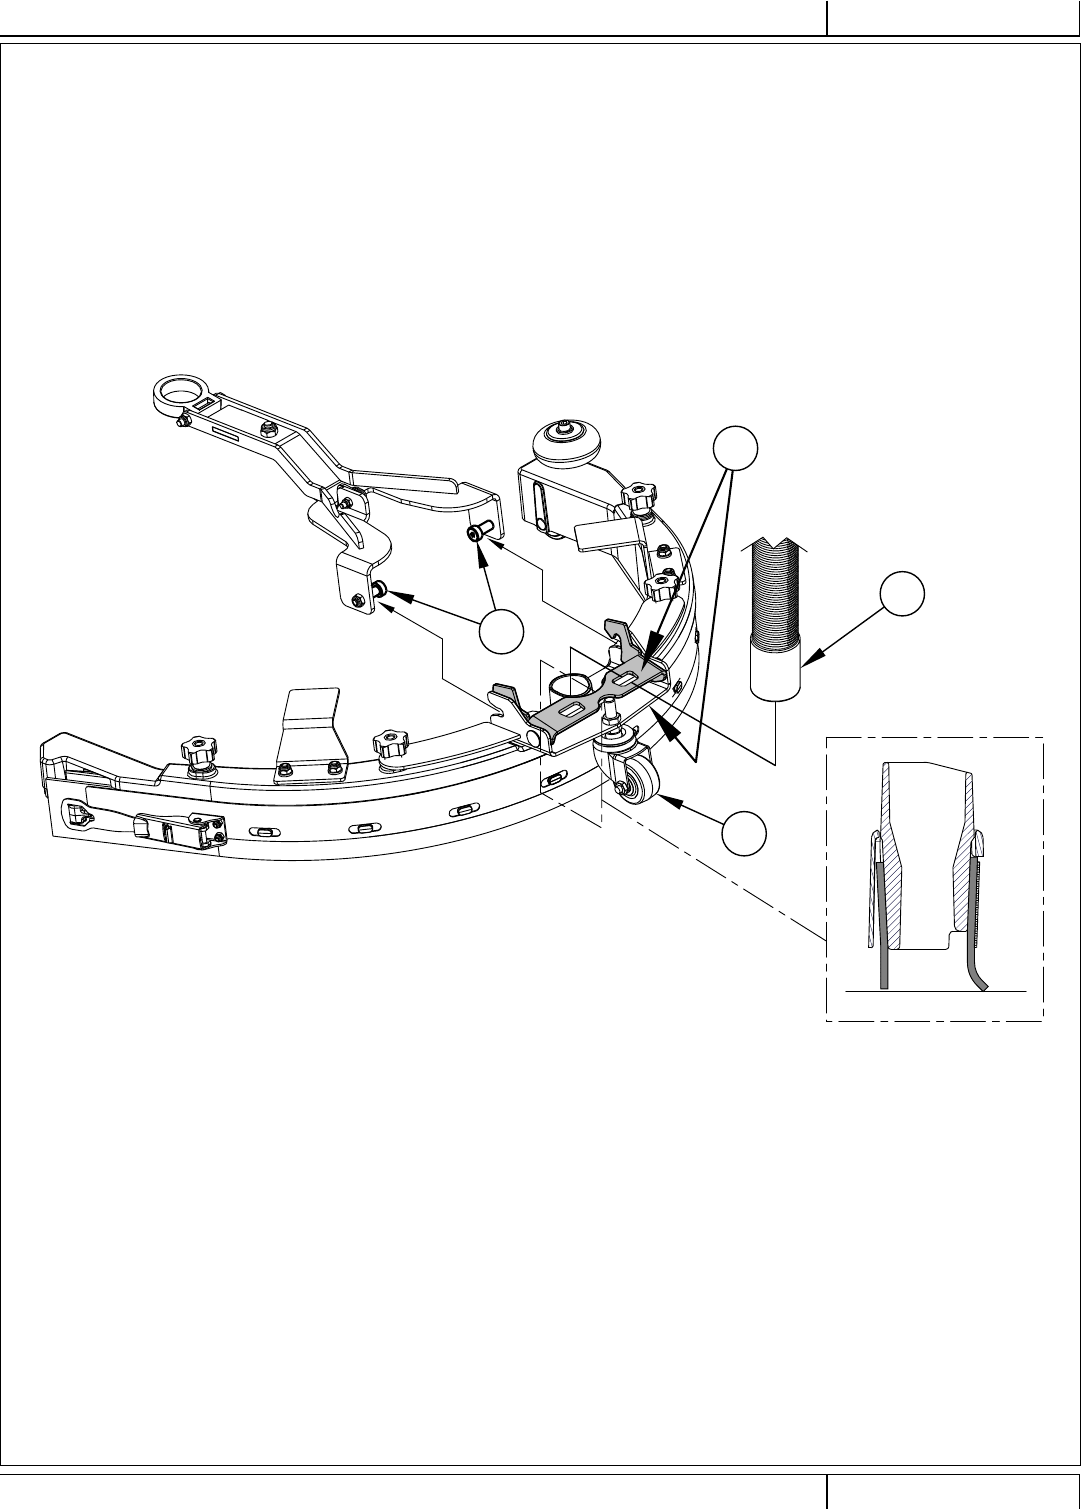
INSTALL THE SQUEEGEE
1 See Figure 2-6. Squeeze the back of the Squeegee Mount Bracket (AA) to open and release the bracket once it’s in place over the deck
arm Pins (AB).
2 Connect the Recovery Hose (AC) to the squeegee inlet.
3 Lower the scrub deck and squeegee, move the machine ahead slightly. If necessary adjust the rear squeegee height using the Rear
Caster Wheel (AD) so that the rear squeegee blade touches the fl oor evenly across its entire width and is bent over slightly as shown in the
squeegee cross section (AE).
FIGURE 2-6
AC
AA
AD
AB
AE
A - 28 Nilfi sk Liberty SC50 - 56091197 12/2017
INSTRUCTIONS FOR USEA - ENGLISH 9/2018
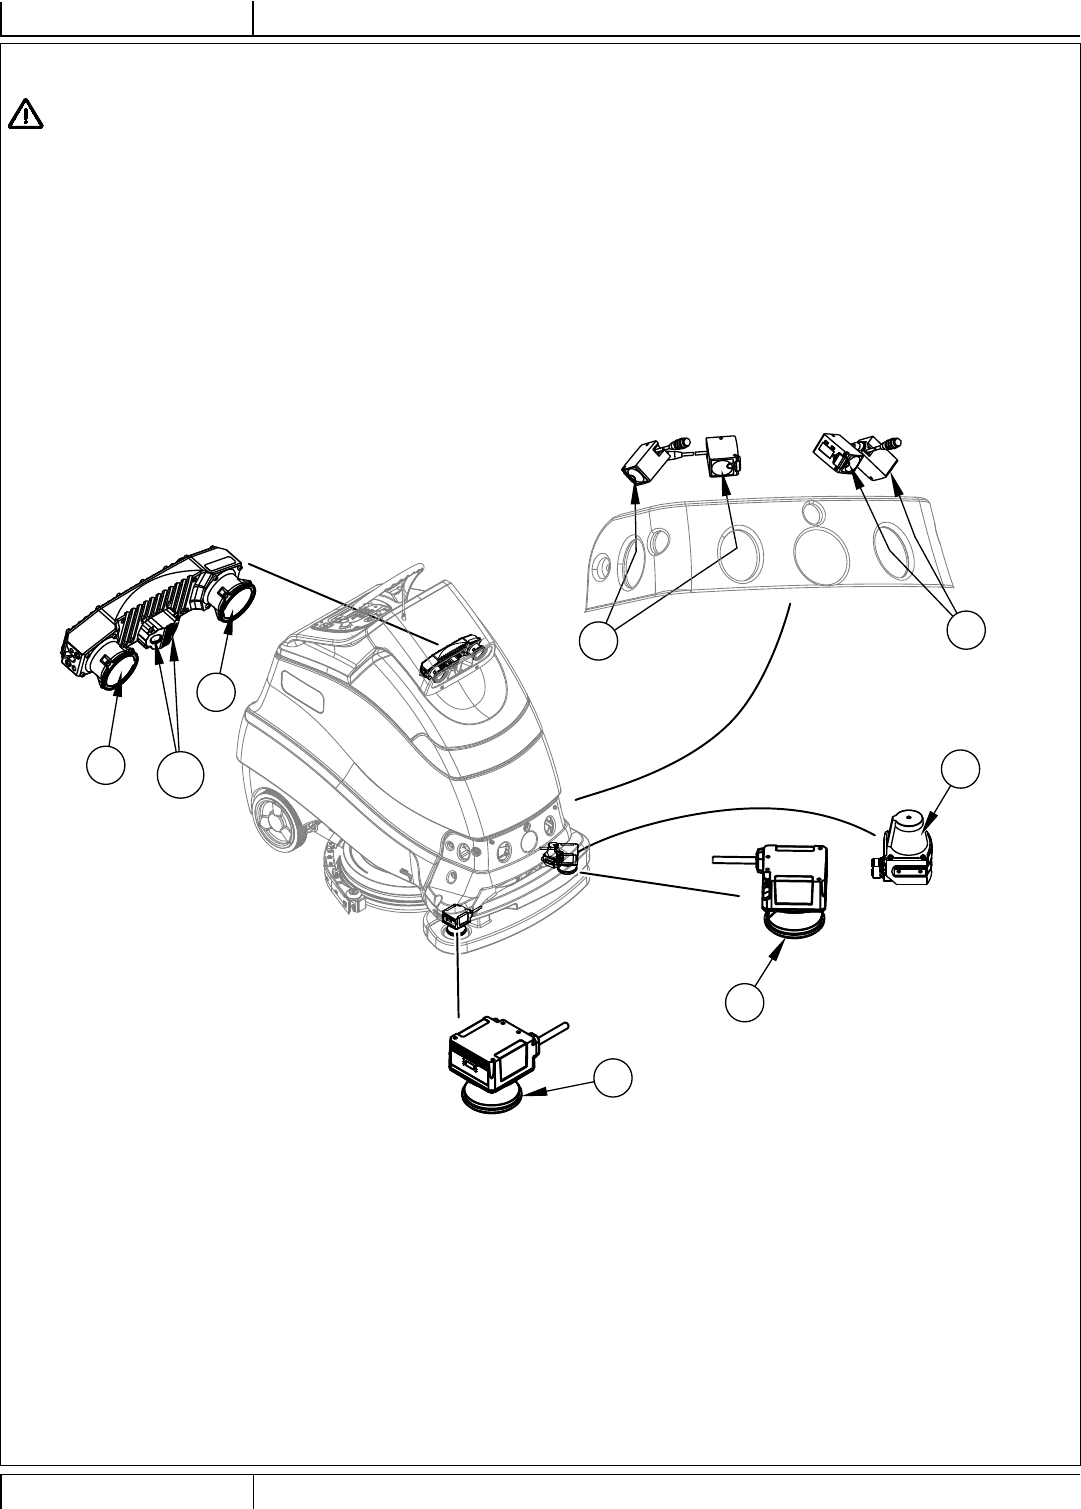
CLEAN SENSOR LENSES
CAUTION!
Do not use any harsh cleaning detergents or abrasive cleaning agents on the camera and laser lenses or damage may occur.
1 See Figure 2-7.
• Clean 3-D Camera lenses (15) and Infrared source lenses (45A) using an optical grade microfi ber cloth dampened with lens cleaning
solution.
• Clean all drop-off safety laser lenses (16) using an optical grade microfi ber cloth dampened with lens cleaning solution.
• Clean all Safety Laser lenses (16 & 17) using an optical grade microfi ber cloth dampened with lens cleaning solution.
• Clean 2-D Mapping Laser lens (14) using an optical grade microfi ber cloth dampened with lens cleaning solution.
FIGURE 2-7
16 16
15 14
45A
15
17
17
12/2017 A - 29 56091197 - Nilfi sk Liberty SC50
ENGLISH - AINSTRUCTIONS FOR USE
9/2018
FILL THE SOLUTION TANK
Open the Solution Tank Fill Cap (41) then fi ll the tank with a maximum of 14 US gallons (53 liters) of cleaning solution. The amount of solution in
the tank can be observed by looking at the Solution Tank Level Sight Tube (38).
The machine is equipped with EcoFlex a detergent dispensing system. When using this system the solution tank should be fi lled with plain water.
The machine can also be used conventionally with detergent mixed with water in the tank. Always follow the dilution instructions on the detergent
container label. The solution should be a mixture of water and the proper cleaning detergent for the job.
CAUTION!
Use only low-foaming, non-fl ammable liquid detergents intended for automatic scrubber machine applications. Water temperature
should not exceed 130 degrees Fahrenheit (55 degrees Celsius).
NOTE: When refi lling the solution tank always empty the recovery tank using Recovery Tank Drain Hose (37).
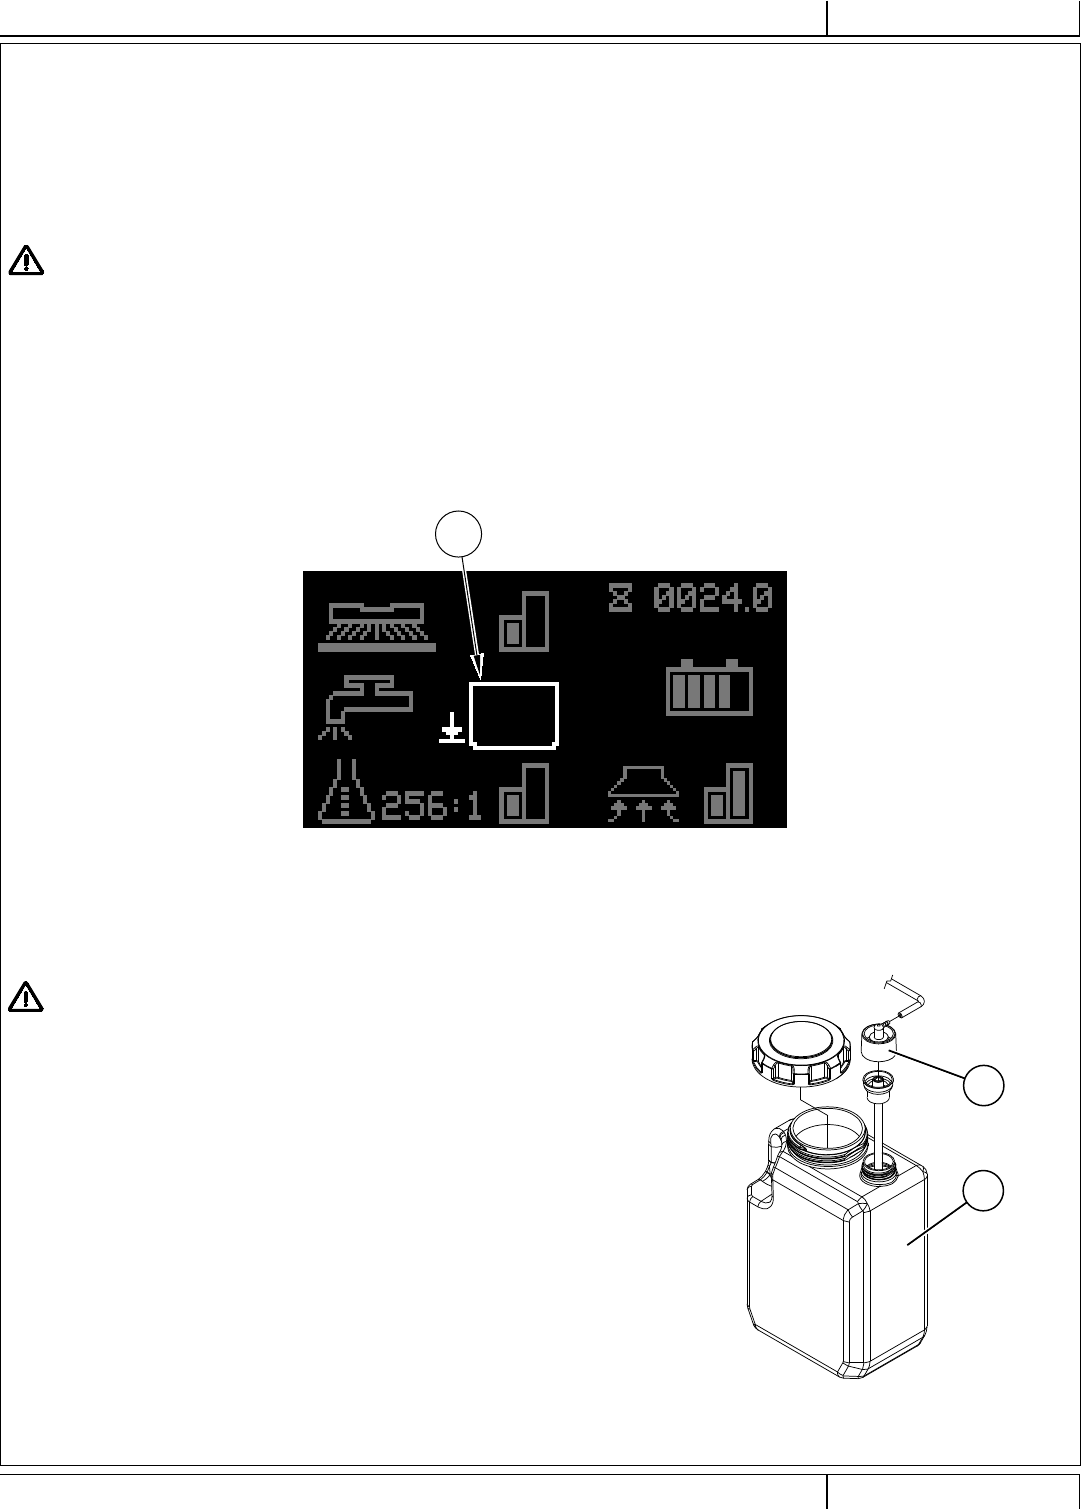
SOLUTION TANK INDICATOR
See Figure 2-8. The solution pump can sense when there is no solution present and send a signal that the solution tank is empty. Once the tank
is empty the Solution Empty Indicator (X23) will fl ash on the display.
FIGURE 2-8
DETERGENT SYSTEM PREPARATION (ECOFLEX)
FILL THE DETERGENT TANK
CAUTION!
AA
3
Always follow the instructions on the labels of the detergent bottles when using
fl oor cleaning detergents. Wear the appropriate personal protective equipment
such as gloves and eye protection when handling fl oor cleaning detergents.
The Detergent Cartridge (3) is located under the Control Panel Housing (20). Fill
the detergent cartridge with a maximum of 1 gallon (4 Liters) of detergent. SERVICE
NOTE: Remove the detergent cartridge from the machine prior to fi lling to avoid spilling
detergent on the machine.
It is recommended that a separate cartridge be used for each detergent you plan to use.
The detergent cartridges have a white decal on them so you can write the detergent
name on each cartridge for clarifi cation. When installing a new cartridge, remove the
factory cap and place the cartridge in the machine. Install the Dry Break Cap (AA) as
shown in Figure 2-9.
The system should be purged of previous detergent when switching to a different
detergent (see “To Purge When Changing Detergent” in the Detergent System Use
Section).
FIGURE 2-9
X23

A - 30 Nilfi sk Liberty SC50 - 56091197 12/2017
INSTRUCTIONS FOR USEA - ENGLISH 9/2018
DETERGENT SYSTEM USE (ECOFLEX)
Detergent Ratio (SCRUB AND SOLUTION SYSTEM MUST BE ON):
No detergent is dispensed until the scrub and detergent systems are activated, direction is selected (Q) or (R) and the Go Pedal (24) is pushed.
The Detergent Indicator (X6) will be displayed in scrub mode when the detergent system is installed on the machine.
The Detergent Ratio/Percentage Indicator (X7) will display the selected ratio/percentage when the detergent system is on.
There are 4 modes of EcoFlex operation:
1A. Chemical Free Cleaning Mode - During scrubbing, the detergent system can be turned off at any time by pressing the Detergent Switch (K) to
allow scrubbing with water only. Detergent Ratio/Percentage Indicator (X7) will be blank and Detergent Indicator Bar Graph (X8) will display no
bars fi lled. Detergent Light (K1) will be off.
2A. Detergent Low Mode – Activated by pressing the Detergent Switch (K) when detergent is off (repeated presses will cycle to High Mode, off and
back to low mode). Detergent Ratio/Percentage Indicator (X7) will display the current low detergent level and Detergent Indicator Bar Graph (X8)
will display fi rst bar fi lled. Detergent Light (K1) will be on. See below the steps “To program the Detergent Low Level”.
3A. Detergent High Mode – Activated by pressing the Detergent Switch (K) when detergent is at low mode (repeated presses will cycle to low mode,
off and back to high mode). Detergent Ratio/Percentage Indicator (X7) will display the current high detergent level and Detergent Indicator Bar
Graph (X8) will display left and right bars fi lled. Detergent Light (K1) will be on. See below the steps “To program the Detergent High Level”.
4A. Burst of Power Cleaning Mode – Press the Burst of Power Switch (O) to enter Burst of Power mode. Burst of Power Indicator (X22) will blink
for one minute on the display along with a 60 second timer countdown. Press Switch (O) again before 60 seconds to cancel Burst of Power. The
amount of time Burst of Power runs is adjustable (see “Information Menu Display” submenu “Options”).
• Detergent ratio will increase to the pre-programmed “high concentration” detergent level (as noted in programming instructions below).
Detergent system will be turned ON at “high concentration” detergent level if it was OFF.
• Solution fl ow rate will increase to the next higher level.
• Scrub pressure will increase to the next level.
• Vacuum power will increase to the next level, unless the vacuum system is off then it will remain off.
To program the Detergent High Level
1. Press the Information Switch (Y) to enter the information menu Use the four Navigation Arrows (Y1) (up, down, left & right) to move through the menu.
2. Scroll to “Options” and press the right navigation button to enter the Options menu. NOTE: Supervisor key required to access Options menu.
3. Scroll down to “Detergent High” press the right navigation button to select the ratio/percentage.
4. Scroll up or down to “Edit” (cycle through) available values: (Note: only ratios/percentages that are a higher concentration than the low detergent setting
will be available.
Ratio = 300:1, 256:1, 200:1, 150:1, 128:1, 100:1, 64:1, 50:1, 32:1, 26:1
Percentage = 0.3%, 0.4%, 0.5%, 0.7%, 0.8%, 1.0%, 1.5%, 2.0%, 3.0%, 3.8%.
CAUTION!
Do not use a concentration level exceeding the detergent manufacturer’s recommendation.
5. Once the desired level is displayed on the screen press the right navigation button to “Save” your changes, or the left navigation button to “Cancel” your
changes.
To program the Detergent Low Level
1. Press the Information Switch (Y) to enter the information menu Use the four Navigation Arrows (Y1) (up, down, left & right) to move through the menu.
2. Scroll to “Options” and press the right navigation button to enter the Options menu. NOTE: Supervisor key required to access Options menu.
3. Scroll down to “Detergent Low” press the right navigation button to select the ratio/percentage.
4. Scroll to cycle through the available options. (Note: only ratios/percentages that are a lower concentration than the high detergent setting will be available.
5. Once the desired level is displayed on the screen press the right navigation button to “Save” your changes, or the left navigation button to “Cancel” your
changes.
Once set, the detergent fl ow rate automatically increases and decreases with the solution fl ow rate, but the detergent ratio/percentage remains the same.
To Purge When Changing Detergent (SCRUB AND SOLUTION SYSTEMS MUST BE OFF):
SERVICE NOTE: Move machine over fl oor drain before purging because a small amount of detergent will be dispensed in the process.
1 Disconnect and remove the detergent cartridge.
2 Place the Magnetic SmartKey (Z) onto SmartKey Reader (A). Press the Power Switch (B) to power ON machine. Wait a few seconds for the start-up
sequence to fi nish.
3 Press and hold the Solution Switch (J) and the Detergent Switch (K) down for 2 seconds. Release the switches when the Detergent Purge Indicator (X17)
appears on the display (the Detergent Switch Light (K1) and Solution Switch Light (J1) will be ON). NOTE: Once activated the purge process takes 20
seconds (timer countdown will display). Press (J) and (K) again before 20 seconds to cancel purge. See illustration on next page for Detergent System
indicators. Normally one purge cycle is adequate to purge the system.
To Purge Weekly (SCRUB AND SOLUTION SYSTEMS MUST BE OFF):
1 Disconnect and remove the detergent cartridge. Install and connect a Cartridge fi lled with clean warm water.
2 Follow steps 2 and 3 from “To Purge When Changing Detergent”.
When the detergent level is nearing the bottom of the cartridge it is time to refi ll or replace the cartridge.
SERVICE NOTE: Follow the “To Purge Weekly” instructions above if the machine is going to be stored for an extended period of time.