Carol Electronics Co CAROL880 DIGITAL WIRELESS MICROPHONE User Manual
Taiwan Carol Electronics Co Ltd DIGITAL WIRELESS MICROPHONE
User manual
DWR-882 Digital Wireless Microphone Manual
Thank you very much for selecting DWR-882 Digital Wireless Microphone. It is
recommended to read this manual carefully before using to make optimum use of your
equipment.
DWR-882 Digital Wireless microphone, based on the concept of designing for modern
lifestyle, with graceful curve, fine texture and user friendly design, is suitable for all kinds of
indoor activities, such as family, karaoke, school, company, organization and so on.
I. Product Contents:
1. One DWR-882 Digital Wireless Receiver
2. Two DWM-880 Digital Wireless Handle Microphones
3. One DC 7.5V Power adapter
4. One φ6.3 M-XLR/M-XLR Cable
5. One User’s Manual
II. Parts Identification:
OUT PUT RESETRESET
figure 1
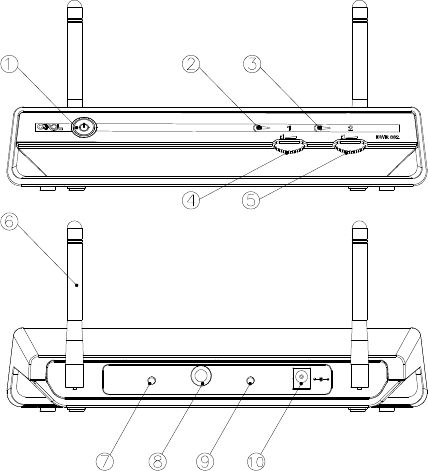
1. DWR-882 Digital Wireless Receiver (as shown in figure 1)
(1) POWER SWITCH: Switches on/off the Receiver (with status LED).
(2) MIC 1 CONNECTING LED: Lights up when microphone 1 is connected.
(3) MIC 2 CONNECTING LED: Lights up when microphone 2 is connected.
(4) VOLUME CONTROLLER 1: Controls the output volume of microphone 1.
(5) VOLUME CONTROLLER 2: Controls the output volume of microphone 2.
(6) ANTENNA: Receives signals from the microphone. The angle of the antennas can
be adjusted leftward, rightward or backward manually.
(7) RESET BUTTON 1: Resets microphone 1 (FOR TECHNICIANS USE ONLY).
(8) φ6.3 FEMALE JACK: Connects to the output of amplifier.
(9) RESET BUTTON 2: Resets microphone 2 (FOR TECHNICIANS USE ONLY).
(10) DC POWER RECEPTACLE: Connects DC adapter, and the polarity of central pole is
positive.
UM-3
UM-3
figure 2
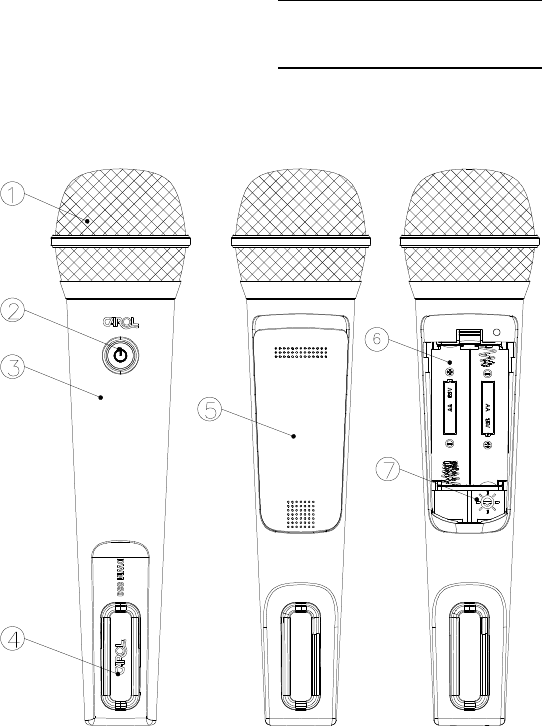
2. DWM-880 Digital Wireless Handle Microphone (as shown in figure 2)
(1) BALL GRILLE: Protects the capsule, and the enclosed windscreen effectively
reduces pop noises.
(2) POWER SWITCH: Switches on/off the microphone (with status LED).
(3) HOUSING: For easy handling the microphone and protects the wireless
transmitting PCB inside.
(4) LOGO PLATE: Protects the antenna and strengthen the transmitting effect. Do
not cover this area while using.
(5) BATTERY COVER: Protects batteries and keeps them from falling off.
(6) BATTERY COMPARTMENT: Accommodates two AA batteries.
(7) CHANNEL SWITCH: Changes the channel (total 16 channels) to eliminate possible
interferences.
III. Operating Instruction:
1. Setting up:
(1) Connect the supplied DC adapter to the power receptacle on Receiver, and then
plug the DC adapter to a wall outlet.
(2) Press the Receiver’s power switch to turn the power on, and the status LED will
light up green.
(3) Press the microphone’s power switch to turn the power on, and the status LED
will light up green. When the microphone connecting LED on the Receiver lights
up red, it indicates the microphone signal is been received by the Receiver.
(4) If the feedback noise appears when the volume is too high or the microphone is
too close to the speaker, turn the volume down.
(5) For best result, keep the microphone to the sound source in between 2 to 5 cm.
2. Turning off
(1) Keep pressing the microphone power switch for 2 to 3 seconds till the status LED
goes off. When the microphone is been turned off, the microphone connecting
LED on the Receiver will also go off.
(2) Press the power switch on the Receiver till the status LED goes off.
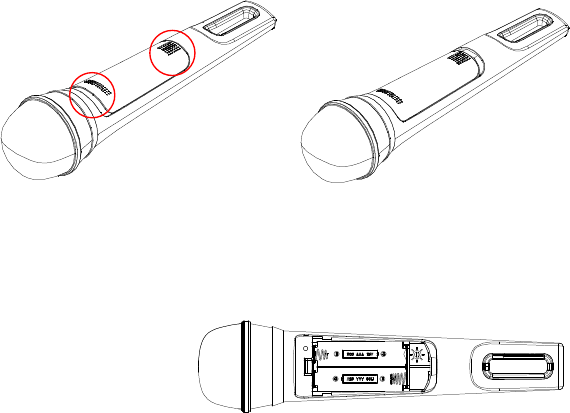
3. Replacing batteries
(1) When the status LED keeps blinking after the microphone is on, it indicates the
battery energy is running low, so please replace the batteries.
(2) As shown in figure 3, press on where circle 1 indicates and push the battery cover
forward to the end, then remove the cover (CAUTION: To avoid injury, DO NOT
place your fingers at where circle 2 indicates when pushing the cover).
figure 3
(3) Insert two AA batteries in the battery compartment according to the polarity
marks.
figure 4
(4) Replace the battery cover. Place the cover on top front of the battery
compartment, then press on where circle 3 indicates and push the battery cover
downward to the end (CAUTION: To avoid injury, DO NOT place your fingers at
where circle 4 indicates when pushing the cover).
1
2
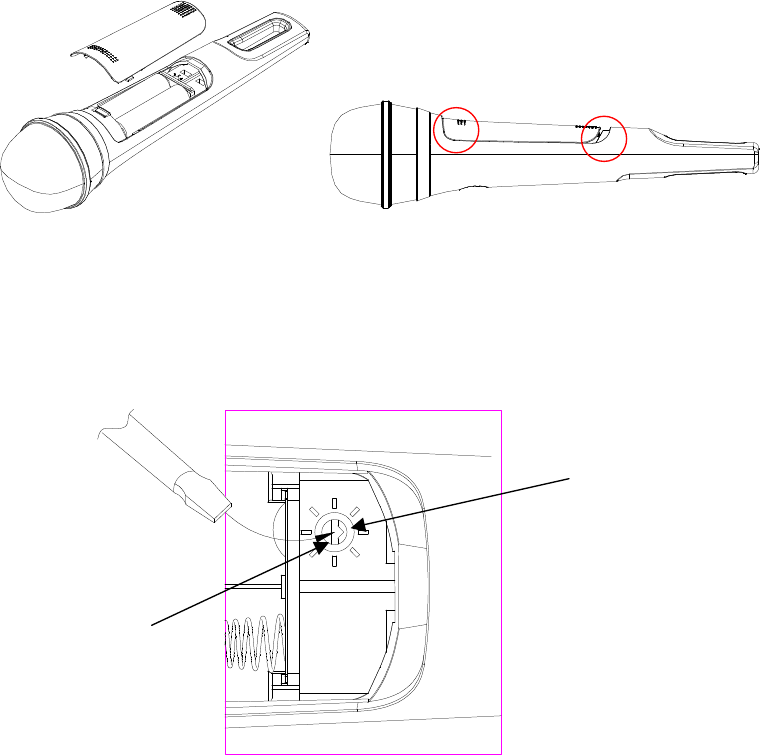
figure 5
4. Change the Digital Wireless Microphone Channel
When using wireless microphone, there might be interferences from the signals
transmitted by another wireless microphone or other 2.4G wireless appliances near
by. These disturbances can be solved by selecting a different channel.
figure 6
(1) When changing the channel, it is not necessary to turn the power off. Open the
battery cover, and the channel switch is located next to the battery
compartment. There are 8 channel scales on the switch (as shown in the figure 6),
and another 8 channels can be selected in between scales.
(2) Fitting a slotted screwdriver into the slot, and rotate the switch clockwise or
counter-clockwise to a desired channel. When a new channel is selected, the
microphone connecting LED on the Receiver will blink once, which indicates the
microphone and Receiver are reconnected.
(3) To avoid interference and gain the best result, microphone 1 and 2 should be 8
channels apart. If not applicable, keep at least 2 channels apart.
IV. Troubleshooting:
1. No sound
(1) Check if the power to Receiver is well connected.
(2) If the status LED is not lit when the microphone been switched on, check
whether the batteries are properly installed or have enough energy.
3
4
Fit the slotted
screwdriver into this
slot.
When selecting
the channel, aim
the arrow at the
scale or in
between two
scales.
(3) The transmitting range is 20 meters, so keep the microphone within the effective
range, or the output audio might be inconsistent.
V. Specification:
1. Digital Wireless Receiver
Model : DWR-882
Power Consumption : 1.5W
Receiving Sensitivity : -78dBm
Volume Adjusting Range : 0dB~12dB
Output Jack : φ6.3 Stereo Female Jack
Output Lever : 100mV
Dimension : 284(L) × 157(W) × 211(H) mm
Weight : 1.5Kg
2. Digital Wireless Handle Microphone
Model : DWM-880
Carrier Frequency : 2.404~2.476 GHz
Transmitting Power : 4.5dBm
Capsule : Dynamic
Polar Pattern : Super-Cardioid
Impedance : 600Ω
Frequency Response : 80Hz~12,000Hz
Power Supply : Two AA batteries
Battery Life : Approx. 26 hours
Dimension : φ55 × 260(L) mm
Weight : 180 g (W/O Batteries)
3. Power Adapter
Input : AC 100/240V ~ 50/60Hz 0.4A
Output : DC 7.5V/1A 7.5W
VI. Precautions:
1. Do not exposure the product to rain, water or heavy humidity environment.
2. Avoid falling, or hitting by external force.
3. Do not place under the direct sunlight or the high temperature environment.
4. Do not use the power adapter for other electronic devices as it might damage the
electric circuit.
5. Avoid approaching the TV set, computer, or electric devices with CRT monitor.
6. While using the wireless microphone, keep the Receiver away from any interference
sources such as computer or communication equipment.
7. If not in use for a long period of time, remove the batteries and the power adapter,
and store them separately.
8. When the status LED keeps blinking after the microphone is on, it indicates the
battery energy is running low, so please replace the batteries.
VII. Caution
1. The changes or modifications not expressly approved by the party responsible for
compliance could void the user’s authority to operate the equipment.
2. To comply with the FCC RF exposure compliance requirements, this device and its
antenna must not co-located or operating to conjunction with any other antenna or
transmitter.
3. This device complies with Part 15 of the FCC Rules. Operation is subject to the
following two conditions: (1) this device may not cause harmful interference, and (2)
this device must accept any interference received, including interference that may
cause undesired operation.