Carpoint CP-X370 Car Navigation User Manual eManual XROAD370
Carpoint Co., Ltd. Car Navigation eManual XROAD370
Carpoint >
USERS MANUAL
X-Road User’s Manual
Description
User’s Manual
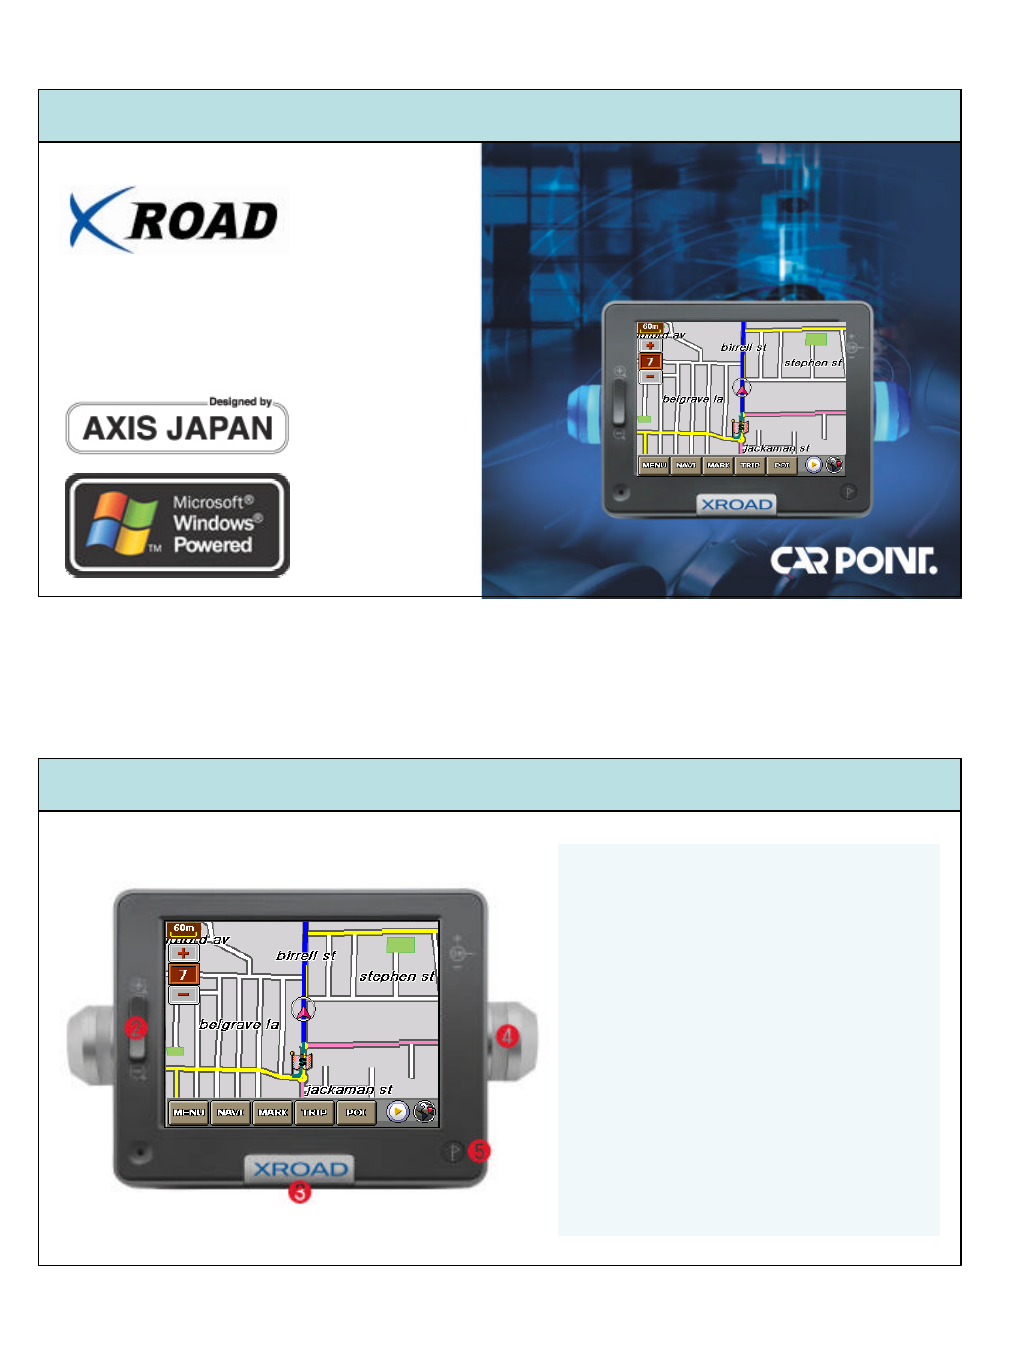
①Display : Points current position
②Zoom in & out : Enlarge and
reduce a scale, pressing + , -
buttons
③POP-UP Menu : Display & Hide
④Message Ramp : Indicate the
direction to turn right or left by
following appropriate light
⑤Destination : Destination Index
①

FCC NOTICE
THIS DEVICE COMPLIES WITH PART 15 OF THE FCC RULES.
OPERATION IS SUBJECT TO THE FOLLOWING TWO CONDITION:
(1) THIS DEVICE MAY NOT CAUSE HARMFUL INTERFERENCE, AND
(2) THIS DEVICE MUST ACCEPT ANY INTERFERENCE RECEIVED,
INCLUDING INTERFERENCE THAT MAY CAUSE UNDERSIRED
OPERATION.
This equipment has been tested and found to comply with the limits for a Class B
digital device, pursuant to part 15 of the FCC Rules. These limits are designed to
provide reasonable protection against harmful interference in a residential installation.
This equipment generates, uses and can radiate radio frequency energy and, if not
installed and used in accordance with the instructions, may cause harmful interference
to radio communication. However, there is no guarantee that interference will not
occur in a particular installation. If this equipment does cause harmful interference to
radio or television reception, which can be determined by turning the equipment off and
on, the user is encouraged to try to correct the interference by one or more of the
following measures :
- Reorient or relocate the receiving antenna.
- Increase the separation between the equipment and receiver.
- Connect the equipment into an outlet on a circuit difference from that to which
the receiver is connected.
- Consult the dealer of an experienced radio/TV technician for help.
NOTE : The manufacturer is not responsible for any radio or TV interference caused by
unauthorized modifications to this equipment. Such modifications could void the user’s
authority to operate the equipment.
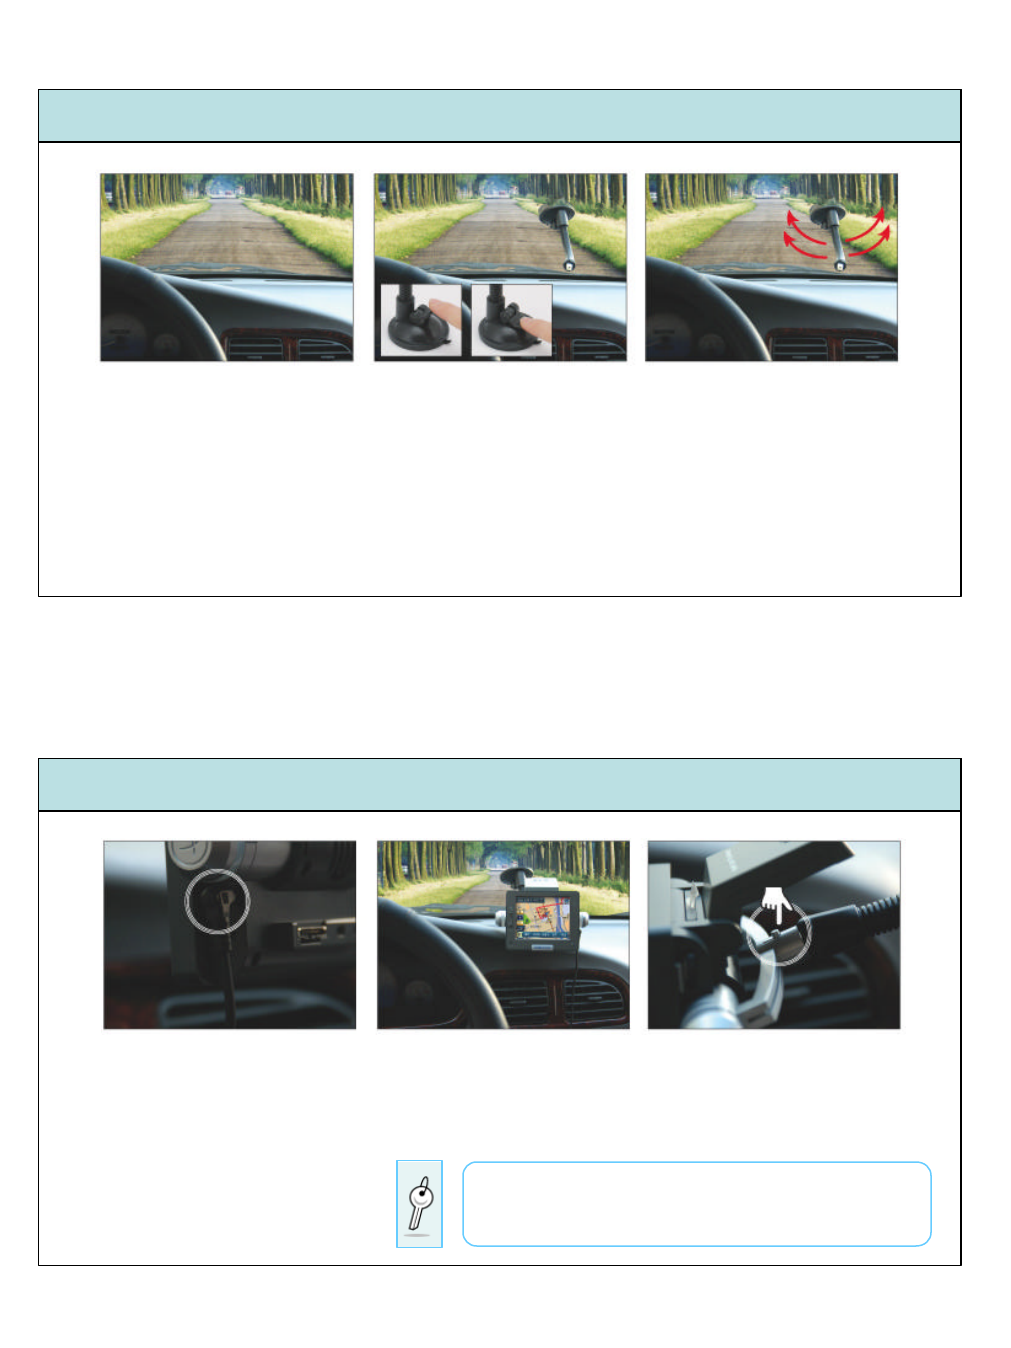
1. Determine proper place to
put on the front windshield.
-Avoid the place that would
interfere driving.
-Wipe out the spot to put.
3. Inhale the air after placing
the arm.
-After placing the transparent
disk against the windshield,
push the inhalation button.
2. Adjust it to fix to the right
direction against the driver’s
view point.
-Move the arm to the right angle
for the driver.
-Do not place X-Road right in front
of the driver so that it cannot fell
down to the driver in case of
accident.
-Do not try to fix while driving. -Wipe out the spot to place to keep it
dropped.
4. Connect cable to power
from cigar jack.
※Do not place cable into car-pack.
5. Connect to the main system ※How to separate the main system
-Push the main system until
the basket operates to lock. -Pull the main system pushing
the button on the basket.
-The navigation system will
automatically started putting
power on.
※Must inject cable to cigar jack
after starting your car.
Please place the main system after completion of setting the
arm to the windshield. Otherwise the system would be hard to
place or consequently be broken.
Set Up
Set Up
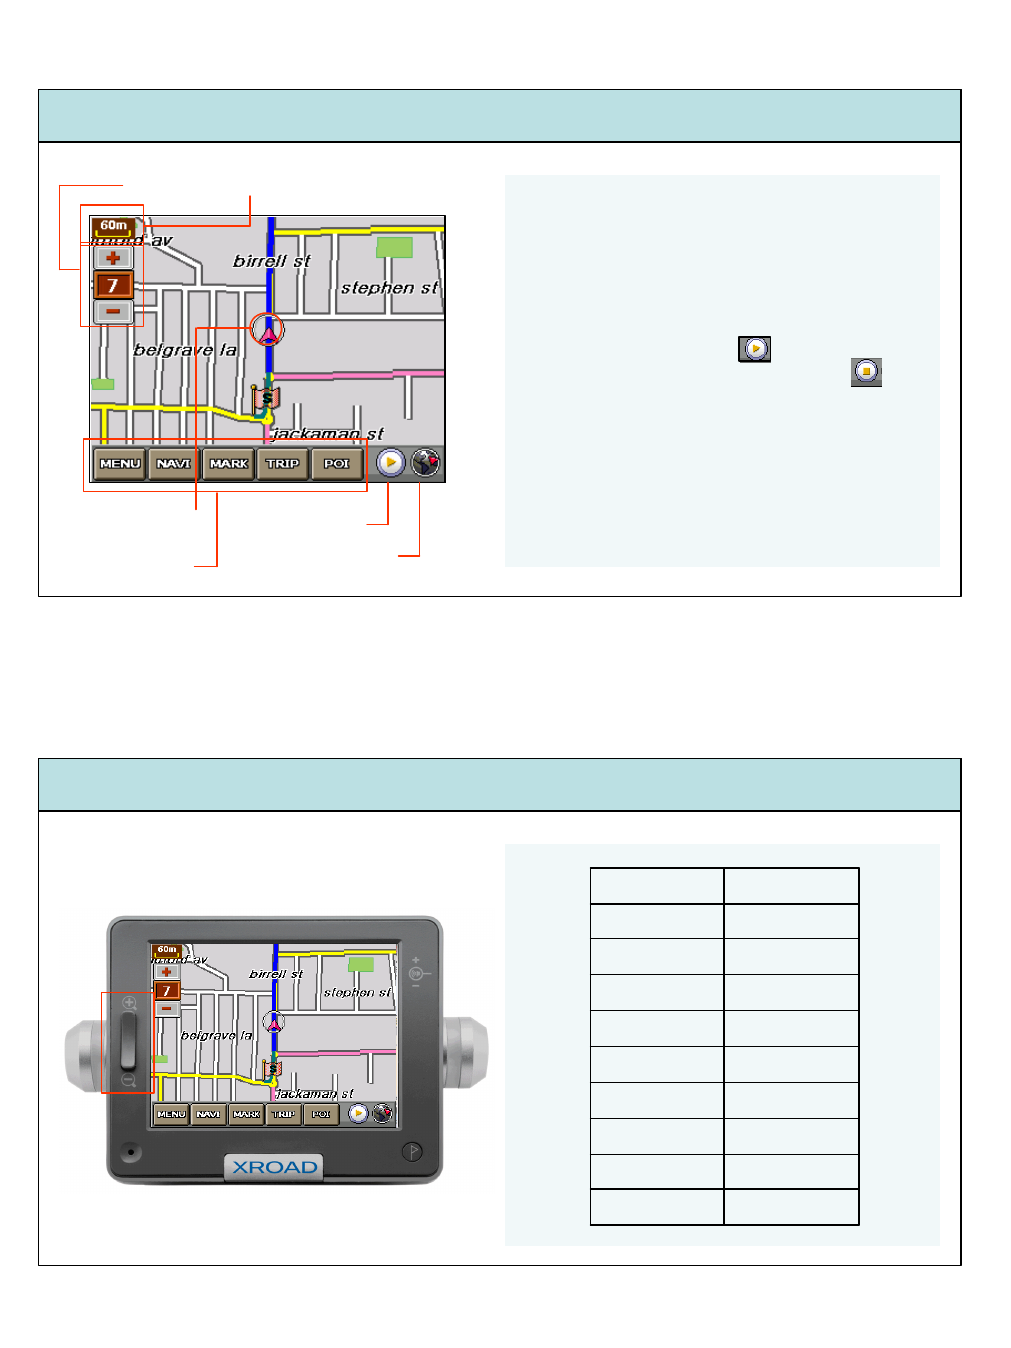
①Level of Map : Scalable from 1 to 9 level.
②Direction :Arrow aims north.
③Start/Stop Operation : To start
operating navigation system and to
stop it
④Display of current location of the car :
Points where you are.
⑤Menu Bar : Choose menu.
Map Guide
Scale up & down
Level of
Map Scale
Manu Bar GPS Condition
Current Location
15m9
30m8
60m7
120m6
240m5
600m4
2km3
4km2
15km1
Scale
Level of Map
Start/Stop Op.
Menu Bar
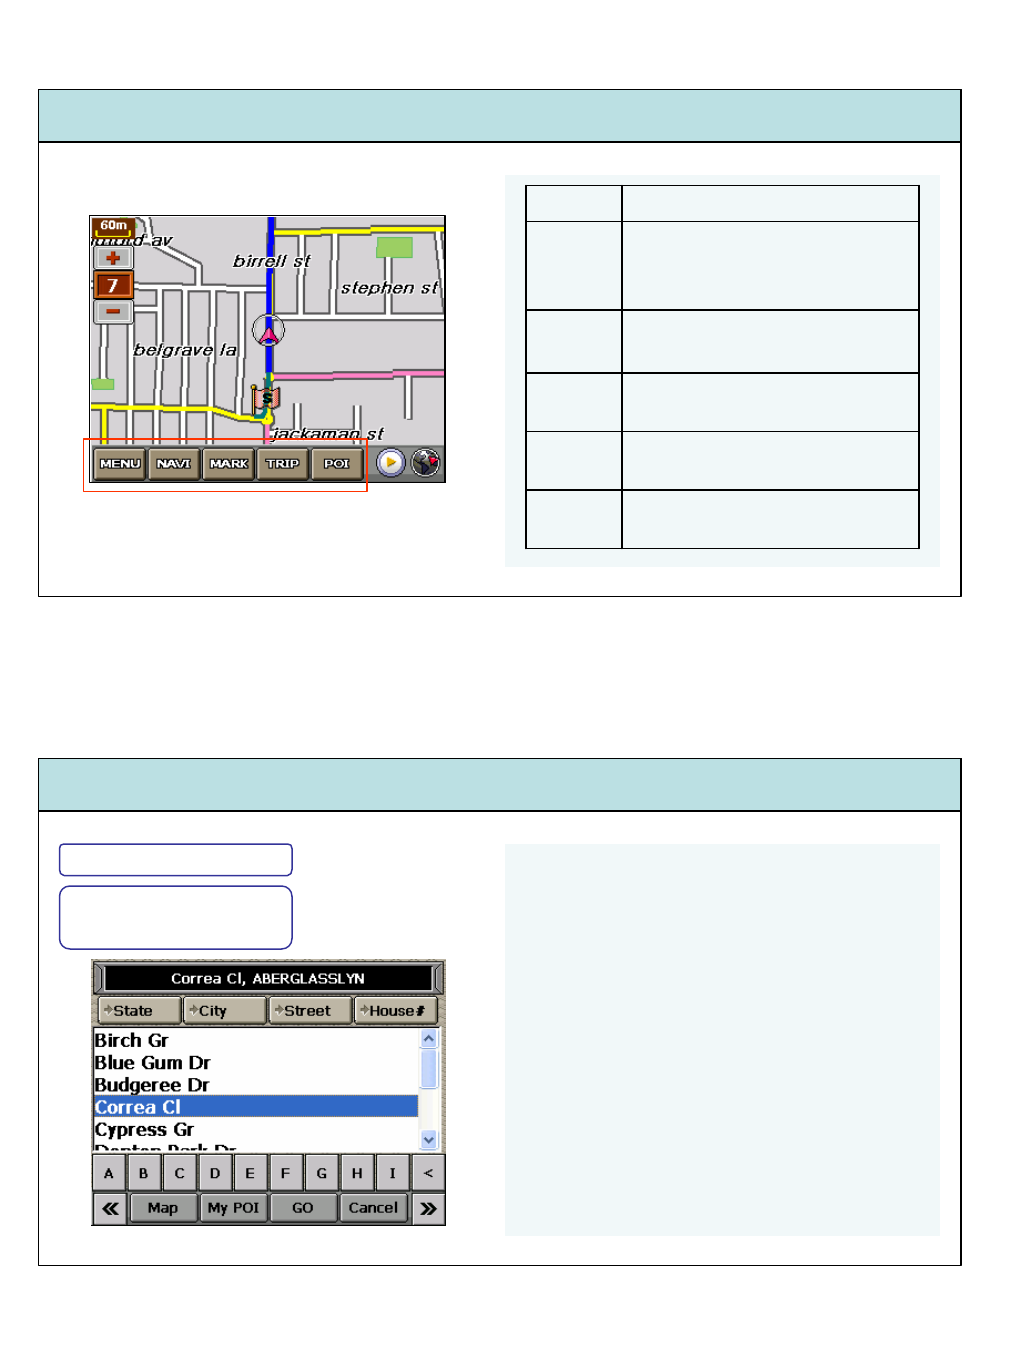
How to use -MENU
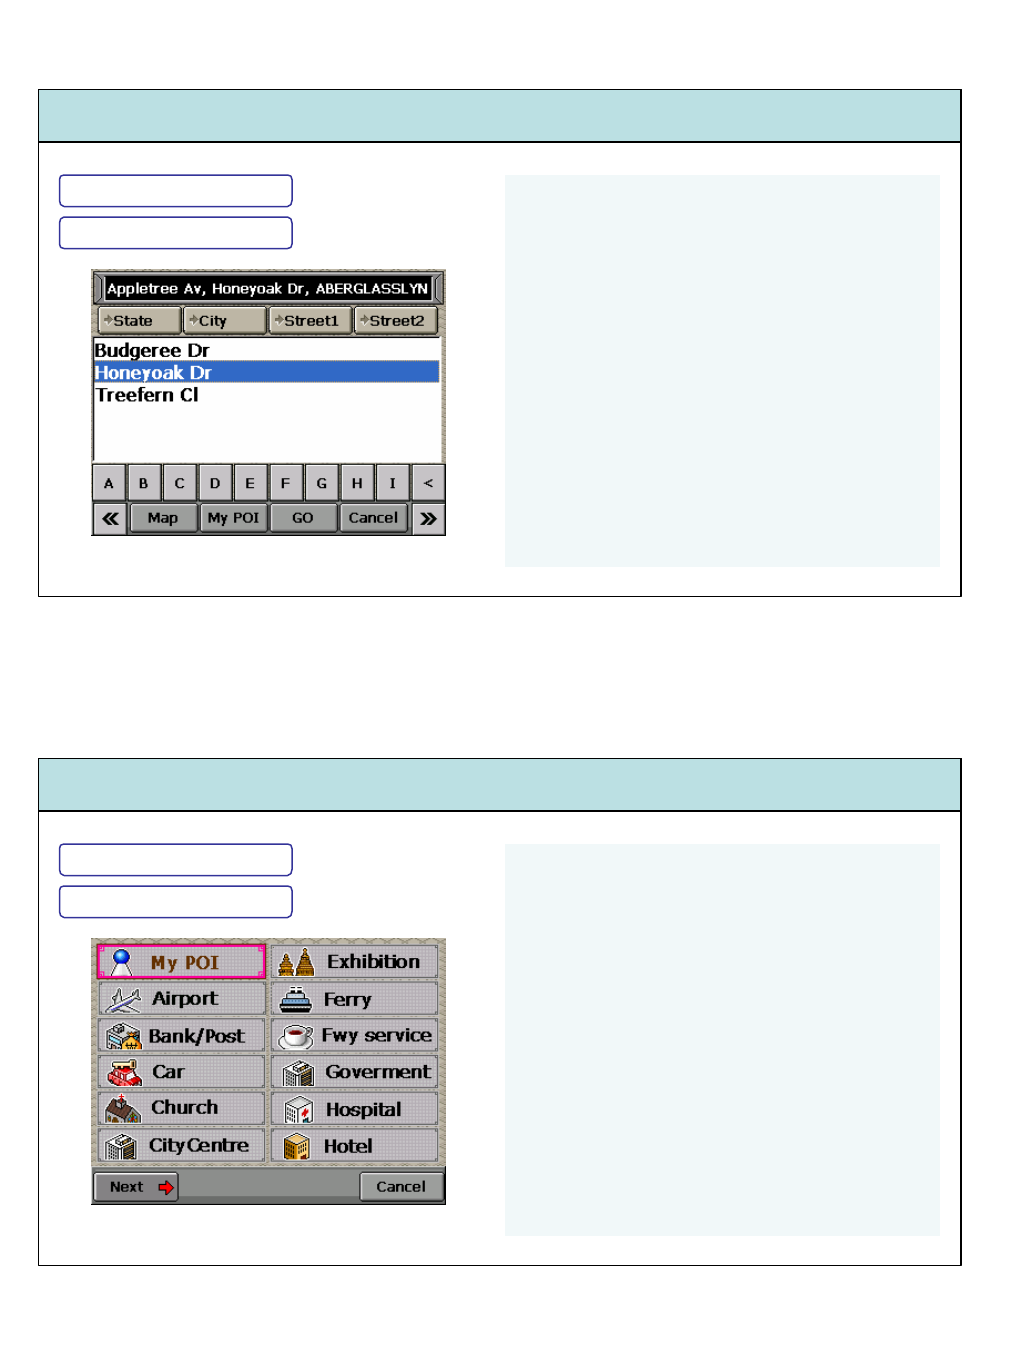
Input destination by order of State->City -
>Street->House using scroll bar or keypad
under the screen
①MAP : Display the destination
②My POI : Save destination in My POI
③GO : Start operation to the destination
④Cancel : Go back to the previous stage
< : erase
<<, >> : move
Point out nearby places such
as airports, banks, etc.
POI
Record the mileage, speed,
time of driving
TRIP
Bookmark of location
(address) and point of interest
MARK
Address/Intersection/POI/
My POI/Route List
NAVI
Destination/Route Manager/
My POIManager/Settings/
Simulation
MENU
FunctionMenu
Destination
Browse destination by
address
MENU>>Destination>>Address
Input intersection by order of State->City -
>Street->House using scroll bar or keypad
under the screen.
①MAP : Display the destination
②My POI : Save destination in My POI
③GO : Start operation to the intersection
④Cancel : Go back to the previous stage
< : erase
<<, >> : move
How to use –MENU
How to use -MENU
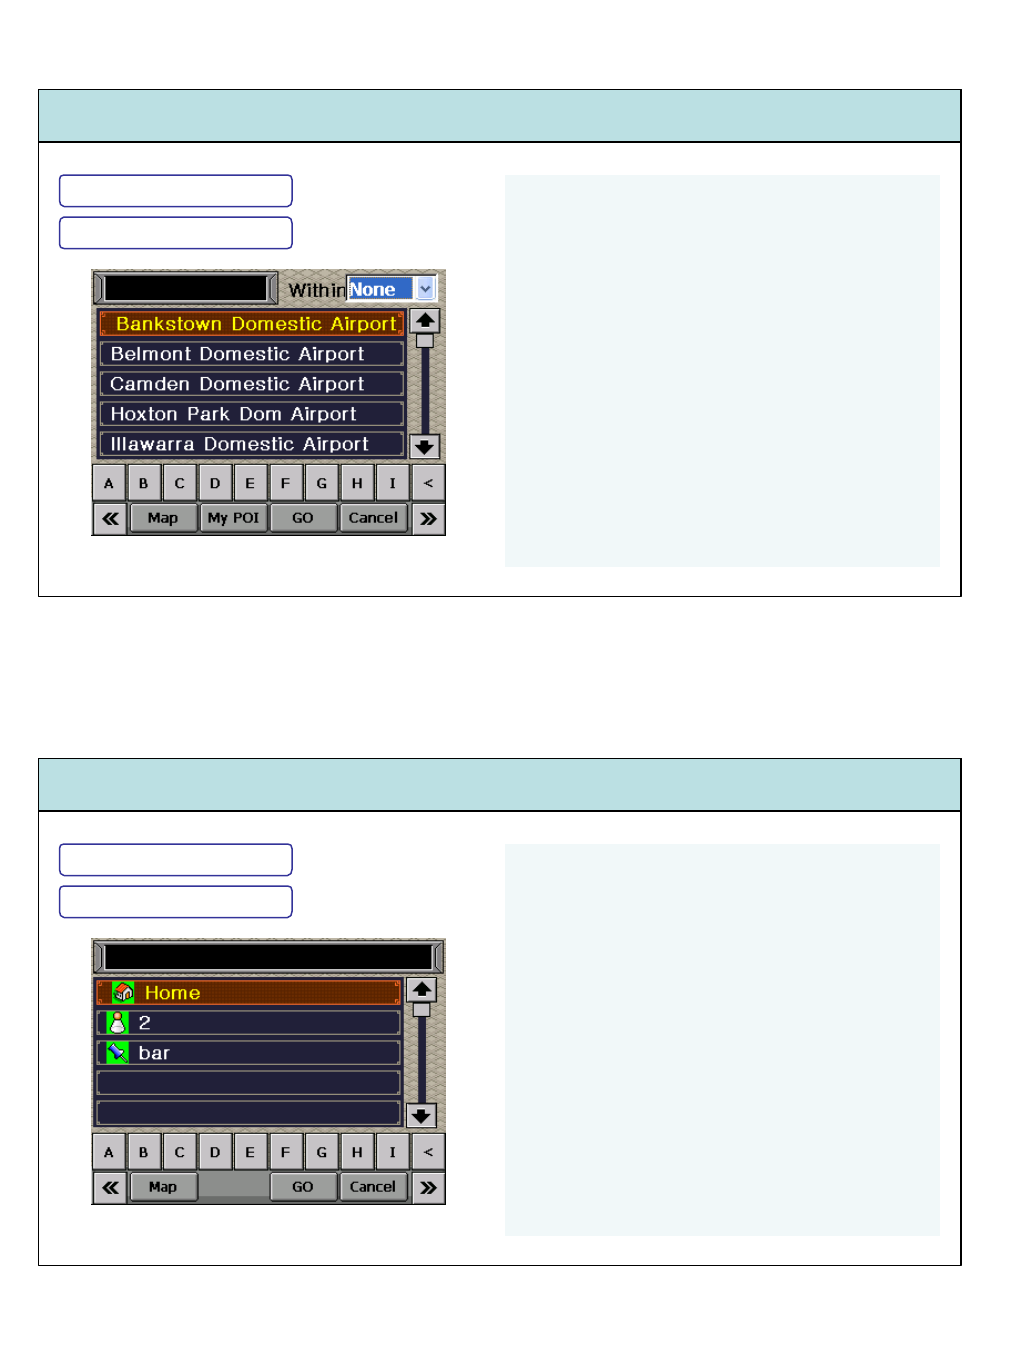
Information of nearby points of interests from
the nearest point
Index : My POI / Exhibition / Airport / Ferry /
Bank-Post / Fwy service / Car / Government /
Church / Hospital / City Centre / Hotel /
Museum / Restaurant / Park / Shopping /
Sports / Petrol / Theatre / Police /
Tourist info / Railway / Other…
* POI : Point Of Interest
Destination
Destination
-Intersection
-POI
MENU>>Destination>>POI
MENU>>Destination>>Intersection
How to use –MENU
How to use -MENU
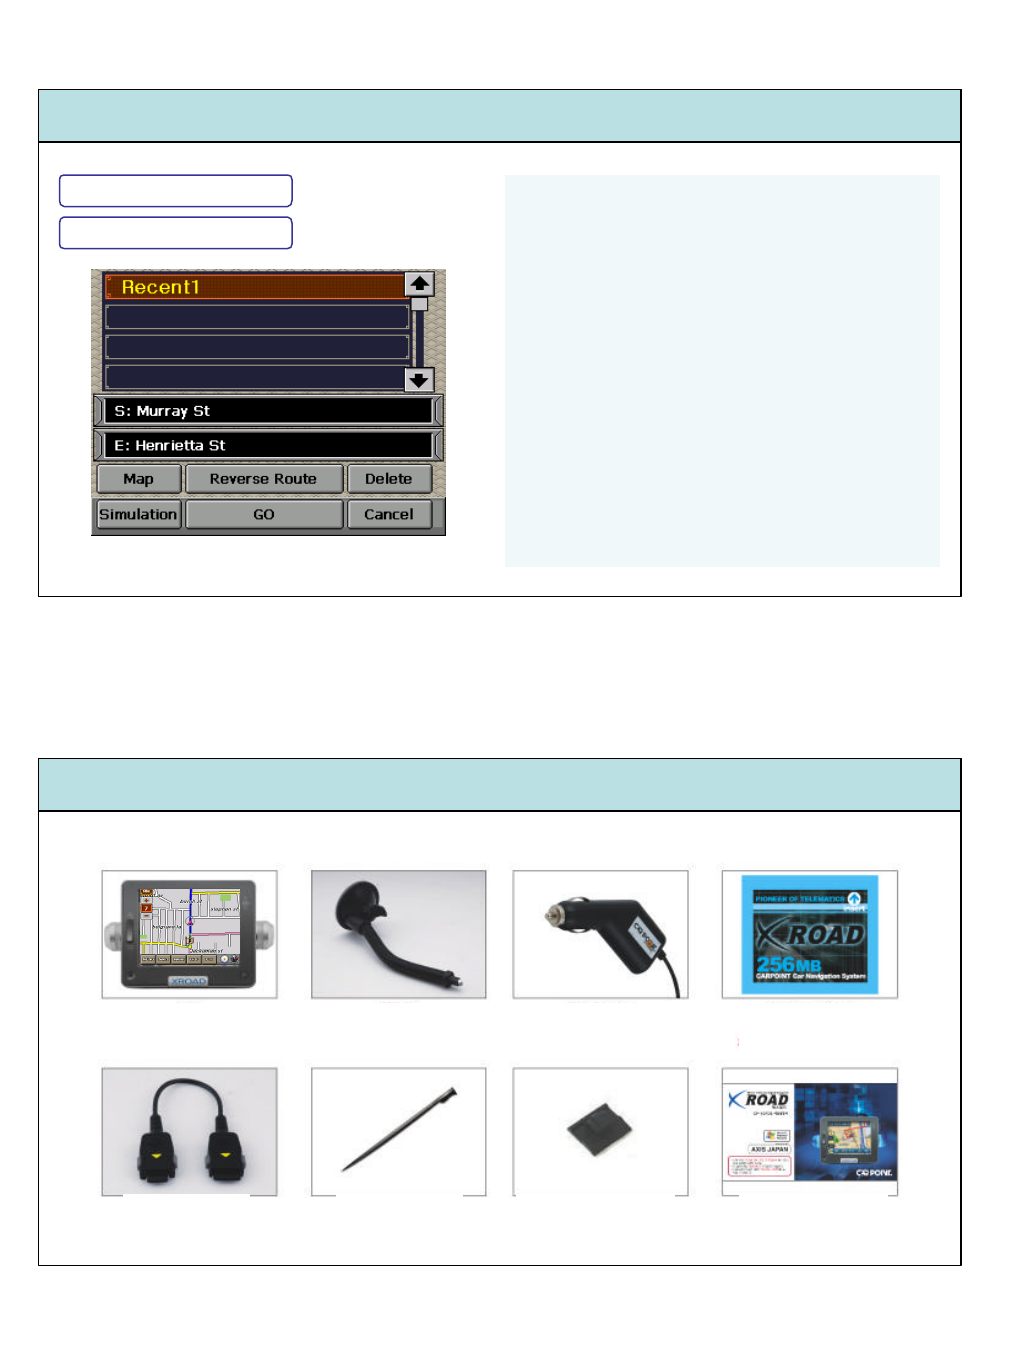
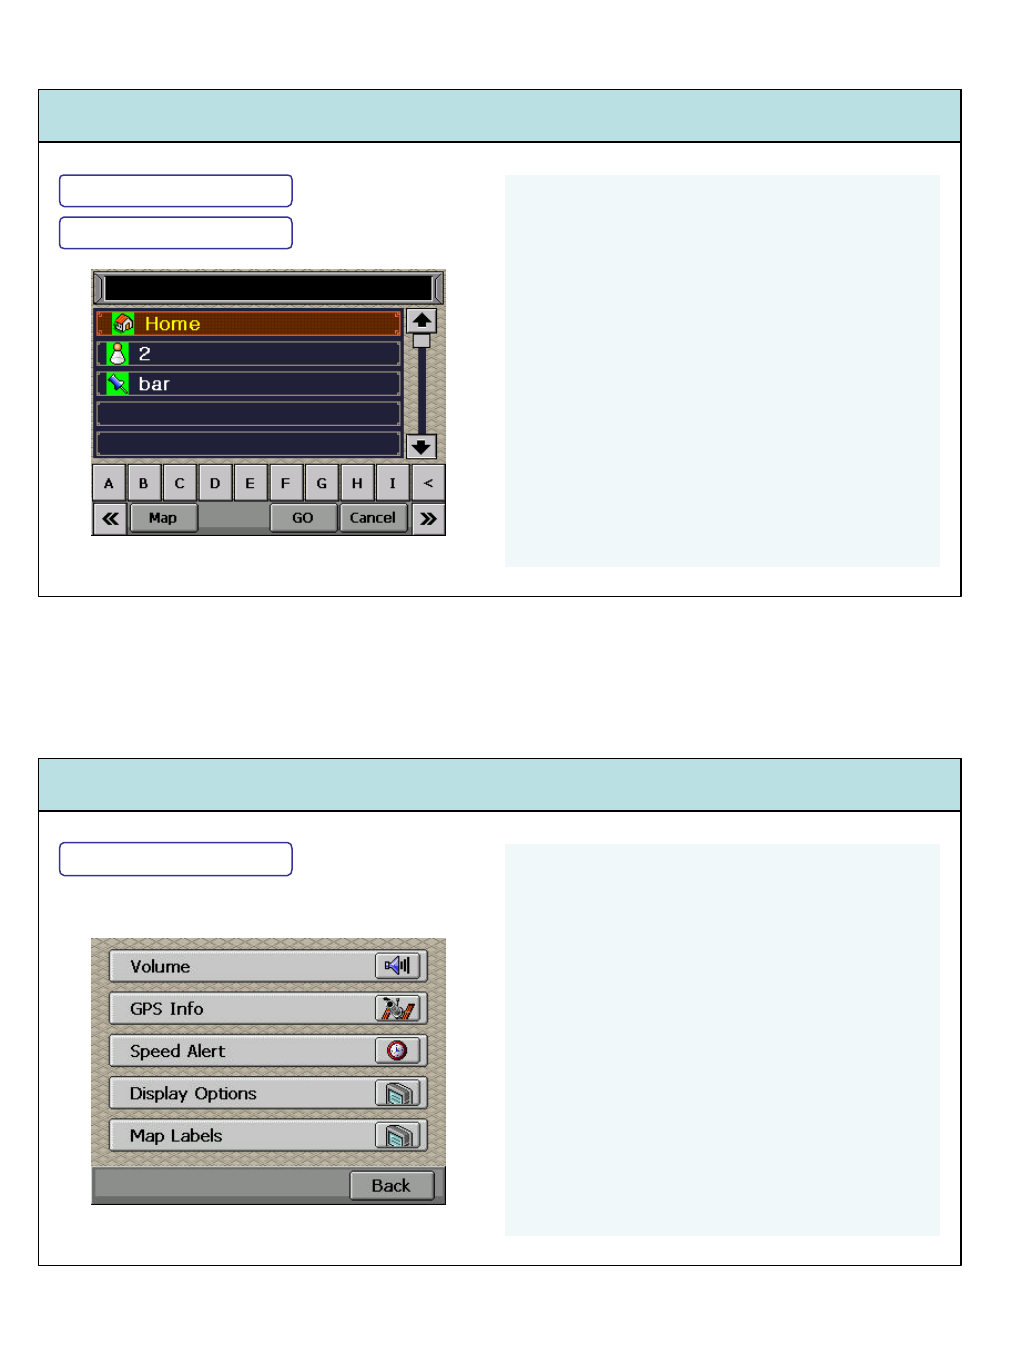
List of the saved POI user bookmarked
Show the list by alphabetical order by using
<<, >> button
①Map : Display the destination from the list
②GO : Start operation to the destination on
the list
③Cancel :Go back to the previous stage
Destination
Destination
-My POI
MENU>>Destination>>My POI
MENU>>Destination>>POI
List of interest points user selects
(ex. Airport)
①MAP : Display the destination
②My POI : Save destination in My POI
③GO : Start operation to the destination
④Cancel : Go back to the previous stage
< : erase
<<, >> : move
-POI
How to use –MENU
Components
Destination
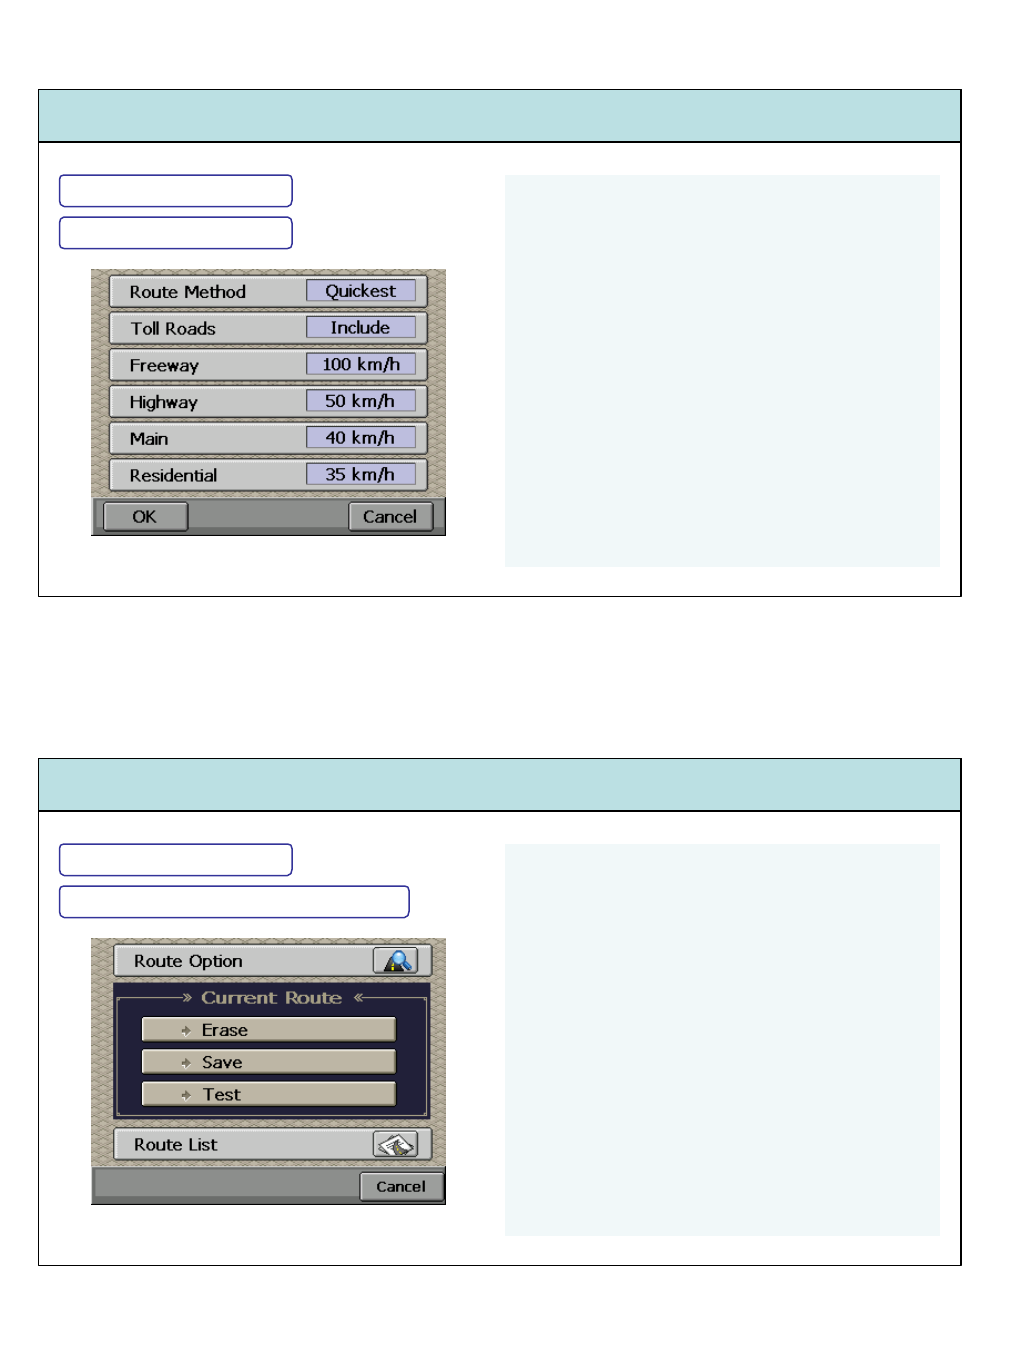
MENU>>Destination>>Route List
Show the list of routes on which user actually
drove from the latest one (including S (Origin)
/ E (Destination))
①MAP : Display the destination
②Reserve Route : Start operation from the
destination to the origin
③Delete : Erase the record
④Simulation : Test drive along the selected
route
⑤GO : Start operation to the destination
⑥Cancel : Go back to the previous stage
-Route List
Main System Arm Power Cable Compact Flash
(256M)
Data Cable Stylus Pen Fixing Pad for
Data Cable User’s Manual
Setting Options for Routing
①Route Method : Quickest / Shortest
②Toll Roads : Include / Exclude
③Freeway : Speed Detection Alarm Setting
by Using <<, <, >, >> Button
④Highway : Speed Detection Alarm Setting
by Using <<, <, >, >> Button
⑤Main : Speed Detection Alarm Setting by
Using <<, <, >, >> Button
⑥Residential : Speed Detection Alarm Setting
by Using <<, <, >, >> Button
How to use MENU
How to use -MENU
Current Route
: Save and Erase recent record of driving
①Erase : Erase the recent record of driving
②Save : Save the recent record of driving.
③Test : Test driving along the recent record
of driving
Route List
: Display the origin and destination of recent
driving.
: Select Reverse Route, Delete, Simulation,
GO, Point on the Map
Route Manager
Route Manager
-Route Option
-Current Route/ -Route List
MENU>>Rute Manager>>
Current Route/Route List
MENU>>Route Manager>>Route Option
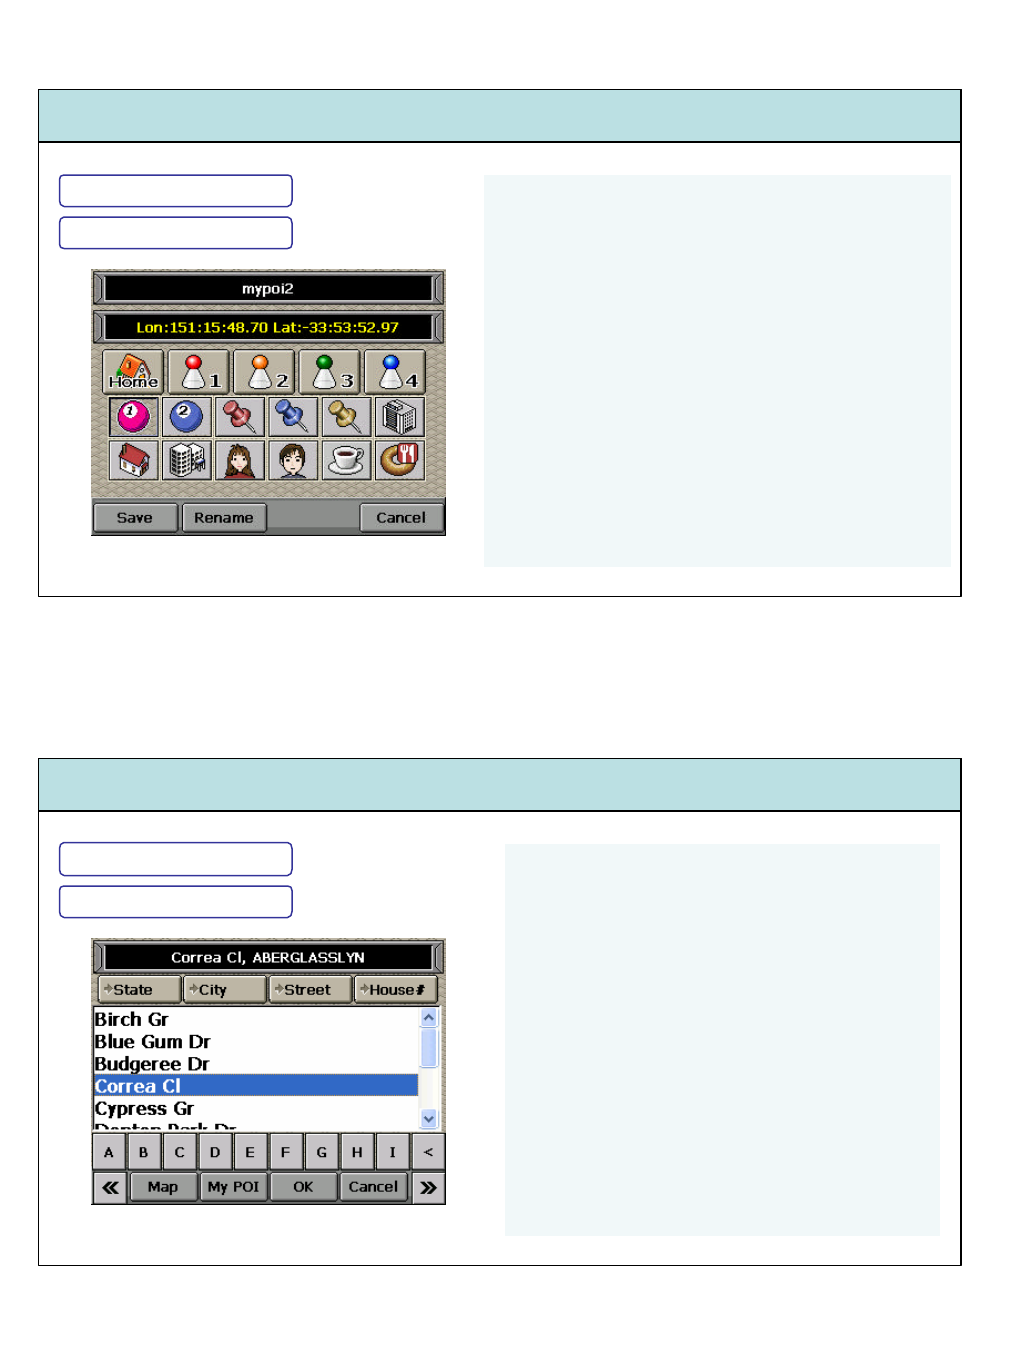
Save or Delete My POI by choosing icons or
rename
①Save : Save or Modify POI
②Rename : Save or Modify POI by using keypad
③Cancel : Go back to the previous stage
How to use –MENU
How to use -MENU
Input POI by order of State->City ->Street-
>House using scroll bar or keypad under the
screen
①Map : Display the destination
②My POI : Save the destination in My POI
③GO : Start operation to the destination
④Cancel : Go back to the previous stage
< : erase
<<, >> : move
MY POI Manager
-Save Position
MY POI Manager
-Save Address
MENU>>MY POI Manager>>Save Position
MENU>>MY POI Manager>>Save Address
Modify or Delete the information on My POI
①Del : Delete POI
②Edit : Edit POI
③Map : Position POI on the map
④Cancel : Go back to the previous stage
How to use –MENU
How to use -MENU
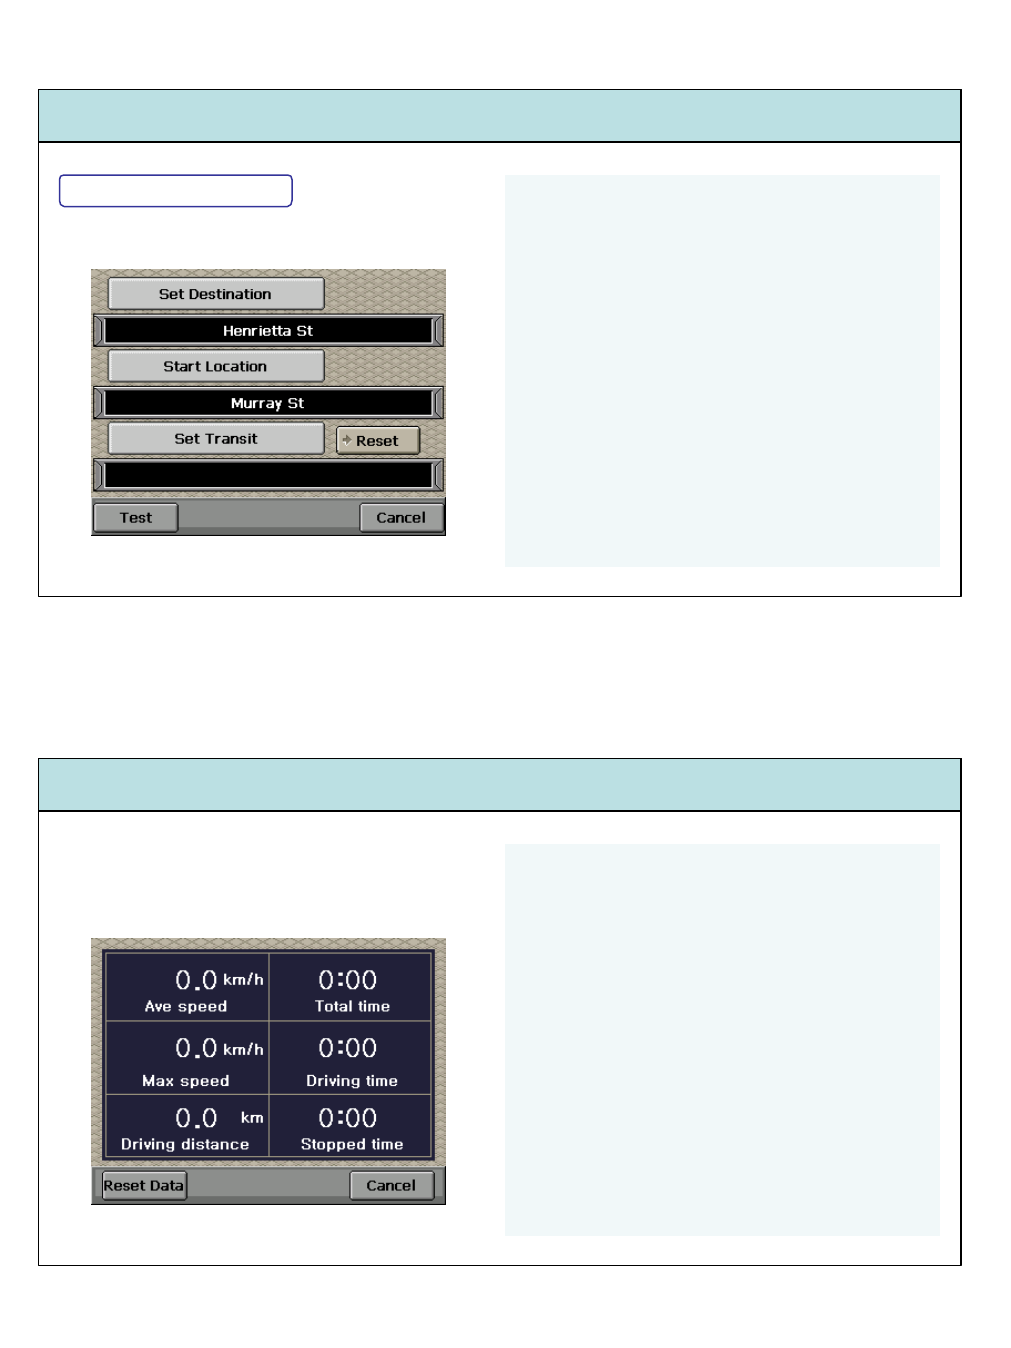
Setting options of Display
①Volume : Adjust volume for information
②GPS Info : GPS Receiving Info.
③Speed Alert : Speed Alert on/off
④Display Options
-Display Mode : Map/Text/Split
-Map Mode : Heading up/North up/3D
-Color : Auto/Day/Night
-Auto Zoom in Guide : None/6-9 level
-Auto Zoom at 80km/h : None/3-6 level
-Auto Zoom at 40km/h : None/6-9 level
⑤Map Labels :
-POI Icon : on/off
-POI Name : on/off
-Street Name : on/off
MY POI Manager
-Edit My POI
Settings
MENU>>MY POI Manager>>Edit My POI
MENU>>Settings
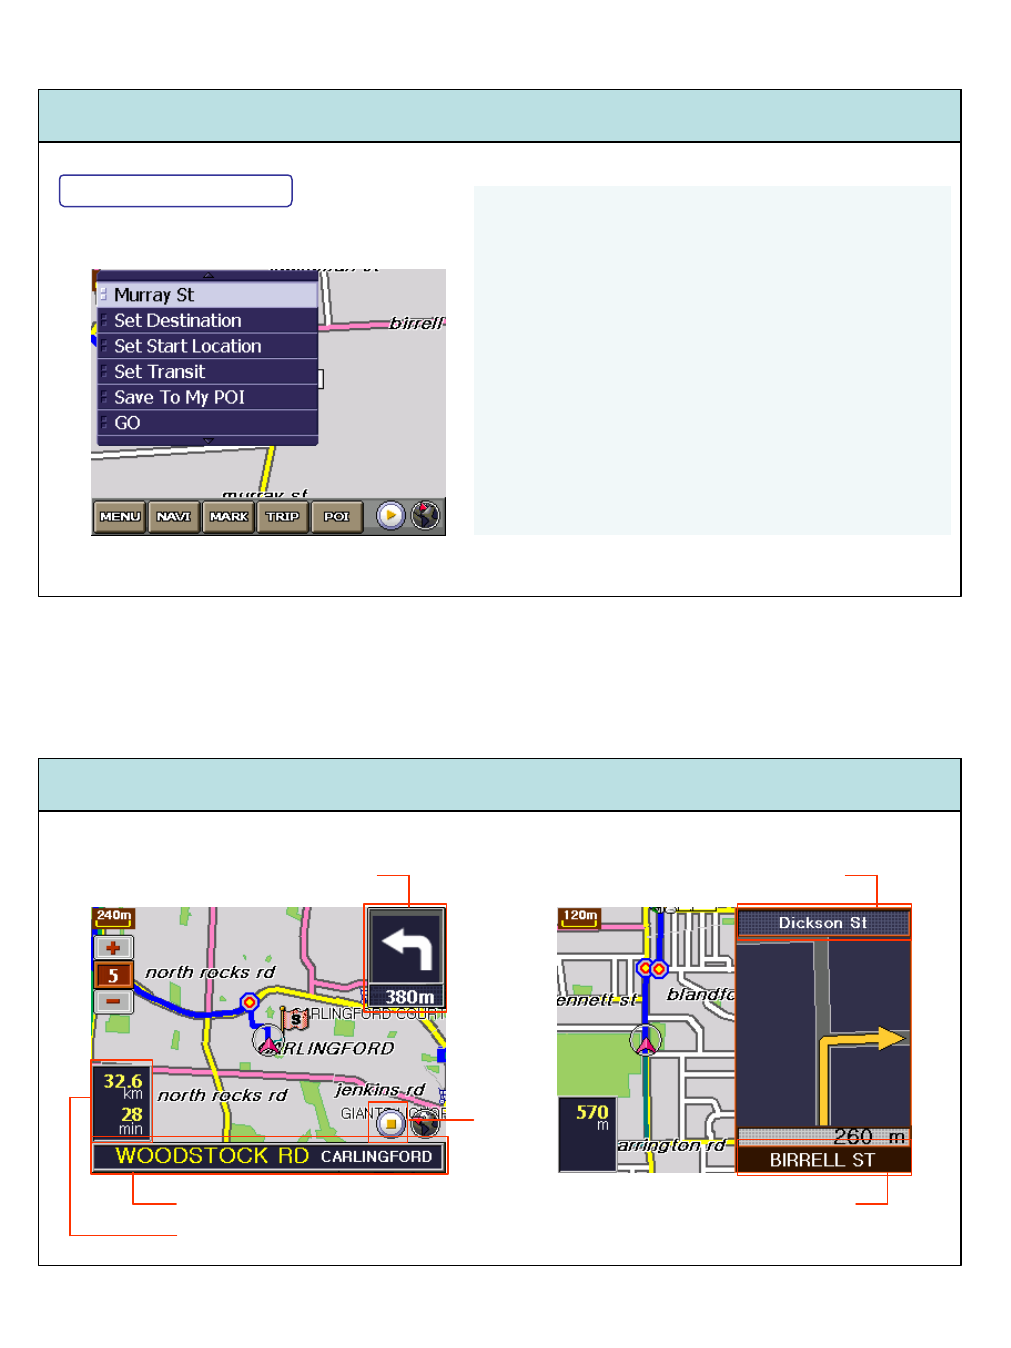
Test driving setting origin, destination, transit
①Set Destination
②Start Destination
③Set Transit
④Test : Start Operation
⑤Cancel : Go back to the previous stage
How to use –MENU
How to use menu bar –NAVI, MARK, TRIP, POI
①NAVI : Destination on MENU
②MARK : MY POI Manager on MENU
③TRIP : Reference of Driving record as
shown in the picture on left (Speed,
Distance, Time, etc.)
④POI : POI on MENU
Simulation
MENU>>Simulation
Display sub-menu by pop-up screen on the map
①Murry ST : Name of the street where you ARE
②Set Destination : Point location on the map
③Set Start Location : Point location on the map
④Set Transit : Point location on the map
⑤Save To My POI : Point location on the map
⑥GO : Go to the destination
How to use –MENU
Simulation
Use XROAD button on the bottom of the screen
Operation Example –Screen Division
Current Position
Time & Distance to Destination
Next turn : Direction/Distance
Next Turn : Direction/Distance/Name
Driving/
Finish
Name of the Street to Turn
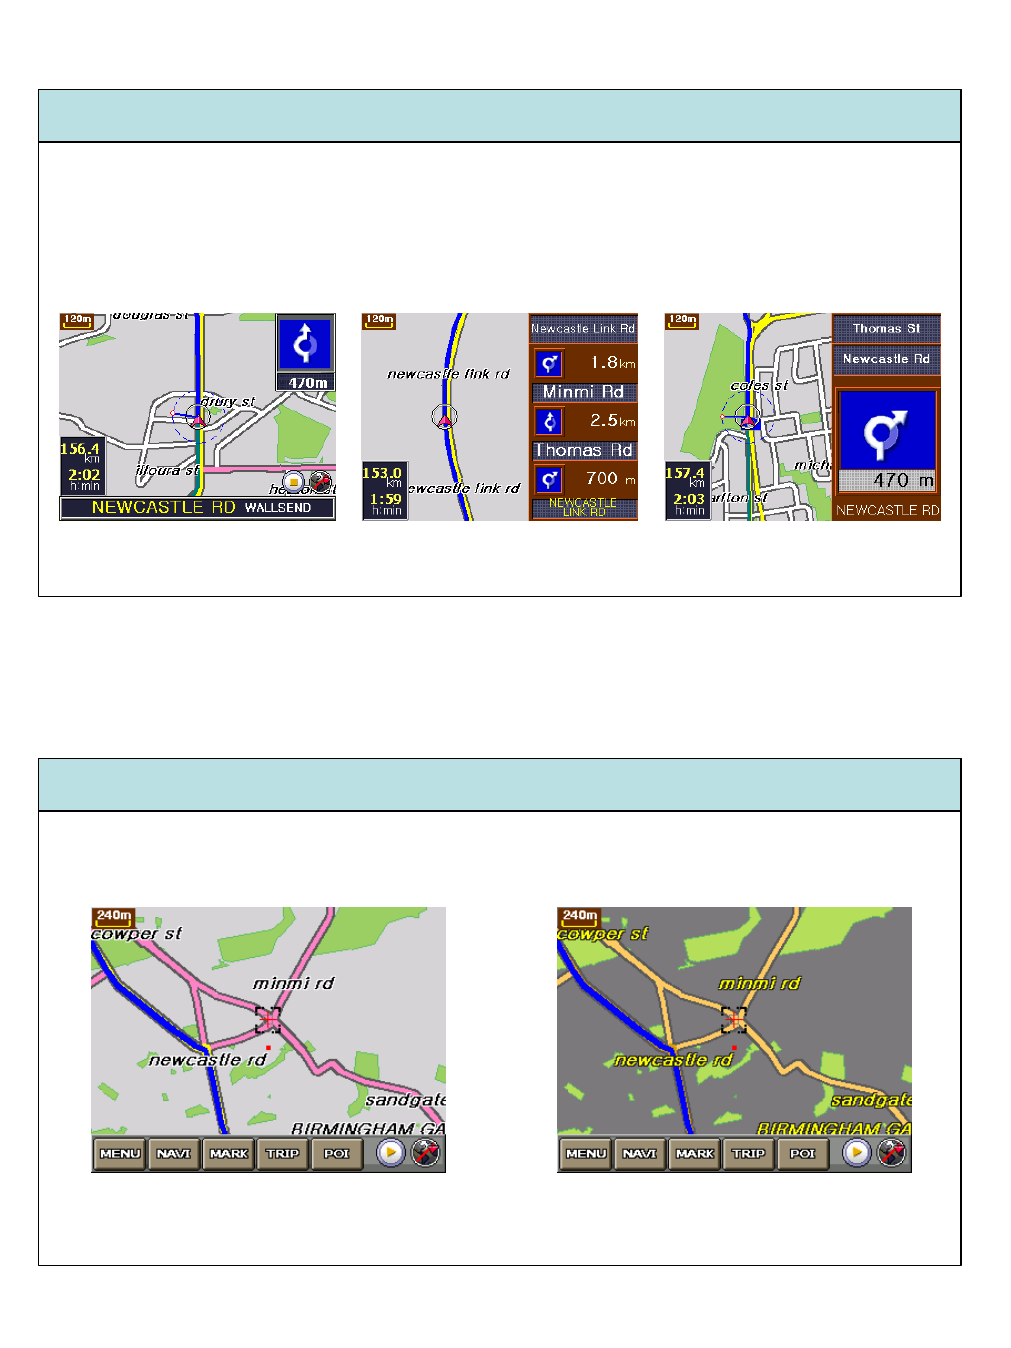
Screen Selection (Viewer Mode)
Setting Display
[Map Mode] [Text Mode] [Split Mode]
3 types of viewer mode while operation : Map/Text/Split Mode
Setting : ①MENU>>Settings>>Display Options>>Display Mode
②Press [XROAD] button to change mode
Setting display mode for the different environment or by the driver’s preference
(MENU>>Settings>>Display Options>>Map Mode)
[① Day Mode] [② Night Mode]
[③ Auto Mode] : Automatic transition from Day Mode to Night Mode and vice versa