Carrera Toys 370401010 Radio Controlled Toy Transmitter (2.4GHz) User Manual 46515 RC BA 501027 501028 14 D Arabic korr indd
Stadlbauer Marketing + Vertrieb Ges.M.B.H. Radio Controlled Toy Transmitter (2.4GHz) 46515 RC BA 501027 501028 14 D Arabic korr indd
Users Manual
Made in China, Shantou
Green Chopper II
Green Chopper II
Orange Sply II
Orange Sply II
# 370501027
# 370501028
Montage- und Betriebsanleitung
Assembly and operating instructions
Instructions de montage et d’utilisation
Instrucciones de montaje y de servicio
Istruzioni per il montaggio e l’uso
Montage- en gebruiksaanwijzing
Instruções de montagem e modo de utilização
Monterings- och bruksanvisning
Asennus- ja käyttöohje
Instrukcja montażu i obsługi
Szerelési és használati utasítás
Navodila za montažo in uporabo
Návod k montáži a obsluze
Návod na montáž a obsluhu
Uputa za montažu i uporabu
Montajse- og bruksanvisning
Monterings- og driftsvejledning
Montaj ve işletme kılavuzu
1
2
ON
ON
ON
ON
4
OFF
OFF
7
3
4x 1.5 V Mignon
AA batteries
LED OFF =
Charging
Green
=
Ready
*
*
212/2015 · 1
3,7V 150mAh
0,56Wh LiPo
3,7V 150mAh
0,56Wh LiPo
4x 1.5 V Mignon
AA batteries
* Nur ein Modell enthalten · Contains only one model · contient un seul modèle · Contiene sólo un modelo · Contiene un solo modellino · Bevat slechts één model · Contém só uma miniatura · Endast en modell ·
Sisältää vain yhden radio-ohjattavan · Zawiera tylko jeden model · Csak egy modellt tartalmaz · Vključen samo en model · Obsahuje pouze jeden model. · Inneholder kun samme modell · Indeholder kun én model ·
· Sadece tek modeli dahildir
R
L
3m 3m
2,4m
8 9
10
5
11
+
‒
‒+
2
3
1
4 5
6
+
‒‒
+
R
L
+
‒
R
L
‒
+
6
7
4
ON
ON
5
3
1
left side
right side
3
4
DEUTSCH
Sehr geehrter Kunde
Wir beglückwünschen Sie zum Kauf Ihres Carrera RC-Mo-
dell-Helikopters, der nach dem heutigen Stand der Technik
gefertigt wurde. Da wir stets um Weiterentwicklung und
Verbesserung unserer Produkte bemüht sind, behalten wir
uns eine Änderung in technischer Hinsicht und in Bezug auf
Ausstattung, Materialien und Design jederzeit und ohne An-
kündigung vor. Aus geringfügigen Abweichungen des Ihnen
vorliegenden Produkts gegenüber Daten und Abbildungen
dieser Anleitung können daher keinerlei Ansprüche abge-
leitet werden. Diese Bedienungs- und Montageanleitung
ist Bestandteil des Produkts. Bei Nichtbeachtung der Be-
dienungsanleitung und der enthaltenen Sicherheitsanwei-
sungen erlischt der Garantieanspruch. Bewahren Sie diese
Anleitung zum Nachlesen und für die eventuelle Weitergabe
des Modells an Dritte auf.
Die aktuellste Version dieser Bedie-
nungsanleitung und Informationen zu
erhaltlichen Ersatzteilen fi nden Sie auf
carrera-rc.com im Servicebereich.
Garantiebedingungen
Bei den Carrera-Produkten handelt es sich um tech-
nisch hochwertige Produkte, die sorgfältig behandelt
werden sollten. Beachten Sie bitte unbedingt die Hin-
weise in der Bedienungsanleitung. Alle Teile werden
einer sorgfältigen Prüfung unterzogen (technische Än-
derungen und Modelländerungen, die der Verbesserung
des Produktes dienen, sind vorbehalten). Sollten den-
noch Fehler auftreten, wird eine Garantie im Rahmen
der nachstehenden Garantie-Bedingung gewährt:
Die Stadlbauer Marketing + Vertrieb GmbH (nachfolgend
„Hersteller“) garantiert dem Endkunden (nachfolgend „Kun-
de“) nach Maßgabe der nachfolgenden Bestimmungen, dass
der an den Kunden gelieferte Carrera RC-Modell-Helikopter
(nachfolgend „Produkt“) innerhalb eines Zeitraums von zwei
Jahren ab Kaufdatum (Garantiefrist) frei von Material- oder
Verarbeitungsfehlern sein wird. Derartige Fehler wird der
Hersteller nach eigenem Ermessen auf seine Kosten durch
Reparatur oder Lieferung neuer oder generalüberholter Teile
beheben. Die Garantie erstreckt sich nicht auf Verschleißteile
(wie z.B. Akku, Rotorblätter, Kabinenabdeckung, Zahnräder
u.ä.), Schäden durch unsachgemäße Behandlung/Nutzung
oder bei Fremdeingriff en. Sonstige Ansprüche des Kunden,
insbesondere auf Schadensersatz, gegen den Hersteller sind
ausgeschlossen. Die vertraglichen oder gesetzlichen Rechte
des Kunden (Nacherfüllung, Rücktritt vom Vertrag, Minderung,
Schadensersatz) gegenüber dem jeweiligen Verkäufer, welche
bestehen, wenn das Produkt bei Gefahrübergang nicht man-
gelfrei war, werden durch diese Garantie nicht berührt.
Ansprüche aus dieser gesonderten Hersteller-Garantie
bestehen nur, wenn
• der geltend gemachte Fehler nicht in Schäden liegt, die
durch einen nach den Vorgaben in der Bedienungsanlei-
tung nicht bestimmungsgemäßen oder unsachgemäßen
Gebrauch verursacht wurden.
• es sich nicht um betriebsbedingte Verschleißerscheinun-
gen handelt.
• das Produkt keine Merkmale aufweist, die auf Reparaturen
oder sonstige Eingriff e von durch den Hersteller nicht auto-
risierten Werkstätten schließen lassen.
• das Produkt nur mit vom Hersteller autorisiertem Zubehör
verwendet wurde.
Bei Fragen wenden Sie sich bitte an die Carrera RC Service
Hotline +49 911 7099-330 (D) bzw. +43 662 88921-330 (AT)
oder besuchen Sie unsere Webseite carrera-rc.com im
Servicebereich.
Garantiekarten können nicht ersetzt werden.
Hinweis für EU-Staaten: Es wird auf die gesetzliche Gewähr-
leistungspfl icht des Verkäufers hingewiesen, dass nämlich
diese Gewährleistungspfl icht durch gegenständliche Garan-
tie nicht eingeschränkt wird. Die Kosten der Einsendung und
Rücksendung des Produkts übernimmt der Hersteller. Diese
Garantie gilt in dem vorstehend genannten Umfang und unter
den oben genannten Voraussetzungen (einschließlich der Vor-
lage des Original-Kaufbelegs auch im Falle der Weiterveräuße-
rung) für jeden späteren, künftigen Eigentümer des Produkts.
Konformitätserklärung
Hiermit erklärt Stadlbauer Marketing + Vertrieb GmbH, dass
sich dieses Modell einschließlich Controller in Übereinstim-
mung mit den grundlegenden Anforderungen folgender EG-
Richtlinien: EG Richtlinien 2009/48 und 2004/108/EG über
die elektromagnetische Verträglichkeit und den anderen
relevanten Vorschriften der Richtlinie 1999/5/EG (R&TTE)
befi ndet.
Die Original-Konformitätserklärung kann unter
carrera-rc.com angefordert werden.
Warnhinweise!
Ein ferngesteuerter Helikopter ist KEIN SPIELZEUG und
nur für Jugendliche ab 14 Jahren geeignet!
Dieses Produkt ist nicht für den Gebrauch durch Kinder
ohne die Aufsicht eines Erziehungsberechtigten vorgese-
hen. Für das Steuern des Hubschraubers ist eine gewisse
Übung erforderlich. Kinder müssen dies unter direkter Be-
aufsichtigung durch einen Erwachsenen erlernen. Lesen
Sie vor dem ersten Gebrauch die Benutzerinformationen
zusammen mit Ihrem Kind.
Bei unsachgemäßer Verwendung kann es zu schweren
Verletzungen und/oder Sachbeschädigungen kommen.
Es muss mit Vorsicht und Umsicht gesteuert werden und er-
fordert einige mechanische und auch mentale Fähigkeiten. Die
Anleitung enthält Sicherheitshinweise und Vorschriften sowie
Hinweise fur die Wartung und den Betrieb des Produktes. Es
ist unabdingbar, diese Anleitung vor der ersten Inbetriebnahme
komplett zu lesen und zu verstehen. Nur so können Unfälle mit
Verletzungen und Beschädigungen vermieden werden.
Fliegen Sie nur in geschlossenen Räumen, die genü-
gend Platz bieten und befolgen Sie alle Anweisungen,
so wie sie in dieser Anleitung empfohlen werden.
Hände, Haare und lose Kleidung, einschließlich anderer
Gegenstände wie Stifte und Schraubendreher müssen vom
Propeller (Rotor) ferngehalten werden. Den rotierenden Ro-
tor nicht berühren. Achten Sie besonders darauf, dass Ihre
Hände NICHT in die Nähe der Rotorblätter kommen!
ACHTUNG: Gefahr von Augenverletzungen. Lassen Sie
den Helikopter nicht in der Nähe Ihres Gesichtes fl iegen,
um Verletzungen zu vermeiden.
Sie als Nutzer dieses Produkts sind alleinverantwortlich
für den sicheren Umgang, so dass weder Sie noch an-
dere Personen oder deren Eigentum Schaden nehmen
oder gefährdet werden.
• Verwenden Sie Ihr Modell nie mit schwachen Controller-
Batterien.
• Dieses Spielzeug ist nur für die Verwendung im häuslichen
Bereich bestimmt.
• ACHTUNG: Starten Sie den Hubschrauber nicht, wenn
sich Personen, Tiere oder andere Hindernisse im Flug-
bereich des Hubschraubers befi nden.
• Befolgen Sie genau die Anweisungen und Warnhinweise
für dieses Produkt und für die mögliche Zusatzausrüstung
(Ladegerät, Akkus usw.), die Sie nutzen.
• Sollte der Helikopter mit Lebewesen oder harten Gegen-
ständen in Berührung kommen, bitte sofort den Gas-
hebel in die Nullstellung bringen, d.h. der linke Joy-
stick muss am unteren Anschlag sein!
• Vermeiden Sie jegliche Feuchtigkeit, denn Sie kann die
Elektronik beschädigen.
• Führen Sie am Hubschrauber keinerlei Änderungen durch.
Wenn Sie diesen Bedingungen nicht zustimmen, geben Sie
das vollständige Helikopter Modell sofort in neuem und un-
benutztem Zustand an den Händler zurück.
Wichtige Informationen über Lithium Polymer Akkus
Lithium-Polymer (LiPo) Akkus sind wesentlich empfi ndlicher
als herkömmliche Alkali-, oder NiMH-Akkus, die sonst bei
Funkfernsteuerungen verwendet werden. Die Vorschriften
und Warnhinweise müssen deshalb genauestens befolgt
werden. Bei falscher Handhabung von LiPo Akkus besteht
Brandgefahr. Beachten Sie immer die Herstellerangaben,
wenn Sie LiPo Akkus entsorgen.
Entsorgungsbestimmungen für Elektro- und Elektronik-
Altgeräte laut WEEE
Das hier abgebildete Symbol der
durchgestrichenen Mülltonnen soll
Sie darauf hinweisen, dass leere
Bat-
terien, Akkumulatoren, Knopfzellen,
Akku packs, Geräte batterien, elektri-
sche Altgeräte etc. nicht in den Hausmüll gehören, da sie
der Umwelt und Gesundheit schaden. Helfen Sie bitte mit,
Umwelt und Gesundheit zu erhalten und sprechen Sie auch
mit Ihren Kindern über die ordentliche Entsorgung ge-
brauchter Batterien und elektrischer Altgeräte. Batterien und
elektrische Altgeräte sollen bei den bekannten Sammelstel-
len abgegeben werden. So werden sie ordnungsgemäßem
Recycling zugeführt.
Ungleiche Batterietypen oder neue und gebrauchte Bat-
terien dürfen nicht zusammen verwendet werden. Leere
Batterien aus dem Spielzeug herausnehmen. Nicht aufl ad-
bare Batterien dürfen aufgrund des Explosionsrisikos nicht
aufgeladen werden.
ACHTUNG!
Akkus dürfen nur von Erwachsenen aufgeladen werden.
Lassen Sie den Akku beim Laden nie unbewacht. Aufl ad-
bare Batterien vor dem Laden aus dem Spielzeug nehmen.
Anschlussklemmen dürfen nicht kurzgeschlossen werden. Es
dürfen nur die empfohlenen Batterien oder die eines gleich-
wertigen Typs verwendet werden.
Bei regelmäßigem Gebrauch des Ladegeräts, muss dieses
am Kabel, Anschluss, Abdeckungen und anderen Teilen kon-
trolliert werden. Im Schadensfall darf das Ladegerät erst nach
einer Reparatur wieder in Betrieb genommen werden. Das fl e-
xible Außenkabel dieses Ladegeräts kann nicht ausgetauscht
werden: Wenn das Kabel beschädigt ist, muss das Ladegerät
verschrottet werden.
Richtlinien und Warnhinweise für die Benutzung des LiPo
Akkus
•
Sie müssen den beigefügten 3,7 V
150 mAh LiPo-Akku an
einem sichern Ort abseits entzündlicher Materialien aufl aden.
• Lassen Sie den Akku beim Laden nie unbewacht auf.
• Zum Laden nach einem Flug muss sich der Akku zunächst
auf die Umgebungstemperatur abgekühlt haben.
• Sie dürfen nur das dazugehörige Lipo-Ladegerät (USB Ka-
bel/ Controller) verwenden. Bei Nichteinhaltung dieser Hin-
weise besteht Brandgefahr und damit Gesundheitsgefähr-
dung und/oder Sachbeschädigung. Benutzen Sie NIEMALS
ein anderes Ladegerät.
• Falls sich der Akku während des Entlade- oder Ladevor-
gangs aufbläht oder verformt, beenden Sie sofort das Laden
oder Entladen. Entnehmen Sie den Akku so schnell und
vorsichtig wie möglich und legen Sie ihn an einen sicheren,
off enen Bereich abseits brennbarer Materialien und beob-
achten Sie ihn mindestens 15 Minuten lang. Wenn Sie einen
Akku, der sich bereits aufgebläht oder verformt hat, weiter
laden oder entladen, besteht Brandgefahr! Selbst bei gerin-
ger Verformung oder Ballonbildung muss ein Akku aus dem
Betrieb genommen werden.
•
Lagern Sie den Akku bei Raumtemperatur an einem trocke-
nen Ort.
• Laden Sie den Akku unbedingt nach Gebrauch wieder
auf um eine sog. Tiefenentladung des Akkus zu vermei-
den. Beachten Sie dabei, dass Sie eine Pause von ca.
20 Min. zwischen dem Flug und dem Ladevorgang ein-
halten. Laden Sie den Akku von Zeit zu Zeit (ca. alle 2-3
Monate) auf. Eine Nichtbeachtung der o.g. Handhabung
des Akkus kann zu einem Defekt führen.
• Für den Transport oder für eine übergangsweise Lagerung
des Akkus sollte die Temperatur zwischen 5-50°C liegen.
Lagern Sie den Akku oder das Modell, wenn möglich nicht
im Auto oder unter direktem Sonneneinfl uss. Wenn der Akku
der Hitze im Auto ausgesetzt wird, kann er beschädigt wer-
den oder Feuer fangen.
Hinweis: Bei geringer Batteriespannung/-leistung werden Sie
feststellen, dass erhebliche Trimmung und/oder Steuerbewegun-
gen erforderlich sind, damit der Helikopter nicht ins Trudeln gerät.
Dies tritt in der Regel vor dem Erreichen von 3 V Akkuspannung
auf und ist ein guter Zeitpunkt, um den Flug zu beenden.
5
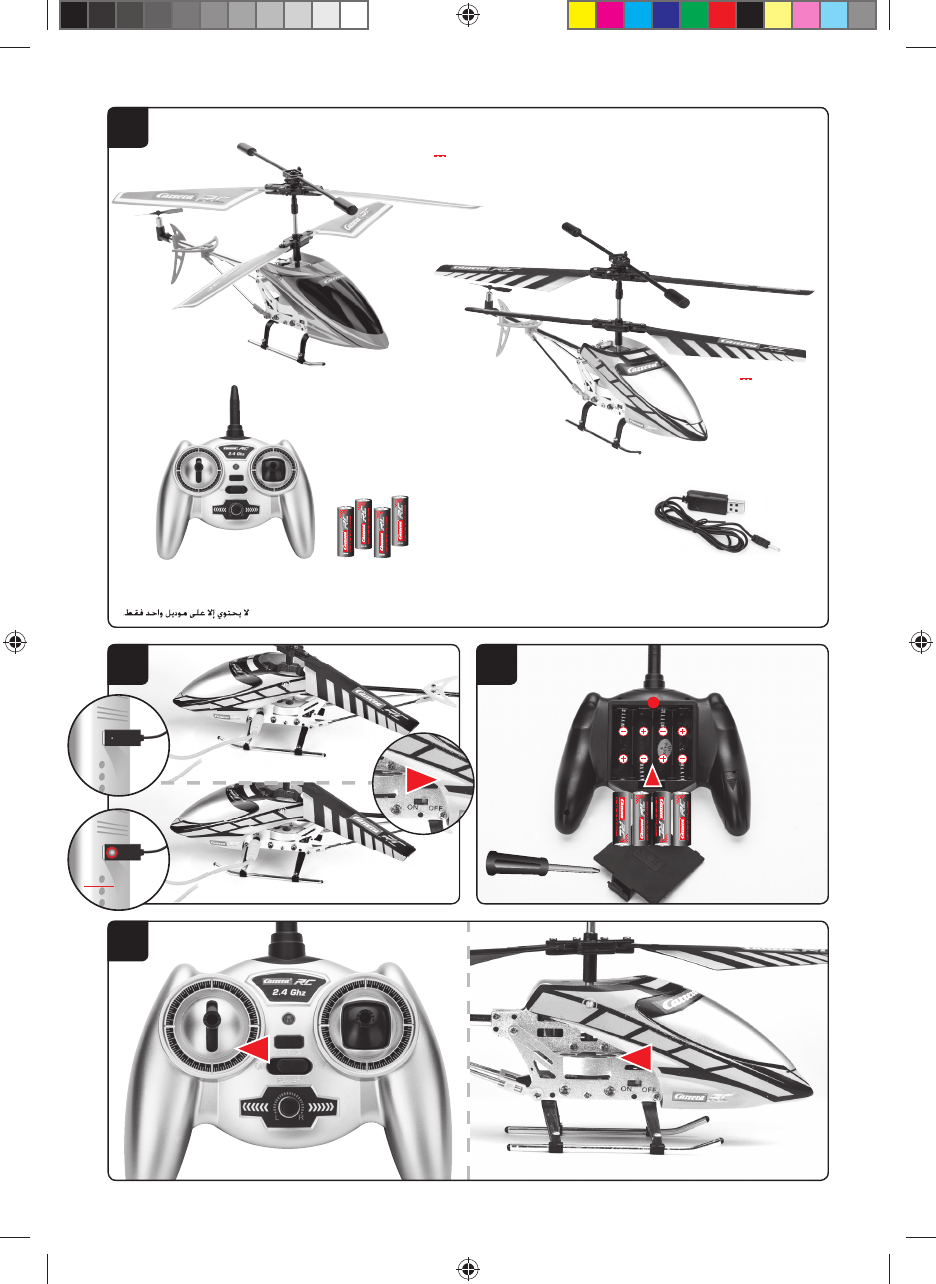
Lieferumfang
1
1x Helikopter
1x Controller
1x USB-Ladekabel
4x 1,5 V Mignon AA Batterien (nicht wiederaufl adbar)
Aufl aden des LiPo-Akkus
Achten Sie darauf, dass Sie den mitgelieferten LiPo-Akku
nur mit dem mitgelieferten LiPo-Ladegerät (USB-Kabel bzw.
Controller) laden. Wenn Sie versuchen den Akku mit einem
anderen LiPo-Akku Ladegerät oder einem anderen Ladegerät
zu laden, kann dies zu schweren Schäden führen. Bitte lesen
Sie den vorangehenden Abschnitt mit den Warnhinweisen
und Richtlinien zur Akku-Verwendung sorgfältig durch, bevor
Sie fortfahren.
2
Laden am Computer:
• Verbinden Sie das USB-Ladekabel mit dem
USB-Port eines Computers. Die LED am USB-
Ladekabel leuchtet grün auf und zeigt an, dass
die Ladeeinheit ordnungsgemäß mit dem Com-
puter verbunden ist. Wenn Sie einen Helikopter
mit leerem Akku anstecken leuchtet die LED am
USB-Ladekabel nicht mehr auf und zeigt an, dass
der Helikopter Akku geladen wird. Das USB-
Ladekabel bzw. die Ladebuchse am Helikopter
sind so hergestellt, dass verkehrte Polarität aus-
geschlossen ist.
• Es dauert ungefähr 30 Minuten, um einen entla-
denen Akku (nicht tiefentladenen) wieder aufzu-
laden. Wenn der Akku voll ist, leuchtet die LED-
Anzeige am USB-Ladekabel wieder grün auf.
Hinweis: Bei der Auslieferung ist der enthaltene LiPo-
Akku teilgeladen. Daher könnte der erste Ladevorgang
etwas kürzer dauern.
Halten Sie die o.g. Anschlussreihenfolge unbedingt ein!
Sollten Sie das Ladekabel nicht an eine Stromquelle
angeschlossen und nur mit dem Helikopter verbunden
haben beachten Sie bitte folgendes: Die grün leuchten-
de LED-Anzeige zeigt nicht an ob der Akku ausreichend
geladen ist.
Während des Ladevorgangs muss der Powerschalter auf
„OFF“ stehen.
Einsetzen der Batterien in den
Controller
3
Öff nen Sie das Batteriefach mit einem Schrau-
bendreher und setzen Sie die Batterien in den
Controller ein. Achten Sie auf die richtige Polari-
tät. Nach dem verschließen des Faches können
Sie die Funktionalität des Controllers mit Hilfe des
Powerschalters auf der Vorderseite prüfen. Bei ON-
Stellung des Powerschalters und ordnungsgemä-
ßer Funktion sollte die LED oben in der Mitte des
Controllers rot aufl euchten. Wenn die Kontroll LED
schnell blinkt, müssen die Batterien im Controller
gewechselt werden.
Bindung des Modells mit dem
Controller
4
Der Carrera RC Helikopter und der Controller sind
werkseitig gebunden. Sollte es am Anfang Proble-
me bei der Kommunikation zwischen dem Carrera
RC Helikopter und dem Controller geben, führen
Sie bitte eine neue Bindung durch.
• Verbinden Sie die am Modell befi ndliche Steck-
verbindung und schalten Sie das Modell am
ON/OFF Schalter an.
• Die LED im Helikopter blinkt nun in rhythmisch
beschleunigender Folge.
• Schalten Sie den Controller am ON/OFF Schal-
ter ein. Während des Bindungsvorgangs ertönt
am Controller ein Signalton.
• Stellen Sie den geladenen Helikopter auf eine
gerade Fläche.
• Geben Sie dem Helikopter einen Augenblick
Zeit, bis das System korrekt initialisiert und be-
triebsbereit ist.
• Die Kontroll LED leuchtet wieder permanent und
zeigt an, dass die Bindung beendet ist.
Checkliste für die Flugvorbereitung
Diese Checkliste ist kein Ersatz für den Inhalt dieser Be-
dienungsanleitung. Obwohl Sie als Quick-Start-Guide
verwendet werden kann, empfehlen wir Ihnen eindringlich
zunächst diese Betriebsanleitung komplett zu lesen, bevor
Sie fortfahren.
• Überprüfen Sie den Verpackungsinhalt.
• Verbinden Sie das Ladegerät mit der Stromquelle.
• Laden Sie den LiPo-Akku wie im Abschnitt „Aufl aden des
LiPo-Akkus“ beschrieben
• Setzen Sie vier AA Batterien in den Controller ein und
achten Sie auf die richtige Polarität.
• Suchen Sie eine geeignete Umgebung zum Fliegen.
• Stellen Sie den Helikopter auf eine gerade Fläche.
• Schalten Sie das Modell am ON/OFF Schalter an.
• Schalten Sie den Controller am ON/OFF Schalter ein.
• Die LED im Helikopter blinkt nun in rhythmisch beschleuni-
gender Folge.
• Während des Bindungsvorgangs ertönt am Controller ein
Signalton.
• Geben Sie dem Helikopter einen Augenblick Zeit, bis das
System korrekt initialisiert und betriebsbereit ist. Die LED
im Helikopter leuchtet nun permanent.
• Wiederholen Sie nun ggf. o.g. Punkte sollten Sie weitere
Helikopter gleichzeitig fl iegen wollen.
• Überprüfen Sie die Steuerung.
• Machen Sie sich mit der Steuerung vertraut.
• Trimmen Sie den Helikopter ggf. wie unter „Steuerung des
Helikopters“ beschrieben, so dass sich der Helikopter im
Schwebefl ug nicht mehr ohne Steuerbewegungen von der
Stelle bewegt.
• Der Helikopter ist jetzt einsatzbereit.
• Sofern der Helikopter keine Funktion zeigt versuchen Sie
den o.g. Bindevorgang erneut.
• Fliegen Sie das Modell.
• Landen Sie das Modell.
• Schalten Sie das Modell am ON/OFF Schalter aus.
• Schalten Sie immer die Fernbedienung als letztes aus.
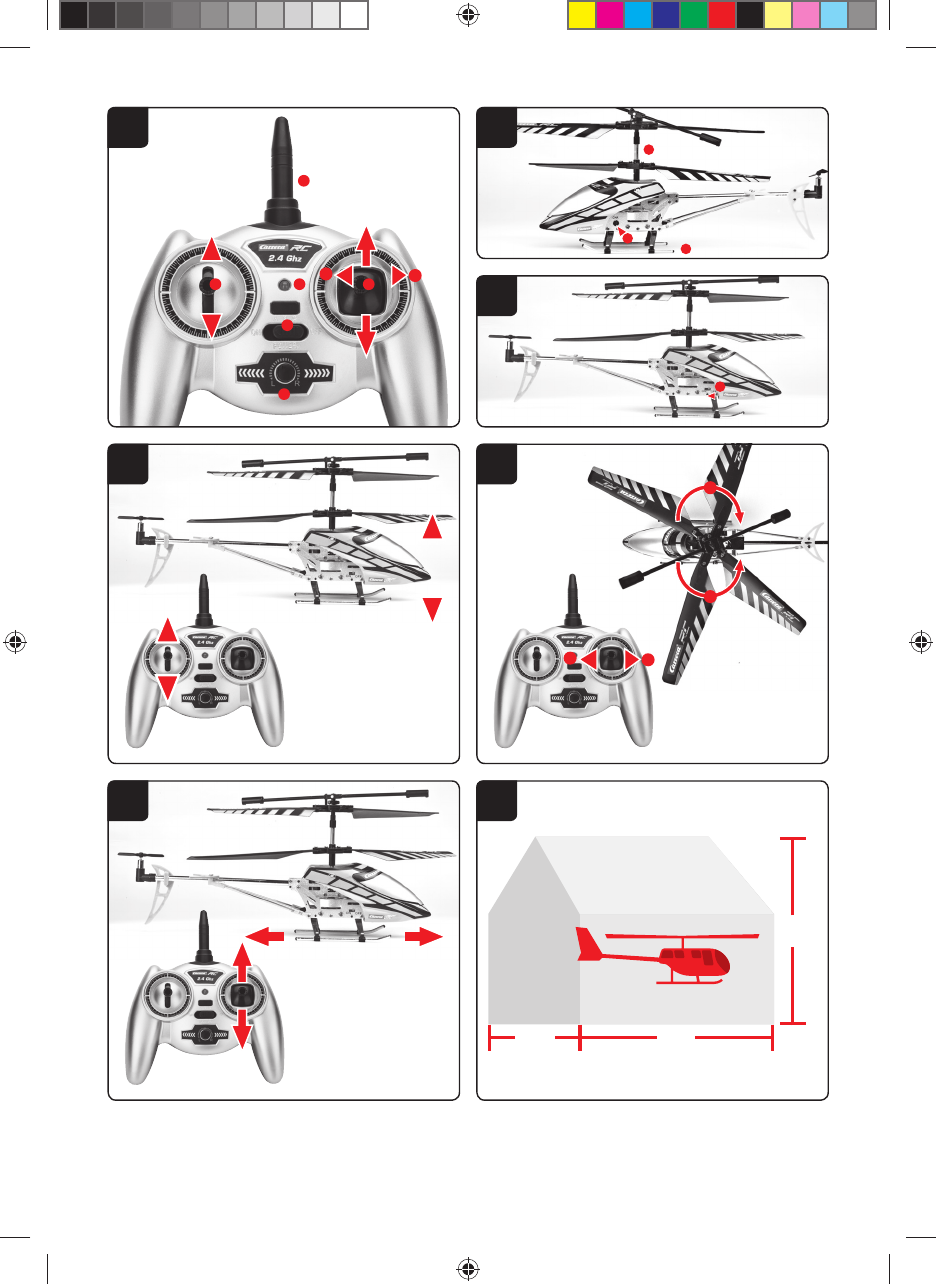
Funktionsübersicht des Controllers
3
1. Antenne
2. Powerschalter (ON / OFF)
3. Kontroll LED
4. Gas
5
5. Vor-/Zurück Heck (Kreisdrehung)
6. Trimmer für Heck
7. Batteriefach
Beschreibung des Helikopters
6
1. Koaxiales Rotorsystem
2. Heck
3. Ladebuchse zum Laden des LiPo-Akku
7
4. Landekufen
5. ON-/OFF-Schalter
Steuerung des Helikopters
8
Wenn Sie die Steuerfunktionen Ihres Carrera
RC Helikopters noch nicht kennen, nehmen Sie
sich bitte vor dem ersten Flug ein paar Minuten
Zeit, um sich mit ihnen vertraut zu machen. Die
Beschreibung Links- oder Rechts entspricht dem
Blick aus dem Cockpit (Pilotensicht). Drücken Sie
den Gashebel nach oben, um die Rotationsge-
schwindigkeit der Hauptrotorblätter zu erhöhen.
Erhöhen Sie die Rotationsgeschwindigkeit der
Hauptrotorblätter und das Modell beginnt zu stei-
gen. Reduzieren Sie den Ausschlag des Gashe-
bels und damit die Rotationsgeschwindigkeit der
Hauptrotorblätter, so sinkt der Helikopter. Wenn
das Modell vom Boden abgehoben ist, können
Sie es durch vorsichtiges Bewegen des Gashe-
bels, nach oben oder nach unten, in einen sta-
tionären Schwebefl ug bringen, ohne dass es zu
abrupt steigt oder sinkt.
9
Bewegen Sie den rechten Hebel (Heck) nach
links und die Nase des Helikopters dreht sich
(giert) um die Achse des Hauptrotors kreisför-
mig nach links. Bewegen Sie den rechten Hebel
(Heck) nach rechts und die Nase des Helikopters
dreht sich (giert) um die Achse des Hauptrotors
kreisförmig nach rechts. Verwenden Sie den Trim-
mer für Heck, bis Sie eine stabile Neutralstellung
des Helikopters im Schwebefl ug, ohne Bewegung
des rechten Hebel (Heck), erreicht haben.
10
Der Vor-/Zurück-Hebel steuert die Neigung des
Helikopters vorwärts/rückwärts. Wenn Sie den
Hebel nach vorne drücken, bewegt sich die He-
likopternase nach unten und der Helikopter fl iegt
vorwärts. Wenn Sie den Vor-/ Zurück-Hebel nach
hinten drücken, bewegt sich der Helikopter nach
hinten und der Helikopter fl iegt rückwärts.
Nachdem Sie sich mit den Hauptsteuerfunktionen vertraut
gemacht haben, sind Sie nach Auswahl des Fluggebietes
bereit für den ersten Flug.
Auswahl des Fluggebietes
11
Wenn Sie für Ihren ersten Flug bereit sind,
sollten Sie einen geschlossenen Raum wäh-
len, der ohne Personen und ohne Hindernis-
se sowie möglichst groß ist. Aufgrund der
Größe und Steuerbarkeit des Helikopters
ist es für erfahrene Piloten möglich, auch
in relativ kleinen geschlossenen Räumen
zu fl iegen. Für Ihre ersten Flüge empfeh len
wir unbedingt eine Mindestraumgröße von
3 mal 3 Metern Grundfl äche und 2,40 Meter
Höhe. Nachdem Sie Ihren Helikopter ausge-
trimmt haben und mit seiner Steuerung und
seinen Fähigkeiten vertraut geworden sind,
können Sie sich auch daran wagen, in klei-
neren und weniger freien Umgebungen zu
fl iegen.
Der Helikopter ist ausschließlich für den Ge-
brauch in geschlossenen Räumen entwickelt
worden.
Informationen zu den Problemlösungen fi nden Sie auf Seite 42.
Irrtum und Änderungen vorbehalten
Farben / endgültiges Design – Änderungen vorbehalten
Technische und designbedingte Änderungen vorbehalten
Piktogramme = Symbolfotos
DEUTSCH
6
Dear customer
Congratulation! You bought a Carrera RC-helicopter which
has been manufactured according to today´s state-of-the-art
technology. As it is our constant endeavour to develop and
improve our products, we reserve the right to make modifi ca-
tions, either of a technical nature or with respect to features,
materials, and design, at any time, and without prior notice.
For this reason, no claims will be accepted for any slight
deviations in your product from the data and illustrations
contained in these instructions. These operating and as-
sembly instructions are an integral part of the product. Non-
observance of these operating instructions and the safety
instructions they contain will render the guarantee null and
void. These instructions are to be kept for future reference
and in the event that the product is passed on to a third party.
For the latest version of these operat-
ing instructions and information on
replacement and spare parts avail-
able, please visit carrera-rc.com in the
service area.
Guarantee conditions
Carrera products are technically advanced products
which should be handled with care. It is important to
follow the directions given in the operating instruc-
tions. All components have been subjected to careful
inspection (technical modifi cations and alterations to
the model for the purpose of product improvement are
reserved).
Should any faults nevertheless occur, guarantee is as-
sumed within the scope of the following conditions:
In accordance with the following provisions, Stadlbauer Mar-
keting + Vertrieb GmbH (hereinafter referred to as “manufac-
turer”) warrants to the endconsumer (hereinafter referred to
as “customer”) that the Carrera RC-model-helicopter (here-
inafter referred to as “product”) delivered to the customer
shall be free from defects in material or workmanship for two
years from the date of purchase (guarantee period). Such
defects will, at the manufacturer´s option, either be repaired
by the manufacturer or fi xed by delivering new or refurbished
parts free of charge. The warranty does not cover failure
due to normal wear and tear, (e.g. to batteries, rotor blades,
cabin covering, gear wheels etc.), or damage as a result of
improper handling/misuse or unauthorised interference. Any
other customer´s claims asserted against the manufacturer,
especially action for damages, shall be excluded.
The contractual and statutory rights of the customer against
the seller (supplementary performance, rescission of the
contract, abatement, compensation) which exist with the
product not having been free from defects at the time of the
passing of risk, shall remain unaff ected by this warranty.
Claims from this special warranty shall only be valid if:
• the defect reported has not arisen by damage caused by
unintended use or misuse as specifi ed in the instruction
manual,
• the failure of the product is not due to normal wear and tear
• the product does not show any signs resulting from repairs
or other interferences carried out by workshops not having
been authorised by the manufacturer,
• the product has only been operated with accessories au-
thorised by the manufacturer.
Guarantee cards cannot be replaced.
Note for EU countries: Reference is hereby made to the
seller’s statutory guarantee obligation, to the extent that this
guarantee obligation is not restricted by the product guarantee.
The manufacturer shall bear the costs for sending in and
returning the product.
This warranty shall be valid to the extent aforementioned and
under the above-named circumstances (including the sub-
mittal of the original proof of purchase also in case of resale)
for any future owner of the product.
Declaration of conformity
Stadlbauer Marketing + Vertrieb GmbH hereby declares
that this model including the controller conforms with the
fundamental requirements of the following EC directives:
EC Directives 2009/48 and 2004/108/EC regarding electro-
magnetic compatibility and the other relevant regulations of
Directive 1999/5/EC (R&TTE).
The original declaration of conformity can be requested from
carrera-rc.com.
Warning!
A remote-controlled helicopter is NOT A TOY and is only
suitable for teenagers over the age of 14!
This product is not intended for use by children without
supervision of a parent. Flying the helicopter requires skill
and children must be trained under the direct supervision of
an adult. Read the user’s information together with your child
Before the fi rst use. Inappropriate use may result in severe
injuries and/or damage to property.
It has to be operated with care and caution and requires both
mechanical and mental skills. The operating instructions
contain notes on safety and technical regulations as well as
information on maintaining and operating the product. It is
indispensable to read these instructions thoroughly before
the fi rst usage. Only this helps to avoid accidents with inju-
ries and damage.
Only use the helicopter in closed rooms which provide
suffi cient space and follow all instructions given in this
manual.
Hands, hair and loose clothing, including other objects such
as pens and screwdrivers must be kept away from the pro-
peller (rotor). Do not touch the rotating rotor. Especially take
care that your hands DO NOT get close to the rotor blades!
WARNING: Risk of eye injuries. Do not fl y near your face
to avoid injuries.
As user of this product you are solely responsible for
handling it safely in order to ensure that neither you nor
other persons or their property suff er damages or are
endangered.
• Never use your model with weak remote control batteries.
• This toy is only designed to be used in a home environ-
ment.
• WARNING: Do not start up and fl y when persons,
a nimals or any obstructions are within the fl ying range
of the helicopter.
• Exactly observe the instructions and warnings for this
product and for any possible additional equipment (battery
charger, rechargeable batteries etc.) being used by you.
• Should the helicopter come into contact with any
living thing or solid object, immediately return the gas
control to zero, in other words the left-hand joystick
must be at the stop at the bottom of the slide!
• Avoid any moisture as this might do damage to the elec-
tronics.
• Do not change or modify anything on the helicopter.
If you do not agree to these terms please immediately return
the complete helicopter model in new and unused condition
to the retailer.
Important information concerning Lithium Polymer re-
chargeable batteries
Lithium-Polymer (LiPo) rechargeable batteries are sig-
nifi cantly more sensitive than traditional alkali- or NiMH-
rechargeable batteries which are normally used with radio
control units. Therefore the instructions and warnings have
to be observed in detail. In case of improper use of LiPo
rechargeable batteries there is a danger of fi re. Always fol-
low the manufacturers´ instructions if you dispose of LiPo
rechargeable batteries.
Regulations on disposal for waste electrical and elec-
tronic equipment (WEEE)
This symbol, showing refuse bins with
a cross through them, denotes that
empty batteries, rechargeable batter-
ies, button cells, recharge able battery
packs, equipment batteries, disused
electrical equipment, etc. should not be disposed of in do-
mestic refuse, as they are harmful to the environment and
health. Please help to preserve environment and health and
talk to your children about the correct disposal of used bat-
teries and disused electrical equipment. Batteries and dis-
used electrical equipment should be handed in to the usual
collection points where they can be properly recycled.
Do not mix dissimilar battery types or employ new and used
batteries together. Empty batteries should be removed from
the product. Do not recharge non-rechargeable batteries
due to risk of explosion.
WARNING!
Rechargeable batteries should only be charged under adult
supervision. Never leave the battery unattended while it
is charging. Exhausted batteries are to be removed from
the toy. Rechargeable batteries should be removed from the
product before charging. Supply terminal are not to be short-
circuited. Only use the batteries recommended or equivalent
types.
If in regular use the charger must be examined for damage
to the cord, plug, covers and all other parts. If any signs of
damage are found the charger may only be used again after
repair work has been completed. The external fl exible cable
or cord of this charger cannot be replaced: If the cord is dam-
aged the charger shall be scrapped.
FCC statement
This device complies with Part 15 of the FCC Rules.
Operation is subject to the following two conditions:
(1) this device may not cause harmful interference, and
(2) this device must accept any interference received, in-
cluding interference that may cause undesired operation.
Changes or modifi cations not expressly approved by the
party responsible for compliance could void the user’s
authority to operate the equipment.
Guidelines and warnings for the use of LiPo recharge-
able batteries
• You have to charge the attached 3.7 V 150 mAh LiPo
rechargeable battery in a safe place and at a safe distance
to fl ammable material.
• Never leave the battery unattended while it is charging
• After a fl ight, the rechargeable battery has to cool down to
the ambient air temperature before charging it.
• You must always use the corresponding LiPo charging unit
(USB cable / remote control). In case of non-compliance
with these directions there is a danger of fi re resulting in
a health risk and/or damage to property. NEVER use any
other battery charger.
• Should the rechargeable battery swell or deform while dis-
charging or recharging, you have to immediately stop charg-
ing or discharging the battery. Take the battery out as quickly
and carefully as possible and place it in a safe and open area
off side any infl ammable material and watch it for at least 15
minutes. In case you continue charging or discharging a bat-
tery which has already started to swell or deform there is a
danger of fi re! Even in case of slight deforming or ballooning
the rechargeable battery has to be taken out of operation.
• Store the rechargeable battery at ambient temperature in a
dry place.
• Always recharge the battery immediately after use to
prevent its becoming deep discharged. Please make
sure to allow a pause of about 20 minutes between fi n-
ishing the fl ight and recharging the battery. Recharge
the battery occasionally (suggested every 2-3 months).
Failure to treat the battery as described above can lead
to its becoming defective.
• When transporting or temporarily storing the rechargeable
battery the temperature should be between 5-50°C. If pos-
sible, do not store the battery or the model in a car and do
not expose it to direct sunlight. In case the battery is broiled
it can be damaged or catch fi re.
Note: If the battery voltage/output is low you will recognise
that a considerable trim and/or controlling is necessary to
avoid that the helicopter starts trundling. This usually occurs
before reaching a battery voltage of 3 V and it is a good mo-
ment to end the fl ight.
ENGLISH
7
Contents of package
1
1x Helicopter
1x Controller
1x USB charging cable
4x 1.5 V Mignon AA batteries (non-rechargeable)
Recharging the LiPo rechargeable
battery
Make sure you only charge the LiPo rechargeable battery
supplied with the LiPo charging unit also supplied (USB
cable and remote control). In case you try to charge the re-
chargeable battery with a diff erent LiPo battery charger or
any other battery charger, this might cause serious damag-
es. Please carefully read the previous chapter about warn-
ings and guidelines on the usage of rechargeable batteries
before proceeding.
2
Charging via computer:
• Connect the USB charging cable with the USB
port of a computer. The LED on the USB charger
cable lights green indicating that the charger unit
is correctly connected to the computer.
If you plug in a helicopter with a discharged bat-
tery, the LED on the USB charging cable does
not light up; this shows that the helicopter bat-
tery is being charged. The USB charging cable
and the charging socket on the helicopter are
designed to make incorrect connection impos-
sible.
• It takes about 30 minutes to recharge a discharged
battery (but NOT a deep-discharged one). When
the battery is fully charged, the LED display on the
USB charger cable lights up green again.
Note: When supplied, the lipo-battery is already partially
charged so the fi rst charging cycle may well take less time.
It is essential to follow the connection sequence given
above! If you have the charger cable only connected
to the helicopter and not to a source of electricity,
please note the following: The green LED display does
not necessarily indicate the battery is still adequately
charged.
While charging, the power switch must be in the “OFF”
position.
Inserting the batteries in the
remote control
3
Open the battery compartment with a screwdriver
and insert the batteries in the remote control.
Please keep in mind the correct polarity. After
having closed the compartment you can check all
functions of the remote control with the help of the
power-switch on the front. With the power-switch
turned ON and proper functioning, the top center
LED on the remote control will light up red.
When the control LED fl ashes rapidly, the batter-
ies in the controller must be changed.
Frequency bind between model
and remote control
4
The Carrera RC helicopter and the remote control
are frequency bound at purchase. Should there
occur any problems with the communication be-
tween the Carrera RC helicopter and the remote
control at the beginning, please carry out a new
frequency bind.
• Connect the plug-in connection at the model and
switch on the model at the ON/OFF switch.
• The LED in the helicopter now fl ashes in rhyth-
mically-accelerating sequence.
• Switch on the controller at the ON/OFF switch.
While connecting, the controller emits a signal
tone.
• Place the charged helicopter on a fl at surface.
• Allow the helicopter a few moments until the
system is correctly initialised and is ready for
operation.
• The control LED now lights continuously once
again, indicating that the connection is ended.
Checklist for fl ight preparation
This checklist does not replace the contents of the operating
instructions. Although it can be used as a quick-start-guide
we strongly advise to fi rst read the operating instructions in
detail before you proceed.
• Check the contents of the package
• Connect the charging unit to the source of power.
• Charge the lipo-battery as described in the section “Charg-
ing the lipo-battery”.
• Fit four AA batteries in the controller, making sure their po-
larity is correct.
• Look for a suitable environment for fl ying
• Place the helicopter on a fl at surface
• Switch on the model at the ON/OFF switch.
• Turn the remote control on at the ON/OFF switch.
• The LED in the helicopter now fl ashes in rhythmically-
accelerating sequence.
• During the binding process, the controller emits an acous-
tic signal.
• Allow the helicopter a few moments until the system is cor-
rectly initialised and is ready for operation. The LED in the
helicopter now lights continuously.
• Repeat the above points as required, if you wish to fl y more
helicopters at the same time.
• Check the control system
• Make yourself familiar with the control system
• Trim the helicopter as necessary as described under “Con-
trolling the helicopter”, so that when hovering the helicopter
no longer moves from the spot, until given a command by
the controller.
• The helicopter is now ready to be fl own.
• If the helicopter displays no functions, retry the above bind-
ing procedure.
• Fly the model
• Land the model
• Switch the model off at the ON/OFF switch
• Always switch off the remote control last
Range of functions of the remote
control
3
1. Antenna
2. Power switch (ON / OFF)
3. Control LED
5
4. Gas · tail (spinning in circles)
5. Forward/backward tail (spinning in circles)
6. Trimmer for tail
7. Battery compartment
Description of helicopter
6
1. Coaxial rotor system
2. Tail rotor
3. Socket for charging the lipo-battery
7
4. Landing skids
5. ON-/OFF switch
Controlling the helicopter
8
In case you don´t know the control functions of
your Carrera RC helicopter yet, please take some
minutes before the fi rst fl ight in or to make your-
self familiar with them. The descriptions left or
right refer to the view out of the cockpit (pilote´s
view). Push the throttle up to increase the rota-
tional speed of the main rotor blades. Increase the
rotational speed of the main rotor blades and the
model will start to ascend.
If you push down the throttle and thus reduce the
rotational speed of the main rotor blades the heli-
copter will descend. When the model has lifted off
the ground you can get it into stationary hovering
without abrupt ascending or descending by care-
fully moving the throttle upwards and downwards.
9
Move the right lever (tail) to the left and the heli-
copter’s nose turns (yaws) round the main rotor’s
axis in a circle to the left.
Move the right lever (tail) to the right and the heli-
copter’s nose turns (yaws) round the main rotor’s
axis in a circle to the right.
Use the trimmer for tail until you have reached a
stable neutral position of the helicopter when hov-
ering, without moving the right lever (tail).
10
The forward-/backward lever controls the
helicopter´s pitch forward and backward. When
shifting the lever forward the nose of the helicop-
ter will move downwards and the helicopter will fl y
forward. When shifting the forward-/backward le-
ver backward the helicopter will move backwards
and the helicopter will fl y backward.
After having made yourself familiar with the main control
functions and having chosen an appropriate area for fl ying
the helicopter, you can start the fi rst fl ight.
Choosing the fl ight area
11
When being prepared for the fi rst fl ight you
should choose a closed room without any
persons or obstacles which is as big as pos-
sible. Due to the size and controllability of the
helicopter experienced pilotes may be able to
fl y the helicopter in relatively small rooms. For
your fi rst fl ights we strongly recommend to
choose a room with a minimum fl oor space of
3 x 3 metres and 2.40 metres of height. After
having trimmed your helicopter for fl ight and
having made yourself familiar with the control-
ling and its functions you may start fl ying in
smaller and less open environments.
The helicopter has exclusively been devel-
oped for indoor use in closed rooms.
Information on trouble-shooting will be found on page 42.
Errors and changes excepted
Colours / fi nal design – changes excepted
Technical changes and design-related changes excepted
Pictograms = symbolic photos
ENGLISH
8
Chère cliente ! Cher client !
Nous vous félicitons pour l‘achat de votre maquette d‘héli-
coptère Carrera RC qui a été fabriqué selon le niveau actuel
de la technique. Nous avons toujours pour ambition d’amé-
liorer et de perfectionner nos produits et nous réservons la
possibilité de réaliser des modifi cations techniques relatives
à la présentation et design de nos produits. Les divergences
de faible importance du produit, que vous avez acheté, par
rapport aux données et illustrations de ces instructions de
montage et d’utilisation ne sauraient donner lieu à des récla-
mations de ce fait. Ces instructions de montage et d’utilisa-
tion forment partie intégrale du produit. Le fabricant décline
toute responsabilité en cas d’inobservation des instructions
de montage et d’utilisation et des consignes de sécurité y
fi gurant. Veuillez conserver ces instructions de montage et
d’utilisation, afi n que vous puissiez les consulter ultérieure-
ment et et les remettre à tout utilisateur de ce véhicule si
besoin est.
Vous trouverez la version la plus ac-
tuelle de ce mode d‘emploi et les infor-
mations sur les pièces de rechange
disponibles sur carrera-rc.com
dans la zone de service.
Conditions de garantie
Les produits Carrera sont des produits de qualité tech-
nique élevée qui devraient être manipulés avec précau-
tion. Veuillez impérativement respecter les indications
du mode d‘emploi. Tous les éléments sont soumis à des
contrôles approfondis (sous réserve de modifi cations
techniques et des véhicules destinées au perfectionne-
ment du produit).
La responsabilité du fabricant est cependant engagée aux
termes des conditions de garantie ci-après à supposer que
le produit présente des défauts :
La société Stadlbauer Marketing + Vertrieb GmbH (ci-après
désignée „Fabricant“) garantit au client fi nal (ci-après dési-
gné „Client“) selon les clauses suivantes que la maquette
d‘hélicoptère Carrera RC livré au client (ci-après désigné
„Produit“) sera exempt de vices de matériel ou de fabrication
durant une période de deux ans à partir de la date d‘achat
(délai de garantie). Le fabricant éliminera de tels vices selon
sa propre appréciation à ses frais en les réparant ou en
livrant des pièces neuves ou ayant subi une révision géné-
rale. La garantie ne s’étend pas aux pièces d’usure (par
exemple la batterie, les pales de rotor, le recouvrement de
cabine, la roue dentée), aux dommages dus à un traitement/
utilisation non conforme ou à des interventions externes.
D‘autres revendications du client, en particulier de dom-
mages et intérêts, contre le fabricant sont exclus.
Les droits contractuels ou légaux du client (exécution ulté-
rieure, résiliation du contrat, réduction du prix, dommages et
intérêts) vis-à-vis du vendeur correspondant, droits existant
si le produit n‘était pas exempt de vices lors du transfert du
risque, ne sont pas concernés par cette garantie.
Les droits issus de cette garantie du fabricant spéciale
n‘existent que si
• le vice réclamé ne repose pas dans des dommages qui
résultent d‘un emploi non conforme ou non dapté aux
directives prescrites dans le mode d‘emploi,
• il ne s‘agit pas de signes d‘usure dus à l‘emploi,
• le produit ne présente aucun signe qui permette de consta-
ter que des réparations ou d‘autres interventions ont été
eff ectuées par des ateliers non autorisés par le fabricant,
• le produit n‘a été utilisé qu‘avec des accessoires autorisés
par le fabricant.
Les cartes de garantie ne sont pas remplaçables.
Avis destinés aux États de l’Union européenne : nous
attirons l’attention sur l’obligation de garantie légale du ven-
deur, pour autant que cette obligation de garantie ne soit pas
restreinte par les conditions de la présente garantie.
Le fabricant prend en charge les coûts de l’expédition et du
renvoi du produit.
Cette garantie est valable dans l’ampleur susmentionnée et
dans les conditions susmentionnées (y compris la présen-
tation du bon d’achat original aussi en cas de revente) pour
chaque propriétaire ultérieur, futur du produit.
Déclaration de conformité
Par la présente, la société Stadlbauer Marketing + Vertrieb
GmbH déclare que cette maquette, y compris le contrôleur,
est conforme aux exigences essentielles des directives
européennes suivantes : est conforme aux Directives euro-
péennes 2009/48 et 2004/108/CE relatives à la comptabilité
électromagnétique et les autres prescriptions importantes de
la Directive 1999/5/CE (R&TTE).
L’original de la déclaration de conformité est à votre disposi-
tion sur le site internet carrera-rc.com.
Avertissements !
Un hélicoptère télécommandé N’EST PAS UN JOUET et
n’est approprié que pour les adolescent à partir de 14
ans !
Ce produit n‘est pas conçu pour être utilisé par des enfants
sans la surveillance d‘une personne chargée de l‘éduca-
tion.
Piloter l’hélicoptère nécessite une certaine habileté que
les enfants doivent acquérir sous la surveillance directe d’un
adulte. Veuillez lire le mode d’emploi avec votre enfant avant la
première utilisation. Un emploi non conforme peut entraîner de
graves blessures et/ou des dommages matériels.
Il doit être piloté avec prudence et circonspection et exige cer-
taines facultés mécaniques et mentales. Le mode d‘emploi
contient des consignes de sécurité et des prescriptions ainsi
que des indications sur l‘entretien et l‘emploi du produit. Il faut
impérativement avoir lu complètement et compris ce mode
d‘emploi avant la première mise en service. C‘est la seule
manière d‘éviter les accidents accompagnés de blessures et
de dommages.
Ne faire voler que dans des pièces closes qui off rent suf-
fi samment de place et suivre toutes les consignes telles
qu‘elles sont recommandées dans ce mode d‘emploi. Il
convient de tenir l’hélice (rotor) à distance des mains, des che-
veux et des vêtements amples ainsi que d’autres objets tels que
des clous ou des tournevis. Ne pas toucher le rotor en mouve-
ment. Veiller surtout à NE PAS tenir les mains à proximité des
pales du rotor !
ATTENTION : Risque de blessure oculaire. Afi n d’éviter tout
accident, ne pas faire voler à proximité du visage.
En tant qu‘utilisateur de ce produit, vous êtes seul res-
ponsable de la sécurité de manipulation de sorte que vous
ni d‘autres personnes ou leur propriété ne subissent des
dommages ou soient mis en danger.
• Ne jamais utiliser cette maquette avec des accus faibles
dans le contrôleur.
• Ce jouet est uniquement destiné à une utilisation dans le cadre
domestique.
• ATTENTION : Ne pas démarrer ni faire voler l’hélicop-
tère tant que des personnes, animaux ou obstacles se
trouvent dans le périmètre de vol de l’appareil.
• Respecter exactement les instructions et les avertisse-
ments pour ce produit et l‘équipement supplémentaire
éventuel (chargeur, accus etc.) que vous utilisez.
• Si l’hélicoptère entre en contact avec des êtres vivants
ou des objets durs, mettre immédiatement le levier
d’accélération en position zéro, à savoir le joystick
gauche doit être en butée inférieure !
• Éviter n‘importe quelle humidité, car elle peut endomma-
ger le système électronique.
• Ne rien remplacer ou modifi er sur l’hélicoptère.
Si vous n‘êtes pas d‘accord avec ces conditions, renvoyez
immédiatement au commerçant la maquette de l‘hélicoptère
intégrale dans sont état neuf et non utilisé.
Informations importantes sur les accus Lithium-Polymère
Les accus Lithium-Polymère (LiPo) sont nettement plus sen-
sibles que les accus alcalins ou NiMh usuels qui sont utilisés
normalement pour les télécommandes radio. C‘est pourquoi
il faut respecter très strictement les prescriptions et avertisse-
ments du fabricant. En cas de mauvaise manipulation de l‘accu
LiPo, il y a risque d‘incendie. Toujours respecter les indications
du fabricant quand vous éliminez des accus LiPo.
Prescriptions d‘élimination de vieux appareils électriques
et électroniques selon la réglementation WEEE (Déchets
d‘équipements électriques et électroniques provenant des
Équipements Électriques et Électroniques)
Le pictogramme ci-contre des poubelles
sur roues barrées est destiné à attirer
votre attention sur le fait qu’il est interdit
de jeter les piles, accumulateurs, piles
rondes, packs d’accus, batteries d’appa-
reils, appareils électriques usagés etc. dans les ordures ména-
gères, étant donné que ces produits nuisent à l’environnement
et à la santé. Veuillez nous aider à sauvegarder l’environnement
et la santé et attirez aussi l’attention de vos enfants sur une éli-
mination correcte des batteries, piles et appareils électriques
usagés. Remettez les batteries, piles et appareils électriques
usagés aux postes de collecte respectifs. Ces postes veilleront
à leur recyclage aux termes des réglementations en vigueur.
Il est strictement interdit d’utiliser des types diff érents de batte-
ries ou des piles neuves avec des piles usagées. Retirez tou-
jours les batteries et piles vides du jouet. En raison du risque
d’explosion, il est interdit de recharger des piles non rechar-
geables.
ATTENTION !
Le chargement des accumulateurs doit impérativement se
faire sous la surveillance des adultes.
Ne laissez jamais la batterie se charger sans surveillance.
Retirez les accumulateurs du jouet avant de les recharger. Il est
interdit de court-circuiter les bornes de raccordement. Servez-
vous exclusivement du type de pile ou d’accumulateur recom-
mandé ou d’un type de pile ou d’accumulateur équivalent.
En cas d’emploi régulier du chargeur, il faut contrôler le câble,
le raccord, les couvercles et les autres pièces de ce chargeur.
En cas de dommage, le chargeur ne doit être remis en service
qu’après avoir subi une réparation. Le câble extérieur fl exible de
ce chargeur ne peut pas être remplacé : si celui-ci est endom-
magé, il doit être détruit.
Directives et avertissements pour l‘emploi de l‘accu LiPo
• Vous devez charger l‘accu LiPo 3,7 V 150 mAh dans un
endroit sûr, à l‘écart de matériaux infl ammables.
• Ne laissez jamais la batterie se charger sans surveillance.
• Pour charger l‘accu après un vol, il faut tout d‘abord qu‘il refroi-
disse à la température ambiante.
• Utilisez uniquement le chargeur LiPo correspondant (câble
USB / contrôleur). En cas de non-respect de ces indications,
il y a risque d‘incendie et donc un danger pour la santé et/ou
un risque de dommage matériel. NE JAMAIS utiliser un autre
chargeur.
• Si l‘accu gonfl e ou se déforme pendant la décharge ou la
charge, mettre immédiatement fi n à la décharge ou décharge.
Retirer l‘accu aussi rapidement et prudemment que possible et
le déposer dans un endroit sûr, à l‘air libre, à l‘écart de maté-
riaux infl ammables et l‘observer au moins durant 15 minutes.
Si vous continuez à charger ou décharger un accu qui a déjà
gonfl é ou s‘est déformé, il y a risque d‘incendie. Même en pré-
sence d‘une faible déformation ou gonfl ement, un accu doit
être mis hors service.
• Entreposer l‘accu à température ambiante dans un lieu sec.
• Rechargez votre accu après utilisation afi n d’éviter une
décharge profonde de celui-ci. Veillez à faire une pause
de 20 minutes env. entre le vol et la charge. Chargez votre
accu de temps en temps (environ tous les 2 à 3 mois). La
non-observation de l’utilisation mentionnée précédem-
ment peut provoquer une détérioration de l’accu.
• Pour le transport ou pour un entreposage temporaire de
l‘accu, la température devrait se situer entre 5-50 °C. Ne pas
entreposer l‘accu et la maquette si possible dans la voiture ou
sous l‘eff et direct du soleil. Si l‘accu est exposé à la chaleur
dans la voiture, il peut être endommagé ou prendre feu.
Remarque: Si la tension/puissance de l‘accu est faible, vous
constaterez qu‘il faut eff ectuer des opérations d‘équilibrage et/
ou des mouvements de pilotage considérables pour que l‘héli-
coptère ne se mette pas en vrille. Ceci est le cas en général
avant que la tension de l‘accu n‘atteigne les 3 V et c‘est le bon
moment pour interrompre le vol.
FRANÇAIS
9
Fournitures
1
1x Hélicoptère
1x Contrôleur
1x Câble USB de chargement
4x Accus 1,5V mignon AA (non rechargeable)
Charger l‘accu LiPo
Veillez à ce que la batterie LiPo fournie soit chargée uniquement
avec l’appareil de charge LiPo fourni (câble USB ou contrôleur).
Si vous essayez de charger l‘accu avec un autre chargeur
d‘accu LiPo ou un autre chargeur, ceci peut entraîner de graves
détériorations. Veuillez lire attentivement le chapitre précédent
avec les avertissements et les directives d‘emploi de l‘accu
avant de continuer.
2
Charger à l’ordinateur :
• Relier le câble de charge USB au port USB d’un
ordinateur. La DEL sur le câble de charge USB
s’allume en vert et indique que l’unité de charge est
correctement reliée à l’ordinateur.
Lorsque vous branchez un hélicoptère dont l’accu
est vide, la DEL sur le câble de charge USB ne
brille plus et indique que l’accu de l’hélicoptère est
en phase de charge. Le câble de charge USB voire
la douille de charge sur l’hélicoptère sont fabriqués
de sorte qu’il n’est pas possible d’inverser la pola-
rité.
• Cela dure environ 30 minutes pour la recharge
d’un accu déchargé (pas déchargé en profondeur).
Lorsque l’accu est plein, la DEL du câble de charge
USB se rallume en vert.
Remarque : Lors de la livraison, l’accu LiPo contenu est chargé
partiellement. C’est pourquoi le premier processus de charge
pourrait durer un peu moins longtemps.
Veuillez respecter impérativement l’ordre de raccorde-
ment ci-dessus ! Si le câble de charge n’est pas raccordé
à une source de courant et s’il est uniquement relié à
l’hélicoptère, veuillez prendre en compte ce qui suit :
La DEL s‘allumant en vert n‘indique pas si l‘accu est
suffi samment chargé.
Lors du rechargement, l’interrupteur doit se trouver en
position «OFF».
Insérer l‘accu LiPo dans
l‘hélicoptère
3
Ouvrir le compartiment à accu avec un tournevis et
insérer les accus dans le contrôleur. Respecter la
bonne polarité. Après la fermeture du compartiment,
vous pouvez vérifi er la fonctionnalité du contrôleur
à l‘aide du commutateur puissance sur le devant.
En position ON du commutateur puissance et si le
fonctionnement est correct, la DEL devrait s‘allumer
en rouge en haut au milieu du contrôleur.
Quand la DEL de contrôle clignote rapidement, les
batteries doivent être remplacées dans le contrôleur.
Liaison entre la maquette et le
contrôleur
4
L‘hélicoptère Carrera RC et le contrôleur ont été
reliés en usine. Si des problèmes de communication
entre l‘hélicoptère Carrera RC et le contrôleur se pro-
duisent au début, exécuter une nouvelle liaison.
• Mettre le modèle en marche avec le commutateur
ON/OFF.
• La DEL dans l’hélicoptère clignote à présent à un
rythme accéléré.
• Mettre le contrôleur sous tension avec le commuta-
teur ON/OFF. Pendant le processus de liaison, un
signal retentit sur le contrôleur.
• Placer l’hélicoptère chargé sur une surface plane.
• Laisser à l’hélicoptère un peu de temps jusqu’à ce
que le système soit correctement initialisé et prêt
à l’emploi.
• La DEL de contrôle reste à nouveau allumée en
permanence et indique que la liaison est achevée.
Check-list pour la préparation
du vol
Cette check-list ne remplace pas le contenu de ce mode d‘em-
ploi. Même si vous pouvez l‘utiliser comme guide Quick-Start,
nous vous conseillons impérativement de lire tout d‘abord atten-
tivement et intégralement ce mode d‘emploi avant de continuer.
• Vérifi er le contenu de l’emballage
• Reliez l’appareil de charge à la source de courant.
• Charger l’accu LiPo comme cela est décrit au chapitre «Char-
ger l’accu LiPo». R
• Insérer quatre piles AA dans le contrôleur et veiller à la polarité
correcte
• Chercher un environnement approprié pour le vol
• Placer l’hélicoptère sur une surface plate
• Mettre le modèle en marche avec le commutateur ON/OFF.
• Mettre le contrôleur sous tension avec le commutateur ON/
OFF.
• La DEL dans l’hélicoptère clignote à présent à un rythme
accéléré.
• Pendant le processus de liaison, un signal retentit sur le
contrôleur.
• Laisser à l’hélicoptère un peu de temps usqu’à ce que le sys-
tème soit correctement initialisé et prêt à l’emploi. La LED de
l’hélicoptère s’allume maintenant de manière permanente.
• Répétez la procédure ci-dessus si vous désirez faire voler plu-
sieurs hélicoptères simultanément.
• Vérifi er la commande
• Se familiariser avec la commande
• Trimez l’hélicoptère comme décrit dans «Commande de
l’hélicoptère» de sorte que l’hélicoptère en vol stationnaire ne
change pas d’endroit sans commande du contrôleur.
• L’hélicoptère est à présent prêt à fonctionner.
• Si l’hélicoptère ne montre pas de signe de fonctionnement,
réessayez d’exécuter le processus de raccordement men-
tionné ci-dessus.
• Faire voler la maquette
• Faire atterrir la maquette
• Éteignez le modèle avec le commutateur ON/OFF
• Toujours débrancher la télécommande en dernier
Vue d‘ensemble des fonctions
du contrôleur
3
1. Antenne
2. Commutateur puissance (ON / OFF)
3. DEL de contrôle
5
4. Gaz
5. Avant/Arrière
Arrière (mouvement de rotation)
6. Trimmer pour l’arrière
7. Compartiment à accu
Description de l‘hélicoptère
6
1. Système de rotor coaxial
2. Arrière
3. Douille pour charger l’accu LiPo
7
4. Patins d’atterrissage
5. Commutateur ON/OFF
Pilotage de l‘hélicoptère
8
Si vous ne connaissez pas encore les fonctions de
pilotage de votre hélicoptère Carrera RC, prenez
quelques minutes de temps avant le premier vol
pour vous familiariser avec elles. La description
Gauche ou Droite correspond à une vue à partir du
cockpit (vue du pilote). Pousser le levier du gaz vers
le haut afi n d’augmenter la vitesse de rotation des
pales du rotor principal. Si vous augmentez la vitesse
de rotation des pales du rotor principal, la maquette
commence à monter. Si vous réduisez l’amplitude du
levier du gaz et donc la vitesse de rotation des pales
du rotor principal, l’hélicoptère descend. Quand la
maquette a quitté le sol, vous pouvez la mettre en
vol stationnaire en bougeant prudemment le levier
du gaz, vers le haut ou vers le bas sans qu’elle ne
monte ou ne descende abruptement.
9
Si vous bougez le levier de droite (arrière) vers la
gauche, le nez de l’hélicoptère se met en rotation
(louvoie) autour de l’axe du rotor principal en faisant
une rotation circulaire vers la gauche.
Si vous bougez le levier de droite (arrière) vers la
droite, le nez de l’hélicoptère se met en rotation (lou-
voie) autour de l’axe du rotor principal en faisant une
rotation circulaire vers la droite.
Utiliser le trimmer pour l’arrière jusqu’à ce que l’héli-
coptère ait atteint une position neutre stable en vol
stationnaire sans bouger le levier de droite (arrière).
10
Le levier Avant/Arrière commande l‘inclinaison de
l‘hélicoptère vers l‘avant/arrière. Si vous appuyez le
levier vers l‘Avant, le nez de l‘hélicoptère se déplace
vers le bas et l‘hélicoptère s‘envole en avant. Si vous
appuyez le levier Avant/Arrière vers l‘arrière, l‘héli-
coptère se déplace vers l‘arrière et vole en marche
arrière.
Après vous être familiarisé avec les fonctions principales de pilo-
tage, vous êtes prêts pour eff ectuer votre premier vol après avoir
choisi la zone de vol.
Choix de la zone de vol
11
Quand vous êtes prêt pour votre premier vol,
vous devriez choisir une pièce close qui doit être
aussi grande que possible sans la présence de
personnes et d‘obstacles. En raison de la taille et
la facilité de pilotage de l‘hélicoptère, les pilotes
expérimentés sont capables de faire voler l‘héli-
coptère aussi dans des pièces fermées relative-
ment petites. Mais pour vos premiers vols, nous
recommandons une taille minimale de la pièce
de 3 fois 3 mètres de surface et de 2,40 mètres
de haut. Après avoir trimmé votre hélicoptère
et vous être familiarisé avec son pilotage et ses
facultés, vous pouvez aussi risquer de le faire
voler dans des environnements plus petites et
moins libres.
L‘hélicoptère a été exclusivement développé
pour un emploi dans des pièces fermées.
Vous trouverez des informations pour résoudre les problèmes
à la page 42.
Sous réserve d´erreurs et de modifi cations
Couleurs / design fi nal – sous réserve de modifi cations
Sous réserve de modifi cations · techniques et relatives au design
Pictogrammes = photos symboliques
FRANÇAIS
42
DEUTSCH
Problemlösungen
Problem: Controller funktioniert nicht.
Ursache: Der ON/OFF-Powerschalter steht auf „OFF“.
Lösung: Den ON/OFF-Powerschalter auf „ON“ stellen.
Ursache: Die Batterien wurden falsch eingelegt.
Lösung: Überprüfen Sie, ob die Batterien korrekt eingelegt
sind.
Ursache: Die Batterien haben nicht mehr genug Energie.
Lösung: Neue Batterien einlegen
Problem: Der Helikopter lässt sich mit dem Controller nicht
steuern.
Ursache: Der Powerschalter des Controller steht auf „OFF“.
Lösung: Zuerst den Powerschalter am Controller auf „ON“
stellen.
Ursache: Der Controller ist ggf. nicht richtig mit dem Empfän-
ger im Helikopter gebunden.
Lösung: Bitte führen Sie den Bindevorgang wie unter
„Checkliste für die Flugvorbereitung“ beschrieben
durch und verwenden Sie dabei ggf. einen ande-
ren Kanal (A/B/C) am Controller.
Problem: Die Rotorblätter bewegen sich nicht.
Ursache: Der ON/OFF-Powerschalter am Modell bzw.
Controller steht auf „OFF“.
Lösung: Den ON/OFF-Powerschalter auf „ON“ stellen.
Ursache: Der Akku ist zu schwach bzw. leer.
Lösung: Den Akku aufl aden (siehe Kapitel „Aufl aden des
Akkus“).
#
Problem: Der Helikopter steigt nicht auf.
Ursache: Die Rotorblätter bewegen sich zu langsam.
Lösung: Den Gashebel nach oben ziehen.
Ursache: Die Akku-Leistung reicht nicht aus.
Lösung: Den Akku aufl aden (siehe Kapitel „Aufl aden des
Akkus“).
Problem:
Der Helikopter verliert ohne ersichtlichen Grund
während des Flugs an Geschwindigkeit und sinkt
ab.
Ursache: Der Akku ist zu schwach.
Lösung: Den Akku aufl aden (siehe Kap. „Aufl aden des Ak-
kus“).
Problem: Der Helikopter landet zu schnell.
Ursache: Kontrollverlust über den Gashebel.
Lösung: Den Gashebel langsam hinunterziehen.
Ursache: Zu schnelles Hinunterziehen des Gashebel.
ENGLISH
Troubleshooting
Problem: Remote control does not work.
Cause: The ON/OFF-power switch is turned “OFF”.
Solution: Turn the ON/OFF-power switch “ON”.
Cause: The batteries have been wrongly inserted.
Solution: Check if the batteries have been correctly inserted.
Cause: The batteries do not have enough power.
Solution: Insert new batteries.
Problem: The helicopter cannot be controlled with the remo-
te control
Cause: The power switch on the reomote control is turned
“OFF”.
Solution: First turn the power switch on the remote control
“ON”.
Cause: The remote control is possibly not correctly fre-
quency bound with the receiver on the helicopter.
Solution: Please carry out the binding procedure as de-
scribed in „Checklist for fl ight preparation“, if ne-
cessary using a diff erent channel (A/B/C) on the
controller.
Problem: The rotor blades do not rotate.
Cause: The power switch on the model or the controller is
at “OFF”
Solution: Turn the ON/OFF-power switch “ON”.
Cause: The rechargeable battery is too weak or has run
out of power.
Solution: Charge the battery (see chapter “Charging the
battery”).
Problem: The helicopter does not lift.
Cause: The rotor blades rotate too slowly.
Solution: Push the throttle up.
Cause: The battery´s power is not suffi cient.
Solution: Charge the battery (see chapter “Charging the
battery”).
Problem: During fl ight, the helicopter loses speed and
height without any obvious reason.
Cause: The battery is too weak.
Solution: Charge the battery (see chapter “Charging the bat-
tery”).
Problem: The helicopter lands too quickly.
Cause: Loss of throttle control.
Solution: Push the throttle down slowly.
Cause: Throttle has been pushed down too quickly.
FRANÇAIS
Solutions aux problèmes
Problème: Le contrôleur ne fonctionne pas.
Cause: Le commutateur puissance ON/OFF se trouve sur
“OFF”.
Remède: Le commutateur puissance ON/OFF se trouve sur
“ON”.
Cause: L’insertion des accus est incorrecte.
Remède: Vérifi er si l’insertion des accus est correcte.
Cause: Les accus n’ont plus assez d’énergie.
Remède: Insérer des nouveaux accus
Problème: L’hélicoptère ne se laisse pas piloter avec le contrô-
leur.
Cause: Le commutateur puissance du contrôleur se trouve
sur “OFF”.
Remède: Placer d’abord le commutateur puissance sur le
contrôleur sur “ON”.
Cause: Le cas échéant, le contrôleur n’est pas correcte-
ment relié au récepteur dans l’hélicoptère.
Remède: Veuillez exécuter le processus de connexion com-
me décrit dans „Liste pour la préparation de vol“ et
utilisez le cas échéant un canal diff érent (A/B/C)
sur le contrôleur.
Problème: Les pales du rotor ne bougent pas.
Cause: Le commutateur puissance sur le modèle ou le
contrôleur se trouve sur “OFF”.
Remède: Le commutateur puissance ON/OFF se trouve sur
“ON”.
Cause: L’accu est trop faible ou vide.
Remède: Charger l’accu (cf. Chapitre “Charger l’accu”)
Problème: L’hélicoptère ne monte pas.
Cause: Les pales du rotor bougent trop lentement.
Remède: Tirer le levier du gaz vers le haut.
Cause: La puissance de l’accu ne suffi t pas.
Remède: Charger l’accu (cf. Chapitre “Charger l’accu”).
Problème: L’hélicoptère perd de la vitesse sans raison mani-
feste pendant le vol et descend.
Cause: L’accu est trop faible.
Remède: Charger l’accu (cf. Chapitre “Charger l’accu”).
Problème: L’hélicoptère atterrit trop vite.
Cause: Perte de contrôle via le levier du gaz.
Remède: Tirer lentement le levier du gaz vers le bas.
Cause: Le levier du gaz a été tiré vers le bas trop rapide-
ment.
ESPAŃOL
Solución de averías
Avería: El controlador no funciona.
Causa: El interruptor de encendido ON/OFF está en
“OFF”.
Solución: Coloque el interruptor de encendido ON/OFF en
“ON”.
Causa: Las baterías se han colocado de forma errónea.
Solución: Verifi que que las baterías están colocadas correc-
tamente.
Causa: Las baterías ya no tienen sufi ciente energía.
Solución: Inserte baterías nuevas.
Avería:
El helicóptero no puede controlarse con el control.
Causa: El interruptor de encendido del control está en
“OFF”.
Solución: Primero coloque el interruptor de encendido del
control en “ON”.
Causa: El control no está o no está correctamente vincula-
do con el receptor del helicóptero.
Solución: Lleve a cabo el proceso de vinculación como se
describe en „Lista de comprobación para la prepa-
ración del vuelo“ y utilice, dado el caso, otro canal
(A/B/C) del controlador.
Avería: Las palas del rotor no se mueven.
Causa: El interruptor de encendido del modelo o del con-
trol está en “OFF”.
Solución: Coloque el interruptor de encendido ON/OFF en
“ON”.
Causa: La batería tiene poca energía o está agotada.
Solución: Cargue la batería (véase el capítulo “Carga de la
batería”).
Avería: El helicóptero no se eleva.
Causa: Las palas del rotor se mueven excesivamente
despacio.
Solución: Desplace hacia arriba la palanca del acelerador.
Causa: La potencia de la batería es insufi ciente.
Solución: Cargue la batería (véase el capítulo “Carga de la
batería”).
Avería: El helicóptero pierde velocidad durante el vuelo
sin motivo aparente y desciende.
Causa: La batería está casi agotada.
Solución: Cargar la batería (véase el capítulo “Carga de la
batería”).
Avería: El helicóptero aterriza de forma excesivamente
rápida.
Causa: Pérdida de control de la palanca del gas.
Solución:
Tirar la palanca del gas lentamente hacia abajo.
Causa: Tirar hacia abajo la palanca del gas de forma ex-
cesivamente rápida.
43
ITALIANO
Soluzioni dei problemi
Problema: Il controller non funziona.
Causa: L’interruttore di potenza ON/OFF è posizionato su
“OFF”.
Rimedio: Posizionare l’interruttore di potenza ON/OFF su
“ON”.
Causa: Le batterie sono state inserite in modo errato.
Rimedio: Controllare se le batterie sono state inserite corret-
tamente.
Causa: Le batterie sono quasi scariche.
Rimedio: Inserire batterie nuove
Problema:
Impossibile comandare l’elicottero con il controller.
Causa: L’interruttore di potenza dell’elicottero è posizionato
su “OFF”.
Rimedio: Posizionare dapprima l’interruttore di potenza del
controller su “ON”.
Causa: Il controller potrebbe non essere collegato in modo
corretto con il ricevitore nell’elicottero.
Rimedio: Eseguire il processo di collegamento come de-
scritto sotto „Check-list per la preparazione al volo“
usando eventualmente un altro canale (A/B/C) sul
controller.
Problema: Le pale del rotore non girano.
Causa: L’interruttore di potenza sul modellino e sul con-
troller è posizionato su “OFF”.
Rimedio: Posizionare l’interruttore di potenza ON/OFF su
“ON”.
Causa: L’accumulatore è troppo debole o scarico.
Rimedio: Caricare l’accumulatore (vedi capitolo “Carica
dell’accumulatore”).
Problema: L’elicottero non decolla.
Causa: Le pale del rotore girano troppo lentamente.
Rimedio: Tirare la leva del gas verso l’alto.
Causa: La potenza dell’accumulatore è insuffi ciente.
Rimedio: Caricare l’accumulatore (vedi capitolo “Carica
dell’accumulatore”).
Problema: Durante il volo l’elicottero perde velocità senza
motivo apparente e si abbassa.
Causa: L’accumulatore è troppo debole.
Rimedio: Caricare l’accumulatore (vedi capitolo “Carica
dell’accumulatore”).
Problema: L’elicottero atterra troppo velocemente.
Causa: Perdita di controllo sulla leva del gas.
Rimedio: Abbassare lentamente la leva del gas.
Causa: Abbassamento troppo veloce della leva del gas.
NEDERLANDS
Probleemoplossingen
Probleem:
Controller functioneert niet.
Oorzaak De ON/OFF-Powerschakelaar staat op „OFF“.
Oplossing:
De ON/OFF-Powerschakelaar op „ON“ zetten.
Oorzaak: De batterijen werden verkeerd ingelegd.
Oplossing: Controleer, of de batterijen correct werden ingelegd.
Oorzaak De batterijen hebben niet meer genoeg energie.
Oplossing:
Nieuwe batterijen inleggen
Probleem:
De helicopter laat zich met de controller niet besturen.
Oorzaak: De Powerschakelaar van de controller staat op
„OFF“.
Oplossing:
Eerst de Powerschakelaar aan de controller op
„ON“ zetten.
Oorzaak De controller is evt. niet correct met de ontvanger
in de helicopter gebonden.
Oplossing:
Voer het koppelproces uit zoals beschreven onder
‘Checklist voor de vluchtvoorbereiding’, en gebruik
daarbij indien nodig een ander kanaal (A/B/C) aan
de controller.
Probleem:
De rotorbladen bewegen zich niet.
Oorzaak: De Power-schakelaar aan het model resp. de
Controller staat op „OFF“.
Oplossing:
De ON/OFF-Powerschakelaar op „ON“ zetten.
Oorzaak: De accu is te zwak resp. leeg.
Oplossing:
De accu laden (zie hoofdstuk „Laden van de accu“).
#
Probleem:
De helicopter stijgt niet op.
Oorzaak: De rotorbladen bewegen zich te langzaam.
Oplossing:
De gashendel naar boven trekken.
Oorzaak: Het accuvermogen volstaat niet.
Oplossing:
De accu laden (zie hoofdstuk „Laden van de accu“).
Probleem:
De helikopter vertraagt en daalt zonder ogen-
schijnlijke reden tijdens de vlucht.
Oorzaak: De accu is te zwak.
Oplossing:
De accu laden (zie hoofdstuk „Laden van de accu“).
Probleem:
De helicopter landt te snel.
Oorzaak Controleverlies via de gashendel.
Oplossing:
De gashendel langzaam naar onder trekken.
Oorzaak: Te snel naar onder trekken van de gashendel.
PORTUGUĘS
Soluções de problemas
Problema: O comando não funciona.
Causa: O interruptor ON/OFF está em „OFF“.
Solução: Colocar o interruptor ON/OFF em „ON“.
Causa: A pilha está mal colocada.
Solução: Verifi que se as pilhas estão bem colocadas.
Causa: As pilhas não têm energia sufi ciente.
Solução: Colocar pilhas novas
Problema: Não é possível comandar o helicóptero com o co-
mando.
Causa: O interruptor dos comandos está em „OFF“.
Solução: Primeiro colocar o interruptor do comando em
„ON“.
Causa: Eventualmente, a interligação entre o comando e o
receptor do helicóptero não está correcta.
Solução: Estabeleça a interligação como se descreve em
„Lista de verifi cação (checklist) para preparação
do voo“ e, se for necessário, utilize outro canal
(A/B/C) no comando.
Problema: As pás do rotor não se movem.
Causa: O botão de ligação da corrente da miniatura e/ou
do comando está desligado (OFF).
Solução: Colocar o interruptor ON/OFF em „ON“.
Causa: A pilha está demasiado fraca ou vazia.
Solução: Carregar a pilha (ver capítulo „Modo de carregar
a pilha“). #
Problema: O helicóptero não sobe.
Causa As pás do rotor movem-se muito lentamente.
Solução: Puxar a alavanca de acelerar para cima.
Causa: A potência da pilha não é sufi ciente.
Solução: Carregar a pilha (ver capítulo „Modo de carregar
a pilha“).
Problema: O helicóptero perde velocidade durante o voo
sem motivo aparente e baixa.
Causa: A pilha está demasiado fraca.
Solução: Carregar a pilha (ver capítulo „Modo de carregar a
pilha“).
Problema: O helicóptero pousa rápido demais.
Causa:
Perda de controlo através da alavanca de acelerar.
Solução:
Puxar a alavanca de gás para baixo lentamente.
Causa: A alavanca de acelerar foi puxada para baixo rá-
pido demais.
44
SVENSKA
Felsökningsguiden
Fel: Kontrollen fungerar inte.
Orsak: ON/OFF-strömbrytaren står på “OFF”.
Åtgärd: Ställ ON/OFF-knappen till “ON”.
Orsak: Batterierna har satts i fel.
Åtgärd: Kontrollera att batterierna ligger rätt.
Orsak: Batterierna har otillräcklig kapacitet.
Åtgärd: Sätt i nya batterier.
Fel: Helikoptern kan inte styras med kontrollen.
Orsak: Kontrollens strömbrytare står på “OFF”.
Åtgärd: Ställ först strömbrytaren på kontrollen till “ON”.
Orsak: Kontrollen har ev. inte korrekt förbindelse med mot-
tagaren i helikoptern.
Åtgärd: Utför bindningen så som beskrivs under „Check-
lista för fl ygförberedelse“ och använd då ev. en
annan kanal (A/B/C) på kontrollen.
Fel: Helikoptern kan inte styras med kontrollen.
Orsak: Strömbrytaren på modellen resp. kontrollen står
på “OFF”.
Åtgärd: Ställ ON/OFF-knappen till “ON”.
Orsak: Batteriet är för svagt eller tomt.
Åtgärd:
Ladda batteriet (se kapitel “Laddning av batteriet”).
#
Fel: Helikoptern stiger inte.
Orsak: Rotorbladen rör sig för sakta.
Åtgärd: Dra gasreglaget uppåt.
Orsak: Batterikapaciteten är otillräcklig.
Åtgärd:
Ladda batteriet (se kapitel “Laddning av batteri-
et”).
Fel: Under fl ygning tappar helikoptern hastighet och
sjunker, utan synbar anledning.
Orsak: Batteriet är för svagt.
Åtgärd: Ladda batteriet (se kapitel “Laddning av batteriet”).
Fel: Helikoptern landar för snabbt.
Orsak: Kontrollförlust via gasreglaget.
Åtgärd: Dra gasspaken sakta nedåt.
Orsak: Gasreglaget drogs ned för snabbt.
SUOMI
Ongelmaratkaisut
Ongelma: Ohjain ei toimi.
Syy: ON-/OFF-virtakytkin on kohdassa “OFF”.
Ratkaisu: Aseta ON-/OFF-virtakytkin kohtaan “ON”.
Syy: Paristot on laitettu väärin sisään.
Ratkaisu: Tarkasta, onko paristot laitettu oikein sisään.
Syy: Paristoissa ei ole enää tarpeeksi energiaa.
Ratkaisu: Laita uudet paristot sisään.
Ongelma: Helikopteria ei voi ohjata ohjaimella.
Syy: Ohjaimen virtakytkin on kohdassa “OFF”.
Ratkaisu: Aseta ensin ohjaimen virtakytkin kohtaan “ON”.
Syy: Ohjainta ei ole mahdollisesti liitetty kunnolla heliko-
pterin vastaanottimeen.
Ratkaisu: Tee yhdistäminen kuten kohdassa „Lentoon val-
mistautumisen tarkastuslista“ on kuvattu ja käytä
tällöin ohjaimessa tarvittaessa toista kanavaa
(A/B/C).
Ongelma: Roottorin siivet eivät liiku.
Syy: Kauko-ohjattavan tai controllerin virtakytkin on
asennossa “OFF”.
Ratkaisu: Aseta ON-/OFF-virtakytkin kohtaan “ON”.
Syy: Akku on liian heikko tai tyhjä.
Ratkaisu: Lataa akku (katso luku “Akun lataaminen”).
Ongelma: Helikopteri ei nouse.
Syy: Roottorin siivet liikkuvat liian hitaasti.
Ratkaisu: Vedä kaasuvipu ylös.
Syy: Akun teho ei riitä.
Ratkaisu: Lataa akku (katso luku “Akun lataaminen”).
Ongelma: Helikopteri menettää lennon aikana nopeutta ilman
ilme istä syytä ja laskee.
Syy: Akku on liian heikko.
Ratkaisu: Lataa akku (katso luku “Akun lataaminen”).
Ongelma: Helikopteri laskeutuu liian nopeasti.
Syy: Kaasuvipua ei voi enää kontrolloida.
Ratkaisu: Vedä kaasuvipu hitaasti alas.
Syy: Kaasuvipua vedetty alas liian nopeasti.
POLSKI
Usuwanie problemów (usterek)
Problem: Kontroler nie działa.
Przyczyna: Przycisk Power ON/OFF znajduje się w położeniu
“OFF”.
Sposób usunięcia usterki:
Przycisk Power ON/OFF nastawić na “ON”.
Przyczyna: Baterie zostały nieprawidłowo włożone
Sposób usunięcia usterki:
Sprawdźcie Państwo czy baterie są prawidłowo
włożone.
Przyczyna: Baterie nie dysponują wystarczającym zapasem
energii.
Sposób usunięcia usterki:
IWłożyć nowe baterie.
Problem: Helikoptera nie można sterować przy pomocy kon-
trolera.
Przyczyna: Przycisk Power kontrolera znajduje się w położeniu
“OFF”.
Sposób usunięcia usterki:
Najpierw nastawić przycisk Power kontrolera na
“ON”.
Przyczyna: Kontroler jest ewentualnie nieprawidłowo
połączony z odbiornikiem helikoptera.
Sposób usunięcia usterki:
Prosimy Państwa o przeprowadzenie procesu
połączenia zgodnie z opisem zawartym w „Liście
kontrolnej przygotowań do lotu“ i ewentualnie
używajcie Państwo przy tym innego kanału (A/B/C)
znajdującego się przy kontrolerze.
Problem: Łopatki śmigła nie poruszają się.
Przyczyna: Włącznik znajdujący się przy modelu lub przy
kontrolerze znajduje się w pozycji “OFF”.
Sposób usunięcia usterki:
Przycisk Power ON/OFF nastawić na “ON”.
Przyczyna: Akumulator jest zbyt słaby lub wyczerpany.
Sposób usunięcia usterki:
Naładować akumulator (Rozdział “Ładowanie
akumulatora”).
Problem: Helikopter nie wznosi się.
Przyczyna: Łopatki śmigła poruszają się zbyt wolno.
Sposób usunięcia usterki:
Przesunąć do góry dźwignię gazu.
Przyczyna: Moc akumulatorów jest niewystarczająca.
Sposób usunięcia usterki:
Naładować akumulator (Rozdział “Ładowanie
akumulatora”).
Problem: Helikopter bez widocznego powodu traci
prędkość podczas lotu i zniża się.
Przyczyna: Akumulator jest zbyt słaby.
Sposób usunięcia usterki:
Naładować akumulator (Rozdział “Ładowanie aku-
mulatora”).
Problem: Helikopter ląduje za szybko.
Przyczyna: Utrata kontroli nad dźwignią gazu.
Sposób usunięcia usterki:
Wolno przesunąć dźwignię gazu do dołu.
Przyczyna: Zbyt szybkie przesunięcie dźwigni gazu do dołu.
45
MAGYAR
Problémamegoldások
Probléma: A vezérlő nem működik.
Ok: Az ON/OFF power-kapcsoló „OFF“ állásban van.
Megoldás: Az ON/OFF power-kapcsolót „ON“ állásba visszük.
Ok: Rosszul lettek behelyezve az elemek.
Megoldás: Ellenőrizze, hogy az elemek szabályszerűen van-
nak-e behelyezve.
Ok: Az elemeknek már nincs elég energiája.
Megoldás: Új elemeket kell betenni.
Probléma: A helikopter nem irányítható a vezérlővel.
Ok: A vezérlők power-kapcsolója „OFF“ állásban van
Megoldás: Először a vezérlő power-kapcsolóját visszük „ON“
állásba.
Ok: A vezérlő esetleg nincs szabályosan összekapcso-
lódva a helikopterben lévő vevővel.
Megoldás: Kérjük, az összekapcsolást „A repülés
előkészítésének ellenőrző listája“ szerint végez-
ze el és közben szükség esetén használjon a
vezérlőn egy másik csatornát (A/B/C).
Probléma: A rotorlapátok nem mozognak.
Ok: A modell ill. a vezérlő power-kapcsolója „OFF“ ál-
lásban van.
Megoldás: Az ON/OFF power-kapcsolót „ON“ állásba visszük.
Ok: Az akku túl gyenge ill. lemerült.
Megoldás: Az akkut fel kell tölteni (lásd „Az akku feltöltése“
fejezetet).
Probléma: A helikopter nem száll fel.
Ok: A rotorlapátok túl lassan mozognak.
Megoldás: A gázkart felfelé kell húzni.
Ok: Nem elég az akku teljesítménye.
Megoldás: Az akkut fel kell tölteni (lásd „Az akku feltöltése“
fejezetet).
Probléma: A helikopter repülés közben felismerhető ok
nélkül lelassul és süllyedni kezd.
Ok: Az akku túl gyenge.
Megoldás: Az akkut fel kell tölteni (lásd „Az akku feltöltése“
fejezetet).
Probléma: A helikopter túl gyorsan száll le.
Ok: A gázkar feletti kontroll elveszítése.
Megoldás: A gázkart lassan kell lehúzni.
Ok: A gázkart túl gyorsan húzták le.
SLOVENŠČINA
Odpravljanje težav
Težava:
Upravljalnik ne deluje.
Vzrok: Stikalo za vklop ON/OFF je na »OFF«.
Rešitev: Stikalo za vklop ON/OFF nastavite na »ON«.
Vzrok: Napačno vstavljena baterija.
Rešitev: Preverite, če je baterija pravilno vstavljena.
Vzrok: Baterije več nimajo dovolj energije.
Rešitev: Vstavite nove baterije.
Težava: Helikopterja ni možno voditi z upravljalnikom.
Vzrok: Stikalo za vklop upravljalnika je na »OFF«.
Rešitev: Najprej postavite stikalo za vklop na upravljalniku
na »ON«.
Vzrok: Upravljalnik morebiti ni pravilno povezan s sprejem-
nikom v helikopterju.
Rešitev: Prosimo, da postopek vezave opravite tako, kot
je to opisano pod „kontrolni seznam za pripravo
poleta“, in pri tem uporabite po potrebi drug kanal
(A/B/C) na upravljalniku.
Težava: Lopatice rotorja se ne premikajo.
Vzrok: Vklopno stikalo na modelu oz. upravljalniku je v
položaju “IZKLOP”.
Rešitev: Stikalo za vklop ON/OFF nastavite na »ON«.
Vzrok: Slaba oz. prazna baterija.
Rešitev: Napolnite baterijo (glej poglavje »Polnjenje bateri-
je«).
#
Težava: Helikopter se ne dvigne.
Vzrok: Lopatice rotorja se premikajo prepočasi.
Rešitev: Ročico plina povlecite navzgor.
Vzrok: Zmogljivost baterije ne zadostuje.
Rešitev: Napolnite baterijo (glej poglavje »Polnjenje bat-
erije«).
Težava: Helikopter brez vidnega razloga med letom izgublja
hitrost in se spušča.
Vzrok: Preslaba baterija.
Rešitev:
Napolnite baterijo (glej poglavje »Polnjenje bateri-
je«).
Težava: Helikopter prehitro pristane.
Vzrok: Izguba kontrole preko ročice za plin.
Rešitev: Ročico za plin počasi povlecite navzdol.
Vzrok: Prehiter poteg navzdol ročice za plin.
ČESKY
Řešení problémů
Problém: Ovladač nefunguje.
Příčina: Vypínač ON/OFF je v poloze „OFF“.
Řešení: Vypínač ON/OFF přepněte na „ON“.
Příčina: Baterie byla nesprávně vložena.
Řešení: Zkontrolujte, zda jsou baterie správně vloženy.
Příčina: Baterie už nemají dostatek energie.
Řešení: Vložte nové baterie
Problém: Vrtulník se nedá řídit ovladačem.
Příčina: Vypínač ovladače je v poloze „OFF“.
Řešení: Nejprve přepněte vypínač na ovladači do polohy
„ON“.
Příčina: Ovladač možná není správně propojen s
přijímačem ve vrtulníku.
Řešení: Proveďte připojení jak je popsáno v oddíle „Kon-
trolní seznam pro přípravu k letu“ a v případě
nutnosti při tom použijte jiný kanál (A/B/C) na
ovladači.
Problém: Listy rotoru se nepohybují.
Příčina: Vypínač na modelu, resp. na ovladači je v poloze
„OFF“.
Řešení: Vypínač ON/OFF přepněte na „ON“.
Příčina: Akumulátor je příliš slabý resp. prázdný.
Řešení: Nabijte akumulátor (viz kapitola „Nabití akumulá-
toru“).
#
Problém: Vrtulník nestoupá nahoru.
Příčina: Listy rotoru se pohybují příliš pomalu.
Řešení: Plynovou páku potáhněte směrem nahoru.
Příčina: Výkon akumulátoru je nedostatečný.
Řešení: Nabijte akumulátor (viz kapitola „Nabití akumulá-
toru“).
Problém: Vrtulník bez zjevného důvodu během letu ztratí
rychlost a klesne.
Příčina: Akumulátor je příliš slabý.
Řešení: Nabijte akumulátor (viz kapitola „Nabití akumu-
látoru“).
Problém: Vrtulník přistává příliš rychle.
Příčina: Ztráta kontroly prostřednictvím plynové páky.
Řešení: Plynovou páku stlačte pomalu dolů.
Příčina: Příliš rychlé stlačení plynové páky dolů.
46
SLOVENČINA
Riešenie problémov
Problém: Ovládač nefunguje.
Príčina: Výkonový spínač ON/OFF je v pozícii „OFF“.
Riešenie: Výkonový spínač ON/OFF prepnite do pozície
„ON“.
Príčina: Batérie boli nesprávne vložené.
Riešenie: Skontrolujte, či sú batérie správne vložené.
Príčina: Batérie už nemajú dosť energie.
Riešenie: Vložte nové batérie.
Problém: Vrtuľník sa nedá ovládať ovládačom.
Príčina: Výkonový spínač ovládača je v pozícii „OFF“.
Riešenie: Najprv prepnite vypínač na ovládači do pozície
„ON“.
Príčina: Ovládač asi nie je správne prepojený s prijímačom
v helikoptére.
Riešenie: Vykonajte prepojenie vrtuľníka s ovládačom tak,
ako je to uvedené v časti „Kontrolný zoznam na
prípravu letu“.
Riešenie: Vykonajte prosím proces viazania tak ako je to
popísané v „Kontrolnom zozname pre prípravu
letu“ a použite pritom v prípade potreby niektorý
iný kanál (A/B/C) na kontroléri.
Problém: Listy rotora sa nehýbu.
Príčina: Výkonový spínač ON/OFF na modeli resp. kontro-
léri je na „OFF“.
Riešenie: Výkonový spínač ON/OFF prepnite do pozície
„ON“.
Príčina: Akumulátor je príliš slabý resp. prázdny.
Riešenie: Nabite akumulátor (pozri kapitolu „Nabitie akumu-
látora“).
#
Problém: Vrtuľník nestúpa.
Príčina: Listy rotora sa pohybujú príliš pomaly.
Riešenie: Plynovú páčku potiahnite smerom nahor.
Príčina: Výkon akumulátora je nedostatočný.
Riešenie: Nabite akumulátor (pozri kapitolu „Nabitie aku-
mulátora“).
Problém: Vrtuľník bez zjavného dôvodu stráca počas letu
rýchlosť a klesá.
Príčina: Akumulátor je príliš slabý.
Riešenie: Nabite akumulátor (pozri kapitolu „Nabitie akumu-
látora“).
Príčina: S vrtuľníkom nie je žiadne infračervené spojenie.
Riešenie: Zabezpečte, aby spojenie nebolo rušené priamym
slnečným svetlom resp. jasným svetlom refl ektora
ani žiadnym predmetom.
Problém:
Vrtuľník pristáva príliš rýchlo.
Príčina:
Strata kontroly nad plynovou páčkou.
Riešenie:
Plynovú páčku stiahnite pomaly nadol.
Príčina:
Príliš rýchle stiahnutie plynovej páčky nadol.
HRVATSKI
Rješavanje problema
Problem: Upravljač ne funkcionira.
Uzrok: Sklopka Power ON/OFF stoji na „OFF“
Rješenje: Sklopka Power ON/OFF stavite na „ON“.
Uzrok: Baterije su pogrešno umetnute.
Rješenje: Provjerite, da li su baterije ispravno postavljene.
Uzrok: Baterije više nemaju dovoljno energije.
Rješenje: Umetnite nove baterije.
Problem: Helicopter se ne može upravljati pomoću pravljača.
Uzrok: Sklopka Power upravljača stoji na „OFF“.
Rješenje: Najprije sklopka Power na upravljačku stavite na
„ON“.
Uzrok: Upravljač u danom slučaju nije ispravno spojen sa
prijemnikom Helicopter.
Rješenje: Postupak povezivanja izvršite molimo Vas kao što
je opisano pod „Kontrolna lista za pripremanje leta“
i pri tome po potrebi na upravljaču koristite drugi
kanal (A/B(C).
Problem: Listovi rotora se ne okreću.
Uzrok: Sklopka Power ON/OFF na modelu tj. upravljaču
stoji na „OFF“.
Rješenje: Sklopka Power ON/OFF stavite na „ON“.
Uzrok: Punjiva baterija je preslaba tj. prazna.
Rješenje: Napunite akumulator (vidi poglavlje „Punjenje aku-
mulatora“).
#
Problem: Helicopter se ne diže.
Uzrok: Listovi rotora se sporo pokreću.
Rješenje: Polugu za gas povucite gore.
Uzrok: Snaga akumulator nije dovoljna.
Rješenje: Napunite akumulator (vidi poglavlje “Punjenje
akumulatora”).
Problem: Helicopter
bez jasnog razloga za vrijeme leta gubi
brzinu i spušta se.
Uzrok: Akumulator je preslab.
Rješenje: Napunite akumulator (vidi poglavlje „Punjenje aku-
mulatora“).
Uzrok: Ne postoji IR veza sa helikopterom.
Rješenje: Uvjerite se, da izravno sunčano svijetlo tj. svijetlo
svjetlo refl ektora ili neki predmet ne smeta vezu.
Problem: Helikopter se prebrzo prizemljuje.
Uzrok: Gubitak kontrole preko poluge za gas.
Rješenje: Pulugu za gas polako spustite dole.
Uzrok: Prebrzo povlačenje poluge za gas dole.
NORSK
Problemløsninger
Problem: Kontroller fungerer ikke.
Årsak: ON/OFF power-bryter står på ”OFF”.
Løsning: ON/OFF power-bryter stilles på ”ON”.
Årsak: Batteriene ble lagt feil inn.
Løsning: Kontroller om batteriene er riktig innlagt.
Årsak: Batteriene har ikke lenger tilstrekkelig energi.
Løsning: Legg inn nye batterier.
Problem: Helikopteret lar seg ikke styre med kontrolleren.
Årsak: Power-bryteren til kontrolleren står på ”OFF”.
Løsning: Sett først power-bryteren på kontrolleren på ”ON”.
Årsak: Kontrolleren er ev. ikke forbundet riktig med motta-
ker i helikopter.
Løsning: Bindeforløpet gjennomføres som beskrevet under
”Sjekkliste for forberedelse av fl ygning” og bruk ev.
en annen kanal (A/B/C) på kontroller.
Problem: Rotorbladene beveges ikke.
Årsak: Power-bryteren til modellen eller kontrolleren står
på ”OFF”.
Løsning: ON/OFF power-bryter stilles på ”ON”.
Årsak: Akkumulatoren er svak eller tom.
Løsning: Akkumulatoren lades opp (se kapittel ”Lade opp
akkumulator”).
#
Problem: Helikopteret stiger ikke opp.
Årsak: Rotorbladene beveges for langsomt.
Løsning: Trekk gasspaken oppover.
Årsak: Akkumulatorens eff ekt er ikke tilstrekkelig.
Løsning: Akkumulatoren lades opp (se kapittel ”Lade opp
akkumulator”).
Problem: Helikopteret mister hastighet under fl ygning, uten
synlig grunn, og synker ned.
Årsak: Akkumulatoren er for svak.
Løsning: Akkumulatoren lades opp (se kapittel ”Lade opp
akkumulator”).
Problem: Helikopteret lander for raskt.
Årsak: Kontrolltap over gasspake.
Løsning: Trekk gasspaken langsomt nedover.
Årsak: For rask nedtrekking av gasspaken.
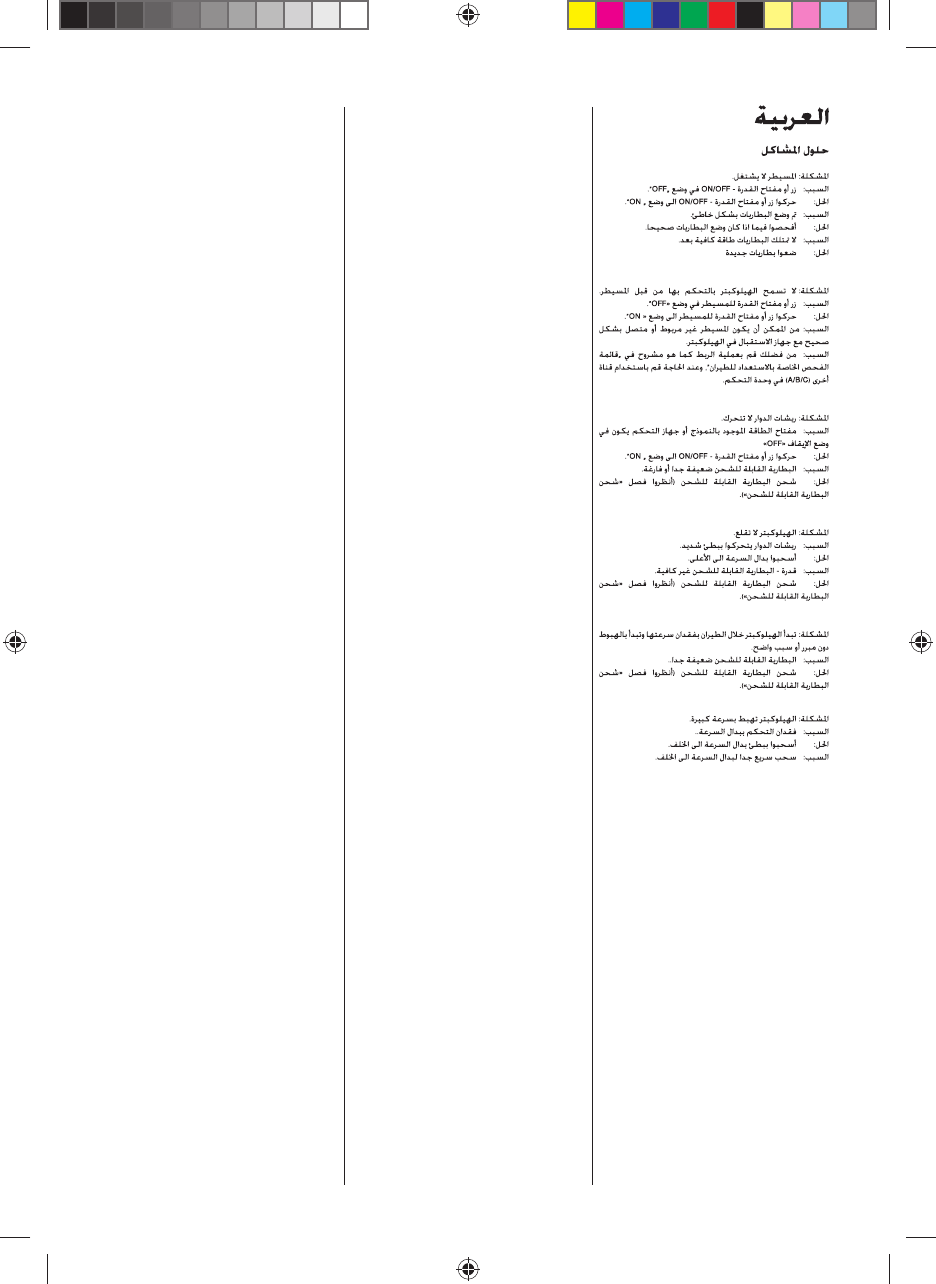
47
DANSK
Problemløsninger
Problem: Controller fungerer ikke.
Årsag: ON/OFF Power-kontakten står på „OFF“.
Løsning: Stil ON/OFF Power-kontakten på „ON“.
Årsag: Batterierne blev lagt forkert i.
Løsning: Kontrollér, om batterierne er lagt korrekt i.
Årsag: Batterierne er for svage.
Løsning: Læg nye batterier i
Problem: Helikopteren kan ikke styres med styreenheden.
Årsag: Controllerens Power-kontakt står på „OFF“.
Løsning: Stil først Power-kontakten på controlleren på „ON“.
Årsag: Controlleren er evt. ikke synkroniseret rigtigt med
modtageren i helikopteren.
Løsning: Gennemfør synkroniseringen som beskrevet un-
der „Tjekliste til fl yveforberedelsen“ og brug derved
om nødvendigt en anden kanal (A/B/C) på control-
leren.
Problem: Rotorbladene bevæger sig ikke.
Årsag: Modellens hhv. controllerens Power-kontakt står
på „OFF“.
Løsning: Stil ON/OFF Power-kontakten på „ON“.
Årsag: Akku’en er for svag eller afl adt.
Løsning: Oplad akku’en (se kapitel „Opladning af akku“).
#
Problem: Helikopteren letter ikke.
Årsag: Rotorbladene bevæger sig for langsomt.
Løsning: Tryk gashåndtaget opad.
Årsag: Akku-ydelsen er for svag.
Løsning: Oplad akku’en (se kapitel „Opladning af akku“).
Problem: Helikopteren bliver uden synlig grund langsom-
mere under fl yvningen og taber højde.
Årsag: Akku’en er for svag.
Løsning: Oplad akku’en (se kapitel „Opladning af akku“).
Problem: Helikopteren lander for hurtigt.
Årsag: Kontroltab via gashåndtaget.
Løsning: Tryk gashåndtaget langsomt ned.
Årsag: Gashåndtaget trykkes for hurtigt ned.
TÜRKÇE
Sorunlara çözüm
Sorun: Controller fonksiyonsuz.
Sebep: ON/OFF Power şalteri „OFF“ pozisyonunda du-
ruyor.
Çözüm: ON/OFF Power şalterini „ON“ pozisyonuna getiri-
niz.
Sebep: Piller yanlış yerleştirildi.
Çözüm: Pillerin doğru yerleştirilip yerleştirilmediğini kontrol
ediniz.
Sebep: Pillerin artık yeterli enerjisi yok.
Çözüm: Yeni piller yerleştiriniz
Sorun: Helikopter Controller ile kumanda edilemiyor
Sebep: Controller‘in Power şalteri „OFF“ pozisyonunda
duruyor.
Çözüm: İlk önce Controller‘deki Power şalterini „ON“ pozi-
syonuna getiriniz.
Sebep: Duruma göre Controller helikopterdeki alıcı ile
doğru bağlanmamış.
Çözüm: Lütfen bağlama işlemini ‚Uçuş hazırlığı kontrol
listesi‘ altında açıklandığı şekilde yapınız ve bu
esnada gerekirse Controller‘de başka bir kanal
(A/B/C) kullanınız.
Sorun: Rotor kanatları hareket etmiyor.
Sebep: Model veya Controller’deki power/güç şalteri
‘OFF’ pozisyonundadır.
Çözüm: ON/OFF’ Power şalterini „ON“ pozisyonuna getiri-
niz.
Sebep: Akü çok zayıf veya boş.
Çözüm: Aküyü doldurunuz („Aküyü doldurma“ bölümüne
bakınız).
#
Sorun: Helikopter yükselmiyor.
Sebep: Rotor kanatları çok yavaş hareket ediyor.
Çözüm: Gaz pedalını yukarıya çekiniz.
Sebep: Akü gücü yetmiyor.
Çözüm: Aküyü doldurunuz („Aküyü doldurma“ bölümüne
bakınız).
Sorun: Helikopter uçma esnasında görülür sebep
olmaksızın hız kaybediyor ve düşüyor.
Sebep: Akü çok zayıf.
Çözüm: Aküyü doldurunuz („Aküyü doldurma“ bölümüne
bakınız).
Sorun: Helikopter çok hızlı iniyor.
Sebep: Gaz pedalı üzerinden kontrol kaybı.
Çözüm: Gaz pedalını yavaşça aşağıya çekiniz.
Sebep: Gaz pedalının çok çabuk aşağıya çekilmesi.

DISTRIBUTORS
Stadlbauer Marketing + Vertrieb GmbH · Rennbahn Allee 1 · 5412 Puch / Salzburg · Austria
AUSTRIA
Stadlbauer Marketing +
Vertrieb GmbH
Rennbahn Allee 1
A-5412 Puch / Salzburg
Phone ++43 662 88921-0
Fax ++43 662 88921-512
Internet www.carrera-rc.com
GERMANY
Stadlbauer Marketing +
Vertrieb GmbH
Rennbahn Allee 1
A-5412 Puch / Salzburg
Phone ++49 911 7099-0
Fax ++49 911 7099-119
Internet www.carrera-rc.com
HONG KONG
Stadlbauer (HK) Ltd.
Room 1917,
North Tower,
Concordia Plaza
1 Science Museum Road,
Tsimshatsui East
Kowloon Hong Kong
Phone ++852 2722 0620
Fax ++852 2367 0792
Internet www.carrera-rc.com
USA ⁄ CANADA/MEXICO
Carrera of America Inc.
2 Corporate Drive
Cranbury,
NJ 08512,
USA
Phone ++1 609 409 8510
Fax ++1 609 409 8610
Email reception@
carrera-toys.com
Internet www.carrera-rc.com
BENELUX
Stadlbauer Marketing +
Vertrieb GmbH
Landsheerlaan 33
NL-6114 MP Susteren
Email service.benelux@
carrera-toys.com
Internet www.carrera-rc.com
FRANCE
Stadlbauer Marketing +
Vertrieb GmbH
21 B, Route Nationale
Domaine de L’Hancardrie
FR-59320 Ennetieres-En-Weppes
Email carrera-toys@orange.fr
Internet www.carrera-rc.com
HUNGARY
Magyarország Importer
Stadlbauer Marketing +
Vertrieb GmbH
Rennbahn Allee 1
A-5412 Puch / Salzburg
Phone ++36 305556502
Email offi ce@stadlbauer-toys.hu
Internet www.carrera-rc.com
Service:
GAME PARK - VINCZE ZOLTÁN
Berky Lili utca 36.
1171 Budapest · Hungary
Phone ++36 1 258-7809
Email vinzol@t-online.hu
POLAND
Stadlbauer Marketing +
Vertrieb GmbH
Rennbahn Allee 1
A-5412 Puch / Salzburg
Phone ++48 22 645 14 20
Fax ++48 22 645 14 21
Email offi ce@stadlbauer-toys.pl
Internet www.carrera-rc.com
Service:
REKMAN
ul. Fabryczna 14
53-609 Wroclaw
Poland
Phone ++48 71 359 46 19
Fax ++48 71 359 46 21
Email jbojda@rekman.com.pl
SPAIN ⁄ PORTUGAL
Stadlbauer Iberia SLU
Calle Fluviá, 97, 1º 2ª
08019 Barcelona · Spain
Phone ++34 93 303 63 35
Email
contacto@carrera-toys.com
Internet www.carrera-rc.com
CARRERA RC DISTRIBUTORS
AUSTRALIA
Zimbler Pty Ltd.
899 Heidelberg Road
Ivanhoe, Victoria 3079
Australia
Phone ++ 61 3 8481 1000
Fax ++ 61 3 9497 2311
Email sales@zimbler.com.au
Internet www.zimbler.com.au
BULGARIA
Ivantchev Ltd.
78a, Maria Luiza Blvd.
BG-1202 Sofi a
Phone ++359 283 22020
Fax ++359 283 22020
Email kivanchev@del.bg
CHINA
Shanghai Wowgame Commercial
Company Ltd.
Room 110, Tower 1,
German Centre, 88 Keyuan Road,
(Zhangjiang Hi-Tech Park),
Pudong, Shanghai, (Zip: 201203)
China
Phone ++86 21-53821692
Mobile ++86 15577449439
Email eddychan@wowgame.com.cn
Internet www.wowgame.net.cn
CZECH REPUBLIC
ConQuest entertainment a.s.
Hloubetinska 11
CZ-198 00 Praha 9 – Hloubetin
Phone ++420 284 000 175
Fax ++420 284 000 101
Email radim.kalo@conquest.cz
Internet www.autodrahy.cz
ESTONIA
Anvol Ltd.
Madikse 7
EE-74114 Maardu
Phone ++372 63 88 100
Fax ++372 63 88 101
Email anvol@anvol.ee
Internet www.anvol.ee
GREECE
Enarxis Dynamic Media Ltd.
68, Ilis Iliou Street
11744, Neos Kosmos
Athens
Greece
Phone ++30 210 9011900
Fax ++30 210 9028700
Email info@enarxis.eu
Internet www.enarxis.eu
HONG KONG
Chun Lee (China) Industrial Limited
RM. 1801-5, 18/F.,
King Palace Plaza,
52A Sha Tsui Road,
Tsuen Wan,
N.T. Hong Kong
Email eddychan@yu-lee.com
Mobile ++ 852 9103 6679
INDIA
Karma Solutions
121A, Oshiwara Industrial Centre,
Link Rd · Goregaon (W),
Mumbai - 400104
India
Phone ++91 22 66716714
Mobile ++91 9920075400
Email karmasolutions7@gmail.com
Internet www.karma-toys.com
ISRAEL
TOP PLAY ISRAEL (T.P.I.) LTD
Simtat Atavor Str. 8A – Industrial
Zone Segula-Petach-Tikva, 4969108
Israel
Phone ++972 3 9323767
Fax ++972 3 9086074
Mobile ++972 52 8338966
Email top-play@012.net.il
Internet www.TopPlay-toys.com
LEBANON
F. AOUAD
Pobox1565 Jounieh Lebanon
Twin Towers Building Blk A
Sarba High Way
Jounieh · Lebanon
Phone ++961 3 840505
Fax ++961 9 635473
Email fawad@dm.net.lb
riad.aouad@faouad.com
NEW ZEALAND
F W Cave Ltd.
15 Old North Road
P O Box 278
Kumeu 0841
Auckland · New Zealand
Phone ++64 9 415 7766
Fax ++64 9 415 7099
Email sales@fwcave.co.nz
Internet www.fwcave.co.nz
ROMANIA
Seven Springrom srl.
Piata 22 Decembrei nr. 18
RO 610007 Piatra Neamt, jud. Neamt
Phone ++40-233-221117
Email offi ce@seventoys.ro
Internet www.seventoys.ro
RUSSIA
Unitoys MSK Ltd.
Mnewniki Street 7, Building 2
RU-123308, Moscow
Phone ++7 495 276 0286
Fax ++7 499 946 4616
Email offi ce@unitoys.ru
Internet www.unitoys.ru
SERBIA ⁄ MONTENEGRO
Cool Play d.o.o.
Zivka Davidovica 13
11000 Beograd · Serbien
Phone ++381 11 3809143
Fax ++381 11 3809144
Email offi ce@coolplay.rs
SWITZERLAND
Waldmeier AG
Neustrasse 50
CH-4623 Neuendorf
Phone ++41 62 387 98 18
Fax ++41 62 387 98 20
Email info@waldmeier.ch
Internet www.waldmeier.ch
UNITED KINGDOM
The Hobby Company Ltd.
Garforth Place, Knowlhill
Milton Keynes MK5 8PG · UK
Phone ++44 1908 209 480
Fax ++44 1908 235 900
Email enquiries@hobbyco.net
Internet www.hobbyco.net
UNITED ARAB EMIRATES
Toy world Dist ribu to r
P.O. Box 289, Gibca Building
AI Wahda Street, Sharjah
United Arab Emirates
Phone ++971 6 533 7418
Fax ++971 6 533 6682
Email toyworld@faisalholding.net