Casio Computer YAP10 Wireless Pen Mouse User Manual YA P10
Casio Computer Co Ltd Wireless Pen Mouse YA P10
UserManual.wiki
>
Casio Computer
>
YAP10 User Manual
User Manual
Navigation menu
Upload a User Manual
Namespaces
Wiki Guide
HTML
PDF
Info
Views
User Manual
Discussion / Help
Navigation
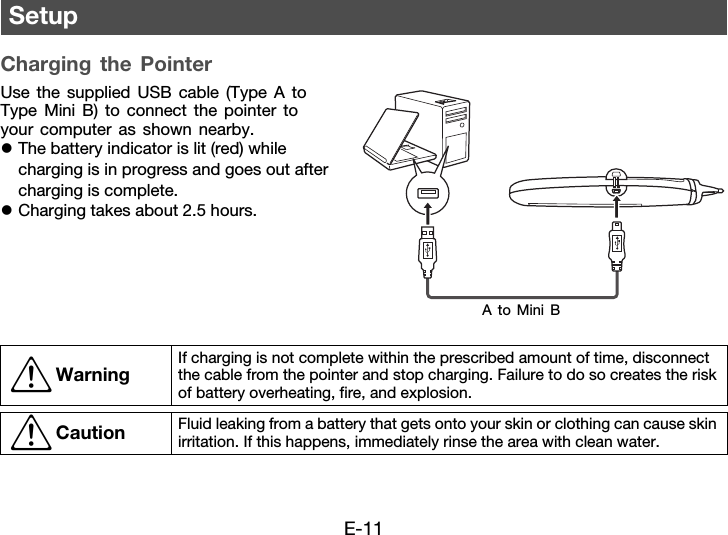
![E-9The CD-ROM that comes with the pointer contains a Presentation Draw application that provides various projector presentation tools, and a PDF file version of its User’s Guide. Your computer will need to have Adobe® Reader® installed in order for you to view the PDF User’s Guide.The PDF User’s Guide also includes information about the minimum computer system requirements for Presentation Draw, and the procedure for installing it. Be sure to read the User’s Guide before installation. To view the contents of a User’s Guide (PDF)1. Place the CD-ROM that comes with the pointer into your computer’s CD-ROM drive.2. Perform either of the following operations.• If the CD-ROM menu screen appears:• If the CD-ROM menu screen does not appear:3. Double-click the User’s Guide file.Using the CD-ROM1On the menu screen, click the [Open Folder] button to the right of “User’s Guide”.2When the User’s Guide folder opens, open the folder that corresponds to the language you want to use.1On your computer, navigate to the CD-ROM and then open it.2Open the User’s Guide folder and then open the folder that corresponds to the language you want to use.](https://usermanual.wiki/Casio-Computer/YAP10/User-Guide-1490795-Page-10.png)