Casio Fx 97SG X 97SG_X EN
User Manual: Casio fx-97SG_X fx-97SG X | Calculators | Manuals | CASIO
Open the PDF directly: View PDF ![]() .
.
Page Count: 31

EN
http://edu.casio.com
User’s Guide
RJA537336-001V01
CASIO Worldwide Education Website
http://world.casio.com/manual/calc
Manuals are available in multi languages at
Be sure to keep all user documentation handy for future
reference.
fx-97SG X
http://wes.casio.com
Worldwide Education Service
スクリプト.indd 1 2017/05/16 14:58:05

CONTENTS
About this Manual......................................................................................2
Initializing the Calculator........................................................................... 2
Precautions................................................................................................2
Getting Started.......................................................................................... 3
Calculation Mode.......................................................................................4
Input and Output Formats......................................................................... 5
Configuring the Calculator Setup.............................................................. 6
Inputting Expressions and Values............................................................. 7
Toggling Calculation Results..................................................................... 9
Basic Calculations................................................................................... 10
Calculation History and Replay............................................................... 11
Using Memory Functions.........................................................................11
Function Calculations.............................................................................. 12
QR Code Function................................................................................... 14
Statistical Calculations.............................................................................15
Base-Q Calculations.................................................................................18
Equation Calculations..............................................................................19
Using Spreadsheet..................................................................................20
Errors....................................................................................................... 24
Before Assuming Malfunction of the Calculator... .................................25
Replacing the Battery.............................................................................. 26
Technical Information...............................................................................26
ŶŶ Frequently Asked Questions ŶŶ.........................................................28
• In no event shall CASIO Computer Co., Ltd. be liable to anyone for
special, collateral, incidental, or consequential damages in connection
with or arising out of the purchase or use of this product and items that
come with it.
• Moreover, CASIO Computer Co., Ltd. shall not be liable for any claim of
any kind whatsoever by any other party arising out of the use of this
product and the items that come with it.
1
スクリプト.indd 1 2017/06/12 17:18:28
About this Manual
• Unless specifically stated, all sample operations in this manual assume
that the calculator is in its initial default setup. Use the procedure under
“Initializing the Calculator” to return the calculator to its initial default
setup.
• The contents of this manual are subject to change without notice.
• The displays and illustrations (such as key markings) shown in this User’s
Guide are for illustrative purposes only, and may differ somewhat from
the actual items they represent.
• Company and product names used in this manual may be registered
trademarks or trademarks of their respective owners.
Initializing the Calculator
Perform the following procedure when you want to initialize the calculator
and return the calculation mode and setup (except for the Contrast setting)
to their initial default settings. Note that this operation also clears all data
currently in calculator memory.
(RESET)(Initialize All)(Yes)
Precautions
Safety Precautions
Battery
• Keep batteries out of the reach of small children.
• Use only the type of battery specified for this calculator in this manual.
Handling Precautions
• Even if the calculator is operating normally, replace the battery at least
once every two years. A dead battery can leak, causing damage to and
malfunction of the calculator. Never leave a dead battery in the
calculator.
• The battery that comes with the calculator discharges slightly during
shipment and storage. Because of this, it may require replacement
sooner than the normal expected battery life.
• Avoid use and storage of the calculator in areas subjected to
temperature extremes, and large amounts of humidity and dust.
• Do not subject the calculator to excessive impact, pressure, or bending.
• Never try to take the calculator apart.
• Use a soft, dry cloth to clean the exterior of the calculator.
• Whenever discarding the calculator or batteries, be sure to do so in
accordance with the laws and regulations in your particular area.
2
スクリプト.indd 2 2017/06/12 17:18:28
Getting Started
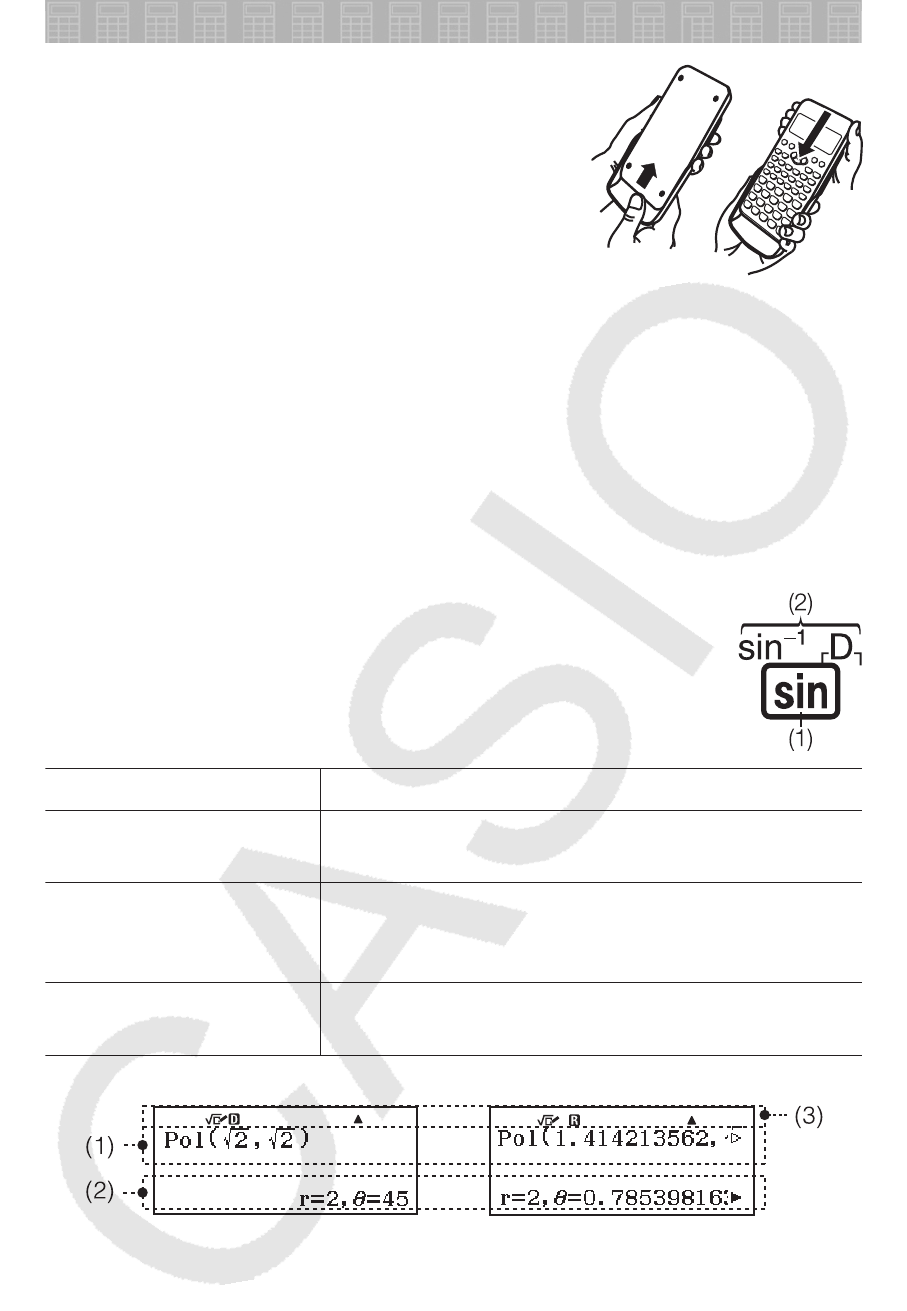
Before using the calculator, slide its hard case
downwards to remove it, and then affix the hard
case to the back of the calculator as shown in the
illustration nearby.
Turning Power On and Off
Press to turn on the calculator. Press
(OFF) to turn off the calculator.
Note: The calculator also will turn off automatically after approximately 10
minutes of non-use. Press the key to turn the calculator back on.
Adjusting Display Contrast
Display the Contrast screen by performing the key operation below:
(SETUP)(Contrast). Next, use and to adjust contrast.
After the setting is the way you want, press .
Important: If adjusting display contrast does not improve display
readability, it probably means that battery power is low. Replace the battery.
Key Markings
Pressing the or key followed by a second key
performs the alternate function of the second key. The alternate
function is indicated by the text printed above the key.
(1) Keycap function (2) Alternate function
This color: Means this:
Yellow Press and then the key to access the
applicable function.
Red
Press and then the key to input the
applicable variable, constant, function, or
symbol.
Blue (or enclosed in
blue brackets) Enter the Base-N Mode to access the function.
Reading the Display
• If a or indicator appears on the right side of either the input
expression line (1) or calculation result line (2), it means the displayed
line continues to the right. Use and to scroll the line display. Note
that if you want to scroll the input expression while both the and
indicators are displayed, you will need to press first and then use
and to scroll.
• The table below describes some of the typical indicators that appear at
the top of the screen (3).
3
スクリプト.indd 3 2017/06/12 17:18:28

The keypad has been shifted by pressing the key. The
keypad will unshift and this indicator will disappear when you
press a key.
The alpha input mode has been entered by pressing the
key. The alpha input mode will be exited and this indicator
will disappear when you press a key.
//Indicates the current setting of Angle Unit (: Degree, :
Radian, or : Gradian) on the setup menu.
FIX A fixed number of decimal places is in effect.
SCI A fixed number of significant digits is in effect.
MThere is a value stored in independent memory.
The calculator is standing by for input of a variable name to
assign a value to the variable. This indicator appears after
you press .
Indicates that MathI/MathO or MathI/DecimalO is selected for
Input/Output on the setup menu.
The display currently shows an intermediate result of a multi-
statement calculation.
Using Menus
Some of the operations of this calculator are performed using menus.
Menus are displayed by pressing or and then (SETUP).
General menu operation operations are described below.
• You can select a menu item by pressing the number key that
corresponds to the number to its left on the menu screen.
• A vertical scroll bar (1) indicates that the menu runs off the screen. In this
case, you can use and to scroll the menu up and down. A left
arrow (2) indicates that the currently displayed menu is a sub-menu. To
return from a sub-menu to its parent menu, press .
• To close a menu without selecting anything, press .
Calculation Mode
The calculation modes of this calculator are described below.
(Calculate) General calculations
(Base-N)
Calculations involving specific number
systems (binary, octal, decimal,
hexadecimal)
(Statistics) Statistical and regression calculations
4
スクリプト.indd 4 2017/06/12 17:18:28
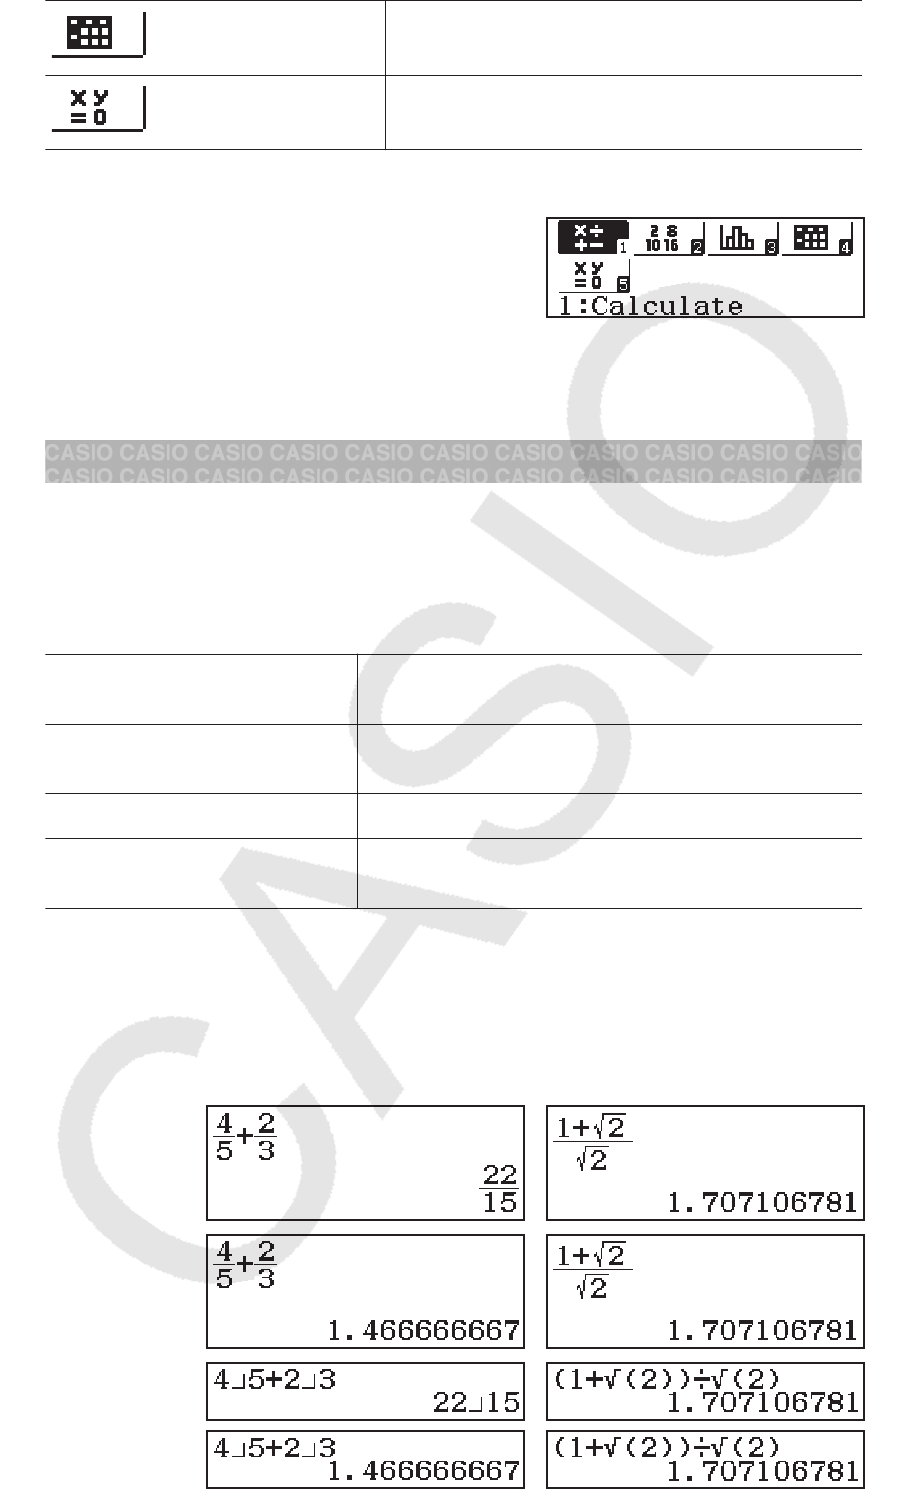
(Spreadsheet) Spreadsheet calculations
(Equation) Equation calculations
Specify the calculation mode that is suitable for the type of calculation you
want to perform.
1. Press to display the Main Menu.
2. Use the cursor keys to move the
highlighting to the icon you want.
3. Press to display the initial screen of the mode whose icon you
selected.
Note: The initial default calculation mode is the Calculate Mode.
Input and Output Formats
Before starting a calculation on the calculator, you should first use the
operation below to specify the formats that should be applied for calculation
formula input and calculation result output.
1. Press (SETUP)(Input/Output).
2. Press a number key ( to ).
(MathI/MathO) Input: Natural Textbook; Output: Format that
includes a fraction*1
(MathI/DecimalO) Input: Natural Textbook; Output: Converted to
decimal value
(LineI/LineO) Input: Linear*2; Output: Decimal or fraction
(LineI/DecimalO) Input: Linear*2; Output: Converted to decimal
value
*1 Decimal output is applied when this format cannot be output for some
reason.
*2 All calculations, including fractions and functions are input in a single
line. Same output format as that for models without Natural Textbook
Display.
Input/Output Format Display Examples
MathI/
MathO
MathI/
DecimalO
LineI/LineO
LineI/
DecimalO
Note: The initial default input/output format setting is MathI/MathO.
5
スクリプト.indd 5 2017/06/12 17:18:28

Configuring the Calculator Setup
To change the calculator setup
1. Press (SETUP) to display the setup menu.
2. Use and to scroll the setup menu, and then input the number
displayed to the left of the item whose setting you want to change.
Items and Available Setting Options
“ڏ” indicates the initial default setting.
Input/Output
MathI/MathOڏ;
MathI/DecimalO;
LineI/LineO;
LineI/DecimalO Specifies the format to be used by the calculator for
formula input and calculation result output.
Angle Unit
Degreeڏ;
Radian;
Gradian Specifies degree,
radian or gradian as the angle unit for value input and calculation result
display.
Number Format Specifies the number of digits for display of a calculation
result.
Fix (FIX): The value you specify (from 0 to 9) controls the number of
decimal places for displayed calculation results. Calculation results are
rounded off to the specified digit before being displayed.
Example: 1007(≈)* 14.286 (Fix 3)
Sci (SCI): The value you specify (from 0 to 9) controls the number of
significant digits for displayed calculation results. Calculation results are
rounded off to the specified digit before being displayed.
Example: 17(≈)* 1.4286 × 10⁻¹ (Sci 5)
Norm: Displays calculation results in exponential format when they fall
within the ranges below.
Norm 1: 10-2 > |[|, |[| Ԝ 1010,
Norm 2ڏ: 10-9 > |[|, |[| Ԝ 1010
Example: 1200(≈)* 5 × 10⁻³ (Norm 1), 0.005 (Norm 2)
* Pressing (≈) instead of after inputting a calculation will display
the calculation result in decimal form.
Fraction Result
ab/c;
d/cڏ Specifies either mixed fraction or
improper fraction for display of fractions in calculation results.
Complex
DELڏ;
U
Ә
ș Specifies either rectangular coordinates or
polar coordinates for Equation Mode solutions.
Note: An L indicator is displayed at the top of the screen while DEL is
selected for the Complex setting. Ә is displayed while UӘș is selected.
Statistics
On;
Offڏ Specifies whether or not to display a Freq
(frequency) column in the Statistics Mode Statistics Editor.
Spreadsheet For configuring Spreadsheet Mode settings.
Auto Calc: Specifies whether or not formulas should be re-calculated
automatically.
Onڏ;
Off Enables or disables auto re-calculation.
Show Cell: Specifies whether a formula in the edit box should be
displayed as it is or as its calculation result value.
Formulaڏ: Displays the formula as it is.
Value: Displays the calculation result value of the formula.
Equation
Onڏ;
Off Specifies whether or not to use complex
numbers in solutions output in the Equation Mode.
6
スクリプト.indd 6 2017/06/12 17:18:28
Decimal Mark
Dotڏ;
Comma Specifies whether to display a dot or
a comma for the calculation result decimal mark. A dot is always displayed
during input.
Note: When dot is selected as the decimal mark, the separator for multiple
results is a comma (,). When comma is selected, the separator is a
semicolon (;).
Digit Separator
On;
Offڏ Specifies whether or not a separator
character should be used in calculation results.
MultiLine Font
Normal Fontڏ;
Small Font Specifies the display
font size when LineI/LineO or LineI/DecimalO is selected for Input/Output.
Up to four lines can be displayed while Normal Font is selected, and up to
six lines can be displayed with Small Font.
QR Code Specifies the version of the QR Code displayed when
(QR) is pressed.
Version 3: Indicates QR Code Version 3.
Version 11ڏ: Indicates QR Code Version 11.
To initialize calculator settings (except the Contrast setting)
(RESET)(Setup Data)(Yes)
Inputting Expressions and Values
Basic Input Rules
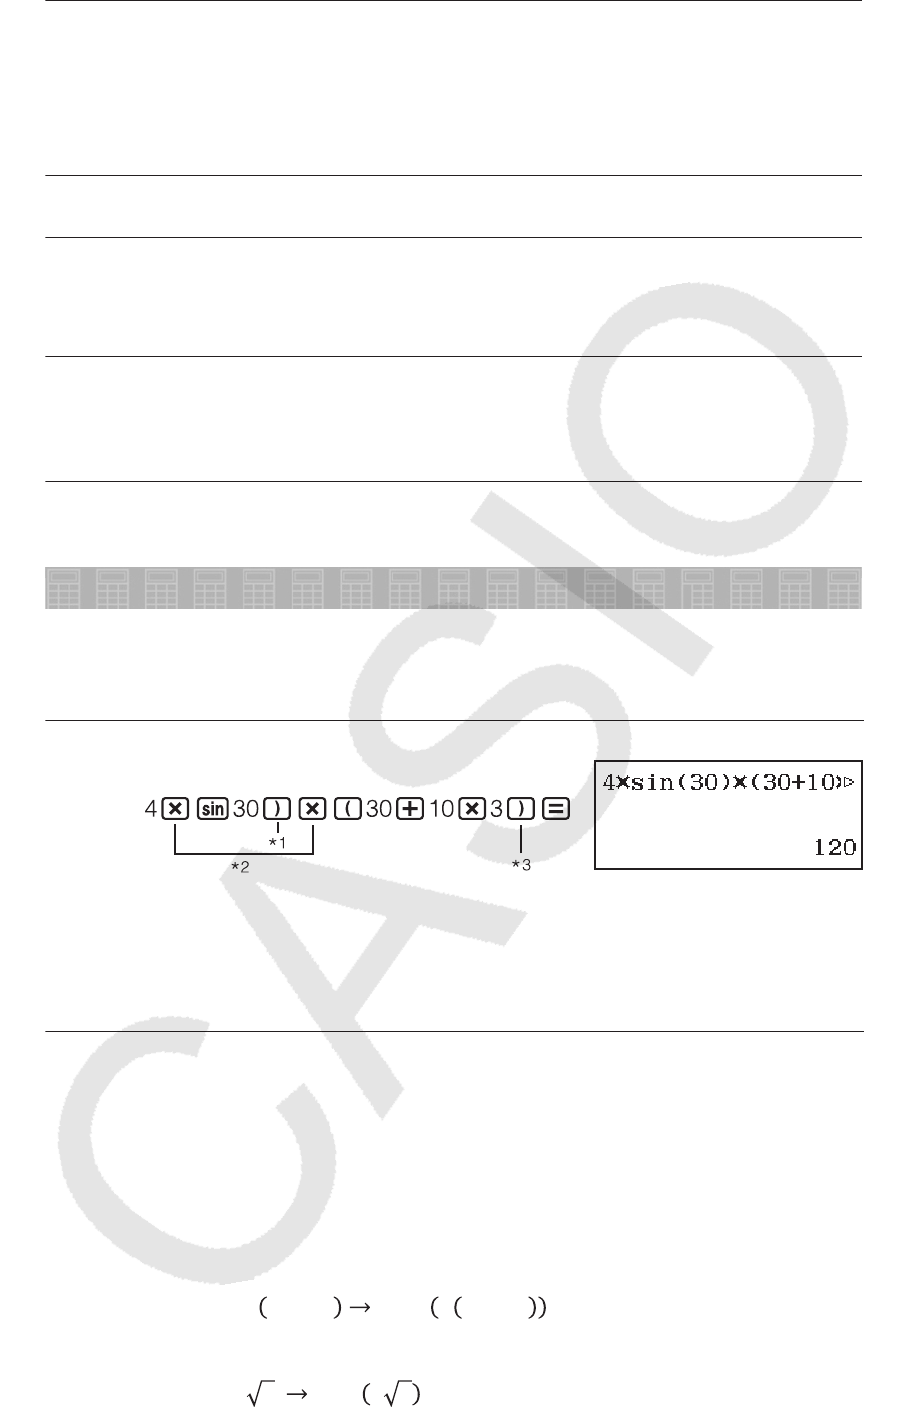
When you press the priority sequence of the input calculation will be
evaluated automatically and the result will appear on the display.
4 × sin 30 × (30 + 10 × 3) = 120
*1 Input of the closing parenthesis is required for sin and other functions
that include parentheses.
*2 These multiplication symbols (×) can be omitted.
*3 The closing parenthesis immediately before the operation can be
omitted.
Note
• The cursor will change shape to when there are 10 bytes or less of
allowed input remaining. If this happens, end calculation input and then
press .
• If you execute a calculation that includes both division and multiplication
operations in which a multiplication sign has been omitted, parentheses
will be inserted automatically as shown in the examples below.
- When a multiplication sign is omitted immediately before an open
parenthesis or after a closed parenthesis.
Example: ൊʹ ͳ ʹ ൊ ʹ ͳ ʹ
- When a multiplication sign is omitted immediately before a variable, a
constant, etc.
Example: ʹൊʹ ʹ ʹ ൊ ʹ ʹ
Calculation Priority Sequence
The priority sequence of input calculations is evaluated in accordance with
the rules below. When the priority of two expressions is the same, the
calculation is performed from left to right.
7
スクリプト.indd 7 2017/06/12 17:18:28

1 Parenthetical expressions
2
Functions that have parentheses (sin(, log(, etc., functions that take
an argument to the right, functions that require a closing parenthesis
after the argument)
3Functions that come after the input value (ݔʹ, ݔ͵, ݔǦͳ, ݔǨ,ιǯdz, ι, , J, Ψ,
ݐ), powers (), roots ()
4 Fractions
5Negative sign ((-)), base-Q symbols (d, h, b, o)
6Statistics Mode estimated values (ݔ, ݕ, ݔͳ, ݔʹ)
7 Multiplication where the multiplication sign is omitted
8Permutation (QPU), combination (QCU)
9 Multiplication (×), division (÷)
10 Addition (+), subtraction (−)
11 and (logical operator)
12 or, xor, xnor (logical operators)
Note: When squaring a negative value (such as -2), the value being
squared must be enclosed in parentheses (2). Since [2 has
a higher priority than the negative sign, inputting 2 would result in
the squaring of 2 and then appending a negative sign to the result. Always
keep the priority sequence in mind, and enclose negative values in
parentheses when required.
Inputting an Expression Using Natural Textbook
Format (MathI/MathO or MathI/DecimalO Only)
Formulas and expressions that include fractions and/or special functions
such as 䌮 can be input in natural textbook format by using templates that
appear when certain keys are pressed.
Example: ͵ͳ
ʹͷ͵
ʹ
1. Press ().
• This inputs a mixed fraction template.
2. Input values into the integer, numerator, and denominator areas of the
template.
312
3. Do the same to input the remainder of the expression.
() 532
Tip: While the input cursor is located within the input area of a template
(mixed fractions), pressing jumps to the position immediately
following (to the right) of the template, while pressing jumps to the
position immediate before (to the left of) it.
8
スクリプト.indd 8 2017/06/12 17:18:28
Note
• When you press and obtain a calculation result, part of the
expression you input may be cut off. If you need to view the entire input
expression again, press and then use and to scroll the input
expression.
• Nesting of functions and parentheses is allowed. Further input will
become impossible if you nest too many functions and/or parentheses.
To undo operations (MathI/MathO or MathI/DecimalO only): To undo the
last key operation, press (UNDO). To redo a key operation you have
just undone, press (UNDO) again.
Using Values and Expressions as Arguments (MathI/
MathO or MathI/DecimalO only)
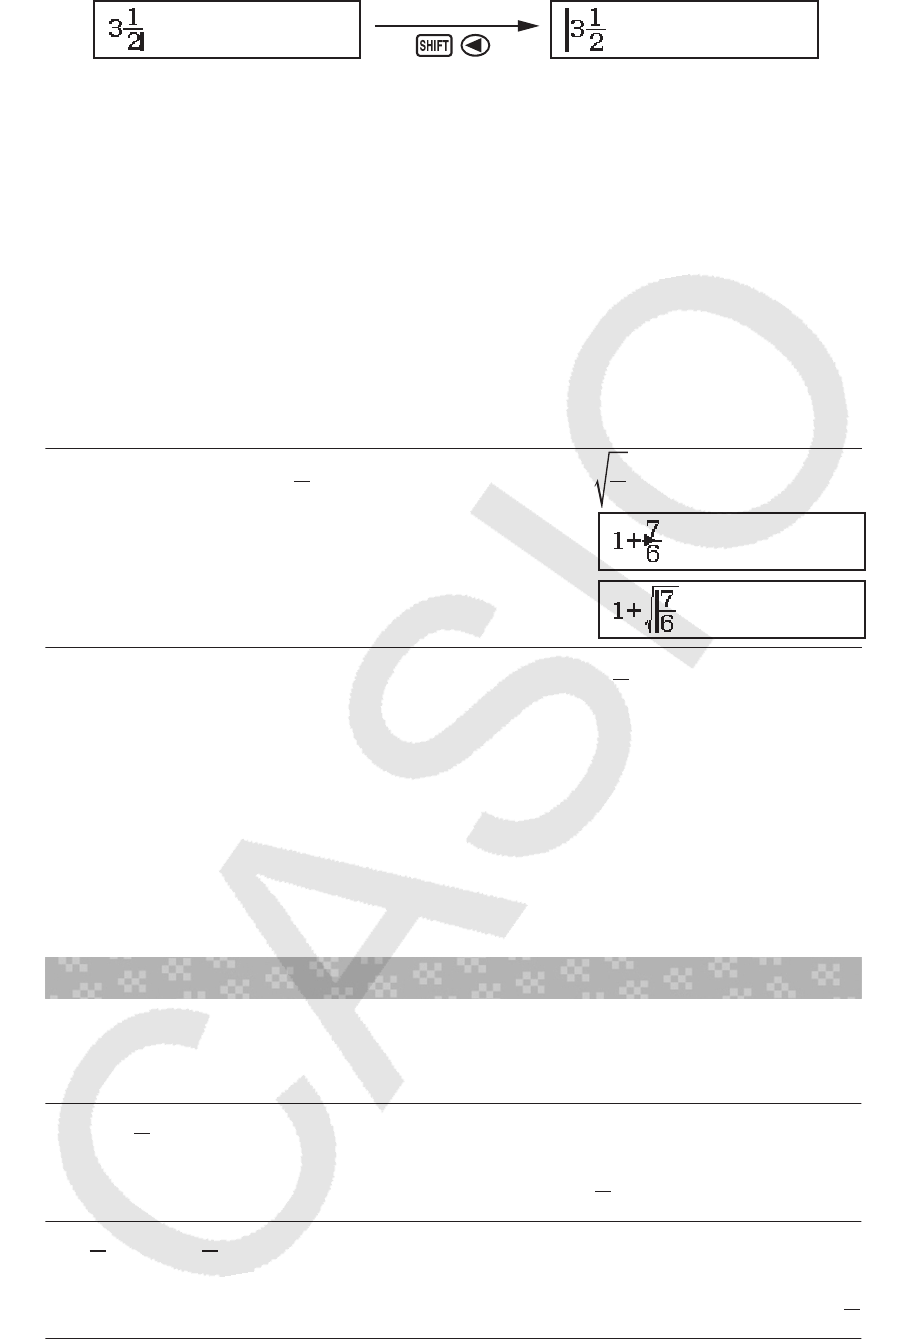
Example: To input ͳ
and then change it to ͳ
176(INS)
Pressing (INS) in the above example causes
to be the argument
of the function input by the next key operation (䌮).
Overwrite Input Mode (LineI/LineO or LineI/DecimalO
only)
In the overwrite mode, text you input replaces the text at the current cursor
location. You can toggle between the insert and overwrite modes by
performing the operations: (INS). The cursor appears as “” in the
insert mode and as “” in the overwrite mode.
Toggling Calculation Results
Regardless of what is selected for Input/Output on the setup menu, each
press of will toggle the currently displayed calculation result between its
decimal form and fraction form.
ͳൊͷൌ ͳ
ͷൌ ͲǤʹ (MathI/MathO)
15ͳ
ͷĸĺͲǤʹ
ͳെͶ
ͷൌ ͲǤʹ ൌ ͳ
ͷ (MathI/DecimalO)
145ͲǤʹ ĸĺͳ
ͷ
Important
• With certain calculation results, pressing the key will not convert the
displayed value.
• You cannot switch from decimal form to mixed fraction form if the total
number of digits used in the mixed fraction (including integer, numerator,
denominator, and separator symbol) is greater than 10.
9
スクリプト.indd 9 2017/06/12 17:18:29

To obtain a decimal value calculation result while MathI/MathO or LineI/
LineO is selected
Press (≈) instead of after inputting a calculation.
Basic Calculations
Fraction Calculations
Note that the input method for fractions depends on the current Input/
Output setting on the setup menu.
ʹ
͵ͳͳ
ʹൌͳ͵
(MathI/MathO) 23()
112
ͳ͵
(LineI/LineO) 23112ͳ͵
Note
• Mixing fractions and decimal values in a calculation while something
other than MathI/MathO is selected will cause the result to be displayed
as a decimal value.
• Fractions in calculation results are displayed after being reduced to their
lowest terms.
• To switch a calculation result between improper fraction and mixed
fraction form, press ().
Percent Calculations
Inputting a value and pressing (%) causes the input value to
become a percent.
150 × 20% = 30 15020(%)͵Ͳ
Calculate what percentage of 880 is 660. (75%)
660880(%)ͷ
Discount 3500 by 25%. (2625)
3500350025(%)ʹʹͷ
Degree, Minute, Second (Sexagesimal) Calculations
The syntax below is for inputting a sexagesimal value: {degrees}
{minutes} {seconds} . Note that you must always input something
for the degrees and minutes, even if they are zero.
2°20’30” + 9’30” = 2°30’00”
220300930 ʹι͵ͲǯͲdz
Convert 2°30’0” to its decimal equivalent. ʹǤͷ
(Converts decimal to sexagesimal.) ʹι͵ͲǯͲdz
Multi-Statements
You can use the colon character (:) to connect two or more expressions and
execute them in sequence from left to right when you press .
3 + 3 : 3 × 3 33(:) 33
ͻ
Note: Inputting a colon (:) while LineI/LineO or LineI/DecimalO is selected
for the Input/Output setting on the setup menu causes a newline operation
to be performed.
Using Engineering Notation
Transform the value 1234 to engineering
notation, shifting the decimal mark to the
right, and then to the left.
1234ͳʹ͵Ͷ
ͳǤʹ͵ͶൈͳͲ͵
ͳʹ͵ͶൈͳͲͲ
10
スクリプト.indd 10 2017/06/12 17:18:29
(ĸ)ͳǤʹ͵ͶൈͳͲ͵
(ĸ)ͲǤͲͲͳʹ͵ͶൈͳͲ
Calculation History and Replay
Calculation History
An and/or at the top of the display indicates that there is more
calculation history content above and/or below. You can scroll through
calculation history contents using and .
2 + 2 = 4 22Ͷ
3 + 3 = 6 33
(Scrolls back.) Ͷ
Note: Calculation history data is all cleared whenever you press , when
you change to a different calculation mode, when you change the Input/
Output setting, or whenever you perform a RESET operation (“Initialize All”
or “Setup Data”).
Replay
While a calculation result is on the display, you can press or to edit
the expression you used for the previous calculation.
4 × 3 + 2 = 14 432ͳͶ
4 × 3 − 7 = 5 (Continuing) 7ͷ
Using Memory Functions
Answer Memory (Ans)
The last calculation result obtained is stored in Ans (answer) memory.
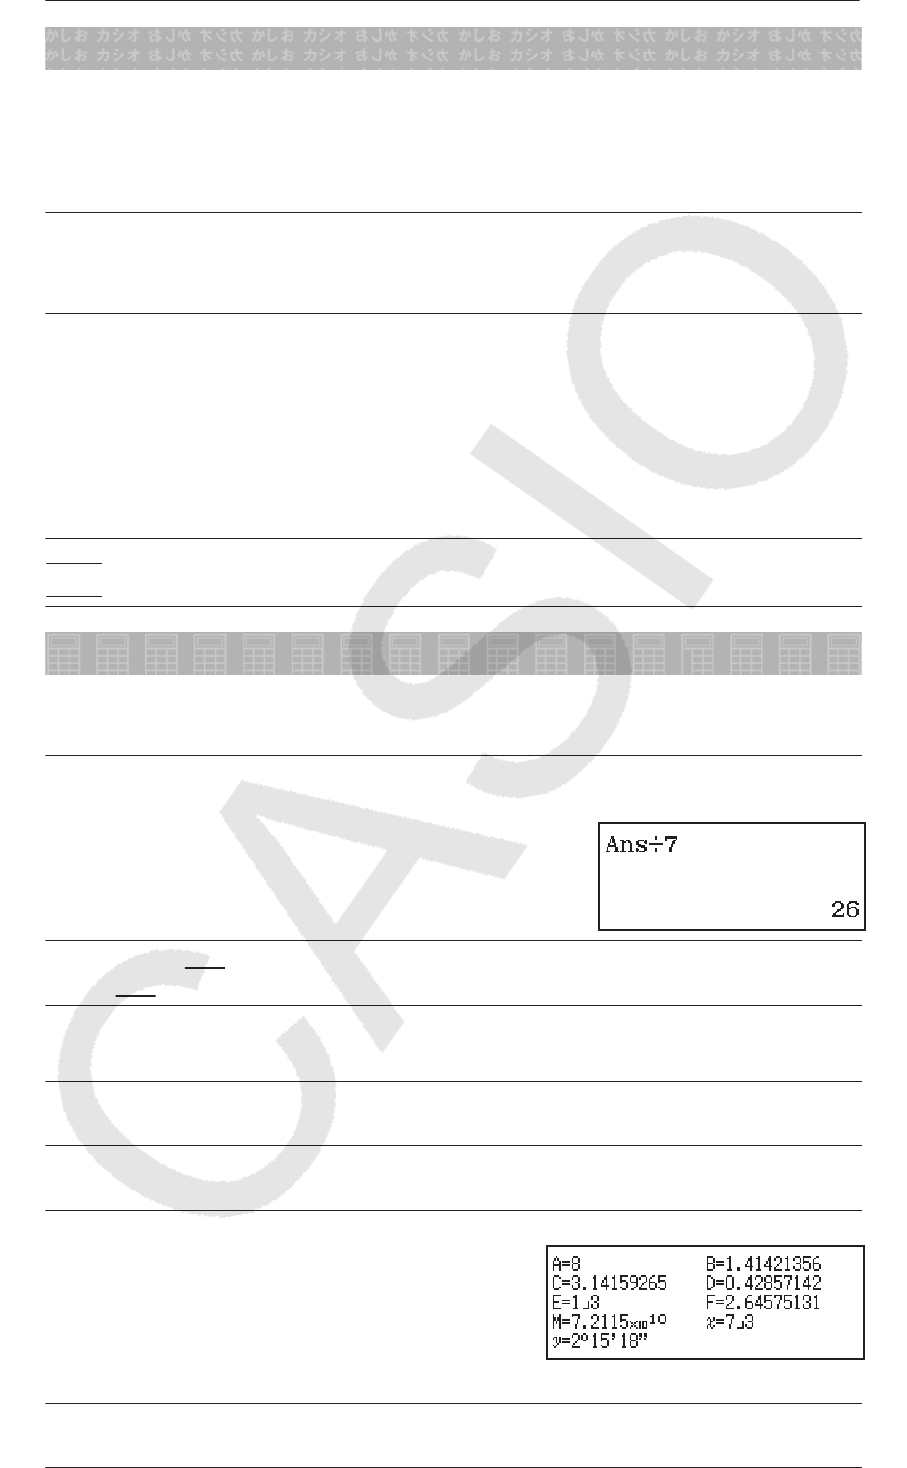
To divide the result of 14 × 13 by 7
1413ͳͺʹ
(Continuing) 7
123 + 456 = 579
789 − 579 = 210
123456
(Continuing) 789
ͷͻ
ʹͳͲ
Variables (A, B, C, D, E, F, M, [, \)
You can assign values to variables and use the variables in calculations.
To assign the result of 3 + 5 to variable A
35(A) ͺ
To multiply the contents of variable A by 10
(Continuing) (A)10*1ͺͲ
To recall the contents of variable A
(Continuing) (RECALL)*2
(A)ͺ
To clear the contents of variable A
0(A) Ͳ
11
スクリプト.indd 11 2017/06/12 17:18:29

*1 Input a variable as shown here: press and then press the key that
corresponds to the desired variable name.
*2 Pressing (RECALL) displays a screen that shows the values
currently assigned to variables A, B, C, D, E, F, M, [, and \. On this
screen, values are always displayed using the “Norm 1” Number
Format. To close the screen without recalling a variable value, press
.
Independent Memory (M)
You can add calculation results to or subtract results from independent
memory. The “M” appears on the display when there is any value other than
zero stored in independent memory.
To clear the contents of M
0(M) Ͳ
To add the result of 10 × 5 to M
(Continuing) 105ͷͲ
To subtract the result of 10 + 5 from M
(Continuing) 105(M−) ͳͷ
To recall the contents of M
(Continuing) (RECALL)(M)͵ͷ
Note: Variable M is used for independent memory. You also can call M and
use it in a calculation you are inputting.
Clearing the Contents of All Memories
Ans memory, independent memory, and variable contents are retained even
if you press , change the calculation mode, or turn off the calculator.
Perform the procedure below when you want to clear the contents of all
memories.
(RESET)(Memory)(Yes)
Function Calculations
Note: To interrupt an ongoing calculation before its result appears, press
.
Pi ʌ: ʌis displayed as 3.141592654, but ʌ = 3.14159265358980 is used for
internal calculations.
Natural Logarithm Base H H is displayed as 2.718281828, but H =
2.71828182845904 is used for internal calculations.
sin, cos, tan, sin-1, cos-1, tan-1: Specify the angle unit before performing
calculations.
sin 30° = ͳ
ʹ(Angle Unit: Degree) 30 ͳ
ʹ
sinh, cosh, tanh, sinh-1, cosh-1, tanh-1: Input a function from the menu that
appears when you press (Hyperbolic Func)*1. The angle unit setting
does not affect calculations.
*1 Depending on the calculation mode, you should press .
ל
, r,
: These functions specify the angle unit. ° specifies degree, r radian,
and J gradian. Input a function from the menu that appears when you
perform the following key operation: (Angle Unit)*2.
ʌ/2 radians = 90° (Angle Unit: Degree)
(ʌ)2(Angle Unit)(r)ͻͲ
12
スクリプト.indd 12 2017/06/12 17:18:29
*2 Depending on the calculation mode, you should press .
, : Exponential functions.
H5 × 2 = 296.8263182
(MathI/MathO) () 52ʹͻǤͺʹ͵ͳͺʹ
(LineI/LineO) () 52ʹͻǤͺʹ͵ͳͺʹ
log: Logarithmic function.
log101000 = log 1000 = 3 1000 ͵
ln: Natural logarithm to base H.
ln 90 (= logH 90) = 4.49980967 90 ͶǤͶͻͻͺͲͻ
[2, [3,
,
,
,
, [-1: Powers, power roots, and reciprocals.
(1 + 1)2+2 = 16 1122ͳ
(52)3 = 15625 5 ͳͷʹͷ
͵ʹ
ͷൌʹ
(MathI/MathO) () 532ʹ
(LineI/LineO) 5() 32 ʹ
ʹൈ͵ൌ ͶǤʹͶʹͶͲͺǤǤǤ
(MathI/MathO) 23ͶǤʹͶʹͶͲͺ
(LineI/LineO) 23ͶǤʹͶʹͶͲͺ
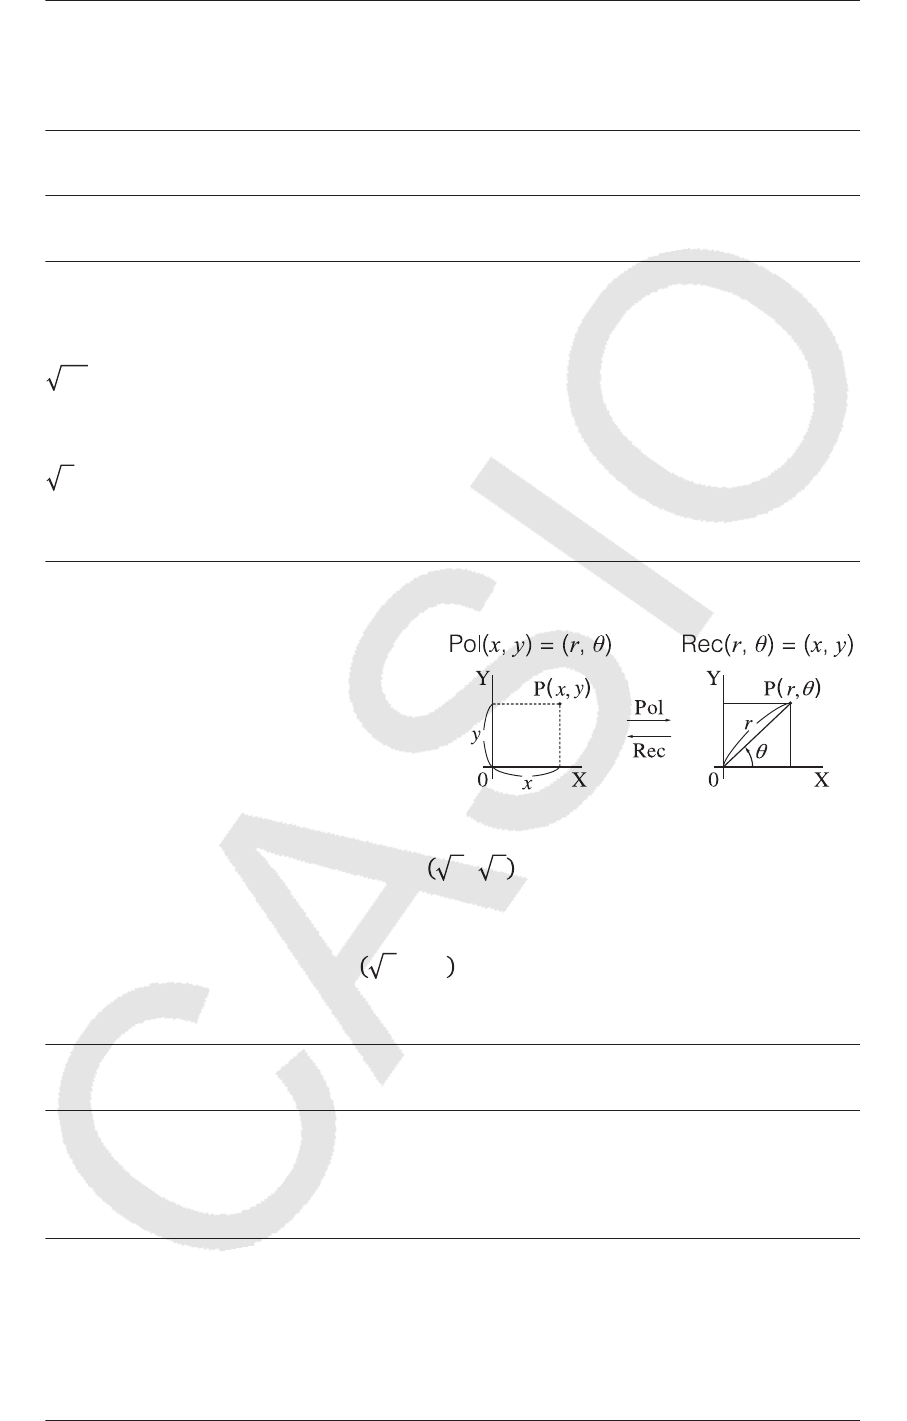
Pol, Rec: Pol converts rectangular coordinates to polar coordinates, while
Rec converts polar coordinates to rectangular coordinates.
• Specify the angle unit before
performing calculations.
• The calculation result for U and ș
and for [ and \ are each
assigned respectively to
variables [ and \.
• Calculation result ș is displayed
in the range of -180° < ș ԛ 180°.
To convert rectangular coordinates ʹǡ ʹ to polar coordinates (Angle
Unit: Degree)
(MathI/MathO) (Pol)2(,)2 UൌʹǡșൌͶͷ
To convert polar coordinates ʹǡ Ͷͷι to rectangular coordinates (Angle
Unit: Degree)
(MathI/MathO) (Rec)2(,) 45 [ൌͳǡ \ൌͳ
[!: Factorial function.
(5 + 3) ! = 40320 53 ͶͲ͵ʹͲ
Abs: Absolute value function.
|2 − 7| × 2 = 10
(MathI/MathO) 272ͳͲ
(LineI/LineO) 272ͳͲ
Ran#: Function that generates a pseudo random number in the range of
0.000 to 0.999. The result is displayed as a fraction when MathI/MathO is
selected for Input/Output on the setup menu.
To obtain random three-digit integers
1000(Ran#)Ͷͷͻ
(The result differs with each execution.)
RanInt#: Function that generates a pseudo random integer between a
specified start value and end value.
13
スクリプト.indd 13 2017/06/12 17:18:29

To generate random integers in the range of 1 to 6
(RanInt) 1(,) 6 ʹ
(The result differs with each execution.)
QPU, QCU: Permutation (QPU) and combination (QCU) functions.
To determine the number of permutations and combinations possible when
selecting four people from a group of 10
Permutations: 10(QPU) 4ͷͲͶͲ
Combinations: 10(QCU) 4ʹͳͲ
Rnd: Using the Rnd function causes decimal fraction values of the
argument to be rounded in accordance with the current Number Format
setting. For example, the internal and displayed result of Rnd(10 ÷ 3) is
3.333 when the Number Format setting is Fix 3. Using the Norm 1 or Norm
2 setting cause the argument to be rounded off at the 11th digit of the
mantissa part.
To perform the following calculations when Fix 3 is selected for the number
of display digits: 10 ÷ 3 × 3 and Rnd(10 ÷ 3) × 3 (MathI/DecimalO)
(SETUP)(Number Format)(Fix)
1033ͳͲǤͲͲͲ
(Rnd) 1033ͻǤͻͻͻ
QR Code Function
Your calculator can display QR Code* symbols that can be read by a smart
device.
* QR Code is a registered trademark of DENSO WAVE INCORPORATED in
Japan and in other countries.
Important
• The operations in this section assume that the smart device being used
has a QR Code reader that can read multiple QR Code symbols, and it
can connect to the Internet.
• Scanning a QR Code displayed by this calculator with a smart device will
cause the smart device to access the CASIO website.
Note: A QR Code can be displayed by pressing (QR) while the
setup screen, a menu screen, an error screen, a calculation result screen in
any calculation mode, or a table screen is displayed. For details, visit the
CASIO website (wes.casio.com).
Displaying a QR Code
Example: To display the QR Code for a calculation result in the calculator’s
Calculate Mode and scan it with a smart device
1. In the Calculate Mode, execute some calculation.
2. Press (QR) to display the QR Code.
• The numbers in the lower right corner of the
display shows the current QR Code
number and the total number of QR Code
symbols. To display the next QR Code,
press or .
Note: A indicator is displayed at the top of the screen while the
calculator is generating a QR Code.
To return to a previous QR Code, press or as many times as
required to scroll forward until it appears.
3. Use a smart device to scan the QR Code on the calculator display.
14
スクリプト.indd 14 2017/06/12 17:18:29

• For information about how to scan a QR Code, refer to the user
documentation of the QR Code reader you are using.
If you experience difficulty scanning a QR Code: While the QR Code is
displayed use and to adjust the display contrast of the QR Code.
This contrast adjustment affects QR Code displays only.
Important
• Depending on the smart device and/or QR Code reader app being used,
you may experience problems scanning the QR Code symbols produced
by this calculator.
• When the setup “QR Code” setting is “Version 3”, the calculator modes
that can display QR Code symbols are limited. If you try to display a QR
Code in a mode that does not support QR Code display, the message
“Not Supported (Version 3)” will appear. However, the QR Code
produced by this setting is easier to scan with a smart device.
• For more information, visit the CASIO website (wes.casio.com).
To exit the QR Code display: Press or (QR).
Statistical Calculations
Perform the steps below to start a statistical calculation.
1. Press , select the Statistics Mode icon, and then press .
2. On the Select Type screen that appears, press one of the keys below to
select a statistical calculation type.
(1-Variable) Single-variable ([)
(y=a+bx) Paired-variable ([, \), linear regression
(y=a+bx+cx2)Paired-variable ([, \), quadratic regression
(y=a+b㺃ln(x)) Paired-variable ([, \), logarithmic regression
(y=a㺃H^(bx)) Paired-variable ([, \), H exponential regression
(y=a㺃b^x) Paired-variable ([, \), DE exponential regression
(y=a㺃x^b) Paired-variable ([, \), power regression
(y=a+b/x) Paired-variable ([, \), inverse regression
• Performing any of the above key operations displays the Statistics
Editor.
Note: When you want to change the calculation type after entering the
Statistics Mode, perform the key operation (Select Type) to display
the calculation type selection screen.
Inputting Data with Statistics Editor
Statistics Editor displays one, two, or three columns: single-variable ([),
single variable and frequency ([, Freq), paired-variable ([, \), paired-
variable and frequency ([, \, Freq). The number of data rows that can be
input depends on the number of columns: 160 rows for one column, 80
rows for two columns, 53 rows for three columns.
Note
• Use the Freq (frequency) column to input the quantity (frequency) of
identical data items. Display of the Freq column can be turned on
15
スクリプト.indd 15 2017/06/12 17:18:29
(displayed) or off (not displayed) using the Statistics setting on the setup
menu.
• Pressing the key while the Statistics Editor is on the screen will
display a statistical calculation screen for performing calculations based
on the input data. What you need to do to return to the Statistics Editor
from the statistical calculation screen depends on the calculation type
you selected. Press (Data) if you selected single-variable or
(Data) if you selected paired-variable.
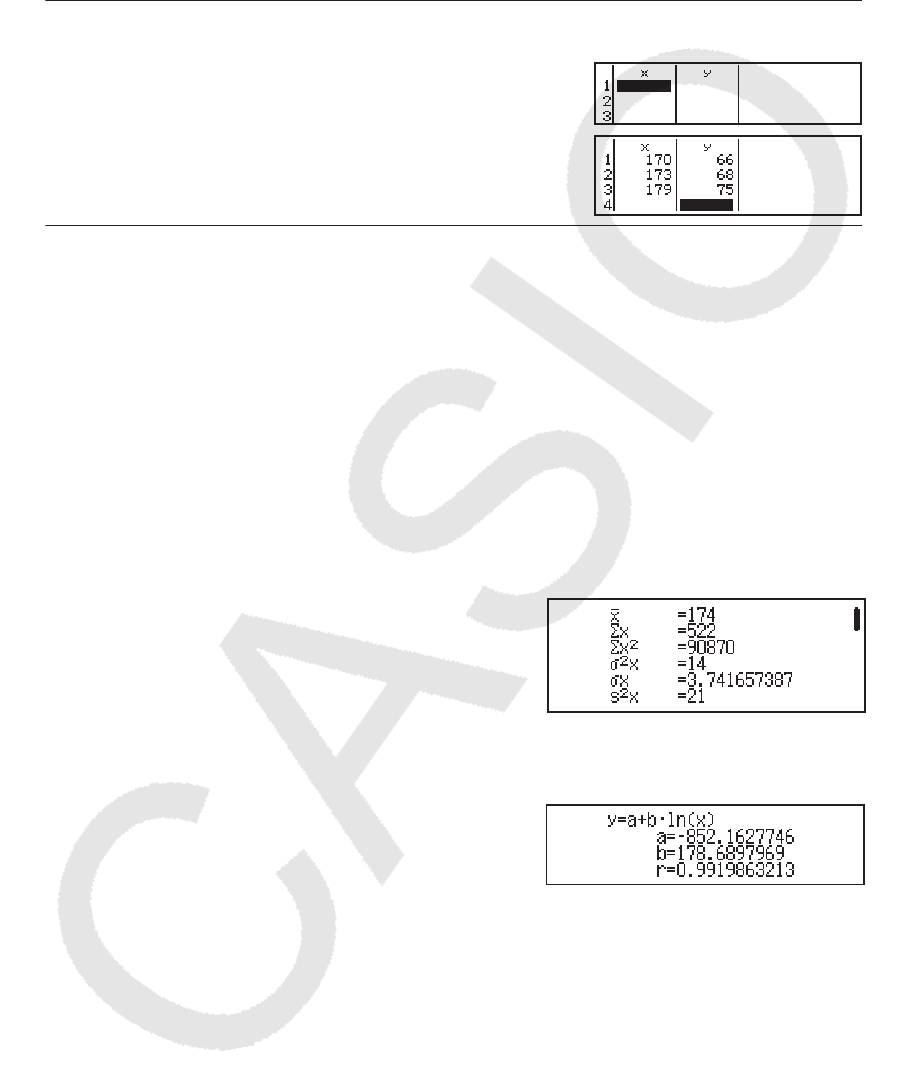
Ex 1: To select logarithmic regression and input the following data: (170,
66), (173, 68), (179, 75)
(Select Type)(y=a+b㺃ln(x))
170173179
666875
Important: All data currently input in the Statistics Editor is deleted
whenever you exit the Statistics Mode, switch between the single-variable
and a paired-variable statistical calculation type, or change the Statistics
setting on the setup menu.
To delete a line: In the Statistics Editor, move the cursor to the line that you
want to delete and then press .
To insert a line: In the Statistics Editor, move the cursor to the location
where you want to insert the line and then perform the following key
operation: (Editor)(Insert Row).
To delete all Statistics Editor contents: In the Statistics Editor, perform
the following key operation: (Editor)(Delete All).
Displaying Statistical Values Based On Input Data
From the Statistics Editor:
(1-Variable Calc or 2-Variable Calc)
From the statistical calculation screen:
(1-Variable Calc or 2-Variable Calc)
Displaying Regression Calculation Results Based On
Input Data (Paired-Variable Data Only)
From the Statistics Editor:
(Regression Calc)
From the statistical calculation screen:
(Regression Calc)
Obtaining Statistical Values from Input Data
You can use the operations in this section to recall statistical values
assigned to variables (ı[, Ȉ[2, etc.) based on the data you input with the
Statistics Editor. You can also use the variables in calculations. The
operations in this section are performed on the statistical calculation screen
that appears when you press while the Statistics Editor is displayed.
Supported statistical variables and the keys you should press to recall them
are shown below. For single-variable statistical calculations, the variables
marked with an asterisk (*) are available.
Summation: Ȉ[*, Ȉ[2*, Ȉ\, Ȉ\2, Ȉ[\, Ȉ[3, Ȉ[2\, Ȉ[4
(Summation) to
16
スクリプト.indd 16 2017/06/12 17:18:29
Number of Items: Q* / Mean: ݔ
െ*, ݕ
െ / Population Variance: ı2[*, ı2\ /
Population Standard Deviation: ı[*, ı\ / Sample Variance: s2[*, s2\ /
Sample Standard Deviation: s[*, s\
(Variable) to , to
Minimum Value: min([)*, min(\) / Maximum Value: max([)*, max(\)
When the single-variable statistical calculation is selected:
(Min/Max) ,
When a paired-variable statistical calculation is selected:
(Min/Max) to
Regression Coefficients: D, E / Correlation Coefficient: U / Estimated
Values: ݔ, ݕ
(Regression) to
Regression Coefficients for Quadratic Regression: D, E, F / Estimated
Values: ݔ1, ݔ2, ݕ
(Regression) to
•ݔ, ݔ1, ݔ2 and ݕ are commands of the type that take an argument
immediately before them.
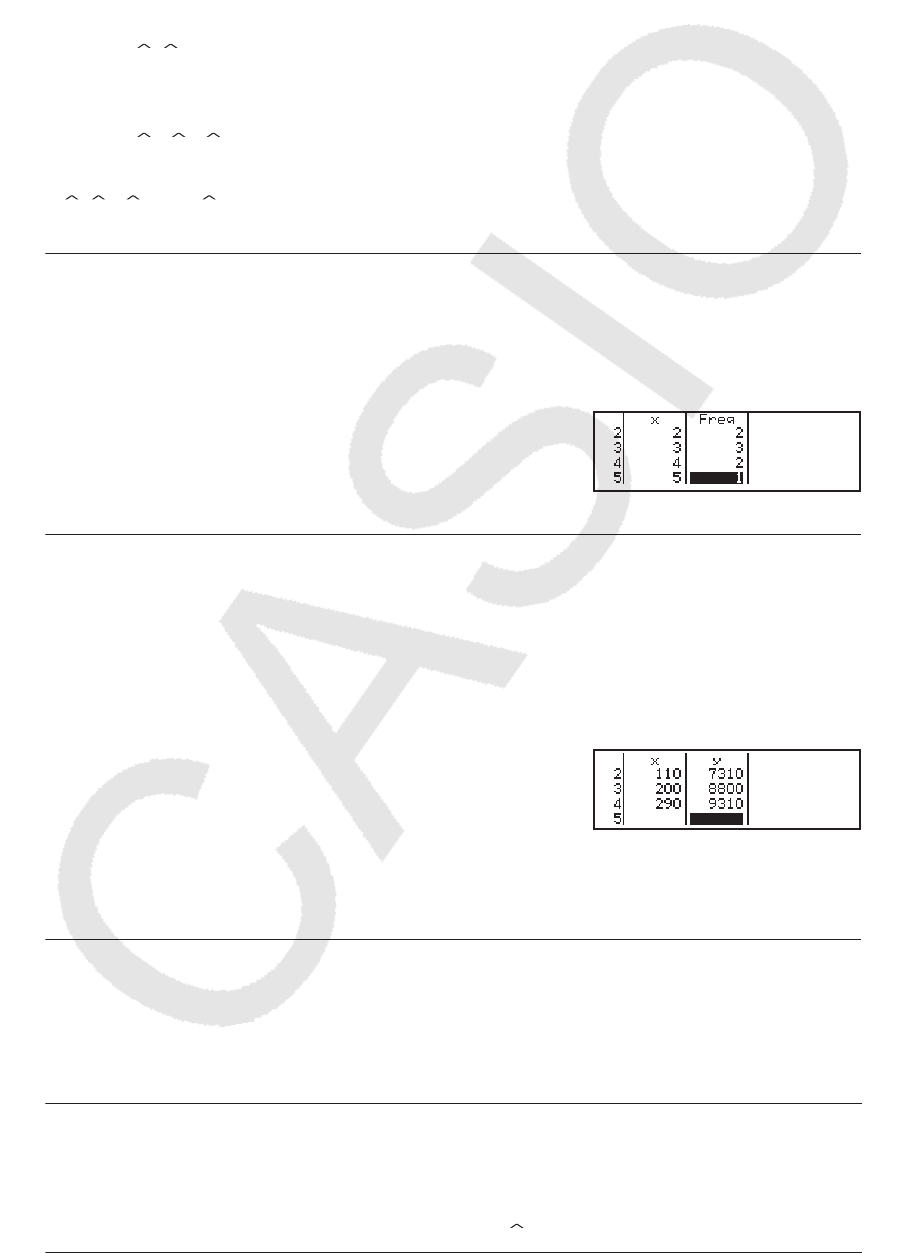
Ex 2: To input the single-variable data [ = {1, 2, 2, 3, 3, 3, 4, 4, 5}, using the
Freq column to specify the number of repeats for each items {[Q; FreqQ} =
{1;1, 2;2, 3;3, 4;2, 5;1}, and calculate the mean.
(SETUP)(Statistics)(On)
(Select Type)(1-Variable)
12345
1232
(Variable)(ݔ
െ)͵
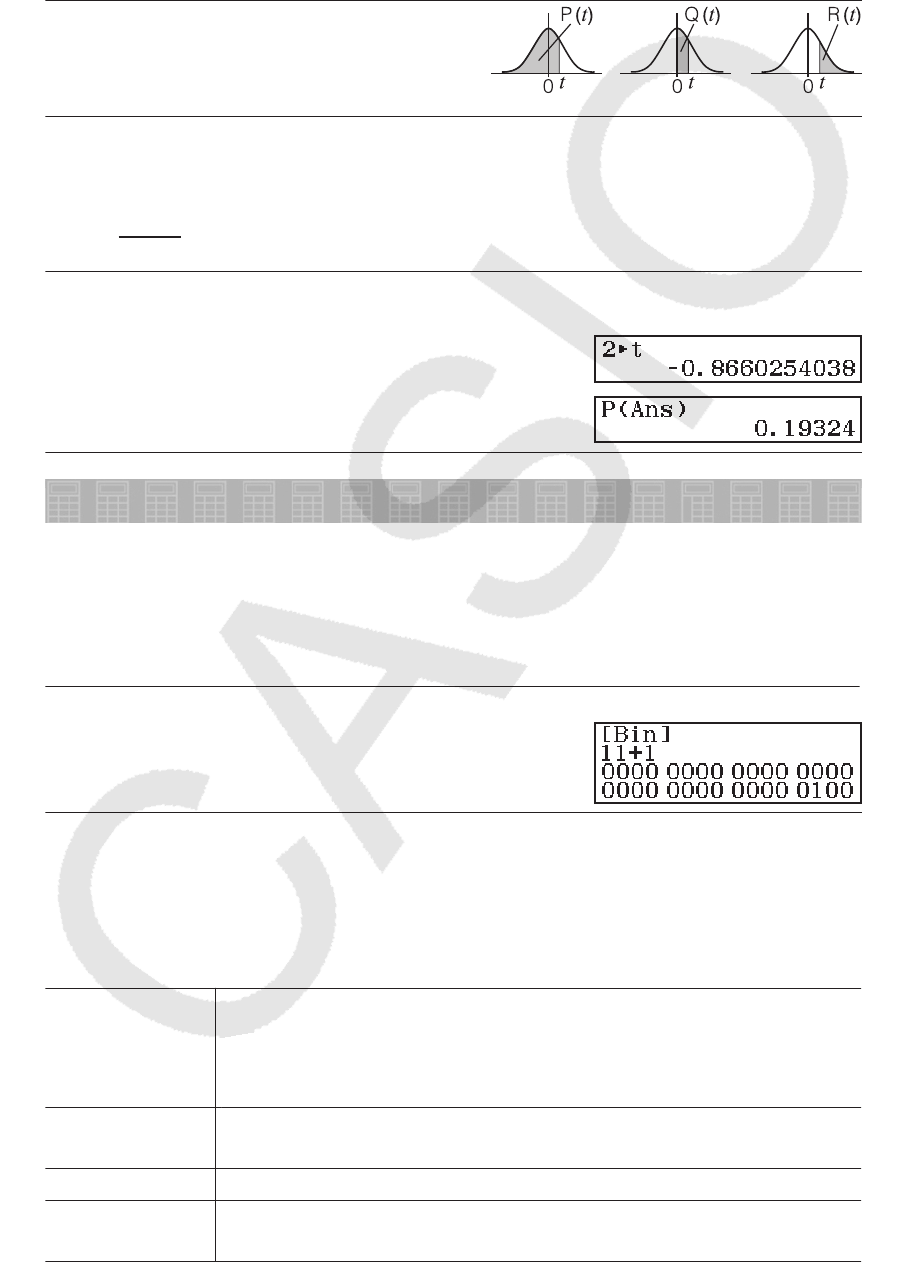
Ex 3: To calculate the logarithmic regression correlation coefficients for the
following paired-variable data and determine the regression formula: ([, \) =
(20, 3150), (110, 7310), (200, 8800), (290, 9310). Specify Fix 3 (three
decimal places) for results.
(SETUP)(Statistics)(Off)
(SETUP)(Number Format)(Fix)
(Select Type)(y=a+b㺃ln(x))
20110200290
3150731088009310
(Regression)(r)ͲǤͻͻͺ
(Regression)(a)Ǧ͵ͺͷǤͻͺͶ
(Regression)(b)ʹ͵ͷǤͷ͵ʹ
Calculating Estimated Values
Based on the regression formula obtained by paired-variable statistical
calculation, the estimated value of \ can be calculated for a given [-value.
The corresponding [-value (two values, [1 and [2, in the case of quadratic
regression) also can be calculated for a value of \ in the regression formula.
Ex 4: To determine the estimate value for \ when [ = 160 in the regression
formula produced by logarithmic regression of the data in Ex 3. Specify Fix
3 for the result. (Perform the following operation after completing the
operations in Ex 3.)
160(Regression)(ݕ)ͺͳͲǤͺͻͺ
17
スクリプト.indd 17 2017/06/12 17:18:29
Important: Regression coefficient, correlation coefficient, and estimated
value calculations can take considerable time when there are a large
number of data items.
Performing Normal Distribution Calculations
While single-variable statistical calculation is selected, you can perform
normal distribution calculation using the functions shown below from the
menu that appears when you perform the following key operation:
(Norm Dist).
P, Q, R: These functions take the
argument W and determine a probability
of standard normal distribution as
illustrated nearby.
W: This function is preceded by the argument [. It calculates the standard
variate for data value [ using the mean value (ݔ
െ) and population standard
deviation (ı[) of data input with Statistics Editor.
[W ൌݔെݔ
െ
ߪݔ
Ex 5: For the single variable data in Ex 2, to determine the normalized
variate when [ = 2, and P(W) at that point.
2(Norm Dist)(W)
(Norm Dist)(P()
Base-Q Calculations
When you want to perform calculations using decimal, hexadecimal, binary,
and/or octal values, enter the Base-N Mode. After entering the Base-N
Mode, press one of the following keys to switch number modes: (DEC)
for decimal, (HEX) for hexadecimal, (BIN) for binary, or (OCT) for
octal.
To calculate 112 + 12
(BIN)111
Note
• Use the following keys to input the letters A through F for hexadecimal
values: (A), (B), (C), (D), (E), (F).
• In the Base-N Mode, input of fractional (decimal) values and exponents
is not supported. If a calculation result has a fractional part, it is cut off.
• Details about input and output ranges (32 bits) are shown below.
Binary
Positive: 00000000000000000000000000000000 ԛ [ ԛ
01111111111111111111111111111111
Negative: 10000000000000000000000000000000 ԛ [ ԛ
11111111111111111111111111111111
Octal Positive:
Negative:
00000000000 ԛ [ ԛ 17777777777
20000000000 ԛ [ ԛ 37777777777
Decimal -2147483648 ԛ [ ԛ 2147483647
Hexadecimal Positive:
Negative:
00000000 ԛ [ ԛ 7FFFFFFF
80000000 ԛ [ ԛ FFFFFFFF
18
スクリプト.indd 18 2017/06/12 17:18:30

Specifying the Number Mode of a Particular Input
Value
You can input a special command immediately following a value to specify
the number mode of that value. The special commands are: d (decimal), h
(hexadecimal), b (binary), and o (octal).
To calculate 1010 + 1016 + 102 + 108 and display the result as a decimal
value
(DEC)(d) 10(h) 10
(b) 10(o) 10͵
Converting a Calculation Result to another Type of
Value
You can use any one of the following key operations to convert the currently
displayed calculation result to another type of value: (DEC), (HEX),
(BIN), (OCT).
To calculate 1510 × 3710 in the decimal mode, and then convert the result to
hexadecimal
(DEC) 1537
(HEX)
ͷͷͷ
ͲͲͲͲͲʹʹ
Logical and Negation Operations
Logical and negation operations are performed by pressing and then
selecting the desired command (and, or, xor, xnor, Not, Neg) from the menu
that appears. All of the examples below are performed in the binary mode
((BIN)).
To determine the logical AND of 10102 and 11002 (10102 and 11002)
1010(and) 1100ͲͲͲͲͲͲͲͲͲͲͲͲͲͲͲͲ
ͲͲͲͲͲͲͲͲͲͲͲͲͳͲͲͲ
To determine the bitwise complement of 10102 (Not(10102))
(Not) 1010 ͳͳͳͳͳͳͳͳͳͳͳͳͳͳͳͳ
ͳͳͳͳͳͳͳͳͳͳͳͳͲͳͲͳ
Note: In the case of a negative binary, octal or hexadecimal value, the
calculator converts the value to binary, takes the two’s complement, and
then converts back to the original number base. For decimal values, the
calculator merely adds a minus sign.
Equation Calculations
Perform the steps below to solve an equation in the Equation Mode.
1. Press , select the Equation Mode icon, and then press .
2. Perform one of the operations below to select a calculation type.
Simultaneous linear equations
with two, three, or four
unknowns
Press (Simul Equation), and then
use a number key ( to ) to
specify the number of unknowns.
Quadratic equations, cubic
equations, or quartic equations
Press (Polynomial), and then use
a number key ( to ) to specify
the polynomial degree.
3. Use the Coefficient Editor that appears to input coefficient values.
19
スクリプト.indd 19 2017/06/12 17:18:30
• To solve 2[2 + [ − 3 = 0, for example, press (Polynomial) in
step 2. Use the Coefficient Editor that appears to input
213.
• Pressing will clear all of the coefficients to zero.
4. After all the values are the way you want, press .
• This will display a solution. Each press of will display another
solution. Pressing while the final solution is displayed will return to
the Coefficient Editor.
• A message appears to let you know when there is no solution or when
there are infinite solutions. Pressing or will return to the
Coefficient Editor.
• You can assign the currently displayed solution to a variable. While
the solution is displayed, press and then the key that
corresponds to the name of the variable to which you want to assign
it.
• To return to the Coefficient Editor while any solution is displayed,
press .
To change the current equation type setting: Press (Simul
Equation) or (Polynomial), and then press , , or . Changing
the equation type causes the values of all Coefficient Editor coefficients to
change to zero.
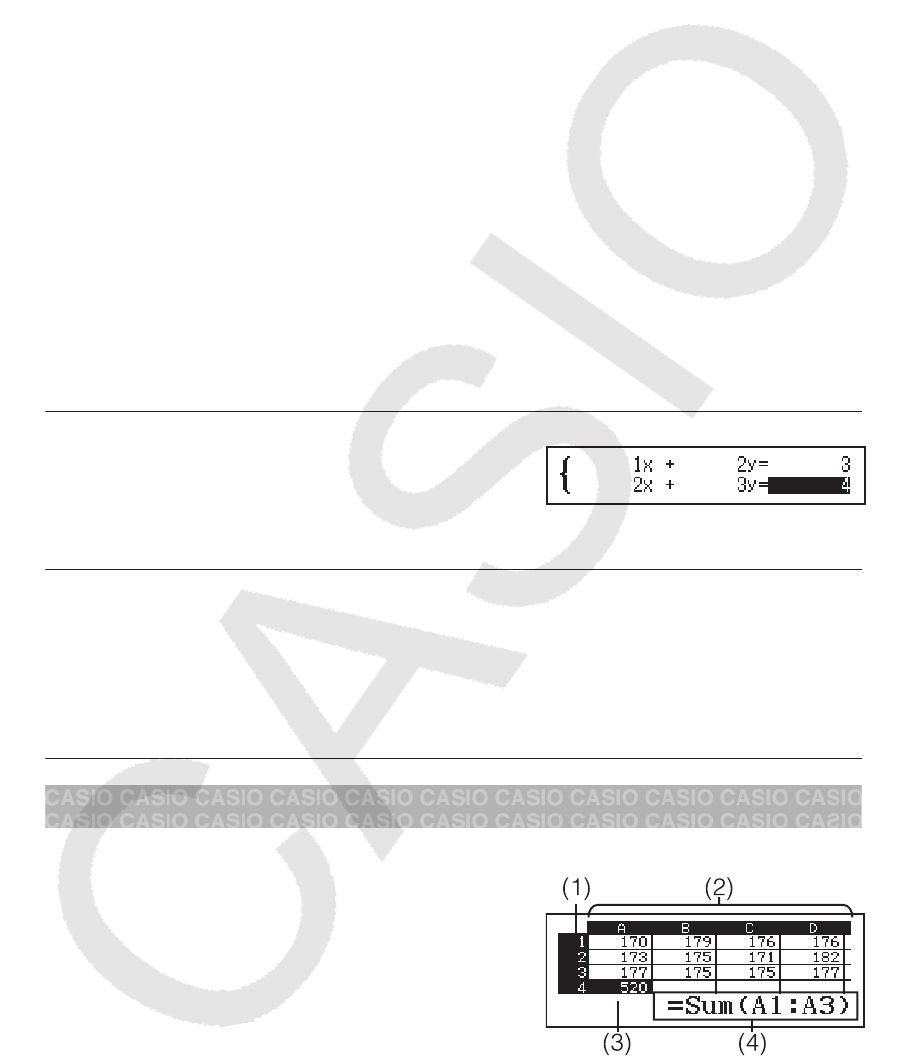
Equation Mode Calculation Examples
[ + 2\ = 3, 2[ + 3\ = 4
(Simul Equation)
123234
[
\
Ǧͳ
ʹ
[2 + 2[ + 2 = 0
(SETUP)(Complex)(DEL)
(SETUP)(Equation)(On)
(Polynomial)
122
[
[
Ǧͳ
Ǧͳെ
Using Spreadsheet
To perform the operations in this section, first enter the Spreadsheet Mode.
The Spreadsheet Mode makes it possible to
perform calculations using a 45-row × 5-
column (cell A1 to E45) spreadsheet.
(1) Row numbers (1 to 45)
(2) Column letters (A to E)
(3) Cell cursor: Indicates the currently
selected cell.
(4) Edit box: Shows the contents of the cell
where the cell cursor is currently located.
Important: Any time you exit the Spreadsheet Mode, turn off the calculator
or press the key, every input into the spreadsheet is cleared.
Inputting and Editing Cell Contents
You can input a constant or a formula into each cell.
20
スクリプト.indd 20 2017/06/12 17:18:30
Constants: A constant is something whose value is fixed as soon as you
finalize its input. A constant can be either a numeric value, or a calculation
formula (such as 7+3, sin30, A1×2, etc.) that does not have an equal sign
(=) in front of it.
Formula: A formula that starts out with an equal sign (=), such as =A1×2, is
executed as it is written.
Note: Inputting a constant into a cell will take up 10 bytes of memory,
regardless of the number of characters input. In the case of a formula, you
can input up to 49 bytes into each cell. Inputting a formula into a cell
requires 11 bytes in addition to the number of bytes for the actual formula
data.
To display the remaining input capacity: Press (Free Space).
To input a constant and/or formula into a cell
Ex 1: Into cells A1, A2, and A3, input constants 7×5, 7×6, and A2+7
respectively. And then, input the following formula into cell B1: =A1+7.
1. Move the cell cursor to cell A1.
2. Perform the key operation below.
7576(A)7
3. Move the cell cursor to cell B1, and then perform the key operation
below.
(=)(A)7
Note: You can specify whether a formula in the edit box should be
displayed as it is or as its calculation result value.
To edit existing cell data
1. Move the cell cursor to the cell whose contents you want to edit, and
then press (Edit Cell).
• Cell contents in the edit box will change from align right to align left. A
text cursor will appear in the edit box so you can edit its contents.
2. Use and to move the cursor around the contents of the cell, and
edit them as required.
3. To finalize and apply your edits, press .
To input a cell reference name using the Grab command
The Grab command can be used in place of manual reference name (such
as A1) input using a key operation to select and input a cell you want to
reference.
Ex 2: Continuing from Ex 1, input the following formula into cell B2: =A2+7.
1. Move the cell cursor to cell B2.
2. Perform the key operation below.
(=)(Grab)
7
Cell Relative and Absolute References
There are two types of cell reference: relative and absolute.
Relative cell reference: The cell reference (A1) in a formula like =A1+7 is a
relative reference, which means that it changes depending on the cell
21
スクリプト.indd 21 2017/06/12 17:18:30

where the formula is located. If the formula =A1+7 is originally located in
cell B1, for example, copying and then pasting to cell C3 will result in
=B3+7 being input into cell C3. Since the copy and paste operation moves
the formula one column (B to C) and two rows (1 to 3) causes the A1
relative cell reference in the formula to change to B3. If the result of a copy
and paste operation causes a relative cell reference name to change to
something that is outside the range of the spreadsheet cells, the applicable
column letter and/or row number will be replaced by a question mark (?),
and “ERROR” will be displayed as the cell’s data.
Absolute cell reference: If you want the row or the column, or both the row
and the column parts of a cell reference name to remain the same no matter
where you paste them, you need to create an absolute cell reference name.
To create an absolute cell reference put a dollar sign () in front of the
column name and/or row number. You can use one of three different
absolute cell references: absolute column with relative row (A1), relative
column with absolute row (A1), or absolute row and column (A1).
To input the absolute cell reference symbol (
)
While inputting a formula into a cell, press ().
To cut and paste spreadsheet data
1. Move the cursor to the cell whose data you want to cut and then press
(Cut & Paste).
• This enters paste standby. To cancel paste standby, press .
2. Move the cursor to the cell into which you want to paste the data you
just cut, and then press .
• Pasting data simultaneously deletes the data from the cell where you
performed the cut operation, and automatically cancels paste
standby.
Note: In the case of a cut and paste operation, cell references do not
change when pasted, regardless of whether they are relative or absolute.
To copy and paste spreadsheet data
1. Move the cursor to the cell whose data you want to copy and then press
(Copy & Paste).
• This enters paste standby. To cancel paste standby, press .
2. Move the cursor to the cell into which you want to paste the data you
just copied, and then press .
• Paste standby remains enabled until you press , so you can paste
the copied data to other cells, if you want.
Note: When you copy the contents of a cell that contains a formula with a
relative reference, the relative reference will change in accordance with the
location of the cell where the contents are pasted.
To delete input data from a specic cell
Move the cell cursor to the cell whose contents you want to delete and then
press .
To delete the contents of all the cells in a spreadsheet
Press (Delete All).
Using Variables (A, B, C, D, E, F, M, [, \)
You can use to assign the value of a cell to a variable. You can also use
(RECALL) to input the value assigned to a variable into a cell.
22
スクリプト.indd 22 2017/06/12 17:18:30
Using Spreadsheet Mode Special Commands
In the Spreadsheet Mode, the commands below can be used inside
formulas or constants. These command are on the menu that appears when
you press .
Min( Returns the minimum of the values in a specified range of cells.
Syntax: Min(start cell:end cell)
Max( Returns the maximum of the values in a specified range of cells.
Syntax: Max(start cell:end cell)
Mean( Returns the mean of the values in a specified range of cells.
Syntax: Mean(start cell:end cell)
Sum( Returns the sum of the values in a specified range of cells.
Syntax: Sum(start cell:end cell)
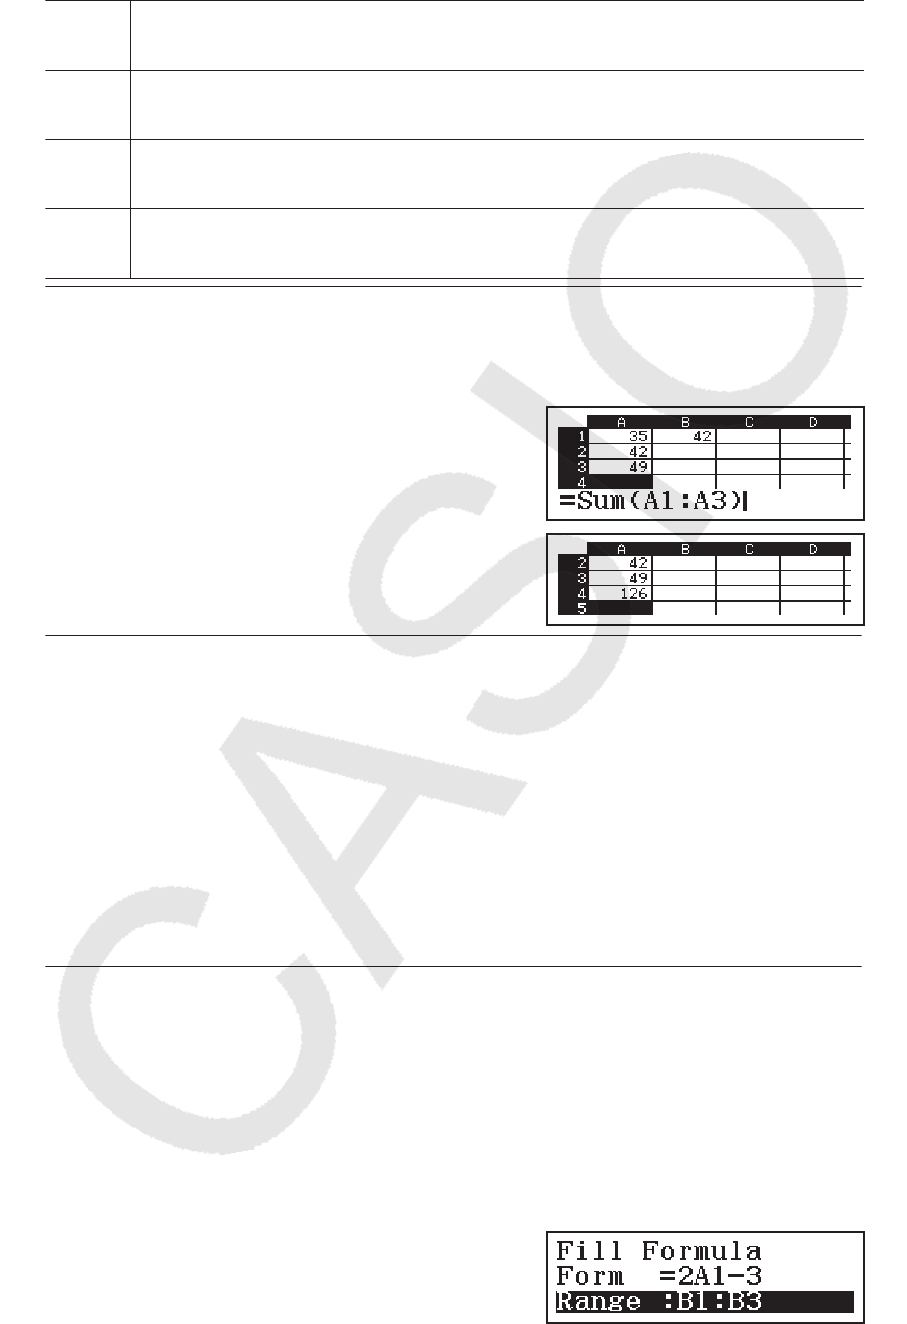
Ex 3: Continuing from Ex 1, input the formula =Sum(A1:A3), which
calculates the sum of cells A1, A2, and A3, into cell A4.
1. Move the cell cursor to cell A4.
2. Input =Sum(A1:A3).
(=);Sum)
(A)(:)(A)
3. Press .
Batch Inputting the Same Formula or Constant into
Multiple Cells
You can use the procedures in this section to input the same formula or
constant into a specific series of cells. Use the Fill Formula command to
batch input a formula, or Fill Value to batch input a constant.
Note: If the input formula or constant includes a relative reference, the
relative reference will be input in accordance with the upper left cell of the
specified range. If the input formula or constant includes an absolute
reference, the absolute reference will be input into all of the cells in the
specified range.
To batch input the same formula into a series of cells
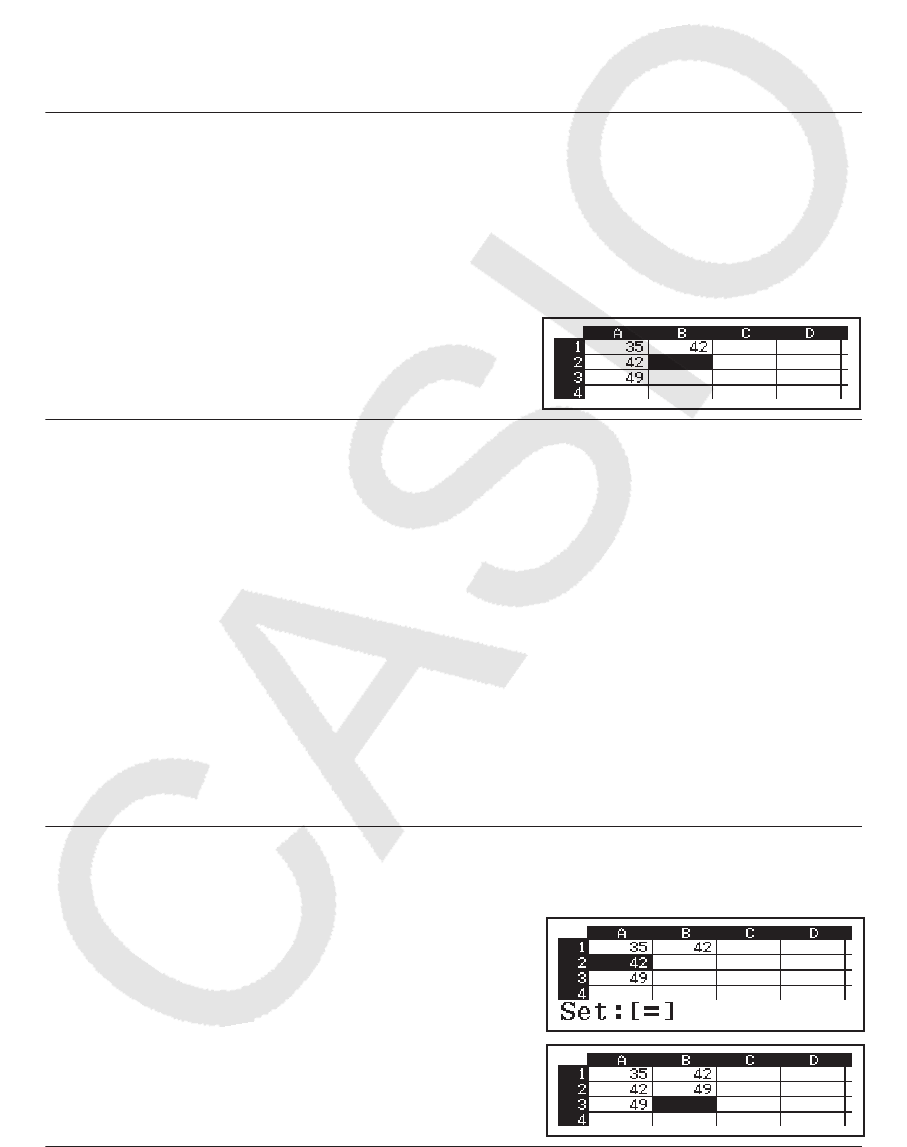
Ex 4: Continuing from Ex 1, batch input into cells B1, B2, and B3 a formula
that doubles the value of the cell to the left and then subtracts 3.
1. Move the cell cursor to cell B1.
2. Press (Fill Formula).
• This displays a Fill Formula dialog box.
3. In the “Form” row, input the formula “=2A1–3”: 2(A)3.
• Input of the equals symbol (=) at the beginning is not required.
4. Move the highlighting to the “Range” line and specify B1:B3 as the
range of the batch input.
23
スクリプト.indd 23 2017/06/12 17:18:30
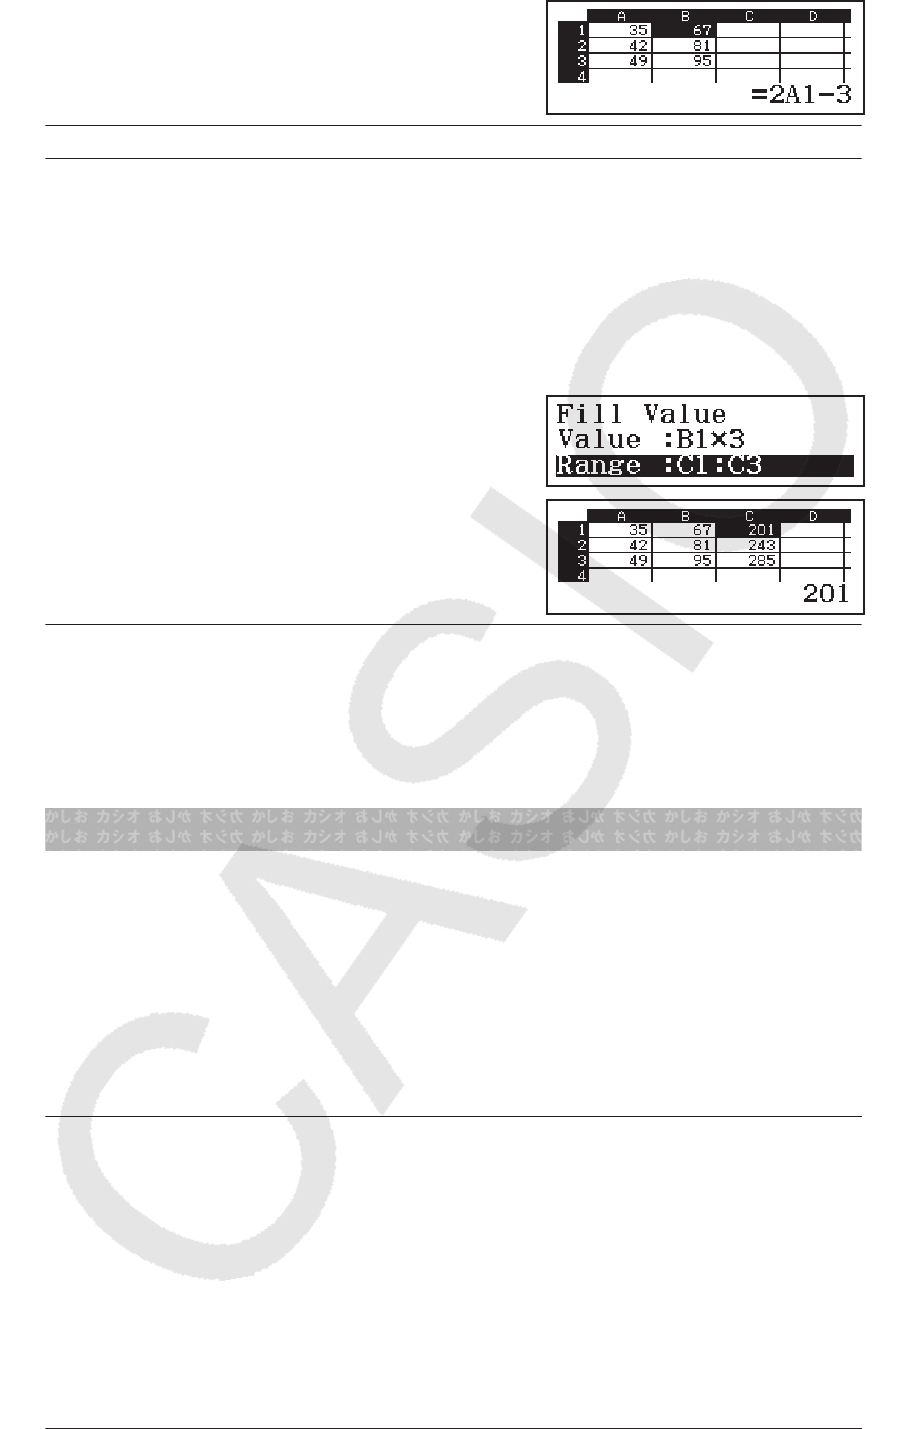
5. To apply the input, press .
• This inputs =2A1–3 into cell B1,
=2A2–3 into cell B2, and =2A3–3
into cell B3.
To batch input the same constant into a series of cells
Ex 5: Continuing from Ex 4, batch input into cells C1, C2, and C3 the values
that are triple those of the cells to the left.
1. Move the cell cursor to cell C1.
2. Press (Fill Value).
• This displays a Fill Value dialog box.
3. In the “Value” line, input the constant B1×3: (B)3.
4. Move the highlighting to the “Range” line and specify C1:C3 as the
range of the batch input.
5. To apply the input, press .
• This inputs the values of each
calculation result into cells C1, C2,
and C3.
Recalculation
Auto Calc is a setup item. Depending on the content of the spreadsheet,
auto recalculation can take a long time to complete. When Auto Calc is
disabled (Off), you need to execute recalculation manually as required.
To perform recalculation manually: Press (Recalculate).
Errors
The calculator will display an error message whenever an error occurs for
any reason during a calculation. While an error message is displayed, press
or to return to the calculation screen. The cursor will be positioned
at the location where the error occurred, ready for input.
To clear the error message: While an error message is displayed, press
to return to the calculation screen. Note that this also clears the
calculation that contained the error.
Error Messages
Math ERROR
• The intermediate or final result of the calculation you are performing
exceeds the allowable calculation range.
• Your input exceeds the allowable input range (particularly when using
functions).
• The calculation you are performing contains an illegal mathematical
operation (such as division by zero).
ĺCheck the input values, reduce the number of digits, and try again.
ĺWhen using independent memory or a variable as the argument of a
function, make sure that the memory or variable value is within the
allowable range for the function.
Stack ERROR
• The calculation you are performing has caused the capacity of the
numeric stack or the command stack to be exceeded.
24
スクリプト.indd 24 2017/06/12 17:18:30

• The calculation you are performing has caused the capacity of the matrix
or vector stack to be exceeded.
ĺSimplify the calculation expression so it does not exceed the capacity
of the stack.
ĺTry splitting the calculation into two or more parts.
Syntax ERROR
• There is a problem with the format of the calculation you are performing.
Argument ERROR
• There is a problem with the argument of the calculation you are
performing.
Range ERROR
• During batch input in the Spreadsheet Mode, input for Range is outside
the allowable range or is a cell name that does not exist.
ĺFor Range, input a cell name within the range of A1 through E45, using
the syntax: “A1:A1”.
Circular ERROR (Spreadsheet Mode only)
• There is a circular reference (such as “=A1” in cell A1) in the
spreadsheet.
ĺChange cell contents to remove the circular references.
Memory ERROR (Spreadsheet Mode only)
• You are attempting to input data that exceeds the allowable input
capacity (1700 bytes).
• You are attempting to input data that results in a chain of consecutive cell
references (such as cell A2 referenced from cell A1, cell A3 referenced
from cell A2…, etc.) This type of input always causes this error to be
generated, even if memory capacity (1700 bytes) is not exceeded.
• Memory capacity was exceeded because a formula that includes a
relative cell reference was copied, or because of batch input of formulas
that use relative cell references.
ĺDelete unneeded data and input data again.
ĺMinimize input that results in a chain of consecutive cell references.
ĺShorten the formula being copied or the formulas being batch input.
Before Assuming Malfunction of the
Calculator...
Note that you should make separate copies of important data before
performing these steps.
1. Check the calculation expression to make sure that it does not contain
any errors.
2. Make sure that you are using the correct mode for the type of
calculation you are trying to perform.
3. If the above steps do not correct your problem, press the key.
• This will cause the calculator to perform a routine that checks
whether calculation functions are operating correctly. If the calculator
discovers any abnormality, it automatically initializes the calculation
mode and clears memory contents.
4. Return the calculation mode and setup (except for the Contrast setting)
to their initial default settings by performing the following operation:
(RESET)(Setup Data)(Yes).
25
スクリプト.indd 25 2017/06/12 17:18:30

Replacing the Battery
A low battery is indicated by a dim display, even if contrast is adjusted, or
by failure of figures to appear on the display immediately after you turn on
the calculator. If this happens, replace the battery with a new one.
Important: Removing the battery will cause all of the calculator’s memory
contents to be deleted.
1. Press (OFF) to turn off the calculator.
• To ensure that you do not accidentally turn on
power while replacing the battery, slide the
hard case onto the front of the calculator.
2. On the back of the calculator, remove the screws
and the cover.
3. Remove the battery, and then load a new battery
with its plus (+) and minus (−) ends facing
correctly.
4. Replace the cover.
5. Initialize the calculator:
(RESET)(Initialize All)(Yes).
• Do not skip the above step!
Technical Information
Calculation Range and Precision
Calculation Range ±1 × 10-99 to ±9.999999999 × 1099 or 0
Number of Digits for
Internal Calculation 15 digits
Precision
In general, ±1 at the 10th digit for a single
calculation. Precision for exponential display is
±1 at the least significant digit. Errors are
cumulative in the case of consecutive
calculations.
Function Calculation Input Ranges and Precision
Functions Input Range
sin[
cos[
Degree 0 ԛ |[| < 9 × 10⁹
Radian 0 ԛ |[| < 157079632.7
Gradian 0 ԛ |[| < 1 × 10¹⁰
tan[
Degree Same as sin[, except when |[| = (2Q−1) × 90.
Radian Same as sin[, except when |[| = (2Q−1) ×
ʌ/2.
Gradian Same as sin[, except when |[| = (2Q−1) ×
100.
sin-1[, cos-1[0 ԛ |[| ԛ 1
tan-1[0 ԛ |[| ԛ 9.999999999 × 1099
26
スクリプト.indd 26 2017/06/12 17:18:30
sinh[, cosh[0 ԛ |[| ԛ 230.2585092
sinh-1[0 ԛ |[| ԛ 4.999999999 × 1099
cosh-1[1 ԛ [ ԛ 4.999999999 × 1099
tanh[0 ԛ |[| ԛ 9.999999999 × 1099
tanh-1[0 ԛ |[| ԛ 9.999999999 × 10⁻¹
log[, ln[0 < [ ԛ 9.999999999 × 1099
10[-9.999999999 × 1099 ԛ [ ԛ 99.99999999
H[-9.999999999 × 1099 ԛ [ ԛ 230.2585092
ݔ0 ԛ [ < 1 × 10100
[2|[| < 1 × 1050
[-1 |[| < 1 × 10100 ; [ ≠ 0
ݔ
͵|[| < 1 × 10100
[!0 ԛ [ ԛ 69 ([ is an integer)
QPU0 ԛ Q < 1 × 10¹⁰, 0 ԛ U ԛ Q (Q, U are integers)
1 ԛ {Q!/(Q−U)!} < 1 × 10100
QCU0 ԛ Q < 1 × 10¹⁰, 0 ԛ U ԛ Q (Q, U are integers)
1 ԛ Q!/U! < 1 × 10100 or 1 ԛ Q!/(Q−U)! < 1 × 10100
Pol([, \)|[|, |\| ԛ 9.999999999 × 1099
ݔʹݕ
ʹ ԛ 9.999999999 × 1099
Rec(U, ș)0 ԛ U ԛ 9.999999999 × 1099
ș: Same as sin[
°’ ”
|D|, E, F < 1 × 10100 ; 0 ԛ E, F
The display seconds value is subject to an error of ±1 at
the second decimal place.
ιǯdz
|[| < 1 × 10100
Decimal ļ Sexagesimal Conversions
0°0’0” ԛ |[| ԛ 9999999°59’59”
[\
[ > 0: -1 × 10100 < \log[ < 100
[ = 0: \ > 0
[ < 0: \ = Q, ݉
ʹ݊ͳ (P, Q are integers)
However: -1 × 10100 < \log |[| < 100
ݕ
ݔ
\ > 0: [ ≠ 0, -1 × 10100 < 1/[ log\ < 100
\ = 0: [ > 0
\ < 0: [ = 2Q+1, ʹ݊ͳ
݉ (P ≠ 0; P, Q are integers)
However: -1 × 10100 < 1/[ log |\| < 100
27
スクリプト.indd 27 2017/06/12 17:18:30

DEF
Total of integer, numerator, and denominator must be 10
digits or less (including separator symbol).
RanInt#(D, E)D < E; |D|, |E| < 1 × 10¹⁰; E − D < 1 × 10¹⁰
• Precision is basically the same as that described under “Calculation
Range and Precision”, above.
•[\, ݕ
ݔ,
͵, [!, QPU, QCU type functions require consecutive internal
calculation, which can cause accumulation of errors that occur with each
calculation.
• Error is cumulative and tends to be large in the vicinity of a function’s
singular point and inflection point.
Specications
Power Requirements: AAA-size battery R03 (UM-4) × 1
Approximate Battery Life:
2 years (based on one hour of operation per day)
Power Consumption: 0.0006 W
Operating Temperature: 0°C to 40°C (32°F to 104°F)
Dimensions: 13.8 (H) × 77 (W) × 165.5 (D) mm
1/2” (H) × 3” (W) × 61/2” (D)
Approximate Weight: 100 g (3.5 oz) including the battery
ŶŶ Frequently Asked Questions ŶŶ
How can I change a fraction form result produced by a division
operation to decimal form?
ĺWhile a fraction calculation result is displayed, press . To have
calculation results initially appear as decimal values, change the setup
menu Input/Output setting to MathI/DecimalO.
What is the difference between Ans memory, independent memory, and
variable memory?
ĺEach of these types of memory acts like “containers” for temporary
storage of a single value.
Ans Memory: Stores the result of the last calculation performed. Use
this memory to carry the result of one calculation on to the next.
Independent Memory: Use this memory to totalize the results of
multiple calculations.
Variables: This memory is helpful when you need to uses the same
value multiple times in one or more calculations.
What is the key operation to take me from the Statistics Mode to a
mode where I can perform arithmetic calculations?
ĺPress (Calculate).
How can I return the calculator to its initial default settings?
ĺPerform the following operation to initialize calculator settings (except
the Contrast setting): (RESET)(Setup Data)(Yes).
When I execute a function calculation, why do I get a calculation result
that is completely different from older CASIO calculator models?
ĺWith a Natural Textbook Display model, the argument of a function that
uses parentheses must be followed by a closing parenthesis. Failing to
press after the argument to close the parentheses may cause
unwanted values or expressions to be included as part of the
argument.
Example: (sin 30) + 15 (Angle Unit: Degree)
28
スクリプト.indd 28 2017/06/12 17:18:31

Older (S-V.P.A.M.) Model: 3015ͳͷǤͷ
Natural Textbook Display Model:
(LineI/LineO) 3015 ͳͷǤͷ
Failure to press here as shown below will result in calculation of sin
45.
3015ͲǤͲͳͲͺͳʹ
29
スクリプト.indd 29 2017/06/12 17:18:31

Manufacturer:
CASIO COMPUTER CO., LTD.
6-2, Hon-machi 1-chome
Shibuya-ku, Tokyo 151-8543, Japan
Responsible within the European Union:
Casio Europe GmbH
Casio-Platz 1
22848 Norderstedt, Germany
www.casio-europe.com
© 2018 CASIO COMPUTER CO., LTD.
Printed in ThailandSA1706-A
スクリプト.indd 1 2017/05/16 14:58:45
