Centrica Hive MH11 Mini Hub V2 User Manual Jupiter User Guides
AlertMe.com Ltd Mini Hub V2 Jupiter User Guides
Contents
user guide
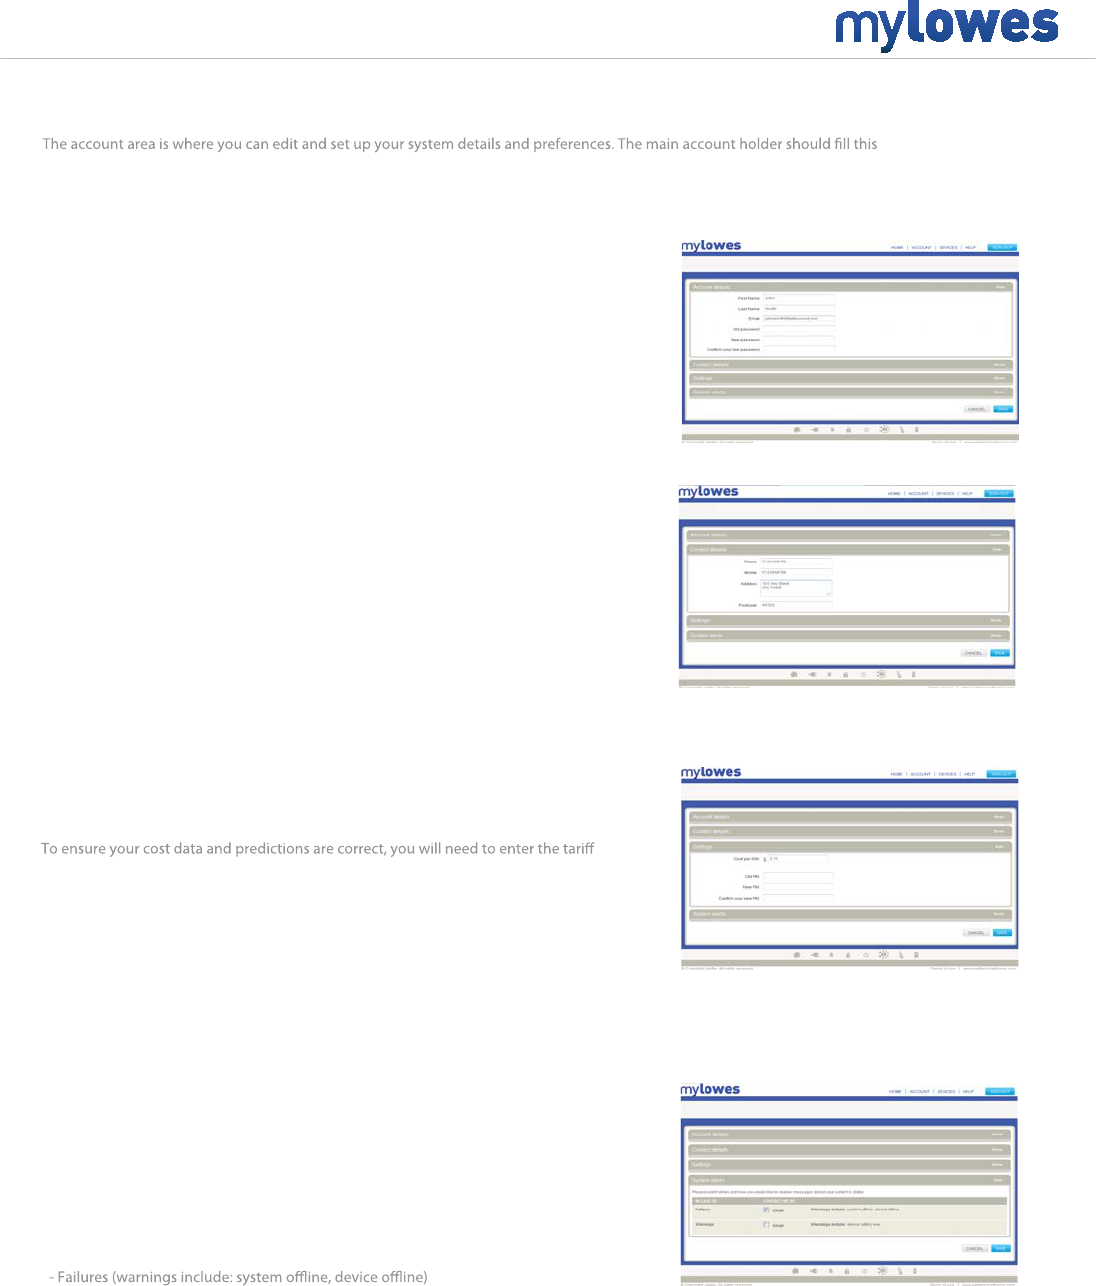
Account
+
Account details
Enter the account holder name here, as well as the prefered contact email address
of the main account holder. This will be the default email address for this account.
You can also change your password here - you will need to enter the previous
password in order to do this.
If you have forgotten your password, go to www.jupitersmarthome.com where you will
see a ‘forgotten password’ link - follow this for further instructions.
Contact details
In this section the default contact telephone and SMS numbers can be entered. These
are the contact numbers that will be used for your alerts to yourself from the system.
Your address can also be added in here. This includes your zip code which is used by
the system to report local weather forecasts in the temperature widget.
If this is left blank, your system will not report any external weather or temperature.
Settings
Set your system time zone here. The system will use this for all timings on the system,
meaning you can accurately see what is happening both in real time, and historically.
amount that you pay for your electricity. This can be found on your paper or online bill,
or by contacting your supplier.
The PIN will be required to control your system via SMS and email, so should be a number
that is easily remembered and known only to you. It is not a good idea to use the same
PIN as your bank card.
System Alerts
The system alerts can be used to keep you informed of the health of your system. For
example; if a battery runs out the relevant device will go missing and will no longer be
active on your system.
If selected, you will be sent an alert when this is running low, meaning you can change
the battery before it dies.
You can set up alerts for the following:
- Warnings (warnings include: device battery low)
Account overview
out upon installation.
Account
+
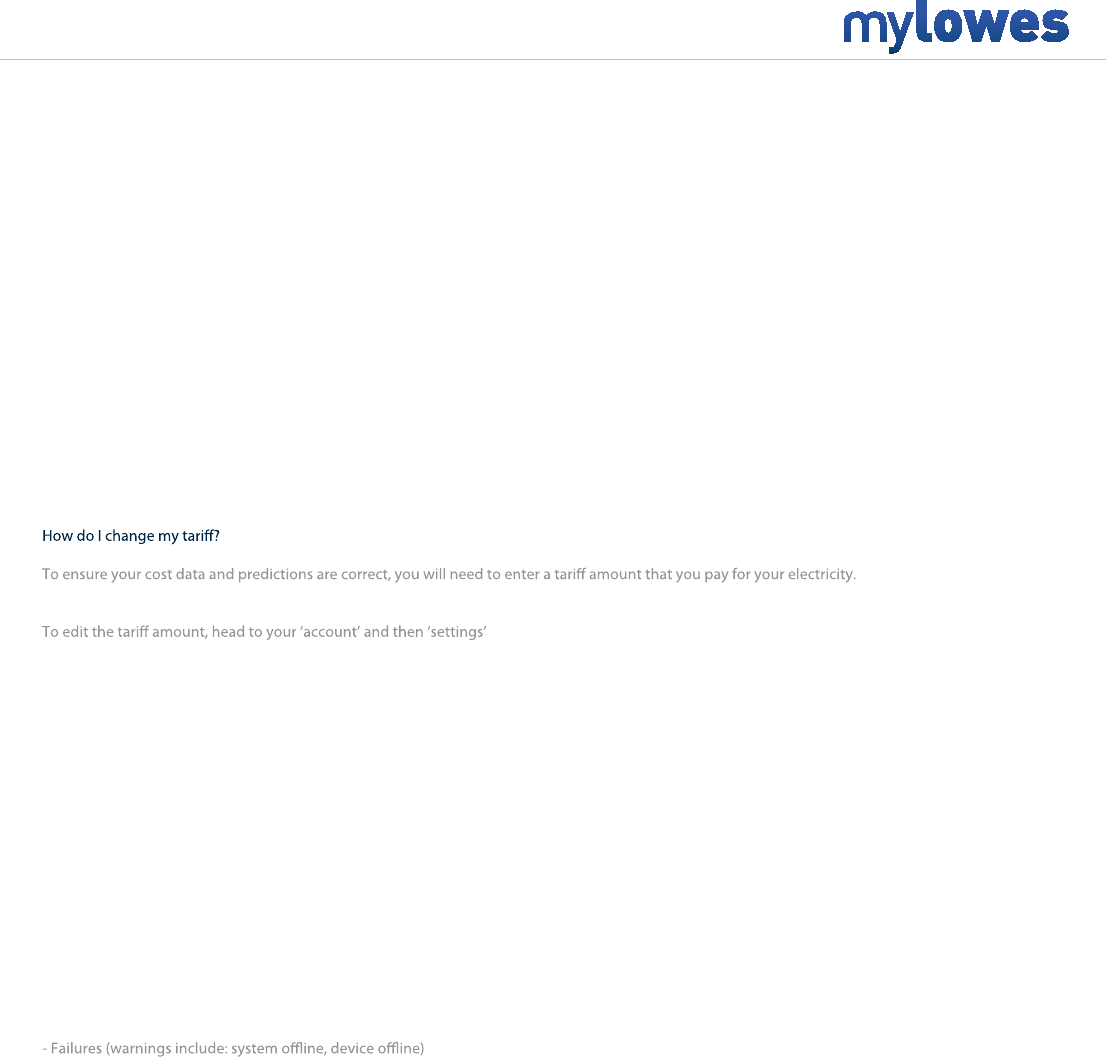
Where can I change my password?
Head to ‘account’ and then ‘account details’.
You will need to enter the previous password in order to do this. If you have forgotten your password please refer to the ‘forgotten password’ question
below.
I have forgotten my password, what do I do?
If you have forgotten your password, log out or go to www.jupitersmarthome.com where you will see a ‘forgotten password’ link - follow this for further
instructions.
How do I edit my contact details?
Head to ‘account’ where you can then edit these in the following ways:
Account details - in this section you can enter the prefered contact email address of the main account holder. This will be the default email address for
this account.
Contact details - in this section the default contact telephone and SMS numbers can be entered. These are the contact numbers that will be used for
alerts to yourself from the system.
This can be found on your
paper or online bill, or by contacting your supplier.
How do I change my PIN?
Please head to your ‘account’ and then ‘settings’. Here you can edit your PIN. This will be required to control your system via SMS and email, so should
be a number that is easily remembered and known only to you.
It is not a good idea to use the same PIN as your bank card.
How do I edit my zip code?
Head to ‘account’ and then ‘contact details’.
Your zip code can be added or edited in here - this is used by the system to gather local weather forecasts and temperature in the temperature widget.
If this is left blank, your system will not report any external weather forecast or temperature readings.
What are the system alerts and how do I edit them?
Head to ‘account’ and then ‘system alerts’.
Here you can select which of the below alerts are active on your system.
- Warnings (warnings include: device battery low)
Intruder Alarm
The alarm can be controlled on your website by dragging the slider to the required mode. Please note that it is not possible to
to away mode, or vice versa, you must rst go into mode.
The alarm can be set using a SmartKeyfob . Press the away button (the button with the stickman outside the house) once to set the alarm to
away mode. Hold down the away button for three seconds to set the alarm to night mode. Press the home button (stickman inside the house) once
to set the alarm to home mode or cancel an activated alarm.
You can also control your alarm using SMS or email. Send an SMS to +44 78-6001-5215 or 010-4478-6001-5215 and type your command followed
by your PIN, or email remote@jupitersmarthome.com with the command and your PIN in the subject line. For a list of commands you can use, please
check the remote control help guide.
Should you attempt to arm the system while a SmartContact sensor is open, the system will display a warning. You may still arm the system - however
the indicated sensor will need to close and then open before it will trigger the alarm.
go directly from night
When the intruder alarm is activated, the alarm widget
which sensor triggered the alarm and at what time this
happened. The hub will now be playing an alarm, warning
any intruder that the alarm has been activated and the
+
Alarm overview
Clicking the intruder alarm widget navigates to an overview of the alarm system.This view
shows the current alarm mode as well as which sensors on your system are in use and
currently active with the intruder, panic and emergency alarms.
You will also be able to see whether any SmartContact sensors are currently opened or closed.
Changing the alarm mode
Devices
This section allows you to decide which devices are to be active for away and night mode on
your intruder alarm system, emergency alarm and also your panic button.
Simply tick and untick the devices where required.
Ensure you select ‘submit’ when you are happy with any changes you make - alternatively
select ‘reset’ to return these settings to default set up.
Settings
You can decide on timings on your alarm, so for example allowing yourself more time to leave
the house after arming, or reducing the time between sensors being triggered and the alarm
sounding.
You can also decide on how many sensors it will take for the alarm to be triggered in away
or night mode.
This feature gives you more control when setting up your intruder alarm, giving
you the option to decide when you want to be alerted if there is aproblem in your home.
If you choose two devices to be triggered, the system will go into a state of alert for 5 minutes
and you will receive an alert if a second device is triggered within this time. This will inform you
that there is an issue that really should be investigated.
You may wish to disable sounds when arming the alarm or for when it is triggered; once again
these options can be changed here for away and night mode.
The nal settings option is to auto reset your alarm. If the alarm is activated it will sound for 15
minutes before turning itself o. Here you can select whether the alarm should auto-reset, and
if so, for how long.
To cancel the alarm either select ‘cancel alarm’ on the
widget, click the home button on your SmartKeyfob
or send a command via SMS or email.
Away and Night mode
Having the away and night mode allows you to customise your alarm depending on how much coverage is required.
For example, you may wish to have all your SmartMotion sensors and SmartContact sensors active on away mode, but only the SmartContact sensors
at night, meaning you can move around while at home, but still keeping your home secure.
Alarm
+
I have lost one of my SmartKeyfobs, what do I do?
First of all, head to ‘devices’ on your website where you will see all the devices currently linked to your system. Check to see if the SmartKeyfob you have
lost is still showing signal range – if it is and it’s been more than 10 minutes since you lost it, then the SmartKeyfob is still within or close to your property.
If there is no signal showing and you are sure you have lost it, then to prevent someone else using it to disarm your alarm – simply head to the ‘manage’
option for that SmartKeyfob within the devices section. This will open up a new window which gives you the option to ‘remove device’ . Select this and
the device will no longer appear on your system, and more importantly will no longer be able to control the alarm.
Why can't I arm or disarm my alarm?
One of the requirements of the intruder alarm service is to have a working SmartKeyfob. You cannot use this without a SmartKeyfob installed, so you will
need to add one of these to the system.
You will also need a device installed that can trigger the alarm, these must be set up in the active mode in the ‘alarm conguration’ and then ‘devices’
area for the relevant alarm mode.
Why will my device not trigger the alarm?
First of all, head to the devices section on your website where you will see all the devices currently linked to your system. Check the relevant device is
present on the system, and has a good battery life showing.
Secondly, please check that the device is set up in the active devices for the required mode. You can do this by going to the ’
where you can choose which sensors are active within which modes.
How do I rename a SmartKeyfob?
Go to the ‘devices’ section on your website where you will see all the devices currently linked to your system – then select ‘manage’ for the relevant
device. This will open up a pop up box where you can edit the name of that SmartKeyfob.
How do I set the SmartHub to silent?
You can sert the SmartHub to be silent both when the system is arming or disarming, or when the alarm has been triggered. and ‘play sounds when
triggered’.
These can be edited for away as well as night mode.
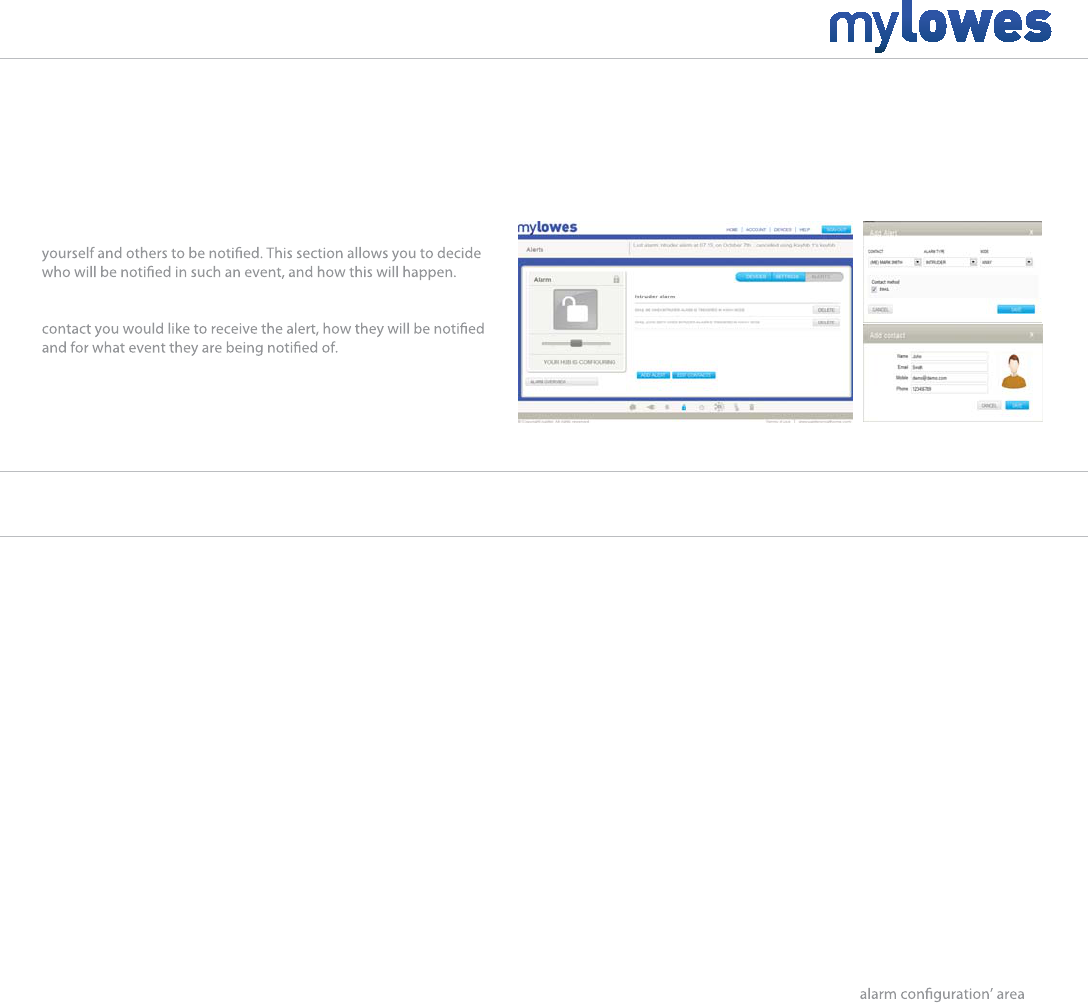
Alerts
Should the alarm be triggered and not be cancelled, the alarm will sound for 15 minutes. In here you can set the alarm to reset again after this time for both
away and night mode.
Ensure you select ‘submit’ when you are happy with any changes you make - alternatively select‘reset’ to return these settings to default set up.
When an alarm on your system is activated you will most likely want
You can add new alerts within this screen too, by manually adding the
The option to edit, add or delete new contacts is also found here.
FAQs
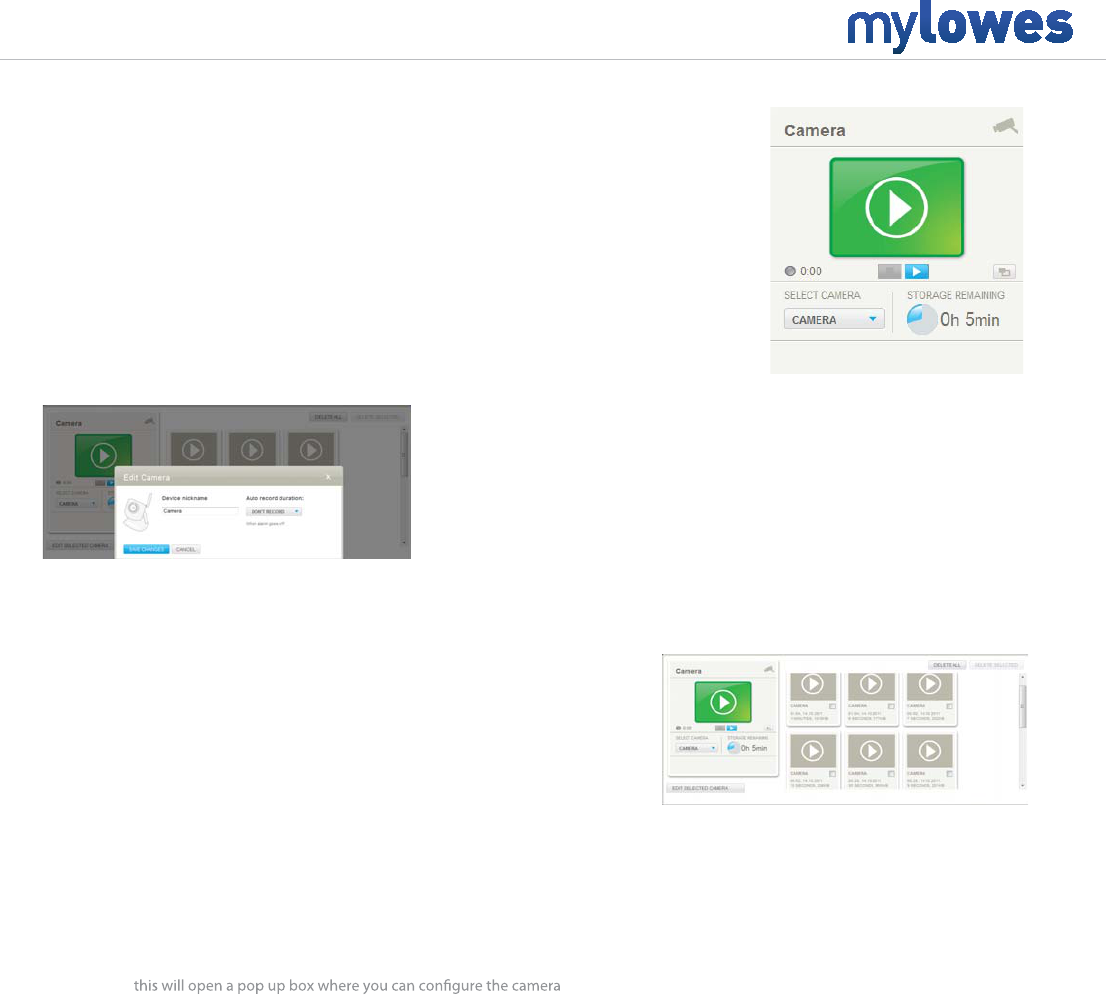
SmartCamera overview
The SmartCamera widget will allow you to view live footage from the dashboard. Click the play button on the
widget to view your camera feed in real time, or increase the video size by selecting the enlarge icon to
the bottom right of the video screen.
If you have more than one SmartCamera on your system, the drop down allows you to select which
SmartCamera to view.
The widget will also inform you of the remaining space on the selected SmartCamera, telling you how much
recording time you have remaining.
Viewing your recordings
Past recordings are available in the dashboard; click to view them. You may also delete
recordings that you no longer need here.
To auto delete past recordings when storage capacity is reached, head to ‘account’ and
then ‘settings’.
Tick the selection for ‘auto-delete the oldest camera recordings when the total space
used is above 250MB?’
SmartCamera
Setting your camera to record
As you watch a live stream it is also recorded. The widget will show a red light when this
is happening.
You can also set the SmartCamera to record automatically when the intruder alarm is
triggered - this can be set to various time amounts or not turned on at all.
Within your SmartCamera widget there is a link to ‘edit selected camera’ - in here you can
set-up automatic recording and change the SmartCamera name.
Setting your camera to wireless
To make your SmartCamera work wirelessly, it must be installed and connected to a spare network port on the same router your hub is connected to,
using the cable supplied.
1. Head to ‘devices’ and you will now see your camera listed along with your other system devices. Select ‘manage’ next to the camera,
2. You will see the wireless network and security options; this allows you to set up the SmartCamera to be connected wirelessly.
3. You will see a wireless network drop down menu, this will show you all available wireless networks that your SmartCamera can see. Select
the appropriate option, which would be the same router your hub is connected to.
You will now need to enter the correct security type and password, which will be case sensitive.
4. Now remove the power and ethernet cable from your SmartCamera and then reinsert the power cable only.
5. Wait ve minutes and then go to your homepage. You now be able to view live and recorded footage on your SmartCamera widget.
If at any time you wish to reconnect the SmartCamera using an ethernet cable, you will need to reconnect it (once again to the same router the hub is
connected to) and then remove and reinsert the SmartCamera power cable.

SmartCamera
+
What is the storage capacity policy for cameras?
The SmartCamera is able to store 250MB of video footage, which amounts to just over 7 hours of footage.
How can I clear old video recordings that I no longer want?
You can select the recordings individually using the tick box on each one, then choosing to ‘delete selected’. You can also ‘delete all’ recordings at once.
To auto delete past recordings when storage capacity is reached, head to ‘account’ and then ‘settings’. Tick the selection for ‘auto-delete the oldest
camera recordings when the total space used is above 250MB?’
Do I need any software on my computer to view my SmartCamera?
For you to be able to view live and saved videos, you will need to have QuickTime installed on your computer. This is one of the most common free video
viewers and is normally pre-installed on most computers.
If you do not have QuickTime installed you will be prompted to download it. To download this please visit www.quicktime.com
If for some reason you are unable to view video, please check that you are running the latest QuickTime plugins - new versions are available quite often so
do check that there are no further plugins for you to download.
How do I set my SmartCamera up to record automatically?
You can also set the SmartCamera to record automatically when the intruder alarm is triggered - this can be for various time periods or not at all.
Within your SmartCamera widget there is a link to ‘edit selected camera’ - in here you can set up automatic recording, the time it will record for and
you can also edit the SmartCamera name.
Why is my SmartCamera not showing as available?
If the SmartCamera is showing as not available, then please do the following:
If the SmartCamera is connected via wireless connection, rst of all check that your SmartCamera is within range of your Wi-Fi network. Following this,
please restart your wireless router and unplug your camera. When the internet comes back, please plug the power cable back into your SmartCamera.
If the SmartCamera is connected via ethernet cable, remove the power cable and then restart your router. Once the internet is back, plug the power cable
back into your SmartCamera.
Either of these should cause the camera to show up as present within a few minutes.
Why is my SmartCamera showing as available but not letting me view any footage?
The small button above the lens is a privacy button, meaning no live footage can be seen or recorded. If this is illuminated green then it is on, press it
once to switch o.
For you to be able to view live and saved videos, you will need to have QuickTime installed on your computer. This is one of the most common free video
viewers and is normally pre-installed on most computers.
If you do not have QuickTime installed you will be prompted to download it. To download this please visit www.quicktime.com
If for some reason you are unable to view video, please check that you are running the latest QuickTime plugins - new versions are available quite often so
do check that there are no further plugins for you to download.
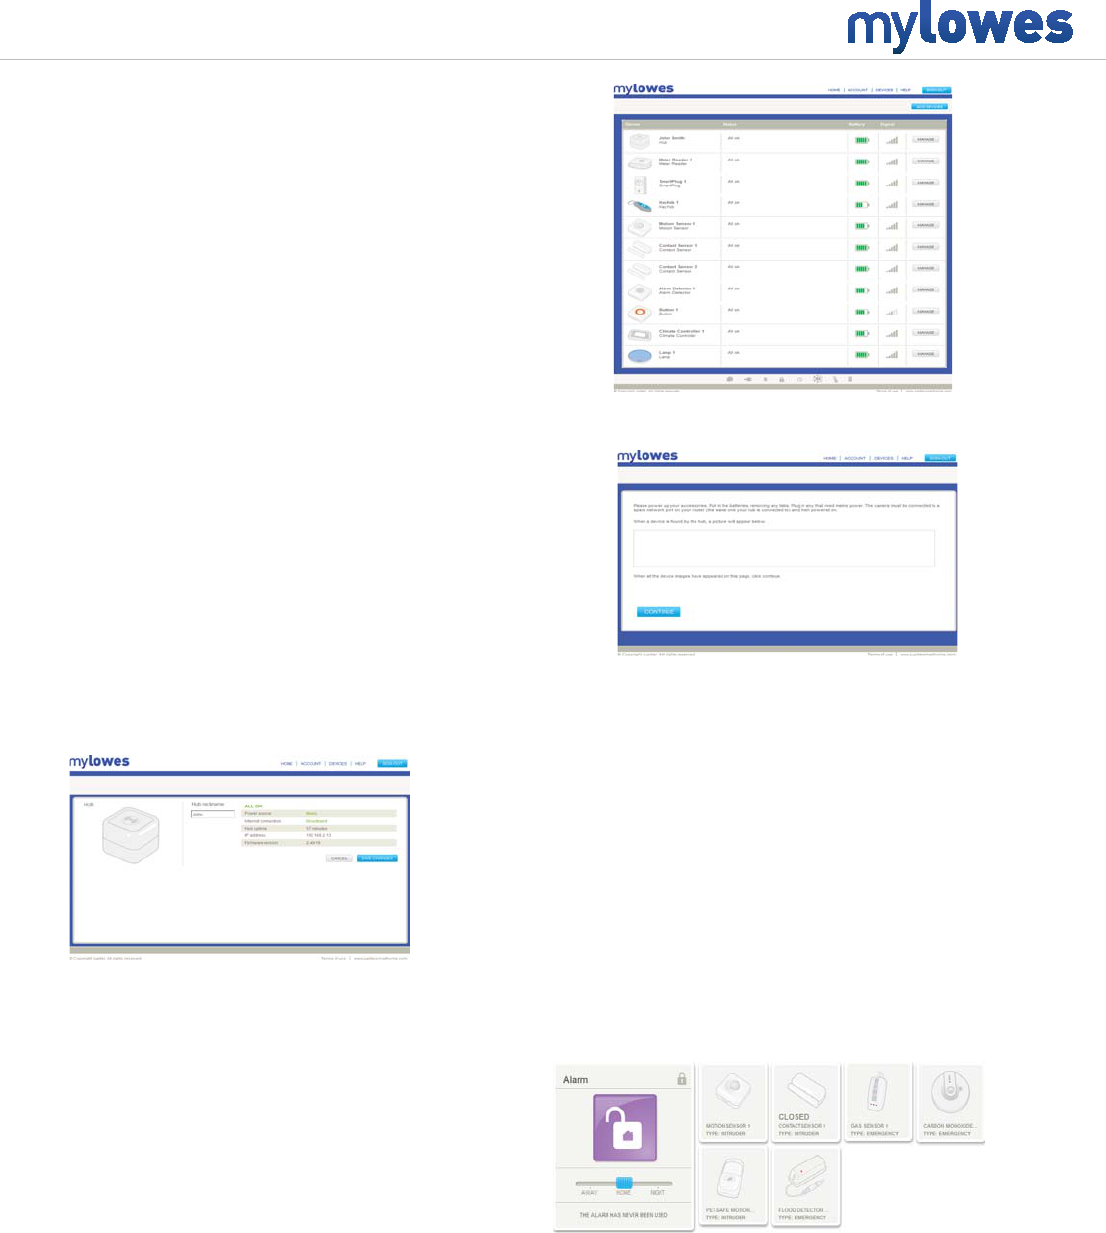
Devices overview
The devices overview allows you to see all the devices currently
installed on your system, and lets you see the status of these at
a glance.
You will see the following information for each device:
- device type
- device name
- current status
- battery level
- signal level
Adding new devices
Should you wish to add any devices to your system, these will need
to be powered up and then placed within 6 feet of the SmartHub.
Once done, please select ‘add devices’.
any new and available devices.
As these join the SmartHub, a picture of each device will pop up on screen.
When all the device icons have appeared, select ‘continue’.
SmartHub and device information
By selecting the ‘manage’ button next to any device a new window will appear,
giving you further information on that device.
For any device you will be able to edit the name and for SmartPlugs you can also
edit the device icon. You can also edit the behaviour of your SmartLamp in this screen.
When selected for the SmartHub, you will see information on its power and internet
connection, the SmartHub IP address and how long the SmartHub has been running.
Selecting the ‘manage’ option on a device will also cause that device to start ashing,
making it easier to identify which device you are viewing.
Door / Window status
To check if a specic SmartContact sensor is open or closed you’ll need
to leave the devices section and head to intruder alarm.
In here, you’ll see all the devices which are active on the alarm, including
SmartContact sensors. If you open and close a specic sensor, you’ll
see the status of the sensor change accordingly, to OPEN or CLOSED.
This can be useful when placing a SmartContact sensor, checking that it
shows as open and closed before you secure it into place with the sticky
pads.
Your SmartHub will now switch to search mode and start to look for
Devices
Devices
+
How do I add a new device?
Should you wish to add any devices to your system, these will need to be powered where necessary and placed within 3 yards of the SmartHub. Once
done head to your ‘devices’ section and then please select ‘add devices’.
Your SmartHub will now switch to search mode and will start to look for new and available devices. As these join the SmartHub, a picture of each device
will pop up on screen. When all the device icons have appeared, select ‘continue’.
How do I remove a device?
Within the devices section you will see all your installed devices listed. By selecting the ‘manage’ option next to each device you will open a new page
where you will see an option to remove the device. Select ‘remove device’ here and the device will disappear from your devices list and will no longer
be active on your system.
How do I rename a device?
Within the devices section you will see all your installed devices listed. By selecting the ‘manage’ option next to each device you will open a new page
where you have the option to change its name to suit its location or owner (SmartKeyfob).You can also rename the hub in this way and choose a new
icon for the SmartPlug to reect which appliance is plugged into it.
Where can I see further information about my SmartHub?
By selecting the ‘manage’ button next to any device; a new window will appear, giving you further information on that device.
The SmartHub pop up will give you information on its power and internet connection, the SmartHub IP address and rmware version and also how long
the SmartHub has been running.
How do I check the battery level of a device?
Within the devices section you will see all your installed devices listed. Next to each there is a battery level indicator which shows you the level of the
battery in that device. When this indicator shows only one red bar remaining, it would be advisable to replace this battery soon as the device will not
function when this fails.
How do I check the signal level of a device?
Within the devices section you will see all your installed devices listed. Next to each there is a signal level indicator which shows you the signal strength of
that device. While it is prefered if the signal level is at full strength, any signal reported will mean the device is talking to the SmartHub. If the device status
says ‘searching’and there is no signal level reported, that device is possibly out of range and should be moved closer to the SmartHub.
I have more than one of the same device, how do I know which is which?
By selecting the ‘manage’ button next to any device a new window will appear, giving you further information on that device.
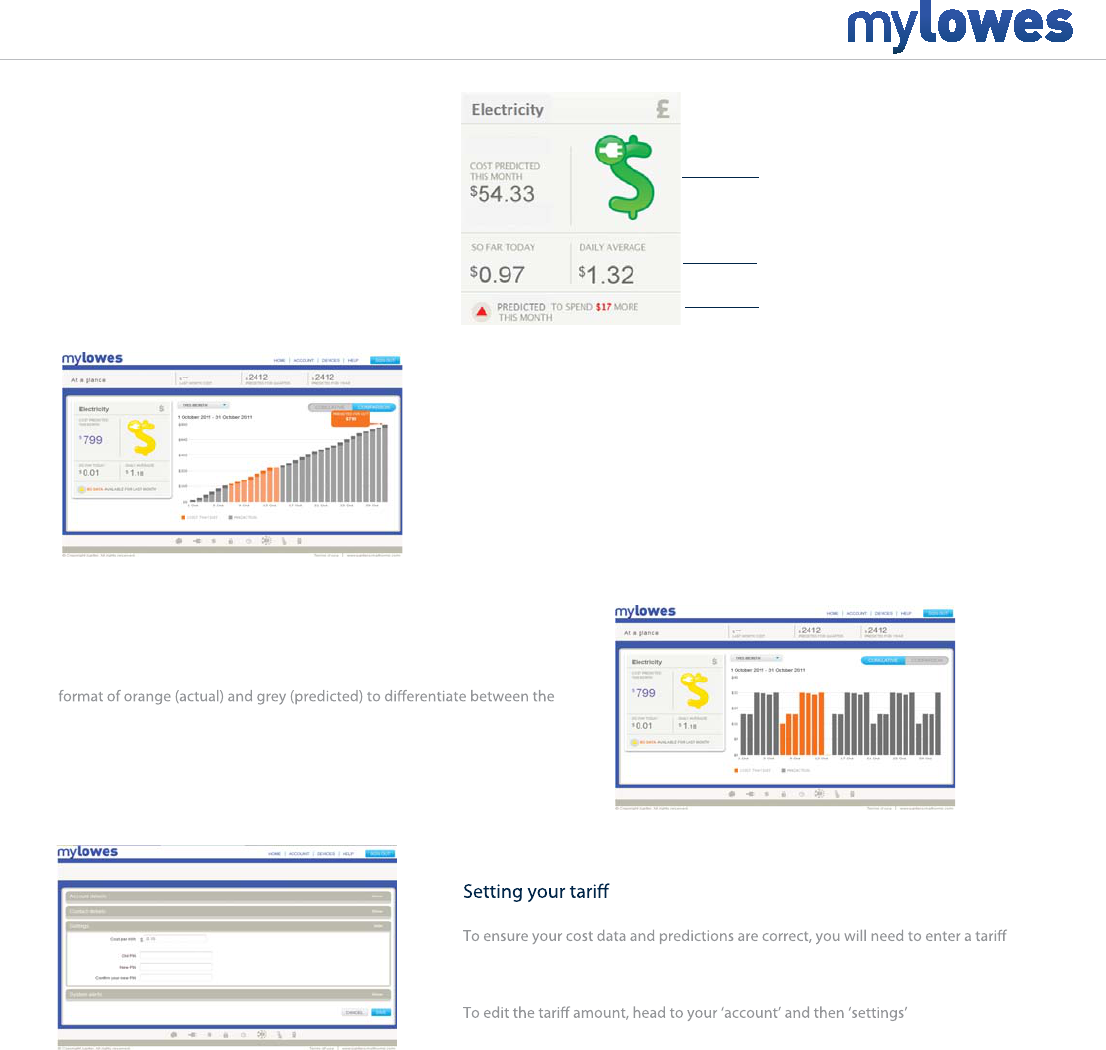
Electricity overview
From the main dashboard you can view your predicted
expenditure, as well as your daily cost and average.
You will also get information on how you are performing
in comparison to your usage the previous month.
Comparison
Here you can see what your actual and predicted usage is, using the same
two.
The same date formats can be selected from, meaning you can choose
between more immediate targets as well as more long term aims.
Electricity
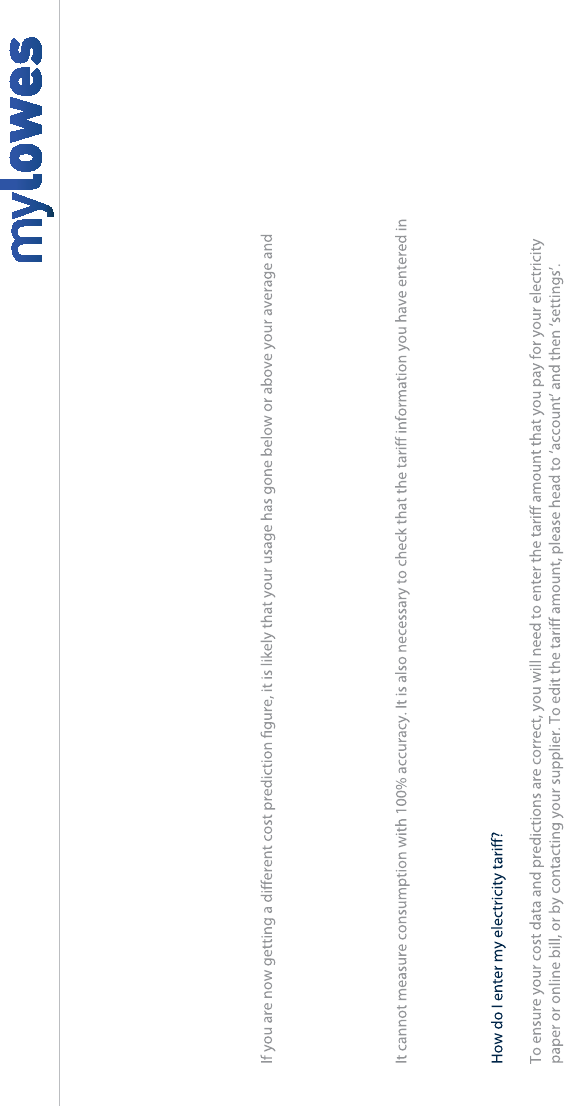
As well as your cost prediction for the month;
the color of this $ sign shows how your
predicted cost for this month compares with
the cost of last month. If it is green, you are
predicted to spend less this month. If it is red,
you are predicted to spend more. If it’s amber
you are predicted to spend about the same as
last month.
Your power usage so far today, as well as the
daily average use
Real time cost prediction.
Cumulative
This graph shows your electricity cost so far this month (in orange) and the predicted
cost for the rest of the month (in grey).
You can choose to set your graph for today, yesterday, the previous week, month or
even year. You may also choose custom dates. These predictions are based upon your
previous usage.
amount that you pay for your electricity. This can be found on your paper or online bill,
or by contacting your supplier.
Electricity
+
How does the system work out my predicted cost?
The prediction is based on the amount of electricity you have used so far this month and how much you have tended to use in the past.
So where it gives you a daily prediction, that is based on what you’ve spent on the same day of the week in previous weeks and months.
Why has my predicted cost changed?
predicted amount.
Therefore, your predictions will adjust to match this.
The predicted cost / actual usage does not match my electricity bill, why is this?
The cost prediction gives a good indication of your energy usage to help you track your progress in reducing your energy co nsumption and your bills.
your online account is
the same as that used to calculate your bill.
Please note that the cost prediction cannot take into account extra charges such as standing charges which may be included in your bill.
. This can be found on your
Why has the ‘$’ sign on my Cost Prediction widget changed color?
The ‘S’ will move from green to red as you get closer to your previous months expenditure.

How can I control my system remotely?
You can control and monitor your home via SMS on your cell phone or by using email. Have your PIN handy.
The number to text is
You should save this in your address book.
: +44 78-6001-5215 or 010-4478-6001-5215 and the email address to send these commands to is remote@jupitersmarthome.com.
If you are the main user of your system:
By setting your cell phone number to be the default on your system, your phone will be automatically recognised as the system owner. To do this, head to
‘account’ and then ‘contact details’. Change the SMS number in here.
Interacting with your own home:
Simply send one of the remote commands (see below) followed by your PIN.
status 1234 will let you know the current status of the system
arm 1234 will arm the system to away mode for you
night 1234 will arm the system to night mode
disarm 1234 will disarm the system
log 1234 will provide you with the last entry from history log
help 1234 will provide you with some guidance on the commands
You will get an SMS back with a response.
If you aren't the main user of an system:
In this case, the server won't automatically know which system you want to interact with, as you could be a friend on several systems.
So when you want to control or monitor a system, you will always need to specify which home you are trying to contact, by sending a connect
message containing the email address or cell phone number of the main user of that system, and their PIN. Once you have done this, you will
As an example, if Sue wants to set the alarm for her house, for which the system main user is her husband Bob, she sends the following:
connect NNN NNN NNNN 1234
where the cell number is Bob's mobile, and 1234 is his PIN. Or she could send:
connect bob@bobsemailprovider.com 1234
Controlling your SmartPlugs by SMS and email
sma lis XXXX will provide you with a list of all your SmartPlugs, and the power they are measuring
sma xxx on XXXX will switch SmartPlug xxx on
If you only have one SmartPlug, the XXX can be left blank. If you have more than one SmartPlug, the XXX should be used for entering as much of the
plug's name as necessary to make it unique, so if you have, for example, SmartPlugs named 'kitchen refridgerator' and 'kitchen microwave', you would
need to write at least 'kitchen r’ or 'kitchen m'.
You will be sent an error message if you try to switch on a SmartPlug that is already switched on or is non existant.
How do I change my PIN?
Please head to your ‘account’ and then ‘settings’.
Here you can edit your PIN. The PIN will be required to control your system via SMS and email, so
should be a number that is easily remembered and known only to you.
It is not a good idea to use the same PIN as your bank card.
cancel 1234 will clear the alarm if it is currently going o
receive a conrmation SMS, and then you can send normal remote commands.
sma xxx o XXXX will switch SmartPlug xxx o
Once she has received the conrmation SMS, Sue can send normal remote commands.
SMS & email control
SmartPlugs
+
SmartPlugs widget
You can monitor the usage and control any SmartPlugs
you have on the system, via the appliances widget.
The main widget itself will give you an overview of your
SmartPlug, with further options inside.
Once the widget has been selected, a large appliances
screen will open.
You can now see a graph area, showing further
information as well as your energy usage over
customisable time frames using the drop down menu.
The green power button here can be used to
turn the SmartPlug on or o remotely.
Your current power usage and cost so far today
The icon here can be changed to represent
what the SmartPlug is controlling. To do this,
head to ‘devices’ and then ‘manage’ for the
required SmartPlug.
Real time cost prediction.
Customising your graphs
You can switch between SmartPlugs if you have more than one on your system, by
selecting from the drop down menu above the graphs.
The other drop down menu allows you to select either set or customisable timeframes by
which your graphical data is shown.
The color of the selected SmartPlug icon will change according to your usage compared
to the previous day - going from green (using less power) to amber and then red as it
uses more than the previous day.
FAQs
amount that you pay for your electricity. This can be found on your paper or online bill,
or by contacting your supplier.
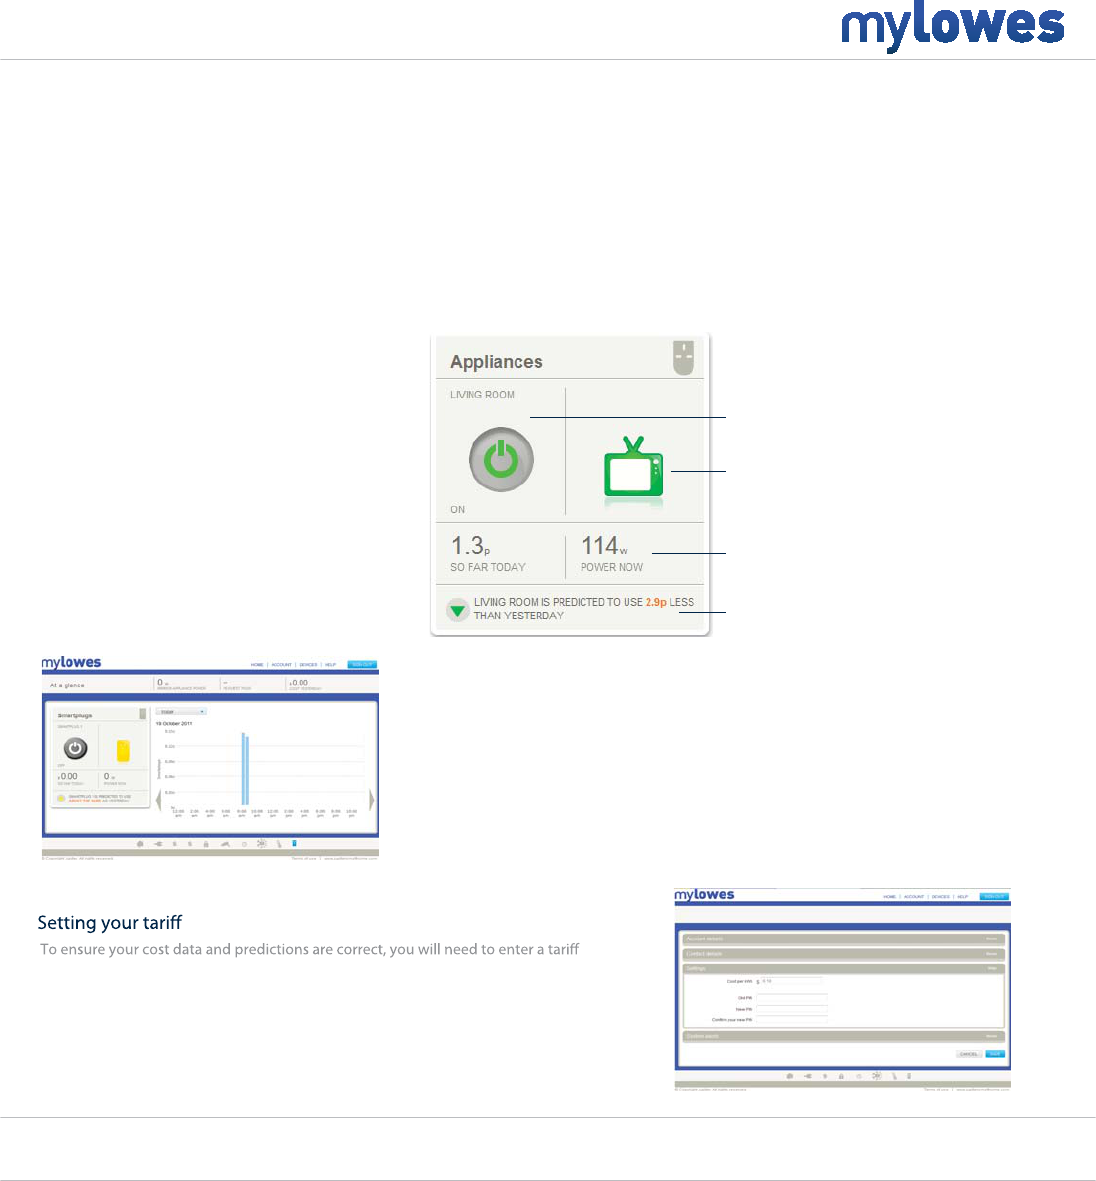
To edit the tari amount please head to ‘account’ and then ‘settings’
What is a SmartPlug?
The SmartPlug is used to control and monitor the energy usage of any appliance plugged into it.
They can be controlled or monitored in the following ways:
Remotely - switch the SmartPlug on or o by clicking the green power button on your SmartPlug widget.
Send a remote SMS to either
: +44 78-6001-5215 or 010-4478-6001-5215 or an email to remote@jupitersmarthome.com. For a full list of commands please
refer to the Remote Control help guide.
Manually - simply press the button on the front of the SmartPlug to on or o.
Why is my SmartPlug not working?
Head to the devices section on your website where you will see all the devices currently linked to your system. Check the relevant device is present
on the system, and has a good battery life showing.
How do I change my SmartPlug icon?
The SmartPlug icon here can be changed to represent what the SmartPlug is controlling.
To do this, head to ‘devices’ and ‘manage’ for the required SmartPlug and select an icon from the list given.
+
An overview
Some of the monitoring devices on your system contain a small thermometer, allowing you
the option to remotely monitor the temperature of your home.
By selecting the temperature widget, you will be taken to an overview of the temperature
readings that your devices are reporting.
Modifying your graphs
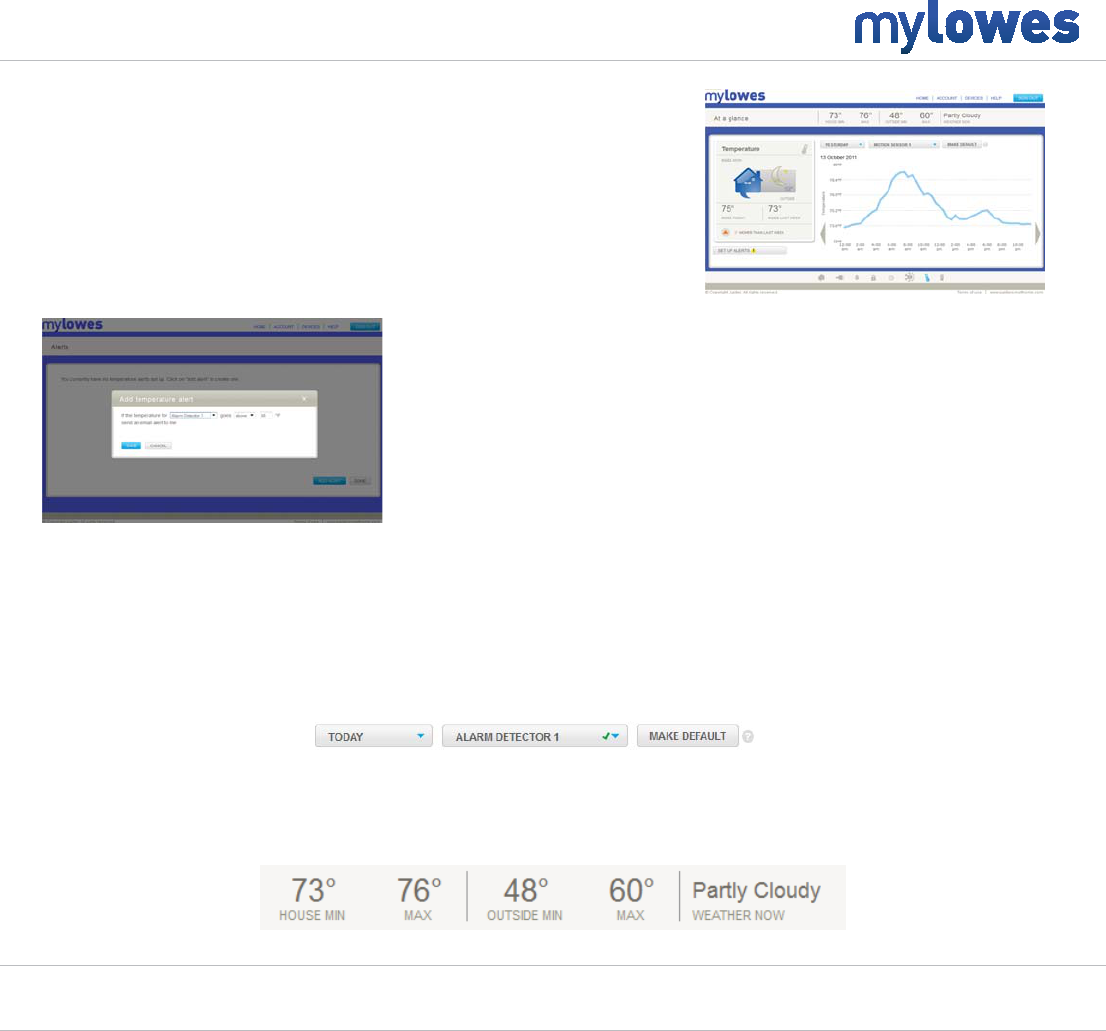
The date period can be adjusted as required, as can the option of which device you would like to report data for. To set a device to be your default, select it
from the from the drop down menu and then select ‘make default’.
At a glance
By heading to ‘account - settings’ and entering your zip code, you will at a glance see data for both the temperature inside your house and the weather
outside too.
Temperature alerts
Email alerts can be set up to keep you updated with the temperature of your house.
The system can email you if a certain device goes above, or falls below, a certain temperature.
As an example, if your conservatory SmartMotion drops below 60°F you could have an electric
heater linked to a SmartPlug in your conservatory. You could then remotely switch this on
FAQs
How does the system work out my internal and external temperatures and the weather?
Head to your temperature widget and above the graph you will see a drop down menu listing all the temperature enabled devices. Select which one you
would like to be your internal temperature reading and then select ‘make default’- you will see a green tick appear next to the device chosen.
The external temperature and current weather is calculated based on the zip code entered on the account.
How do I set up temperature alerts?
Within your temperature widget there is an option to ‘set up alerts’.
Here you can add and edit alerts for devices and temperatures reached – deciding who is contacted and by which method (SMS or email) is done.
The temperature graphs can be modied using the drop down menus.
from your website, and switch if o when the room has suciently warmed up again.
These can be set up by following the ‘set up alerts’ link at the bottom left of your widget.
Temperature

Thermostat overview
The thermostat widget on the dashboard gives you control of the heating and cooling
in your home.
You may also congure your SmartKeyfobs so that heating and cooling changes
automatically as you come and go through the day; adjust the automatic time
schedules to best suit you lifestyle or simply turn the temperature up and down.
Thermostat
Hold (Cool / Heat)
Where you wish to set a temperature target at any time, then
once reached the tenperature will stay at this level until
changed
Auto (Cool / Heat)
Setting up your online thermostat for Automatic Control
1. Click on the Thermostat widget on your dashboard to enter the detailed
screen
2. Switch to Heating or Cooling mode as required
3. Set the Temperature slider to Auto
4. Check your temperature schedule and adjust the temperatures for ‘Night’
and ‘Day’ as required.
5. Set an Away temperature for when you are out of the house. The Away
temperature setting is located at the bottom of the screen.
6. Select ‘set up keyfobs’ to decide which SmartKeytfobs will be active.
7. Save your settings by clicking on the ‘Submit’ button at the bottom of
the screen.
8. Your SmartKeyfobs are already set up to operate your Thermostat. Just
attach them to your house keys to enjoy the convenience of automatic
Thermostat control.
By setting up an automatic heating schedule you can set your heating to suit your home. You can ensure your house is at a comfortable temperature
when you’re at home as well as knowing you’re not wasting unnecessary energy when you’re out, therefore saving you money.
The ‘Simple’ mode allows you to change either weekdays or weekends, while
the ‘Advanced’ mode lets you edit times and temperatures on a day by day
basis.
Drag the borders to set up your prefered time periods for each day; then select
the temperatures icon in each period to adjust your required termperature level.
Remember, if you make changes don’t forget to click ‘submit’ to save them.
Your new schedule will be sent to your in-home heating controller within two
minutes.
The automatic schedule can be overridden at anytime, so if you come home earlier than expected or want to change the temperature slightly, that can
still be done.
Heating schedule (Cool / Heat)
Using your thermostat manually
To manually adjust the temperature in your home:
1. Touch the large number on your In Home Thermostat
2. Use the arrow icons to adjust the temperature.
3. Press the house to save your adjustment.
Press the mode button on the right hand side of your In Home Thermostat to change modes. You can cycle through Heat, Cool or O by pressing
this button.
Q) I want to turn my thermostat ON/OFF now, how can I do this?
A) From the dashboard you can use the slide bar on the main widget to change the heating status to ‘OFF’. If you wish to turn the heating or cooling
system ON then please choose either ‘Auto’, ‘Schedule’ or ‘Hold’.
Q) I want to set up my system to automatically change when we are in and out of the home, how do I do this?
A) From the dashboard select the Thermostat widget. This will open up a larger and more detailed screen where you can edit your automatic
heating schedule and edit it to change as required when your designated SmartKeyfobs are present or not.
Q) I want to set up a Heating Schedule for my home.
A) From the dashboard select the Thermostat widget. This will open up a larger and more detailed screen where you can edit your heating schedule.
Q) What happens if I make changes on the thermostat rather than online?
A) Any changes you make on the thermostat will be copied online, and vice versa. For example, increase the target temperature on your thermostat
and within two minutes your online target temperature will change accordingly.
Q) Won’t my home freeze if I switch the Remote Heating Control to ‘OFF’?
ystem will automatically
switch on, ensuring your home does not freeze.
Q) The heating controller is not changing the temperature, why not?
A) There can be a delay of up two minutes between making changes to the temperature on the site and the heating controller showing this. If it still does
not you can press the “+” button on the controller once to view the temperature it is currently set to aim for.
Q) Where can I view the battery level and signal of my thermostat?
A) In the Devices section on your dashboard you will see the current status of any devices installed on your system.
Q) My thermostat is showing as ‘searching’ in my device list, what should I do?
A) In this case the device isnot currently communicating with your SmartHub. To correct this, remove the batteries from the controller for 10 minutes,
then put them back in again. If it does not reconnect, contact Customer Support.
Q) Why does my heating switch on 30 minutes before I’ve set it to?
A) The heating schedule works on the basis that your home will take 30 minutes to warm up. Therefore; if you’ve set your home to be 20°C at 10:00
the system will switch on at 09:30 to ensure that by 10:00 the house is at it’s required temperature.
Thermostat
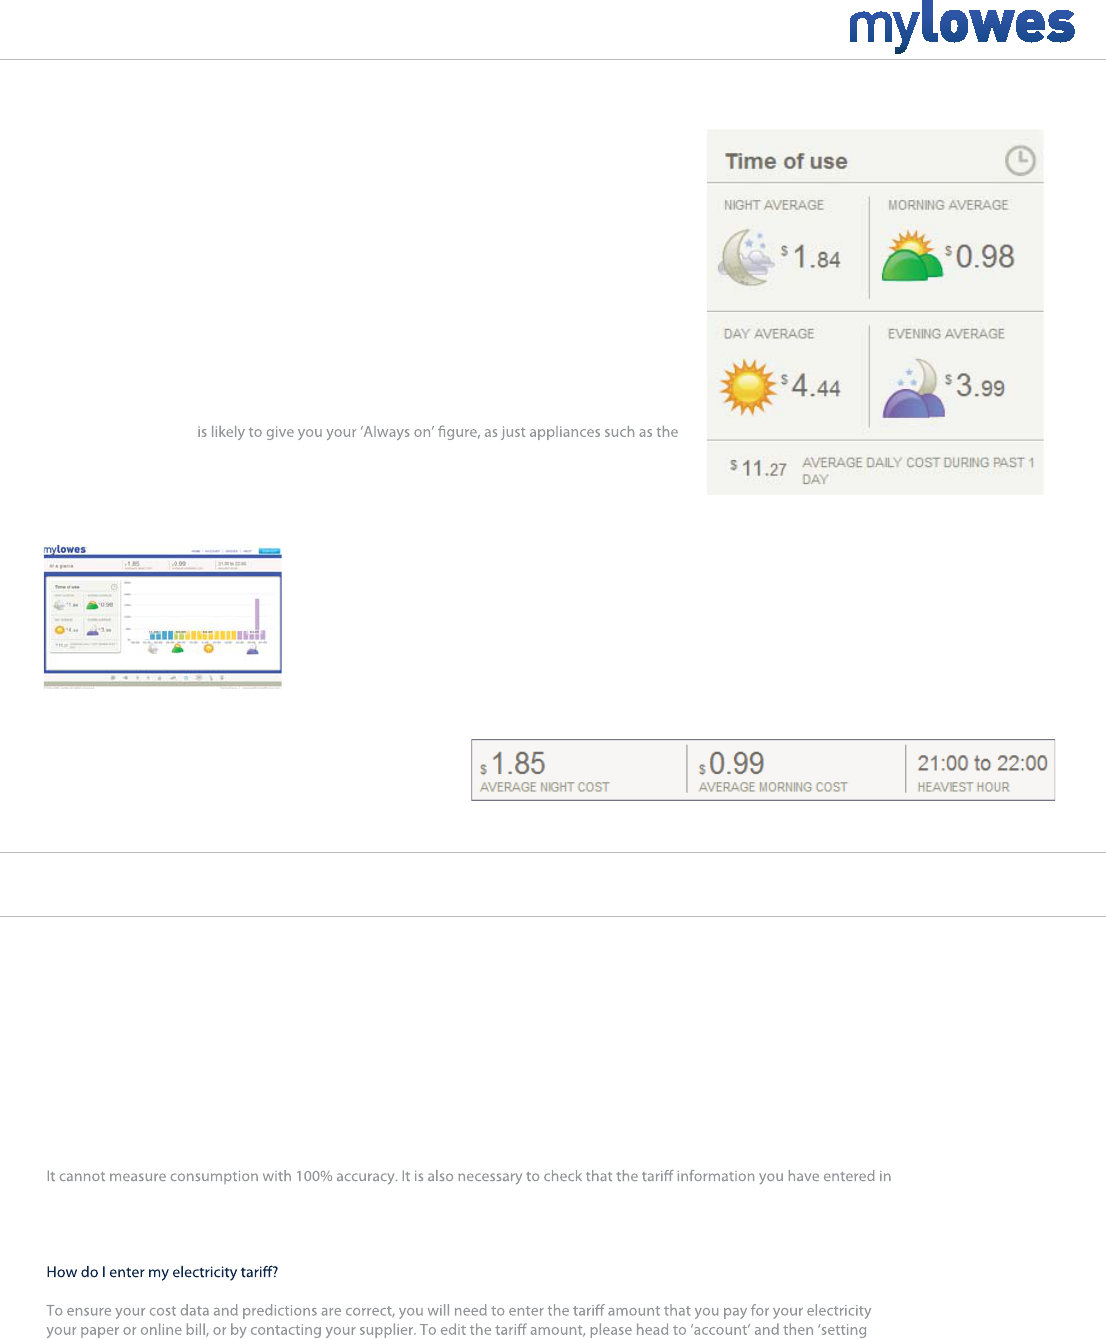
Time of use
+
An overview
The Time of Use widget allows you to see what times of the day you are using the least
and most energy, as well as how much this is costing you.
The data is split into four time periods:
Morning (7am-9am) would generally cover the period where the household gets up and gets
ready for school or work.
Day (9am-6pm) is likely to be one of the least active periods of the day, with people out of the
house.
Evening (6pm - Midnight) begins as the house members arrive home from school or work, the
evening meal is prepared and many other electrical appliances are used. This would also see
household lights being used as daylight ends.
Night (Midnight - 6am)
refridgerator are left in use while the household sleeps. Alternatively, some households may run
the washing machine or dishwasher overnight.
You will also see here your average daily expenditure.
Reading your graph
You can view your time of use data in more detail, seeing how much you’re using at what
times of day.
As the data builds up over time you could well see daily patterns appearing here.
At a glance
Above the graph you will see some of your average gures at
a glance, as well as the heaviest usage hour of your day.
How does the system work out my daily usage?
The averages given are based on the amount of electricity you have used over the last 30 days, including timed usage throughout each day. From this,
it forms a picture of how much you’re spending and at what times.
The average does cover weekdays as well as weekends, which may account for a more balanced graph than you’d expect.
The predicted cost / actual usage does not match my electricity bill, why is this?
Jupiter cost prediction gives a good indication of your energy usage to help you track your progress in reducing your energy consumption and your
bills.
your online account
is the same as that used to calculate your bill.
Please note that the cost prediction cannot take into account extra charges such as standing charges which may be included in your bill.
. This can be found on
s’
Why am I using electricity overnight when everyone is in bed?
This will be your base load, which is the appliances that never switch o (your refridgerator for example).
FAQs
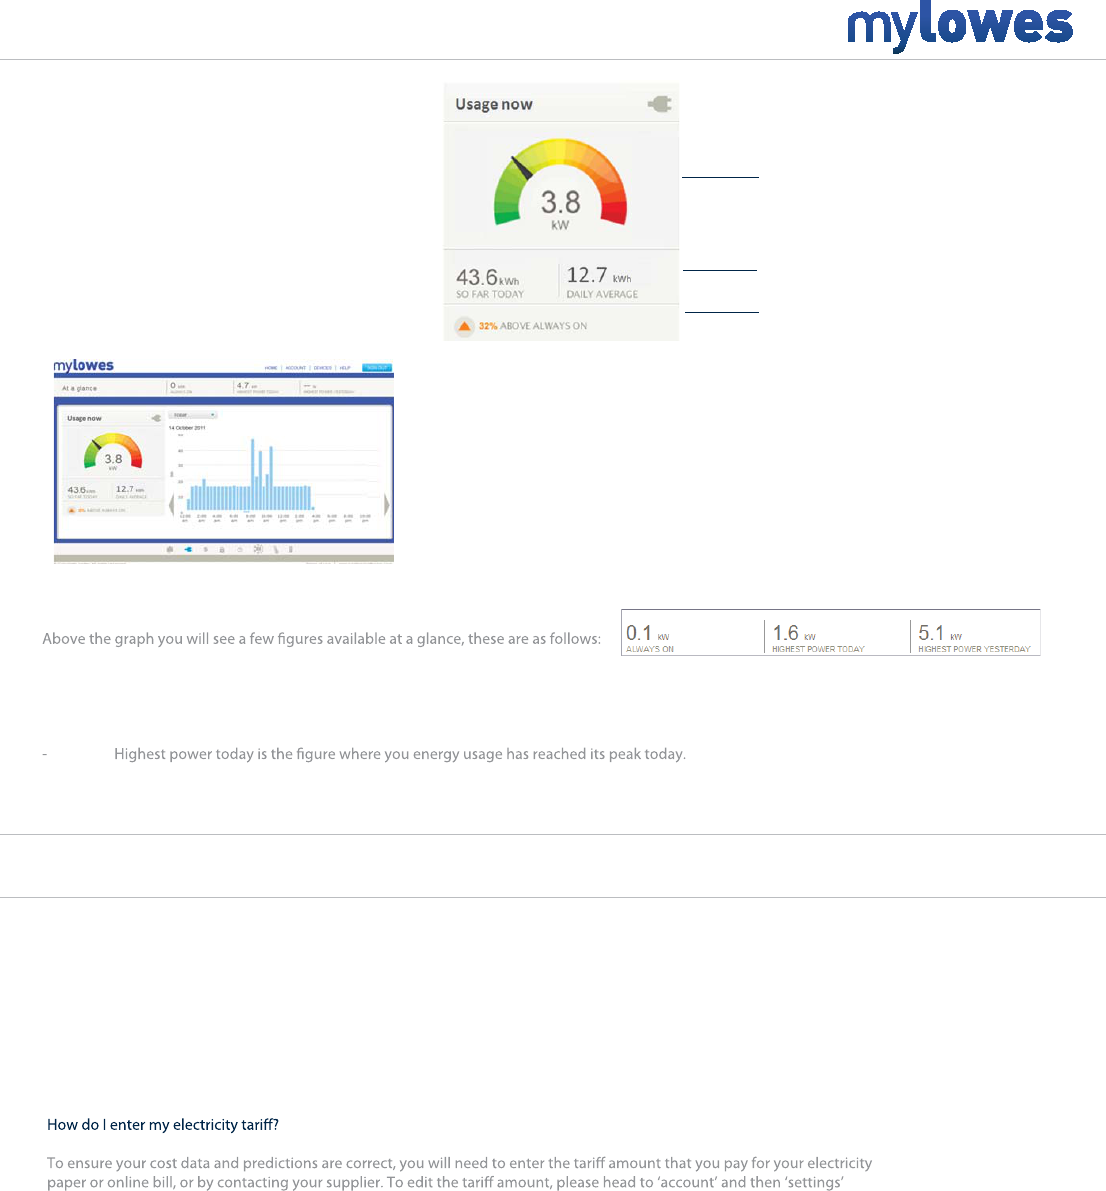
Electricity overview
From the main dashboard you can see what you’re using
right now, with the dial signifying how this compares to
the previous days usage
You will also get information on your cumulative usage
as well as your current daily average.
Whole Home Power
Your power usage so far today, as well as the
daily average use
How much energy you are using compared to
your ‘always on’ amount.
Reading your graph
Once inside the Whole Home Power widget, you can see an overview of your energy
usage on a broader scale.
This will show how much energy you’ve used throughout the day, week, month, year
or during custom dates you select.
This is your current usage. Watch the dial swing
from Green to Red as you approach, and then go
over your previous days usage*
At a glance
- Always on. This will be your base load, which is the appliances that never switch o (your refridgerator for example). This is also know as
the ‘baseload’.
- Highest power yesterday allows you to see what the peak of your usage was, this is useful for comparison and target purposes.
FAQs
+
How can I view my Whole Home Power data?
Head to your Whole Home Power widget and you will see your power usage in real time, power usage so far today and your average daily usage.
Why is my Whole Home Power not showing any data?
Head to the devices section on your website where you will see all the devices currently linked to your system. Check the relevant device is present on
the system, and has a good battery life showing.
If there is still no data reported, please contact Customer Support.
. This can be found on your
Why has the power now icon changed colour?
The colour of the plug icon will in the main widget will change colour according to your usage compared to the previous day - going from green (using
less power) to amber and then red (as it uses more than the previous day).