Centrica Hive NH11 HUB310 User Manual
AlertMe.com Ltd HUB310
Contents
- 1. Install guide
- 2. user guide
Install guide

Install Guide
AlertMe Thermostat Control
Start Saving Money.
Stop Wasting Energy.
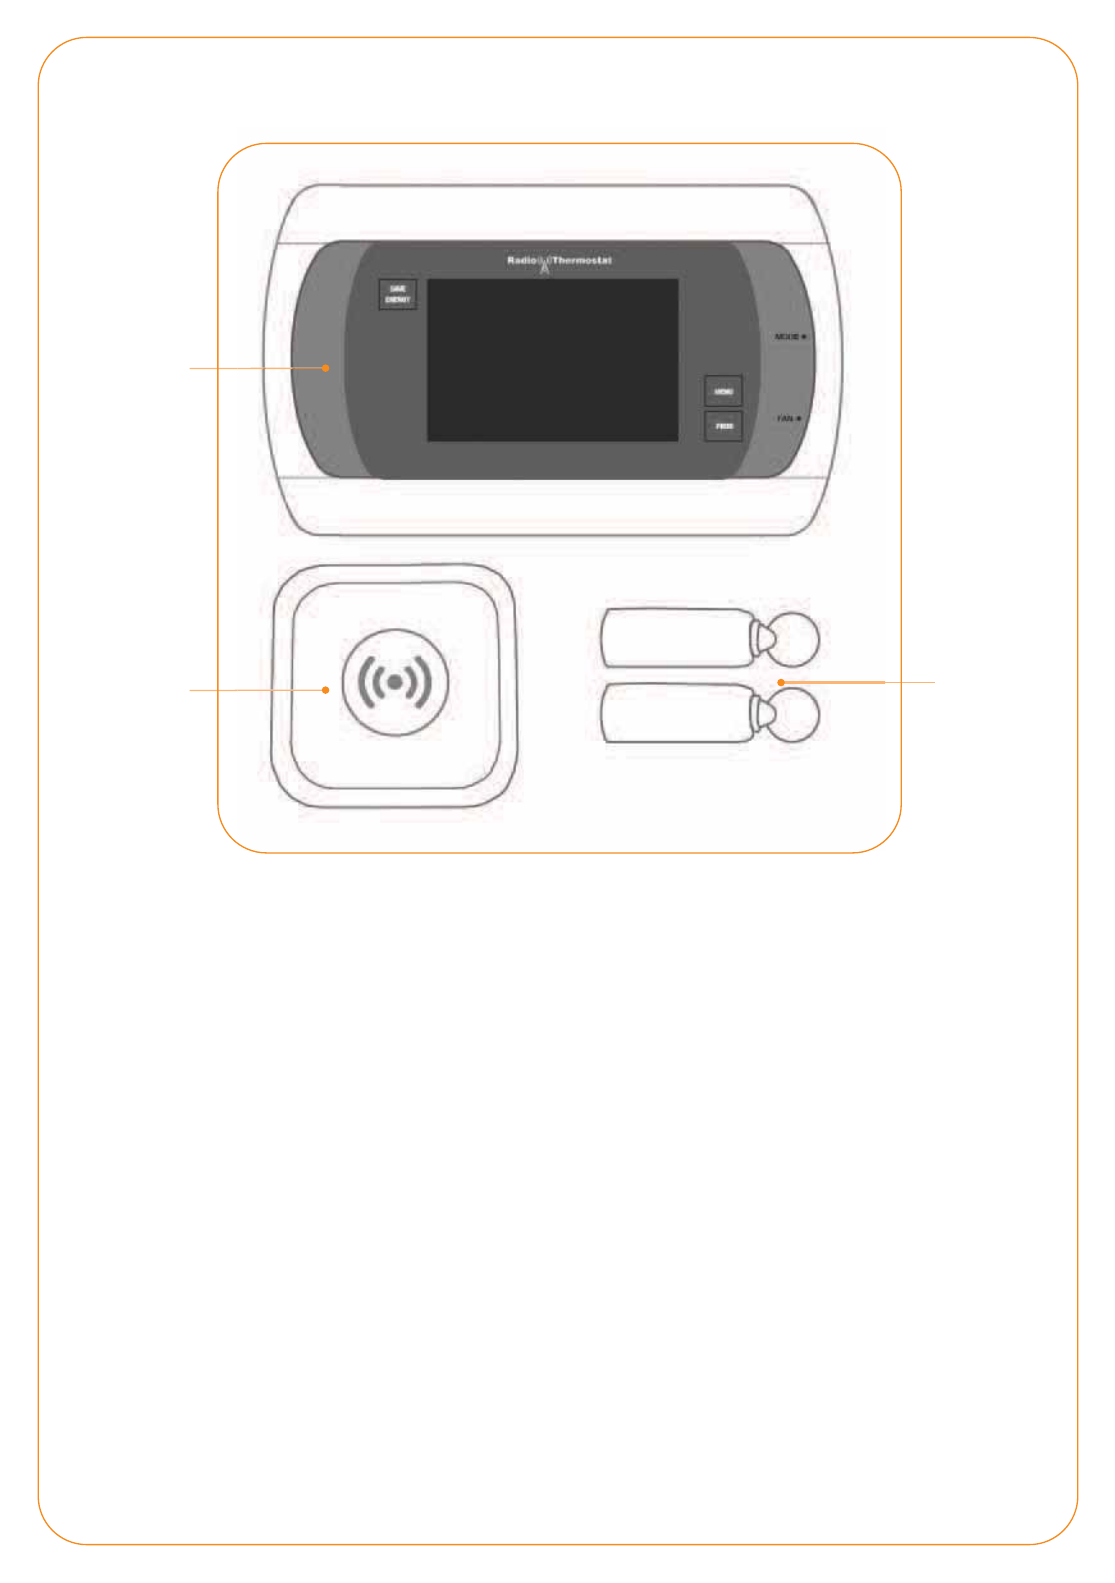
What’s in the box
Your AlertMe Thermostat Control system comes with the following accessories:
In Home Thermostat (CT30)
Installed in your home, the Thermostat allows you to manually adjust the
temperature and switch between Heat, Cool and O modes.
AlertMe Hub
Your AlertMe Hub talks wirelessly to your In Home Thermostat and
connects securely to the Internet, putting your Thermostat online.
Keyfobs x 2
Your Keyfobs attach to your keyring to tell your system when you are in or
out of the house, enabling it to adjust your system accordingly.
Keyfobs x2
In Home
Thermostat
AlertMe
Hub
The installation guide
The following steps will guide you through the installation of your AlertMe system,
as well as set up of your Home Heating and AC schedule.
Before you start
Before you start
You will need access to your broadband router, computer and 2
spare power sockets.
DO NOT insert batteries or plug in thermostat/accessories until instructed to do so
by this guide or the onscreen instructions
DO NOT mount thermostat in its nal location until instructed to do so by this guide
or the onscreen instructions.
Your hub ID
Please make a note of your six-character hub ID that can be found on the back of
your hub, next to the power and Ethernet ports.
You’ll need this when you login to your account:
Hub ID
Log-in Online
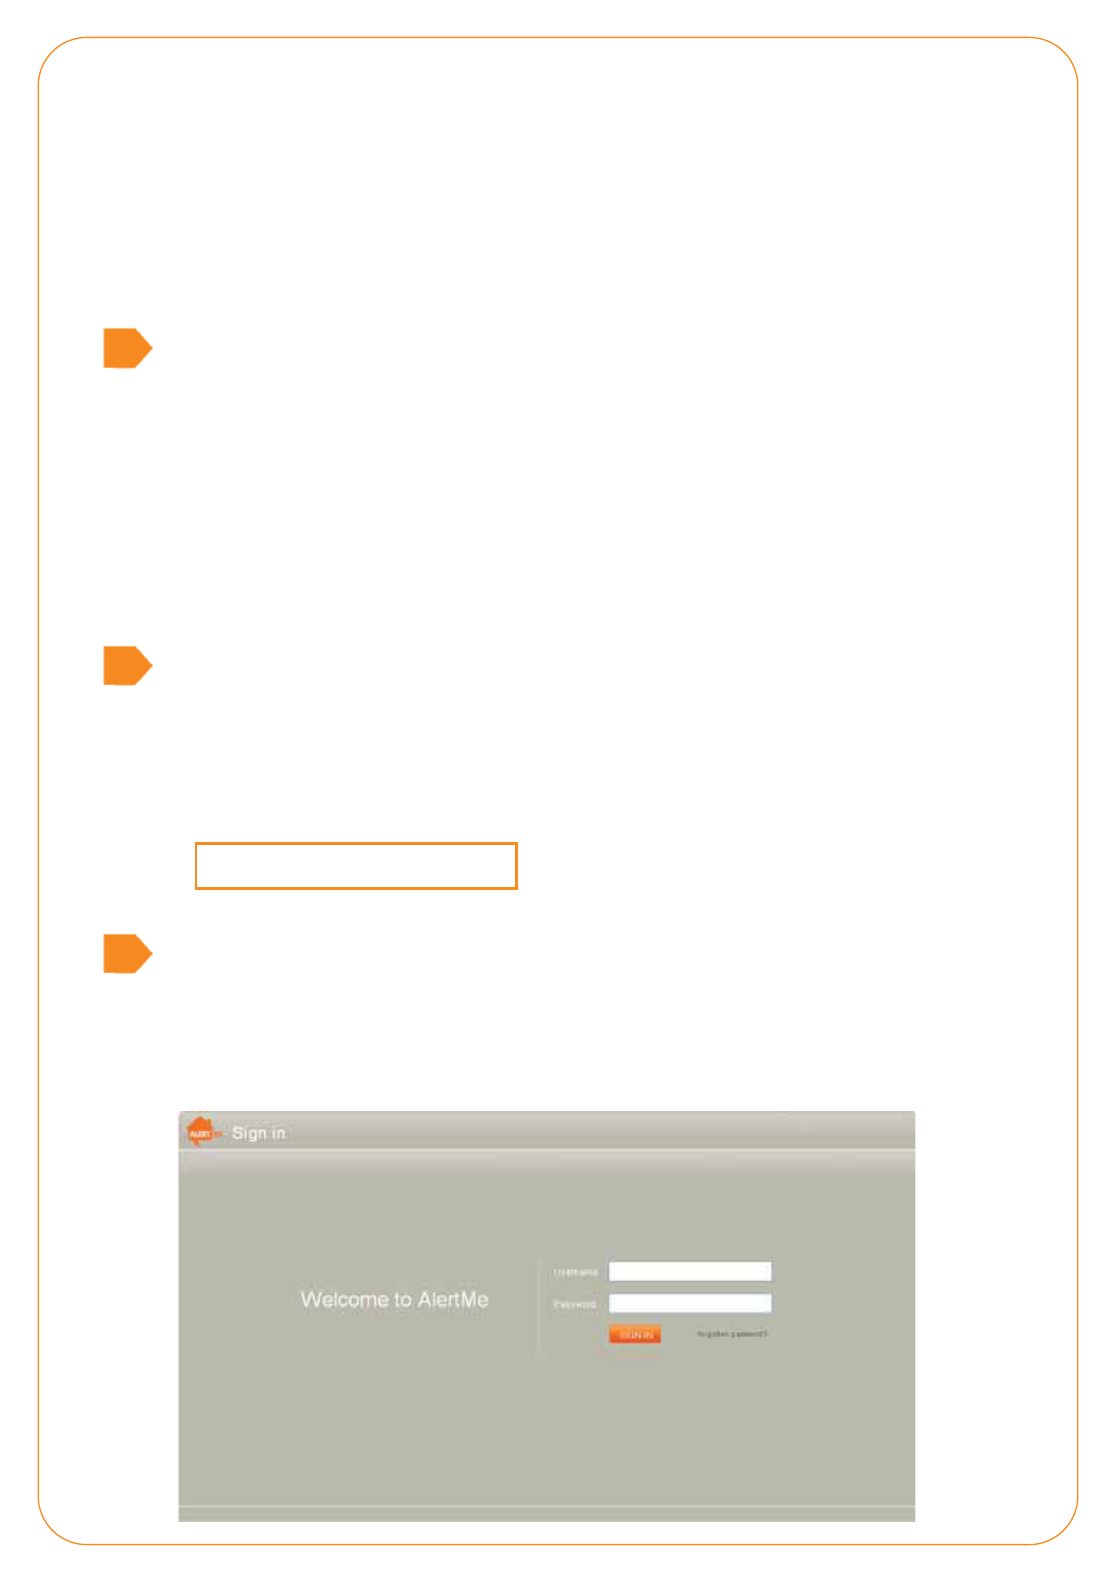
a. Start up your PC or Laptop and open your internet browser.
b. Go to http://smartclimatecontrol.com
c. Login using your username and password provided.
3
1
2
3
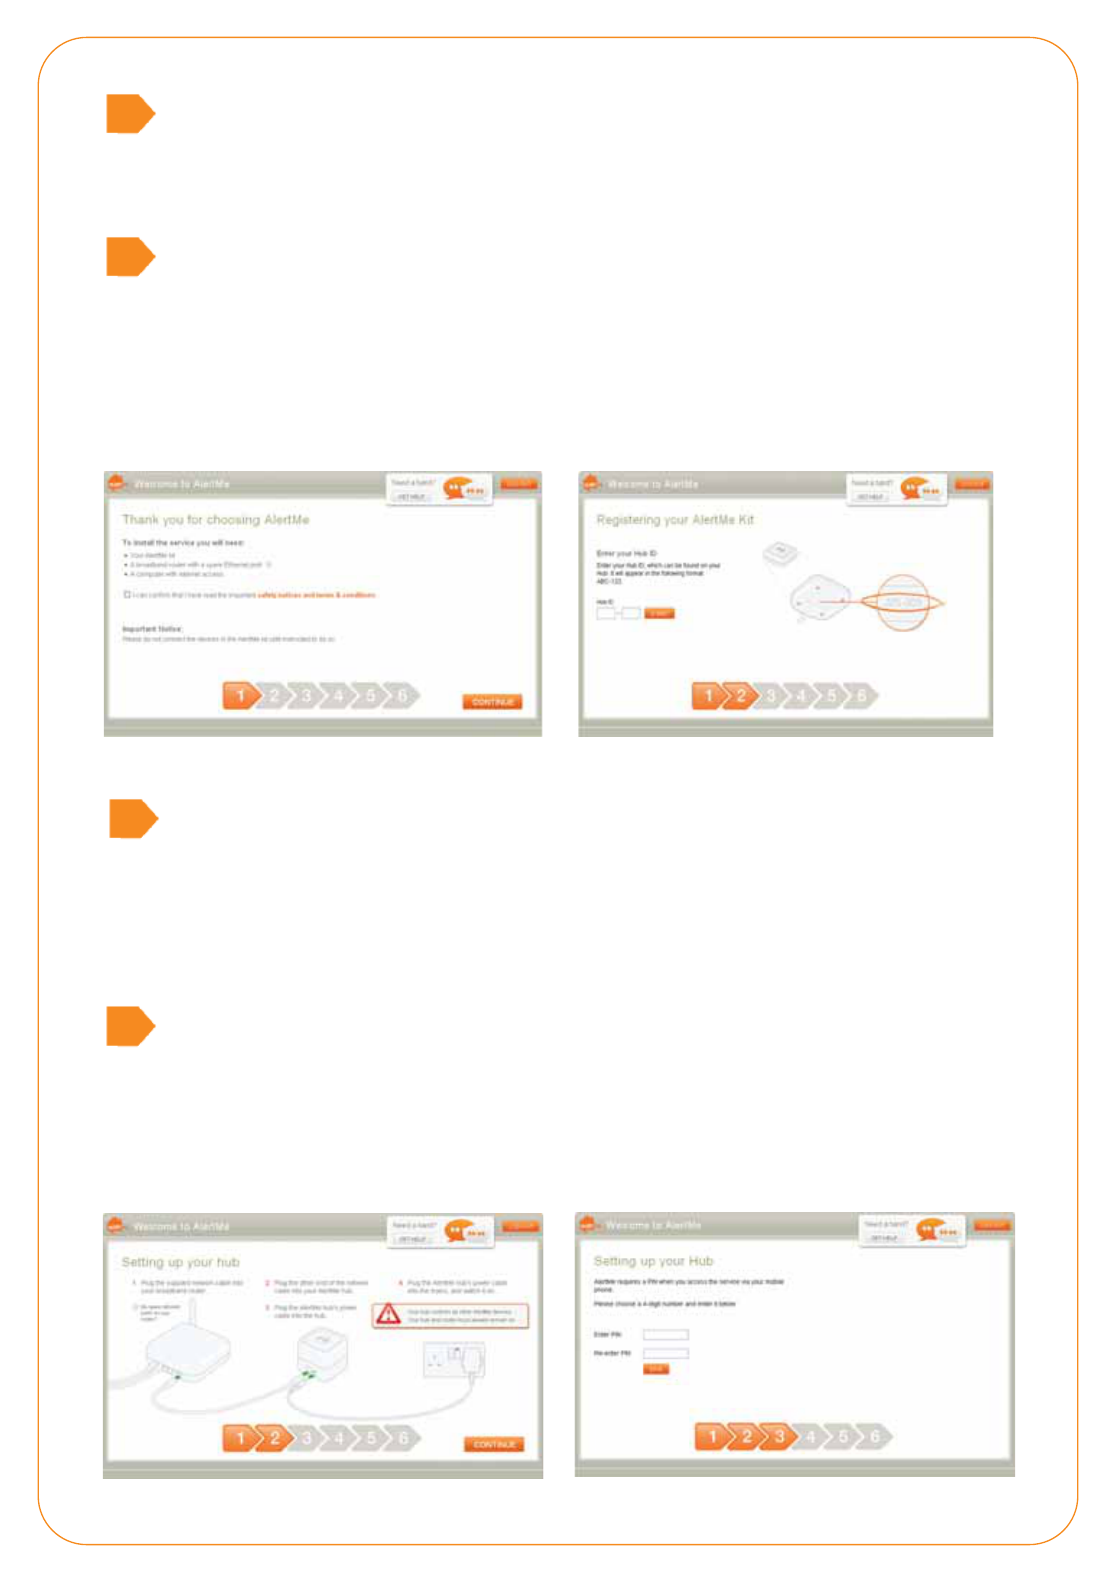
Terms and Conditions
Once you have read the Safety Notices and Terms & Conditions by clicking on the
orange text in the middle of the screen, please tick the box and click “Continue”.
4
Register your kit
The Hub ID can be found on the back of the hub, below the power and ethernet
sockets. The three letters need to be entered in the rst box, and the three numbers
in the second.
When you have done this click “Submit”.
5
Connecting your hub
You now need to connect your hub to your broadband router and to the mains
power, as shown.
Once you have done this click “Continue”.
6
Choose your PIN
You need to choose a 4 digit PIN (for example 1234) to allow you to control the
system remotely.
Please enter your chosen number in both boxes, and then click “Save”.
7
45
67
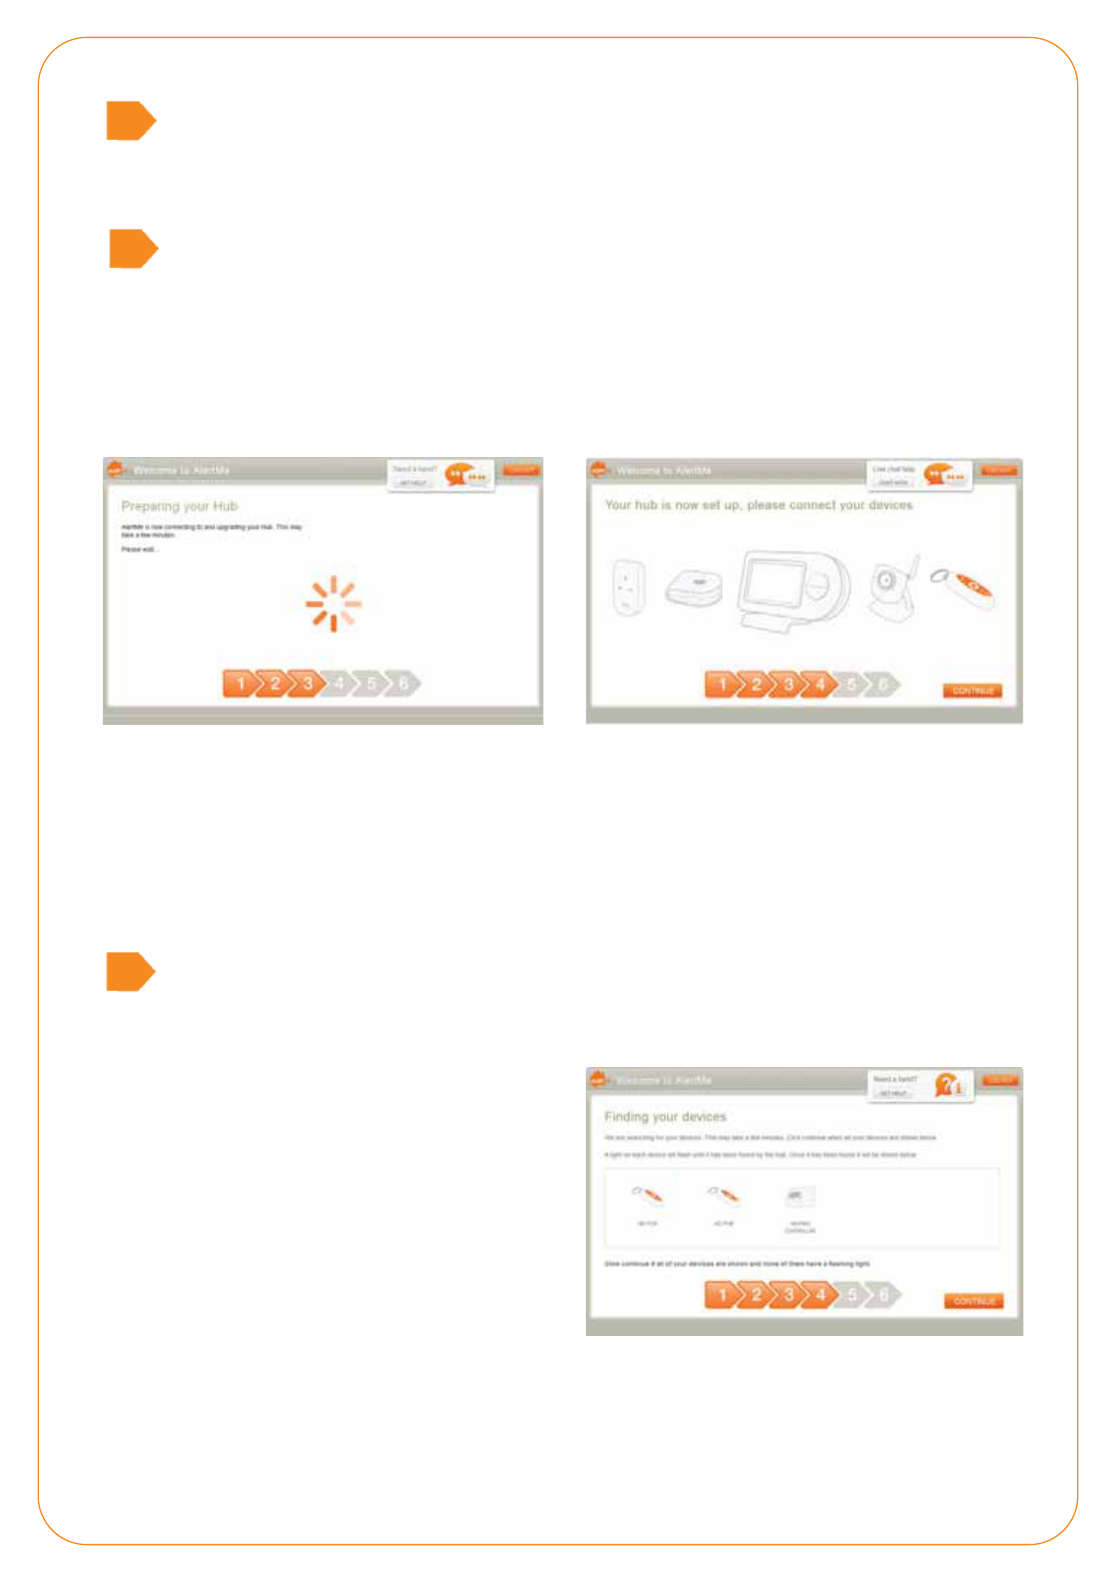
Preparing your hub
The hub will now securely link to our servers; this may take a minute or two, however
once this has occurred the screen will advance.
8
Power up your devices
The hub is now connected; you now need to power up your other devices. For
installation it is best to have these devices placed within two metres of the AlertMe
hub, they can be moved away later.
When you have done this click “Submit”.
9
Please note! The Keyfob LEDs will light up solid green, before starting to ash.
When the CT-30 starts for the rst time it will enter a search mode automatically
and this can be conrmed by seeing the radio waves blink from the radio mask icon
on the Thermostat.
Finding your devices
The devices should now begin to appear on the screen. You should see one icon for
each device added.
Please note! When the Keyfob LED stops
ashing it means the device has been
found by the hub.
When the Thermostat has been found
you will see the word “LINK” displayed
on the CT-30 display panel.
These deviceswill then appear on your screen.
Once all your devices have appeared click “Continue”.
10
89
10
8
9
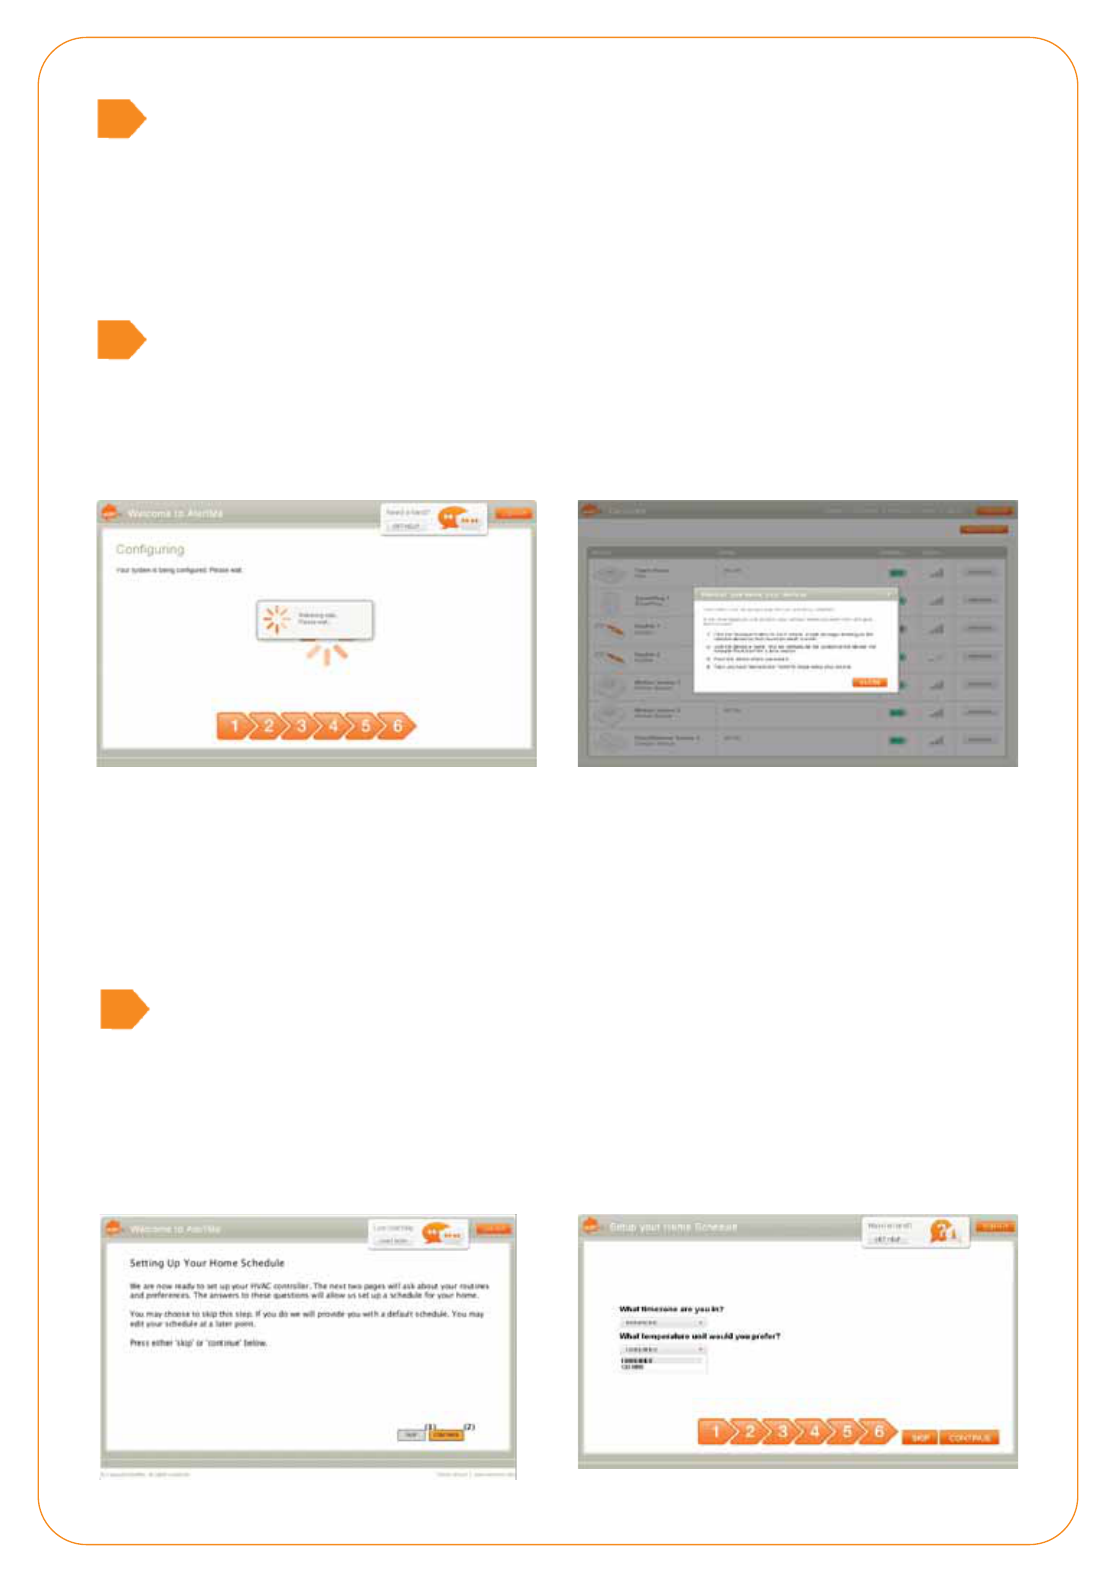
Finding your devices
The system will now congure whilst your devices are in the process of being securely
linked to the AlertMe servers.
Once this completes the process will advance to the next step.
11
8
Install complete!
The install process is now complete.
Click “Close” when you are ready to name and place the accessories.
12
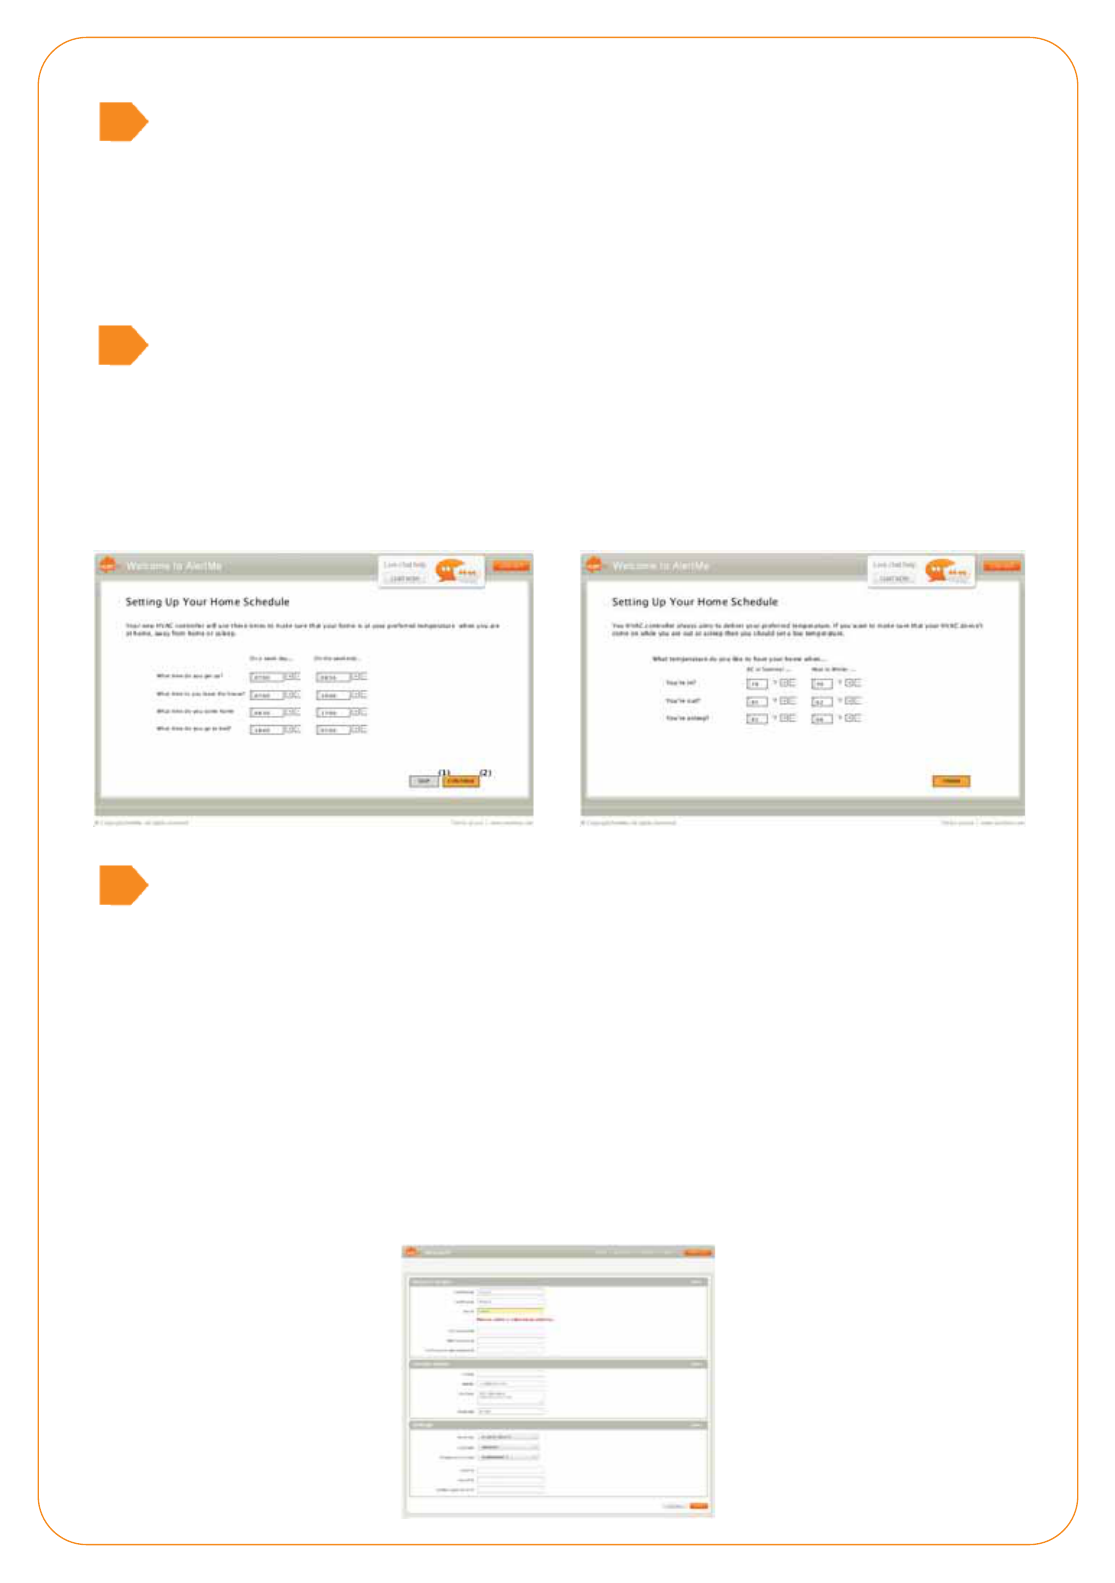
Home schedule set up
Once you have installed your AlertMe kit, you will be prompted to set up your Home
heating schedule.
8
Home schedule settings
Select your time zone and the temperature unit you would like your system to use.
Select ‘continue’ when done, or choose to ‘skip’ this section and use the shown
settings as default. You can edit these later on.
13
11 12
13
8
9
Modify your movements
You will now be prompted to set the times according to your daily movements, both
on weekdays and the weekend.
Select ‘continue’ when done, or choose to ‘skip’ this section and use the shown settings
as default. You can edit these later on.
14
8
Set the temperature
You will now be prompted to set the temperatures you would like in your home,
according to your daily movements. This applies for the Heating System in Winter as
well as the AC system in Summer.
Select ‘nish’ when done to complete your Home Schedule setup
15
8
9
Set up your personal details
Once these settings have been completed – select ‘Account’ on your AlertMe
homepage to conrm all your personal and system details are correct.
The ZIP code entered will be used for gathering data on your ‘Weather’ widget, so
be sure to set this correctly.
These can be amended at any time, remember to select ‘Save’ to keep any changes you
have made.
Now head to your AlertMe home page - the installation is now complete!
16
8
14 15
16

Why will my hub will not authorise?
Please conrm that your hub is connected
via mans power and Ethernet cable to a
working broadband router.
If you are sure this is the case and the hub
will still not authorise, please contact
Customer Support
The hub is not picking up my keyfobs
Ensure that the keyfobs are double ashing.
If this is not the case please remove the
battery for 1 minute before reinserting
(check that this has been inserted the
correct way round).
When the keyfob is double ashing and
place it around 3 feet from the hub. Check
that the hub is in search mode and is
ashing white.
My keyfob was double ashing but is
no longer.
If the keyfob was double ashing but is
no longer, repeat the steps above.
The hub is not picking up my Thermostat
When the Thermostat is on search mode
you will see the radio waves blink from the
radio mask icon on the Thermostat screen.
Remove the Thermostat batteries for 1
minute before reinserting.
When the radio waves are blinking place it
around 3 feet from the hub. Check that the
hub is in search mode and is ashing white.
My thermostat was in serach mode but is
no longer.
If the Thermostat has time out of search
mode, repeat the steps above.
Frequently Asked Questions:
What is the wireless range of the system?
The normal range of the system is around 20
metres – however this is dependent on the type
of building and any obstacles between the hub
and devices.
Will the system work without broadband?
No, the system requires a constant broadband
connection to work.
Can my hub connect wirelessly to my wireless
internet router at home?
No, the hub needs to be connected to your
broadband router using an Ethernet cable.
Do I need to have a spare port on my router?
Yes, you need to connect the hub to a spare
port (or socket) on your broadband router.
Will the system interfere with my wireless
internet?
No, the system is designed to work in conjunction
with wireless internet and should not interfere
with its operation.
Can I change the settings for my Home
schedule?
Yes, you can edit these settings at any time
What does the system require to work?
All you need is a computer for installation, mains
power, an ‘always on’ broadband connection
For any further questions or support on the
system, please contact our Customer Support
on 0888 882-4440 or support@alertme.com

Regulatory Compliance
From Alertme
FCC
In the United States radio-frequency equipment is regulated by the Federal
Communications Commission (FCC). The following Alertme.com accessories are dened by the
FCC as Class B Digital Devices and Intentional Radiators. Each is subject to Certication by the
FCC and has a unique FCC Identier:
[see FCC rules 15.3 (i) (k) (o) (z), 2.907, 2.926]
Key Fob (FCC ID WJHKF11)
Nano Hub (FCC ID WJHNH11)
The following statements contain important information applying to each of your Alertme
accessories:
This device complies with Part 15 of the FCC Rules. Operation is subject to the following two
conditions: (1) this device may not cause harmful interference, and (2) this device must accept
any interference received, including interference that may cause undesired operation.
[see FCC rule 15.19 (3) (5)]
Caution!
Changes or modications not expressly approved by Alertme.com could void your authority to
operate this equipment.
[see FCC rule 15.21]
NOTE: This equipment has been tested and found to comply with the limits for a Class B digital
device, pursuant to Part 15 of the FCC Rules. These limits are designed to provide reasonable
protection against harmful interference in a residential installation. This equipment generates,
uses and can radiate radio frequency energy and, if not installed and used in accordance with
the instructions, may cause harmful interference to radio communications. However, there is no
guarantee that interference will not occur in a particular installation. If this equipment does
cause harmful interference to radio or television reception, which can be determined by turning
the equipment o and on, the user is encouraged to try to correct the interference by one or
more of the following measures:
Reorient or relocate the receiving antenna.
Increase the separation between the equipment and receiver.
Connect the equipment into an outlet on a circuit dierent from that to which the
receiver is connected.
Consult the dealer or an experienced radio/TV technician for help.
This device has been evaluated for and shown compliant with the FCC RF exposure limits
under mobile exposure conditions (antennas are at least 20 cm from a person's body) when
installed. This device when installed has also been evaluated for and shown compliant with the
FCC RF exposure limits under portable exposure conditions (antennas are within 20 cm of
a person's body). Details of the authorized congurations can be found at http://www.fcc.gov/oet/ea/
by entering the FCC ID number on the device.
FCC documentation

Start Saving Money.
Stop Wasting Energy.
Contact information
If you require any further assistance, please contact our customer support team on
0888 882-4440 or support@ alertme.com
Maintenance
Keep all sensors away from water or liquids. Disconnect before cleaning and never immerse
in water or other liquids. Please contact AlertMe Customer Support if any components appear
to be damaged or faulty.
There are no serviceable parts in the Hub so there is no need to access inside. The user must
never attempt to open or tamper with the Hub.
Technical Specification
The batteries supplied are Alkaline and Lithium Primary Cells. After use they must be
disposed of safely.
Disposal
Waste electrical and electronic products must not be disposed of with household waste.
Please recycle where facilities exist. Check with your Community or Local Recycling Center
or the Government pages in the phone book for recycling advice.
The card packaging that the product is delivered in can also be recycled with your household
collections or at local recycling centers.
Copyright © 2011 AlertMe.com Ltd. All rights reserved.
AlertMe.com Ltd, Compass House,80 Newmarket Road, Cambridge, CB5 8DZ, UK.
Registered in England, Company number 578 2908,
VAT registration number GB 895 9914 42.