Chamberlain Group The 6421 Remote Control Finger Print Transmitter User Manual 114A
Chamberlain Group Inc, The Remote Control Finger Print Transmitter 114A
Exhibit D Users Manual per 2 1033 b3
Incorrect
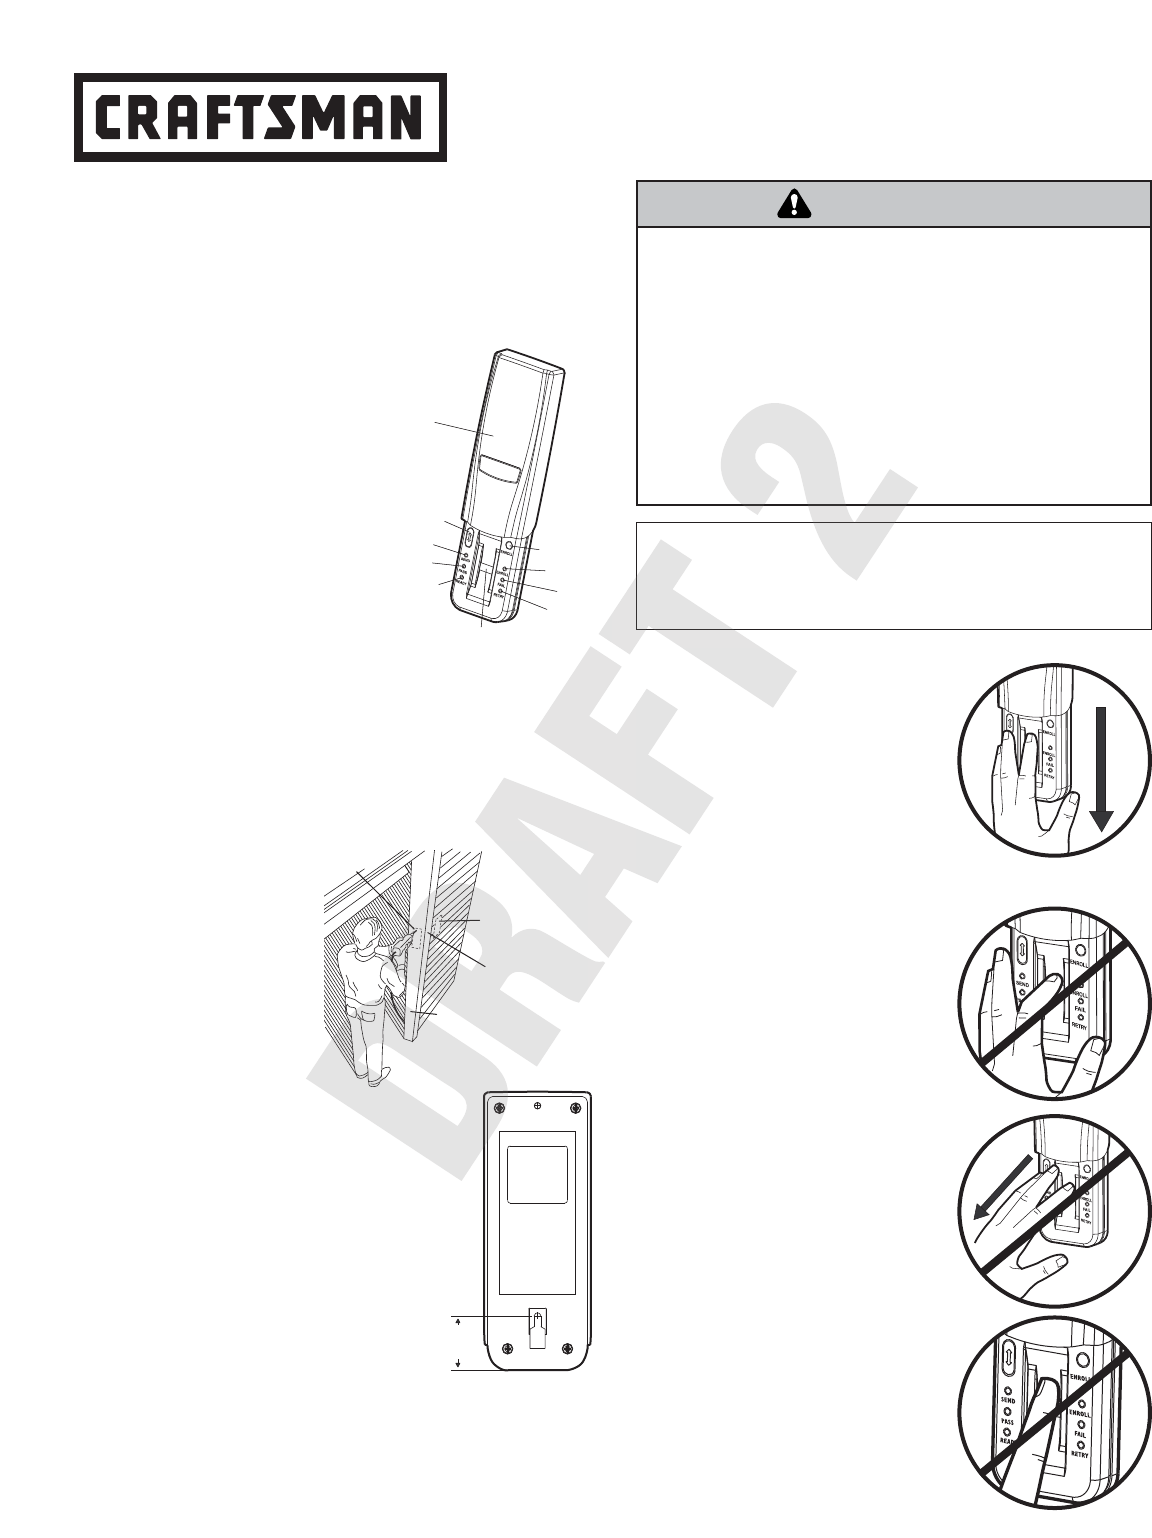
• Do not bend finger during the swipe
as this will only scan the tip of your
finger.
• Swipe straight down, not at an angle.
• Swipe flat, not tilted or rolled to one
side.
1
Model 139.53555 Security✚®
EntryEase
NOTICE: To comply with FCC and or Industry Canada (IC) rules, adjustment or modifications of
this receiver and/or transmitter are prohibited, except for changing the code setting or replacing
the battery. THERE ARE NO OTHER USER SERVICEABLE PARTS.
Tested to Comply with FCC Standards FOR HOME OR OFFICE USE. Operation is subject to the
following two conditions: (1) this device may not cause harmful interference, and (2) this device
must accept any interference received, including interference that may cause undesired operation.
®
To prevent possible SERIOUS INJURY or DEATH from a moving
gate or garage door:
• Install Keyless Entry Control within sight of the garage door, out of
reach of children at a minimum height of 5 feet (1.5 m), and away
from all moving parts of door.
• ALWAYS keep remote controls out of reach of children. NEVER
permit children to operate, or play with remote control
transmitters.
• Activate gate or door ONLY when it can be seen clearly, is properly
adjusted, and there are no obstructions to door travel.
• ALWAYS keep gate or garage door in sight until completely closed.
NEVER permit anyone to cross path of moving gate or door.
WARNING
CAUTION WARNING
WARNING
OVERVIEW
For use with any 315 MHz SECURITY✚®garage door openers
having a purple “learn” button.
The EntryEase system uses biometric technology that enables
an authorized user to gain access by scanning their fingerprint.
The sensor strip on the unit makes a numeric template of the
fingerprint that is unique only to that user.
Resend Button: When pressed the traveling door will reverse.
The fingerprint sensor is inactive for
15 seconds after valid swipe so
reswiping will not reverse the door.
Enroll Button: When pressed the
Enroll LED will light up signaling
that the device is in enroll mode.
READY LED: Lit (green) when unit
is ready to accept a fingerprint scan.
PASS LED: Lit (green) when a
scanned fingerprint matches a
stored print.
FAIL LED: Lit (red) when a scanned
fingerprint does not match a stored
print.
RETRY LED: Lit (yellow) when another swipe is required.
ENROLL LED: Lit (yellow) when the unit is in enroll mode.
SEND LED: Lit (yellow) after a passed fingerprint scan and
enables the Resend button for retransmission.
NOTE: The term “enroll” refers to scanning the fingerprint so
the device will recognize the user. The term “swipe” refers to
the movement of the finger across the sensor strip. The term
“LED” stands for Light Emitting Diode.
INSTALLATION
1. Choose a convenient
location for installation.
Install out of the reach of
children at a minimum
height of 5 feet (1.5 m),
away from all moving parts
of door.
For a one-piece door,
choose the optional
location shown in the
illustration to avoid injury as
the door swings up and out.
2. Remove the cover to access the top
mounting hole by sliding past the “up stop”
position.
3. Center the unit at eye level against the
selected location. Mark the bottom edge at
the center of the unit and remove from wall.
Measure up 1-1/4" (3.2 cm) from this mark
to locate the bottom mounting hole. Be sure
that you have at least 11" (28 cm)above this
mark to allow for the removal of cover. Drill
a 1/8" (3.2 mm) pilot hole. Install bottom
mounting screw, allowing 1/8"
(3.2 mm) to protrude above surface.
Position unit on screw head and adjust for
snug fit.
With cover off so top mounting hole is visible, mark the
position of the hole. Remove unit and drill 1/8" (3.2 mm) pilot
hole. Replace unit and complete installation of top screw,
using care to avoid cracking plastic housing. Do not over
tighten. To replace cover, insert into tracks and slide down.
Door Jamb Edge
(Optional)
Keyless
Entry
Door Jamb Face
(SECTIONAL DOOR ONLY)
KEYLESS ENTRY MUST BE
INSTALLED WITHIN
SIGHT OF THE DOOR
Exterior Front Wall
1-Piece or
Sectional Door
Typical
Installation
Send LED
Pass LED
Ready LED
Enroll button
Enroll LED
Fail LED
Retry LED
Unit Cover
Sensor Strip
Resend button
TIPS FOR SUCCESSFUL ENROLLMENT
Correct
1. Make sure finger is free of grease or
dirt. Place finger flat above the
sensor strip with the top knuckle
above the sensor.
2. Swipe finger straight down keeping
firm contact with the sensor. The
swipe should be a slow, constant
speed.
NOTE: Use the same finger for every
swipe.
UNIT MUST BE INSTALLED
WITHIN SIGHT OF THE DOOR
EntryEase
1-1/4"
(3.2 cm)
Back View
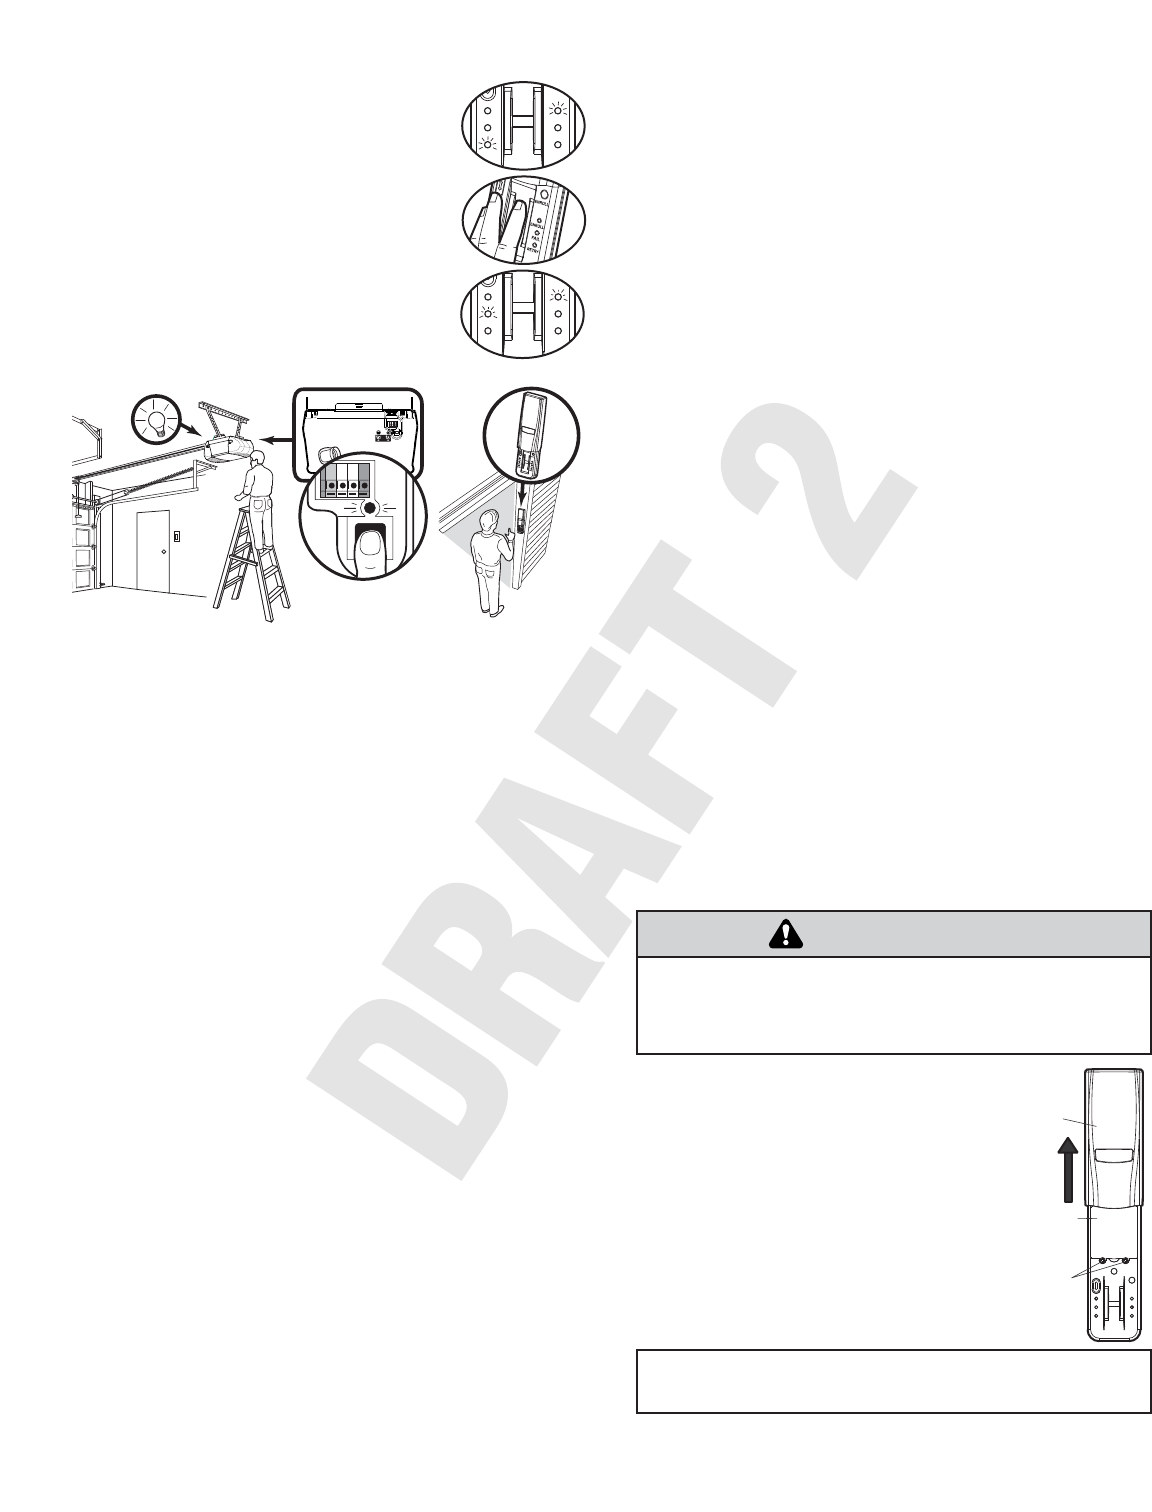
1. Slide cover past the normal “up stop”
position.
2. Unscrew the two screws and remove the
battery cover.
3. Replace the batteries. Screw the battery
cover back on.
4. Slide entry cover back into place.
To prevent possible SERIOUS INJURY or DEATH:
• NEVER allow small children near batteries.
• If battery is swallowed, immediately notify doctor.
WARNING
CAUTION WARNING
WARNING
THE BATTERY
The batteries should produce power for at least
one year. Replace when the Fail LED flashes
during use.
The unit requires 4 AAA batteries.
Dispose of old batteries properly.
FOR SERVICE DIAL OUR TOLL FREE NUMBER:
1-800-4-MY-HOME®(1-800-469-4663)
ENROLL
FAIL
RETRY
SEND
PASS
READY
ENROLL
Screws
Cover
Battery
Cover
Replacement parts:
Unit cover . . . . . . . . . . . . . . . . . . . . . . . . . . . . . . . . . . . . . . . .41A579
NOTE: The unit requires at least 3 good
swipes to enroll a user.
1. Ensure that Enroll LED and Ready LED are
lit and not flashing.
2. Swipe fingerprint down the sensor strip. The
Pass LED will light briefly if a good swipe
was achieved. If Retry LED lights followed
by Ready LED, continue swiping until Pass
LED is lit.
3. When enroll process is complete, the Enroll
LED and Pass LED will flash.
ENROLLING INITIAL USER
ENROLL
FAI L
RETRY
SEND
PAS S
READY
ENROLL
TO ENROLL ADDITIONAL USERS
The device can store up to four fingerprints at a time.
1. Turn unit on and wait for Ready LED to light.
2. Press and hold Enroll button for 1 second.
3. The Enroll LED will flash and an enrolled user must swipe
fingerprint to allow new enrollment.
4. The Enroll LED and Ready LED will light up when ready for
scan. The new user can now swipe their fingerprint. The
fingerprint will be swiped at least 3 times to ensure that a
good scan is made.
5. The Enroll LED and Pass LED will flash indicating successful
enrollment and unit will return to Ready mode.
TO ERASE USERS
NOTE: Erasing a user will erase ALL stored fingerprints and
will no longer be programmed to the opener.
1. Enrolled user must swipe fingerprint.
2. Press and hold the Enroll button for at least 6 seconds. The
Pass LEDs will flash for 15 seconds. During this time the
Resend button is active. After 15 seconds the Enroll and
Ready LEDs will light indicating fingerprints are erased. The
unit will return to Enroll mode.
ENROLL
FAI L
RETRY
SEND
PAS S
READY
ENROLL
TROUBLESHOOTING
• If no known enrolled users are available:
— The unit must be reset using the Factory Reset process.
• If the unit does not recognize a swiped fingerprint:
— Ensure that the Ready LED is lit before you swipe.
— Ensure that fingerprint is swiped correctly (See Tips for
Successful Enrollment).
— Ensure that fingerprint is enrolled.
— Ensure that sufficient pressure is being applied to sensor
strip (do not press too hard).
— The finger may need to be moistened if skin is too dry.
• If the unit is Enroll mode at power up:
— Complete enrollment process for initial user.
— The initial enroll process failed (signalled by a lit Enroll
LED and Fail LED) and must be repeated.
• If enrolling new user and all LEDs flash and unit returns to
Ready mode:
— The memory is full.
• If the unit does not wake:
— A button may be stuck. Press Enroll and Resend buttons
to ensure free movement.
— The batteries may need to be replaced.
NOTE: If sensor is dirty, user should wipe sensor with a clean
finger to remove any residue. It is recommended that the sensor
be periodically cleaned with a lint-free cloth dampened with
alcohol.
® Registered Trademark / ™ Trademark / SM Service Mark of Sears, Roebuck and Co.
114A3393 ® Marca Registrada / ™ Marca de Fábrica / SM Marca de Servicio de Sears, Roebuck and Co. © 2007 Sears
FACTORY RESET
1. When unit is on, press and hold the Enroll button until all
LEDs turn off (approximately 6 seconds).
2. Release the Enroll button.
3. Press and hold the Enroll button until the Ready and Enroll
LEDs are lit and not flashing. The unit will clear all enrolled
users and return to factory reset state.
PROGRAMMING TO OPENER
NOTE: The unit must have an enrolled user before it can be
programmed to the opener.
1. Press the purple “learn” button on the motor unit of the
opener.
2. Within 30 seconds, swipe enrolled fingerprint then press the
Resend button.
NOTE: Due to the 30 second time interval, a second person
may be needed to press the “learn” button.
OPERATION
1. Open cover and unit will turn on. If cover is already open,
press either the Resend or the Enroll button to turn unit on.
2. When Ready LED is lit, swipe an enrolled finger.
3. The Pass LED will flash and garage door will either open or
close depending on the door’s current state. The Fail LED
will light if another swipe is required.