Chamk lnorated MB300C Wireless Pocket Scanner User Manual
Champtek lncorporated Wireless Pocket Scanner Users Manual
UserManual.wiki
>
Chamk lnorated
>
MB300C User Manual
Users Manual
Navigation menu
Upload a User Manual
Namespaces
Wiki Guide
HTML
PDF
Info
Views
User Manual
Discussion / Help
Navigation
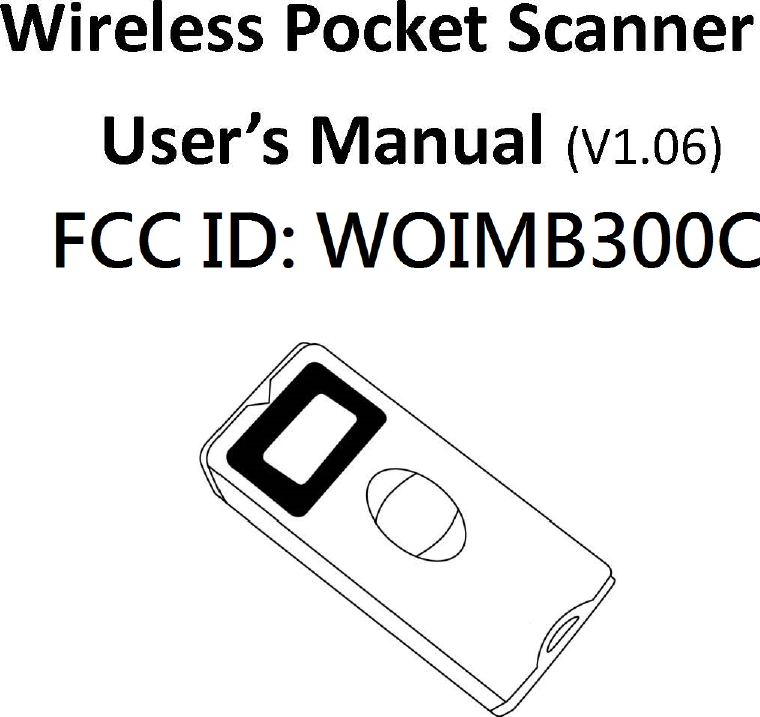


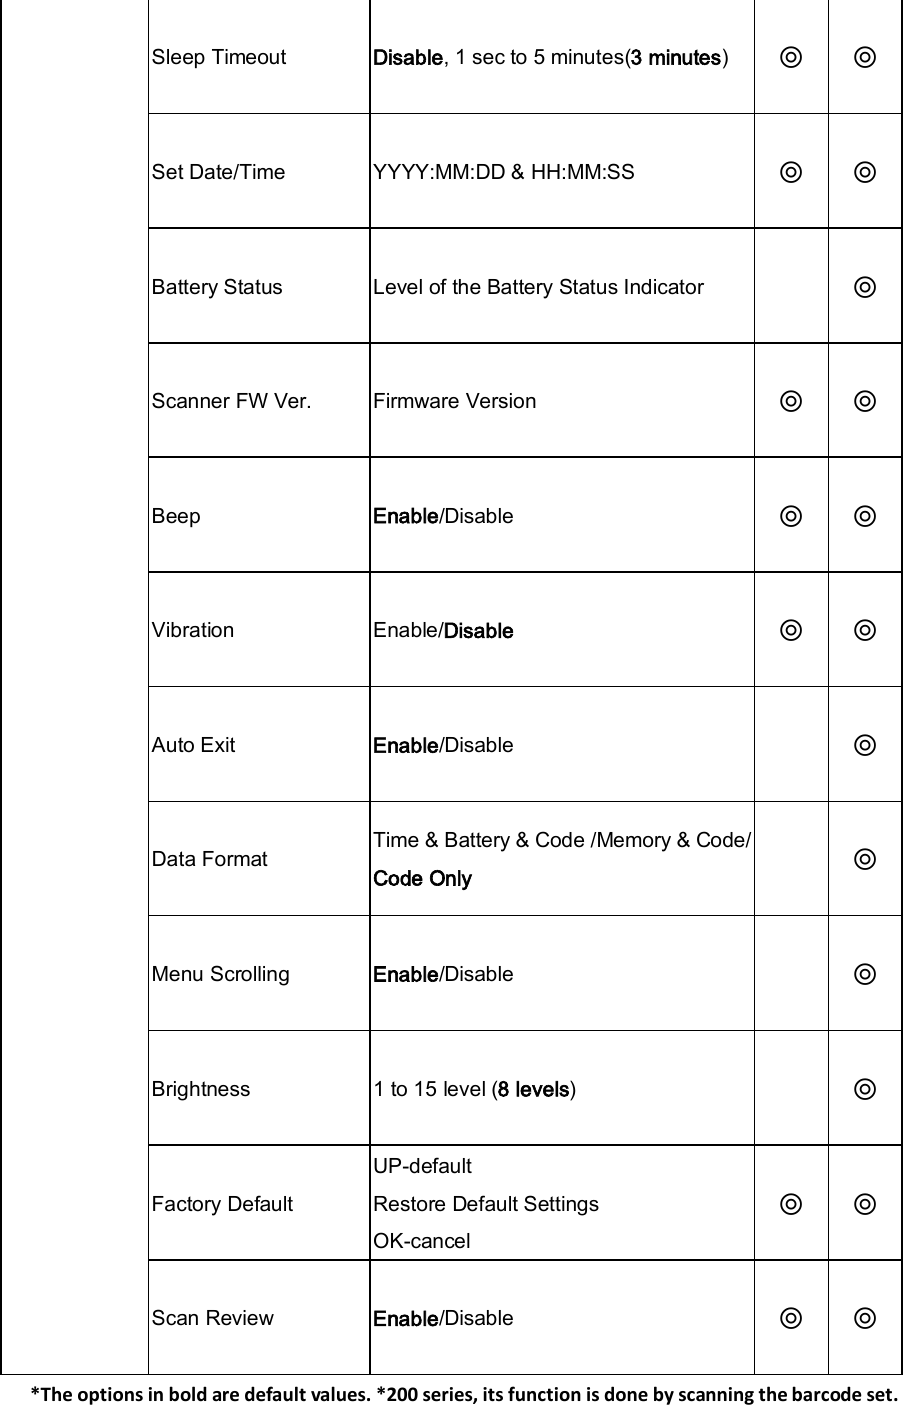
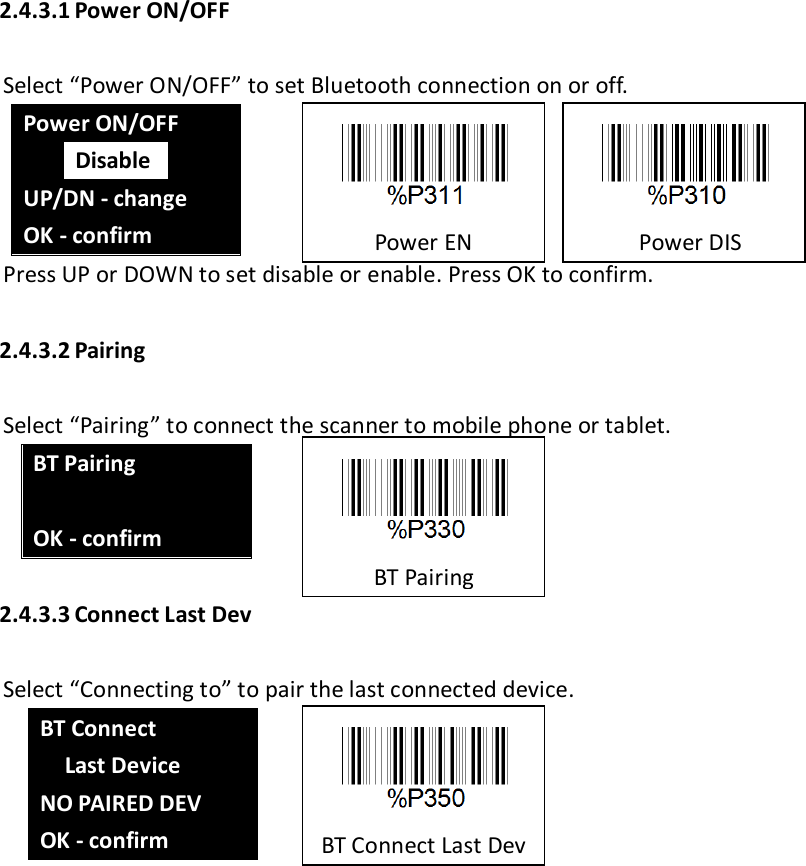
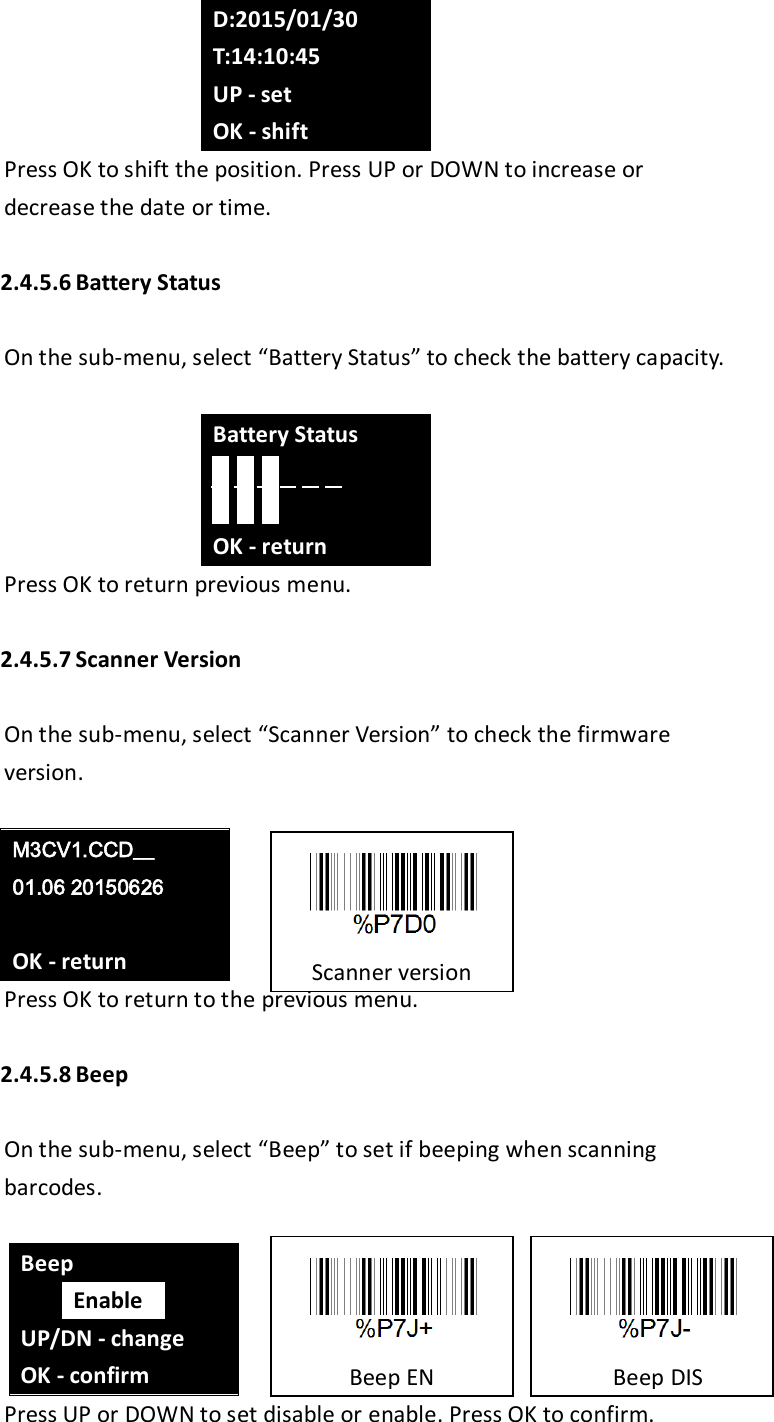
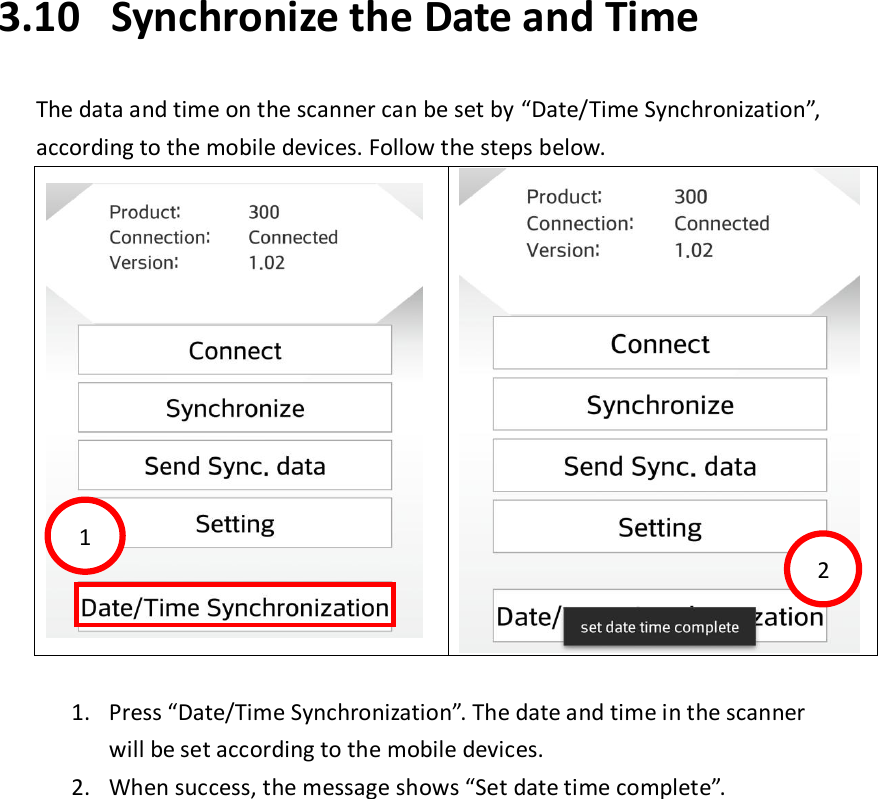
![TRIGGER/OK key and point the red beam fully across the barcodes. The following are examples. V Correct Scanning V Acceptable Scanning V Acceptable Scanning X Incorrect Scanning 2.4 Enter Scanner Menu The scanner can be configured by scrolling control buttons. Press the UP and DOWN buttons or Down button 3~5 sec simultaneously to access the scanner configuration menu. View Data BT Configure BT Service Data Process System Setting . Return The menu and functions are listed as the below table. (200/300 series) Top Menu Sub Menu Option 200 300 View Data View/Delete 1.View: press UP & DOWN scroll button 2.Delete: press TRIGGER/OK for 3 sec press UP to delete data press DOWN to exit ◎ BT Configure Connect Device SPP/HID [iOS, HID only] In SPP mode, install the APP on Mobile or Tablet is required. ◎ ◎](https://usermanual.wiki/Chamk-lnorated/MB300C/User-Guide-2801353-Page-11.png)

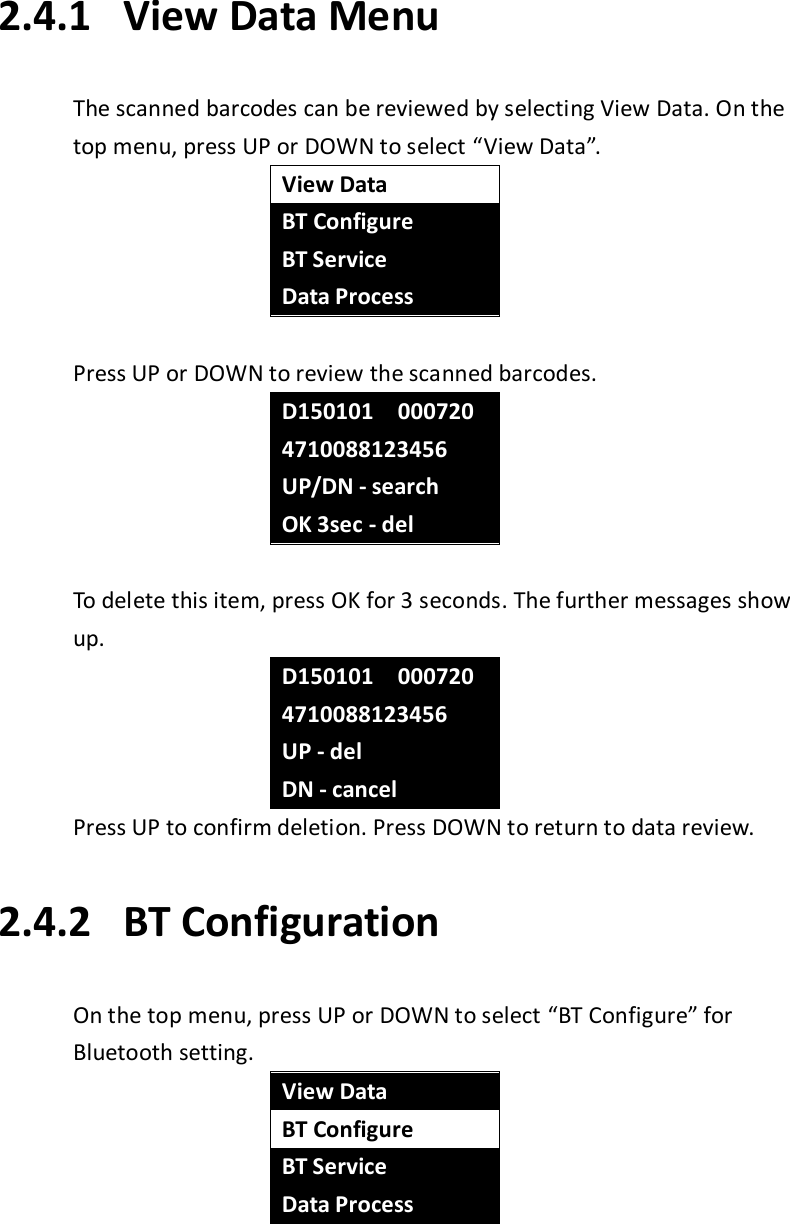
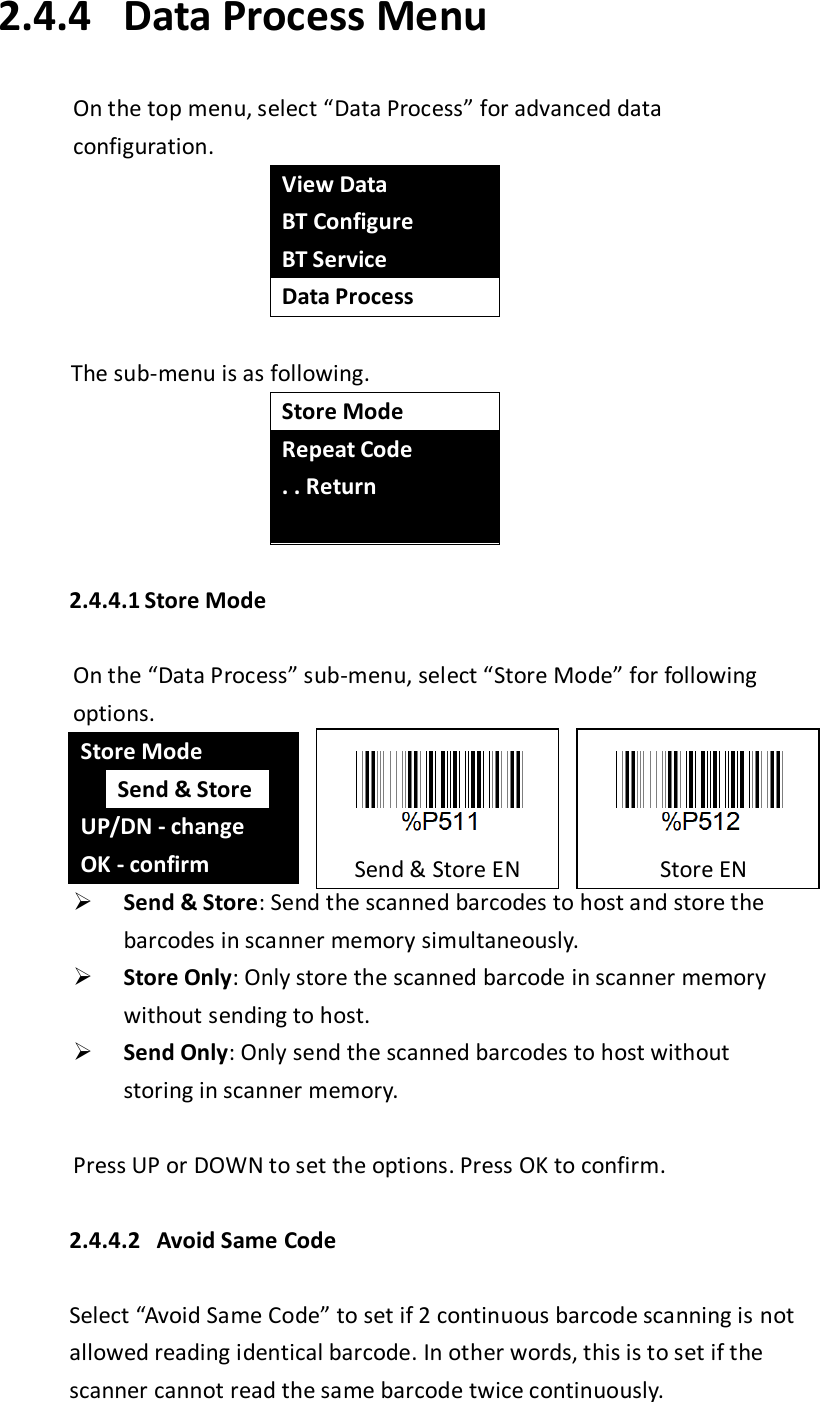
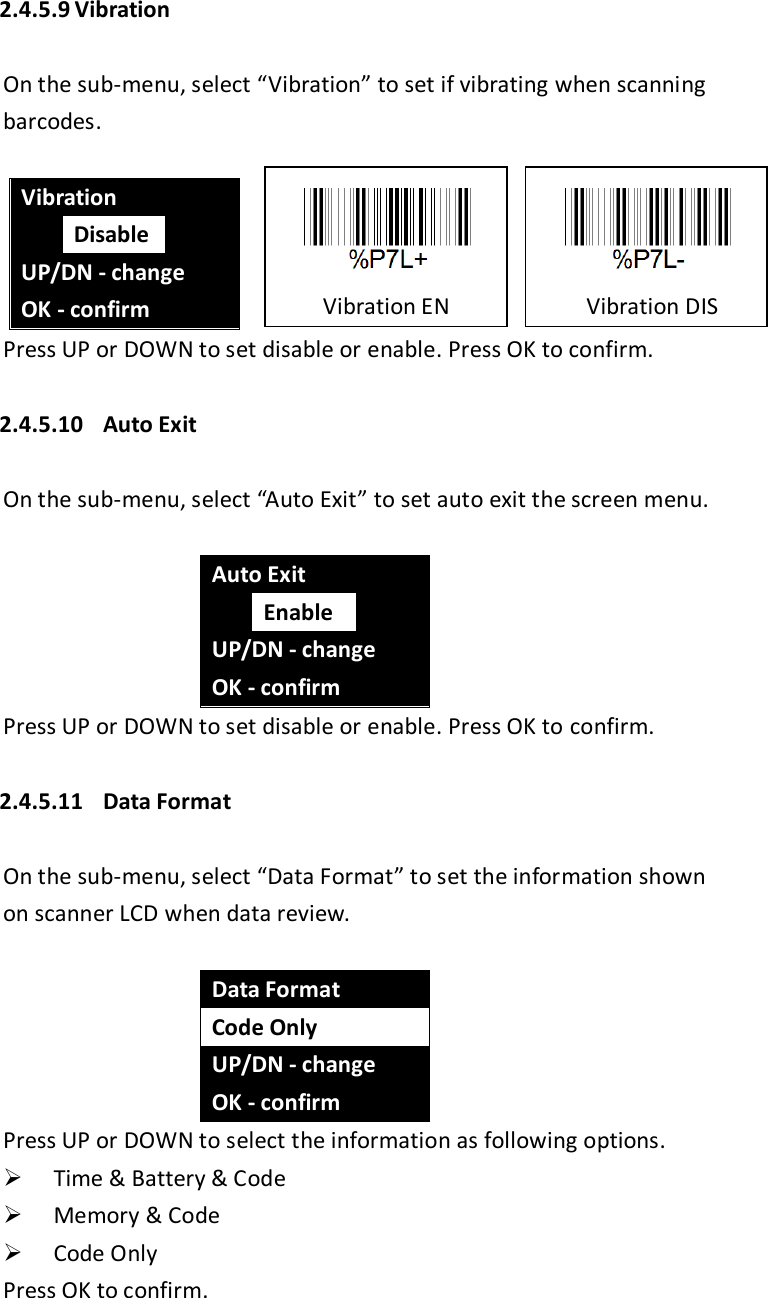

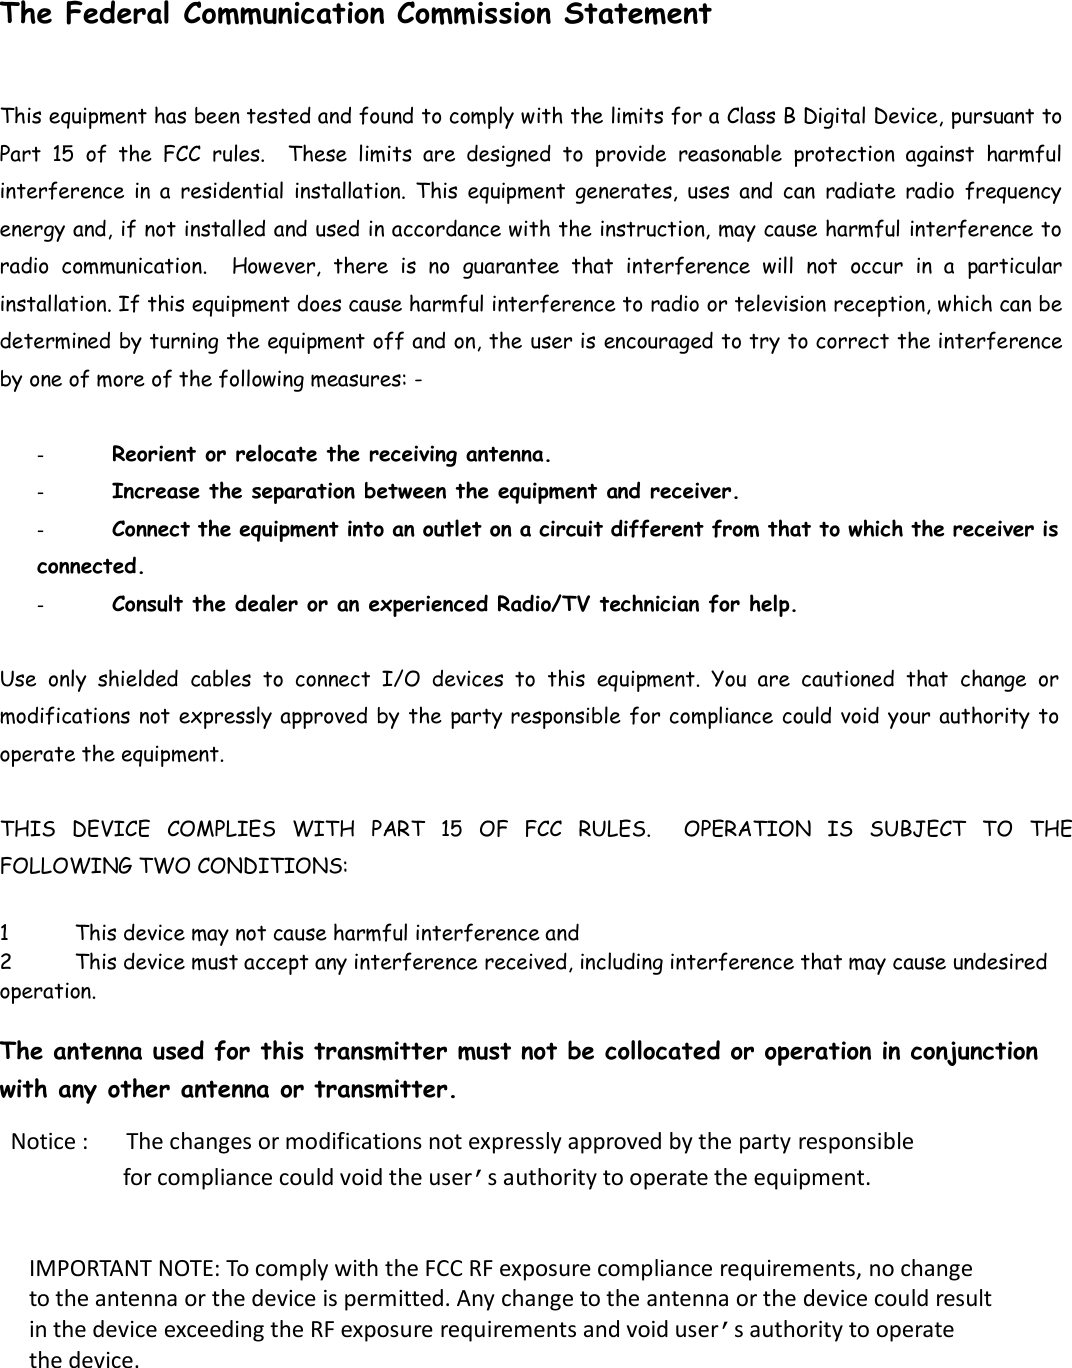
![2.5 LED Status The LED on scanner shows different color to indicate charging and scanning status. Refer to the table below for LED status. Status LED Color [Scanning]Decoding success Green Flashing [Scanning]Battery capacity < 30% Red Flashing [Charging]Battery in charging Red [Charging]Battery in charging when BT connected Blue & Keep Red Flashing [Charging]Battery capacity = 100% Keep Green Flashing [Charging]Battery capacity = 100% when BT connected Blue & Keep Green Flashing [Connecting]BT connected or connecting successful Blue [Checking] BT version or MAC address as BT disconnected Yellow [Reboot] White Green Flashing, indicates the barcode is decoded successfully Red Flashing, indicates the battery capacity is less than 30% Red LED or Keep Red Flashing LED, indicates the battery is in charging Keeps Green Flashing LED, indicates the battery is fully charged. Blue LED, indicates the BT connection is successful or connected Yellow LED, indicates checking the BT information as BT disconnected. White LED, indicates when system is reboot Chapter 3. Connect Mobile Devices The barcode scanner can be connected to mobile devices, such as smart phones or tablets for further configuration and data operation. The corresponding App should be installed on the mobile devices. 3.1 Device Requirements The mobile devices requirements are as following: Android 4.0 or above Bluetooth 2.1](https://usermanual.wiki/Chamk-lnorated/MB300C/User-Guide-2801353-Page-25.png)
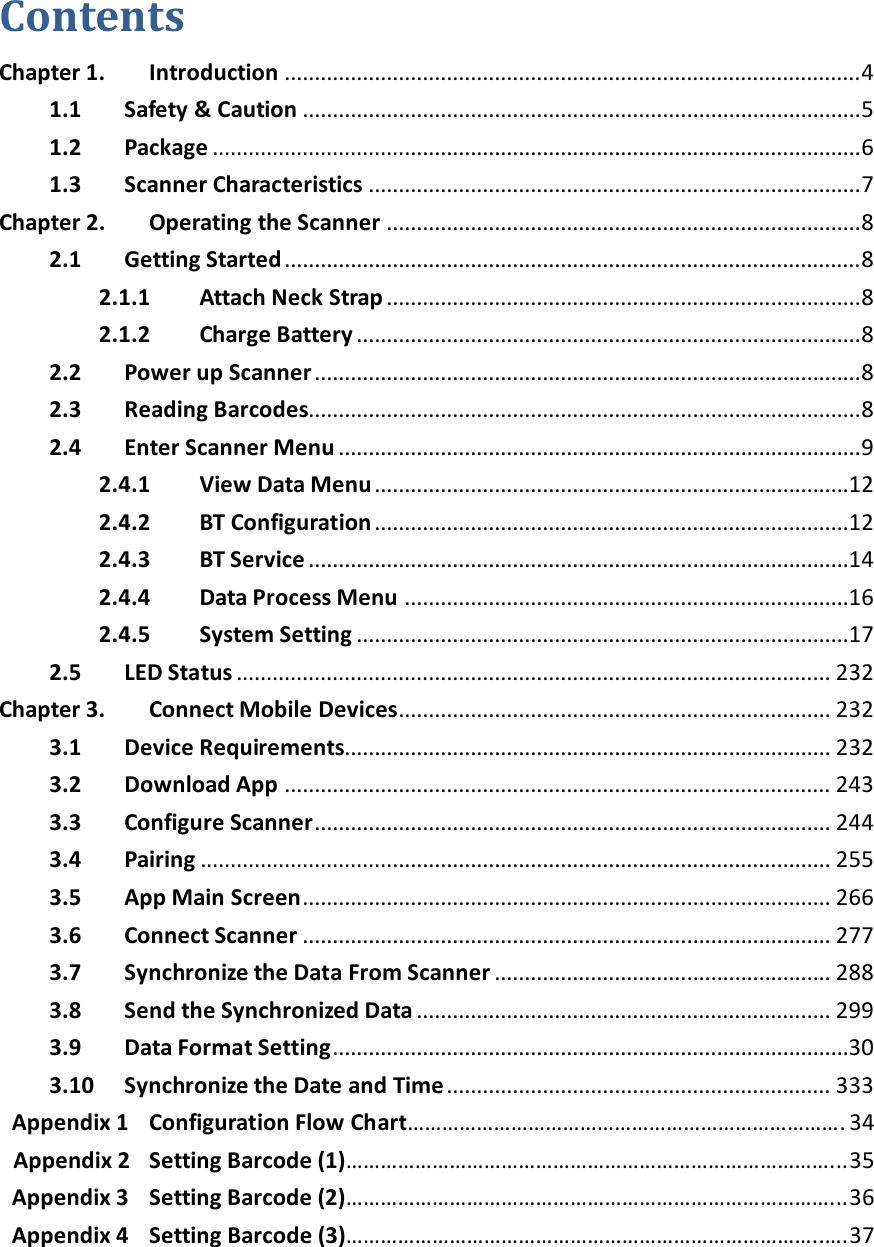
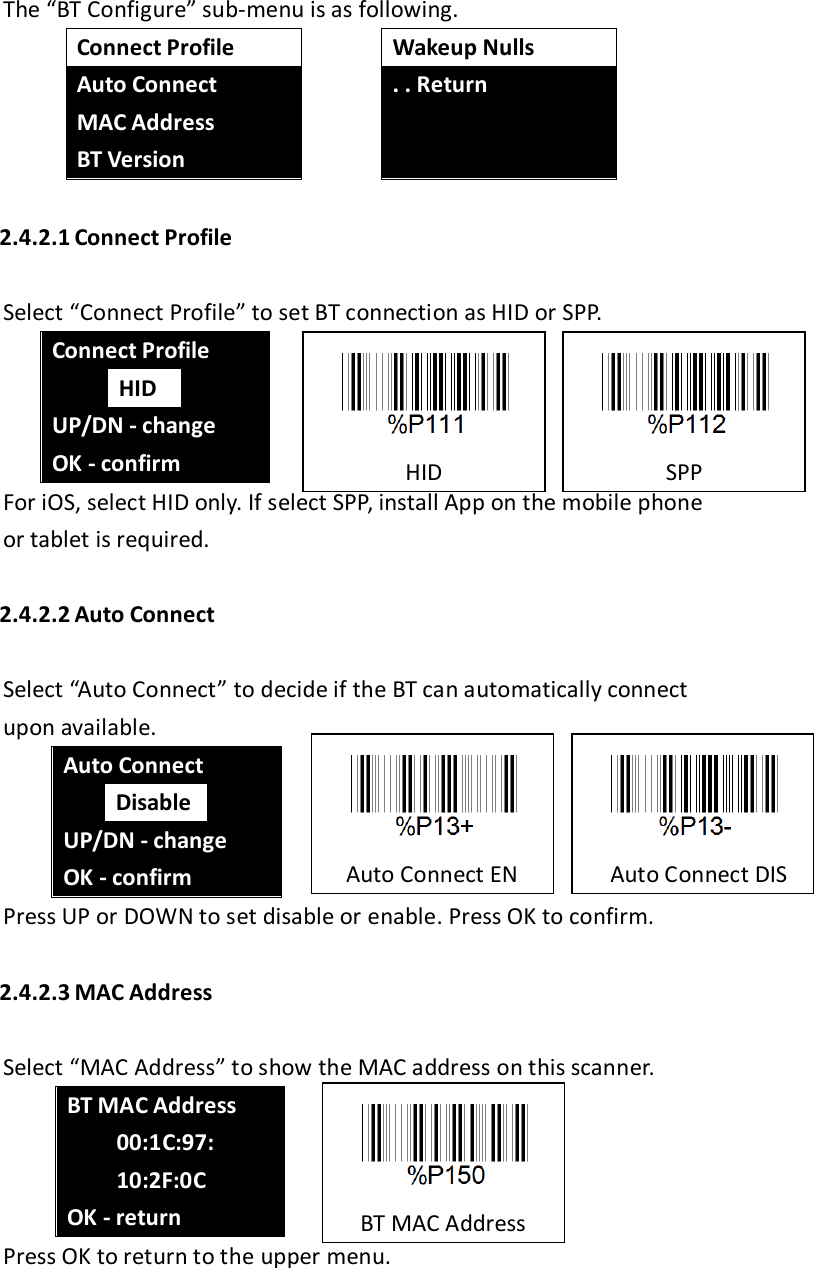
![Appendix 2 - Setting Barcode (1) HID SPP Auto Connect(HID) Enable Auto Connect(HID) Disable BT MAC Address BT Versioin Wakeup Nulls Enable Wakeup Nulls Disable BT Power ON BT Power OFF BT Pairing BT Connect Last Device [Store Mode]Send & Store [Store Mode]Store Only](https://usermanual.wiki/Chamk-lnorated/MB300C/User-Guide-2801353-Page-37.png)
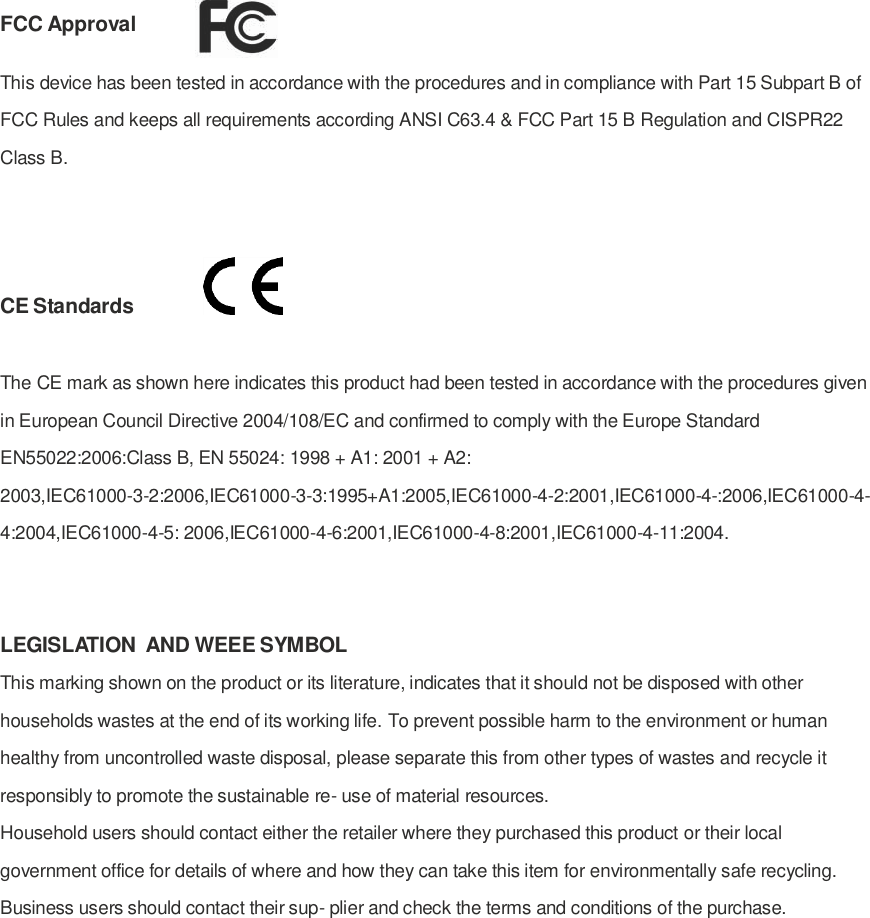
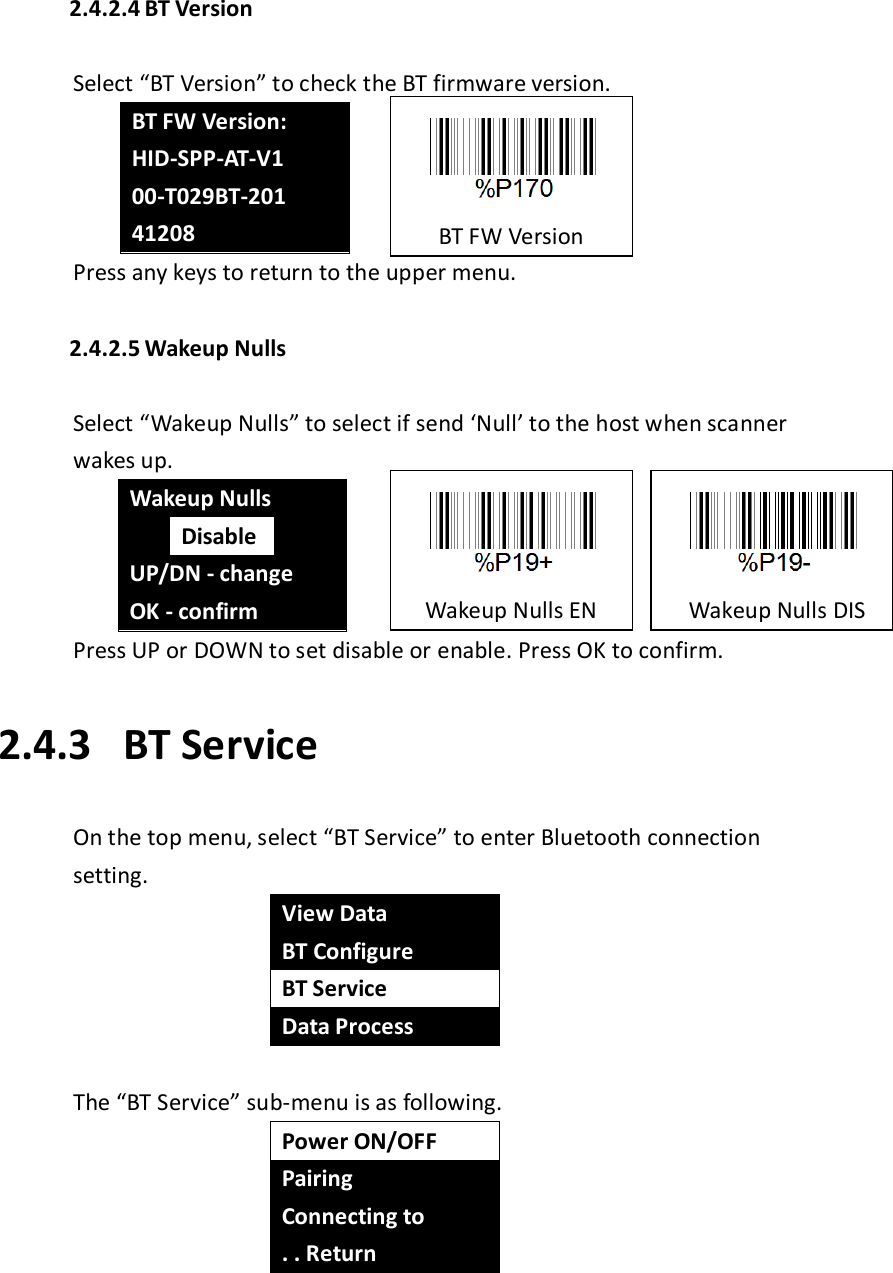
![Appendix 3 - Setting Barcode(2) [Store Mode]Send Only Reset Memory Avoid Same Code Enable Avoid Same Code Disable Auto Erase Enable Auto Erase Disable Memory Status Sleep Timeout 1 sec Sleep Timeout 5 sec Sleep Timeout 10 sec Sleep Timeout 30 sec Sleep Timeout 1 min Sleep Timeout 2 min Sleep Timeout 3 min](https://usermanual.wiki/Chamk-lnorated/MB300C/User-Guide-2801353-Page-38.png)
![Appendix 4 - Setting Barcode(3) Sleep Timeout 5 min Scanner Version Engine Version BT Versioin Beep ON Beep OFF Vibration ON Vibration OFF [Data Format] Time&Battery& Code [Data Format]Memory & Code [Data Format]Code Only Factory Default Scan Review ON(300 series) Scan Review OFF(300 series)](https://usermanual.wiki/Chamk-lnorated/MB300C/User-Guide-2801353-Page-39.png)