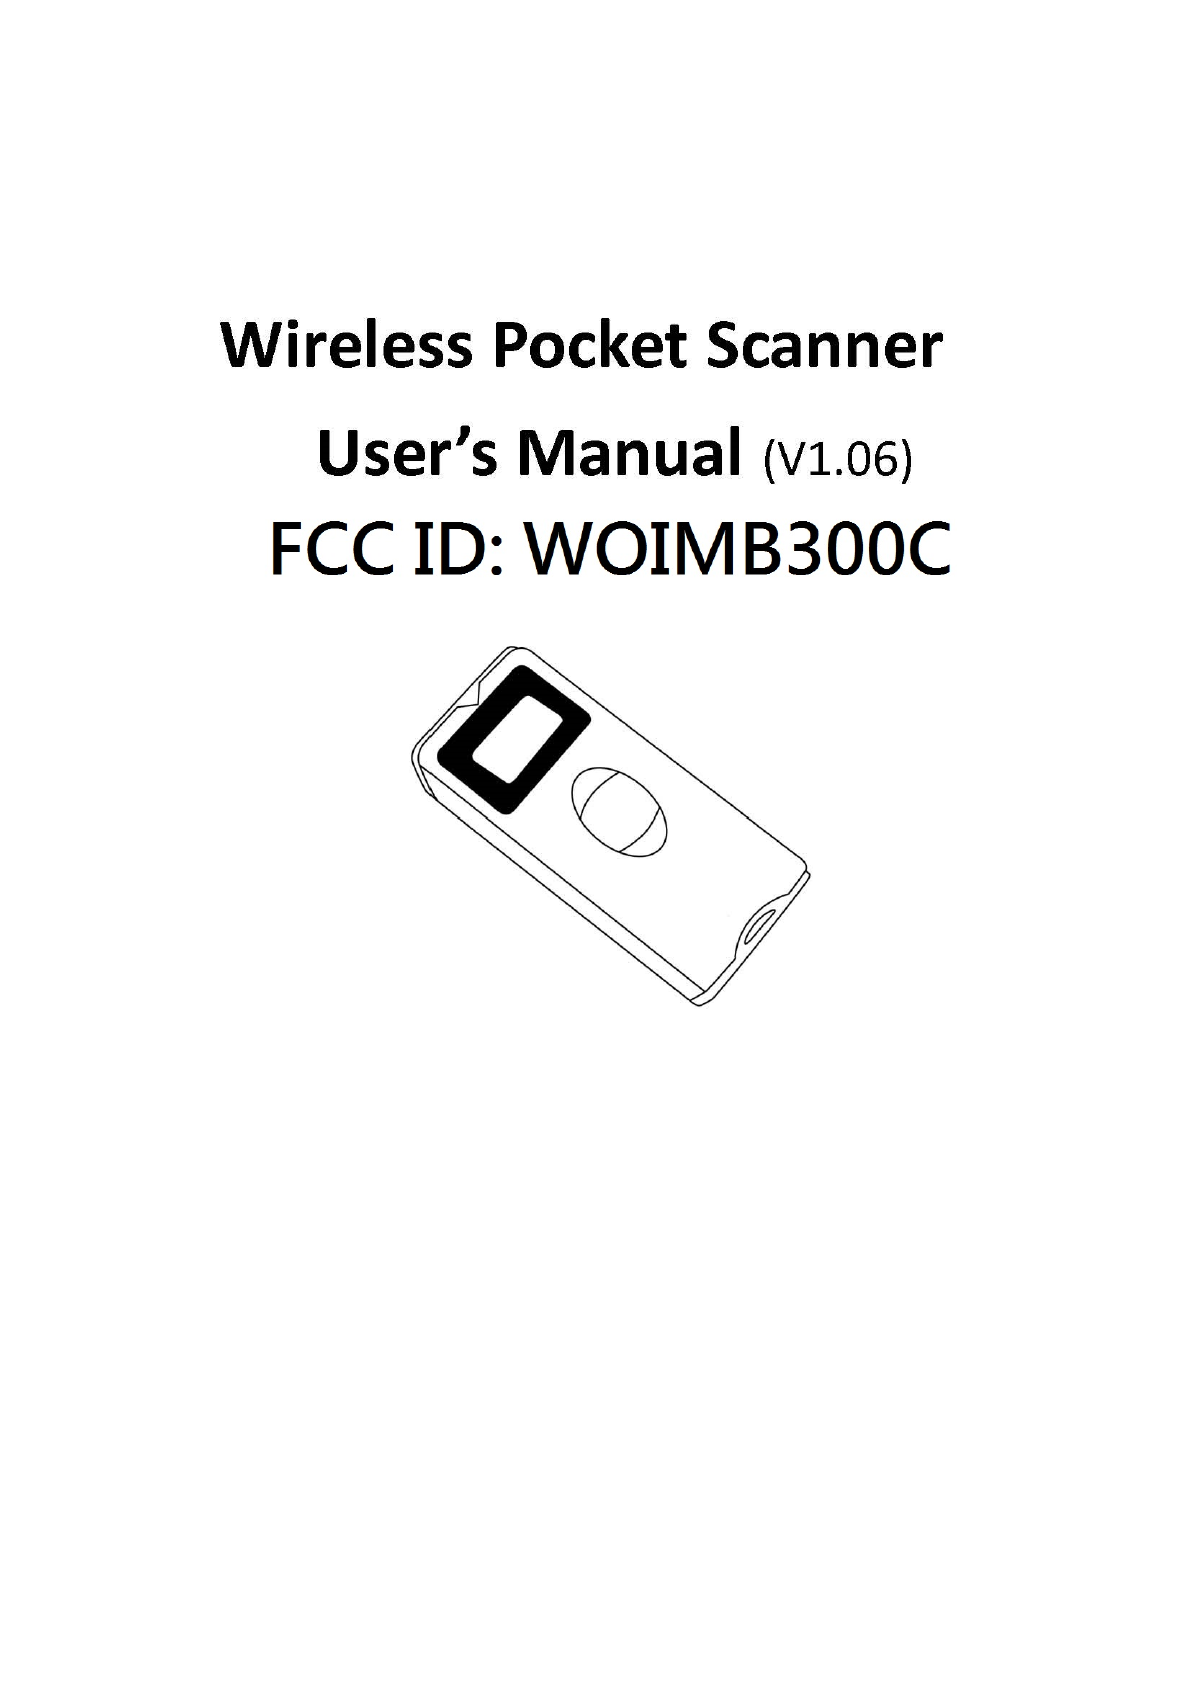
Chamk lnorated MB300C Wireless Pocket Scanner User Manual
Champtek lncorporated Wireless Pocket Scanner Users Manual
Users Manual

The Federal Communication Commission Statement
This equipment has been tested and found to comply with the limits for a Class B Digital Device, pursuant to
Part 15 of the FCC rules. These limits are designed to provide reasonable protection against harmful
interference in a residential installation. T
his equipment generates, uses and can radiate radio frequency
energy and, if not installed and used in accordance with the instruction, may cause harmful interference to
radio communication. However, there is no guarantee that interference will not occur
in a particular
installation. If this equipment does cause harmful interference to radio or television reception, which can be
determined by turning the equipment off and on, the user is encouraged to try to correct the interference
by one of more of the following measures: -
- Reorient or relocate the receiving antenna.
- Increase the separation between the equipment and receiver.
-
Connect the equipment into an outlet on a circuit different from that to which the receiver is
connected.
- Consult the dealer or an experienced Radio/TV technician for help.
Use only shielded cables to connect I/O devices to this equipment. You are cautioned that change or
modifications not expressly approved by the party responsible for compliance could void yo
ur authority to
operate the equipment.
THIS DEVICE COMPLIES WITH PART 15 OF FCC RULES. OPERATION IS SUBJECT TO THE
FOLLOWING TWO CONDITIONS:
1
This device may not cause harmful interference and
2 This device must accept any interference received, including interference that may cause undesired
operation.
The antenna used for this transmitter must not be collocated or operation in conjunction
with any other antenna or transmitter.
Notice : The changes or modifications not expressly approved by the party responsible
for compliance could void the user’s authority to operate the equipment.
IMPORTANT NOTE: To comply with the FCC RF exposure compliance requirements, no change
to the antenna or the device is permitted. Any change to the antenna or the device could result
in the device exceeding the RF exposure requirements and void user’s authority to operate
the device.
Copyright © 2015
This manual is copyrighted, with all right reserved. Under the copyright laws, this manual may not, in
whole or in part, be copied, photocopied, reproduced, translated or converted to any electronic
medium or machine readable form without prior written consent of maker.
Note: Due to product improvement programs, specifications and features are subject to change
without prior notice.
August 2015
Contents
Chapter 1. Introduction ................................................................................................ 4
1.1 Safety & Caution ............................................................................................. 5
1.2 Package ............................................................................................................ 6
1.3 Scanner Characteristics .................................................................................. 7
Chapter 2. Operating the Scanner ............................................................................... 8
2.1 Getting Started ................................................................................................ 8
2.1.1 Attach Neck Strap ............................................................................... 8
2.1.2 Charge Battery .................................................................................... 8
2.2 Power up Scanner ........................................................................................... 8
2.3 Reading Barcodes............................................................................................ 8
2.4 Enter Scanner Menu ....................................................................................... 9
2.4.1 View Data Menu ...............................................................................12
2.4.2 BT Configuration ...............................................................................12
2.4.3 BT Service ..........................................................................................14
2.4.4 Data Process Menu ..........................................................................16
2.4.5 System Setting ..................................................................................17
2.5 LED Status ................................................................................................... 232
Chapter 3. Connect Mobile Devices........................................................................ 232
3.1 Device Requirements................................................................................. 232
3.2 Download App ........................................................................................... 243
3.3 Configure Scanner ...................................................................................... 244
3.4 Pairing ......................................................................................................... 255
3.5 App Main Screen ........................................................................................ 266
3.6 Connect Scanner ........................................................................................ 277
3.7 Synchronize the Data From Scanner ........................................................ 288
3.8 Send the Synchronized Data ..................................................................... 299
3.9 Data Format Setting ......................................................................................30
3.10 Synchronize the Date and Time ................................................................ 333
Appendix 1 Configuration Flow Chart…………………………………………………………………. 34
Appendix 2 Setting Barcode (1)…………………………………………………………………………... 35
Appendix 3 Setting Barcode (2)…………………………………………………………………………... 36
Appendix 4 Setting Barcode (3)………………………………………………………………………..…. 37

FCC Approval
This device has been tested in accordance with the procedures and in compliance with Part 15 Subpart B of
FCC Rules and keeps all requirements according ANSI C63.4 & FCC Part 15 B Regulation and CISPR22
Class B.
CE Standards
The CE mark as shown here indicates this product had been tested in accordance with the procedures given
in European Council Directive 2004/108/EC and confirmed to comply with the Europe Standard
EN55022:2006:Class B, EN 55024: 1998 + A1: 2001 + A2:
2003,IEC61000-3-2:2006,IEC61000-3-3:1995+A1:2005,IEC61000-4-2:2001,IEC61000-4-:2006,IEC61000-4-
4:2004,IEC61000-4-5: 2006,IEC61000-4-6:2001,IEC61000-4-8:2001,IEC61000-4-11:2004.
LEGISLATION AND WEEE SYMBOL
This marking shown on the product or its literature, indicates that it should not be disposed with other
households wastes at the end of its working life. To prevent possible harm to the environment or human
healthy from uncontrolled waste disposal, please separate this from other types of wastes and recycle it
responsibly to promote the sustainable re- use of material resources.
Household users should contact either the retailer where they purchased this product or their local
government office for details of where and how they can take this item for environmentally safe recycling.
Business users should contact their sup- plier and check the terms and conditions of the purchase.
Chapter 1. Introduction
This barcode scanner is a brand new compact design which is especially for the
applications in ticketing, stocktaking or logistic market. With its tiny and
lightweight body, it can be easily carried in pocket or bag for mobility application.
As the tiny compact body, the housing is designed with IP54 rating that prevents
from water and dust and 1.5M dropping resistance. In addition, it can easily
connect to the most mobile devices via Bluetooth technology on android and iOS
system. The scanned data can be immediately transferred to the corresponding
application programs or stored in the built-in memory.
The scanner has built-in a large memory size of 8M bytes for user data storage
that can save over 100,000 items of 50 bytes barcode data. The scanner absolutely
provides plenty of memory requirements.
With its auto-shuttle-emulation-like smart detection that offers superior decoding
on a reading speed up to 500 scans per second and up to 250mm reading depth
for the majority of 1D barcodes, the scanner delivers excellent decoding
performance.
The scanner is absolutely a high performance compact barcode scanner that
provides the most cost-effective solutions in the market. It is perfectly suitable and
definitely the best choice for the application with mobile devices.
1.1 Safety & Caution
Please read the following safety statements carefully.
1. Please preserve this user’s manual for reference.
2. Before cleaning the equipment, the power must be cut off. Do not use
liquid or spray type of detersive to clean the equipment. Please use
dampish cotton cloth to clean the equipment.
3. Keep the equipment dry to avoid short circuit.
4. During installation the equipment must be fixed at solid table to avoid
damage caused by falling.
5. Before inserting power please ensure the voltage is healthy to the
equipment.
6. For safety please tie wire well and don’t put anything on the wire.
7. If equipment is not been used for long time, please cut off the power to
avoid damage from surge power.
8. Don’t spray any liquid on this scanner as it may cause fire or short circuit.
9. Please do not open the equipment. For safety only qualified serviceman
can open the equipment.
10. If there are the following situations please contact the qualified
serviceman to check this equipment.
(a) The damage of wire.
(b) Liquid infiltrates into the equipment.
(c) The equipment has been exposed to wet environment.
(d) The equipment can’t work well.
(e) The equipment has any obvious damage that makes it working
abnormally.
11. Do not store the equipment at the temperature lower than -20°C (-4°F) or
higher than +70°C (158°F) to avoid any damage.
1.2 Package
Unpack the scanner as follows:
Take the scanner and accessories out of the box. Remove the packing materials. Check
the packing list to make sure all the items ordered are received.
Barcode Scanner
USB Cable
Neck Strap
Battery
Quick Guide
Adaptor (Option)
Visually inspect the scanner and accessories for any evidence of physical damage.
If anything is missing or appears to be damaged, immediately contact your dealer.
Barcode Scanner
USB Cable
Neck Strap
Battery
Quick Guide
Adaptor (Option)
--------------------
--------------------
--------------------
-
--------------------
--------------------
--------------------
-
1.3 Scanner Characteristics
The scanner comes with 3 controls buttons and 1 indication LED. The exterior
control and display are shown below.
*300 series are including the OLED display but 200 series are not.
Micro USB
Connector
Reboot
OK/ Power ON
/Trigger Button
OLED Display
(300 Series)
LED Indicator
Power OFF
UP/DOWN
Scrolling Buttons
For Neck Strap
Chapter 2. Operating the Scanner
2.1 Getting Started
The barcode scanner provides the easy-use control buttons and easy-read
signal for user scanning experience. The following will give a guide to start with
this scanner.
2.1.1 Attach Neck Strap
It is recommended to attach the neck strap to the barcode scanner and
wearing it on either neck or hand for a convenient and safety carry.
2.1.2 Charge Battery
The barcode scanner is installed with a high capacity Lithium battery.
When the LED shows flashing red, it indicates low battery and the
capacity is less than 30%. It needs to be charged.
The barcode scanner can be charged by either PC USB port or adaptor.
To charge the scanner, connect the USB port between PC USB port or
adaptor. When the battery is fully charged, the LED illuminates green.
Remove the USB cable from PC USB or adaptor.
2.2 Power up Scanner
To power up the scanner, press “UP” button. The scanner is ready for
scanning barcodes.
2.3 Reading Barcodes
The scanner supports all major 1D barcodes. To read the barcodes, press the
TRIGGER/OK key and point the red beam fully across the barcodes. The
following are examples.
V Correct Scanning
V Acceptable Scanning
V Acceptable Scanning
X Incorrect Scanning
2.4 Enter Scanner Menu
The scanner can be configured by scrolling control buttons. Press the UP and
DOWN buttons or Down button 3~5 sec simultaneously to access the scanner
configuration menu.
View Data
BT Configure
BT Service
Data Process
System Setting
. Return
The menu and functions are listed as the below table. (200/300 series)
Top Menu
Sub Menu
Option
200
300
View Data
View/Delete
1.View: press UP & DOWN scroll button
2.Delete: press TRIGGER/OK for 3 sec
press UP to delete data
press DOWN to exit
◎
BT Configure
Connect Device
SPP/HID [iOS, HID only]
In SPP mode, install the APP on Mobile
or Tablet is required.
◎
◎

Auto Connect(HID)
Enable/Disable
◎
◎
MAC Address
12 Characters
Bluetooth
MAC Address
◎
◎
BT Version
Bluetooth Firmware Version
◎
◎
Wake up Nulls
Enable/Disable
◎
◎
BT Service
Power ON/OFF
Enable/Disable
◎
◎
Pairing
Pairing neighboring Bluetooth devices
◎
◎
Connect to Last Dev
View Connect to Bluetooth
device
◎
◎
Data Process
Store Mode
Send Only / Send & Store /Store Only
◎
◎
Avoid Same Code
Enable/Disable
◎
◎
System Setting
Memory Status
Indicates: Scanned/Deleted/Available
barcode numbers
◎
◎
Reset Memory
Reset the memory counters
◎
◎
Auto Erase
Enable/Disable
◎
◎

Sleep Timeout
Disable, 1 sec to 5 minutes(3 minutes)
◎
◎
Set Date/Time
YYYY:MM:DD & HH:MM:SS
◎
◎
Battery Status
Level of the Battery Status Indicator
◎
Scanner FW Ver.
Firmware Version
◎
◎
Beep
Enable/Disable
◎
◎
Vibration
Enable/Disable
◎
◎
Auto Exit
Enable/Disable
◎
Data Format
Time & Battery & Code /Memory & Code/
Code Only
◎
Menu Scrolling
Enable/Disable
◎
Brightness
1 to 15 level (8 levels)
◎
Factory Default
UP-default
Restore Default Settings
OK-cancel
◎
◎
Scan Review
Enable/Disable
◎
◎
*The options in bold are default values. *200 series, its function is done by scanning the barcode set.

2.4.1 View Data Menu
The scanned barcodes can be reviewed by selecting View Data. On the
top menu, press UP or DOWN to select “View Data”.
View Data
BT Configure
BT Service
Data Process
Press UP or DOWN to review the scanned barcodes.
D150101 000720
4710088123456
UP/DN - search
OK 3sec - del
To delete this item, press OK for 3 seconds. The further messages show
up.
D150101 000720
4710088123456
UP - del
DN - cancel
Press UP to confirm deletion. Press DOWN to return to data review.
2.4.2 BT Configuration
On the top menu, press UP or DOWN to select “BT Configure” for
Bluetooth setting.
View Data
BT Configure
BT Service
Data Process
The “BT Configure” sub-menu is as following.
Connect Profile
Auto Connect
MAC Address
BT Version
Wakeup Nulls
. . Return
2.4.2.1 Connect Profile
Select “Connect Profile” to set BT connection as HID or SPP.
Connect Profile
HID
UP/DN - change
OK - confirm
For iOS, select HID only. If select SPP, install App on the mobile phone
or tablet is required.
2.4.2.2 Auto Connect
Select “Auto Connect” to decide if the BT can automatically connect
upon available.
Auto Connect
Disable
UP/DN - change
OK - confirm
Press UP or DOWN to set disable or enable. Press OK to confirm.
2.4.2.3 MAC Address
Select “MAC Address” to show the MAC address on this scanner.
BT MAC Address
00:1C:97:
10:2F:0C
OK - return
Press OK to return to the upper menu.
HID
SPP
Auto Connect EN
Auto Connect DIS
BT MAC Address
2.4.2.4 BT Version
Select “BT Version” to check the BT firmware version.
BT FW Version:
HID-SPP-AT-V1
00-T029BT-201
41208
Press any keys to return to the upper menu.
2.4.2.5 Wakeup Nulls
Select “Wakeup Nulls” to select if send ‘Null’ to the host when scanner
wakes up.
Wakeup Nulls
Disable
UP/DN - change
OK - confirm
Press UP or DOWN to set disable or enable. Press OK to confirm.
2.4.3 BT Service
On the top menu, select “BT Service” to enter Bluetooth connection
setting.
View Data
BT Configure
BT Service
Data Process
The “BT Service” sub-menu is as following.
Power ON/OFF
Pairing
Connecting to
. . Return
Wakeup Nulls EN
Wakeup Nulls DIS
BT FW Version
2.4.3.1 Power ON/OFF
Select “Power ON/OFF” to set Bluetooth connection on or off.
Power ON/OFF
Disable
UP/DN - change
OK - confirm
Press UP or DOWN to set disable or enable. Press OK to confirm.
2.4.3.2 Pairing
Select “Pairing” to connect the scanner to mobile phone or tablet.
BT Pairing
OK - confirm
2.4.3.3 Connect Last Dev
Select “Connecting to” to pair the last connected device.
BT Connect
Last Device
NO PAIRED DEV
OK - confirm
Power EN
Power DIS
BT Pairing
BT Connect Last Dev
EN
2.4.4 Data Process Menu
On the top menu, select “Data Process” for advanced data
configuration.
View Data
BT Configure
BT Service
Data Process
The sub-menu is as following.
Store Mode
Repeat Code
. . Return
2.4.4.1 Store Mode
On the “Data Process” sub-menu, select “Store Mode” for following
options.
Store Mode
Send & Store
UP/DN - change
OK - confirm
Send & Store: Send the scanned barcodes to host and store the
barcodes in scanner memory simultaneously.
Store Only: Only store the scanned barcode in scanner memory
without sending to host.
Send Only: Only send the scanned barcodes to host without
storing in scanner memory.
Press UP or DOWN to set the options. Press OK to confirm.
2.4.4.2 Avoid Same Code
Select “Avoid Same Code” to set if 2 continuous barcode scanning is not
allowed reading identical barcode. In other words, this is to set if the
scanner cannot read the same barcode twice continuously.
Send & Store EN
Store EN
Avoid Same Code
Disable
UP/DN - change
OK - confirm
Press UP or DOWN to set disable or enable. Press OK to confirm.
2.4.5 System Setting
On the top menu, select “System Setting” for other system settings.
System Setting
. Return
The settings in “System Setting” are listed below.
Memory Status
Reset Memory
Auto Erase
Sleep Timeout
Page 1
Set Date/Time
Battery Status
Scanner FW Ver
Beep
Page 2
Vibration
Auto Exit
Data Format
Menu Scrolling
Page 3
Brightness
Factory Default
Scan Review
. . Return
Page 4
2.4.5.1 Memory Status
On the sub-menu, select “Memory Status” to check the memory usage
which indicates the item numbers of scanned barcodes by memory
counters.
Memory Status
Scanned:000147
Deleted:000001
Avaible:099853
In this case, 147 barcodes are stored. 1 barcode is deleted. 99853 items
AvoidSameCode EN
AvoidSameCode
DIS
Memory Status
are available. Press OK to return to upper menu.
2.4.5.2 Reset Memory
On the sub-menu, select “Reset Memory” to reset the memory
counters.
Reset Memory
UP - reset
OK - cancel
Press UP to reset the counters.
2.4.5.3 Auto Erase
On the sub-menu, select “Auto Erase” to erase all the saved items in
memory automatically when the items reach 100,000. A message will
prompt before erasing.
Auto Erase
Disable
UP/DN - change
OK - confirm
2.4.5.4 Sleep Timeout
On the sub-menu, select “Sleep Timeout” to set the time to enter sleep
mode. The time can be set from 1 second to 5 minutes.
Sleep Timeout
03 min
UP/DN-change
OK-confirm
Press UP or DOWN to set the time. Press OK to confirm.
2.4.5.5 Date/Time Set
On the sub-menu, select “Date/Time” to set the current date and time.
Reset Memory EN
Auto Erase EN
Auto Erase DIS
Sleep Timeout 1min
Sleep Timeout 3min

D:2015/01/30
T:14:10:45
UP - set
OK - shift
Press OK to shift the position. Press UP or DOWN to increase or
decrease the date or time.
2.4.5.6 Battery Status
On the sub-menu, select “Battery Status” to check the battery capacity.
Battery Status
OK - return
Press OK to return previous menu.
2.4.5.7 Scanner Version
On the sub-menu, select “Scanner Version” to check the firmware
version.
M3CV1.CCD__
01.06 20150626
OK - return
Press OK to return to the previous menu.
2.4.5.8 Beep
On the sub-menu, select “Beep” to set if beeping when scanning
barcodes.
Beep
Enable
UP/DN - change
OK - confirm
Press UP or DOWN to set disable or enable. Press OK to confirm.
Beep EN
Beep DIS
Scanner version
2.4.5.9 Vibration
On the sub-menu, select “Vibration” to set if vibrating when scanning
barcodes.
Vibration
Disable
UP/DN - change
OK - confirm
Press UP or DOWN to set disable or enable. Press OK to confirm.
2.4.5.10 Auto Exit
On the sub-menu, select “Auto Exit” to set auto exit the screen menu.
Auto Exit
Enable
UP/DN - change
OK - confirm
Press UP or DOWN to set disable or enable. Press OK to confirm.
2.4.5.11 Data Format
On the sub-menu, select “Data Format” to set the information shown
on scanner LCD when data review.
Data Format
Code Only
UP/DN - change
OK - confirm
Press UP or DOWN to select the information as following options.
Time & Battery & Code
Memory & Code
Code Only
Press OK to confirm.
Vibration EN
Vibration DIS

2.4.5.12 Menu Scrolling
On the sub-menu, select “Menu Scrolling” to set whether the scanner
menu is scrolling when pressing UP/DOWN and reaching the last item.
Menu Scrolling
Disable
UP/DN - change
OK - confirm
Press UP or DOWN to set disable or enable. Press OK to confirm.
2.4.5.13 Brightness
On the sub-menu, select “Brightness” to set the LCD brightness.
Brightness
Level
08
UP/DN - change
OK - confirm
The brightness is ranged from level 1 to level 15. Press UP or DOWN to
set the level. Press OK to confirm.
2.4.5.13.1 Factory Default
On the sub-menu, select “Factory Default” to restore all to factory
default settings.
Factory Default
UP - default
OK - cancel
Press UP to restore the default settings. Press OK to return to the
previous menu.
2.4.5.13.2 Scan Review
On the sub-menu, select “Scan Review” to set the data to show on the
display after scanning. It will be able to review the scanned data right
Factory Default EN

after scanning.
Scan Review
Disable
UP/DN - change
OK - confirm
Press UP or DOWN to set disable or enable. Press OK to confirm.

2.5 LED Status
The LED on scanner shows different color to indicate charging and scanning
status. Refer to the table below for LED status.
Status
LED Color
[Scanning]Decoding success
Green Flashing
[Scanning]Battery capacity < 30%
Red Flashing
[Charging]Battery in charging
Red
[Charging]Battery in charging when BT connected
Blue & Keep Red Flashing
[Charging]Battery capacity = 100%
Keep Green Flashing
[Charging]Battery capacity = 100% when BT connected
Blue & Keep Green Flashing
[Connecting]BT connected or connecting successful
Blue
[Checking] BT version or MAC address as BT disconnected
Yellow
[Reboot]
White
Green Flashing, indicates the barcode is decoded successfully
Red Flashing, indicates the battery capacity is less than 30%
Red LED or Keep Red Flashing LED, indicates the battery is in charging
Keeps Green Flashing LED, indicates the battery is fully charged.
Blue LED, indicates the BT connection is successful or connected
Yellow LED, indicates checking the BT information as BT disconnected.
White LED, indicates when system is reboot
Chapter 3. Connect Mobile Devices
The barcode scanner can be connected to mobile devices, such as smart
phones or tablets for further configuration and data operation. The
corresponding App should be installed on the mobile devices.
3.1 Device Requirements
The mobile devices requirements are as following:
Android 4.0 or above
Bluetooth 2.1

3.2 Download App
Use the mobile device and open browser to visit Google Play. In the input box,
type “OEM Pocket Scanner” to search the app. Click “INSTALL” to install it on
the mobile device. This version of app is for Android mobile devices.
3.3 Configure Scanner
Prior to connecting scanner to the mobile devices, the settings on the scanner
should be configured. On the scanner, press UP and DOWN buttons
simultaneously to enter configuration menu.
Select BT Configure -> Connect Profile -> SPP.
View Data
BT Configure
BT Service
Data Process
Connect Profile
Auto Connect
MAC Address
BT version
Connect Profile
SPP
UP/DN-change
OK- confirm
Select BT Service -> Power ON/OFF -> Enable.
View Data
BT Configure
BT Service
Data Process
Power ON/OFF
Pairing
Connecting to
. . Return
Power ON/OFF
Enable
UP/DN-change
OK-confirm
3.4 Pairing
The following steps show the pairing steps for the scanner and mobile device.
a. Turn on Bluetooth power on mobile device.
b. Discover the searching devices shown on mobile device. Find “Pocket
Scanner” and click “Pair” to connect the scanner with mobile device
by Bluetooth.
c. When paired, the scanner will be shown as paired device on mobile
device.
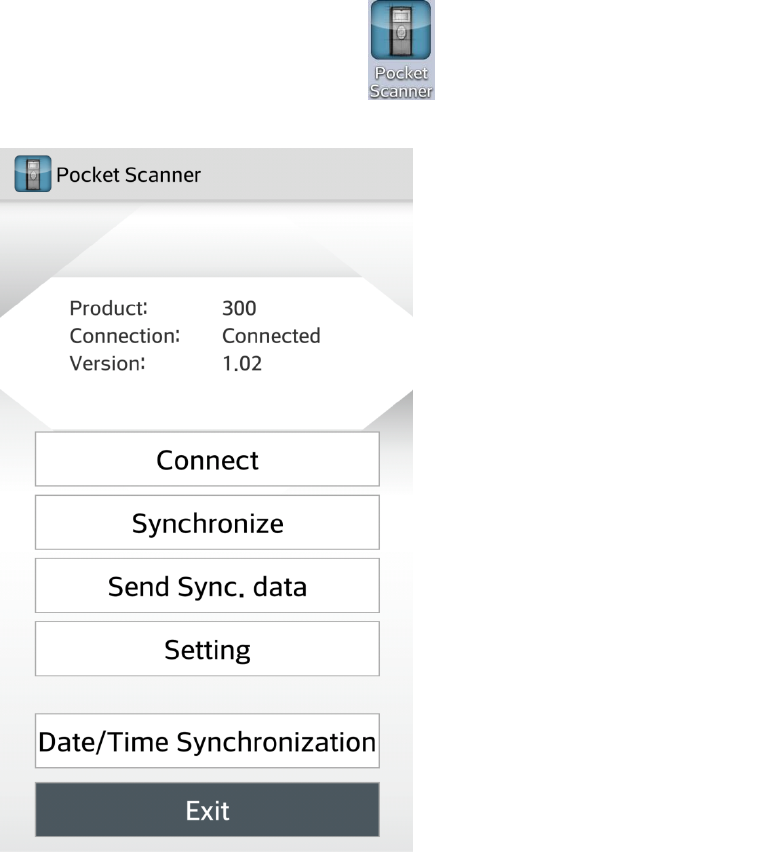
3.5 App Main Screen
In the App list, click “Pocket Scanner” to
execute the scanner application program.
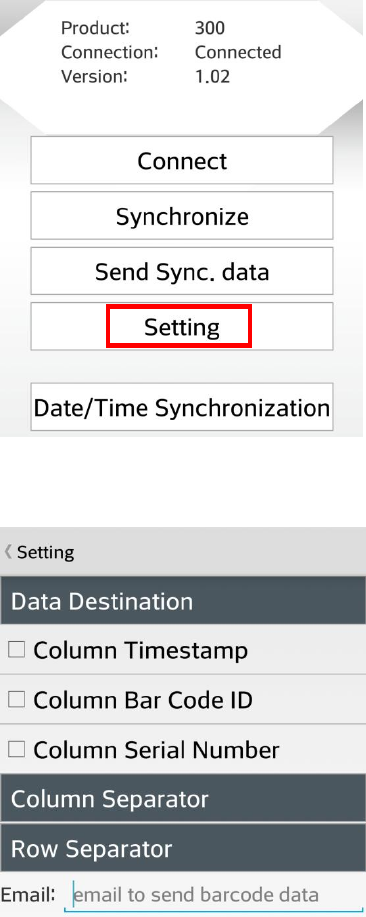
The main screen looks like this.
On the screen top shows the product name, connection status and
app version.
Connect Button: Connect app to the scanner.
Synchronize: Upload the data from scanner to mobile device.
Send Sync. data: Send out the uploaded data to the designated
email address.
Setting: Configure the data format for the uploaded barcodes.
Date/Time Synchronize: Set the date and time on scanner
according to mobile device.
Exit: Close this app program.
Down from Google Play
Search “oem pocket scanner”
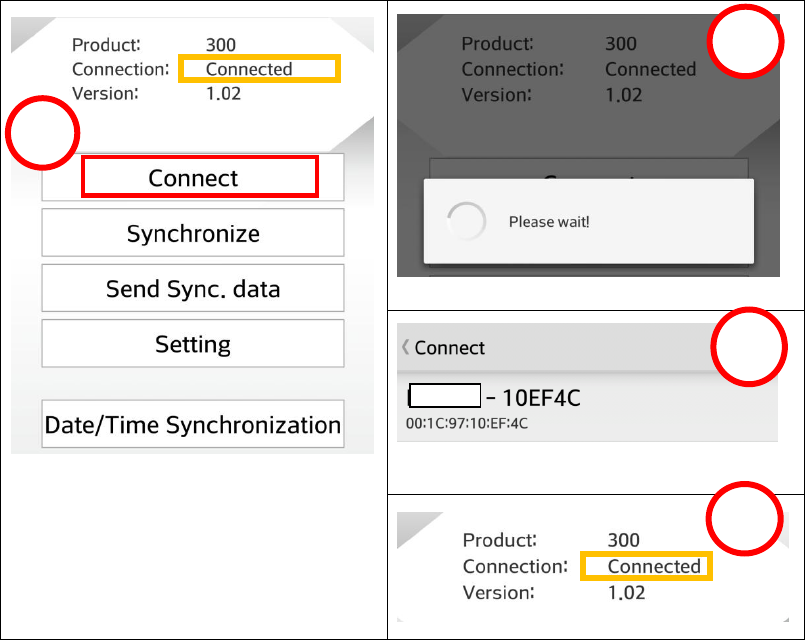
3.6 Connect Scanner
To connect the app with mobile device, follow the steps below.
1. Press “Connect”
2. Wait for a while
3. When connected, the scanner is shown on the device list
4. On the screen top, the connection status shows “Connected”.
1
2
3
4
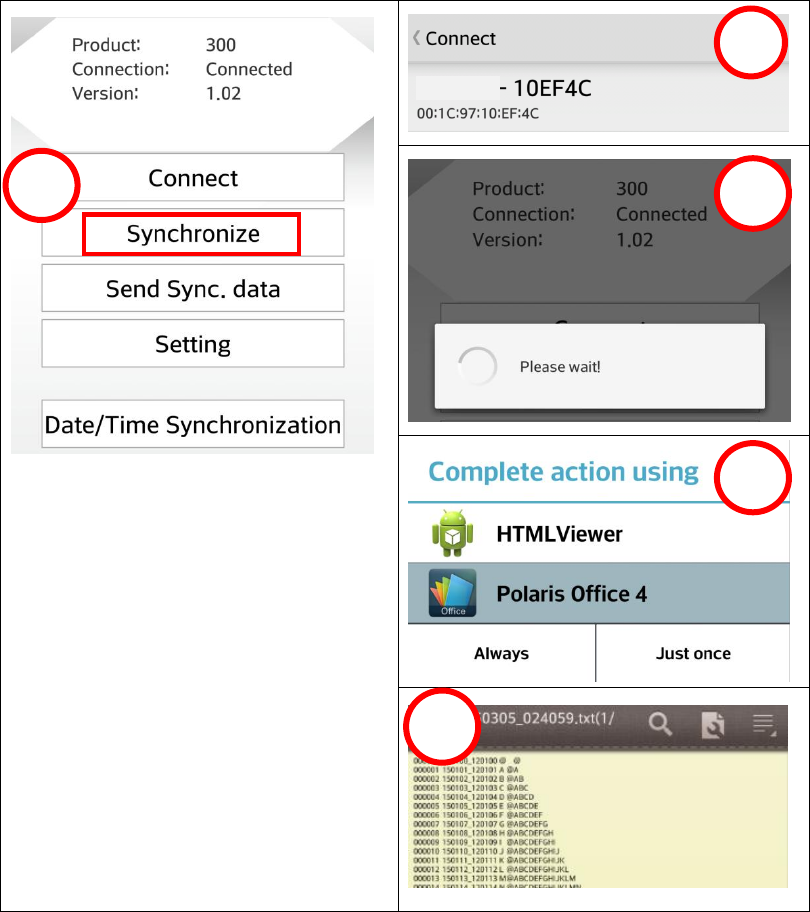
3.7 Synchronize the Data From Scanner
The scanned data can be saved in the barcode scanner and the data can be
uploaded to the mobile devices. Follow the steps below.
1. Press “Synchronize” to upload all the data from scanner to mobile
device.
2. Select the corresponding scanner.
3. Wait for a while when data is transferring.
4. Select a program to display the data.
5. All the scanned data is shown in the program.
1
2
2
3
2
4
4
5
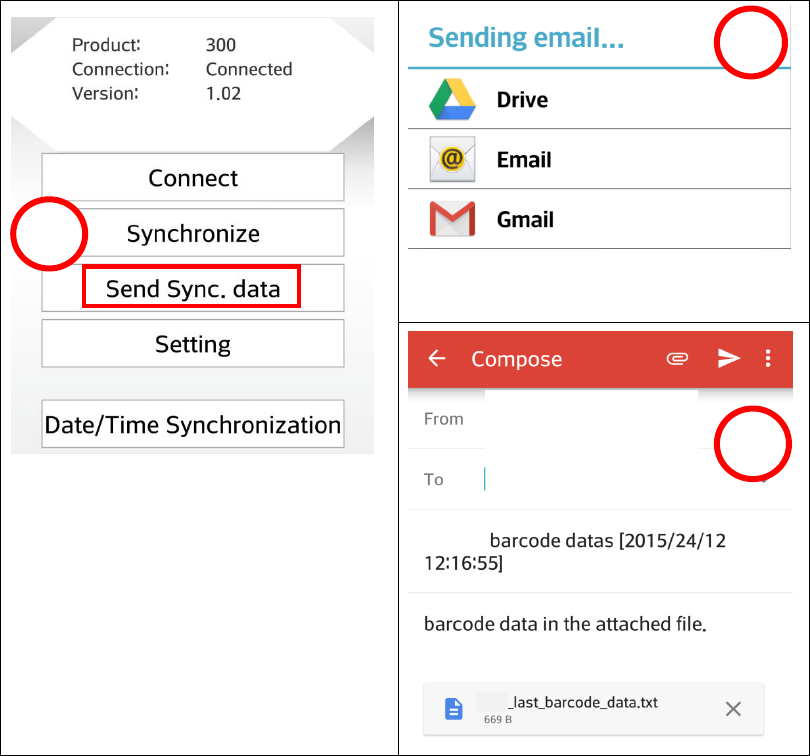
3.8 Send the Synchronized Data
Save the uploaded data from scanner as a file in the mobile devices. This file
can be sent out to the designated email address. Therefore the data can be
downloaded from PC or other equipment in order to do further data process
on other PC’s or equipment. Follow the steps below.
1. Press “Send Sync. data” to send out the data file.
2. The mobile devices will pop up email options. Depending on the mobile
devices and email address availability, select appropriate option.
3. Input the email address. The data file can be sent to this address.
1
2
2
3
2
4
abc@hello.com
3.9 Data Format Setting
The data shown in mobile devices can be formatted prior to upload the data
from scanner. Therefore required data format can be used in the mobile
devices.
On the main screen, press “Setting” to enter the menu.
The options in “Setting” are shown as following.
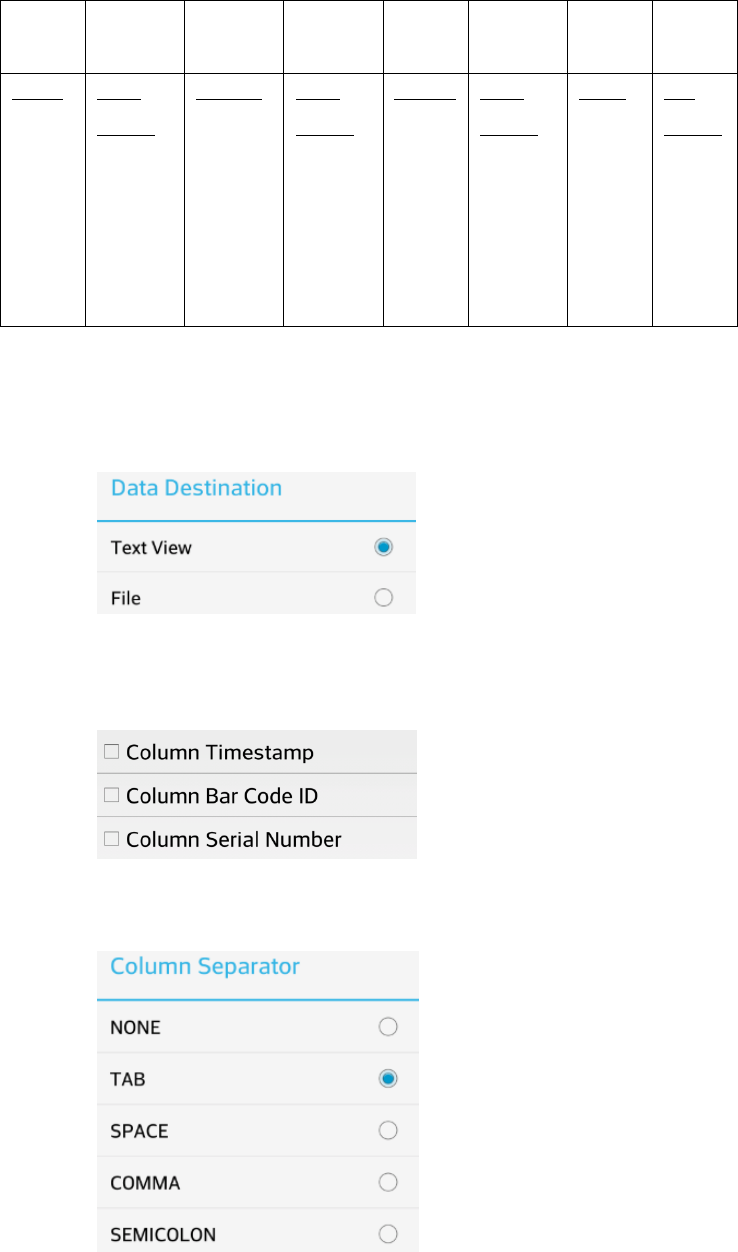
The data format to be configured is defined as following. For example:
000001,2015-06-20_14:10:15, A,12345678CR
Data Destination: The data uploaded from scanner can be assigned to
be viewed by data process program or saved as a file.
Column: Tick to add time stamp, barcode ID or barcode sequence
number in front of each barcode.
Column Separator: Select one of the separators between columns.
Data
000001
,
2015-06-20_
14:10:15
,
A
,
12345678
CR
Format
Serial No
Column
separator:
NONE
TAB
SPACE
COMMA
SEMICOLON
Time stamp
Column
separator:
NONE
TAB
SPACE
COMMA
SEMICOLON
Barcode ID
Column
separator:
NONE
TAB
SPACE
COMMA
SEMICOLON
Barcode
Row
separator:
NONE
LF
CR
CRLF
Row Separator: Select one the separators between 2 rows.
Email: Set the email address here for the data file to be sent to. When
press “Send Sync. data” to send out the file, the email address will be
automatically prompted. No need to type it afterwards.

3.10 Synchronize the Date and Time
The data and time on the scanner can be set by “Date/Time Synchronization”,
according to the mobile devices. Follow the steps below.
1. Press “Date/Time Synchronization”. The date and time in the scanner
will be set according to the mobile devices.
2. When success, the message shows “Set date time complete”.
2
1
4
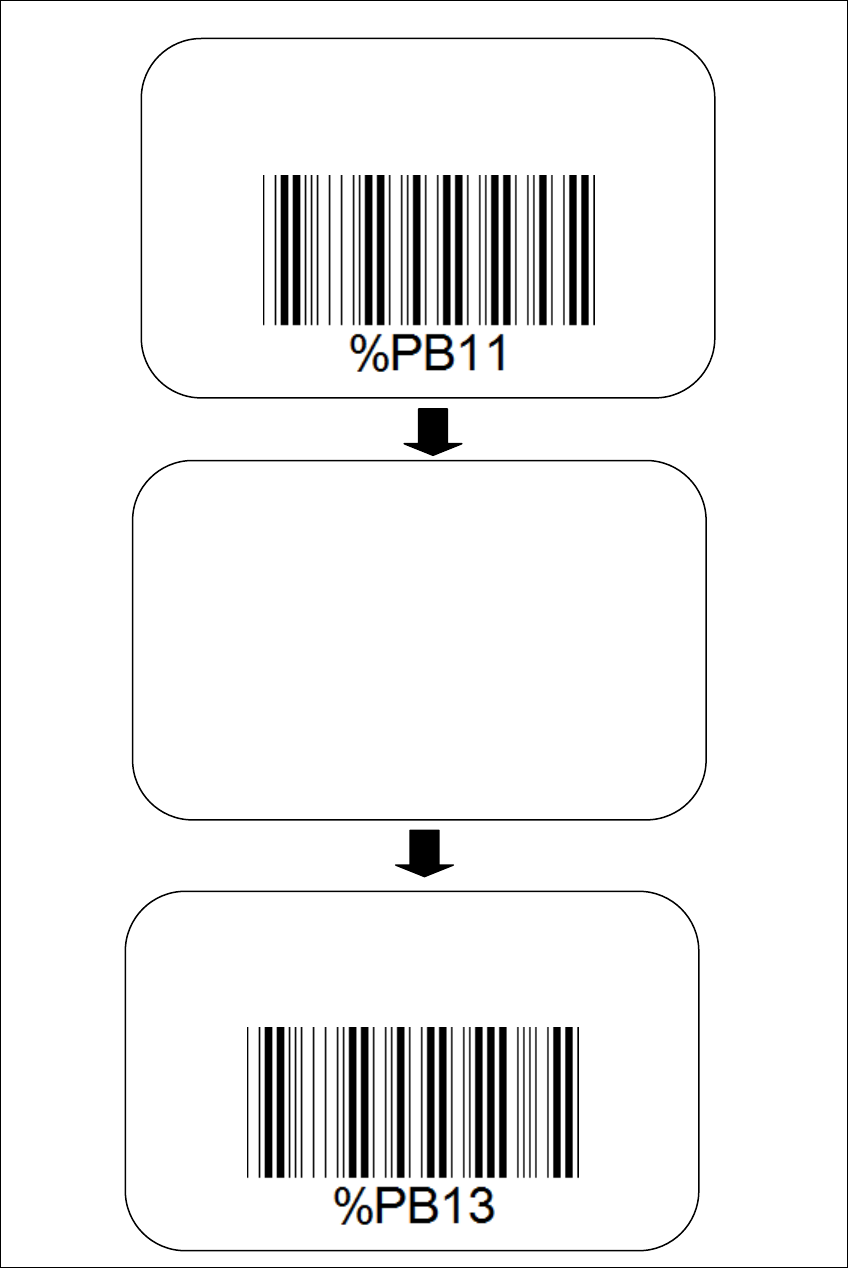
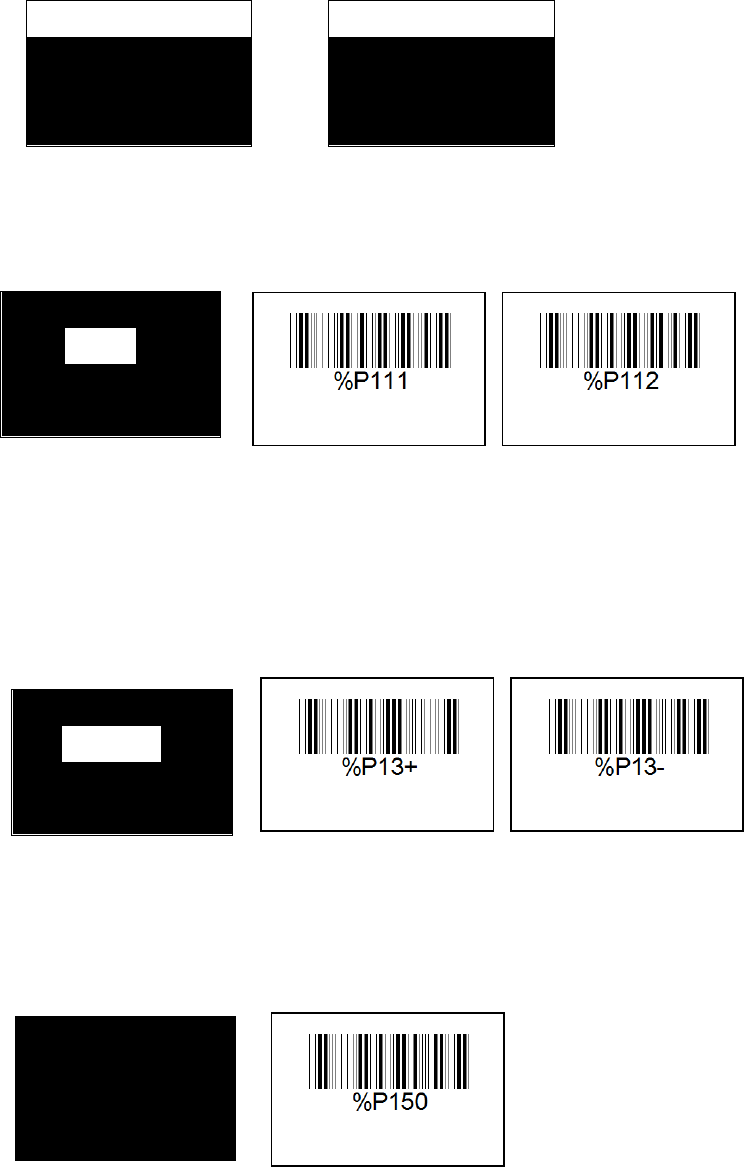
Appendix 1 -Configuration Flow Chart(Pocket Scanner)
①Scan Start of Configuration
②Scan all necessary labels for parameters
that meet applications
Interface Selection
Connection Selection
Symbologies Selection
③Scan End & Save Parameter to permanently
save the settings by your programmed.
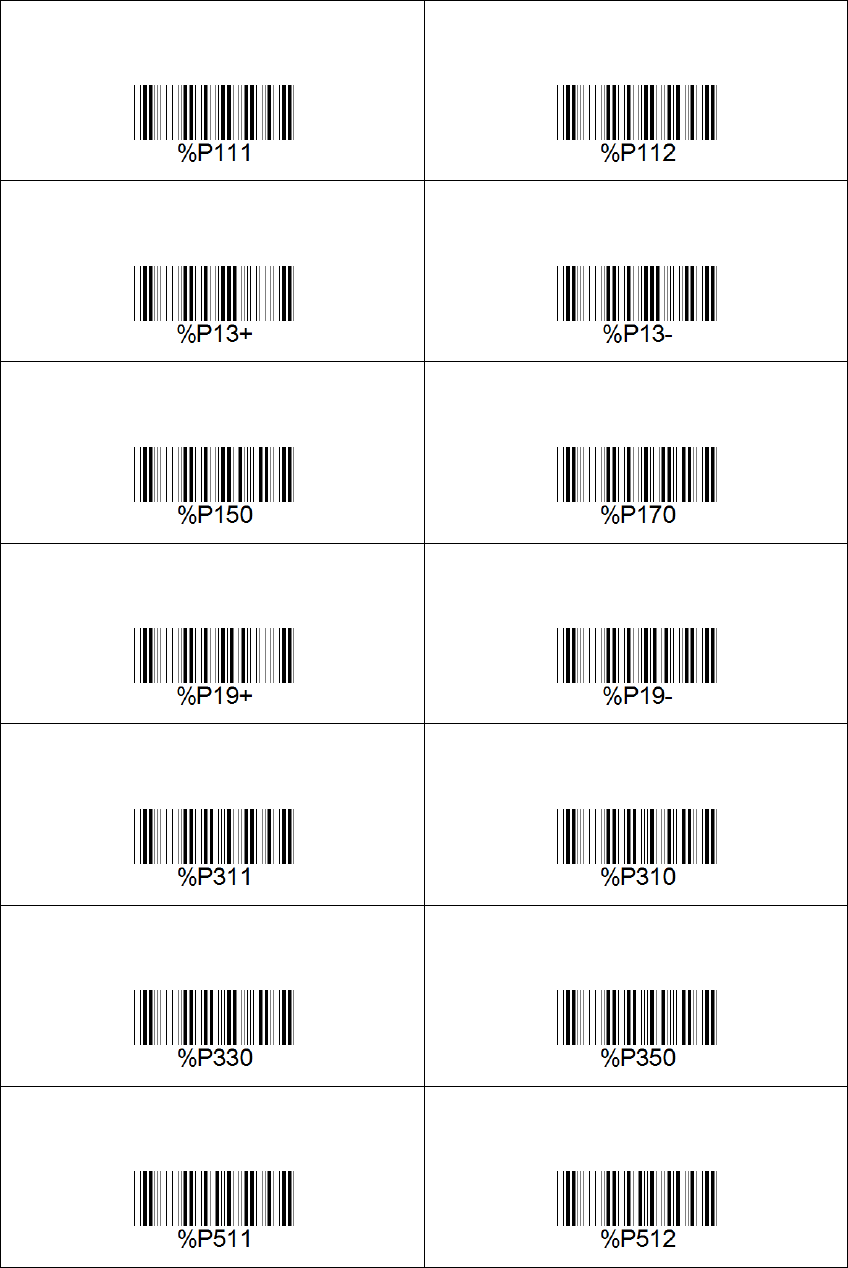
Appendix 2 - Setting Barcode (1)
HID
SPP
Auto Connect(HID) Enable
Auto Connect(HID) Disable
BT MAC Address
BT Versioin
Wakeup Nulls Enable
Wakeup Nulls Disable
BT Power ON
BT Power OFF
BT Pairing
BT Connect Last Device
[Store Mode]Send & Store
[Store Mode]Store Only
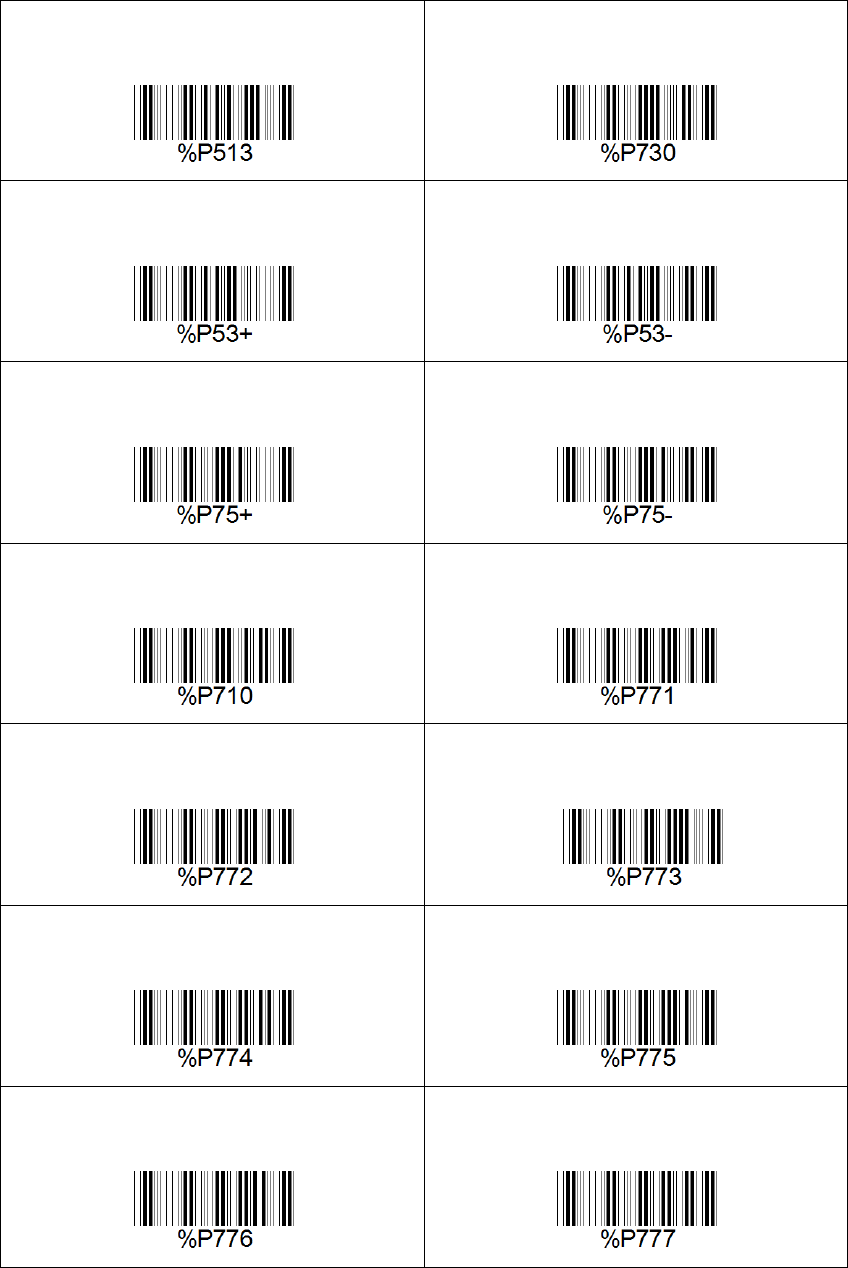
Appendix 3 - Setting Barcode(2)
[Store Mode]Send Only
Reset Memory
Avoid Same Code Enable
Avoid Same Code Disable
Auto Erase Enable
Auto Erase Disable
Memory Status
Sleep Timeout 1 sec
Sleep Timeout 5 sec
Sleep Timeout 10 sec
Sleep Timeout 30 sec
Sleep Timeout 1 min
Sleep Timeout 2 min
Sleep Timeout 3 min
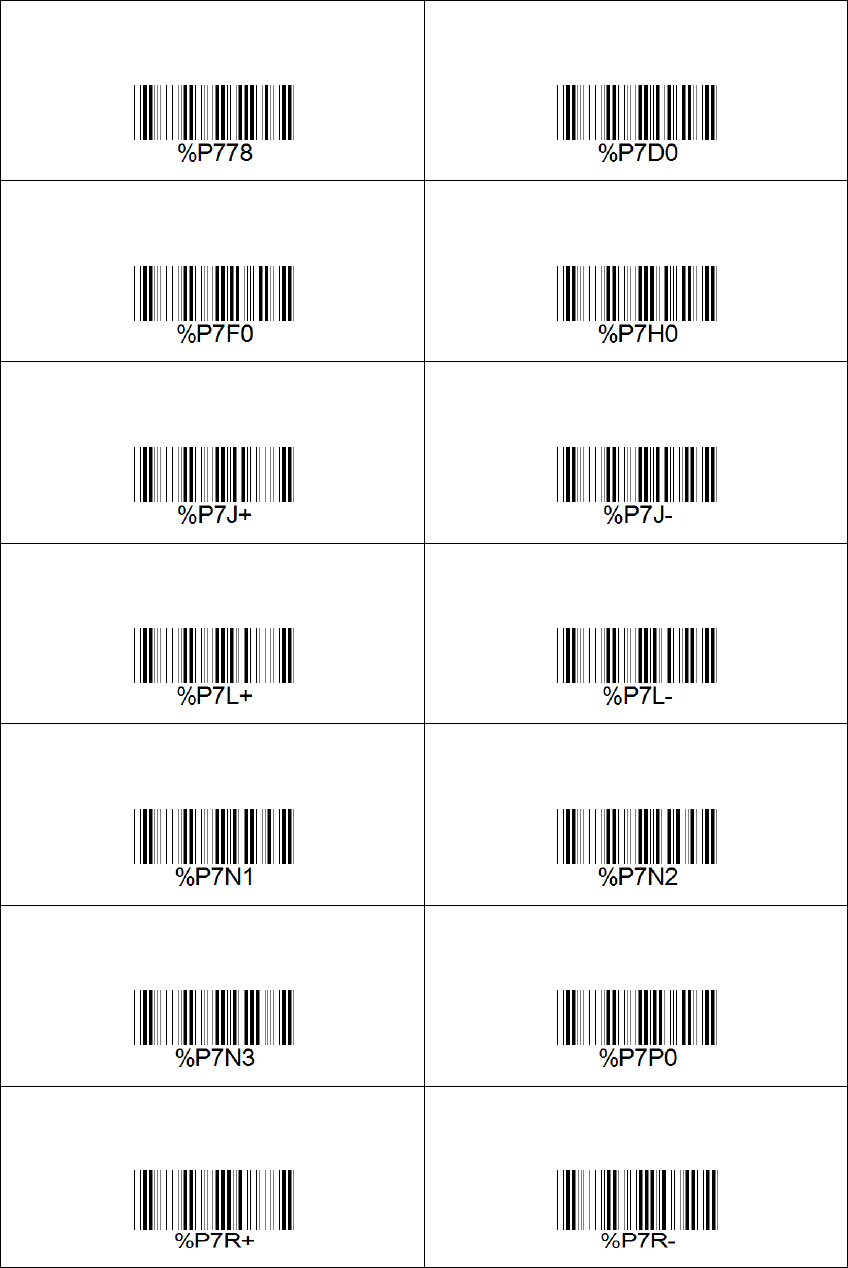
Appendix 4 - Setting Barcode(3)
Sleep Timeout 5 min
Scanner Version
Engine Version
BT Versioin
Beep ON
Beep OFF
Vibration ON
Vibration OFF
[Data Format] Time&Battery& Code
[Data Format]Memory & Code
[Data Format]Code Only
Factory Default
Scan Review ON(300 series)
Scan Review OFF(300 series)