Cheng Uei Precision Industry 58905350 TXTR User Manual BMK UG EN
Cheng Uei Precision Industry Co., Ltd. TXTR BMK UG EN
Users Manual

motorola.com
TXTR™ x5
DRAFT 3 -- 11/18/2005

DRAFT
2
Export Law Assurances
This product is controlled under the export regulations of
the United States of America and Canada. The
Governments of the United States of America and Canada
may restrict the exportation or re-exportation of this
product to certain destinations. For further information
contact the U.S. Department of Commerce or the Canadian
Department of Foreign Affairs and International Trade.
The use of wireless devices and their accessories may be
prohibited or restricted in certain areas. Always obey the
laws and regulations on the use of these products.
The TXTR keyboard is a Class 1 Bluetooth device. Bluetooth
features and Bluetooth Class 1 power levels are not
allowed for outdoor operation in France. To avoid unlawful
interference with radio signals, do not use the Bluetooth
features in France unless you are indoors.
MOTOROLA and the Stylized M Logo are registered in the
US Patent & Trademark Office. The Bluetooth trademarks
are owned by their proprietor and used by Motorola, Inc.
under license. All other product or service names are the
property of their respective owners.
© Motorola, Inc., 2005.
Manual number:6809500A07-O

3
Contents
Safety and General Information
. . . 6
Introduction
. . . . . . . . . . . . . . . . . . . 11
TXTR Controls
. . . . . . . . . . . . . . . . . 14
Charging TXTR Battery
. . . . . . . . . 15
Turning TXTR On & Off
. . . . . . . . . 18
Idle Screen . . . . . . . . . . . . . . . . . . 20
Pairing TXTR with Phone
. . . . . . . . 22
Turning On Bluetooth on Phone . . 23
Setting TXTR to Look for Phone . . 24
Pairing Phone with TXTR. . . . . . . . 24
Pairing to Additional Devices. . . . . 26
Operating Your TXTR
. . . . . . . . . . . 28
Basic Operation. . . . . . . . . . . . . . . 29
Text Entry . . . . . . . . . . . . . . . . . . . 30
Messages . . . . . . . . . . . . . . . . . . . 32
Chat. . . . . . . . . . . . . . . . . . . . . . . . 46
Phonebook . . . . . . . . . . . . . . . . . . 51
5

DRAFT
6
Safety and General Information
Safety and General
Information
IMPORTANT INFORMATION ON SAFE AND
EFFICIENT OPERATION. READ THIS
INFORMATION BEFORE USING YOUR
DEVICE.
Users are not permitted to make changes or
modify the device in any way. Changes or
modifications not expressly approved by the party
responsible for compliance could void the user’s
authority to operate the equipment. See 47 CFR
Sec. 15.21.
This device complies with part 15 of the FCC
Rules. Operation is subject to the following two
conditions: (1) This device may not cause harmful
interference, and (2) this device must accept any
interference received, including interference that
may cause undesired operation. See 47 CFR Sec.
15.19(3).
DRAFT
Safety and General Information
7
Electromagnetic
Interference/Compatibility
Note: Nearly every electronic device is
susceptible to electromagnetic interference (EMI)
if inadequately shielded, designed, or otherwise
configured for electromagnetic compatibility.
Facilities
To avoid electromagnetic interference and/or
compatibility conflicts, turn off your device in any
facility where posted notices instruct you to do
so. Hospitals or health care facilities may be
using equipment that is sensitive to external RF
energy.
Aircraft
When instructed to do so, turn off your device
when on board an aircraft. Any use of a device
must be in accordance with applicable
regulations per airline crew instructions.
DRAFT
8
Safety and General Information
Medical Devices
Hearing Aids
Some devices may interfere with some hearing
aids. In the event of such interference, you may
want to consult with your hearing aid
manufacturer to discuss alternatives.
Other Medical Devices
If you use any other personal medical device,
consult the manufacturer of your device to
determine if it is adequately shielded from RF
energy. Your physician may be able to assist you
in obtaining this information.
Industry Canada Notice to Users
Operation is subject to the following two
conditions: (1) This device may not cause
interference and (2) This device must accept any
interference, including interference that may
cause undesired operation of the device Ref IC
RSS 210 Sec. 5.11. The term “IC:” before the
certification/registration number only signifies
that registration was performed based on a
Declaration of Conformity indicating that Industry
DRAFT
Safety and General Information
9
Canada technical specifications were met. It
does not imply that Industry Canada approved the
equipment. See Ref IC Self-Marking 6(f) and
RSP-100 Sec. 4.
FCC Notice to Users
This equipment has been tested and found to
comply with the limits for a Class B digital
device, pursuant to part 15 of the FCC Rules.
These limits are designed to provide reasonable
protection against harmful interference in a
residential installation. This equipment
generates, uses and can radiate radio frequency
energy and, if not installed and used in
accordance with the instructions, may cause
harmful interference to radio communications.
However, there is no guarantee that interference
will not occur in a particular installation. If this
equipment does cause harmful interference to
radio or television reception, which can be
determined by turning the equipment off and on,
the user is encouraged to try to correct the
DRAFT
10
Safety and General Information
interference by one or more of the following
measures:
• Reorient or relocate the receiving
antenna.
• Increase the separation between the
equipment and the receiver.
• Connect the equipment to an outlet on a
circuit different from that to which the
receiver is connected.
• Consult the dealer or an experienced
radio/TV technician for help.

DRAFT
Introduction
11
Introduction
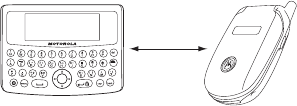
The Motorola TXTR allows you to
compose, send, and receive SMS text
messages with your Motorola Bluetooth
phone using a full QWERTY keyboard.
With the TXTR, you can:
•
Compose, send and receive SMS
text messages.
•
Chat directly with other TXTR
device users.
To perform messaging tasks, a
bluetooth connection is established
between the phone and TXTR. Your
phone remains in its holster, briefcase,
or purse while you use the TXTR.
DRAFT
12
Introduction
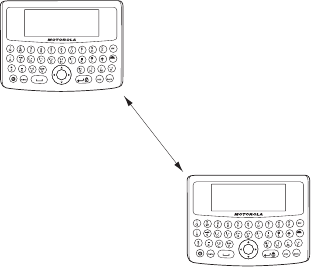
The Bluetooth connection range
between the phone and TXTR can be up
to 300 feet (exact range is dependent
on phone model).
To chat with another TXTR user, a
bluetooth connection is established
between both TXTR devices.
DRAFT
Introduction
13
The Bluetooth connection range
between the TXTR devices is 300 feet.
Bluetooth connection
up to 300 feet
DRAFT
14
TXTR Controls
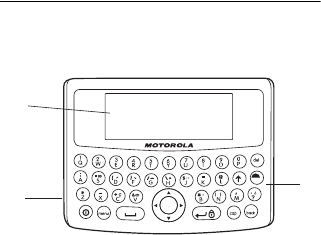
TXTR Controls
1. Display:
Shows text and icons for
TXTR.
2. Charging Port:
Accepts the plug for
your TXTR battery charger.
3. Keypad:
Allows you to perform
operations with the TXTR.
2
1
3

DRAFT
Charging TXTR Battery
15
Charging TXTR
Battery
First-Time Use
— Before you can use
your TXTR, charge its self-contained
battery for two hours.
Recharging
— When you hear an audio
alert along with no bars displayed on the
battery meter, the TXTR battery needs
recharging.
Over time, batteries gradually wear
down and require longer charging times.
This is normal. The more you use your
TXTR with your phone, the less standby
time your battery has.
The rechargeable batteries that
power your TXTR must be

DRAFT
16
Charging TXTR Battery
disposed of properly and may need to
be recycled. Contact your local recycling
center for proper disposal methods.
Warning:
Never dispose of batteries in
a fire because they may explode.
1
Plug the
Motorola
charger into
the TXTR’s
charging port
as shown.
2
Plug the other end of the charger
into an electrical outlet.
During charging, the battery meter
flashes until charging is complete.
Your TXTR fully charges in
approximately two hours. When
complete, the battery meter stops
DRAFT
Charging TXTR Battery
17
flashing along with three bars
displayed on the battery meter.
Note:
The TXTR can be used while
charging.
3
When charging completes, remove
the charger from the electrical
outlet, and detach the charger from
the TXTR.
Note:
You can also use a
Motorola Original Vehicle Power
Adapter to charge the TXTR battery
while in your vehicle.
A fully charged battery provides
approximately:
•
20 hours of typical messaging
time
•
hours standby time

DRAFT
18
Turning TXTR On & Off
Turning TXTR
On & Off
To turn on the TXTR, press and hold
p
key for at least 5 seconds until the
display is on.
When turned on, the TXTR establishes a
connection with your phone. Ensure
your phone’s Bluetooth feature is
turned on and is paired with the TXTR.
Note:
If the TXTR is connected to the
phone, and a previously paired
headset/car kit is turned on, the headset
is connected and the TXTR remains
disconnected until the headset/car kit is
turned off or out of range. Any
messages composed on the TXTR
during this period are saved as drafts.

DRAFT
Turning TXTR On & Off
19
When connecting to the phone, the
following screen is displayed for a few
seconds:
If your phone is not paired with your
TXTR, see “Pairing TXTR with Phone”
on page 22. The phone and TXTR will
not communicate without being paired.
To turn off the TXTR, select
m
(Main
Menu) > Settings > Power Off
.
12:31PM E
Connecting with XYZ

DRAFT
20
Turning TXTR On & Off
Idle Screen
Upon connecting to the phone, the
Idle
screen
is displayed:
Once connected, the TXTR downloads
existing SMS messages and phone
book from the phone. Up to 10 of the
newest messages are retrieved. When
downloading is complete, the TXTR
generates an audio alert.
After the initial download of existing
messages, the TXTR polls the phone for
new messages every 30 seconds.
When a new message is received, the
TXTR:
12:31PM E
Connected to
XYZ
DRAFT
Turning TXTR On & Off
21
•
displays a New Message icon on
the display,
•
generates an audio alert, and
•
if at Idle screen, the text “New
Message” is displayed for a few
seconds.

DRAFT
22
Pairing TXTR with Phone
Pairing TXTR
with Phone
Note:
You must pair (link) your TXTR
and phone before you can send or
receive messages.
“Pairing” creates a link between
devices with Bluetooth
®
wireless
technology, and allows the phone to
remember the TXTR’s unique ID. When
your TXTR and phone are paired, the
TXTR automatically connects to the
phone.
To pair (link) your TXTR and phone:
1
Start Bluetooth feature on phone.
2
Set TXTR to look for phone.
DRAFT
Pairing TXTR with Phone
23
3
Pair (link) your phone with your
TXTR.
Turning On Bluetooth
on Phone
Your phone's Bluetooth feature is off by
default. To use your phone with the
system, turn on the Bluetooth feature in
your Motorola phone.
1
On the phone, select
Main Menu > Settings
> Connection >Bluetooth Link > Setup
.
2
Scroll to
Power
.
3
Select
Change
.
4
Scroll to
On
.
5
Press
Select
to turn on the
Bluetooth feature. The Bluetooth
DRAFT
24
Pairing TXTR with Phone
feature remains on until you turn it
off.
Setting TXTR to Look
for Phone
To place the TXTR into Bluetooth search
mode, select
m
(Main Menu) > Settings >
Bluetooth > Search phone
.
The TXTR is placed in search mode for
[xx] seconds.
Pairing Phone with
TXTR
While the TXTR is in search mode, place
your phone in Bluetooth discovery
mode to pair (link) it with your TXTR.

DRAFT
Pairing TXTR with Phone
25
1
On your phone, select
Main Menu >
Settings > Connection >Bluetooth Link > Setup >
Handsfree >Find Me.
The phone is placed in Discovery
mode. After a few moments, a
pop-up window is displayed with
text “Bond with TXTR?”.
2
Select
Yes
to pair your TXTR with
your phone.
3
Enter the passkey:
0000
4
Select
OK
.
When your TXTR successfully pairs with
your phone, the Idle screen indicates
that the TXTR and phone are connected:
12:31PM E
Connected to
XYZ
DRAFT
26
Pairing TXTR with Phone
Pairing to Additional
Devices
Your TXTR can store pairing information
for up to eight different devices with
Bluetooth wireless technology. Devices
are stored in a “Paired Device List” in
memory in the order entered. When an
attempt to pair to more than eight
devices is made, the oldest paired
device is removed from the list.
Any of the eight paired devices can
initiate a connection to the TXTR.
The TXTR will automatically initiate a
connection (when powered on) only
with the
last
device it was
connected to
. If you want to connect
the TXTR to another device in the paired
device list, you must initiate the
connection from that device. Whichever
DRAFT
Pairing TXTR with Phone
27
of the eight devices initiates a
connection to the TXTR afterwards, that
device then becomes the
last connected device.
DRAFT
28
Operating Your TXTR
Operating Your
TXTR
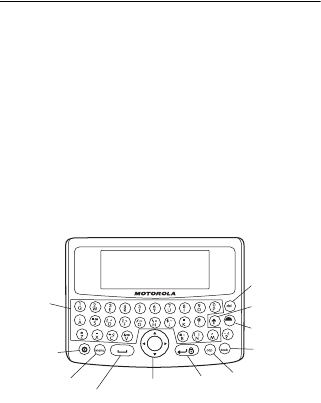
The TXTR furnishes a combination of
keypad and a display screen to send and
receive SMS messages.
The keypad consists of 36 keys and a
4-way navigation key.Here’s a quick
anatomy lesson of the keypad.
Delete
Alt
Back
Cap
Enter
Power
Menu
Space
Up Arrow
Navigation
Text
Entry

DRAFT
Operating Your TXTR
29
Basic Operation
To perform basic keyboard operations:
Function Action
Turn TXTR On Press and hold
Power
key.
Turn TXTR Off
1
Select
m
Main Menu >
Settings
and press
Enter
key.
2
Select
Power Off
and
press
Enter
key.
Access Idle
screen
1
Press
Menu
key.
2
Press
Back
key.
Access main
menu
Press
Menu
key.
Scroll menu
selections
Press
Navigation
key.

DRAFT
30
Operating Your TXTR
Text Entry
To type text entries on your TXTR:
Select menu
item or
perform
actions.
Press
Enter
key.
Back to
previous menu
Press
Back
key.
Lock/unlock
keypad
Press both
Alt
and
Enter
keys.
Function Action
Type
lowercase
letters
Press letter key.
Function Action (Continued)

DRAFT
Operating Your TXTR
31
Type
uppercase
letters
Use
Cap
key as follows:
•
Press once to type
next letter in
uppercase.
•
Press twice to place
keypad in uppercase
mode.
•
Press again to disable
uppercase mode.
Type numbers
and symbol
characters
Note:
Numbers and
symbols are
smaller on
Text Entry
keys.
Use
Up Arrow
key as
follows:
•
Press once to type
next character as
number/symbol.
•
Press twice to place
keypad in
number/symbol mode.
•
Press again to disable
number/symbol mode.
Function Action (Continued)

DRAFT
32
Operating Your TXTR
Messages
Use this section to perform messaging
operations with your TXTR.
Type special
characters
Note:
Special
characters are
blue on Text
Entry keys.
Use
Alt
key as follows:
•
Press once to type
next special character.
•
Press twice to place
keypad in
number/symbol mode.
•
Press again to disable
number/symbol mode.
Delete
character
Press
Del
key.
Type space
character
Press
Space
key.
Function Action (Continued)

DRAFT
Operating Your TXTR
33
New Messages
To perform basic operations with new
messages.
Function Action
Reading a
new message
1
Select
m
Main Menu >
Recent Messages
and
press
Enter
key.
2
Select
Received
Messages
and press
Enter
key.
3
Select message and
press
Enter
key. The
newest messages are
displayed at the top of
the list. The message is
displayed.

DRAFT
34
Operating Your TXTR
Sending a
new message
1
Select
m
Main Menu >
Create Message
and
press
Enter
key.
2
Type message text and
press
Enter
key.
3
Choose message
recipient:
•
Select
One Time
Entry
and enter
phone number of a
new contact, then
press
Enter
key, or
•
Select one or more
contact names from
phonebook using the
Space
key, then press
Enter
key.
4
Select
Send
and press
Enter
key. You see
sent
message...
displayed.
Function Action (Continued)

DRAFT
Operating Your TXTR
35
Editing a new
message
(before
sending)
1
Select
m
Main Menu >
Create Message
and
press
Enter
key.
2
Type message text and
press
Enter
key.
3
Choose message
recipient:
•
Select
One Time
Entry
and enter
phone number of a
new contact, then
press
Enter
key, or
•
Select contact name
from phonebook, then
press
Enter
key.
4
Select
Edit
and press
Enter
key.
5
Edit message text and
press
Enter
key.
Function Action (Continued)

DRAFT
36
Operating Your TXTR
Saving a new
message
(before
sending)
1
Select
m
Main Menu >
Create Message
and
press
Enter
key.
2
Type message text and
press
Enter
key.
3
Choose message
recipient:
•
Select
One Time
Entry
and enter
phone number of a
new contact, then
press
Enter
key, or
•
Select contact name
from phonebook, then
press
Enter
key.
4
Select
Draft
and press
Enter
key. You see
Saving draft...
displayed.
Function Action (Continued)

DRAFT
Operating Your TXTR
37
Recent Messages
To perform basic operations with recent
messages.
Function Action
Reading an
old message
1
Select
m
Main Menu >
Recent Messages
and
press
Enter
key.
2
Select
Received
Messages
or
Sent
Messages
and press
Enter
key.
3
Select message and
press
Enter
key. The
message is displayed.

DRAFT
38
Operating Your TXTR
Replying to a
received
message
1
Select
m
Main Menu >
Recent Messages
and
press
Enter
key.
2
Select
Received
Messages
and press
Enter
key.
3
Select message and
press
Enter
key.
4
View message and press
Enter
key.
5
Select
Reply
and press
Enter
key.
6
Type reply message text
and press
Enter
key.
7
Select
Send
and press
Enter
key. You see
sent
message...
displayed.
Function Action (Continued)

DRAFT
Operating Your TXTR
39
Forwarding a
recent
message
1
Select
m
Main Menu >
Recent Messages
and
press
Enter
key.
2
Select
Received
Messages
or
Sent
Messages
and press
Enter
key.
3
Select message and
press
Enter
key.
4
View message and press
Enter
key.
5
Select
Forward
and press
Enter
key.
6
View message and press
Enter
key.
Function Action (Continued)

DRAFT
40
Operating Your TXTR
Forwarding a
recent
message
(con’t)
7
Choose message
recipient:
•
Select
One Time
Entry
and enter
phone number of a
new contact, then
press
Enter
key, or
•
Select contact name
from phonebook, then
press
Enter
key.
8
Select
Send
and press
Enter
key. You see
sent
message...
displayed.
Function Action (Continued)

DRAFT
Operating Your TXTR
41
Deleting a
recent
message
1
Select
m
Main Menu >
Recent Messages
and
press
Enter
key.
2
Select
Received
Messages
or
Sent
Messages
and press
Enter
key.
3
Select message and
press
Enter
key.
4
View message and press
Enter
key.
5
Select
Delete
and press
Enter
key.
6
Select
Yes
and press
Enter. The message is
deleted.
Function Action (Continued)

DRAFT
42
Operating Your TXTR
Resending a
sent message
1
Select
m
Main Menu >
Recent Messages
and
press
Enter
key.
2
Select
Sent Messages
and press
Enter
key.
3
Select message and
press
Enter
key.
4
View message and press
Enter
key.
5
Select
Re-send
and
press
Enter
key.
Function Action (Continued)

DRAFT
Operating Your TXTR
43
Storing phone
number from
received
message
1
Select
m
Main Menu >
Recent Messages
and
press
Enter
key.
2
Select
Received
Messages
and press
Enter
key.
3
Select message and
press
Enter
key.
4
View message and press
Enter
key.
5
Select
Add Address
and
press
Enter
key.
6
Select
Yes
and press
Enter
key.
7
Enter name and press
Enter
key.
8
Select number type and
press
Enter
key.e
Function Action (Continued)

DRAFT
44
Operating Your TXTR
Sending a
saved draft
message
1
Select
m
Main Menu >
Recent Messages
and
press
Enter
key.
2
Select
Draft
and press
Enter
key.
3
Select message and
press
Enter
key.
4
View message and press
Enter
key.
5
Select
Send
and press
Enter
key.
Function Action (Continued)

DRAFT
Operating Your TXTR
45
Deleting a
saved draft
message
1
Select
m
Main Menu >
Recent Messages
and
press
Enter
key.
2
Select
Draft
and press
Enter
key.
3
Select message and
press
Enter
key.
4
View message and press
Enter
key.
5
Select
Delete
and press
Enter
key.
Function Action (Continued)

DRAFT
46
Operating Your TXTR
Chat
To perform basic operations with the
TXTR-to-TXTR chat feature.
Deleting all
stored
messages
1
Select
m
Main Menu >
Recent Messages
and
press
Enter
key.
2
Select
Delete All
Messages
and press
Enter
key.
3
Select
Yes
and press
Enter key.
Function Action (Continued)

DRAFT
Operating Your TXTR
47
Function Action
Placing TXTR
in chat
discovery
mode
1
Select
m
Main Menu >
Chat
and press
Enter
key.
2
Select
Find Me
and press
Enter
key.

DRAFT
48
Operating Your TXTR
Searching for
TXTR devices
to chat
1
Select
m
Main Menu >
Chat
and press
Enter
key.
2
Select
Look for Device
and press
Enter
key.
3
Select TXTR device and
press
Enter
key.
4
Do one of the following:
•
To connect with TXTR,
select
Request
Connecting
and press
Enter
key.
•
To add to Friends list,
select
Add to Friends
and press
Enter
key.
Function Action (Continued)

DRAFT
Operating Your TXTR
49
Searching for
TXTR devices
to chat (con’t)
•
To add to Block list,
select
Block
and
press
Enter
key.
•
To remove TXTR from
list, select
Delete
from List
and press
Enter
key,
Chatting with
a friend TXTR
device
1
Select
m
Main Menu >
Chat
and press
Enter
key.
2
Select
Friends
and press
Enter
key.
3
Select TXTR device and
press
Enter
key.
4
Select
Request
Connecting
and press
Enter
key.
Function Action (Continued)

DRAFT
50
Operating Your TXTR
Renaming
TXTR device
1
Select
m
Main Menu >
Chat
and press
Enter
key.
2
Select
Friends
and press
Enter
key.
3
Select TXTR device and
press
Enter
key.
4
Select
Rename
and
press
Enter
key.
5
Type new name and press
Enter
key.
Function Action (Continued)

DRAFT
Operating Your TXTR
51
Phonebook
To perform basic operations with the
phonebook feature.
Function Action
Adding new
contact to
phonebook
1
Select
m
Main Menu >
Phonebook
and press
Enter
key.
2
Select
NEW ENTRY
and
press
Enter
key.
3
Type name and press
Enter
key.
4
Type phone number and
press
Enter
key.
5
Select number type and
press
Enter
key.

DRAFT
52
Operating Your TXTR
Modifying
contact
information in
phonebook
1
Select
m
Main Menu >
Phonebook
and press
Enter
key.
2
Select contact and press
Enter
key.
3
Select
Edit
and press
Enter key.
4
Type name and press
Enter
key.
5
Type phone number and
press
Enter
key.
6
Type number type and
press
Enter
key.
Function Action (Continued)

DRAFT
Operating Your TXTR
53
Adding new
phone number
to contact in
phonebook
1
Select
m
Main Menu >
Phonebook
and press
Enter
key.
2
Select contact and press
Enter
key.
3
Select
New
and press
Enter
key.
4
Type phone number and
press
Enter
key.
5
Select number type and
press
Enter
key.
Function Action (Continued)

DRAFT
54
Operating Your TXTR
Calculator
To perform basic operations with the
calculator feature.
Deleting
contact from
phonebook
1
Select
m
Main Menu >
Phonebook
and press
Enter
key.
2
Select contact and press
Enter
key.
3
Select
Delete
and press
Enter
key.
4
Select
Yes
and press
Enter key.
Function Action (Continued)

DRAFT
Operating Your TXTR
55
Settings
To customize settings for your TXTR:.
Function Action
Placing TXTR
in Bluetooth
search mode
1
Select
m
Main Menu >
Settings
and press
Enter
key.
2
Select
Bluetooth
and
press
Enter
key.
3
Select
Search phone
and
press
Enter
key.

DRAFT
56
Operating Your TXTR
Viewing TXTR
Bluetooth
Device
Address (BDA)
1
Select
m
Main Menu >
Settings
and press
Enter
key.
2
Select
Bluetooth
and
press
Enter
key.
3
Select
Bluetooth
Address
and press
Enter
key. You see address
displayed.
Enabling
audio alert
1
Select
m
Main Menu >
Settings
and press
Enter
key.
2
Select
Audio Alert
and
press
Enter
key.
3
Select
On
and press
Enter
key.
Function Action (Continued)

DRAFT
Operating Your TXTR
57
Enabling
battery save
mode
1
Select
m
Main Menu >
Settings
and press
Enter
key.
2
Select
Backlight
Timeout
and press
Enter
key.
3
Select
On
and press
Enter
key.
Changing
display
language
1
Select
m
Main Menu >
Settings
and press
Enter
key.
2
Select
Language
and
press
Enter
key.
3
Select language and
press
Enter
key.
Function Action (Continued)

DRAFT
58
Operating Your TXTR
Changing
TXTR device
name
1
Select
m
Main Menu >
Settings
and press
Enter
key.
2
Select
Device Name
and
press
Enter
key.
3
Type device name and
press
Enter
key.
Enabling TXTR
keypad
locking
1
Select
m
Main Menu >
Settings
and press
Enter
key.
2
Select
Security
and
press
Enter
key.
3
Select
PIN Required
and
press
Enter
key.
4
Select
Enable
and press
Enter
key.
Function Action (Continued)

DRAFT
Operating Your TXTR
59
Changing
TXTR keypad
lock PIN
Note:
Keypad locking must be
enabled to set the PIN.
1
Select
m
Main Menu >
Settings
and press
Enter
key.
2
Select
Security
and
press
Enter
key.
3
Select
Change PIN
and
press
Enter
key.
4
Type in old PIN and press
Enter
key.
5
Type in new PIN and
press
Enter
key.
6
Retype in new PIN and
press
Enter
key.
Function Action (Continued)

DRAFT
60
Operating Your TXTR
Viewing
software
version
1
Select
m
Main Menu >
Settings
and press
Enter
key.
2
Select
Version Info
and
press
Enter
key.
Restoring
TXTR to
factory default
settings
Warning:
Restoring TXTR to
default settings will erase all
content saved on device.
1
Select
m
Main Menu >
Settings
and press
Enter
key.
2
Select
Master Clear
and
press
Enter
key.
3
Select
Yes
and press
Enter
key.
Function Action (Continued)

DRAFT
61
European Union
Directives Conformance
Statement
Hereby, Motorola declares that this
product is in compliance with
•
The essential requirements and other
relevant provisions of Directive
1999/5/EC
•
All other relevant EU Directives
You can view your product’s Declaration of
Conformity (DoC) to Directive 1999/5/EC (to
R&TTE Directive) at www.motorola.com/rtte. To
find your DoC, enter the product Approval
Number from your product’s label in the “Search”
bar on the web site.
DRAFT
62

motorola.com
FCC Caution
1. The device complies with Part 15 of the FCC rules. Operation is subject to
the following two conditions:
(1)This device may not cause harmful interference.
(2)This device must accept any interference received, including interference
that may cause undesired operation.
2. This Transmitter must not be co-located or operating in conjunction with
any other antenna or transmitter.
3. Changes or modifications to this unit not expressly approved by the party
responsible for compliance could void the user authority to operate the
equipment.