Cheng Uei Precision Industry BM58YB3 GSM 850/1900 Terminal Device User Manual
Cheng Uei Precision Industry Co., Ltd. GSM 850/1900 Terminal Device
Contents
- 1. User Manual
- 2. user manual
User Manual
BM58YB3
User Manual
Copyrights 2010, Foxlink Technologies

1
Welcome
Thank you for purchasing a BM58YB3 Handset Mobile phone. We built our Handset to give
user what we believe user really want from a wireless phone, clear sound, and fashion
outlook.
Our advanced technology is designed to grow with user’s communications needs so that
one day you will be able to rely entirely on users Handset to stay connected.
This guide will familiarize user with our technology and new Handset phone through
simple, easy to follow instructions. If users have already reviewed the Quick Start Guide,
which was packaged with new Handset, then user is ready to explore the advanced
features outlined in this guide.
If users have not read “Quick Start Guide”, go to Section One Getting Started. This section
provides the entire information user needs to quickly activate phone, and much more.
We congratulate on your choice.
Safety Information
2
Safety Information
Please read and understood the details which are both safe to you and your environment.
Failure to observe these instructions may lead to suspension of cellular phone services to
the user, or some legal action
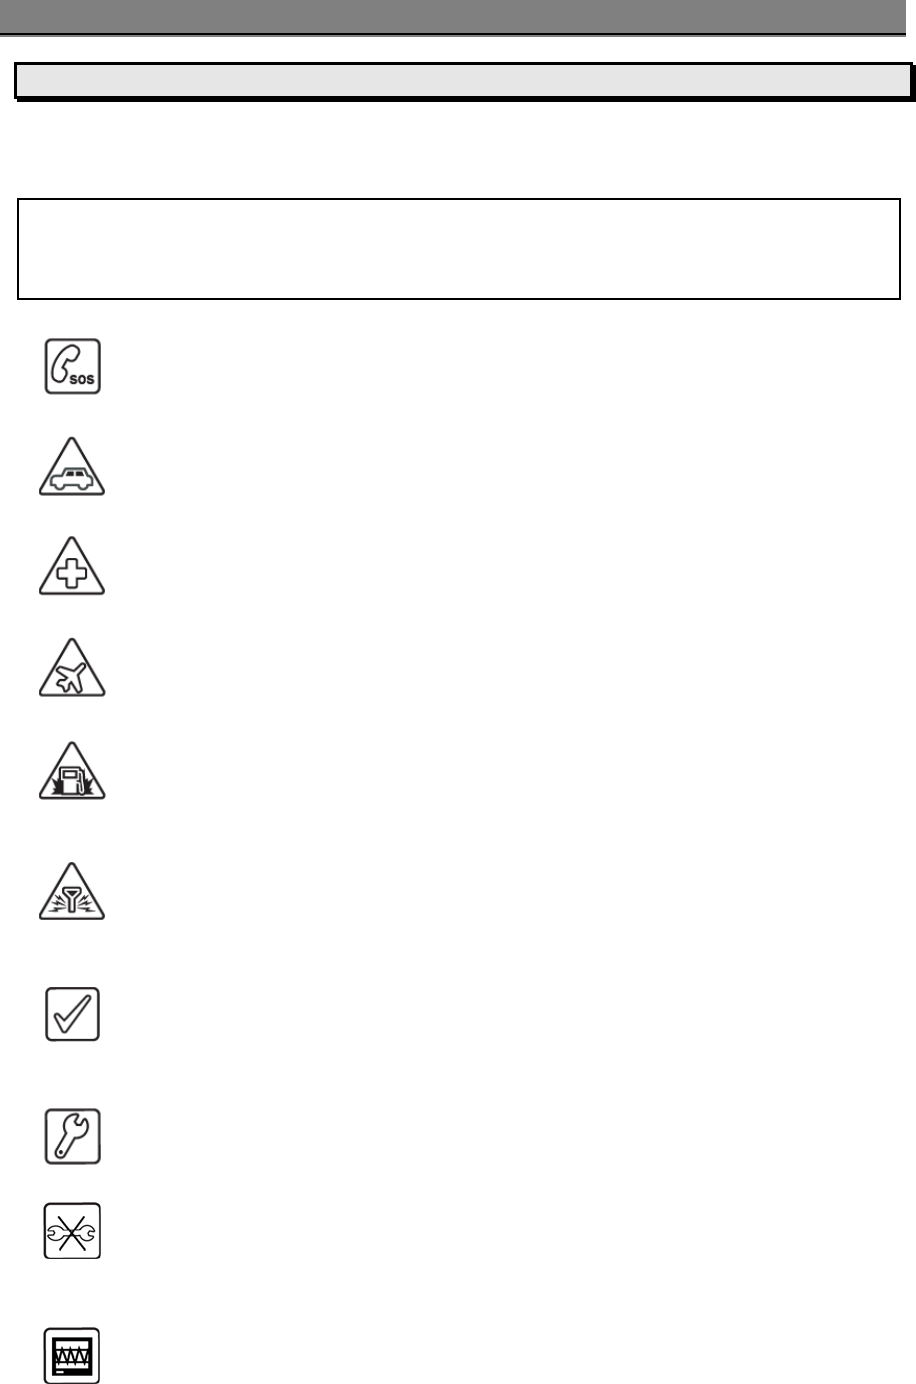
Emergency Calls (SOS)
Emergency call can be made from your cellular phone even without a SIM in
the network service area.
Traffic Safety
Please do not use your cellular phone while driving; find a safe place to stop
first.
Switch off in Hospital
The use of cellular phones may interfere with the functionality of some
possible insufficiently protected medical devices in hospital.
Switch off in Airplane
The use of cellular phone in an aircraft may be dangerous to the operation of
the aircraft, disrupt the cellular network and may be illegal.
Switch off in Gasoline Station and Explosive Site
It is advisable that users turn off cellular phone when refueling is in
progress, users are reminded to observe restrictions on the use of radio
equipment in fuel depots.
Operating Environment
Mobile radio transmitting equipment, including cellular phones, may be
subject to interference and may cause danger. Switch off your phone
whenever it is forbidden to use it.
Use Sensibly
Do not hold the phone to your ear when it rings or when you have switched
on the hand free function. Otherwise you risk serious permanent damage to
your hearing.
Appropriate Maintenance
Only qualified and authorized personnel should service your cellular phone.
Faulty installation or repair may be hazardous.
Replace
You may only open the phone to replace the battery and SIM card. You must
not open the battery under any circumstances. All other changes to this
device are strictly prohibited and will invalidate the operating license.
Interference Noticed
The phone may cause interference in the vicinity of TV sets, radios and PCs.
Important information for parents:
Please read the operating instructions and safety precautions carefully before use.
Explain the content and the hazards associated with using the phone to your children.
Safety Information
3
Safety Warnings
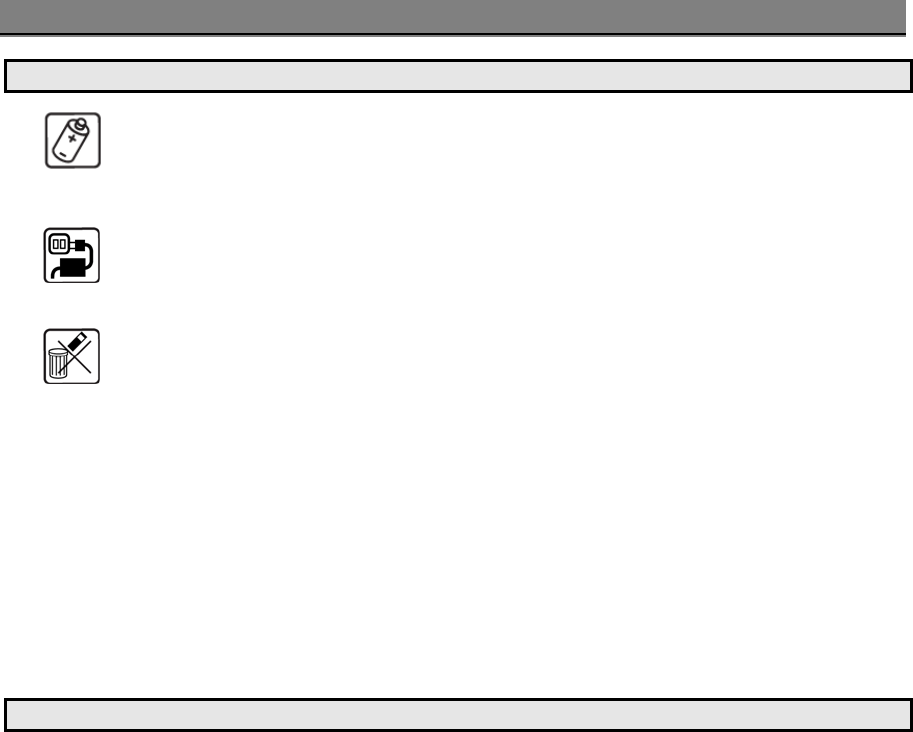
Accessories
Use only accessories and charging devices approved by the phone
manufacturer! Otherwise you risk serious damage to health and property.
The battery could explode, for instance.
Power Voltage
The mains voltage specified on the power supply unit (Volt) must not be
exceeded. Otherwise the charging device may be destroyed.
Waste Disposal
Dispose of worn out batteries and phone in accordance with local provisions!
Rechargeable Battery
If battery is over discharged the handset will need to pre-charge less than 10-20
minutes.
Avoid accidental shorts across the contacts of battery by metal parts. Shorts can
cause rapid discharge currents that can damage the battery, the part that creates
the short or cause injuries.
Prevent extreme low and high ambient temperatures for the battery. Therefore,
do not place battery near a heater or on the car dashboard.
Do not open, penetrate or otherwise physically damage the battery.
Do not incinerate battery.
FCC Regulations
• You are cautioned that changes or modifications not expressly approved by the part
responsible for compliance could void the user’s authority to operate the equipment.
• This equipment has been tested and found to comply with the limits for a Class B
digital device, pursuant to part 15 of the FCC rules. These limits are designed to
provide reasonable protection against harmful interference in a residential installation.
This equipment generates, uses and can radiate radio frequency energy and, if not
installed and used in accordance with the instructions, may cause harmful interference
to radio communications. However, there is no guarantee that interference will not
occur in a particular installation. If this equipment does cause harmful interference to
radio or television reception, which can be determined by turning the equipment off
and on, the user is encouraged to try to correct the interference by one or more of the
following measures:
Reorient or relocate the receiving antenna.
Increase the separation between the equipment and receiver.
Connect the equipment into an outlet on a circuit different from that to which the
receiver is connected.
Consult the dealer or an experienced radio/TV technician for help.
• This device complies with Part 15 of the FCC Rules.Operation is subject to the following
two conditions:
1) this device may not cause harmful interference and
2) this device must accept any interference received, including interference that may
cause undesired operation of the device.
• FCC RF Radiation Exposure Statement:
For body worn operation, this phone has been tested and meets FCC RF exposure
guidelines when used with an accessory that contains no metal and that positions the

Safety Information
4
handset a minimum of 1.5 cm from the body. Use of other accessories may not ensure
compliance with FCC RF exposure guidelines."
Warning:
• SAR Head Max value : 0.595 W/Kg(1g )
5
Contents
WELCOME ...................................................................................................... 1
SAFETY INFORMATION..................................................................................... 2
SAFETY WARNINGS .......................................................................................... 3
FCC REGULATIONS .......................................................................................... 3
GETTING STARTED.......................................................................................... 8
SIM CARD AND BATTERY INFORMATION .................................................................. 8
Insert SIM Card ........................................................................................ 8
Insert Memory Card................................................................................... 8
Insert Battery........................................................................................... 9
Charge Battery ......................................................................................... 9
YOUR PHONE................................................................................................ 10
Front / Back / Side View of Phone.............................................................. 10
Key Function List..................................................................................... 11
Idle Mode............................................................................................... 11
Main Menu.............................................................................................. 12
Essential Indicators ................................................................................. 12
Listing of Functions.................................................................................. 13
Using the touch screen............................................................................. 14
Onscreen Keyboard ................................................................................. 14
Personalizing your Phone.......................................................................... 14
Display Language.................................................................................... 14
Tone...................................................................................................... 14
Wallpaper............................................................................................... 14
Shortcuts key ......................................................................................... 14
Activated Profile...................................................................................... 14
Silent Mode ............................................................................................ 15
Writing Text ........................................................................................... 15
Multitap text input................................................................................... 15
Smart text input...................................................................................... 15
Tips for writing text ................................................................................. 15
Text Input Mode...................................................................................... 15
Calling................................................................................................... 15
GSM setting............................................................................................ 15
Making and answering call........................................................................ 16
To make a call ........................................................................................ 16
To make international call......................................................................... 16
To answer call......................................................................................... 16
Missed calls ............................................................................................ 16
To use loudspeaker during a call................................................................ 16
To call emergency ................................................................................... 16
Tip of call options.................................................................................... 16
Hold single call........................................................................................ 17
Make a new call during a call..................................................................... 17
Multiparty call......................................................................................... 17
Switch two calls ...................................................................................... 17
6
MENU FUNCTIONS & THEIR DESCRIPTIONS ...................................................... 18
CALL RECORD (MENU 1) .................................................................................. 18
Call record.............................................................................................. 18
Dialed calls............................................................................................. 18
Received calls......................................................................................... 18
Missed calls ............................................................................................ 18
Delete call lists........................................................................................ 19
Call duration........................................................................................... 19
Call cost................................................................................................. 19
SMS counter........................................................................................... 19
GPRS counter ......................................................................................... 19
CONTENT CAFÉ (MENU 2) ................................................................................ 20
APP CAFÉ (MENU 3)....................................................................................... 20
PHONEBOOK (MENU 4).................................................................................... 20
Search................................................................................................... 20
Smart Search ......................................................................................... 20
Add new ................................................................................................ 20
Move ..................................................................................................... 21
Move to private....................................................................................... 21
Delete ................................................................................................... 21
Copy ..................................................................................................... 21
Caller groups .......................................................................................... 22
Speed dials............................................................................................. 22
Settings................................................................................................. 22
Blacklist................................................................................................. 23
MESSAGES (MENU 5) ..................................................................................... 23
Write new .............................................................................................. 23
Inbox .................................................................................................... 24
Outbox .................................................................................................. 24
Drafts.................................................................................................... 25
SMS settings .......................................................................................... 25
Delete Folder.......................................................................................... 25
Templates .............................................................................................. 25
Voice messages ...................................................................................... 25
Broadcast message.................................................................................. 26
Memory status........................................................................................ 26
Message settings..................................................................................... 26
FILE MANAGER (MENU 6) ................................................................................. 27
ORGANIZER (MENU 7) .................................................................................... 28
Private menu .......................................................................................... 28
Stopwatch.............................................................................................. 29
Alarm clock ............................................................................................ 29
Calendar ................................................................................................ 29
To do list................................................................................................ 30
Memo.................................................................................................... 30
World clock ............................................................................................ 30
7
Calculator............................................................................................... 30
Unit converter......................................................................................... 30
Heath .................................................................................................... 30
Ebook reader.......................................................................................... 30
Torch..................................................................................................... 31
MULTIMEDIA (MENU 8) ................................................................................... 31
Camera.................................................................................................. 31
Photo album........................................................................................... 32
Java ...................................................................................................... 33
VRE....................................................................................................... 33
Games................................................................................................... 33
Video recorder ........................................................................................ 33
Video player ........................................................................................... 34
Voice Recorder........................................................................................ 35
FM radio................................................................................................. 35
FM radio recorder scheduler...................................................................... 36
Photo editor............................................................................................ 36
Melody composer .................................................................................... 36
SETTINGS (MENU 9) ...................................................................................... 37
Dual SIM settings.................................................................................... 37
Pen calibration........................................................................................ 37
Profiles .................................................................................................. 37
Display settings....................................................................................... 38
Date and time......................................................................................... 39
Phone settings ........................................................................................ 39
Call settings ........................................................................................... 39
Connection setting................................................................................... 41
Security settings ..................................................................................... 42
Restore factory ....................................................................................... 42
MUSIC PLAYER (MENU 10) ............................................................................... 42
TV (MEMU 11)............................................................................................. 44
SERVICES (MENU 12)..................................................................................... 45
STK....................................................................................................... 45
WAP ...................................................................................................... 45
Data account .......................................................................................... 47
TO USE MASS STORAGE (USB CABLE).................................................................. 47
8
Getting Started
SIM Card and Battery Information
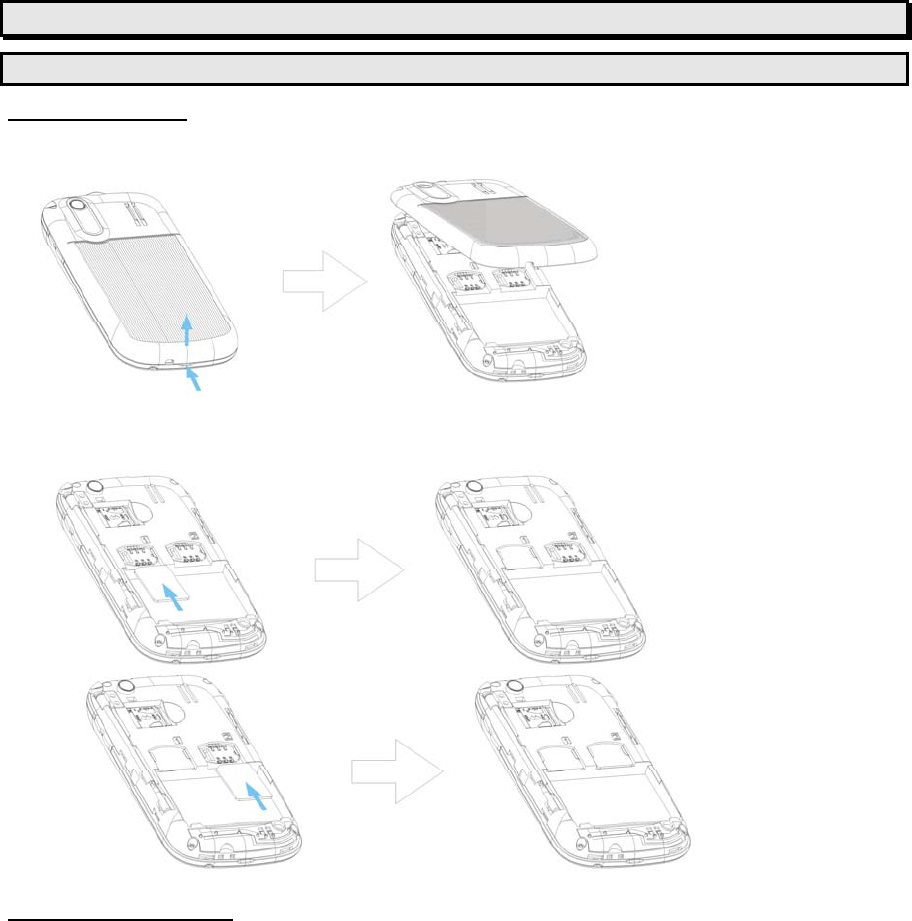
Insert SIM Card
The SIM card is inserted into the back of the phone underneath the battery.
• Tap the knob and open the battery cover off.
• Remove the battery.
• Place the card inside the SIM cardholder such that the golden connectors are facing
downwards.
Insert Memory Card
• Use only compatible T-Flash (Micro SD) card with this device. Other memory cards,
such Secure Digital (SD) cards, do not fit in the T-Flash (Micro SD) card slot and are
not compatible with this device. Using an incompatible memory card may damage the
memory card as well as phone, and data stored on the incompatible card may be
corrupted.
• The T-Flash (Micro SD) cardholder is the back of the phone underneath the battery.
• Place the T-Flash (Micro SD) card in the notch. Make sure that the T-Flash (Micro SD)
card is properly inserted and that the golden contact area on the card is facing
upwards.
• Close the cover of cardholder.
9
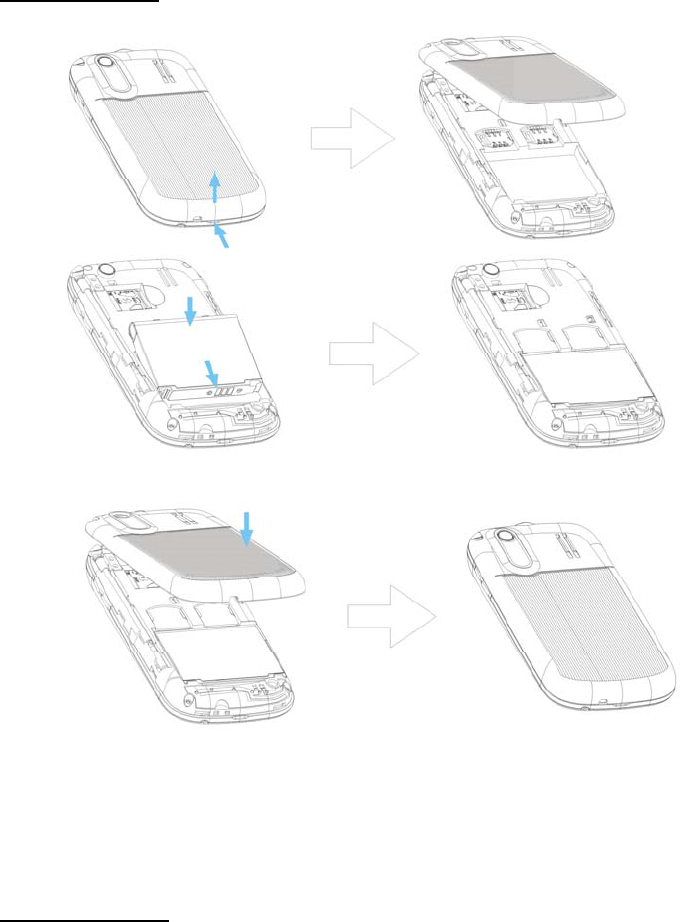
Insert Battery
• Slide the battery into the cradle and tap the battery down flat.
• Place the back cover and slide it into place.
[Warning]:
1. If the battery is totally empty, charging icon or LED is not on. There fore, you should
charge the battery maximum up to 10-20 minutes.
2. If you turn off handset abnormally, please take out battery about 10 seconds then
insert battery. Otherwise the battery will discharge and run out of power quickly.
Charge Battery
• Connect the USB cable the power jack on the right side of your phone.
• Connect the charger to an AC wall socket. The charging icon is displayed briefly if the
phone is switched on. If the battery is completely empty, it may take a few minutes
before the charging indicator appears on the display or any calls can be made.
10
Your phone
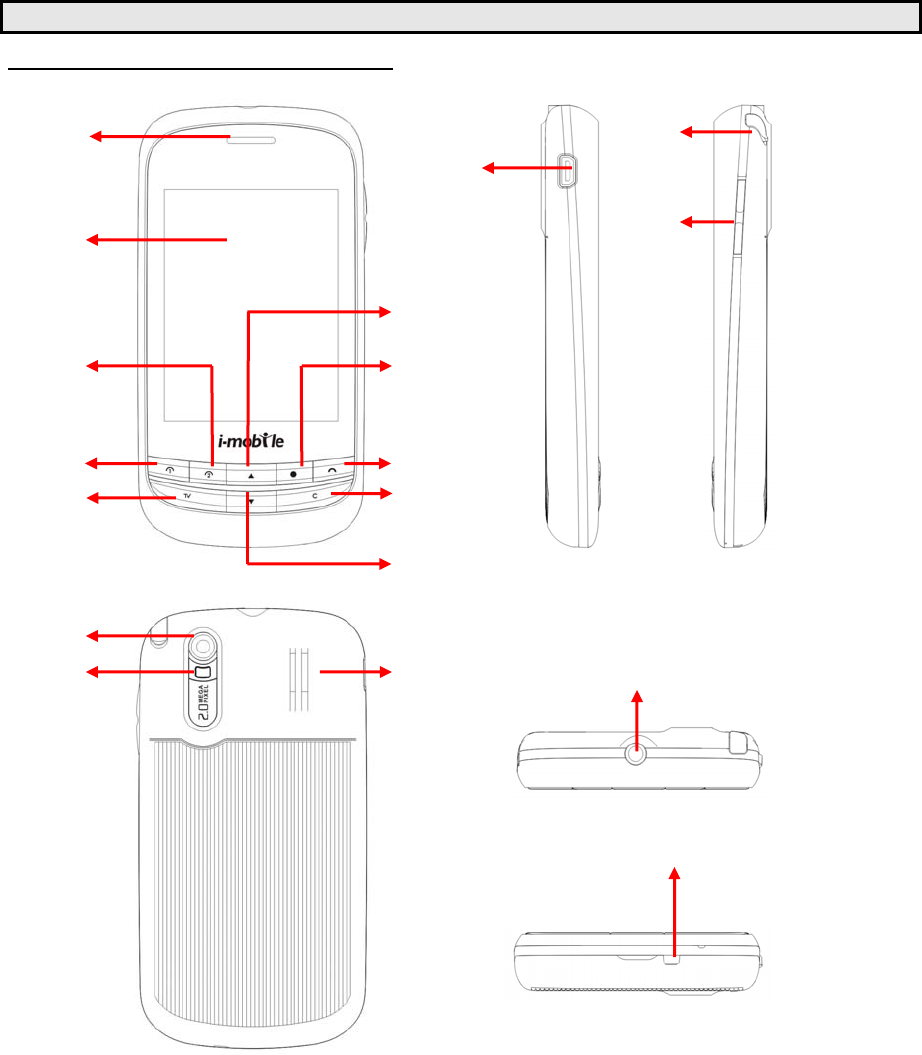
Front / Back / Side View of Phone
1 Ear speaker 10
Down key
2 Display screen & Touch panel 11
USB connector
3 SIM 2 key 12
TV antenna
4 SIM 1 key 13
Volume key
5 TV key 14
Camera
6 UP key 15
Touch light
7 Shortcut key or Capture key 16
Speaker
8 End key 17
Microphone
9 Clean key 18
Headset connector
1
2
3
4
5
6
7
8
9
11
12
14
15 16
13
17
10
18
11
Key Function List
SIM1 Send key
Answer key Dials a phone number and answer a call.
In idle mode: it shows the most recently called.
SIM2 Send key
Answer key Dials a phone number and answer a call.
In idle mode: it shows the most recently called.
Up key In menu list: To move through selections on the list.
In text: Move cursor up.
Down key In menu list: To move through selections on the list.
In text: Move cursor down.
Shortcut key
Capture key In idle mode: Short press will go to page “Shortcut
menu”. Long press will open the torch.
In camera mode: Take a photo.
Side key Adjust handset volume.
End key
Power key In idle mode: Switch phone on and off.
In call context: End Call.
In menu: Back to idle mode.
TV key Enter TV.
Clean key In text: Delete the text.
Idle Mode
When the phone is on, and you have not keyed in any characters, the phone is in idle mode.
1. Top of the screen shows Essential Indicators.
2. SIM 1 network provider.
3. SIM 2 network provider
4. Widget bar.
5. Shortcut bar.
1
2
3
4
5
12
Main Menu
1.
Call record 7.
Organizer
2.
Content Café 8.
Multimedia
3.
App Café 9.
Settings
4.
Phonebook 10.
Music player
5.
Messages 11.
TV
6.
File manager 12.
Services
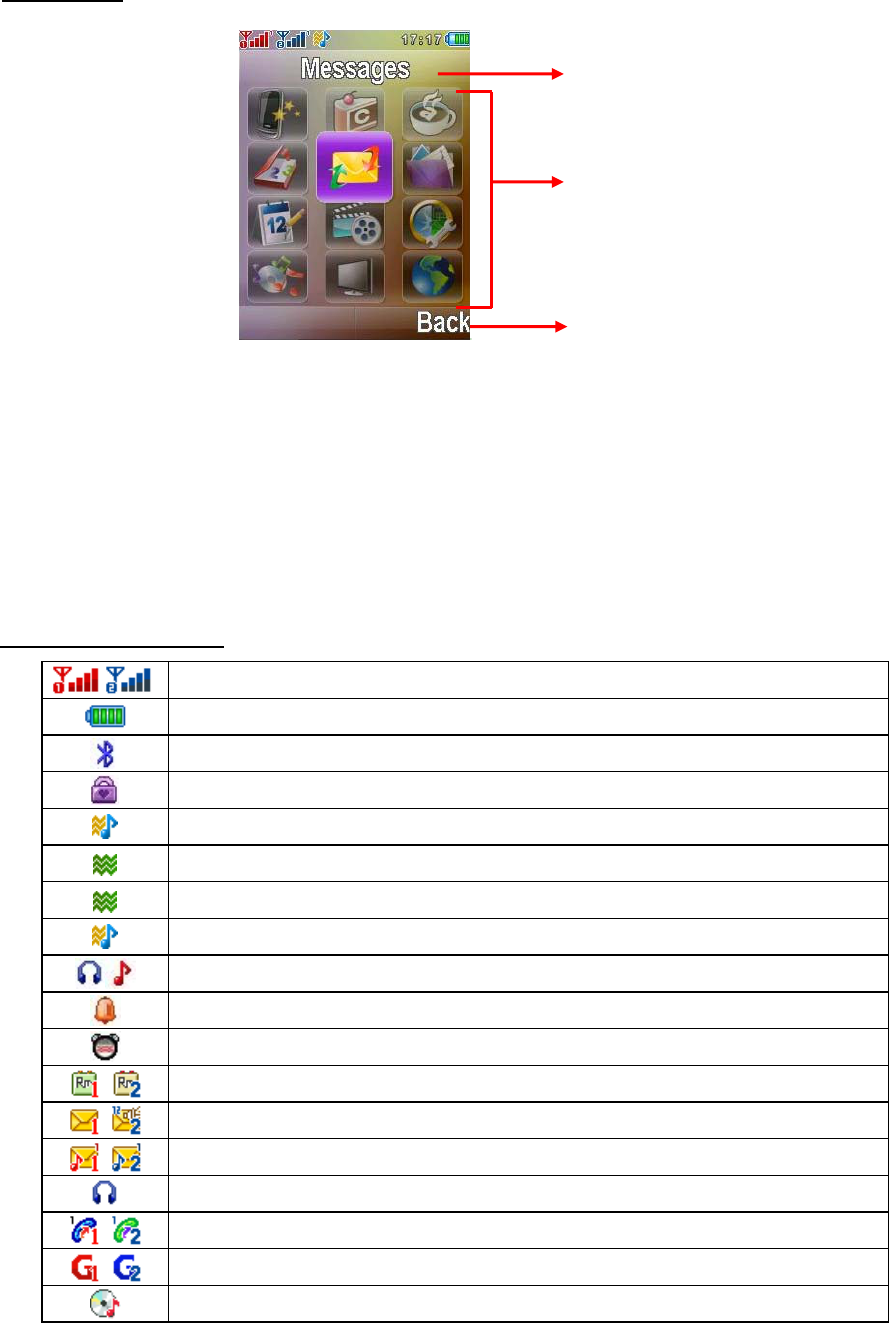
Essential Indicators
Indicates signal strength of SIM.
Shows handset current battery charge strength.
Bluetooth feature is active.
Indicates the phone keypad is locked.
Indicates the current profile is General.
Indicates the current profile type is Silent.
Indicates the current profile type is Meeting.
Indicates the current profile type is Outdoor.
Indicates the current profiles type is Headset.
The Alarm clock is set on.
The Stopwatch function is on.
Indicates “roaming”.
Indicates new SMS.
Indicates new MMS.
Insert the headset.
Indicates call forward is set on.
Indicates GPRS is connected.
Indicates Music player is in background playing.
Menu title
Main menu
Soft key bar

13
Listing of Functions
Call record
Missed calls
Dialed calls
Received calls
Delete call lists
Call duration
Call cost
SMS counter
GPRS counter
Content Café
Gallery
Ringtone
JAVA Game
Cartoon
Horoscope
SMS Game
Lotto
News-Info
Entertainment
i-Top Up
Sport
i-Club
App Café
Phonebook
Search
Smart search
Add new
Move
Move to private
Delete
Copy
Caller groups
Speed dials
Settings
Blacklist
Message
Write new
Inbox
Outbox
Drafts
Delete folder
Templates
Voice messages
Broadcast message
Memory status
Message settings
File manager
Phone
Card
Organizer
Private menu
Stopwatch
Alarm clock
Calendar
To do list
Memo
World clock
Calculator
Unit converter
Health
Ebook reader
Torch
Multimedia
Camera
Photo album
Java
VRE
Games
Video recorder
Video player
Photo editor
Voice recorder
FM radio
FM radio recorder schedule
Melody composer
Settings
Dual SIM settings
Pen calibration
Profiles
Display settings
Date and time
Phone settings
Call settings
Connection settings
Security settings
Restore factory
Music player
TV
Services
SIM1 STK
SIM2 STK
WAP
Data account
14
Using the touch screen
• The controls on the touch screen change dynamically depending on the task you are
performing.
• Tap any application to open it.
• Drag up or down to scroll. Dragging your finger to scroll doesn’t choose or activate
anything on the screen.
• Some lists have a scroll bar along the right side. Tap a letter to jump to items starting
with that letter. Drag your finger along the scroll bar to scroll quickly through the list.
• Tap an item in the list to choose it. Depending on the list, tapping an item can do
different things – for example, it may open a new list, play a song, or show someone’s
contact information.
Onscreen Keyboard
You can use the on screen keyboard to enter text, such as contact information. The
intelligent keyboard automatically suggests corrections as you type (some languages
only), to help prevent mistyped words.
Personalizing your Phone
Display Language
• From idle mode, tap Menu and select Settings / Phone settings / Language, tap
OK to enter language list.
• Select a language and tap OK.
Tone
• From Idle mode, tap Menu and select Settings / Profiles / General / Customize/
Tone settings / SIM1 or SIM2 incoming call, then select item enter to tone list.
• Select a ring tone and tap OK.
Wallpaper
• You can set wallpaper for the idle screen.
• From idle mode, tap Menu and select Settings / Display settings / Wallpaper tap
OK to enter option list.
• Select Default or My folder and link to image list.
• Select image and tap OK.
Shortcuts key
• Use shortcuts key to quickly function.
Activated Profile
• To access the list of profiles from idle mode, tap Menu, then select Settings /
Profiles and tap OK.
• Tap Options to activate the certain profile and tap OK.

15
Silent Mode
• You can switch the phone to Silent mode easy and quickly to avoid disturbing other
people.
• Long tap * of screen keyboard in idle mode.
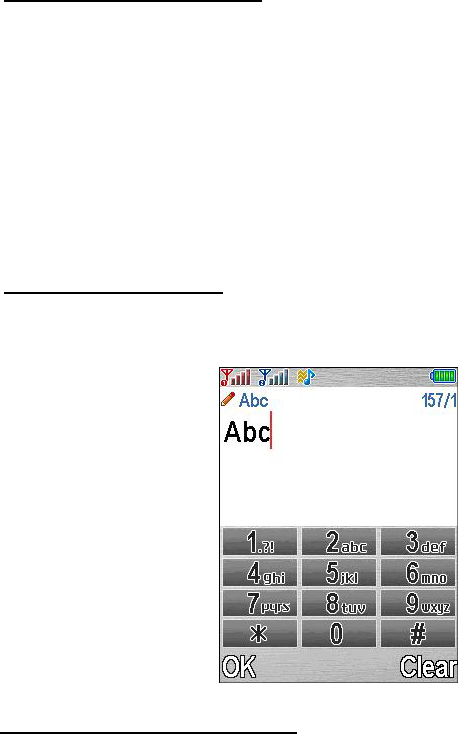
Writing Text
• To tap the screen keyboard can input the word which you selected.
• You can tap the input method on the screen to change it.
• There are two ways of writing messages, notes or name in contacts, multi-tap text
input and Smart text input mode.
Multitap text input
• Tap a number key 2 to 9, all the characters of that keyboard will be shown on the below
area. Tap the character that you wanted.
• When you are writing text, tap either # to change input mode.
• The most common punctuation marks are available under the number key *.
Smart text input
Smart text input mode is based on a built- in dictionary. And this input mode is only
available for the modes and languages on the mode list. When you writing text, and then
you can key in any letter with a single tap. The word changes after each keystroke.
• Start writing a word by using the keys 2 to 9. Tap each key only once for one letter. The
word changes after each keystroke.
• Example: To write Happy when the predictive test mode is selected, tap 4 once for H,
2 once for A, 7 once for p, 7 once for other p, and 9 once for Y.
• When you have finished writing the word and it is correct, confirm it by tap Select.
Tips for writing text
• To insert a space, tap 0.
• To delete a character to the left of the cursor, tap Clear. Tap and hold Clear to delete
all characters more quickly.
• The phone can remember the latest input method.
Text Input Mode
Multitap Abc (Traditional input mode)
Multitap abc (Traditional input mode)
Multitap ABC
Smart abc (English Smart mode)
Smart Abc (English Smart mode)
Smart ABC (English Smart mode)
Multitap Thai(Traditional input mode)
Smart Thai
Multitap pinyin
Simplified Chinese stroke
Smart pinyin
Numeric
Calling
GSM setting
• The GSM default was SIM 1, so start to calling need to switch your GSM.
• Only one SIM provides connection at the same time, if you want to set another SIM,
you must change SIM setting.
16
Making and answering call
Before you can make or answer any calls, make sure that the phone is charged and your
SIM card is inserted before you power on the phone.
Ensure that the phone is on, the network operator name is displayed and the signal
strength meter shows network coverage is available in the current area.
To make a call
• Enter phone number include area code you want to dial. If you key in wrong character,
tap Clean key to delete it.
• Press or to call the number.
• Press to end the call or to cancel the call attempt.
To make international call
• Tap and hold 0 of screen keyboard until a + sign appears.
• Enter the country code, area code and phone number, and then Press or
to make a call.
To answer call
• To receive a call, the phone must be switched on and the signal strength meter must
be displayed.
• Press or to answer a call.
Missed calls
• When an incoming call is not answered, the Missed call log is displayed on your screen.
To display the Missed call entry.
• Select the entry to read call detail.
To use loudspeaker during a call
• Loudspeaker mode is uses handset as loudspeaker during a call. Do not hold the
handset to your ear if loudspeaker mode on. To activate/deactivate the loudspeaker
during a call, tap “H-free/H-held”, and the single will show on the screen.
• The loudspeaker is automatically deactivated when you end the call or call attempt or
connect the headset to the phone
• The loudspeaker is default setting for playing MP3, voice recorder, using the
loudspeaker with MP3 player and Voice recorder, see detail on MP3 player and Voice
recorder.
To call emergency
• Your phone supports the international emergency number, for example, 112 or 911.
This number can normally be used to make emergency calls in any country, with or
without a SIM card inserted, if a GSM network is within range.
• You can place emergency calls “dial 112 or 911 and press or ” even if your
phone is locked or your account is restricted.
Tip of call options
A call can be connected to any single caller by taping Options. When user taps “Options”
during active call, user can choose one of those functions from the list:
♦ Hold single call: Put a call on.
♦ End single call: End a call.
♦ New call: Make a new call during an active call.
♦ Phonebook: Shortcut to phonebook menu.
♦ Message center: Shortcut to Message menu.
♦ Sound recorder: Star recorder conversation.

17
♦ Mute: Mute the call during the conversation.
♦ DTMF: Set On / Off for DTMF (Dual Tone Multi-Frequency) tone dialing system.
Hold single call
Taping “Options” and selecting Hold single call allows you to put an active call on hold.
This feature can be used when an incoming call is received during an active call or if you
want to make another without disconnecting the active call.
Make a new call during a call
You can dial a number during a call without disconnecting the active call.
• Press or and selecting Hold single call to put an active call on hold and
tap Options select New call make a new call by keying new number.
• Tap Options and select Swap, new number will go on hold, and old number will be
active.
• Also, you can select record from phonebook, after select New call, tap Back to option
list and choose Contacts.
Multiparty call
• You can connect to several people together or individually at a time.
1. Make a call to the first participant.
2. Call the second participant as explained in Make a new call during a call.
3. Tap “Options” and select Conference. This joins the calls to the conference.
4. Repeat step 2 and 3 to allow new participants to be connected to the Conference.
5. Tap Options and select End all to end the call. Or press .
• Any call (participant) can be disconnected by tap Options key and select End Single
call.
Switch two calls
• Tap “Options”. The first call is put on hold.
• To switch between two calls, tap Options and choose Swap.
• To end the active call press . (Or to end both calls at the same time. Tap Options,
and then move to End single call or End all calls. And tap OK.)
18
Menu Functions & Their Descriptions
Call record (Menu 1)
The numbers of the last 300 (Each page of SIM1’s or SIM2’s Missed calls / Dialed calls/
Received calls can save 50 calls) calls that you have made are saved in the call record list.
If your subscription includes the Calling Line Identification service and the caller’s number
is identified, the call record list also shows the numbers of received and missed calls. Call
records, Dialed calls, Received calls and Missed calls are list under separate tabs. User can
press or enter call list from idle mode. Use navigation key to scroll between
the tabs.
Call record
♦ From idle mode, press or . Scroll to the Call record item. Within the
submenu, you can view all the Missed, Dialed, and Received calls.
♦ In the list of Call record tap OK display Call information.
♦ In the Call info list, tap Options, you can: View / Dial / Save / Delete / Edit / Mark /
Send SMS / Send MMS / Move Record to Private / Add to Blacklist.
Dialed calls
♦ From idle mode, press or . Scroll to the Dialed calls tap OK. Within the
submenu you can view the numbers from which you have most recently called or
attempted calls.
♦ In the dialed calls list you can saw (SIM 1) or (SIM 2) icon.
♦ In the list of dialed calls tap OK display Call information.
♦ In the dialed calls list, tap Options, you can: Delete / Save / Dial / Edit / Send SMS /
Send MMS / Add to blacklist / Delete all / Move to private.
Received calls
♦ From idle mode, press or . Scroll to the Received calls tap OK. Within
the submenu you can view the numbers from which you have most recently accepted
calls
♦ In the received calls list you can saw (SIM 1) or (SIM 2) icon.
♦ In the list of missed calls tap OK display Call information.
♦ In the received calls list, tap Options, you can: Delete / Save / Dial / Edit / Send SMS
/ Send MMS / Add to blacklist / Delete all / Move to private.
Missed calls
♦ From idle mode, press or . Scroll to the Missed calls tap OK. Within the
submenu, you can view the phone numbers from which somebody has most recently
tried to call you
♦ In the missed calls list you can saw (SIM1) or (SIM 2) icon.
♦ In the list of missed calls tap OK display Call information.
♦ In the missed calls list, tap Options, you can: Delete / Save / Dial / Edit / Send SMS
/ Send MMS / Add to blacklist / Delete all / Move to private.
Users also can tap Menu, select Call record tap OK to see all the Missed calls, Dialed
calls and Received calls information in this submenu.

19
* Users only can see Call records information by press or from idle
mode.
** If the call record is moved to the private, you can not see the detail information in the
Call record---Missed calls / Dialed calls / Received calls folder, it will be find in
the Organizer---Private Menu---Call record--- Dialed calls / Received calls /
Missed calls folder.
[Note: The default password is 0000]
Within the Call record submenu, we also have many other functions:
Delete call lists
♦ In this submenu, Tap "OK" will display SIM 1 or SIM 2 item for you to choose the
following list:
• Missed calls
• Dialed calls
• Received calls
• Delete All
♦ Tap OK to delete it
Call duration
This function records the length of time or duration of all incoming and outgoing calls in
hours, minutes, and seconds. Tap "OK" will display SIM 1 or SIM 2 item for you to choose
the following list:
♦ Last call time: Display last one outgoing call in hours, minutes, and seconds.
♦ Total dialed: Display the time for all outgoing calls in hours, minutes, and seconds.
♦ Total received: Display the time for all incoming calls in hours, minutes, and seconds.
♦ Reset all time: Clear the time records.
Call cost
This network service allows you to check the cost of your last call or all calls. The call costs
are shown separately for each SIM card.
♦ Last call cost: you can set the phone to show the cost of last call. You may need the
PIN2 code to select the currency or unit. Contact your service provider for charging
unit prices.
♦ Total cost: you can set the phone to show the remaining talk time in terms of charging
units or units of currency by using this option. You may need the PIN2 code to select
the currency or unit. Contact your service provider for charging unit prices.
♦ Reset cost: this option allows you to reset the call cost counter. You may need the PIN2
code to clear your setting.
♦ Max cost set: you can limit the costs of your calls to a certain amount of charging units
or units of currency by using this option. You can make and receive charged calls as
long as the specified cost limit is not exceeded. The number of remaining units is
shown in the idle mode. You may need the PIN2 code to set the Max cost.
♦ Price per unit: this is the cost that the Service Provider charges for one unit of call time.
At this point you will be asked to enter your PIN 2 code to set this function.
SMS counter
This function can show you how many SMS you already sent and received. Tap "OK" will
display SIM 1 or SIM 2 item for you to choose and check contents.
GPRS counter
With the GPRS counter you can check the amount of data sent and received data in last
session in total and to clear the counters. The counters unit is a byte. To reset counter,
answer “Yes” when confirm window show up. Tap "OK" will display SIM 1 or SIM 2 item for
you to choose and check contents.
20
Content Café (Menu 2)
You can access various mobile Internet services with your phone browser. Please
remember always use only services that you trust and that offer adequate security and
protection against harmful software.
Check the availability of these services, pricing, tariffs, and instructions with your service
provider. With the phone browser you can view the services that use wireless markup
language or extensible hypertext markup language on their pages. Appearance may very
due to screen size you may not be able to view all details of the Internet pages.
For detail information, please see Services.
♦ Gallery: http://app.bug2mobile.com/menu_gallery.aspx
♦ Ringtone: http://app.bug2mobile.com/menu_music.aspx
♦ JAVA Game: http://app.bug2mobile.com/menu_game.aspx
♦ Cartoon: http://app.bug2mobile.com/menu_cartoon.aspx
♦ Horoscope: http://app.bug2mobile.com/menu_horo.aspx
♦ SMS Game: http://app.bug2mobile.com/menu_smsgame.aspx
♦ Lotto: http://app.bug2mobile.com/menu_ilotto.aspx
♦ News-Info: http://app.bug2mobile.com/menu_news.aspx
♦ Entertainment: http://app.bug2mobile.com/menu_movies.aspx
♦ i-Top Up: Application i-Top Up
♦ Sport: http://app.bug2mobile.com/menu_sport.aspx
♦ i-Club: http://app.bug2mobile.com/menu_iclub.aspx
App Café (Menu 3)
App cafe interface provides users to search and download more new applications.
Phonebook (Menu 4)
Search
You can search contacts by name characters or number.
♦ Name and Number, allow you key in the first characters of the name or number for
which you are searching in the editor line, the matched record will be shown.
♦ To search the name, users also can put up to 9 characters in the editor line; the
matched record will be shown.
♦ To input or edit a searched item, tap Options to enter into the submenu.
You can View, Edit, Delete, Copy, Move, Send SMS, Send MMS, Send contact,
Add to blacklist, Move to Private and Mark an entry.
** If the contact is moved to the private, you can not see the detail information in the
Phonebook; it will be find in the Organizer--Private menu--Phonebook.
[Note: The default password is 0000]
Smart Search
You can search contacts by first number of number you key, user can put number search
in the editor line, the matched record will be shown, then tap Name you send key.
Add new
♦ It is possible to store phone numbers in three places:
• Add to Phone memory
• Add to SIM 1 card
• Add to SIM 2 card
• Add to private

21
♦ To store a Number in the Phone memory:
In main menu, enter to Phonebook menu and select Add new. You can store 500
entries in your phone.
• Then select Add to phone memory, tap OK.
• Enter the name and number, tap Done.
• For each number or text item you can choose:
Name / Number / Home number / Company name / Email address / Office number
/ Fax number / Birthday / Image / Video call / Tone / Caller group
[Note]: Tone support MP3, Midi, AMR, and WAV files.
[Note]: Image support JPEG, GIF format. The JPEG /GIF images size should be less
than 200k.
[Note]: Video support motion JPEG files
* When users select Ring tone, Image, Video, you can go to File manager page to
choose from every folder. When users use these functions, if there is an incoming
call, the Video function will only be performed by Image, the ring tone will not work.
The Video function can be on or off. When the Video sound is off, the Ring tone can
be used.
♦ To store a number in the SIM1 or SIM2 card:
In main menu, select Phonebook, and select Add new. You can store 500 entries
(Maximum) in your SIM card for name, telephone number and image.
• Then select Add to SIM card (SIM1 or SIM2), tap OK.
• Enter the name, number, caller group and image, tap OK.
[Note]: Image support JPEG, GIF format. The JPEG /GIF images size should be less
than 200k.
[Note]: The number of store entries in SIM card, it may be different depend on your
SIM card service provider.
♦ To store a Number in the Private:
In main menu, select Phonebook, and select Add new. You can store 500 entries
(Maximum) in your Private for name, telephone number and image.
• Then select Add to Private, tap OK.
• Enter the name, number, caller group and image, tap OK.
[Note]: Image support JPEG, GIF format. The JPEG /GIF images size should be less
than 200k.
[Note]: The number of store entries in SIM card, it may be different depend on your
SIM card service provider.
Move
You can move names and phones number from the phone’s memory to SIM card’s
memory or from SIM card’s memory to Phone’s memory. The copy options have: One by
one, All from SIM1 to phone, All from SIM1 to SIM2, All from SIM2 to phone, All
from SIM2 to SIM1, All from phone to SIM1, All from phone to SIM2.
Move to private
You can move the data from the phone or SIM card to private. The copy options have: One
by one, All from SIM1, All from SIM2 or All from phone.
Delete
You can remove name and phone numbers from selected contacts all at once.
♦ In the Phonebook Menu, select Delete then tap OK.
♦ Choose All from phone, All from SIM1, All from SIM2 or One by one tap OK. User
needs to enter phone code to confirmed delete then tap OK
[Note]: The default phone code is 0000
Copy
♦ You can copy names and phones number from the phone’s memory to SIM card’s
memory or from SIM card’s memory to Phone’s memory. The copy options have:

22
• All from SIM1 to phone
• All from SIM1 to SIM2
• All from SIM2 to phone
• All from SIM2 to SIM1
• All from phone to SIM1
• All from phone to SIM2
♦ Copy entry records will both save in SIM and Phone’s memory.
Caller groups
♦ You can set the phone to sound a specific ring tone and flash a selected graphic on the
display when you receive a call from a particular name and phone number. To do this,
first include a name and number in a caller group. Then define a ring tone and
picture/animation for this group. If you want to activate this function, please store
names and phone numbers in the phone memory.
♦ After entering the Caller group’s menu, use Navigation key to select group name.
Group default name include: Friends, Family, VIP, Business and Others.
♦ After selecting the Group name, you can make Group settings to edit Group name,
tone, image, Video call and member list for each group. After each setting, tap
Done and Save.
Speed dials
In this function, you can make a call by using the speed dialing keys.
♦ You can set any of the numbers key 2 to 9, to work as a speed-dialing key. To do this
you need to assign a contact record to a number key.
♦ Within Speed Dials submenu, select Status to activation or deactivation the
function.
♦ Select Set number and select records from contacts then tap OK.
♦ After assigning a number to a speed dial key, you can call, reassign the record or undo
the speed dial.
♦ When a phone number is assigned to one of the speed dialing keys ( 2 to 9 ) you can
call the phone number in the following ways:
If you have set the menu function Speed dials to on, tap and hold to corresponding
speed dialing key until the call is started.
Settings
♦ My numbers
• You can view and edit personal name and phone number. To display my number on
idle screen.
• Tap “OK” to select SIM 1 or SIM 2 for view and edit information.
♦ Service dial number
• Your service provider may program some special phone numbers into your SIM. It
is not possible to modify the Service Dial Numbers.
• The phone number pointed to can only be recalled or dialed.
• Tap OK to select SIM 1 or SIM 2 for recalled or dialed service number.
♦ Memory status
You can check what percentage of the phone’s internal memory is occupied and how
many name and number entries can still be stored in SIM1/SIM2 card’s and Phone’s
memory.
♦ Prefer storage
You can choose where you want to save the name and phone number. You can select
SIM1 card, SIM2 card, Phone memory or All.
♦ Phonebook backup
• You can backup your phonebook to memory card or restore the phonebook.
• Selected the card, and the phonebook will be backup or restore to Phone or Card
memory.
♦ Fields
The phone allows you to personalize the contacts looking. In the Setting submenu,

23
selected Fields, and choose the item you want to display or not.
♦ My vCard
• You can edit personal vCard in the handset. Also, you can send vCards to your
friends that numbers save in the contacts list.
• Edit my vCard.
• In the My vCard submenu, select Edit my vCard enter the information for your
vCard then tap Save.
• Send my vCard.
• In the My vCard submenu, select Send my vCard and select transfer method:
Send by SMS, Send by MMS, Send by Bluetooth and Save to file.
♦ Video Audio
You can turn the function to On or Off. When this function is On, if there is an incoming
call, the Video function will only be performed by Image, the ring tone will not work.
When the Video sound is off, the Ring tone can be used.
Blacklist
Black list will automatically reject any unwanted call. You can define the list of
correspondents you don’t want to answer. If this rule is activated and some one from the
list is calling, Black list function will automatically decline this call.
♦ Mode: To turn on/off call black list setting.
♦ Black list: Edit black list from contacts list or hand input.
♦ Reject log: To view the reject list.
Messages (Menu 5)
This function only used if your network operator or service provider supports it. Only
devices that offer compatible picture message, or multimedia message features can
receive and display these messages. Devices that do not have multimedia features may
receive details of a link to a web page.
In Messages you can create, send receive, view, and edit text message (SMS) /
multimedia message (MMS).
Write new
Create and send a text message.
In the navigation bar, you can see the message length indicator counting backwards from
160/ (1). For example, 30/ (2) means that you can still add 30 characters for the text to
be sent as two messages.
The “SMS” option list includes options for Done, Use template, Insert object and
Input method.
The handset supports the sending and receiving of multimedia message that contain
several pages (slides). Each slide can contain text, one image and one sound clip.
SMS
For detail information is about how to write text in the phone.
♦ Select Write new tap OK, the create options appear, you can select one of the
following options: Done, Use template, Insert object and Input method.
♦ In the message tap Options, select Use template. You can choose templates from
the list.
♦ You can add pictures, animations, melodies and sound effects to a text message and
format the text using EMS. (Enhanced Messaging Service). In the message tap
Options, select Insert object, the object option list appears: Picture, My picture,
Animation, My animation, Melody, My melody and Sound.
♦ To send the message, tap Options, select Done and SIM options then send option
appear, choose send option: Send only, Send and save, Save, Send to many,
Send to by group and tap OK.
• If users select Send only, you should enter the Phone number by yourself or
24
search the contacts by taping Quick Search (in this page, users can put up to 9
characters to sorting the desired names.) and tap OK to send the message.
• If users select Send and save / Save, you can choose Save to normal and Save
to private.
Save to normal: the sent message is stored in the
Messages---SMS---Outbox folder.
Save to private: the sent message is stored in the Organizer---Private
menu---SMS---Outbox.
If the message is stored in Private, users need to enter the password to view the
detail information of the message.
[Note]: The default password is 0000.
MMS
Create and send a multimedia message.
Use navigation key up/down to select message type then tap OK. If select “MMS”, the
MMS editor screen appear.
♦ Use navigation key to select recipients from the contacts directory, or write the phone
number or email address of the recipient in the To field if you are sending a MMS or
email to the recipient. You also can edit the phone number or email address of the
recipient in the CC and BCC fields if you are sending a MMS or email to the recipient.
♦ To edit the subject of the MMS or email, scroll to Subject field.
♦ Scroll to Edit content, tap Edit enter Edit slide text. Tap Options, you can select:
Done, Input method, Add image, Add audio, Add video and Add attachment,
Add slide before, Add slide after, Delete slide, Next slide, Preview, Slide
timing.
♦ To insert a file in the message, scroll to Add attachment option then tap OK. Tap
Open to link a specific folder in File manager and scroll to the desired file, then tap
OK and Done. An attached file is indicated with the file name in the message.
♦ To send the message, tap Done and send option appear, choose send option: Send
only, Send and save, Save to drafts, Send options, Exit and tap OK.
• If users select Send and save / Save, you can choose Save to normal and Save
to private.
If users select Send only, you should enter the Phone number by yourself or
search the Contacts by taping Quick Search (in this page, users can put up to
9 characters to sorting the desired names.) and tap OK to send the message.
If users select Send and save /Save to drafts, the sent message is stored in
the Messages---Drafts folder.
Inbox
To check an unread message later:
♦ From SMS menu selects Inbox tap OK.
♦ You can select SIM 1 Inbox or SIM 2 Inbox item.
♦ Move to desired message and tap OK to enter list. Tap Options and inbox option list
appears, you can select View, Delete, Delete all, Move to private, Detail and
Mark. The message is stored in the inbox folder after you have read it.
The icon is indicate whether a SMS is read or unread and also show
message stored position in front of the message in the list.
The icon indicates whether a SMS is illegal message format or broken
message, which cannot be displayed in the Message body screen.
♦ While reading the message, tap Options to select through the list of options and tap
OK at the highlighted option to select it.
♦ The inbox message option list includes options have Reply, Delete, Edit, Forward,
Chat, Advance, Use number, Extract URL and Move to private.
Outbox
♦ In Idle mode enter Menu, Messages and Outbox than Tap OK.

25
♦ Move to desired message and tap OK to enter list. Tap Options and inbox option list
appears, you can select View, Delete, Delete all, Move to private detail and Mark
♦ While reading the message, tap Options to select through the list of options and tap
OK at the highlighted option to select it.
♦ The outbox message option list includes options have Send from SIM1, Send from
SIM2, Edit, Copy to SIM card, Move to SIM card, Delete, Use Number, Extract
URL and Move to private.
** If the SMS is moved to the private, you can not see the detail information in the
Messages---Inbox/Drafts/Outbox folder, it will be find in the Organizer ---
Private menu --- Messages --- Inbox / Drafts / Outbox folder.
Drafts
♦ To finish or view an draft message
♦ From Message submenu select Drafts move to desired message and tap Options,
the options list appears you can select View, Delete, Delete all and **Move to
Private, Detail and Mark.
♦ While reading the message, tap Options to select through the list of options and tap
OK at the highlighted option to select it.
♦ The Drafts message option list includes options have Send form SIM1, Send from
SIM2, Edit, Delete, Use Number, Extract URL, Move to Private.
SMS settings
Message setting have been divided into groups according to the different message types.
Select the settings you want to edit, and tap OK to select SIM 1 message settings or
SIM 2 message settings for you to choose the following list.
♦ Profile setting: lists all the message centers that have been defined.
♦ Common settings: The message settings under the SMS menu are common to all
outgoing SMS, irrespective of the selected set.
• Delivery report
User can turn On or Off this function if user wants to receive delivery report from
service provider or not.
• Reply path
Also, user can choose to use the same service center as the received message to
reply or not.
♦ Memory status
• You can check what percentage of the phone’s internal memory is occupied and
how many messages can still be stored in SIM card’s or Phone’s memory.
• The phone will show message to remind user if SIM card and Phone set both out of
memory.
♦ Prefer storage
• You can choose where you want to save the message depend on memory status.
• If either one of storage locations, SIM card or Phone, already full, the phone will
automatically save information to another.
• Select Phone memory or SIM card and tap OK.
Delete Folder
You can choose delete process depend on that selection message box or once deleted all
folder messages.
Templates
♦ Select Templates tap OK, the templates options appear.
♦ From the MMS templates list, tap Options to View, Detail and Create MMS.
Voice messages
Voice messages are a network service and you may need to subscribe to it first. For more
information and for the voice mail number, contact your service provider. Tap Menu, and

26
select Messages, and Voice messages.
♦ Each phone line may have its own voice mailbox number.
♦ Within Voice messages submenu, choose phone line 1 or 2.
• The option are:
Edit: general number editor.
Erase: erase the voice mail number.
Dial to listen: user can dial the voice mail server number to listen voice mails.
• Choose the option and tap OK to save it.
• In the Idle mode, holding and taping 1 can connect to voice mail.
Broadcast message
Broadcast message are spread by the network service to all handsets in a cell. User cans
enable/disable the service to choose if user wants to receive broadcast messages from
particular channels or not.
♦ Receive mode
When you turn on/off the mode, you can choose to receive or not receive the last
broadcast message received.
♦ Read message
Using the direction of Navigation key allows you browse through the message. Tap OK
or Back, if you want to read or exit.
♦ Languages
User can select the languages of the Info Messages user wants to receive.
♦ Channel settings
• You can select the channels from the channel list.
• You can add new channels where you want the messages to be received to the list.
Then select it from select list.
• Also, the function allows you Select, Add, Edit, and Delete setting.
Memory status
♦ You can check what percentage of the phone’s internal memory is occupied and how
many messages can still be stored in SIM card’s or Phone’s memory.
♦ The phone will show message to remind user if SIM card and Phone set both out of
memory.
Message settings
Within the MMS submenu of the Message setting you can change the settings of a
Multimedia message sending option:
♦ Compose:
Creation User can set Free or Restricted mode to restrict to inserting
media object.
Image resizing User can switch
to Off, 160x120 or 320X240 from this function
and your attached image will be changed follow your setting.
Auto signature User can edit content from this function and it will be attached
in MMS.
♦ Sending:
Validity period This is the duration that your message is stored at the Message
center. Delivery attempts will be repeated until the message
has been delivered or expired.
The options of length of time have: Max. /1 hour/ /12 hours/1
day/1 week.
Delivery report User can turn On or Off this function if user wants to receive
delivery report from service provider or not.
Read report User can turn On or Off this function if user wants to read
report from service provider or not.
Priority User can choose message priority; the options have: Normal,
High, and Low.
Slide timing User can set slide timing by own desire.

27
Delivery time The option of length of time has: Immediate/ In one hour/In 12
hours/In 24 hours.
♦ Retrieve:
Home network The options of home network have: Immediate / Restricted /
Delayed.
Roaming The options of roaming network have: As home / Delayed /
Restricted.
Read report The options of read report have: On request / Send / Never
send.
Delivery report User can turn On or Off this function to ask the network to send
delivery reports about your message.
♦ Filters:
Anonymous The option of anonymous have: Allow/ Reject.
Max size (KB) Set multimedia messages size by user.
Advertisement The option of advertisement setting has: Allow/ Reject.
♦ Edit profile:
You may use network or service provider to receive and send multimedia message.
♦ Memory status
• You can check what percentage of the phone’s internal memory is occupied and
how many messages can still be stored in SIM card’s or Phone’s memory.
• The phone will show message to remind user if SIM card and Phone set both out of
memory.
File manager (Menu 6)
In the File manager menu, you can manage images, photos, recordings, tones that you
have.
Tap Menu, select File manager, tap OK to enter submenu of File manager.
♦ In the File manager screen, a list of folders is shown.
♦ Scroll to the desired device Phone or Card tap Options, you can choose Open,
Create folder, Memory status and Format item. One of the options is available.
Open: To view the files in the folder. The files in this folder have: Audio,
Bluetooth, Images, My Music, Photos, Received and Video.
For selected folder, tap Options, one of the options is available:
Open, Create folder, Rename, Delete, Sort and Move to privacy.
Create folder: To add a new folder into list.
Memory status:
You can check what percentage of the phone’s internal memory is
occupied and how many files can still be stored in Phone’s memory
and memory card.
Format: You can format the file list.
Remove Let’s you phone and SD card data change to empty after choose
delete This phone and SD card will without any data.
♦ Scroll to the desired file, and tap Options select options, the file option have: View
(Image), Play (Video, Audio), Set as (Set as Ringtone, Set as Message Tone), Send
(MMS, Bluetooth), Detail, Rename, Copy, Move, Delete, Delete all, Sort, Move
to private and Mark.

28
Organizer (Menu 7)
Private menu
You can move the Call records, SMS, Phonebook and File manager to the Private menu;
if you do not want others see this detail information.
[Note]: To enter the submenu of the Private Menu, users need to enter the password.
The default password is 0000.
♦ Call record:
• Missed calls:
Tap OK to enter the Misseed calls list. Scroll to the desired item; tap OK to see
the detail information.
The Options of the item have: Delete, Save to Phonebook, Dial, Edit, Send
SMS, Send MMS, Add to blacklist, Delete all and Move to normal.
• Dialed calls:
Tap OK to enter the Dialed calls list. Scroll to the desired item; tap OK to see
the detail information.
The Options of the item have: Delete, Save, Dial, Edit, Send SMS, Send MMS,
Add to blacklist, Delete all and Move to normal.
• Received calls:
Tap OK to enter the Received calls list. Scroll to the desired item; tap OK to see
the detail information.
The Options of the item have: Delete, Save, Dial, Edit, Send SMS, Send MMS,
Add to blacklist, Delete all and Move to normal.
• Delete call list:
Tap OK to enter the Delete call list. Within this submenu you can to delete Missed
calls, Dialed calls, Received calls and Delete call lists.
♦ SMS:
• Write new (SMS):
For detail information about how to write text in the phone, see also “Writing Text”
on page 18.
• Inbox:
Tap OK to enter the Inbox list will be shown Inbox options for you choose.
Scroll to the desired message, tap Options. The Options of the message have:
View, Delete, Delete all and Move to normal.
After viewing the message, tap Options. The Options have: Reply, Delete,
Dial, Forward, Detail, Advance, Use number, Extract URL, Save objects and
Move to normal.
• Outbox:
Tap OK to enter the Outbox list will be shown Outbox options for you choose.
Scroll to the desired message, tap Options. The Options of the message have:
View, Delete, Delete all and Move to normal.
After viewing the message, tap Options. The Options have: Send, Edit,
Delete, Detail, Use number, Extract URL, Save objects and Move to normal.
• Drafts:
To finish or view a draft message.
From Message submenu select Drafts move to desired message and tap
Options, the options list appears you can select Detail, View, Delete, and
Delete all.
While reading the message, tap Options to select through the list of options
and tap OK at the highlighted option to select it.
The Drafts message option list includes options have Play, Send, Edit, Delete,
Delete all, Detail, Save Object and Use number.
♦ Phonebook:
• Tap OK to enter the phonebook list. Scroll to the desired item; tap OK to see the

29
detail information.
• The Options of the item have: View, Edit, Delete, Copy to phone memory, Copy to
SIM card, Send SMS, Send MMS, Send contact, Add to blacklist, Move to normal
and Mark.
♦ File manager:
• Tap OK to enter the File manager list. Scroll to the desired item; tap OK to see the
detail information.
• The Options of the item have: Open, Create folder, Rename, Sort, Move to normal,
Play, View, Forward, Print, Detail, Copy, Move, Delete, Delete all, Mark.
♦ Setting:
Change code: Change the private’s password.
Stopwatch
You can measure time, take intermediate times, or take lap times using the stopwatch.
During timing, the other functions of the phone can be used. To set the stopwatch timing
in the background, press the end key.
Using the stopwatch or allowing it to run in the background when using other features
increases the demand on battery power and reduces the battery life. The stopwatch
continues to run when you answer an incoming call.
Tap Menu, select Organizer / Stopwatch, tap OK to enter submenu of Stopwatch.
Split timing: To take intermediate times. To start the time observation, tap
Start, tap Split
every time that you want to take an intermediate
time. To stop the time observation, tap Stop. To save the
measured time, tap Save. To start the time observation again, tap
Resume, the new time is added to the previous time.
Lap timing: To take lap times. To set the stopwatch timing in the background
presses the (End key).
Count down timer: To count down timer. Set up the time of count down timer, and
then begin to count down according to tap Start.
View record: To view the saved time. The record options have: View, Delete
and Delete all.
Alarm clock
The alarm clock uses the time format set for the clock.
♦ Tap Menu, select Organizer/Alarm clock, tap OK to enter submenu of Alarm
clock.
♦ To set the alarm, tap Edit and set on the alarm, key in the alarm time. You can set at
least 5 lists.
♦ You can set the alarm to repeat, Once, Days or Everyday.
♦ Tap Stop to stop the alarm. If you let the phone continue to alarm for a minute or tap
Snooze, the alarm stops for about 1 minute and then resumes.
♦ If the alarm time is reached while the phone is switched off, the phone switches itself
on and starts sounding the alarm tone, if you tap Stop, the phone ask whether you
want to active the phone (Power on?), Tap No to switch off the phone or Yes to
switch on the phone.
Calendar
♦ You can use the phone’s calendar to keep track of reminders, calls you need to make,
meetings and birthdays. You can set the calendar to sound an alarm when it’s time for
you to make a call or to go to a meeting.
♦ Tap Menu, select Organizer/Calendar. Tap Options to the options list, you can Add
task, View, week view, Jump to date.
♦ Calendar display depend on user setting calendar format in the Calendar setting, for
example: you can select Thai Calendar when language setting is Thai mode
♦ If you want to add new task, within the calendar submenu, use Navigation key move
to the day you want or use Go to date option the current day is indicated with a frame

30
around the day. If there is any tasks set for the day, the day is changed display icon.
To view the appointments, tap OK to Edit and Delete.
To do list
♦ In this function, you can View the task, Add task, Edit task, Delete task, and
Delete all the list of tasks. You can also select and view a single task.
♦ The task view allows you to view the details of the select task. You can move through
the task.
♦ When setting time is coming, the alarm notification is enable, the phone will remain
user his activities.
Memo
♦ In this function, you can Add the memo, View the memo, Edit memo, Send Note,
Delete, and Mark the list of memo. You can also select and view a single memo.
♦ The memo view allows you to view the details of the select memo. You can remember
through the memo.
♦ When view this memo, you can tap options to Edit, Send Note or Delete.
World clock
♦ The screen shows the city name, current date and time.
♦ You can to choose the city and check the local time.
The time zone setting of each city in world time menu may be affected by network
condition.
Calculator
♦ You can use your phone’s calculator to add, subtract, multiply and divide.
♦ Tap Menu, select Organizer/Calculator, and tap OK.
♦ With the screen showing a “0”, enter the first number in the calculation.
♦ Use Navigation key to select add, subtract, multiply, and divide then tap OK or center
key to continue operation.
♦ Tap # to enter a decimal point.
♦ Tap Clear to start the new calculation.
Unit converter
♦ To convert measures such as Weight from one unit (Pound) to another (Kg), tap the
Menu, and select Organizer then Unit converter.
♦ In the Unit converter submenu, tap Options to select converter options, option in
Set weight converter is Reverse converter and Set converter.
[Note]: the Converter option display is depending on user settings
♦ In the first amount field, and enter the value you want to convert, the other amount
field automatically shows the converted value. For example, in weight converter,
pound units extaped in kg units, enter 110 and 49.895164 automatically show in kg
field.
♦ Press up/down key to reverse converter, or tap Options to select reverse converter
option.
♦ If you want to select other converter types, tap Options and select Set converter to
open a list of measures. Choose the measure you want to use and tap OK to enter
converter unit list.
♦ Choose the converter unit from which you want to converter and tap
Options\Activate.
Heath
Application program to offer a series of for health consultation, BMI, Menstrual, let you
finish body and mind clever health care at the same time.
Ebook reader
Ebook reader is an application used to read E-books on your mobile phone. E-books are
31
nothing but electronic book, which can be read on your phone. These E-books are
available in various formats.
♦ Formats supported for E-books:
• Palm doc(prc and pbd) file format.
• Txt format.
• TCR format.
• Ztxt format.
Torch
Torch is equivalent to normal flashlight. When the user opens this feature, the phone will
open the flash function to facilitate lighting. You can set torch need to light up the length
of time.
Multimedia (Menu 8)
Camera
[Note]: Please obey all local laws governing the taking of picture.
Your phone has a digital camera and digital video recorder. You can take pictures, record
video clips, view them and send them in MMS. To do this, you must subscribe to these
services. Please check with your network operator. The camera lens is on the back of the
handset and the display of the handset works as viewfinder. The camera produces pictures
in JPEG format and the video clips in motion JPEG format. Please pay attention; if handset
is not enough memory to take a new photo, you need to free some by deleting old photos
or other files in the File manager.
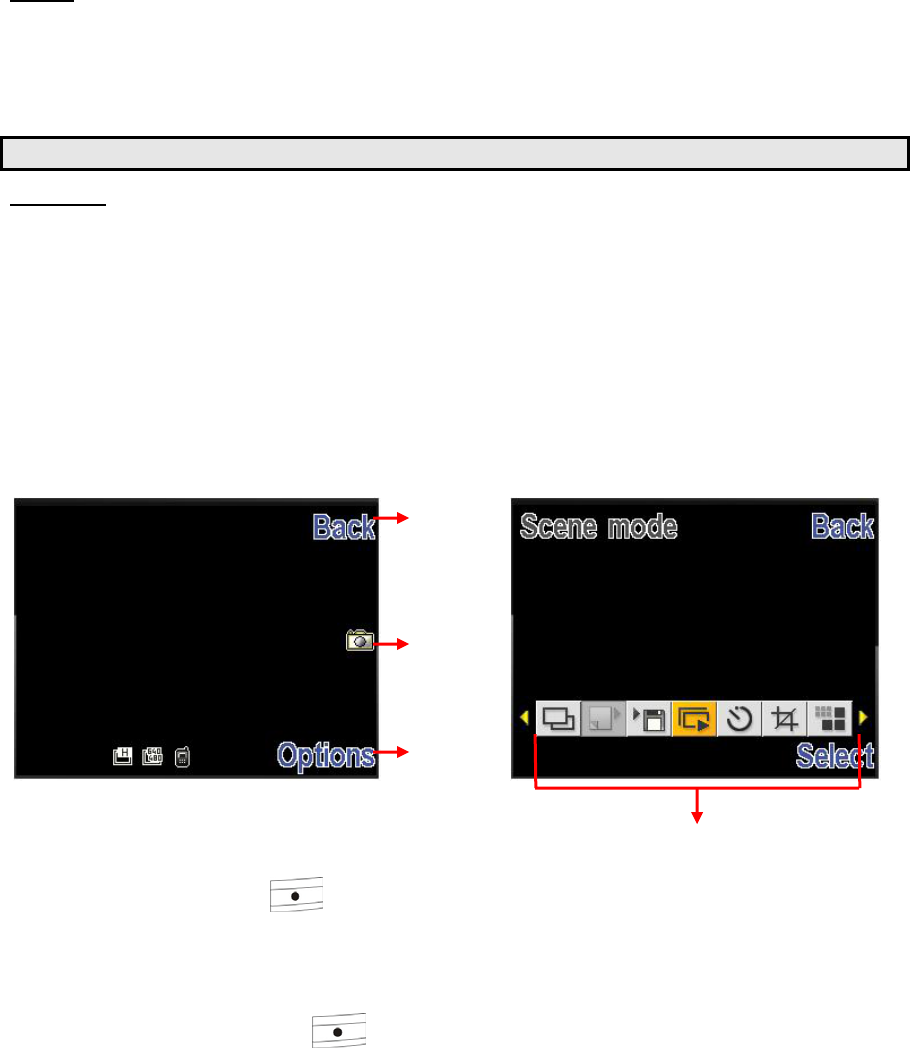
To access this menu, tap Multimedia and select Camera.
1. Tap Back to go back previous level.
2. Tap the Options to choose camera options.
3. Tap the icon or press to snapshoot this screen.
4. Camera’s options menu.
♦ Taking a Photo
• The live image appears on the display, and you can use the display as a viewfinder.
• To take a photo press to capture. When taking a photo a shutter sound is
heard. The phone saves the photo in the Photo album of the Multimedia menu.
♦ To setup camera option
Tap Options enter options bar. User can select:
• Self timer: Set a time delay before the camera takes a photo, the detail option see
below table.
1
3
2
4

32
• Image size: Select an image size, for detail see table below.
• Image quality: To define how much the photo file will be comtaped when saving
the image, the detail option see below table.
• Effect settings: Apply a special effect to the photo, the detail option see below
table.
• Shutter sound: Select the sound that you hear when you take photo.
• EV: Select the value of EV to the photo, for detail see table below.
• AE meter: This determines the exposure by metering and calculating the light
levels in the center and other areas of the image separately.
• Banding: Adjust screen backlight flicker, the detail option see below table.
• White balance: Adjust the color balance of the photo, the detail option see below
table.
• Storage: Storage place in phone and memory card.
• Restore default: Restore camera setting to default.
• Help: Reveal the swift function of each button.
• Capture mode: Take a photo in the following mode.
Single: Take a photo in the normal mode.
[Note]: When user set camera capture mode to “Single” and then all camera
options available except “Mode setting”
Sticker: Take a series of action stills. You can select the number of photos in
the mode setting the camera will take.
Burst shot: Take a series of photos.
• Save mode: There are Manual Save and Auto Save that you can choose.
• Mode setting: The option might change depend on Capture mode, for detail see
table below. Camera options
Capture mode Single / Sticker / Burst
Mode setting 1. If capture mode set to Burst shot, the mode setting have
options are: 4 shots / 6 shots
2. If capture mode set to Sticker shot, the mode setting have
options are: Frame 1 / Frame 2 / Frame 3
3. If capture mode set to single shot, the mode setting will be
disabling.
Save Mode Take and save / Automatic save
Scene mode Auto / Night
Self timer Off / 5 sec / 10 sec / 15 sec
Image size 160*120 / 240*320 / 320*240 / 640*480
Image quality Low / Normal / High
Effect settings Normal / Gray scale / Sepia / Sepia green / Sepia blue / Color
invert
Shutter sound Off / Sound 1 / Sound 2 / Sound 3
EV EV+1 ~ EV+4 / EV0 / EV-1 ~ EV-4
AE meter Auto / Spot / Weight / Average
Banding 50 Hz / 60 Hz
White Balance Auto / Daylight / Tungsten / Fluorescent / Cloudy /
Incandescence
Restore default Restore camera setting to default
Help Reveal the swift function of each button
Torch light On/Off
Photo album
Photo album is a folder under Multimedia; it is a folder to save the photo images. You
can view image in this folder.
Tap Options and choice one of the following functions that may be available for the
selected files:
♦ View: To view the photo.
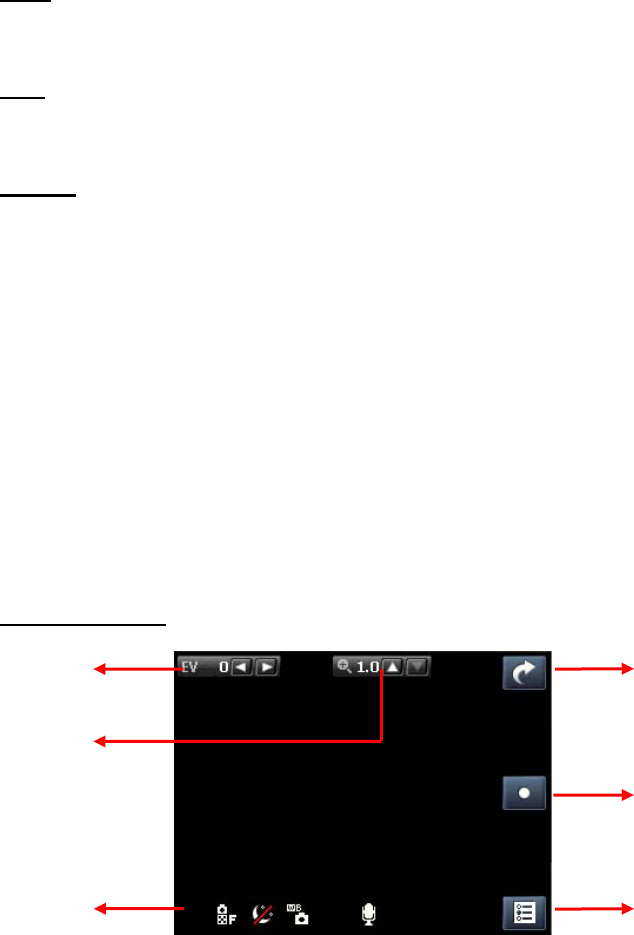
33
When you viewing the photo, press up/down key can change the image
♦ Image info: To display image detail information.
♦ View mode: To select image display style.
♦ Set as: You can use the photo to Wallpaper and Screen saver or Caller picture.
♦ Send: You can use MMS or Bluetooth function send this picture
♦ Rename: Change the name of photo.
♦ Delete: Delete selected photo.
♦ Delete all: selected delete all photo.
♦ Sort: To sort the file by File name, File type, Time, File size and None.
♦ Storage: Select storage place in phone and memory card.
♦ Mark: You can mark several or mark all many photos to delete copy or move.
Java
This device supports JAVA, providing you the freedom of using JAVA applications and
games. You can into the “File manager” and choose the JAVA game to install.
VRE
This device supports VRE, providing you the freedom of using VRE applications and games.
VRE interface provides users to search and download more new applications.
Games
♦ Your phone software includes some games specially designed for this handset.
♦ You can launch a game by tap Menu/ Multimedia and select Games.
♦ Use Navigation key select a game or game set, tap OK.
♦ Tap OK again, you can choose the option that you want:
Resume
Start game
Game level
Best grades
Game help
♦ Game setting
This function designs for Games only.
BGM: Turn On / Off music.
Sound effect: Turn On / Off effect of game.
Game vibration: Turn On / Off vibration of game.
Video recorder
1. Tap “Options” to choose video recorder options.
2. Tap “Exit” to exit the video recorder.
3. Tap it or use the side key to adjust zoom in/zoom out.
4. Tap it or use the navigation key up/down key to adjust EV.
2
5
1
4
3
6

34
5. Tap it or press to start record video.
6. Current configuration parameter values.
♦ To record a video clip
1. Tap Menu, and select Multimedia and Video recorder.
2. The live image appears on the display, and you can use the display as a viewfinder.
3. To record a video clip, press .
4. The phone saves the video in the Video player of the Multimedia menu. For
detail information about playing video, see Video player.
♦ To setup video recorder option
Enter options list. User can select:
Video recorder settings: The settings including -White balance / EV/ Night mode
/ Banding. For detail see table below.
Video settings: The settings including Video quality / Rec. time limit / Record
audio. For detail see table below.
Effect settings: Apply a special effect to the photo, the detail option see below
table.
Storage: Select storage place in phone and memory card.
Restore default: to restore video settings to default.
Video recorder options
White balance Auto / Daylight / Tungsten / Fluorescent / Cloudy /
Incandescence
EV EV+1 ~ EV+4 / EV0 / EV-1 ~ EV-4
Night mode On / Off
Banding 50 Hz / 60 Hz
Video quality High / Normal / Low
Effect settings Normal / Gray scale / Sepia / Sepia green / Sepia blue / Color
invert
Restore default Restore video recorder settings to default
Video player
`
1. Tap “Options” to choose video player options, tap “Back” to back to previous level or
saving recording.
2. Tap it or press side key to adjust volume.
3. Tap it pr press to start play video.
4. Tap the right/left icon to Fast Forward or Slow Forward.
4
5 2
1
3

35
5. Tap it to full screen the video.
Video player is a folder under Multimedia, the folder name Video player. It is a folder
to save the video. You can view video in this folder.
Tap Options and choice one of the following functions that may be available for the
selected files:
♦ Play: play the video.
♦ Set as: Set the video to Contacts or Screen saver
♦ Send: You can use MMS or Bluetooth function send this Video
♦ Rename: Change the name of the file.
♦ Delete: Delete the file.
♦ Delete all: Delete all the recorder files.
♦ Sort: To sort the file by File name, File type, Time, File size and None.
♦ Storage: Select storage place in phone and memory card.
♦ Mark: You can choose many photos to delete or copy.
Voice Recorder
Voice Recorder is a simple voice recording application, which provides functionalities for
the user to manage voice files.
Within Recorder/List submenu, tap Options you can select:
♦ Record: To record new sound.
♦ Play: Play the selected sound.
♦ Append: To append the new sound with the already existing sound (for AMR format
only).
♦ Rename: To modify the name of the selecting sound.
♦ Delete: To delete the selected sound file.
♦ Delete all: To delete the entire available sound files.
♦ Settings: The further setting of recorder.
Preferred storage: Storage place in phone and memory card.
File format: There are two types format setting: AMR or WAV.
♦ Set as: To forward the sound file to “Set as ringtone”.
♦ Send: You can use MMS or Bluetooth function send this sound.
FM radio
To listen to the FM radio on your phone connects the compatible headset connector on the
left side of the phone. Note that the quality of the radio broadcast depends on the radio
station’s coverage in that particular area.
♦ To turn on the radio
Tap Menu and select FM radio.
Tap to turn on/off radio.
On the display are:
• Channel location number and the name of the radio channel if you have saved
the channel.
• Frequency of the radio channel.
♦ If you have already saved radio channels, you can scroll to the channel you would like
to listen to or select a radio channel location 1 to 20 by taping the corresponding
number key.
♦ Search a radio channel
When the radio is on, press to enable / disable Auto search then
tap or to search channel when a channel is found searching will stop. Or you can
tap or to search channel by hand.
♦ Saving radio channels
To save channels quickly in positions 1-20, tap and hold number icon. Selecting a
channel you want to save in position 1-20, and tap and hold number icon 1-20.
♦ FM recorder

36
To record FM radio, tap to begin FM recorder.
♦ Using the radio
When the radio is on, tap “Option” selection FM Radio function.
Stations: To save the channel you have found, tap and select Edit. Key in the
name of the channel and Frequency tap OK. You can save 10 radio channels in the
handset.
Set frequency: If you know the frequency of the radio channel you would like to
listen to (between 87.5 MHz and 108.0 MHz), key it in and tap OK.
Auto search: If you want to search radio channel, tap Yes when Preset list
confirm message show up. The search stops when channels has been found and
show channel in Stations.
Settings:
FM radio setting options:
Background play: Turn On/Off Background plays function.
• On: allow radio continuing playing when exit FM radio.
• Off: when user exits FM radio, radio will stop.
Record format: Select the record format, AMR/WAV.
Loud speaker: To turn On / Off the speaker.
Record Storage: Storage place in phone and memory card.
Record: Beginning record FM radio.
Append: To append new radio with the already existing file.
File list: Show amount of record files.
[Note]: Before use FM radio option, please turn on the radio first.
[Note]: You can normally make a call or answer an incoming call while listening to
the radio. The volume of the radio is muted. When you end the call, the radio
volume will automatically be turned up again. Also, when an application using
GPRS or HSCSD connection is sending or receiving data, it may interfere with
the radio.
FM radio recorder scheduler
♦ Tap Menu, select Multimedia/FM radio recorder scheduler, tap OK to enter
submenu of FM radio recorder scheduler.
♦ To set the recorder scheduler, tap Edit and set on the radio, key in the date, and time
to start and stop.
♦ You can repeat the recorder to Everyday, Once, or Days.
♦ The record settings can edit Record format (AMR / WAV), Audio Quality (High /
Low) or Storage (phone and Card).
Photo editor
You can use “Photo artist” feature to edit, cut or Re-size the image file. You can also use
the "Image tiles" feature to merge multiple images into a single image file.
Melody composer
The melody composer application is designed to melody files using the iMelody format
prescribed. It allows user to enter key sequence to compile a melody that can be played
and set as a ring tone as well.
A melody file comprises of seven note types each played for a specified duration of time
and can have different pitch and octave. These files are stored using prescribed format as
identifiers corresponding to tap sequence entered by the user.
The application displays the tap sequence in a graphical format to allow compilation in a
user friendly manner.

37
Settings (Menu 9)
Dual SIM settings
Within the Dual SIM settings menu, you can select Dual SIM open, Only SIM 1 open,
Only SIM 2 open or Flight mode, the GSM operator will follow your setting for this
phone network provide.
♦ Flight mode
You can switch you phone to flight mode when you take aircraft. The options of flight
mode are: Normal mode, Flight mode and Query when power on.
Pen calibration
This function is in adjusting the screen coordinate axis.
Profiles
Within the Profiles menu, you can adjust and customize the phone tone for different
events, environments and caller groups.
♦ Activate
In the idle mode, tap Menu and select Settings/Profiles and tap OK to access
the list of profiles.
Use Navigation key to select the profile. Taping Options to activate and customize
the profile.
♦ Customize
In the idle mode, tap Menu and select Settings/Profiles and tap OK to access
the list of profiles.
General / Silent / Meeting / Outdoor / Headset / Bluetooth.
Use Navigation key to select the profile. Tap Options to customize the profile
Within Profile submenu, select one of the following profiles and tap Options.
In the idle mode, user can hold and tap the * to change profiles to Silent quickly
and easily. Or in the list of profiles, scroll to Silent and tap Options/Activate
Silent mode.
Select the Customize and choose the desired option and tap OK that you want to
personalize. For example, Tone setting, Sound effect, Volume, Alert type, Ring
type, Answer mode, Extra tone.
Once you have selected the setting customize, you can personalize the following
settings of the selected profile:
• Tone settings
Incoming call: To define how the phone notifies you of an incoming voice
call.
Keypad tone: To set any one of the options and the active one is
highlighted.
Power on: To set any one of the options and the active one is highlighted.
Power off: To set any one of the options and the active one is highlighted.
Message tone: To define how the phone notifies you of receiving a
message.
* Ring tone can support these formats: MP3, VDO + sound, Midi, AMR and
also can select files from NAND or Memory Card. Message tone can also
support MP3 (no longer than 5 seconds), Midi and AMR formats.
• Volume: To set the volume level for the Ringing volume, Key tone, Message
tone, Power on and Power off.
• Alert type to choose the phone notifies you for incoming calls and receiving a
message. The options are: Ring /Vibration only / Vibrate and ring / Vibrate then
ring / Beep once.
• Ring type: To set the ring type, the options have Repeat, Single and Ascending.
• Answer mode: To set the phone answer incoming voices call by press any key.
Only when user chooses Headset mode, the answer mode have three options
Send key, Any key and Auto (for Headset mode only) options
• Extra tone: To set the Warning tone, Error tone, Camp-on tone, Connect tone,
Miss Calls and Unread Messages On or Off. For example, when set Extra tone

38
function to on, the phone sounds a warning tone when the battery is running
out of power.
♦ Rename
Yon can change the name of selected profiles. More detail information about writing
text sees also “Writing Text”.
Display settings
♦ Wallpaper
You can set your phone to display a background picture, wallpaper, when the
phone is in idle mode. You can also download wallpaper from WAP and MMS and
then save them in My folder under File manager. Your phone supports JPEG, GIF
formats.
[NOTE]: The wallpaper and screen saver should be less than 1280x1024(for JPG)
and 320x240(for GIF). In addition, the file size can’t be over 300kb.
[NOTE]: If image size is over size, the image displays speed might get slow and
please wait for more time to show up.
To select a wallpaper picture.
• Tap Menu, and select Settings, Display Settings and Wallpaper.
• Select Default and image list will be shown.
Use navigation key Left ◄ and Right ►direction to select the image and tap OK
to choose the desired picture then tap OK
• To set own picture for wallpaper.
To select the My folder and tap the OK. Users can select wallpaper from
Images, Photos and Card folders. Scroll to desired folder and tap Open. Use
and to select the image or photo and tap OK.
♦ Screen saver
The screen saver is activated when the phone is in idle mode and none of the
phone’s function been used for a certain time. Press any key to deactivate the
screen saver.
Turn Settings on to activate the screen saver.
With Select, you can choose an image or animation as screen saver from the
Default list.
Select in timeout after which time the screen saver will be activated.
To set own picture for Screen Saver, with Select, choose From Gallery.
Users can select screen saver from Images, Photos, Video, Phone and Card
folders. Scroll to desired folder and tap Open.
Use and direction to select the image and tap OK to select.
♦ Themes
You can change the appearance of the display, for example, the colors and
background picture, by use Themes. Your phone comes with some pre-set color
schemes. You cannot delete these color schemes and choose one of them from the
list. There are three themes canned been choosing.
For activate each one themes, tap Options to Activate.
♦ Standby mode settings
Date and time
You can turn this function on or off to show or hide Date and Time.
Network name
You can turn the function on or off to display or hide your service provider name in
idle screen.
♦ Light
LCD backlight
You can set the LCD backlight level (10 level) and waiting time (5 ~ 45 sec).
Keypad backlight
You can turn this function on or off
♦ Font setting
Font size

39
This function allows you to change the size of the font displayed in SMS,
Phonebook, Time or Date. The options are: Small font / Normal font / Large font
[Note: Font size setting only for SMS and Phonebook.]
Font color
This function allows you to change the color of the font displayed in Menu, SMS,
Phonebook, Time and Dtae. The options are: Theme color/ Red/ Cyan/ Teal/
Yellow/ Green/ Navy/ Blue/ Purple/ Black/ Silver/ Gray/ White/ Maroon/ Fuchsia/
Lime/ Olive
Dial number color
This function allows you to change the color of the font displayed in Dial number.
The options are: Theme color/ Red/ Cyan/ Teal/ Yellow/ Green/ Navy/ Blue/
Purple/ Black/ Silver/ Gray/ White/ Maroon/ Fuchsia/ Lime/ Olive
Date and time
♦ Set the time
This function allows you to set the time. The format is <HH:MM>.
♦ Time format
This function allows you select the format of the time display, 12 or 24. Use navigation
key to change it and tap OK.
[Note]: The time and date format display is depending on user settings.
♦ Set the date
This function allows you to set the date.
♦ Date format
This function allows you select format of the date display, use navigation key to
change it tap OK.
♦ Auto-update of date / time
Within Settings menu, select Auto-update of date / time (network service) to set
the phone to automatically update the time and date according to the current time
zone, select On.
Automatic update of date and time does not change the time you have set for the
alarm clock, calendar or the alarm notes. They are in local time. Updating may
cause some alarms you have set to expire.
Phone settings
♦ Language
This allows you to switch between different languages and to select a language for the
display texts.
♦ Welcome note
You can turn the function on or off to display or not display the “Welcome note”,
when you switch on the phone.
You can edit text from the Note item.
♦ Preferred input method
Choose preferred input method of the editor.
♦ Shortcuts
The Shortcuts screen displays 10 favorites items set by the user.
You can edit some specific functions to the default list for your personal favorites
list and activate them.
Within Favorites menu, tick the box from the function list.
The phone offers you an extensive range of functions, which are grouped in menus
and submenus. From idle mode, tap shortcut key can access the shortcuts menus.
Call settings
♦ Select SIM
You can select SIM 1 or SIM 2 card for the present setting.
♦ Caller ID
In the call setup menu, the Caller ID allows you to check the status of whether a
caller’s identification is sent
40
This network service allows you to answer an incoming call while you have a call in
progress if you have activated the menu function.
In the submenu, you can choose Set by network, No or Yes.
When you choose Set by network, your phone must be registered with a
network.
♦ Call waiting
In the submenu, select Activate and tap OK to switch on function. It way, selects
Deactivate to switch off the function.
You can check function status while you select Check status.
♦ Call divert
This network service allows you to redirect incoming calls from you phone.
Divert all voice calls
All voice calls are diverted and no ringing tone is played at an incoming call.
Divert if out of reach
Voice calls are diverted when your phone is switched off or outside of the network
service area.
Divert if not answered
Voice calls are diverted when you don’t answer a call within the present timeout.
Divert if busy
Voice calls are diverted when your number is busy. If divert If busy is activated,
rejecting an incoming call will also divert the call.
Divert all data calls
All data calls are diverted.
Cancel all diverts
In the submenu, select Cancel all divert, Tap OK to cancel all divert
♦ Call barring
This network service allows you to restrict incoming calls to and outgoing calls from
your phone. A barring password is required for using the function.
Outgoing calls
To barring all Outgoing calls.
International calls
To barring Outgoing international call.
Int. calls except to home country
To barring Outgoing international call expects home country.
Incoming calls
To barring all Incoming calls.
Incoming calls when roaming
To barring all Incoming calls when roaming.
Cancel all barrings
• This function is cancel all call barring.
• This service may sometimes not be supported by your network. Also, a
network code is required to access this service.
Change bar code
To set barring call, you are asked to input your barring call password. This menu
enables you to change your barring call password. To know the default password
setting, please contact your service operator.
♦ Line Switch
Line for outgoing calls is a network service to select phone line 1 or 2 that is
subscriber number for making calls, within call setup submenu, select Line
Switch, and choose Line1 or 2.
If you select Line2 and have not subscribed to this networks service, you will not be
able to make call. However, calls on both lines can be answered regardless of the
selected line.
♦ Closed user group
This is a network service that specifies the group of people whom you can call and who
can call you. For more information place contact your network operator or service
provider.

41
♦ Call time reminder
Turn function On/Off to remind duration of a call. When this option is set to On, there
will be a short beep when duration of a call exceeds the reminder time.
♦ Call time display
Turn the function On/Off to show the calling time.
♦ Auto redial
Select On and your phone will make a maximum of ten attempts to connect the call
after an unsuccessful call attempt.
Connection setting
♦ Bluetooth
You can utilize wireless technology of Bluetooth to connect other inclusive devices.
The inclusive device may include the mobile phone, the computer and earphone, etc.
You can utilize Bluetooth technology transfer image, the film, music and sound file.
[NOTE]: After opening the Bluetooth function, will increase the power consumption of
the battery.
Power
Turn on or off the Bluetooth function. After turn on the Bluetooth function, will
reveal in top screen
Inquiry audio device
Search the new Bluetooth device in the range and pair it. Before pairing, please set
up the password, and reach an agreement to use the same password with another
device user.
My device
Pair the old Bluetooth device.
Active device
To Active the Bluetooth device that has.
Settings
• Visibility: Whether setting up your mobile phone should let the other Bluetooth
device be found.
• Change device name: Change your mobile telephone name (the display among
other Bluetooth apparatuses).
• Authentication: Turn on / off the Authentication function.
• Audio path: Whether choose from mobile phone answering a call directly or
forward to BT headset.
• Storage location: Select storage place in phone or memory card.
• FTP settings: File transfer protocol setting.
About
Your Bluetooth mobile phone device explains.
♦ Network settings
The function allows you to set SIM1 or SIM2 network related settings.
Network selection
• The phone automatically selects one of the cellular networks available in you
area, when auto mode is selected.
• In manual mode the phone will show a list of available networks that you can
choose from. Only networks that have a roaming agreement with your home
network operator are allowed to be selected.
Prefer networks
The network list is used when the mode is set to automatic. The order of the prefer
network list indicates the search priority. Tap Options key to edit prefer networks:
“Add from list”, “Create new”, “Change priority” and “Delete”.
Band selection
The wireless phone described in this guide is approved for use on 850MHz,
1900MHz, 850/1900MHz and Auto networks. You can choose the band from the
list.

42
Security settings
The function allows you to set SIM1 or SIM2 security settings.
♦ Pin lock
This function allows you to lock the phone with a specific SIM card. The feature is
designed to prevent the use of your phone by means of another person’s SIM cards
if your phone becomes lost.
You can switch on or off to activate the PIN lock function. If you switch PIN Lock on,
every time you turn phone on, you need to enter the PIN number to set the request
on.
♦ Fixed dialing
You can switch mode on and off.
This function dials only the numbers in the fixed dialing number (FDN). To save and
edit numbers on the list, you need the PIN2 code.
♦ Barred dialing
You can switch mode on and off.
♦ Change PIN code
Change PIN cod
This allows you to change the PIN number.
Change PIN2 code
This allows you to change the PIN2 number.
♦ Phone lock
You can switch When switch on / Off the Phone lock function to protect your phone.
If you select When switch on, you need enter the password to set the request on.
[Note]: the default password is 0000.
♦ Auto keypad lock
This allows you to lock the phone’s keypad and touch panel to prevent accidental
key press.
In submenu, select the time that after the last key press/tap will be disabled, then
tap OK.
Mobile Tracker
You can switch mode to Activate or Deactivate.
After mobile tracker function active, the mobile will remember the IMSI of the SIM.
If mobile phone lost and insert the new SIM, then it will send new SIM card's IMSI
automatically for the number set up.
[Note]: The default password is 0000.
♦ Change security code
This allows you to change the password.
Restore factory
♦ Within this menu you can reset the menu settings to their original values. The security
code is needed for this function.
[Note]: The default password is 0000.
♦ After you select restore factory, setting values are returned default value. Those value
including Profile, Ring tone, Call log, Caller group, Time format, Wallpaper, Screen
saver, Themes, WAP setting etc.
Music player (Menu 10)
Your phone includes a Music player for listening to music tracks. MP3 files stored in the
Audio folder (Default setting) will automatically be detected and added to the default play
list. You can listen to the sound files via a compatible headset, or the phone’s loudspeaker.
You can make or answer a call while using the music player. During a call, the playback is
paused.
[Note]: Because of the small dimension of the speaker, in some cases the audio could be
distorted, especially at maximum volume and when there are lots of bass sounds.

43
Therefore, we recommend you to use the stereo headset in order to appreciate the high
quality of your music.
The Music Player supports: AAC, AAC+, MP3, AMR, WAV, MIDI, iMelody formats.
♦ Playing the audio
User can listen to music on the loudspeaker or with headphone.
MP3 headphones jack: Only for playing MP3 file. It provides the other user can also
listen to the music or sound from MP3 file by his headphones.
Use the functions of the four ways Navigation key as describe in the bellow table:
X Play / Pause music
Increase the volume.
Reduce the volume.
Short tap to skip previous tracks.
Long tap to jump previous segment.
Short tap to skip next tracks.
Long tap to jump next segment.
♦ In the Music player menu, taping List allows access to the following settings.
List
You can view all the tracks available on the track list and play the desired track. If
you tap Options in the Play list, you can:
• Play: To play selected music.
• Add: To add music, which not store in the MP3 folder.
• Delete: To delete the selecting music.
• Rename: To modify the name of the selecting music.
• Add to ring tone: To add selected music for ring tone.
• Detail: To show music information.
• Delete all: To delete all the music in the play list.
Settings
Music player’s setting options
• Storage: Storage place in phone and memory card.
• List auto generate: Turn On/Off for List auto generate.
When List auto generate function turns on, user can refresh the track list (for
example after adding new tracks to the list) and change the track list that is
shown.
When List auto generate functions turns off, user can add tracks from the
different folder in File manager.
• Skin: To change the skin. The function include: Skin 1 ~ Skin 3.
• Repeat: To play the current track or the enter track list repeatedly.
• Shuffle: Turn On/Off Shuffle function.
• Background play: Turn On/Off Background plays function.
On: Allow music continuing playing when left music player.
Off: When user left music player, music will stop.
• Equalizer: To change the equalizer. The function include: Normal, Bass, Dance,
Classical, and Treble, Party, Pop, and Rock.
[Note]: All music tracks must be storage in My Music (Default setting, user may
not be change path.)
Add / Delete Music to play list
• Please turn off the handset before Add/Delete music.
• Plug in cable (USB) to handset and PC, screen show three options:
Mass storage mode: For add / remove music or image.
In the Mass Storage mode, user can add / remove music to handset via PC.
COM port: as USB charger.
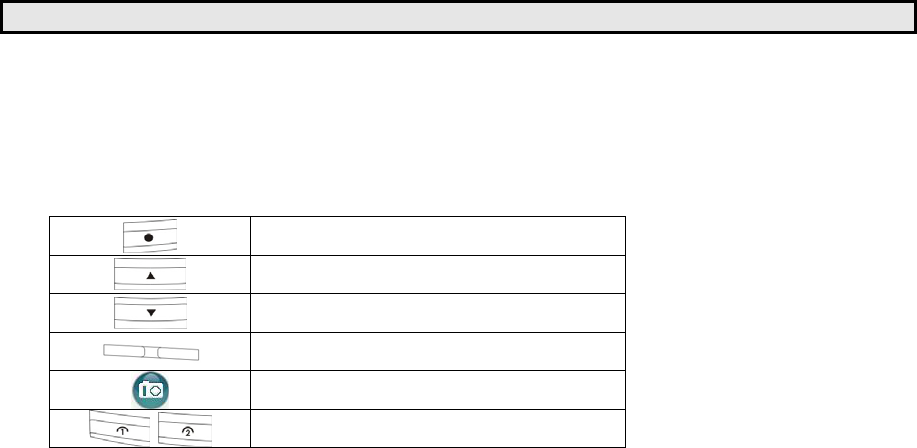
44
[Note]: When you plug in USB cable, can select Mass storage, the handset will
remain power on status. The handset will automatically connect to
memory card only. If you want connect to the phone, please power off the
handset.
TV (Memu 11)
Watch full screen analog TV on this device and be the first to get the news! Please plug in
the antenna before watching TV in this device. You can adjust the antenna lines for better
signals.
When launching TV for the first time, the device will require you to set the country and
automatically start searching for available channels and will set the first channel detected
as default channel.
♦ Use the functions as describe in the bellow table:
Rotate screen
To skip previous channel
To skip next channel
Volume control
Capture the photo
Edit SMS and send
♦ TV Volume Control Method:
You may use volume control key on the side to adjust volume. When watching TV, the
volume adjustment bar will appear on the bottom of the screen after you press volume
control key.
♦ When the TV is on, tap Options and then select.
Set Country: Choose the country of the position of mobile phone.
Auto search: When select “Auto search”, the device will automatically start
searching for available channels and will set the first channel detected as default
channel.
Change channel:
• Channel list: To save the channel you have found, tap and select Edit
channel. Key in the channel number and tap OK. You can save 35 channels in
the handset.
• Favorite list: To input the favorite channel. You can save the 35 channels in
the handset.
Brightness: You can choose 4 kinds of level (Level 1 ~ Level 4).
Reminder: You can set reminder to open the TV.
Auto off: Select the auto off time, the option include None, 15 min, 30 min and 60
min.
Capture mode: You can set the capture mode to Single shot or Nine shot.
Add to favorite: Add the channel you are currently watching to favorite list.
Restore setting: After you select restore factory, TV setting values are returned
default value.
Exit: To exit TV function.
Send SMS: You can send message under the TV function, press send key quick
into SMS function also can tap option selection SMS.

45
Services (Menu 12)
Your phone supports both SIM Service and WAP (Wireless Application Protocol) services.
These services allow you to browse all kinds of information such as news, weather reports,
flight schedules, dictionaries, etc. Even more, you can connect to the Internet and go to
your favorite WAP enabled web sites. The following sections explain how to setup and use
these wonderful services.
STK
In addition to the functions available in the phone, your SIM card* may provide additional
services under the SIM service submenu**. By entering the submenu, you can find a list
of services provided by your operator. The requested information may be responded via
voice speech or SMS (Short Message Service). Additional charges may apply for services
involve sending a SMS or making a phone call.
Note:
* Some SIM cards may not support SIM service. In such case, you won’t be able
to see the SIM service submenu.
** SIM service varies from operator to operator. The name and contents of the
menu depend entirely on the SIM card provided by your operator. For
availability, rates and information on using the SIM service, contact your
network operator, service provider or other third-party vendor.
WAP
The WAP service enables your phone to surf the Internet. Your phone offers you several
default profiles to choose form. These default profiles are based on the connection
settings of major operators at the time this phone was manufactured. You can apply the
desired connection settings by simply activating the respective profile, and you are ready
to go.
♦ Homepage
For each profile you are allowed to store a “Home URL” (Universal Resource Locator)
address. You can quickly access the homepage of the active profile by selecting “Home
URL” when the WAP menu is displayed.
♦ Bookmarks
You can save the addresses of web pages as bookmarks in the phone’s memory.
Tap Menu, and select Services, WAP and Bookmarks.
Choose the bookmarks you want to use and tap Options. And then you can:
Goto: Open a connection to the page associated with the bookmark
Edit: Edit the select bookmark
Send: Send this bookmark by SMS or MMS
Delete: Delete the select bookmark
Delete all: Delete all select bookmark
Add bookmark: Add a new bookmark by entering the title and URL address
♦ Recent pages
You can view the recent pages that you have read. And you can tap Options, and then
you can:
Goto: Connect to the select page
View URL: View the select page’s URL
Delete: Delete the select bookmark
Delete all: Delete all select bookmark
♦ Offline pages
You can view the offline pages that you have read. And you can tap Options, and then
you can:
Goto: Connect to the select page
Delete: Delete the select bookmark
Delete all: Delete all select bookmark
46
♦ Go to URL
Key in the URL address and tap OK to connect to the address.
♦ Service inbox
Received return message from GSM operator.
♦ Settings
• Select SIM
Select “Always ask”, “SIM 1” or “SIM 2” item for you to connect WAP
• Edit profile
The WAP settings are stored in a WAP profile. In most cases you only need to
use one of the default profiles to access the Internet. The settings are different
from operator to operator. Please consult your operator or service provider for
the correct settings and proceed with care. Wrong settings will cause the
connection to fail.
Within Edit profile submenu, tap OK to enter profile-editing list. And then you
can:
Rename profile: Rename the selected WAP profile
Homepage: Enter a title and address of the WAP web site as the
homepage. You can only have a homepage for each
profile.
Data account: Users are only allowed to choose a data account. The list
of the accounts should be consistent to those under
Service menu - Data account.
Connect type: Select Connection-oriented or HTTP from the list.
User name: Enter your user ID for the WAP gateway
Password: Enter your user password for the WAP gateway
• Browser options
Timeout: Set the timeout value for the browser. The browser will
stop connecting to the web site if the web site does not
respond within the timeout time.
Show images: Set option On/Off to view pictures while browsing.
• Service message settings
Turn Off or On to decide whether you want to receive the service message or not.
The message is saved in the Service inbox.
• Clear cache
The information or data you have accessed are stored in the cache of the phone.
A cache is a file buffer that is used to store data temporarily.
Within Settings submenu, select Clear cache, and tap OK.
• Clear cookies
It is advisable to clear any sensitive information like cookies of previously
visited web sites. This is to avoid privacy and security risks if your phone is
misplaced, lost or stolen.
Tap OK to clear all the cookies
• Clear recent page list
It is advisable to clear any sensitive information
About previously visited web pages in Recent Page List. This is to avoid privacy
and security risks if your phone is misplaced, lost or stolen.
Tap OK to delete all the recent pages.
• Trusted certificates
For using some services, such as banking services, you need security
certificates. After you have downloaded the required security certificate from
the Internet, you can view the certificate and then save or delete it. If you save
it, the certificate is added to the list of trust certificates under the Settings of
WAP menu.
View the list of Trusted Certificates:
Tap Menu, select, Services / WAP / Settings / Trusted certificates tap
View.
If the security indicator is displayed during a connection, the data transmission
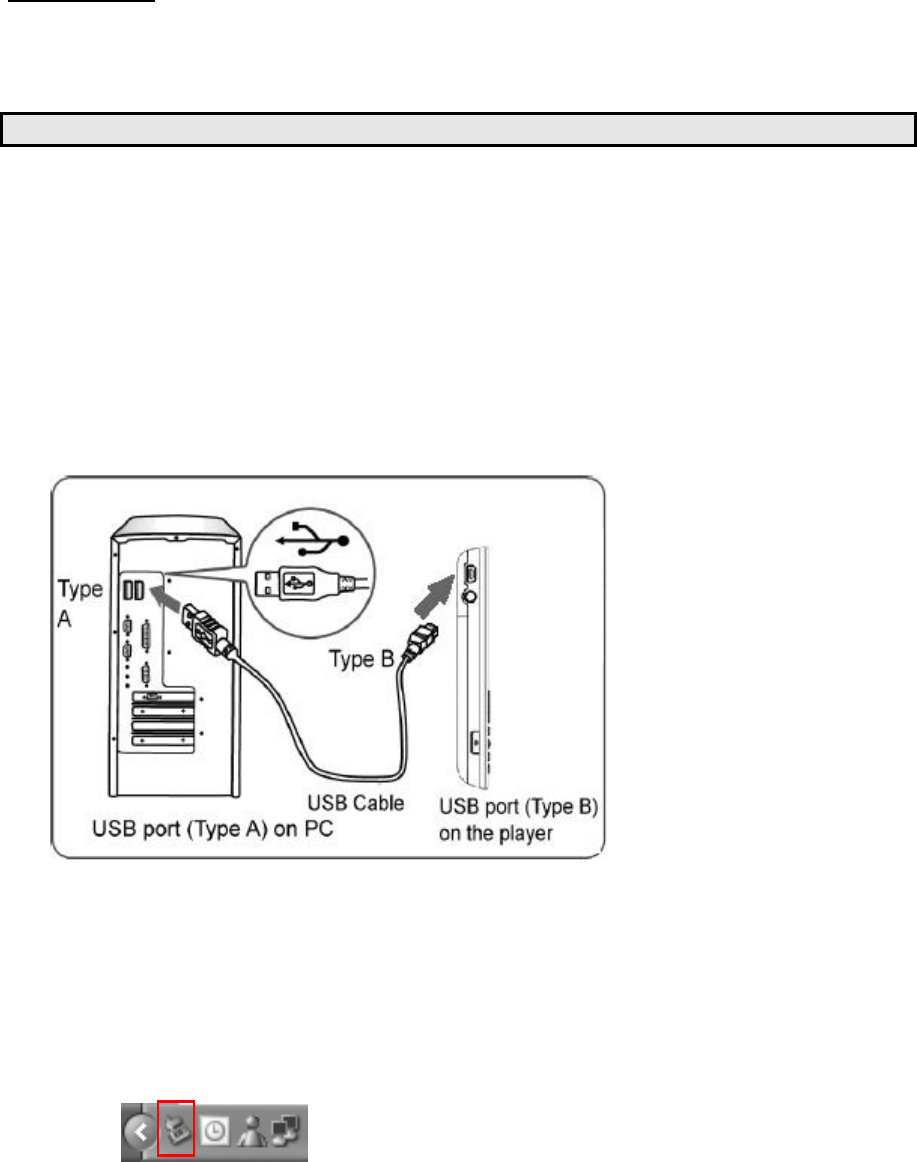
47
between the phone and the gateway server is encrypted. However, the security
indicator does not indicate that the data transmission between the gateway
and the content server (the location where the requested resource is stored) is
secure. It is up to the service provider to secure the data transmission between
the gateway and the content server.
Data account
Connect way while choosing the mobile phone to browse through the WAP. Detailed
materials setting up value, please arrange with a network supplier.
To Use Mass storage (USB cable)
[NOTE]: System default requirement: PC hardware and software for Windows 2000/XP
and above. For more information, please see below “Install USB Software for
Window 2000”
[NOTE]: Please use USB according to the standard steps as below; otherwise the data
may lose or cause damage.
If you want to add/remove music and images to the Handset, connect it to a PC with USB
cable.
♦ Plug in cable (USB) to handset and PC, screen show three options:
Mass storage mode: for add / remove music or image files.
Webcam: for connecting with PC as webcam.
COM port: as USB charger.
♦ Connecting the handset to PC
After connected the handset and PC, choice “Mass Storage” handsets will
automatic turn off.
The OS will automatically generate two “Removable Disk” in My Computer, one
for handset, one for memory card. You can enter the disk to access the data in the
handset.
You can access to the handset from the Window Explorer (Windows 2000/XP) /
File Manager or My Computer and add / erase audio, image or other files to the
handset.
If you want to remove the USB cable from the handset after adding or erasing files.
• Double click the Remove Hardware icon in the taskbar tray.
• Select “USB Mass Storage”, then clicks Stop when the message “You can
remove hardware now” appears on the screen, and removes the handset.
48
♦ Copy files into the handset
After connecting the handset to a PC successfully, there will be two new disks
“Removable Disk” in My computer.
Enter the directory stored your music, image, or other files, and select them thru
your mouse. After selection, move your mouse on the selected files and click right
button of your mouse to select “Copy”, enter the Removable Disk from My
Computer, and click right button of your mouse to select “Paste” then the selected
files will be copied into the handset.