Chengdu Vantron Technology BTADE-PKR M2M Gateway User Manual 0810
Chengdu Vantron Technology, Ltd. M2M Gateway 0810
User Manual
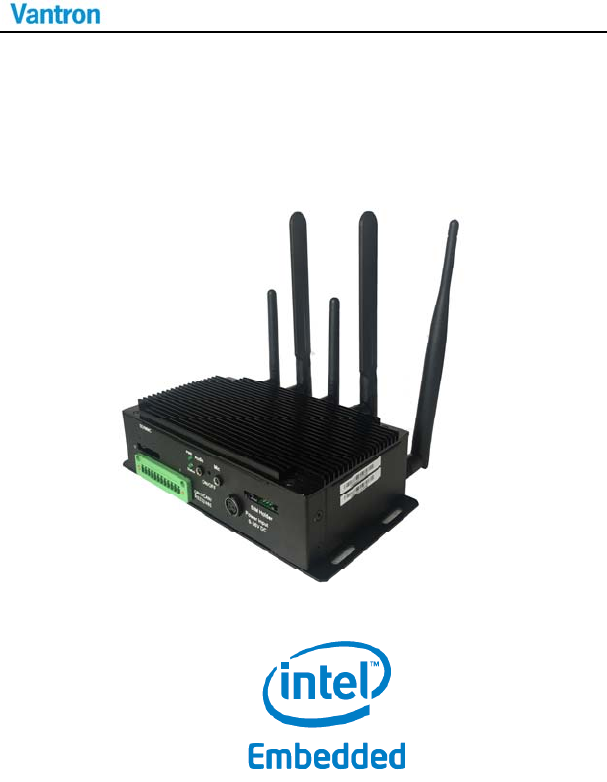
VT‐M2M‐BTA‐DE‐PKR
AllRightsReserved
VT‐M2M‐BTA‐DE‐PKR
User’sManual
ChengduVantronTechnology,Ltd.
www.vantrontech.com

VT‐M2M‐BTA‐DE‐PKR
RevisionHistory:
No.VersionDescription Date
1V1.1Firstrelease July 24,2018
2V1.2ChangeUSBdescription August7,2018
3V1.3Changedcontentsforsoftwareusing.August8,2018

VT‐M2M‐BTA‐DE‐PKR
3/59
TableofContents
PartIHardware.................................................................................6
1Foreword.....................................................................................7
1.1CopyrightNotice......................................................................7
1.2Notes……………….......................................................................8
1.3Statement………........................................................................8
1.4Disclaimer………........................................................................8
1.5LimitationofLiability/Non‐warranty.......................................8
1.6SafetyInstructions...................................................................9
1.7Precautions………......................................................................9
1.8SafetyInstructionsforPowerCablesandAccessories...........10
1.9CleaningInstructions.............................................................10
2Overview....................................................................................11
2.1Introduction……......................................................................11
2.2ProductSeries….....................................................................12
2.2.1ProductOrderCodingRule......................................12
2.2.2OrderingInformation..............................................13
3VT‐M2M‐BTA‐DE‐PKRHardwareInstructions...............................14
3.1ProductAppearance..............................................................14
3.2Specifications…......................................................................17
3.3InterfaceInstructions.............................................................19
3.3.1FrontView...............................................................19
3.3.2BackView................................................................19
3.4Dimension………......................................................................20
3.5InterfaceDescription.............................................................21
3.5.1Wide‐RangePowerInterface..................................21

VT‐M2M‐BTA‐DE‐PKR
4/59
3.5.2EthernetInterface...................................................21
3.5.3DSub‐9RS232Connector........................................22
3.5.4RS232/485,CAN,ExternalIOConnector..................23
3.5.5VGAInterface..........................................................24
3.5.6USBHostConnector................................................25
3.6OperationNotice....................................................................26
3.6.1ChangeSIMCard.....................................................26
3.6.2PowerSupply...........................................................26
4Tips.............................................................................................27
PartIISoftware...............................................................................32
5Introduction..............................................................................33
5.1.1About This Manual..................................................33
5.1.2Linux OS Support....................................................33
5.1.3Sample Programs.....................................................33
5.1.4Functionalities layout..............................................35
6Features Description..................................................................37
6.1.1Power Control.........................................................37
6.1.2Serial COM.............................................................37
6.1.3Audio And Video.....................................................37
6.1.4GPIO Operation.......................................................39
6.1.5Watchdog.................................................................39
6.1.6TPM.........................................................................41
6.1.7mCard(QX-008-490)...............................................42
6.1.8Bluetooth.................................................................42
6.1.9WIFI Control...........................................................44
6.1.103G or 4G Control.....................................................46

VT‐M2M‐BTA‐DE‐PKR
5/59
7UpdateSystem............................................................................52
7.1.1Make USB boot Stick and Copy Image to USB stick
52
7.1.2Update steps............................................................55

VT‐M2M‐BTA‐DE‐PKR
6/59
PartIHardware

VT‐M2M‐BTA‐DE‐PKR
7/59
1 Foreword
1.1 CopyrightNotice
Whileallinformationcontainedhereinhavebeencarefullychecked
toassureitsaccuracyintechnicaldetailsandprinting,Vantronassumes
noresponsibilityresultingfromanyerrororfeaturesofthismanual,or
fromimproperusesofthismanualorthesoftware.Pleasecontactour
technicaldepartmentforrelevantoperationsolutionsifthereisany
problemthatcannotbesolvedaccordingtothismanual.
Vantronreservesallrightsofthismanual,includingtherightto
changethecontent,form,productfeatures,andspecifications
containedhereinatanytimewithoutpriornotice.Thelatestversionof
thismanualisatwww.vantrontech.com.cn.PleasecontactVantronfor
furtherinformation:
VantronTechnology(Vantron)
E‐mail:sales@vantrontech.com
The trademarks and registered trademarks in this manual are properties
of their respective owners. No part of this manual may be copied,
reproduced, translated or sold. No changes or other purposes are
permitted without the prior written consent of Vantron.
Vantronreservestherightofallpublicly‐releasedcopiesofthis
manual.
VT‐M2M‐BTA‐DE‐PKR
8/59
1.2 Notes
Applicablenotesarelistedinthefollowingtable:
SignNoticeTypeDescription
NoticeImportantinformationandregulations
CautionCautionforlatentdamagetosystemorharm
topersonnel
1.3 Statement
Itisrecommendedtoreadandcomplywiththismanualbefore
operatingVT‐M2M‐BTA‐DE‐PKRwhichprovidesimportantguidanceand
helpsdecreasingthedangerofinjury,electricshock,fire,oranydamage
tothedevice.
1.4 Disclaimer
Vantronassumesnolegalliabilityofaccidentsresultingfromfailureof
conformingtothesafetyinstructions.
1.5 LimitationofLiability/Non‐warranty
Fordirectorindirectdamagetothisdeviceorotherdevicesof
Vantroncausedbyfailureofconformingtothismanualorthesafety
instructionsondevicelabel,Vantronassumesneitherwarrantynorlegal
liabilityevenifthedeviceisstillunderwarranty.
TheVT‐M2M‐BTA‐DE‐PKRshouldbeinstalled,debuggedand
maintainedbyprofessionalpeople.
Theoutsideantennasarenotpermittedtobeinstalledortobe
changedbynon‐professionalpeople.Torunthedevicenormally,only

VT‐M2M‐BTA‐DE‐PKR
9/59
specifyantennasareapprovedtobeassembledtogetherby
professionalpeople.
Unitshallbeusedwithindoor‐useantennaonly.Noantennaforthis
unitcanbeinstalledoutdoor.
1.6 SafetyInstructions
Keepandcomplywithalloperationinstructions,warnings,and
information.
Payattentiontowarningsonthisdevice.
Readthefollowingprecautionssoastodecreasethedangerof
injury,electricshock,fire,oranydamagetothedevice.
OperationsandServiceinstructionsareprovidedwiththe
equipment.
Unitshallbeusedwithindoor‐useantennaonly.Noantennaforthis
unitcanbeinstalledoutdoor.
Themaximumoperationtemperatureis61°C.
1.7 Precautions
Payattentiontotheproductlabels/safetyinstructionsprintedon
silkscreens.
Donottryrepairingthisproductunlessdeclaredinthismanual.
Keepawayfromheatsource,suchasheater,heatdissipater,or
enginecasing.
Donotinsertotheritemsintotheslot(ifany)ofthisdevice.
•Keeptheventilationslotventilatedforcooling.
•Systemfaultmayariseifotheritemsareinsertedintothisdevice.
Installation:ensurecorrectinstallationaccordingtoinstructions
fromthemanufacturerwithrecommendedinstallationtools.
Ensureventilationandsmoothnessaccordingtorelevantventilation
standard.
VT‐M2M‐BTA‐DE‐PKR
10/59
1.8 SafetyInstructionsforPowerCablesandAccessories
Properpowersourceonly.Startonlywithpowersourcethat
satisfiesvoltagelabelandthevoltagenecessaryaccordingtothis
manual.PleasecontacttechnicalsupportpersonnelofVantronforany
uncertaintyabouttherequirementsofnecessarypowersource.
Usetestedpowersource.Thisproductstillcontainsabutton
lithiumbatteryasareal‐timeclockafteritsexternalpowersourceis
removedandthereforeshouldnotbeshort‐circuitedduring
transportationorplacedunderhightemperature.
Placecablesproperly:Donotplacecablesatanyplacewith
extrusiondanger.
1.9 CleaningInstructions
Pleasepoweroffbeforecleaningthedevice.
Donotusespraydetergent.
Cleanwithadampcloth.
Donottrycleaningexposedelectroniccomponentsunlesswitha
dustcollector.
Supportforspecialfault:Poweroffandcontacttechnicalsupport
personnelofVantronincaseofthefollowingfaults:
Thedeviceisdamaged.
Thetemperatureisexcessivelyhigh.
Faultisstillnotsolvedaftertheoperationaccordingtothe
manual.

VT‐M2M‐BTA‐DE‐PKR
11/59
2 Overview
2.1 Introduction
ThankyouforchoosingVantron.Itisourcommitmenttoprovideour
valuedcustomerswiththeembeddeddevicesequippedwiththe
state‐of‐the‐arttechnologyandthebestproductservices.
Vantron’sM2MproductsarebasedonthemostadvancedARMand
IntelAtomprocessorsandhavelow‐powerconsumptionandhigh
integration.TheproductsaredesignedforapplicationsofM2Min
industrials,retail,vehicle,andtransportationsetc.
VT‐M2M‐BTA‐DE‐PKR
12/59
2.2 ProductSeries
2.2.1 ProductOrderCodingRule
Order Code
VT-M2M-BTA-DE-PKR-S-1GM-16GF-GWM-V
Version:
I: Extended Temperature
Blank:Commercial tem
p
erature
Wireless Module Option:
G:4G
,
W: WiFi
,
M: mCARD
,
SD Memory Size: 16G: 16GB
DDR Memory Size: 1G: 1GB, 2G: 2GB
CPU Speed: S/D/Q:Single / Dual/ Quad

VT‐M2M‐BTA‐DE‐PKR
13/59
2.2.2 OrderingInformation
Order Examples:
VT-M2M-BTA-DE-PKR-S-2GM-16GF-GWM-I ATOM Baytrail single Processor, 2GB DDR3L, 16GB SSD, 4G, WiFi,
mCARD, extended temperature
Accessories:
InstallMechanicaltools, 1pc
PowerAdapterwithlockedconnector, 1pc
IOTerminal(12x3.81mm), 1pc
LTEAntenna:Main(1pcs);Diversity(1pcs)
Wi‐FiAntenna,1pcs;BT Antenna, 1pc
SRDAntenna,1pc
VT‐M2M‐BTA‐DE‐PKR
14/59
3 VT‐M2M‐BTA‐DE‐PKRHardwareInstructions
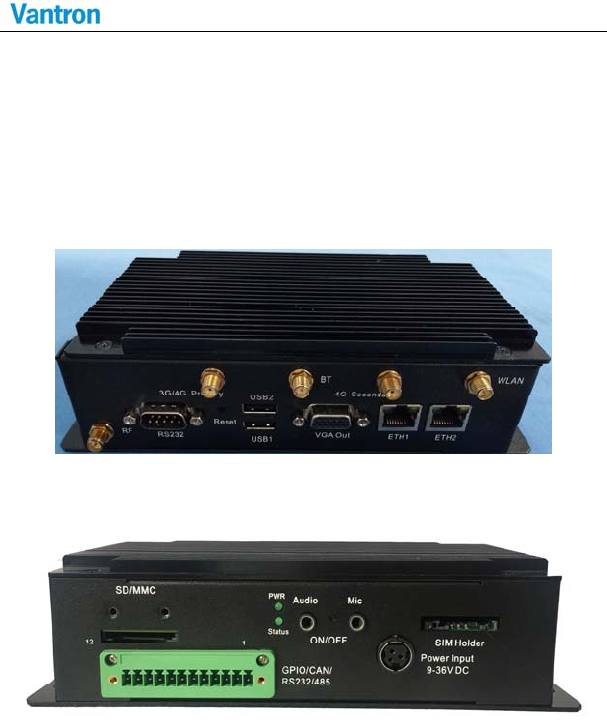
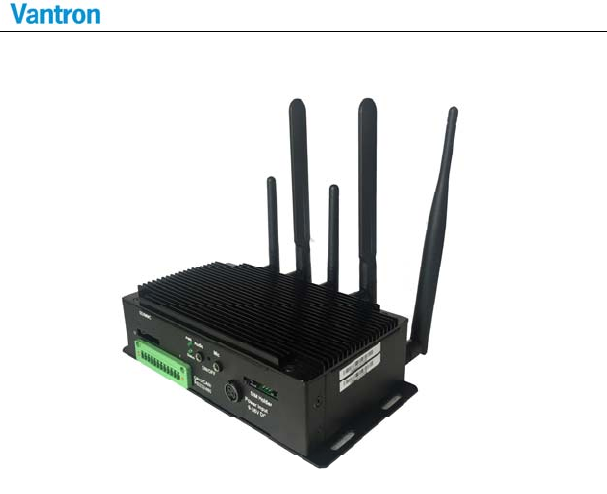
3.1 ProductAppearance
FrontSideView
BackSideView
VT‐M2M‐BTA‐DE‐PKR
15/59
Viewforallembeddedmodulesandantennas
VT‐M2M‐BTA‐DE‐PKR
16/59
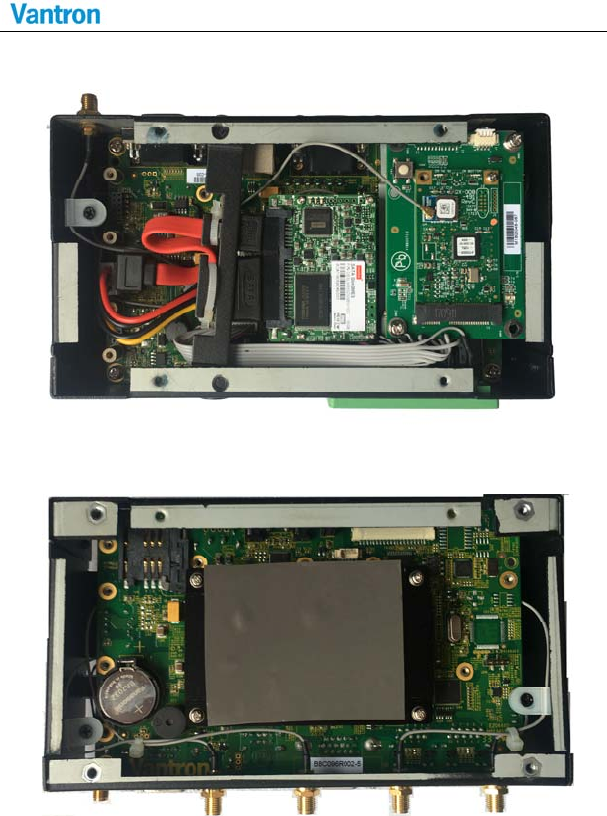
BottomViewforembeddedmodules
(1xHalfPCIeslotunderthe1xPCIeslot)
TopViewforthermalmodule

VT‐M2M‐BTA‐DE‐PKR
17/59
3.2 Specifications
Specifications
CPU Processor Intel® ATOM™, E3815/1.46GHz, 512KB L2 cache per core
Memory
On Board RAM On Board DDRIII 1066MT/s , up to 2GB
SSD Internal Half-Slim SSD Module Internal (16GB)
Display
Resolution Up to 2560x1600@60Hz for VGA
Interface 1xVGA (DB15)
Wireless
Communication
WLAN 802.11 b/g/n Wireless Module, external antenna , Support 1x
Half PCIe Wireless card
4G Module 1xPCIE 4G/LTE Cellular Module with SIM slot
RF Module mCard Module with external antenna
Support 900MHz
Bluetooth Bluetooth module, external antenna
Peripheral
Interfaces
Ethernet 2x10/100/1000-BaseT(RJ45)
USB 2xUSB2.0 Host (Type A)
Audio HD Audio, 1xMIC in 3.5mm, 1xline Out 3.5mm
COM Port 1xRS232/485/422(DB9 full function),
1xRS232
/
485
(
2 wires on Green Terminal
)
Alarm Buzzer Out
SD card 1xSD card Slot
RTC Supported
Control Reset Button on the top
GPIO Reserved GPIO (Terminal)
Accelerometer On Board Accelerometer, 3-Axis
VT‐M2M‐BTA‐DE‐PKR
18/59
Security security
On board Registration Serial Number, and SHA-1
Encrypt/Decrypt Chip DS28E01(Optional)
Optional TPM module
Software OS Ubuntu 16.04 Desktop 64bit
Applications SDK Available
Power
Input DC9-36V( Typical:12V), Locked Power Jack
Consumption 6W (Pulse 8W), Sleep 2W.
(without 4G, mCard, WLAN, Bluetooth)
Mechanical
Dimensions 176x101x52mm (Box)
Install Brackets 198x101x52mm
Weight 0.6Kg (1.2Kg package Kit)
Enclosure Aluminum Alloy with Black Color
Environment
Condition
Temperature
Operating:-20°C ~ +60°C
( ETR:-40°C ~ +80°C Optional)
Storage:-40°C ~ +85°C
Humidity 5-95%RH at 25-35 (Non-Condensation)
Cooling Mode Fan less, Heat Sink
Approvals FCC, ISED, CE, RoHS, and PTCRB Compliance

VT‐M2M‐BTA‐DE‐PKR
19/59
3.3 InterfaceInstructions
3.3.1 FrontView
3.3.2 BackView
VT‐M2M‐BTA‐DE‐PKR
20/59
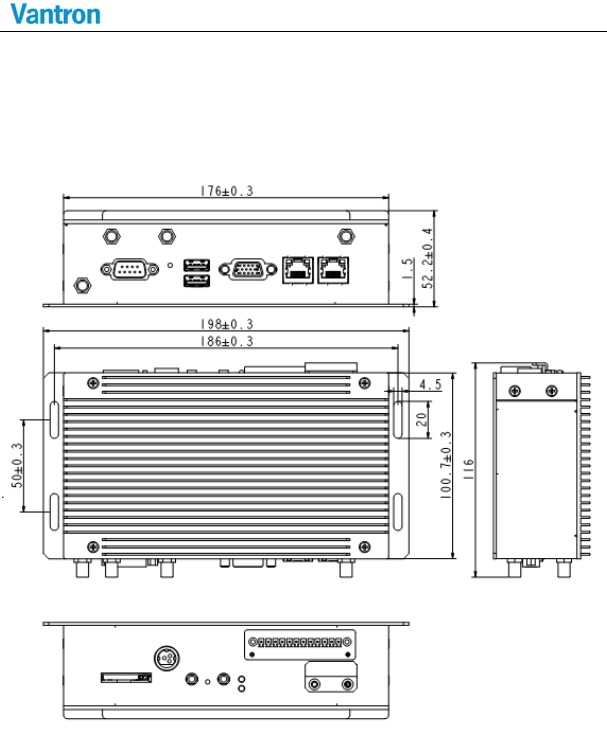
3.4 Dimension
VT‐M2M‐BTA‐DE‐PKR
21/59
3.5 InterfaceDescription
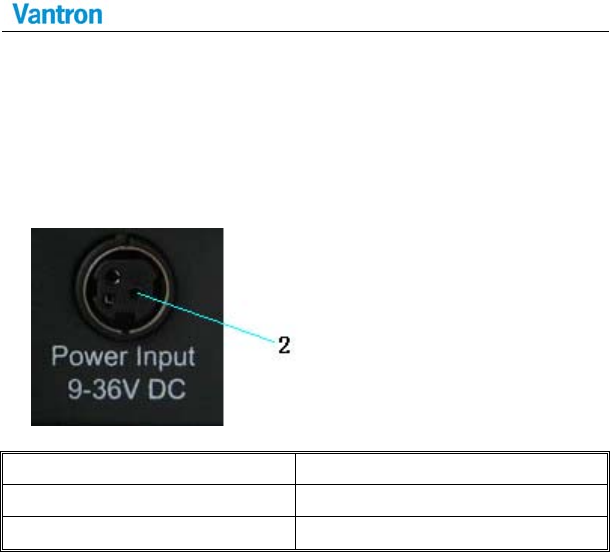
3.5.1 Wide‐RangePowerInterface
PowerJACKwithlock
PinDescription
1,3DGND(groundpin)
2Power(+12DC,UPto36V)
3.5.2 EthernetInterface
StandardRJ45interface,supporting10M/100M/1000M
self‐adaptation,thisisastandardRJ45ethernetport
VT‐M2M‐BTA‐DE‐PKR
22/59
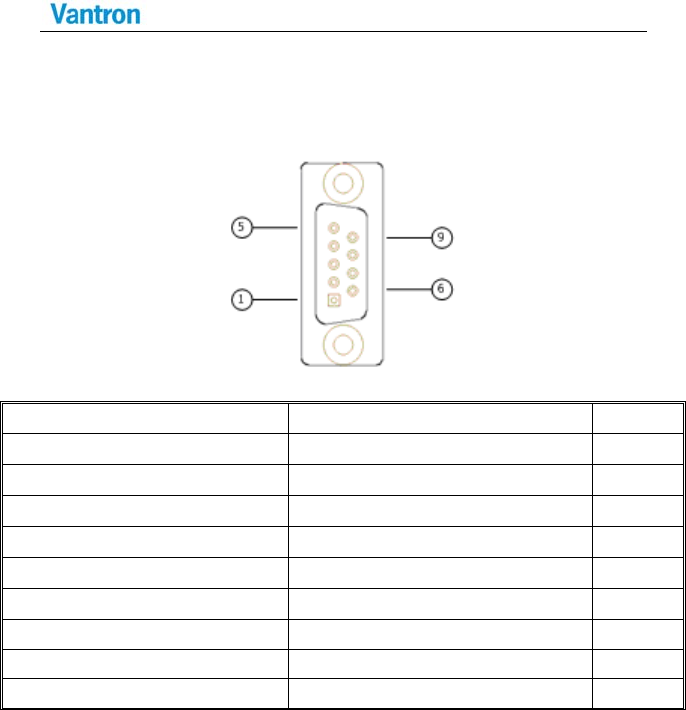
3.5.3 DSub‐9RS232Connector
StandardverticalDB‐9maleconnector
PinDescriptionRemarks
1DCD1/422TX+/485_ABIOSset
2RXD1/422TX‐/485_BBIOSset
3TXD1/422RX+BIOSset
4DTR1/422RX‐ BIOSset
5DGND(groundpin)
6DSR1
7RTS1
8CTS1
9RI1
VT‐M2M‐BTA‐DE‐PKR
23/59
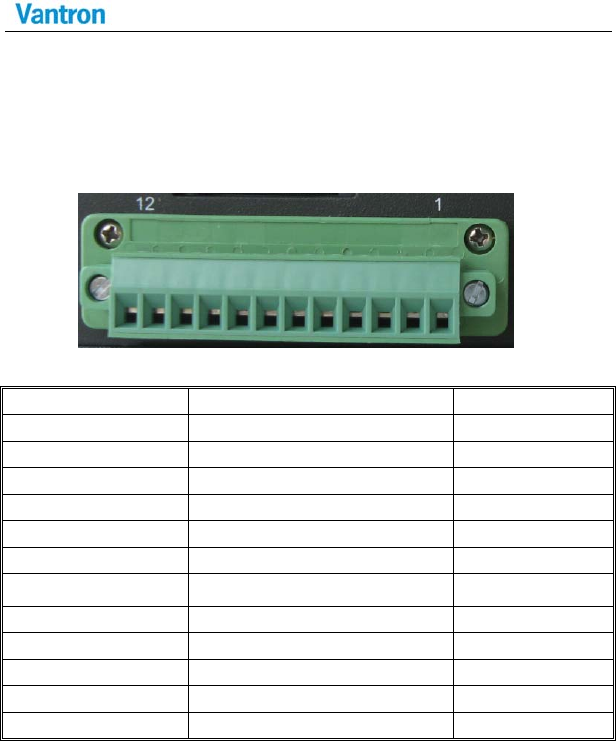
3.5.4 RS232/485,CAN,ExternalIOConnector
12pins3.81pitchterminalwithscrewlock
Loadcapacity:morethan128nodes/RS485channel
PinDescription Remarks
1TXD2/485_2_ABIOSset
2RXD2/485_2_BBIOSset
3DGND
4CANH
5CANL
6DGND
7EXTIO03.3VLevel
8EXTIO13.3VLevel
9EXTIO23.3VLevel
10EXTIO33.3VLevel
11EXTIO43.3VLevel
12EXTIO53.3VLevel
VT‐M2M‐BTA‐DE‐PKR
24/59
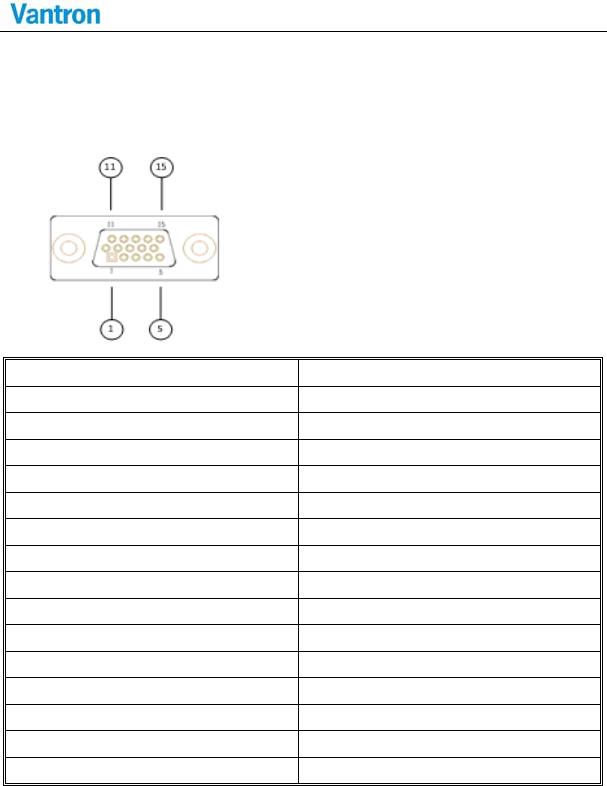
3.5.5 VGAInterface
StandardverticalDB‐15FemaleVGAconnector
PinDescription
1RED
2GREEN
3BLUE
4N.C.
5GND
6GND
7GND
8GND
9+5VDC
10GND
11N.C.
12SD_DDC
13HSYNC
14VHYNC
15SC_DDC
VT‐M2M‐BTA‐DE‐PKR
25/59
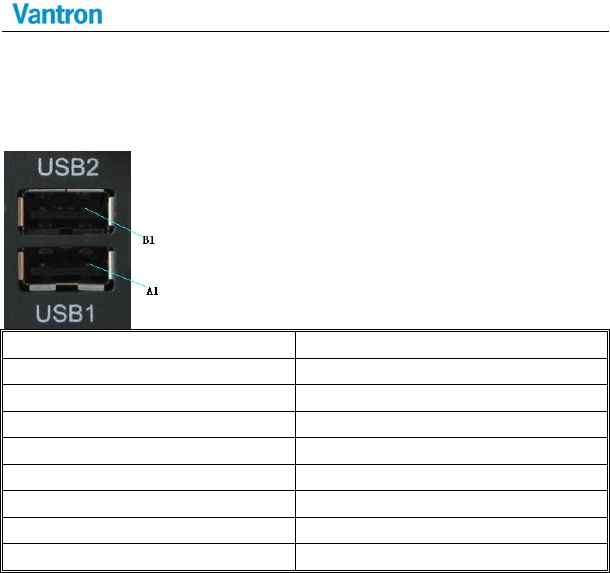
3.5.6 USBHostConnector
DualverticalUSBAtypeinterface,USB2.0
PinDescription
A1USB1_VCC(+5VDC)
A2USB1_D‐
A3USB1_D+
A4USB1_DGND(groundpin)
B1USB2_VCC(+5VDC)
B2USB2_D‐
B3USB2_D+
B4USB2_DGND(groundpin)
Notes:InsertexternaldeviceinUSB1connectorshouldbeforepowering
up.

VT‐M2M‐BTA‐DE‐PKR
26/59
3.6 OperationNotice
3.6.1 ChangeSIMCard
PushthesmallbuttonontheleftofSIMCardHolder,andinstalltheSIM
cardtotheholder.ThenpushtheholderintotheSlot.
3.6.2 Antennainstallation
Each antennaforthisdevicemustbeprovidedbythemanufacturer
ChengduVantronTechnology,Ltd.andtheendusershouldnotinstalland
useanyotherantennas.
Allantennasneedbecorrespondtoconnectorsonetoone,donotbe
mixed,donotreplaceundeclaredantenna.
3.6.3 PowerSupply
Pleasemakesureusingadapterintheaccessory,orthepowerisnot
reversedwhenpoweredbyotheradapter.
VT‐M2M‐BTA‐DE‐PKR
27/59
4 Tips
WasteDisposal
Itisrecommendedtodisassemblethedevicebeforeabandoningitin
conformitywithlocalregulations.Pleaseensurethattheabandoned
batteriesaredisposedaccordingtolocalregulationsonwastedisposal.
Donotthrowbatteriesintofire(explosive)orputincommonwaste
canister.Productsorproductpackageswiththesignof“explosive”
shouldnotbedisposedlikehouseholdwastebutdeliveredto
specializedelectrical &electronicwasterecycling/disposalcenter.
Properdisposalofthissortofwastehelpsavoidingharmandadverse
effectuponsurroundingsandpeople’shealth.Pleasecontactlocal
organizationsorrecycling/disposalcenterformorerecycling/disposal
methodsofrelatedproducts.
Complywiththefollowingsafetytips:
Donotuseincombustibleandexplosiveenvironment
Keepawayfromcombustibleandexplosiveenvironmentforfearof
danger.
VT‐M2M‐BTA‐DE‐PKR
28/59
Keepawayfromallenergizedcircuits.
Operatorsshouldnotremoveenclosurefromthedevice.Onlythe
grouporpersonwithfactorycertificationispermittedtoopenthe
enclosuretoadjustandreplacethestructureandcomponentsofthe
device.Donotchangecomponentsunlessthepowercordisremoved.
Insomecases,thedevicemaystillhaveresidualvoltageevenifthe
powercordisremoved.Therefore,itisamusttoremoveandfully
dischargethedevicebeforecontactsoastoavoidinjury.
Unauthorizedchangestothisproductoritscomponentsare
prohibited.
Intheaimofavoidingaccidentsasfaraspossible,itisnotallowedto
replacethesystemorchangecomponentsunlesswithpermissionand
certification.PleasecontactthetechnicaldepartmentofVantronor
localbranchesforhelp.
Payattentiontocautionsigns.
Cautionsignsinthismanualremindofpossibledanger.Pleasecomply
withrelevantsafetytipsbeloweachsign.Meanwhile,youshouldstrictly
conformtoallsafetytipsforoperationenvironment.
VT‐M2M‐BTA‐DE‐PKR
29/59
Notice
Consideringthatreasonableeffortshavebeenmadetoassure
accuracyofthismanual,Vantronassumesnoresponsibilityofpossible
missingcontentsandinformation,errorsincontents,citations,
examples,andsourceprograms.
Vantronreservestherighttomakenecessarychangestothismanual
withoutpriornotice.Nopartofthismanualmaybereprintedorpublicly
releasedinformsofphotocopy,tape,broadcast,e‐document,etc.
FCCWarning
ThisdevicecomplieswithFCCclassBRules.Operationissubjecttothe
Followingconditions.
Thisdevicemaynotcauseharmfulinterference.
Thisdevicemustacceptanyinterferencereceived,including
interferencethatmaycauseundesiredoperation.
Note:Thisequipmenthasbeentestedandfoundtocomplywiththe
limitsforaClassBdigitaldevice,pursuanttopart15oftheFCCRules.
Theselimitsaredesignedtoprovidereasonableprotectionagainst
harmfulinterferenceinaresidentialinstallation.Thisequipment
generates,usesandcanradiateradiofrequencyenergyand,ifnot
installedandusedinaccordancewiththeinstructions,maycause
harmfulinterferencetoradiocommunications.However,thereisno
guaranteethatinterferencewillnotoccurinaparticularinstallation.If
thisequipmentdoescauseharmfulinterferencetoradioortelevision
reception,whichcanbedeterminedbyturningtheequipmentoffand
on,theuserisencouragedtotrytocorrecttheinterferencebyoneor
moreofthefollowingmeasures:
—Reorientorrelocatethereceivingantenna.
—Connecttheequipmentintoanoutletonacircuitdifferentfrom

VT‐M2M‐BTA‐DE‐PKR
30/59
thattowhichthereceiverisconnected.
—Consultthedealeroranexperiencedradio/TVtechnicianforhelp.
Anymodificationtotheproductisnotpermittedunlessauthorizedby
Vantron.It’snotallowedtodisassembletheproduct,itisnotallowedto
replacethesystemorchangecomponentsunlesswithpermissionand
certification.Pleasecontactthetechnicalsupportdepartmentof
Vantronorlocalbranchesforhelp.
ISEDstatement
Disclaimer:
Operationissubjecttothefollowingtwoconditions:
(1)Thisdevicemaynotcauseinterference,and
(2)Thisdevicemustacceptanyinterference,includinginterference
thatmaycauseundesiredoperationofthedevice.
Warning!
ThisclassBdigitalapparatuscomplieswithCanadianICES‐003.
IndustryCanadaICES‐003ComplianceLabel:
CANICES‐3(B)/NMB‐3(B)
Le présent appareil est conforme aux CNR d
’
Innovation Science
et D
é
veloppement
é
conomique Canada applicables aux appareils
radio exempts.
L'exploitation est autorisée aux deux conditions suivantes :
(1) l'appareil ne doit pas produire de brouillage, et
(2) l'utilisateur de l'appareil doit accepter tout brouillage
radioélectrique subi, même si le brouillage est
susceptible d'en compromettre le fonctionnement.

VT‐M2M‐BTA‐DE‐PKR
31/59
RFexposurewarning
Thisequipmentmustbeinstalledandoperatedinaccordancewith
provideinstructionsandtheantennausedforthistransmittermustbe
installedtoprovideaseparationdistanceofatleast20cmfromall
personsandmustnotbeco‐locatedoroperationinconjunctionwith
anyotherantennaortransmitter.End‐usersandinstallersmustbe
providewithantennainstallationinstructionsandtransmitteroperating
conditionsforsatisfyingRFexposurecompliance.

VT‐M2M‐BTA‐DE‐PKR
32/59
PartIISoftware

VT‐M2M‐BTA‐DE‐PKR
33/59
5 Introduction
Thank you for choosing Vantron. It is our commitment to provide
our valued customers with the embedded devices equipped with the
state of the art technology and the best product services.
Vantron’s M2M products are based on the most advanced ARM
and Intel Atom processors and have low power consumption and high
integration.
5.1.1 About This Manual
This manual is for user how to use sample programs in Linux
system and how to use device in Linux system.
5.1.2 Linux OS Support
The VT-M2M-BTA-DE-PKR supports the following Linux
operating systems.
Ubuntu 16.04
The default normal user is vantron, password is vantron.
5.1.3 Sample Programs
Vantron supports many sample programs for
VT-M2M-BTA-DE-PKR. You can test device modules through these
sample programs, and can be the reference that you develop.

VT‐M2M‐BTA‐DE‐PKR
34/59
power Power control for modules in the set
gpio GPIO control

VT‐M2M‐BTA‐DE‐PKR
35/59
5.1.4 Functionalities layout
The below table lists VT-M2M-BTA-DE-PKR features.
Chips or Interfaces Details
UART VT-M2M-BTA-DE-PKR has 4 UART ports:
/dev/ttyS1:RS232/422/485 DB9 COM Port
/dev/ttyS2: Green Terminal Pin 1,2 RS232/485
USB Host portx2
1xEthernet
2xEthernet
(VT-M2M-BTA-DE-PKR-
DE)
$sudo ifconfig eth0 192.168.16.143
Audio MIC IN
ALSA audio device
$ arecord –t wav test.wav
Audio Out
ALSA audio device
$aplay test.wav
Green Terminal 1 :TXD2
2 :RXD2
3 :GND
4 :CANH
5 :CANL
6 :GND

VT‐M2M‐BTA‐DE‐PKR
36/59
7 :EXTIO0
8 :EXTIO1
9 :EXTIO2
10 :EXTIO3
11 :EXTIO4
12 EXTIO5

VT‐M2M‐BTA‐DE‐PKR
37/59
6 Features Description
This chapter describes some of the features of the software
operation.
Open the terminal (CTRL+ALT+T), use the testing command.
6.1.1 Power Control
power [3g ] [on|off]
3g: Power control of 3G Module
6.1.2 Serial COM
115200,38400 and 9600 bps are valid.
Test the RS232/485, we need two devices.
Select the serial protocol thought the BIOS.
a. One side send data:
$sudo minicom -D /dev/ttyS1 -b 115200
Then input “hello”
will print “hello”s on your output device
b. The other side accept data:
$sudo minicom -D /dev/ttyS2 -b 115200
6.1.3 Audio And Video
a. Audio record:

VT‐M2M‐BTA‐DE‐PKR
38/59
$sudo arecord –t wav test.wav
b. Audio play:
$sudo aplay test.wav

VT‐M2M‐BTA‐DE‐PKR
39/59
6.1.4 GPIO Operation
There are 6 extern GPIO on VT-M2M-BTA-DE-PKR,you can use
this command:
gpio [ set | clear | read | dirout | dirin ] [ 1-6 | all ]
ex 1: Set gpio 1 low
$sudo gpio clear 1
ex2: Set gpio 1 high
$sudo gpio set 1
ex3: Get gpio 1 value
$sudo gpio read 1
ex4: Set gpio 1 input
$sudo gpio dirin 1
6.1.5 Watchdog
a. Configure watchdog driver:
$sudo vim /etc/default/watchdog
#Start watchdog at boot time? 0 or 1
run_watchdog=1
#Load module before starting watchdog
watchdog_module=”sch311x_wdt”
#Specify additional watchdog options here (see manpage).
b. Configure watchdog:

VT‐M2M‐BTA‐DE‐PKR
40/59
$sudo vim /etc/watchdog.conf

VT‐M2M‐BTA‐DE‐PKR
41/59
c. Start watchdog or reboot system:
$sudo watchdog
d. Disable the watchdog
$sudo killall watchdog
$sudo echo 1 > /dev/watchdog
One minute after the system restart.
6.1.6 TPM
The TPM security setting refer to
bios/doc/VT-M2M-BTA-DE-PKR BIOS Guide V1.0.pdf configure
the security menu.
The TPM manager
$sudo tpmmanager
VT‐M2M‐BTA‐DE‐PKR
42/59
6.1.7 mCard(QX-008-490)
Insert the mCard ,using the follow command to get mCard data:
$sudo minicom -D /dev/ttyMcard -b 115200
The mCard QX-008-490 installed into the gateway
VT-M2M-BTA-DE-PKR is designed to be able to communicate with
the other devices which also integrated a mCard QX-008-490 such as
another VT-M2M-BTA-DE-PKR gateway.
6.1.8 Bluetooth
Connect the Bluetooth:
a. Double-click the launcher Bluetooth icon to open the management
interface.
VT‐M2M‐BTA‐DE‐PKR
43/59
b. Turn on the Bluetooth and set it to visible, then click “+” in the
lower left corner to search for Bluetooth devices.
c. Select the bluetooth device to connect to in the device list.
VT‐M2M‐BTA‐DE‐PKR
44/59
d. Click on “Next”,then click “Matches” to connect.
3 Network Module
The network be managed by the network connections, can use
network connections tool from system tools.
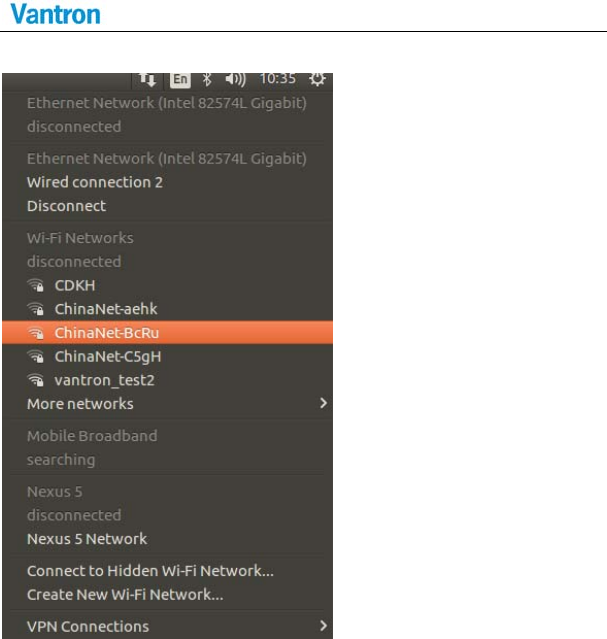
6.1.9 WIFI Control
6.1.9.1 WIFI Client Control
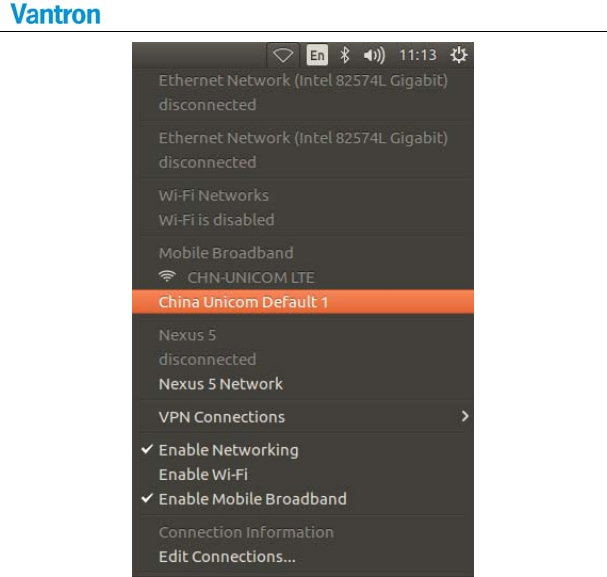
Connect the WIFI hotspot:
a. Left click on the Network Indicator applet, located in the right-hand
corner of the top panel, and ensure that both "Enable Networking" and
"Enable Wireless" have check marks next to them in the drop-down
VT‐M2M‐BTA‐DE‐PKR
45/59
list.
b. Select your wireless network from the list or if it is not shown select
"More Networks" to see all the available networks. You also can select
"Connect to Hidden Wireless Network" from the list to connect to a
hidden network.
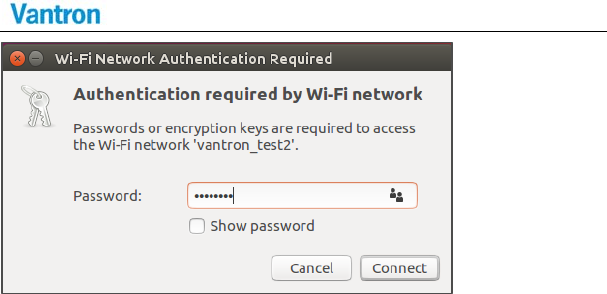
Type your WIFI password and press "Connect" to connect the WIFI.
VT‐M2M‐BTA‐DE‐PKR
46/59
The Network Indicator applet will change to show that it is attempting
to connect to a network, and will display the network strength once it
has connected.
Other method
Follow these steps for changing to new WiFi network
1 .Click on WiFi Symbol which is beside the battery symbol.
2 .Click on Edit Connection which is at the bottom of the drop down.
3 .Select the network on which you want to connect, and then click
edit button.
4 .Click on WiFi-security tab over there and enter the pass word of
that network, save and close.
Now if you connect to this, everything will work fine.
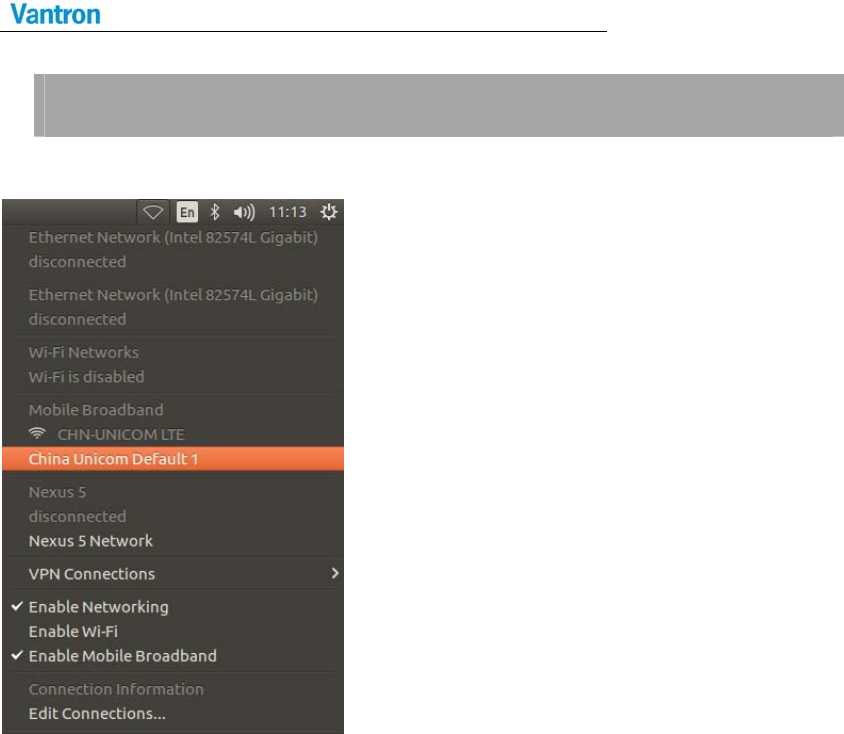
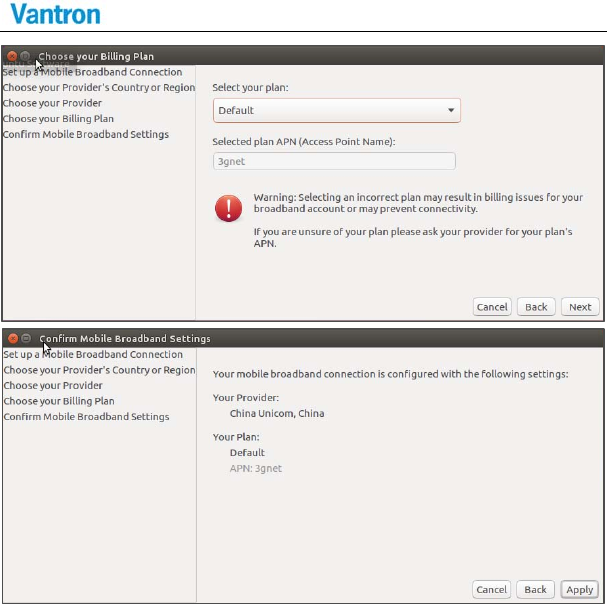
6.1.1 4G Control
Note: When you disconnected the 4G or connected error, you may
need to restart the 4G module:
VT‐M2M‐BTA‐DE‐PKR
47/59
$sudo power 3g off
$sudo power 3g on
a. Click 4G network connection mark on the top side.
b. Click the Edit Connections:
VT‐M2M‐BTA‐DE‐PKR
48/59
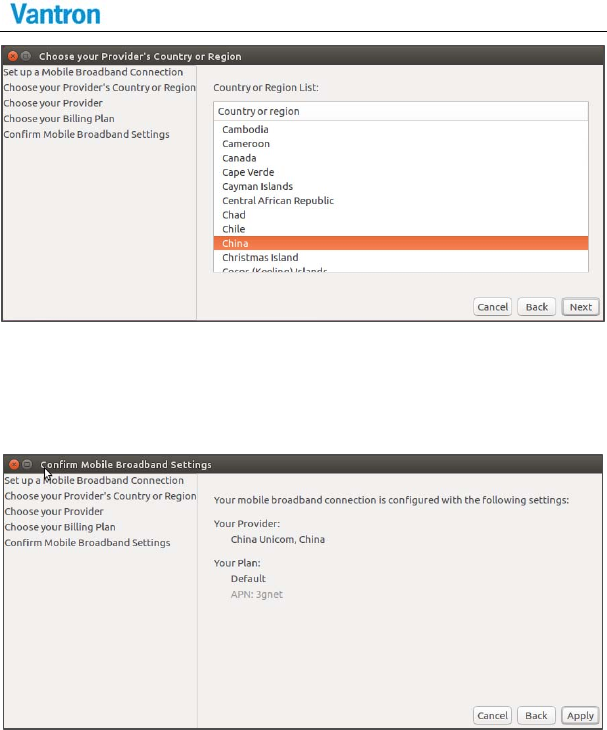
c. Select country, and then click Next.
d. Select provider from list:
e. Apply the config:
VT‐M2M‐BTA‐DE‐PKR
49/59
h. Edit it:

VT‐M2M‐BTA‐DE‐PKR
50/59
i. Clear the Username and Save
j. Connect the internet:
VT‐M2M‐BTA‐DE‐PKR
51/59

VT‐M2M‐BTA‐DE‐PKR
52/59
7 UpdateSystem
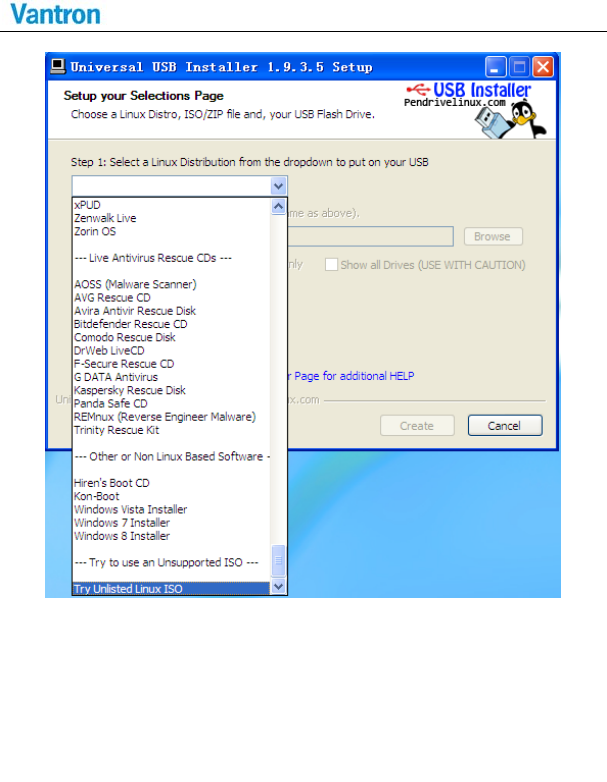
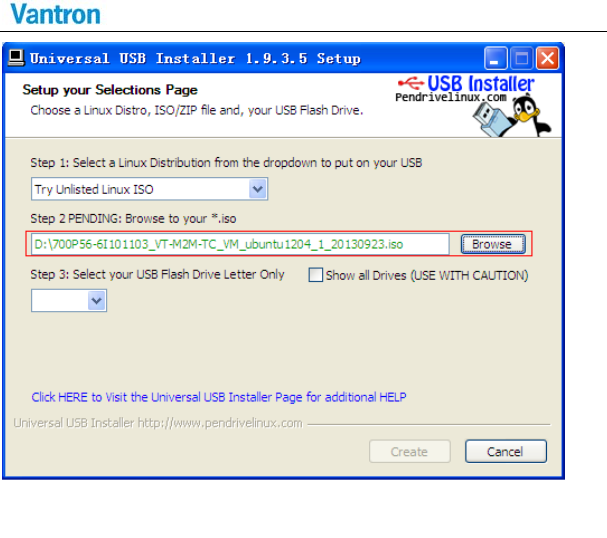
7.1.1 Make USB boot Stick and Copy Image to USB stick
Create PC condition:
Create a bootable USB stick on Windows XP/ Win7, the first thing you
need to do is insert a USB stick with at least 2GB of free space into
your PC.
Here use an USB installer tool to write the image ISO to USB stick.
Please copy the file SW/tools/Universal-USB-Installer-1.9xx.exe to
your PC anywhere.
USB stick making steps in detail as follows:
a. Copy SW/image/xxx.iso image into your PC.
b. Select the “Try Unlisted Linux ISO” from the dropdown list.
VT‐M2M‐BTA‐DE‐PKR
53/59
c. Click 'Browse' and select the image ISO file.
VT‐M2M‐BTA‐DE‐PKR
54/59
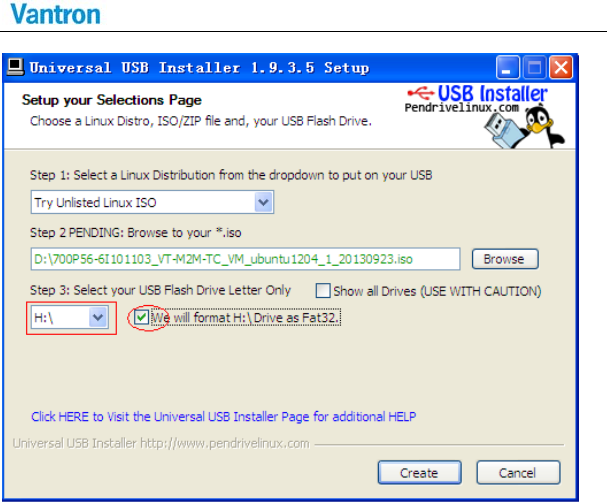
d. Choose the USB drive and click 'Create'.
VT‐M2M‐BTA‐DE‐PKR
55/59
7.1.2 Update steps
a. When the bootable USB stick create over, insert the USB stick into
VT-M2M-BTA-DE-PKR. And connect a USB keyboard on the
VT-M2M-BTA-DE-PKR.
b. Power ON the VT-M2M-BTA-DE-PKR, and step into BIOS by
press the “Esc” key on the keyboard.
VT‐M2M‐BTA‐DE‐PKR
56/59
In the BIOS, set the first boot option for boot up by USB stick.
Power off the 3G module(SCU->Advanced->Onboard Devices
Configuration).
The user guidance of the BIOS is in the package of SW/bios/xxx.ZIP.
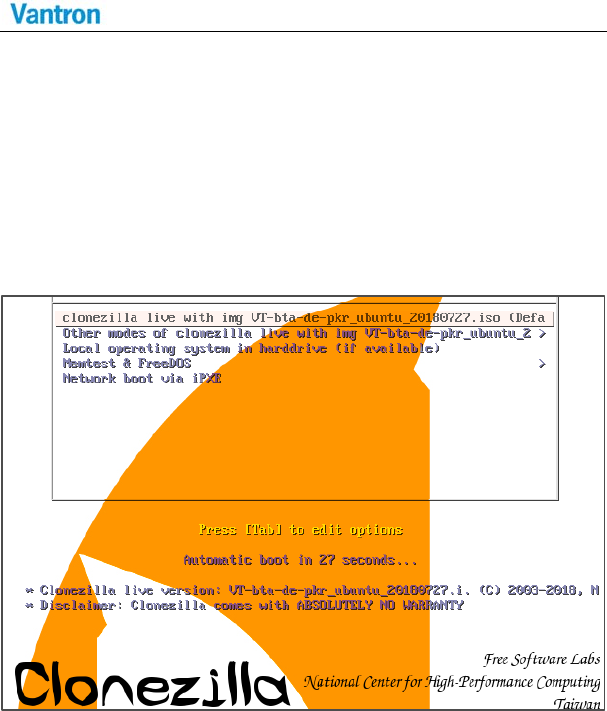
c. Select the first option “clonezilla live with img 700Pxxxxxx”.
VT‐M2M‐BTA‐DE‐PKR
57/59
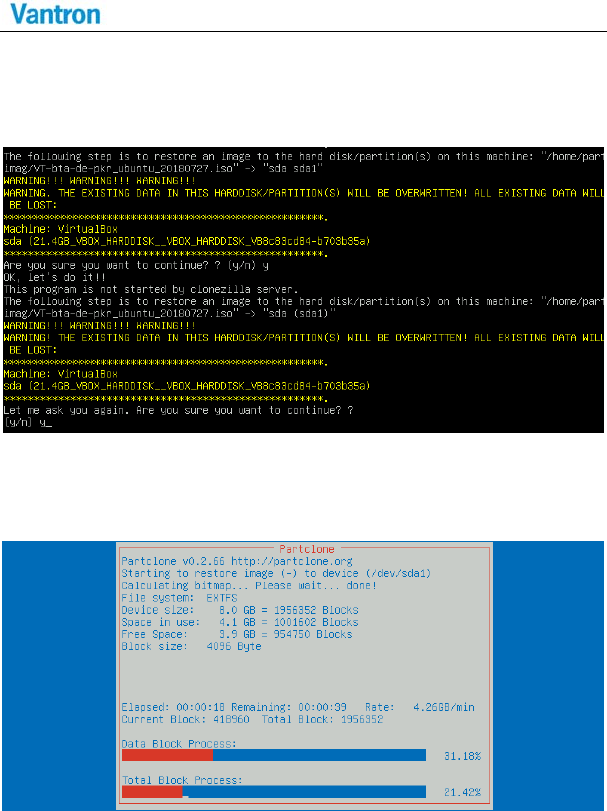
d. When ask “Are you sure want to continue??” or “Let me ask you
again, Are you sure you want to continue??” , please input ‘y’ all.
e. The system is updating.

VT‐M2M‐BTA‐DE‐PKR
58/59
f. When update over, the system will reboot.
Notes: If display "Will now halt", you can direct power off then
power on.
g. Re-power VT-M2M-BTA-DE-PKR, and step into the BIOS, and
restore the first boot option to hard disk.

VT‐M2M‐BTA‐DE‐PKR
59/59
ChinaOffice:ChengduVantronTechnology,Ltd.
Address:No.5GaopengRoad,Hi‐TechZone,Chengdu,Sichuan,P.R.China610045
Tel:86‐28‐8512‐3930/3931,8515‐7572/6320
Email:sales@vantrontech.com.cn
USOffice:VantronTechnology,Inc.
Address:440BoulderCourt,Suite300,
Pleasanton,CA94566
Tel:+1916‐202‐7042
Email:sales@vantrontech.com