Chengdu Vantron Technology VTM2M-TCVM M2M Gateway User Manual
Chengdu Vantron Technology, Ltd. M2M Gateway
Contents
- 1. User Manual
- 2. Users Manual
User Manual
VT-M2M-TC VM
All Rights Reserved
VT‐M2M‐TCVM
User’sManual
ChengduVantronTechnology,Ltd.
www.vantrontech.com.cn

VT-M2M-TC VM
All Rights Reserved
RevisionHistory:
No.VersionDescriptionDate
1V1.0FirstreleaseAug.30,2013
2V2.1ChangeSmartDisplay Audioto mono
line‐out(leftchannel)Oct.10,2013
3V2.2AddFCCwarningstatement Dec.11,2013
4V2.3Changepowerinto
DC6‐36V(default 12V)Dec.16,2013
5V2.4UpdateproductpictureJan.2,2014
6V2.5Updatetheorderinformation Jan.17,2014
7V2.6Add802.11a mode
Addinstallrequirements
Jan23,2014
8V2.7Updateproductpicture Feb20,2014

VT-M2M-TC VM
All Rights Reserved
TableofContents
PartI:HardwarePlatform.........................................................................................................5
1Foreword................................................................................................................................6
1.1CopyrightNotice....................................................................................................................6
1.2Notes......................................................................................................................................6
1.3Statement..............................................................................................................................6
1.4Disclaimer..............................................................................................................................6
1.5LimitationofLiability/Non‐warranty.....................................................................................7
1.6SafetyInstructions.................................................................................................................7
1.7Precautions............................................................................................................................7
1.8SafetyInstructionsforPowerCablesandAccessories...........................................................7
2Overview................................................................................................................................9
2.1Introduction...........................................................................................................................9
2.2ProductSeries.....................................................................................................................10
3M2M‐TCVMHardwareInstructions......................................................................................11
3.1ProductAppearance...........................................................................................................11
3.2Specifications......................................................................................................................12
3.3InterfaceInstructions..........................................................................................................14
3.4Dimension...........................................................................................................................15
3.5InterfaceDescription..........................................................................................................16
3.5.1Wide‐RangePowerInterface...............................................................................16
3.5.2SmartDisplayConnector......................................................................................18
3.5.3EthernetInterface.................................................................................................20
3.5.4DSub‐9RS232Connector....................................................................................21
3.5.5RS232/485,CAN,ExternalIOConnector.................................................................22
3.5.6VGAInterface.......................................................................................................23
3.5.7USBHostConnector.............................................................................................24
3.5.8LED.......................................................................................................................24
3.6OperationNotice.................................................................................................................25
3.6.1ChangeSIMCard.................................................................................................25
4Tips......................................................................................................................................26
PartII:SoftwareReference.....................................................................................................28
1Introduction..........................................................................................................................28
1.1 AboutThisManual.................................................................................................28
1.2 LinuxOSSupport....................................................................................................28
1.3SamplePrograms....................................................................................................28
1.4Functionalitieslayout..............................................................................................29
2BaseControl.........................................................................................................................30
2.1PowerControl..........................................................................................................30
2.2CanControl..............................................................................................................30
2.3GPIOControl............................................................................................................30
2.4SerialCOMControl..................................................................................................31
2.5AudioAndVideoControl........................................................................................32
2.6SDcardControl........................................................................................................32
2.7ADXL345Control.....................................................................................................32

VT-M2M-TC VM
All Rights Reserved
2.8Watchdog................................................................................................................32
2.9Pnl7Control.............................................................................................................33
2.10MCUPowerControl..............................................................................................33
2.11TouchScreen.........................................................................................................34
2.12HostAP..................................................................................................................35
2.13OnBorad.................................................................................................................38
3NetworkModule...................................................................................................................39
3.1WIFIControl............................................................................................................39
3.23GControl...............................................................................................................40
3.3BluetoothControl....................................................................................................43
4GPSModule...........................................................................................................................48
4.1GetGPSData...........................................................................................................48
4.2GPSDataFormat..................................................................................................48
5UpdateSystem......................................................................................................................52
5.1MakeUSBbootStickandCopyImagetoUSBstick................................................52
5.2Updatesteps........................................................................................................54

VT-M2M-TC VM
All Rights Reserved
PartI:HardwarePlatform

VT-M2M-TC VM
All Rights Reserved
1 Foreword
1.1 CopyrightNotice
Whileallinformationcontainedhereinhavebeencarefullycheckedtoassureits
accuracyintechnicaldetailsandprinting,Vantronassumesnoresponsibility
resultingfromanyerrororfeaturesofthismanual,orfromimproperusesofthis
manualorthesoftware.Pleasecontactourtechnicaldepartmentforrelevant
operationsolutionsifthereisanyproblemthatcannotbesolvedaccordingtothis
manual.
Vantronreservesallrightsofthismanual,includingtherighttochangethe
content,form,productfeatures,andspecificationscontainedhereinatanytime
withoutpriornotice.Thelatestversionofthismanualisat
www.vantrontech.com.cn.PleasecontactVantronforfurtherinformation:
VantronTechnologyVantron
E‐mail:sales@vantrontech.com
Thetrademarksandregisteredtrademarksinthismanualarepropertiesoftheir
respectiveowners.Nopartofthismanualmaybecopied,reproduced,translatedor
sold.Nochangesorotherpurposesarepermittedwithoutthepriorwrittenconsent
ofVantron.
Vantronreservestherightofallpublicly‐releasedcopiesofthismanual.
1.2 Notes
Applicablenotesarelistedinthefollowingtable:
SignNoticeTypeDescription
NoticeImportantinformationandregulations
CautionCautionforlatentdamagetosystemorharmtopersonnel
1.3 Statement
Itisrecommendedtoreadandcomplywiththismanualbeforeoperating
VT‐M2MTCwhichprovidesimportantguidanceandhelpsdecreasingthedangerof
injury,electricshock,fire,oranydamagetothedevice.
1.4 Disclaimer
Vantronassumesnolegalliabilityofaccidentsresultingfromfailureof
conformingtothesafetyinstructions.
VT-M2M-TC VM
All Rights Reserved
1.5 LimitationofLiability/Non‐warranty
FordirectorindirectdamagetothisdeviceorotherdevicesofVantroncausedby
failureofconformingtothismanualorthesafetyinstructionsondevicelabel,
Vantronassumesneitherwarrantynorlegalliabilityevenifthedeviceisstillunder
warranty.
TheVT‐M2M‐TCVMshouldbeinstalled,debuggedandmaintainedby
professionalpeople.
Theoutsideantennasarenotpermittedtobeinstalledortobechangedby
non‐professionalpeople.Torunthedevicenormally,onlyspecifyantennasare
approvedtobeassembledtogetherbyprofessionalpeople.
Unitshallbeusedwithindoor‐useantennaonly.Noantennaforthisunitcanbe
installedoutdoor.
1.6 SafetyInstructions
Keepandcomplywithalloperationinstructions,warnings,andinformation.
Payattentiontowarningsonthisdevice.
Readthefollowingprecautionssoastodecreasethedangerofinjury,electric
shock,fire,oranydamagetothedevice.
1.7 Precautions
Payattentiontotheproductlabels/safetyinstructionsprintedonsilkscreens.
Donottryrepairingthisproductunlessdeclaredinthismanual.
Keepawayfromheatsource,suchasheater,heatdissipater,orenginecasing.
Donotinsertotheritemsintotheslot(ifany)ofthisdevice.
•Keeptheventilationslotventilatedforcooling.
•Systemfaultmayariseifotheritemsareinsertedintothisdevice.
Installation:ensurecorrectinstallationaccordingtoinstructionsfromthe
manufacturerwithrecommendedinstallationtools.
Ensureventilationandsmoothnessaccordingtorelevantventilationstandard.
1.8 SafetyInstructionsforPowerCablesandAccessories
Properpowersourceonly
Startonlywithpowersourcethatsatisfiesvoltagelabelandthevoltagenecessary
accordingtothismanual.PleasecontacttechnicalsupportpersonnelofVantronfor
anyuncertaintyabouttherequirementsofnecessarypowersource.
Usetestedpowersource
Thisproductstillcontainsabuttonlithiumbatteryasareal‐timeclockafterits
externalpowersourceisremovedandthereforeshouldnotbeshort‐circuited

VT-M2M-TC VM
All Rights Reserved
duringtransportationorplacedunderhightemperature.
Placecablesproperly:
Donotplacecablesatanyplacewithextrusiondanger.
CleaningInstructions
Pleasepoweroffbeforecleaningthedevice.
Donotusespraydetergent.
Cleanwithadampcloth.
Donottrycleaningexposedelectroniccomponentsunlesswithadustcollector.
Supportforspecialfault:Poweroffandcontacttechnicalsupportpersonnelof
Vantronincaseofthefollowingfaults:
¾ Thedeviceisdamaged.
¾ Thetemperatureisexcessivelyhigh.
¾ Faultisstillnotsolvedaftertheoperationaccordingtothemanual.

VT-M2M-TC VM
All Rights Reserved
2 Overview
2.1 Introduction
ThankyouforchoosingVantron.Itisourcommitmenttoprovideourvalued
customerswiththeembeddeddevicesequippedwiththestate‐of‐the‐art
technologyandthebestproductservices.
Vantron’sM2MproductsarebasedonthemostadvancedARMandIntelAtom
processorsandhavelow‐powerconsumptionandhighintegration.Theproducts
aredesignedforapplicationsofM2Minindustrials,medicals,financial,retail,
vehicle,andtransportationsetc.
VT-M2M-TC VM
All Rights Reserved
2.2 ProductSeries
Order Code
VT-M2M-TC VM-4-1GM-8GF-GW2P-V
Ve r s i o n :
I: Extended Temperature
Blank:Commercial temperature
Wireless Module Option: 2G: 2G, 3G: 3G,
W:WiFi,Z:Bluetooth,P:GPS
SSD Memory Size:8G:8GB,16G:16GB
DDR Memory Size:5:512MB,1G:1GB,2G:2GB
CPU Speed:2:600MHZ,4:1GHZ,6:1.3GHZ:8:1.6GHZ
Order Examples:
VT-M2M-TC VM-4-1GM-8GF ATOM E640 Processor, 1GHz CPU, 1GB DDR2
VT-M2M-TC VM-6-1GM-8GF-W ATOM E660 Processor, 1.3GHz CPU, 1GB DDR2, 8G
Flash, WLAN
VT-M2M-TC VM-8-1GM-8GF-3GW ATOM E680 Processor, 1.6GHz CPU, 1GB DDR2, 8G
Flash , 3G,WLAN
Accessories:
InstallMechanicaltools,1pc
IOTerminal(12x3.81mm)(Optional),1pc
3GAntenna(Optional),1pc
WiFiAntenna(Optional),1pc
BluetoothAntenna(Optional),1pc
GPSAntenna(Optional),1pc
SmartDisplayCable

VT-M2M-TC VM
All Rights Reserved
3 M2M‐TCVMHardwareInstructions
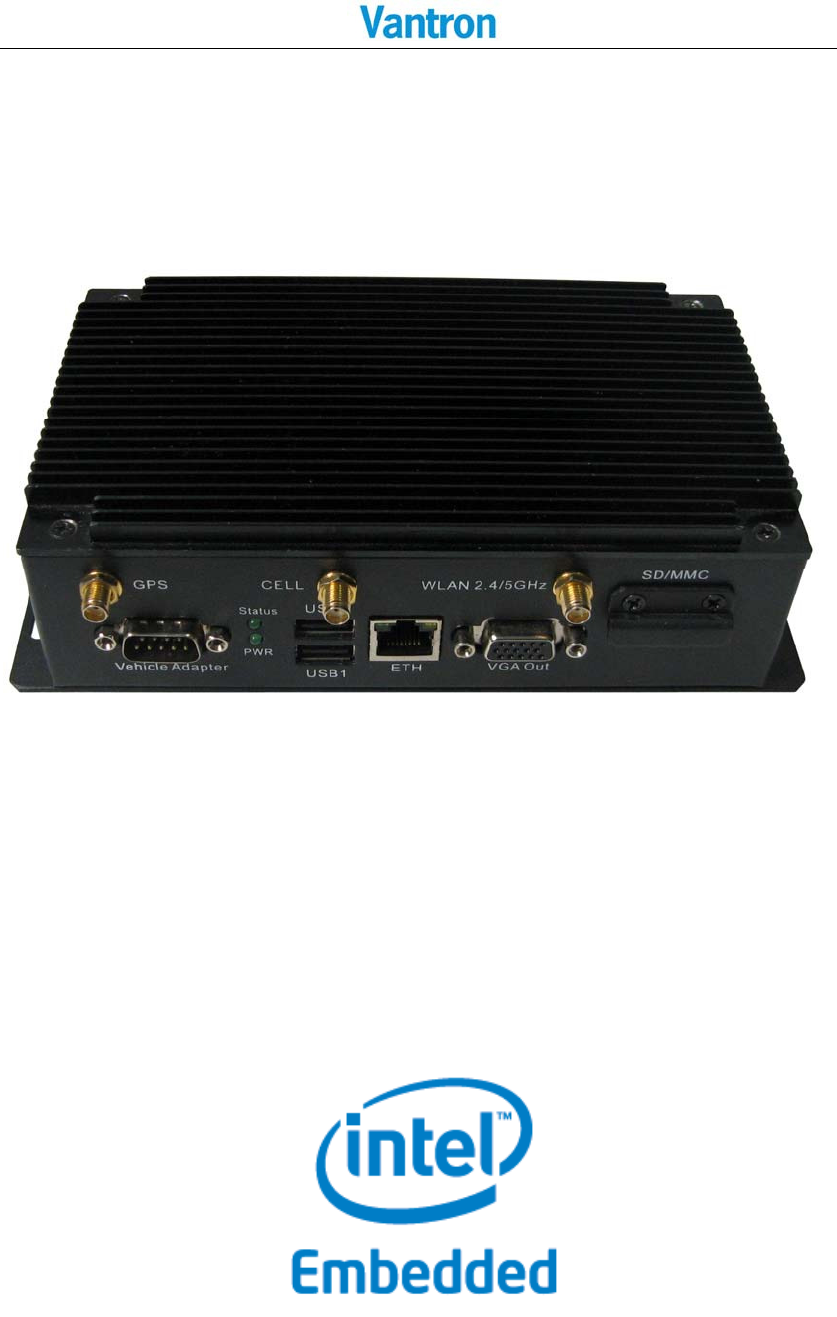
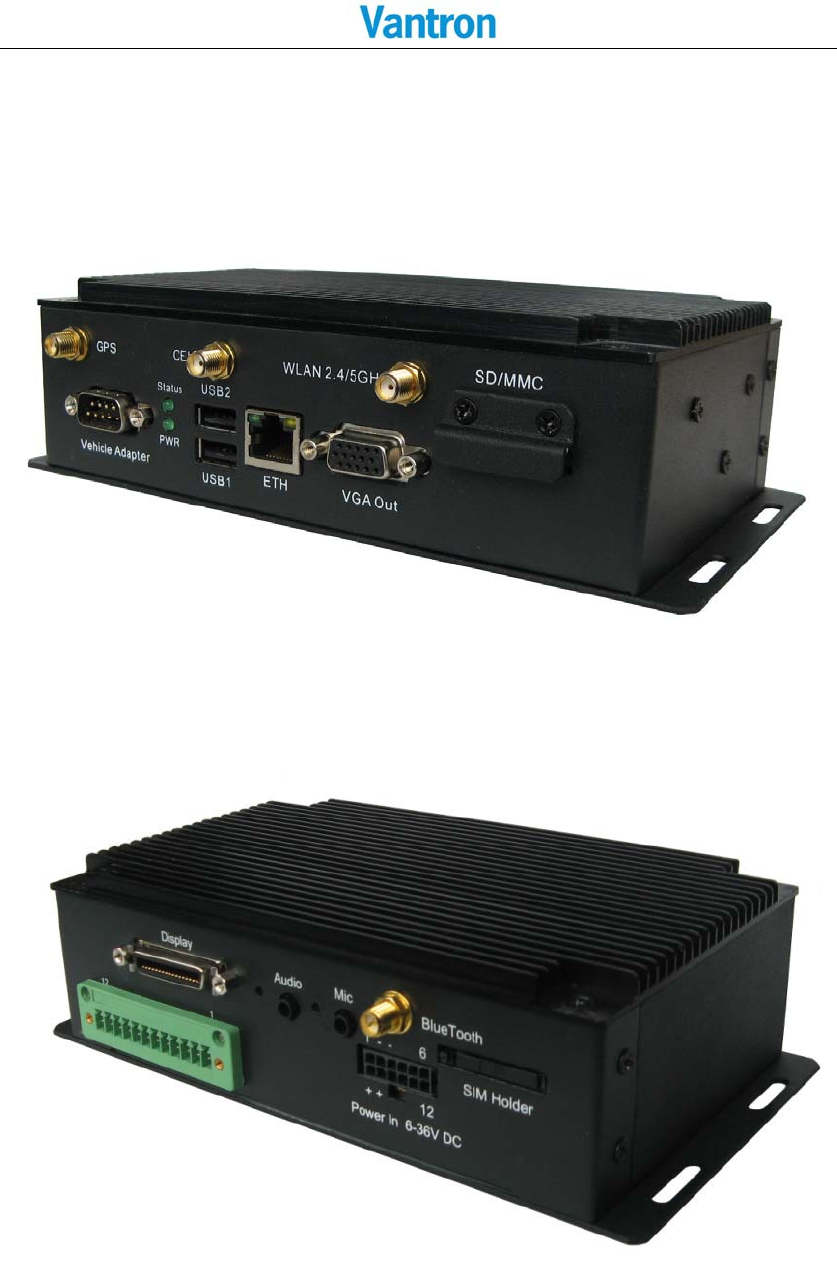
3.1 ProductAppearance
FrontSideView
BackSideView
BottomViewforoptionalembeddedmodules

VT-M2M-TC VM
All Rights Reserved
3.2 Specifications
Spe cif ica t ions
CPU Processor I ntel® ATOM™, E620( T) 0.6GHz E640( T) 1GHz,
E660( T) 1.3GHz, E680( T) ,1.6GHz
32KB I nstruction cache + 23KB L1 cache, 512KB L2
cache
Mem or y On Board RAM DDR2 512MB ( up t o 2GB)@800MHz
ROM I nter nal Half SATA SSD Module I nternal ( 8GB or ot hers)
Display Chipset I nt el® Platform Cont roller Hub EG20T.
Support LCD/ SDVO, Sim ultaneous/ dual view display
Resolut ion Up t o 1280 x 1024 @ 85Hz for VGA
Decode: H.264,MPEG4, MPEG2,VC1,WMV-9, Div- X
Encode: H.264,MPEG4
I nt erface 1xVGA ( DB15)
1xLVDS ( Optional I nt ernal)
W ireless
Com m unicati
on
WLAN Opt ional 1X ( Mini PCI E or USB2.0) 802.11a/ b/ g/ n
Wireless Module, external ant enna
3G Module Opt ional 1x m ini PCI E 3G Br oad Ban d Module wit h SI M
slot
Bluet ooth
Bluet ooth Class1.
Wireless Transm it Module
GPS Opt ional 1X GPS m odule, ext ernal ant enna
Pe riphe ral
I nt e r fa ces
Ethernet 1x10/ 100/ 1000- BaseT(RJ45)
USB 2xUSB2.0 Host ( Type A)
Audio HD Audio, 1xMI C in 3.5m m , 1xstereo Headphone
3.5m m ,Sm artDisplay m ono line-out ( left channel)
COM Por t 1xDB9 External,
1xRS232/ 485 I nt ernal
1xCAN 2.0b up t o 1Mbit/ s
Alarm Buzzer Out
SD card 1xSD card Slot ( Optional )
RTC Supported
Cont rol Power But ton on t he back
GPI O Reserved GPI O X6( Term inal)
UART 1x full function UART use DB9,MAX: 1.0M Baud
Secu rit y Securit y( Opt io
nal)
On board Registration Serial Num ber, and SHA-1
Encrypt / Decrypt Chip DS28E01
Softw are OS Linux
Applications SDK Available
Pow er I nput DC6- 36V(default 12V), Locked Power Jack
Consum ption 8W ( Pulse15W) , Sleep 2W. ( without
3G
,
GPS
,
Zi
g
bee
,
WLAN
)
Mech anical Dim ensions 170x102x52m m ( Box)
I nstall Brackets
192x102x52m m
Weight 0.6Kg ( 1.2KKg package Kit)
Enclosure Alum inum Alloy wit h Black Color
Environm ent
Condit ion
Tem perat ure Operating: - 0° C ~ + 60° C
( ETR: -40° C ~ + 80° C Optional)

VT-M2M-TC VM
All Rights Reserved
St orage: - 20° C ~ + 70° C,
( ETR: -40° C ~ + 85° C Optional)
Hum idit y 5- 95% RH at 25- 35 ( Non- Condensat ion)
Cooling Mode Fan less, Heat Sink
Approvals UL, FCC Class B, and CE
VT-M2M-TC VM
All Rights Reserved
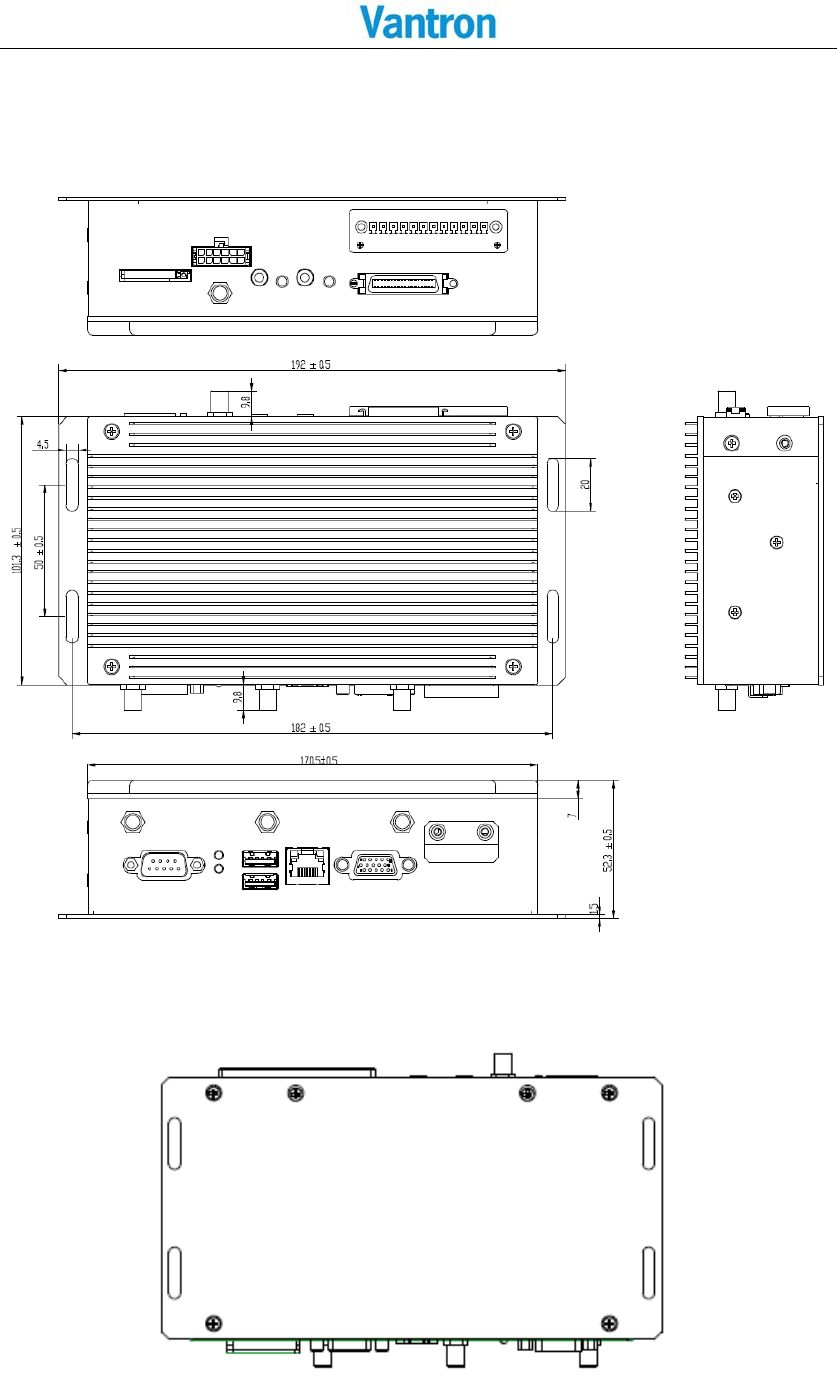
3.3 InterfaceInstructions
Front Side View
Back Side View
VT-M2M-TC VM
All Rights Reserved
3.4 Dimension
VT-M2M-TC VM
All Rights Reserved
3.5 InterfaceDescription
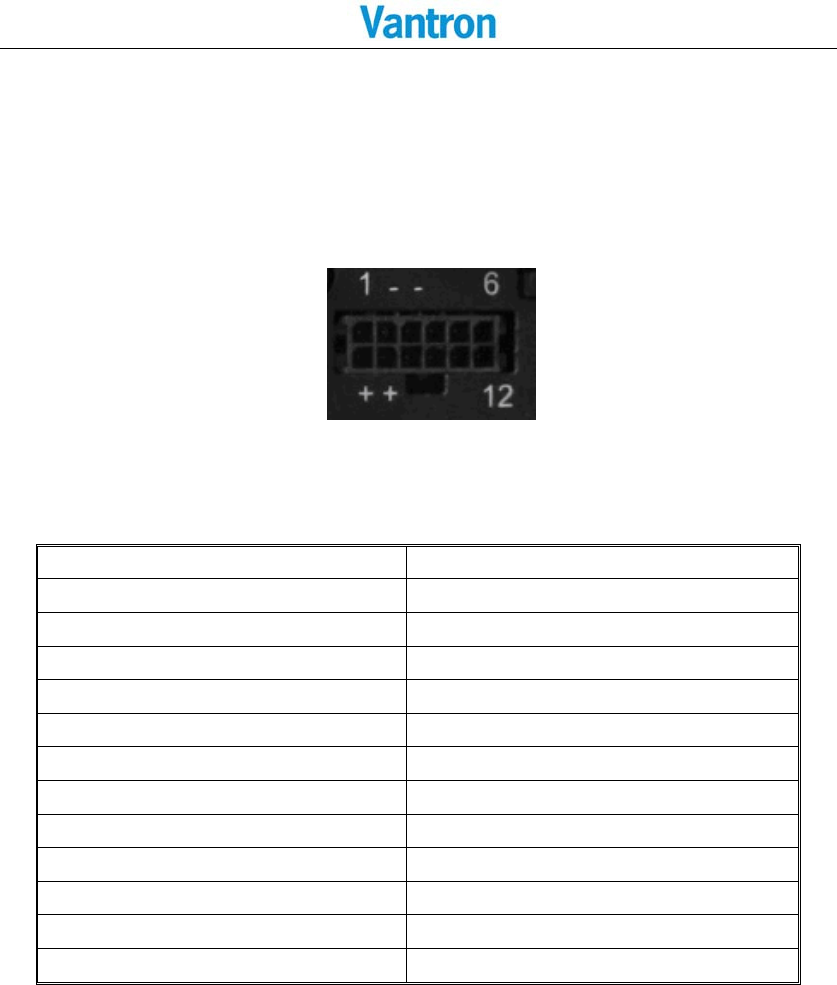
3.5.1 Wide‐RangePowerInterface
Powerconnectoroutlook
PinDescription
1ChassisGround
2Ground
3Ground
4N/C(NotConnect)
5N/C(NotConnect)
6N/C(NotConnect)
7PowerInput(6~36VDC)
8PowerInput(6~36VDC)
9AccIgnitionInput
10Ground
11N/C(NotConnect)
12PowerbuttonInputoptional
VT-M2M-TC VM
All Rights Reserved
Powerconnectorphoto
PinDefinitionofPowerCord
PinDefinitionColor
7,8+Red
2,3‐ Black
1
Chassis
GroundBlue
9Ignition White

VT-M2M-TC VM
All Rights Reserved
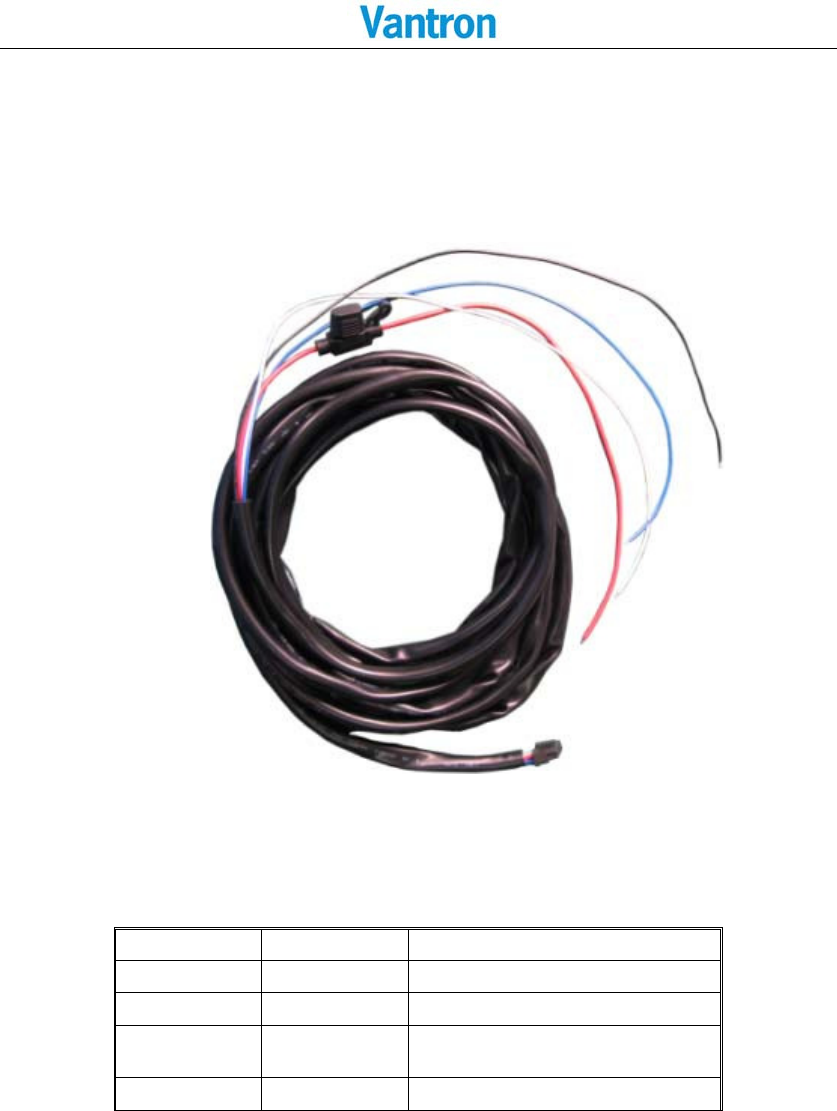
3.5.2 SmartDisplayConnector
Smart Display Connector Photo
Pin Definition of Smart Display Connector
Pin Description Pin Description
1 LCD_BL_EN( Backlight Enable output) 19 USB_D-(USB Data Negative Output Pin)
2 Panel_PWR_EN(Panel Power Enable
output) 20 USB_D+(USB Data Positive Output Pin)
3 LVDS Ground(ground pin) 21 USB Ground(ground pin)
4 Reset_BTN#(Reset Signal Input) 22 USB Ground(ground pin)
5 LVDS_CLKP(Positive Clock Signal Input
Pin) 23 +12 VDC output(+/- 10%, max 1.5A)
6 LVDS_CLKN( Negative Clock Signal Input
Pin) 24 +12 VDC output(+/- 10%, max 1.5A)
7 LVDS Ground(ground pin) 25 +12 VDC output(+/- 10%, max 1.5A)
8 LVDS Ground(ground pin) 26 +12 VDC output(+/- 10%, max 1.5A)
9 LVDS_DATAP2(LVDS Data2 Positive Input
Pin) 27 Power Ground(ground pin)
10 LVDS_DATAN2(LVDS Data2 Negative
Input Pin) 28 Power Ground(ground pin)
11 RS232_TXD1(RS232 Data output Pin) 29 Power Ground(ground pin)
12 RS232_RXD1(RS232 Data input Pin) 30 Power Ground(ground pin)
13 LVDS_DATAP1(LVDS Data1 Positive Input
Pin) 31 N/C(Not Connect)
14 VDS_DATAN1(LVDS Data1 Negative
Input Pin) 32 N/C(Not Connect)
15 LVDS Ground(ground pin) 33 N/C(Not Connect)
16 LVDS Ground(ground pin) 34 Power Button Input #
17 VDS_DATAP0(LVDS Data0 Positive Input
Pin) 35 Audio Ground
18 VDS_DATAN0(LVDS Data0 Negative
Input Pin) 36 Mono. Line-out( left channel)

VT-M2M-TC VM
All Rights Reserved
Optional Smart Display Cable.
VT-M2M-TC VM
All Rights Reserved
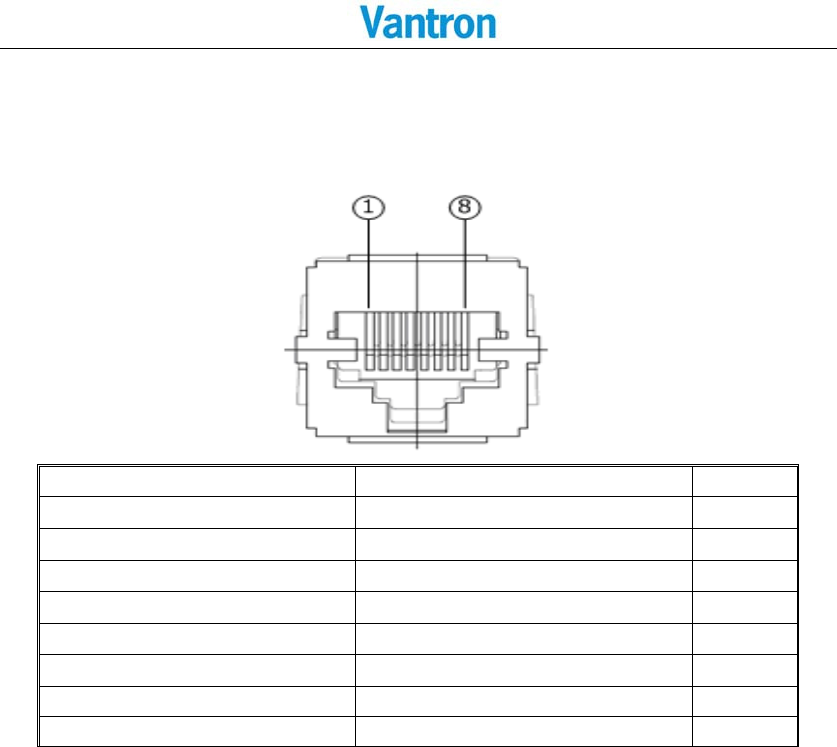
3.5.3 EthernetInterface
StandardRJ45interface,supporting10M/100M/1000Mself‐adaptation,thisisa
standardRJ45Ethernetport
PinDescriptionRemarks
1L_MDI_0PIO
2L_MDI_0NIO
3L_MDI_1PIO
4L_MDI_1NIO
7L_MDI_2PIO
8L_MDI_2NIO
9L_MDI_3PIO
10L_MDI_3NIO
VT-M2M-TC VM
All Rights Reserved
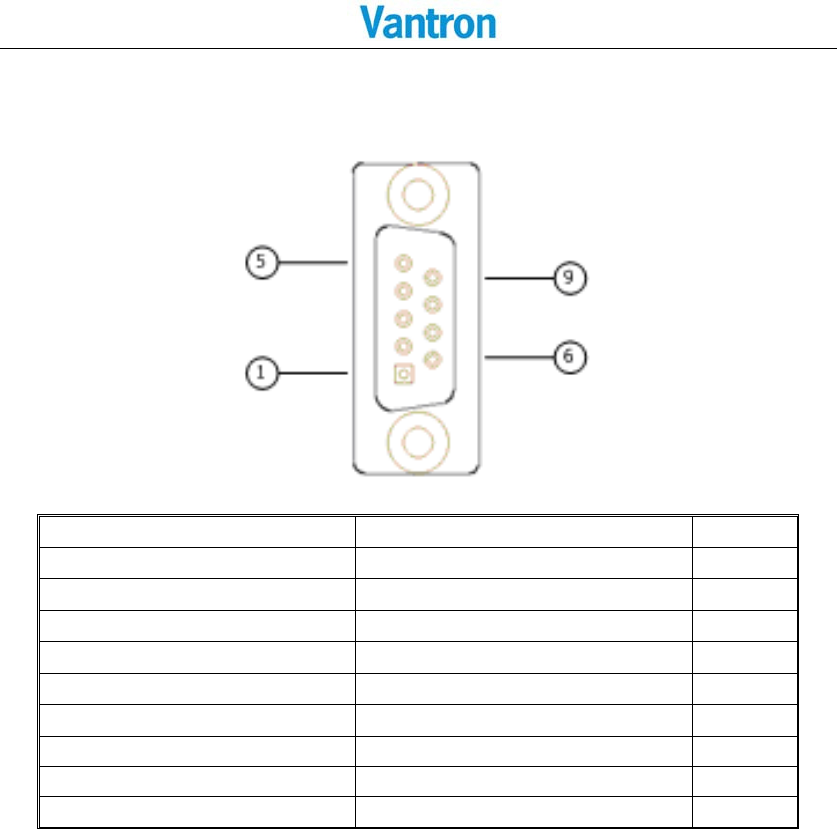
3.5.4 DSub‐9RS232Connector
StandardverticalDB‐9maleconnector ,The bit rat e 4 6 0 K
PinDescriptionRemarks
1DCD1/422TX+/485_ABIOSset
2RXD1/422TX‐/485_BBIOSset
3TXD1/422RX+BIOSset
4DTR1/422RX‐ BIOSset
5DGND(groundpin)
6DSR1
7RTS1
8CTS1
9RI1
VT-M2M-TC VM
All Rights Reserved
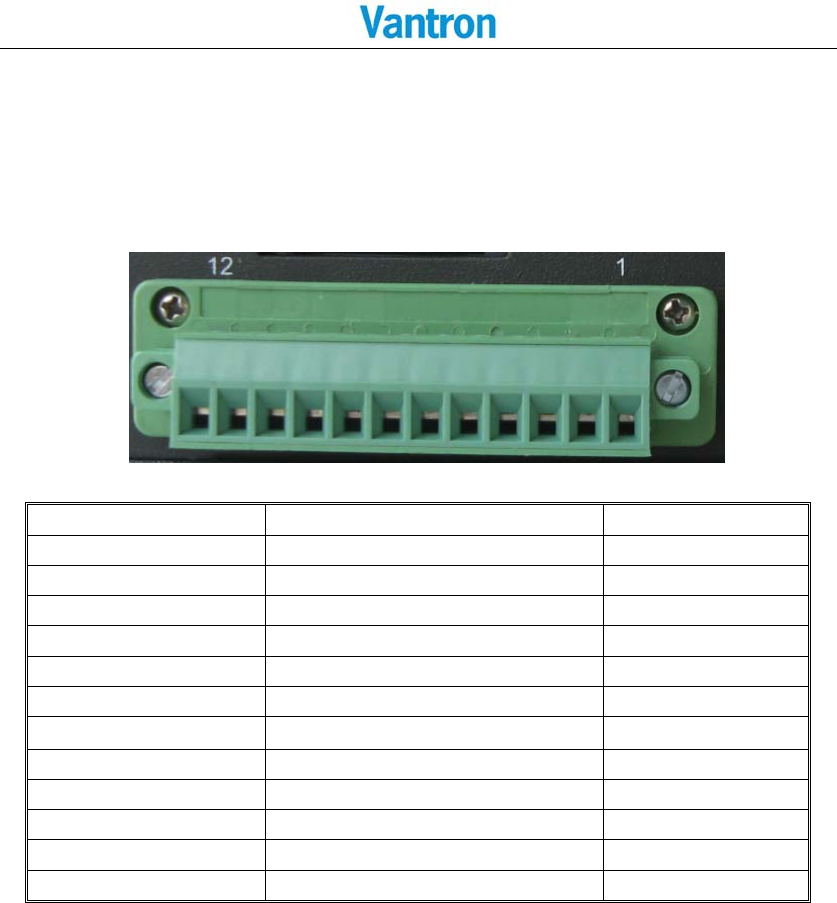
3.5.5 RS232/485,CAN,ExternalIOConnector
12pins3.81pitchterminalwithscrewlock
Loadcapacity:morethan128nodes/RS485channel‐‐ bit rat e :1 1 5 2 0 0
CAN : Th e bit ra t e can be pr ogr am m e d t o a m ax im um of 1 Mbit/ s
PinDescriptionRemarks
1TXD2/485_2_ABIOSset
2RXD2/485_2_BBIOSset
3DGND
4CANH
5CANL
6DGND
7EXTIO03.3VLevel
8EXTIO13.3VLevel
9EXTIO23.3VLevel
10EXTIO33.3VLevel
11EXTIO43.3VLevel
12EXTIO53.3VLevel
VT-M2M-TC VM
All Rights Reserved
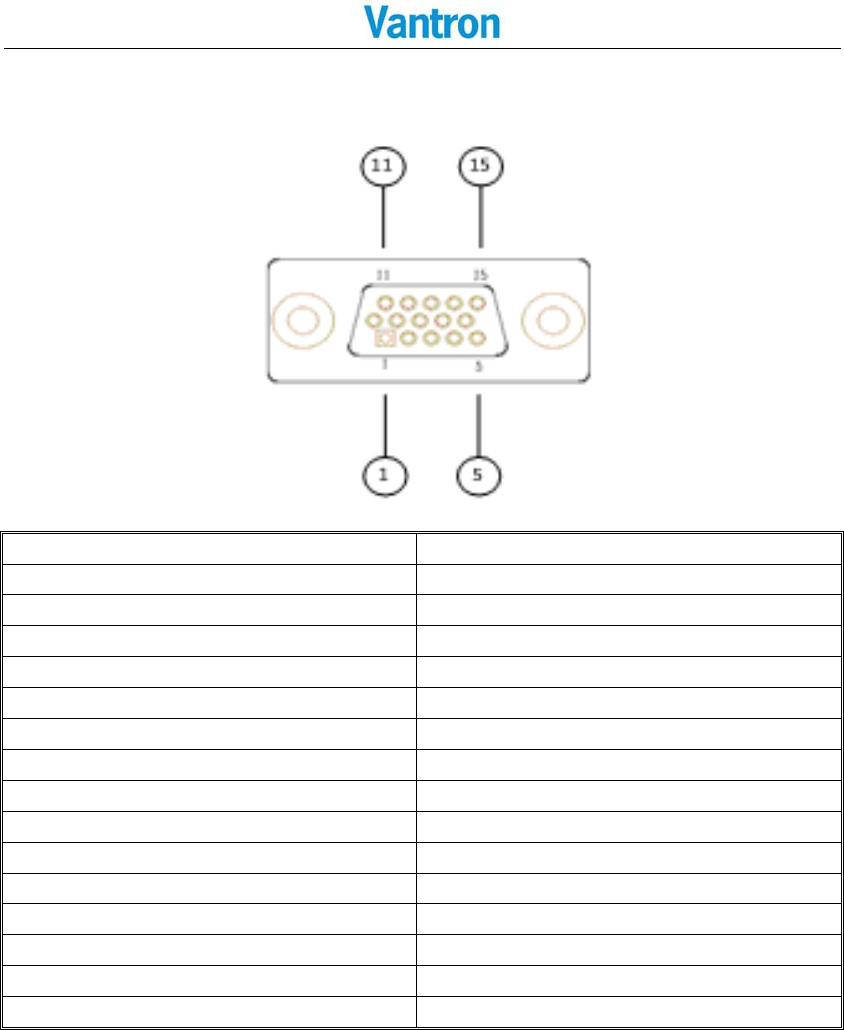
3.5.6 VGAInterface
StandardverticalDB‐15FemaleVGAconnector
bit r ate:4 6 0 K
PinDescription
1RED
2GREEN
3BLUE
4N.C.
5GND
6GND
7GND
8GND
9+5VDC
10GND
11N.C.
12SD_DDC
13HSYNC
14VHYNC
15SC_DDC
VT-M2M-TC VM
All Rights Reserved
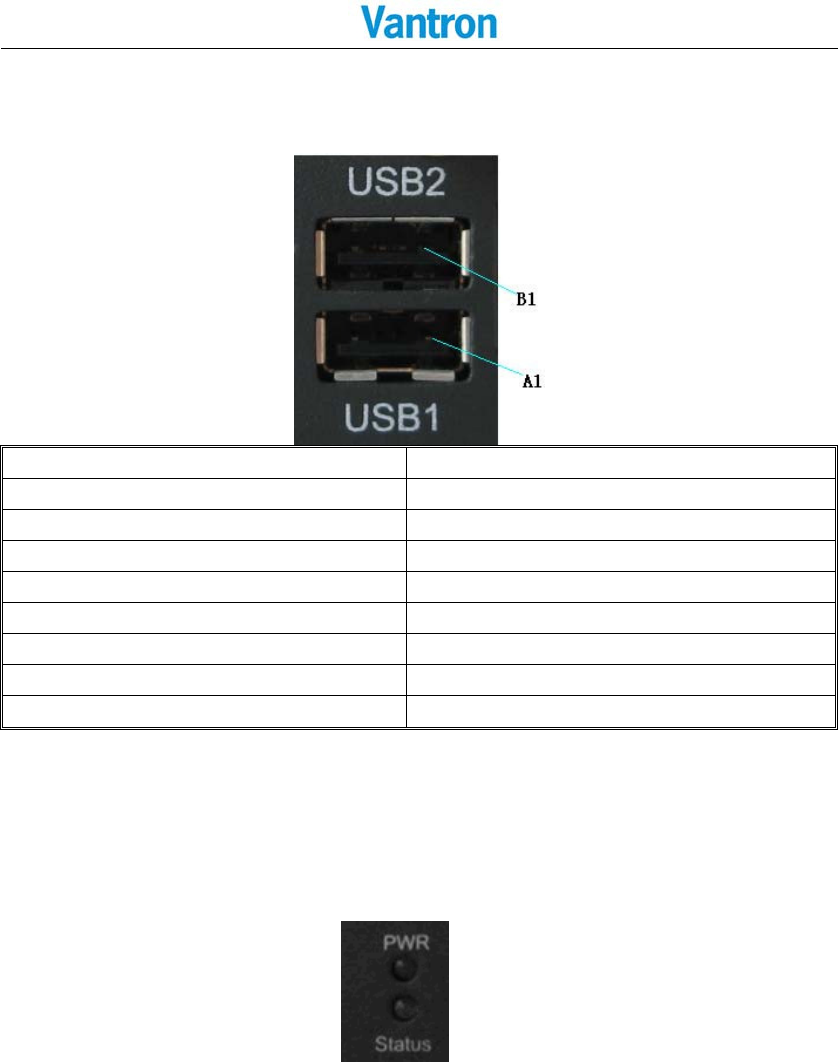
3.5.7 USBHostConnector
DualverticalUSBAtypeinterface,USB2.0
PinDescription
A1USB1_VCC(+5VDC)
A2USB1_D‐
A3USB1_D+
A4USB1_DGND(groundpin)
B1USB2_VCC(+5VDC)
B2USB2_D‐
B3USB2_D+
B4USB2_DGND(groundpin)
3.5.8 LED
PWR LED: light system power OK(main power up);off system power turn off
Status LED:Blink SATA HDD active.

VT-M2M-TC VM
All Rights Reserved
3.6 OperationNotice
3.6.1 ChangeSIMCard
PushthesmallbuttonontheleftofSIMCardHolder,andinstalltheSIMcardtothe
holder.ThenpushtheholderintotheSlot.
VT-M2M-TC VM
All Rights Reserved
4 Tips
WasteDisposal
Itisrecommendedtodisassemblethedevicebeforeabandoningitinconformity
withlocalregulations.Pleaseensurethattheabandonedbatteriesaredisposed
accordingtolocalregulationsonwastedisposal.Donotthrowbatteriesintofire
(explosive)orputincommonwastecanister.Productsorproductpackageswith
thesignof“explosive”shouldnotbedisposedlikehouseholdwastebutdelivered
tospecializedelectrical &electronicwasterecycling/disposalcenter.Proper
disposalofthissortofwastehelpsavoidingharmandadverseeffectupon
surroundingsandpeople’shealth.Pleasecontactlocalorganizationsor
recycling/disposalcenterformorerecycling/disposalmethodsofrelatedproducts.
Complywiththefollowingsafetytips:
Donotuseincombustibleandexplosiveenvironment
Keepawayfromcombustibleandexplosiveenvironmentforfearofdanger.
Keepawayfromallenergizedcircuits.
Operatorsshouldnotremoveenclosurefromthedevice.Onlythegroupor
personwithfactorycertificationispermittedtoopentheenclosuretoadjustand
replacethestructureandcomponentsofthedevice.Donotchangecomponents
unlessthepowercordisremoved.Insomecases,thedevicemaystillhaveresidual
voltageevenifthepowercordisremoved.Therefore,itisamusttoremoveand
fullydischargethedevicebeforecontactsoastoavoidinjury.
Unauthorizedchangestothisproductoritscomponentsareprohibited.
Intheaimofavoidingaccidentsasfaraspossible,itisnotallowedtoreplacethe
systemorchangecomponentsunlesswithpermissionandcertification.Please
contactthetechnicaldepartmentofVantronorlocalbranchesforhelp.
Payattentiontocautionsigns.
Cautionsignsinthismanualremindofpossibledanger.Pleasecomplywith
relevantsafetytipsbeloweachsign.Meanwhile,youshouldstrictlyconformtoall
safetytipsforoperationenvironment.
Notice
Consideringthatreasonableeffortshavebeenmadetoassureaccuracyofthis
manual,Vantronassumesnoresponsibilityofpossiblemissingcontentsand
information,errorsincontents,citations,examples,andsourceprograms.
Vantronreservestherighttomakenecessarychangestothismanualwithoutprior
notice.Nopartofthismanualmaybereprintedorpubliclyreleasedinfor
VT-M2M-TC VM
All Rights Reserved
FCC Warning:
ThisdevicecomplieswithFCCclassBRules.Operationissubjecttothefollowing
conditions.
(1) Thisdevicemaynotcauseharmfulinterference.
(2) Thisdevicemustacceptanyinterferencereceived,includinginterferencethat
maycauseundesiredoperation.
Note:ThisequipmenthasbeentestedandfoundtocomplywiththelimitsforaClass
Bdigitaldevice,pursuanttopart15oftheFCCRules.Theselimitsaredesignedto
providereasonableprotectionagainstharmfulinterferenceinaresidential
installation.Thisequipmentgenerates,usesandcanradiateradiofrequencyenergy
and,ifnotinstalledandusedinaccordancewiththeinstructions,maycauseharmful
interferencetoradiocommunications.However,thereisnoguaranteethat
interferencewillnotoccurinaparticularinstallation.Ifthisequipmentdoescause
harmfulinterferencetoradioortelevisionreception,whichcanbedeterminedby
turningtheequipmentoffandon,theuserisencouragedtotrytocorrectthe
interferencebyoneormoreofthefollowingmeasures:
—Reorientorrelocatethereceivingantenna.
—Consultthedealeroranexperiencedradio/TVtechnicianforhelp.
Modificationsnotauthorizedbythemanufacturermayvoidusersauthorityto
operatethisdevice.Intheaimofavoidingaccidentsasfaraspossible,itisnot
allowedtoreplacethesystemorchangecomponentsunlesswithpermissionand
certification.PleasecontactthetechnicaldepartmentofVantronorlocalbranches
forhelp.
RFexposurewarning
Thisequipmentmustbeinstalledandoperatedinaccordancewithprovide
instructionsandtheantennausedforthistransmittermustbeinstalledtoprovidea
separationdistanceofatleast20cmfromallpersonsandmustnotbeco‐locatedor
operationinconjunctionwithanyotherantennaortransmitter.End‐usersand
installersmustbeprovidewithantennainstallationinstructionsandtransmitter
operatingconditionsforsatisfyingRFexposurecompliance.

VT-M2M-TC VM
All Rights Reserved
PartII:SoftwareReference
1Introduction
Thank you for choosing Vantron. It is our commitment to provide our valued customers
with the embedded devices equipped with the state of the art technology and the best
product services.
Vantron’s M2M products are based on the most advanced ARM and Intel Atom
processors and have low power consumption and high integration. The products are
designed for applications of M2M in industrials, medicals, financial, retail, vehicle, and
transportations etc.
1.1 AboutThisManual
This manual is for user how to use sample programs in Linux system and how to use
device in Linux system.
1.2 LinuxOSSupport
TheTV‐M2M‐TCVMsupportsthefollowingLinuxoperatingsystems.
z Ubuntu 12.04.2 LTS
TheUbuntu12.04.2LTSdefaultnormaluserisvantron,passwordisvantron.
1.3SamplePrograms
VantronsupportsmanysampleprogramsforTV‐M2M‐TVVM.Youcantestdevicemodules
throughthesesampleprograms,andcanbethereferencethatyoudevelop.
z client CANdatasendprogram
z loopback CANdatareceiveprogram
z gpioctl GPIOtestprogram
z power Powercontrolformodulesintheset
z serialdemo SerialtestingandsendATCommandprogram
z gpsGetthegpsinformation

VT-M2M-TC VM
All Rights Reserved
z mcupower Powercontrolconfigure
z mcupowerui PowercontrolconfigureUI
z adxlDigitalAccelerometer
z pnlPnl7control
z hostapdup HostAPup
z hostapdoff HostAPoff
1.4Functionalitieslayout
ThebelowtablelistsVT‐M2M‐TCVMfeatures.
ChipsorInterfacesDetails
UART VT‐M2M‐TChas4UARTports:
/dev/ttyS0:RS232DB9COMPort
/dev/ttyS1:GreenTerminalPin1,2
/dev/ttyS2:GPS
/dev/ttyS3:Pnl7buttoncontrol
USBHostportx2
1xEthernet$sudoifconfigeth0192.168.16.143
AudioMICIN
ALSAaudiodevice
$arecord–twavtest.wav
AudioOut
ALSAaudiodevice
$aplaytest.wav
Videoplayer$mplayer/programs/tmp/1.mp4
GreenTerminal1:TXD2
2:RXD2
3:GND
4:CANH
5:CANL
6:GND
7:EXTIO0
8:EXTIO1
9:EXTIO2
10:EXTIO3
11:EXTIO4
1.1 EXTIO5

VT-M2M-TC VM
All Rights Reserved
2BaseControl
Opentheterminal(CTRL+ALT+T),thengetintothedemodirectory.
Thedirectorypatchis/programs/demo.
ex:
$cd/programs/demo
2.1PowerControl
powercan|gps|3g][on|off]
can:PowercontrolofCANModule
gps:PowercontrolofGPSModule
3g:Powercontrolof3GModule
ex1:Turnonpowerofcanmodule
$sudo./powercanon
ex2:Turnoffpowerofcanmodule
$sudo./powercanoff
2.2CanControl
a.Closecandevice
$sudoifconfigcan0down
b.Configurecan,setcan’sbaudrateto1Mbps,or100000(100kbps)
$sudoiplinksetcan0typecanbitrate100000
$sudoifconfigcan0up
c.Receivecandata,itwillreceivecandatawhichfromotherside
$sudo./loopback
d.Sendcandata,itwillsendcanpackagewithIDof0x02
$sudo./client
2.3GPIOControl
gpioctl<dirin|dirout|get|set|clear><gpionum>
dirin: SetspecifiedGPIOasinputtype
dirout: SetspecifiedGPIOasoutput
get:ReadGPIOinputlevel.NeedsettheGPIOasinputfirst.
set:SetGPIOashighlevel.NeesettheGPIOasoutputfirst.
VT-M2M-TC VM
All Rights Reserved
clear: ClearGPIOtolowlevel,needsettheGPIOasoutputfirst.
gpionum:TheGPIObeoperated.0to5isEXTIO,10isbacklightpower
ex1:SetEXTIO2tohigh.
$sudo./gpioctldirout2
$sudo./gpioctlset2
ex2:ReadlevelofEXTIO2.
$sudo./gpioctldirin2
$sudo./gpioctlget2
ex3:SetEXTIO2tolow.
$sudo./gpioctldirout2
$sudo./gpioctlclear2
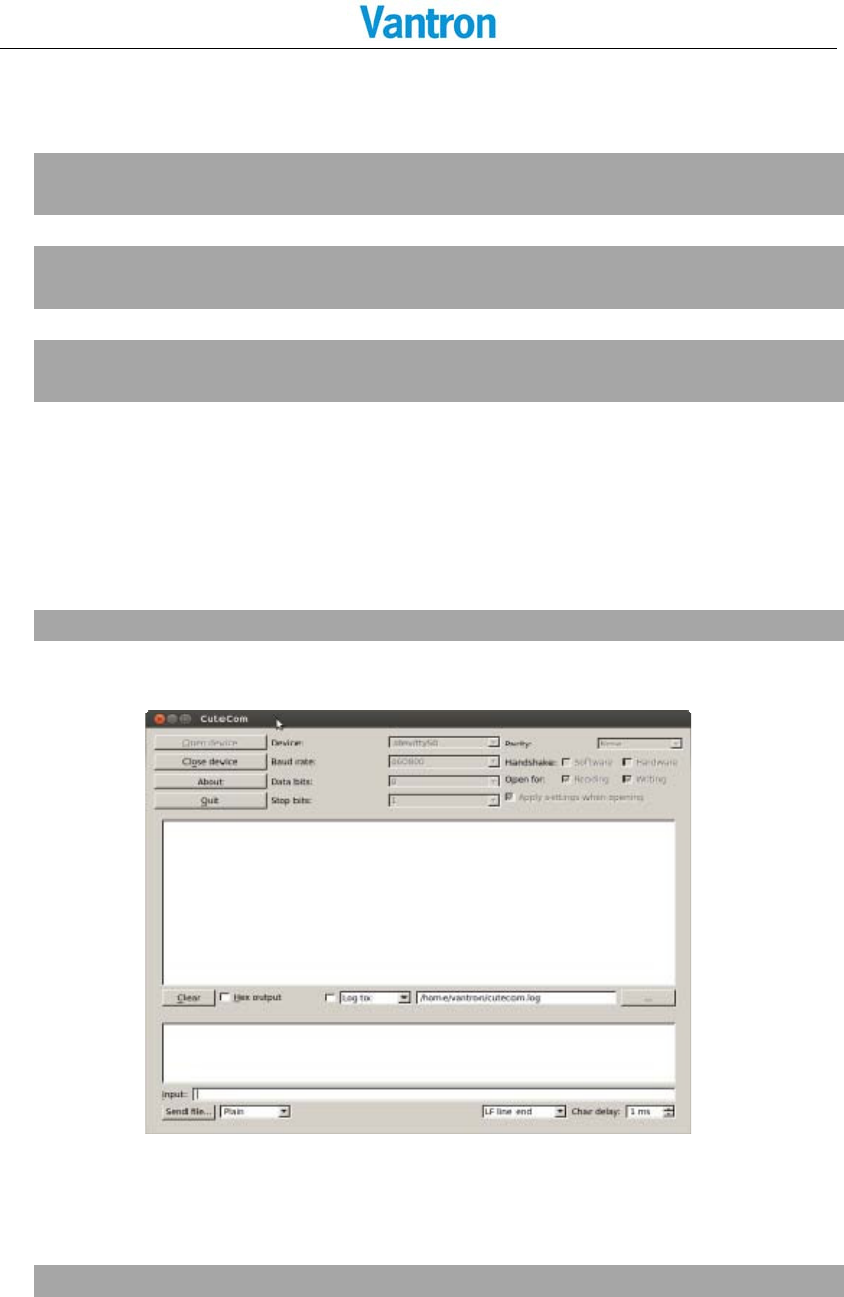
2.4SerialCOMControl
a.RS232DB9COM:
OpentheCutecom,thissoftwaregetfrom“UbuntuSoftwareCenter”.
$sudocutecom
SelectDevice,Baudrate,Databits,Stopbits,Parity,Handshake,thenpress“Opendevice”
button.
b.COMportongreenterminal:
ShortPin1,2ofgreenterminal
$sudo./serialdemo–d/dev/ttyS1–b9600–r–w“hello”
Candisplaysome“hello”outputs

VT-M2M-TC VM
All Rights Reserved
2.5AudioAndVideoControl
a.Audioarecord:
$sudoarecord–twavtest.wav
b.Audioaplay:
$sudoaplaytest.wav
c.Videoplayer,thetestvideoin“/programs/tmp“:
$sudomplayer/programs/tmp/1.mp4
2.6SDcardControl
a.InsertSDcard,thenlookoverdevice:
$sudofdisk–l
b.mountSDcarddevice:
$sudomount/dev/mmcblk0/mnt
2.7ADXL345Control
GetDigitalAccelerometer:
$sudo./adxl
X:233
Y:2
Z:3ed
2.8Watchdog
a.Configurewatchdogdriver:
$sudovim/etc/default/watchdog
#Startwatchdogatboottime?0or1
run_watchdog=1
#Loadmodulebeforestartingwatchdog
watchdog_module=”sch311x_wdt”
#Specifyadditionalwatchdogoptionshere(seemanpage).
b.Configurewatchdog:
$sudovim/etc/watchdog.conf

VT-M2M-TC VM
All Rights Reserved
c.Startwatchdogorrebootsystem:
$sudowatchdog
2.9Pnl7Control
ThecommunicationprotocolinthePNLCD/DVD
740P56‐5KxxxxxxVT_PNL7_xxx/SW/CommunicationProtocolMCUwithPCV1.x.pdf.
Controlpnl7andgetbuttoneventfrompnl7.
$sudo./pnl
1.Getpnlversion2.Getpnlbacklightvalue
…………
…………
25.Exit
InputSelect:
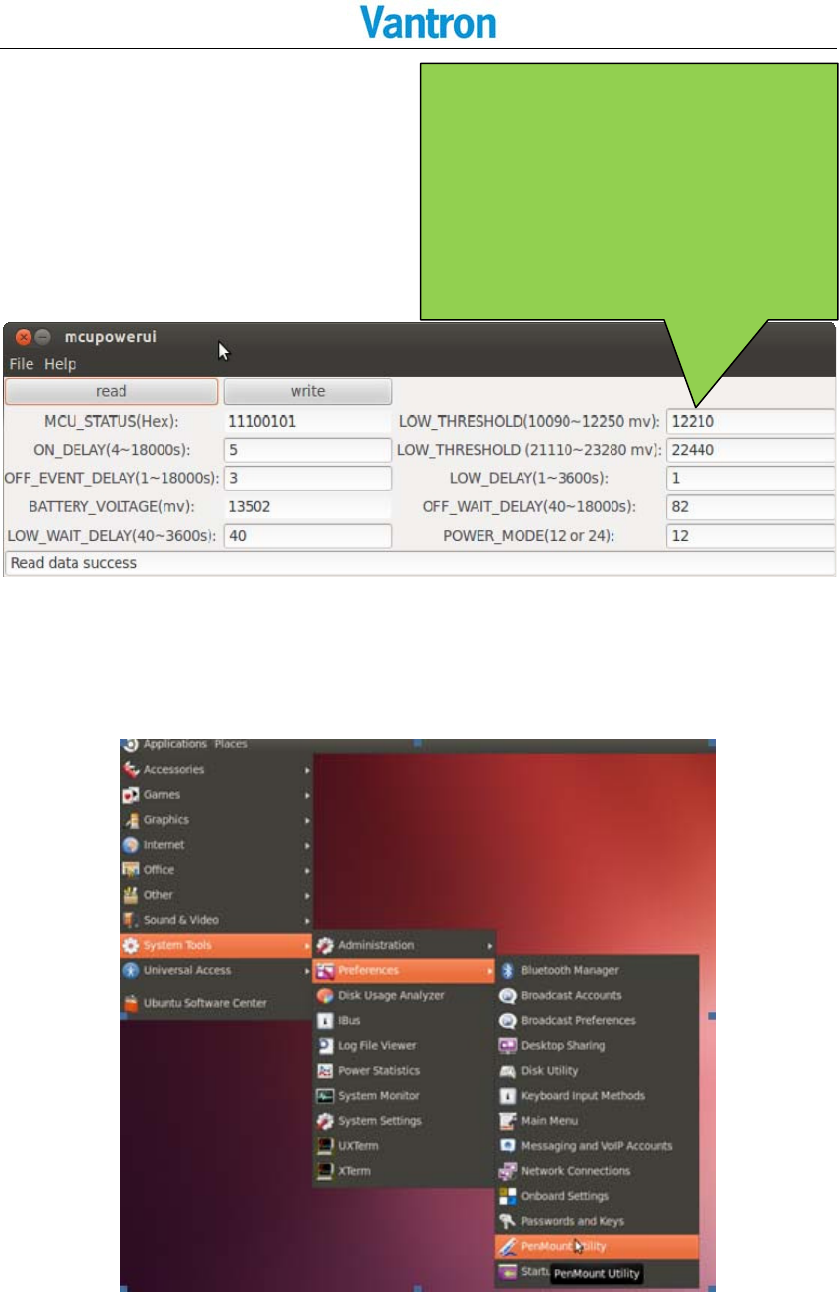
2.10MCUPowerControl
ThecommunicationprotocolinthisCD/DVD
SW/doc/vm‐smbus‐protocol_xx.pdf.
a.GettheMCUpowervalue(D‐DecH‐Hex):
$sudo./mcupowerget1
MCUondelay:(Dec)5(Hex)5
b.SettheMCUpowervalue,setvalueisDec:
$sudo./mcupowerset1200
MCUondelayOK
c.SetandgetMCUpowervalueformUI:
$sudo./mcupowerui
First,press“read”buttontogettheMCUpowervalue.
Second,settheMCUpowervalue,thenpress“write”button.
Thevaluerangeneedrefertothecommunicationprotocol.
d.ExampleofthemethodofchangingthelowDCinputvoltagedetectionvalue:
VT-M2M-TC VM
All Rights Reserved
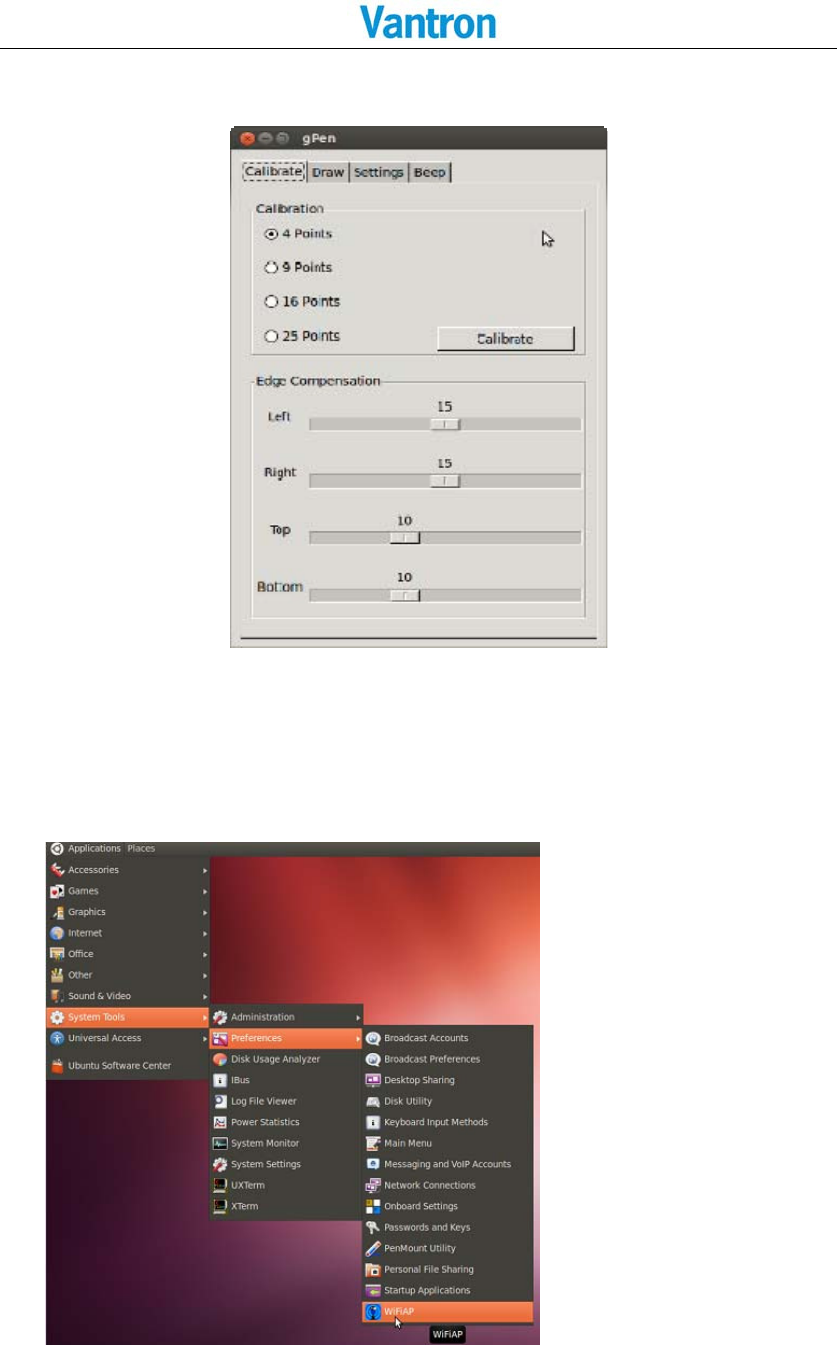
2.11TouchScreen
a.Start“penMountUtility”followingdiagram:
1. Use power supply equal or more than
12V output.
2. "Read" all values
3. Change this value to 10.8V, to settle
long cable with voltage drop issue.
4. "Write" settings to save the ACC
power management parameter.
VT-M2M-TC VM
All Rights Reserved
b.Thencalibrateandsettouchscreen:
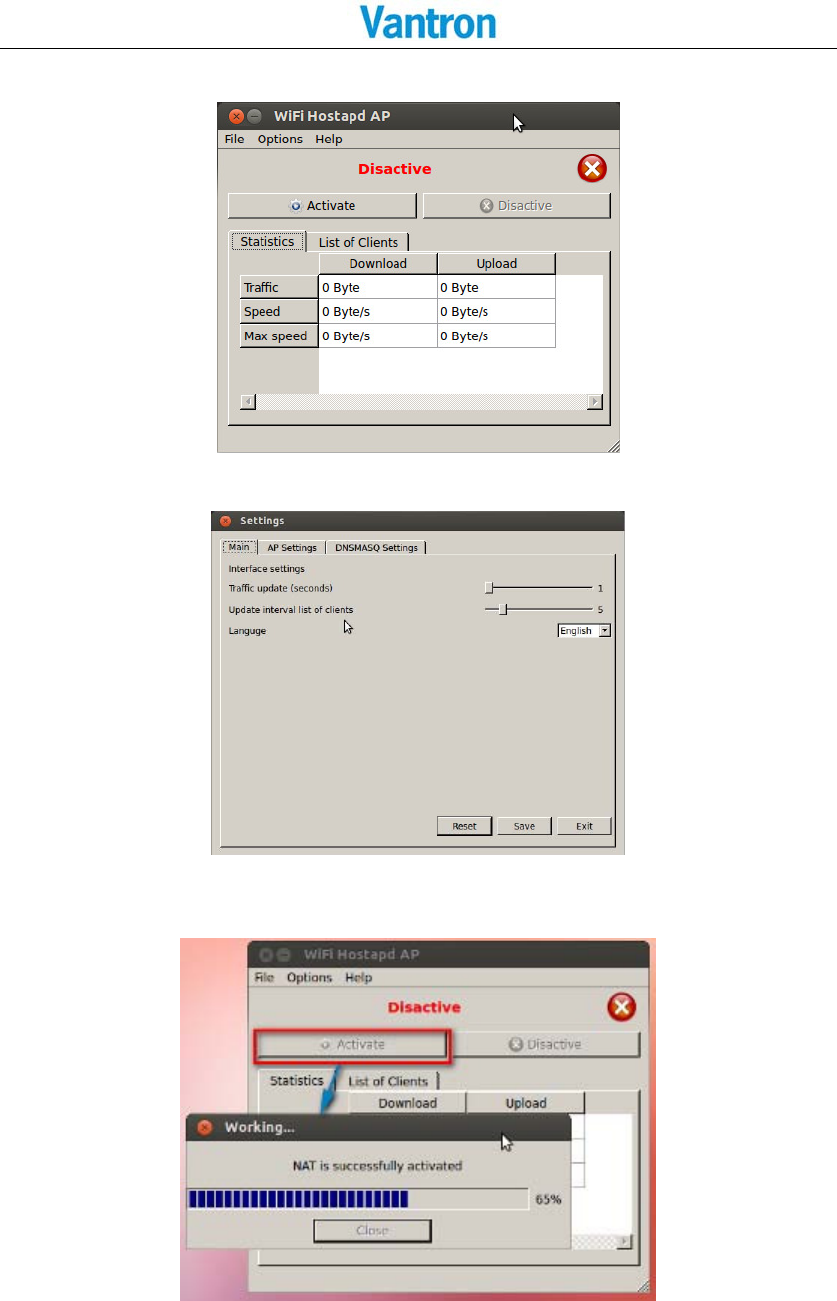
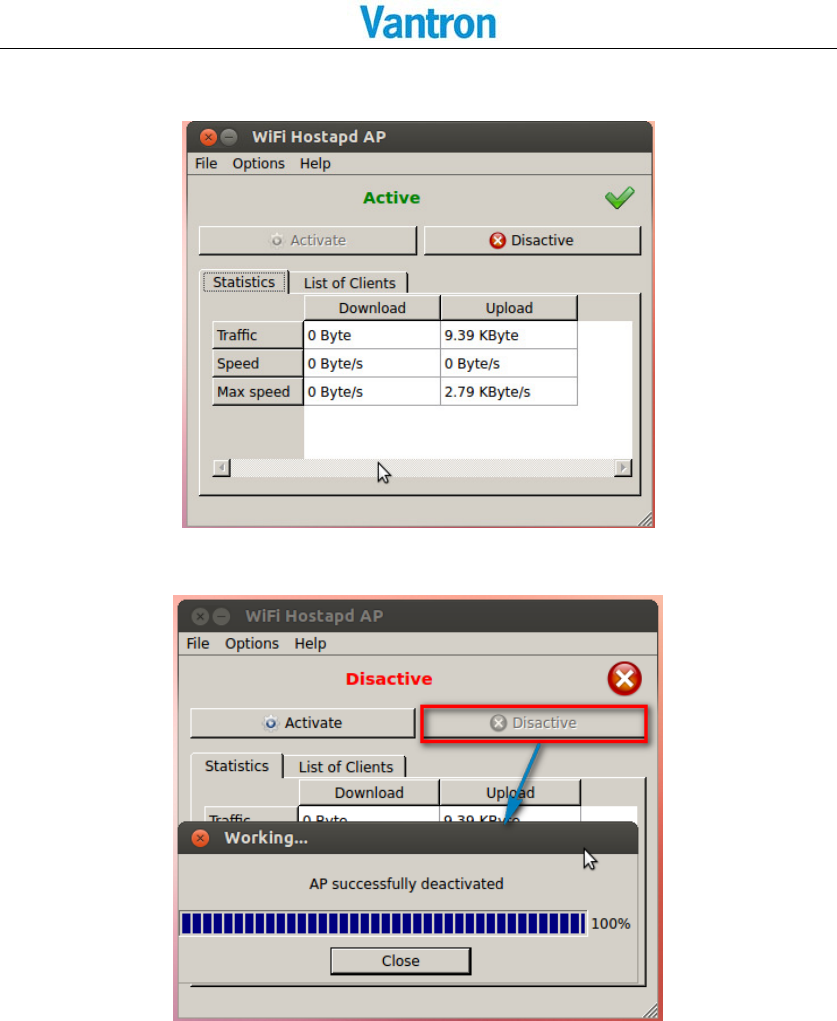
2.12HostAP
Firstofall,disconnectallnetwork.
a. OpentheWIFIAPsoftware:
VT-M2M-TC VM
All Rights Reserved
b. Inputthepasswordandyouwillintothefollowinginterface:
c. OpenOptions‐>Settings,setthehostAPandDNSMASQ:
Note:Whenyouchangedthesetting,youneedclick“Save”.
d. ConnectEthernet(eth0)orcell(ppp0),thenactivatethehostAP:
e. TheactivehostAP:
VT-M2M-TC VM
All Rights Reserved
WhenactivatethehostAP,youcanscan and connect the hot port, and access to the other network
which you configure.
f. Close the activation state:
VT-M2M-TC VM
All Rights Reserved
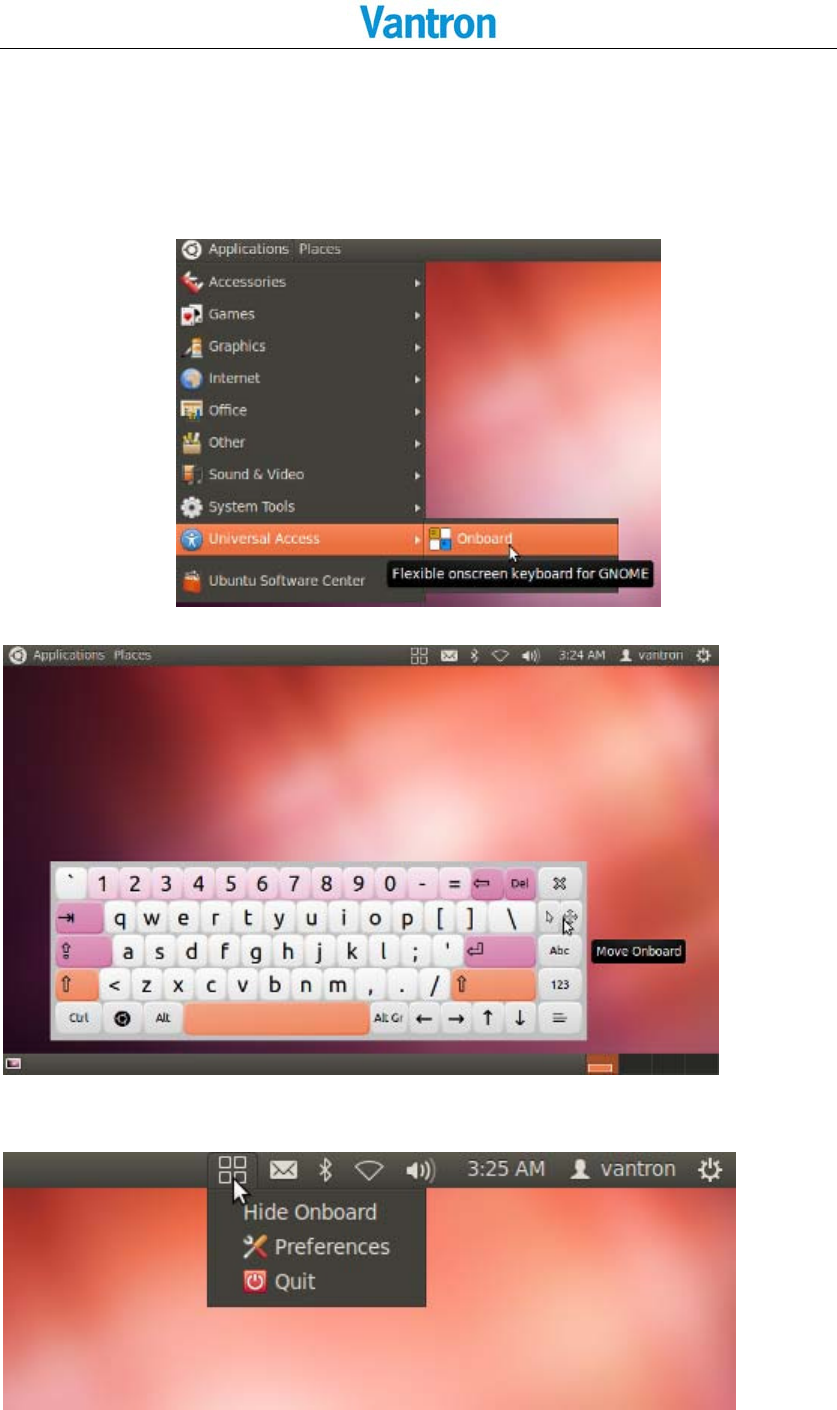
2.13OnBorad
a.Openonboard
b.PreferencesorQuit
VT-M2M-TC VM
All Rights Reserved
3NetworkModule
Thenetworkbemanagedbythenetworkconnections,canusenetworkconnectionstoolfrom
systemtools.
3.1WIFIControl
a.ConnecttheWIFIhotspot:
VT-M2M-TC VM
All Rights Reserved
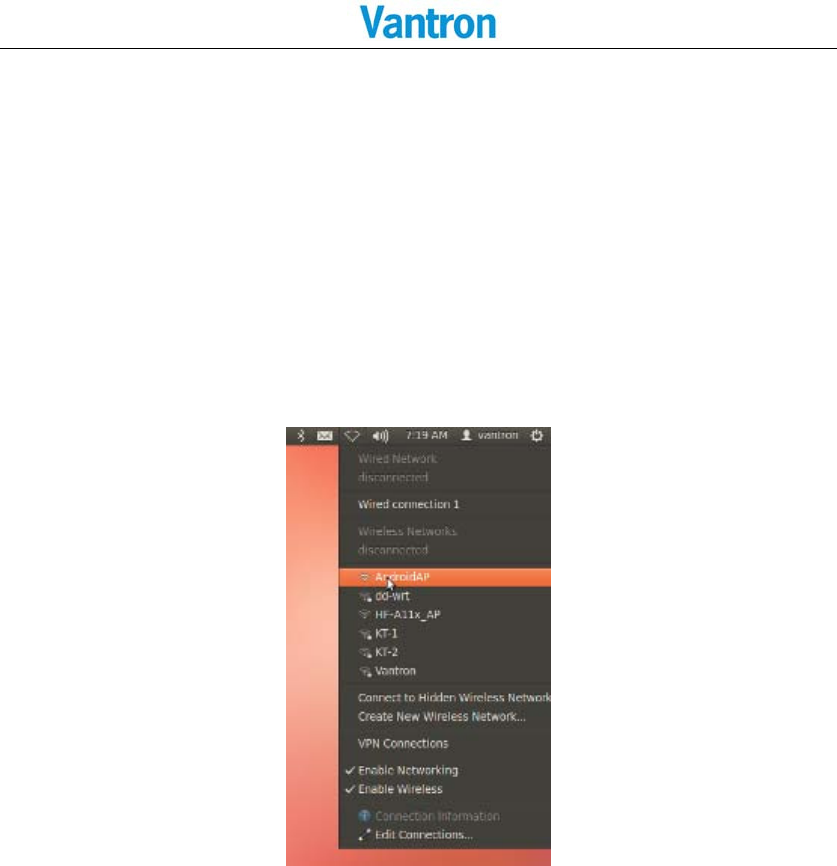
3.23GControl
Note:Whenyoudisconnectedthe3Gorconnectederror,youmustrestartthedevice:
$sudopower3goff
$sudopower3gon
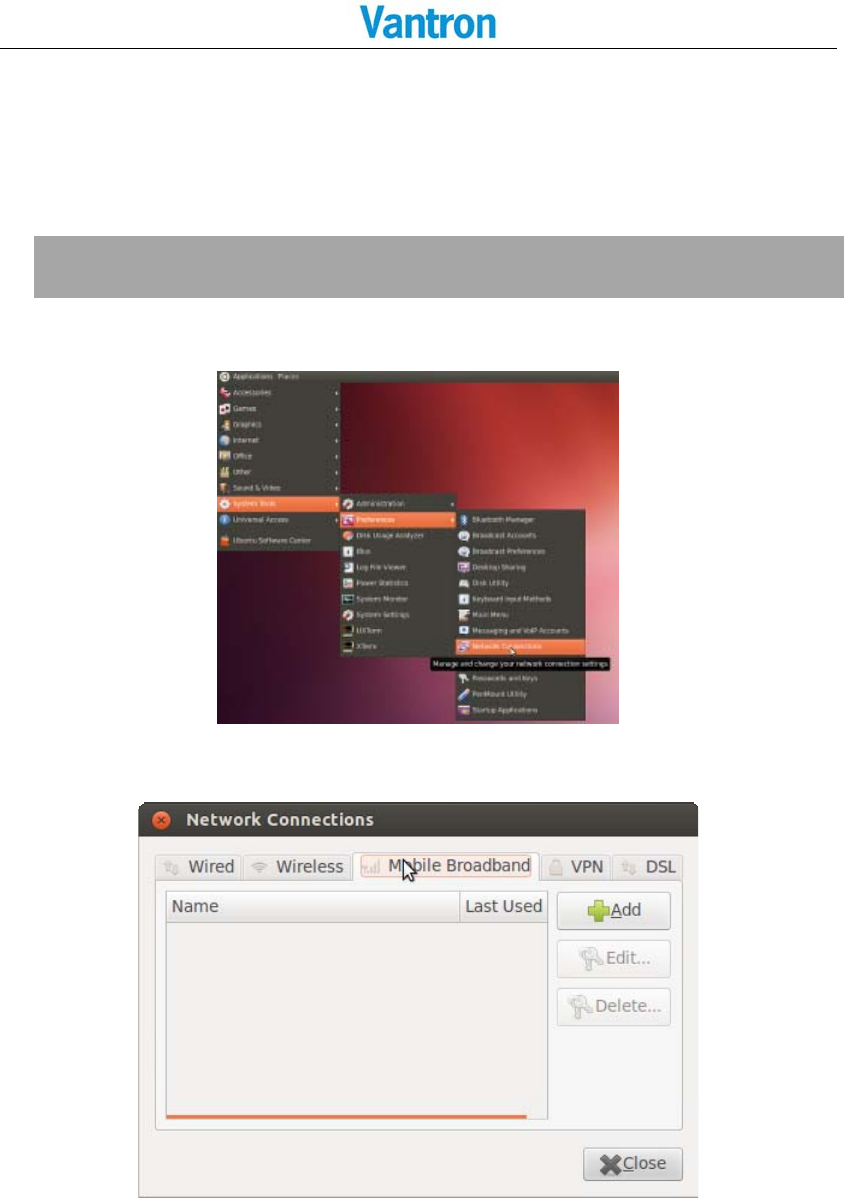
a.Opennetworkconnections.
b.SelectmobileBroadbandandpress“add”buttontoadddevice:
VT-M2M-TC VM
All Rights Reserved
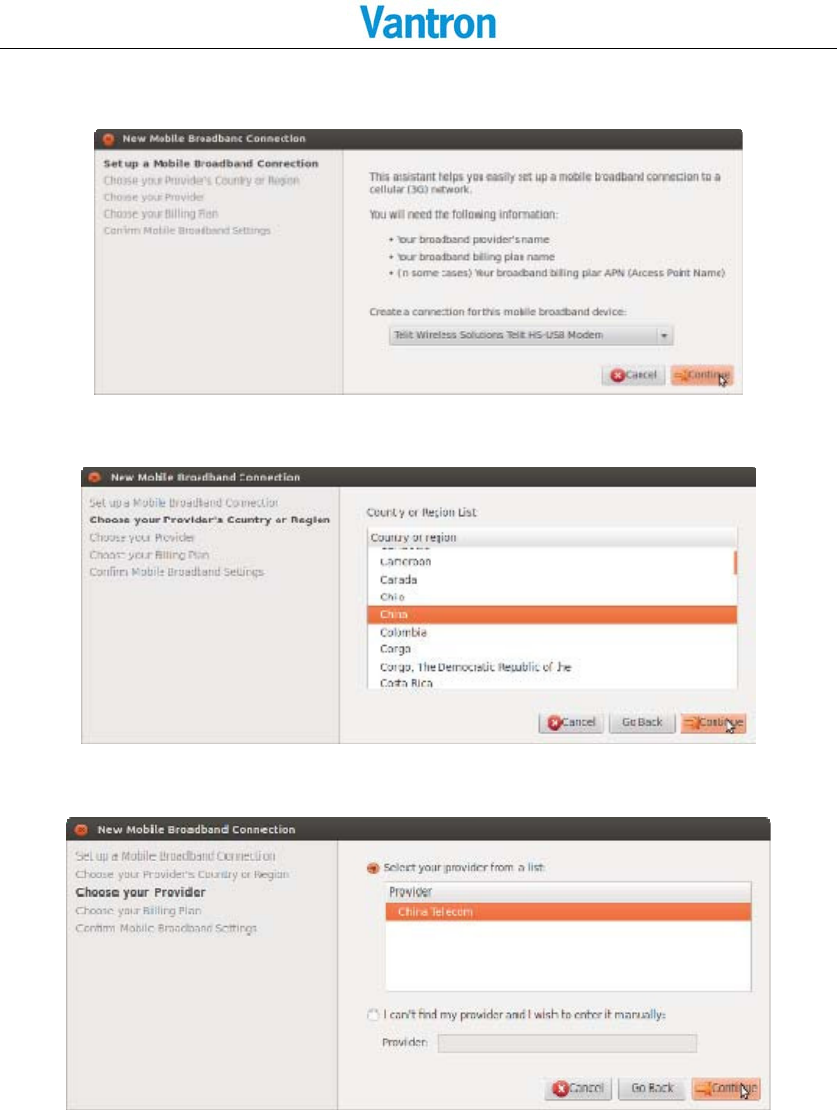
c.Selectthetelitwirelessdevice.
d.Selectcountry,weareinChina,soweselectChina.
e.Selectproviderfromlist:
VT-M2M-TC VM
All Rights Reserved
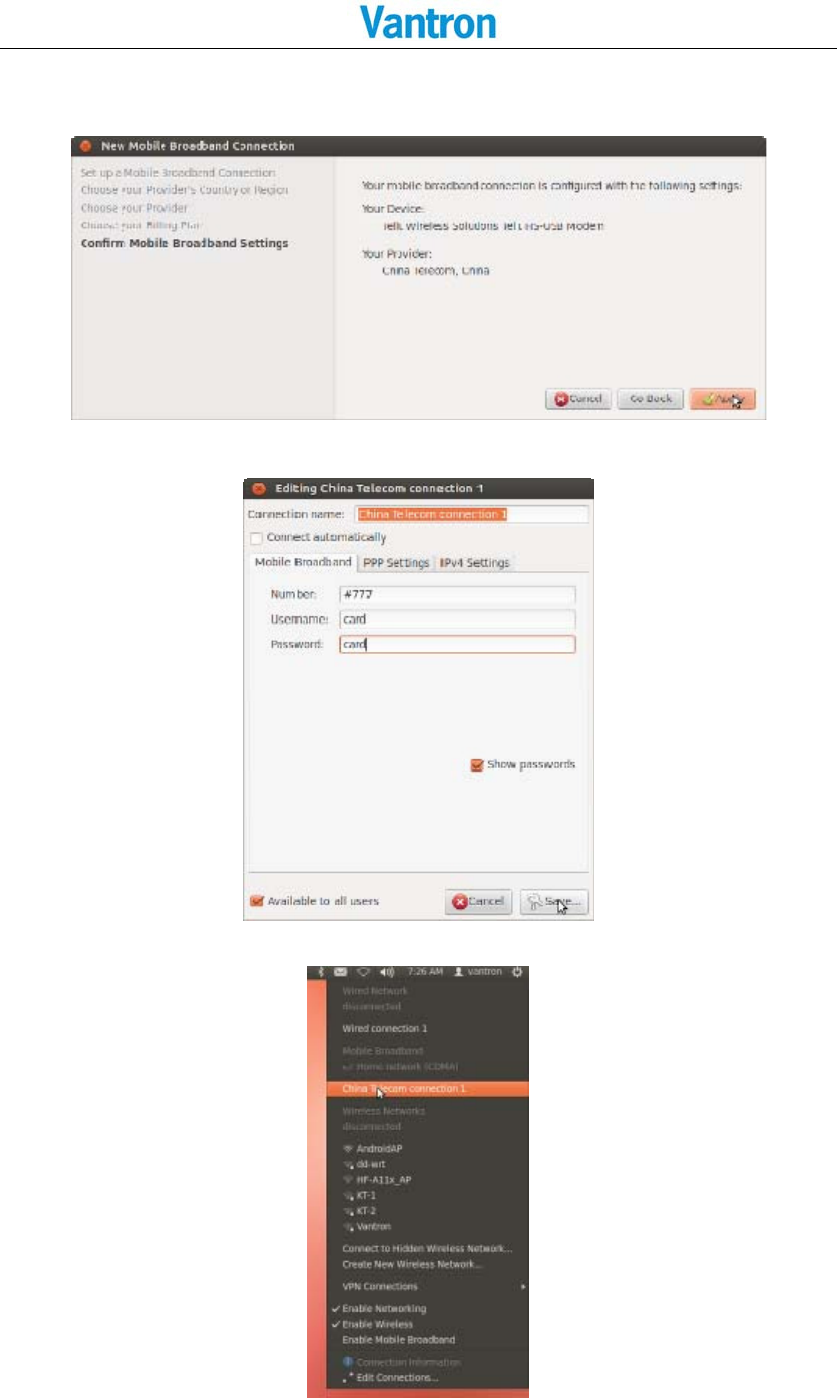
f.Applytheconfig:
g.Setphonenumber,userandpassword:
h.Connecttheinternet:

VT-M2M-TC VM
All Rights Reserved
3.3BluetoothControl
Bluetoothisawirelessprotocolthatallowsyoutoconnectmanydifferenttypesofdevicesto
yourcomputer.Bluetoothiscommonlyusedforheadsetsandinputdeviceslikemiceand
keyboards.YoucanalsouseBluetoothtosendfilesbetweendevices,suchasfromyourcomputer
toyourcellphone.
TurnBluetoothonoroff
EnableordisabletheBluetoothdeviceonyourcomputer.
ConnectyourcomputertoaBluetoothdevice
PairBluetoothdevices.
RemoveaconnectionbetweenBluetoothdevices
RemoveadevicefromthelistofBluetoothdevices.
SendafiletoaBluetoothdevice
SharefilestoBluetoothdevicessuchasyourphone.
WhatisBluetoothvisibility?
Whetherornototherdevicescandiscoveryourcomputer.
Detailedcontentsmakereferencetoafollowing:
https://help.ubuntu.com/lts/ubuntu‐help/bluetooth.html
3.3.1PairBluetoothdev i c e s
a. Lookingatthetoppanelofyourdesktopandifyouseeasmalliconthatresembles
thestandardBluetoothlogoneartheclock(totherightedgeofthetoppanel)as
shownbelow.
b. Makesureyou’veenabledBluetoothonyourdevice.Ifit’samobilephone,then
you’llhavetomanuallyenableitandalsomakesureit’s‘visible’(discovermode)to
otherdevices.
VT-M2M-TC VM
All Rights Reserved
c. ThenlocatethatsmallBluetoothicononthetoppanelandclickonit.Thenfromthe
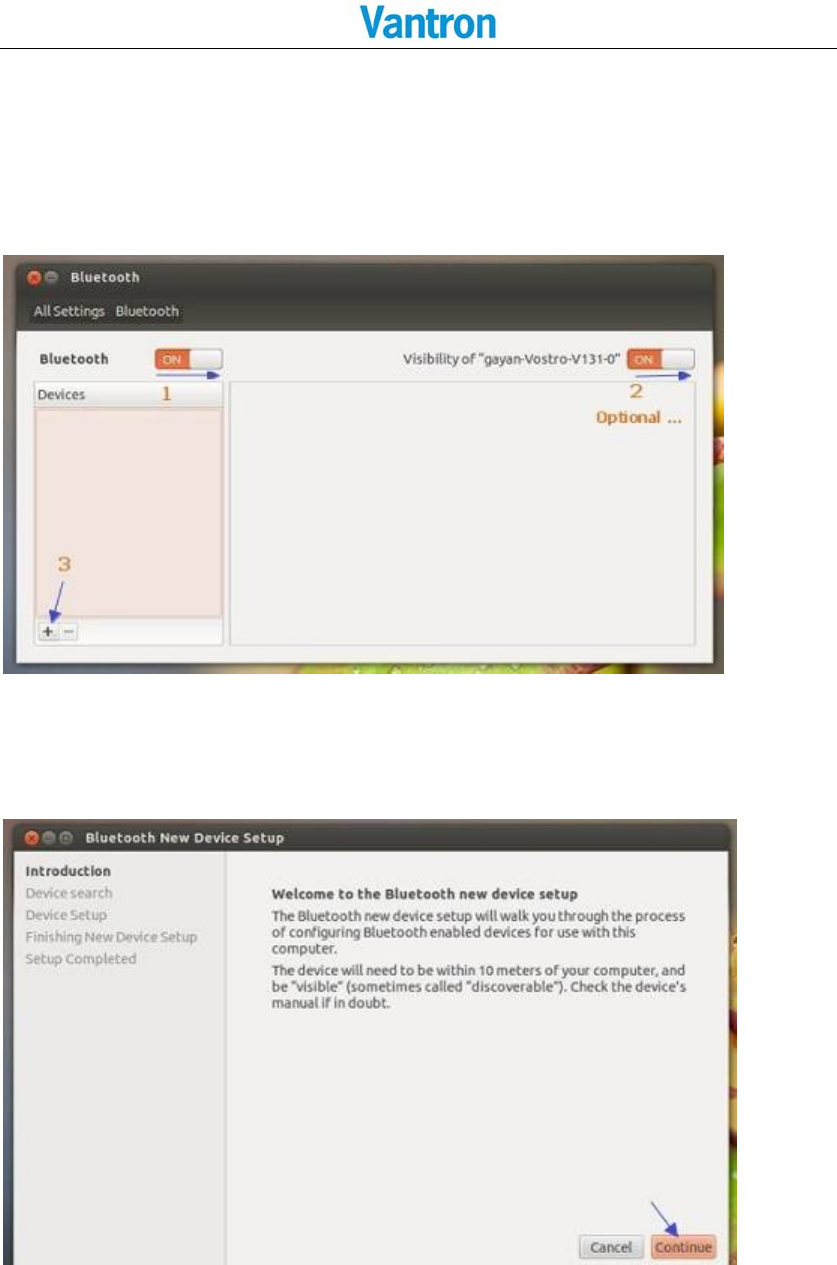
menuthatyouget,clickonthatwhichsays‘BluetoothSettings…’.
d. Thisshouldopenthedefaultconfigurationwindowandyou’llseeabuttonthatlets
youturnon/offBluetoothasshownbelow.Nowsimplyclickanddragittothe
right‐sideuntilitsays‘ON’toturniton.
Thenclickonthe‘+’signatthebottomofthe‘BluetoothSettings’windowtoaddthedevice
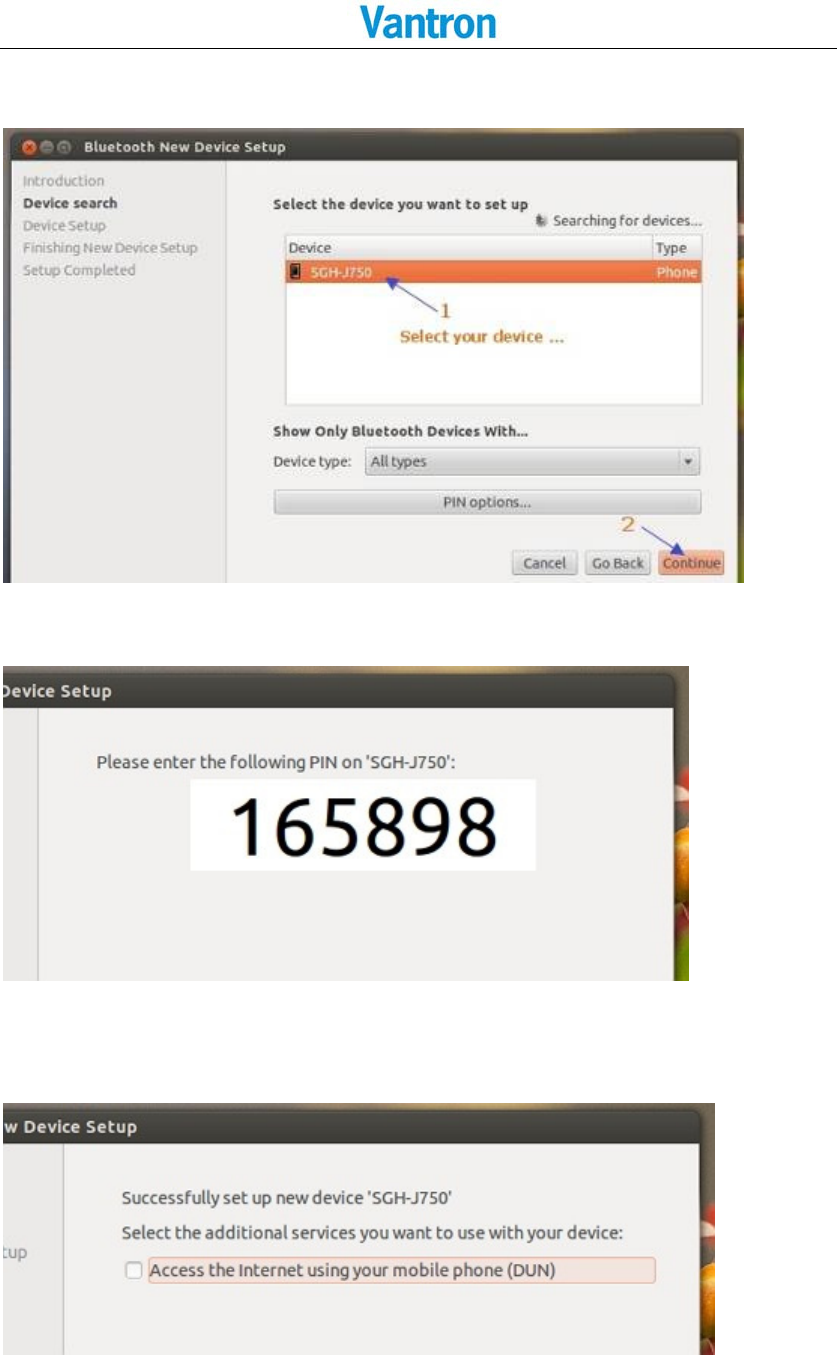
(shownintheabovescreenshot).
e. Click‘Continue’buttonandthenUbuntuwillscanandconnectany‘visible’
Bluetoothdevice.
Asyoucanseeinbelowscreenshots,itdetectedSamsungmobilephoneandifyouhavemore
thanone,thenthey’llbelisted,onebyone.
VT-M2M-TC VM
All Rights Reserved
f. Nowwhenyou’reready,clickonthedevicethatyouwantaconnectiontobe
establishedandclick‘Continue’.
g. ThisPINnumberisonlydisplayedforafewsecondssoyoushouldbetterhurryup.
Ifit’saphone,thenyourphonewillaskforthisPINcodeautomatically.
h. IfyousuccessfullyenteredthePINnumberthenyoushouldseeamessagesaying
thatthesetupwassuccessfulasshownbelow.IfyoufailedenteredthePINnumber,
youcanclosethewindowandrestarttheBluetoothsettingagain.

VT-M2M-TC VM
All Rights Reserved
3.3.2SendFile
YoucanusetheBluetoothdevice,ifyou’veconnectedamobilephonethenyoucanuse
‘BluetoothSettings’window.
ClickontheBluetoothicononthetoppanelforsendingorbrowsingfilesetcasshownbelow.

VT-M2M-TC VM
All Rights Reserved
3.3.3AcceptFile
a. Firstofall,makesuretheBluetoothdevicesare‘visible’,pairtheBluetoothdevices.
b. Openfilesharing.
c. ConfigureBluetooth.
d. SendfilefromothersBluetoothdevice,thefilewillbesavedin
/home/vantron/Download.

VT-M2M-TC VM
All Rights Reserved
4GPSModule
4.1GetGPSData
Open/dev/ttyS2,readGPSdata
$sudo./gps38400/dev/ttyS2
4.2 GPSDataFormat
4.2.1GPGGA
GlobalPositioningSystemFixData
NameExampleData Description
SentenceIdentifier$GPGGAGlobalPositioningSystemFixData
Time17083417:08:34Z
Latitude4124.8963,N41d24.8963'Nor41d24'54"N
Longitude08151.6838,
W
81d51.6838'Wor81d51'41"W
FixQuality:
‐0=Invalid
‐1=GPSfix
‐2=DGPSfix
1DataisfromaGPSfix
NumberofSatellites055Satellitesareinview
HorizontalDilutionofPrecision
(HDOP)
1.5Relativeaccuracyofhorizontalposition
Altitude280.2,M280.2metersabovemeansealevel
HeightofgeoidaboveWGS84
ellipsoid
‐34.0,M‐34.0meters
TimesincelastDGPSupdateblankNolastupdate
DGPSreferencestationidblankNostationid
Checksum*75Usedbyprogramtocheckfortransmission
errors
ex:$GPGGA,hhmmss.ss,llll.ll,a,yyyyy.yy,a,x,xx,x.x,x.x,M,x.x,M,x.x,xxxx
hhmmss.ss=UTCofposition
llll.ll=latitudeofposition

VT-M2M-TC VM
All Rights Reserved
a=NorS
yyyyy.yy=Longitudeofposition
a=EorW
x=GPSQualityindicator(0=nofix,1=GPSfix,2=Dif.GPSfix)
xx=numberofsatellitesinuse
x.x=horizontaldilutionofprecision
x.x=Antennaaltitudeabovemean‐sea‐level
M=unitsofantennaaltitude,meters
x.x=Geoidalseparation
M=unitsofgeoidalseparation,meters
x.x=AgeofDifferentialGPSdata(seconds)
xxxx=DifferentialreferencestationID
4.2.2GPGSA
GPSDOPandactivesatellites
ex1:$GPGSA,A,3,,,,,,16,18,,22,24,,,3.6,2.1,2.2*3C
ex2:$GPGSA,A,3,19,28,14,18,27,22,31,39,,,,,1.7,1.0,1.3*35
ex3:$GPGSA,<1>,<2>,<3>,<4>,,,,,<11>,<12>,<13>,<14>,<15>,<16>,<17>*<18>
1=Mode:
M=Manual,forcedtooperatein2Dor3D
A=Automatic,3D/2D
2=Mode:
1=Fixnotavailable
2=2D
3=3D
3‐14=IDsofSVsusedinpositionfix(nullforunusedfields)
15=PDOP
16=HDOP
17=VDOP
18=cheaksum
4.2.3GPGSV
GPSSatellitesinview
ex:$GPGSV,3,1,11,03,03,111,00,04,15,270,00,06,01,010,00,13,06,292,00*74
$GPGSV,3,2,11,14,25,170,00,16,57,208,39,18,67,296,40,19,40,246,00*74
$GPGSV,3,3,11,22,42,067,42,24,14,311,43,27,05,244,00,,,,*4D
$GPGSV,1,1,13,02,02,213,,03,‐3,000,,11,00,121,,14,13,172,05*67
1=Totalnumberofmessagesofthistypeinthiscycle

VT-M2M-TC VM
All Rights Reserved
2=Messagenumber
3=TotalnumberofSVsinview
4=SVPRNnumber
5=Elevationindegrees,90maximum
6=Azimuth,degreesfromtruenorth,000to359
7=SNR,00‐99dB(nullwhennottracking)
8‐11=InformationaboutsecondSV,sameasfield4‐7
12‐15=InformationaboutthirdSV,sameasfield4‐7
16‐19=InformationaboutfourthSV,sameasfield4‐7
4.2.4GPRMC
RecommendedminimumspecificGPS/Transitdata
ex1:$GPRMC,081836,A,3751.65,S,14507.36,E,000.0,360.0,130998,011.3,E*62
ex2:$GPRMC,225446,A,4916.45,N,12311.12,W,000.5,054.7,191194,020.3,E*68
225446Timeoffix22:54:46UTC
ANavigationreceiverwarningA=OK,V=warning
4916.45,NLatitude49deg.16.45minNorth
12311.12,WLongitude123deg.11.12minWest
000.5Speedoverground,Knots
054.7CourseMadeGood,True
191194Dateoffix19November1994
020.3,EMagneticvariation20.3degEast
*68mandatorychecksum
ex3:$GPRMC,220516,A,5133.82,N,00042.24,W,173.8,231.8,130694,004.2,W*70
123456789101112
1220516TimeStamp
2Avalidity‐A‐ok,V‐invalid
35133.82currentLatitude
4NNorth/South
500042.24currentLongitude
6WEast/West
7173.8Speedinknots
8231.8Truecourse
9130694DateStamp
10004.2Variation
11WEast/West
12*70checksum
ex4:$GPRMC,hhmmss.ss,A,llll.ll,a,yyyyy.yy,a,x.x,x.x,ddmmyy,x.x,a*hh

VT-M2M-TC VM
All Rights Reserved
1=UTCofpositionfix
2=Datastatus(V=navigationreceiverwarning)
3=Latitudeoffix
4=NorS
5=Longitudeoffix
6=EorW
7=Speedovergroundinknots
8=TrackmadegoodindegreesTrue
9=UTdate
10=Magneticvariationdegrees(Easterlyvar.subtractsfromtruecourse)
11=EorW
12=Checksum
4.2.5GPVTG
TrackMadeGoodandGroundSpeed.
ex1:$GPVTG,360.0,T,348.7,M,000.0,N,000.0,K*43
ex2:$GPVTG,054.7,T,034.4,M,005.5,N,010.2,K
054.7,TTruetrackmadegood
034.4,MMagnetictrackmadegood
005.5,NGroundspeed,knots
010.2,KGroundspeed,Kilometersperhour
ex3:$GPVTG,t,T,,,s.ss,N,s.ss,K*hh
1=Trackmadegood
2=Fixedtext'T'indicatesthattrackmadegoodisrelativetotruenorth
3=notused
4=notused
5=Speedovergroundinknots
6=Fixedtext'N'indicatesthatspeedovergroundininknots
7=Speedovergroundinkilometers/hour
8=Fixedtext'K'indicatesthatspeedovergroundisinkilometers/hour
9=Checksum
Theactualtrackmadegoodandspeedrelativetotheground.
$GPVTG,x.x,T,x.x,M,x.x,N,x.x,K
x.x,T=Track,degreesTrue
x.x,M=Track,degreesMagnetic
x.x,N=Speed,knots
x.x,K=Speed,Km/hr
VT-M2M-TC VM
All Rights Reserved
5UpdateSystem
5.1MakeUSBbootStickandCopyImagetoUSBstick
CreatePCcondition:
CreateabootableUSBstickonWindowsXP/Win7,thefirstthingyouneedtodoisinsertaUSB
stickwithatleast2GBoffreespaceintoyourPC.
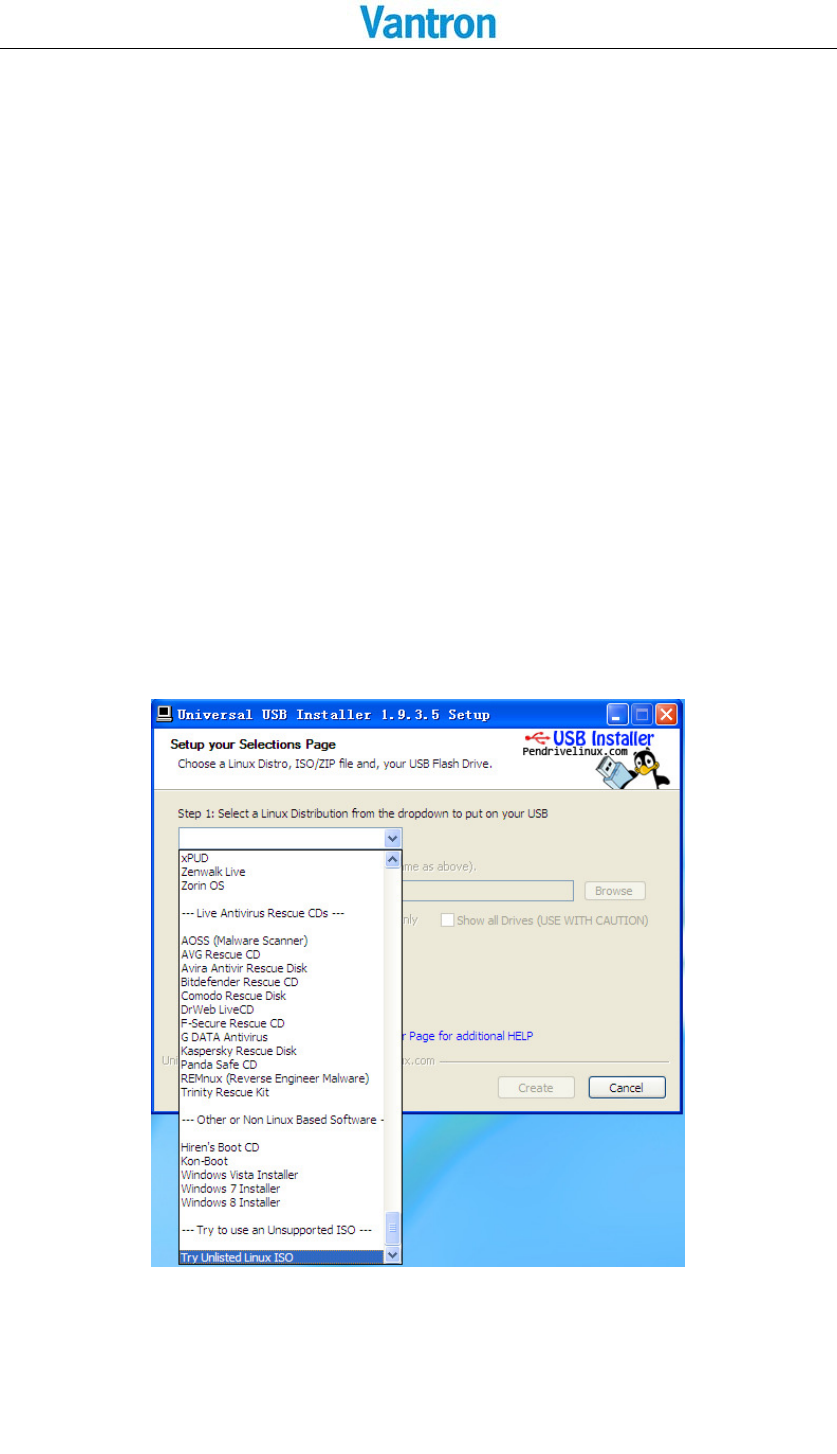
HereuseanUSBinstallertooltowritetheimageISOtoUSBstick.Pleasecopythefile
SW/tools/Universal‐USB‐Installer‐1.9.3.5.exetoyourPCanywhere.
USBstickmakingstepsindetailasfollows:
a. CopySW/image/xxx.isoimageintoyourPC.
b. Selectthe“TryUnlistedLinuxISO”from the dropdown list.
c. Click 'Browse' and select the image ISO file.

VT-M2M-TC VM
All Rights Reserved
d. Choose the USB drive and click 'Create'.
VT-M2M-TC VM
All Rights Reserved
5.2 Updatesteps
a. WhenthebootableUSBstickcreateover,inserttheUSBstickintoVT‐M2M‐TC.Andconnect
aUSBkeyboardontheM2M‐TC.
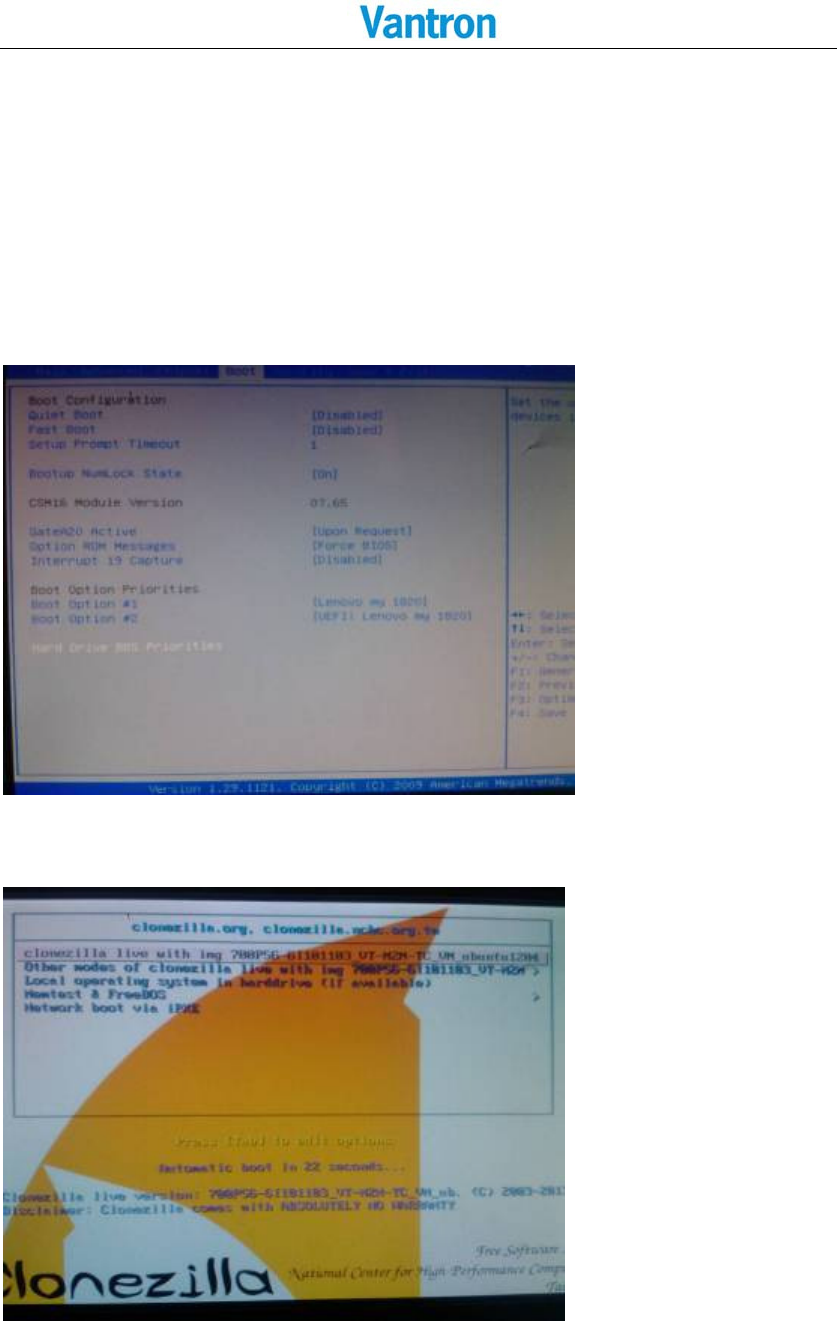
b. PowerONtheVT‐M2M‐TC,andstepintoBIOSbypressthe“Delete”keyonthekeyboard.
IntheBIOS,setthefirstbootoptionforbootupbyUSBstick.TheuserguidanceoftheBIOSisin
thepackageofHW/700N16‐6Bxxxxxx_VT‐M2M‐TC_VM_xxx.zip.
c. Selectthefirstoption“clonezillalivewithimg700Pxxxxxx”.
VT-M2M-TC VM
All Rights Reserved
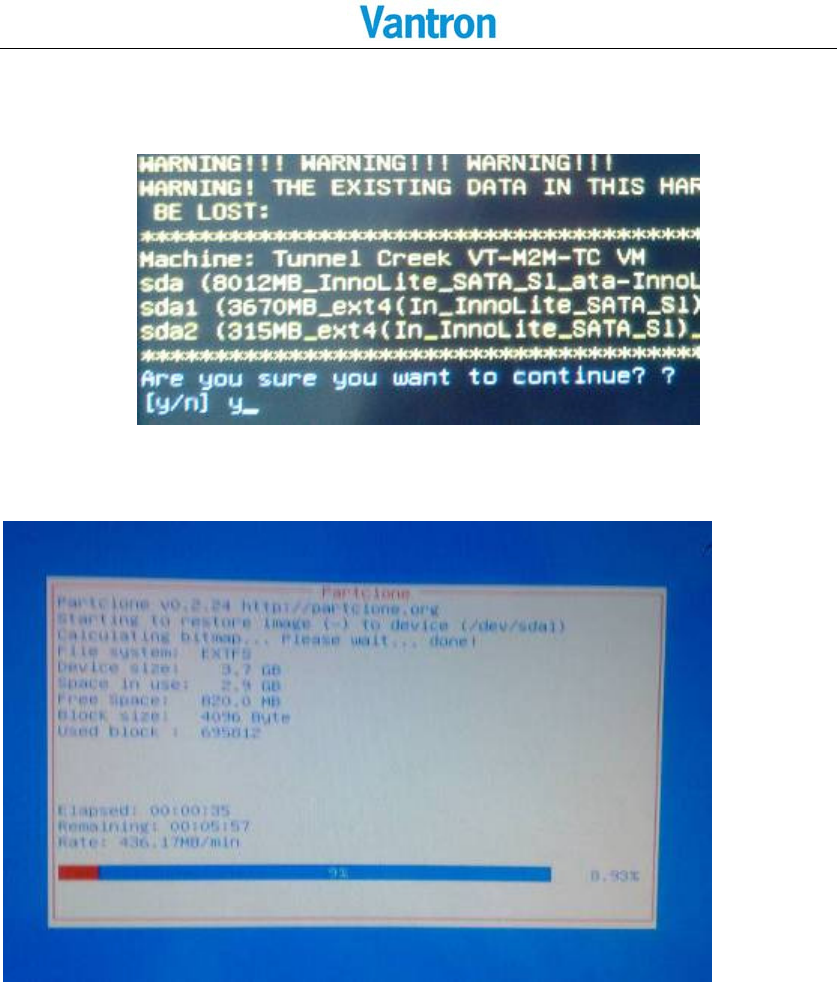
d. Whenask“Areyousurewanttocontinue??”or“Letmeaskyouagain,Areyousureyou
wanttocontinue??”,pleaseinput‘y’all.
e. Thesystemisupdating.
f. Whenupdateover,thesystemwillpoweroff.
Re‐powerVT‐M2M‐TC,andstepintotheBIOS,andrestorethefirstbootoptionto
harddisk.

VT-M2M-TC VM
All Rights Reserved
US Office: Vantron Technology, Inc.
Address: 1292 Kifer Road #807,
Sunnyvale, CA 94086
Tel: 510-304-7666
Email: sales@vantrontech.com
China Office: Chengdu Vantron Technology, Ltd.
Address: 3rd floor, 3rd building, No.9, 3rd WuKe East Street, WuHou District,
Chengdu, P.R. China 610045
Tel: 86-28-8512-3930/3931, 8515-7572/6320
Email: sales@vantrontech.com.cn