Chi Mei Communication Systems 0302AMD01 PCS Wireless Phone User Manual Amadeus
Chi Mei Communication Systems, Inc. PCS Wireless Phone Amadeus
Contents
- 1. users manual part1
- 2. users manual part2
- 3. users manual part3
users manual part2
23
Basic Operations
Erasing text
If you have entered a wrong character or number, press Clear to erase. Press-
ing and holding Clear will clear a whole line.
Press Left or Right to move the cursor backward/forward.
Using key lock
The key lock helps to prevent unwanted key operations when you carry your
phone.
To enable key lock:
In standby mode, press the left soft key, then key.
To unlock:
(Space)

Basic Operations
24
Press Unlock, and then press key.

25
Phone Book

Phone Book
26
Adding a Phone Book entry
You can add a new entry to Phone Book in the following ways:
Method 1
1. Enter Phone Book by pressing the right soft key in standby mode.
2. Scroll to Add and press Select.
3. You will be prompted to enter the name of the entry. Enter the name and
press OK.
4. Enter the phone number and press OK.
Method 2
1. In standby mode, enter the number using the alphanumeric keys.
2. Press Save. You will be prompted to enter the name of the entry. Enter the
name and press OK.
Method 3
1. During a call, enter the number using the alphanumeric keys.
2. Press Save. You will be prompted to enter the name of the entry. Enter the
name and press OK.
Searching for a Phone Book entry
To search for a Phone Book entry:
1. Enter Phone Book by pressing the right soft key in standby mode.
2. Press Select.
3. Enter the name of the Phone Book entry you want to look for. You can also
enter only the beginning few letters of the name.
4. The entries that match the name (or contain the letters) you entered will
appear on the screen.
Editing a Phone Book entry
Editing name
1. Scroll to a Phone Book entry.
2. Press Detail.
3. Scroll to the name and press Options.
4. Press Select.

27
Phone Book
5. Edit the name and when finished, press OK.
Editing number
1. Scroll to a Phone Book entry.
2. Press Detail.
3. Scroll to the number and press Options.
4. Scroll to Edit in the menu that appears and press Select.
5. Edit the number and when finished, press OK.
Adding new phone number to existing entries
You can record up to 4 different phone numbers under a Phone Book entry
that is stored in the phone memory.
1. Scroll to a Phone Book entry.
2. Press Detail.
3. Scroll to the name (or number) and press Options.
4. Scroll to Add Number and press Select.
5. Enter the new number and when finished, press OK.
6. You will be prompted to select a type for the new number. Scroll to an
appropriate type and press Select.
Changing caller group
The Caller group function allows you to separate your Phone Book entries in
different groups. For details about the Caller group function, please refer to
"Setting up Caller Group"on page 31.
1. Scroll to a Phone Book entry.
2. Press Detail.
3. Scroll to the name (or number) and press Options.
4. Scroll to Change Group and press Select.
5. Scroll to a desired caller group and press Select.
Sending a entry as business card
With this function, you can send the details of a Phone Book entry to another
person as a business card.
1. Scroll to a Phone Book entry.
2. Press Detail.
3. Scroll to the name (or number) and press Options.
4. Scroll to Send business card and press Select.

Phone Book
28
5. If you want to send the business card as a new message immediately, scroll
to Send as SMS and press Select. Enter the number of the recipient (or pick
up a recipient from Phone Book by pressing Names) and press Send.
If you want to edit the business card before sending it, scroll to Send as text
and press Select.
Assigning default phone number
If you have multiple phone numbers in a Phone Book entry, you can assign
one of these numbers as default number. This default number is dialed when
you make a call from the Phone Book or using the Speed Dial function.
1. Scroll to a Phone Book entry.
2. Press Detail.
3. Scroll to the number you want to set as default and press Options.
4. Scroll to Set as default and press Select.
Changing the type of number
1. Scroll to a Phone Book entry.
2. Press Detail.
3. Scroll to the number and press Options.
4. Scroll to Change Type and press Select.
5. Scroll to a desired type for the number and press OK.
Sending messages from Phone Book
To send a new message from Phone Book:
1. Scroll to a Phone Book entry.
2. Press Detail.
3. Scroll to the number and press Options.
4. Scroll to Send message and press Select.
5. Compose the message. When finished, press Options and then Send to send
the message.
Erasing Phone Book entry
Method 1
1. Enter Phone Book by pressing the right soft key in standby mode.
2. Scroll to Erase and press Select.
To erase Phone Book entries one by one:

29
Phone Book
1. Scroll to One by one and press Select.
2. Scroll to select the Phone Book entry you want to erase and press OK.
3. Press OK.
To erase all Phone Book entries:
1. Scroll to All.
2. To delete all Phone Book entries stored in phone memory, scroll to Phone.
To delete entries on the SIM card, scroll to SIM.
3. Press Select.
Method 2
1. In Phone Book, scroll to the entry you want to erase and press Detail.
2. Scroll to the name (or number) and press Options.
3. Scroll to Erase and press Select.
Copying Phone Book entry
Method 1
With the copy function, you can copy (or moving) Phone Book entries in the
phone memory to SIM card memory and vise versa. Please note that if you
copy a Phone Book entry with multiple numbers from phone memory to SIM
card, only the first (default) number will remain.
1. Enter Phone Book by pressing the right soft key in standby mode.
2. Scroll to Copy and press Select.
To copy Phone Book entries from phone to SIM card:
• Press Select. You can choose to copy Phone Book entries one by one or all
at once.
• Select Keep original (copy the Phone Book entry to a new location) or
Move original (move the Phone Book entry to a new location).
To copy Phone Book entries from SIM card to phone:
• Scroll to SIM to Phone and press Select. You can choose to copy Phone
Book entries one by one or all at once.
• Select Keep original (copy the Phone Book entry to a new location) or
Move original (move the Phone Book entry to a new location).
Method 2
1. In Phone Book, scroll to the entry you want to copy and press Detail.
2. Scroll to the name (or number) and press Options.

Phone Book
30
3. Scroll to Copy and press Select.
4. If you want to keep the original and make a copy to another location (i.e, if
your Phone Book is using SIM card memory, it will be copied to the phone
memory and vise versa), scroll to Keep original. To move the entry to
another location, scroll to Move original.
5. Press Select.
Setting up Speed Dial
Speed Dial is a shortcut that allows you to make a call simply by long pressing
alphanumeric keys ~ .
To set up speed dial:
Method 1
1. Enter Phone Book by pressing the right soft key in standby mode.
2. Scroll to Speed Dial and press Select.
3. Choose an empty speed dial key and press Select.
4. Your Phone Book entries will appear on the screen. Pick up a number by
pressing Select.
Method 2
1. Long press a key that has not been assigned a speed dial number.
2. The screen will prompt you to assign the speed dial key. Press OK.
3. Press Select.
4. Your Phone Book entries will appear on the screen. Pick up a number by
pressing Select.
Viewing speed dial number
1. Enter Phone Book by pressing the right soft key in standby mode.
2. Scroll to Speed Dial and press Select.
3. On the speed dial list that appears, scroll to choose a number to view.
4. Press Options and select View.
Changing speed dial number
1. Enter Phone Book by pressing the right soft key in standby mode.
2. Scroll to Speed Dial and press Select.
3. On the speed dial list that appears, scroll to choose a number to change.

31
Phone Book
4. Press Options and select Change.
5. Your Phone Book numbers will appear on the screen. Pick up a new num-
ber by pressing Select.
Erasing speed dial number
1. Enter Phone Book by pressing the right soft key in standby mode.
2. Scroll to Speed Dial and press Select.
3. On the speed dial list that appears, scroll to choose a number to erase.
4. Press Options and select Erase.
Setting up Caller Group
You can place your Phone Book entries under different Caller Groups and
give each Caller Group different ringtone, backlight and screen graphic. When
you have an incoming call, you can judge the caller by its specific Caller
Group.
Changing caller group settings
Changing caller group name
1. Enter Phone Book by pressing the right soft key in standby mode.
2. Scroll to Caller Group and press Select.
3. The Caller Group list will appear on the screen. Scroll to a caller group and
press Select.
4. Press Select.
5. Enter a new name of the Caller Group.
6. Press OK.
Changing caller group ringtone
1. Enter Phone Book by pressing the right soft key in standby mode.
2. Scroll to Caller Group and press Select.
3. The Caller Group list will appear on the screen. Scroll to a caller group and
press Select.
4. Scroll to Ring Tone and press Select.
5. Scroll to a desired ring tone and press OK.
Changing caller group graphic
1. Enter Phone Book by pressing the right soft key in standby mode.

Phone Book
32
2. Scroll to Caller Group and press Select.
3. The Caller Group list will appear on the screen. Scroll to a caller group and
press Select.
4. Scroll to Graphic and press Select.
5. Press On (display graphic) or Off (do not display graphic).
6. If On is selected, scroll to View to view available graphics. Scroll to a
desired graphic and press OK.
Miscellaneous settings
Personal number
If your SIM card supports, your phone number will be recognized and dis-
played here. Otherwise, you need to specify your phone number manu-
ally.You can specify up to 2 numbers.
Adding a personal number
1. Enter Phone Book by pressing the right soft key in standby mode.
2. Scroll to Personal Number and press Select.
3. Press Options and press Select.
4. Enter your name and phone number.
5 Press OK.
Editing personal number
1. Enter Phone Book by pressing the right soft key in standby mode.
2. Scroll to Personal Number and press Select.
3. Scroll to the number you want to edit and press Options.
4. Scroll to Edit and press Select.
5. Edit the name and number. When finished, press OK.
Erasing personal number
1. Enter Phone Book by pressing the right soft key in standby mode.
2. Scroll to Personal Number and press Select.
3. Scroll to the number you want to erase and press Options.
4. Scroll to Erase and press Select.
5. Press OK.
Your own business card

33
Phone Book
With the business card function, you can edit your personal information and
send it to other person via a short message.
Creating your own business card
1. Enter Phone Book by pressing the right soft key in standby mode.
2. Scroll to My Own Card and press Select.
3. Scroll to Edit and press Select.
4. Enter your personal information. When finished, press Save.
Viewing your business card
1. Enter Phone Book by pressing the right soft key in standby mode.
2. Scroll to My Own Card and press Select.
3. Press Select.
Sending your business card
1. Enter Phone Book by pressing the right soft key in standby mode.
2. Scroll to My Own Card and press Select.
3. Scroll to Send My Own Card and press Select.
4. If you want to send the business card as a new message immediately, scroll
to Send as SMS and press Select. Enter the number of the recipient (or pick
up a recipient from Phone Book by pressing Names) and press Send.
If you want to edit the business card before sending it, scroll to Send as text
and press Select.
Before sending a business card, you can specify the contents of the informa-
tion.
1. Scroll to Info. setting and press Select.
2. Scroll to an item and press Off or On. Only checked items will be included
in the business card.
Editing your business card
1. Enter Phone Book by pressing the right soft key in standby mode.
2. Scroll to My Own Card and press Select.
3. Scroll to Edit and press Select.
4. Edit the contents of your business card. When finished, press Save.
Erasing your business card
1. Enter Phone Book by pressing the right soft key in standby mode.
2. Scroll to My Own Card and press Select.

Phone Book
34
3. Scroll to Erase and press Select.
4. Press OK.
Fixed dial number
If your SIM card supports, you can use this function to restrict outgoing calls
only to the numbers (or the numbers that begin with the same digit(s)) on the
fixed dial list.
Activating Fixed dial
1. Enter Phone Book by pressing the right soft key in standby mode.
2. Scroll to Fixed dial number and press Select.
3. Press On.
4. Enter your PIN 2 code and press OK.
Adding new Fixed dial number
1. Enter Phone Book by pressing the right soft key in standby mode.
2. Scroll to Fixed dial number and press Select.
3. Scroll to Number list and press Select.
4. Press Select.
6. Enter your PIN 2 code and press OK.
7. Enter the name of the fixed dial number and press OK.
8. Enter the number and press OK.
Viewing Fixed dial number
1. Enter Phone Book by pressing the right soft key in standby mode.
2. Scroll to Fixed dial number and press Select.
3. Scroll to Number list and press Select.
Editing Fixed dial number
1. Enter Phone Book by pressing the right soft key in standby mode.
2. Scroll to Fixed dial number and press Select.
3. Scroll to Number list and press Select.
4. Scroll to a Fixed dial number and press Options.
5. Scroll to Edit and press Select.
6. Enter your PIN2 code and press OK.
7. Edit the name and number. When finished, press OK.
Erasing Fix dial number

35
Phone Book
1. Enter Phone Book by pressing the right soft key in standby mode.
2. Scroll to Fixed dial number and press Select.
3. Scroll to Number list and press Select.
4. Scroll to a Fixed dial number and press Options.
5. Scroll to Erase if you want to erase selected Fixed dial number. If you want
to erase all fixed dial numbers, scroll to Erase all. Press Select.
6. Enter your PIN2 code and press OK.
7. Press OK to confirm.
Phone Book memory setting
Selecting Phone Book memory
You can select the memory to use for your Phone Book.
1. Enter Phone Book by pressing the right soft key in standby mode.
2. Scroll to Option and press Select.
3. Press Select.
4. Scroll to SIM and press Select if you want to use SIM memory, or scroll to
Phone and press Select if you want to use phone memory.
5. Press OK.
Checking Phone Book memory status
1. Enter Phone Book by pressing the right soft key in standby mode.
2. Scroll to Option and press Select.
3. Scroll to Memory status and press Select.
Dialing lo ???

36
The Main Menu
The Main Menu
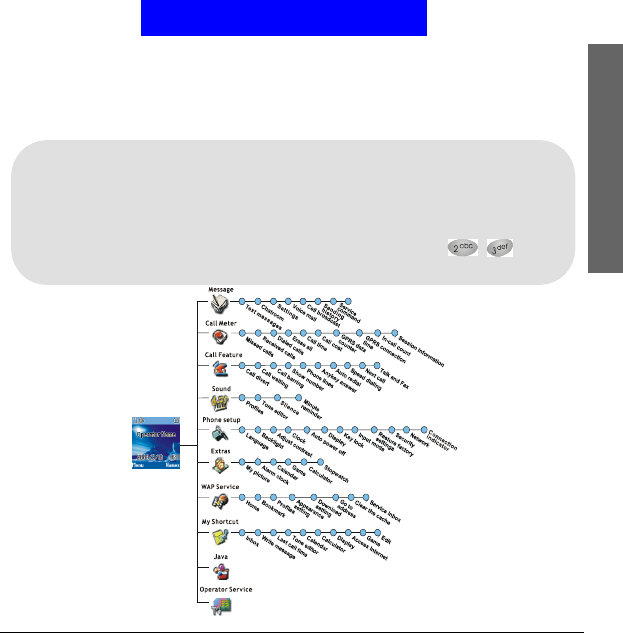
Overview
37
Overview
The main menu of your phone is accessed by pressing the left soft key in
standby mode.
Press Up or Down to scroll the menu.
Press Right or Select to view the contents of the menu or select an option.
Press Left or Exit to return to previous menu or abort selection.
You can also navigate using the quick access keys:
1. In standby mode, press the left soft key.
2. Press the quick access keys. For example, to go to Dialed Calls, press .
See Appendix for the quick access keys.
To navigate in the Main Menu

The Main Menu
Message
38
Message
The options in the Message menu allow you to write, send and receive mes-
sages and setup message settings.
Writing and sending new messages
You can write and send text messages. Your phone supports EMS (Enhanced
Messaging Service) standard which allows you to insert picture, sound, anima-
tion and melodies..., etc. in a message.
To write a new message:
1. In standby mode, press the let soft key, Select.
2. Press Select two times.
3. Enter the contents of the message. When writing, you can press Options to
access the options below:
• Send: Send the message immediately. If this option is selected, you will be
prompted to enter the number of the recipients. You can also pick up recip-
ients from your Phone Book by pressing Names.
The message can be sent to one recipient and copy to up to 9 recipients.
• Save: Save the message as a draft in Outbox.
• Insert template: Insert preset messages template. You can also customize
your own templates. Please refer to "Customizing preset message tem-
plates"on page 42 for how to customize message templates.
• Insert personal data: Insert a name or phone number from your Phone
Book. You can also insert your own business card into the message.
• Insert picture: Insert a picture into the message. You can also draw your
own picture. For details, refer to "Alarm clock"on page 75.
• Insert animation: Insert an animation into the message.
• Insert sound: Insert sound effect into the message.
Before you can use Message functions, make sure that related message settings are configured
properly. (Depending on your operator, the settings may have already been programmed on
the SIM card). Refer to "Text message settings"on page 43 for details.
Note
The recipient’s phone must also support EMS functionality to receive and view your EMS mes-
sages.
Note
The Main Menu
Message
39
• Insert melody: Insert a ring tone melody into the message.
• Insert calendar note: Insert a calendar note into the message.
4. If the message is sent, copy will be stored in your Outbox.
You can also send a message from message templates. Please refer to "Sending
a message from templates"on page 42 for details.
Viewing sent messages
The draft and sent messages are automatically stored in the Outbox. To open
the Outbox and check these messages:
1. In standby mode, press the left soft key, Select.
2. Press Select.
3. Scroll to Outbox and press Select. A list of draft and sent messages will
appear on the screen. The icon that appears in front of a message indicates
the status of the message.
4. Scroll to a message and press Select. The message will be opened.
5. Press Options and you can also choose to perform the following operations
to selected message.
• Erase: Erase current message.
• Send: Send this message to other recipients.
• Edit: Edit current message. You can send the message after you finish edit-
ing.
• Use number: Capture the numbers in the message. The numbers captured
will appear on the screen. Scroll to a number and press Select. You can call
the number directly or save it in Phone Book.
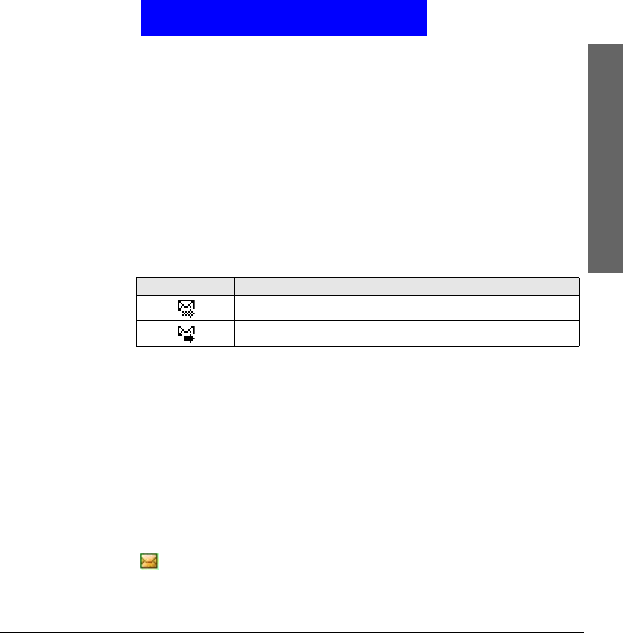
Viewing received messages
When a new message is received, the new message prompt and the icon
will appear on the screen.
Press Detail. The list of received messages will appear on the screen.
Icon Status of message
Unsent message
Sent message
The Main Menu
Message
40
Viewing received messages in the Inbox
The messages you received are stored in the Inbox.
To open Inbox and view received messages:
1. In standby mode, press the left soft key, Select.
2. Press Select.
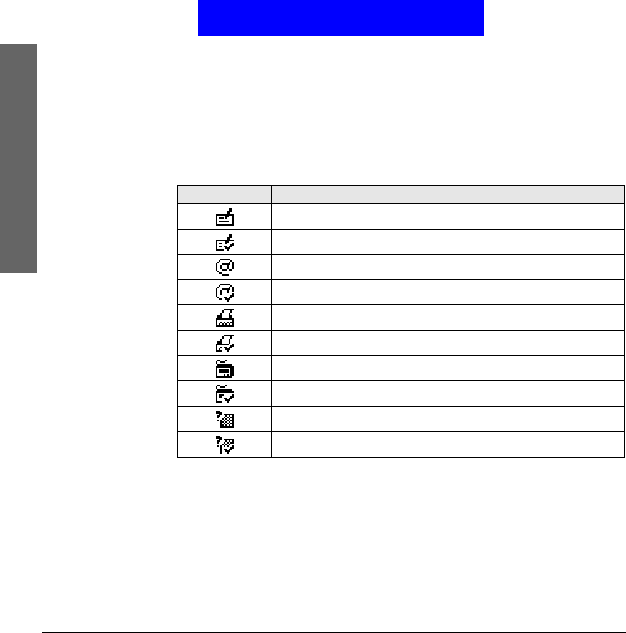
3. Scroll to Inbox and press Select. A list of received messages will appear on
the screen. The icon that appears in front of a message indicates the status
and type of it.
4. Scroll to a message you want to read and press Select. The contents of the
message will be opened to the screen.
5. You can press Options to perform the following operations:
• Erase: Erase current message.
• Reply: Reply to current message.
• Forward: Send this message to other recipients.
• Edit: Edit current message. You can send the message after you finish edit-
ing.
• Use number: Capture the numbers in the message. The numbers captured
will appear on the screen. Scroll to a number and press Select. You can call
the number directly or save it in Phone Book.
Icon Status of message
Unread message
Read message
Unread e-mail message
Read e-mail message
Unread Fax message
Read Fax message
Unread paging message
Read paging message
Unread message in any other format
Read message in any other format

The Main Menu
Message
41
• Callback: Make a call to the sender of current message.
• Open Chatroom: Open a new chatroom session with the sender of current
message. You can also add other members to the chatroom.
Chatroom
The Chatroom function allows you to chat on-line with multiple members via
text messages. In a chat session, you can invite up to 4 members to your chat-
room and talk to each other simultaneously.
If someone else invites you to join his/her chatroom, you will be notified by a
chat message. Press OK to join the chat.
Opening a new chat session
1. In standby mode, press the left soft key, Select.
2. Scroll to Chatroom and press Select.
3. Enter the number of chat member, or pick a member from your Phone
Book by pressing Names. Repeat this step if you want to invite multiple
members to your chatroom.
4. Press OK.
5. Enter your nickname and press OK.
In a chat session, the chat members’ message will appear on the screen follow-
ing their nicknames. You can enter your message and send it by pressing
Options, Select. Your message will appear on the screen following the symbol
">" and your nickname.
Options during a chat session
Press Options during a chat session. Scroll to an option and press Select to
select it.
• Send: Send the message you entered.
• Insert template: Insert message templates into your chat message. You can
also customize your own message templates. See "Customizing message
template"on page 42 for details.
• Insert Smiley: Insert smiley symbols into your chat message.
• Nickname: change your nickname during a chat session. Enter your new
nickname and press OK.
• Chat numbers: Invite new members to your chatroom. Enter the number of
chat member, or pick a member from your Phone Book by pressing Names.
• View History: View the history of current chat session.

The Main Menu
Message
42
Customizing preset message templates
Templates are frequently used phrases preset in phone memory. When writing
a message, you can insert them into your message directly. You can also cus-
tomize your own templates.
Customizing message template
1. In standby mode, press the left soft key, Select.
2. Press Select.
3. Scroll to Template and press Select.
4. Scroll to an empty template and press Select.
5. Scroll to Edit template and press Select.
6. Write the contents of the template. When done, press Save.
Erasing customized message template
1. In standby mode, press the left soft key, Select.
2. Press Select.
3. Scroll to Template and press Select.
4. Scroll to a customized template and press Select.
5. Scroll to Erase template and press Select.
Sending a message from templates
1. In standby mode, press the left soft key, Select.
2. Press Select.
3. Scroll to Template and press Select.
4. Scroll to a template you want to send and press Select.
5. Press Select.
6. Enter the recipients number or pick one from Phone Book by pressing
Names.
7. Press Send and the message will be sent.
Erasing all messages
This function allows you to erase all messages in Inbox and Outbox.
1. In standby mode, press the left soft key, Select.
2. Press Select.
3. Scroll to Erase all and press Select.
4. Press Erase.

The Main Menu
Message
43
Text message settings
Configuring text message setting profiles
The message settings can be configured in different profiles. Usually you use
the profile of your operator on the SIM card. If your SIM card does not con-
tain such profile, you need to set up a profile in your phone.
Using the profile on your SIM card
1. In standby mode, press the left soft key, Select.
2. Scroll to Settings and press Select.
3. Press Select three times.
Configuring a new profile
1. In standby mode, press the left soft key, Select.
2. Scroll to Settings and press Select.
3. Press Select.
4. Scroll to an empty profile and press Select.
5. Scroll to Customize and press Select.
6. Complete following settings:
• Name: Enter a name for this profile.
• Center number: Enter the message center number. This number is supplied
by your operator.
• Send As: Defines the type of message. Your system operator may be able to
convert your message to the type you select here. Press Left or Right to
select a type.
• Valid Period: The valid period determines the duration of time the message
is stored in the message center if it can not be successfully received by the
recipient. Press Left or Right to select a duration.
6. Press Save.
Using a self-configured profile
1. In standby mode, press the left soft key, Select.
2. Scroll to Settings and press Select.
3. Press Select.
4. Scroll to the profile you configured and press OK.
5. Press Select.

The Main Menu
Message
44
Configuring voice mailbox number
Depending on your operator, the voice mailbox number may have already
been programmed on the SIM card and your phone can detect it automati-
cally. Otherwise, you have to enter it following the steps below:
1. In standby mode, press the left soft key, Select.
2. Scroll to Voice mail and press Select.
3. Enter the voice mailbox number and press Save.
Message options
Message status report
If this function is turned on, your operator will send you a message delivery
report, letting you know if your message is sent successfully.
To turn on/off the message status report:
1. In standby mode, press the left soft key, Select.
2. Scroll to Settings and press Select.
3. Scroll to Misc. setting and press Select.
4. Press On (or Off).
Reply path
The Reply Path function allows the recipient of your message to send you a
reply message via your message center.
To turn on/off the reply path:
1. In standby mode, press the left soft key, Select.
2. Scroll to Settings and press Select.
3. Scroll to Misc. setting and press Select.
4. Scroll to Reply Path and press On (or Off).
Send by GSM or GPRS
Depending on your selection here, your message can be sent either by GSM or
by GPRS.
1. In standby mode, press the left soft key, Select.
2. Scroll to Settings and press Select.
3. Scroll to Misc. setting and press Select.
4. Scroll to Send by and press Select.
5. Scroll one of the following items and press OK.

The Main Menu
Message
45
• GSM first: Send messages via GSM network first. If GSM network is not
available, send messages via GPRS.
• GPRS first: Send messages via GPRS first. If GSM network is not available,
send messages via GSM network.
• GSM only: Send messages via GSM network only.
• GPRS only: Send messages via GPRS only.
Checking message memory status
The messages you received and the copy of your sent messages are stored in
the memory in your phone and on the SIM card. You can check the status of
the memory here.
1. In standby mode, press the left soft key, Select.
2. Scroll to Settings and press Select.
3. Scroll to Misc. setting and press Select.
4. Scroll to Memory status and press Select.
Sending history
After you send a message, the related data will be registered to the sending his-
tory for you to check later.
1. In standby mode, press the left soft key, Select.
2. Scroll to Sending history and press Select.
3. The list of history records will appear on the screen. Scroll to a record and
press Select to view its details.
Cell broadcast options
Cell broadcast refers to the text messages that your operator sends to all sub-
scribers. For example, on-line traffic report or notification from the system
operator. For details about cell broadcast services and contents, please contact
your operator.
Turning on or off cell broadcast
You can choose to turn on or off the cell broadcast.
1. In standby mode, press the left soft key, Select.
2. Scroll to Cell broadcast and press Select.
3. Press On (or Off).
Setting up cell broadcast topics

The Main Menu
Message
46
You can edit cell broadcast topics in the topics list.
1. In standby mode, press the left soft key, Select.
2. Scroll to Cell broadcast and press Select.
3. Scroll to Topic and press Select.
4. Scroll to the topic you want to edit.
5. Edit the topic. When done, press Save.
Sending message service commands
With this function you can edit and send certain service commands to your
operator to perform certain operations.
For details on service commands and how to use them, please consult your
operator.
1. In standby mode, press the left soft key, Select.
2. Scroll to Service command and press Select.
3. Enter the command and press Send.

The Main Menu
Call Meter
47
Call Meter
The options in the Call Meter menu allow you to easily manage your phone
call records.
Viewing missed call records
1. In standby mode, press the left soft key.
2. Scroll to Call meter and press Select.
3. Press Select. The list of missed calls will appear on the screen. Each call
record is represented by the name of the caller. If the caller can not be
found in your Phone Book, or the number is unknown, No Number will
appear.
4. You can press Options to access the following options:
• View: View date and time record of the missed call.
• Erase: Erase this call record. Press OK to erase it.
Viewing received call records
1. In standby mode, press the left soft key.
2. Scroll to Call meter and press Select.
3. Scroll to Received calls and press Select. The list of received calls will appear
on the screen. Each call record is represented by the name of the caller. If
the caller can not be found in your Phone Book, or the number is
unknown, No Number will appear.
4. You can press Options to access the following options:
• View: View date and time record of the missed call.
• Erase: Erase this call record. Press OK to erase it.
Viewing dialed call records
1. In standby mode, press the left soft key.
2. Scroll to Call meter and press Select.
3. Scroll to Dialed calls and press Select. The list of dialed calls will appear on
the screen. Each call record is represented by the name of the recipient. If
the recipient can not be found in your Phone Book, only the number you
dialed will appear.
4. You can press Options to access the following options:
• View: View date and time record of the missed call.
• Erase: Erase this call record. Press Select to erase it.
• Call: Make a call to the recipient immediately.

The Main Menu
Call Meter
48
• Save: Save this record to Phone Book.
Erasing all call records
1. In standby mode, press the left soft key.
2. Scroll to Call meter and press Select.
3. Scroll to Erase all and press Select.
4. Press OK.
Viewing call time information
You can check the duration of your phone calls with this function. The infor-
mation includes the duration of the last call, all calls, received calls and dialed
calls.
To view call time information:
1. In standby mode, press the left soft key.
2. Scroll to Call meter and press Select.
3. Scroll to Call Time and press Select.
4. Scroll to the type of information you want to view and press Select.
Clearing call timer
The call time can be cleared by resetting the call timer.
1. In standby mode, press the left soft key.
2. Scroll to Call meter and press Select.
3. Scroll to Call Time and press Select.
4. Scroll Clear timer and press Select.
Viewing call cost information
If your operator supports, you can check the cost of your last call and all calls
with this function. Note that the call cost shown here may not exactly reflect
the amount of your phone bill, since there may be different discount rates
offered by your system operator in different time periods.
Viewing call cost
1. In standby mode, press the left soft key.
You need PIN2 code to access certain call cost functions.
Note

The Main Menu
Call Meter
49
2. Scroll to Call meter and press Select.
3. Scroll to Call Cost and press Select.
4. Scroll to Last call or All calls and press Select.
Clearing call cost
1. In standby mode, press the left soft key.
2. Scroll to Call meter and press Select.
3. Scroll to Call Cost and press Select.
4. Scroll to Clear cost and press Select.
5. Enter your PIN2 code and press OK.
Viewing remaining call cost credit
Call cost credit is used to limit the cost of your call. If your call cost exceeds
such credit, you will not be able to make phone calls. However, you can still
make emergency calls.
1. In standby mode, press the left soft key.
2. Scroll to Call meter and press Select.
3. Scroll to Call Cost and press Select.
4. Scroll to Credit remaining and press Select.
Configuring call cost settings
Before you can obtain call cost information, you need to configure call cost
settings following the steps below:
1. In standby mode, press the left soft key.
2. Scroll to Call meter and press Select.
3. Scroll to Call Cost and press Select.
4. Scroll to Setting and press Select.
5. Scroll to an item and press Select to configure.
• Cost limit: Enter a cost limit. This limit is also your call cost credit.
• Currency: Enter the currency that will be used to calculate your call cost.
• Price unit: Enter the unit of price that will be used to calculate your call cost.
6. When done, press OK.
You will be prompted to enter your PIN2 code when modifying call cost settings.
Note

The Main Menu
Call Meter
50
Viewing GPRS related information
GPRS data
GPRS data counter
The GPRS data counter provides information about the size of data you sent/
received via GPRS.
1. In standby mode, press the left soft key.
2. Scroll to Call meter and press Select.
3. Scroll to GPRS data counter and press Select.
4. Scroll to an item below and press Select to view corresponding informa-
tion:
Last sent: Display the total size of data you last sent.
Last received: Display the total size of data you last received.
Total sent: Display the total size of data you sent.
Total received: Display the total size of data you received.
Clearing GPRS data counter
1. In standby mode, press the left soft key.
2. Scroll to Call meter and press Select.
3. Scroll to GPRS data counter and press Select.
4. Scroll to Clear counter and press Select.
GPRS connection time
GPRS timer
The GPRS time counter provides information about the duration you spent
on GPRS connection.
1. In standby mode, press the left soft key.
2. Scroll to Call meter and press Select.
3. Scroll to GPRS connection time and press Select.
4. Scroll to an item below and press Select to view corresponding informa-
tion:
• Last connection: Display the duration of your last GPRS connection.
• Total connection: Display accumulated duration of all GPRS connection.
Clearing GPRS timer

The Main Menu
Call Meter
51
1. In standby mode, press the left soft key.
2. Scroll to Call meter and press Select.
3. Scroll to GPRS connection time and press Select.
4. Scroll to Clear timer and press Select.
In-call count
The In-call count function automatically counts the time or cost and displays
such information on the screen when you are on a call.
1. In standby mode, press the left soft key.
2. Scroll to Call meter and press Select.
3. Scroll to In-call count and press Select.
4. Scroll to Call time (display call time during a call) or Call cost (display call
time during a call) and press Select.
Session information
If this function is activated, the time and cost information of the phone call
will appear on the screen after you end a call.
1. In standby mode, press the left soft key.
2. Scroll to Call meter and press Select.
3. Scroll to Session information and press On (to activate it) or Off (to deacti-
vate it).

The Main Menu
Call Feature
52
Call Feature
The options in the Call Feature menu allows you to access advanced call fea-
tures.
Call divert
If for any reason you can not answer a call, you can activate the call divert
function to direct incoming calls to a specific phone number. If Call divert
function is activated, the icon will appear on the screen.
Diverting voice calls
To activate call divert function for vioce calls:
1. In standby mode, press the left soft key.
2. Scroll to Call feature and press Select.
3. Press Select.
4. Press Select.
5. Scroll to a desired condition:
• When Busy: divert all voice calls when you are on a call.
• No Reply: divert all voice calls when they are not answered.
• Not Reachable: divert all voice calls when you are outside your operator’s
network service area.
• Not Available: divert all voice calls whenever you are not available for
answering a call.
• All Calls: divert all incoming voice calls.
6. Press Select.
7. Enter the number you want to diver to and press OK, or press Names to
pick up the number from your Phone Book.
8. Press OK.
Deactivating voice call divert function
To cancel specific call divert function, scroll to Off and press Select in step 6
above.
Some of the call features described in this section are operator dependent. Please consult your
operator for availability.
Note

The Main Menu
Call Feature
53
Inquiring status
To inquire the service status of specific call divert function, scroll to Status and
press Select in step 6 above.
Diverting data or fax calls
To activate call divert function for vioce calls:
1. In standby mode, press the left soft key.
2. Scroll to Call feature and press Select.
3. Press Select.
4. Scroll to Fax calls (to divert Fax calls) or Data calls (to divert data calls) and
press Select.
5. Press Select.
6. Enter the number you want to diver to and press OK, or press Names to
pick up the number from your Phone Book.
7. Press OK.
Deactivating data or fax call divert function
Scroll to Off and press Select in step 5 above.
Inquiring status
Scroll to Status and press Select in step 5 above.
Deactivating all call divert functions
You can deactivate all call divert functions (including voice, Fax and data calls)
at once.
1. In standby mode, press the left soft key.
2. Scroll to Call feature and press Select.
3. Press Select.
4. Scroll to Cancel all and press Select.
Call waiting
If activated, the Call waiting function allows you to answer the second incom-
ing call when you are on a call. See "Answering a new incoming call"on page
19 for details.
1. In standby mode, press the left soft key.
2. Scroll to Call feature and press Select.

The Main Menu
Call Feature
54
3. Scroll to Call waiting and press Select.
4. Scroll to On and press Select.
Deactivating call waiting
To cancel call waiting, scroll to Off and press Select in step 4 above.
Inquiring status
To inquire the service status of call waiting function, scroll to Status and press
Select in step 4 above.
Call barring
With Call barring function, you can bar (restrict) incoming and outgoing calls
under certain conditions.
Barring outgoing calls
To bar outgoing calls:
1. In standby mode, press the left soft key.
2. Scroll to Call feature and press Select.
3. Scroll to Call barring and press Select.
4. Press Select.
5. Scroll to a desired barring condition:
• Int’l calls: bar all outgoing international calls.
• Int’l calls except home: bar all outgoing international calls except the calls
made to your home country.
• All calls: bar all outgoing calls.
6. Press Select.
7. Press Select.
8. Enter your network code and press OK. The phone will contact the system
and activate selected call barring function.
Cancel barring of outgoing calls
You need network code to activate/deactivate call barring function. Such code is available from
your operator.
Note

The Main Menu
Call Feature
55
To deactivate barring of outgoing calls, scroll to Off and press Select in step 7
above.
Inquiring status
To inquire the service status of call barring function, scroll to Status and press
Select in step 7 above.
Barring incoming calls
To bar incoming calls:
1. In standby mode, press the left soft key.
2. Scroll to Call feature and press Select.
3. Scroll to Call barring and press Select.
4. Scroll to Incoming calls and press Select.
5. Scroll to a desired barring condition:
• When roaming: bar all incoming calls when roaming.
• All calls: bar all incoming calls.
6. Press Select.
7. Press Select.
8. Enter your network code and press OK. The phone will contact the system
and activate selected call barring function.
Cancel barring of incoming calls
To deactivate barring of outgoing calls, scroll to Off and press Select in step 7
above.
Inquiring status
To inquire the service status of call barring function, scroll to Status and press
Select in step 7 above.
Cancel all call barring functions
You can deactivate all call barring functions (including barring of incoming
and outgoing calls) here.
1. In standby mode, press the left soft key.
2. Scroll to Call feature and press Select.
3. Scroll to Call barring and press Select.
4. Scroll to Cancel all and press Select.
5. Enter your network code and press OK.

The Main Menu
Call Feature
56
Changing network code
1. In standby mode, press the left soft key.
2. Scroll to Call feature and press Select.
3. Scroll to Call barring and press Select.
4. Scroll to Change password and press Select.
5. Enter your network code and press OK.
6. Enter new network code and press OK.
7. Enter new network code again to confirm. Press OK.
Showing/hiding your number
Depending on the your operator, you may choose to show or hide your num-
ber when making a call. If your number is hidden, it will not be shown to the
person who receives your call.
To show/hide your number:
1. In standby mode, press the left soft key.
2. Scroll to Call feature and press Select.
3. Scroll to Show number and press Select.
4. Scroll to one of the following:
• Preset: use your operator setting. Your operator decides whether to show
your number or not.
• On: show your number.
• Off: hide your number.
5. Press OK.
Selecting a phone line to use
Depending on your subscription to the operator, you may use two different
phone lines (numbers) to receive and make voice calls. You can select a phone
line to use here.
To select a phone line:
1. In standby mode, press the left soft key.
2. Scroll to Call feature and press Select.
3. Scroll to Phone lines and press Select.
4. Scroll to Line 1 (to use phone line 1) or Line 2 (to use phone line 2).
5. Press OK.
If phone line 2 is selected, the icon will appear on the screen.

The Main Menu
Call Feature
57
Anykey answer
The anykey answer function allows you to answer a call by pressing any key
(except End and key). You can activate/deactivate such function here.
1. In standby mode, press the left soft key.
2. Scroll to Call feature and press Select.
3. Scroll to Anykey answer and press On (to activate it) or Off (to deactivate
it).
Auto redial
If this function is activated, your phone redials the number automatically
when your attempt to make a call fails.
1. In standby mode, press the left soft key.
2. Scroll to Call feature and press Select.
3. Scroll to Auto redial and press On (to activate it) or Off (to deactivate it).
Speed dialing
You can activate/deactivate speed dialing function here. You must activate
speed dialing before you setup speed dialing numbers.
1. In standby mode, press the left soft key.
2. Scroll to Call feature and press Select.
3. Scroll to Speed dialing and press On (to activate it) or Off (to deactivate
it).
Receiving a fax or data call
Depending on your subscription to the operator, your may be able to receive
fax and data calls. However, if you do not have separate data and voice lines,
you need to setup the type of phone call to answer.
To receive a fax or data call:
1. Before receiving the call, connect the phone to a computer using one of the
methods below:
• Place the phone near the computer and align the infrared port of the phone
to the one on the computer.
• Connect the phone to the computer using the data cable (available sepa-
rately).
2. In standby mode, press the left soft key.
3. Scroll to Call feature and press Select.

The Main Menu
Call Feature
58
4. Scroll to Next call and press Select.
5. Depending on the type of call to receive, scroll to Fax or Data and press
OK.
6. Open the software program on the computer and answer the call.
The icon (the next call is set as Fax call) or (the next call is set as data
call) will appear on the screen.
To receive voice calls after the data or fax call:
1. In standby mode, press the left soft key.
2. Scroll to Call feature and press Select.
3. Scroll to Next call and press Select.
4. Scroll to Voice and press OK.
Talk and Fax
If you have subscribed the fax service to your operator and you have activated
this function, you can send or receive fax after making a voice call.
To activate/deactivate the talk and fax function:
1. In standby mode, press the left soft key.
2. Scroll to Call feature and press Select.
3. Scroll to Talk and Fax and press On (to activate it) or Off (to deactivate it).

The Main Menu
Sound
59
Sound
The options in the Sound menu allows you to setup the sound settings of your
phone.
Sound profiles
A sound profile is a combination of sound settings. Your phone provides 6
pre-configured sound profiles and you can select one that fits your circum-
stances to use. For example, in a meeting, you can select to use the Meeting
profile. You can also configure these profiles according to your preferences.
Selecting a sound profile
To select a sound profile to use:
1. In standby mode, press the left soft key.
2. Scroll to Sound and press Select.
3. Press Select.
4. Scroll to desired sound profile and press OK.
Default profile settings
Ringing
volume Ringing
tone Incoming
call alert Vibrating Message
alert tone Keypad
tones Warning
tones
General Volume
5Tone 1 Continue
ringing On Tone 1 Level 3 On
Meeting Volume
1Tone 3 Ring once Off Tone 2 Level 1 Off
Outdoor Volume
5Tone 4 Continue
ringing On Tone 3 Level 4 On
(Empty) Volume
5Tone 4 Continue
ringing On Tone 3 Level 4 On
Headset Volume
4Tone 1 Continue
ringing Off Tone 4 Level 2 On
The Headset profiles won’t work unless a handsfree kit or headset in plugged into your phone.
Note about sound profiles

The Main Menu
Sound
60
5. Press Select.
Or:
1. Press the power key in standby mode. The sound profiles will appear on the
screen.
2. Scroll to desired profile and press Select.
The name of selected sound profile will appear on the screen in standby mode.
Customizing a sound profile
To customize a sound profile:
1. In standby mode, press the left soft key.
2. Scroll to Sound and press Select.
3. Press Select.
4. Scroll to the sound profile you want to customize and press Select.
5. Scroll to Customize and press Select.
6. Use the following options to customize settings. Scroll to each option and
press Select to customize.
• Ringing volume: Scroll to a desired ringing volume and press OK. 5 volume
levels are available.
• Ringing tone: Scroll to a desired ringing tone and press OK. There are 30
built-in ringing tomes and 5 ringing tones you can compose by yourself (see
"Composing your ringing tones"on page 61 for how to compose a ringing
tone).
• Incoming call alert: Here you can select the ringing mode of incoming calls.
Available modes are: Off (no ringing tone), Continue Ringing, Ring Once,
Ascending, Group (the phone rings only when calls from selected caller
groups are received). If Group is selected, you will be prompted to select a
caller group.
• Vibrating: Press On to activate vibration, or Off to deactivate it.
• Message alert tone: Select the sound that is played upon receiving a mes-
sage. There are 4 tones available for selection. If Off is selected, the message
alert tone will be turned off.
• Keypad tones: Scroll to select a desired keypad tone level, or Off to deacti-
vate it.
• Warning tones: Warning tone is played when phone battery is low, or there
is an error in operation. Press On to activate warning tone, or Off to deacti-
vate it.
Renaming a sound profile
The Main Menu
Sound
61
1. In standby mode, press the left soft key.
2. Scroll to Sound and press Select.
3. Press Select.
4. Scroll to the sound profile you want to rename and press OK.
5. Enter the new name and press OK.
Composing your ringing tones
With the Tone editor function, you can create your unique ringing tone or
compose a ringing tone according to your favorite songs. You can create up to
5 ringing tones.
1. In standby mode, press the left soft key.
2. Scroll to Sound and press Select.
3. Scroll to Tone editor and press Select.
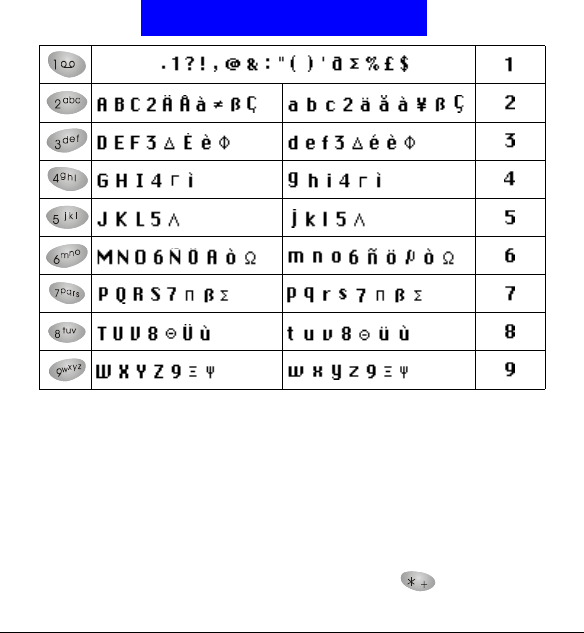
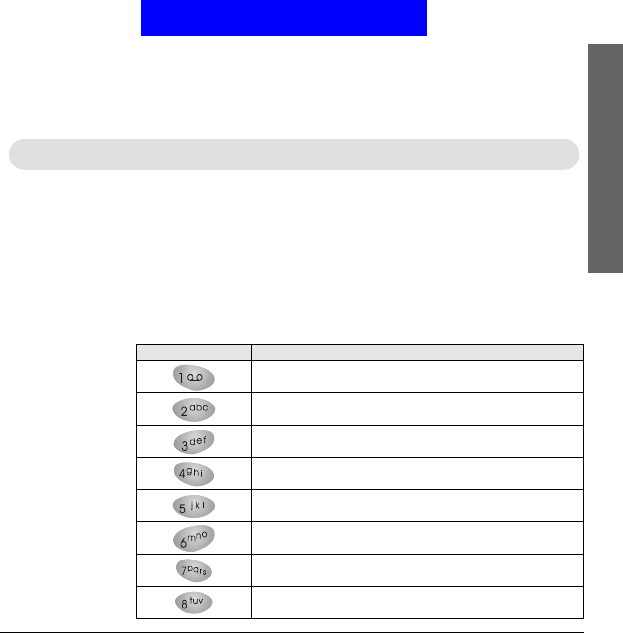
4. The ringing tone editor screen appears. Press an appropriate key to insert
symbols. Please see the table below for the mapping of keys and symbols.
The Headset profiles can’t be renamed.
Note
Press this key... To...
Insert a C sharp note.
Insert a D sharp note.
Insert an E sharp note.
Insert an F sharp note.
Insert a G sharp note.
Insert an A sharp note.
Insert a B sharp note.
Increase the length of selected note/rest.
The Main Menu
Sound
62
When selecting a note, inserting a note, moving selected note up/down or
changing the length of the note, corresponding tone is played.
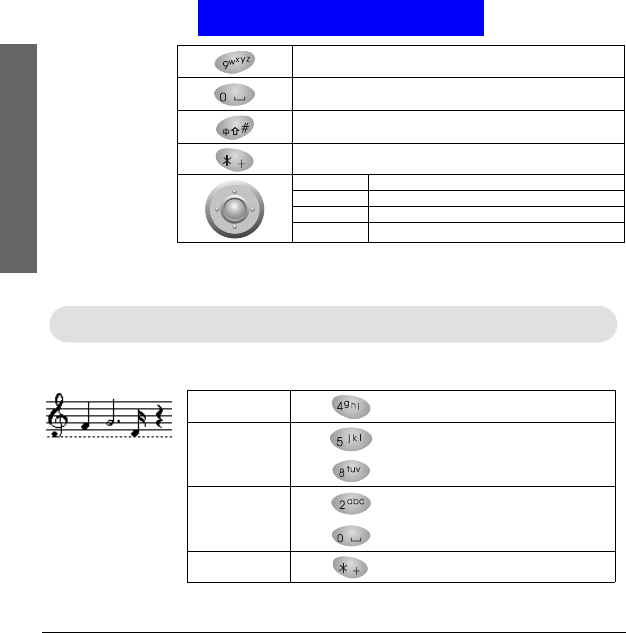
For example, to get the melody on the left:
5. Press Options to select from the following:
Move the note one octave up.
Decrease the length of selected note/rest.
Move the note one octave down.
Insert a rest.
Up Move selected symbol up on the staff.
Down Move selected symbol down on the staff.
Left Select previous symbol.
Right Select next symbol.
You can insert up to 126 symbols in one ringing tone.
Note
1st symbol Press to get an F sharp note.
2nd symbol
Press to get a G sharp note.
Press three times to increase length.
3rd symbol
Press to get a D sharp note.
Press four times to decrease length.
4th symbol Press to insert a rest.