Chi Mei Communication Systems 0302AMD01 PCS Wireless Phone User Manual Amadeus
Chi Mei Communication Systems, Inc. PCS Wireless Phone Amadeus
Contents
- 1. users manual part1
- 2. users manual part2
- 3. users manual part3
users manual part3

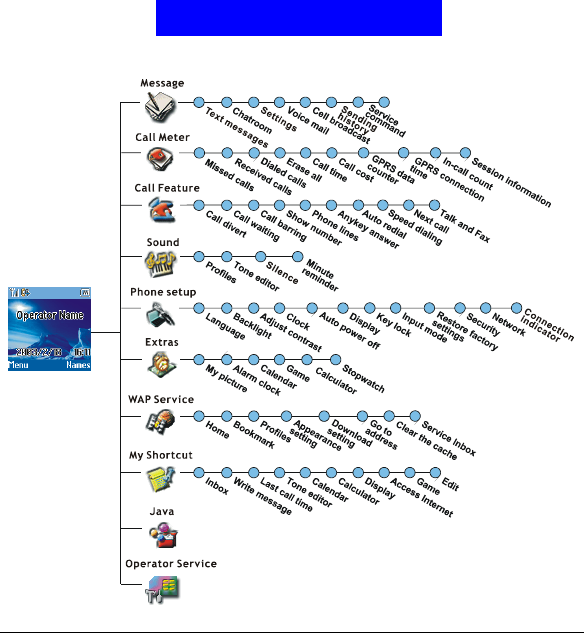
The Main Menu
Sound
63
Play: Press Select to play the ringing tone you just created.
Save: Press Select to save the ringing tone you just created.
Instruments: Press Select to choose an instrument that is used to play the
ring tone.
Tempo: Press Select to change the speed of tempo. Scroll to a tempo and
press OK. The larger the number, the slower the tempo.
Clear Screen: Press Select to delete all symbols.
Erase: Press Select to erase this ring tone.
Rename: Press Select to change the name of current ringing tone. Enter
the new name and press OK.
Quick silence
If you want your phone not to emit any sound under all circumstances, you
can activate the quick silence function. The phone will not issue any sound no
matter what sound profile is used.
1. In standby mode, press the left soft key.
2. Scroll to Sound and press Select.
3. Scroll to Silence and press On (to activate it) or Off (to deactivate it).
Minute reminder
If this function is activated, your phone will generate a beep tone every 50 sec-
onds when you are on a call to remind you of the call time.
1. In standby mode, press the left soft key.
2. Scroll to Sound and press Select.
3. Scroll to Minute reminder and press On (to activate it) or Off (to deactivate
it).

The Main Menu
Phone setup
64
Phone setup
The options in the Phone Setup menu allows you to setup the phone accord-
ing to your preferences.
Changing menu language
1. In standby mode, press the left soft key.
2. Scroll to Phone setup and press Select.
3. Press Select.
4. Scroll to preferred language and press Select.
Adjusting backlight duration
This option allows you to change the duration of backlight in standby mode.
Note that longer backlight consumes more battery power. You can also
choose to turn it off.
1. In standby mode, press the left soft key.
2. Scroll to Phone setup and press Select.
3. Scroll to Backlight and press Select.
4. Scroll to desired duration and press OK. If Off is selected, the backlight will
be turned off.
Adjusting screen contrast
1. In standby mode, press the left soft key.
2. Scroll to Phone setup and press Select.
3. Scroll to Adjust contrast and press Select.
4. Press Left or Right to select an appropriate contrast level and press OK.
Clock
Showing/hiding clock on the screen
1. In standby mode, press the left soft key.
2. Scroll to Phone setup and press Select.
3. Scroll to Clock and press Select.
4. Press On (to show clock) or Off (to hide clock).
Setting up current time and date

The Main Menu
Phone setup
65
Before you can use the clock of your phone, you need to setup current time
and date first.
Selecting time zone
1. In standby mode, press the left soft key.
2. Scroll to Phone setup and press Select.
3. Scroll to Clock and press Select.
4. Scroll to Local time zone and press Select.
5. Press Left or Right to scroll to the time zone where you are located and
press Save.
Setting up current date
1. In standby mode, press the left soft key.
2. Scroll to Phone setup and press Select.
3. Scroll to Clock and press Select.
4. Scroll to Set the date and press Select.
5. Enter current date using alphanumeric keys and press Save.
Setting up current time
1. In standby mode, press the left soft key.
2. Scroll to Phone setup and press Select.
3. Scroll to Clock and press Select.
4. Scroll to Set the time and press Select.
5. Enter current time using the alphanumeric keys and press Save.
Setting up date format
Here you can select a preferred date format.
1. In standby mode, press the left soft key.
2. Scroll to Phone setup and press Select.
3. Scroll to Clock and press Select.
4. Scroll to Date Format and press Select.
5. Scroll to desired format and press OK.
World clock
The world clock function allows you to view current time of major cities in the
world.

The Main Menu
Phone setup
66
1. In standby mode, press the left soft key.
2. Scroll to Phone setup and press Select.
3. Scroll to Clock and press Select.
4. Scroll to World Clock and press Select.
5. Press Left or Right to scroll to a desired city, and the current time will
appear on the screen. You can also press Detail to view detailed time infor-
mation of selected city.
Auto power off
If this function is activated, your phone can be switched off automatically at
the specified time.
Activating Auto power off
1. In standby mode, press the left soft key.
2. Scroll to Phone setup and press Select.
3. Scroll to Auto power off and press Select.
4. Scroll to On and press OK.
5. Enter the power off time using alphanumeric keys. When done, press
Down.
6. Press Left or Right to select desired repeat type.
7. Press Save.
Deactivating Auto power off
To deactivate Auto power off function, scroll to Off and press OK in step 4
above.
Display settings
Changing color scheme
Your phone provides several color schemes and you can change it whenever
you like.
1. In standby mode, press the left soft key.
2. Scroll to Phone setup and press Select.
3. Scroll to Display and press Select.
4. Press Select two times.
5. Scroll to a desired color scheme and press OK.

The Main Menu
Phone setup
67
Changing wallpaper
Wallpaper is the background image that is displayed under standby mode.
You can change it whenever you like.
1. In standby mode, press the left soft key.
2. Scroll to Phone setup and press Select.
3. Scroll to Display and press Select.
4. Scroll to Wall paper and press Select.
5. Scroll to a desired wallpaper and press OK. If Off is selected, the wallpaper
image will not be displayed.
Key lock
Activating Key lock
1. In standby mode, press the left soft key.
2. Scroll to Phone setup and press Select.
3. Scroll to Key lock and press Select.
4. Scroll to Auto (the phone activates key lock automatically if there is no key
operation in 20 seconds) or Lock now (activate Key lock immediately) and
press Select.
In standby mode, you can activate key lock by pressing the left soft key and
then key. To temporarily unlock, press Unlock, key.
Deactivating Key lock
To deactivate Key lock function, scroll to Off and press OK in step 4 above.
Selecting default input mode
Here you can select a default input mode to use.
1. In standby mode, press the left soft key.
2. Scroll to Phone setup and press Select.
3. Scroll to Input mode and press Select.
4. Scroll to the input mode you want to set as default, and press OK.
You can still make emergency calls when keypad is locked.
Note

The Main Menu
Phone setup
68
Changing right softkey function
With this option, you can change the function of the right soft key as a short-
cut to a desired feature under standby mode.
1. In standby mode, press the left soft key.
2. Scroll to Phone setup and press Select.
3. Scroll to Right key and press Select.
4. Scroll to a function item and press OK.
Restoring factory settings
With this function, you can reset most of the menu settings to their original
factory values at once.
1. In standby mode, press the left soft key.
2. Scroll to Phone setup and press Select.
3. Scroll to Restore factory settings and press Select.
4. Enter your phone code and press OK.

The Main Menu
Phone setup
69
Phone security settings
The security settings deal with security codes of your phone. With these codes,
you can protect your phone from being accidentally used by another person.
Activating/deactivating security codes
Activating/deactivating PIN code
1. In standby mode, press the left soft key.
2. Scroll to Phone setup and press Select.
3. Scroll to Security and press Select.
4. Press Select.
5. Press On (to activate it) or Off (to deactivate it).
6. Enter your PIN code and press OK.
Activating/deactivating phone code
1. In standby mode, press the left soft key.
2. Scroll to Phone setup and press Select.
Network Code: The code for accessing your operator's network. You can get such code from
your operator.
Phone code: The code for preventing unauthorized use of your phone. If Phone code is
enabled, you have to enter it each time you turn on your phone. The default Phone
code of your phone is 12345678.
SIM lock code: The SIM lock function prevents your phone from being used with unknown
SIM cards and vise versa. If the SIM lock is activated, unknown SIM cards can
not be used with your phone. The default SIM lock code of your phone is
12345678.
PIN code: A 4~8 digit code that is supplied by your operator upon subscription.
PIN2 code: The second set of PIN code that is supplied by your operator to control over cer-
tain services (such as call cost calculation). This code is supplied by your operator.
PUK code: The code for unblocking your SIM card. You can get such code from your opera-
tor.
PUK 2 code: The code for unblocking your PIN2 code. You can get such code from your oper-
ator.
About security codes

The Main Menu
Phone setup
70
3. Scroll to Security and press Select.
4. Press Select.
5. Scroll to Phone code and press On (to activate it) or Off (to deactivate it).
6. Enter your phone code (the default phone code is 12345678) and press
OK.
Activating/deactivating SIM lock
1. In standby mode, press the left soft key.
2. Scroll to Phone setup and press Select.
3. Scroll to Security and press Select.
4. Press Select.
5. Scroll to SIM lock and press On (to activate it) or Off (to deactivate it).
6. Enter your SIM lock code (the default SIM lock code is 12345678) and
press OK.
Changing security codes
Changing PIN code
1. In standby mode, press the left soft key.
2. Scroll to Phone setup and press Select.
3. Scroll to Security and press Select.
4. Scroll to Change code and press Select.
5. Press Select.
6. Enter the old PIN code and press OK.
7. Enter the new PIN code and press OK.
8. Enter the new PIN code again and press OK.
Changing PIN2 code
1. In standby mode, press the left soft key.
2. Scroll to Phone setup and press Select.
3. Scroll to Security and press Select.
4. Scroll to Change code and press Select.
5. Scroll to PIN2 and press Select.
6. Enter the old PIN2 code and press OK.
7. Enter the new PIN2 code and press OK.
Before changing these codes, you must activate them first.
Note

The Main Menu
Phone setup
71
8. Enter the new PIN2 code again and press OK.
Changing phone code
1. In standby mode, press the left soft key.
2. Scroll to Phone setup and press Select.
3. Scroll to Security and press Select.
4. Scroll to Change code and press Select.
5. Scroll to Phone code and press Select.
6. Enter the old Phone code and press OK.
7. Enter the new Phone code and press OK.
8. Enter the new Phone code again and press OK.
Changing SIM lock code
1. In standby mode, press the left soft key.
2. Scroll to Phone setup and press Select.
3. Scroll to Security and press Select.
4. Scroll to Change code and press Select.
5. Scroll to SIM lock and press Select.
6. Enter the old SIM lock code and press OK.
7. Enter the new SIM lock code and press OK.
8. Enter the new SIM lock code again and press OK.
Closed user group
Closed user group is an operator dependent function. If you have subscribed
this feature, you can specify the group of people who can call you and receive
your call.
To activate closed user group:
1. In standby mode, press the left soft key.
2. Scroll to Phone setup and press Select.
3. Scroll to Security and press Select.
4. Scroll to Closed user group and press Select.
5. Scroll to one of the following and press OK.
• Preset: activate the closed user group function and use preset closed user
group.
• On: activate the closed user group function and specify a closed user group.
You will be prompted to enter the number of the closed user group. The
number is available from your system operator.
• Off: deactivate the closed user group function.

The Main Menu
Phone setup
72
Network settings
Network selection
Your phone provides 2 network selection modes: Automatic and Manual.
Your phone automatically selects the network of your operator in Automatic
mode. In Manual mode, your phone scans the networks available and allows
you to select a network to use. For example, if you are roaming under other
networks, you can manually select the network that has roaming agreement
with your home network.
1. In standby mode, press the left soft key.
2. Scroll to Phone setup and press Select.
3. Scroll to Network and press Select.
4. Scroll to Automatic or Manual and press Select. If Manual is selected, the
phone scans the network and a network operator list appears. Scroll to
desired operator and press Select.
Band selection
Normally, your phone selects an appropriate band of the network automati-
cally. However, you can also select it manually when you are using your phone
in different countries.
1. In standby mode, press the left soft key.
2. Scroll to Phone setup and press Select.
3. Scroll to Network and press Select.
4. Scroll to Band and press Select.
5. Scroll to Auto, 900/1800 MHz or 1900MHz and press OK.
Connection indicator
If this function is activated, you can be notified by the screen prompt of the
phone when your outgoing call is connected.
To activate/deactivate connection indicator:
1. In standby mode, press the left soft key.
2. Scroll to Phone setup and press Select.
3. Scroll to Connection indicator and press On (to activate it) or Off (to deac-
tivate it).
To select the type of connection indicator:
If you have activated Connection indicator in step 3 above, you can also scroll
to Vibrating alert or Tone to activate/deactivate the vibration or sound.

The Main Menu
Extras
73
Extras
My Picture
My Picture allows you to draw your own pictures. You can use them as
standby logo and insert them into your messages.
Creating My Picture
1. In standby mode, press the left soft key.
2. Scroll to Extras and press Select.
3. Press Select.
4. Scroll to an empty picture and press Select.
5. Press Select.
6. Press Options.
7. Scroll to Picture size and press Select.
8. Press Left or Right to determine the width of the picture (in pixels), and
press Down.
9. Press Left or Right to determine the height of the picture. Press Save.
10. Now you can start drawing your picture:
• Press key to switch among line mode (to draw lines), dot mode (to
make dots) or eraser mode (to erase lines and dots).
• Press key to change the thickness of line (when drawing lines) or size
of dot (when making dots).
• Press key to change the color of pen.
• You can also change drawing modes by pressing Options, scrolling to Pen
mode, Pen color, Pen size and Pen step and pressing OK.
• Press Options; scroll to Zoom in (or Zoom out) to zoom in (or out) on the
picture.
• Press Options; scroll to Clear screen to clear the screen.
• Press the arrows on the navigation key to draw a line in desired direction (in
line mode), or move the cursor to desired position (in dot mode). You can
also use the keys on the keypad to control the direction.
The Main Menu
Extras
74
11. Press Options and Select to save the picture.
Editing My Picture
1. In standby mode, press the left soft key.
2. Scroll to Extras and press Select.
3. Press Select.
4. Scroll to the picture you want to edit and press Select.
5. Press Select.
6. Now you can start editing the picture.
Erasing My Picture
1. In standby mode, press the left soft key.
2. Scroll to Extras and press Select.
3. Press Select.
4. Scroll to the picture you want to erase and press Select.
5. Scroll to Erase and press Select.
Sending My Picture
With this function, you can send My Picture via message.
1. In standby mode, press the left soft key.
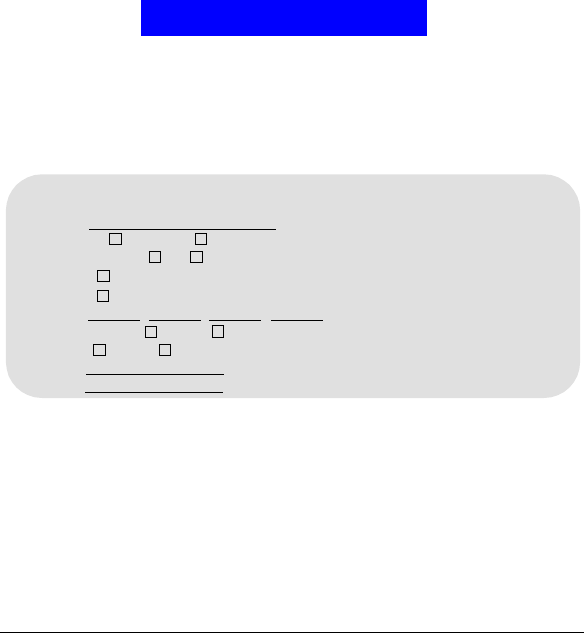
Make a dot in dot mode

The Main Menu
Extras
75
2. Scroll to Extras and press Select.
3. Press Select.
4. Scroll to the picture you want to send and press Select.
5. Scroll to Send and press Select.
6. Press Options, Select.
7. Enter recipient’s number, or press Names to pick up a recipient from your
Phone Book.
8. Press Send.
Alarm clock
Activating alarm clock
1. In standby mode, press the left soft key.
2. Scroll to Extras and press Select.
3. Scroll to Alarm clock and press Select.
4. Scroll to On and press OK.
5. Enter alarm time using alphanumeric keys. Press Down.
6. Press Left or Right to select a repeat type. Press Down.
7. Press Left or Right to select an alarm tone. Press Down.
8. Press Left or Right to turn on/off vibration.
9. Press Save.
When alarm is activated, the icon will appear on the screen.
When alarm rings, press Stop to stop the alarm, or Snooze to activate the
Snooze function. If the Snooze function is activated, The alarm will ring again
in 5 minutes.
Deactivating alarm clock
Scroll to Off and press OK in step 4 above.
Calendar
With the Calendar function, you can easily write down notes and check
appointments on each date to keep you organized.
Writing note
1. In standby mode, press the left soft key.
2. Scroll to Extras and press Select.

The Main Menu
Extras
76
3. Scroll to Calendar and press Select.
• To write a note for today, press Select two times.
• To write a note for a specific date, scroll to Go to date and press Select.
Enter the date using alphanumeric keys and press OK.
Press Select two times.
4. Specify the following:
• Time: enter the time of the event using alphanumeric keys. Press Down.
• Note type: Press Left or Right to select a type for this note. Press Down.
• Content: enter the description of the event. Press Down.
• Name: If you want to make a call to someone, enter a name here, or press
Options and select From Phone Book to pick up a name from Phone Book.
• Phone number: Same as above. You can enter a phone number here or pick
up a phone number in Phone Book by pressing Options and select From
Phone Book.
• Alarm tone: Press Left or Right to select an alarm tone.
• Circulation type: Press Left or Right to select the repeat type of this event.
If this event occurs only once, select Off.
• Alarm: Press Left or Right to select the time of the alarm to be activated
before the event. If Off is selected, the alarm will be deactivated.
• Alarm vibrating: Press Left or Right to turn on/off the vibration when
alarm is activated.
5. Press Save.
Viewing note
Viewing today’s note
1. In standby mode, press the left soft key.
2. Scroll to Extras and press Select.
3. Scroll to Calendar and press Select.
4. Press Select.
5. Scroll to a note and press Select.
Viewing notes on a specific date
1. In standby mode, press the left soft key.
2. Scroll to Extras and press Select.
3. Scroll to Calendar and press Select.
4. Scroll to Go to date and press Select.
5. Enter the date using alphanumeric keys and press OK.
6. Press Select.

The Main Menu
Extras
77
7. Scroll to a note and press Select to view the details of selected note.
View all notes
1. In standby mode, press the left soft key.
2. Scroll to Extras and press Select.
3. Scroll to Calendar and press Select.
4. Scroll to View all notes and press Select.
5. Scroll to a note and press Select.
6. Press Select to view the details of selected note.
Viewing calendar in month mode
1. In standby mode, press the left soft key.
2. Scroll to Extras and press Select.
3. Scroll to Calendar and press Select.
4. Scroll to Month mode and press Select.
5. Use the navigation key to go to desired day.
The days that have notes are bold. You can highlight them and press Select to
view notes.
Jumping to a specific day
1. In standby mode, press the left soft key.
2. Scroll to Extras and press Select.
3. Scroll to Calendar and press Select.
4. Scroll to Go to date and press Select.
5. Enter the date using alphanumeric keys and press OK.
Editing note
1. Scroll to the note you want to edit and press Select.
2.Press Options.
3. Scroll to Edit and press Select.
4. Edit the note. When done, press Save.
Erasing note
Method 1
1. In standby mode, press the left soft key.
2. Scroll to Extras and press Select.

The Main Menu
Extras
78
3. Scroll to Calendar and press Select.
4. Scroll to Erase notes and press Select.
• To erase notes one by one, press Select.
Scroll to the note you want to erase and press Erase.
• To erase notes on a specific date, scroll to Of chosen day and press Select.
Enter the date using alphanumeric keys and press OK.
Press Erase.
• To erase all notes at once, scroll to All at once and press Select.
Press Yes.
• To let the phone erase notes automatically, scroll to Auto erase and press
Select.
Scroll to a desired time period and press OK.
Method 2
1. Scroll to the note you want to erase and press Select.
2.Press Options.
3. Scroll to Erase and press Select.
4. Press Yes.
Moving a note to another date
1. Scroll to the note you want to move and press Select.
2.Press Options.
3. Scroll to Move and press Select.
4. Enter the date using alphanumeric keys.
5. Press OK.
Copying a note to another date
1. Scroll to the note you want to move and press Select.
2.Press Options.
3. Scroll to Copy and press Select.
4. Enter the date using alphanumeric keys.
5. Press OK.
Sending a note
You can send your calendar note to other person as a message.
1. Scroll to the note you want to send and press Select.
2. Press Options.
3. Scroll to Send note and press Select.

The Main Menu
Extras
79
4. You can send the note in two types:
• Scroll to Send as SMS to send the note as a short message. The recipient
who uses compatible phone will receive the message as a calendar note.
Press Select.
Enter the recipient’s number, or pick up a recipient from your Phone Book
by pressing Names.
Press Send.
• Scroll to Send as text to send the note as text. You can edit the contents
before sending.
Press Options, Select.
Enter the recipient’s number, or pick up a recipient from your Phone Book
by pressing Names.
Press Send.
Sending a message
If the calendar note contains a name in your Phone Book, you can use this
function to send a message to that name directly.
1. Scroll to the note you want to send and press Select.
2. Press Options.
3. Scroll to Send message and press Select.
Account book
The Account book of your phone helps you to track your income and
expenses records easily. You can also get a balance result of all your accounting
records or records in a specific month.
Creating an accounting record
1. In standby mode, press the left soft key.
2. Scroll to Extras and press Select.
3. Scroll to Calendar and press Select.
4. Scroll to Account book and press Select.
5. Press Select.
6. Complete the following:
• Date: Enter the date of the accounting record using alphanumeric keys.
When done, press Down.
• Amount: Enter the amount of the accounting record using alphanumeric
keys. When done, press Down.

The Main Menu
Extras
80
• Item: Enter the description of the accounting record. When done, press
Down.
• In/Out: Press Left or Right to select the type of the accounting record.
7. Press Save.
Viewing accounting records
1. In standby mode, press the left soft key.
2. Scroll to Extras and press Select.
3. Scroll to Calendar and press Select.
4. Scroll to Account book and press Select.
5. Scroll to Accounts list and press Select.
6. You can choose to view accounting records of a specific month or view all
records.
• To view accounting records of a specific month, press Select.
Enter the year and month using alphanumeric keys and press OK.
Scroll to a record and press Select.
• To view all accounting records, scroll to All accounts and press Select.
All accounting records will appear on the screen. Scroll to a record and press
Select.
Viewing results of accounting records
1. In standby mode, press the left soft key.
2. Scroll to Extras and press Select.
3. Scroll to Calendar and press Select.
4. Scroll to Account book and press Select.
5. Scroll to Total count and press Select.
6. You can choose to view result of accounting records of a specific month or
view result of all records.
• To view result of accounting records of a specific month, press Select.
Enter the year and month using alphanumeric keys and press OK.
Scroll to In (sum of all income amount), Out (sum of all expense amount)
or Balance (balance of income and expense) and press Select.
Corresponding information will appear on the screen.
• To view result of all accounting records, scroll to All accounts and press
Select.
Scroll to In (sum of all income amount), Out (sum of all expense amount)
or Balance (balance of income and expense) and press Select.
Corresponding information will appear on the screen.

The Main Menu
Extras
81
Editing accounting record
1. Scroll to the accounting record you want to edit and press Select.
2. Scroll to Edit and press Select.
3. Edit the accounting record. When done, press Save.
Erasing accounting record
Method 1
1. In standby mode, press the left soft key.
2. Scroll to Extras and press Select.
3. Scroll to Calendar and press Select.
4. Scroll to Account book and press Select.
5. Scroll to Erase accounts and press Select.
• To erase accounting records one by one, press Select.
Scroll to the record you want to erase and press Erase.
• To erase records of a specific month, scroll to Of chosen month and press
Select.
Enter the year and month using alphanumeric keys and press OK.
Press Erase.
• To erase all records at once, scroll to All at once and press Select.
Press Yes.
• To let the phone erase accounting records automatically, scroll to Auto erase
and press Select.
Scroll to a desired time period and press OK.
Method 2
1. Scroll to the note you want to erase and press Select.
2. Scroll to Erase and press Select.
Playing Games
Your phone provides 5 interesting games.
To play a game:
1. In standby mode, press the left soft key.
2. Scroll to Extras and press Select.
3. Scroll to Game and press Select.
3. Scroll to a game you want to play and press Select.
4. Scroll to one of the following:
The Main Menu
Extras
82
• New Game: Start a new game.
• Level: Press Up or Down to select the level of the game and press OK.
• Top Score: View top score.
• Instruction: View instructions of the game.
During a game, you can press key to pause and access the options above.
Five Ball
The objective of this game is to put 5 balls with the same color in adjacent
straight vertical, diagonal or horizontal lines. Once done, the balls will disap-
pear and you will get 2 points for each ball.If you move a ball without being
able to make other balls disappear, 3 more new balls will appear on the pad.
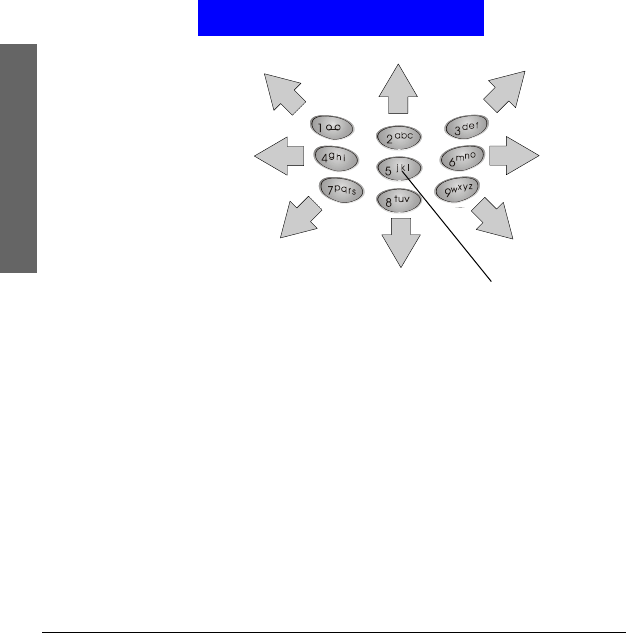
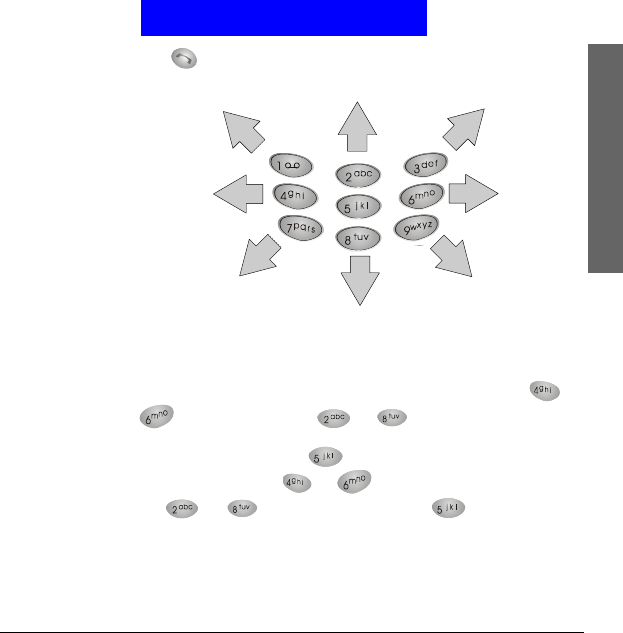
Press the alphanumeric keys to move the cursor on the pad. please see the
illustration below for the mapping of key and direction.
Press key to select a ball and then the alphanumeric keys to moved it.
Flying
Move the aircraft away from the attack of enemy fire (the yellow moving
dots). The longer you survive, the higher your score. The game is over when
you get hit by enemy fire.
The Main Menu
Extras
83
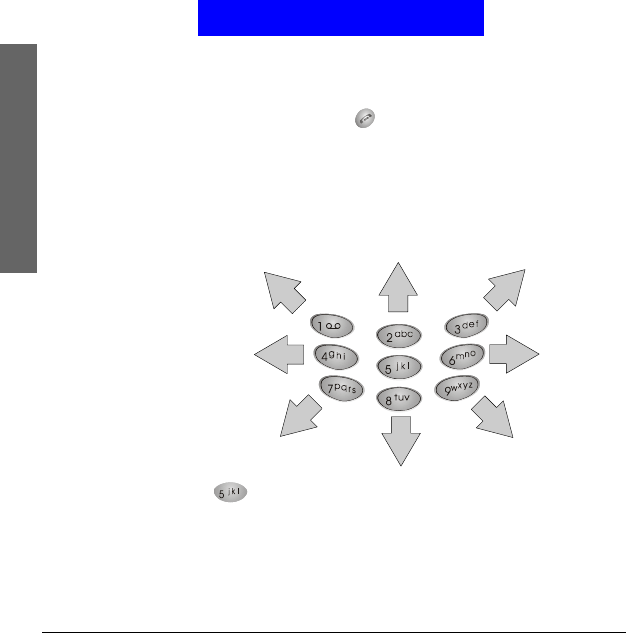
Press key to start the game. Press the alphanumeric keys to move the
cursor on the pad. please see the illustration below for the mapping of key and
direction.
Popo car
Drive your car and get as more flags as you can. While you are driving, you
will be chased by enemy cars. Try to get away from them. When necessary,
you can emit a popo to confuse them temporarily. The yellow bar on the right
of the screen indicates your fuel level. If the fuel is low, you need to get a fuel-
box to refuel. The game is over when you run out of your fuel or when the
enemy car gets you.
The Main Menu
Extras
84
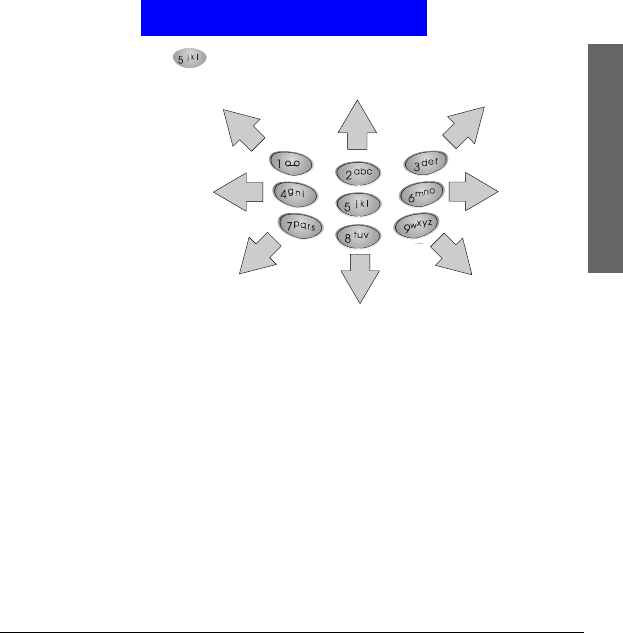
Press key to start the game. Drive your car using the alphanumeric keys.
Please see the illustration below for the mapping of the keys and directions.
Press key to emit a popo to confuse enemy cars. The more flags you get,
the higher your score.
Genie
Guide the genie to eat the white dots on the path and keep it away from the
enemies. If the genie eats the pink dots located at the corners, the enemies will
become weak temporarily and you can guide the genie to eat them. The more
dots and enemies the genie eats, the higher your score.
The Main Menu
Extras
85
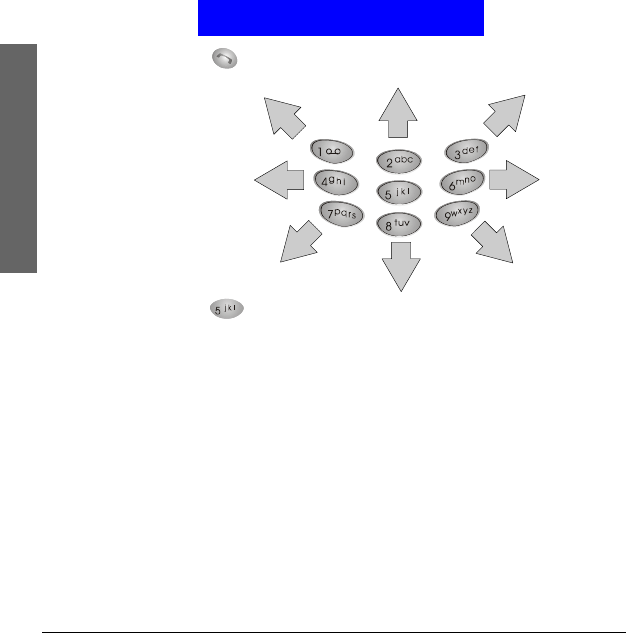
Press key to start the game. Guide the genie using the alphanumeric
keys. Please see the illustration below for the mapping of the keys and direc-
tions.
The game is over once the enemy gets the genie.
Thirteen
You are given 13 cards and have to separate them in to 3 decks: deck 1 (con-
taining 3 cards), deck 2 and deck 3 (containing 5 cards each). Press or
key to select a card and or key to assign selected card to
deck 1, 2 or 3. Make the combination of cards in each deck as deck 3 > deck 2
> deck 1. When ready, press key to compare your decks with that of
all other 3 players. Press or key to view different decks of cards,
and or key to view the result. Press key to view the
score of all players.
The player that gets the highest score wins the play. Press any key to start the
next play. A game consists of 25 plays.

The Main Menu
Extras
86
Calculator
You can use this function to perform simple calculations and covert curren-
cies.
Using calculator
1. In standby mode, press the left soft key.
2. Scroll to Extras and press Select.
3. Scroll to Calculator and press Select.
4. Enter numbers using alphanumeric keys.
5. Press the navigation key to perform operations.
Press key to get the result of calculation.
Converting currencies
Setting up exchange rate
Exchange rate must be setup before using the currency exchange function.
1. In standby mode, press the left soft key.
2. Scroll to Extras and press Select.
3. Scroll to Calculator and press Select.
4. Press Options.
5. Scroll to Exchange rate and press Select.
6. Press Select.
6. Enter the exchange rate of foreign unit expressed in domestic unit using
alphanumeric keys and press OK.
7. Scroll to Domestic unit expressed in foreign unit and press Select.
8. Enter the exchange rate of domestic unit expressed in foreign unit using
alphanumeric keys and press OK.
Navigation key Operation
Up +
Down -
Left *
Right /

The Main Menu
Extras
87
Performing currency exchange
1. In standby mode, press the left soft key.
2. Scroll to Extras and press Select.
3. Scroll to Calculator and press Select.
4. Enter the amount of currency and press Options.
4. Scroll to In foreign or In domestic and press Select.
Stopwatch
Split timing
1. In standby mode, press the left soft key.
2. Scroll to Extras and press Select.
3. Scroll to Stopwatch and press Select.
4. Press Select.
5. Press Start to start timing.
6. Press Split to get a split timing. You can get up to 10 split timings.
7. Press Stop to stop timing.
8. Press Options and you can do the following:
• Press Select to start the timer again.
• Save the timing record. Scroll to Save. Enter the name of the record and
press OK.
• Scroll to Reset and press Select to reset timer.
Lap timing
1. In standby mode, press the left soft key.
2. Scroll to Extras and press Select.
3. Scroll to Stopwatch and press Select.
4. Scroll to Lap timing and press Select.
5. Press Start to start timing.
6. Press Lap to get a lap timing. You can get up to 10 lap timings.
7. Press Stop to stop timing.
8. Press Options and you can do the following:
• Press Select to start the timer again.
• Save the timing record. Scroll to Save. Enter the name of the record and
press OK.
• Scroll to Reset and press Select to reset timer.
Viewing timing records

The Main Menu
Extras
88
1. In standby mode, press the left soft key.
2. Scroll to Extras and press Select.
3. Scroll to Stopwatch and press Select.
4. Scroll to View times and press Select.
5. Scroll to the timing record you want to view and press Select.
Erasing timing records
1. In standby mode, press the left soft key.
2. Scroll to Extras and press Select.
3. Scroll to Stopwatch and press Select.
4. Scroll to Erase times and press Select.
5. You can erase timing records one by one or all at once:
• To erase timing records one by one, press Select.
Scroll to the timing record to erase and press Select.
Press Yes.
• To erase all timing records at once, scroll to All at once and press Select.
Press OK.

The Main Menu
WAP Service
89
WAP Service
The WAP Service allows you to access mobile Internet information via your
operator using the WAP (Wireless Application Protocol) technology. For
example, you can browse weather reports, parking information and on-line
banking services.
If you are using the GPRS network to access WAP services, the icon will
appear on the screen.
The WAP settings must be configured before you can use the WAP service.
See "Configuring WAP profiles"on page 91 for details.
Browsing the Internet
Going to your homepage
1. In standby mode, press the left soft key.
2. Scroll to WAP service and press Select.
3. Press Select.
4. Your phone will start connecting to the mobile Internet. If connection is
successful, the homepage will appear on the screen.
Going to your bookmarked pages
1. In standby mode, press the left soft key.
2. Scroll to WAP service and press Select.
3. Scroll to Bookmark and press Select.
4. Scroll to a desired bookmark and press Select.
5. Press Select.
6. Your phone will start connecting to the mobile Internet. If connection is
successful, the page will appear on the screen.
Navigating the Internet using the options menu
When browsing the mobile Internet, you can press Options to access the fol-
lowing options:
• Home: Scroll to this option and press Select to return to the homepage.
• Bookmark: Scroll to this option and press Select to open the bookmark list.
To go to bookmarked pages, scroll to a bookmark and press Select two
times.

The Main Menu
WAP Service
90
To edit a bookmark, scroll to a bookmark and press Select, then scroll to
Edit and press Select. Enter the name and address of the book mark and
then press OK.
To erase a bookmark, scroll to a bookmark and press Select, then scroll to
Erase and press Select two times.
• Open link (appears when you selected a link in the browser): Scroll to this
option and press Select to open selected link.
• Add bookmark: Scroll to this option and press Select to bookmark current
page.
• Go to Address: Go to another page by entering the address. Scroll to this
option and press Select. Enter the address and press OK.
• Appearance Settings: This option allows you to configure the appearance of
information when browsing the mobile Internet. Scroll to this option and
press Select. You will be presented with the following sub-options:
Text wrapping: Scroll to this sub-option and press On (or Off) to turn on or
off the text wrapping function.
Show image: Scroll to this sub-option and press On (or Off) to show or not
to show the image.
Show title: Scroll to this sub-option and press On (or Off) to show or not to
show the title of page.
• Download Settings: You can decide whether to accept the cookies or not
when browsing. Scroll to this option and press Select two times. Scroll to
Allow (to accept cookies) or Reject (to reject all cookies) and press OK.
• Reload: Scroll to this option and press Select to reload current page.
• Clear the Cache: Scroll to this option and press Select to delete all cache files
in phone memory.
• Service inbox: Your operator may send you some service messages that con-
tains WAP links and other information. If such message is received by your
phone under standby mode, you can open and read it immediately. Other-
wise it will be store in the service inbox. Here you can check the service mes-
sages.
• Exit: Scroll to this option and press Select to disconnect from the Internet
and exit browser.
91
The Main Menu
Configuring WAP profiles
You can configure up to 5 sets of WAP settings. Each set of WAP settings is
called a WAP profile. The WAP profile may have already been programmed
on your SIM card after you subscribe the WAP service to your system so you
can access mobile Internet immediately. Otherwise, you need to configure the
settings manually. Please contact your system operator for details.
Setting up a WAP profile
1. In standby mode, press the left soft key.
2. Scroll to WAP service and press Select.
3. Scroll to Profiles and press Select.
4. Scroll to an empty profile and press Select.
5. Scroll to Edit and press Select.
6. According to the parameters supplied by your operator, configure the fol-
lowing:
Homepage: Enter the address of the homepage.
Session mode: Temporary or Permanent.
Connection Security: On or Off.
Data bearer: GSM Data or GPRS. If GSM is selected, you need to setup
the Dial-up number, Data call type and Data call speed. If GPRS is
Before setting up a WAP profile, please be sure to obtain the following parameters from your
operator:
Homepage:
Session mode: Temporary Permanent
Connection security: On Off
Data bearer: GSM Data (Dial-up number, Data call type, Data call speed)
GPRS (GPRS access point )
IP address: . . .
Authentication type: Normal Secure
Login type: Manual Automatic
Username:
Password:
Information you need in case you have to set up a WAP profile manually

The Main Menu
92
selected, you need to setup GPRS connection type and access
point.
IP address: Enter the IP address.
Authentication type: Normal or Secure.
Login type: Manual or Automatic.
Username: Enter the username.
Password: Enter the password.
The setup is complete. Now you are ready to access the mobile Internet.
Selecting and activating a WAP profile
If you have multiple WAP profiles for different operators, you can use this
function to select one to use.
1. In standby mode, press the left soft key.
2. Scroll to WAP service and press Select.
3. Scroll to Profiles and press Select.
4. Scroll to a desired profile and press Select.
Editing a WAP profile
1. In standby mode, press the left soft key.
2. Scroll to WAP service and press Select.
3. Scroll to Profiles and press Select.
4. Scroll to the profile you want to edit and press Select.
5. Scroll to Edit and press Select.
6. Edit the contents of the profile.
Renaming a WAP profile
1. In standby mode, press the left soft key.
2. Scroll to WAP service and press Select.
3. Scroll to Profiles and press Select.
4. Scroll to the profile you want to rename and press Select.
5. Scroll to Rename and press Select.
6. Enter the new profile name and press OK.

93
The Main Menu
My shortcut
You can put 9 most frequently used functions in My Shortcut so you can
access them quickly and easily.
Using My shortcut
9 frequently used functions are already pre-programmed in My shortcut and
you can use them directly.
To use My shortcut:
1. Long press key under standby mode and the shortcut menu will
appear.
2. Scroll to an item and press Select.
Customizing My shortcut
To customize My Shortcut:
1. In standby mode, press the left soft key.
2. Scroll to My shortcut and press Select.
3. Scroll to Edit and press Select.
4. Scroll to a desired item and press Select.
5. Specify the position of the item in My shortcut and press Select.

The Main Menu
94
Java
(To be implemented)

95
The Main Menu
Operator services
If you have subscribed STK (SIM Tool Kit) or other operator services to your
operator, there will be an additional item here. The contents of service and
how to use them depends on your subscription. Please consult your opera-
tor for details.

Appendix
Appendix
Left soft key
Appendix
Quick Reference
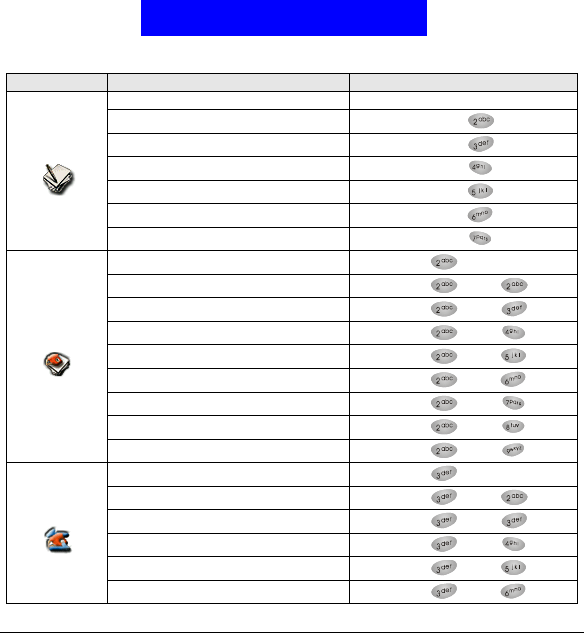
Left soft key To go to this item Press these keys
Message
Text messages Left soft key Select Select
Chatroom Left soft key Select Select
Settings Left soft key Select Select
Voice mail Left soft key Select Select
Cell broadcast Left soft key Select Select
Sending history Left soft key Select Select
Service command Left soft key Select Select
Call Meter
Missed calls Left soft key Select Select
Received calls Left soft key Select Select
Dialed calls Left soft key Select Select
Erase all Left soft key Select Select
Call time Left soft key Select Select
Call cost Left soft key Select Select
GPRS data counter Left soft key Select Select
GPRS connection time Left soft key Select Select
In-call count Left soft key Select Select
Call Feature
Call divert Left soft key Select Select
Call waiting Left soft key Select Select
Call barring Left soft key Select Select
Show number Left soft key Select Select
Phone lines Left soft key Select Select
Anykey answer Left soft key Select Select
Appendix
Auto redial Left soft key Select Select
Speed dialing Left soft key Select Select
Next call Left soft key Select Select
Sound Profiles Left soft key Select Select
Tone editor Left soft key Select Select
Silence Left soft key Select Select
Minute reminder Left soft key Select Select
Phone Settup
Language Left soft key Select Select
Backlight Left soft key Select Select
Adjust contrast Left soft key Select Select
Clock Left soft key Select Select
Auto power off Left soft key Select Select
Display Left soft key Select Select
Key lock Left soft key Select Select
Input mode Left soft key Select Select
Restore factory settings Left soft key Select Select
Extras
My picture Left soft key Select Select
Alarm clock Left soft key Select Select
Calendar Left soft key Select Select
Game Left soft key Select Select
Calculator Left soft key Select Select
Stopwatch Left soft key Select Select
Appendix
WAP Service
Home Left soft key Select Select
Bookmark Left soft key Select Select
Profiles Left soft key Select Select
Appearance setting Left soft key Select Select
Download setting Left soft key Select Select
Authority certificates Left soft key Select Select
Go to address Left soft key Select Select
Clear the cache Left soft key Select Select
Service inbox Left soft key Select Select
My Shortcut
Inbox Left soft key Select Select
Write message Left soft key Select Select
Last call time Left soft key Select Select
Tone editor Left soft key Select Select
Calendar Left soft key Select Select
Calculator Left soft key Select Select
Display Left soft key Select Select
Access Internet Left soft key Select Select
Game Left soft key Select Select
Java
Left soft key Select
Operator Ser-
vice