Chicony Electronics Co DCB229C100 Digital Video Camera User Manual
Chicony Electronics Co Ltd Digital Video Camera
UserManual.wiki
>
Chicony Electronics Co
>
DCB229C100 User Manual
user manual
Navigation menu
Upload a User Manual
Namespaces
Wiki Guide
HTML
PDF
Info
Views
User Manual
Discussion / Help
Navigation

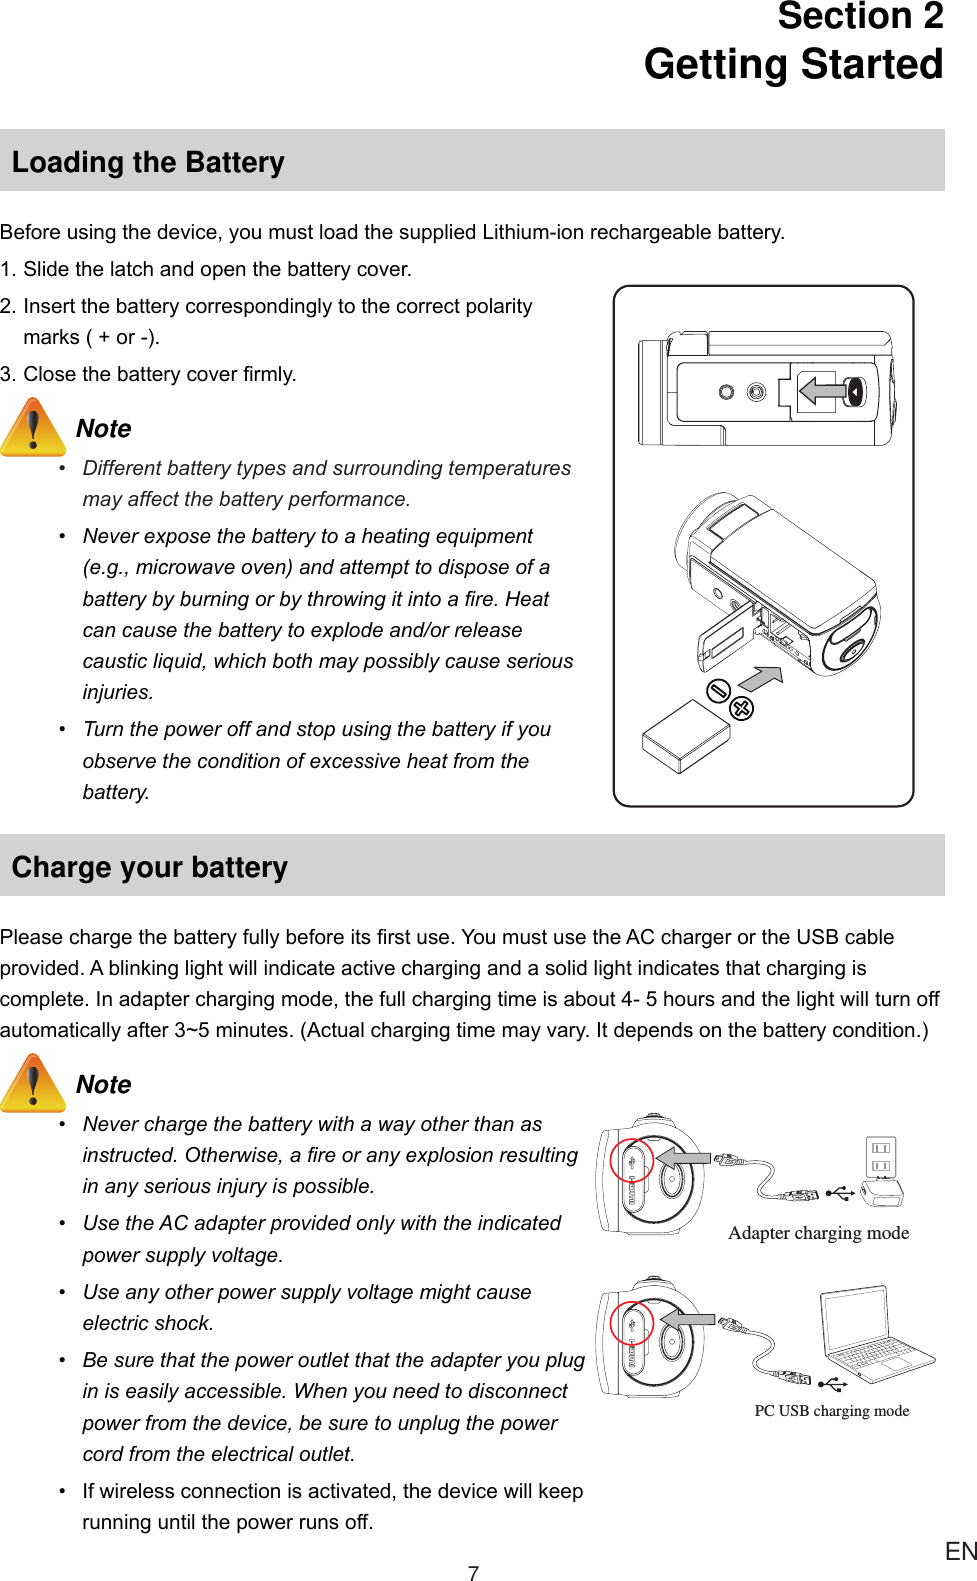
![5ENBattery / SD Card CoverTripod SocketIndicator LightExternal Lens MountMicrophone[Tele/Wide] ButtonOptical Lens[Photo] ButtonFront View Bottom View](https://usermanual.wiki/Chicony-Electronics-Co/DCB229C100/User-Guide-1799652-Page-5.png)
![6ENSide/Rear View[ Pause ] ButtonLCD Touch Panel [ Power ] Button Speaker[ Record ] ButtonIndicatorMini USB PortHDMI Port[ Wireless ] On/Off Button](https://usermanual.wiki/Chicony-Electronics-Co/DCB229C100/User-Guide-1799652-Page-6.png)
![9ENTurning the Video Camera On • Toturnonthedevice:1. FlipouttheLCDpanel;thedevicewillturnonautomatically.2. Orpressthe[ PowerButton ]foronesecondtoturniton.3. Afteridlingfor3minutes,thedevicewillturnoffautomatically.Conguring the Initial Date and Time Setup• Thetimesettingscreenappearstoallowyoutosetupdateandtime:Operation Display Screen1. TouchYear,Month,Day,Hour,Minute,andAM/PMtoset.2. Adjustthenumericvaluebytouching /3. TouchtheOKicon( )tovalidatethesetting.4. TouchtheExiticon()toexit.Getting Started• Torecordavideo:Pressthe[VideoButton ]torecordvideo.Tostoprecording,pressitagain.• Topauserecording:Pressthe[PauseButton ]topauserecording.Tocontinuetherecording,pressitagain.• Totakeaphoto:Pressthe[PhotoButton ]halfwaydownuntilthefocusingframeturnsfromwhitetogreen.Then,pressitfullydowntotakephoto.FocusingFrame:White FocusingFrame:Green• Toviewstoredvideosandphotos:Touch onthescreentoswitchtothePlaybackTurning the Video Camera Off• Toturnoffthedevice:Youcaneitherpressthe[ PowerButton ]foronesecond,oryoucanplacetheLCDpanelbacktoitsoriginalposition.](https://usermanual.wiki/Chicony-Electronics-Co/DCB229C100/User-Guide-1799652-Page-9.png)
![10 ENSection 3 Enjoying the Record ModeButton FunctionPower‧FlipouttheLCDpanelorpressthe[ Power ]button.‧Afteridlingfor3minutes,thedevicewillturnoffautomatically.Record ‧Presstotakevideo.Pressagaintostop.Photo‧Presstotakephoto.Tele/Wide‧T:Zoomin.‧W:Zoomout.Wireless‧Touchtoenable/disablewirelessUsewirelesstolinkwithPC/Mobile/Cloud.Pause‧Presstopauserecording.Pressagaintocontinue.Video/Photo‧TouchtoswitchbetweenVideoandPhoto.‧ThedefaultisinVideomode.Menu‧Touchtoturntheoptionmenuon.‧Scrollleft/rightortouch tochangeamongthreemenupages(Video/Photo/Setting).Playback‧TouchtogotothePlaybackMode.Viewordeletetherecordedles.](https://usermanual.wiki/Chicony-Electronics-Co/DCB229C100/User-Guide-1799652-Page-10.png)
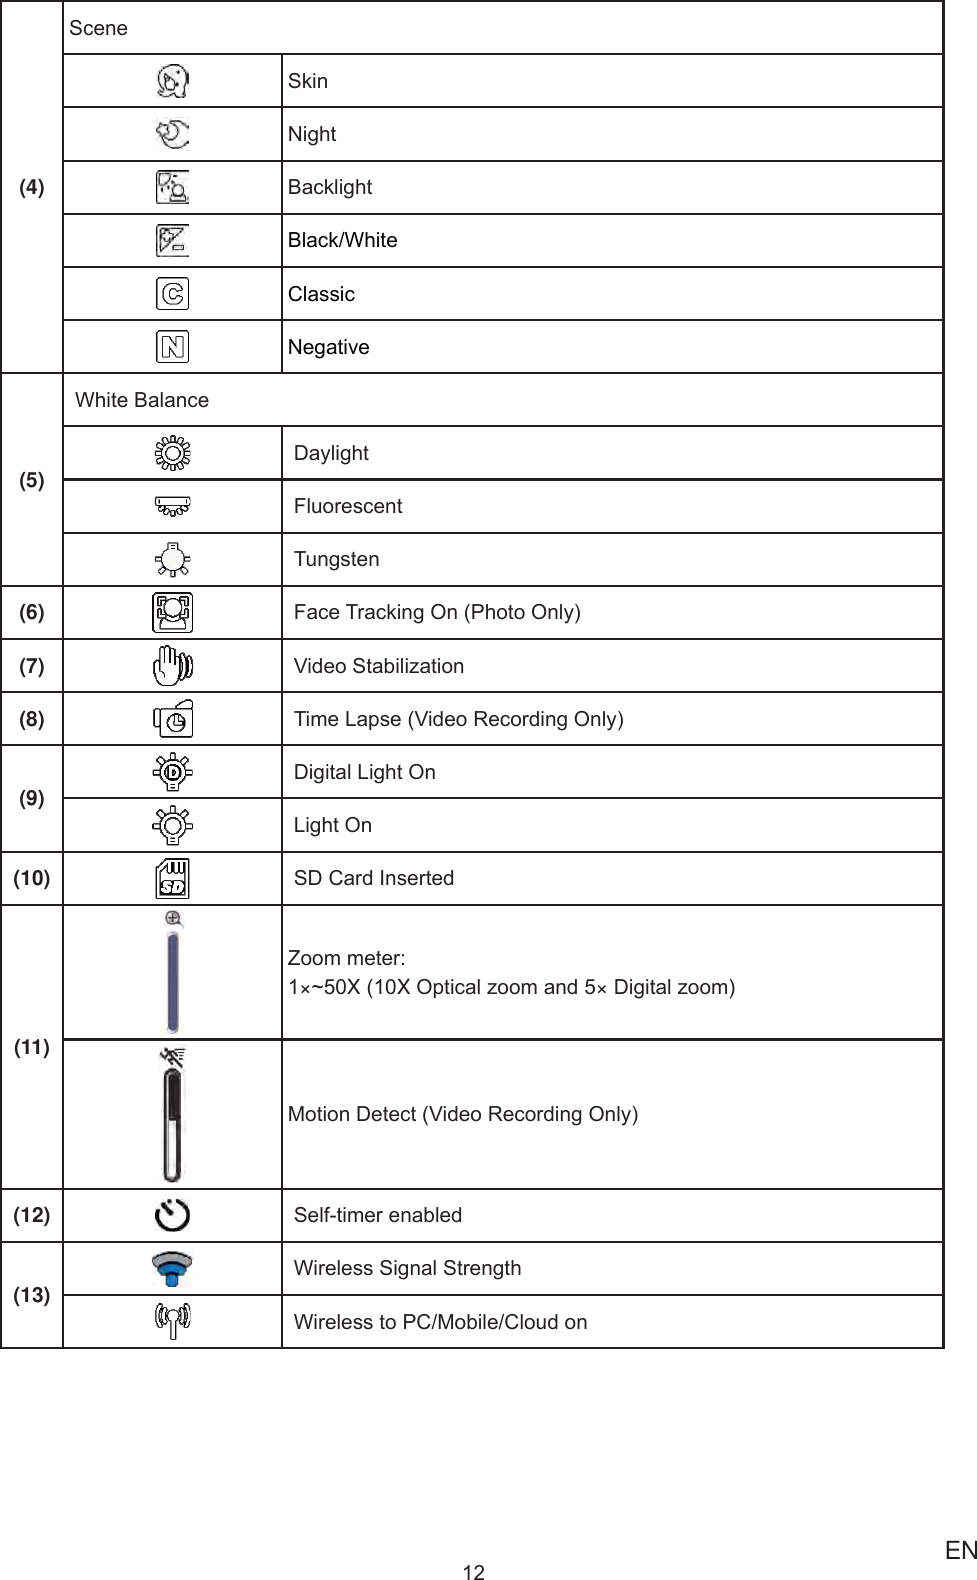
![13 EN(14)Battery:fullpowerBattery:highpowerBattery:mediumpowerBattery:lowpowerBattery:nopowerDCpowermodeOn-screen touchable function icon(15) PlaybackModeOn(16) MenuOn(17) Switchbetween[VideoMode]and[PhotoMode] Note• Taponthescreentoclosethetouchablefunctionbar.Tapagaintoshowthebar.• ThefunctionsofTimeLapse,andSlowMotioncannotbeusedsimultaneously.(OnceTimeLapseturnson,thefunctionofSlowMotionwillbeswitchedoff;orviceversa.)• ThefunctionsofMotionDetect,SlowMotion,andTimeLapsecannotbeusedsimultaneously.(OnceMotionDetectturnson,thefunctionsofSlowMotionandTimeLapsewillbeswitchedoff.)• ThefunctionsofMotionDetectandZoomingcannotbeusedsimultaneously.• ThefunctionsofMotionDetect,TimeLapse,SlowMotion,andPausecannotbeusedsimultaneously.• InACchargingmode,youcanturnonthedeviceanditwillbecomeDCpowermode.InDCpowermode,thedeviceischargedbylesselectriccurrent.• Thewirelesssignalstrengthindicatestheconnectionstrengthbetweentheaccesspointandyourcamera.Someaccesspointsdonotallowyoutoconnecttothenetwork.Somenetworksrequiretheauthenticationfromthenetworkservicerprovider(NSP).Pleasefollowtheinstructiononthescreenorcontactwiththenetworkserviceprovider.](https://usermanual.wiki/Chicony-Electronics-Co/DCB229C100/User-Guide-1799652-Page-13.png)
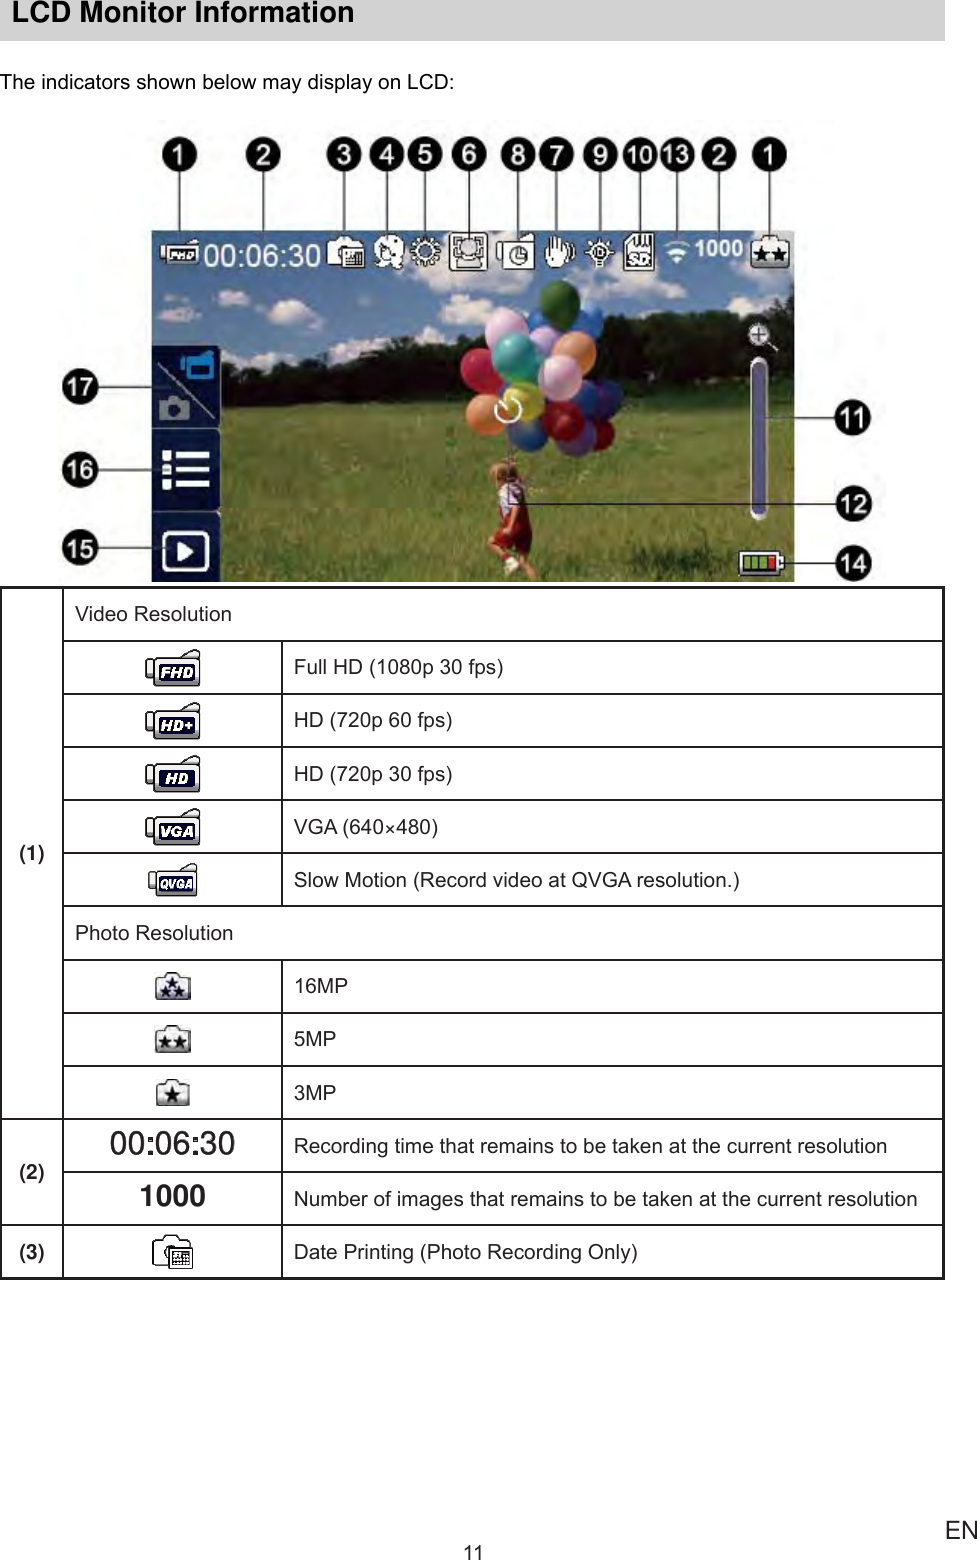
![14 ENVideo Recording• Pressthe[VideoButton ]tostartrecording.Whenavideoisbeingrecorded,atimeindicatorwilldisplayontheLCDmonitor( 00:06:30).Tostoprecording,pressitagain.• Topauserecording,pressthe[PauseButton ].Tocontinuetherecording,pressitagain.• Touch onthescreentoviewtherecordedvideo• Fourresolutionsettingsareavailable:Video QualityFull HD (1080p 30 fps)HD (720p 60 fps)HD (720p 30 fps)VGA (640×480) Note• Theimageresolutioncapturedduringvideorecordingisthesameasthevideoresolution.• WhenthefunctionofSlowMotionisactivated,thevideoresolutionisQVGAandtheviewanglebecomessmaller.Photo Capturing• Pressthe[PhotoButton ]halfwaydownuntilthefocusingframeturnsfromwhitetogreen.Then,pressitfullydowntotakephoto.• Touch onthescreentoviewthephoto.• Threeresolutionsettingsareavailable:Image Quality 16 Mega Pixels 5 Mega Pixels3 Mega PixelsUsing Zoom Function• Thezoommagniesimageswhenrecordingvideosortakingphotos.1.Tozoomin/out,presstheTele/WideButton .Thedevicezoomsinbyopticalzoomrst.Whentheopticalzoomfactorisatmaximum,zoomingstopstemporarily.Pressandholdthe[ TeleButton ](T)againwhenyouwanttozoominbeyondtheopticalzoomrange.Thedigitalzoomisactivatedandzoomingcontinues.2.Itcanbesetfrom1Xto50X(10XOpticalzoomand5×Digitalzoom).](https://usermanual.wiki/Chicony-Electronics-Co/DCB229C100/User-Guide-1799652-Page-14.png)
![15 ENUsing Wireless Connection• ToConnectbetweenthedeviceandPC/Mobile/Cloudwirelessly.• Tostarttheconnectionofwireless.• Pressthe[ Wireless ].• Therearethreeconnectiontypestoselect:WirelesstoMobile/WirelesstoPC/WirelesstoCloud.ThreeConnectionTypes Note• Fordetails,pleaserefertosection6,7,and8.Options for Record MenuMenuFlow1. Touch onthescreentoopentheMenu.2. Scrollleft/rightortouch onthemenuscreentochangeamongthepages.Video Photo Setting*• VideoResolution• Light• Scene• WhiteBalance• VideoStabilization• MotionDetect• SlowMotion• TimeLapse• PhotoResolution• FaceTracking• DatePrinting• ISO• Self-Timer• WirelessConnectionType• WirelessID• MenuSound• TVSystem• Language• TimeSetting• Format• DefaultSetting*PleaserefertoSection5forthedetailsof[ Setting ].](https://usermanual.wiki/Chicony-Electronics-Co/DCB229C100/User-Guide-1799652-Page-15.png)
![16 ENVideo MenuOperation Display Screen1. Touch onthescreentoopentheMenu.Themenuwillshowonthescreen.2. Therstpagecontains8options--Resolution,Light,Scene,WhiteBalance,VideoStabilization,MotionDetect,SlowMotion,andTimeLapse--foryoutoadjustthedevicesettings.3. TouchtheExiticon()toexit. Video Resolution Fourresolutionsettingsareavailable.• Full HD (1080p 30):Recordvideosat1920×1080p30fpsresolution.• HD+ (720p 60):Recordvideosat1280×720p60fpsresolution.• HD (720p 30):Recordvideosat1280×720p30fpsresolution.• VGA (640×480): Recordvideosat640×480p30fpsresolution.Operation Display Screen1. In the Video menu, touch the [ Resolution ] icon on thescreen.2. Touchtoselectthedesiredoption.3. TouchtheOKicon( )tovalidatethesetting.4. TouchtheReturnicon()toreturn. Note• Theremainingtimewillbevariedbasedontheoptionyouhave.](https://usermanual.wiki/Chicony-Electronics-Co/DCB229C100/User-Guide-1799652-Page-16.png)
![17 EN LightThreelightsettingsareavailable.• Light ON:Thelightwillbeturnedon.• Digital Light: Toextendthedynamicrangeforbacklightand the high contrast sense so that theobjectswillbebrighterandclearer.• Light OFF: Thelightisturnedoff.Operation Display Screen1. IntheVideomenu,touchthe[ Light ]icononthescreen.2. Touchtoselectthedesiredoption.3. TouchtheOKicon( )tovalidatethesetting.4. TouchtheReturnicon()toreturn.WithoutDigitalLight DigitalLightON Scene Youcanselectthemodeaccordingtothescenecondition.• Auto:Shootwithoutanyspecialeffectontheimage.• Skin: Shootwithaneffectthatmakesskintonesmorenatural.• Night: UseNightModefornightscenesorunderdullconditions.• Backlight:Youcantakeshotswhenthebrightlightisbehindthesubject.• Black/White: Theimageisconvertedtoblack-and-white.• Classic: Theimageisconvertedtoasepialook.• Negative: Theimageisconvertedtothenegativeofthenormal.Operation Display Screen1. IntheVideomenu,touchthe[ Scene ]icononthescreen.2. Touchtoselectthedesiredoption.3. TouchtheOKicon( )tovalidatethesetting.4. TouchtheReturnicon()toreturn. Note• Toavoidblurryimage,placethedeviceonaat,steadysurface,oruseatripodintheNightMode.](https://usermanual.wiki/Chicony-Electronics-Co/DCB229C100/User-Guide-1799652-Page-17.png)
![18 EN White BalanceThedeviceadjuststhecolorbalanceofimagesautomatically.Threemanualwhitebalancesettingsareavailable.• Auto: Thedeviceautomaticallyadjustswhitebalance.• Daylight: Underoutdoorcondition.• Fluorescent: Underuorescentcondition.• Tungsten: Undertungstenlightcondition.Operation Display Screen1. IntheVideomenu,touchthe[ WhiteBalance ]icononthescreen.2. Touchtoselectthedesiredoption.3. TouchtheOKicon( )tovalidatethesetting.4. TouchtheReturnicon()toreturn. Video Stabilization Recordwithaneffecttoeliminateanyshakeandincreasethedigitalimagestability.Operation Display Screen1. IntheVideomenu,touchthe[ VideoStabilization]icononthescreen.2. Touchtoselect[ On ]()or[ Off ]().3. TouchtheReturnicon()toreturn.WithoutStabilization StabilizationON\ Motion DetectRecordvideosautomaticallywhenthedevicedetectsamovement.Operation Display Screen1. IntheVideomenu,touchthe[ MotionDetect ]icononthescreen.2. Touchtoselect[ On ]()or[Off]().3. TouchtheReturnicon()toreturn.4. Thedevice will start to record a video automatically if itdetectsamovement.Itwillstoprecordingonceitdetectsnomovement.](https://usermanual.wiki/Chicony-Electronics-Co/DCB229C100/User-Guide-1799652-Page-18.png)
![19 EN Slow Motion Recordvideoswithslowmotioneffect.Whenplayingthevideo,theplaybacktimewillbelongerthantheactualrecordingtime.Someoccasionsyoucanusethiseffect,suchastheskilldemonstrationofathleticactivitiesofallkinds,orakeymomentinanathleticgame.Operation Display Screen1. IntheVideomenu,touchthe[ SlowMotion ]icononthescreen.2. Touchtoselect[ On ]()or[ Off ]().3. TouchtheReturnicon()toreturn. Note• WhenSlowMotionfunctionisactivated,audiowillnotberecordedanddigitalzoomwillbecomedisabled.• TheviewanglemaybecomesmallerwhentheSlowMotionisactivated.• WhenSlowMotionfunctionisactivated,thevideoresolutionisQVGA. Time LapseRecordstill images at specic intervals you canset a play as one video le.Thiseffect is good forrecordingcloudscapes,seedgerminatingandowersopening.• Off:DisableTimeLapse.• 1 Second.: Recordoneframepersecond.• 3 Seconds: Recordoneframeevery3seconds.• 5 Seconds: Recordoneframeevery5seconds.Operation Display Screen1. IntheVideomenu,touchthe[ TimeLapse ]icononthescreen.2. Touchtoselectthedesiredoption.3. TouchtheOKicon( )tovalidatethesetting.4. TouchtheReturnicon()toreturn. Note• PausefunctioncannotbeusedwhenTimeLapsefunctionisactivated.](https://usermanual.wiki/Chicony-Electronics-Co/DCB229C100/User-Guide-1799652-Page-19.png)
![20 ENPhoto MenuOperation Display Screen1. Touch onthescreentoopentheMenu.Themenuwillshowonthescreen.2. Swipeonthemenuscreentochangethepage.3. Thesecondpagecontains5options--Resolution,FaceTracking,DatePrinting,ISO,andSelf-Timer--foryoutoadjustthedevicesettings.4. TouchtheExiticon()toexit. Photo ResolutionThreeresolutionsettingsareavailable.• 16MP:Shootphotoat4608×3456,16MPquality.• 5MP:Shootphotoat2592×1944,5MPquality.• 3MP:Shootphotoat2048×1536,3MPquality.Operation Display Screen1. InthePhotomenu,touchthe[ Resolution ]icononthescreen.2. Touchtoselectthedesiredoption.3. TouchtheOKicon( )tovalidatethesetting.4. TouchtheReturnicon()toreturn. Face TrackingThecameracandetecthumanface(s)andfocusontheface(s)automatically.Thisfunctioncanworkwithphotocapturingonly.Itiswonderfultocapturebeautifulportraitsinbacklightsituations.Operation Display Screen1. InthePhotomenu,touchthe[ FaceTracking ]icononthescreen.2. Touchtoselect[ On ]()or[ Off ]().3. TouchtheReturnicon()toreturn.• WhenFaceTrackingisactivated,thefocusframe(s)willaimatthehumanface(s).Also,theframe(s)willdisplayontheLCDbeforethe[ Record ]buttonispressed.Note](https://usermanual.wiki/Chicony-Electronics-Co/DCB229C100/User-Guide-1799652-Page-20.png)
![21 EN Date PrintingImprintthedateandtimeonthephoto.Operation Display Screen1. InthePhotomenu,touchthe[ DatePrinting ]icononthescreen.2. Touchtoselect[ On ]()or[ Off ]().3. TouchtheReturnicon()toreturn.4. Onceaphotoistaken,thedatewilldisplayattherightdowncornerofthephtowhenyouactivatethisfunction. Note• DatePrintingfunctioncannotbeusedinRecordMode. ISOThecameraadjuststheISOsensitivityofitsimagesautomatically.TwomanualISOsensitivitysettingsareavailable(800/1600).Thelargerthenumberis,thehighertheISOsensitivitywillbe.Selectthelowersettingtoshootasmootherimage.Selectthehighersettingtoshootaphotoinadullenvironment,ortoshootamovingsubjectatahighspeed.Operation Display Screen1. InthePhotomenu,touchthe[ ISO ]icononthescreen.2. Touchtoselectthedesiredoption.3. TouchtheOKicon( )tovalidatethesetting.4. TouchtheReturnicon()toreturn. Note• Theimagemaybecomeblurredwhenyouselectalargernumber. Self-TimerTheself-timerallowsyoutotakephotoswithaten-secondtimeofdelay.TheLEDlightatthefrontofthedevicewillalsoblink.Theblinkingspeedwillincreaserightbeforethephotoistaken.Operation Display Screen1. InthePhotomenu,touchthe[ Self-Timer ]icononthescreen.2. Touchtoselect[ On ]()or[ Off ]().3. TouchtheReturnicon()toreturn.](https://usermanual.wiki/Chicony-Electronics-Co/DCB229C100/User-Guide-1799652-Page-21.png)
![22 ENSection 4 Enjoying the Playback ModeOperations for Playback Mode ThePlaybackModeistoviewormanagevideos/photosfromthebuilt-inmemoryorinanSDCard.Operation Display Screen1. Touch onthescreentoswitchtothePlaybackmode.2. Touch togototheVideoPlaybackMode.3. Touch togotothePhotoPlaybackMode4. Touch togobacktotheRecordMode.Button FunctionTheButtonshavethefollowingfunctionsinPlaybackMode.Video Button:1.PresstogothePlaybackModeMainMenu.Photo Button:1.PresstogothePlaybackModeMainMenu.[T] Tele Button:1.Volumeincreases.2.Zoominthephoto[W] Wide Button1.Volumedecreases.2.ZoomoutthephotoPower Button: 1. Pressonesecondtoturnthedeviceonoroff.Wireless Button:WirelessOn/Off](https://usermanual.wiki/Chicony-Electronics-Co/DCB229C100/User-Guide-1799652-Page-22.png)
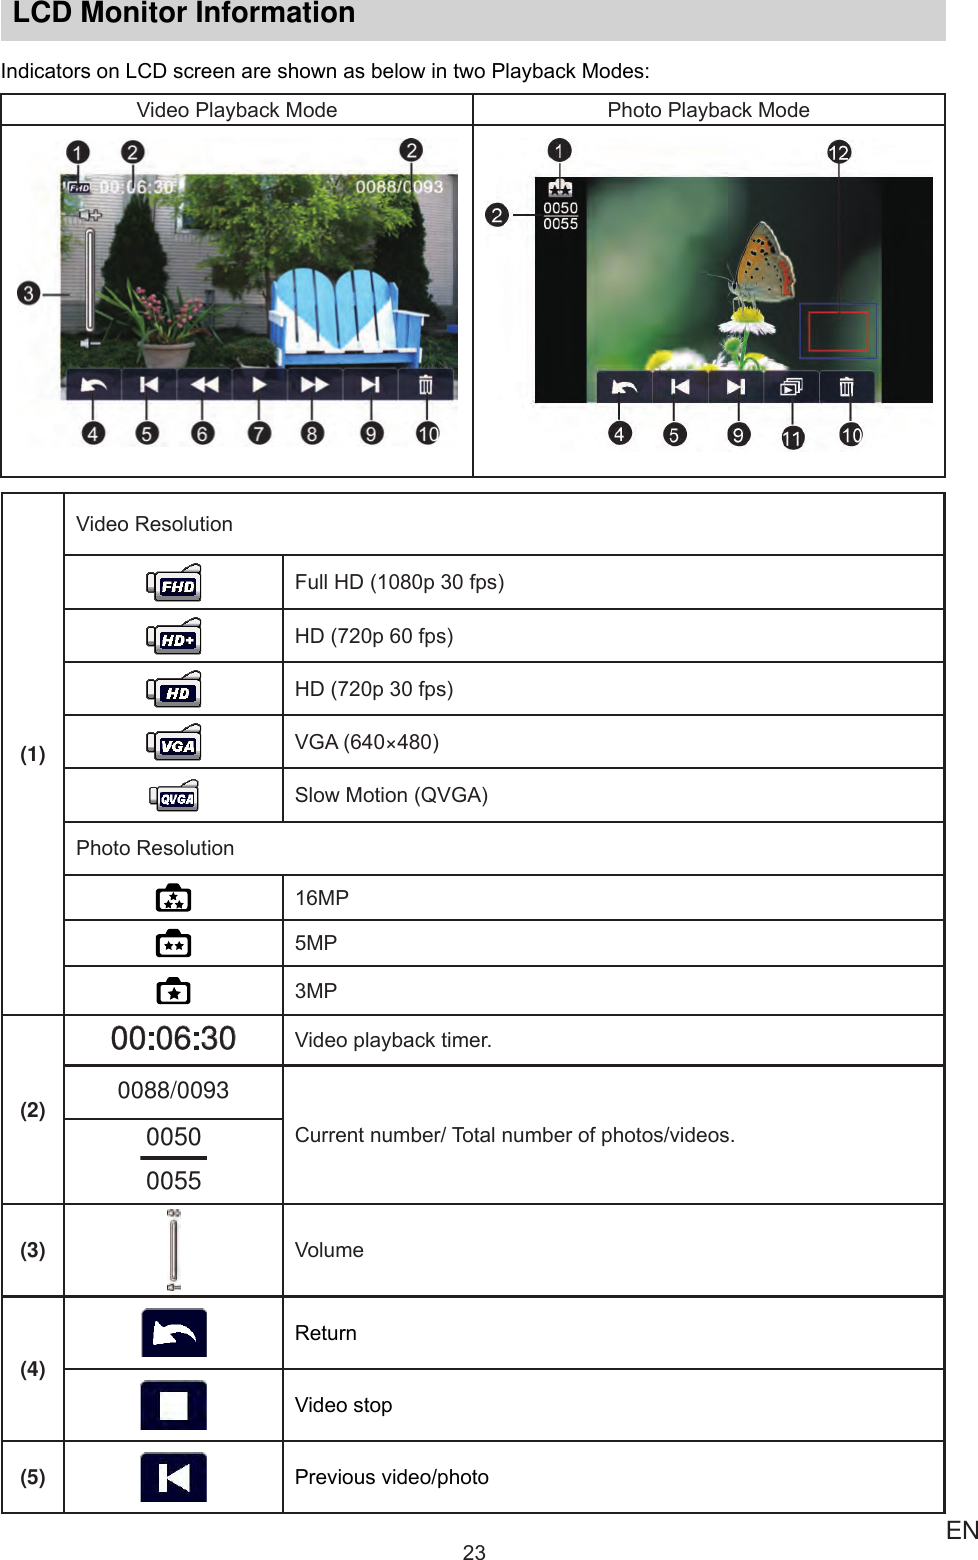
![25 ENVideo PlaybackOperation Display Screen1. IntheVideoPlaybackmode,touch / toplayorpausethevideo.2. Scrolltorightortouch togoback;scrolltoleftortouch toproceedtothenext.3. Whileplayingvideo,touch / torewind/forward.4. Touch toadjustthevolume5. Touch toexit. Note• WhentheLCDisidleforafewseconds,theplaybackfunctioniconswilldisappearautomatically.Taponthescreenagaintorequestforthefunctionbar.Delete VideosOperation Display Screen1. Touch togototheDeleteoptionscreen.2. Touch [ Yes ] to delete the current video or [ No ] tocanceltheoperationandthenexit;touch[All(DeleteAll)]todeleteallvideos.3. Once [ All ] is selected, a conrmation screen willappear;touch[Yes]toexecutetheoperationand[No]tocanceltheoperation. Note• Ifamemorycardisapplied,youmaydeletethosevideosstoredfromthecardonly.• Videosonawritten-protectedmemorycardcannotbedeleted.](https://usermanual.wiki/Chicony-Electronics-Co/DCB229C100/User-Guide-1799652-Page-25.png)
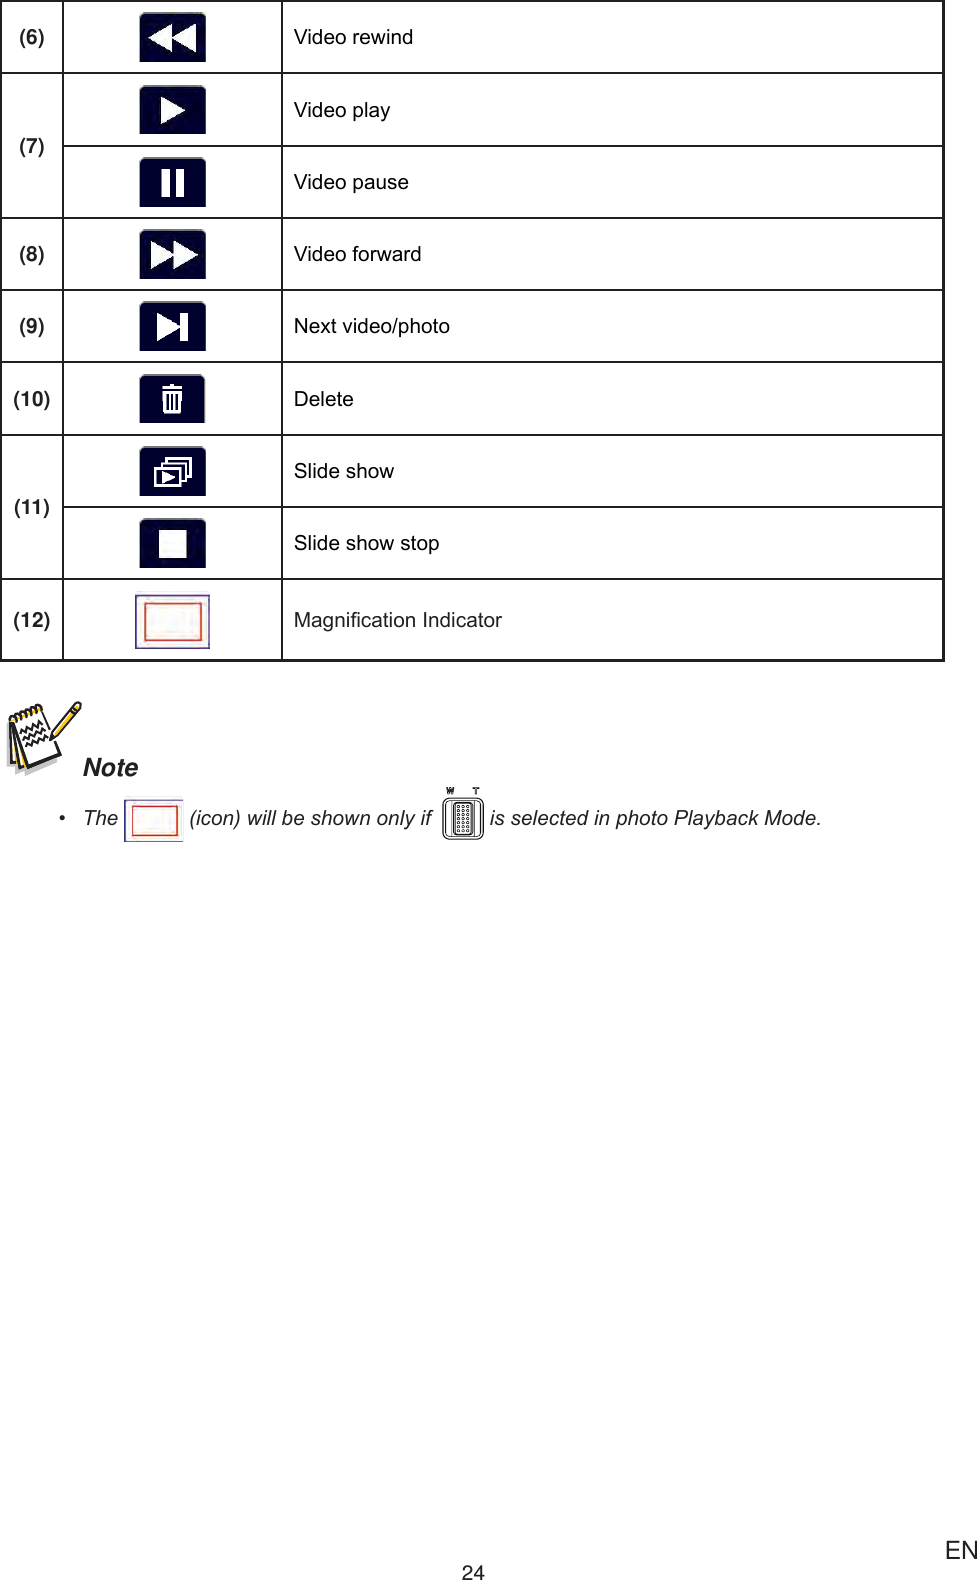
tomagnify.(ThemagnicationIndicatorappearsonthescreen)3. Tonavigatethemagniedphoto,pressonthescreenandmovetoanydirectionrequestedwithonengertip.4. Pushforwardstothe[ W ](WideButton)tozoomoutorexitthemagnicationmode.5. Touch / tostartorstoptheslideshow.6. Touch toexit. Note• WhentheLCDisidleforafewseconds,theplaybackfunctioniconswilldisappearautomatically.Taponthescreenagaintorequestforthefunctionbar.Delete PhotoOperation Display Screen1. Touch togototheDeleteoptionscreen.2. Touch[ Yes ]todeletethecurrentphotoor[ No ]tocanceltheoperationandtoexit;touch[ All(DeleteAll) ]todeleteallphotos.3. Once[ All ]isselected,aconrmationscreenwillappear;touch[ Yes ]toexecutetheoperationand[ No ]tocanceltheoperation. Note• Ifamemorycardisapplied,youmaydeletethosephotosstoredthecardonly.• Photosonawritten-protectedmemorycardcannotbedeleted.](https://usermanual.wiki/Chicony-Electronics-Co/DCB229C100/User-Guide-1799652-Page-26.png)
![27 ENSection 5 Setting Your Video Camera Setting MenuOperation Display Screen1. Touch onthescreentoopentheMenu.Themenuwillshowonthescreen.2. Scrollonthemenuscreentochangethepage.3. The[Setting]pagecontains8optionsforconguringyourdevicesetup.TheyareWirelessConnection,WirelessID,MenuSound(operationsound),TVSystem,Language,TimeSetting,Format,andDefaultSetting.4. TouchtheExiticon()toexit. Wireless ConnectionYoucanselectthefunctiontosetuporwatchlivevideoviawirelessconnection.Operation Display Screen1. IntheSettingmenu,touchthe[WirelessConnection]icononthescreen.2. Threeconnecitontypesareprovided.3. Chooseamong(1)WirelesstoMobile(2)WirelesstoPC(3)WirelesstoCloudforconnection. ‧Fordetails,pleaserefertosection6,7,and8. Wireless IDEdit[WirelessID&Password]on[WirelesstoMobile]/[WirelesstoPC]Operation Display Screen1. IntheSettingmenu,touchthe[WirelessID]icononthescreen.2. Touchtoenter[WirelessID]and[Password]3. TouchtheReturnicon()toreturn.Note](https://usermanual.wiki/Chicony-Electronics-Co/DCB229C100/User-Guide-1799652-Page-27.png)
![28 EN Menu SoundEnableordisablethesoundeffectoftheoperationsound.Operation Display Screen1. IntheSettingmenu,touchthe[MenuSound ]icononthescreen.2. Touchtoselect[ On ]()or[ Off ]().3. TouchtheReturnicon()toreturn. TV SystemSelecttheappropriateTVstandardinyourarea–eitherNTSCorPAL,AnywrongTVsystemsettingmaycauseimageickers.• NTSC(60Hz):USA,Canada,Japan,SouthKoreaandTaiwan,etc.• PAL(50Hz):UK,Europe,China,Australia,SingaporeandHongKong,etc.Operation Display Screen1. IntheSettingmenu,touchthe[ TV ]icononthescreen.2. Touchtoselect[ PAL ]or[ NTSC ].3. TouchtheOKicon( )tovalidatethesetting.4. TouchtheReturnicon()toreturn.](https://usermanual.wiki/Chicony-Electronics-Co/DCB229C100/User-Guide-1799652-Page-28.png)
![29 EN LanguageUsethisoptiontoselectalanguageoftheuser’sinterface.Operation Display Screen1. IntheSettingmenu,touchthe[Language]icononthescreen.2. Touchtoselectthedesiredoption.3. TouchtheOKicon( )tovalidatethesetting.4. TouchtheReturnicon()toreturn. Time SettingOperation Display Screen1. IntheSettingmenu,touchthe[TimeSetting]icononthescreentoenterthetimesettingscreen.2. TouchYear,Month,Day,Hour,Minute,andAM/PMtoset.3. Adjustthenumericvaluebytouching /4. TouchtheOKicon( )tovalidatethesetting.5. TouchtheExiticon()toexit. Format• Yes: Formatthebuilt-inmemory(WhennoSDcardisinstalled)/oranSDcardyouinstalled.• No: Donotformatthebuilt-inmemory(WhennoSDcardisinstalled)/oranSDcardyouinstalled.Operation Display Screen1. IntheSettingmenu,touchthe[Format]icononthescreen.2. Touchtoselect[Yes]or[ No ]( ).(Touch[Yes] toentertheconrmationscreen.)3. Touchthe icontoexecutetheoperationandtheicontocanceltheoperation. Note• AllthedatawillbeerasediftheSDcardisformatted.Makesureacopyofthedatahasbeenmade.](https://usermanual.wiki/Chicony-Electronics-Co/DCB229C100/User-Guide-1799652-Page-29.png)
![30 EN Default SettingRestorethedefaultsetting.Operation Display Screen1. IntheSettingmenu,touchthe[ DefaultSetting ]icononthescreen.2. Touchtoselect[ Yes ]or[ No ]( ).(Touch[ Yes ] toentertheconrmationscreen.)3. Touchthe icontoexecutetheoperationandtheicontocanceltheoperation.Thedefaultsettingsofthisdevicearelistedasbelow.Setting Default SettingResolution FHD(1080p30)forVideo5MPforPhotoLight OffScene AutoWhite Balance AutoVideo Stabilization OffMotion Detection OffSlow Motion OffTime Lapse OffSelf-Timer OffFace Tracking OffDate Printing OffISO AutoMenu Sound OnPassword of Wireless ID 0000TV System ShippingareaaccordinglyLanguage ShippingareaaccordinglyVolume Level3](https://usermanual.wiki/Chicony-Electronics-Co/DCB229C100/User-Guide-1799652-Page-30.png)
![31 ENSection 6 Wireless to PC WiVideo SuiteAdvanced Operation on Your Computer - WiVideoThecameracanconnecttoyourcomputerviawirelessorUSB.Onceyoulaunchthe[ WiVideo ]application (forWindows®systemsonly)onyourcomputer,itwillsearchforyourcameraandconnecttoit. Then,youcanoperatemorefunctionsonyourcomputer.Thereareseveralfunctionsasbelow:•Transferthelesfromthecamera.(wireless/USBconnection)•Watchlivestreamingvideofromthecameraonyourcomputer.(wirelessconnection)•Usethecameraasawirelesswebcamforonlinevideochatting.(wirelessconnection)•Setupsocialnetworkaccountandsaveinfotocamera.(USBconnection)•Congureandsynchronizewirelessprolesoncamera.(USBconnection)Install [ WiVideo ] on your computerToconnecttothecameraandlaunch[ WiVideo ]applicationviawirelesscorrectly,youhavetoinstallthisprogramrstly.Itisaperfectplatformforyoutowatchlivestreamingvideofromyourcameraandusethecameraasawebcamforyouronlinevideochatting.Followthestepsbelowtoinstallthe[ PCWiVideoSuite ]onthecomputer.1.ConnectthecameratoyourcomputerbyusingthesuppliedUSBcable.2.AftermakingaUSBconnection,theprograminstallsautomatically,ortheAutoRuns/AutoPlaywindowappears.(It may be differentbasedonOS recognition.) If theAutoPlaywindow does not appear.Pleaseclick[ MyComputer ] → [ PCWiVideoSuite ]toexecutetheinstallationofthisprogram.Windows XP Win7(Install automatically)(AutoPlay window)(Path to WiVideo.exe) (Path to WiVideo.exe)](https://usermanual.wiki/Chicony-Electronics-Co/DCB229C100/User-Guide-1799652-Page-31.png)
toconnect.(Thedefaultpasswordis0000.WirelessIDandpasswordcanbeeditedfromWirelessID( )onSettingmenu.)3.Followtheon-screeninstructionstocompletetheinstallation.4.TheshortcutofWiVideo( )showsonthedesktop.(Oryoucanndtheapplicationat[ Start ] → [ AllProgram ].)5.Themainscreenappearsautomaticallyonthedesktop.6.Whentheinstallationiscompleted,youcanunplugtheUSBcable. Note• WiVideoprogramwillinstalltheH.264Codec(ffdshow-afreesoftwareunderGPLlicense)forviewingthevideoscorrectly.• Toinstallcorrectly,youhavetologout/quitfromtheInstantMessage(IM)applicationbeforetheinstallation.• WiVideoisforWindows®systemsonly.• Whenlanguageonscreenisnotlegible,refertotrouble-shootingsection.](https://usermanual.wiki/Chicony-Electronics-Co/DCB229C100/User-Guide-1799652-Page-32.png)
![33 ENOnyourcomputer:2.Doubleclickthe[ WiVideo ]shortcut onthedesktop.(makesurethe[ WiVideo ]applicationisinstalledinyourcomputerinadvance.)3.Click [ Detect Wireless Camera ] button to search foryourcamera.*Onetaskwindowmaypopoutandaskyoutoselectyour camera when there are two or more wirelesscamerasinthesamewirelessnetworkrange.4.Check[ WirelessID ]andinput[ Password ]shownonyourcameraontheWiVideotaskwindow.Then,click[ OK ]5.Oncetheconnectionisestablished,thesignalofWirelesstoPC willshowontopofthescreen.6.Then,WirelesstoPCWiVideoSuiteconnectionmodeiscompleted. Note TurnPCwirelessfunctiononbeforeuse.TheWiVideoapplicationserves3optionswithconnectionviawireless:Function DescriptionTRANSFER/DELETEYoucanremotecontrolthevideosandphotosstoredinyourcamera.Youcantransferordeletethelesinyourcomputer.LIVE VIDEO Watchlivestreamingonyourcomputerviayourcamera.Youcanselectthevideoresolution.VIDEO CHAT Useyourcameraasawirelesswebcamforonlinevideochatting(Youhavetoselectthisdeviceasyourwebcamonthevideo/audiosettingrst.)**Youhavetoselect[ WiVideoCamera ]asyourwebcam/microphonefortheonlinevideochatting. Note• Forthewirelessconnectivityworkingcorrectly,makesurethebundledWiVideo(forWindows®basedsystemsonly)isinstalledandthewirelessLANmoduleofyourcomputerisactivated.• Makesureyourcomputerconnectswithyouraccesspoint(AP)correctlyandyourcameraisinthesamerangeoftheWLAN.• ForthemuchmorestablevideostreamingwhenusingLIVEVIDEOorVIDEOCHAT,pleasemakesurethewirelesssignalstrengthshows2bars( )oraboveonthecamera.• Toboostthewirelesssignalstrength,youcanmovethecameraclosertoyourcomputer.• IfthecameraisfarfromyourcomputerortheAPdevice,itmaytakelongertoconnecttothenetwork.(Thesignalandtheradiofrequencymaybeinterfered.)• Topreventthecamerafromturningoffaccidentally,pleasebesurethebatteryisfullycharged.](https://usermanual.wiki/Chicony-Electronics-Co/DCB229C100/User-Guide-1799652-Page-33.png)
![34 ENUsing WiVideo via USB Connection1.ConnectthecameratoyourcomputerbyusingthesuppliedUSBcable.2.AftermakingaUSBconnection,themainscreenwillappear.Orpleaseclick[ WiVideoPCSuite ]shortcut onthedesktoptoexecutetheapplication.Oryoucannditat[ Start ]→[ AllProgram ].TheWiVideoapplicationserves2functionsviaUSB:Function DescriptionTRANSFER You can access the videos and photos in your camera and upload the les to thesocialnetworks.Upload1. Selectthevideos/photosonthethumbnailscreen.2. Clickon[ Upload ].3. Thewebsiteoptionsappears.4. SelectthewebsiteandchecktheUsername/Emailandpasswordofthespecicsocialwebsiteintheelds.5. Clickon[ SET ]toupload. SETUP Account SetupSetupyoursocialnetworkaccountinformationandsavethemtoyourcamera.Wireless SetupCongureandsynchronizeyourwirelessproletoyourcamera.Nameyourcameraandcreateyoursecuritypassword. Note• LIVEVIDEOandVIDEOCHATarenotavailableviaUSBconnection.• Somesocialwebsitesmaynotbeallowedtoaccessincertainregionsornetworks.• Yourcomputermusthaveinternetaccesstouploadlestothewebsite.• Ifyoudonothaveaaccount,pleasesignuponthewebsiterst.• The social network is subject to update without notice. (e.g. password validation, create achannel)Pleasevisitthewebsitersttoupdateyouraccountsetting.](https://usermanual.wiki/Chicony-Electronics-Co/DCB229C100/User-Guide-1799652-Page-34.png)
![35 ENSection 7 Wireless to Mobile WiVideo AppAdvanced Operation on Your Mobile - WiVideoUseyourmobileasaremotecontroltotakephoto/videosfromcamerawirelessly.Itmakesthecamerabecomeahandyaccessorytogowithyourmobile,whichallowsyoutorecordanyscene,anytimeandanywhere.Thereareseveralfunctionsasbelow:• Useyourmobileasaremotecontroltotakephotos/videosfromyourcamerawirelessly.• Zoomin/outthelensonthecameraviayourmobile.Install [ WiVideo ] on Your Mobile To connect to the camera, you have to install [ WiVideo ] application program rstly. There are two systemstoinstall[ MobileWiVideoApp ]ontoyourmobile.Itdependsonwhichsystemyourmobileisappliedto.ForAndroidsystem,pleasedownloadthisAppfromGooglePlay;foriOSsystem(iPhone/iPad),pleaserefertoAppleAPPStoreforinstallation.Followthestepsbelowtoinstall[ MobileWiVideoApp ]onyourmobile.1.DownloadWiVideoAppfromGooglePlay(OS:Android2.2orhigher)orAppleAPPStore(OS:iOS4orhigher)ontoyourmobile.2.Followtheon-screeninstructionstocompletetheinstallation.3.TheshortcutofWiVideo( )isshownonthescreen.iOS(iPhone/iPad) Androidsystem](https://usermanual.wiki/Chicony-Electronics-Co/DCB229C100/User-Guide-1799652-Page-35.png)
![36 ENiOS system (iPhone/iPad): Direct/Hotspot/AP ModesTherearethreemodesofwirelessconnectionstoyourmobilefromthecameraifyouareaiPhone/iPaduser.Underdifferentenvironmentsandcircumstances,youmayusetheonethatismosteffectivetoconnectatthetime.(1) iOS: Using [ Direct Mode ] without wireless mobile serviceOperation Schema IllustrationOnyourcamera:1.PresswirelessButton andselect[ WirelesstoMobile ]( )toconnect.2.Select[ DirectMode ]onthe[ WirelessAccessPoint ]list.3.Ifthe[ DirectMode ]isconnected,asignaliconwillshow( ).4.Taptheconnectionmodeandascreenwillshowwith[ WirelessID ]and[ Password ]forthreeseconds. \Onyourmobile:1.Goto[ Settings ]andthengoto[ Wireless ]function.2.Selectthesame[ WirelessID ]shownonyourcameratoconnect.3.Oncetheicon[ ]shows,theDirectModeconnectionisactivated.4.PressWiVideoicon[ ]toactivateMobielWiVideoApp.Note:Itwilltakeawhilefor[ ]toshowupinordertoconnect. (2) iOS: Using [ Hotspot Mode ] with wireless service mobileOperation Schema IllustrationOnyourmobile:1.Goto[ Settings ]onyourmobileandthengoto[ Wireless ]function.2.Select[ PersonalHotspot ]functiononyourmobile.3.Tap[On]toenable[ PersonalHotspot ].4.Onceactivate[ PersonalHotspot ],youmaysharewirelesstoyourcameraforconnection.Onyourcamera:1.PresswirelessButton( )andselect[ WirelesstoMobile ]( )toscanavailableWirelessAccessPoint(AP).2.SelectthesameHotspotfromyourmobileontheavailableAPlist.3.ConnectyourcameratothisHotspot. (3) iOS: Using [ AP Mode ] with Wireless Access PointOperation Schema Illustration Onyourmobile:1.Goto[ Settings ]onyourmobileandthengoto[ Wireless ]function.2.Enablewirelessfunctionfrom[ Wi-FiNetworks ].3.SelectoneAPavailabletoyou.Onyourcamera:1.PresswirelessButton( )andselect[ WirelesstoMobile ]( )toscanavailableWireless AccessPoint(AP).2.SelectthesameAPchosenfromyourmobile.3.ConnectyourcameratothisAP.](https://usermanual.wiki/Chicony-Electronics-Co/DCB229C100/User-Guide-1799652-Page-36.png)
![37 ENAndroid System: Hotspot / AP ModesTherearetwomodesofwirelessconnectionstoyourmobilefromthecameraifyouareaphoneuserwithanAndroidsystem.Underdifferentenvironmentsandcircumstances,youmayusetheonethatismosteffectivetoconnectatthetime. (1) Android: Using [ Hotpost Mode ] with wireless mobile serviceOperation Schema IllustrationOnyourmobile:1.Goto[ Settings ]andthengoto[ Wireless&network ]function.2.EnableHotspotand/orAPfunction.3.OnceactivateHotspot,youmaysharewirelesstoyourcameraforconnection.Onyourcamera:1.PressWirelessButton( )andselect[ WirelesstoMobile ]( )toscanavailableAP.2.SelectthesameHotspotfromyourmobileontheavailable[WirelessAccessPoint]list.3.ConnectyourcameratothisHotspot.Note:Operationmayvary,pleaserefertoeachindividualmodel. (2) Android: Using [ AP Mode ] with Wireless Access PointOperation Schema IllustrationOnyourmobile:1.Goto[ Settings ]andthengoto[ Wireless&network ]function.2.Enablewirelessfunctionfrom[ Wirelesssettings ].3.SelectoneAPavailabletoyou.Onyourcamera:1.PressWirelessButton( )andselect[ WirelesstoMobile ]( )toscanavailableAP.2.SelectthesameAPchosenfromyourmobile.3.ConnectyourcameratothisAP.](https://usermanual.wiki/Chicony-Electronics-Co/DCB229C100/User-Guide-1799652-Page-37.png)
![38 ENUsing WiVideo via Wireless ConnectionOperation ScreenRemoteControlYourCamera(fromMobile):1.Press[ MobileWiVideoApp ]icononyourmobile.2.Detecttheavailablecamerasautomaticallyfromyourmobile.3.Enterthepassword(Thedefaultis0000anditcanbeeditedvia[ SETUP ]fromWiVideoAPP.)orvia[ Settings ]fromthecamera.4.Enjoyplayingyourcameraviayourmobile.Mobile WiVideo Suite FunctionThroughyourmobile,youmayremotecontrolyourcamerawirelessly.Hereisalistoficonsshownonyourmobiletoillustratetheirfunctions.Tele(T)•ZoominWide(W)•ZoomoutVideo•Presstotake/stopvideoPhoto•PresstotakephotoView•WatchliveviewoncameraAlbum•Playback/DeletelesoncameraSetup•Managesettingsoncamera](https://usermanual.wiki/Chicony-Electronics-Co/DCB229C100/User-Guide-1799652-Page-38.png)
![39 ENSection 8 Wireless to Cloud-UstreamSign up and Store Ustream Account to Camera Ustreamenablesyoutofreebroadcastthelivevideoofyourcamera.PeoplecanwatchyourbroadcastingontheiriPhone,iPad,iPodpress,Androidphones/tablets,orPConUstreamwebsite/APPanytime,anywhere.WiVideoprogramcanguideyoutosetupUstreamautomatically.BeforeyoustartusingUstream,youneedtoregisteranaccountatUstreamwebsite(www.ustream.tv).Operation Screen(1) Create an account (skip this if a Ustream account isready)1. GotoPCWiVideoSuite[ AccountSetup ]andcreateanewaccountforUstream.2. Click[ CreateANewAccount ]andthenlluptheinformationrequestedstepbystep.3. Thenclick[ SignUp ]. Note• RemembertoplugtheUSBcablebetweenPCandyourcameraforconnection.• ThescreenwillgobacktoWiVideosettingsoncesignupsuccessfully.• Makesuretoinsertdateandtimeon[ TimeSetting ]inadvanceforlivevideoviaUstreamcorrespondingly.(2)Save/Removeanaccountinfoto/fromyourcamera.EnterUsername/PasswordandclickStore/Remove.(3)SelectonechannelPCWiVideoSuitehasonedefaultchannel.YoucouldcreatemorechannelsonUstreamwebsite.• SelectonechannelforUstreamvideobroadcasting.• Forprivacy,itisoptionaltoenterpasswordfortheselectedchannel.Note • Mobile device Ustream App cannot accessprivatechannel.• For private channel usage, refer to Ustreamwebsitefordetailinformation.• UstreamwillremainonevenLCDpanelisclosed.1.2.](https://usermanual.wiki/Chicony-Electronics-Co/DCB229C100/User-Guide-1799652-Page-39.png)
![40 ENPrepare AP / Mobile Hotspot for Ustream broadcastingEnsureyouhaveaworkingAP(AccessPoint)/MobileHotspotdevicetogetreadytostartbroadcasting.Broadcast live video on Ustream StartLiveVideoStreamingfromCamera1. Press[Wireless’ ]buttononthecamera2. Select[ WirelesstoCloud ]( )from[ ConnectionType ].3. LoginyourUstreamaccount4. Enteryourusernameandpassword.5. ThecameralistsavailableAccessPoint.6. Selectoneforwirelessconnection.7. The camera connects to Ustream server and startsvideostreaming. Note• Once the username and password of Ustreamaccountinsert,itwillshownexttimeautomatically.• Ifyoudonotseeanything,pleaseenterusername/passwordwithkeypad.](https://usermanual.wiki/Chicony-Electronics-Co/DCB229C100/User-Guide-1799652-Page-40.png)
![41 ENWatchLiveVideofromMobile1.InstallUstreamAppfromGooglePlayorAppleStore.2.LaunchAppandentertheusername/channel3.ClickUstreamApp4. Searchyouraccount.5.ThemobileconnectstoUstreamserverandviewvideostreamingfromcamera.6.Whentheconnectionisestablished,thesignalstrengthwillshowonthetopofthescreen.7.Tocancelstreaming,touchthe[ Return ]icontoterminatestreaming.WatchLiveVideofromPC1.GotoUstreamwebsiteandentertheusername/channel2.ThevideostreamingwillbebroadcastedontheUstreamwebsite.3.Peoplewhohasyouraccount,theycanvisitUstreamwebsiteandwatchthelivevideostreamingfromcamerathroughcomputers.www.ustream.tvThecameralistsavailableAccessPoints.Pleaseselectoneforwirelessconnection.Icon DescriptionCurrentlyconnectingAPSecurednetwork:RequiresthepasswordtoaccesstheAP.SignalstrengthUpDowncursor:Changethepages.AP Prole information: Check the statusoryoucanremoveitsprole.1. SelectthedesiredAP(Network)toconnectto.2. IftheselectedAPrequiresthepasswordauthentication,youwillenterthekeypadscreen.3. Enterthepasswordandtouchthe[ Enter ]icontoconrmit.4. Ortouchthe[ Return ]icontoexit.Capital LockBackToggle between letters and numbers/symbols ConfirmExit](https://usermanual.wiki/Chicony-Electronics-Co/DCB229C100/User-Guide-1799652-Page-41.png)
indicatesthecameradoesnotconnecttothenetworkcorrectly. Note• Thepossiblereasonsfor“ConnectingFailed”couldbe(1)wrongpassword;(2)youarenotinthewirelessnetworkareaoftheAP.(3)thecameradoesnotsupportthetypeofencryptionusedontheAP.ThismodelonlysupportsWEP/WPA/WPA2personaltypeofencryption,butnotuptoenterpriselevel(4)yournetworkrequiresPPPoEaccount/passwordinformation.• ThiscameraonlysupportstheAP(SSID)namedinEnglish/number/symbols(ASCIIcharacters).• YoucanonlyentertextinEnglish,regardlessoftheOSDlanguage.• SomeAProutersdonotallowyoutoconnecttothenetwork(e.g.rewall).• Youmaybechargedbythenetworkserviceprovider.• Pleasestayawayfromanyelectronicequipmentsincetheradiofrequencysignalsmayinterfereconnecting.• WhenstreamingonUstream,therecord/zoomfunctionsaredisabled.• ThecameracannotconnecttothenetworkwhileitisconnectedtoanHDTVviathecable,orviceversa.• ItmaytaketimetoscanandconnecttotheAP/networkortoupload.ThestreamspeedisaffectedbytheInternetconnectionspeedorotherfactors.• Pleasebesurethebatteryisfullychargedbeforeconnectingtothenetwork.Itmaytaketimetoupload.• Ifyoudonothaveanaccount,pleasesignuponthewebsiterst.• Thesocialwebsiteupdateisthesubjecttochangewithoutnotice.(e.g.passwordvalidation,createachannel)Pleasevisitthewebsitersttoupdateyouraccountsetting.• Ustreammaynotbeallowedtoaccessincertainregionsornetworks.• Pleaseavoidtransferringthecondentiallesandsettingyourpersonalaccountinformationontheopennetworksorinpublicareas.Thedatatransferredviawirelesscouldbeleaked.](https://usermanual.wiki/Chicony-Electronics-Co/DCB229C100/User-Guide-1799652-Page-42.png)


![47 ENSection 12 TroubleshootingTroubleshooting Ifthecamerafailstofunctionasexpected,checkthelistofthecommonproblemsbelow.Problem/Situation Remediation/SolutionCannot turn on the camera. The power turns off suddenly.• Powerisoff.Pressthe[ PowerButton ]toturnon.• Batterypackisweakordepleted.Rechargethebatterypack.Camera cannot be turned on after plugging power adapter.• Pleasemake sure that you use the supplied power adapterandconnectittothepoweroutletcorrectly.The les on the memory card do not display smoothly when the LCD shows the “!” marking.• “!”meanstheSDcardislowspeedorcontainscorruptedles.Tosolvethis,formattheSDcardusingthecamerainsteadofacomputer.(PleaserefertothedetailedFormatinstructioninSection5).• Thecardhassomeproblemsandcannotberecognized.Changethecardwithanotherone.• OrpleasechangetheSDcardtoahighspeedone.Cannot take video/photo. • Memoryisfull.Deletesomeunnecessaryvideos/photosorinsertanewSDcard.• Powerisoff.Pressthe[ PowerButton ]toturnon.The camera is frozen. • Pleaseremovethebattery/unplugtheadapter.Then,insertthebattery/plugtheadapterandturnonthecameraagain.The date imprinted on the photo is incorrect • Setthedateandtimeinthe[ Setting ]menu.Why do some of my indoor photos look blurry and dark?• Poorlighting.Takephotoinbetterlighting.• Thecameraextendsphotoexposuretimeunderlowlight/indoorcondition.Keepthecamera(andthetargetsubject)steadyforseveralsecondswhentakingphotos.• Placethecameraonaatandsteadysurface,oruseatripodwhentakephoto.The color of the video/photo is not natural.• Selecttheproperwhitebalanceoptiontomatchthelightsource.When the camera is connected to the PC via USB cable, many Autoplay windows may pop out. They indicate the disks of the camera.• [ DV ]indicatestheinternalmemoryofthecamera.• [ RemovableDisk ]indicatestheexternalmemory(memorycardinstalledinthecamera).• Thedisk[ DVAP ]showsthebuilt-inInternetDirectapplicationissavedatthisdisk.PleaseDONOTformatthisdiskordeletetheapplicationinside;otherwise,theInternet Directapplicationcannotfunction.Language on screen is not legible.• Whenthelanguageshownonthescreenisnotlegible,pleaserefertoFAQatwebsitesfromeachoriginalcomputermanufacturer.](https://usermanual.wiki/Chicony-Electronics-Co/DCB229C100/User-Guide-1799652-Page-47.png)