Chicony Electronics Co DCB229C100 Digital Video Camera User Manual
Chicony Electronics Co Ltd Digital Video Camera
user manual
High Denition
Wireless Camcorder
User’s Manual

2EN
Read This Before Using the Video Camera
SAFETY INSTRUCTIONS
• Donotdrop,punctureordisassemblethedevice.
• Usethedevicewithgoodcare.Roughhandlingmaydamagetheinternalcomponents.
• Donotexposethedevicetohightemperature.Avoidcontactwithwater.
• Pleasenoticethatthebodyofthisdevicemaybecomewarmerafteroperatingoveraperiodoftime.
• Testitwithaproperoperationbeforeusingthedevice.
• Useaccessoriessuppliedbythemanufactureronly.
• Usethetypeofbatterythatcamewithyourdeviceonly.
• Removethebatteryifthedeviceisnotgoingtobeusedforalongperiodoftime.
Product Information
• Designsandspecicationsofthedevicearesubjecttochangewithoutnotice.Thisincludesprimary
productspecications,software,andthisuser’smanual.
• ThisUser’sManualisageneralguideforreference.
• Theillustrationsinthismanualmaynotbethesameastheactualdesignofyourdevice,including
whatyousee.
Contents
Read This Before Using the Video Camera .........................................2
Section 1 Getting to Know Your Video Camera ...............................4
Section 2 Getting Started ...................................................................7
Section 3 Enjoying the Record Mode ............................................. 10
Section 4 Enjoying the Playback Mode ..........................................22
Section 5 Setting Your Video Camera ............................................27
Section 6 Wireless to PC WiVideo Suite ........................................31
Section 7 Wireless to Mobile WiVideo App ....................................35
Section 8 Wireless to Cloud-Ustream .............................................39
Section 9 Viewing Photo and Video on TV .....................................43
Section 10 Viewing Photo and Video on PC ....................................44
Section 11 Specications and System Requirements .................... 45
Section 12 Troubleshooting ..............................................................47
Section 13 FCC Regulations and SAR Information .........................48

4EN
Section 1
Getting to Know Your Video Camera
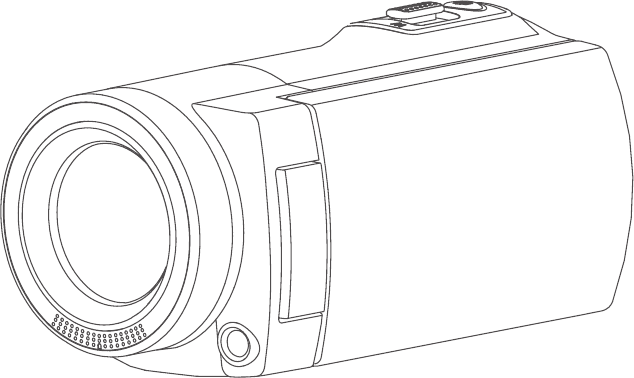
Overview
Thisvideocameraequippedwitha5MegaPixelsensorcantakeH.264formatvideos.TheH.264
technologyallowsforextendedvideorecordingwithlessmemory.Highqualityimagesupto16
mega-pixelscanalsobedeliveredsmoothly.WithacolorLCDmonitor,youcanviewandexamine
thevideoandphotoeasily.
The3”LCDtouchpanelisanidealplatformforyoutooperateyourdevice.Themenuoptionsare
accessiblewithyourngertip.Withthetouchpanel,youcanselecttheoptionsdirectlyandquickly.
ThevideocameraalsofeaturesvideorecordingatanHDresolutionof1920x1080.Youmayconnect
ittoan HDTVviaanHDMI cable, andplaybacktherecorded high-denitionvideosonthewide
screenHDTVeasily.
Moreover, the camera is equipped with wireless module and the exclusive application. You can
broadcastlivestreamingofthecameraonUstreamwebsiteviawireless.Yourfamilyandfriends
canwatchthelivevideostreamingofthecamerafromtheirsmartphones,tables,orcomputers.
A 10X optical zoom helps you to control over the video and photo you take. The varied effect
options,suchasPre-Record,TimeLapse,andSlowMotion,bringyoumorefunwhilerecording.
The built-in memory allows you to take photos and record videos without a memory card. The
memorycardslotallowsuserstoincreasethestoragecapacity.
The mount thread on the front edge of the lens allows the mounting of screw-on lens/lter for
advancedrecording,suchas,anauxiliarywide-anglelensforprovidingbetterwide-anglescene,a
macrolensforcapturingclose-upphoto,orotherspecialeffectsltersforspecialpurposes.
Moreover,thedevicehasanadvanceduploadingfeature.Withtheexclusivebuilt-inInternet Direct
application,youcanuploadthevideoscapturedbythedevicetothewebsitemoreeffortlessly.
Note
• Apartofthebuilt-inmemoryisusedforthecamera’sFirmwarecodeandsoftware.
• InstallthebundledArcSoftMediaImpressionapplicationforviewingthevideoscorrectlyonthe
computer.
• Inordertoworkwirelesscorrectly,ensurethebundledWiVideoprogram(forWindows®only)
isinstalledandthewirelessLANmoduleofyourcomputerisactivated.
Standard Accessories
Unpackthepackageandensurealistofstandardaccessoriesbelowareincluded:
• MiniUSBCable
• HDMICable
• Adaptor
• Lithium-ionRechargeableBattery
• QuickGuide
• CD-ROM(Software,User’sManual)
• ClothBag
• LensCoverSet(LenscoverandStrap)
5EN
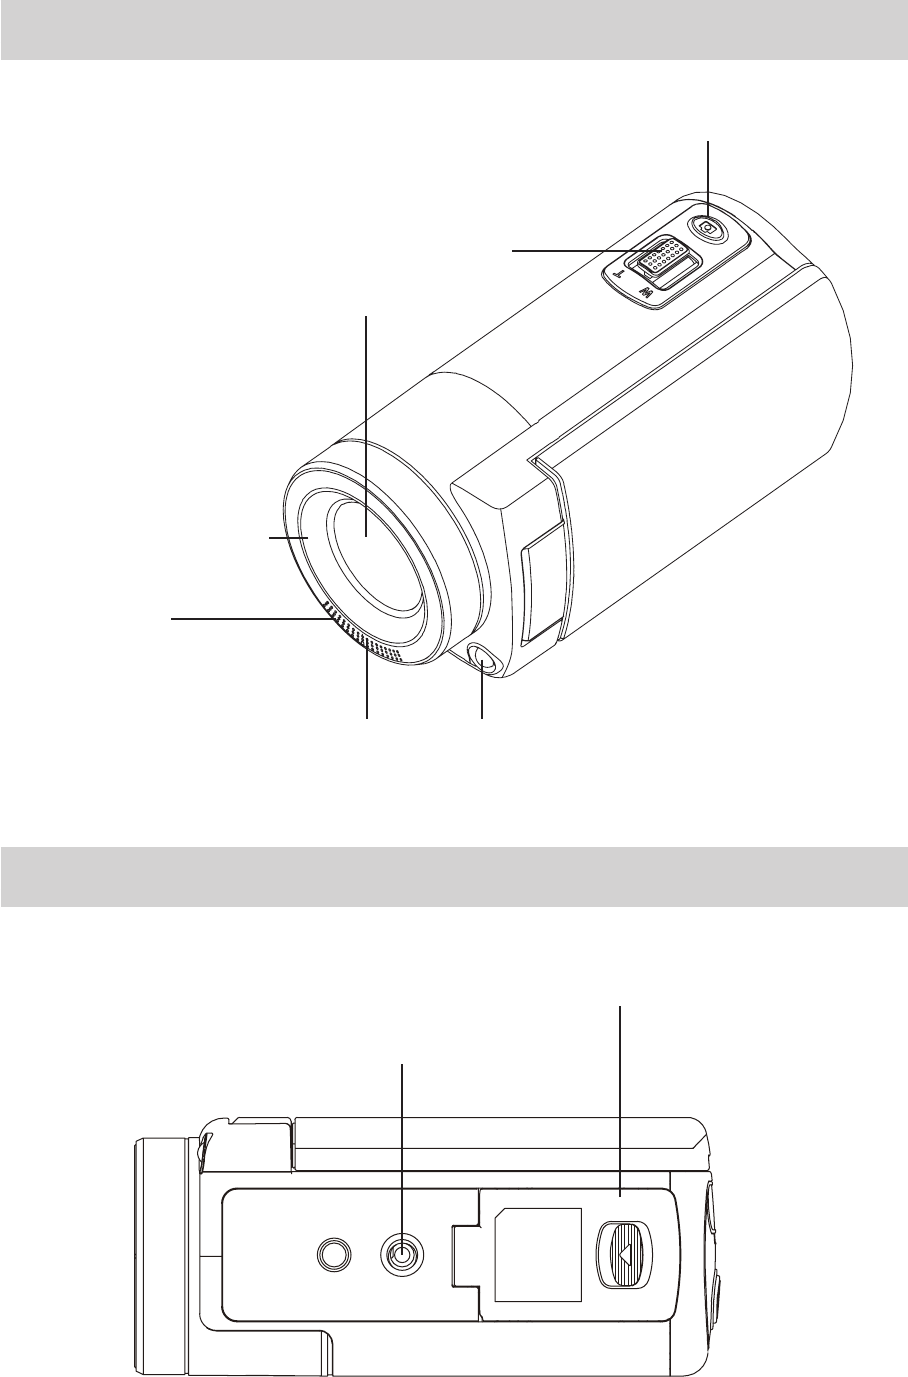
Battery / SD Card Cover
Tripod Socket
Indicator Light
External Lens Mount
Microphone
[Tele/Wide] Button
Optical Lens
[Photo] Button
Front View
Bottom View
6EN
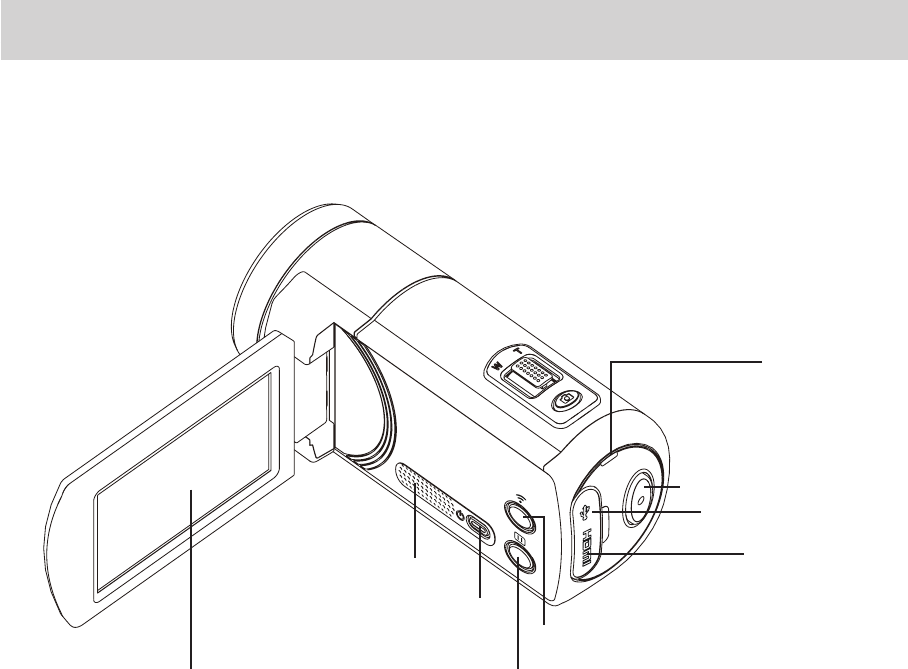
Side/Rear View
[ Pause ] ButtonLCD Touch Panel
[ Power ] Button
Speaker
[ Record ] Button
Indicator
Mini USB Port
HDMI Port
[ Wireless ] On/Off Button
7EN
Section 2
Getting Started
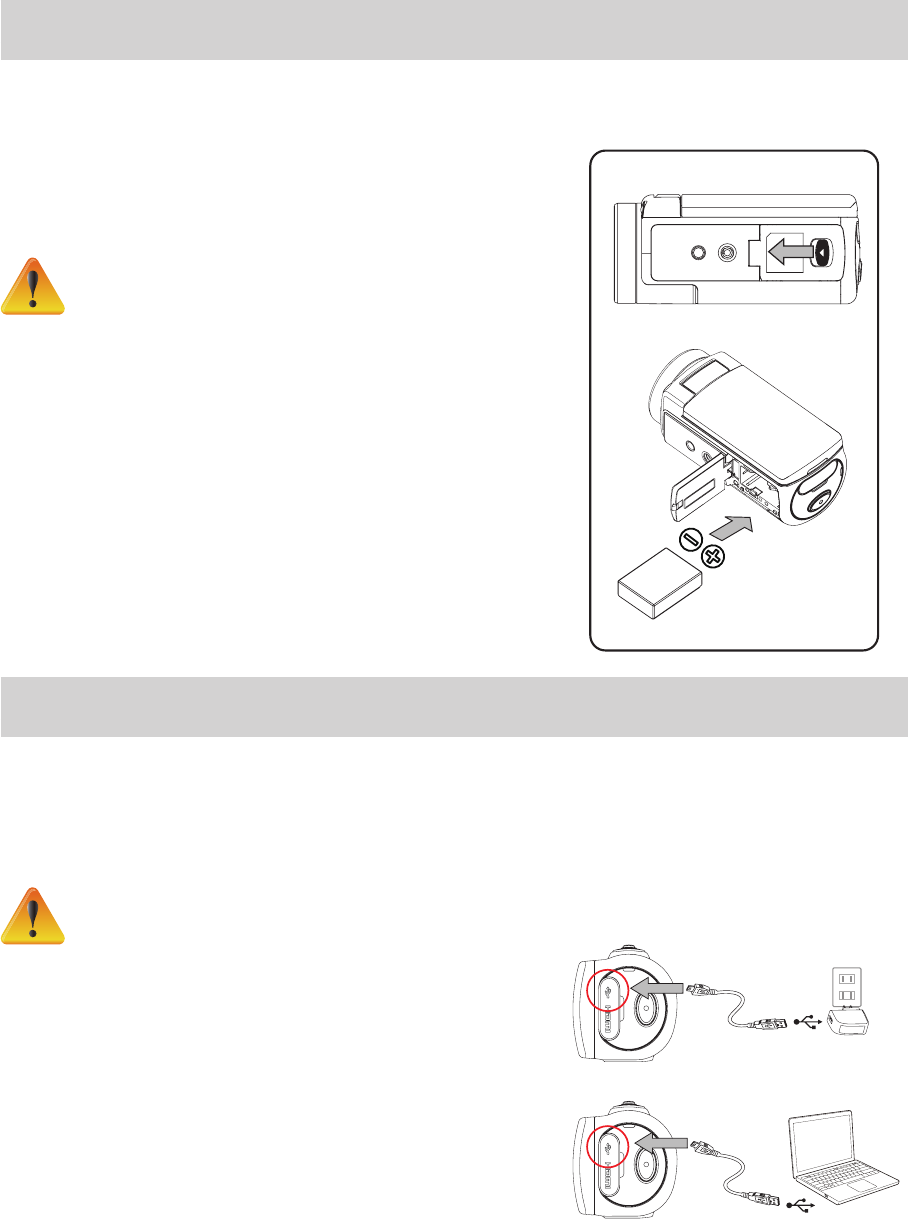
Loading the Battery
Beforeusingthedevice,youmustloadthesuppliedLithium-ionrechargeablebattery.
1.Slidethelatchandopenthebatterycover.
2.Insertthebatterycorrespondinglytothecorrectpolarity
marks(+or-).
3.Closethebatterycoverrmly.
Note
• Differentbatterytypesandsurroundingtemperatures
mayaffectthebatteryperformance.
• Neverexposethebatterytoaheatingequipment
(e.g.,microwaveoven)andattempttodisposeofa
batterybyburningorbythrowingitintoare.Heat
cancausethebatterytoexplodeand/orrelease
causticliquid,whichbothmaypossiblycauseserious
injuries.
• Turnthepoweroffandstopusingthebatteryifyou
observetheconditionofexcessiveheatfromthe
battery.
Charge your battery
Pleasechargethebatteryfullybeforeitsrstuse.YoumustusetheACchargerortheUSBcable
provided.Ablinkinglightwillindicateactivechargingandasolidlightindicatesthatchargingis
complete.Inadapterchargingmode,thefullchargingtimeisabout4-5hoursandthelightwillturnoff
automaticallyafter3~5minutes.(Actualchargingtimemayvary.Itdependsonthebatterycondition.)
Note
• Neverchargethebatterywithawayotherthanas
instructed.Otherwise,areoranyexplosionresulting
inanyseriousinjuryispossible.
• UsetheACadapterprovidedonlywiththeindicated
powersupplyvoltage.
• Useanyotherpowersupplyvoltagemightcause
electricshock.
• Besurethatthepoweroutletthattheadapteryouplug
iniseasilyaccessible.Whenyouneedtodisconnect
powerfromthedevice,besuretounplugthepower
cordfromtheelectricaloutlet.
• Ifwirelessconnectionisactivated,thedevicewillkeep
runninguntilthepowerrunsoff.
PC USB charging mode
Adapter charging mode
8EN
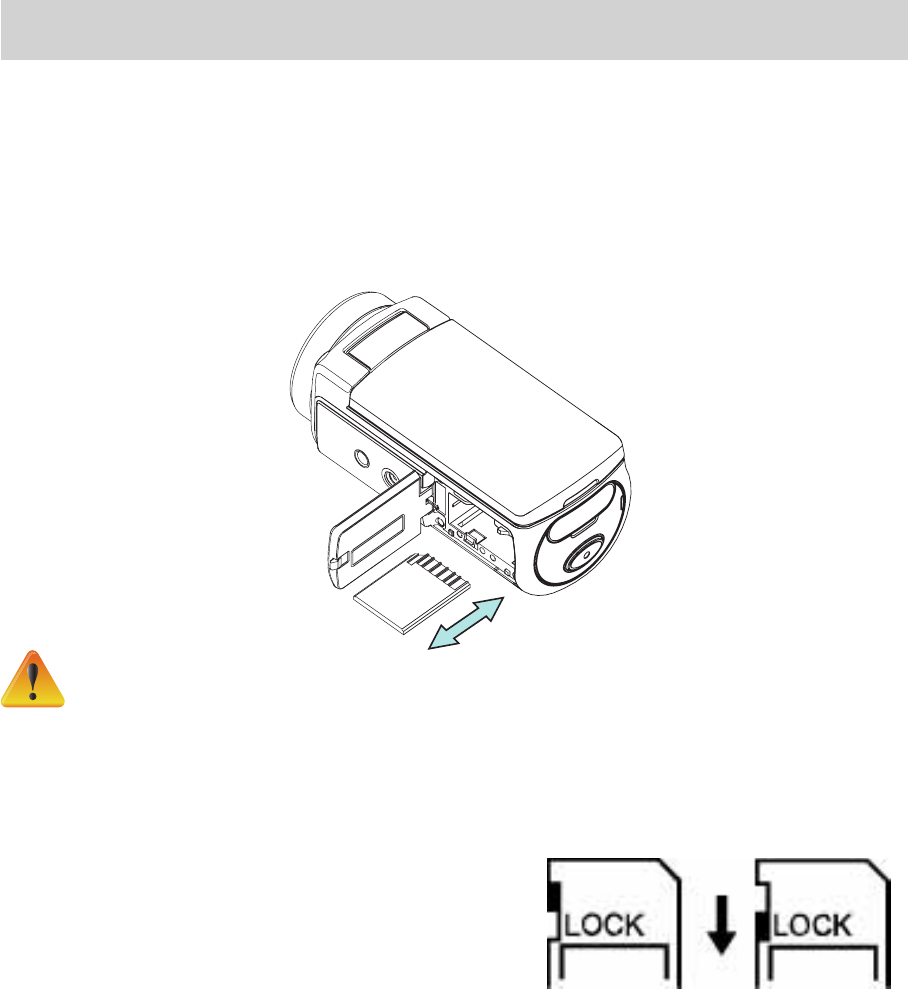
Inserting and Removing SD Card (Optional)
Thevideocameracomeswithaninternalmemorywhichallowsyoutostorephotosandvideos.You
canexpandthememorycapacitybyusinganoptionalSDmemorycard.
1.Insertthememorycardintotheslotuntilitlocksinplace.Pleaserefertothegure.
2.ToremoveaninstalledSDcard,pressthecardinwardstoreleaseit.
3.Whenthecardpopsout,gentlyremoveitfromitsslot.
4.Recommendedmemorycapacity:1GBorabove.
Note
• Whenamemorycardisplaced,videos/photosarekeptinthecardratherthaninthebuilt-in
memory.
• ProtectingDataonSDCard:SDCardisread-onlywhenitislocked.Nophotosorvideos
canberecordedwhentheSDcardislocked.Makesurethelockisonthewriteableposition
beforerecordinganymedia.
9EN
Turning the Video Camera On
• Toturnonthedevice:
1. FlipouttheLCDpanel;thedevicewillturnonautomatically.
2. Orpressthe[ PowerButton ]foronesecondtoturniton.
3. Afteridlingfor3minutes,thedevicewillturnoffautomatically.
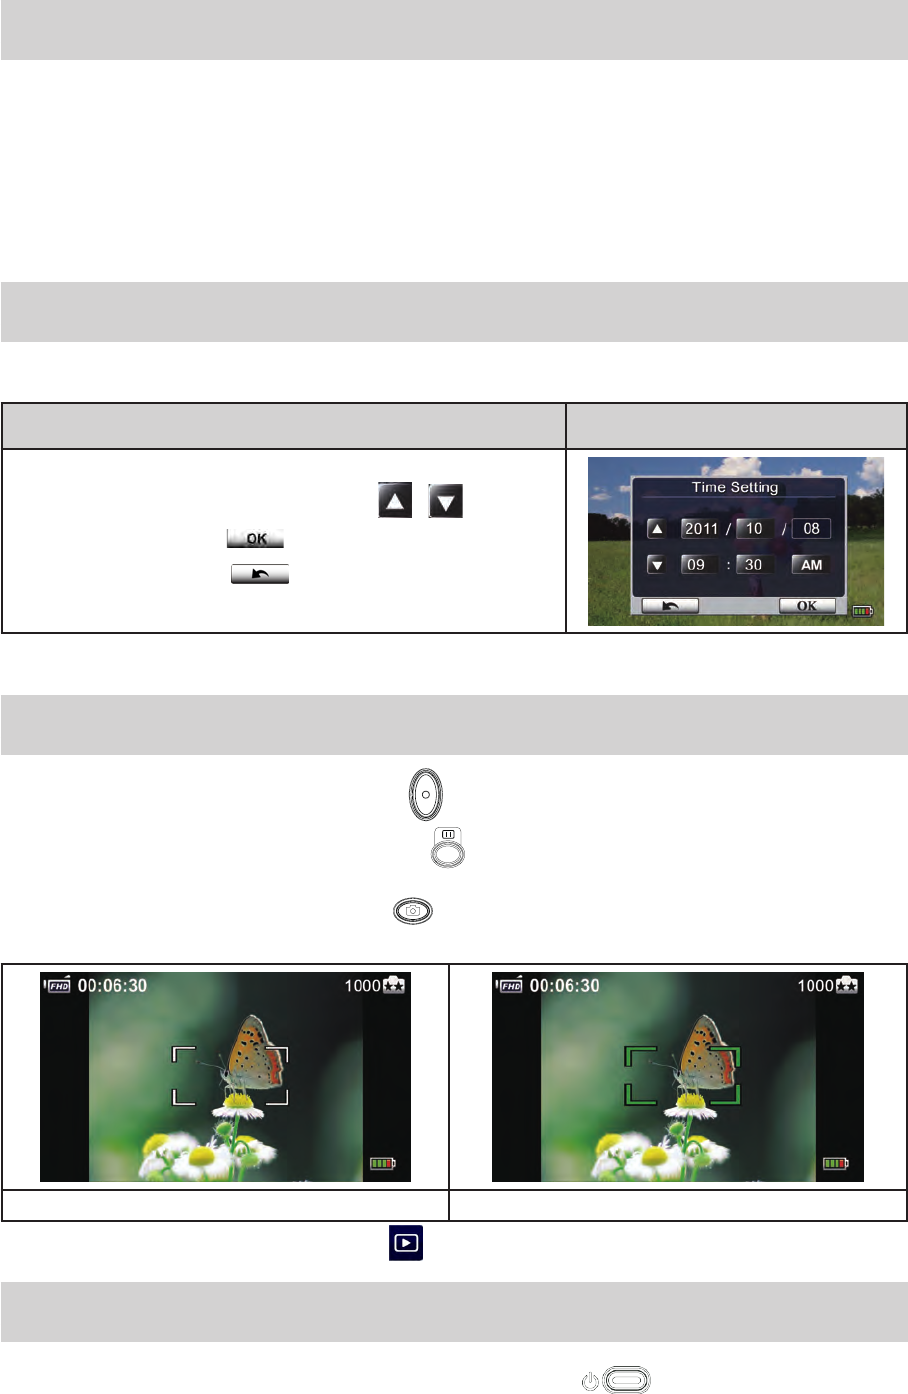
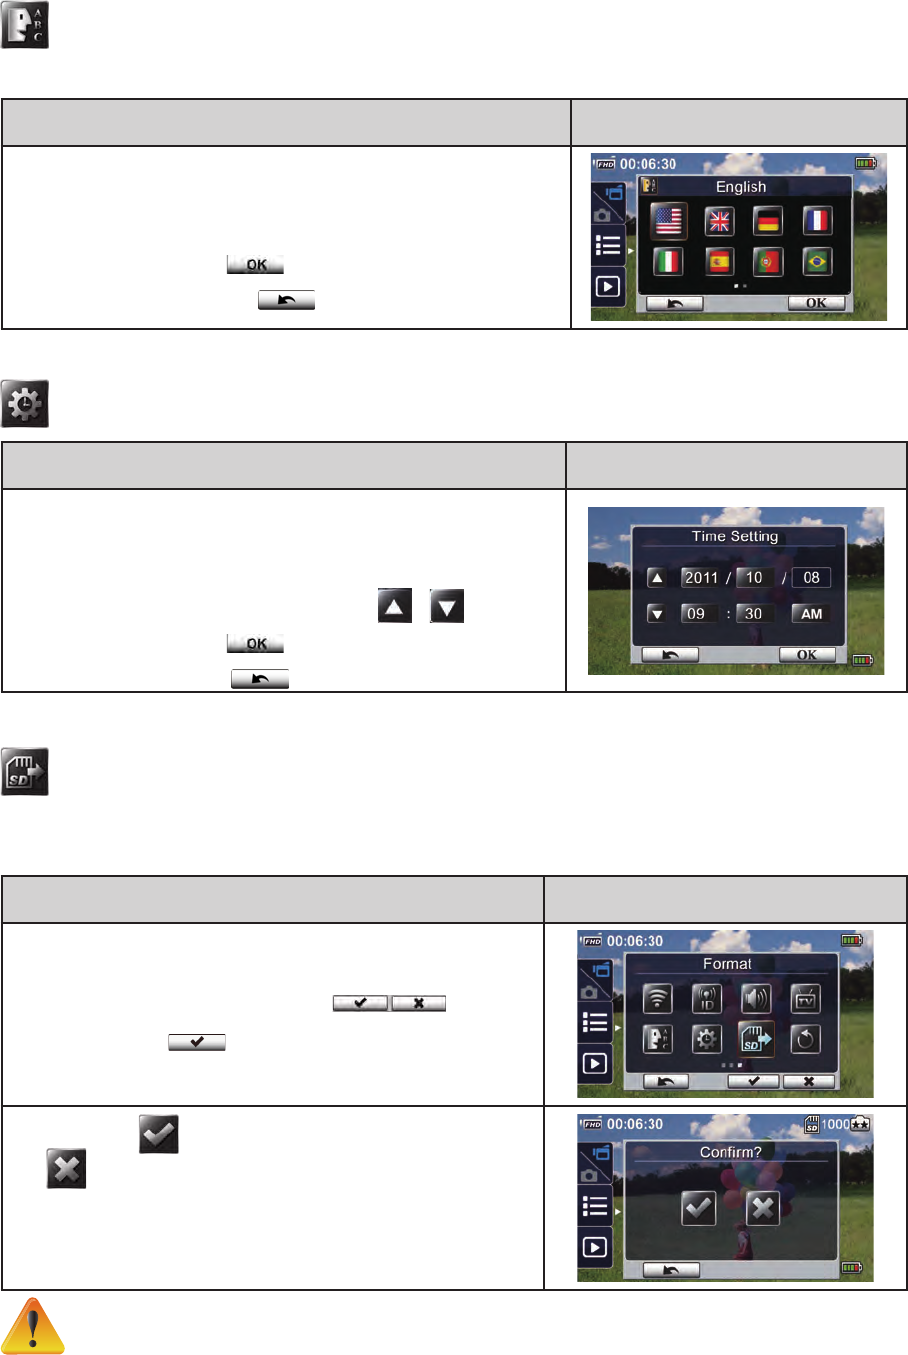
Conguring the Initial Date and Time Setup
• Thetimesettingscreenappearstoallowyoutosetupdateandtime:
Operation Display Screen
1. TouchYear,Month,Day,Hour,Minute,andAM/PMtoset.
2. Adjustthenumericvaluebytouching /
3. TouchtheOKicon( )tovalidatethesetting.
4. TouchtheExiticon()toexit.
Getting Started
• Torecordavideo:Pressthe[VideoButton ]torecordvideo.Tostoprecording,pressitagain.
• Topauserecording:Pressthe[PauseButton ]topauserecording.Tocontinuetherecording,
pressitagain.
• Totakeaphoto:Pressthe[PhotoButton ]halfwaydownuntilthefocusingframeturnsfrom
whitetogreen.Then,pressitfullydowntotakephoto.
FocusingFrame:White FocusingFrame:Green
• Toviewstoredvideosandphotos:Touch onthescreentoswitchtothePlayback
Turning the Video Camera Off
• Toturnoffthedevice:Youcaneitherpressthe[ PowerButton ]foronesecond,oryoucan
placetheLCDpanelbacktoitsoriginalposition.
10 EN
Section 3
Enjoying the Record Mode
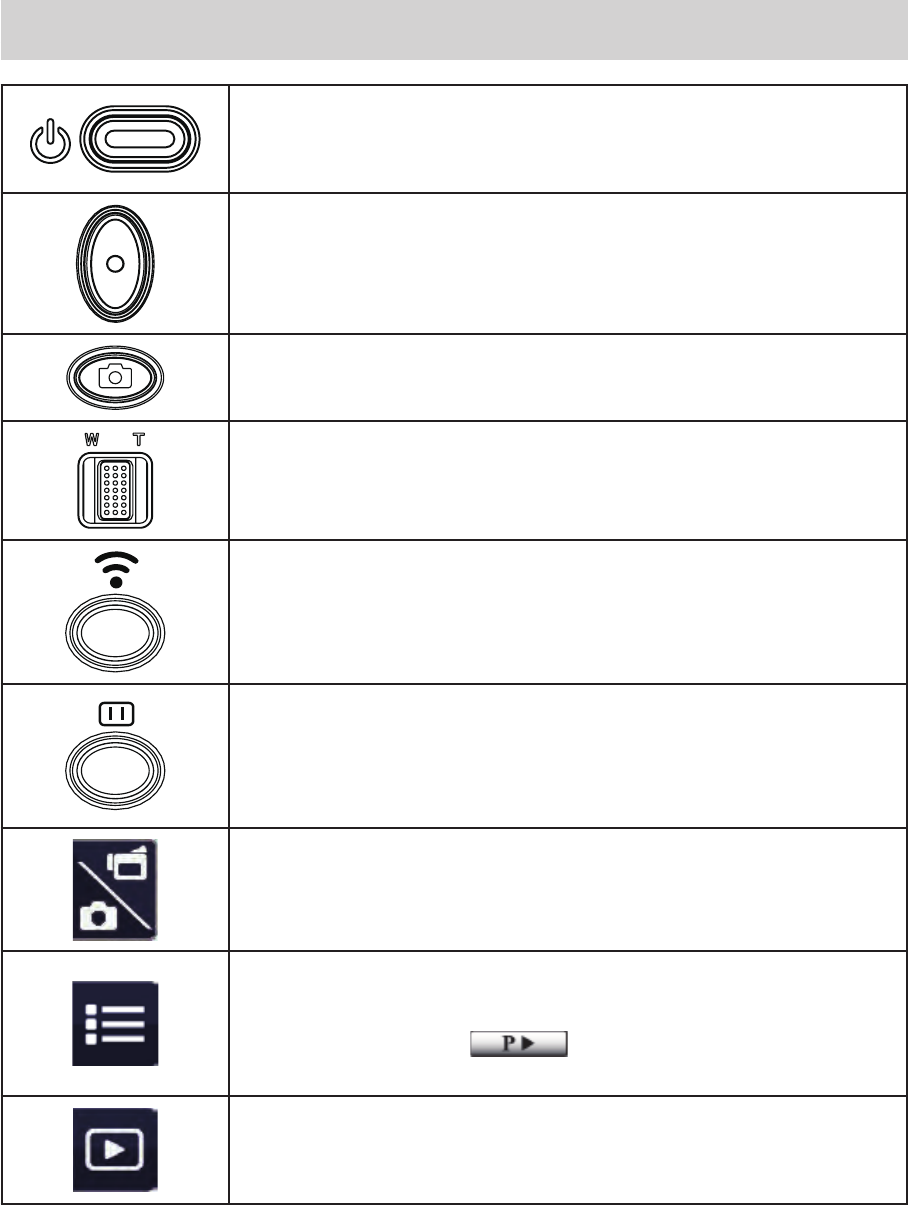
Button Function
Power
‧FlipouttheLCDpanelorpressthe[ Power ]button.
‧Afteridlingfor3minutes,thedevicewillturnoffautomatically.
Record
‧Presstotakevideo.
Pressagaintostop.
Photo
‧Presstotakephoto.
Tele/Wide
‧T:Zoomin.
‧W:Zoomout.
Wireless
‧Touchtoenable/disablewireless
UsewirelesstolinkwithPC/Mobile/Cloud.
Pause
‧Presstopauserecording.
Pressagaintocontinue.
Video/Photo
‧TouchtoswitchbetweenVideoandPhoto.
‧ThedefaultisinVideomode.
Menu
‧Touchtoturntheoptionmenuon.
‧Scrollleft/rightortouch tochangeamongthreemenu
pages(Video/Photo/Setting).
Playback
‧TouchtogotothePlaybackMode.
Viewordeletetherecordedles.
11 EN
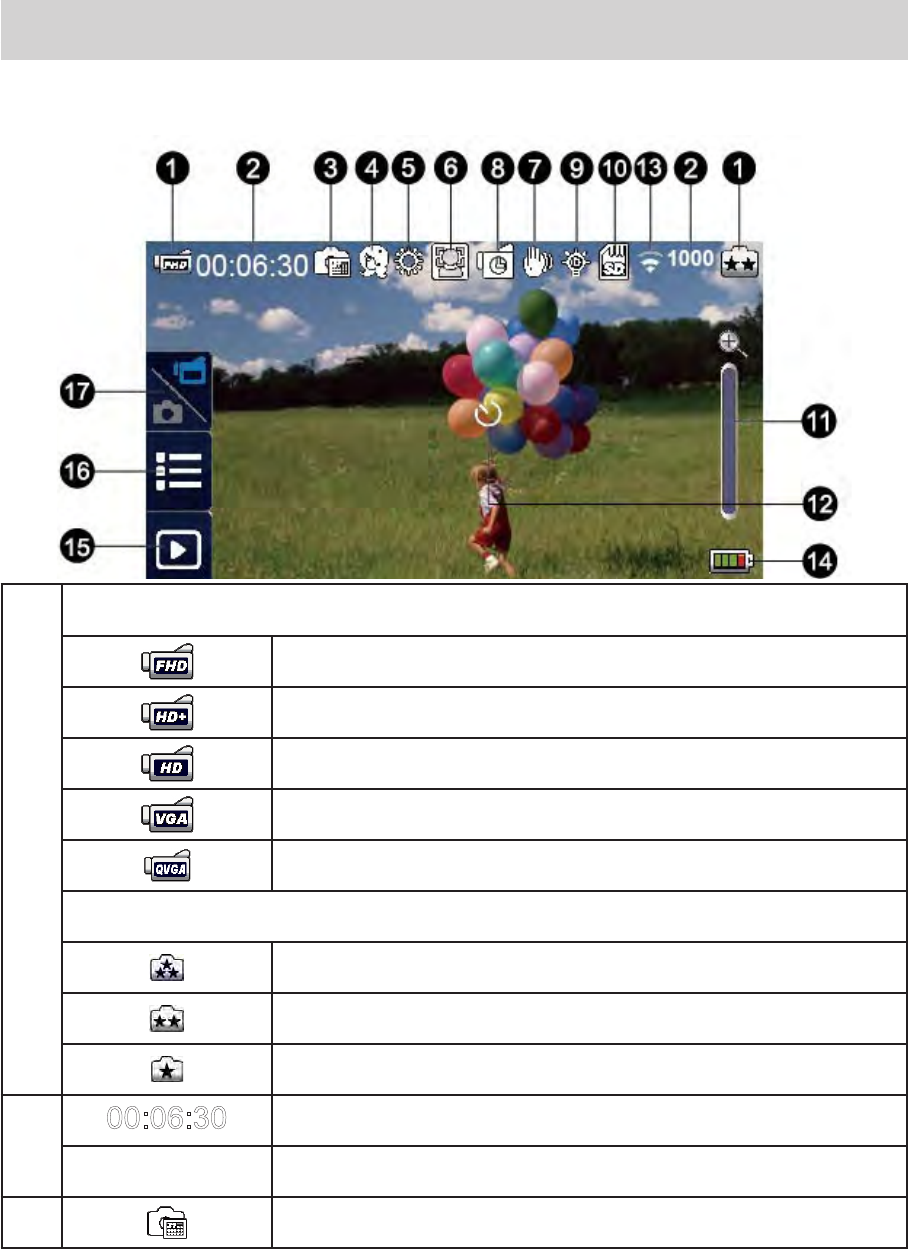
LCD Monitor Information
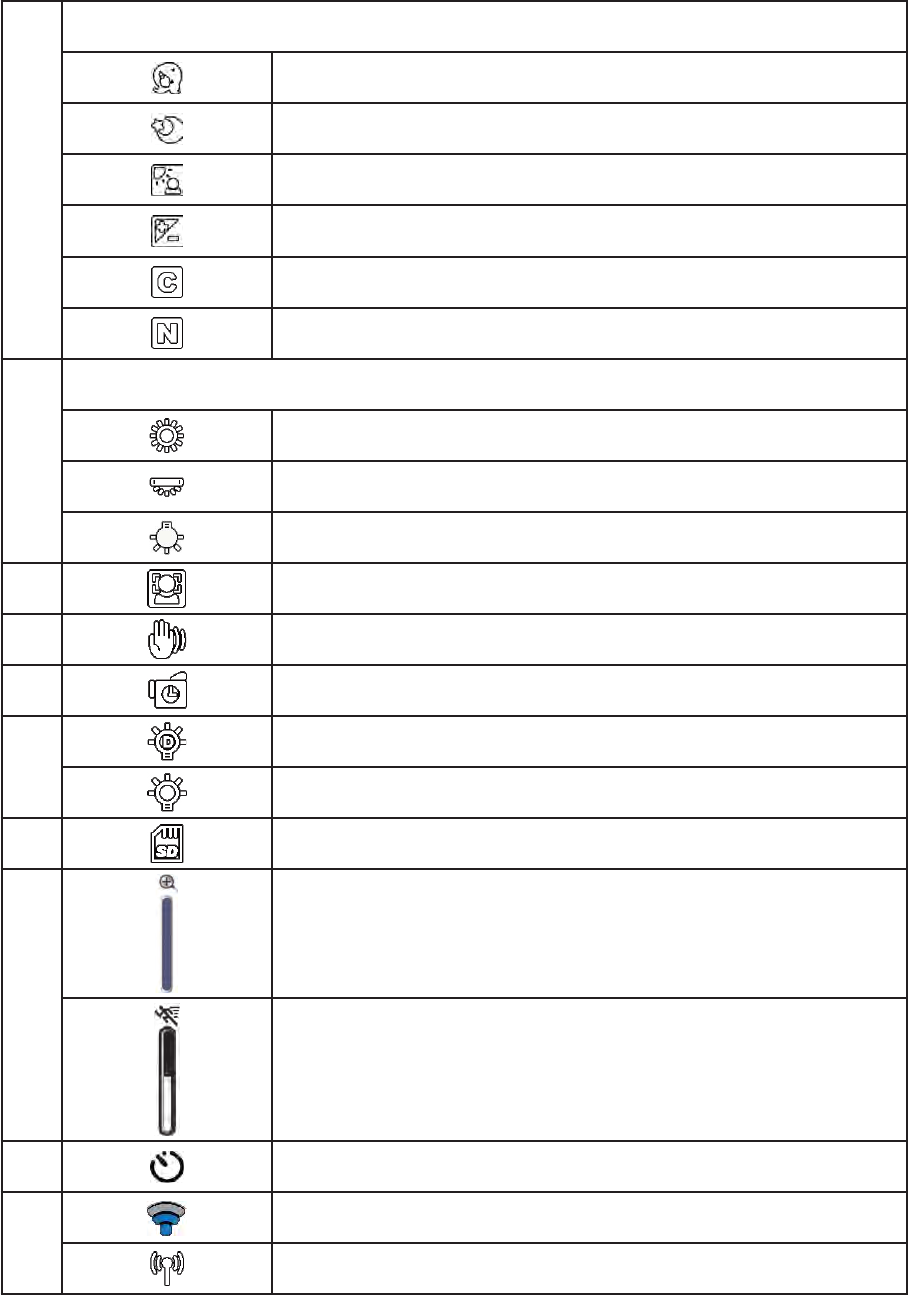
TheindicatorsshownbelowmaydisplayonLCD:
(1)
VideoResolution
FullHD(1080p30fps)
HD(720p60fps)
HD(720p30fps)
VGA(640×480)
SlowMotion(RecordvideoatQVGAresolution.)
PhotoResolution
16MP
5MP
3MP
(2)
00:06:30
Recordingtimethatremainstobetakenatthecurrentresolution
1000
Numberofimagesthatremainstobetakenatthecurrentresolution
(3) DatePrinting(PhotoRecordingOnly)
12 EN
(4)
Scene
Skin
Night
Backlight
Black/White
Classic
Negative
(5)
WhiteBalance
Daylight
Fluorescent
Tungsten
(6) FaceTrackingOn(PhotoOnly)
(7) VideoStabilization
(8) TimeLapse(VideoRecordingOnly)
(9)
DigitalLightOn
LightOn
(10) SDCardInserted
(11)
Zoommeter:
1×~50X(10XOpticalzoomand5×Digitalzoom)
MotionDetect(VideoRecordingOnly)
(12) Self-timerenabled
(13)
WirelessSignalStrength
WirelesstoPC/Mobile/Cloudon

13 EN
(14)
Battery:fullpower
Battery:highpower
Battery:mediumpower
Battery:lowpower
Battery:nopower
DCpowermode
On-screen touchable function icon
(15) PlaybackModeOn
(16) MenuOn
(17) Switchbetween[VideoMode]and[PhotoMode]
Note
• Taponthescreentoclosethetouchablefunctionbar.Tapagaintoshowthebar.
• ThefunctionsofTimeLapse,andSlowMotioncannotbeusedsimultaneously.(OnceTime
Lapseturnson,thefunctionofSlowMotionwillbeswitchedoff;orviceversa.)
• ThefunctionsofMotionDetect,SlowMotion,andTimeLapsecannotbeused
simultaneously.(OnceMotionDetectturnson,thefunctionsofSlowMotionandTimeLapse
willbeswitchedoff.)
• ThefunctionsofMotionDetectandZoomingcannotbeusedsimultaneously.
• ThefunctionsofMotionDetect,TimeLapse,SlowMotion,andPausecannotbeused
simultaneously.
• InACchargingmode,youcanturnonthedeviceanditwillbecomeDCpowermode.InDC
powermode,thedeviceischargedbylesselectriccurrent.
• Thewirelesssignalstrengthindicatestheconnectionstrengthbetweentheaccesspoint
andyourcamera.Someaccesspointsdonotallowyoutoconnecttothenetwork.Some
networksrequiretheauthenticationfromthenetworkservicerprovider(NSP).Pleasefollow
theinstructiononthescreenorcontactwiththenetworkserviceprovider.
14 EN
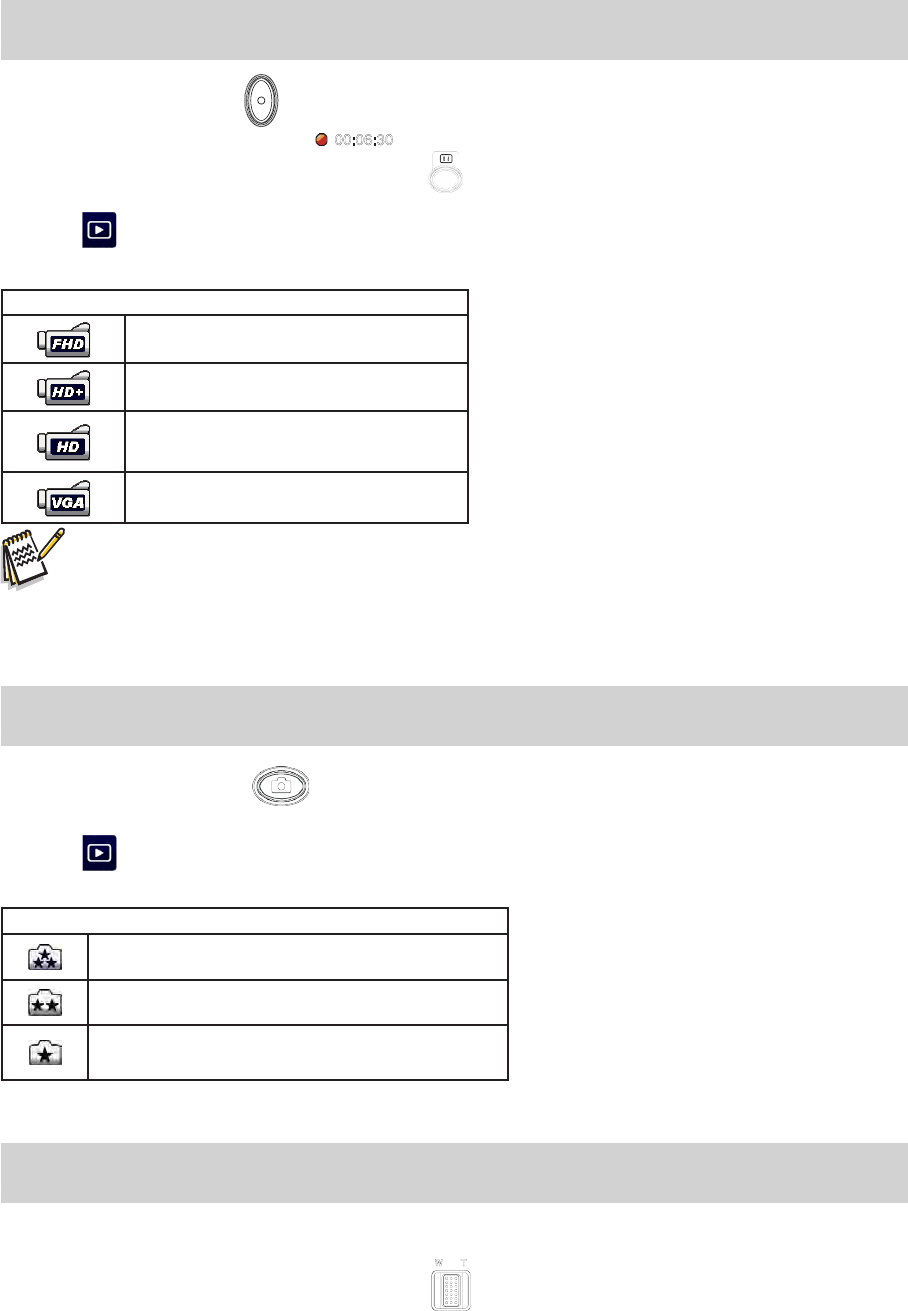
Video Recording
• Pressthe[VideoButton ]tostartrecording.Whenavideoisbeingrecorded,atimeindicator
willdisplayontheLCDmonitor( 00:06:3
0
).Tostoprecording,pressitagain.
• Topauserecording,pressthe[PauseButton ].Tocontinuetherecording,pressitagain.
• Touch onthescreentoviewtherecordedvideo
• Fourresolutionsettingsareavailable:
Video Quality
Full HD (1080p 30 fps)
HD (720p 60 fps)
HD (720p 30 fps)
VGA (640×480)
Note
• Theimageresolutioncapturedduringvideorecordingisthesameasthevideoresolution.
• WhenthefunctionofSlowMotionisactivated,thevideoresolutionisQVGAandtheviewangle
becomessmaller.
Photo Capturing
• Pressthe[PhotoButton ]halfwaydownuntilthefocusingframeturnsfromwhitetogreen.
Then,pressitfullydowntotakephoto.
• Touch onthescreentoviewthephoto.
• Threeresolutionsettingsareavailable:
Image Quality
16 Mega Pixels
5 Mega Pixels
3 Mega Pixels
Using Zoom Function
• Thezoommagniesimageswhenrecordingvideosortakingphotos.
1.Tozoomin/out,presstheTele/WideButton .Thedevicezoomsinbyopticalzoomrst.
Whentheopticalzoomfactorisatmaximum,zoomingstopstemporarily.Pressandholdthe[ Tele
Button ](T)againwhenyouwanttozoominbeyondtheopticalzoomrange.Thedigitalzoomis
activatedandzoomingcontinues.
2.Itcanbesetfrom1Xto50X(10XOpticalzoomand5×Digitalzoom).
15 EN
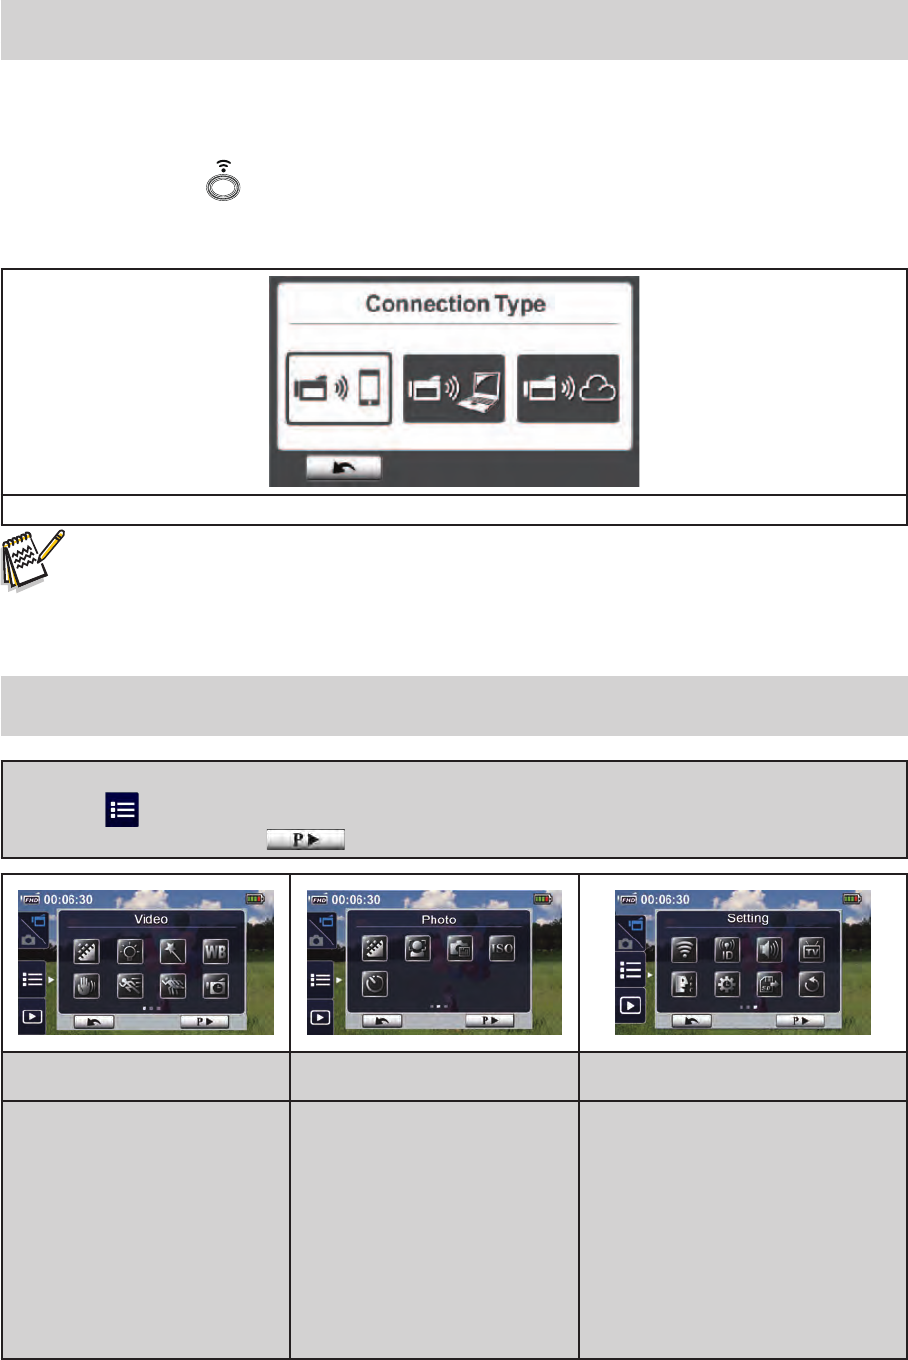
Using Wireless Connection
• ToConnectbetweenthedeviceandPC/Mobile/Cloudwirelessly.
• Tostarttheconnectionofwireless.
• Pressthe[ Wireless ].
• Therearethreeconnectiontypestoselect:WirelesstoMobile/WirelesstoPC/WirelesstoCloud.
ThreeConnectionTypes
Note
• Fordetails,pleaserefertosection6,7,and8.
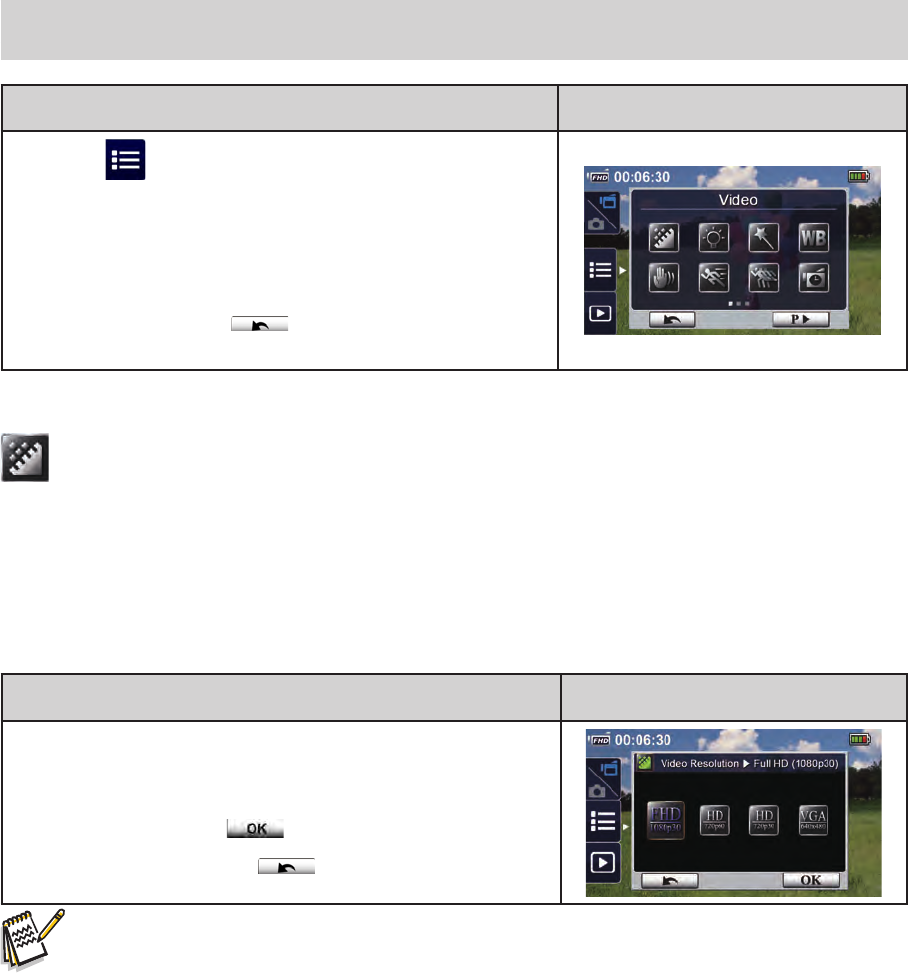
Options for Record Menu
MenuFlow
1. Touch onthescreentoopentheMenu.
2. Scrollleft/rightortouch onthemenuscreentochangeamongthepages.
Video Photo Setting*
• VideoResolution
• Light
• Scene
• WhiteBalance
• VideoStabilization
• MotionDetect
• SlowMotion
• TimeLapse
• PhotoResolution
• FaceTracking
• DatePrinting
• ISO
• Self-Timer
• WirelessConnectionType
• WirelessID
• MenuSound
• TVSystem
• Language
• TimeSetting
• Format
• DefaultSetting
*PleaserefertoSection5forthedetailsof[ Setting ].
16 EN
Video Menu
Operation Display Screen
1. Touch onthescreentoopentheMenu.Themenu
willshowonthescreen.
2. Therstpagecontains8options--Resolution,Light,
Scene,WhiteBalance,VideoStabilization,Motion
Detect,SlowMotion,andTimeLapse--foryoutoadjust
thedevicesettings.
3. TouchtheExiticon()toexit.
Video Resolution
Fourresolutionsettingsareavailable.
• Full HD (1080p 30):Recordvideosat1920×1080p30fpsresolution.
• HD+ (720p 60):Recordvideosat1280×720p60fpsresolution.
• HD (720p 30):Recordvideosat1280×720p30fpsresolution.
• VGA (640×480): Recordvideosat640×480p30fpsresolution.
Operation Display Screen
1. In the Video menu, touch the [ Resolution ] icon on the
screen.
2. Touchtoselectthedesiredoption.
3. TouchtheOKicon( )tovalidatethesetting.
4. TouchtheReturnicon()toreturn.
Note
• Theremainingtimewillbevariedbasedontheoptionyouhave.
17 EN
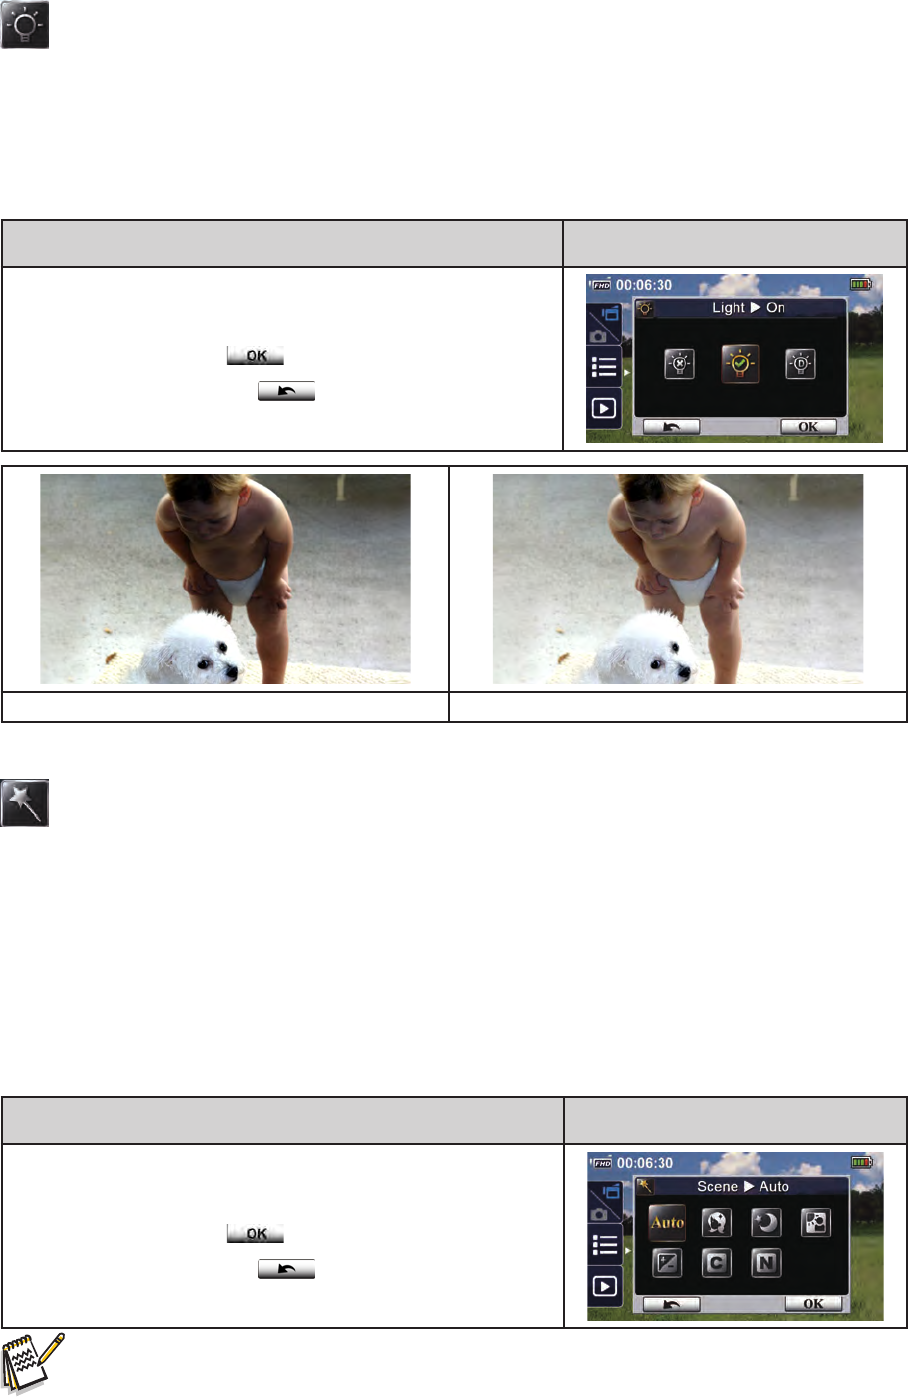
Light
Threelightsettingsareavailable.
• Light ON:Thelightwillbeturnedon.
• Digital Light: Toextendthedynamicrangeforbacklightand the high contrast sense so that the
objectswillbebrighterandclearer.
• Light OFF: Thelightisturnedoff.
Operation Display Screen
1. IntheVideomenu,touchthe[ Light ]icononthescreen.
2. Touchtoselectthedesiredoption.
3. TouchtheOKicon( )tovalidatethesetting.
4. TouchtheReturnicon()toreturn.
WithoutDigitalLight DigitalLightON
Scene
Youcanselectthemodeaccordingtothescenecondition.
• Auto:Shootwithoutanyspecialeffectontheimage.
• Skin: Shootwithaneffectthatmakesskintonesmorenatural.
• Night: UseNightModefornightscenesorunderdullconditions.
• Backlight:Youcantakeshotswhenthebrightlightisbehindthesubject.
• Black/White: Theimageisconvertedtoblack-and-white.
• Classic: Theimageisconvertedtoasepialook.
• Negative: Theimageisconvertedtothenegativeofthenormal.
Operation Display Screen
1. IntheVideomenu,touchthe[ Scene ]icononthescreen.
2. Touchtoselectthedesiredoption.
3. TouchtheOKicon( )tovalidatethesetting.
4. TouchtheReturnicon()toreturn.
Note
• Toavoidblurryimage,placethedeviceonaat,steadysurface,oruseatripodintheNight
Mode.
18 EN
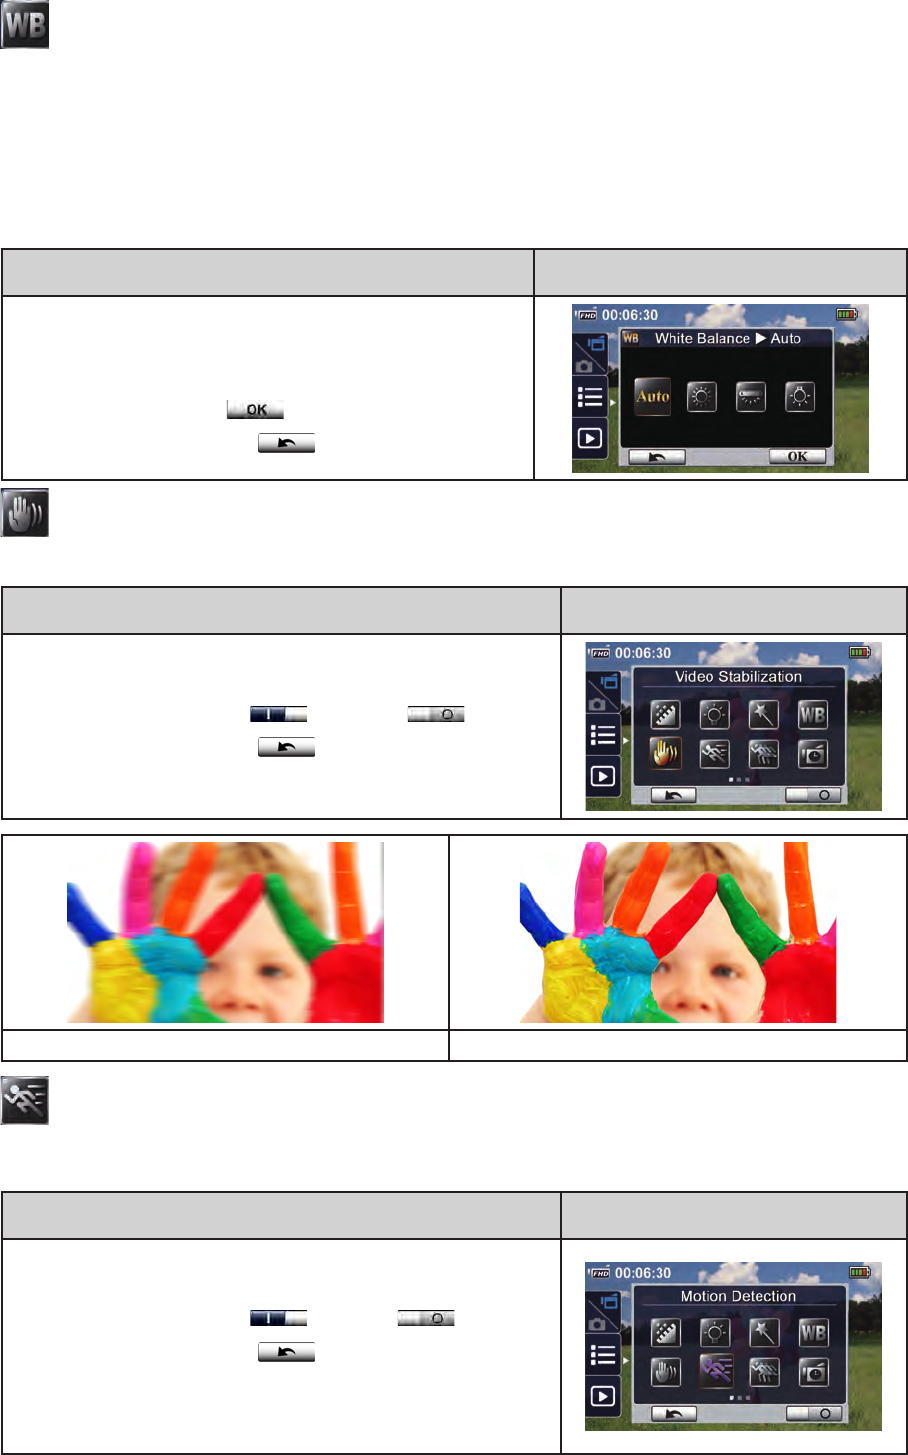
White Balance
Thedeviceadjuststhecolorbalanceofimagesautomatically.Threemanualwhitebalancesettingsare
available.
• Auto: Thedeviceautomaticallyadjustswhitebalance.
• Daylight: Underoutdoorcondition.
• Fluorescent: Underuorescentcondition.
• Tungsten: Undertungstenlightcondition.
Operation Display Screen
1. IntheVideomenu,touchthe[ WhiteBalance ]iconon
thescreen.
2. Touchtoselectthedesiredoption.
3. TouchtheOKicon( )tovalidatethesetting.
4. TouchtheReturnicon()toreturn.
Video Stabilization
Recordwithaneffecttoeliminateanyshakeandincreasethedigitalimagestability.
Operation Display Screen
1. IntheVideomenu,touchthe[ VideoStabilization]iconon
thescreen.
2. Touchtoselect[ On ]()or[ Off ]().
3. TouchtheReturnicon()toreturn.
WithoutStabilization StabilizationON
\ Motion Detect
Recordvideosautomaticallywhenthedevicedetectsamovement.
Operation Display Screen
1. IntheVideomenu,touchthe[ MotionDetect ]icononthe
screen.
2. Touchtoselect[ On ]()or[Off]().
3. TouchtheReturnicon()toreturn.
4. Thedevice will start to record a video automatically if it
detectsamovement.Itwillstoprecordingonceitdetects
nomovement.
19 EN
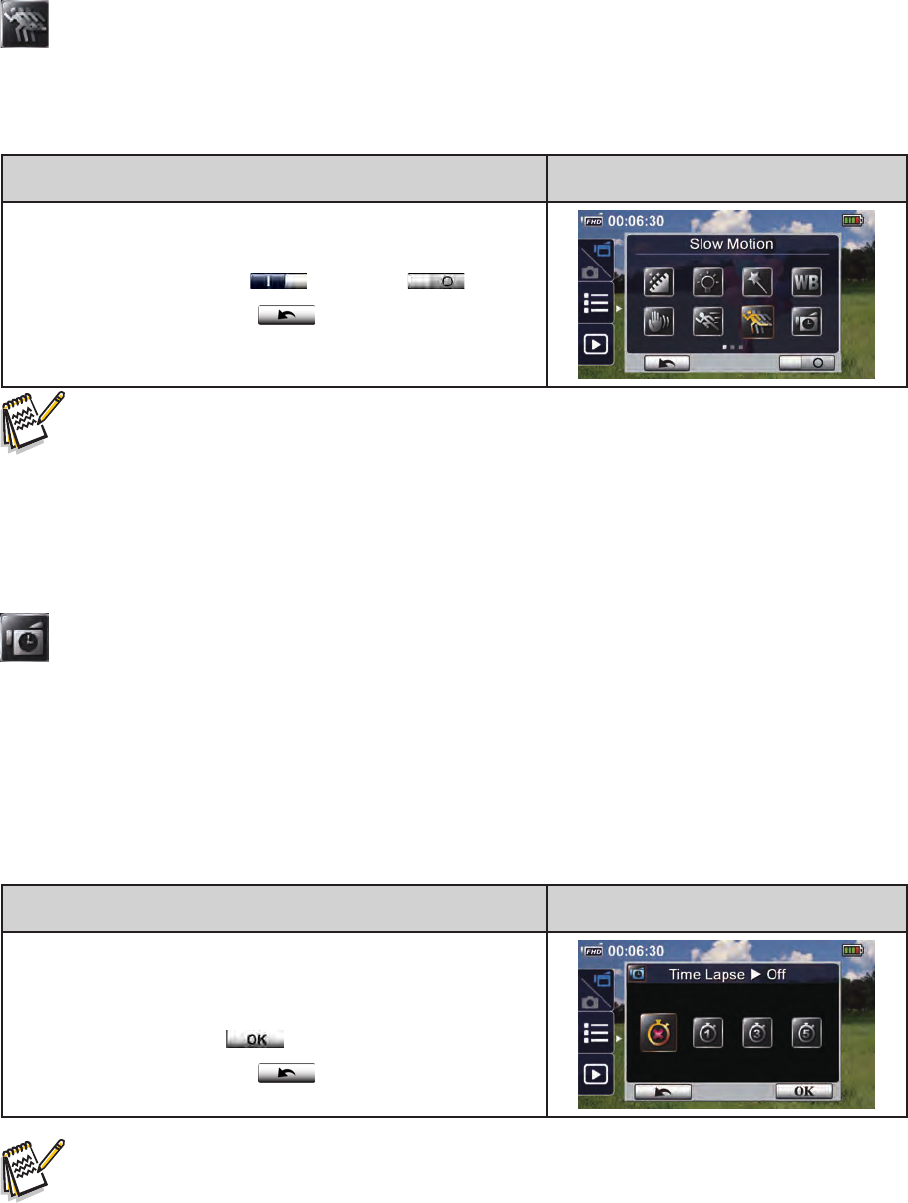
Slow Motion
Recordvideoswithslowmotioneffect.Whenplayingthevideo,theplaybacktimewillbelongerthan
theactualrecordingtime.Someoccasionsyoucanusethiseffect,suchastheskilldemonstrationof
athleticactivitiesofallkinds,orakeymomentinanathleticgame.
Operation Display Screen
1. IntheVideomenu,touchthe[ SlowMotion ]icononthe
screen.
2. Touchtoselect[ On ]()or[ Off ]().
3. TouchtheReturnicon()toreturn.
Note
• WhenSlowMotionfunctionisactivated,audiowillnotberecordedanddigitalzoomwillbecome
disabled.
• TheviewanglemaybecomesmallerwhentheSlowMotionisactivated.
• WhenSlowMotionfunctionisactivated,thevideoresolutionisQVGA.
Time Lapse
Recordstill images at specic intervals you canset a play as one video le.Thiseffect is good for
recordingcloudscapes,seedgerminatingandowersopening.
• Off:DisableTimeLapse.
• 1 Second.: Recordoneframepersecond.
• 3 Seconds: Recordoneframeevery3seconds.
• 5 Seconds: Recordoneframeevery5seconds.
Operation Display Screen
1. IntheVideomenu,touchthe[ TimeLapse ]icononthe
screen.
2. Touchtoselectthedesiredoption.
3. TouchtheOKicon( )tovalidatethesetting.
4. TouchtheReturnicon()toreturn.
Note
• PausefunctioncannotbeusedwhenTimeLapsefunctionisactivated.
20 EN
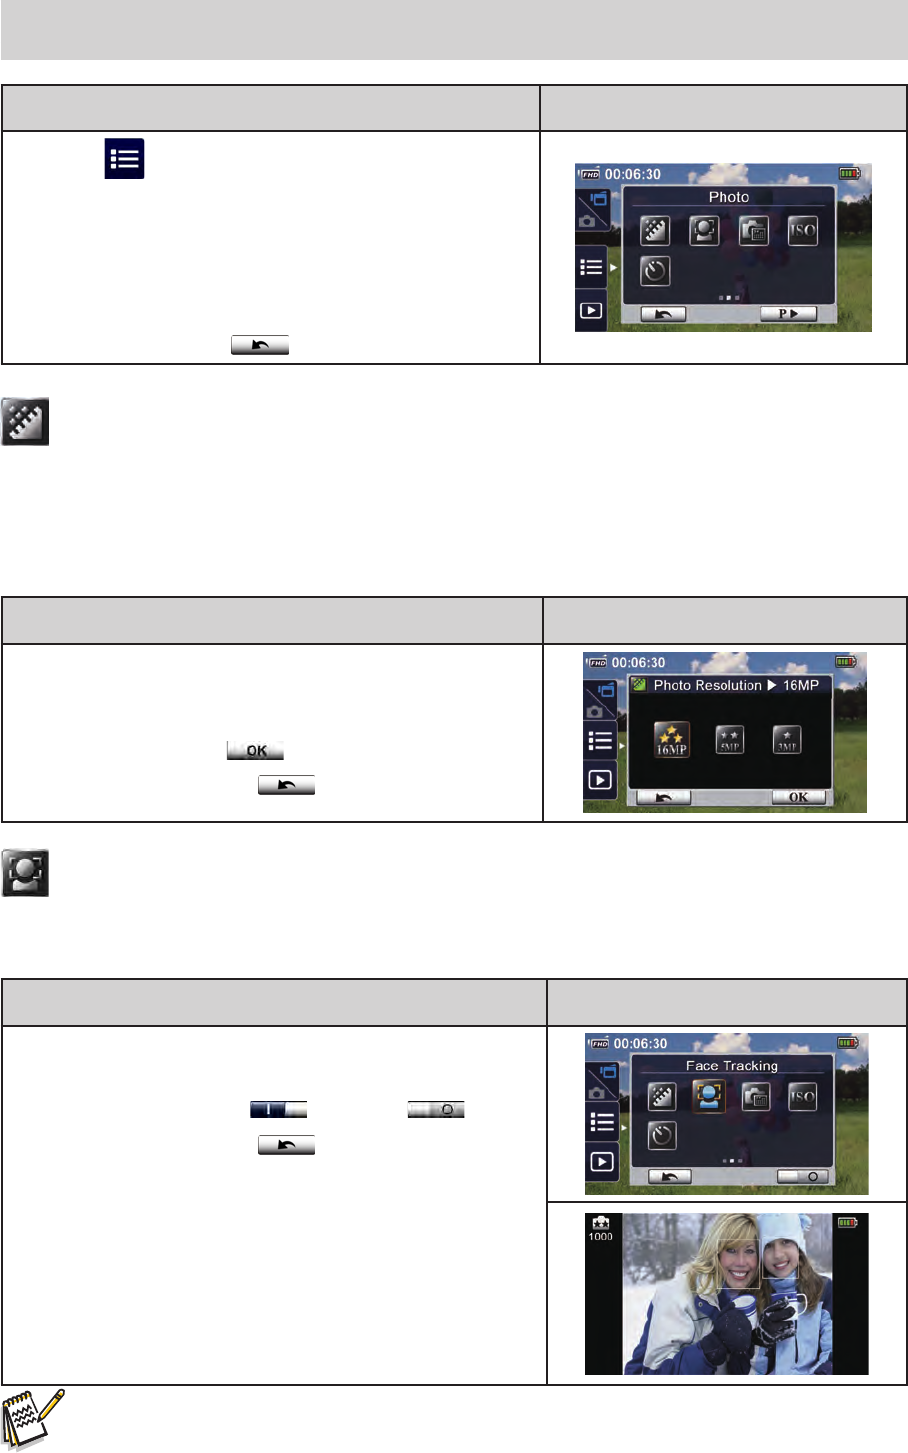
Photo Menu
Operation Display Screen
1. Touch onthescreentoopentheMenu.Themenu
willshowonthescreen.
2. Swipeonthemenuscreentochangethepage.
3. Thesecondpagecontains5options--Resolution,Face
Tracking,DatePrinting,ISO,andSelf-Timer--foryouto
adjustthedevicesettings.
4. TouchtheExiticon()toexit.
Photo Resolution
Threeresolutionsettingsareavailable.
• 16MP:Shootphotoat4608×3456,16MPquality.
• 5MP:Shootphotoat2592×1944,5MPquality.
• 3MP:Shootphotoat2048×1536,3MPquality.
Operation Display Screen
1. InthePhotomenu,touchthe[ Resolution ]icononthe
screen.
2. Touchtoselectthedesiredoption.
3. TouchtheOKicon( )tovalidatethesetting.
4. TouchtheReturnicon()toreturn.
Face Tracking
Thecameracandetecthumanface(s)andfocusontheface(s)automatically.Thisfunctioncanwork
withphotocapturingonly.Itiswonderfultocapturebeautifulportraitsinbacklightsituations.
Operation Display Screen
1. InthePhotomenu,touchthe[ FaceTracking ]iconon
thescreen.
2. Touchtoselect[ On ]()or[ Off ]().
3. TouchtheReturnicon()toreturn.
• WhenFaceTrackingisactivated,thefocusframe(s)willaimatthehumanface(s).Also,theframe
(s)willdisplayontheLCDbeforethe[ Record ]buttonispressed.
Note
21 EN
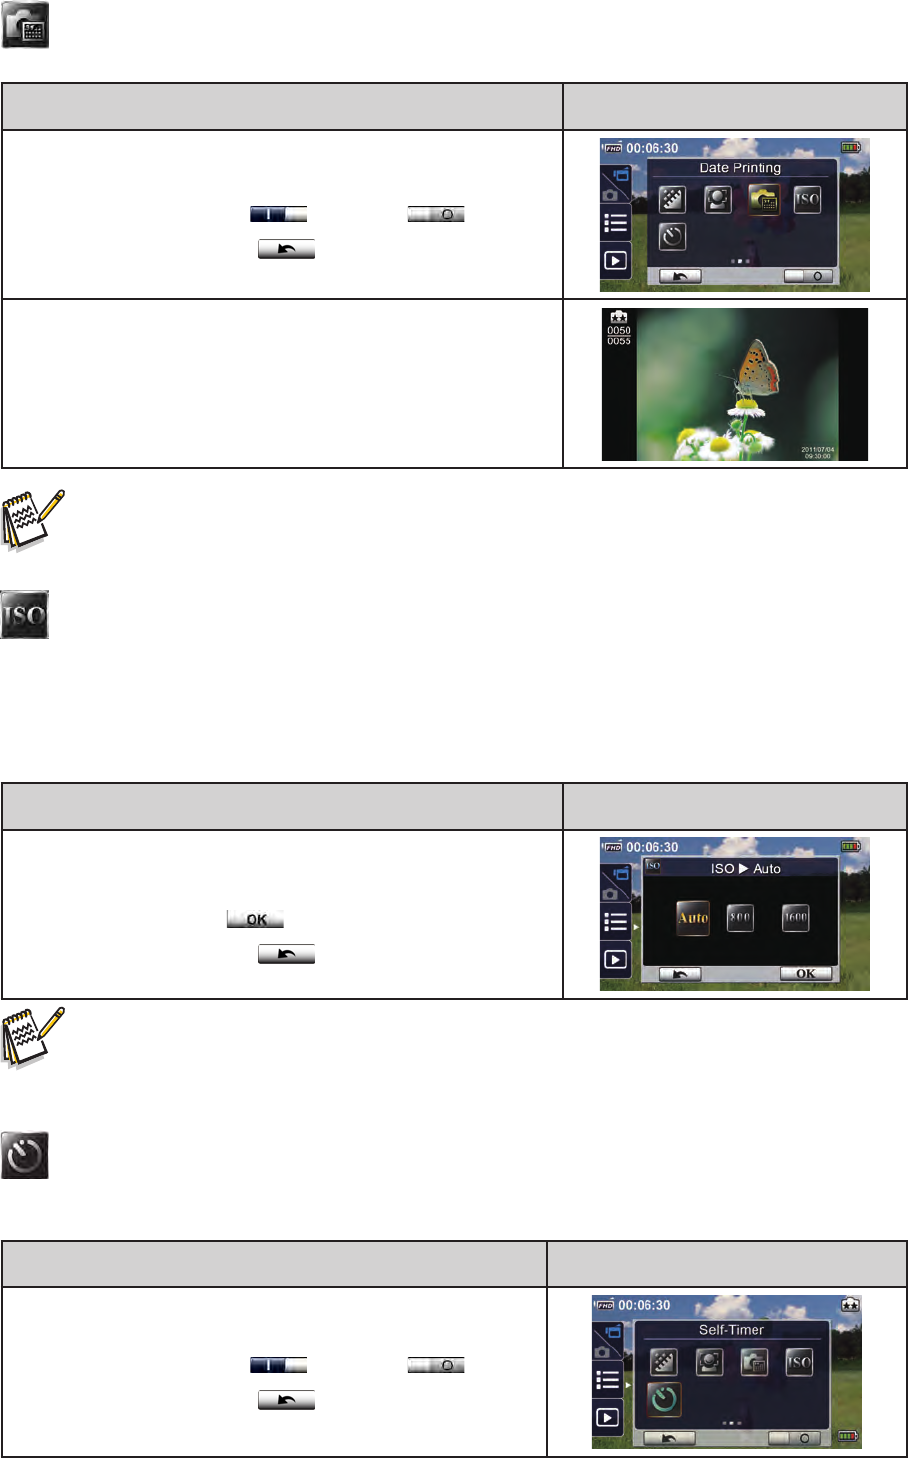
Date Printing
Imprintthedateandtimeonthephoto.
Operation Display Screen
1. InthePhotomenu,touchthe[ DatePrinting ]icononthe
screen.
2. Touchtoselect[ On ]()or[ Off ]().
3. TouchtheReturnicon()toreturn.
4. Onceaphotoistaken,thedatewilldisplayattheright
downcornerofthephtowhenyouactivatethisfunction.
Note
• DatePrintingfunctioncannotbeusedinRecordMode.
ISO
ThecameraadjuststheISOsensitivityofitsimagesautomatically.TwomanualISOsensitivitysettings
areavailable(800/1600).Thelargerthenumberis,thehighertheISOsensitivitywillbe.Selectthelower
settingtoshootasmootherimage.Selectthehighersettingtoshootaphotoinadullenvironment,orto
shootamovingsubjectatahighspeed.
Operation Display Screen
1. InthePhotomenu,touchthe[ ISO ]icononthescreen.
2. Touchtoselectthedesiredoption.
3. TouchtheOKicon( )tovalidatethesetting.
4. TouchtheReturnicon()toreturn.
Note
• Theimagemaybecomeblurredwhenyouselectalargernumber.
Self-Timer
Theself-timerallowsyoutotakephotoswithaten-secondtimeofdelay.TheLEDlightatthefrontofthe
devicewillalsoblink.Theblinkingspeedwillincreaserightbeforethephotoistaken.
Operation Display Screen
1. InthePhotomenu,touchthe[ Self-Timer ]icononthe
screen.
2. Touchtoselect[ On ]()or[ Off ]().
3. TouchtheReturnicon()toreturn.
22 EN
Section 4
Enjoying the Playback Mode
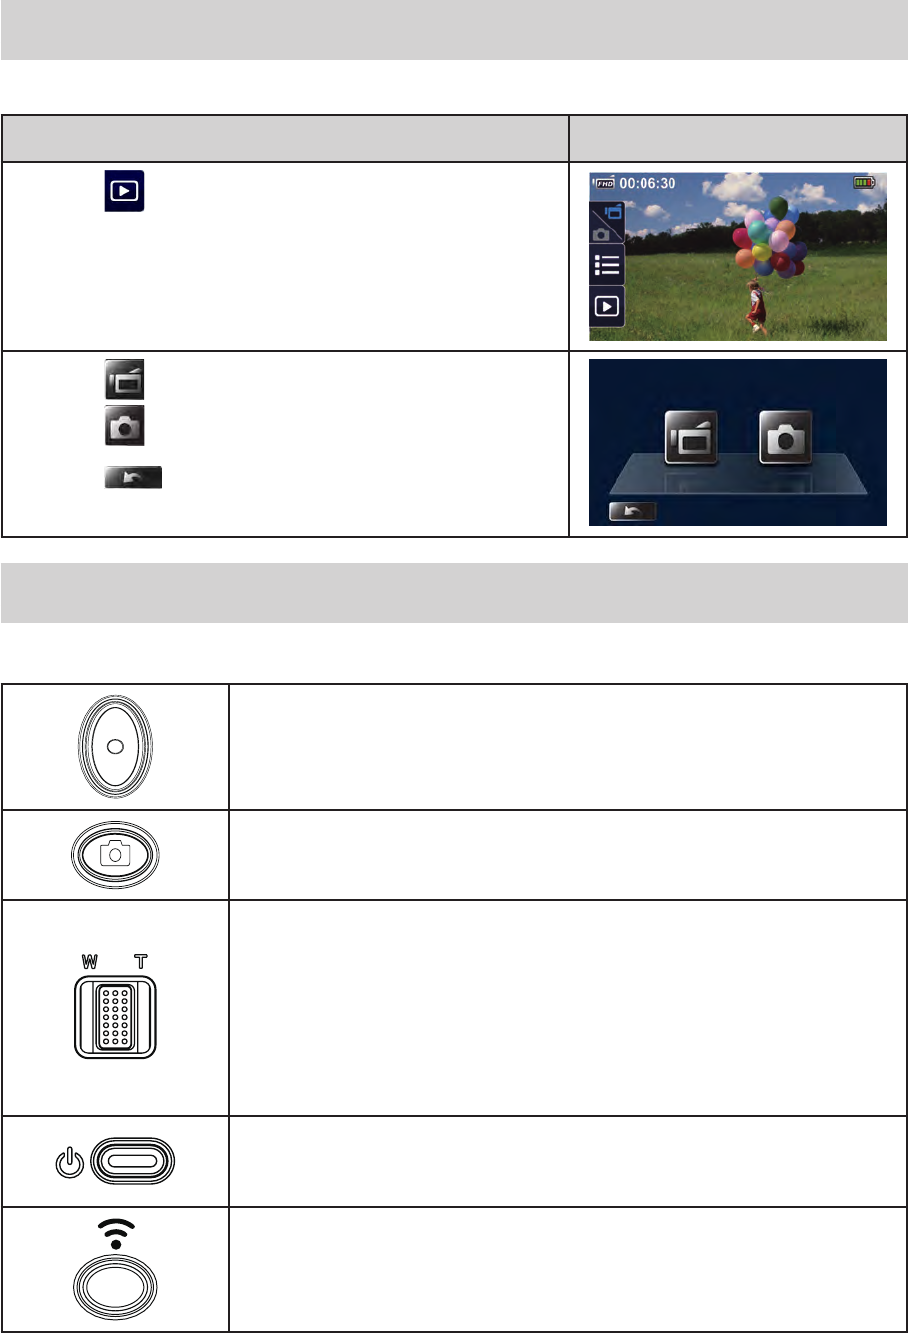
Operations for Playback Mode
ThePlaybackModeistoviewormanagevideos/photosfromthebuilt-inmemoryorinanSDCard.
Operation Display Screen
1. Touch onthescreentoswitchtothePlaybackmode.
2. Touch togototheVideoPlaybackMode.
3. Touch togotothePhotoPlaybackMode
4. Touch togobacktotheRecordMode.
Button Function
TheButtonshavethefollowingfunctionsinPlaybackMode.
Video Button:
1.PresstogothePlaybackModeMainMenu.
Photo Button:
1.PresstogothePlaybackModeMainMenu.
[T] Tele Button:
1.Volumeincreases.
2.Zoominthephoto
[W] Wide Button
1.Volumedecreases.
2.Zoomoutthephoto
Power Button:
1. Pressonesecondtoturnthedeviceonoroff.
Wireless Button:
WirelessOn/Off
23 EN
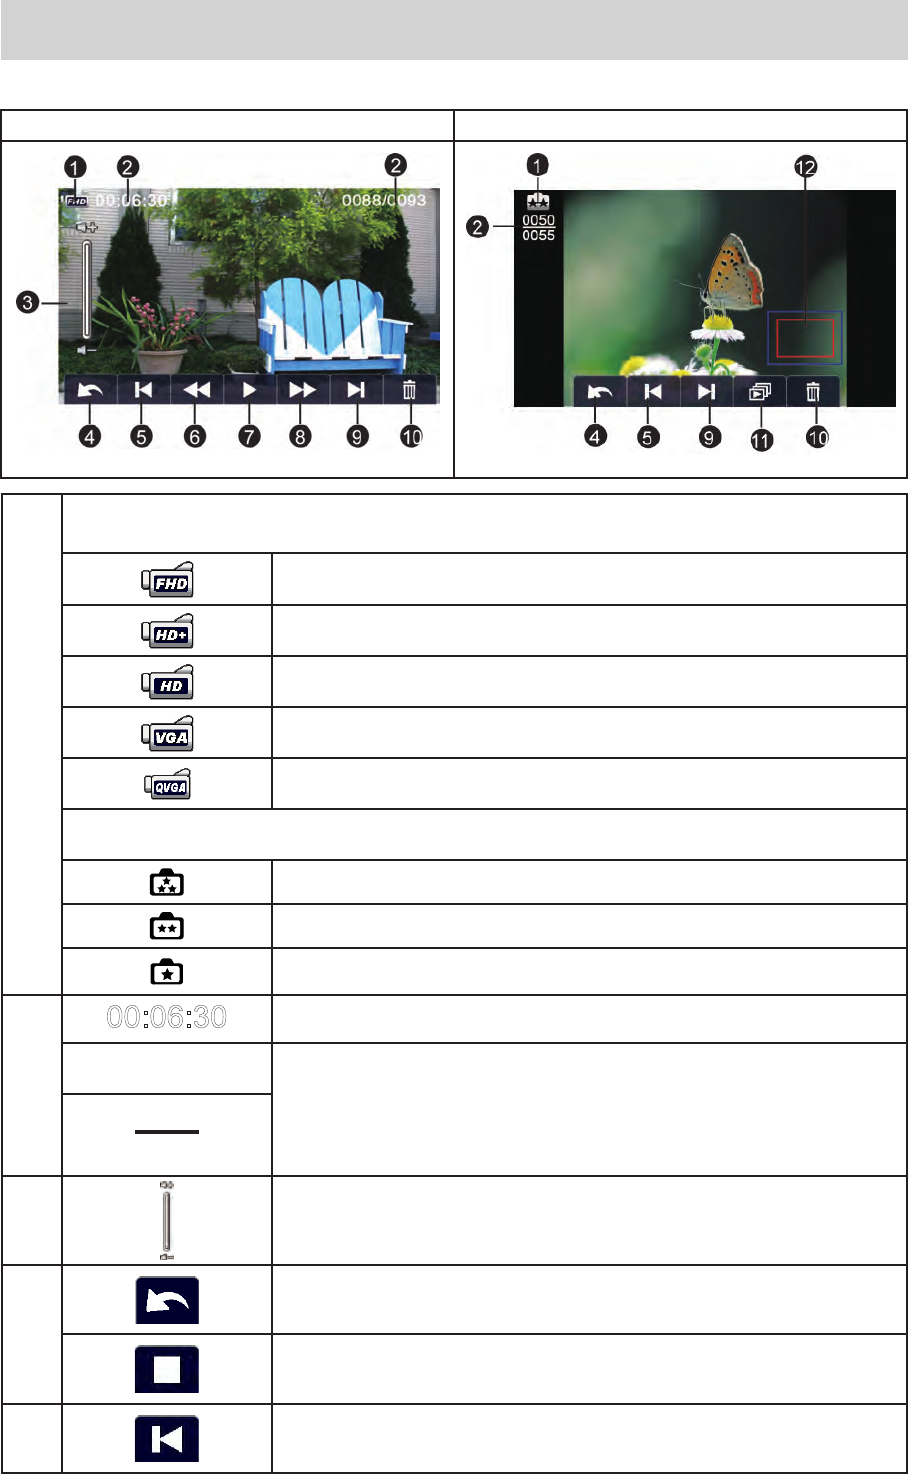
LCD Monitor Information
IndicatorsonLCDscreenareshownasbelowintwoPlaybackModes:
VideoPlaybackMode PhotoPlaybackMode
(1)
VideoResolution
FullHD(1080p30fps)
HD(720p60fps)
HD(720p30fps)
VGA(640×480)
SlowMotion(QVGA)
PhotoResolution
16MP
5MP
3MP
(2)
00:06:30
Videoplaybacktimer.
0088/0093
Currentnumber/Totalnumberofphotos/videos.
0050
0055
(3) Volume
(4)
Return
Videostop
(5) Previousvideo/photo
24 EN
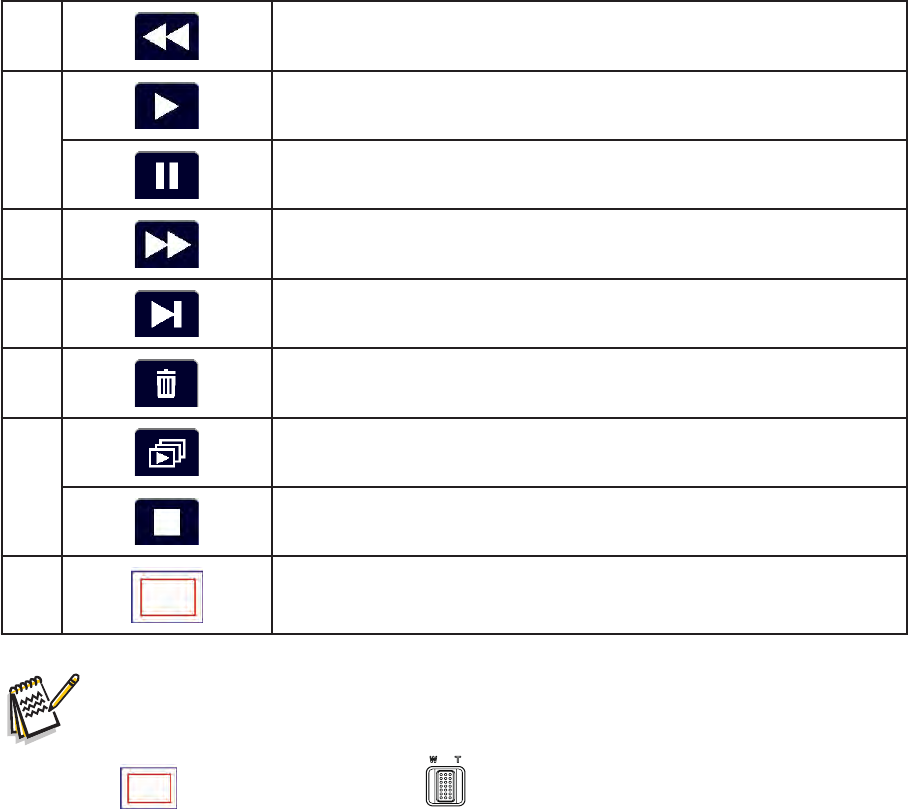
(6) Videorewind
(7)
Videoplay
Videopause
(8) Videoforward
(9) Nextvideo/photo
(10) Delete
(11)
Slideshow
Slideshowstop
(12) MagnicationIndicator
Note
• The (icon)willbeshownonlyif isselectedinphotoPlaybackMode.
25 EN
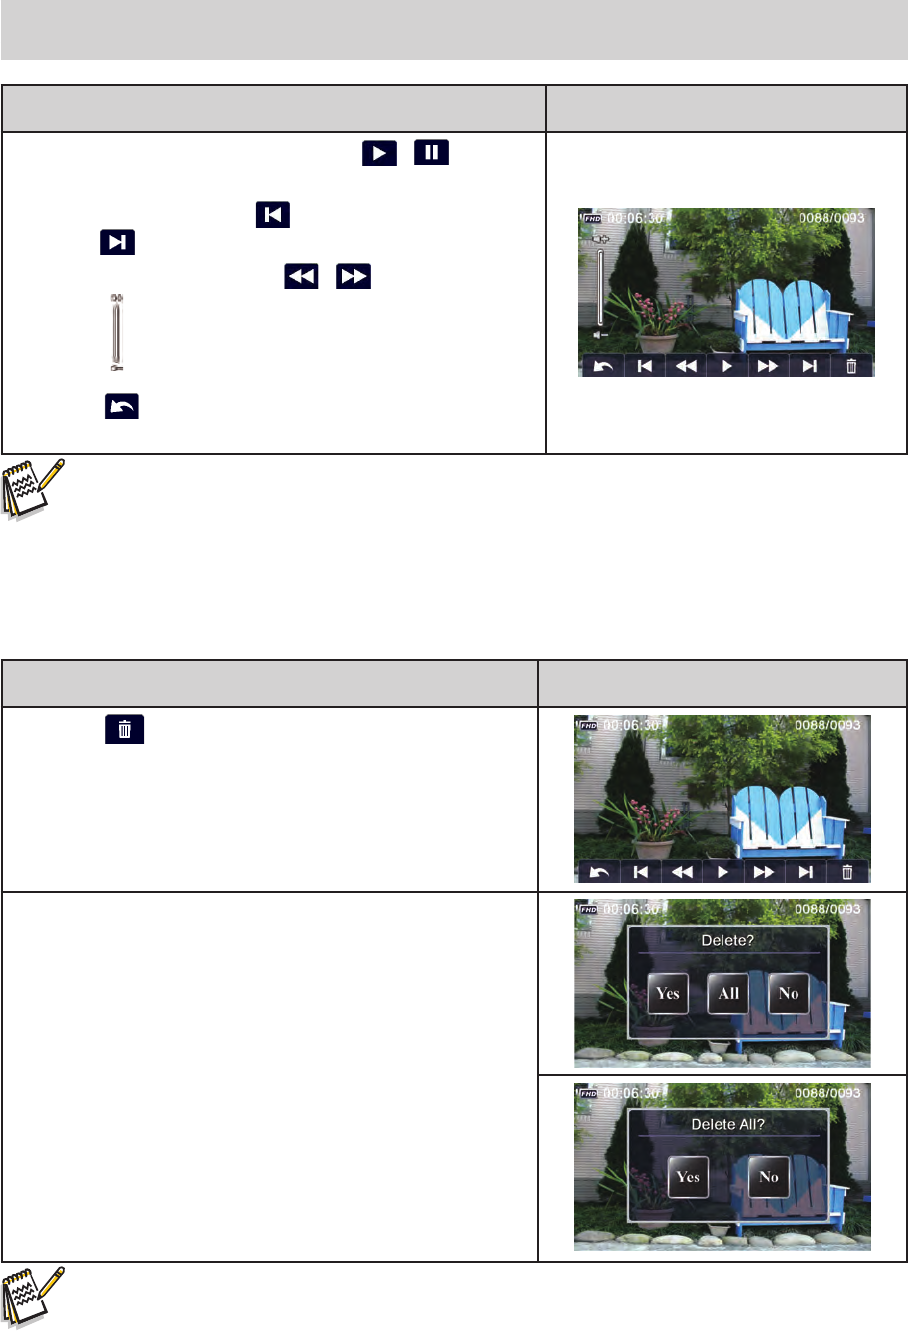
Video Playback
Operation Display Screen
1. IntheVideoPlaybackmode,touch / toplayor
pausethevideo.
2. Scrolltorightortouch togoback;scrolltoleftor
touch toproceedtothenext.
3. Whileplayingvideo,touch / torewind/forward.
4. Touch toadjustthevolume
5. Touch toexit.
Note
• WhentheLCDisidleforafewseconds,theplaybackfunctioniconswilldisappear
automatically.Taponthescreenagaintorequestforthefunctionbar.
Delete Videos
Operation Display Screen
1. Touch togototheDeleteoptionscreen.
2. Touch [ Yes ] to delete the current video or [ No ] to
canceltheoperationandthenexit;touch[All(Delete
All)]todeleteallvideos.
3. Once [ All ] is selected, a conrmation screen will
appear;touch[Yes]toexecutetheoperationand[No]
tocanceltheoperation.
Note
• Ifamemorycardisapplied,youmaydeletethosevideosstoredfromthecardonly.
• Videosonawritten-protectedmemorycardcannotbedeleted.
26 EN
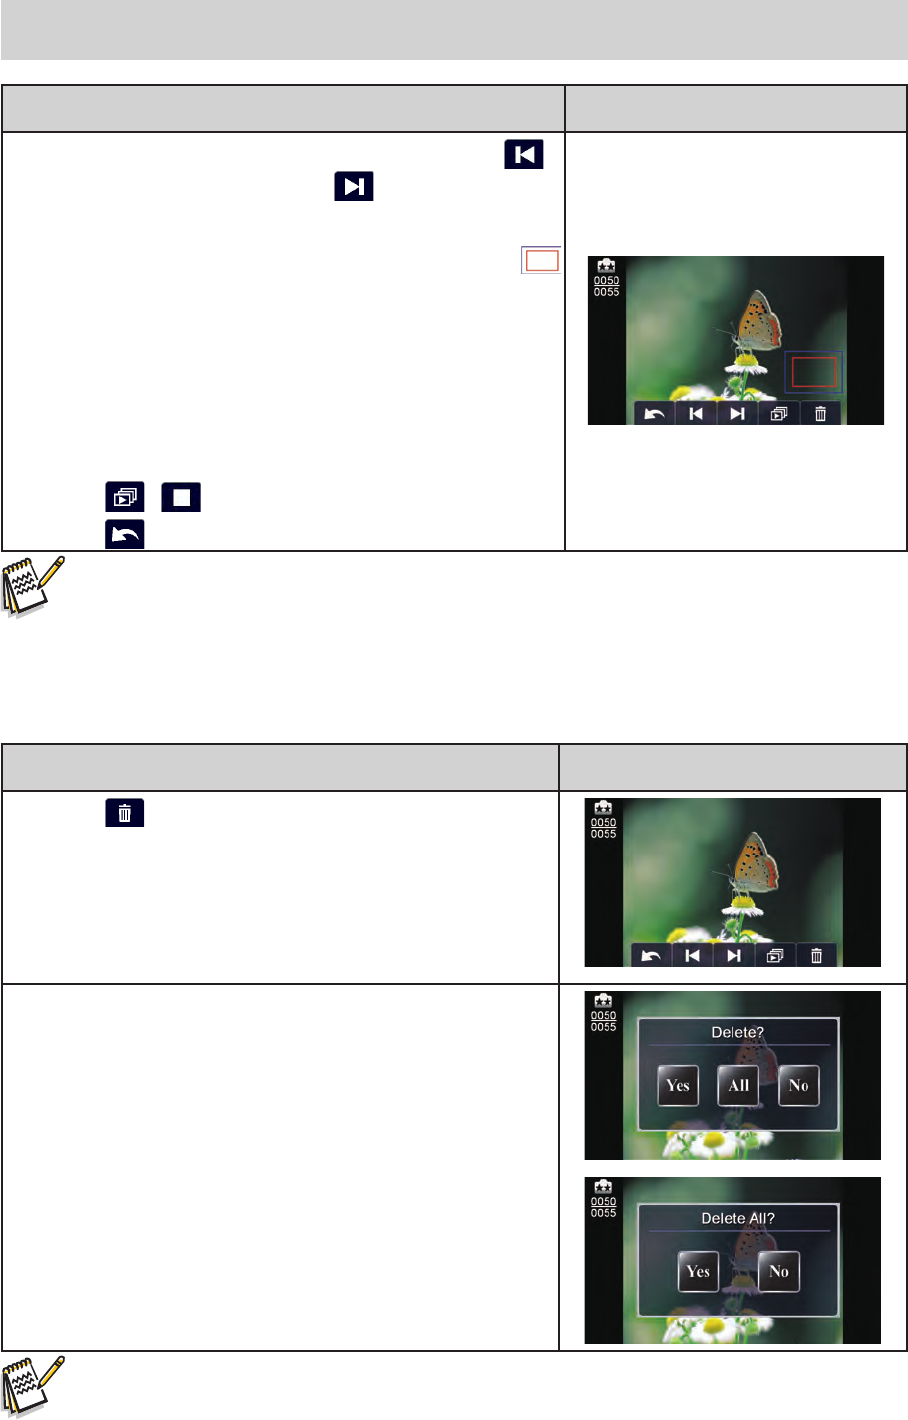
Photo Playback
Operation Display Screen
1. InthePhotoPlaybackmode,scrolltorightortouch
togoback;scrolltoleftortouch toproceedtothe
next.
2. Whenthephotoisselected,pushforwardstothe[ T ]
(TeleButton)tomagnify.(ThemagnicationIndicator
appearsonthescreen)
3. Tonavigatethemagniedphoto,pressonthescreenand
movetoanydirectionrequestedwithonengertip.
4. Pushforwardstothe[ W ](WideButton)tozoomoutor
exitthemagnicationmode.
5. Touch / tostartorstoptheslideshow.
6. Touch toexit.
Note
• WhentheLCDisidleforafewseconds,theplaybackfunctioniconswilldisappear
automatically.Taponthescreenagaintorequestforthefunctionbar.
Delete Photo
Operation Display Screen
1. Touch togototheDeleteoptionscreen.
2. Touch[ Yes ]todeletethecurrentphotoor[ No ]tocancel
theoperationandtoexit;touch[ All(DeleteAll) ]todelete
allphotos.
3. Once[ All ]isselected,aconrmationscreenwillappear;
touch[ Yes ]toexecutetheoperationand[ No ]tocancel
theoperation.
Note
• Ifamemorycardisapplied,youmaydeletethosephotosstoredthecardonly.
• Photosonawritten-protectedmemorycardcannotbedeleted.
27 EN
Section 5
Setting Your Video Camera
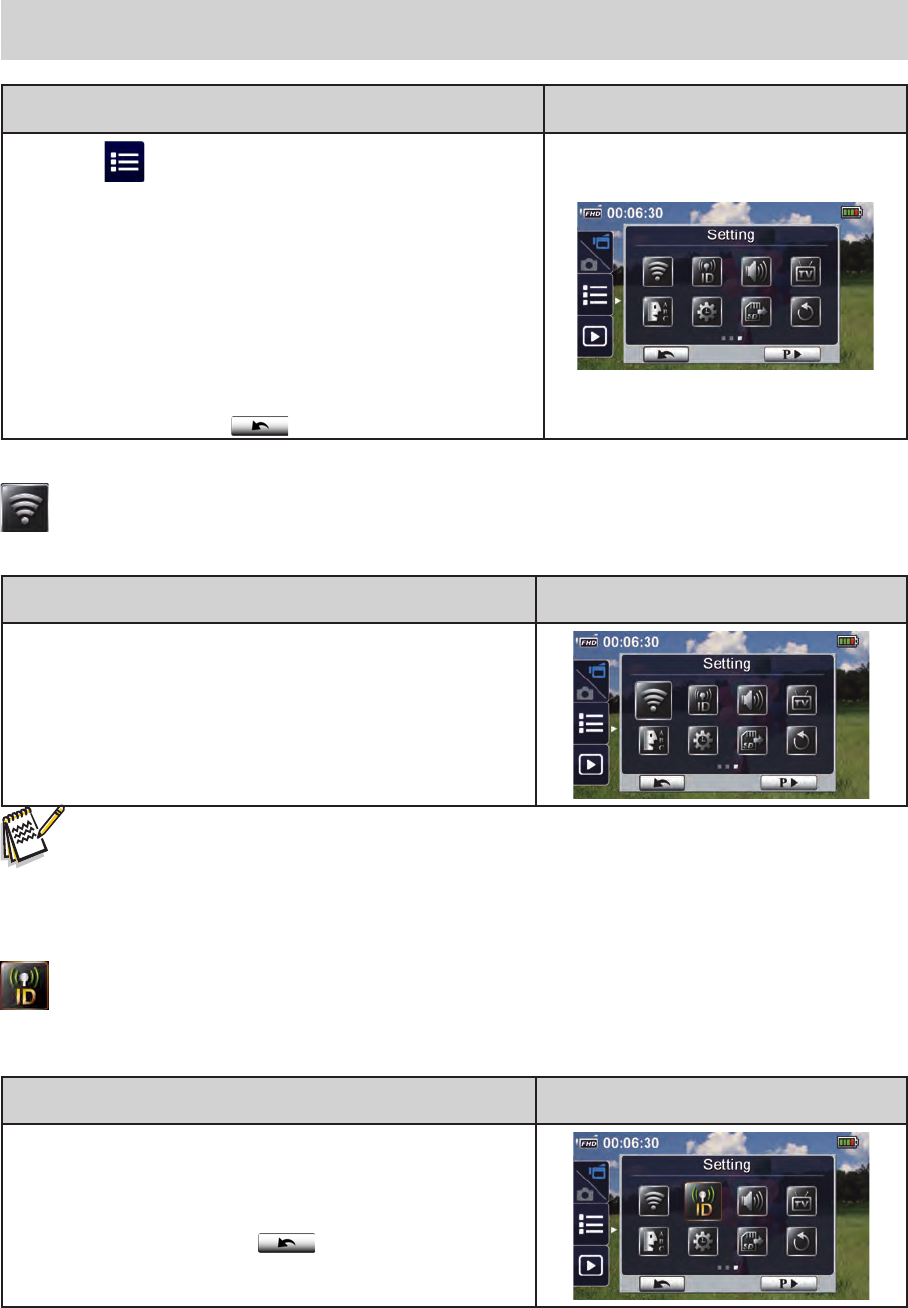
Setting Menu
Operation Display Screen
1. Touch onthescreentoopentheMenu.Themenu
willshowonthescreen.
2. Scrollonthemenuscreentochangethepage.
3. The[Setting]pagecontains8optionsforconguring
yourdevicesetup.TheyareWirelessConnection,
WirelessID,MenuSound(operationsound),TV
System,Language,TimeSetting,Format,andDefault
Setting.
4. TouchtheExiticon()toexit.
Wireless Connection
Youcanselectthefunctiontosetuporwatchlivevideoviawirelessconnection.
Operation Display Screen
1. IntheSettingmenu,touchthe[WirelessConnection]
icononthescreen.
2. Threeconnecitontypesareprovided.
3. Chooseamong(1)WirelesstoMobile(2)Wirelessto
PC(3)WirelesstoCloudforconnection.
‧Fordetails,pleaserefertosection6,7,and8.
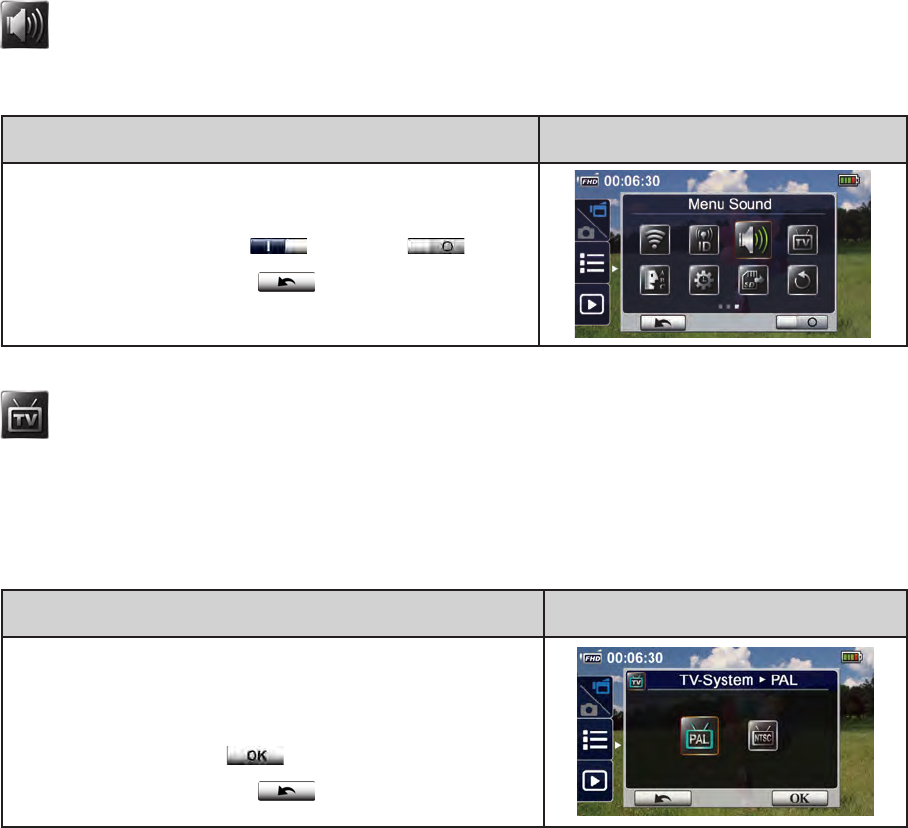
Wireless ID
Edit[WirelessID&Password]on[WirelesstoMobile]/[WirelesstoPC]
Operation Display Screen
1. IntheSettingmenu,touchthe[WirelessID]iconon
thescreen.
2. Touchtoenter[WirelessID]and[Password]
3. TouchtheReturnicon()toreturn.
Note
28 EN
Menu Sound
Enableordisablethesoundeffectoftheoperationsound.
Operation Display Screen
1. IntheSettingmenu,touchthe[MenuSound ]iconon
thescreen.
2. Touchtoselect[ On ]()or[ Off ]().
3. TouchtheReturnicon()toreturn.
TV System
SelecttheappropriateTVstandardinyourarea–eitherNTSCorPAL,AnywrongTVsystemsetting
maycauseimageickers.
• NTSC(60Hz):USA,Canada,Japan,SouthKoreaandTaiwan,etc.
• PAL(50Hz):UK,Europe,China,Australia,SingaporeandHongKong,etc.
Operation Display Screen
1. IntheSettingmenu,touchthe[ TV ]icononthe
screen.
2. Touchtoselect[ PAL ]or[ NTSC ].
3. TouchtheOKicon( )tovalidatethesetting.
4. TouchtheReturnicon()toreturn.
29 EN
Language
Usethisoptiontoselectalanguageoftheuser’sinterface.
Operation Display Screen
1. IntheSettingmenu,touchthe[Language]icononthe
screen.
2. Touchtoselectthedesiredoption.
3. TouchtheOKicon( )tovalidatethesetting.
4. TouchtheReturnicon()toreturn.
Time Setting
Operation Display Screen
1. IntheSettingmenu,touchthe[TimeSetting]icononthe
screentoenterthetimesettingscreen.
2. TouchYear,Month,Day,Hour,Minute,andAM/PMtoset.
3. Adjustthenumericvaluebytouching /
4. TouchtheOKicon( )tovalidatethesetting.
5. TouchtheExiticon()toexit.
Format
• Yes: Formatthebuilt-inmemory(WhennoSDcardisinstalled)/oranSDcardyouinstalled.
• No: Donotformatthebuilt-inmemory(WhennoSDcardisinstalled)/oranSDcardyouinstalled.
Operation Display Screen
1. IntheSettingmenu,touchthe[Format]icononthe
screen.
2. Touchtoselect[Yes]or[ No ]( ).
(Touch[Yes] toentertheconrmationscreen.)
3. Touchthe icontoexecutetheoperationandthe
icontocanceltheoperation.
Note
• AllthedatawillbeerasediftheSDcardisformatted.Makesureacopyofthedatahasbeen
made.
30 EN
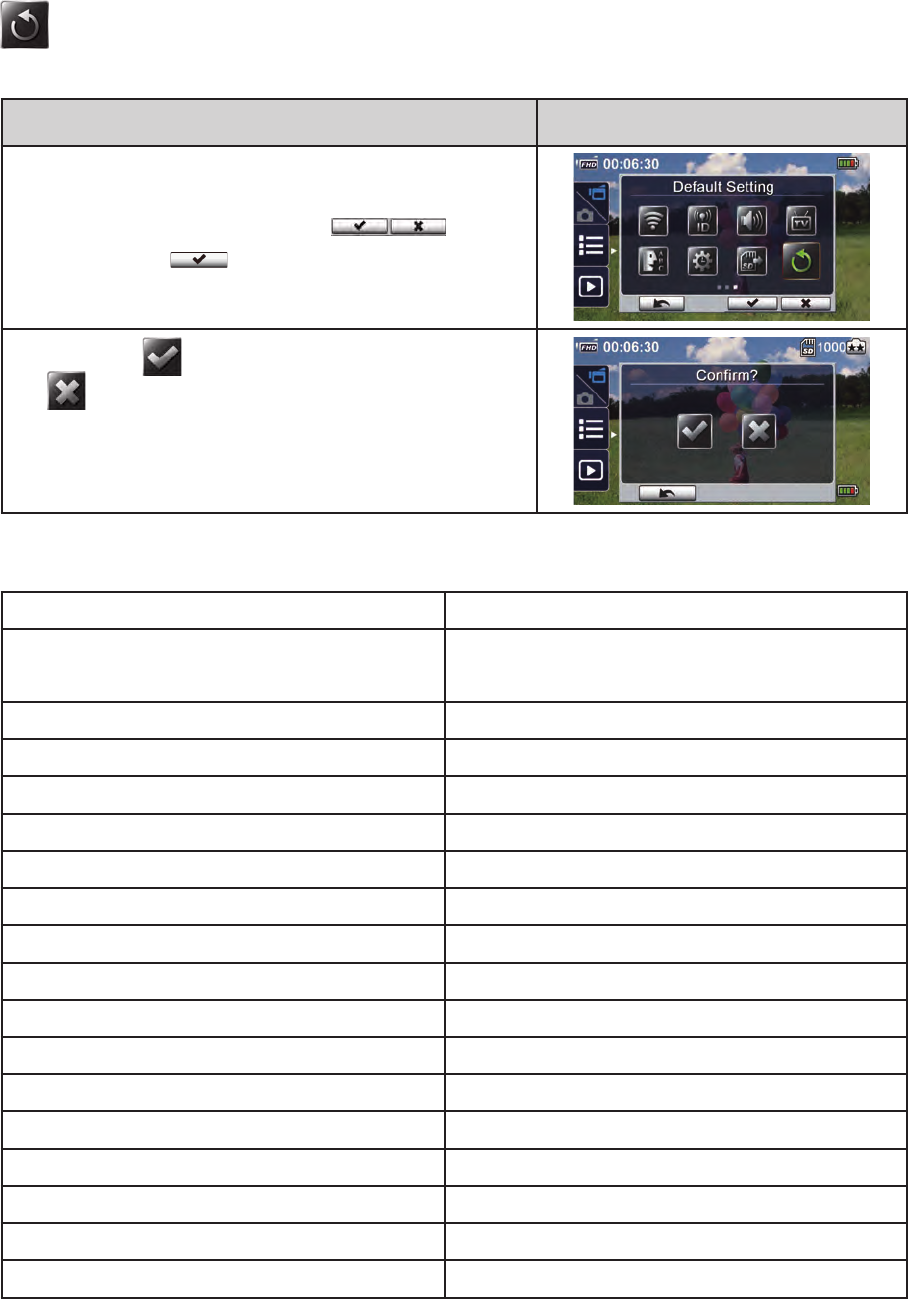
Default Setting
Restorethedefaultsetting.
Operation Display Screen
1. IntheSettingmenu,touchthe[ DefaultSetting ]icon
onthescreen.
2. Touchtoselect[ Yes ]or[ No ]( ).
(Touch[ Yes ] toentertheconrmationscreen.)
3. Touchthe icontoexecutetheoperationandthe
icontocanceltheoperation.
Thedefaultsettingsofthisdevicearelistedasbelow.
Setting Default Setting
Resolution FHD(1080p30)forVideo
5MPforPhoto
Light Off
Scene Auto
White Balance Auto
Video Stabilization Off
Motion Detection Off
Slow Motion Off
Time Lapse Off
Self-Timer Off
Face Tracking Off
Date Printing Off
ISO Auto
Menu Sound On
Password of Wireless ID 0000
TV System Shippingareaaccordingly
Language Shippingareaaccordingly
Volume Level3
31 EN
Section 6
Wireless to PC WiVideo Suite
Advanced Operation on Your Computer - WiVideo
ThecameracanconnecttoyourcomputerviawirelessorUSB.Onceyoulaunchthe[ WiVideo ]
application (forWindows®systemsonly)onyourcomputer,itwillsearchforyourcameraandconnect
toit. Then,youcanoperatemorefunctionsonyourcomputer.Thereareseveralfunctionsasbelow:
•Transferthelesfromthecamera.(wireless/USBconnection)
•Watchlivestreamingvideofromthecameraonyourcomputer.(wirelessconnection)
•Usethecameraasawirelesswebcamforonlinevideochatting.(wirelessconnection)
•Setupsocialnetworkaccountandsaveinfotocamera.(USBconnection)
•Congureandsynchronizewirelessprolesoncamera.(USBconnection)
Install [ WiVideo ] on your computer
Toconnecttothecameraandlaunch[ WiVideo ]applicationviawirelesscorrectly,youhavetoinstall
thisprogramrstly.Itisaperfectplatformforyoutowatchlivestreamingvideofromyourcameraand
usethecameraasawebcamforyouronlinevideochatting.
Followthestepsbelowtoinstallthe[ PCWiVideoSuite ]onthecomputer.
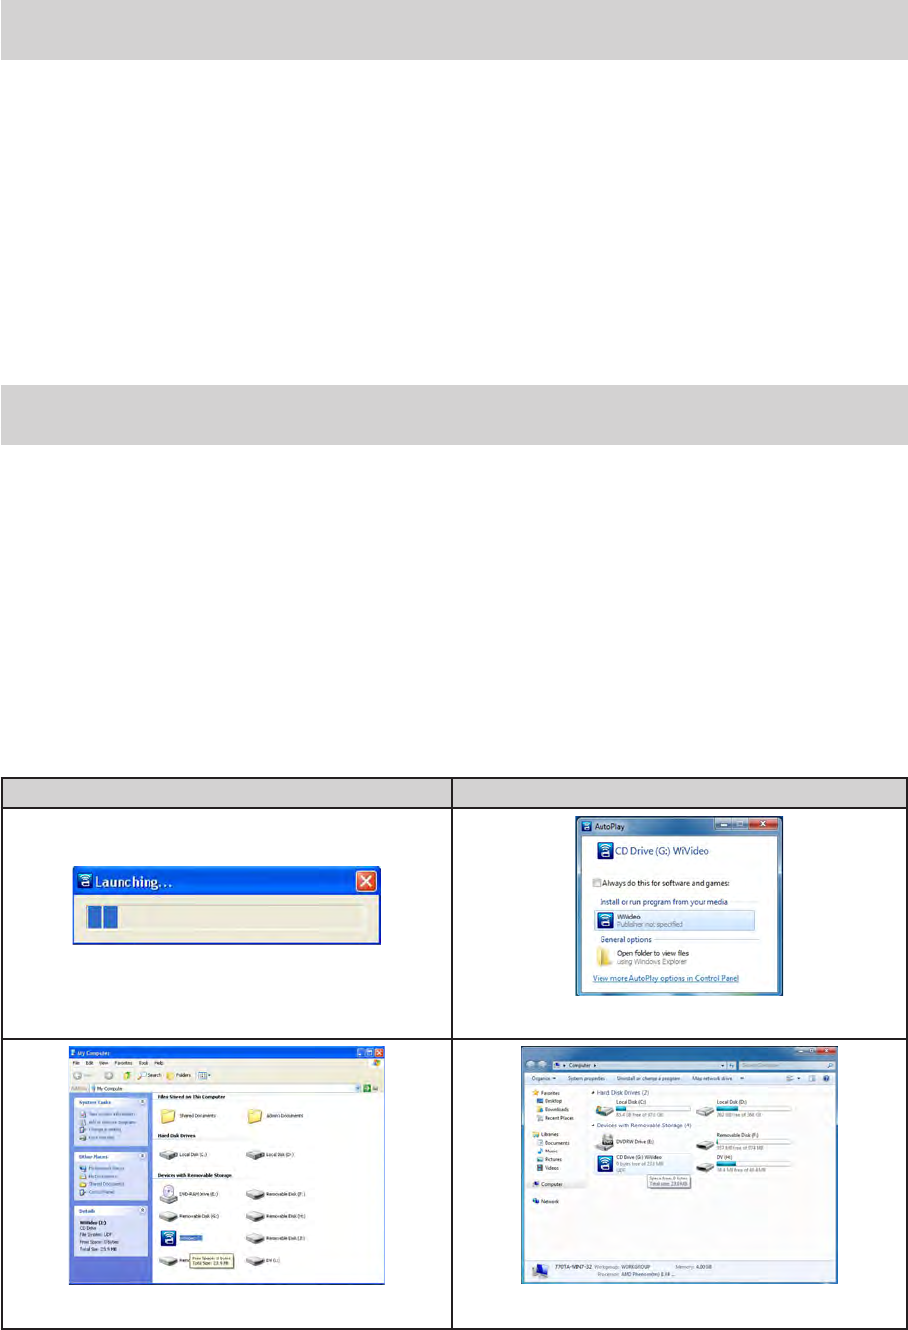
1.ConnectthecameratoyourcomputerbyusingthesuppliedUSBcable.
2.AftermakingaUSBconnection,theprograminstallsautomatically,ortheAutoRuns/AutoPlaywindow
appears.(It may be differentbasedonOS recognition.) If theAutoPlaywindow does not appear.
Pleaseclick[ MyComputer ] → [ PCWiVideoSuite ]toexecutetheinstallationofthisprogram.
Windows XP Win7
(Install automatically)
(AutoPlay window)
(Path to WiVideo.exe) (Path to WiVideo.exe)

32 EN
Using WiVideo via Wireless Connection
Operation Screen
Onyourcamera:
1. PressWirelessButton andselect[ Wirelessto
PC ]( )toconnect.(Thedefaultpasswordis
0000.WirelessIDandpasswordcanbeeditedfrom
WirelessID( )onSettingmenu.)
3.Followtheon-screeninstructionstocompletetheinstallation.
4.TheshortcutofWiVideo( )showsonthedesktop.(Oryoucanndtheapplicationat[ Start ]
→ [ AllProgram ].)
5.Themainscreenappearsautomaticallyonthedesktop.
6.Whentheinstallationiscompleted,youcanunplugtheUSBcable.
Note
• WiVideoprogramwillinstalltheH.264Codec(ffdshow-afreesoftwareunderGPLlicense)for
viewingthevideoscorrectly.
• Toinstallcorrectly,youhavetologout/quitfromtheInstantMessage(IM)applicationbefore
theinstallation.
• WiVideoisforWindows®systemsonly.
• Whenlanguageonscreenisnotlegible,refertotrouble-shootingsection.
33 EN
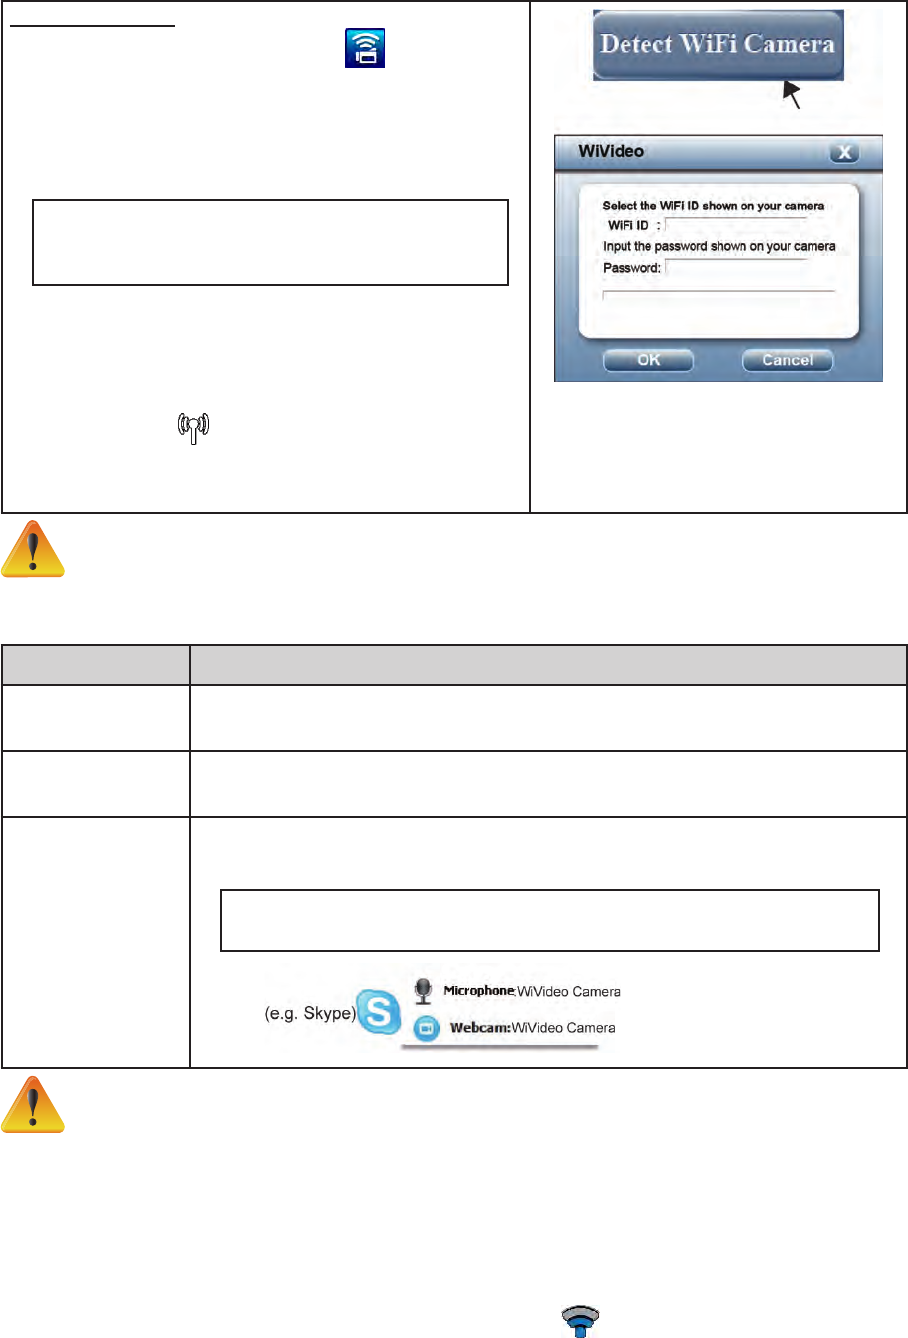
Onyourcomputer:
2.Doubleclickthe[ WiVideo ]shortcut onthedesktop.
(makesurethe[ WiVideo ]applicationisinstalledinyour
computerinadvance.)
3.Click [ Detect Wireless Camera ] button to search for
yourcamera.
*Onetaskwindowmaypopoutandaskyoutoselect
your camera when there are two or more wireless
camerasinthesamewirelessnetworkrange.
4.Check[ WirelessID ]andinput[ Password ]shownon
yourcameraontheWiVideotaskwindow.Then,click[
OK ]
5.Oncetheconnectionisestablished,thesignalof
WirelesstoPC willshowontopofthescreen.
6.Then,WirelesstoPCWiVideoSuiteconnectionmode
iscompleted.
Note
TurnPCwirelessfunctiononbeforeuse.
TheWiVideoapplicationserves3optionswithconnectionviawireless:
Function Description
TRANSFER/
DELETE
Youcanremotecontrolthevideosandphotosstoredinyourcamera.
Youcantransferordeletethelesinyourcomputer.
LIVE VIDEO Watchlivestreamingonyourcomputerviayourcamera.
Youcanselectthevideoresolution.
VIDEO CHAT Useyourcameraasawirelesswebcamforonlinevideochatting
(Youhavetoselectthisdeviceasyourwebcamonthevideo/audiosettingrst.)*
*Youhavetoselect[ WiVideoCamera ]asyourwebcam/microphone
fortheonlinevideochatting.
Note
• Forthewirelessconnectivityworkingcorrectly,makesurethebundledWiVideo(for
Windows®basedsystemsonly)isinstalledandthewirelessLANmoduleofyourcomputer
isactivated.
• Makesureyourcomputerconnectswithyouraccesspoint(AP)correctlyandyourcamerais
inthesamerangeoftheWLAN.
• ForthemuchmorestablevideostreamingwhenusingLIVEVIDEOorVIDEOCHAT,please
makesurethewirelesssignalstrengthshows2bars( )oraboveonthecamera.
• Toboostthewirelesssignalstrength,youcanmovethecameraclosertoyourcomputer.
• IfthecameraisfarfromyourcomputerortheAPdevice,itmaytakelongertoconnecttothe
network.(Thesignalandtheradiofrequencymaybeinterfered.)
• Topreventthecamerafromturningoffaccidentally,pleasebesurethebatteryisfully
charged.
34 EN
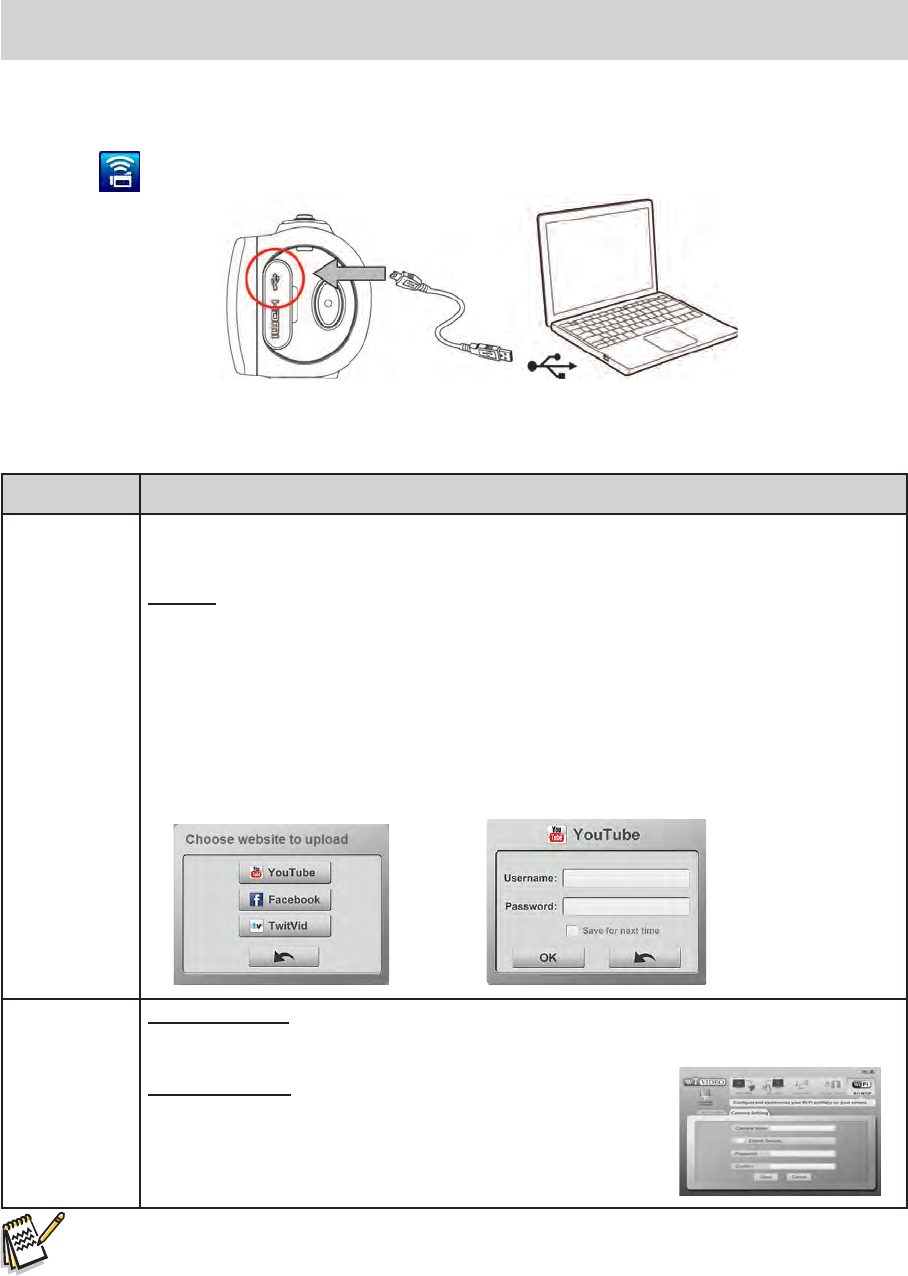
Using WiVideo via USB Connection
1.ConnectthecameratoyourcomputerbyusingthesuppliedUSBcable.
2.AftermakingaUSBconnection,themainscreenwillappear.Orpleaseclick[ WiVideoPCSuite ]
shortcut onthedesktoptoexecutetheapplication.Oryoucannditat[ Start ]→[ AllProgram ].
TheWiVideoapplicationserves2functionsviaUSB:
Function Description
TRANSFER You can access the videos and photos in your camera and upload the les to the
socialnetworks.
Upload
1. Selectthevideos/photosonthethumbnailscreen.
2. Clickon[ Upload ].
3. Thewebsiteoptionsappears.
4. SelectthewebsiteandchecktheUsername/Emailandpasswordofthespecic
socialwebsiteintheelds.
5. Clickon[ SET ]toupload.
SETUP Account Setup
Setupyoursocialnetworkaccountinformationandsavethemtoyourcamera.
Wireless Setup
Congureandsynchronizeyourwirelessproletoyourcamera.
Nameyourcameraandcreateyoursecuritypassword.
Note
• LIVEVIDEOandVIDEOCHATarenotavailableviaUSBconnection.
• Somesocialwebsitesmaynotbeallowedtoaccessincertainregionsornetworks.
• Yourcomputermusthaveinternetaccesstouploadlestothewebsite.
• Ifyoudonothaveaaccount,pleasesignuponthewebsiterst.
• The social network is subject to update without notice. (e.g. password validation, create a
channel)Pleasevisitthewebsitersttoupdateyouraccountsetting.
35 EN
Section 7
Wireless to Mobile WiVideo App
Advanced Operation on Your Mobile - WiVideo
Useyourmobileasaremotecontroltotakephoto/videosfromcamerawirelessly.Itmakesthecamera
becomeahandyaccessorytogowithyourmobile,whichallowsyoutorecordanyscene,anytimeand
anywhere.Thereareseveralfunctionsasbelow:
• Useyourmobileasaremotecontroltotakephotos/videosfromyourcamerawirelessly.
• Zoomin/outthelensonthecameraviayourmobile.
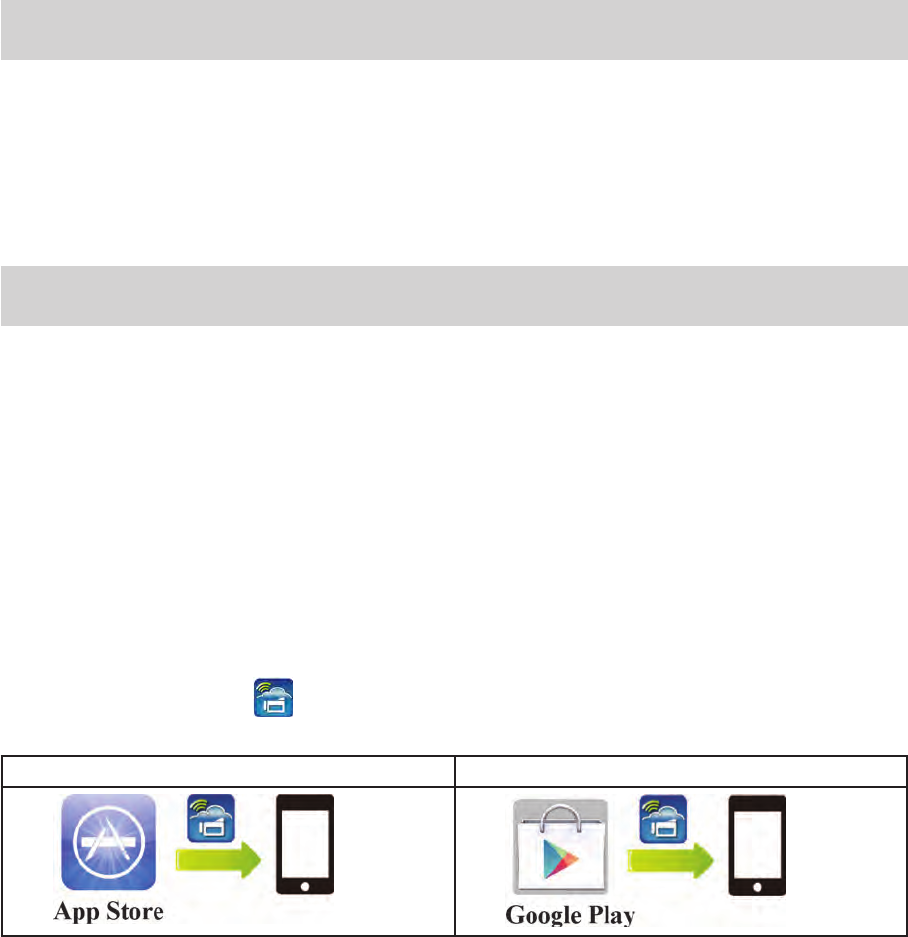
Install [ WiVideo ] on Your Mobile
To connect to the camera, you have to install [ WiVideo ] application program rstly. There are two
systemstoinstall[ MobileWiVideoApp ]ontoyourmobile.Itdependsonwhichsystemyourmobileis
appliedto.ForAndroidsystem,pleasedownloadthisAppfromGooglePlay;foriOSsystem(iPhone/
iPad),pleaserefertoAppleAPPStoreforinstallation.
Followthestepsbelowtoinstall[ MobileWiVideoApp ]onyourmobile.
1.DownloadWiVideoAppfromGooglePlay(OS:Android2.2orhigher)orAppleAPPStore(OS:iOS4
orhigher)ontoyourmobile.
2.Followtheon-screeninstructionstocompletetheinstallation.
3.TheshortcutofWiVideo( )isshownonthescreen.
iOS(iPhone/iPad) Androidsystem
36 EN
iOS system (iPhone/iPad): Direct/Hotspot/AP Modes
TherearethreemodesofwirelessconnectionstoyourmobilefromthecameraifyouareaiPhone/
iPaduser.Underdifferentenvironmentsandcircumstances,youmayusetheonethatismost
effectivetoconnectatthetime.
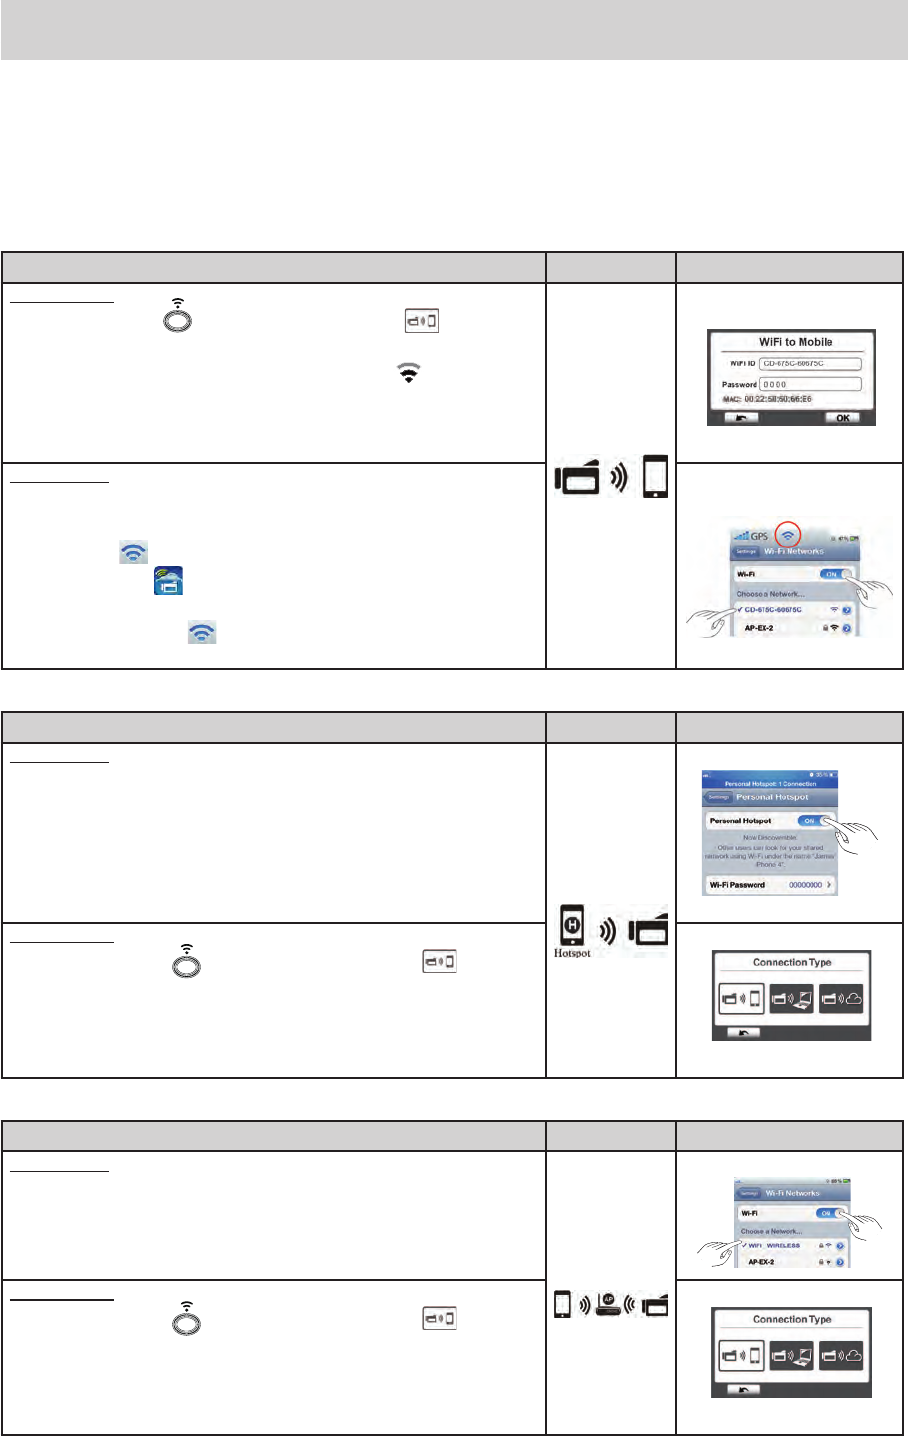
(1) iOS: Using [ Direct Mode ] without wireless mobile service
Operation Schema Illustration
Onyourcamera:
1.PresswirelessButton andselect[ WirelesstoMobile ]( )toconnect.
2.Select[ DirectMode ]onthe[ WirelessAccessPoint ]list.
3.Ifthe[ DirectMode ]isconnected,asignaliconwillshow( ).
4.Taptheconnectionmodeandascreenwillshowwith[ WirelessID ]and
[ Password ]forthreeseconds. \
Onyourmobile:
1.Goto[ Settings ]andthengoto[ Wireless ]function.
2.Selectthesame[ WirelessID ]shownonyourcameratoconnect.
3.Oncetheicon[ ]shows,theDirectModeconnectionisactivated.
4.PressWiVideoicon[ ]toactivateMobielWiVideoApp.
Note:Itwilltakeawhilefor[ ]toshowupinordertoconnect.
(2) iOS: Using [ Hotspot Mode ] with wireless service mobile
Operation Schema Illustration
Onyourmobile:
1.Goto[ Settings ]onyourmobileandthengoto[ Wireless ]function.
2.Select[ PersonalHotspot ]functiononyourmobile.
3.Tap[On]toenable[ PersonalHotspot ].
4.Onceactivate[ PersonalHotspot ],youmaysharewirelesstoyourcamerafor
connection.
Onyourcamera:
1.PresswirelessButton( )andselect[ WirelesstoMobile ]( )toscan
availableWirelessAccessPoint(AP).
2.SelectthesameHotspotfromyourmobileontheavailableAPlist.
3.ConnectyourcameratothisHotspot.
(3) iOS: Using [ AP Mode ] with Wireless Access Point
Operation Schema Illustration
Onyourmobile:
1.Goto[ Settings ]onyourmobileandthengoto[ Wireless ]function.
2.Enablewirelessfunctionfrom[ Wi-FiNetworks ].
3.SelectoneAPavailabletoyou.
Onyourcamera:
1.PresswirelessButton( )andselect[ WirelesstoMobile ]( )toscan
availableWireless AccessPoint(AP).
2.SelectthesameAPchosenfromyourmobile.
3.ConnectyourcameratothisAP.

37 EN
Android System: Hotspot / AP Modes
Therearetwomodesofwirelessconnectionstoyourmobilefromthecameraifyouareaphoneuser
withanAndroidsystem.Underdifferentenvironmentsandcircumstances,youmayusetheonethatis
mosteffectivetoconnectatthetime.
(1) Android: Using [ Hotpost Mode ] with wireless mobile service
Operation Schema Illustration
Onyourmobile:
1.Goto[ Settings ]andthengoto[ Wireless&network ]function.
2.EnableHotspotand/orAPfunction.
3.OnceactivateHotspot,youmaysharewirelesstoyourcameraforconnection.
Onyourcamera:
1.PressWirelessButton( )andselect[ WirelesstoMobile ]( )toscan
availableAP.
2.SelectthesameHotspotfromyourmobileontheavailable[WirelessAccessPoint]
list.
3.ConnectyourcameratothisHotspot.
Note:Operationmayvary,pleaserefertoeachindividualmodel.
(2) Android: Using [ AP Mode ] with Wireless Access Point
Operation Schema Illustration
Onyourmobile:
1.Goto[ Settings ]andthengoto[ Wireless&network ]function.
2.Enablewirelessfunctionfrom[ Wirelesssettings ].
3.SelectoneAPavailabletoyou.
Onyourcamera:
1.PressWirelessButton( )andselect[ WirelesstoMobile ]( )toscan
availableAP.
2.SelectthesameAPchosenfromyourmobile.
3.ConnectyourcameratothisAP.
38 EN
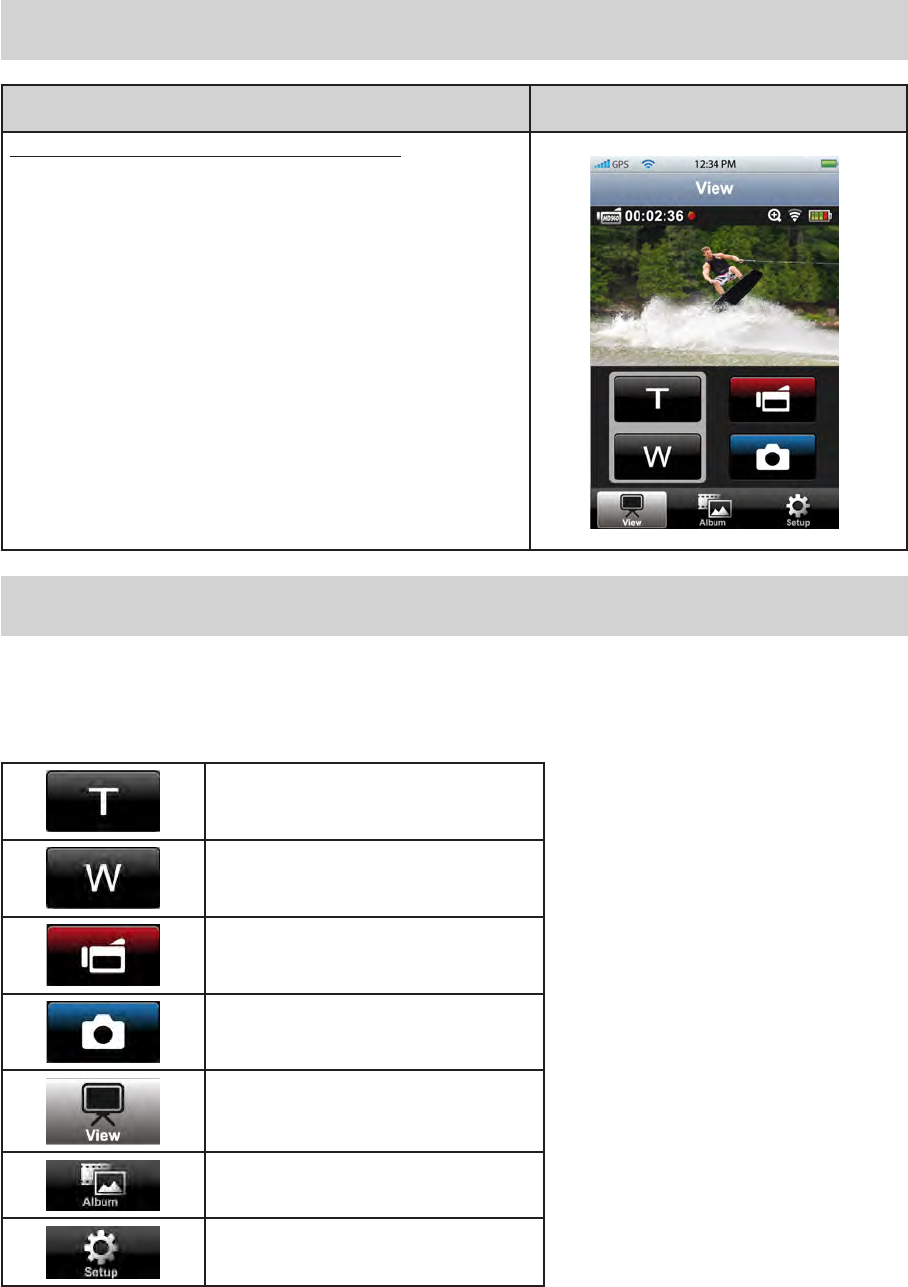
Using WiVideo via Wireless Connection
Operation Screen
RemoteControlYourCamera(fromMobile):
1.Press[ MobileWiVideoApp ]icononyourmobile.
2.Detecttheavailablecamerasautomaticallyfromyour
mobile.
3.Enterthepassword(Thedefaultis0000anditcanbe
editedvia[ SETUP ]fromWiVideoAPP.)orvia
[ Settings ]fromthecamera.
4.Enjoyplayingyourcameraviayourmobile.
Mobile WiVideo Suite Function
Throughyourmobile,youmayremotecontrolyourcamerawirelessly.Hereisalistoficonsshownon
yourmobiletoillustratetheirfunctions.
Tele(T)
•Zoomin
Wide(W)
•Zoomout
Video
•Presstotake/stopvideo
Photo
•Presstotakephoto
View
•Watchliveviewoncamera
Album
•Playback/Deletelesoncamera
Setup
•Managesettingsoncamera
39 EN
Section 8
Wireless to Cloud-Ustream
Sign up and Store Ustream Account to Camera
Ustreamenablesyoutofreebroadcastthelivevideoofyourcamera.Peoplecanwatchyourbroadcasting
ontheiriPhone,iPad,iPodpress,Androidphones/tablets,orPConUstreamwebsite/APPanytime,
anywhere.WiVideoprogramcanguideyoutosetupUstreamautomatically.
BeforeyoustartusingUstream,youneedtoregisteranaccountatUstreamwebsite(www.ustream.tv).
Operation Screen
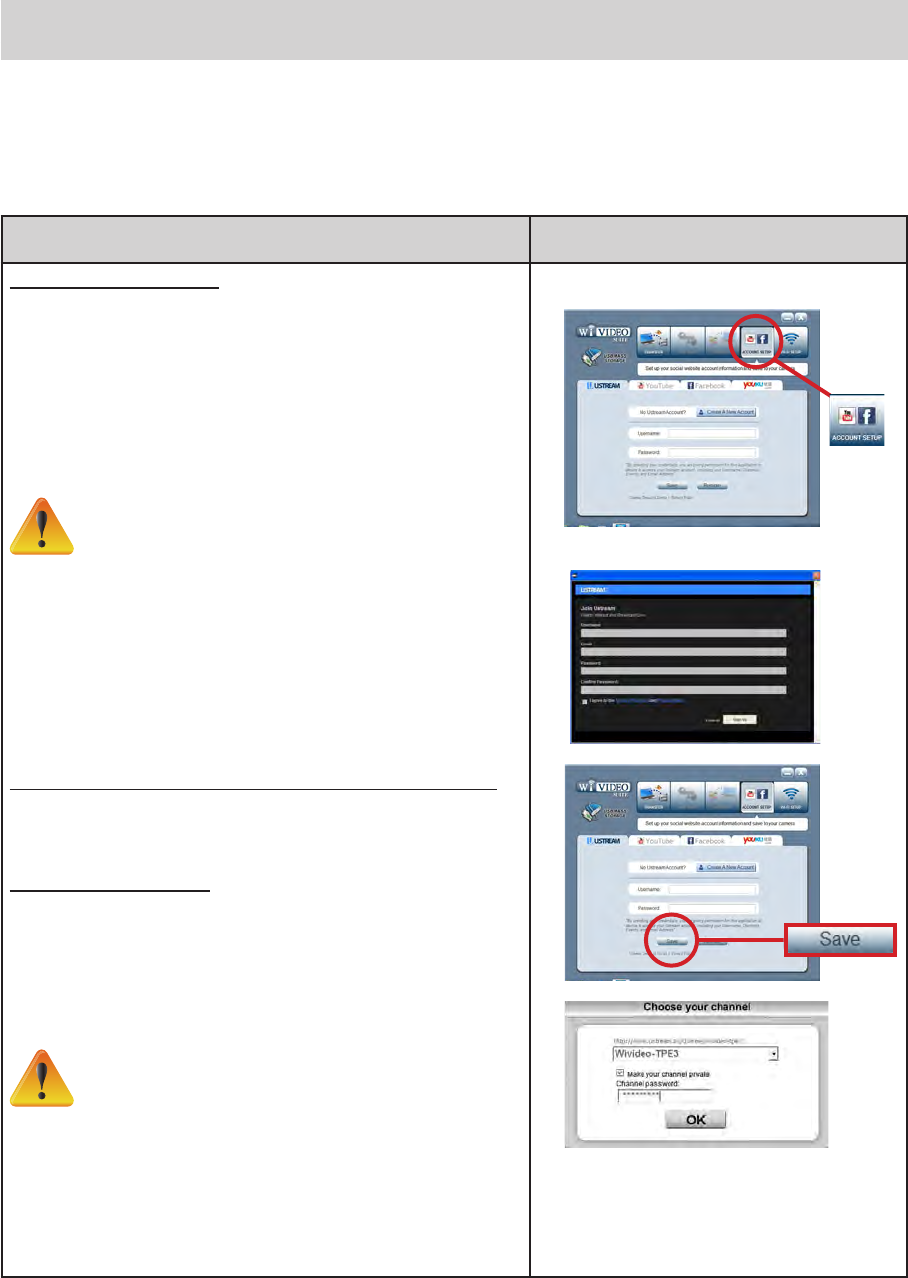
(1) Create an account (skip this if a Ustream account is
ready)
1. GotoPCWiVideoSuite[ AccountSetup ]andcreate
anewaccountforUstream.
2. Click[ CreateANewAccount ]andthenllupthe
informationrequestedstepbystep.
3. Thenclick[ SignUp ].
Note
• RemembertoplugtheUSBcablebetweenPC
andyourcameraforconnection.
• ThescreenwillgobacktoWiVideosettings
oncesignupsuccessfully.
• Makesuretoinsertdateandtimeon[ Time
Setting ]inadvanceforlivevideoviaUstream
correspondingly.
(2)Save/Removeanaccountinfoto/fromyourcamera.
EnterUsername/PasswordandclickStore/Remove.
(3)Selectonechannel
PCWiVideoSuitehasonedefaultchannel.Youcould
createmorechannelsonUstreamwebsite.
• SelectonechannelforUstreamvideobroadcasting.
• Forprivacy,itisoptionaltoenterpasswordfortheselected
channel.
Note
• Mobile device Ustream App cannot access
privatechannel.
• For private channel usage, refer to Ustream
websitefordetailinformation.
• UstreamwillremainonevenLCDpanelisclosed.
1.
2.
40 EN
Prepare AP / Mobile Hotspot for Ustream broadcasting
EnsureyouhaveaworkingAP(AccessPoint)/MobileHotspotdevicetogetreadytostartbroadcasting.
Broadcast live video on Ustream
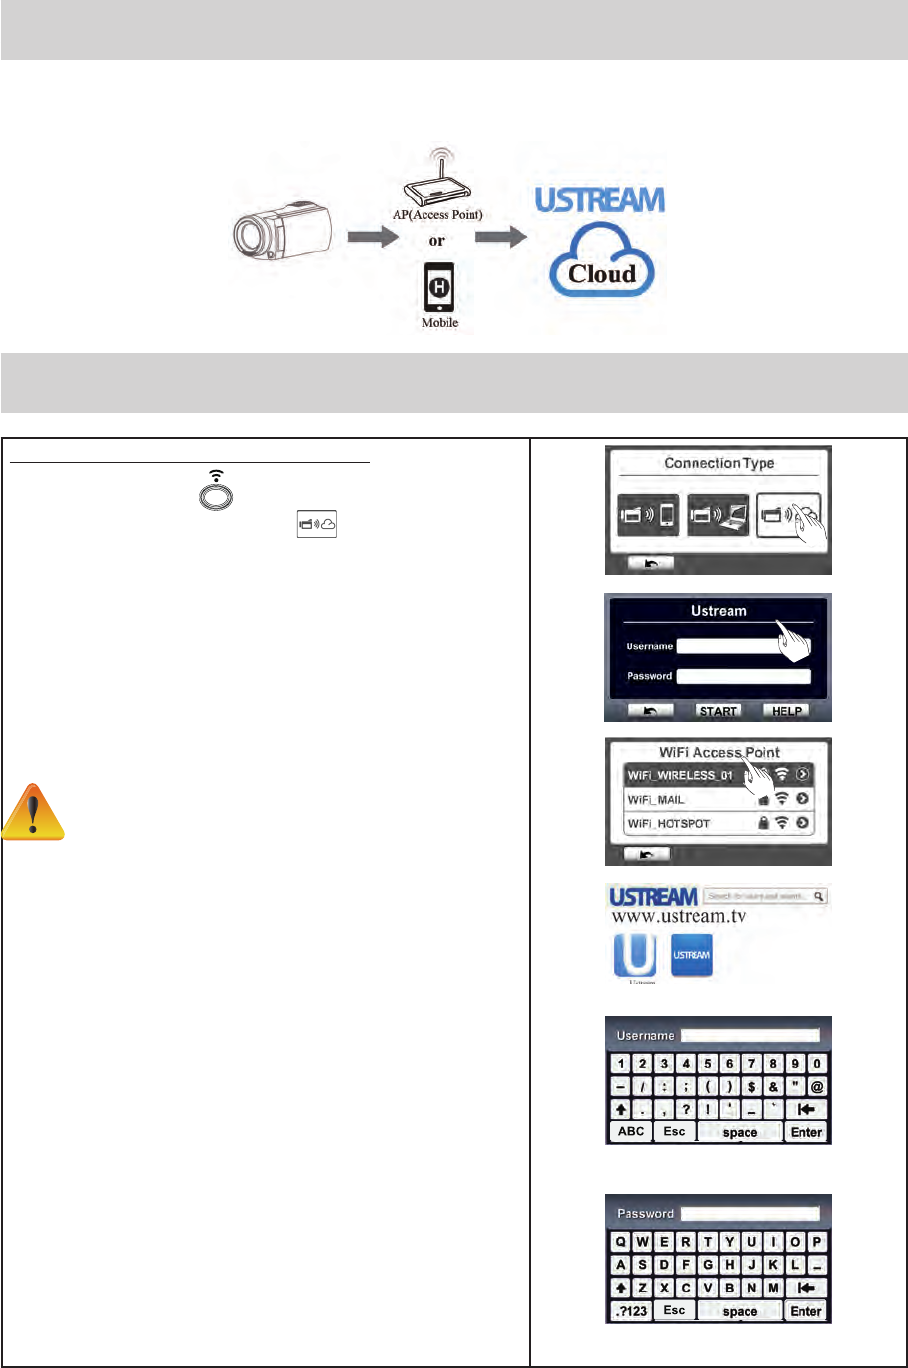
StartLiveVideoStreamingfromCamera
1. Press[Wireless’ ]buttononthecamera
2. Select[ WirelesstoCloud ]( )from[ Connection
Type ].
3. LoginyourUstreamaccount
4. Enteryourusernameandpassword.
5. ThecameralistsavailableAccessPoint.
6. Selectoneforwirelessconnection.
7. The camera connects to Ustream server and starts
videostreaming.
Note
• Once the username and password of Ustream
accountinsert,itwillshownexttimeautomatically.
• Ifyoudonotseeanything,pleaseenterusername/
passwordwithkeypad.
41 EN
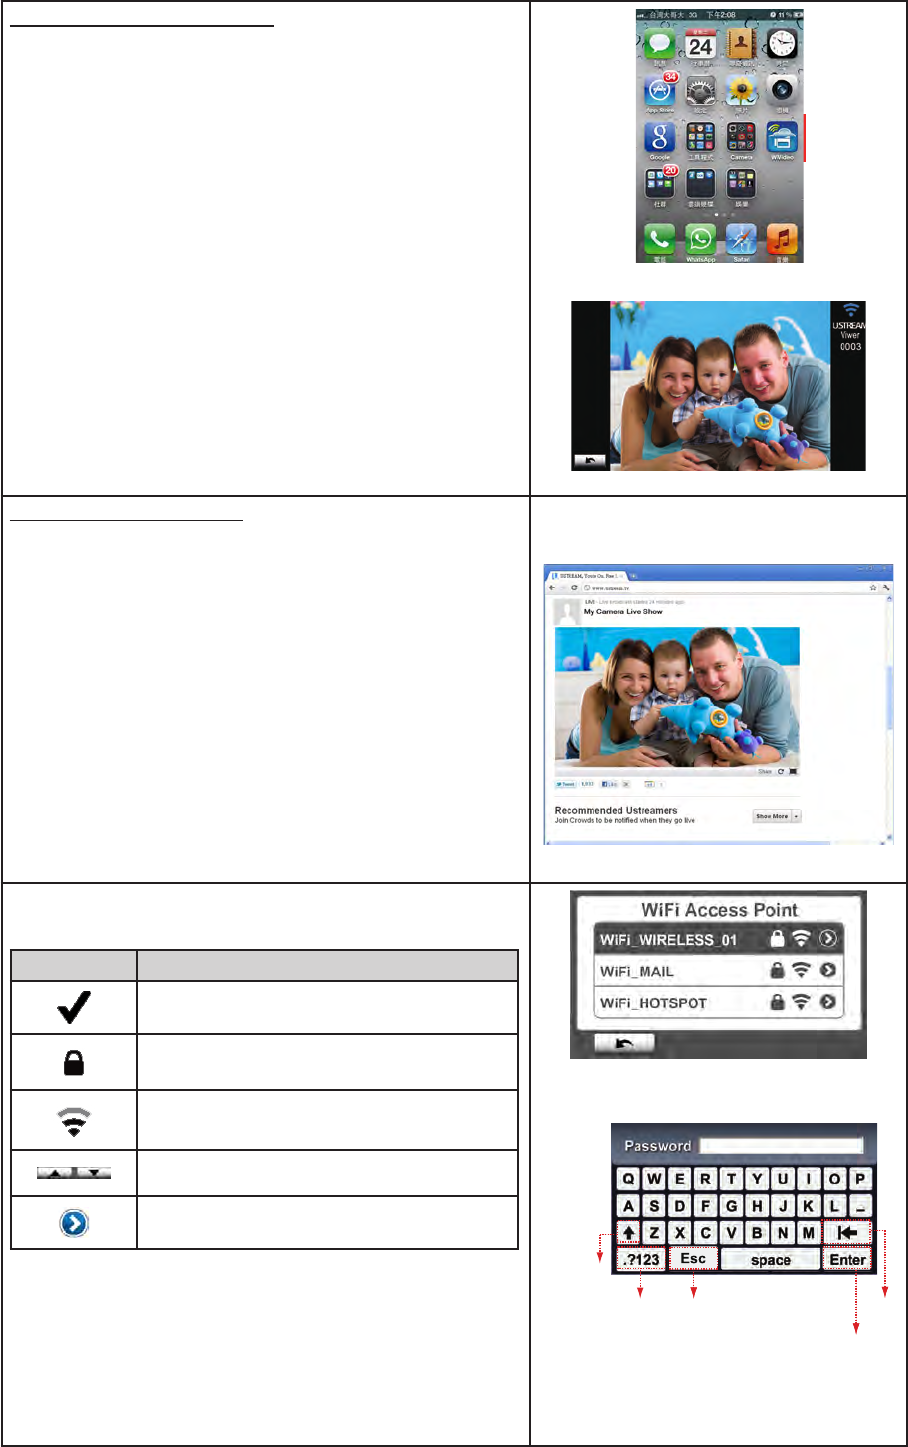
WatchLiveVideofromMobile
1.InstallUstreamAppfromGooglePlayorAppleStore.
2.LaunchAppandentertheusername/channel
3.ClickUstreamApp
4. Searchyouraccount.
5.ThemobileconnectstoUstreamserverandviewvideo
streamingfromcamera.
6.Whentheconnectionisestablished,thesignalstrength
willshowonthetopofthescreen.
7.Tocancelstreaming,touchthe[ Return ]icontoterminate
streaming.
WatchLiveVideofromPC
1.GotoUstreamwebsiteandentertheusername/channel
2.ThevideostreamingwillbebroadcastedontheUstream
website.
3.Peoplewhohasyouraccount,theycanvisitUstream
websiteandwatchthelivevideostreamingfromcamera
throughcomputers.
www.ustream.tv
ThecameralistsavailableAccessPoints.Pleaseselect
oneforwirelessconnection.
Icon Description
CurrentlyconnectingAP
Securednetwork:Requiresthepassword
toaccesstheAP.
Signalstrength
UpDowncursor:Changethepages.
AP Prole information: Check the status
oryoucanremoveitsprole.
1. SelectthedesiredAP(Network)toconnectto.
2. IftheselectedAPrequiresthepassword
authentication,youwillenterthekeypadscreen.
3. Enterthepasswordandtouchthe[ Enter ]iconto
conrmit.
4. Ortouchthe[ Return ]icontoexit.
Capital Lock
Back
Toggle between letters
and numbers/symbols Confirm
Exit
42 EN
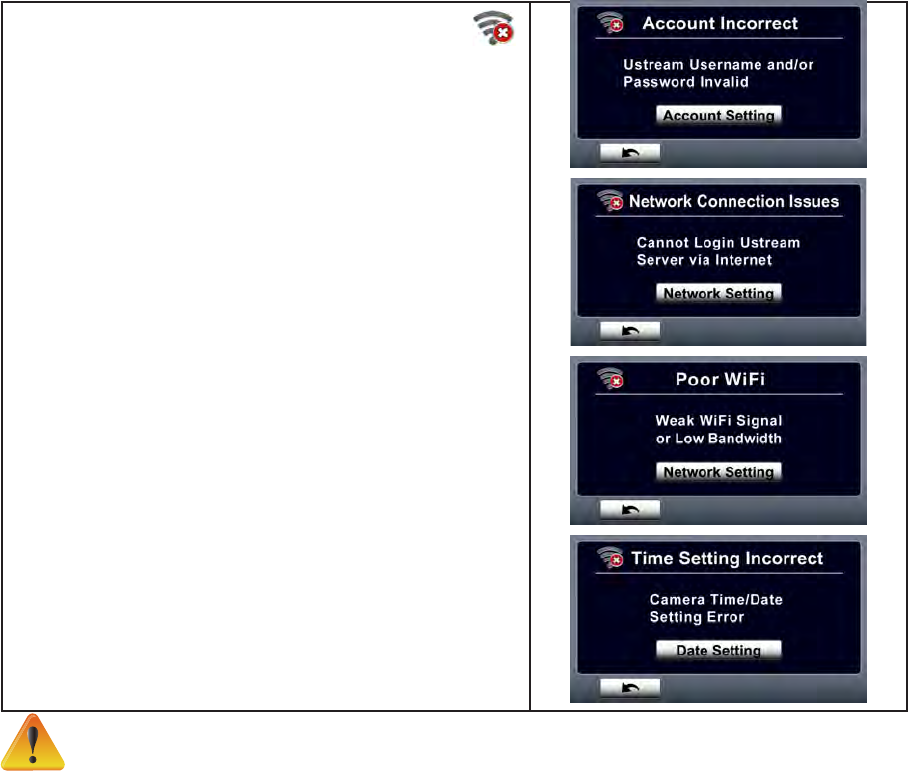
1. Thescreenshowntheicon[ ConnectingFailed ]( )
indicatesthecameradoesnotconnecttothenetwork
correctly.
Note
• Thepossiblereasonsfor“ConnectingFailed”couldbe(1)wrongpassword;(2)youarenot
inthewirelessnetworkareaoftheAP.(3)thecameradoesnotsupportthetypeofencryption
usedontheAP.ThismodelonlysupportsWEP/WPA/WPA2personaltypeofencryption,but
notuptoenterpriselevel(4)yournetworkrequiresPPPoEaccount/passwordinformation.
• ThiscameraonlysupportstheAP(SSID)namedinEnglish/number/symbols(ASCII
characters).
• YoucanonlyentertextinEnglish,regardlessoftheOSDlanguage.
• SomeAProutersdonotallowyoutoconnecttothenetwork(e.g.rewall).
• Youmaybechargedbythenetworkserviceprovider.
• Pleasestayawayfromanyelectronicequipmentsincetheradiofrequencysignalsmay
interfereconnecting.
• WhenstreamingonUstream,therecord/zoomfunctionsaredisabled.
• ThecameracannotconnecttothenetworkwhileitisconnectedtoanHDTVviathecable,or
viceversa.
• ItmaytaketimetoscanandconnecttotheAP/networkortoupload.Thestreamspeedis
affectedbytheInternetconnectionspeedorotherfactors.
• Pleasebesurethebatteryisfullychargedbeforeconnectingtothenetwork.Itmaytaketime
toupload.
• Ifyoudonothaveanaccount,pleasesignuponthewebsiterst.
• Thesocialwebsiteupdateisthesubjecttochangewithoutnotice.(e.g.passwordvalidation,
createachannel)Pleasevisitthewebsitersttoupdateyouraccountsetting.
• Ustreammaynotbeallowedtoaccessincertainregionsornetworks.
• Pleaseavoidtransferringthecondentiallesandsettingyourpersonalaccountinformation
ontheopennetworksorinpublicareas.Thedatatransferredviawirelesscouldbeleaked.
43 EN
Section 9
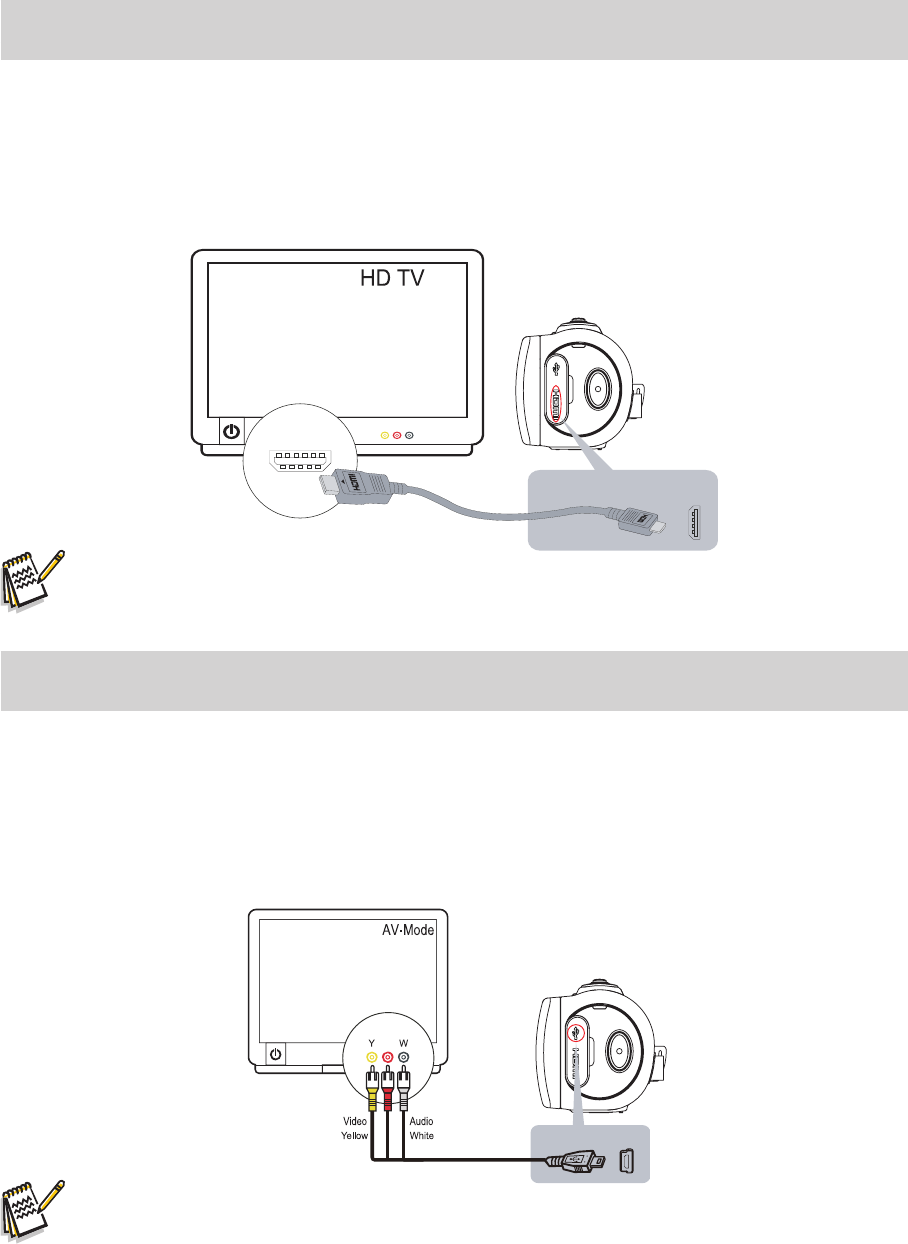
Viewing Photos and Videos on TV
Connecting to a High-Denition 16:9(Wide) TV
1.ConnecttheHDMIcabletoyourdevice’sHDMIOutport.
2.Connecttheotherendofthecabletoatelevision.
3.SetthevideoinputsourceofyourTVto“HDMI.”
4.ThestepsforviewingstoredvideosandphotosonHDTVareexactlythesameasforviewingthem
ontheLCDscreen.
(16:9)
Note
• SomefunctionsmaynotbeaccessiblewhenthedeviceisconnectedtoanHDTV.
Connecting to a 4:3 TV
1.ConnecttheAVcable(soldseparately)toyourdevice’sMiniUSB2.0port.
2.Connecttheotherendofthecabletoatelevision.
3.ThestepsforviewingstoredvideosandphotosonaTVareexactlythesameasforviewingthemon
theLCDscreen.
( 4 : 3 )
Note
• SomefunctionsmaynotbeaccessiblewhenthedeviceisconnectedtoaTV/HDTV.
• SomeiconsontheLCDscreendonotdisplaywhenthecameraisconnectedtoanHDTV.
• Video/phototakingisnotappliedwhileHDMIcableison.
• WirelessfunctionwouldnotbeappliedwhileHDMIcableisusedwithTV.

44 EN
Section 10
Viewing Photos and Videos on PC
Transferring Photos or Videos to a Computer
Youcantransferphotosorvideosstoredonyourdevicetoacomputerandsendthemine-mails to
friendsorpostthemonthewebsites.
Todothisyoushould:
1. ConnectthecomputeranddevicewiththesuppliedminiUSB2.0cable.
2. ToaccessphotosandvideosonyourSDcard:Videosandphotoscanbefoundonyourcomputer
atMyComputer\SD\DCIM\100MEDIA(pathwillvarydependingonnameofSDcard).
3. Toaccessphotosandvideosinthedevice’sinternalmemory:Videosandphotoscanbefoundon
yourcomputeratMyComputer\DV\DCIM\100MEDIA
4. Underthisfolder,youcanview,delete,move,orcopyanyvideo/photoyouwant.
(InWindowsXP)

45 EN
Section 11
Specications and System Requirements
Specication
Imagesensor 5MegapixelCMOSsensor
Operationmodes Videorecord,Photorecord
LensType 10XOpticalzoom
Lens AutoFocusLens(F2.8)
Focusrange NormalMode Wide:1cm~Innity
Tele:80cm~Innity
Zoom 1X~50X(10XOpticalzoomand5XDigitalzoom)
Shutter Electronic
LCDmonitor 3inchestouchLCD(16:9)
ExternalLens/Filtermount Ø37mm
Storagemedia Built-in128MBmemory(partialmemoryisusedforrmwarecodeand
software);
SD/SDHC/SDXCcardslotsupport(upto64GB)
Photoresolution 16MP:4608×3456(16Mpixels)(Interpolated)
5MP:2592×1944(5Mpixels)
3MP:2048×1536(3Mpixels)
Videoresolution FullHD(1080p30):1920×1080(30fps)
HD+(720p60):1280×720(60fps)
HD(720p30):1280×720(30fps)
VGA(640×480):640×480(30fps)
Whitebalance Auto/Manual(Daylight,Fluorescent,Tungsten)
Self-timer 10secondsdelay
Light LightOn/DigitalLight/LightOff
Fileformat Photo:JPG
Video:MP4(H.264)
Imageplay Singleimage/Slideshow
PCinterface MiniUSB2.0port
TVout HDMI
Battery Lithium-ionrechargeablebattery
Dimension 121mm(L)×59mm(H)×54mm(W)
Weight 247g(withoutbattery)

46 EN
System requirements
• MicrosoftWindowsXP/Vista/7
• Intel/AMDDual-CoreCPUorabove
• 1GBSystemmemoryandfree
• 2GBSystemharddiskspace
• AvailableUSB1.1/2.0portorabove
Note
• TheLCDscreenismanufacturedusingextremelyhigh-precisiontechnology,soover99.99%
of the pixels are operational for effective use. However, some tiny black and/or bright dots
(white,red,blueorgreen)mayappearontheLCDscreen.Thesedotsareanormalresultof
themanufacturingprocess,anddonotaffecttherecording.

47 EN
Section 12
Troubleshooting
Troubleshooting
Ifthecamerafailstofunctionasexpected,checkthelistofthecommonproblemsbelow.
Problem/Situation Remediation/Solution
Cannot turn on the camera. The
power turns off suddenly.
• Powerisoff.Pressthe[ PowerButton ]toturnon.
• Batterypackisweakordepleted.Rechargethebatterypack.
Camera cannot be turned on
after plugging power adapter.
• Pleasemake sure that you use the supplied power adapter
andconnectittothepoweroutletcorrectly.
The les on the memory card do
not display smoothly when the
LCD shows the “!” marking.
• “!”meanstheSDcardislowspeedorcontainscorruptedles.
Tosolvethis,formattheSDcardusingthecamerainsteadof
acomputer.(PleaserefertothedetailedFormatinstructionin
Section5).
• Thecardhassomeproblemsandcannotberecognized.
Changethecardwithanotherone.
• OrpleasechangetheSDcardtoahighspeedone.
Cannot take video/photo. • Memoryisfull.Deletesomeunnecessaryvideos/photosor
insertanewSDcard.
• Powerisoff.Pressthe[ PowerButton ]toturnon.
The camera is frozen. • Pleaseremovethebattery/unplugtheadapter.Then,insert
thebattery/plugtheadapterandturnonthecameraagain.
The date imprinted on the photo
is incorrect
• Setthedateandtimeinthe[ Setting ]menu.
Why do some of my indoor
photos look blurry and dark?
• Poorlighting.Takephotoinbetterlighting.
• Thecameraextendsphotoexposuretimeunderlowlight/
indoorcondition.Keepthecamera(andthetargetsubject)
steadyforseveralsecondswhentakingphotos.
• Placethecameraonaatandsteadysurface,orusea
tripodwhentakephoto.
The color of the video/photo is
not natural.
• Selecttheproperwhitebalanceoptiontomatchthelight
source.
When the camera is connected
to the PC via USB cable, many
Autoplay windows may pop out.
They indicate the disks of the
camera.
• [ DV ]indicatestheinternalmemoryofthecamera.
• [ RemovableDisk ]indicatestheexternalmemory(memory
cardinstalledinthecamera).
• Thedisk[ DVAP ]showsthebuilt-inInternetDirect
applicationissavedatthisdisk.PleaseDONOTformatthis
diskordeletetheapplicationinside;otherwise,theInternet
Directapplicationcannotfunction.
Language on screen is not
legible.
• Whenthelanguageshownonthescreenisnotlegible,
pleaserefertoFAQatwebsitesfromeachoriginalcomputer
manufacturer.

48 EN
Section 13
FCC Regulations and SAR Information
FCC Regulations
15.19(a)(3):
Thisdevicecomplieswithpart15oftheFCCRules.Operationissubjecttothefollowingtwoconditions:(1)
Thisdevicemaynotcauseharmfulinterference,and(2)thisdevicemustacceptanyinterferencereceived,
includinginterferencethatmaycauseundesiredoperation.
15.105(b):
NOTE:ThisequipmenthasbeentestedandfoundtocomplywiththelimitsforaClassBdigitaldevice,
pursuanttopart15oftheFCCRules.Theselimitsaredesignedtoprovidereasonableprotectionagainst
harmfulinterferenceinaresidentialinstallation.
Thisequipmentgenerates,usesandcanradiateradiofrequencyenergyand,ifnotinstalledandusedin
accordancewiththeinstructions,maycauseharmfulinterferencetoradiocommunications.However,there
isnoguaranteethatinterferencewillnotoccurinaparticularinstallation.Ifthisequipmentdoescause
harmfulinterferencetoradioortelevisionreception,whichcanbedeterminedbyturningtheequipmentoff
andon,theuserisencouragedtotrytocorrecttheinterferencebyoneormoreofthefollowingmeasures:
—Reorientorrelocatethereceivingantenna.
—Increasetheseparationbetweentheequipmentandreceiver.
—Connecttheequipmentintoanoutletonacircuitdifferentfromthattowhichthereceiverisconnected.
—Consultthedealeroranexperiencedradio/TVtechnicianforhelp
Changesormodicationsnotexpresslyapprovedbythepartyresponsibleforcompliancecouldvoidthe
user‘sauthoritytooperatetheequipment.
RF Exposure Information (SAR)
Thisdevicemeetsthegovernment’srequirementsforexposuretoradiowaves.
Thisdeviceisdesignedandmanufacturednottoexceedtheemissionlimitsforexposuretoradiofrequency
(RF)energysetbytheFederalCommunicationsCommissionoftheU.S.Government.
TheexposurestandardemploysaunitofmeasurementknownastheSpecicAbsorptionRate,orSAR.
TheSARlimitsetbytheFCCis1.6W/kg.TestsforSARareconductedusingstandardoperatingpositions
acceptedbytheFCCwiththeEUTtransmittingatthespeciedpowerlevelindifferentchannels.
ThehighestSARvalueforthedeviceasreportedtotheFCCis0.226W/kgwhenplacednexttothebody.
TheFCChasgrantedanEquipmentAuthorizationforthisdevicewithallreportedSARlevelsevaluatedas
incompliancewiththeFCCRFexposureguidelines.SARinformationonthisdeviceisonlewiththeFCC
andcanbefoundundertheDisplayGrantsectionofwww.fcc.gov/oet/ea/fccidaftersearchingonFCCID:
E8HDCB229C100.
ThisdeviceiscompliancewithSARforgeneralpopulation/uncontrolledexposurelimitsinANSI/IEEEC95.1-
1999andhadbeentestedinaccordancewiththemeasurementmethodsandproceduresspeciedinOET
Bulletin65SupplementC.