Chicony Electronics Co DCC225U30 DIGITAL VIDEO CAMERA User Manual
Chicony Electronics Co Ltd DIGITAL VIDEO CAMERA
UserManual.wiki
>
Chicony Electronics Co
>
DCC225U30 User Manual
User Manual
Navigation menu
Upload a User Manual
Namespaces
Wiki Guide
HTML
PDF
Info
Views
User Manual
Discussion / Help
Navigation
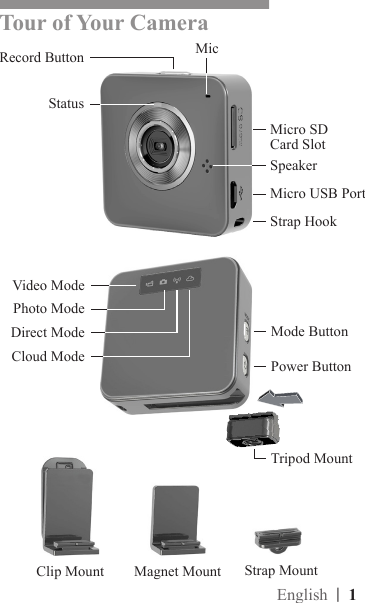
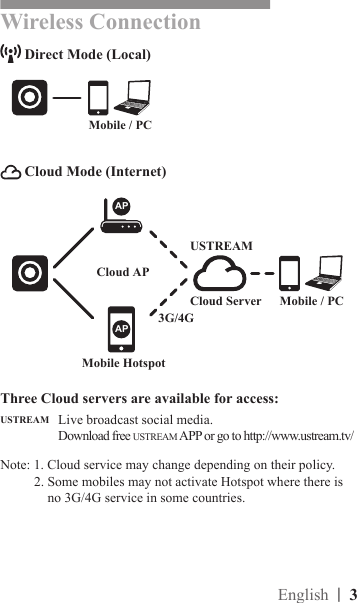
![2 | EnglishGetting StartedCharging the Unit• Before rst use, charge the battery fully by either adapter or PC USB.• Under charging, Status indicator will ash. Once complete, it will turn off automatically.Modes Navigation• Press Power button to turn on camera.• Press Mode button to switch between two camera modes (Video, Photo) and two wireless modes (Direct, Cloud).Two Camera ModesInsert micro SD card. (SD card is optional accessory) Take Video• Press Mode button to Video Mode.• Press Record button to take and again to stop. Take Photo• Press Mode button to Photo Mode.• Press Record button to take.Two Wireless ModesBefore using wireless modes, install below applications:• Mobile APP: Download [Unieye] from Google Play or Apple Store.• PC Software: Install [Unieye] from camera (Windows). (page 6) Direct ModeTo connect camera and mobile or PC directly for remote control, live view, managing album, and camera setup. Cloud ModeTo connect camera to Cloud server via Access Point (AP) or mobile Hotspot for Internet live video and monitoring.](https://usermanual.wiki/Chicony-Electronics-Co/DCC225U30/User-Guide-1895215-Page-3.png)
![4 | English Direct Mode (Mobile)Each camera has unique Camera ID. ( U2-xxxxxx) The Password is not required for rst use, it is advised to go to [Setup] on APP to edit Password after connected. Cloud Mode (Mobile)For Android user:• Set camera to Direct Mode .• On mobile, activate WiFi connection. • Execute [Unieye] APP.• Press camera bar to start.For iOS user:• Set camera to Direct Mode .• On mobile, go to [Settings][Wi-Fi] Choose a camera. • Execute [Unieye] APP. • Press camera bar to start.Connect CameraAndroid: iOS: Zoom In Zoom Out Invert Image Take Photo (SD card required) Take Video (SD card required) Loop Recording (SD card required)• Keep the last 10 minutes of recording at least. Two Way Voice• Press to turn on mobile microphone and speak to camera.• Camera microphone is mute while speaking. Quad View• Press to enable Quad View. (up to four cameras)• Press to optimize connection.• Select one window and press back to single view.](https://usermanual.wiki/Chicony-Electronics-Co/DCC225U30/User-Guide-1895215-Page-5.png)
![| 5EnglishBefore using Cloud Mode, setup Cloud AP and Cloud Server to camera.How to Setup Cloud AP on Direct Mode• On mobile, APP [Setup] [Cloud Setting] [Cloud AP].Two ways to setup Cloud AP:1. Select a WiFi network from [AP list] and enter Password.2. Press [Other] from [AP list] Enter Network SSID and Password.Note: Mobile Hotspot can be set as Cloud AP. How to Setup Cloud Server on Direct Mode• New user, press then enter Email/Username/Password for auto-registration. Registered user, enter Email/Username/Password only. • Select one server for camera to access. • Press [Save to Camera].How to Connect Camera with Cloud ServerTwo ways to connect Cloud server:1. On camera, set to Cloud Mode .2. On mobile, press [Camera to Cloud] in [Setup] page.• Once connected successfully, camera Cloud indicator is slow-ashed in green. If connection failed, Cloud indicator is fast-ashed in red. Go back to check and correct the setting of [Cloud AP] and [Cloud Server].How to View Live Video on Cloud Server1. Using APP:USTREAM APP are available for download to view live video.2. Go to website:USTREAM user Cloud Mode (Mobile)http://www.ustream.tv/](https://usermanual.wiki/Chicony-Electronics-Co/DCC225U30/User-Guide-1895215-Page-6.png)
![6 | EnglishPC ApplicationTo use PC application, install PC [Unieye] software rst. The WiFi functions on PC application are similar to mobile APP.Install PC [Unieye] Software from Camera• Plug in USB to connect camera and PC.• [Unieye] AutoRuns/AutoPlay is activated automatically.• If AutoRuns/AutoPlay is not activated:Go to [My computer] search [Unieye] for installation.• Once installed, software will be auto-launched.• Unplug USB for WiFi application or keep USB plugged for additional USB application.Additional USB Application (USB plugged)Once USB plugged, [View] function on [Unieye] is invalid.Press camera Mode button to switch between Mass Storage Mode and Webcam Mode. Mass Storage Mode (default): (Indicator show orange)1. Save Video/Photo to PC• Go to [Album] Select video/photo Press [Save to PC].2. Upload Video/Photo to YouTube, Facebook or Youku• Go to [Setup] [Upload Setting].• Enter Email/Username and Password.• Press [Save to PC].• Go to [Album] Select video/photo Press [Upload].Webcam Mode: (Indicator show green)• Exit and disfunction [Unieye].• In Instant Messaging (Skype or QQ), select "U2 video device" and "U2 audio device". (For Win XP, select "video device")](https://usermanual.wiki/Chicony-Electronics-Co/DCC225U30/User-Guide-1895215-Page-7.png)
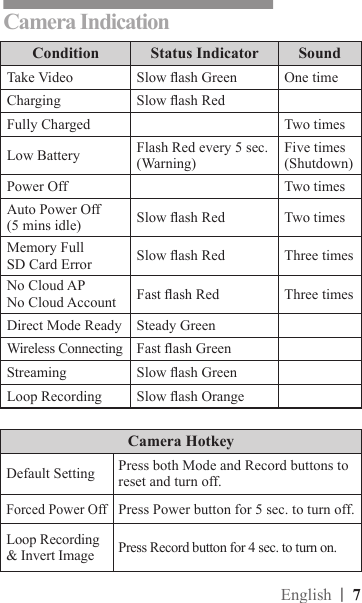
![8 | EnglishTrouble ShootingSituation SolutionCamera cannot turn on Battery power is low. Recharge the battery.Camera is frozen Press Power button for 5 sec. to turn off. Press Power button twice to turn on. Camera cannot recordNo SD card or SD card is full.SD card cannot be recognized. Format SD card by [Unieye] or change SD card.Camera not found Turn on camera, switch to Direct Mode. Press "Refresh" on mobile or PC to scan again.Forget camera password Press both Mode and Record buttons to reset.Cannot watch live view Network bandwidth is not sufcient.Move camera closer to AP or mobile Hotspot. Flickering segments on live view TV system setting (50Hz/60Hz) is incorrect.Cloud connection errorAP or mobile Hotspot is not on.No Cloud AP or Cloud AP SSID/Password is incorrect.Camera is not in wireless area or weak signal. Move camera closer to AP or mobile Hotspot. No Cloud account or account is incorrect. No internet or Cloud server is not accessible. Cloud service may be blocked by network rewall.](https://usermanual.wiki/Chicony-Electronics-Co/DCC225U30/User-Guide-1895215-Page-9.png)