Chicony Electronics Co DCC225U30 DIGITAL VIDEO CAMERA User Manual
Chicony Electronics Co Ltd DIGITAL VIDEO CAMERA
User Manual
Wireless Camcorder
User Manual
| 1
English
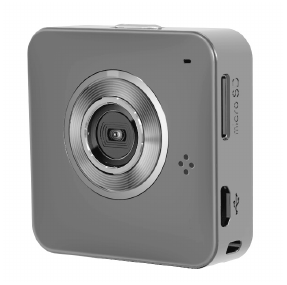
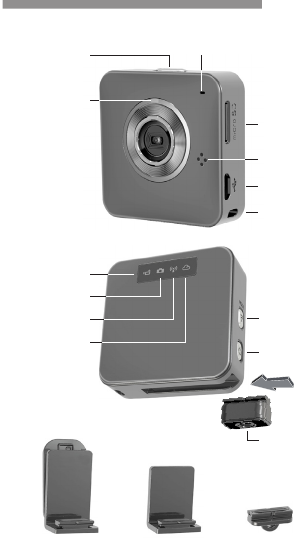
Tour of Your Camera
Clip Mount Magnet Mount
Tripod Mount
Strap Mount
Record Button
Status
Mic
Micro SD
Card Slot
Micro USB Port
Strap Hook
Speaker
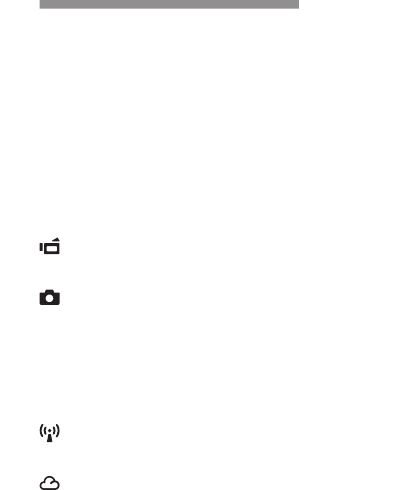
Video Mode
Photo Mode
Direct Mode
Cloud Mode
Mode Button
Power Button
2 | English
Getting Started
Charging the Unit
•
Before rst use, charge the battery fully by either adapter or PC USB.
• Under charging, Status indicator will ash. Once complete, it
will turn off automatically.
Modes Navigation
• Press Power button to turn on camera.
• Press Mode button to switch between two camera modes
(Video, Photo) and two wireless modes (Direct, Cloud).
Two Camera Modes
Insert micro SD card. (SD card is optional accessory)
Take Video
• Press Mode button to Video Mode.
• Press Record button to take and again to stop.
Take Photo
• Press Mode button to Photo Mode.
• Press Record button to take.
Two Wireless Modes
Before using wireless modes, install below applications:
•
Mobile APP: Download [Unieye] from Google Play or Apple Store.
• PC Software: Install [Unieye] from camera (Windows). (page 6)
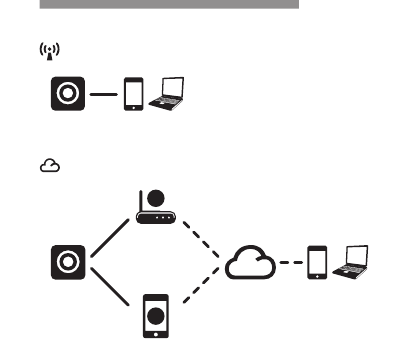
Direct Mode
To connect camera and mobile or PC directly for remote control,
live view, managing album, and camera setup.
Cloud Mode
To connect camera to Cloud server via Access Point (AP) or
mobile Hotspot for Internet live video and monitoring.
| 3
English
Cloud Mode (Internet)
AP
Cloud Server
Cloud AP
AP
Mobile Hotspot
Mobile / PC
USTREAM
3G/4G
Live broadcast social media.
Download free USTREAM APP or go to http://www.ustream.tv/
Getting Started
Direct Mode (Intranet)
Mobile / PC
Wireless Connection
Direct Mode (Local)
Cloud Mode (Internet)
USTREAM
Note: 1. Cloud service may change depending on their policy.
2. Some mobiles may not activate Hotspot where there is
no 3G/4G service in some countries.
Three Cloud servers are available for access:
4 | English
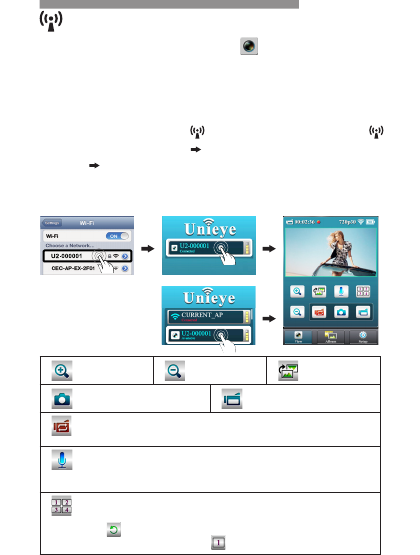
Direct Mode (Mobile)
Each camera has unique Camera ID. ( U2-xxxxxx)
The Password is not required for rst use, it is advised to go to
[Setup] on APP to edit Password after connected.
Cloud Mode (Mobile)
For Android user:
• Set camera to Direct Mode .
• On mobile, activate WiFi
connection.
• Execute [Unieye] APP.
• Press camera bar to start.
For iOS user:
• Set camera to Direct Mode .
• On mobile, go to [Settings]
[Wi-Fi] Choose a camera.
• Execute [Unieye] APP.
• Press camera bar to start.
Connect Camera
Android:
iOS:
Zoom In Zoom Out Invert Image
Take Photo (SD card required) Take Video (SD card required)
Loop Recording (SD card required)
• Keep the last 10 minutes of recording at least.
Two Way Voice
• Press to turn on mobile microphone and speak to camera.
• Camera microphone is mute while speaking.
Quad View
• Press to enable Quad View. (up to four cameras)
• Press to optimize connection.
• Select one window and press back to single view.
| 5
English
Before using Cloud Mode, setup Cloud AP and Cloud Server to camera.
How to Setup Cloud AP on Direct Mode
• On mobile, APP [Setup] [Cloud Setting] [Cloud AP].
Two ways to setup Cloud AP:
1. Select a WiFi network from [AP list] and enter Password.
2.
Press [Other] from [AP list] Enter Network SSID and Password.
Note: Mobile Hotspot can be set as Cloud AP.
How to Setup Cloud Server on Direct Mode
• New user, press then enter Email/Username/Password
for auto-registration. Registered user, enter Email/Username/
Password only.
• Select one server for camera to access.
• Press [Save to Camera].
How to Connect Camera with Cloud Server
Two ways to connect Cloud server:
1. On camera, set to Cloud Mode .
2. On mobile, press [Camera to Cloud] in [Setup] page.
• Once connected successfully, camera Cloud indicator is slow-
ashed in green. If connection failed, Cloud indicator is fast-
ashed in red. Go back to check and correct the setting of
[Cloud AP] and [Cloud Server].
How to View Live Video on Cloud Server
1. Using APP:
USTREAM
APP are available for download to view live video.
2. Go to website:
USTREAM user
Cloud Mode (Mobile)
http://www.ustream.tv/

6 | English
PC Application
To use PC application, install PC [Unieye] software rst.
The WiFi functions on PC application are similar to mobile APP.
Install PC [Unieye] Software from Camera
• Plug in USB to connect camera and PC.
• [Unieye] AutoRuns/AutoPlay is activated automatically.
• If AutoRuns/AutoPlay is not activated:
Go to [My computer] search [Unieye] for installation.
• Once installed, software will be auto-launched.
• Unplug USB for WiFi application or keep USB plugged for
additional USB application.
Additional USB Application (USB plugged)
Once USB plugged, [View] function on [Unieye] is invalid.
Press camera Mode button to switch between Mass Storage
Mode and Webcam Mode.
Mass Storage Mode (default): (Indicator show orange)
1. Save Video/Photo to PC
• Go to [Album] Select video/photo Press [Save to PC].
2. Upload Video/Photo to YouTube, Facebook or Youku
• Go to [Setup] [Upload Setting].
• Enter Email/Username and Password.
• Press [Save to PC].
• Go to [Album] Select video/photo Press [Upload].
Webcam Mode: (Indicator show green)
• Exit and disfunction [Unieye].
•
In Instant Messaging (Skype or QQ), select "U2 video device"
and "U2 audio device". (For Win XP, select "video device")
| 7
English
Camera Indication
Camera Hotkey
Default Setting Press both Mode and Record buttons to
reset and turn off.
Forced Power Off
Press Power button for 5 sec. to turn off.
Loop Recording
& Invert Image
Press Record button for 4 sec. to turn on.
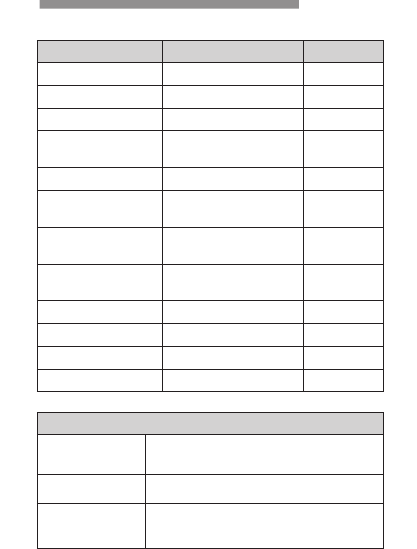
Condition Status Indicator Sound
Take Video Slow ash Green One time
Charging Slow ash Red
Fully Charged Two times
Low Battery Flash Red every 5 sec.
(Warning)
Five times
(Shutdown)
Power Off Two times
Auto Power Off
(5 mins idle) Slow ash Red Two times
Memory Full
SD Card Error Slow ash Red Three times
No Cloud AP
No Cloud Account Fast ash Red Three times
Direct Mode Ready Steady Green
Wireless Connecting Fast ash Green
Streaming Slow ash Green
Loop Recording Slow ash Orange

8 | English
Trouble Shooting
Situation Solution
Camera cannot turn on Battery power is low. Recharge the battery.
Camera is frozen Press Power button for 5 sec. to turn off.
Press Power button twice to turn on.
Camera cannot record
No SD card or SD card is full.
SD card cannot be recognized. Format SD
card by [Unieye] or change SD card.
Camera not found Turn on camera, switch to Direct Mode. Press
"Refresh" on mobile or PC to scan again.
Forget camera password Press both Mode and Record buttons to reset.
Cannot watch live view Network bandwidth is not sufcient.
Move camera closer to AP or mobile Hotspot.
Flickering segments on
live view TV system setting (50Hz/60Hz) is incorrect.
Cloud connection error
AP or mobile Hotspot is not on.
No Cloud AP or Cloud AP SSID/Password is
incorrect.
Camera is not in wireless area or weak signal.
Move camera closer to AP or mobile Hotspot.
No Cloud account or account is incorrect.
No internet or Cloud server is not accessible.
Cloud service may be blocked by network rewall.

| 9
English
FCC & Safety Instruction
FCC Regulations
15.19(a)(3):
This device complies with part 15 of the FCC Rules. Operation is
subject to the following two conditions: (1) This device may not cause
harmful interference, and (2) this device must accept any interference
received, including interference that may cause undesired operation.
15.105(b):
NOTE: This equipment has been tested and found to comply with the
limits for a Class B digital device, pursuant to part 15 of the FCC Rules.
These limits are designed to provide reasonable protection against
harmful interference in a residential installation.
This equipment generates, uses and can radiate radio frequency energy
and, if not installed and used in accordance with the instructions, may
cause harmful interference to radio communications. However, there is
no guarantee that interference will not occur in a particular installation.
If this equipment does cause harmful interference to radio or television
reception, which can be determined by turning the equipment off and on,
the user is encouraged to try to correct the interference by one or more
of the following measures:
— Reorient or relocate the receiving antenna.
— Increase the separation between the equipment and receiver.
— Connect the equipment into an outlet on a circuit different from that
to which the receiver is connected.
— Consult the dealer or an experienced radio/ TV technician for help
Changes or modications not expressly approved by the party responsible
for compliance could void the user‘s authority to operate the equipment.

10 | English
FCC & Safety Instruction
RF Exposure Information (SAR)
This device meets the government’s requirements for exposure to radio
waves.
This device is designed and manufactured not to exceed the emission
limits for exposure to radio frequency (RF) energy set by the Federal
Communications Commission of the U.S. Government.
The exposure standard employs a unit of measurement known as the
Specic Absorption Rate, or SAR. The SAR limit set by the FCC
is 1.6W/kg. Tests for SAR are conducted using standard operating
positions accepted by the FCC with the EUT transmitting at the specied
power level in different channels.
The highest SAR value for the device as reported to the FCC is 1.46 W/
kg when placed next to the body.
The FCC has granted an Equipment Authorization for this device with
all reported SAR levels evaluated as in compliance with the FCC RF
exposure guidelines. SAR information on this device is on le with the
FCC and can be found under the Display Grant section of www.fcc.gov/
oet/ea/fccid after searching on FCC ID: E8HDCC225U30.
This device is compliance with SAR for general population /
uncontrolled exposure limits in ANSI/IEEE C95.1-1999 and had been
tested in accordance with the measurement methods and procedures
specied in OET Bulletin 65 Supplement C.