Chigo Air Conditioning CP-WF-DL-01 Portable Air-Conditioner User Manual
Guangdong Chigo Air Conditioning Co.,Ltd Portable Air-Conditioner Users Manual
User manual

MOBILE AIR CONDITIONER OWNER'S MANUAL
*<(QJ

Before installing and using your portable air conditioner, please read this owner’s manual
carefully. Store this manual in a safe place for future reference.
1) Always place the unit on a level surface.
2) Never use or store gasoline or other flammable vapor or liquid near
this unit unless instructed by this manual.
3) Maintain at least 10 inches (25 cm) clearance space around this unit.
Do not block or cover air inlet or outlet grilles.
4) The unit must be connected to a correctly grounded power supply.
5) Do not start or stop the unit by inserting or pulling out the power plug.
6) Do not use an adapter plug or extension cord.
7) Do not use the unit in the immediate surroundings of a bath, a shower
or a swimming pool.
8) Do not insert anything into the air outlet. Do not obstruct air inlet or
outlet grills unless instructed by this manual.
9) Do not let children play near this unit.
10) Always inspect the cord for signs of damage before use. If the power
cord is damaged, it must be replaced by the manufacturer or a qualified
service technician.
11) When cleaning the unit, always turn the unit off and unplug the power cord.
12) Do not mix old and new batteries in the remote control.
3RUWDEOH$LUFRQGLWLRQHUVDUHSLHFHVRIKLJKYDOXH,QRUGHUWRHQVXUH\RXUODZIXOULJKWV
DQGLQWHUHVWVSOHDVHKDYHWKHSURIHVVLRQDOWHFKQLFLDQVWRGRWKHLQVWDOODWLRQIRU\RX
7KLV,QVWUXFWLRQ0DQXDOLVWKHXQLYHUVDOSXUSRVHYHUVLRQIRUWKHPRGHOVRISRUWDEOH
DLUFRQGLWLRQHUVPDQXIDFWXUHGE\RXU&R7KHDSSHDUDQFHRIWKHXQLWVWKDW\RXSXUFKDVH
PLJKWEHVOLJKWO\GLIIHUHQWIURPWKHRQHVGHVFULEHGLQWKH0DQXDOEXWLWGRHVQRWDIIHFW
\RXUSURSHURSHUDWLRQVDQGXVDJH
3OHDVHUHDGFDUHIXOO\WKHVHFWLRQVFRUUHVSRQGLQJWRWKHVSHFLILFPRGHO\RXFKRRVH
DQGNHHSWKH0DQXDOSURSHUO\VRDVWRIDFLOLWDWH\RXUUHIHUHQFHDWODWHUWLPH
&
&RQWHQWV
352'8&7',$*5$0
3$576$66(0%/<
:,1'2:.,7$66(0%/<
:,1'2:.,7,167$//$7,21
6(&85,7<%5$&.(7
&21752/3$1(/
5(027(&21752/
81,723(5$7,21
0$,17(1$1&(
7528%/(6+227,1*
Foreword
Attention:
F
O
R
E
w
O
R
D
*
C
O
N
T
E
N
T
S

1. Control Panel
2. Manual Control Louver & Air Outlet
3. Carry Handle
4. Caster
5. Air Filter
6. Continuous Drain Port
7. Hot Air Discharge Opening
8. Air Intake Grille
9. Condensation Drain Hole
10. Exhaust Hose
11. Exhaust Hose Connector
12. Window Kit Adapter Grille
13. Window Kit Adapter
14. Optional Window Kit Adapter Extension
15. Window Kit Panel
16. Wing Nuts
17. Optional Drain Tube
18. Drain Tube Stopper
19. Remote Control
20. Battery
21. Optional Window Security Pack
1
PRO D UCT DIAGRAM
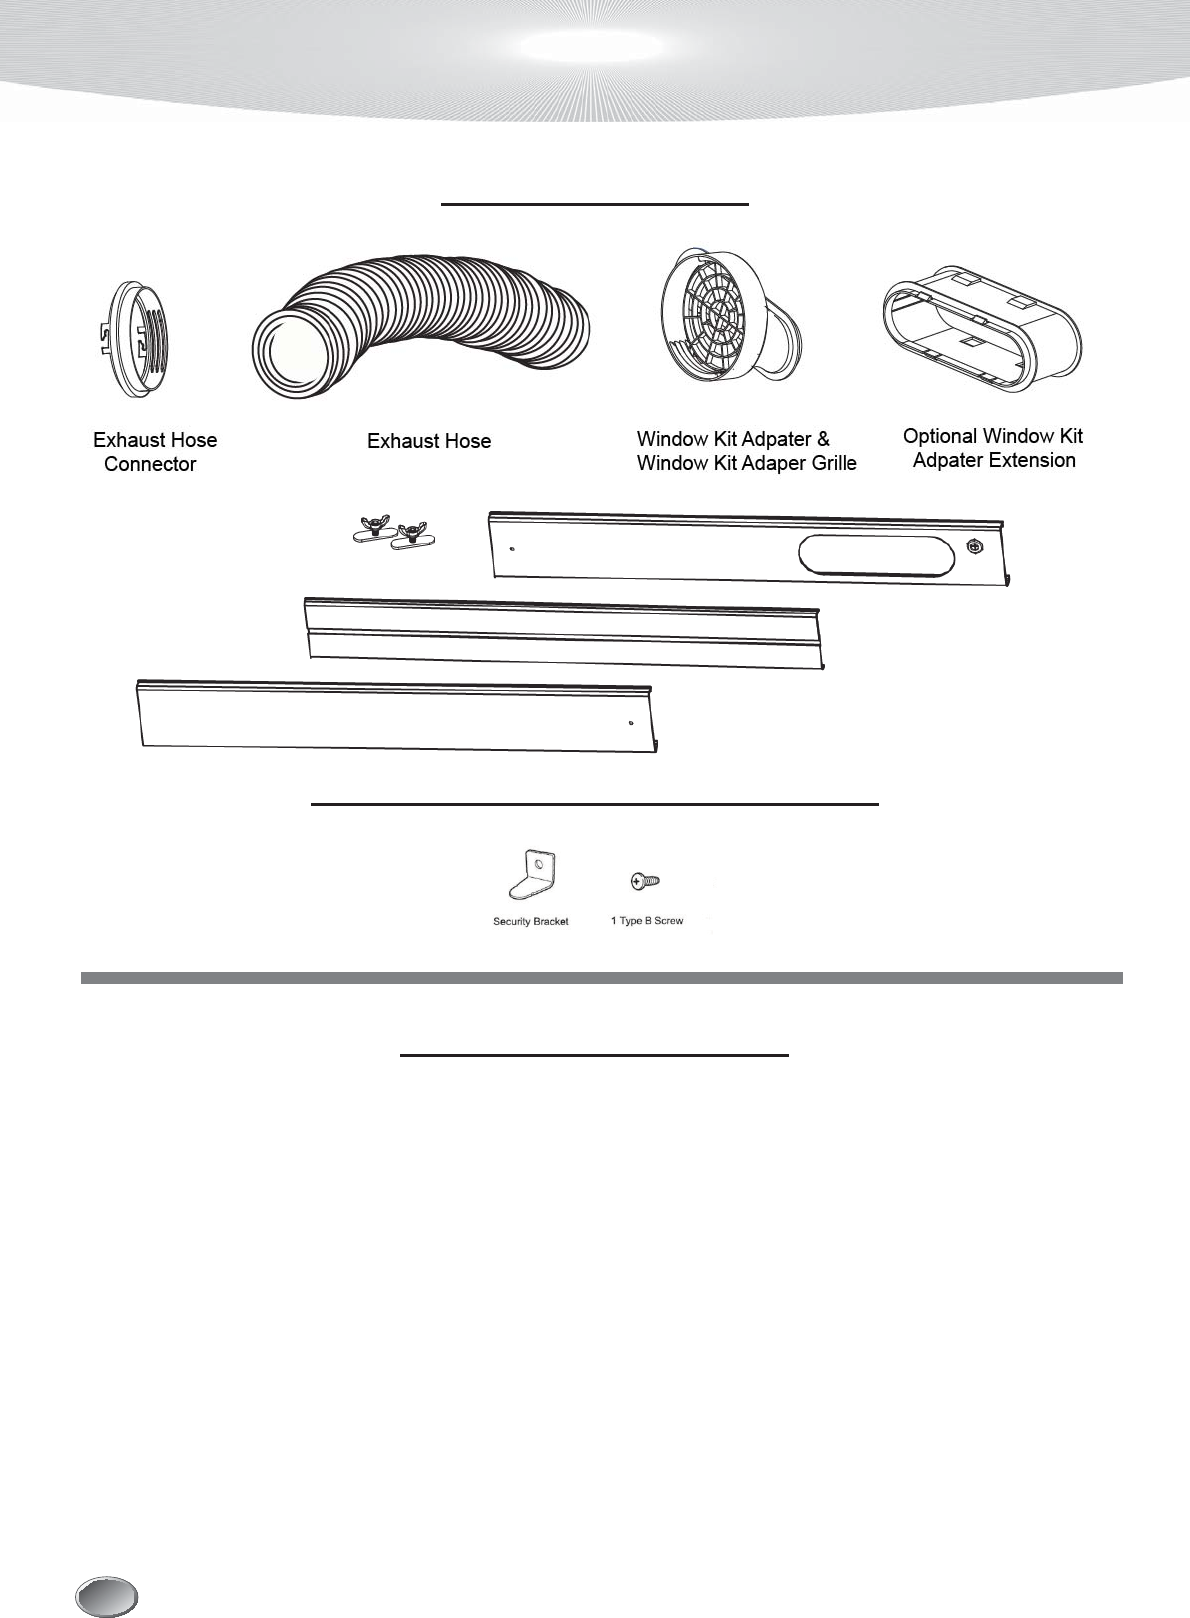
WINDOW VENTING KIT
OPTIONAL WINDOW SECURITY BRACKET
ASSEMBLY & INSTALLATION
When the unit is operating in air conditioning mode, the unit draws in indoor air and exhausts hot air out of the room
to complete the air exchange. The Window Kit must be installed when operating the unit in air conditioning, dehu-
midification and heating modes. When the unit is operating in Fan Mode, no outdoor air exchange takes place. The
window kit and exhaust hose do not need to be installed when the unit is used as a fan.
The supplied window kit can be installed in sliding windows and sliding glass doors up to 7 ft. long
(approximate length). When installed, be sure to keep the exhaust hose and short and straight as possible for
maximum efficiency.
2
PARTS & ASSEM BLY
.
3
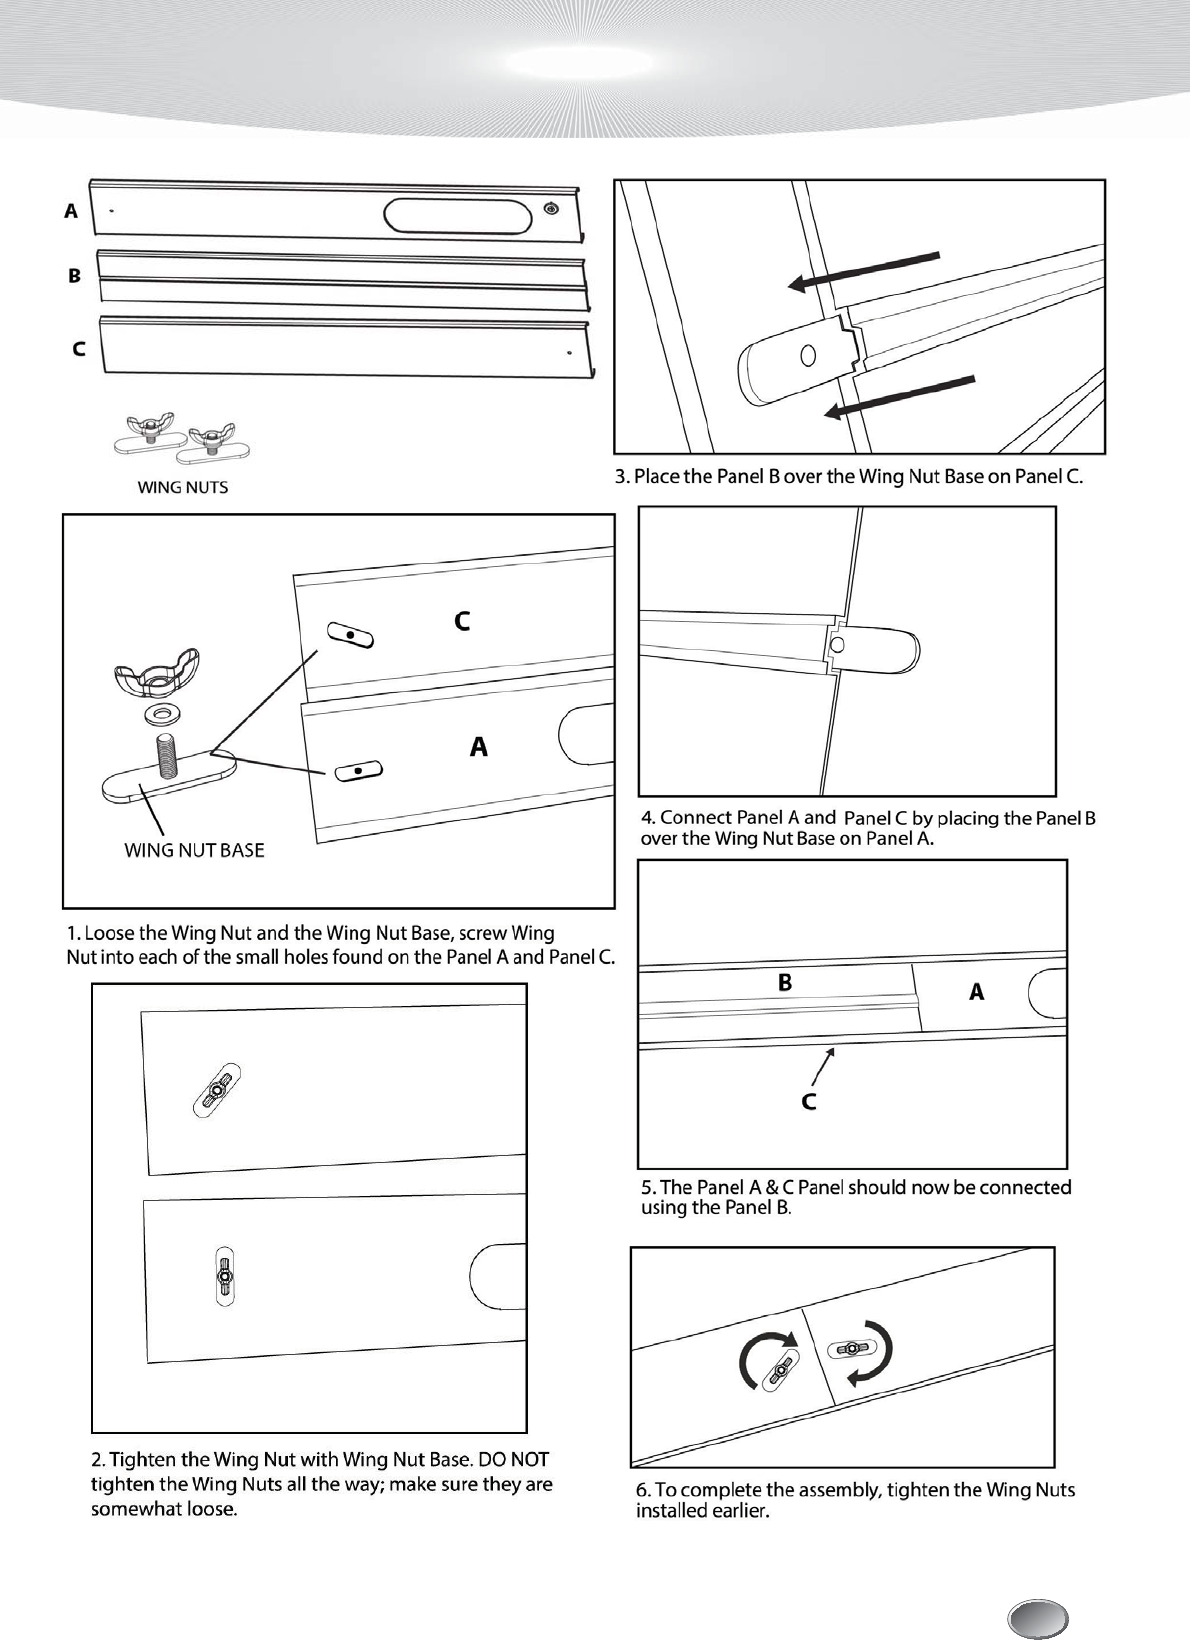
WINDOW KIT ASSEM BLY
.
PORTABLE AIR CONDITIONER
7KHZLQGRZYHQWLQJNLWPXVWEHLQVWDOOHGLQRUGHUIRUWKHXQLWWRZRUNFRUUHFWO\7KHZLQGRZYHQWLQJNLWKDVEHHQGH
VLJQHGWRILWLQWRPRVWYHUWLFDODQGKRUL]RQWDOZLQGRZRSHQLQJVDQGVOLGLQJJODVVGRRUVXSWRIHHW
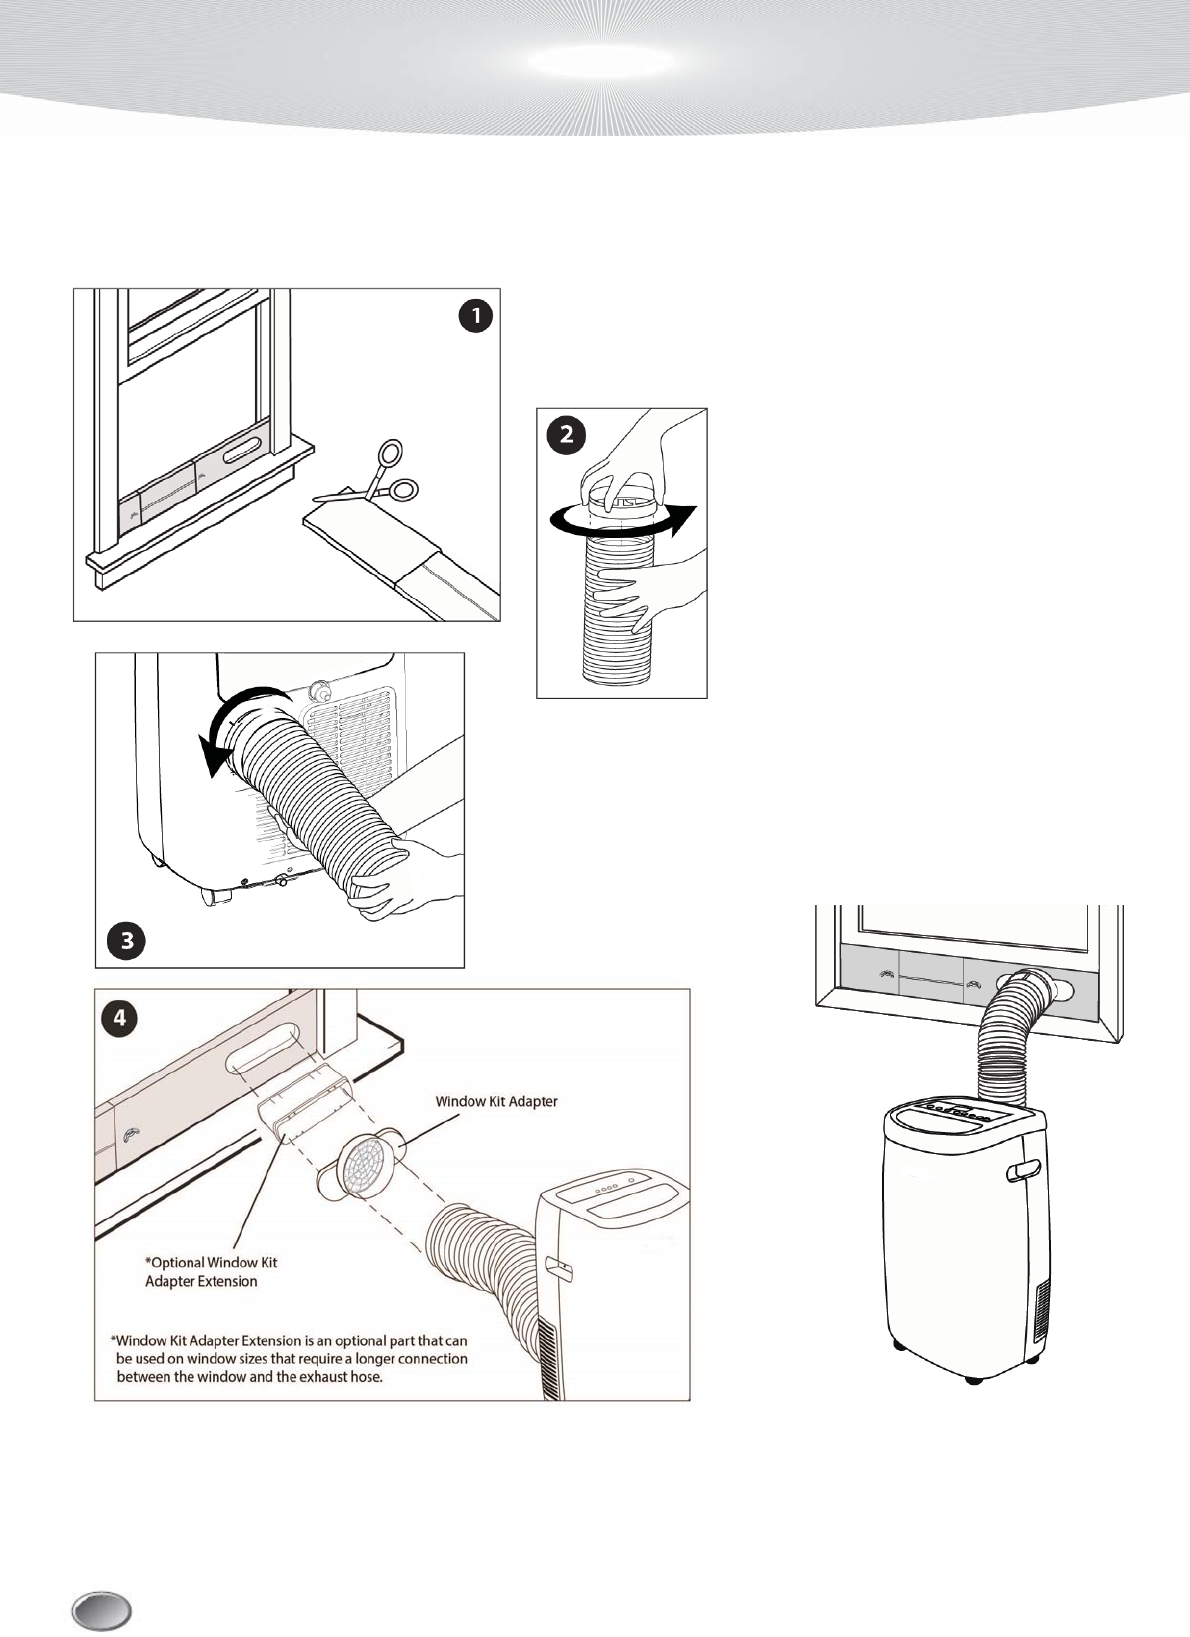
2. 7ZLVWWKH([KDXVW+RVH&RQQHFWRU
RQWR([KDXVW+RVH
1. 2SHQWKHZLQGRZRUGRRUWRDGMXVWWKHOHQJWKRIWKH:LQGRZ
.LW3DQHOVWRILWWKHRSHQLQJ,IQHFHVVDU\PDUNWKHNLWDQGFXW
RQHHQGGRZQWRSURSHUO\ILWWKHRSHQLQJ
3. 7ZLVWWKH([KDXVW+RVH&RQQHFWRURYHUWKHGLVFKDUJHRSHQLQJ
RQWKHEDFNRIWKHXQLWDQGH[WHQGWKH([KDXVW+RVH(Keep the
exhaust hose as short and straight as possible)
4. $WWDFKWKH([KDXVW+RVHWRWKH:LQGRZ.LW$GDSWHU1RZFRQQHFW
WKH2SWLRQDO:LQGRZ.LW$GDSWHU([WHQVLRQ
WRWKH:LQGRZ.LW$GDSWHU7KHQDWWDFKWKH
2SWLRQDO:LQGRZ.LW$GDSWHU([WHQVLRQWR
.HHSWKHH[KDXVWKRVH
DVVKRUWDQGVWUDLJKWDV
SRVVLEOHIRUPD[LPXP
HIILFLHQF\
4
4
WINDOW KIT IN STA LLA TIO N
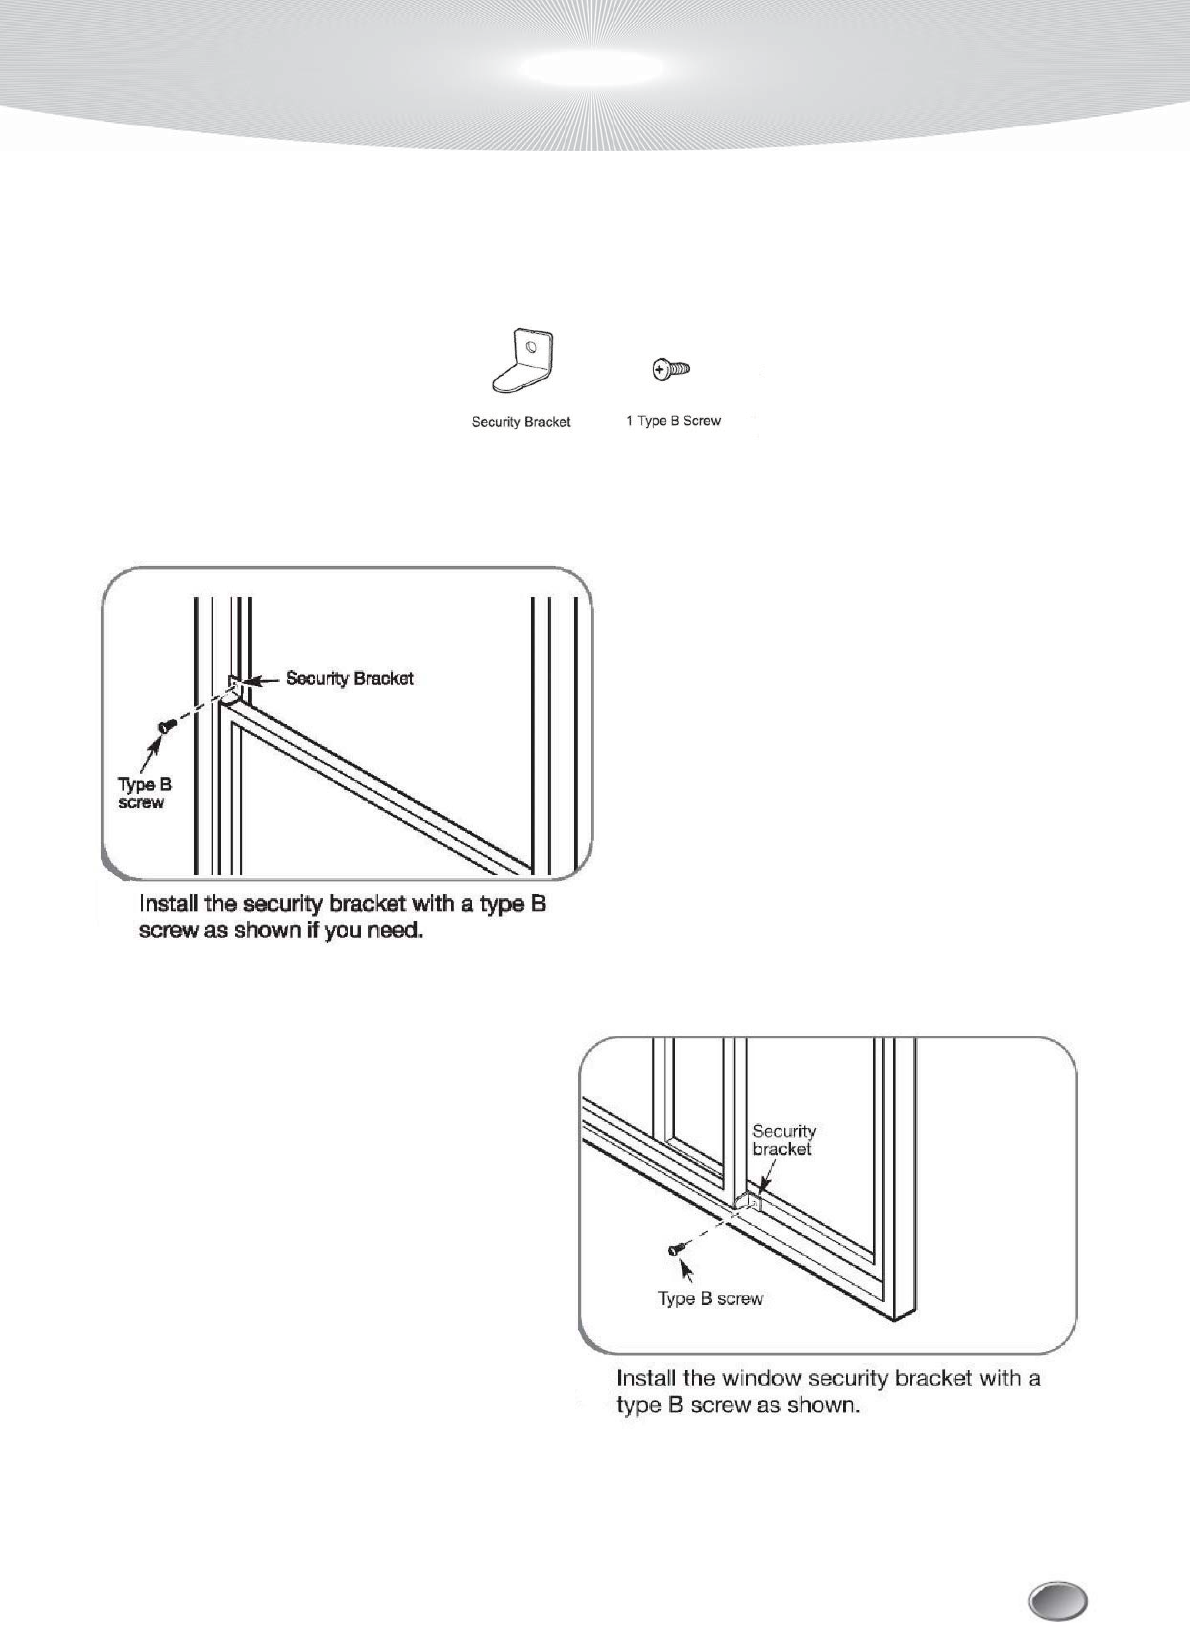
Optional Security Bracket Installation
<RXU:LQGRZ.LWDOVRLQFOXGHVDQRSWLRQDOVHFXULW\EUDFNHWWKDWFDQEHLQVWDOOHGWRSUHYHQWWKHZLQGRZIURPEHLQJ
RSHQHGIURPWKHRXWVLGHZKLOHD:LQGRZ.LWLVLQVWDOOHG
Single and Double Hung Windows
Sliding Windows
5
SECU RITY BRACKET

OPERATING INSTRUCTIONS FOR CONTROL PANEL BUTTONS
1) Power On and Off - Press the POWER button once to manually turn the unit on. Press the POWER
button once more to turn the unit off.
2) Mode Selection - Press the MODE Button repeatedly to cycle between the different modes: Air
Conditioner (Cool) mode, Fan-only mode, Dehumidifier (Dry) mode, Heat mode(cooling-only model
without this mode), Sleep mode, and Auto mode. Each press of the MODE button will light up a
different indicator on the control panel. The exhaust hose and window kit must be installed when the
unit is in Air Conditioner, Heater, Dehumidifier mode, Auto mode, and Sleep mode. When using the
unit as a fan, the window kit is not required.
3) Temperature - Select the desired temperature by pressing either the + or -button when using the unit
in Air Conditioner or Heat mode. The temperature indicator flashes to display the desired temperature
setting. After the temperature is set, the unit will display this temperature setting until it is changed by
the user. The temperature indicator display shows temperature in Fahrenheit. While the unit is plugged
in, but not powered on, press and hold the + and - buttons for 3 seconds to switch between Celsius and
Fahrenheit.
4) Fan Speed Press FAN SPEED button to choose fan speed in High, Medium or low.
5) Timer - Press TIMER button to set the unit automatically turn ON or OFF. Use the + and -buttons to
program the hour increment.
6) Turbo Cool - When Turbo Cool is activated, the unit will cool at 61F on fan high for 10 minutes and
then return to the original settings.
7) Bucket Full - When the unit cannot evaporate the collected moisture fast enough, the excess water
will collect in a backup water tank located inside the unit. The BUCKET FULL indicator will light up.
8) Louver Direction - This unit has 2-way directional louvers. Use the louver guides manually to direct
air up and down.
Sleep Mode
Indicator
Fan Speed
Indicators
Auto Mode
Indicator
Air Conditioner
Mode Indicator
Fan Mode
Indicator
Power
Indicator
Bucket Full
Indicator
Turbo Cool
Indicator
Timer
Indicator
Dehumidifier Mode
Indicator
Heat Mode
Indicator
6
CONTRO L PANEL
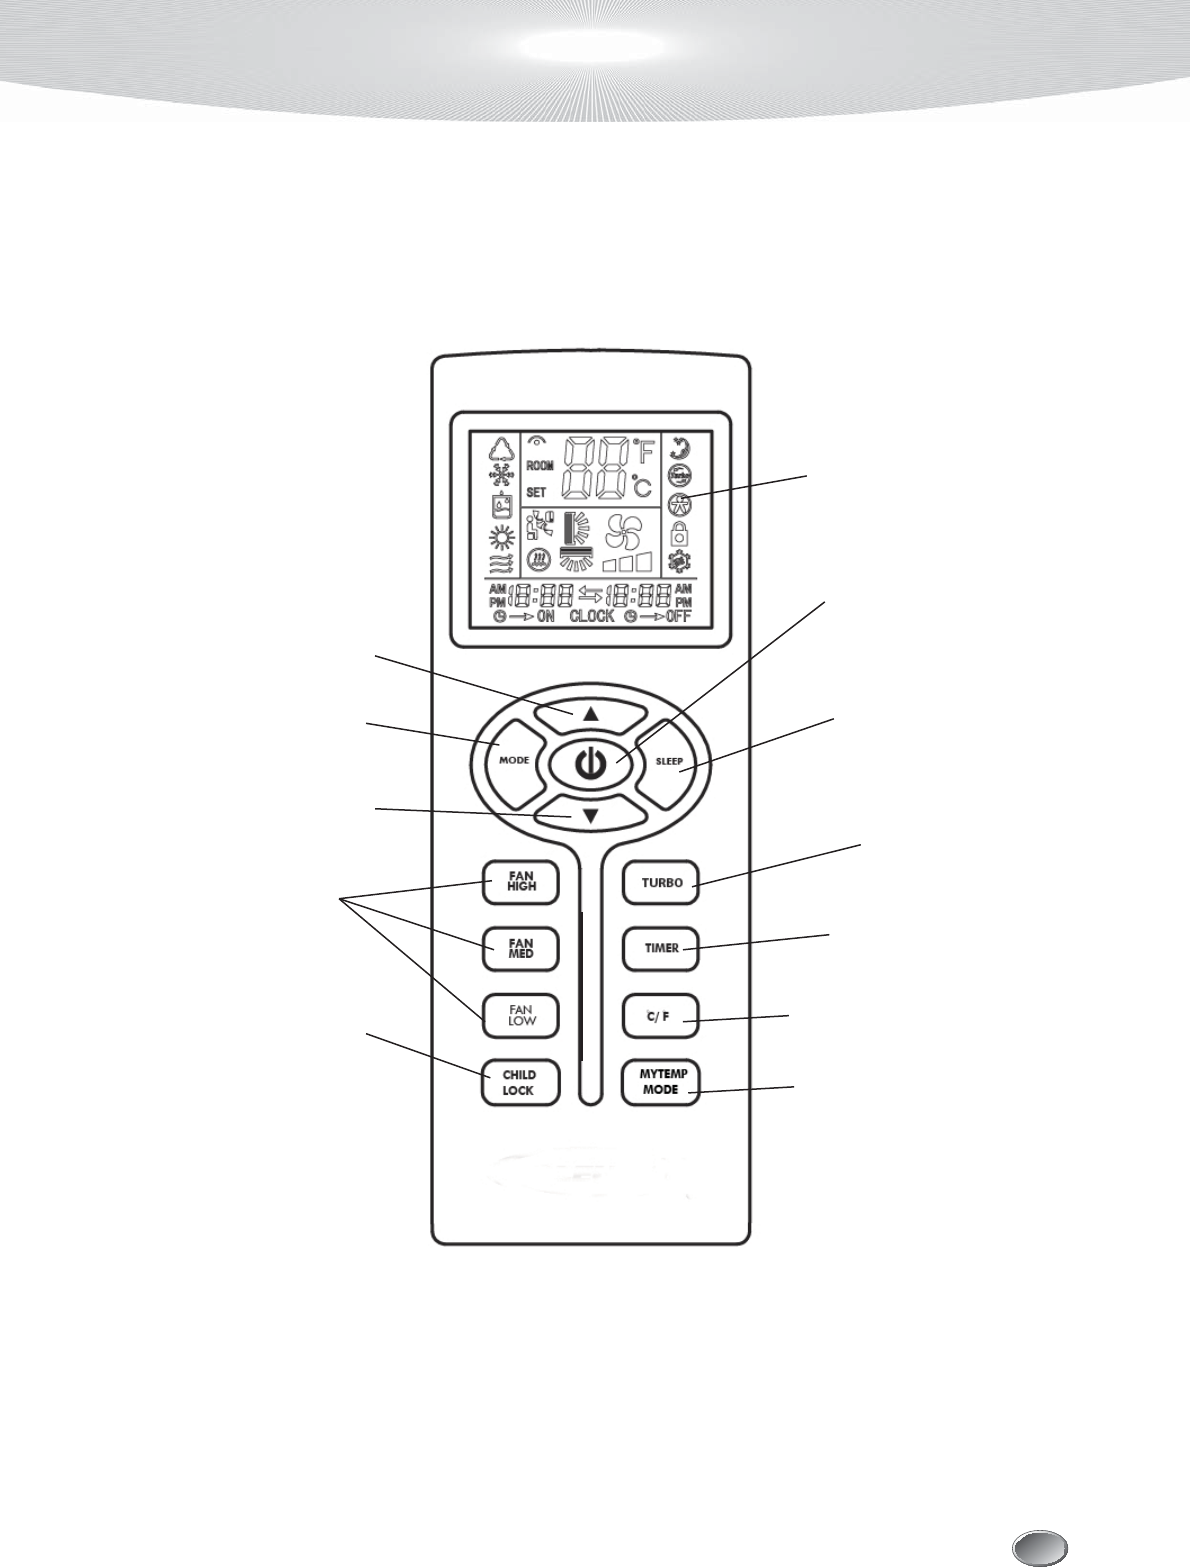
LCD DISPLAY
POWER BUTTON
TIMER/TEMP DECREASE
TIMER/TEMP INCREASE
REMOTE LOCK BUTTON
SLEEP BUTTON
TIMER BUTTON
TURBO COOL
BUTTON
°C/°F SWITCH BUTTON
MODE BUTTON
FAN SPEED
MY TEMP BUTTON
REM O TE CONTROL
Power On and Off :KHQWKHXQLWLVSOXJJHGLQSUHVVWKHPOWER EXWWRQWRWXUQRQWKHXQLW
3UHVVWKHPOWER EXWWRQRQFHPRUHWRWXUQWKHXQLWRII:KHQLQ$LU&RQGLWLRQHUPRGH+HDWPRGH
$XWRPRGHDQG6OHHSPRGHWKHVHOHFWHGWHPSHUDWXUHZLOODSSHDURQWKHUHPRWHFRQWURO/&'GLVSOD\
:KHQWKHXQLWLVLQ)DQPRGHRU'HKXPLGLILHUPRGHQRWHPSHUDWXUHZLOOEHGLVSOD\HG7KLVVKRZVWKDW
WHPSHUDWXUHVHOHFWLRQLVQRWDYDLODEOHZKHQWKHXQLWLVLQ)DQPRGHDQG'HKXPLGLILHUPRGH
Mode Selection 3UHVVWKHMODE%XWWRQUHSHDWHGO\WRF\FOHEHWZHHQWKHGLIIHUHQWPRGHV$XWR
6OHHS$LU&RQGLWLRQHU'HKXPLGLILHU+HDWFRROLQJRQO\PRGHOZLWKRXWWKLVPRGHDQG)DQ2QO\
PRGH7KHPRGHLFRQRQ/&'GLVSOD\ZLOOOLJKWXSVKRZLQJZKLFKPRGHLVVHOHFWHG
Fan Speed 3UHVVWKHFAN HIGH, FAN MED, or FAN LOW EXWWRQWRFKRRVHGHVLUHGIDQVSHHG
:KHQWKHXQLWLVLQ'HKXPLGLILHUPRGHWKHIDQVSHHGFDQQRWEHFKDQJHG:KHQ7XUER&RROLVDFWLYDW
HGIDQVSHHGLVDXWRPDWLFDOO\VHWRQKLJKDQGLVQRWDGMXVWDEOHLQWKLVPRGH
Temperature Setting :KHQWKHXQLWLVLQ$LU&RQGLWLRQHUPRGHRU+HDWPRGH\RXFDQVHOHFW\RXU
GHVLUHGWHPSHUDWXUH3UHVVWKHŸRUźWRVHOHFW\RXUGHVLUHGWHPSHUDWXUHVHWWLQJ7KHWHPSHUDWXUH
RQWKH/&'GLVSOD\RQWKHUHPRWHFRQWUROZLOOLQFUHDVHRUGHFUHDVHDFFRUGLQJO\3UHVVLQJWKH°C °F
EXWWRQZLOOVZLWFKWKHWHPSHUDWXUHVHOHFWEHWZHHQ&DQG)
SLEEP MODE :KHQLQDLUFRQGLWLRQLQJPRGHSUHVVWKHSLEEP %XWWRQRQWKHUHPRWHFRQWURO6OHHS
PRGHLFRQZLOOVKRZRQWKHUHPRWHFRQWURO/&'GLVSOD\:KHQLQSLEEP PRGHWKHIDQZLOOUXQRQORZ
WRNHHSIDQQRLVHDWDPLQLPXP7KHWHPSHUDWXUHVHWWLQJZLOOJUDGXDOO\LQFUHDVHWR)DERYHWKHRULJL
QDOVHWWHPSHUDWXUHHDFKRIILUVWKRXUV7KHXQLWZLOONHHSRSHUDWLQJWKHVDPHWHPSHUDWXUHXQWLOWKH
VOHHSPRGHLVWXUQHGRII
TIMER
Auto-On: 3UHVVWKHTIMER EXWWRQZKHQWKHXQLWLVRIIWRVHWXSWKH$XWRRQWLPHU7KHKRXULQGLFDWRU
RQWKH/&'GLVSOD\ZLOOWXUQRQ3UHVVWKHTIMER EXWWRQUHSHDWHGO\WRVHWWLPHUZLWKLQKRXUV
Auto-Off: 3UHVVWKHTIMER EXWWRQZKHQWKHXQLWLV2QWRVHWXSWKH$XWRRIIWLPHU7KHKRXULQGLFDWRU
RQWKH/&'GLVSOD\ZLOOWXUQRQ3UHVVWKHTIMER EXWWRQVWRVHWWLPHUZLWKLQKRXUV7RFDQFHOWKH
WLPHUSUHVVWKHTIMEREXWWRQXQWLOWKHWLPHUPRGHLVWXUQHGRII
TURBO COOL 3UHVVWKHTurbo Cool EXWWRQ WRDFWLYDWH7XUER&RROPRGH7KHXQLWZLOOFRRODW
)RQIDQKLJKIRUPLQXWHVDQGWKHQUHWXUQWRWKHRULJLQDOVHWWLQJV)DQVSHHGLVQRWDGMXVWDEOHLQWKLV
PRGH
NOTE: ,I)DQPRGHDFWLYDWHVOHVVWKDQPLQXWHVDQGVZLWFKHVWR7XUER&RROLWZLOOEHDFRPSUHVVRUSUR
WHFWLRQVKXWGRZQFRPSUHVVRUZLOOWXUQRQDJDLQXQWLOWKHPLQXWHVLVWRSSHGRII6ZLWFKLQJIURP+HDWRU
$XWRPRGHWRWXUERFRROLVnot allowed GXHWRWKHSURWHFWLRQRIFRPSUHVVRU
MY TEMP MODE 3UHVVWKLVEXWWRQWRFKDQJHWKHWKHUPRVWDWVHQVRUIURPWKHDLUFRQGLWLRQHUWRWKH
UHPRWHFRQWUROORFDWLRQ7KHDLUFRQGLWLRQHUZLOOFRROWKHDUHDDWWKHORFDWLRQDQGVHWWHPSHUDWXUHRIWKH
UHPRWHFRQWURO
CHILD LOCK±3UHVVWKLVEXWWRQWRORFNXQORFNWKHUHPRWHFRQWUROEXWWRQV
REM O TE CONTROL
Air Conditioner Mode
1) Install the exhaust hose and window kit properly (see pages &).
2) Plug the Power Cord into an electrical outlet.
3) Turn on the unit by pressing the POWER button.
4) Press the Mode button until the air conditioner mode indicator lights up on the control panel display.
5) Press the + or - until the desired room temperature appears on the control panel display. The tempera-
ture ranges from 61˚F - 88˚F.
6) Select the desired fan speed by pressing the FAN SPEED button.
NOTE: During hot days, the unit will cool the room most efficiently by setting the temperature at the low-
est setting and the fan speed on high. Reducing the length of the exhaust duct, insulating the ex-
haust hose and window kit, and keeping direct sunlight to a minimum will also improve the cool-
ing efficiency.
NOTE: When the unit is running on air conditioning mode, the exhaust hose is required and must be
vented outside using the supplied window kit.
Dehumidifier Mode
1) Install the exhaust hose and window kit properly (see pages &).
2) Plug the Power Cord into an electrical outlet.
3) Turn on the unit by pressing the POWER Button.
4) Press the MODE button until the dehumidifier mode indicator lights up on the control panel display.
5) Temperature indicator displays room temperature
NOTE: The unit operates at low fan speed during dehumidifier mode. The unit cools room slightly dur-
ing the dehumidification process. Keep the windows and doors closed to aid the effectiveness of
the unit in removing the moisture from the room.
NOTE: When the unit is running on dehumidifier mode, the exhaust hose is required and must be
vented outside using the supplied window kit.
NOTE: The unit will not perform in de-
humidifier mode when the room temper-
ature is lower than 50˚F .
Heat Mode(cooling-only model without this mode)
1) Install the exhaust hose and window kit properly (see pages &).
2) Plug the Power Cord into an electrical outlet.
3) Turn on the unit by pressing the POWER button.
4) Press the Mode button until the heat mode indicator lights up on the control panel display.
5) Press the + or - until the desired room temperature appears on the control panel display. The tempera-
ture ranges from 61˚F - 88˚F.
6) Select the desired fan speed by pressing the FAN SPEED button.
NOTE: When the unit is running on Heat mode, the exhaust hose is required and must be vented
outside using the supplied window kit.
NOTE: Switching from Heat mode to Turbo cool is not allowed due to the protection of compressor.
UNIT OPERATION
Auto Mode
1) Install the exhaust hose and window kit properly (see pages &).
2) Plug the Power Cord into an electrical outlet.
3) Turn on the unit by pressing the POWER button.
4) Press the MODE button until the Auto mode indicator lights up on the control panel display.
Auto Mode will operate the unit in air conditioning mode when the temperature is above 72 degrees, Fan
mode when the temperature is below 72 degrees, and heating mode when the temperature is below 68 de-
grees.
Fan Mode
1) Plug the Power Cord into an electrical outlet.
2) Turn on the unit by pressing the POWER button on the control panel.
3) Press the MODE button until the fan mode indicator lights up on the control panel display.
4) Select the fan speed by pressing the FAN SPEED button.
NOTE: It is not necessary for the exhaust hose and window kit to be installed to operate the unit in fan
mode.
Sleep Mode
1) Install the exhaust hose and window kit properly (see pages &).
2) Plug the Power Cord into an electrical outlet.
3) Turn on the unit by pressing the POWER button on the control panel.
4) Press the MODE button until the sleep mode indicator lights up on the control panel display.
NOTE: When in SLEEP mode, the fan will run on low to keep fan noise at a minimum. The temperature
setting will gradually increase to 2°F above the original set temperature each of first 2 hours. The unit will
keep operating the same temperature until the sleep mode is turned off.
NOTE: Switching from Auto mode to Turbo cool is not allowed due to the protection of compressor.
UNIT OPERATION
BUCKET FULL INDICATOR
When the Internal Water Tank is full, the Bucket Full light will illuminate and the unit will automatically
shut down. The air conditioner will resume normal operation once Internal Water Tank is emptied.
INTERNAL WATER TANK
When the room temperature is low and the indoor humidity is high, the air conditioner may not be able to
evaporate some of the moisture fast enough. When this happens, the water will accumulate in an internal
water tank inside the unit. The internal water tank holds approximately 1.5 liters of water. When this tanks
becomes full, the unit will automatically shutdown and illuminate the Bucket Full indicator.
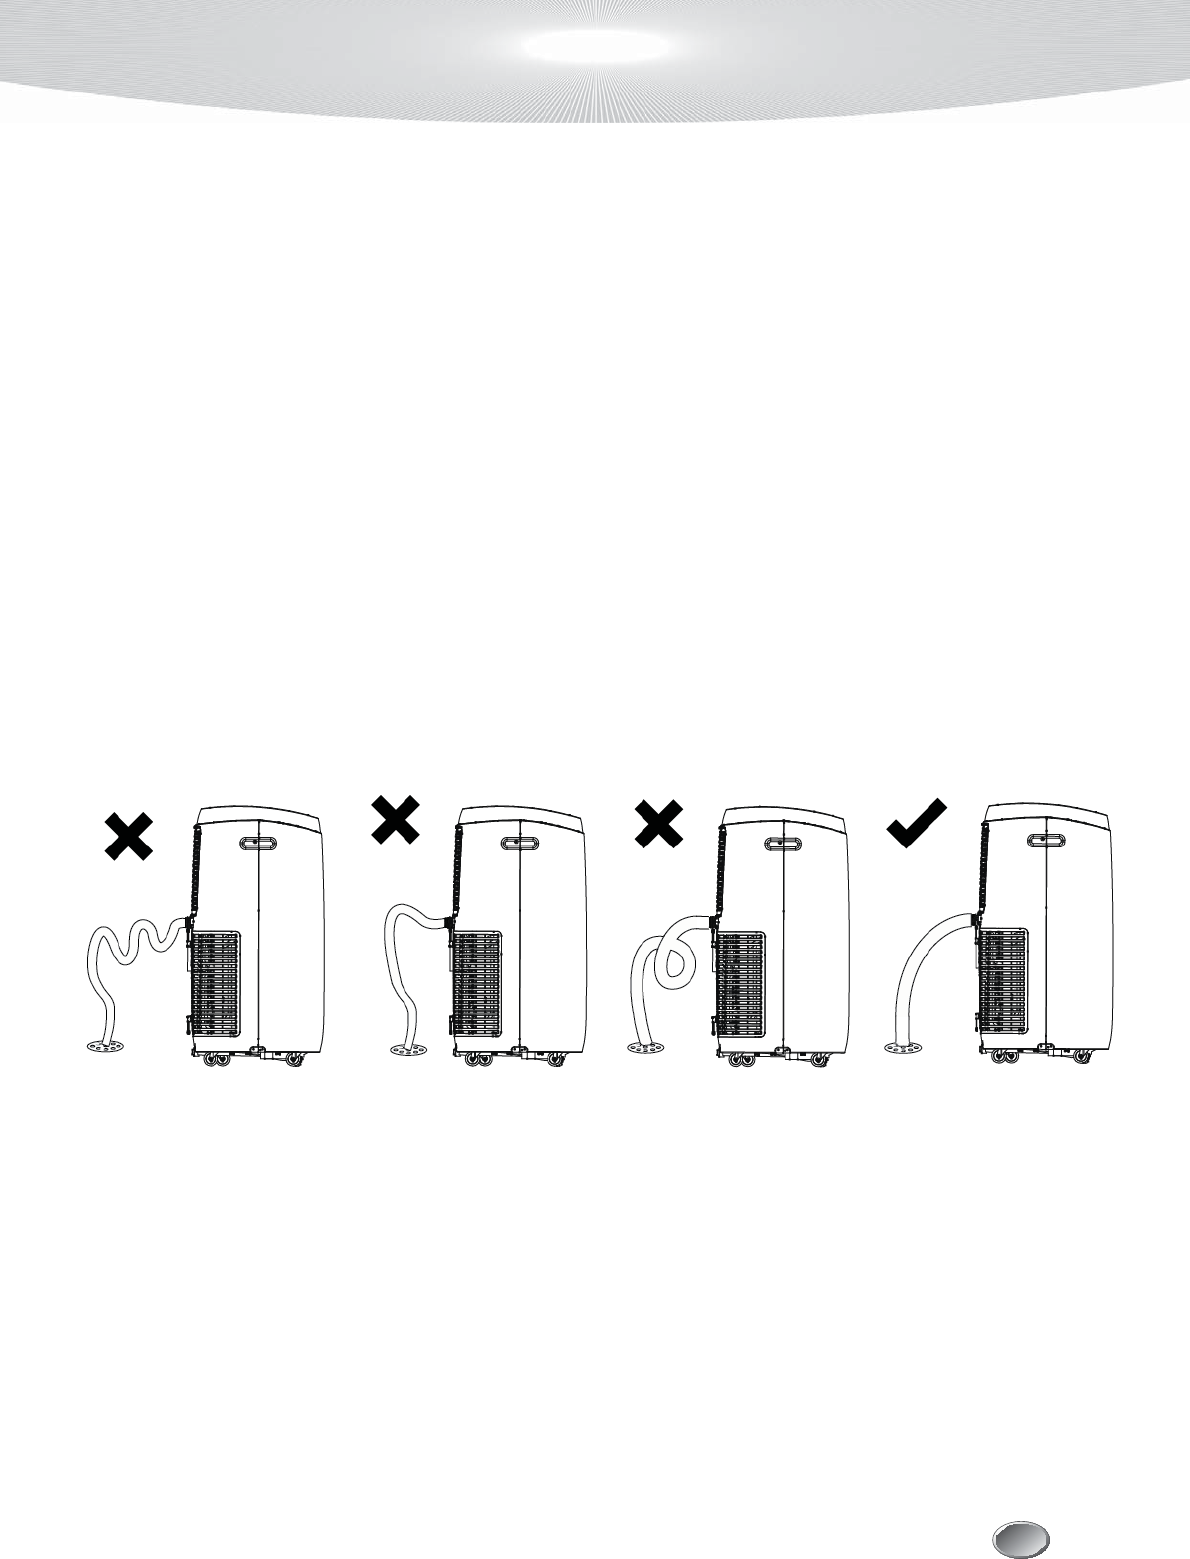
HOW TO INSTALL CONTINUOUS DRAIN OPTION:
1. Place the Portable AC on a level surface.
2. Remove the cap on continuous drain port on the back of the unit to access the Continuous Drain Port.
3. Thread a garden hose (not supplied) onto the accessible Continuous Drain Port.
4. Lead Garden Hose to a floor drain and cut to length.
5. Make sure that there are no kinks or knots in the garden hose (Fig 15.1).
6. Turn on the unit and gravity draining will begin automatically.
Fig 15.1
M AINTENANCE
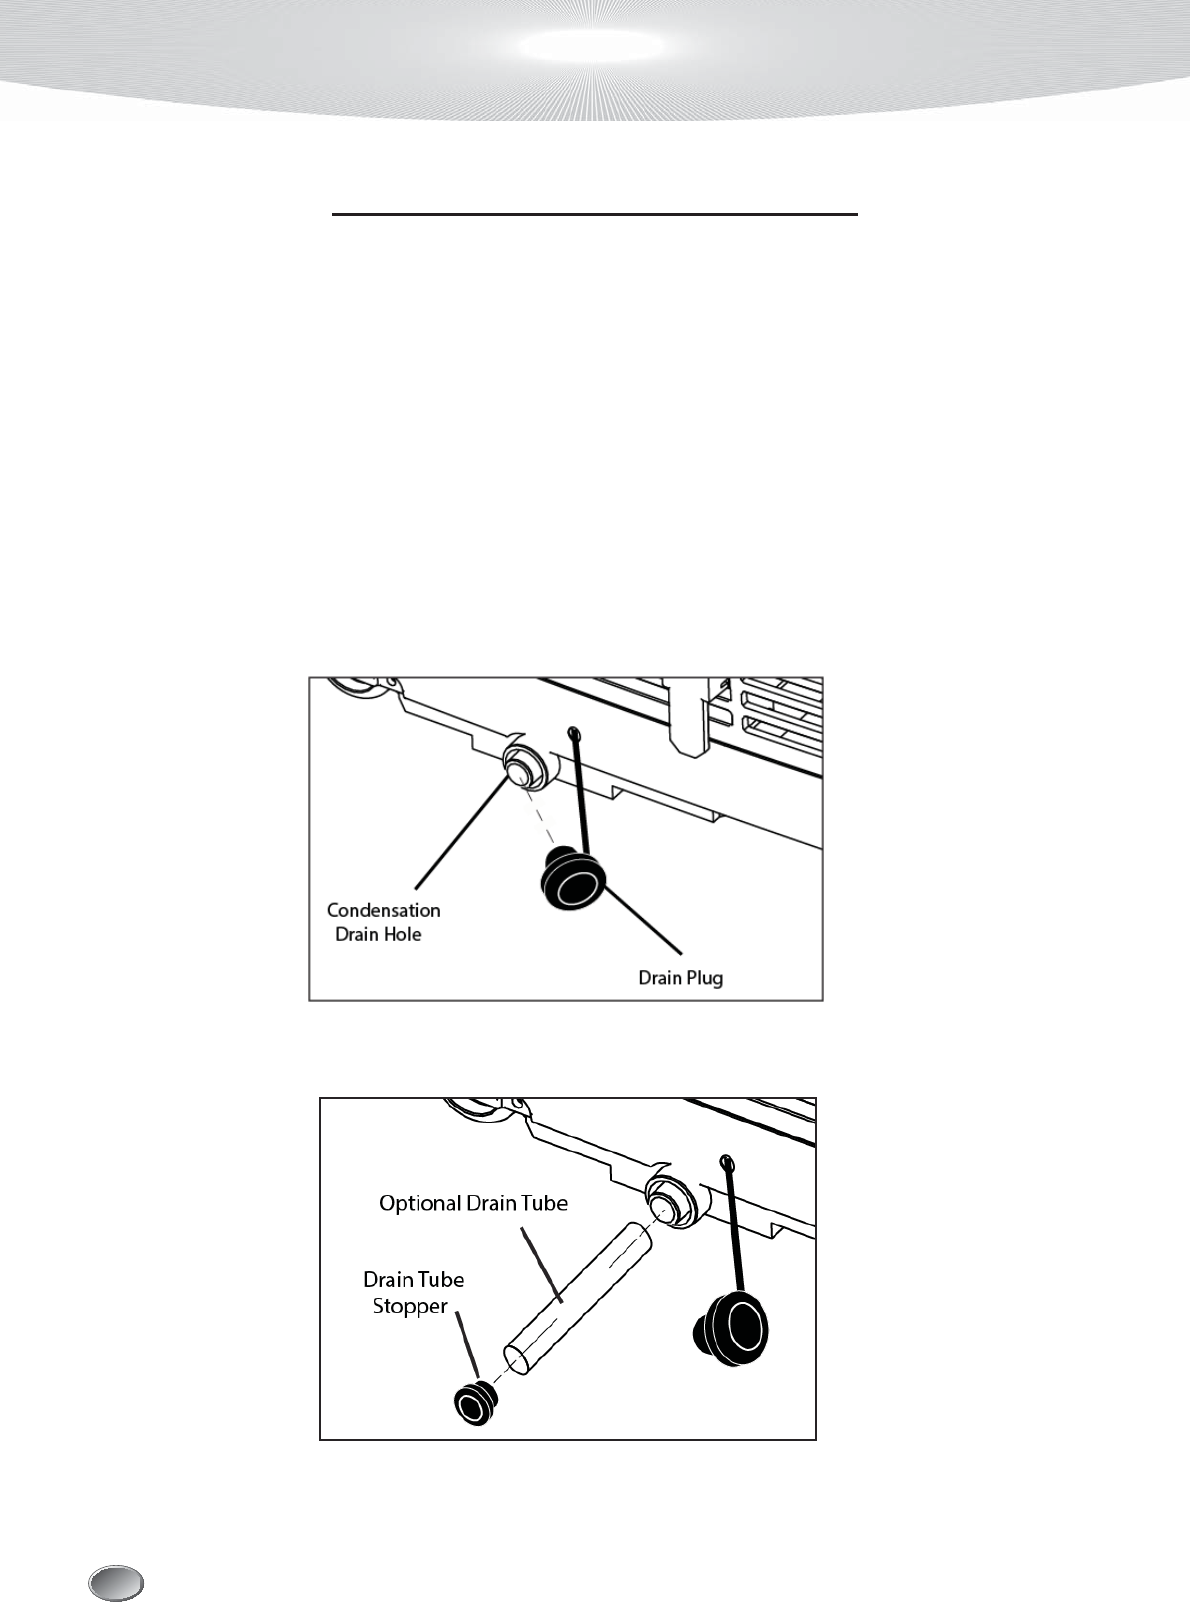
HOW TO DRAIN THE INTERNAL WATER TANK
*You will need a small pan, approximately 1” high to catch the water coming out of the water tank. Once
the water tank is empty, the unit will resume operation within a few minutes.
1. Do not move the unit when the water container is full. (Water will spill out)
2. Place a small pan under the condensation drain hole on the bottom side of the unit.
3. Remove the drain plug from the condensation drain hole. The condensate water will drain out automati-
cally.
4. When the drain pan is full, install the drain plug back onto the condensation drain hole to stop the water
flow.
5. Empty the drain pan.
6. Repeat steps 2-5 until all the water is emptied.
NOTE: Once the condensate tank has been emptied, firmly press the drain plug back onto the condensa-
tion drain hole (Fig 16.1). It is not advised to use continuous drainage when the room temperature is higher
than 90˚F.
NOTE: You may also use enclosed Optional Drain Tube to facilitate the draining process, make sure to re-
plug the Drain Stopper once the condensation tank has been emptied (Fig 16.2).
Fig 16.1
Fig 16.2
M AINTENANCE

Clean or replace filter - If the air filter is blocked with a dust, the airflow volume may reduce. It is
recommended to clean the filter once every two weeks or as needed.
1) Remove the filter from the filter compartment on the back of the unit.
2) Wash the air filter by immersing it gently into warm water with a neutral detergent. Rinse the
filter and dry it thoroughly out of sunlight.
3) Slide the filter back into the filter compartment after it is thoroughly dried.
4) If the filter is torn or unusable, order a new filter by calling the customer service number on the
warranty page of this manual.
Clean the unit Housing
1) Keep the unit from being exposed directly to the sun to prevent color fading.
2) Clean the surface with a damp cloth and dry it with a soft towel.
Storing the Unit for an Extended Period of Time or Transporting the unit
1) Empty any excess water by unplugging the drain plug in the back of the unit (located at the bot-
tom).
2) Unplug the unit.
3) The unit should be stored in a cool dry place.
NOTE: Make sure power is off and the power cord is not plugged into an electrical outlet prior to perform-
ing any maintenance on the unit
M AINTENANCE

PROBLEM
CAUSE
SOLUTION
Air conditioner does not
power on
• Unit is not plugged in
• No electric current to outlet
• Internal safety device has tripped
• Plug unit in.
• Check electric breaker box for a
trip
• Wait 30 minutes for safety de-
vice to reset
Air conditioner works for a
limited amount of time
• There are bends in the exhaust
hose
• Something is blocking the air
from being discharged
• Position the air exhaust hose
correctly, keeping it as short and
free of curves as possible
• Check and remove anything
obstructing air discharge
During operation, there is an
unpleasant smell in the room • Air filter is dirty • Remove air filters, clean and
re-install
Air conditioner does not oper-
ate after restarting the unit
• The internal compressor safety de-
vice prevents the unit from being
restarted until three minutes have
elapsed since it was last turned off
• Wait for compressor to turn on
The control panel display
shows Error codes
• The unit has a self diagnosis
system to identify a number of
malfunctions
• See page 19 Self-Diagnosis
7528%/(6+227,1*
TROUBLESHOOTING
FCC Caution.
This device complies with part 15 of the FCC Rules. Operation is subject to the following two
conditions: (1) This device may not cause harmful interference, and (2) this device must accept
any interference received, including interference that may cause undesired operation.
Any Changes or modifications not expressly approved by the party responsible for compliance
could void the user's authority to operate the equipment.
Note: This equipment has been tested and found to comply with the limits for a Class B digital
device, pursuant to part 15 of the FCC Rules. These limits are designed to provide reasonable
protection against harmful interference in a residential installation. This equipment generates
uses and can radiate radio frequency energy and, if not installed and used in accordance with the
instructions, may cause harmful interference to radio communications. However, there is no
guarantee that interference will not occur in a particular installation. If this equipment does
cause harmful interference to radio or television reception, which can be determined by turning
the equipment off and on, the user is encouraged to try to correct the interference by one or
more of the following measures:
-Reorient or relocate the receiving antenna.
-Increase the separation between the equipment and receiver.
-Connect the equipment into an outlet on a circuit different from that to which the receiver is
connected.
-Consult the dealer or an experienced radio/TV technician for help.
This equipment complies with FCC radiation exposure limits set forth for an uncontrolled
environment. This equipment should be installed and operated with minimum distance 20cm
between the radiator & your body.