Chuango Security Technology IP6 HD WiFi Camera User Manual Manual 1
Chuango Security Technology Corporation HD WiFi Camera Manual 1
Contents
- 1. Manual 1
- 2. Manual 2
Manual 1
Printed in China
PA: IP6-UM-EN/FR/ES/PT-V1.0
© 2015 SMANOS HOLDING LTD. All Rights Reserved.
HD WiFi Camera
MULTILINGUAL QUICK GUIDE
EN ES PTFR
IP6
ENEN
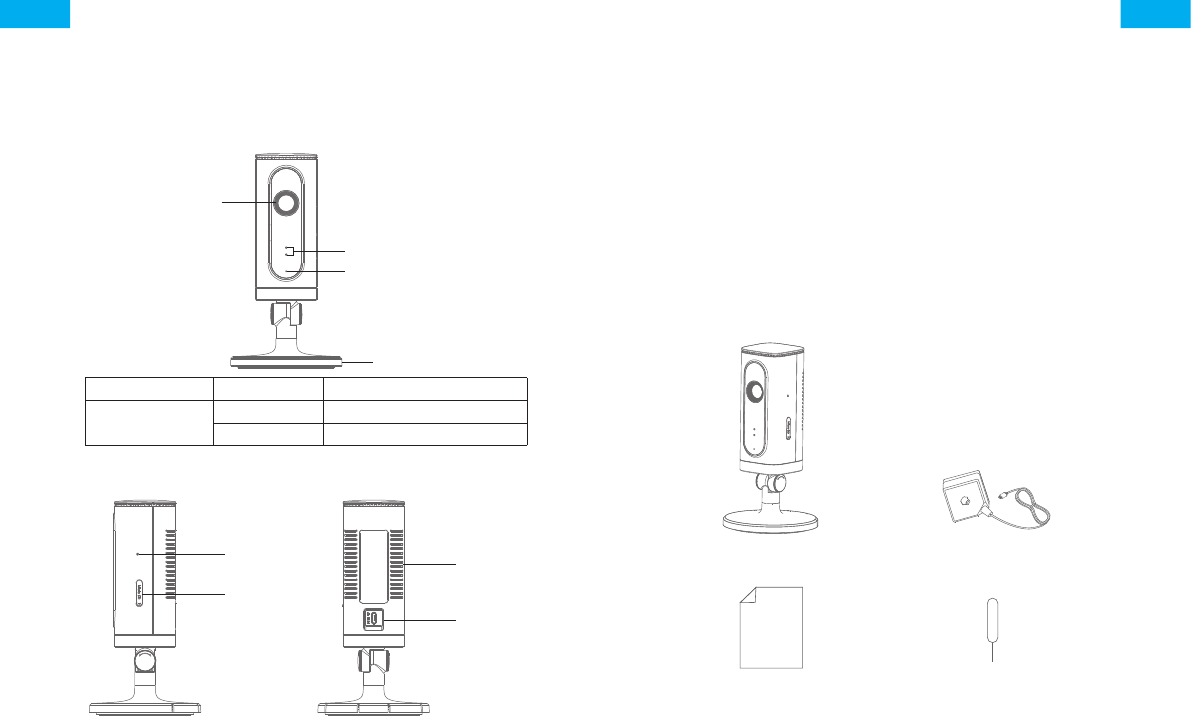
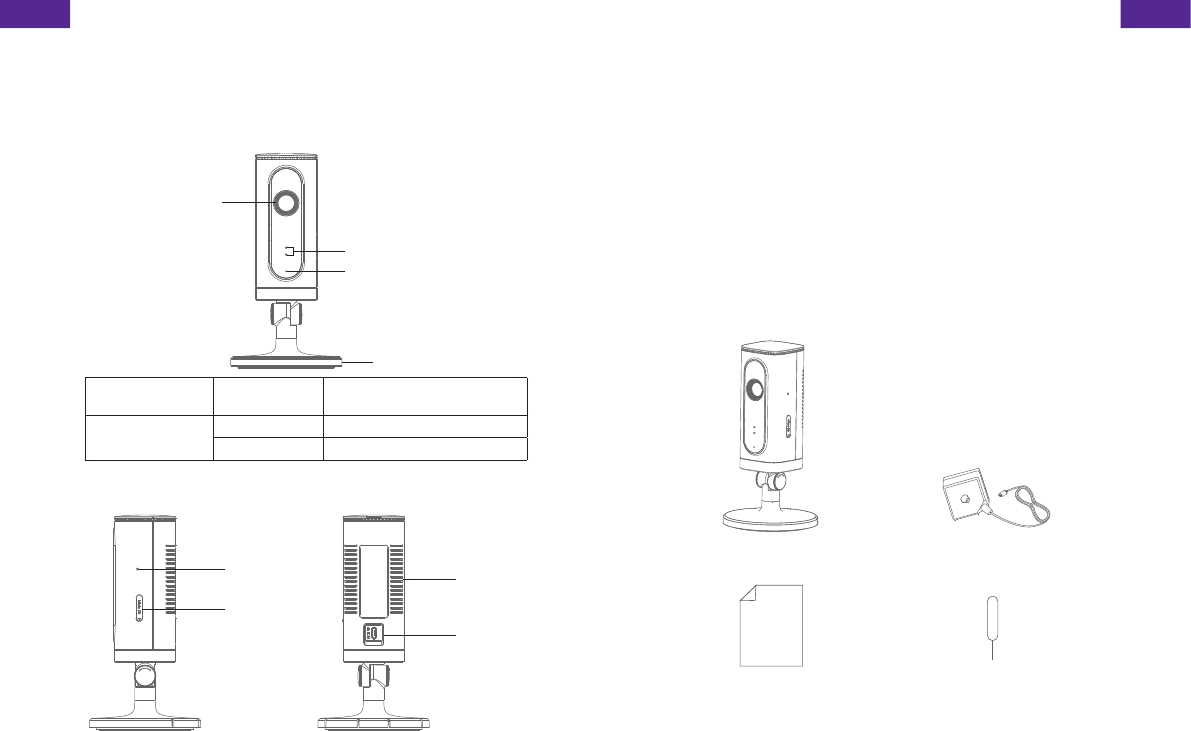
Overview
• Front View
LED Indicators
Camera
Microphone
Bracket
Red indicator Blinking Enter WiFi pairing state
Blue indicator Blinking Searching network
On Network connected
• Side View • Back View
Reset button
microSD
Card Slot
Heat Vent
Power Jack
microSD Card (Not included)
Support 32GB microSD card maximum; please do not insert the
card after the camera is powered on.
This camera automatically records and saves video once every
20 minutes; the video recorded at the earliest will be replaced with
the latest ones if the microSD card is full.
Note: Please format your microSD card before inserting into this slot if any
le had been written in.
Check What You Have
WiFi Camera×1 AC Adapter×1
Quick guide×1 Reset Pin×1
ENEN
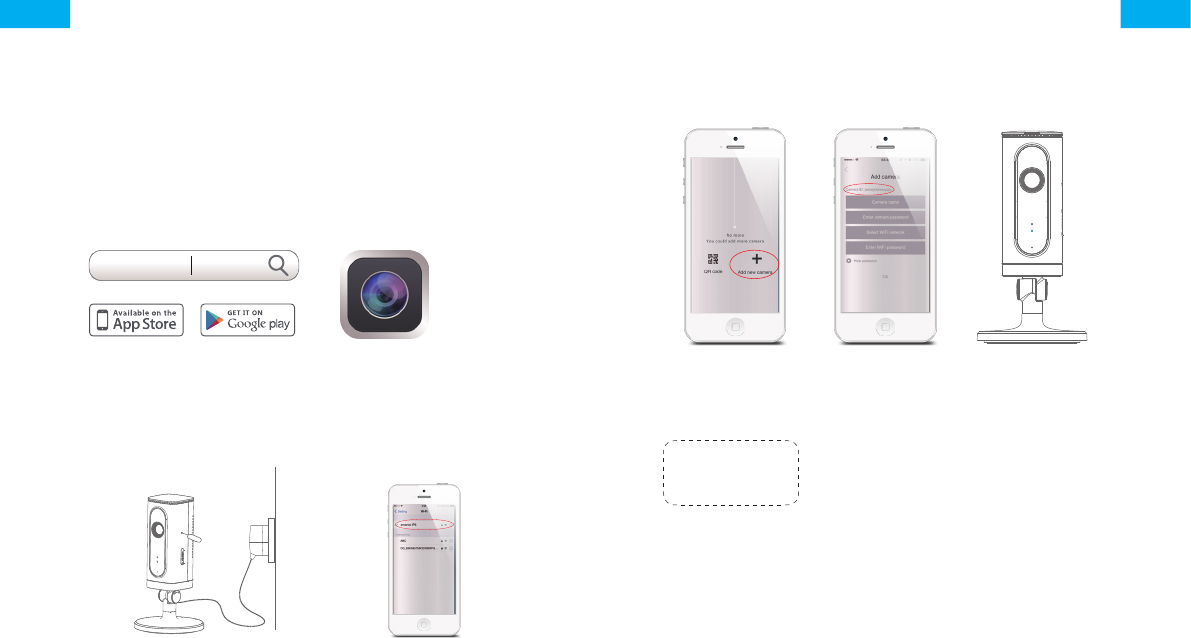
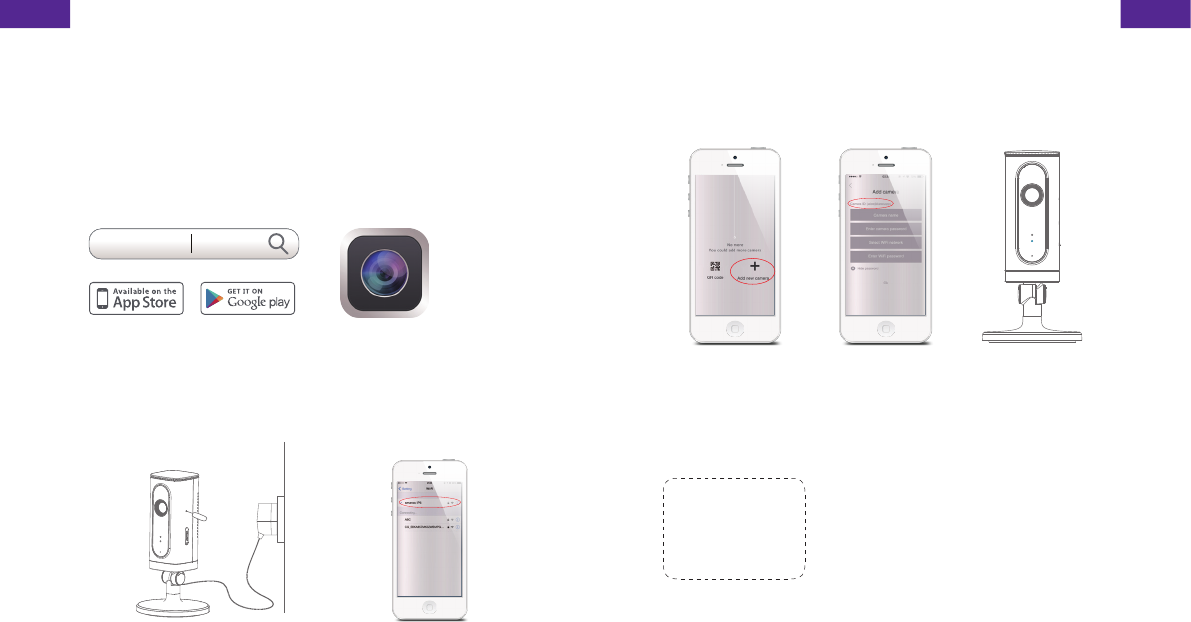
Download the App
Download the App by searching “IP6 camera” from Apple Store or
Google Play.
If you also bought a smanos alarm system, you don't need to
download the separate app for the camera, just setup through the
app for the alarm system.
IP6 Camera
WiFi Pairing
1. Preparation
• Hold the reset button by using
the supplied reset pin until the
camera beeps once, and then
the red indicator starts to blink
• Find and choose the WiFi
named “smanos IP6” from
your phone’s WiFi list
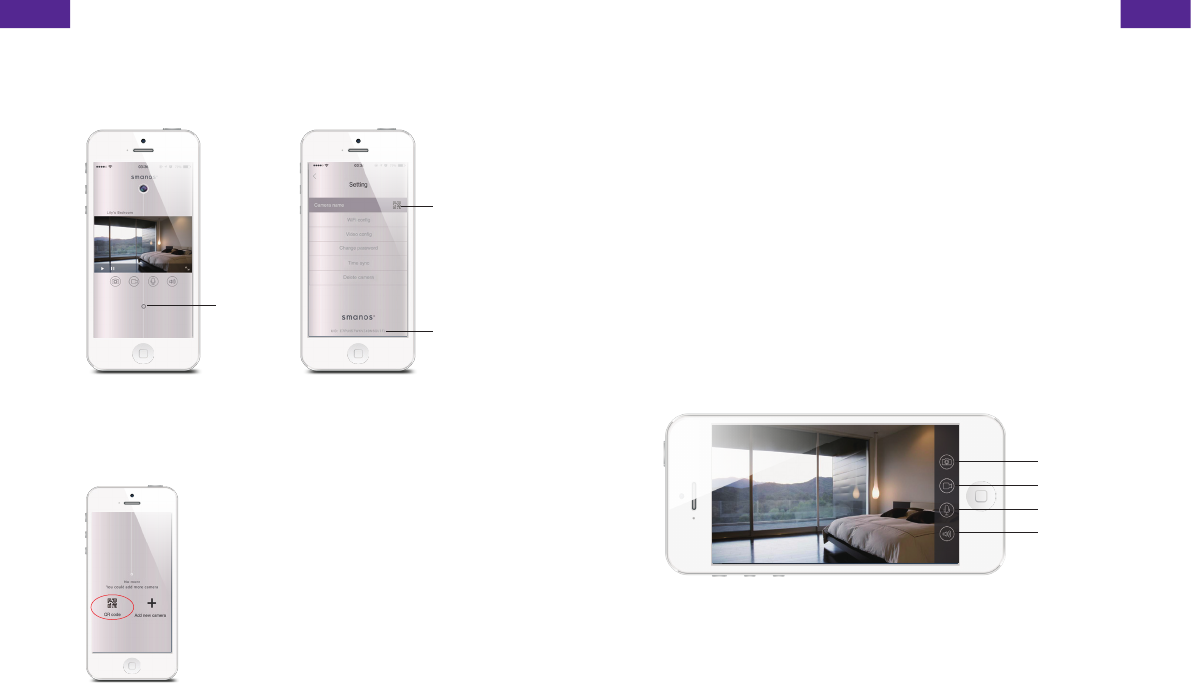
2. Pairing Camera with WiFi through App
*
*
*
• Launch the App,
and then tap [+] to
add a new camera
* Make sure the
UID No. is displayed
before tapping [OK]
• Name your
camera, enter the
password (default:
888888) and input
your home WiFi
name & password
• When the blue
indicator is on,
it means the
camera has
connected with
WiFi
The paired camera will be displayed in the video list.
Note: For safety, it is recommended to change the password of your
camera on the setting menu after pairing.
ENEN
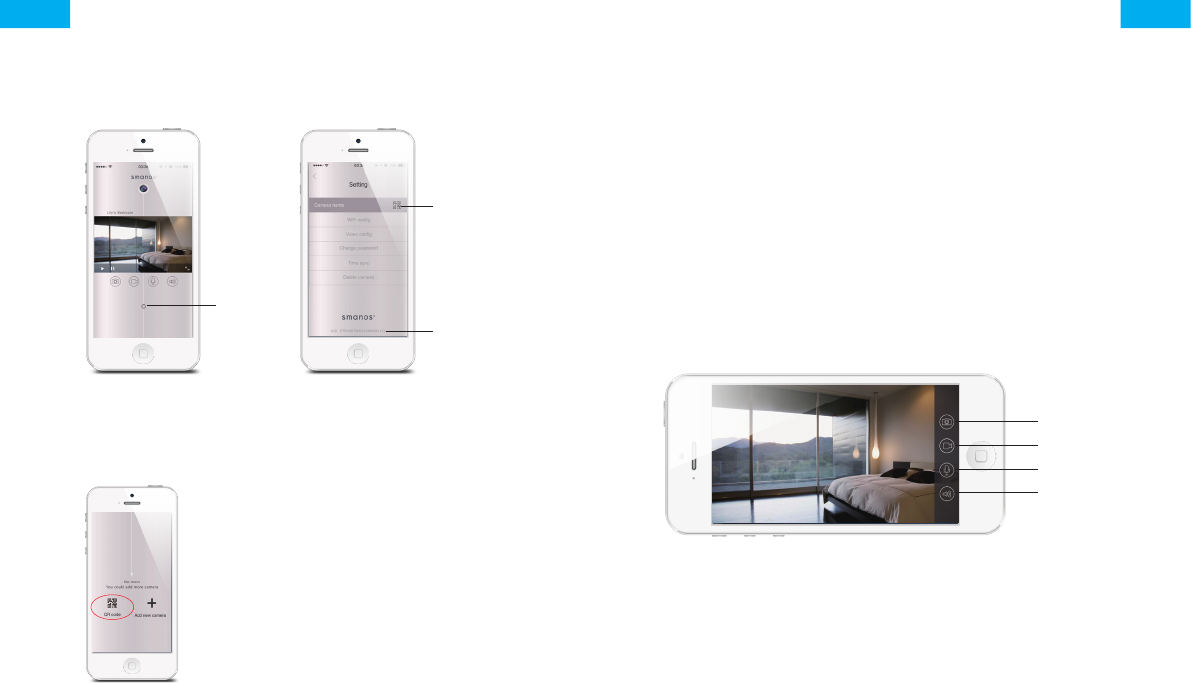
Settings
Setting
Button
Camera
Sharing QR
Code
Device ID
Share or Stop Sharing Camera with Your Friends
Tap and save the QR code icon on your
camera’s [Settings] interface, send to your
friends so they can watch your camera
from his/her App by scanning the given
QR code.
If you want to stop sharing the camera,
please change the password of camera.
Password
All the successfully paired phones have the same authority
as administrator who can view and set the camera (including
changing the password), so it is recommended to pair the phones
of users with caution. For non-administrator users, you can share
the camera by sending the QR code for them to scan.
Sync the Date and Time
Check if the camera’s date and time are set correctly. Sync them
with your phone’s time if necessary.
Enjoy the App
Snapshot
Record
Hold To Talk
Speaker
ENEN
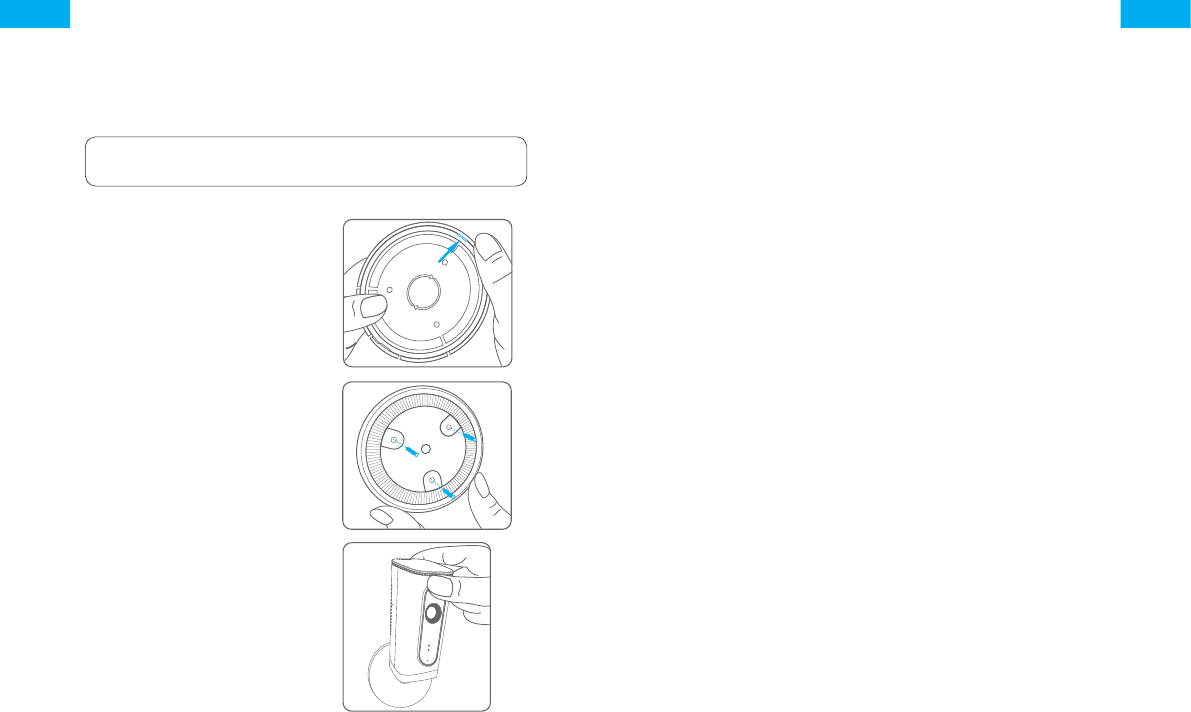
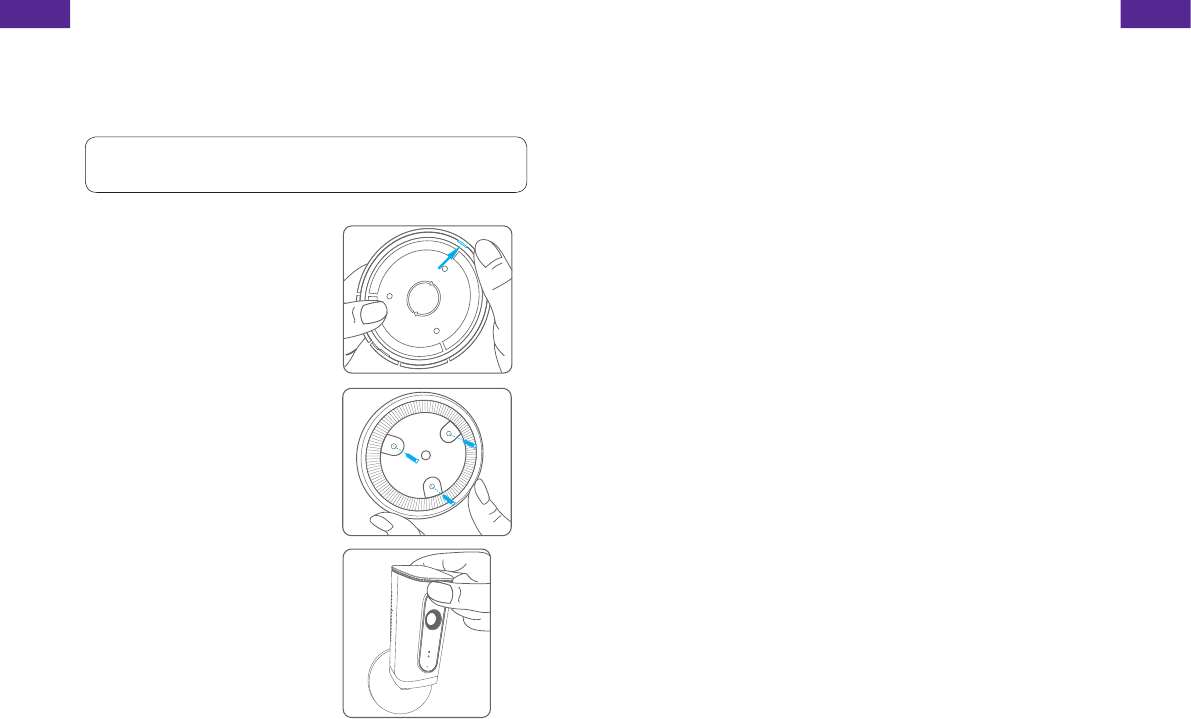
Installation
Important: This camera should be placed where the WiFi signal is
strong for optimal performance.
1. Separate the mounting
template on the bottom
of this camera from the
bracket by pressing the
snap as picture shows
2. Mount the template on the
wall by using the supplied
screws
3. Push and press the bracket
of the camera into the
template carefully, and then
adjust the angle to achieve
best shooting effect
Specications
Image sensor Sony 1/3” CMOS sensor
Min. illumination Color: 0.01Lux@ (F1.2, AGC ON)
Black and white : 0.001Lux@
(F1.2, AGC ON)
Shutter time 1/50s to 1/100,000s
Lens 2.4mm F2.0
Angle of view 110°
Video compression H.264
Bit rate Self-adaption
Max. image resolution 1280 x 720
Frame rate 30fps (1280 × 720)
Storage Built-in microSD card slot, up to 32GB
Wireless standards IEEE802.11b/g/n
Frequency range 2.4 GHz ~ 2.4835 GHz
Channel bandwidth 20/40MHz Support
Operating conditions Temperature: -30 °C - 60 °C
(-22 °F - 140 °F)
Humidity: < 95% (non-condensing)
Power supply DC 5V 1A
Power consumption 5W MAX
Dimensions (L x W x H) 80 x 80 x 150 mm

ENEN
Industry Canada Notice
This device complies with Industry Canada licence-exempt RSS standard(s).
1. Operation is subject to the following two conditions:
(1) this device may not cause interference, and (2) this device must accept
any interference, including interference that may cause undesired operation
of the device.
2. Changes or modications not expressly approved by the party responsible for
compliance could void the user's authority to operate the equipment.
FCC STATEMENT
1.This device complies with Part 15 of the FCC Rules. Operation is subject to the
following two conditions:
(1)This device may not cause harmful interference.
(2)This device must accept any interference received, including interference that
may cause undesired operation.
2. Changes or modications not expressly approved by the party responsible for
compliance could void the user's authority to operate the equipment.
NOTE: This equipment has been tested and found to comply with the limits for
a Class B digital device, pursuant to Part 15 of the FCC Rules. These limits are
designed to provide reasonable protection against harmful interference in a
residential installation.
This equipment generates uses and can radiate radio frequency energy and, if
not installed and used in accordance with the instructions, may cause harmful
interference to radio communications. However, there is no guarantee that
interference will not occur in a particular installation. If this equipment does
cause harmful interference to radio or television reception, which can be
determined by turning the equipment off and on, the user is encouraged to try
to correct the interference by one or more of the following measures:
Reorient or relocate the receiving antenna.
Increase the separation between the equipment and receiver.
Connect the equipment into an outlet on a circuit different from that to which
the receiver is connected.
Consult the dealer or an experienced radio/TV technician for help.
FCC Radiation Exposure Statement:
This equipment complies with FCC radiation exposure limits set forth for an
uncontrolled environment. In order to avoid the possibility of exceeding the FCC
radio frequency exposure limits, Human proximity to the antenna shall not be
less than 20cm(8 inches) during normal operation.
FR
Caméra Wi-Fi HD
IP6
GUIDE RAPIDE
FRFR
Vue d’ensemble
• Vue de face
Indicateur lumineux
Caméra
Microphone
Support
Indicateur rouge Clignotant Accès au mode
d’appariement Wi-Fi
Indicateur bleu Clignotant Recherche du réseau
Activé Réseau connecté
• Vue de côté • Vue arrière
Bouton de
réinitialisation
Logement de la
carte micro-SD
Ouverture de
ventilation
Prise
d’alimentation
Carte micro-SD (non incluse)
Prise en charge d’une capacité de carte mémoire jusqu’à 32 Go ;
veuillez ne pas insérer la carte une fois la caméra allumée.
Cette caméra reprend et enregistre automatiquement une fois
toutes les 20 minutes ; les vidéos les plus anciennes seront
remplacés par les plus récentes si la carte micro-SD est pleine.
Remarque : Veuillez formater la carte micro-SD avant de l’insérer dans son
emplacement si des chiers sont déjà enregistrés.
Vériez le contenu de l’emballage
1 caméra Wi-Fi 1 adaptateur secteur
1 guide rapide 1 broche de réinitialisation
FRFR
Télécharger l’application
Téléchargez l’application en recherchant le mot clé « IP6 camera »
dans les magasins d’application « Apple Store » ou « Google Play ».
Si vous utilisez l'IP6 avec un smanos système d'alarme, il faut
seulement télécharger l'application du système d'alarme.
IP6 Camera
Appariement Wi-Fi
1. Préparation
• Maintenez enfoncé le bouton de
réinitialisation à l’aide de la broche
de réinitialisation fournie jusqu’à
ce que la caméra émette un bip.
L’indicateur lumineux rouge se
mettra ensuite à clignoter
• Recherchez et
sélectionnez l’entrée
portant le nom « smanos
IP6 » dans la liste des
réseaux Wi-Fi de votre
téléphone
2. Appariement de la caméra avec le réseau Wi-Fi au moyen
de l’application
*
*
*
• Lancez l’application
puis appuyez sur
[+] pour ajouter
une nouvelle
caméra
* Vérier que
le numéro de
l’identiant unique
(UID) s’afche avant
d’appuyer sur [OK]
• Donnez un nom
à votre caméra,
saisissez le mot de
passe (par défaut :
888888), le nom de
votre réseau Wi-Fi
domestique et son
mot de passe
• Une fois
l’indicateur bleu
allumé, la caméra
aura établi la
connexion Wi-Fi.
La caméra appariée sera afchée dans la liste vidéo.
Remarque : Pour votre sécurité, il est préférable de modier le mot de
passe de votre caméra dans le menu de réglage après l’appariement.
FRFR
Réglages
Bouton
de
réglage
Code QR de
partage de la
caméra
Identiant de
l’appareil
Partager ou annuler le partage de la caméra avec vos amis
Appuyez sur l’entrée correspondante
et enregistrez l’icône du code QR de
l’interface [Paramètres] de votre caméra,
envoyez-le à vos amis de façon à qu’ils
puissent visualiser votre caméra depuis
leur application en scannant le code QR
donné.
Si vous souhaitez ne plus partager la
caméra, veuillez changer le mot de passe
de la caméra.
Mot de passe
Tous les téléphones appariés ont le même niveau d’autorité qu’un
administrateur qui peut voir et effectuer des réglages de la caméra
(y compris changer le mot de passe) et donc il est recommandé
d’apparier les téléphones personnels avec précaution. Pour des
utilisateurs qui ne sont pas administrateurs, il est possible de
partager la caméra en leur envoyant le code QR à scanner.
Synchroniser la date et l’heure
Vériez que la date et l’heure de la caméra sont dénies
correctement. Synchronisez-les avec l’heure et la date de votre
téléphone si nécessaire.
Proter de l’application
Instantané
Enregistrer
Maintenir
pour parler
Haut-parleur
FRFR
Installation
Important : Cette caméra doit être placée à un endroit où le signal
Wi-Fi est fort pour obtenir des performances optimales.
1. Séparez le gabarit de
montage situé au bas de
cette caméra du support
en appuyant sur l’attache
comme le montre l’image
2. Fixez le gabarit de montage
au mur à l’aide des vis
fournies
3. Poussez et pressez avec
soin le support de la caméra
dans le gabarit de montage
puis réglez l’angle pour
obtenir la meilleure capture
d’image.
Caractéristiques
Capteur d’image Capteur CMOS Sony 1/3"
Illumination min. Couleur : 0,01 lux à
(F1.2, AGC activé)
Noir et blanc : 0,001 lux à
(F1.2, AGC activé)
Temps de pose de 1/50 s à 1/100 000 s
Objectif 2,4 mm F2.0
Angle de vue 110°
Compression vidéo H.264
Débit binaire Adaptation automatique
Résolution d’image max. 1280 x 720
Images par seconde 30 images/s (1280 × 720)
Stockage Logement de carte micro-SD
intégré, jusqu’à 32 Go
Normes sans l IEEE802.11b/g/n
Gamme de fréquences de 2,4 GHz à 2,4835 GHz
Bande passante du canal 20/40 MHz pris en charge
Conditions de fonctionnement Température : de -30 °C à 60 °C
(de -22 °F à 140 °F)
Humidité : < 95% (sans
condensation)
Alimentation électrique 5 V CC 1A
Consommation électrique 5 W MAX.
Dimensions (L x l x H) 80 x 80 x 150 mm