Chuango Security Technology W120 Wi-Fi Alarm System User Manual W120 UM EN V1 0
Chuango Security Technology Corporation Wi-Fi Alarm System W120 UM EN V1 0
UserManual.wiki
>
Chuango Security Technology
>
W120 User Manual
Users Manual
Navigation menu
Upload a User Manual
Namespaces
Wiki Guide
HTML
PDF
Info
Views
User Manual
Discussion / Help
Navigation


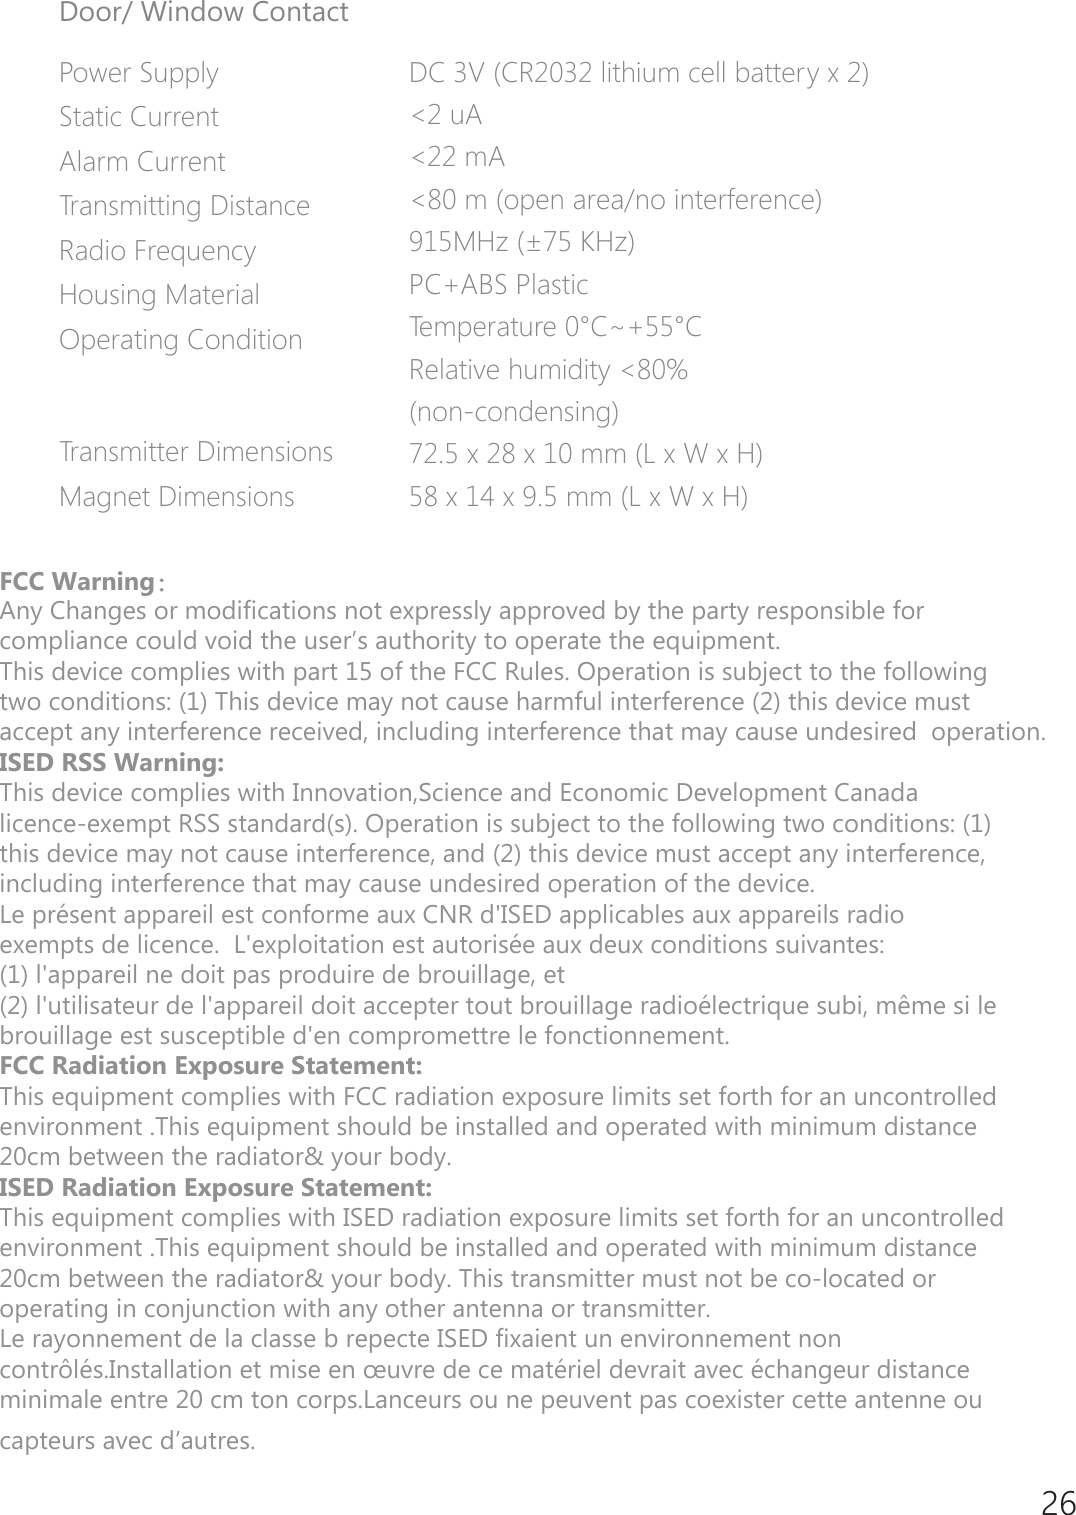
![4Remote ControlLED IndicatorGuide Point For The BlindArmDisarmStaySOSMetal RingButton System StatusAll Sensors will be Armed. This mode is for use when the property is unoccupied.The System will be Disarmed, no Sensors will be triggered.1RWH:KHQVHWWR¶'LVDUP·VHQVRUVLQ+RXU=RQHZLOOUHPDLQDFWLYHDVWKH\DUHIDFWRU\VHWWR,QVWDQW$ODUP=RQH6HQVRUVZKLFKDUHVHWWRWKH+RPH=RQHZLOOQRWEH$UPHG$OORWKHUSensors will be Armed. This mode allows the occupier freedom of PRYHPHQWZLWKLQWKHSURSHUW\ZLWKRXWWULJJHULQJWKH+RPH=RQHSensor(s). 7KH626%XWWRQZLOOWULJJHUDQ¶HPHUJHQF\·DOHUWQRWLÀFDWLRQWRregistered users regardless of the Hub mode.Press the [stay ] button. After the indicator on the remote control blinks once, press [Arm ] button within 3 seconds to mutely arm the system.Press the [stay ] button. After the indicator on the Remote Control blinks once, press [Disarm ] button within 3 seconds to mutely disarm the system.](https://usermanual.wiki/Chuango-Security-Technology/W120/User-Guide-3517982-Page-8.png)
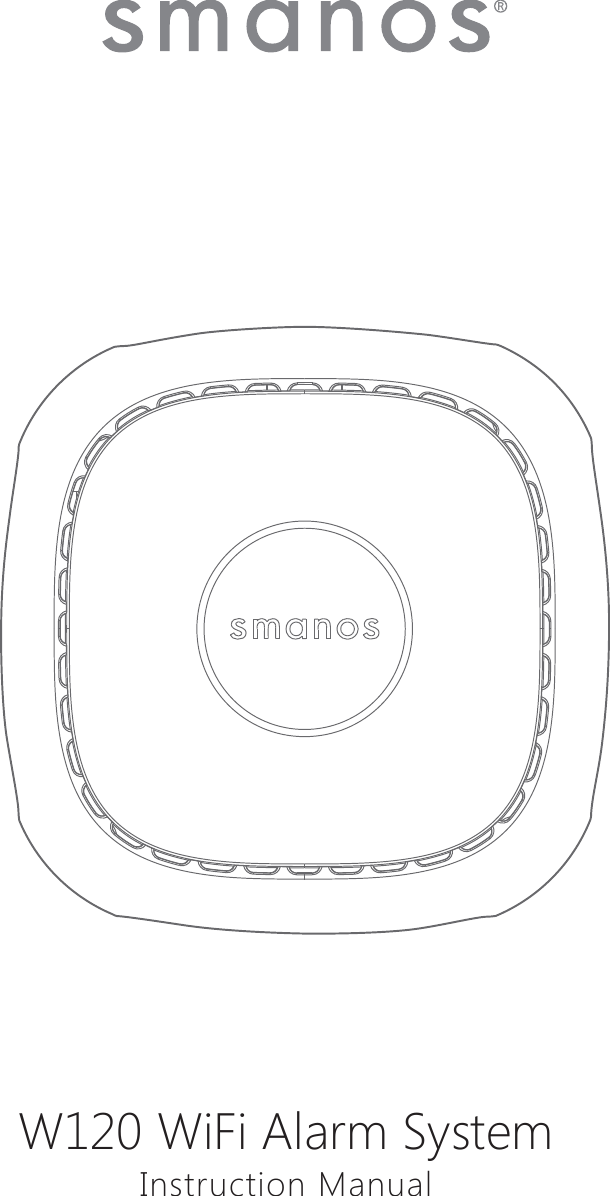
![7Adding a DeviceYou can operate multiple devices from a single account. If you have multiple W120 Hubs or P70 cameras; it is easy for you to manage these devices within this App.Press the [+] button on the main page. Tap on [W120 WiFi Alarm System], then IROORZWKHFRQÀJXUDWLRQVWHSVWRVHWXS\RXU:+XEZLWK\RXUKRPH:L)LImportant: W120 does not support WiFi of 5GHz band, if dual-band (5GHz and 2.4GHz) router under the same name is used, please go into your routers settings to separate these two bands into different names and make sure to select with the 2.4GHz WiFi instead of the 5GHz's. ཉPlug the Power Adapter into the wall to power on the Hub.ཊ3UHVVWKH:L)L&RQÀJXUDWLRQ%XWWRQRQWKH+XEIRUVHFRQGV<RXZLOOKHDUDbeep and the indicator light will alternate between red and blue, letting you know WKH+XELVQRZLQWKH:L)L&RQÀJXUDWLRQ0RGH](https://usermanual.wiki/Chuango-Security-Technology/W120/User-Guide-3517982-Page-11.png)
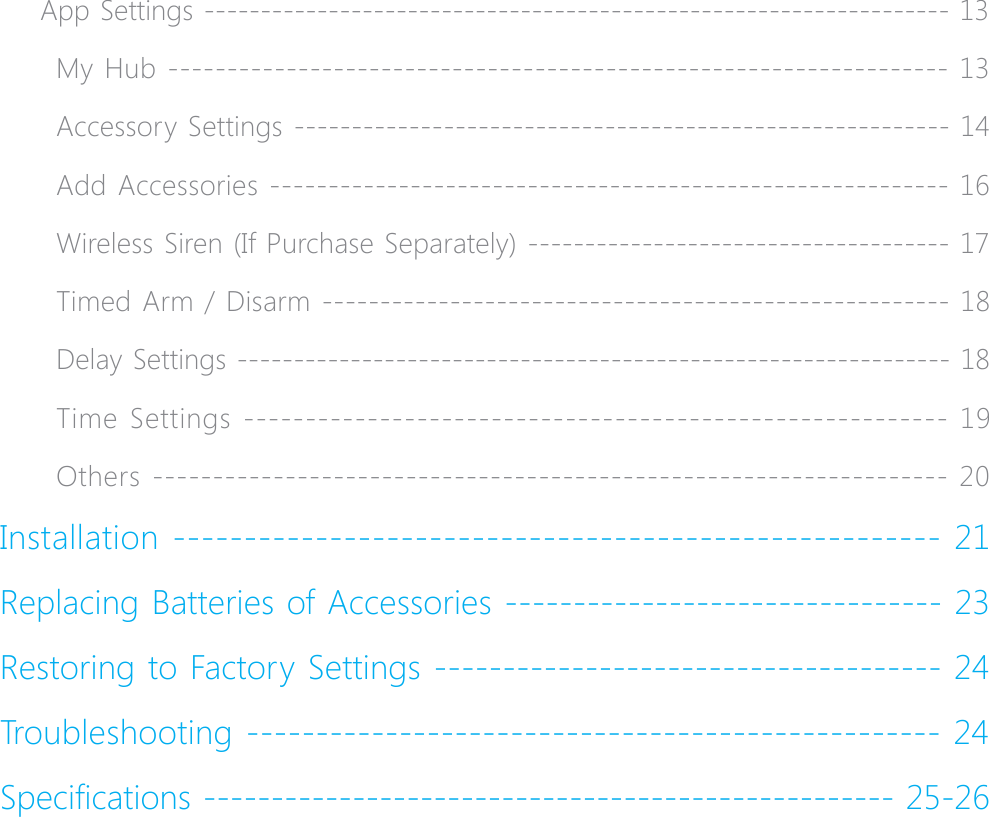
![9App OperationDevice List Check device status after set upIntegrate your W120 Hub with cameras so you can directly YLHZFDPHUDVLQ+XE·VPDLQSDJH$QGLIWKLVicon appears in the right of your device, it means integration has been completed.When the status bar is white, it means the device is ONLINE and available.If the device is grayed out, it means the device is OFFLINE and cannot be accessed.If this icon appears in the left of your device, it means the device is shared from your family or friends to you. Account ManagementEditing Your AccountTap on [ ] on the main page to manage your account.](https://usermanual.wiki/Chuango-Security-Technology/W120/User-Guide-3517982-Page-13.png)
![10Account ImageTap on the picture, and you can add or replace your account image by taking a SLFWXUHRUFKRRVLQJDSLFWXUHIURP\RXUSKRQH·VDOEXPAccount NameIf you want to change your account name, just tap on the [ ] button and enter a new name.Account PasswordYou can change your password on this page.My SharesSharing your device with family or friends.By choosing “My Shares” on the menu and pressing the [+] Add Button, you can share access to your device(s) with other registered smanos accounts.Enter the email address and nickname of the account you want to share with, and then select the device(s).The user who receives the shared device(s) can only edit the name of the device(s) and receive alerts; they will NOT be able to re-share the device with anyone else, or change settings.It is highly recommended that you set access limits to those who you may share your device (s) with. By not doing so, you grant your family members or friends continual accesses to the device(s) you have shared.](https://usermanual.wiki/Chuango-Security-Technology/W120/User-Guide-3517982-Page-14.png)
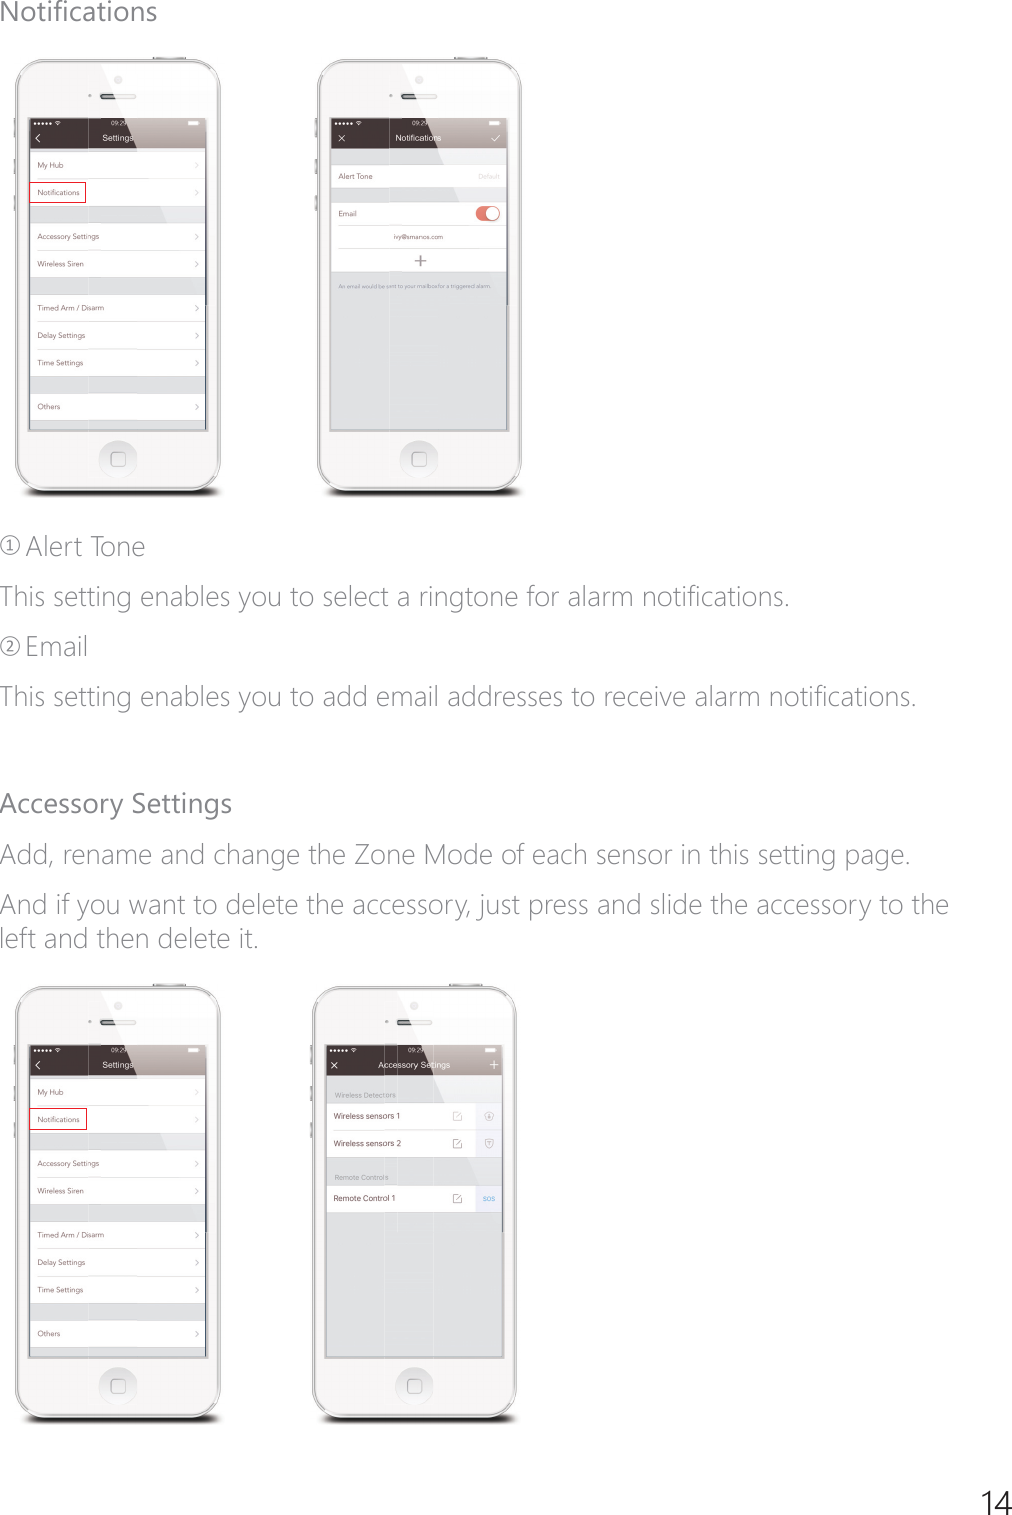
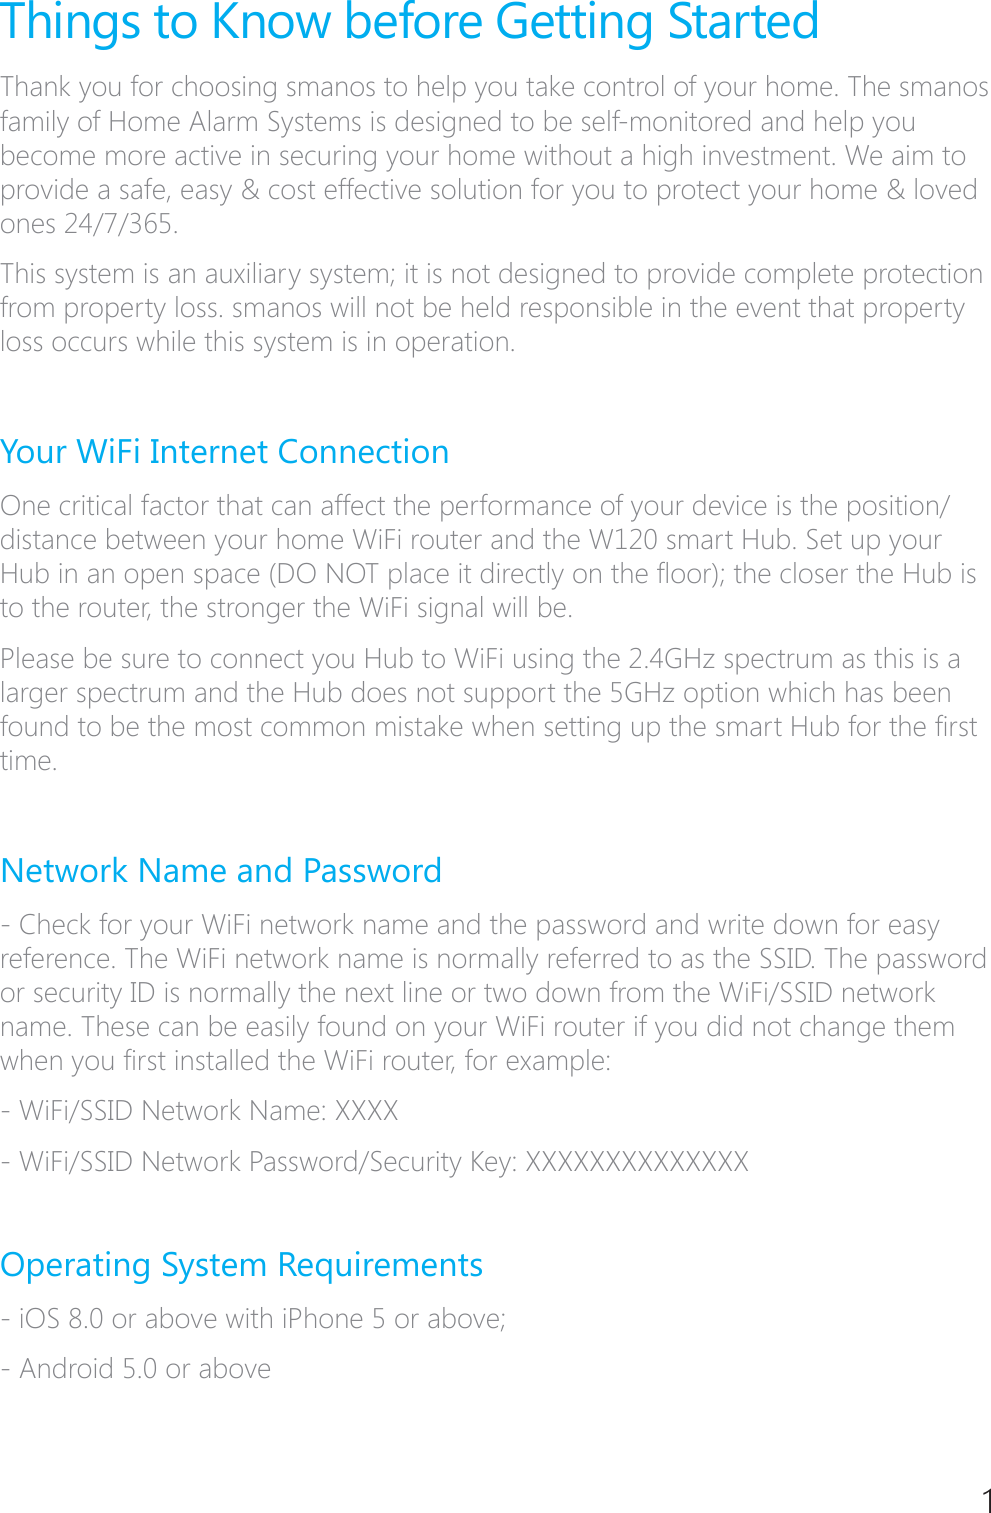
![15Zone Mode1RUPDO=RQH6HQVRUVVHWWR1RUPDO=RQHDUHDUPHGZKHQWKHV\VWHPLVLQ$UP(Full Arm) or Home Arm (Part Arm) Mode. We recommend setting Window/Door Sensors to this zone because they would always be installed to the perimeter of a house in practice, like doors or windows.+RPH=RQH6HQVRUVVHWWR+RPH=RQHDUHRQO\DUPHGZKHQWKHV\VWHPLVLQ$UP(Full Arm) Mode. If Home Mode (Partial Arm) is used, these Sensors are not armed and will not activate the alarm on trigger. We recommend setting PIR Motion 6HQVRUVLISXUFKDVHVHSDUDWHO\WR+RPH=RQHEHFDXVHWKH\VKRXOGEHLQVWDOOHGinside the house.+RXU=RQH Sensors set to 24-Hour zone will activate the alarm when triggered, regardless of the alarm status at the time (Armed or Disarmed or Home).'HOD\=RQH7KHZRUNLQJPRGHRIVHQVRULQWKLV]RQHZLOOEHVDPHDV1RUPDO=RQHVHQVRU·VEXWWKH+XEZLOODODUPDIWHUDQ(QWU\'HOD\7LPHLIWKLVVHQVRULVWULJJHUHGwhen system was armed or in home mode.(QWU\'HOD\7LPH\RXFDQVHWWKLVGHOD\WLPHRQ$SS>6HWWLQJV@>'HOD\6HWWLQJV@[Entry Delay Time].](https://usermanual.wiki/Chuango-Security-Technology/W120/User-Guide-3517982-Page-19.png)