Chuango Security Technology W120 Wi-Fi Alarm System User Manual W120 UM EN V1 0
Chuango Security Technology Corporation Wi-Fi Alarm System W120 UM EN V1 0
Users Manual

W120 WiFi Alarm System
Instruction Manual

In the Box
W120 Smart Hub x 1 DS2300 Door/window Control x 2
RE2300 AC adapter x 1 AA Battery x 4
Remote Control x 1
Reset Pin x 1 User Manual x 1
Contents
Things to Know before Getting Started ----------------------------- 1
Your WiFi Internet Connection ------------------------------------------------- 1
Network Name and Password ------------------------------------------------- 1
Operating System Requirements ---------------------------------------------- 1
How the W120 System Works -------------------------------------- 2
Getting to Know Your WiFi Alarm System --------------------------- 3
Hub --------------------------------------------------------------------------- 3
Remote Control --------------------------------------------------------------- 4
Door / Window Sensor ------------------------------------------------------- 5
Tamper Switch --------------------------------------------------------------- 5
Low Battery Indication ------------------------------------------------------ 5
Getting Started ------------------------------------------------ 6-8
Download the “W120 WiFi Alarm System” App ------------------------------- 6
Sign Up/In --------------------------------------------------------------------6
Adding a Device ----------------------------------------------------------- 7-8
App Operation ------------------------------------------------ 9-20
Device List -------------------------------------------------------------------- 9
Account Management -------------------------------------------------------- 9
Editing Your Account -------------------------------------------------------- 9
My Shares ------------------------------------------------------------------ 10
Access Settings -------------------------------------------------------------- 11
App Control - Main Page ---------------------------------------------------- 11
History Page ------------------------------------------------------------------ 12

4
App Settings ------------------------------------------------------------------ 13
My Hub ------------------------------------------------------------------ 13
Accessory Settings --------------------------------------------------------- 14
Add Accessories ---------------------------------------------------------- 16
Wireless Siren (If Purchase Separately) ------------------------------------- 17
Timed Arm / Disarm ------------------------------------------------------ 18
Delay Settings --------------------------------------------------------------- 18
Time Settings --------------------------------------------------------- 19
Others ------------------------------------------------------------------ 20
Installation ------------------------------------------------------ 21
Replacing Batteries of Accessories -------------------------------- 23
Restoring to Factory Settings ------------------------------------- 24
Troubleshooting -------------------------------------------------- 24
6SHFLÀFDWLRQV

1
Things to Know before Getting Started
Thank you for choosing smanos to help you take control of your home. The smanos
family of Home Alarm Systems is designed to be self-monitored and help you
become more active in securing your home without a high investment. We aim to
provide a safe, easy & cost effective solution for you to protect your home & loved
ones 24/7/365.
This system is an auxiliary system; it is not designed to provide complete protection
from property loss. smanos will not be held responsible in the event that property
loss occurs while this system is in operation.
Your WiFi Internet Connection
One critical factor that can affect the performance of your device is the position/
distance between your home WiFi router and the W120 smart Hub. Set up your
+XELQDQRSHQVSDFH'2127SODFHLWGLUHFWO\RQWKHÁRRUWKHFORVHUWKH+XELV
to the router, the stronger the WiFi signal will be.
Please be sure to connect you Hub to WiFi using the 2.4GHz spectrum as this is a
larger spectrum and the Hub does not support the 5GHz option which has been
IRXQGWREHWKHPRVWFRPPRQPLVWDNHZKHQVHWWLQJXSWKHVPDUW+XEIRUWKHÀUVW
time.
Network Name and Password
- Check for your WiFi network name and the password and write down for easy
reference. The WiFi network name is normally referred to as the SSID. The password
or security ID is normally the next line or two down from the WiFi/SSID network
name. These can be easily found on your WiFi router if you did not change them
ZKHQ\RXÀUVWLQVWDOOHGWKH:L)LURXWHUIRUH[DPSOH
:L)L66,'1HWZRUN1DPH;;;;
:L)L66,'1HWZRUN3DVVZRUG6HFXULW\.H\;;;;;;;;;;;;;;
Operating System Requirements
- iOS 8.0 or above with iPhone 5 or above;
- Android 5.0 or above
2
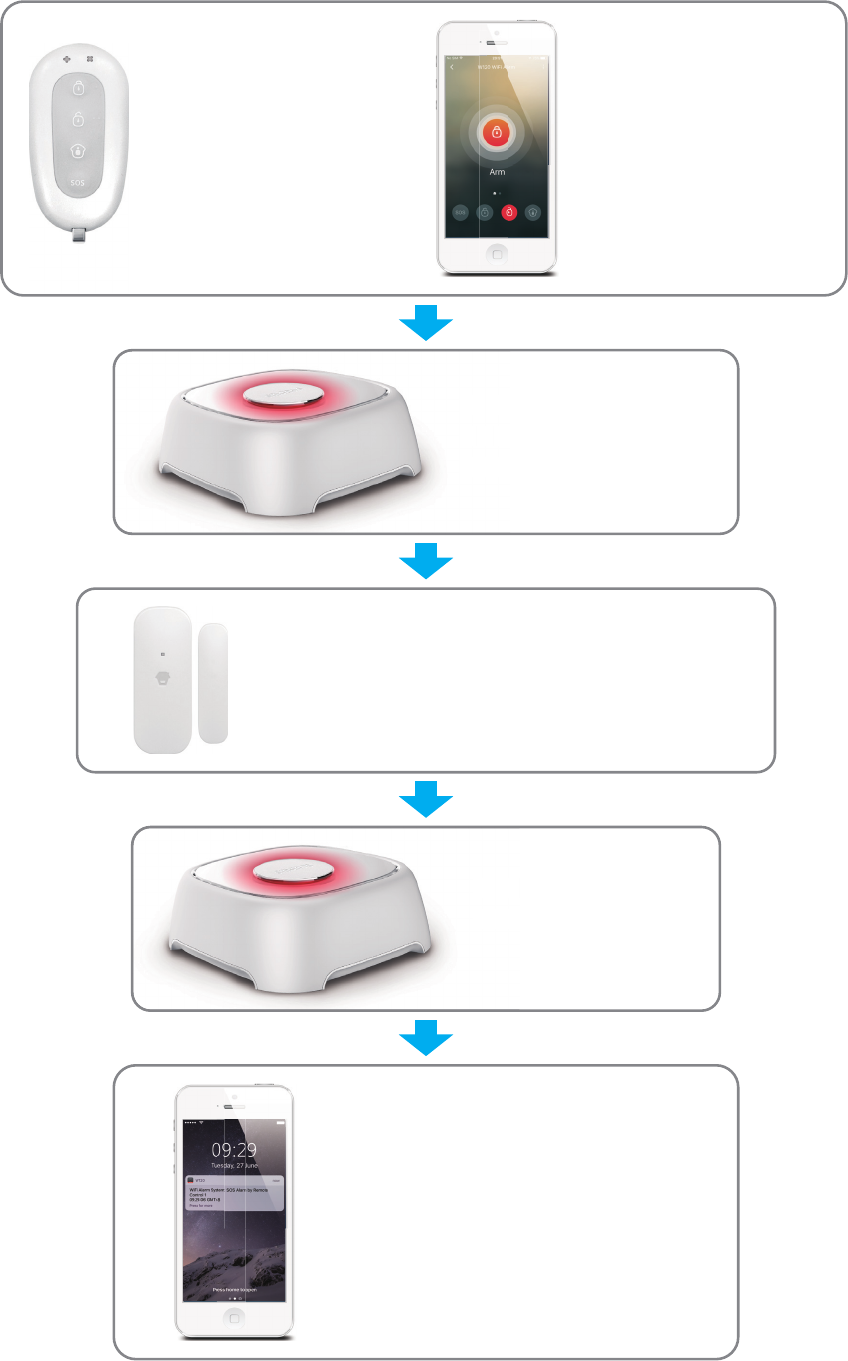
How the W120 System Works
Through the
Remote Control,
put the system in
Armed Mode
The Hub is set to
Armed Mode
(The red indicator is
on) by the user.
The Hub sends push a notifica-
tion to your phone.
And you wound receive an
email when sensor is triggered
if you enable notification
function on in your App
settings.
The Hub receives the
command and enters
“Armed” mode.
T
h
e
H
comm
“A r m e
The Hub sounds at
95dB on-site.
The
95dB
When a Door/Window Sensor detects a
door/window opening, the sensor sends a
signal to the Hub letting the hub know
there has been an intrusion.

3
Getting to Know Your WiFi Alarm System
Hub
Front Rear
Status Indicator
@
@
@
@
Reset Button
Battery
Side
1HWZRUNFRQÀJXUDWLRQEXWWRQ
Adapter Jack
$OWHUQDWLQJUHGDQGEOXHOLJKWVÁDVK :L)L&RQÀJXUDWLRQ0RGH
Alternating red, green and blue lights
ÁDVK Ready to pair with new accessory
Solid light Stable WiFi connection
Flashes once every second No Connection / Disconnected from
the router
Flashes every 3 seconds Low battery
5HGOLJKWÁDVKHVTXLFNO\ A sensor has triggered the Alarm
Red light Armed
Blue light Armed in Home Mode
Green light Disarmed
Note: The Hub must be always connected to AC power in order to maintain a WiFi connection. When
AC power is lost, the speaker will beep for 30 seconds, and the Hub will stay online for 2 minutes; long
HQRXJKWRVHQGRXWSXVKQRWLÀFDWLRQVWRXVHUVDOHUWLQJWKHPWRWKHSRZHUGLVFRQQHFW7KHV\VWHP
will remain active in a local manner only and, if armed, will monitor and sound siren if any sensor is
triggered.
4
Remote Control
LED Indicator
Guide Point For
The Blind
Arm
Disarm
Stay
SOS
Metal Ring
Button System Status
All Sensors will be Armed. This mode is for use when the property is
unoccupied.
The System will be Disarmed, no Sensors will be triggered.
1RWH:KHQVHWWR¶'LVDUP·VHQVRUVLQ+RXU=RQHZLOOUHPDLQDFWLYH
DVWKH\DUHIDFWRU\VHWWR,QVWDQW$ODUP=RQH
6HQVRUVZKLFKDUHVHWWRWKH+RPH=RQHZLOOQRWEH$UPHG$OORWKHU
Sensors will be Armed. This mode allows the occupier freedom of
PRYHPHQWZLWKLQWKHSURSHUW\ZLWKRXWWULJJHULQJWKH+RPH=RQH
Sensor(s).
7KH626%XWWRQZLOOWULJJHUDQ¶HPHUJHQF\·DOHUWQRWLÀFDWLRQWR
registered users regardless of the Hub mode.
Press the [stay ] button. After the indicator on the remote control
blinks once, press [Arm ] button within 3 seconds to mutely arm the
system.
Press the [stay ] button. After the indicator on the Remote Control
blinks once, press [Disarm ] button within 3 seconds to mutely disarm
the system.
5
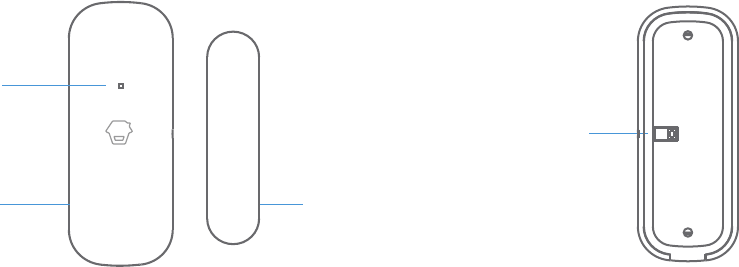
Door / Window Sensor
LED Indicator
Transmitter
Front Side Back Side
Magnet
Tamper Switch
'RRU:LQGRZ6HQVRUVDUHVHWWR¶1RUPDO=RQH·E\GHIDXOWDQGDUHLGHDOIRU
protecting entry/exit points such as front and back doors and windows. When the
system is armed, and a Sensor is triggered (Magnet separated from the Transmitter),
DSXVKQRWLÀFDWLRQLQFOXGLQJWKHVHQVRUQDPHZLOODXWRPDWLFDOO\EHVHQWWRWKH
registered users and the Hub Internal Siren will sound immediately.
Tamper Switch
The Tamper Switch (small black button underneath the back cover) will activate
an alarm condition if any attempt is made to remove the Sensor from its installed
location.
Low Battery Indication
,IWKH/('LQGLFDWRUÁDVKHVRQFHSHUVHFRQGVWKHEDWWHU\QHHGVWREHUHSODFHGDV
soon as possible.

6
Getting Started
Download the “W120 WiFi Alarm System” App
Search for “W120 Alarm” in App Store/Google Play, then download and install the
App.
Special Tips (For iPhone only)
7DS´2.µWRDOORZUHFHLYLQJQRWLÀFDWLRQV
from “W120 Alarm”. Forbidden to receive
QRWLÀFDWLRQVPD\UHVXOWLQDQDSSOLFDWLRQ
running failure, please allow it to send
QRWLÀFDWLRQVWR\RXUSKRQHLQFDVHRI
alarm.
Sign Up/In
If you have not registered an account with smanos, please press “Sign Up” just
below the “Sign In” icon on the App, and follow the instructions to create your
DFFRXQWÀUVW
,I\RXGRQRWUHFHLYHDQDFFRXQWYHULÀFDWLRQFRGHLQ\RXUHPDLOER[GXULQJWKH
registration process, please remember to check your spam/junk folder and make
sure the notice has not been blocked by your service provider.
Once you have an account with us, please select the “Sign In” icon and enter your
email address and password to log in.
7
Adding a Device
You can operate multiple devices from a single account. If you have multiple W120
Hubs or P70 cameras; it is easy for you to manage these devices within this App.
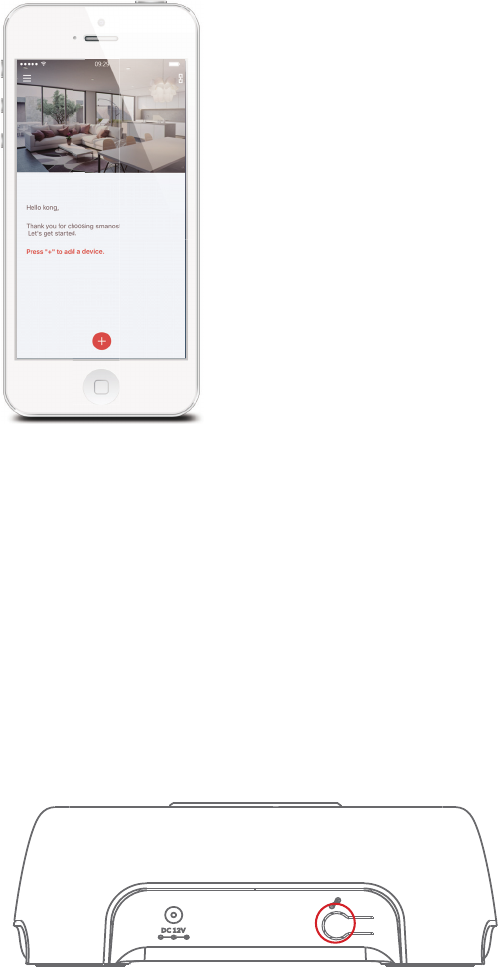
Press the [+] button on the main page. Tap on [W120 WiFi Alarm System], then
IROORZWKHFRQÀJXUDWLRQVWHSVWRVHWXS\RXU:+XEZLWK\RXUKRPH:L)L
Important: W120 does not support WiFi of 5GHz band, if dual-band (5GHz and 2.4GHz)
router under the same name is used, please go into your routers settings to separate these
two bands into different names and make sure to select with the 2.4GHz WiFi instead of the
5GHz's.
ཉPlug the Power Adapter into the wall to power on the Hub.
ཊ3UHVVWKH:L)L&RQÀJXUDWLRQ%XWWRQRQWKH+XEIRUVHFRQGV<RXZLOOKHDUD
beep and the indicator light will alternate between red and blue, letting you know
WKH+XELVQRZLQWKH:L)L&RQÀJXUDWLRQ0RGH
8
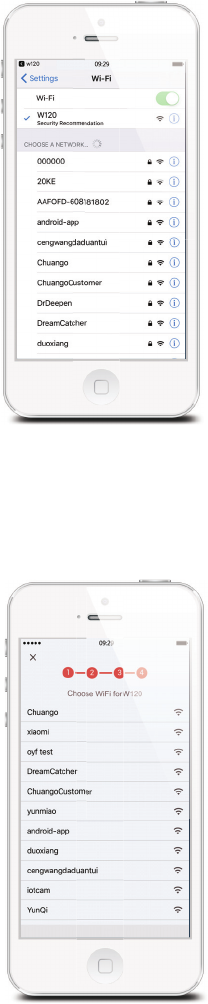
ཋ*RWR\RXUSKRQH·V:L)LVHWWLQJVORRNIRUDQGVHOHFW:KRWVSRWWRFRQQHFW
your mobile to the Hub. When connected, return to your app.
ཌSelect your 2.4GHz WiFi network from the list, and enter the WiFi network
password. The Hub will connect to the selected WiFi network. This binding process
should take about one minute.
:KHQDVXFFHVVIXOFRQQHFWLRQLVHVWDEOLVKHGWKHLQGLFDWRUZLOOVWRSÁDVKLQJ
Now, your W120 Hub is ready to help keep you safe & secure!
9
App Operation
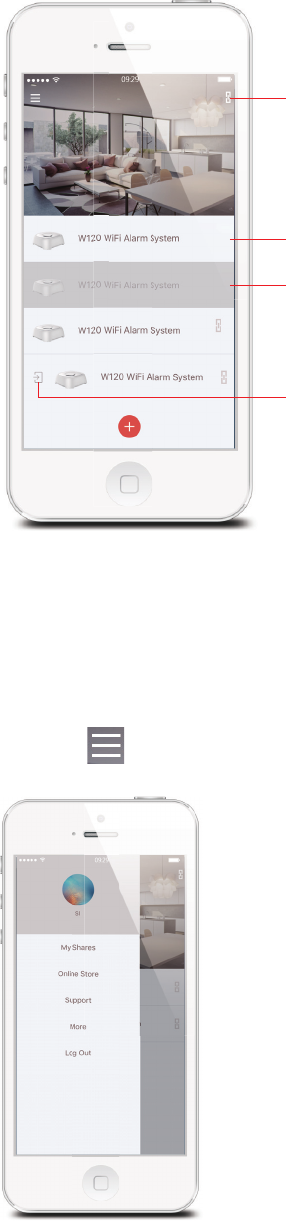
Device List
Check device status after set up
Integrate your W120 Hub with cameras so you can directly
YLHZFDPHUDVLQ+XE·VPDLQSDJH$QGLIWKLV
icon appears in the right of your device, it means integration
has been completed.
When the status bar is white, it means the device is ONLINE
and available.
If the device is grayed out, it means the device is OFFLINE
and cannot be accessed.
If this icon appears in the left of your device, it means the
device is shared from your family or friends to you.
Account Management
Editing Your Account
Tap on [ ] on the main page to manage your account.
10
Account Image
Tap on the picture, and you can add or replace your account image by taking a
SLFWXUHRUFKRRVLQJDSLFWXUHIURP\RXUSKRQH·VDOEXP
Account Name
If you want to change your account name, just tap on the [ ] button and enter a
new name.
Account Password
You can change your password on this page.
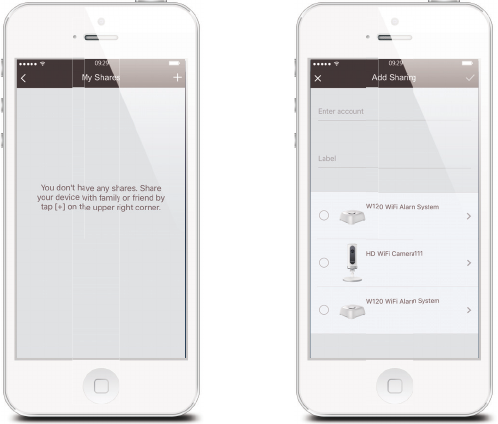
My Shares
Sharing your device with family or friends.
By choosing “My Shares” on the menu and pressing the [+] Add Button, you can
share access to your device(s) with other registered smanos accounts.
Enter the email address and nickname of the account you want to share with, and
then select the device(s).
The user who receives the shared device(s) can only edit the name of the device(s)
and receive alerts; they will NOT be able to re-share the device with anyone else, or
change settings.
It is highly recommended that you set access limits to those who you may share
your device (s) with. By not doing so, you grant your family members or friends
continual accesses to the device(s) you have shared.
11
Access Settings
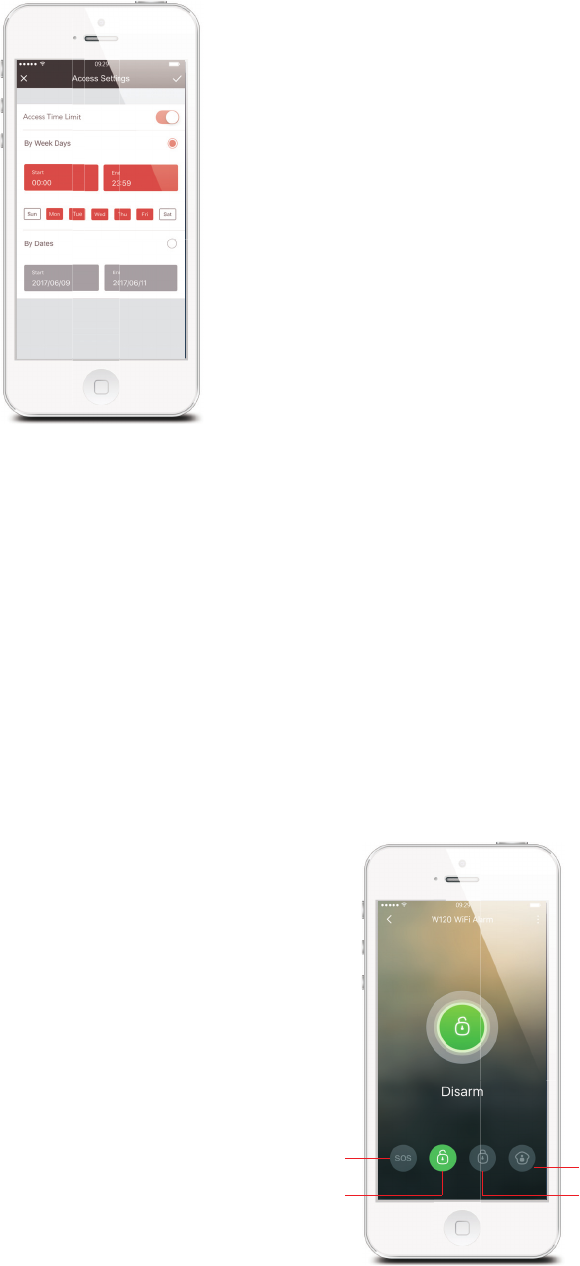
ཉBy Week Days
Select the day(s) and routine you wish to share your device with others.
ཊBy Dates
Users you share your device with will have access during the period you choose.
App Control - Main Page
Arm, Disarm, Home Arm (Partial Arm) this system and trigger an emergency alarm
can be done at this page.
,PSRUWDQW1RWLFHIn order to control the system remotely (WiFi/App), the Hub must be
receiving power from the wall. If the power adapter is unplugged the WiFi will be disabled to
SOS
Disarm
Home Mode (Partial Arm)
Arm

12
conserve battery power that enables the system to still communicate with the sensors for a
longer period of time.
System Armed
In this mode, all of the sensors are on alert; the Hubs built-in siren will sound when
a sensor is triggered. You and ALL other pre-authorized users will receive push
QRWLÀFDWLRQVWR\RXUVDQGWKHLUGHYLFHV7KLVPRGHLVUHFRPPHQGHGIRUZKHQQR
one is at home; it can be easily set from the remote control or app.
System in Home Mode
2QO\´µ+RPH=RQHµVHQVRUZLOOVWRSGHWHFWLQJXQGHUWKLV0RGHZKLFKHQDEOHV\RX
and your family to move freely inside your home without accidentally triggering an
unwanted alarm.
This mode is recommended for when someone is at home, such as during the
night, and can be easily set from the remote control or app.
1RWH7KHGRRUZLQGRZVHQVRUVLQWKLVNLWKDYHEHHQVHWWR1RUPDO=RQHE\GHIDXOW\RXFDQ
refer to page 18 and change their zone mode on the “Accessory Settings” of the App.
System Disarmed
All the sensors stop detecting except any sensors that you may have set to 24-
+RXU=RQH+RXU=RQH6HQVRUVZLOOFRQWLQXRXVO\PRQLWRUDSDUWLFXODUDUHD
For example.DQH[WUDVPDQRV:DWHU6HQVRUZKLFKKDVEHHQVHWWR+RXU=RQH
by default and installed near a washing machine would trigger alarm if water is
detected, regardless of system status.
History Page
Operations and triggered alerts can be reviewed from this History page, you can
tap on [ @WRSLFNDVSHFLÀFGD\WRIDFLOLWDWH\RXUVHDUFKRIRSHUDWLRQVDQGDOHUWV
of interest.
The Event Log holds a record of up to 300 events.
13
App Settings
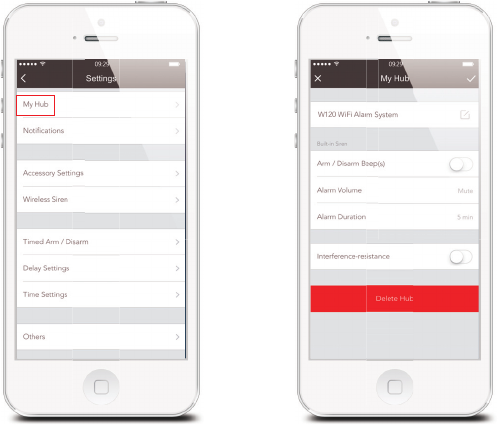
My Hub
ཉDevice Name
This setting enables you to rename your W120 WiFi Alarm System, and the new
name will be shown on the Device List.
ཊBuilt-in Siren
This setting enables you to adjust the volume level, alarm duration, and arm /
disarm beep of the built-in siren in your W120 WiFi Alarm Hub.
ཋ Interference-detection
The W120 Hub has a feature of interference-detection. If this feature is enabled, an
alarm will be triggered if the radio channel is jammed continuously and the built-in
siren will sound rapid beeps as a pre-alarm warning 10 seconds before a full alarm
occurs. The function is switched off in default.
14
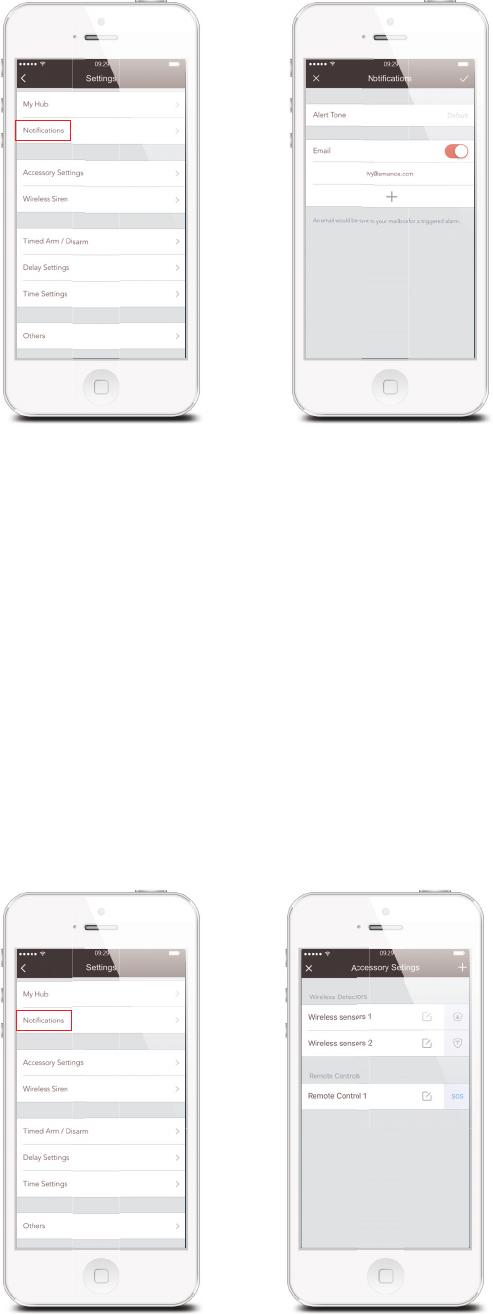
1RWLÀFDWLRQV
ཉAlert Tone
7KLVVHWWLQJHQDEOHV\RXWRVHOHFWDULQJWRQHIRUDODUPQRWLÀFDWLRQV
ཊEmail
7KLVVHWWLQJHQDEOHV\RXWRDGGHPDLODGGUHVVHVWRUHFHLYHDODUPQRWLÀFDWLRQV
Accessory Settings
$GGUHQDPHDQGFKDQJHWKH=RQH0RGHRIHDFKVHQVRULQWKLVVHWWLQJSDJH
And if you want to delete the accessory, just press and slide the accessory to the
left and then delete it.

15
Zone Mode
1RUPDO=RQH6HQVRUVVHWWR1RUPDO=RQHDUHDUPHGZKHQWKHV\VWHPLVLQ$UP
(Full Arm) or Home Arm (Part Arm) Mode. We recommend setting Window/Door
Sensors to this zone because they would always be installed to the perimeter of a
house in practice, like doors or windows.
+RPH=RQH6HQVRUVVHWWR+RPH=RQHDUHRQO\DUPHGZKHQWKHV\VWHPLVLQ$UP
(Full Arm) Mode. If Home Mode (Partial Arm) is used, these Sensors are not armed
and will not activate the alarm on trigger. We recommend setting PIR Motion
6HQVRUVLISXUFKDVHVHSDUDWHO\WR+RPH=RQHEHFDXVHWKH\VKRXOGEHLQVWDOOHG
inside the house.
+RXU=RQH Sensors set to 24-Hour zone will activate the alarm when triggered,
regardless of the alarm status at the time (Armed or Disarmed or Home).
'HOD\=RQH7KHZRUNLQJPRGHRIVHQVRULQWKLV]RQHZLOOEHVDPHDV1RUPDO=RQH
VHQVRU·VEXWWKH+XEZLOODODUPDIWHUDQ(QWU\'HOD\7LPHLIWKLVVHQVRULVWULJJHUHG
when system was armed or in home mode.
(QWU\'HOD\7LPH\RXFDQVHWWKLVGHOD\WLPHRQ$SS>6HWWLQJV@>'HOD\6HWWLQJV@
[Entry Delay Time].
16
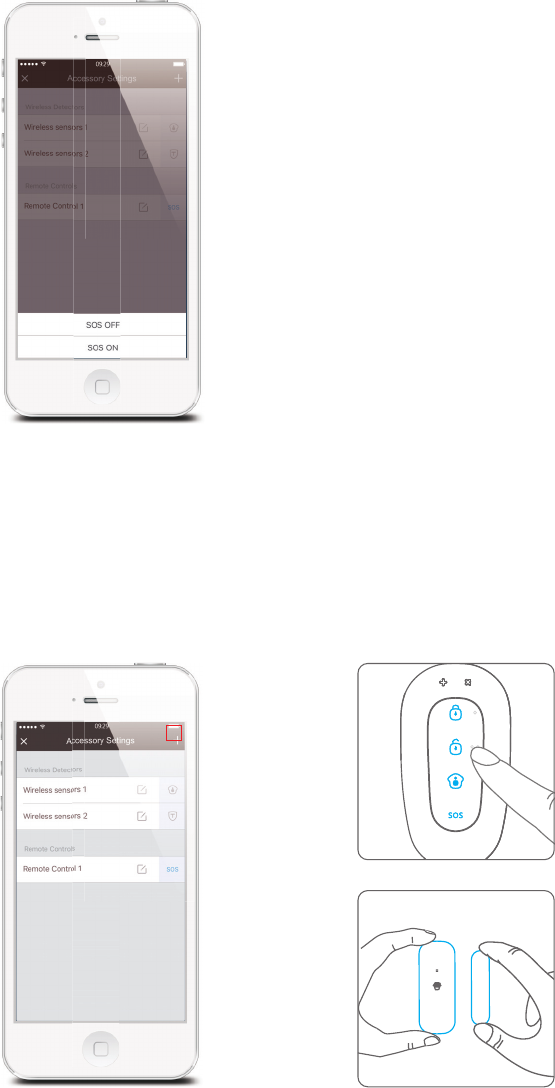
SOS Function of Remote Control
This setting enables you to turn ON/OFF the SOS function of every remote control
to avoid false triggering.
Add Accessories
Press any button on the
remote control
Separate the transmitter
from the magnet
9HU\,PSRUWDQWPlease note that pressing the Tamper Switch of the Sensor instead
RIWULJJHULQJWKH6HQVRUZLOOUHJLVWHULWDVD+RXU=RQH
1RWHPlease refer to the user manual of the new purchased accessory and then follow its
steps to pair it with W120 Hub.

17
Wireless Siren (If Purchase Separately)
smanos wireless siren will beep once or twice when system is armed or partial
armed.
This setting enables you to turn on/off this prompt tone.
This function is switched off by default.

18
Timed Arm / Disarm
The system can be programmed to automatically Arm and Disarm the Hub at
SUHGHÀQHGWLPHVE\IROORZLQJWKHVWHSVEHORZ
6OLGHWKHVZLWFKWRWKH21SRVLWLRQWRDFWLYDWHWKHVHWWLQJ
2. Choose any status you want the system to become (Arm / Disarm / Home Arm).
3. Choose the activate time of the status.
4. Tap the date that you want this Timed Group repeat.
Delay Settings
([LW'HOD\7LPH Set a time delay and turn on/off reminding tone for you to leave
your property without triggering an alarm.
19
(QWU\'HOD\7LPHSet a time delay and turn on/off reminding tone for you to enter
\RXUSURSHUW\ZLWKRXWWULJJHULQJWKH'HOD\=RQH6HQVRUV
'HOD\=RQHplease refer to page 19.
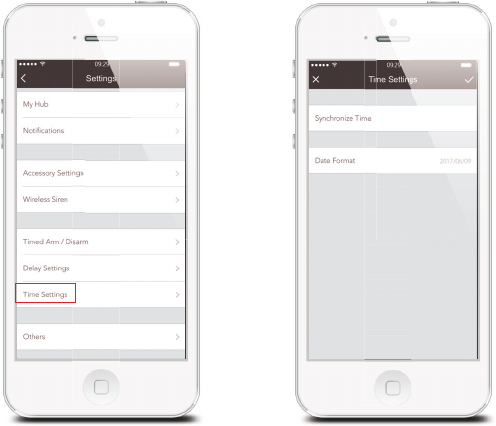
Time Settings
ཉSynchronize Time
This setting enables you to synchronize device time to your mobile, to make sure
WKHWLPHVKRZQRQWKHKLVWRU\DQGWKHWLPHRQSXVKQRWLÀFDWLRQVDUHFRUUHFW
ཊDate Format
This setting enables you to change the format of the date shown on your smanos
home app.
20
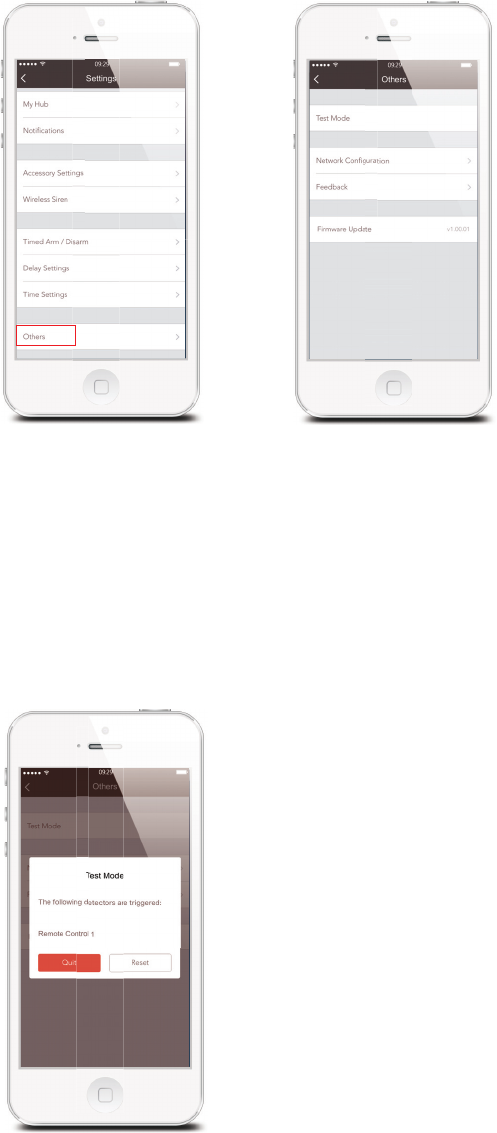
Others
ཉTest Mode
With test mode, you can check the range between accessories and your Hub
without triggering any alarm, and prevent tamper switch alarm triggered while
installing the accessories or replacing batteries.
Once a trigger is detected during this process, the name of the triggered sensor will
be displayed.

21
ཊ1HWZRUN&RQÀJXUDWLRQ
:LWKQHWZRUNFRQÀJXUDWLRQ\RXFDQFKHFNFXUUHQWQHWZRUN\RXU+XEFRQQHFWLQJ
DQGPRGLI\\RXU:L)LZKHQWKHUH·VVWURQJHURQHZLWKRXWUHEXLOGLQJD:L)L
connection, so the Hub will work more smoothly.
2U\RXFDQFKRRVHUHFRQÀJXUDWLRQGLUHFWO\WRUHFRQQHFW\RXU+XEDQG:L)L
network.
ཋFirmware Update
7KLVVHWWLQJHQDEOHV\RXWRXSGDWH\RXU+XEWRWKHODWHVWÀUPZDUHLIQHFHVVDU\
WHEN AN UPDATE IS TAKING PLACE, FORCED TERMINATION WILL CAUSE
SERIOUS DAMAGE TO YOUR HUB. It is highly recommended that you keep your
W120 Hub plugged in at all times, and DO NOT SWITCH THE DEVICE OFF BEFORE
AN UPDATE IS COMPLETED.
8SGDWHVWHSVWDSRQ>)LUPZDUH8SGDWH@DQG\RXZLOOVHHWKHUHGOLJKWÁDVKTXLFNO\
which indicates the update has started.
Installation
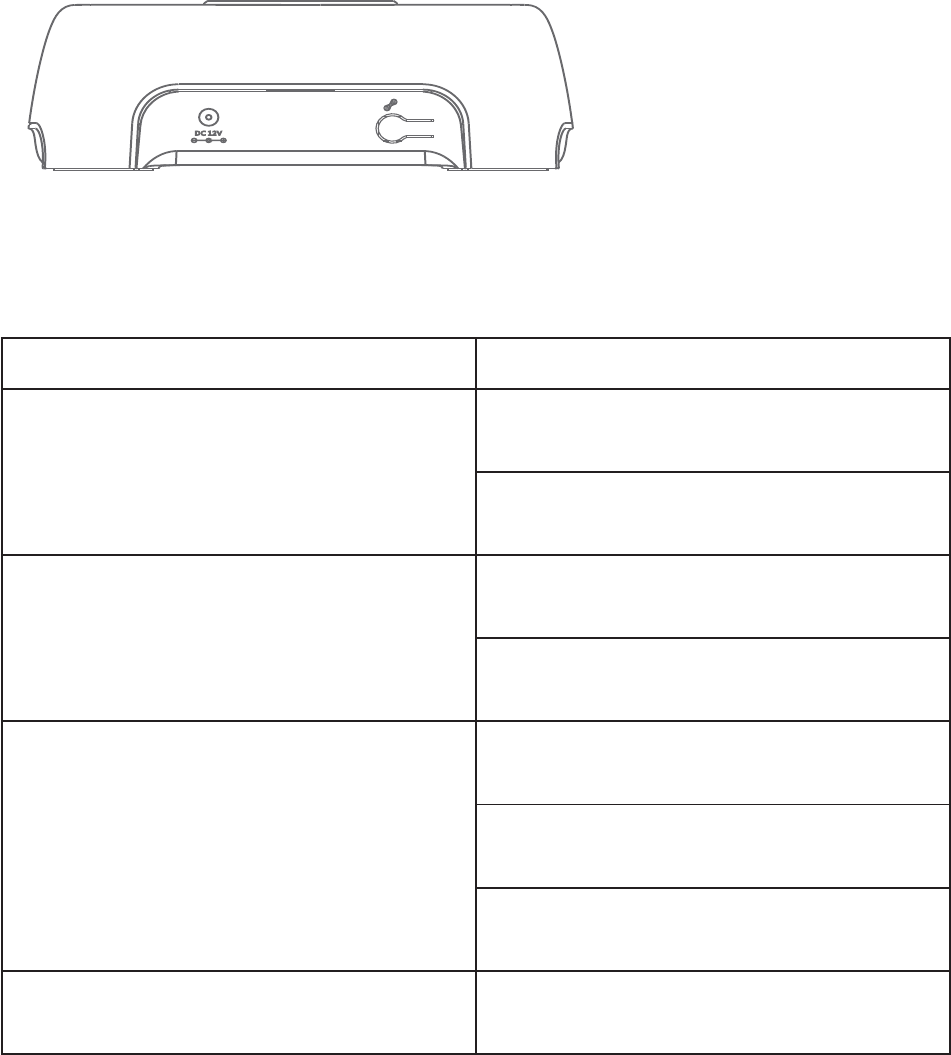
Hub
Place on the table and start to use
1RWLFH avoid using it next to a load-bearing wall or home appliances which may cause
attenuation. It is highly recommended to place the Hub in the center of the system or open
area for optimal performance.
22
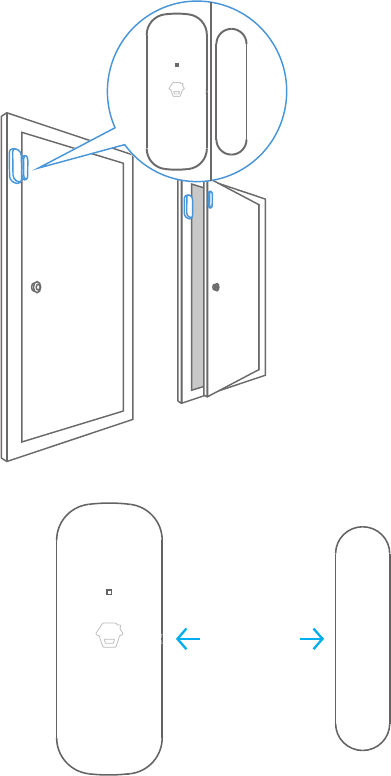
Door/Window Contact
Make sure the contacts work properly
before installation.
6WHS&KRRVHDVXLWDEOHORFDWLRQ
It can be installed on doors, windows or
any other objects that can be opened
and closed. If it is applied to a mental
door, please place spacer under the
transmitter and magnet.
6WHS6HFXUHWKHFRQWDFWVZLWKGRXEOH
sided taps
Make sure the triangle marks on the side
of the transmitter and magnet are facing
& close to each other and within the
range of 1 cm. As you separate and the
space between them is over 2cm, the
LED on the transmitter will blink once.
>2cm
23
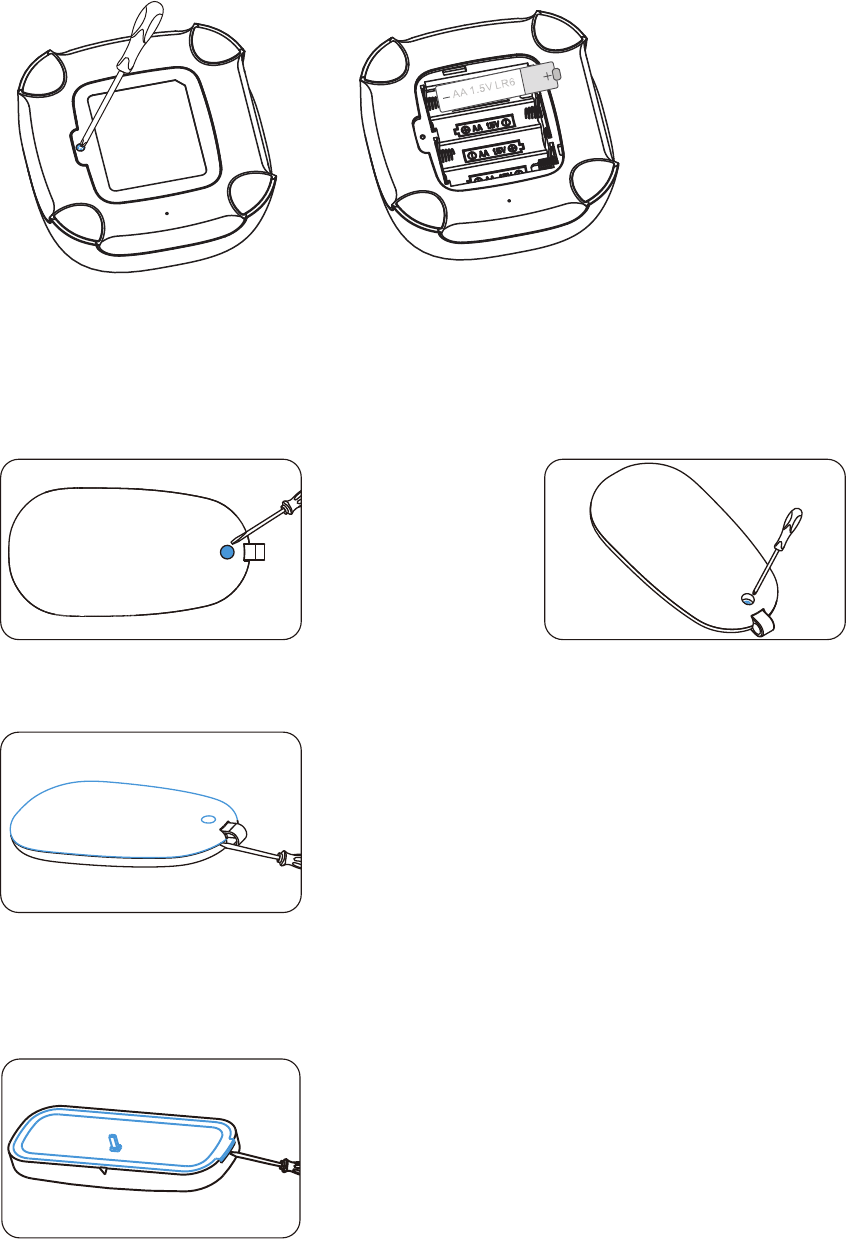
Replacing Batteries of Accessories
Smart Hub W120
Open the case and change the battery
Remote Control RE2300
Remove the rubber item Loose the screw
Open the case and change the battery
Door/Window Contact DS2300
Open the case and change the batteries
24
Restoring to Factory Settings
3UHVVWKH:L)L&RQÀJXUDWLRQ%XWWRQVKRUWO\WLPHVDQG\RXZLOOKHDUEHHSVZKHQ
\RXÀQLVKWKHWKLUGVKRUWSUHVV7KHQORQJSUHVVWKH+XEXQWLO\RXKHDUDORQJEHHS
After that, the Hub is restored to factory settings.
1RWHWKHDFFHVVRULHVZLOOQRWEHGHOHWHGDIWHUUHVWRULQJWRIDFWRU\VHWWLQJV
Troubleshooting
Problems Reason/ Solution
The Hub dose not respond to app
operation
Check whether the local network is
working
Make sure the Hub is powered by
adapter
Remote control does not work
Check if the remote control has been
paired to the Hub successfully
The distance between the Hub and
remote control is too far away
Door/ Window contact is triggered but
the control does not alarm
Check whether the system is in arm
state
Check if the Door/ Window contact has
been paired to the Hub successfully
The distance between the Hub and
Door/ Window contact is too far away
No sound when alarming Check if the volume of the Hub is set to
mute; Reset alarm ring volume on App
25
6SHFLÀFDWLRQV
Hub
Power Supply
Battery
Standby Current
Alarm Current
Internal Siren
Expandable Accessories
WiFi
Radio Frequency
Housing Material
Operating Condition
Dismensions
DC 12V 500mA
AA 1.5V LR 6 x 4pcs
<60 mA
<200 mA
95dB
10 remote controls, 50 sensors
IEEE 802.11b/g/n
915MHz(±75 KHz)
PC+ABS Plastic
Temperature -10°C~+55°C
Relative humidity <80% (non-condensing)
117 x 118.5 x 40.5 mm (L x W x H)
Remote Control
Power Supply
Transmitting Current
Transmitting Distance
Radio Frequency
Housing Material
Operating Condition
Dimensions
DC 3V (CR2032 lithium cell battery x 1)
<10 mA
<80 m (open area/no interference)
915MHz (±75 KHz)
PC+ABS plastic
Temperature -10°C~+55°C
Relative humidity <80% (non-condensing)
71 x 38 x 12 mm (L x W x H)
26
Door/ Window Contact
Power Supply
Static Current
Alarm Current
Transmitting Distance
Radio Frequency
Housing Material
Operating Condition
Transmitter Dimensions
Magnet Dimensions
DC 3V (CR2032 lithium cell battery x 2)
<2 uA
<22 mA
<80 m (open area/no interference)
915MHz (±75 KHz)
PC+ABS Plastic
Temperature 0°C~+55°C
Relative humidity <80%
(non-condensing)
72.5 x 28 x 10 mm (L x W x H)
58 x 14 x 9.5 mm (L x W x H)
)&&:DUQLQJ:
$Q\&KDQJHVRUPRGLILFDWLRQVQRWH[SUHVVO\DSSURYHGE\WKHSDUW\UHVSRQVLEOHIRU
FRPSOLDQFHFRXOGYRLGWKHXVHU·VDXWKRULW\WRRSHUDWHWKHHTXLSPHQW
7KLVGHYLFHFRPSOLHVZLWKSDUWRIWKH)&&5XOHV2SHUDWLRQLVVXEMHFWWRWKHIROORZLQJ
WZRFRQGLWLRQV7KLVGHYLFHPD\QRWFDXVHKDUPIXOLQWHUIHUHQFHWKLVGHYLFHPXVW
DFFHSWDQ\LQWHUIHUHQFHUHFHLYHGLQFOXGLQJLQWHUIHUHQFHWKDWPD\FDXVHXQGHVLUHGRSHUDWLRQ
,6('566:DUQLQJ
7KLVGHYLFHFRPSOLHVZLWK,QQRYDWLRQ6FLHQFHDQG(FRQRPLF'HYHORSPHQW&DQDGD
OLFHQFHH[HPSW566VWDQGDUGV2SHUDWLRQLVVXEMHFWWRWKHIROORZLQJWZRFRQGLWLRQV
WKLVGHYLFHPD\QRWFDXVHLQWHUIHUHQFHDQGWKLVGHYLFHPXVWDFFHSWDQ\LQWHUIHUHQFH
LQFOXGLQJLQWHUIHUHQFHWKDWPD\FDXVHXQGHVLUHGRSHUDWLRQRIWKHGHYLFH
/HSUpVHQWDSSDUHLOHVWFRQIRUPHDX[&15G,6('DSSOLFDEOHVDX[DSSDUHLOVUDGLR
H[HPSWVGHOLFHQFH/H[SORLWDWLRQHVWDXWRULVpHDX[GHX[FRQGLWLRQVVXLYDQWHV
ODSSDUHLOQHGRLWSDVSURGXLUHGHEURXLOODJHHW
OXWLOLVDWHXUGHODSSDUHLOGRLWDFFHSWHUWRXWEURXLOODJHUDGLRpOHFWULTXHVXELPrPHVLOH
EURXLOODJHHVWVXVFHSWLEOHGHQFRPSURPHWWUHOHIRQFWLRQQHPHQW
)&&5DGLDWLRQ([SRVXUH6WDWHPHQW
7KLVHTXLSPHQWFRPSOLHVZLWKFCCUDGLDWLRQH[SRVXUHOLPLWVVHWIRUWKIRUDQXQFRQWUROOHG
HQYLURQPHQW7KLVHTXLSPHQWVKRXOGEHLQVWDOOHGDQGRSHUDWHGZLWKPLQLPXPGLVWDQFH
FPEHWZHHQWKHUDGLDWRU\RXUERG\
,SED5DGLDWLRQ([SRVXUH6WDWHPHQW
7KLVHTXLSPHQWFRPSOLHVZLWK,SEDUDGLDWLRQH[SRVXUHOLPLWVVHWIRUWKIRUDQXQFRQWUROOHG
HQYLURQPHQW7KLVHTXLSPHQWVKRXOGEHLQVWDOOHGDQGRSHUDWHGZLWKPLQLPXPGLVWDQFH
FPEHWZHHQWKHUDGLDWRU\RXUERG\7KLVWUDQVPLWWHUPXVWQRWEHFRORFDWHGRU
RSHUDWLQJLQFRQMXQFWLRQZLWKDQ\RWKHUDQWHQQDRUWUDQVPLWWHU
/HUD\RQQHPHQWGHODFODVVHEUHSHFWH,SEDIL[DLHQWXQHQYLURQQHPHQWQRQ
FRQWU{OpV,QVWDOODWLRQHWPLVHHQ±XYUHGHFHPDWpULHOGHYUDLWDYHFpFKDQJHXUGLVWDQFH
PLQLPDOHHQWUHFPWRQFRUSV/DQFHXUVRXQHSHXYHQWSDVFRH[LVWHUFHWWHDQWHQQHRX
FDSWHXUVDYHFG·DXWUHV

Printed in China
3$:80(19
© 2017 SMANOS HOLDING LTD. All Rights Reserved.