Chung Hsin Electric and Machinery Mfg PPT-100 Portable Data Terminal User Manual
Chung-Hsin Electric & Machinery Mfg. corp. Portable Data Terminal
User Manual
Quick Guide
User Information
This equipment has been tested and found to comply with the limits for a
Class B Digital Device, pursuant to part 15 of the FCC Rules. These limits
are designed to provide reasonable protection against harmful
interference in a residential installation. This equipment generates, uses
and can radiate radio frequency energy and, if not installed and used in
accordance with the instruction, may cause harmful interference to radio
communication. However, there is no grantee that interference will not
occur in a particular installation. If this equipment dose cause harmful
interference to radio or television reception, which can be determined by
turning the equipment off and on , the user is encouraged to try to correct
the interference by one or more of the following measures:
-- Reorient or relocate the receiving antenna.
-- Increase the separation between the equipment and receiver.
-- Connect the equipment into an outlet on a circuit different from that to
which the receiver is connected.
-- Consult the dealer or an experienced radio/TV technician for help.
The changes or modifications not expressly approved by the party
responsible for compliance could void the user’s authority to operate the
equipment.
To comply with the FCC RF exposure compliance requirements, this
device and its antenna must not be co-located or operating to conjunction
with any other antenna or transmitter.
This device complies with Part 15 of the FCC Rules. Operation is subject
to the following two conditions: (1) this device may not cause harmful
interference, and (2) this device must accept any interference received,
including interference that may cause undesired operation.

- Contents -
1. Hardware ..........................................................1
1.1 Exterior (Face) ............................................. 1
1.2 Exterior (Back) ............................................. 2
1.3 Features ....................................................... 3
Table 1. Keypad key assignments .................... 6
2. System set up ...................................................7
3. Battery ..............................................................8
4. Use and care of the touch panel .......................9
5. Care of the terminal ..........................................9
6. System reset...................................................10
7. Desktop...........................................................11
8. System setting ................................................12
9. Bluetooth Network ..........................................15
10. Barcode Test...................................................17
11. WiFi Manager (Optional).................................18
12. RFID Test (Optional) .......................................19
13. Backup............................................................21
14. Using the Browser ..........................................23
070711
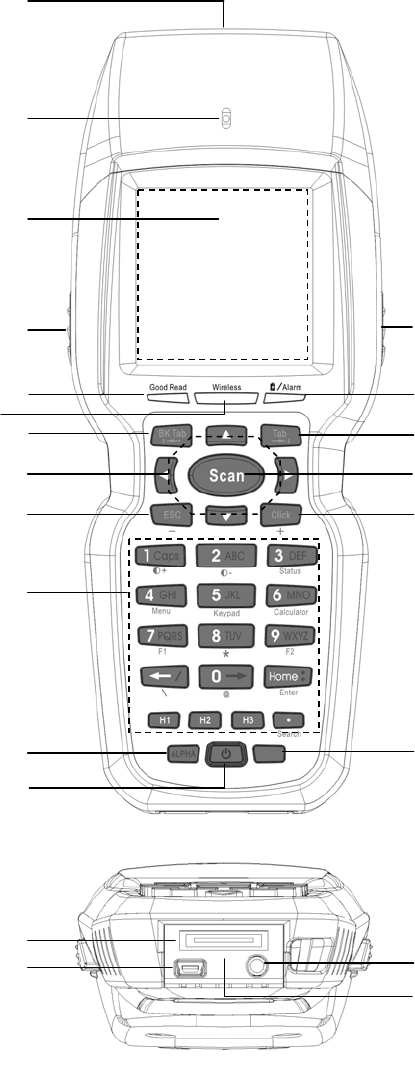
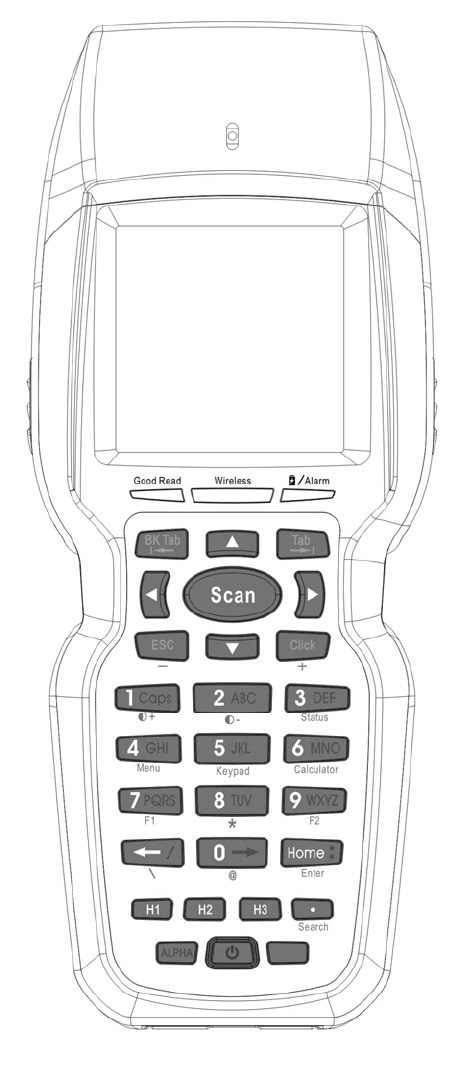
1. Hardware
1.1 Exterior (Face)
1.Barcode scanner window
2. Buzzer
3. Touch screen
4. Side scan keys
5. Successful barcode read
indicator
6. Wireless signal indicator
7. System warning / charging
battery indicator
8. Back tab key
9. Tab key
10. Directional arrow keys
11. Scan key
12. Esc key
13. Click key
14. Alphanumeric keys
15. Alpha mode key
16. Power button
17. FN (function) key
18. Multifunction port
19. USB port (host)
20. Earphone jack
21. IrDA window
2
1
3
4 4
5
6 7
8 9
10
1312
20
14
15
16
11
17
18
19
21
- 2 -
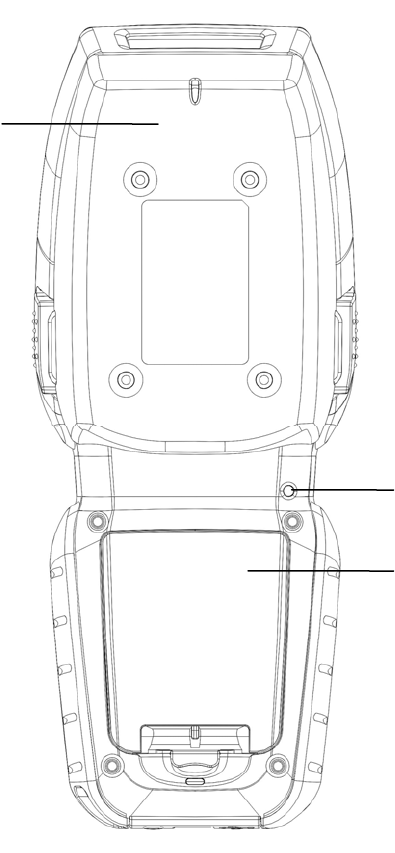
1.2 Exterior (Back)
22
22.RFID module
23. System reset button
24. Battery slot
23
24

- 3 -
1.3 Features
1. Barcode scanner windows
Location of built-in 1D or 2D barcode scanner (optional)
Note: This window emits a beam of laser light. During use, do not
point directly into anyone’s eyes to avoid causing injury.
2. Buzzer
3. Touch screen
The 160 x 160 graphic dots, 16-gray scale, LCM touch screen
provides data entry via the included stylus.
4. Side scan keys
Same as main scan key but can be disabled if necessary.
5. Successful barcode read indicator
Green LED is illuminated each time a barcode is successfully
scanned.
6. Wireless signal indicator
The blue LED is lit constantly after a wireless (optional) connection
has been made.
7. System warning / charging battery indicator
The red LED lights up in the following situations:
‧ Remains lit constantly when battery is fully charged.
‧ Flashes when the battery is being charged and is also a
system warning indicator. The system integrator may design an
application to control this LED, if needed.
8. Back tab key
Used to move focus to the previous object.
9. Tab key
Used to move focus to the next object.
10. Directional arrow keys
Used to move the cursor up, down, left or right, or to select items
within an object, like within a list object.
- 4 -
11. Scan key
‧ When the focus is on a single- or multi-line editor object, this
key activates the laser scanning function.
‧ The scan key will not operate when the focus is on any other
object.
‧ When the terminal is off, this button can be used to turn the
unit on.
12. Esc key
Press this button to exit the current application.
13. Click key
Press this button to execute the chosen application.
14. Alphanumeric keys
These keys are used to enter numbers and letters. Every key can
be used together with the Alpha or FN key to allow a different
mode of data entry (refer to Table 1).
15. Alpha mode key
Press the Alpha key once to enter Alpha mode, indicated by the
backlight. Now the keypad will function as shown in Table 1.
16. Power button
‧ For turning the terminal on or off.
‧ When terminal is on, press the key for three seconds to turn
the backlight on or off.
17. FN (function) key
Pressing this key alone will not produce any action. The key must
be pressed and held while pressing another key at the same time.
The resulting action is shown in Table 1. This key can be used in
both the normal operating mode and the Alpha mode.
18. Multifunction port
‧ RS232 interface: must use the RS232 cable provided.
‧ USB (client) interface: must use the USB cable provided to
connect to a host computer.
‧ Battery charging: connect the power adapter to the
multifunction USB or RS232 cable to charge the battery.
- 5 -
19. USB port (host)
Supports specified USB memory drive only.
20. Earphone jack
21. IrDA window
The IrDA interface can be used to transfer data to another terminal
or a personal computer.
22. RFID module (optional)
Reads ISO15693 standard 13.56MHz tags
23. System reset button
‧ Press this button with the stylus to restart the terminal.
‧ For further information, refer to section 6, “System reset”.
24. Battery slot
Compartment for the terminal’s battery; before changing, make
sure the terminal is switched off in order to avoid loss of data.

- 6 -
Table 1. Keypad key assignments
Key Normal mode Alpha mode While pressing FN key
1 Numeral ” 1 ” Caps:Caps lock mode Increases screen contrast
2 Numeral ” 2 ” Rotates through letters
A->B->C
Decreases screen
contrast
3 Numeral ” 3 ” Rotates through letters
D->E->F Displays system status
4 Numeral ” 4 ” Rotates through letters
G->H->I
Displays menu for various
applications
5 Numeral ” 5 ” Rotates through letters
J->K->L
When entering letters,
shows a small keypad on
screen
6 Numeral ” 6 ” Rotates through letters
M->N->O Calculator application
7 Numeral ” 7 ” Rotates through letters
P->Q->R->S
Hot key F1: can be
programmed, except on
desktop where key
switches between time
and date
8 Numeral ” 8 ” Rotates through letters
T->U->V “ * ” symbol
9 Numeral ” 9 ” Rotates through letters
W->X->Y->Z
Hot key F2: can be
programmed, except on
desktop where key
displays group menu
0 Numeral ” 0 ” Space key “@” symbol
← Backspace ” \ ” symbol “ / ” symbol
Home
Ends current
application and
returns to desktop
“ : ” symbol Return key
▪ ” ▪ ” symbol No action Global search
H1 Programmable Programmable Programmable
H2 Programmable Programmable Programmable
H3 Programmable Programmable Programmable
- 7 -
2. System set up
Before you begin to use the terminal, first perform the following
steps:
‧ Charge the battery
Before using, first charge the battery fully in order to preserve
battery life. Read section 3 “Battery” for further explanation about
use of the battery.
‧ Touch screen initialization
Next, a “+” symbol appears in the upper left corner of the display.
Use the stylus to tap the center of the “+” character. Then, the “+”
will appear in lower right corner and center of the screen. Tap the
“+” as it appears to complete the initialization process.
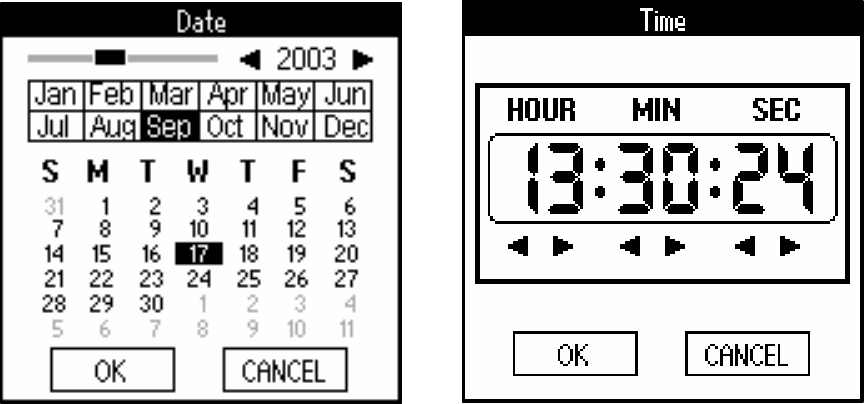
‧ Setting the time
Following the commands displayed, set the correct date and time
to complete the system set up.

- 8 -
3. Battery
The battery is a precision electronic product. Please use in the
proper manner to extend its life and preserve the continuity of data
stored in the terminal.
When shipped from the factory, the battery contains a minimal
amount of power. Before using for the first time, charge the battery
fully. An icon on the terminal’s desktop displays the amount of
remaining battery power. When the battery is almost completely
drained, the system will display a message that power is nearly
depleted. If the battery cannot be recharged before completely
losing all power, data stored in the terminal could be lost. In order to
protect data on the terminal, try to charge the unit as soon as
seeing the low power warning. As the battery used is a Lithium ion
type, it can also be charged when power is moderately low without
harming the battery. The charging status of the battery can be
determined from the terminal’s LED.
Flashing red LED: battery currently being charged
Constantly lit red LED: battery is fully charged
Note:
1. Please use the specialized charger and battery for this terminal
to avoid damaging the unit.
2. If the device is not used for long periods of time, please remove
the battery.
3. Backup battery provides only necessary power to keep data in
RAM when the main battery is being replaced. (Not for any other
operation of the Terminal)
Warning:
Do not leave the Terminal with out power supply for a long time to
prevent Data loss
- 9 -
4. Use and care of the touch panel
In order to maintain the quality and functioning of the terminal’s
touch screen, please carefully read the following:
‧ Do not place any objects on the screen.
‧ Use only the provided stylus with this screen. Do not use your
finger or any other pointed objects.
‧ Wipe the screen with a smooth, clean, anti-static cloth. Mild
household cleaner or water can also be used if needed. Do not
use alcohol or other industrial strength cleaning fluids.
Note: Do not pour water directly onto the screen. Cleaning should
be done only with a damp cloth, in order to avoid damaging the
terminal.
5. Care of the terminal
When using the terminal, take note of the following:
‧ The terminal is a precision electronic device. Avoid exposing
the terminal to the following conditions:
1. Electrostatic environments
2. Temperature range out of operating temperature: 0 ~ + 50 ℃℃
3. Overly humid environments
4. Quickly changing temperatures
5. Extremely dusty environments
‧ Do not disassemble the terminal in order to prevent damage
to the device.
‧ Avoid spilling any liquids on the terminal.
- 10 -
6. System reset
In the event an application hangs or there is no response from the
system, the system reset function can return the terminal to normal
operating state.
This terminal features two types of reset:
‧ Warm reset
Using the stylus, press the reset button found on the back of the
terminal. This action will not delete any data stored within the
device.
‧ Cold reset
When doing a cold reset, all data stored in the RAM will be
deleted, and the terminal will be restored to its original state when
delivered from the manufacturer. It is recommended to save a
copy of all data before performing the reset, as well as to backup
data regularly.
The reset is performed as follows:
1. Press and hold the ‘down’ arrow key.
2. Using the tool from the stylus, press and release the reset
button on the back of the terminal.
3. Wait for a message to appear on the display before
releasing the ‘down’ arrow key.
4. As instructed, press the ‘right’ arrow key to begin the cold
reset. Or press the ‘left’ arrow key to cancel the operation
and instead do a warm reset.
5. Then, follow the steps for initializing the touch screen, and
setting the date and time.
After performing the above steps, the cold reset is complete and
the terminal is returned to its original factory-direct state.
- 11 -
7. Desktop
The main system interface (desktop) is shown as figure below
when the terminal is turned on.
Click to display
menu
(“FN”+ “4”)
Battery Power
indicator
Click to switch the display
between time and date
Click to display group menu
and select the group of your
choice, or press the “home”
key to rotate through the
menu list
Display contents of
current application
- 12 -
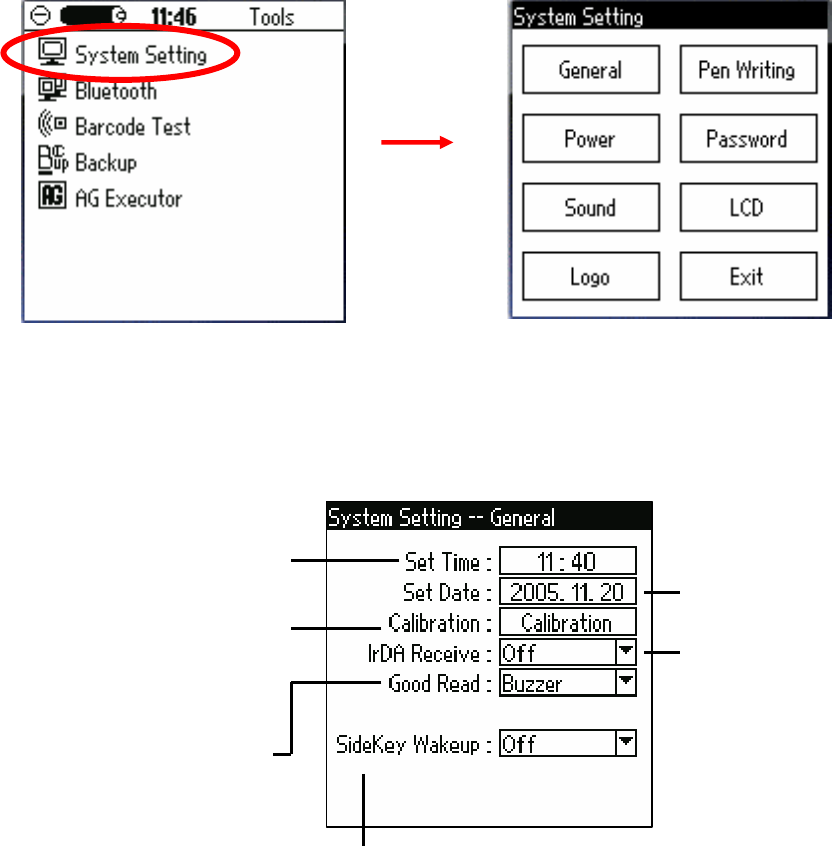
8. System setting
Enter [Tools] group and select [System Setting]. This program
allows you to adjust operating parameters according to the
terminal’s intended use.
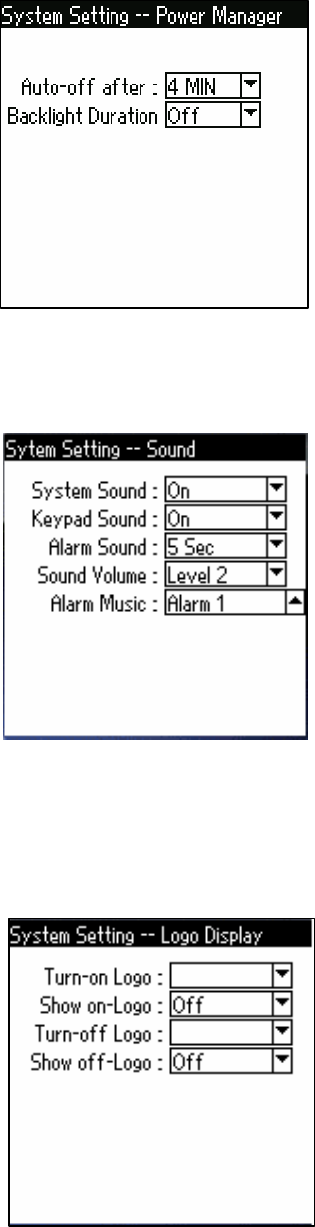
1. General
Set the system time Set the system
date
Recalibrate the touch
screen
Turn on and off the function to wake up the machine when device
is in suspend mode
Set the notify method
when a barcode is
scanned successfully
Turn on/off the
IrDA receive
function
- 13 -
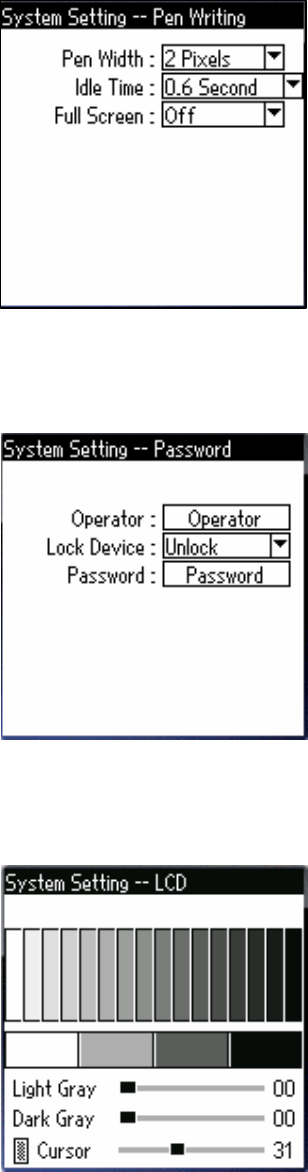
2. Power
3. Sound
4. Logo
Set the time before the device enters
suspend mode after its latest use
Set the time before turning off backlight
after the device’s latest use
Turn system sound on/off
Turn keypad and touch screen sound on/off
Set duration of the pre-set alarm
Adjust sound volume
Select music type for pre-set alarm
Select logo to be displayed when turning on
terminal
Enable/disable display of logo when turning
on terminal
Choose logo to be displayed when turning
off terminal
Enable/disable display of logo when turning
off terminal
- 14 -
5. Pen Writing
6. Password
7. LCD
Width of the pen tip
Idle time between lifting pen from the
screen and recognizing the character just
written
Enable/disable character recognition
function for full screen
Operator name
Enable or disable password protection
when turning terminal on
Set the password
Set the cursor speed and
the values of light and dark
gray for the four grayscale
settings
- 15 -
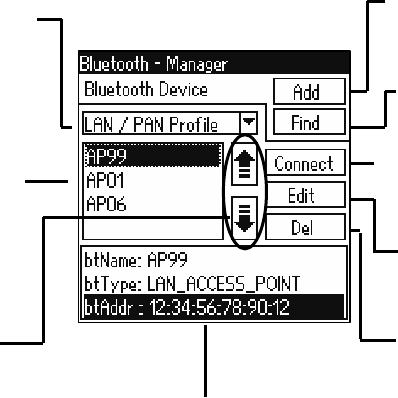
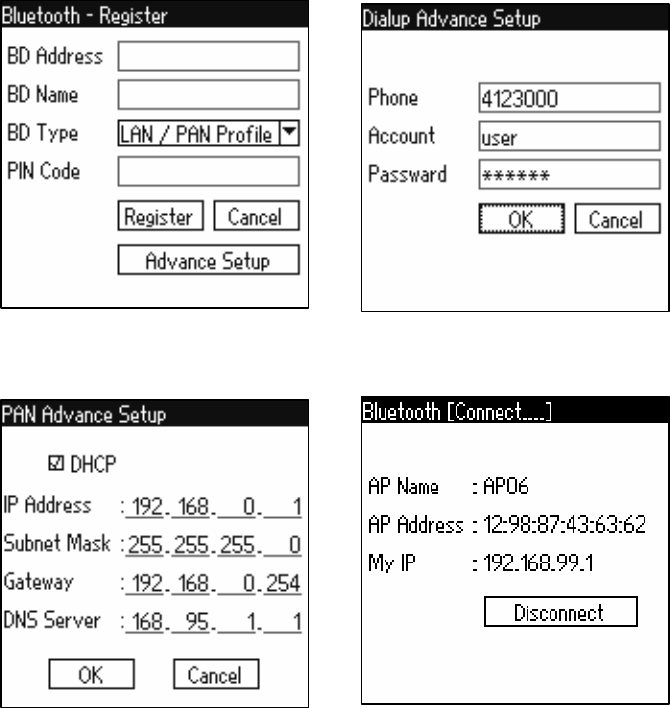
9. Bluetooth Network
This terminal is equipped with Bluetooth wireless connectivity.
Before using any wireless network related applications, use this
program to define the settings. You can also establish the
connection priority for several access points to more efficiently use
network resources.
Switch to the [Tools] group and run the Bluetooth network
application. Basic operations are shown in the image below.
1. User can connect to a Bluetooth device manually or with the
auto-connect function. Up/down arrows can be used to change
connection priority of the devices.
2. Every recognized Bluetooth device is stored according to its
profile type.
3. Details of each device, PIN access code, and advanced
connection parameters can be edited as shown in images 1, 2
and 3 below.
4. To make a connection, select the desired device and press the
“Connect” button. If the connection is successful, the screen
will display the view shown below (image 4) and the terminal’s
Bluetooth LED will flash intermittently. Press the “Home” button
Switch between
Bluetooth profiles
Recognized Bluetooth
devices: when using
the auto-connect
function, the next
available device is
automatically chosen
in this order
Up/down arrows:
Select a device,
then move it up or
down the priority
list by clicking the
arrows
System information
window
Manually add new
device
A
uto search for
available device
Connect to the
selected device
Edit parameters
of selected device
Delete selected device
- 16 -
to return to the main menu and run other network-related
applications, or press “Disconnect” to end the connection.
(1) (2)
(3) (4)
- 17 -
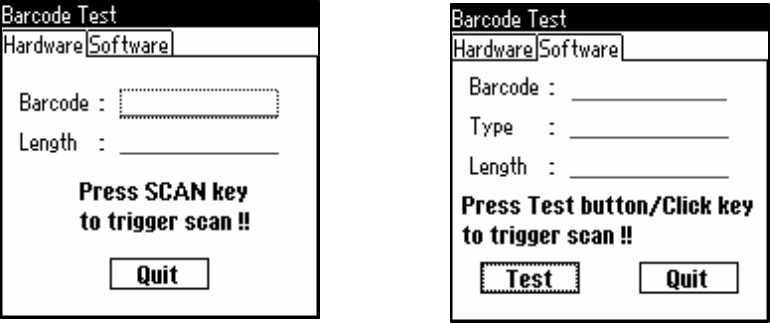
10. Barcode Test
This terminal features a built-in barcode test, which is accessed
from the [Tools] group.
In this application, there are two ways to trigger a barcode scan, via
either the hardware (image 1) or the software (image 2). Operation
is as follows:
1. Hardware trigger: with the object focus on “Barcode”, press the
“Scan” button to scan a barcode. This type of scan will stop for the
following reasons:
‧ Successful read of a barcode
‧ Scan key is released
‧ Scanning for several seconds without successful read
2. Software trigger: with the object focus on “Test”, press this object
or the “Click” button to scan a barcode. When using the software
trigger, the scan process cannot be interrupted; however, the scan
results will display the type of barcode read. This type of scan will
stop for the following reasons:
‧ Successful read of a barcode
‧ Scanning for several seconds without successful read
(
1
)
(
2
)
- 18 -
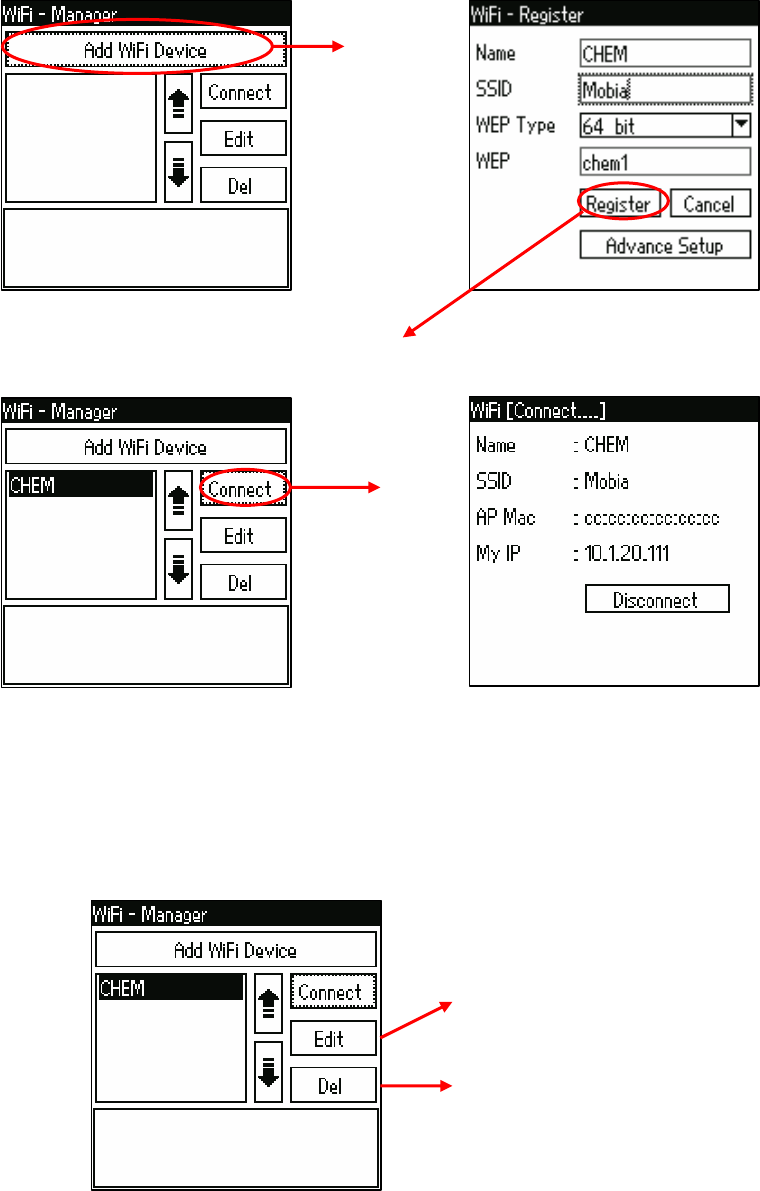
11. WiFi Manager (Optional)
This terminal is equipped with WiFi wireless connectivity. Before
using any wireless network related applications, use this program
to define the settings.
Click “Add” to register a
new WiFi device
Click “Register” when
finishing setting up
Click “Connect” to
make the connection
Successful connected
Modify the properties
of the WiFi device
Delete a registered
WiFi device
- 19 -
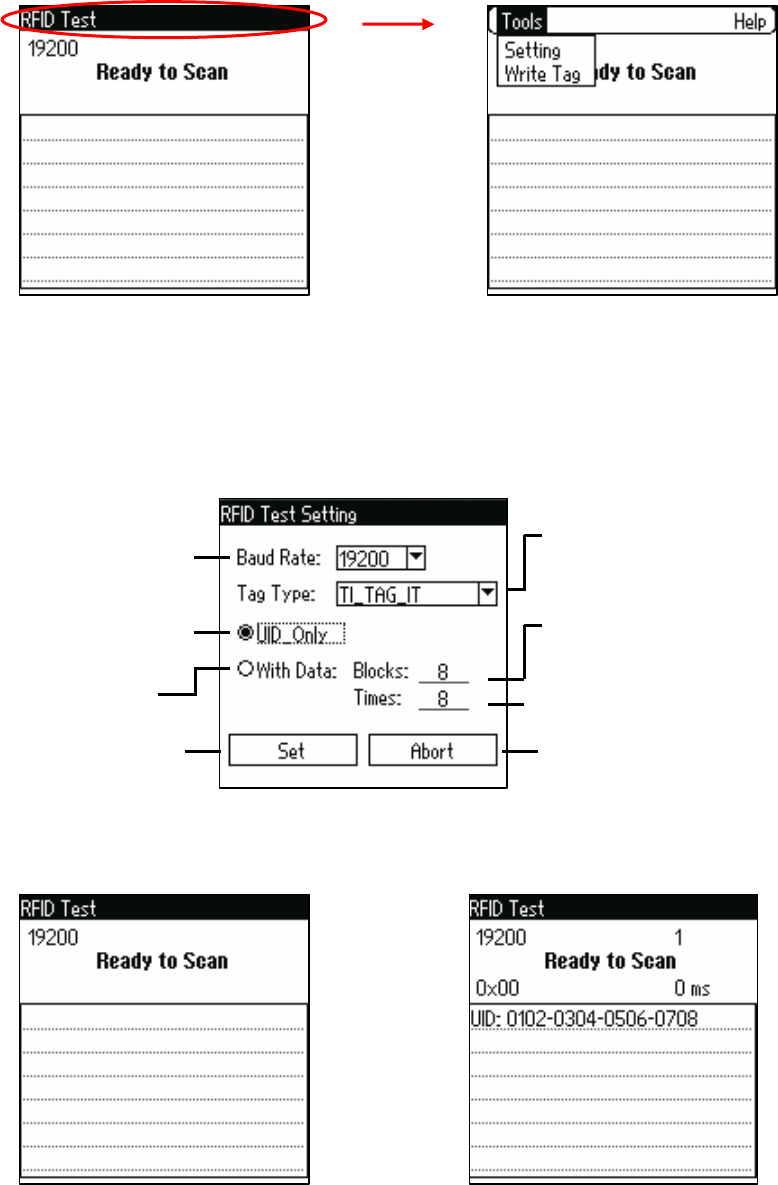
12. RFID Test (Optional)
The built-in HF13.56 MHz RFID module allows to read and write
RFID tags. Click the title bar to enter the setting.
(1) Setting
Set the Baud rate Select Tag type
Read User ID only
Read with Data Set how many times to read
Set the number of blocks
to read at one time
Save the setting Abort the action
Press “Scan” key to read UID successful read
- 20 -
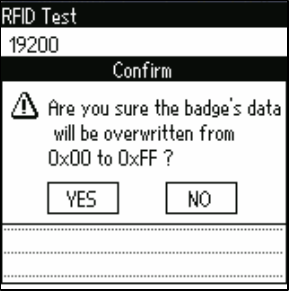
(2) Write Tag
Click “YES” to overwrite
the tag data
Click “NO” to cancel

- 21 -
13. Backup
The backup feature on the terminal allows a copy of data to be
stored on the NAND Flash, preventing data loss when power is low.
Switch to the [Tools] group and run the Backup application as
shown below:
[Backup]
1. Switch to the “Backup” function.
2. Select the type of data to backup and
click “Start”.
3. Enter the backup file name and click the
“”√” symbol to begin the backup.
4. The backup process will take some time
to complete. While backing up files, do
not run any other functions to ensure
data is not lost.
Function currently in Use
Pre-set as B:
(NAND Flash) Backup Information
Start the Backup or
Restore function How information is dis
p
la
y
ed
Switch between Backup / Restore
- 22 -
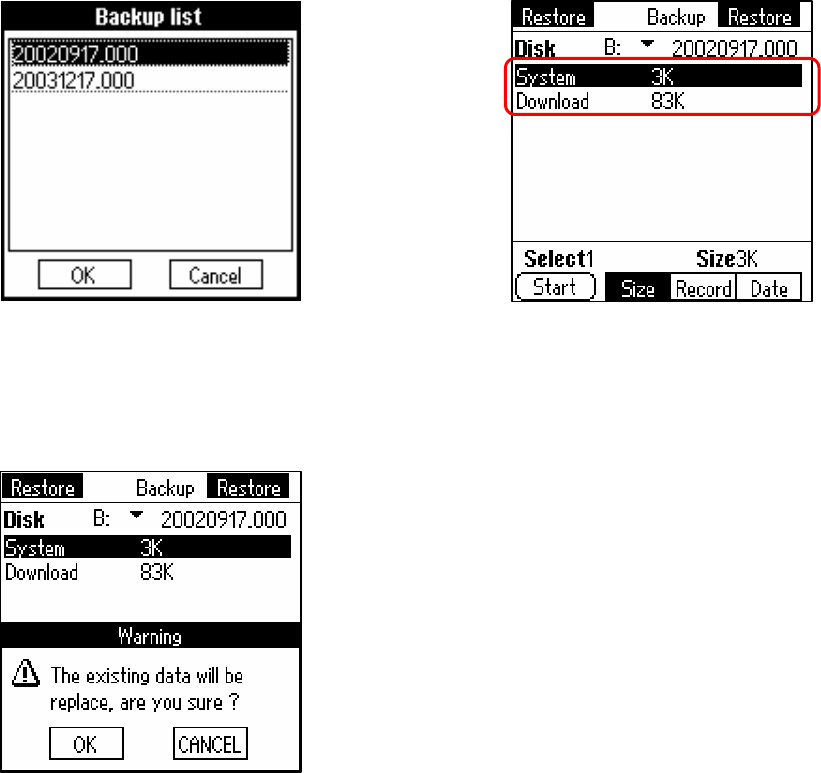
[Restore]
1. Switch to the “Restore” function.
2. The window shown below (image 1) will appear. Select the
file to be restored and click “OK”.
3. The window shown here (image 2) will appear, containing
information about the selected file. Select the data to be
restored, then click “Start”.
4. The system will ask you to reconfirm that you want to restore
data (image 3). Click “OK” to begin the process.
The Restore process will take some time to complete. While
backing up files, do not run any other functions to ensure data is not
lost.
(2)
(3)
(1)
- 23 -
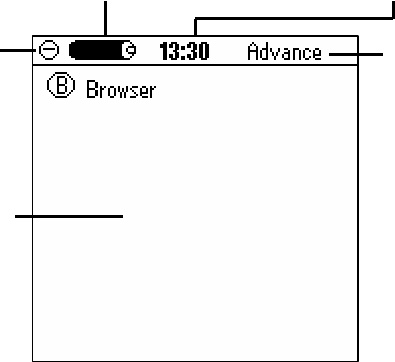
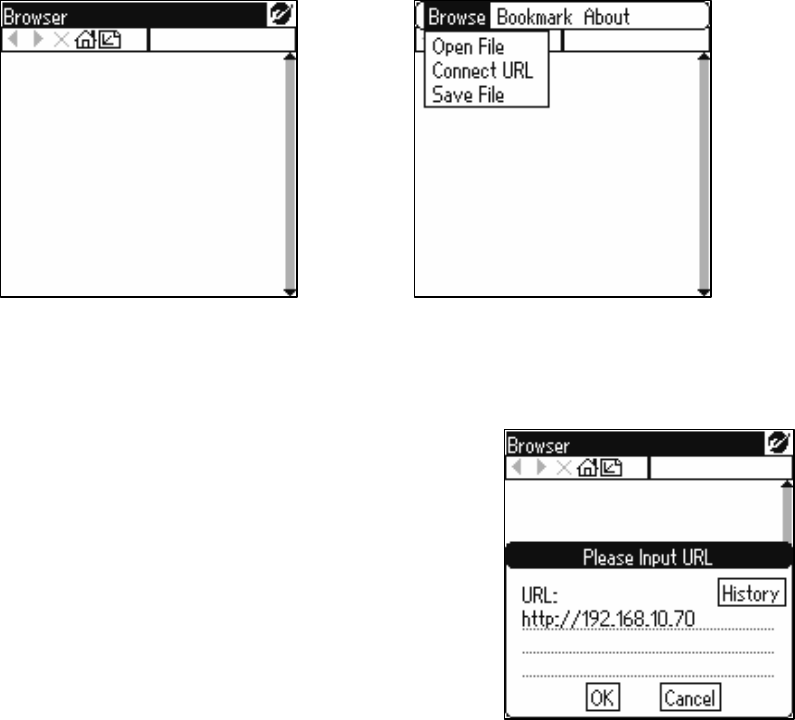
14. Using the Browser
This terminal features a built-in browser application which can be
used to send data to a server in real time. The browser functions as
follows:
1. Before starting the browser, first establish a network connection.
2. Enter the ‘Advance’ group and execute the browser application.
3. Click the word in reverse type at the top of the menu bar (image
1) or press the ‘Menu’ hot key (‘FN’ + ‘4’) to call the menu.
4. Select ‘Connect URL’ under ‘Browse’ in the menu bar (image 2).
5. The view shown here (image 3)
appears. Enter the URL of the desired
website and click ‘OK’. The URL can
also be chosen from the ‘History’,
which stores previously entered URLs.
(1) (2)
(3)

- 24 -
6. Next, the data from the URL address will appear on the browser
(image 4).
7. The URL currently being viewed can be set as the home page
or added as a bookmark by choosing ‘Set HomePage’ or ‘Add
Bookmark’ from ‘Bookmark’ in the menu bar (image 5).
Note: The browser only supports text-based web pages, and the
page must match the terminal’s resolution for optimum viewing.
(4) (5)