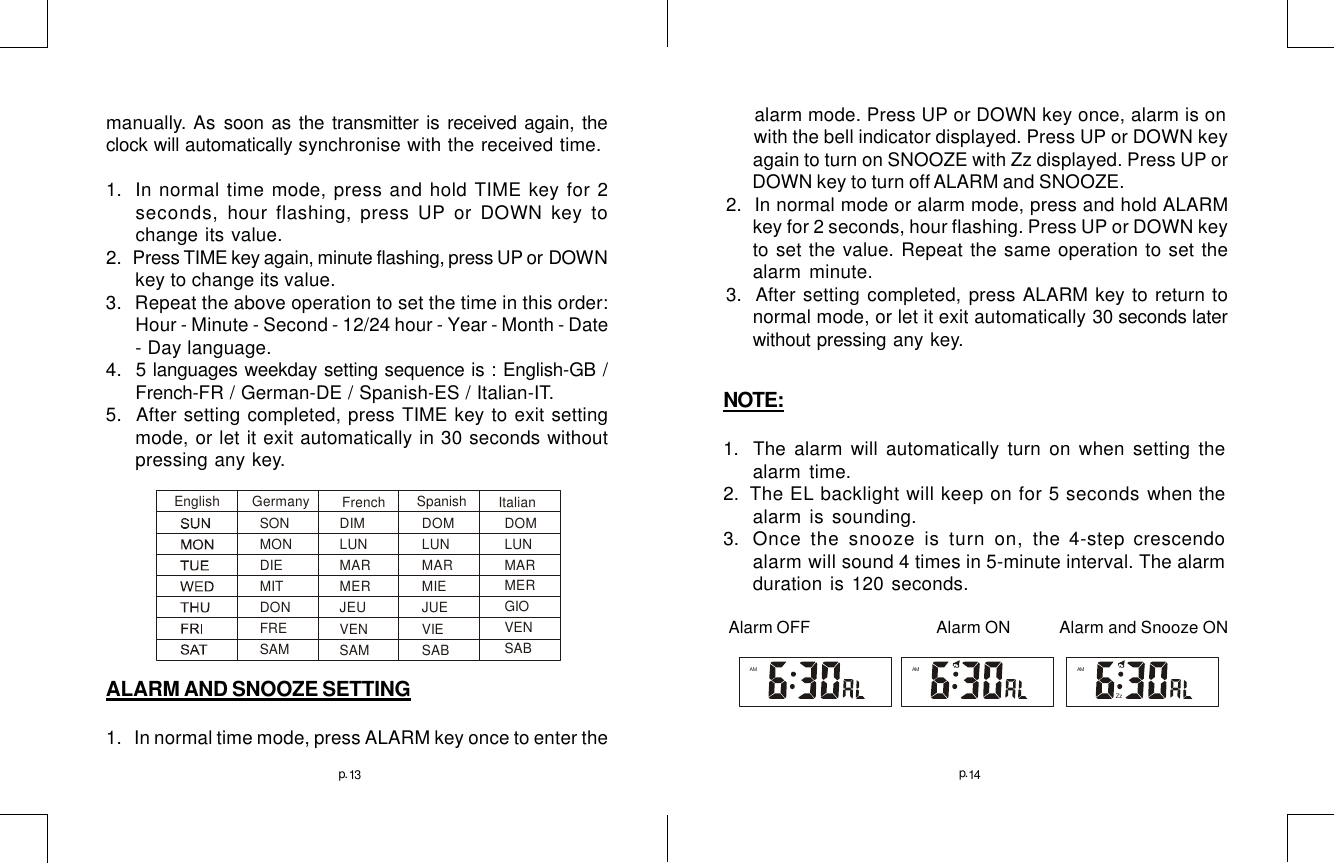
Chung s Electronic CHUNGS-05-004 Wireless Weather Station (Receiver) User Manual D 2005 D 1 2005PD 2 MANUAL 8xx

Chung's Electronic Co. Ltd. Wireless Weather Station (Receiver) D 2005 D 1 2005PD 2 MANUAL 8xx

User Manual

WIRELESS  WEATHER  STATIONC-8154USER’S INSTRUCTIONSP17815400030
1p.
2p.25p.The multifunctional weather station is equipped with manyfunctions providing thorough weather information to you.The receiver unit has a clear, easy-to-read display thatshows weather forecast, indoor temperature, pressure,moon phase, time and date, as well as the temperaturemeasured and transmitted by the sensor. It is able to re-ceive and display readings from up to 3 remote sensors.The receiver unit retains the minimum and maximumtemperatures and relative humidity readings measured atvarious locations. The 433 MHz technology means no wireinstallation is required and you can place the sensorsanywhere you like.With radio controlled function, the current time and dateare automatically synchronized with the time signaltransmitted from Frankfurt Germany (DCF77) / UK (MSF) /US (WWVB). The signal can cover a distance of about 1500km from the related transmitter.
24p.3p.FCC Remarks:This device complies with Part 15 of the FCC Rules.  Operation issubject to the following two conditions:  (1) This device may notcause harmful interference, and (2) This device must accept anyinterference received, including interference that may causeundesired operation.Warning:  Changes or modifications to this unit not expresslyapproved by the party responsible for compliance could void theuser’s authority to operate the equipment.NOTE:  This equipment has been tested and found to comply withthe limits for a Class B digital device, pursuant to Part 15 of the FCCRules.  These limits are designed to provide reasonable protectionagainst harmful interference in a residential installation.  Thisequipment generates, uses and can radiate radio frequency energyand, if not installed and used in accordance with the instructions,may cause harmful interference to radio communications.However, there is no guarantee that interference will not occur ina particular installation.  If this equipment does cause harmfulinterference to radio or television reception, which can bedetermined by turning the equipment off and on, the user isencouraged to try to correct the interference by one or more of thefollowing measures:l   Reorient or relocate the receiving antenna.l  Increase the separation between the equipment and receiver.l  Connect the equipment into an outlet on a circuit different fromthat to which the receiver is connected.lConsult the dealer or an experienced radio/TV technician forhelp.MAIN FEATURES:WEATHTER STATION:1234567891011
4p.23p.Temperature resolution:    0.1 ºC / 1ºF (above 0 ºC)                  1 ºC / ºF (below 0 ºC)RF transmission frequency: 433MHzNo of remote unit: up to 3 unitsRF transmission range: Maximum 30 metersTemperature sensing cycle: around 60 ~ 64secondsPressure measuring range: 800mb to 1050mbPressure sampling cycle: 15 minutesMoon phase scanner range: From 2000 to 2050Radio controlled signal: DCF77,  MSF,  WWVBPower:Main unit: 4.5 V, use 3 x AA 1.5V                                                                    alkaline batteryRemote sensor: 3 V, use 2 x AAA 1.5V                                                              alkaline batteryWeightMain unit: 650gmRemote sensor:                 53gmDimensionMain unit:                                                        306x224x24mmRemote sensor:                65(W)x93(H)x 27(D)mm1.   TIME:- Press it once to view the year.- Press and hold it for 2 seconds to enter the time setting  mode.2.    ALARM:- Press it to switch to alarm and temperature alarm.- In alarm mode, press and hold it for 2 seconds to enter  the alarm and pre-alarm setting mode.3.   UP:- In normal time mode, press it to choose between channel (1), (2) and (3).- In setting mode, press it to increase the setting value.- In alarm mode, press it to turn on/off alarm and snooze.4.   DOWN:- Press and hold it for 3 seconds, release, then press it  to change the weather indicator.- In alarm mode, press it to turn on/off alarm and snooze.5.    HISTORY:- Check the past 24 hours pressure records.6.   MAX/MIN :- Press it once to check max./ min. temperature record.- Press and hold it for 3 seconds to delete the max. and  min. record.7.     RESET: - Press it to set all values to factory value.
22p.5p.Fix the separate wall-mounting stand on the wall by screws.Push the stand of the clock upward, hang it on thewall-mounting stand by its recessed holes.For the transmitter, fix the wall-mount holder on the wall orsimply place it on the table.MAIN UNITIndoor temperature measuring range:       -5 ºC to +50 ºCRecommended operating range:      0 ºC to +45 ºCTemperature resolution:     0.1 ºC / 1ºF (above 0 ºC)                                    1 ºC / ºF (below 0 ºC)REMOTE SENSORTemperature measuring range:  -20 ºC to +60 ºCRecommended operating range:   -20 ºC to +55 ºC - In case of mal-function, the unit may be required to reset.8.   ºC / ºF:        - Switch between ºC / ºF.9.     mb/hPa . inHg: - Switch between mb/hPa or inHg.10.   TABLE STAND      -  use to stand on desktop11.    WALL-MOUNTING HOLE: - Use to support the main unit on wall.12.   WEATHER FORECAST WINDOW:                                                   SPECIFICATIONS - Displays the weather forecast indicator.13.   ATMOSPHERE PRESSURE WINDOW: - Displays the current atmospheric pressure data and indicates the last 24 hours pressure history.14.  CALENDAR WINDOW: -  Displays the date, year, day of the week and moon        phase.15.   CLOCK WINDOW:       - Displays the time radio controlled signal.
6p.21p.LOW BATTERY INDICATORWhen the battery does not have enough power to operatethe unit, the low battery indicator will appear to remind youto replace with new batteries.Transmitter’s low battery indicator    Transmitter’s low battery indicator     ( shows on transmitter )             ( shows on the main unit)Receiver’s low battery indicatorNOTE:Attention should be drawn to the environmental aspectsof battery disposalUSING THE TABLE STAND OR WALL MOUNTINGThe receiver has both desk-top and wall-mounting structure.16.    INDOOR TEMPERATURE AND HUMIDITY WINDOW:        - Shows the indoor temperature-trend, current  temperature,        or the maximum or minimum recorded temperature.17.    OUTDOOR TEMPERATURE :       - Shows the outdoor temperature-trend, current  temperature,        or the maximum or minimum recorded temperature.TRANSMITTER:123456789CH
20p.7p.Each press on the button will go back by an hour. Therecorded atmospheric values for the past 24 hours aredisplayed in the atmospheric pressure window.ABOUT THE MOON PHASEThe unit has 8 different moon phases. It will changeaccording to the lunar calendar.1.   New moon2.   Waxing crescent3.   First quarter4.   Waxing Gibbous5.   Full moon6.   Waning Gibbous7.   Last quarter8.   Waning crescent1 2 3 4 5 6 87 1.   LED indicator: - Flashes when the remote unit transmits a reading.2.   LCD: - Displays the current temperature   monitored by theremote unit .3.   Channel slide switch: - Assign the transmitter to Channel 1, Channel 2 or          Channel 3.4.    ºC / ºF: - Switches between ºC / ºF.5.   RESET:- Return all values to default value.6.   Battery compartment:- Accommodates 2 AAA size batteries.7.   Battery door8.   Wall mount holder:- Supports the transmitter in wall mounting.9.   Folding table stand
8p.19p.2.   The weather forecast is meant for next 12 to 24  hours. It      may not necessarily reflect the current situation.3.   The “Sunny” icon, when applies to nighttime, implies clear       weather.                      Slightly cloudy    Cloudy            Rainy                Storm                     SunnyPAST 24 HOURS PRESSURE RECORDSThe current and historical barometric pressure is shownon the atmospheric pressure window. The atmosphericpressure can be displayed in mb/hPa or inHg by selectingthe atmospheric pressure slide switch at the case back.Checking the pressure history for a particular hour durtheTENDENCY TENDENCYTENDENCY TENDENCYBEFORE YOU BEGINTRANSMITTER:1.  Remove the removable stand, unscrew the screws of theback cover and lift the cover off.2.    Insert 2 x AAA batteries into the battery compartment. Besure to insert them the right way round (see polarityinformation +/- in the battery compartment).3.   The receiver can receive humidity and temperature datafrom up to 3 transmitters. Assign the channel to eachtransmitter, Channel 1, 2 or 3 respectively by sliding theswitch besides the battery compartment.4.  Press the reset key of the transmitter individually by a pinto confirm the channel setting.5.  Select the temperature unit by sliding the ºC / ºF switchbesides the battery compartment.6.   Re-fix the battery door, and secure its screws evenly     and diagonally.NOTE:1.   Once the channel is assigned to a transmitter, you canonly change it by removing the batteries or resetting theunit.2.  Avoid placing the transmitter in direct sunlight, rain orsnow.
18p.9p.WEATHER TRENDThe temperature-trend, and pressure-trend indicators showthe trends of changes for the last few minutes. Arrows indi-cate a rising, steady or falling trend.WEATHER FORECASTThe built-in barometer can notice atmospheric pressurechanges. Based on the data collected, it can predict theweather condition in the forthcoming 12-24 hours. Theeffective covers area ranges from 30 to 50 km.NOTE:1.  The accuracy of a general pressure-based weatherforecast is about 70 to 75% , and therefore, cannot beheld responsible for any inconvenience caused by aninaccurate data.Arrow indicatorTemperature t rend Rising        Steady       FallingRising        Steady       FallingArrow indicatorPressure trend   WEATHER STATION:1.  Remove the battery door and insert 3 x AA batteries intothe battery compartment. Make sure you insert thebatteries the right way round (see polarity information +/-in the battery compartment).2.  Close the battery compartment.3.Press reset button to re-start the clock and it willsynchronise the channels of the transmitter automatically.NOTE:1. If extra transmitter is added in the future, press resetbutton to re-start the clock and synchronise the channelonce again.2. The building material and the position of thereceiver and   transmitter affect the effective range. Sotry various locations will help to obtain the best result.3.  Place the units away from metal objects and electricalappliances to minimize the interference. Position thereceiver and the transmitter within effectivetransmission range: 30 meters in usual circumstances.SETTING WEATHER INDICATORImportant: To get a better result of weather forecast
10p.17p.1.  Press MAX/MIN key to check Maximum temperature records.Press it twice to check the Minimum records. Press itthrice to exit.2.   Press and hold MAX/MIN key for 3 seconds to delete therecords.MAX. Temperature recordMIN. Temperature recordindicator, please set the weather forecast iconaccording to the current weather condition.1.  In normal time mode, press and hold DOWN key for 3seconds, weather indicator flashing.2.   Press DOWN key to change the weather indicator in thisorder:Slightly cloudy - Cloudy - Rainy - Storm - Sunny3.  Choose the suitable indicator according to the currentweather.4. Press TIME key to return to the normal mode or let itautomatically return to normal mode after 30 secondswithout pressing any keys.                        Slightly cloudy    Cloudy              Rainy  Storm       SunnyTENDENCY TENDENCYTENDENCY TENDENCY
11p. 16p.HOW TO READ INDOOR AND OUTDOORTEMPERATURE RECORDSChange the temperature unit by sliding ºC / ºF slide switchto ºC for Centigrade or ºF for Fahrenheit.If the readings go above or below the specified range, thereceiver and transmitter will keep show the last record withinthe operation range.NOTE:1. If no signals are received or the transmission isinterfered with, “---” appears in the display.2. Locate the clock in other position and make sure thetransmission is within the effective range of 30 metersapprox.3.  After several trials but in vain, please reset the clockthoroughly. Try out where your multifunctional alarmclock receives the signals best.CHECKING AND DELETING MAX./MIN.TEMPERATURE  REOCRDSNOTE:1.  Do not set the weather indicator when it is raining.     Raining will give unstable data.2.  Do not set the weather indicator in night time.RECEPTION OF RADIO CONTROLLED TIME SIGNALThe time and date are radio-controlled. The current timeand date are automatically synchronized with the timesignal transmitted from Frankfurt, Germany (DCF77), UK/(MSF) / US (WWVB) provided the device is within about of1500 km range of the transmitter.When used for the first time (after inserting the batteries orpressing RESET), the clock starts receiving time signalsand the reception display flashes.SIGNAL STRENGTH INDICATORThe signal indicator displays signal strength in 3 levels.Wave segment flashing means time signals are beingreceived. The signal quality could be classified intothreetypes:
15p. 12p.SETTING THE TEMPERATURE ALARMUse this function to be woken up at a determined period oftime earlier (1-30 minutes), if one of the transmitter’stemperatures is below -1ºC.1.  In normal time mode, press ALARM key twice to enterpre-alarm mode, press UP or DOWN key to turnpre-alarm on.2.   Press and hold the ALARM key for 2 seconds, pre-alarmtime flashing, press UP or DOWN key to change its value.NOTE:To activate pre-alarm function, ALARM must be on.Temperature alarm ON    Pre-alarm mode     Pre-alarm 15 minutesVIEWING THE CHANNELThe default channel is channel 1. In normal time mode,press UP key to view the channel from 1 to 3.AMPRE- ALPRE- ALNOTE:1.  Everyday the unit will automatically search for the time     signal at 2:00, 8:00, 14:00 and 20:00.2.  Always place the unit away from interfering sources suchas TV set, computer, etc.3.   Avoid placing the unit on or next to metal plate.4.  Closed area such as airport, basement, tower block orfactory is not recommended.5.  Do not start reception on a moving article such asvehicle or train.SELECT THE  TIME  ZONE (FOR  WWVB  VERSION  ONLY)The default time Zone is PACIFIC Zone, if  your location is outof Pacific, set the time zone as the following:In normal time mode, press DOWN button to change it:P=Pacific   M=Mountain   C=Central   E=EasternMANUAL TIME SETTINGIf you are out of the reach of the Radio Controlled Tranmsitteror if the reception is not reachable, the time can be set
13     alarm mode. Press UP or DOWN key once, alarm is on      with the bell indicator displayed. Press UP or DOWN key      again to turn on SNOOZE with Zz displayed. Press UP or      DOWN key to turn off ALARM and SNOOZE.2.   In normal mode or alarm mode, press and hold ALARMkey for 2 seconds, hour flashing. Press UP or DOWN keyto set the value. Repeat the same operation to set thealarm minute.3.  After setting completed, press ALARM key to return tonormal mode, or let it exit automatically 30 seconds laterwithout pressing any key.AMZzAMAM14p. p.NOTE:1. The alarm will automatically turn on when setting thealarm time.2.   The EL backlight will keep on for 5 seconds when thealarm is sounding.3.   Once the snooze is turn on, the 4-step crescendoalarm will sound 4 times in 5-minute interval. The alarmduration is 120 seconds. Alarm OFF              Alarm ON         Alarm and Snooze ONmanually. As soon as the transmitter is received again, theclock will automatically synchronise with the received time.1.  In normal time mode, press and hold TIME key for 2seconds, hour flashing, press UP or DOWN key tochange its value.2.  Press TIME key again, minute flashing, press UP or  DOWNkey to change its value.3.   Repeat the above operation to set the time in this order:Hour - Minute - Second - 12/24 hour - Year - Month - Date- Day language.4.  5 languages weekday setting sequence is : English-GB /French-FR / German-DE / Spanish-ES / Italian-IT.5.   After setting completed, press TIME key to exit settingmode, or let it exit automatically in 30 seconds withoutpressing any key.ALARM AND SNOOZE SETTING1.   In normal time mode, press ALARM key once to enter theSONMONDIEMITDONFRESAMDIMLUNMARMERJEUVENSAMDOMLUNMARMIEJUEVIESABDOMLUNMARMERGIOVENSABEnglish Germany French SpanishItalian

Navigation menu