CipherLab 2220 OMNIDIRECTIONAL PRESENATION SCANNER User Manual 2200 Scanner User Guide v1 00
CipherLab Co., Ltd. OMNIDIRECTIONAL PRESENATION SCANNER 2200 Scanner User Guide v1 00
UserManual.wiki
>
CipherLab
>
2220 User Manual
User manual.pdf
Navigation menu
Upload a User Manual
Namespaces
Wiki Guide
HTML
PDF
Info
Views
User Manual
Discussion / Help
Navigation


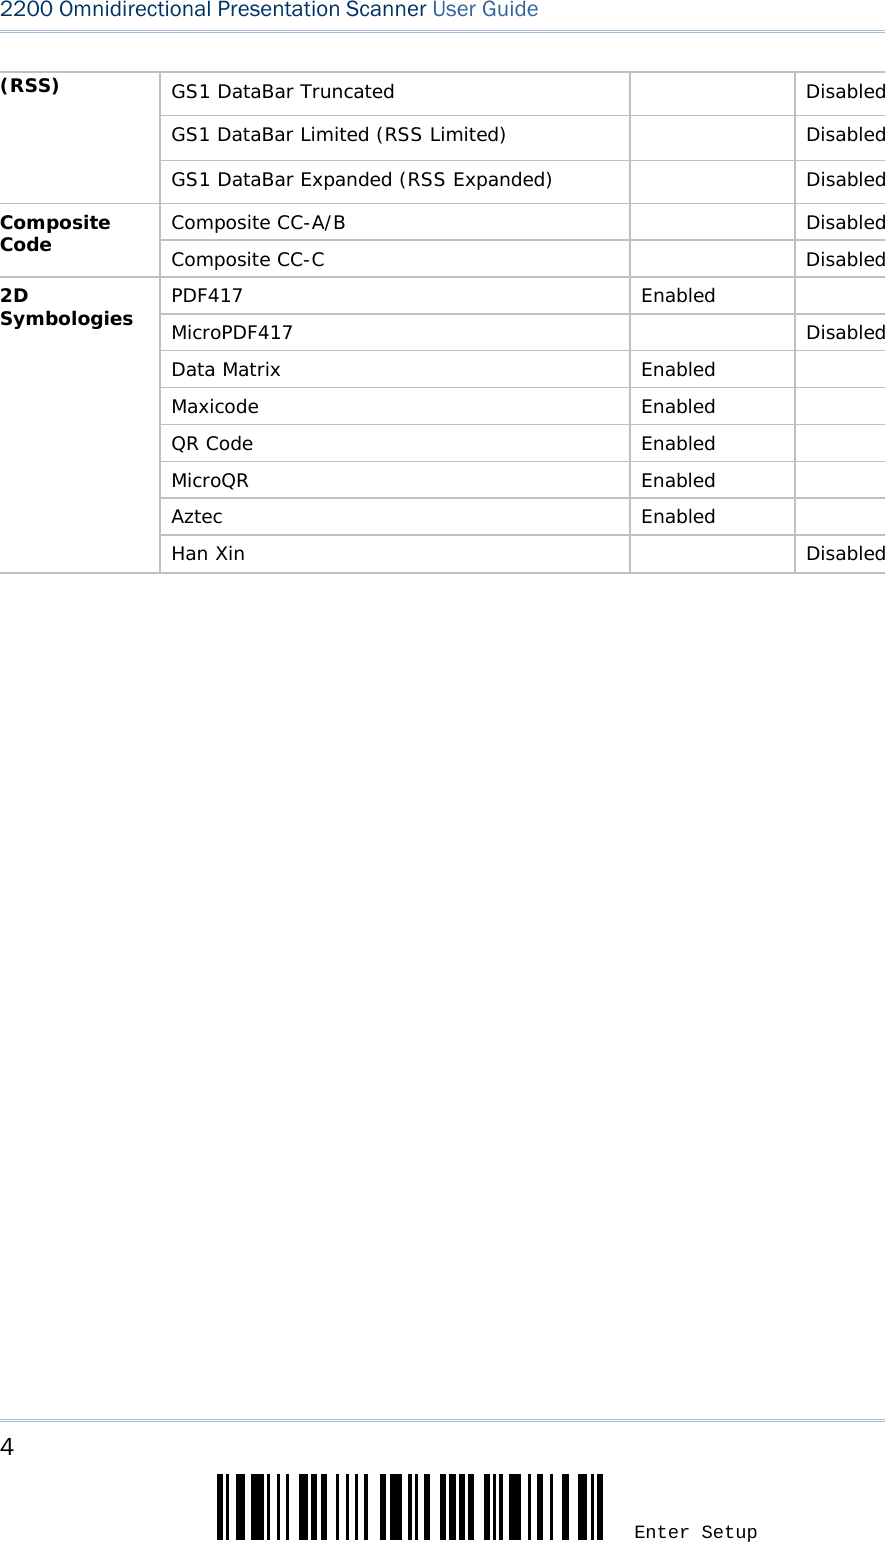
![3 Update 錯誤! 使用 [常用] 索引標籤將 Heading 1 套用到您想要在此處顯示的文字。 SYMBOLOGIES SUPPORTED Most of the popular barcode symbologies are supported, as listed below. Each can be individually enabled or disabled. The scanner will automatically discriminate and recognize all the symbologies that are enabled. Refer to Chapter 3 錯誤! 找不到參照來源。 for details of each symbology. Symbologies Supported: Enable/Disable Default Codabar Enabled Code 93 Enabled MSI Disabled Plessey Disabled Telepen Disabled Code 128 Code 128 Enabled GS1-128 (EAN-128) Enabled ISBT 128 Enabled Code 2 of 5 Industrial 25 Enabled Interleaved 25 Enabled Matrix 25 Disabled Code 3 of 9 Code 39 Enabled Italian Pharmacode Disabled French Pharmacode Disabled EAN/UPC EAN-8 Enabled EAN-8 Addon 2 Disabled EAN-8 Addon 511109951 Disabled EAN-13 Enabled EAN-13 & UPC-A Addon 2 Disabled EAN-13 & UPC-A Addon 5 Disabled ISBN Disabled UPC-E0 Enabled UPC-E1 Disabled UPC-E Addon 2 Disabled UPC-E Addon 5 Disabled UPC-A Enabled Code 11 Disabled GS1 DataBar GS1 DataBar Omnidirectional (RSS-14) Disabled](https://usermanual.wiki/CipherLab/2220/User-Guide-3682224-Page-11.png)
![7 Update 錯誤! 使用 [常用] 索引標籤將 Heading 1 套用到您想要在此處顯示的文字。 DEFAULT SETTINGS SAVE USER SETTINGS AS DEFAULTS For the scanner to keep the customized settings as user defaults, have it read the “Save as User Defaults” barcode. This is a normal setup barcode, and the scanner will respond with two beeps (low-high tone). After reading the “Update” barcode, the current settings will be saved as user defaults. Save as User DefaultsRESTORE USER DEFAULTS For the scanner to restore the user defaults saved earlier, have it read the “Restore User Defaults” barcode. This is a normal setup barcode, and the scanner will respond with two beeps (low-high tone). After reading the “Update” barcode, all the parameters of the scanner will return to their customized values. Restore User DefaultsRESTORE SYSTEM DEFAULTS For the scanner to restore the factory defaults, have it read the “Restore System Defaults” barcode. This is a normal setup barcode, and the scanner will respond with two beeps (low-high tone). After reading the “Update” barcode, all the parameters of the scanner will return to their default values. Restore System DefaultsNote: The system default value (if there is) for each setting is indicated by an asterisk “*”.](https://usermanual.wiki/CipherLab/2220/User-Guide-3682224-Page-15.png)
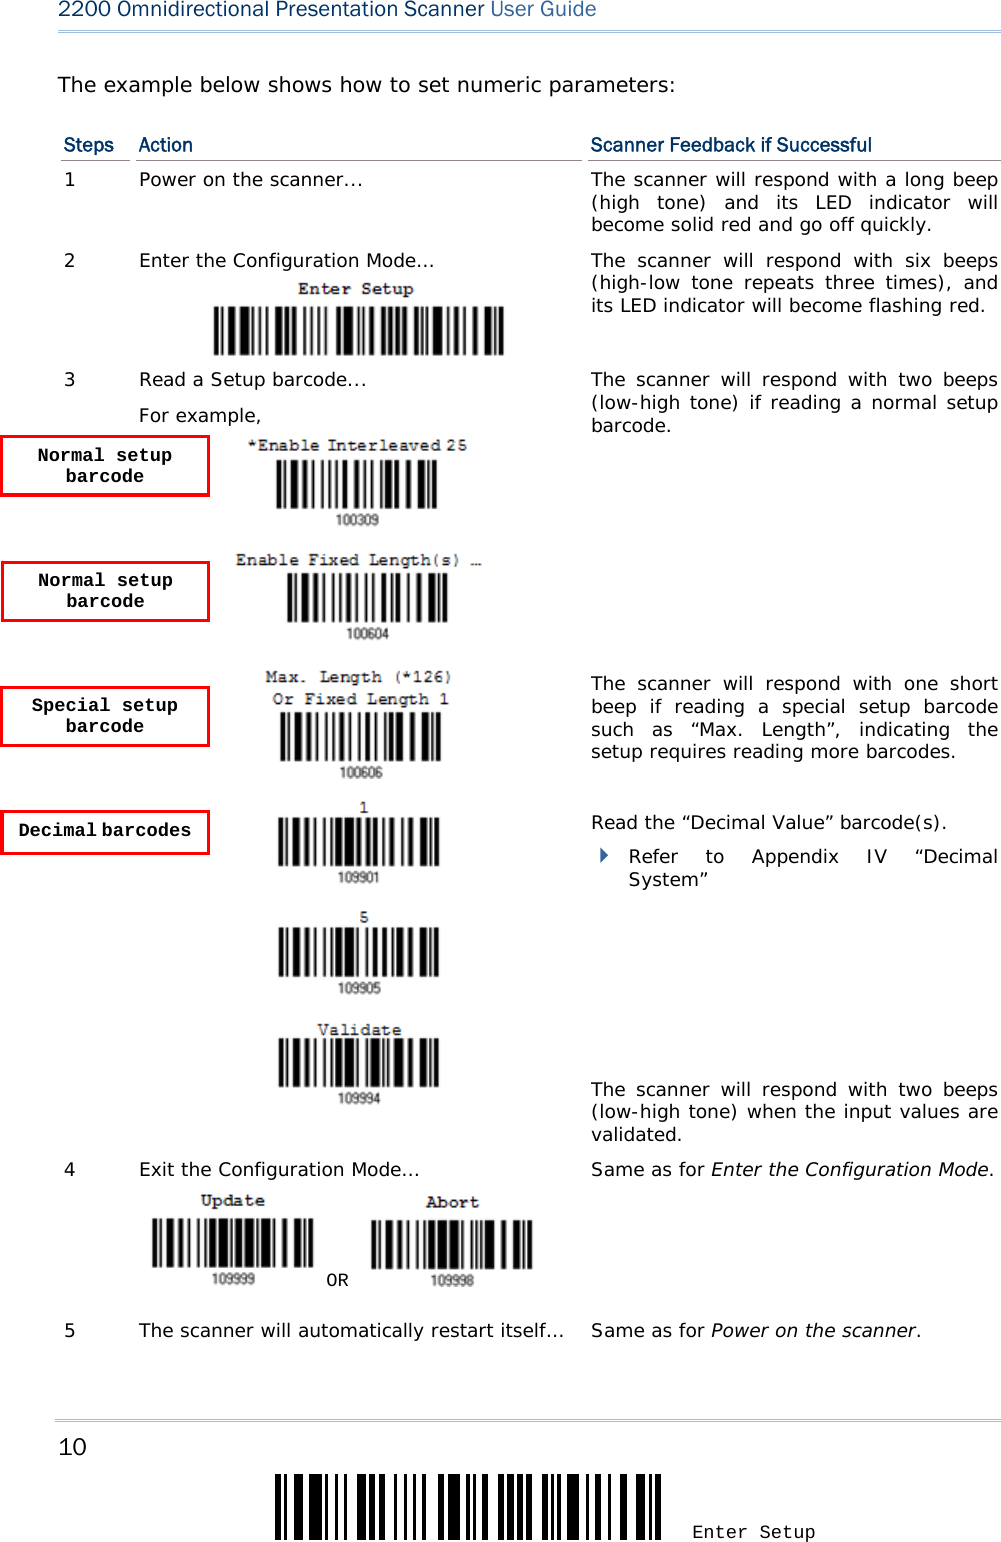
![9 Update 錯誤! 使用 [常用] 索引標籤將 Heading 1 套用到您想要在此處顯示的文字。 The example below shows how to save settings as “User Default” to restore user defaults later: Steps Action Scanner Feedback if Successful 1 Power on the scanner… The scanner will respond with a long beep (high tone) and its LED indicator will become solid red and go off quickly. 2 Enter the Configuration Mode… The scanner will respond with six beeps (high-low tone repeats three times), and its LED indicator will be flashing red. 3 Read a Setup barcode… For example, The scanner will respond with two beeps (low-high tone) if reading a normal setup barcode. 4 Exit the Configuration Mode… OR Same as for Enter the Configuration Mode. 5 The scanner will automatically restart itself… Same as for Power on the scanner. * When any configuration error occurs... The scanner will respond with one long beep (low tone).](https://usermanual.wiki/CipherLab/2220/User-Guide-3682224-Page-17.png)
![11 Update 錯誤! 使用 [常用] 索引標籤將 Heading 1 套用到您想要在此處顯示的文字。 The example below shows how to set string parameters: Steps Action Scanner Feedback if Successful 1 Power on the scanner... The scanner will respond with a long beep (high tone) and its LED indicator will become solid red and go off quickly. 2 Enter the Configuration Mode… The scanner will respond with six beeps (high-low tone repeats three times), and its LED indicator will become flashing red. 3 Read a Setup barcode... For example, The scanner will respond with one short beep if reading a special setup barcode such as “Prefix Code”, indicating the setup requires reading more barcodes. When “Keyboard Wedge” or “USB HID” is configured for interface, Key Type and Key Status will then become applicable. Decide whether or not to change key status when “Normal Key” is selected for Key Type. Refer to Appendix III Read the “Hexadecimal Value” barcodes for the desired character string. For example, read “2” and “B” for the scanner to prefix the character “+”. Refer to Appendix IV “Hexadecimal System” The scanner will respond with two beeps (low-high tone) when the input values are validated. 4 Exit the Configuration Mode… OR Same as for Enter the Configuration Mode. 5 The scanner will automatically restart itself… Same as for Power on the scanner. Special setup barcodes Hexadecimal barcodes](https://usermanual.wiki/CipherLab/2220/User-Guide-3682224-Page-19.png)
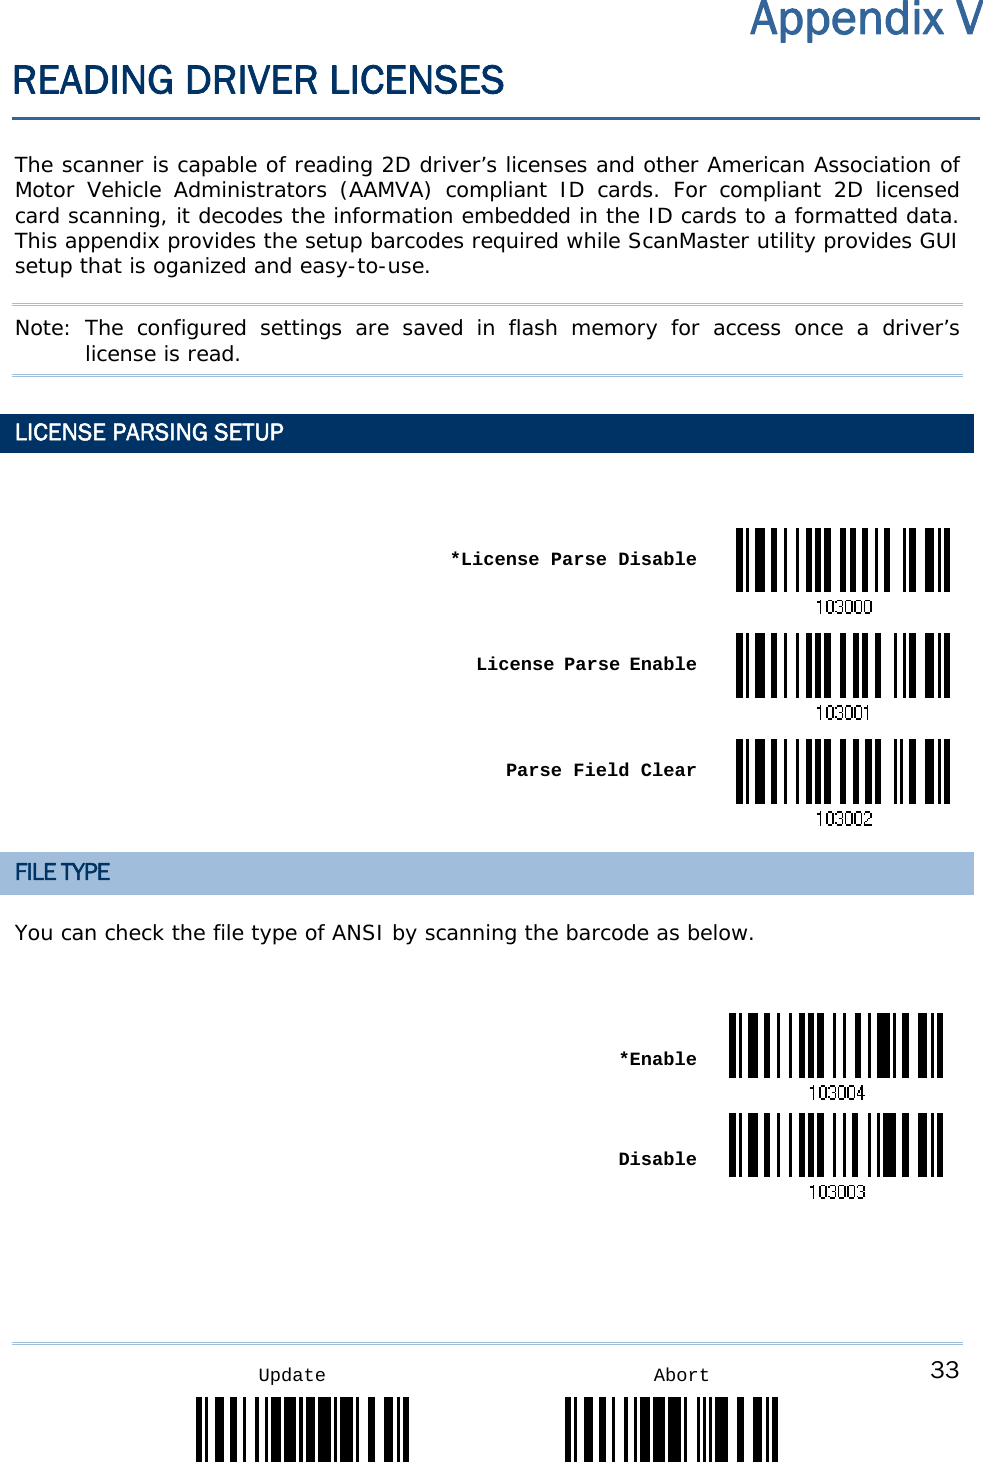
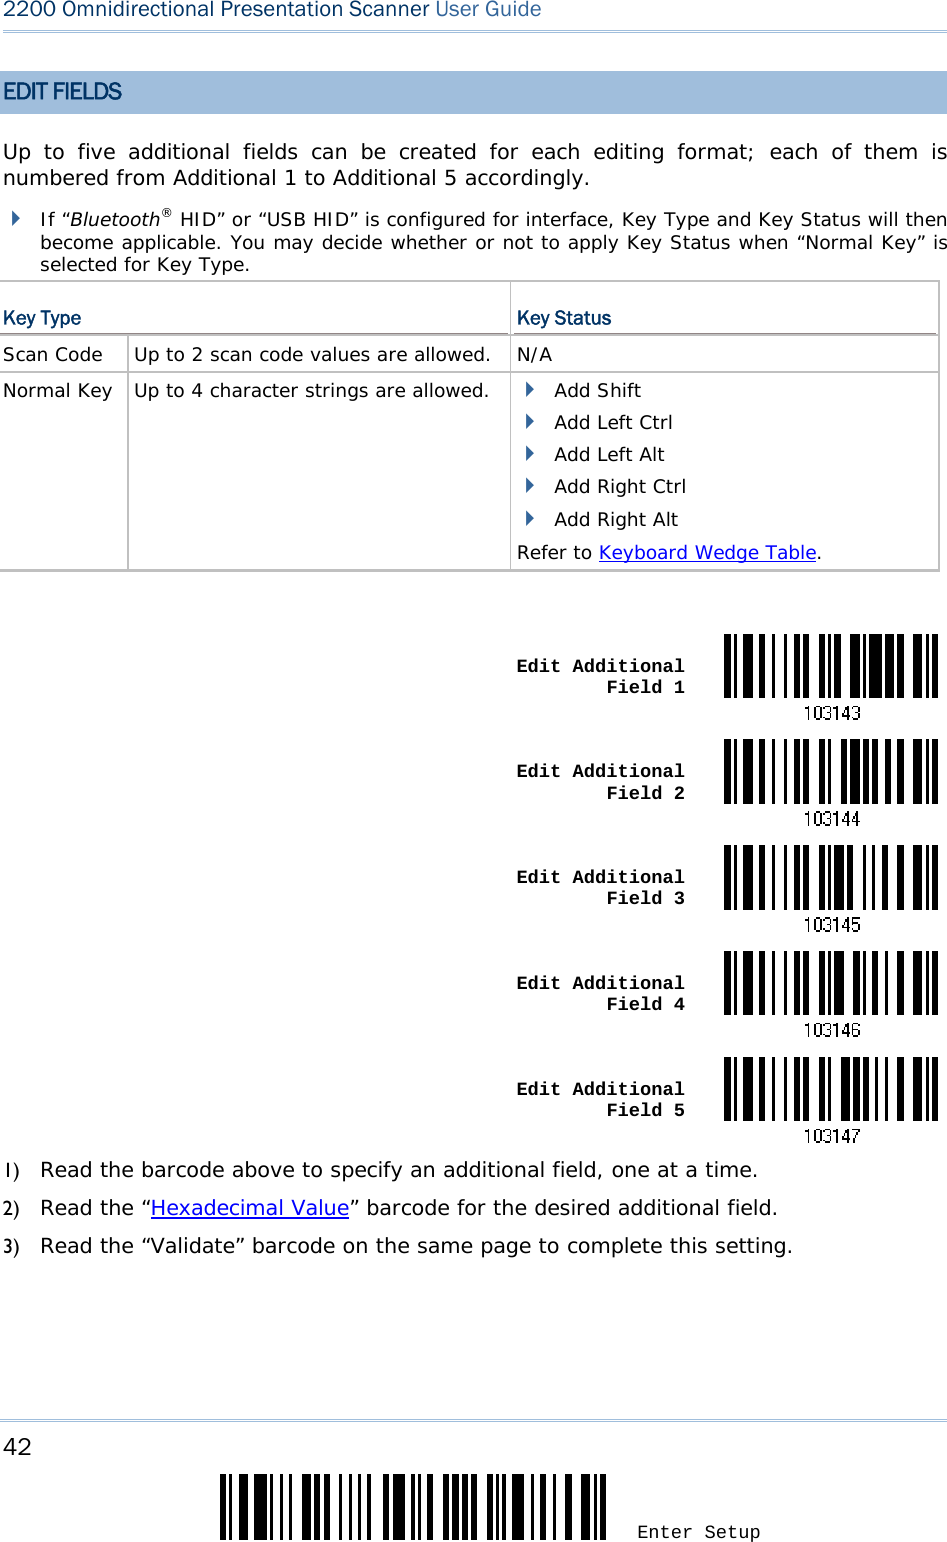
![13 Update 錯誤! 使用 [常用] 索引標籤將 Heading 1 套用到您想要在此處顯示的文字。 Lists settings regarding Editing Format 1 (1/2) List Page 11Lists settings regarding Editing Format 1 (2/2) List Page 12Lists settings regarding Editing Format 2 (1/2) List Page 13Lists settings regarding Editing Format 2 (2/2) List Page 14Lists settings regarding Editing Format 3 (1/2) List Page 15Lists settings regarding Editing Format 3 (2/2) List Page 16Lists settings regarding Editing Format 4 (1/2) List Page 17Lists settings regarding Editing Format 4 (2/2) List Page 18Lists settings regarding Editing Format 5 (1/2) List Page 19Lists settings regarding Editing Format 5 (2/2) List Page 20Lists settings of Driver License parsing List Page 22](https://usermanual.wiki/CipherLab/2220/User-Guide-3682224-Page-21.png)
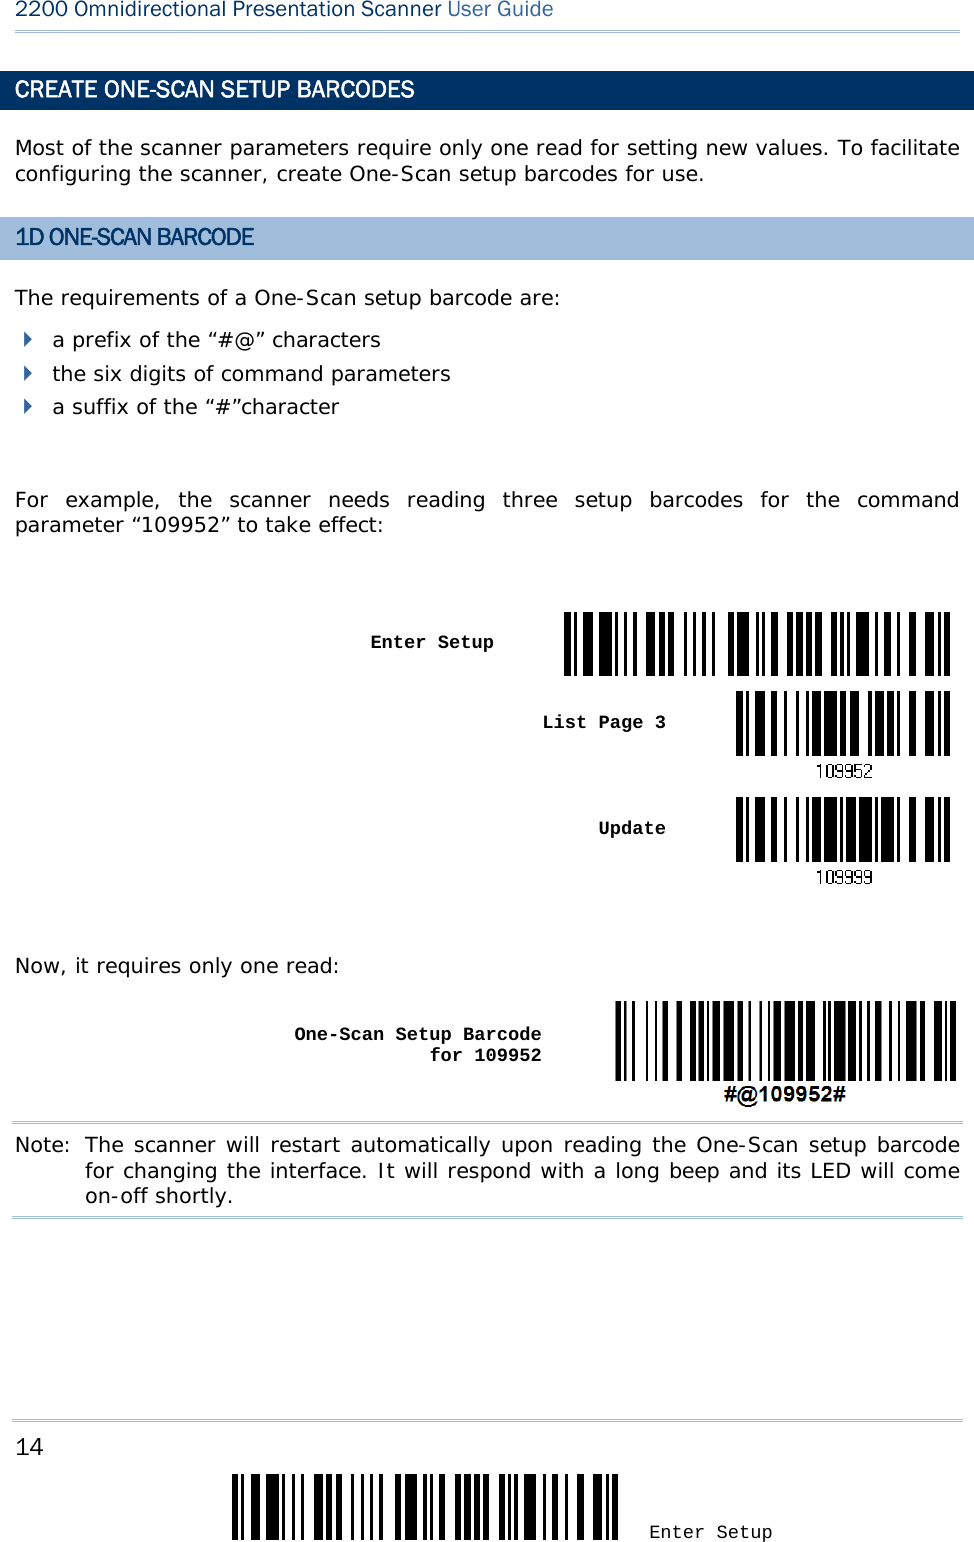
![15 Update 錯誤! 使用 [常用] 索引標籤將 Heading 1 套用到您想要在此處顯示的文字。 2D ONE-SCAN BARCODE Users can also scan a single 2D barcode combining with a series of serial commands to configure the scanner. For example, if you want to change the suffix character to ‘#’, you will need to input the serial commands in sequence as follows (underlining the digits is to make them more readable): #@CipherLab101231109902109903109994 Command Purpose #@CipherLab Enter Setup 101231 Configure suffix 109902 Give the first hexadecimal digit of 0x23 109903 Give the second hexadecimal digit of 0x23 for taking ‘#’ as the suffix 109994 Validate the settings The serial commands above can be combined to form a single 2D barcode: 2D One-Scan Setup Barcode for configuring suffix](https://usermanual.wiki/CipherLab/2220/User-Guide-3682224-Page-23.png)

![20 Enter Setup 2200 Omnidirectional Presentation Scanner User Guide 4) Run the download utility “ProgLoad.exe” on the computer. Kernel Program User Program K250x_V*.shx STD250x_V*.shx For the communication settings, select “RS-232” and the correct COM port for RS-232 or USB Virtual COM interface. For RS-232, select 115200 bps for baud rate; for USB Virtual COM, ignore the baud rate setting. For the file option, click [Browse] to select the target file for firmware update. Click [OK]. 5) After upgrading kernel, you will need to restart the scanner manually. After upgrading the user program, the scanner will automatically restart itself once the download is completed successfully. Note: The output interface remains unchanged as specified in step 2 (= RS-232 or USB Virtual COM). For RS-232, the baud rate setting is still 115200 bps!](https://usermanual.wiki/CipherLab/2220/User-Guide-3682224-Page-28.png)
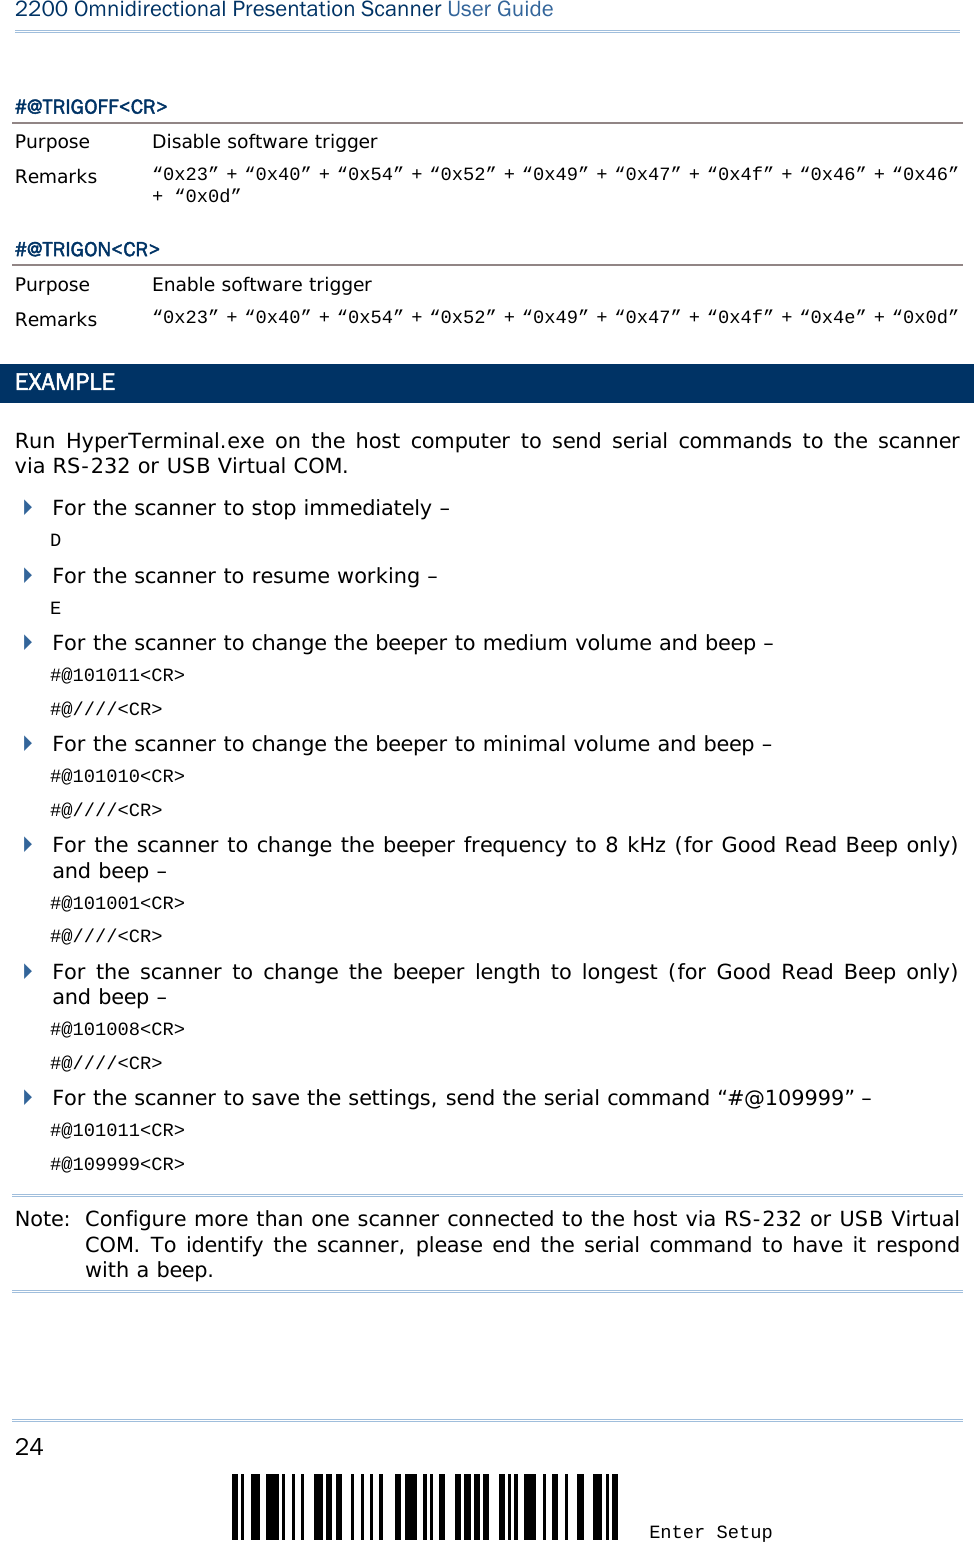
![21 Update Appendix I 錯誤! 使用 [常用] 索引標籤將 Heading 1 套用到您想要在此處顯示的文字。USING USB VIRTUAL COM 1) Connect the USB cable between the scanner and the computer. If using USB Virtual COM for the first time, you must install its driver beforehand. 2) For Windows platform, read the following barcodes in sequence to configure the scanner to use USB VCOM_CDC as download interface. Enter Setup Activate Direct USB VCOM_CDC Update For non-Windows platform, read the following barcodes in sequence to configure the scanner to use USB Virtual COM as download interface. Enter Setup Activate Direct USB VCOM Update 3) Read the following barcodes in sequence for the scanner to enter the download mode. The scanner will respond with beeps to indicate it is ready for downloading. Enter Setup Download 4) Run the download utility “ProgLoad.exe” on the computer.](https://usermanual.wiki/CipherLab/2220/User-Guide-3682224-Page-29.png)
![22 Enter Setup 2200 Omnidirectional Presentation Scanner User Guide Kernel Program User Program K250x_V*.shx STD250x_V*.shx For the communication settings, select “RS-232” and the correct COM port for RS-232 or USB Virtual COM interface. For RS-232, select 115200 bps for baud rate; for USB Virtual COM, ignore the baud rate setting. For the file option, click [Browse] to select the target file for firmware update. Click [OK]. 5) After upgrading kernel, you will need to restart the scanner manually. After upgrading the user program, the scanner will automatically restart itself once the download is completed successfully. Note: The output interface remains unchanged as specified in step 2 (= RS-232 or USB Virtual COM). For RS-232, the baud rate setting is still 115200 bps!](https://usermanual.wiki/CipherLab/2220/User-Guide-3682224-Page-30.png)
![25 Update “Apply” Special Keyboard 0 1 2 3 4 5 6 7 8 0 F2 SP 0 @ P ` p 1 INS F3 ! 1 A Q a q 2 DLT F4 " 2 B R b r 3 Home F5 # 3 C S c s 4 End F6 $ 4 D T d t 5 Up F7 % 5 E U e u 6 Down F8 & 6 F V f v 7 Left F9 ' 7 G W g w 8 BS F10 ( 8 H X h x 9 HT F11 ) 9 I Y i y A LF F12 * : J Z j z B Right ESC + ; K [ k { C PgUp Exec , < L \ l | D CR CR* - = M ] m } E PgDn . > N ^ n ~ F F1 / ? O _ o Dly ENTER* Note: (1) ~: Digits of numeric keypad. (2) CR*/ENTER*: ENTER key on the numeric keypad. Appendix III KEYBOARD WEDGE TABLE](https://usermanual.wiki/CipherLab/2220/User-Guide-3682224-Page-33.png)
![26 Enter Setup 2200 Omnidirectional Presentation Scanner User Guide “Bypass” Special Keyboard 0 1 2 3 4 5 6 7 8 0 SP 0 @ P ` p 1 ! 1 A Q a q 2 " 2 B R b r 3 # 3 C S c s 4 $ 4 D T d t 5 % 5 E U e u 6 & 6 F V f v 7 ' 7 G W g w 8 BS ( 8 H X h x 9 HT ) 9 I Y i y A LF * : J Z j z B ESC + ; K [ k { C , < L \ l | D CR - = M ] m } E . > N ^ n ~ F / ? O _ o Dly Note: (1) ~: Digits of numeric keypad. (2) CR*/ENTER*: ENTER key on the numeric keypad.](https://usermanual.wiki/CipherLab/2220/User-Guide-3682224-Page-34.png)
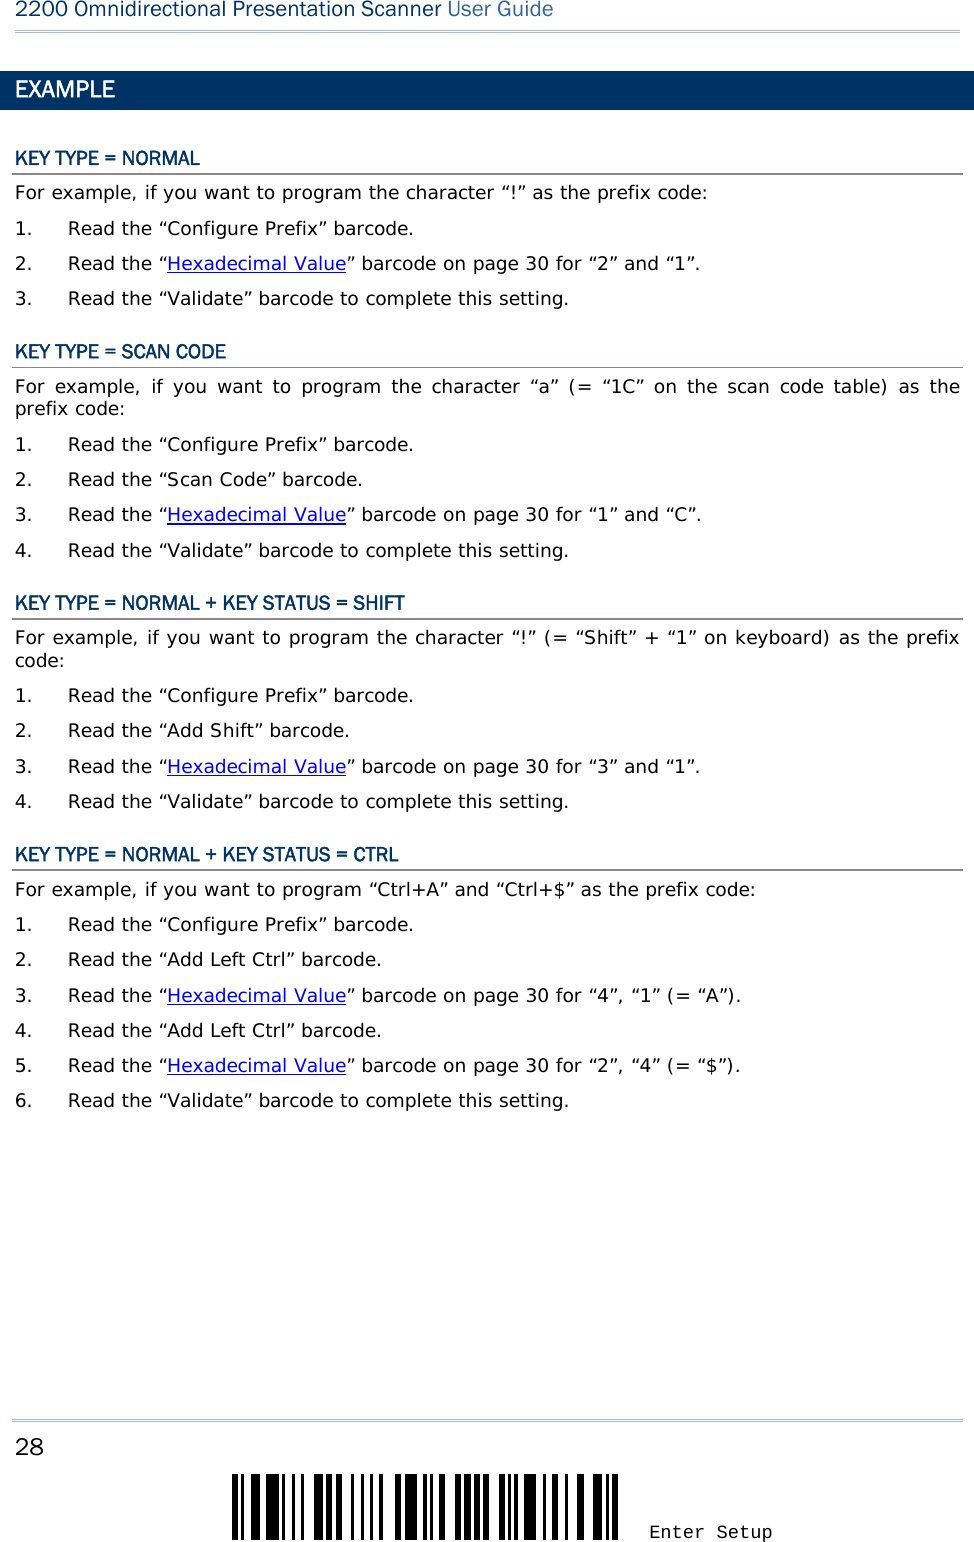
![27 Update Appendix III 錯誤! 使用 [常用] 索引標籤將 Heading 1 套用到您想要在此處顯示的文字。 KEY TYPE & STATUS KEY TYPE If “Keyboard Wedge” or “USB HID” is configured for interface, Key Type and Key Status will then become applicable. *Normal Scan CodeKEY STATUS Decide whether or not to change key status when “Normal Key” is selected for Key Type. Add Shift Add Left Ctrl Add Right Ctrl Add Left Alt Add Right Alt](https://usermanual.wiki/CipherLab/2220/User-Guide-3682224-Page-35.png)
![31 Appendix IV 錯誤! 使用 [常用] 索引標籤將 Heading 1 套用到您想要在此處顯示的文字。 Update AbortValidate the Values ASCII TABLE 0 1 2 3 4 5 6 7 0 DLE SP 0 @ P ` p 1 SOH DC1 ! 1 A Q a q 2 STX DC2 " 2 B R b r 3 ETX DC3 # 3 C S c s 4 EOT DC4 $ 4 D T d t 5 ENQ NAK % 5 E U e u 6 ACK SYN & 6 F V f v 7 BEL ETB ' 7 G W g w 8 BS CAN ( 8 H X h x 9 HT EM ) 9 I Y i y A LF SUB * : J Z j z B VT ESC + ; K [ k { C FF FS , < L \ l | D CR GS - = M ] m } E SO RS . > N ^ n ~ F SI US / ? O _ o DEL Validate](https://usermanual.wiki/CipherLab/2220/User-Guide-3682224-Page-39.png)
![35 Appendix V 錯誤! 使用 [常用] 索引標籤將 Heading 1 套用到您想要在此處顯示的文字。 Update Abort Mailing Address Postal Code Home Address Line1 Home Address Line2 Home Address City Home Address State Home Address Postal Code License ID Number License Class License Restrictions License Endorsements Height (Feet and/or Inches) Height (Centimeters)](https://usermanual.wiki/CipherLab/2220/User-Guide-3682224-Page-43.png)
![37 Appendix V 錯誤! 使用 [常用] 索引標籤將 Heading 1 套用到您想要在此處顯示的文字。 Update Abort Nonresident Customer ID Social Security Number AKA Birth Date AKA Social Security Name AKA Full Name AKA Last Name AKA First Name AKA Middle Name/Initial AKA Name Suffix AKA Name Prefix Weight Range](https://usermanual.wiki/CipherLab/2220/User-Guide-3682224-Page-45.png)
![39 Appendix V 錯誤! 使用 [常用] 索引標籤將 Heading 1 套用到您想要在此處顯示的文字。 Update Abort Restrictions Description Permit Class Permit Expiration Date Permit ID Number Permit Issue Date Permit Restrictions Permit endorsements Issuer ID Number Family Name Truncation First Name Truncation Middle Name Truncation](https://usermanual.wiki/CipherLab/2220/User-Guide-3682224-Page-47.png)
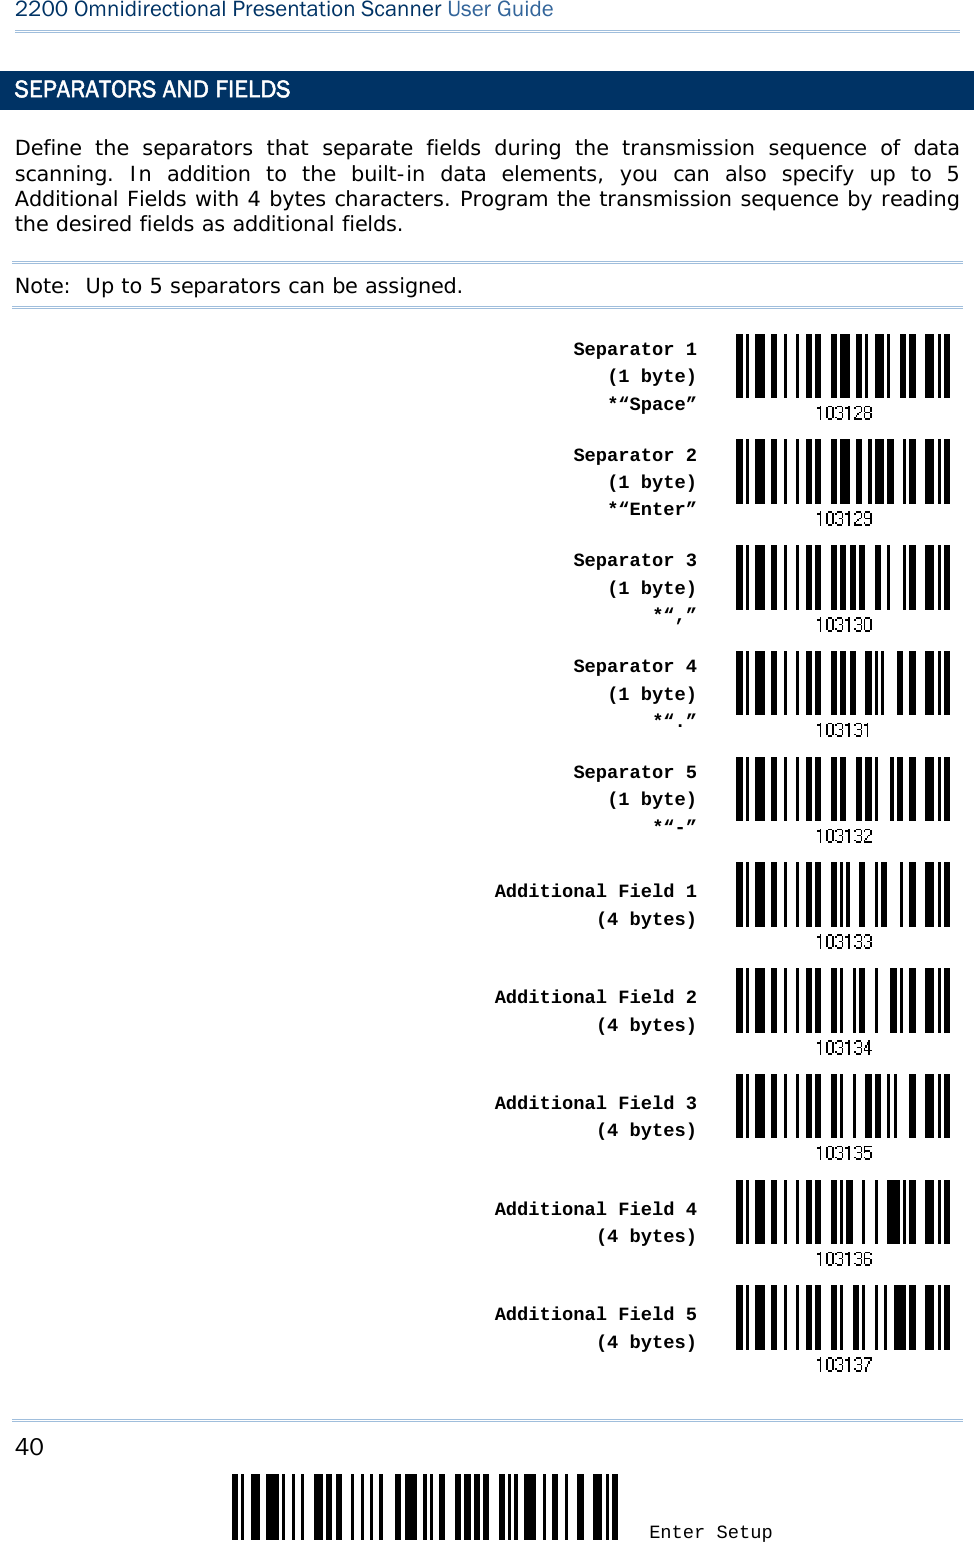
![41 Appendix V 錯誤! 使用 [常用] 索引標籤將 Heading 1 套用到您想要在此處顯示的文字。 Update AbortEDIT SEPARATORS All the driver license fields can be split with a pre-selected separator, for example, “-” as First Name-Last Name or “:” as First Name:Last Name. Edit Separator 1 Edit Separator 2 Edit Separator 3 Edit Separator 4 Edit Separator 51) Read the barcode above to apply separator to driver license information separately, and follow steps 2~3. 2) Read the “Hexadecimal Value” barcode for the desired character string. For example, read “3” and “A” for the separator to split the data with character [:]. 3) Read the “Validate” barcode on the same page to complete this setting.](https://usermanual.wiki/CipherLab/2220/User-Guide-3682224-Page-49.png)
![43 Appendix VI 錯誤! 使用 [常用] 索引標籤將 Heading 1 套用到您想要在此處顯示的文字。 Update AbortKEYBOARD WEDGE PCAT (US)PCAT (French)PCAT (German)PCAT (Italian)PCAT (Swedish)PCAT (Norwegian)PCAT (UK)PCAT (Belgium)Appendix VI KEYBOARD TYPE ONE-SCAN BARCODE](https://usermanual.wiki/CipherLab/2220/User-Guide-3682224-Page-51.png)
![45 Appendix VI 錯誤! 使用 [常用] 索引標籤將 Heading 1 套用到您想要在此處顯示的文字。 Update AbortPS55 001-3PS55 001-8APS55 002-1, 003-1PS55 002-81, 003-81PS55 002-2, 003-2PS55 002-82, 003-82PS55 002-3, 003-3PS55 002-8A, 003-8AIBM 3477 Type 4 (Japanese)](https://usermanual.wiki/CipherLab/2220/User-Guide-3682224-Page-53.png)
![47 Appendix VI 錯誤! 使用 [常用] 索引標籤將 Heading 1 套用到您想要在此處顯示的文字。 Update AbortPCAT (Armenian)PCAT (Thai)](https://usermanual.wiki/CipherLab/2220/User-Guide-3682224-Page-55.png)
![49 Appendix VI 錯誤! 使用 [常用] 索引標籤將 Heading 1 套用到您想要在此處顯示的文字。 Update AbortPCAT (Portuguese)PS55 A01-2 (Japanese)User-defined tablePCAT (Turkish)PCAT (Hungarian)PCAT (Swiss German)PCAT (Danish)PCAT (Russian)PCAT (Cyrillic on Russian)](https://usermanual.wiki/CipherLab/2220/User-Guide-3682224-Page-57.png)