CipherLab 8400GC Cradle User Manual
CipherLab Co., Ltd. Cradle
UserManual.wiki
>
CipherLab
>
8400GC User Manual
user manual
Navigation menu
Upload a User Manual
Namespaces
Wiki Guide
HTML
PDF
Info
Views
User Manual
Discussion / Help
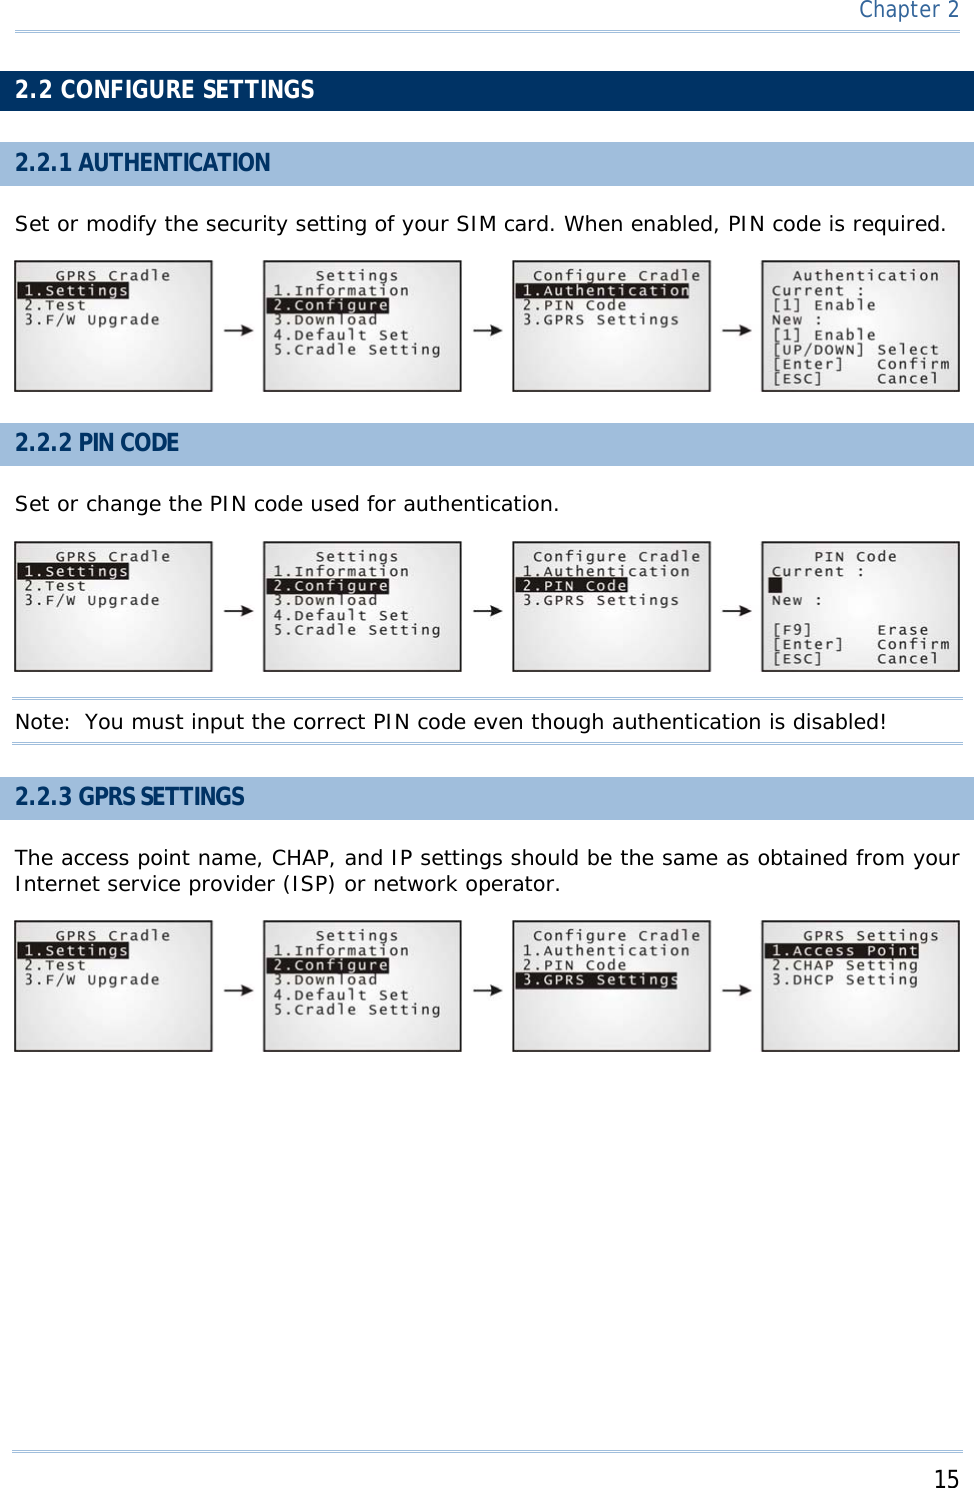
Navigation
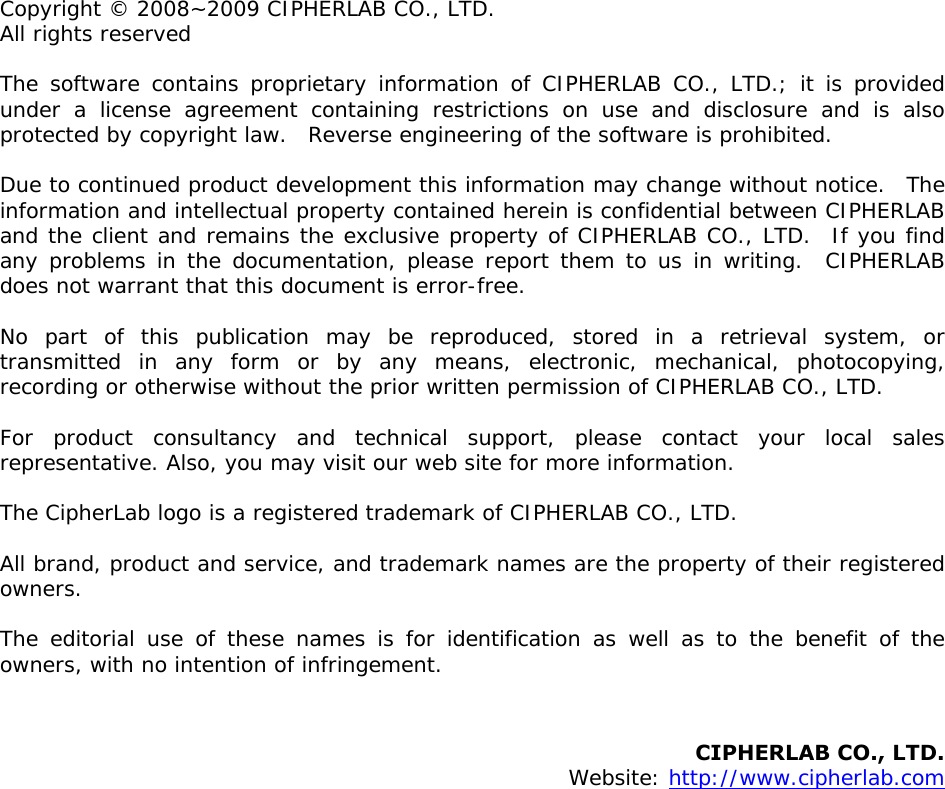

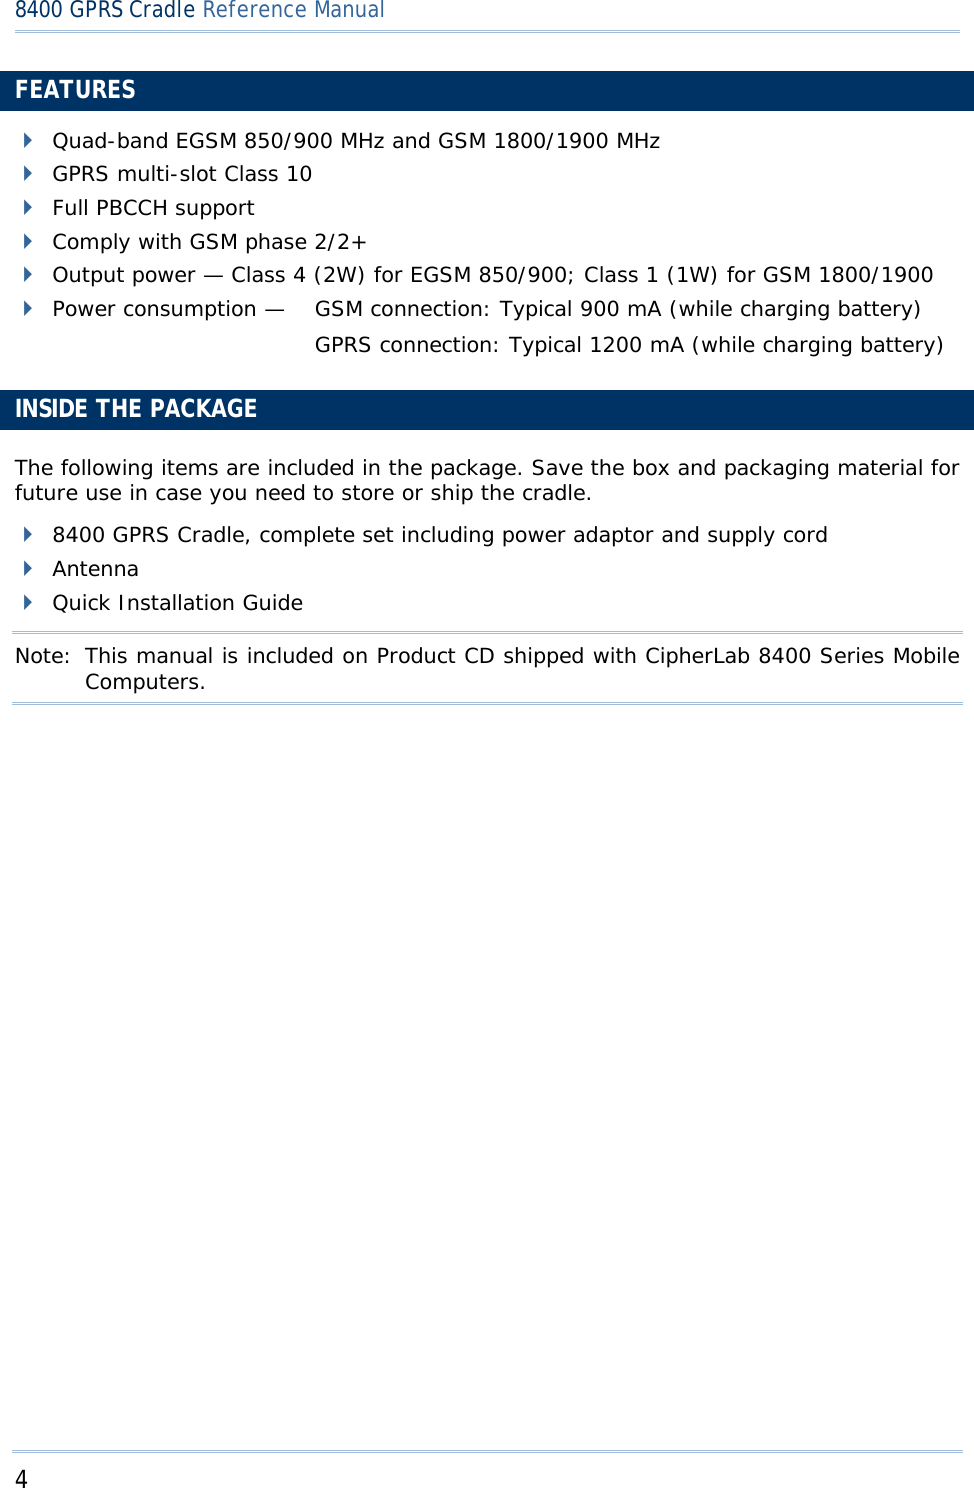
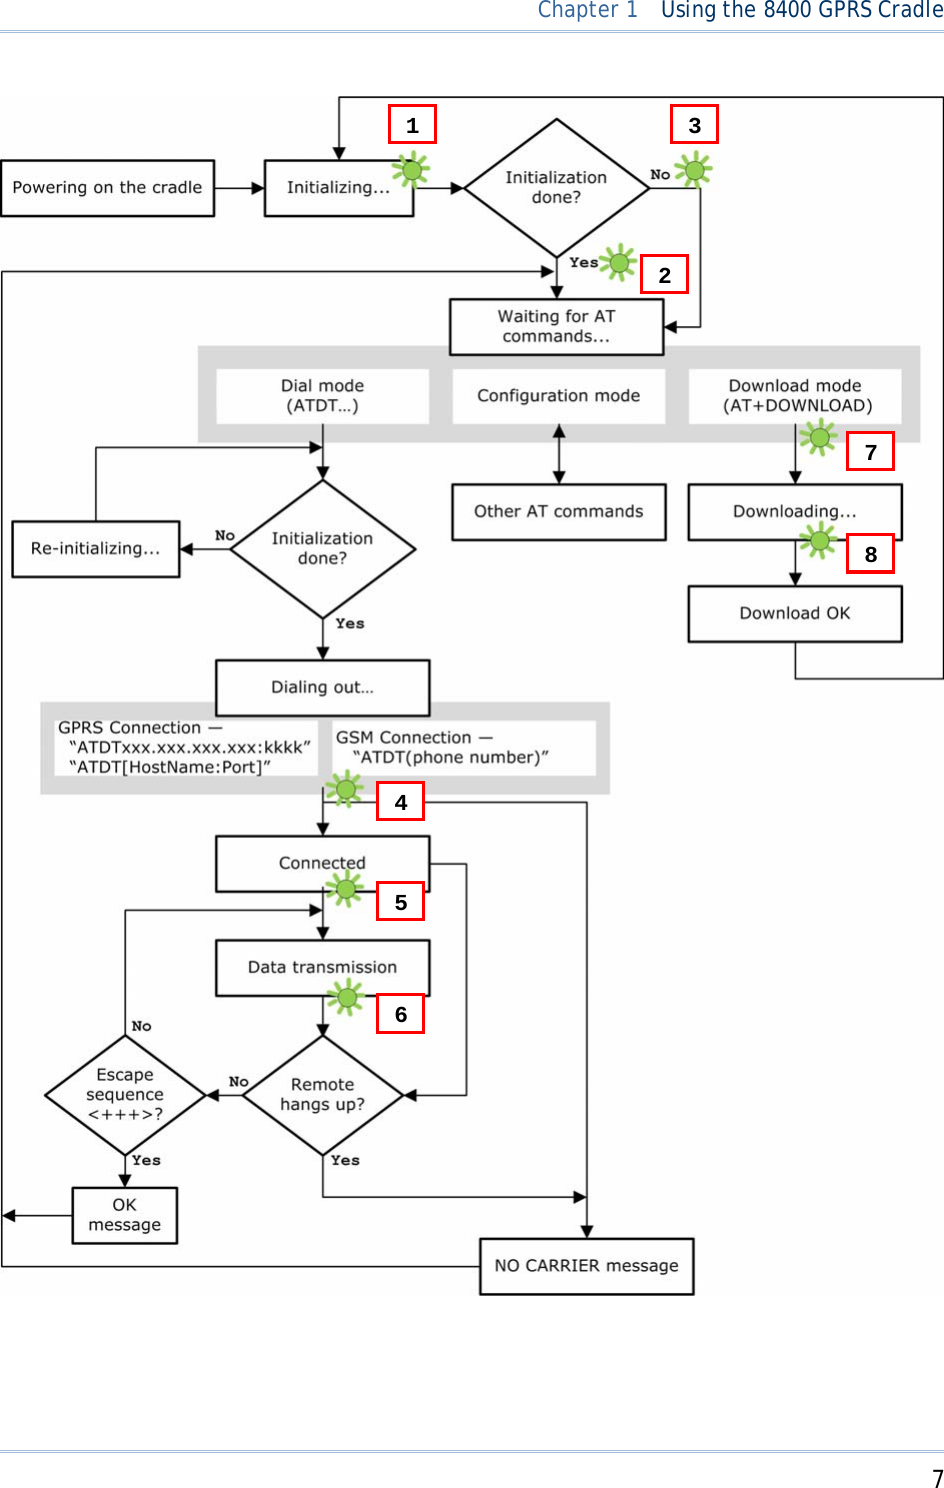
![8 8400 GPRS Cradle Reference Manual 1.2 DIAL MODES When the mobile computer is seated in the cradle, it can send the collected data back to a remote server, as well as download lookup files, via GSM or GPRS. When dialing out (ATDT), the LED of Link will flash at the time interval of 0.3 seconds for about 20 seconds. When connected, the LED of Link will be green after successfully establishing a connection. The LED of Tx/Rx will flash as long as data transmission occurs. Note: It is suggested to issue the command “AT” every five seconds for best practice, in order to check whether the mobile computer is seated in the cradle. The escape sequence, consisting of three characters “+++”, is used to terminate the data connection. 1.2.1 GSM CONNECTION When initialization is done, issue ATDT(phone number) to establish data connection via GSM. 1.2.2 GPRS CONNECTION When initialization is done, issue ATDTxxx.xxx.xxx.xxx:kkkk or ATDT[HostName:Port] to establish data connection via GPRS. The buffer size of the cradle is 1460 bytes, and data packet will be sent out as long as it satisfies any of the following requirements: buffer is full (= maximum packet size is 1460 bytes) delimiter character is encountered end of transmission timeout (= no transmission for 5 milliseconds) Due to the limited memory size, the cradle cannot send three packets at the same time, and therefore, the third packet will be discarded. We suggest you enable the Challenge-Handshake Authentication Protocol (CHAP) setting for best practice.](https://usermanual.wiki/CipherLab/8400GC/User-Guide-1172284-Page-16.png)
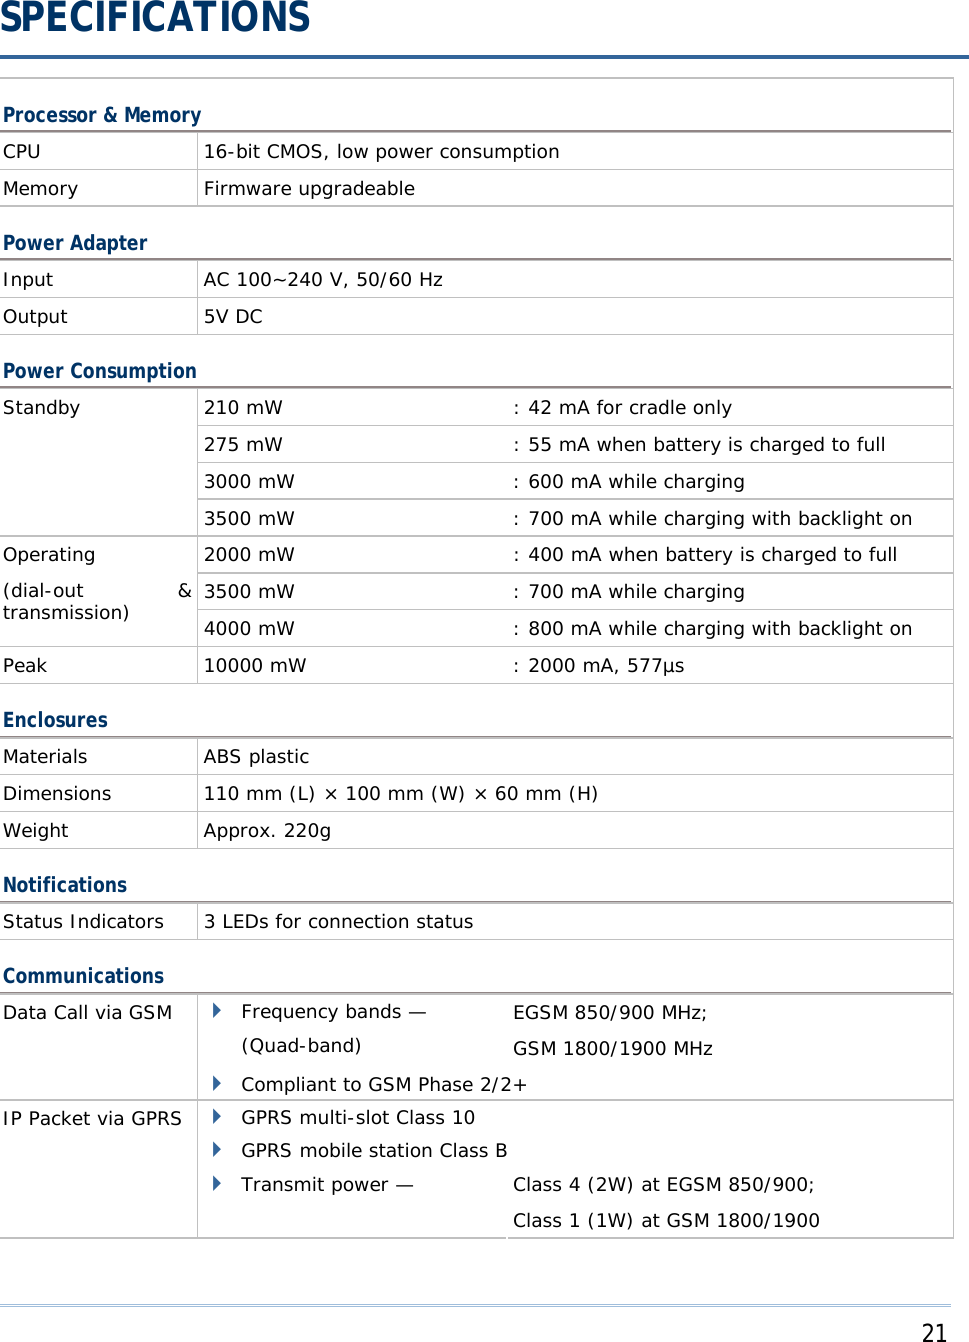
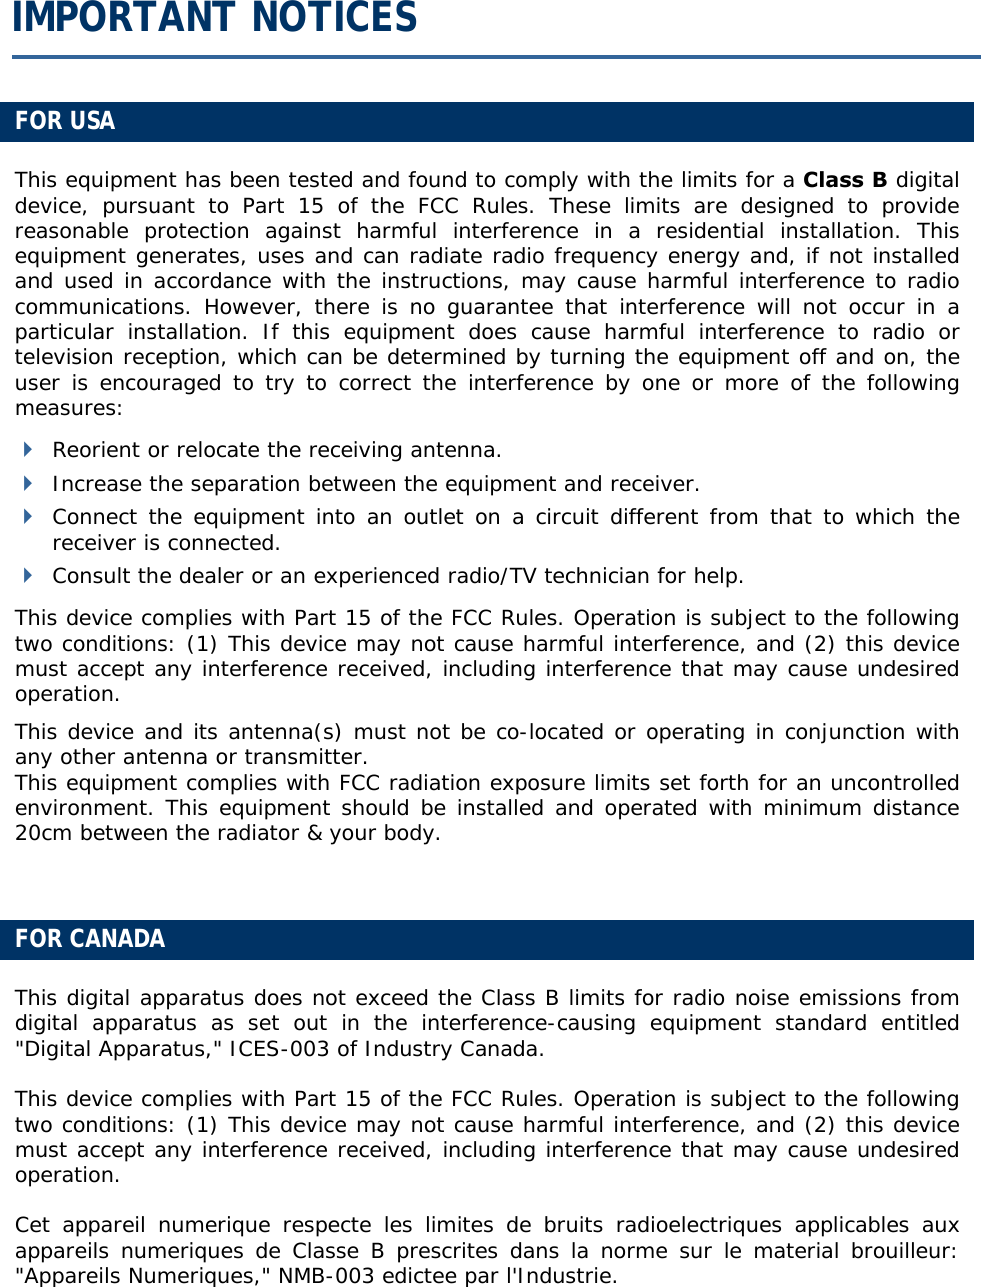
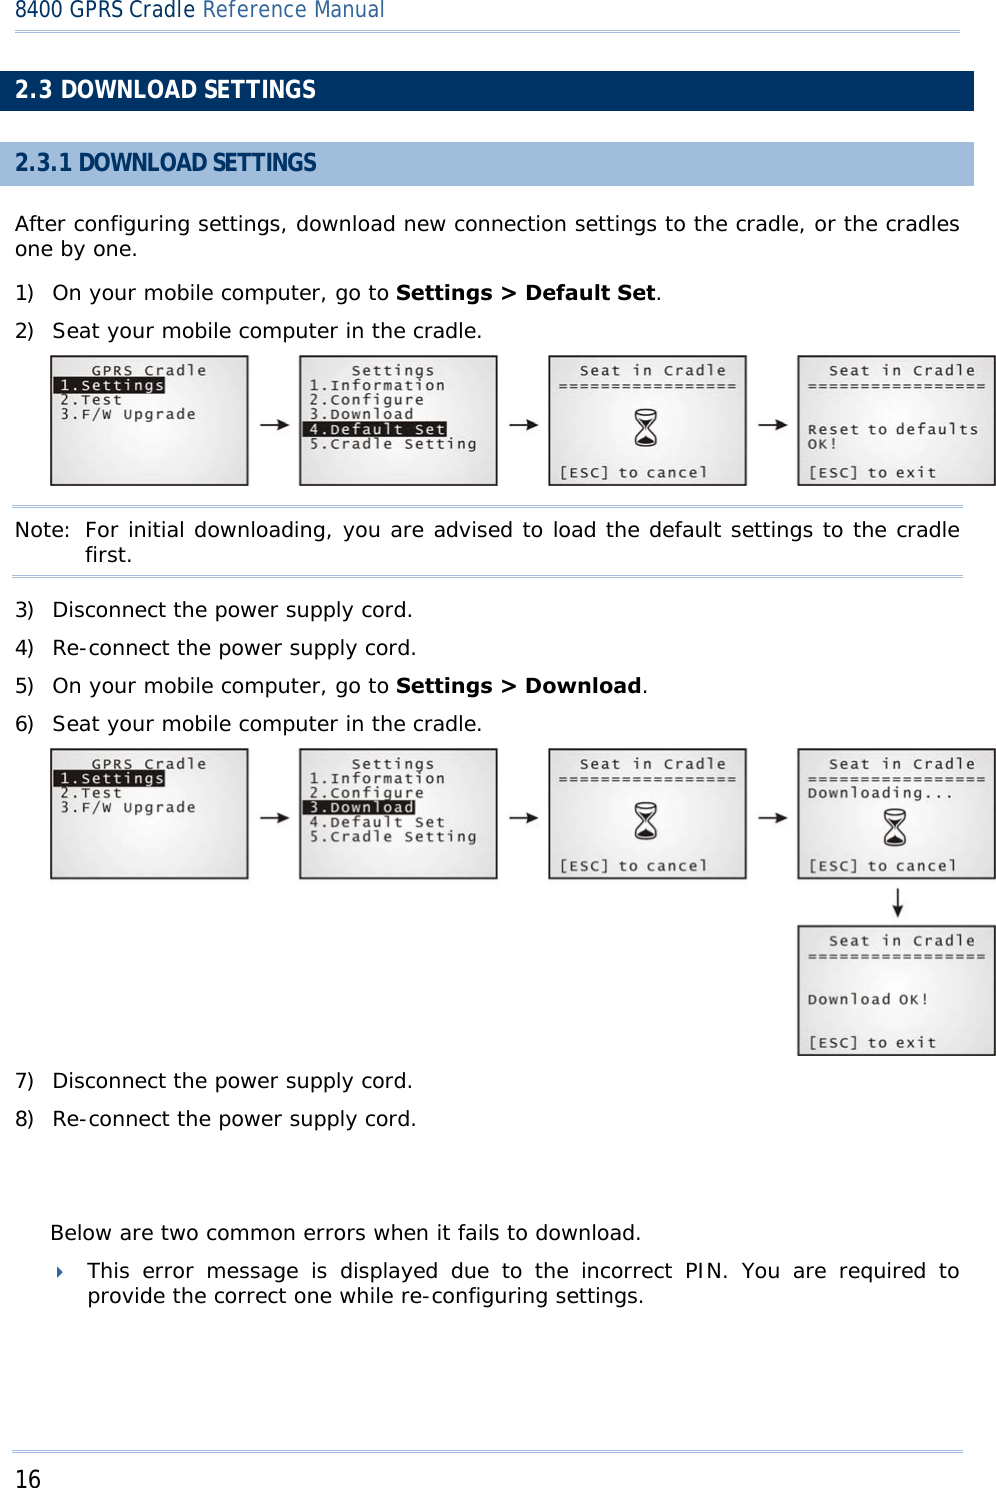
![11 For deployment engineers, you can download the utility “8400DeployGPRS.shx” to your mobile computer, and then use it to deploy a set of standard settings to the cradles, as well as perform light functionality testing. 1) Run one of the CipherLab download utilities on your desktop computer, for example, “ProgLoad.exe”. Choose the correct interface, COM port, baud rate, file type, and browse the file system to locate the utility “8400DeployGPRS.shx”. 2) Press [8]+[Power] on the mobile computer to turn it on and access the Program Manager menu. You may download the program directly to the active memory sector “AC”, or to an empty sector and activate the program later. Choose the correct interface and baud rate that match the settings on your desktop computer. 3) Upon completion of the download process, you will have to activate the program if it is downloaded to an empty sector. 4) The utility “8400DeployGPRS.shx” will start itself in a few seconds. 5) Go to 1. Settings > 2. Configure to configure GPRS settings, such as PIN code, name of access point, etc. Note: You must input the correct PIN code even though authentication is disabled! You can check all these settings via 1. Settings > 1. Information. Go through the following steps on each cradle. 6) Screw the antenna to the cradle. 7) Connect the power supply cord to a suitable power outlet. Note: The cradle’s LED will be red (see LED 1). The LEDs of Tx/Rx and Link will flash by turns at the time interval of 0.25 seconds for about 30 seconds, indicating the cradle is in initialization process. Then, the LED of Tx/Rx will flash, indicating initialization failed due to lack of SIM card. Ignore it. 8) Seat the mobile computer in the cradle. Chapter 2 CONFIGURING THE 8400 GPRS CRADLE](https://usermanual.wiki/CipherLab/8400GC/User-Guide-1172284-Page-19.png)

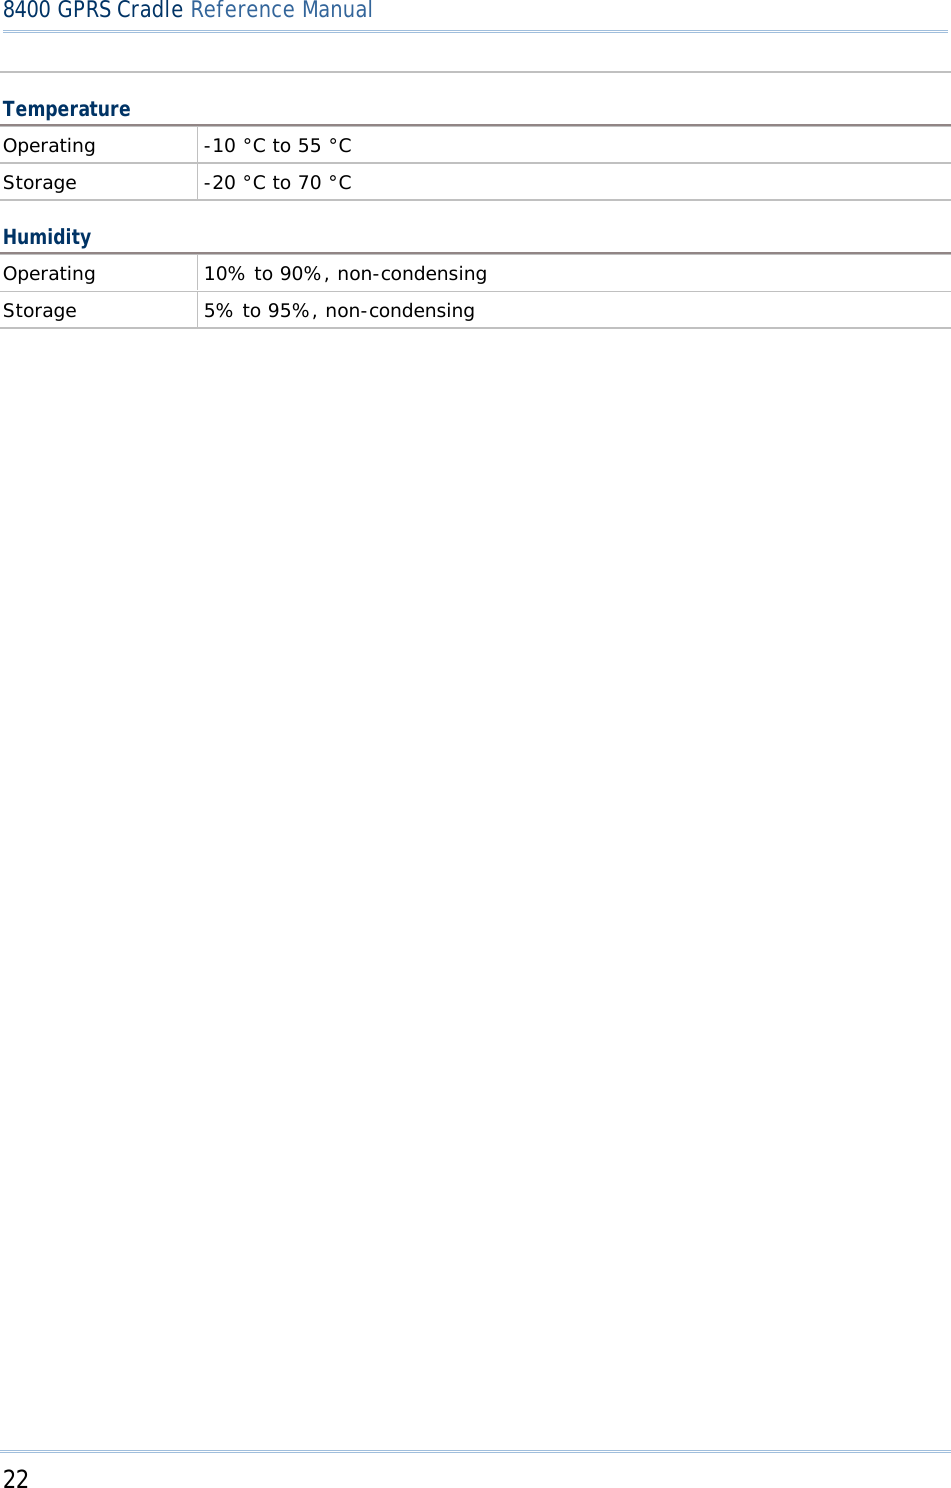
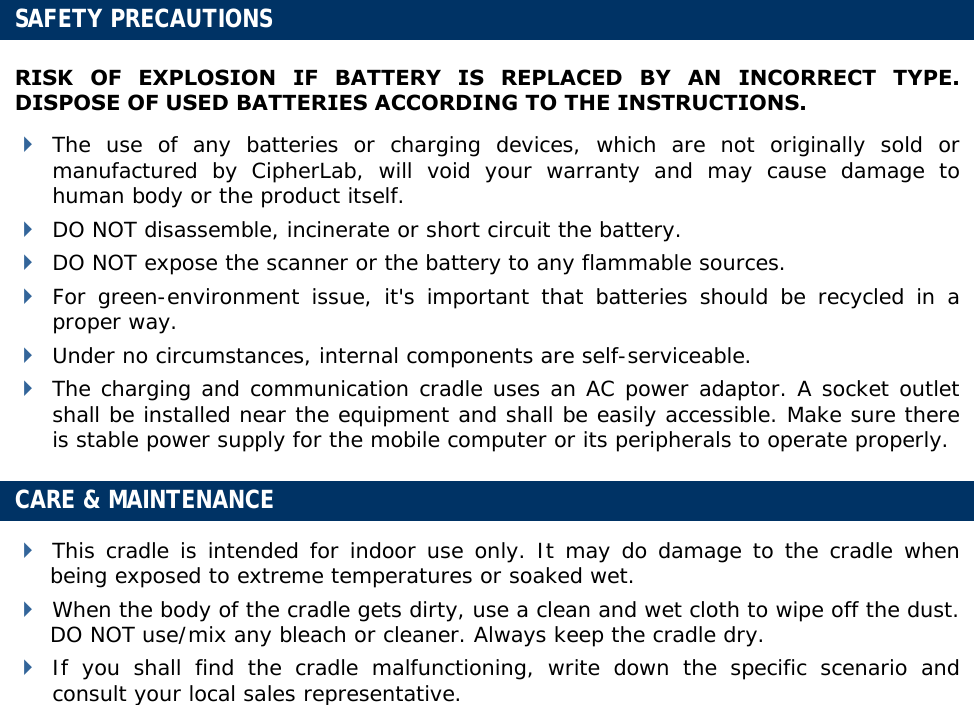
![18 8400 GPRS Cradle Reference Manual 2.4 TEST You may find it necessary to test the basic functionalities of the cradle. Seat your mobile computer in the cradle and run the Echo Test utility on your desktop computer. Note: (1) Echo Test – Dial Test and Dial GPRS are for internal testing. (2) CMU200 Test is for manufacturing use. 2.4.1 GPRS TEST On your desktop computer, select [TCP/IP - Server] and change settings if necessary. Then, click [Start]. On your mobile computer, go to Test > Echo Test > GPRS Echo Test.](https://usermanual.wiki/CipherLab/8400GC/User-Guide-1172284-Page-26.png)
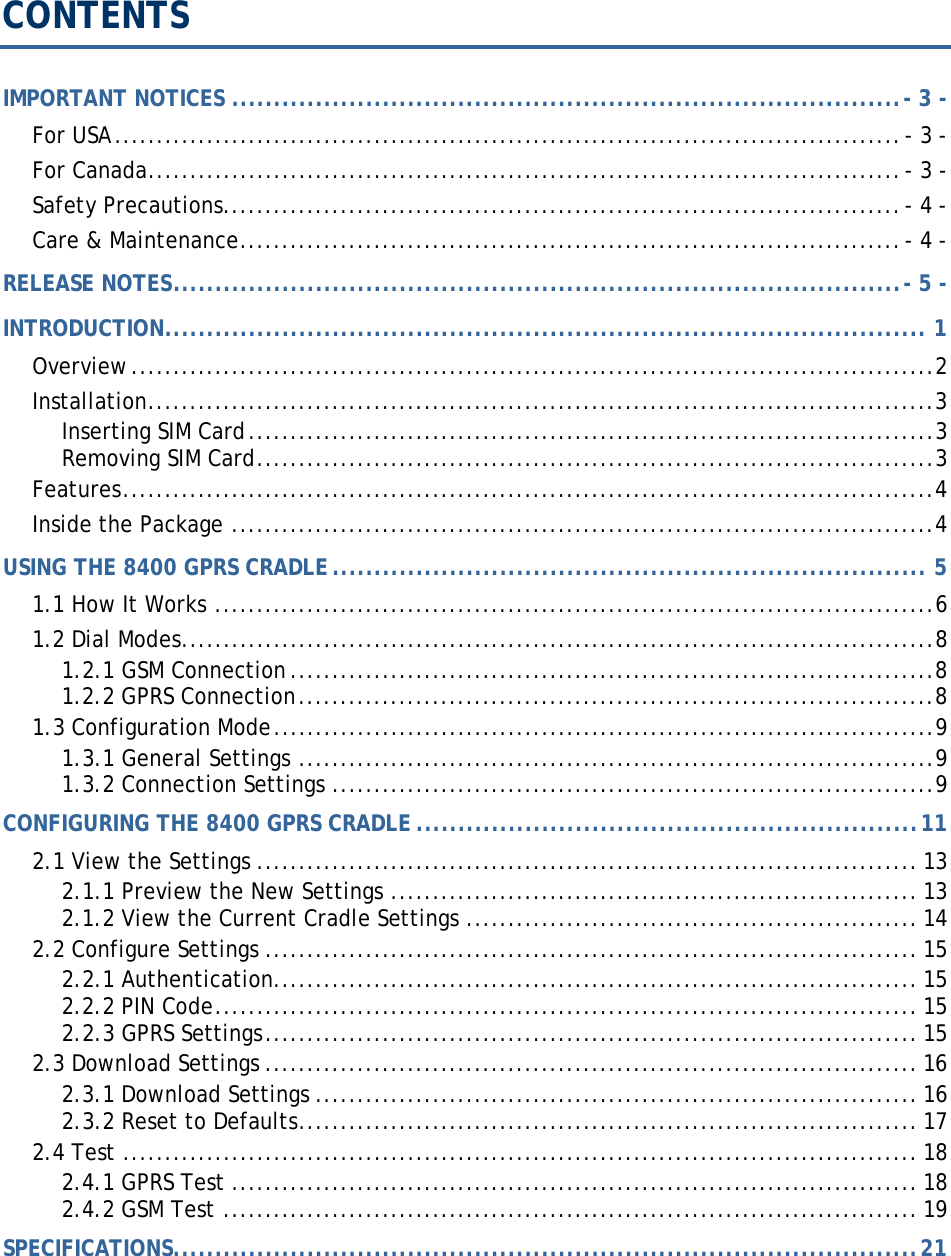
![19 Chapter 2 2.4.2 GSM TEST On your desktop computer, select [Modem - TAPI] and change settings if necessary. For an external modem device, select [Modem – COM] and change settings if necessary. Then, click [Start]. On your mobile computer, go to Test > Echo Test > GSM Echo Test.](https://usermanual.wiki/CipherLab/8400GC/User-Guide-1172284-Page-27.png)