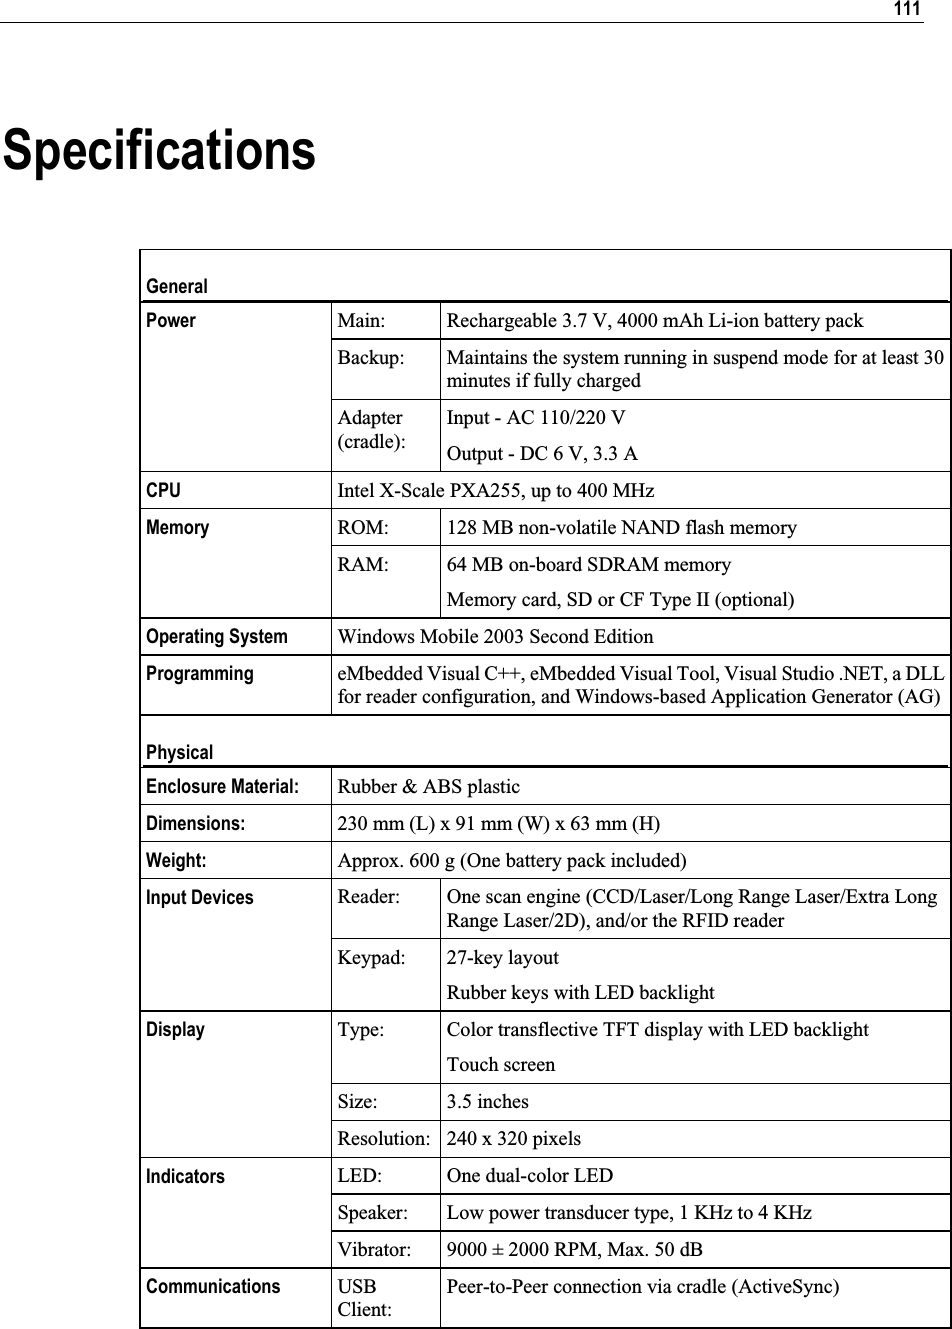
CipherLab 9500 Terminal User Manual 9500
CipherLab Co., Ltd. Terminal 9500
UserManual.wiki
>
CipherLab
>
9500 User Manual
>
Users Manual 2
Contents
1.
Users Manual 1
2.
Users Manual 2
3.
Users Manual 1 of 2
4.
Users Manual 2 of 2
Users Manual 2
Navigation menu
Upload a User Manual
Namespaces
Wiki Guide
HTML
PDF
Info
Views
User Manual
Discussion / Help
Navigation
![Chapter 3 ᙑᎄ!ࡸآࡳᆠᑌڤΖ 51 3.4 Install a New Program You may install a new program during the ActiveSync operation. 1. When connected, open the Microsoft ActiveSync window on your desktop computer. 2. Click the Explorer button from the toolbar. 3. Navigate to the target folder, either Programs folder or Start Menu folder, depending on where you wish to access the program. (My Pocket PC\Windows\Start Menu\Programs or My Pocket PC\Windows\Start Menu)4. Navigate through file folders on your computer to find the new program. 5. Right-click the program and select [copy] on the pop-up menu. 6. Back to the target folder in step 3, right-click anywhere blank and select [Paste] on the pop-up menu. 7. On the terminal, go to Start > Programs (or simply tap the Start button). The new program will appear. Note: If the Start menu already contains seven programs, the new program will appear in the Programs folder only.](https://usermanual.wiki/CipherLab/9500.Users-Manual-2/User-Guide-678012-Page-1.png)
![54 CPT-9500 Reference Manual 3.6 Remove a User Program When you install a program, it may be stored in the storage memory of SDRAM. If so, it will appear in the list of installed programs below. If a user program is no longer desired, you may remove it from the system. Note: If the program does not appear in the list of installed programs, you may use File Explorer to locate it. Tap and hold the program, and select [Delete]. 1. Go to Start > Settings > System tab, and then select Remove Programs.2. Tap the name of the program that you want to delete. 3. Tap [Remove]. 4. Tap [Yes] to uninstall the program. If the program files are still in use, you need to stop the program first. Go to Start > Settings > System tab > Memory > Running Programs tab. Note: To free the storage memory, you may need to remove programs as well.](https://usermanual.wiki/CipherLab/9500.Users-Manual-2/User-Guide-678012-Page-4.png)
![Chapter 3 ᙑᎄ!ࡸآࡳᆠᑌڤΖ 55 3.7 Locate a File 3.7.1 Find a File or an Item 1. Go to Start > Programs, and then select Find.2. In the Find box, enter the file name, word, or other information you want to search for. If you have looked for this item before, tap the drop-down menu and select it. 3. In the Type box, select a data type to help narrow your search. If the data type of your file is other than listed, you may try [Larger than 64 KB]. However, if such file is less than 64 KB, it will not be searchable. 4. Tap [Go]. It will start to search through My Documents folder and its subfolders, as well as DiskOnChip. 5. In the Results list, tap the item you want to open. In the sample screen above, the first file is stored in My Documents folder, and the second one is in DiskOnChip as indicated by its icon.](https://usermanual.wiki/CipherLab/9500.Users-Manual-2/User-Guide-678012-Page-5.png)
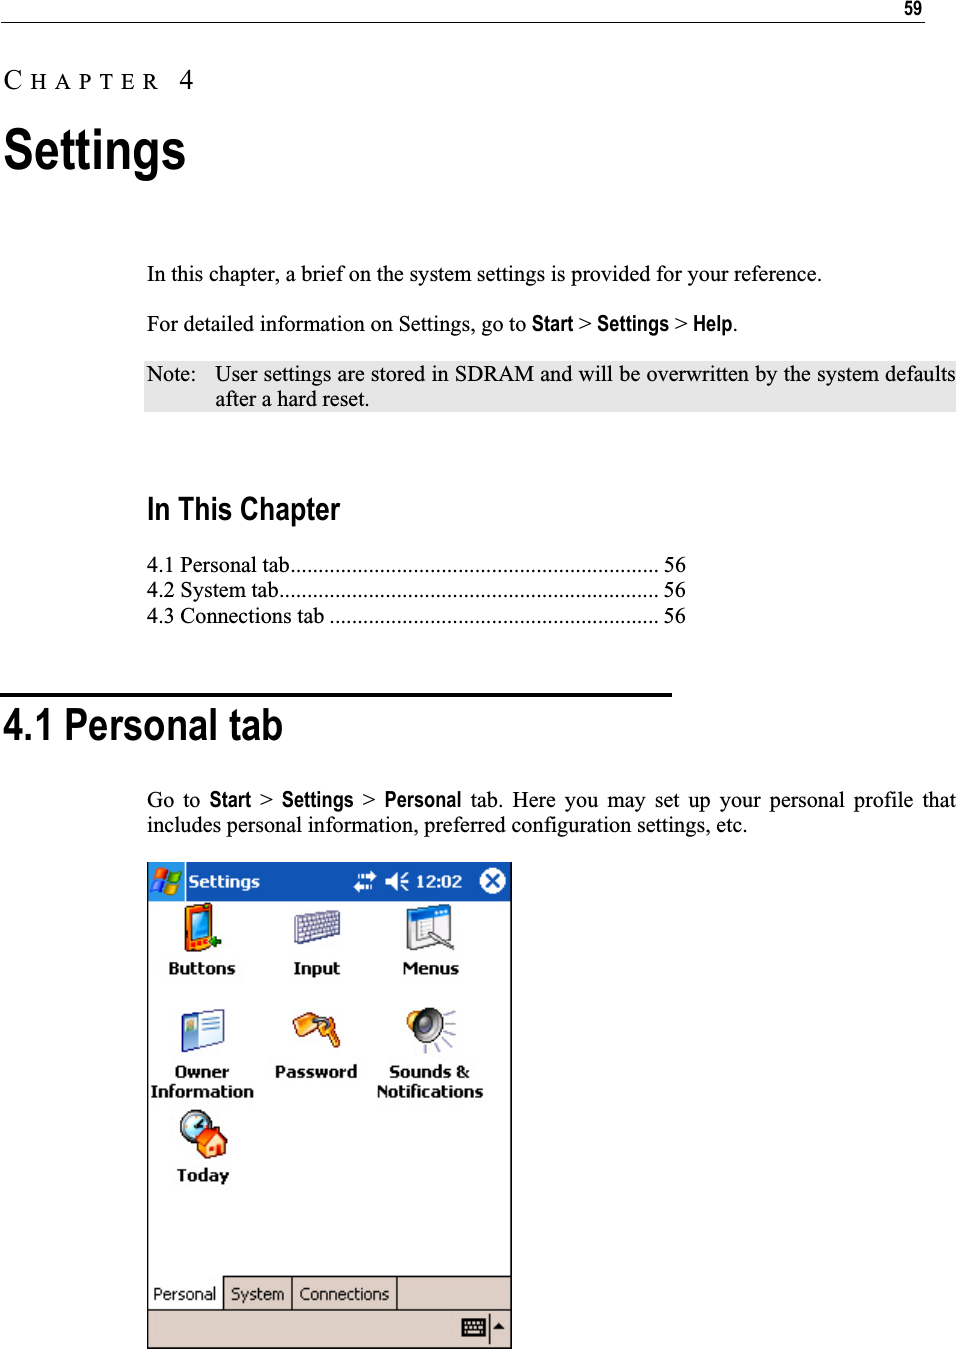
![60 CPT-9500 Reference Manual Start > Settings > Personal tab Buttons Program Buttons tab: Customize [Button 1], the [Task] key on the physical keypad of your terminal, to open your most used program. By default, pressing the [Task] key will invoke File Explorer. Up/Down Control tab: Adjust the delay and repeat rates of the Up/Down control scrolls. Input Input Method tab: Customize the input method via soft input panel (SIP). The same options can be accessed by tapping the arrow next to the SIP button and then Options. Word Completion tab: Make use of this feature to facilitate input. Options tab: More general features. Voice recording is not applicable. Menus Start Menu tab: Select program shortcuts that will appear on the Start menu. New Menu tab: Select items that will appear on the New button menu when it is turned on. OwnerInformation Identification/Notes tab: Enter your contact information or notes. Options tab: Select to display your identification information or notes when it is turned on. Password Password tab: Apply password protection to limit access to the terminal. Hint tab: Enter a password hint as a reminder. Sounds & Notifications Sounds tab: Configure sounds for specific actions, events, programs, etc. Notifications tab: Select to play sounds as notifications for some events. Today Appearance tab: Customize the theme and background of the Today screen. Items tab: Select items that will appear on the Today screen, and configure Today timeout.](https://usermanual.wiki/CipherLab/9500.Users-Manual-2/User-Guide-678012-Page-10.png)

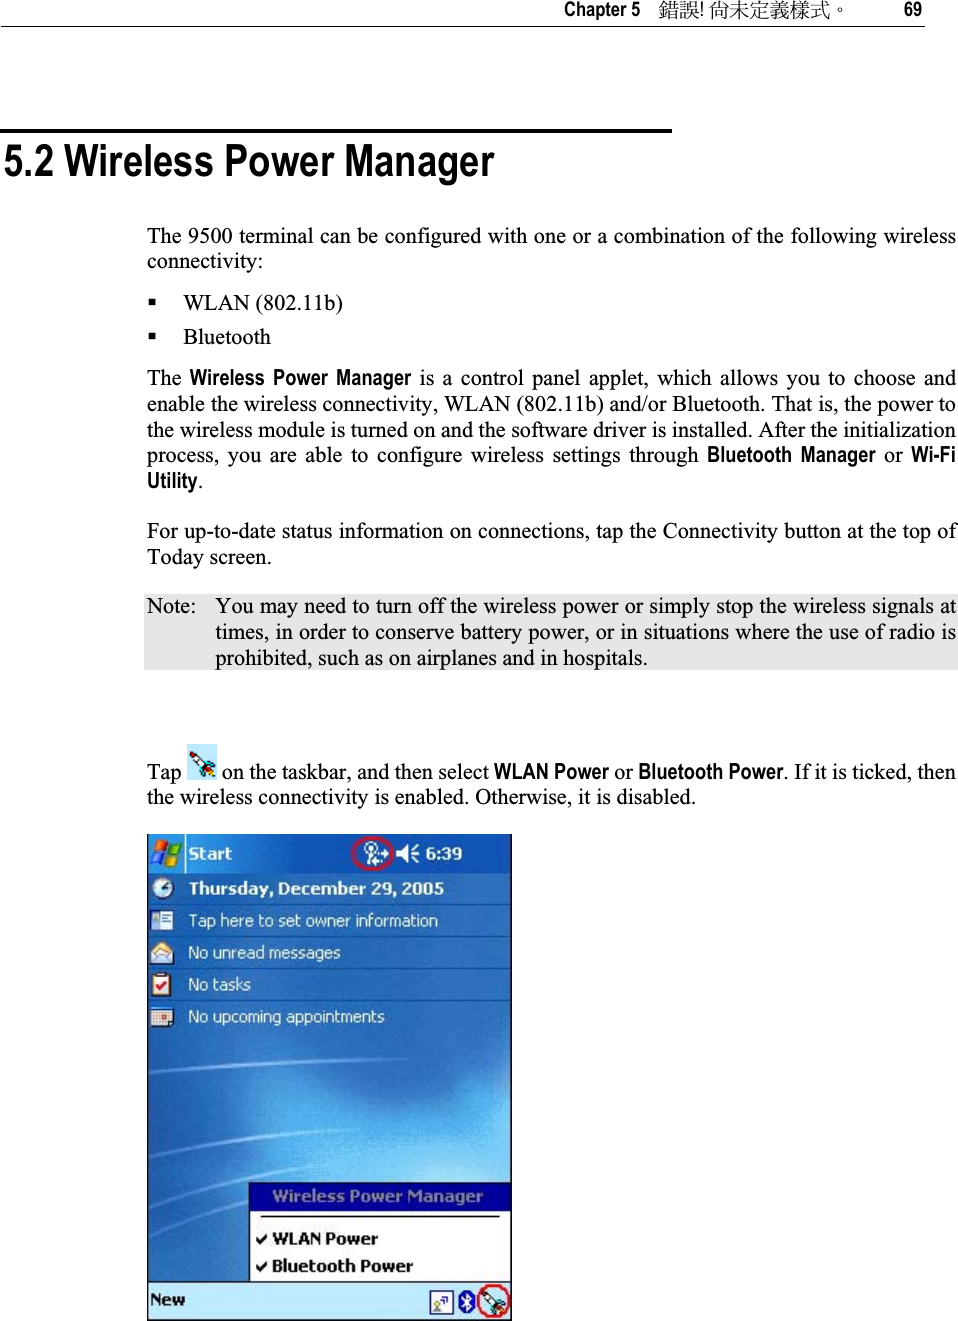


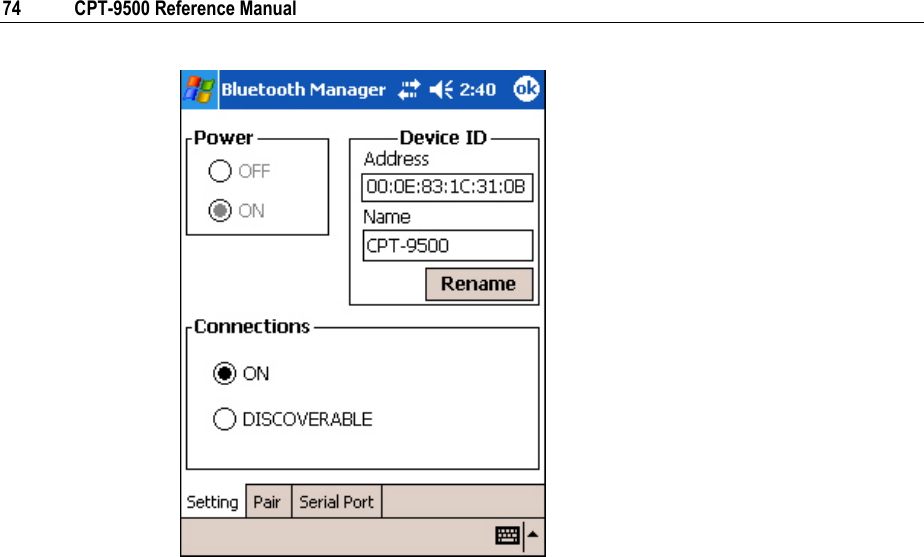
![Chapter 5 ᙑᎄ!ࡸآࡳᆠᑌڤΖ 73 5.3 Bluetooth Manager Tap the rocket button on the taskbar, and then select [Bluetooth Power]. When the Bluetooth button becomes , it indicates the Bluetooth power is turned on. You may tap it to configure the Bluetooth settings. Note: In Wireless Power Manager, Bluetooth is enabled if it is ticked; otherwise, it is disabled. However, it may be interfered by the flight mode switching of Connectivity status. 5.3.1 Setting tab Power This option is unavailable for it is controlled by Wireless Power Manager. It simply indicates the Bluetooth power status. Device ID You may rename the terminal. Usually a friendly Bluetooth name. Connections [ON] is selected by default, for making connection to a remote device. (9500 as Client) [DISCOVERABLE] must be selected if the terminal wishes to be discovered by other devices. (9500 as Server) Note: Select [DISCOVERABLE] if you want the terminal to provide the Bluetooth services to a remote device at the same time. Any Bluetooth-enabled devices will be able to discover the terminal within range.](https://usermanual.wiki/CipherLab/9500.Users-Manual-2/User-Guide-678012-Page-23.png)
![Chapter 5 ᙑᎄ!ࡸآࡳᆠᑌڤΖ 75 5.3.2 Pair tab Here is the Bluetooth paired device list, which is identical to the one found under Start > Settings > Connections tab > Bluetooth > Devices tab. It may show any previously paired devices. If it is blank, tap [Search New Device] to discover any Bluetooth-enabled devices within range. It will generate a list of discovered devices. Select one device from the list. It will start the pairing procedure to establish a trusted relationship between the device and the terminal. To unpair with a device from the paired device list, select the device and tap [Delete Device]. Note: The terminal must be unpaired on the remote device as well. (Both devices must be unpaired!)](https://usermanual.wiki/CipherLab/9500.Users-Manual-2/User-Guide-678012-Page-25.png)
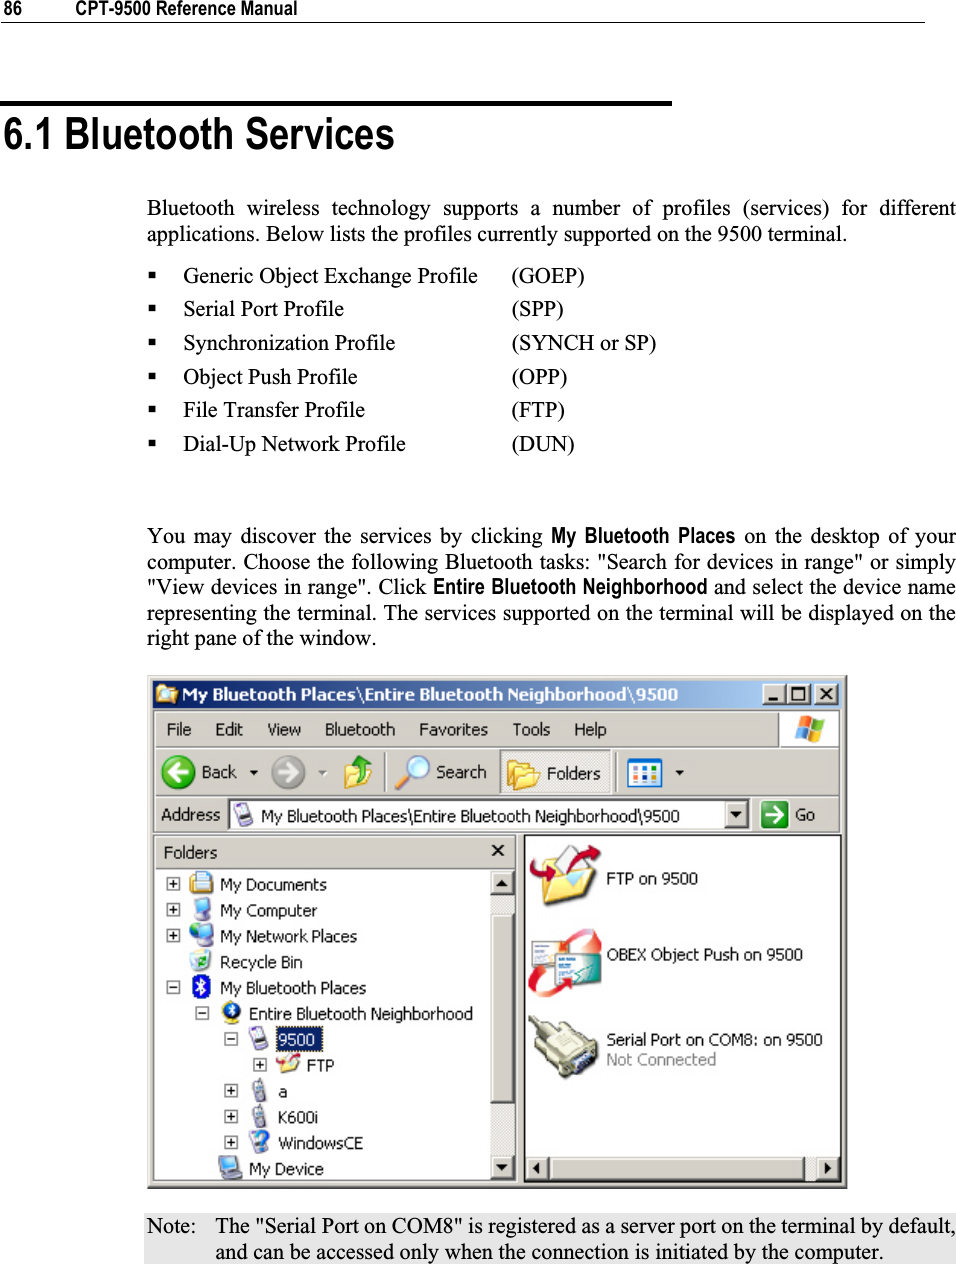
![76 CPT-9500 Reference Manual 5.3.3 Serial Port tab At the last stage of establishing a Bluetooth connection, a dialog box prompts to ask whether you want to register a COM port for the Bluetooth Serial Port service. If you tap [No] to close that dialog box, you may still register a serial port in this tab. COM8 is registered as Server Port by default. The connection will be initiated by a remote device. Tap [Register New Client Port] for a connection initiated by the terminal. If you want to delete the registry of a server or client port, select a Port Name from the list and tap [Deregister Serial Port].](https://usermanual.wiki/CipherLab/9500.Users-Manual-2/User-Guide-678012-Page-26.png)
![Chapter 5 ᙑᎄ!ࡸآࡳᆠᑌڤΖ 77 5.4 Wi-Fi Utility Tap the rocket button on the taskbar, and then select [WLAN Power]. When the Wi-Fi button becomes , it indicates the WLAN power is turned on. Tap it and select from the pop-up menu: UtilitySelect [Utility] to launch Wi-Fi Utility for configuring WLAN settings. Different approaches are available to access the WLAN configuration: Go to Start > Settings > Connections tab > Network Cards.Tap the Connectivity button and select [Settings]. Tap Network Cards.Exit If the Wi-Fi button is not desired to be displayed in the Taskbar any more, you may select [Exit] to remove the program shortcut. To create this button again, go to Start > Programs and select Swluce.Note: In Wireless Power Manager, WLAN is enabled if it is ticked; otherwise, it is disabled. However, it may be interfered by the flight mode switching of Connectivity status.](https://usermanual.wiki/CipherLab/9500.Users-Manual-2/User-Guide-678012-Page-27.png)
![78 CPT-9500 Reference Manual 5.4.1 Status tab For network configuration, tap [Configure]. You may tap [More] to examine signal strength and network information. It results in the same behavior when you take one of the following approaches: Go to Start > Settings > Connections tab > Network Cards.Tap the Connectivity button and select [Settings]. Tap Network Cards.](https://usermanual.wiki/CipherLab/9500.Users-Manual-2/User-Guide-678012-Page-28.png)
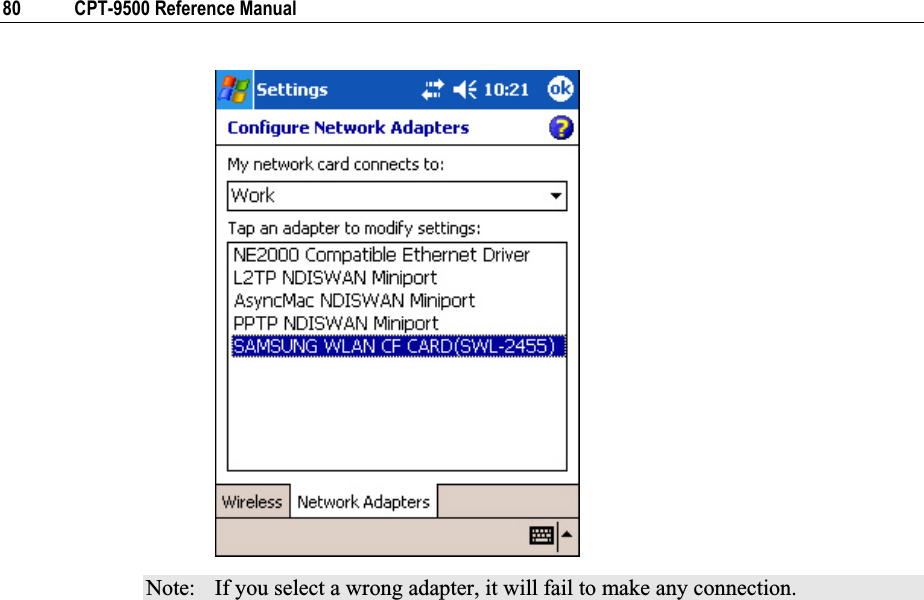
![Chapter 5 ᙑᎄ!ࡸآࡳᆠᑌڤΖ 79 ConfigureWireless tab Tap and hold a connected item to see a menu. To disconnect a WLAN connection, select [Remove Settings]. Network Adapters tab In this tab, you may tap an adapter to modify settings, such as IP address and name servers. The adapter used for the 802.11b connection is [SAMSUNG WLAN CF CARD (SWL-2455)]. My network card connects to: Work: when connecting to a private network, such as a corporate network at work. The Internet: when connecting to a web site. Tap an adapter to modify settings: Because most networks use DHCP, you should not change these settings unless your network administer instructs you to do so.](https://usermanual.wiki/CipherLab/9500.Users-Manual-2/User-Guide-678012-Page-29.png)
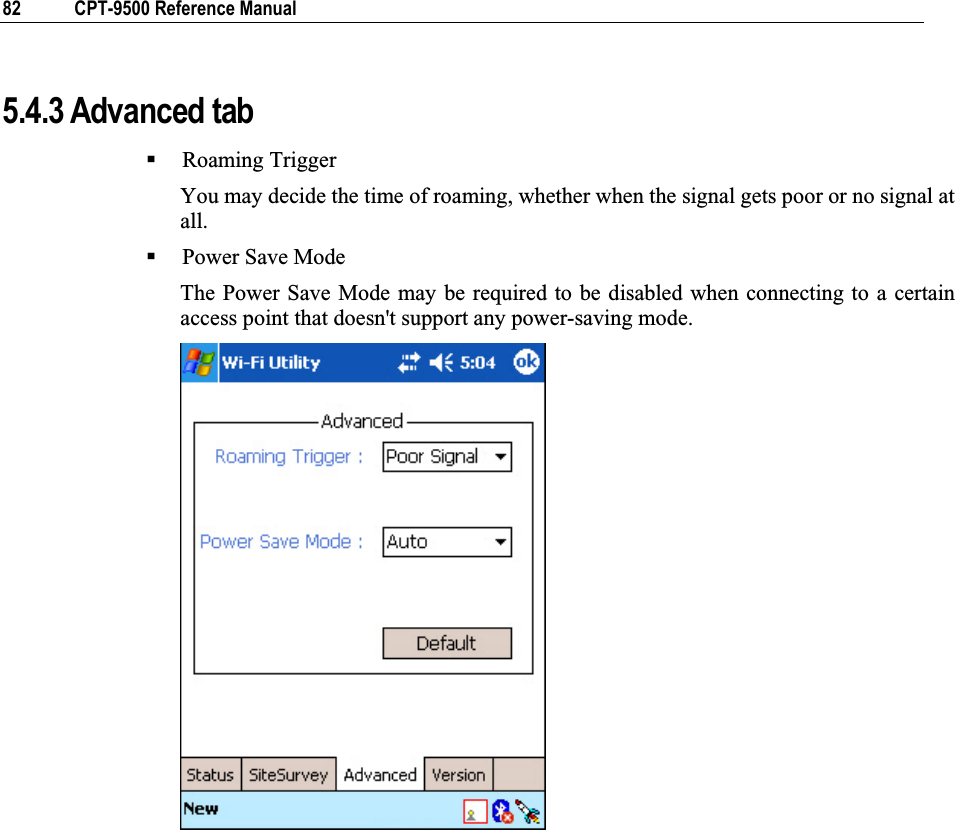
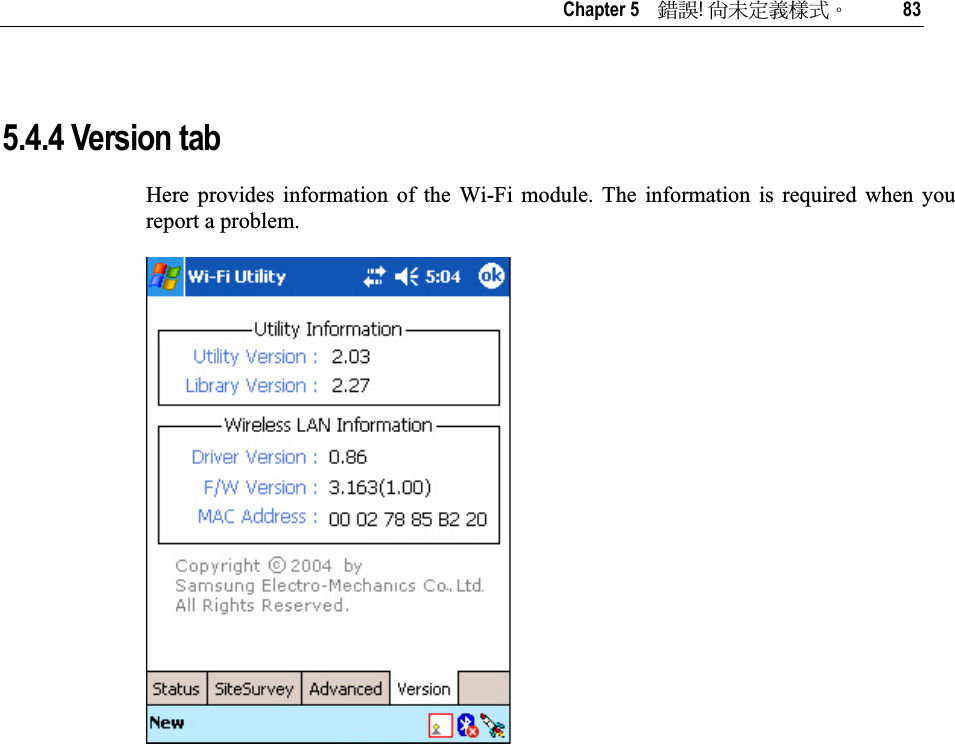
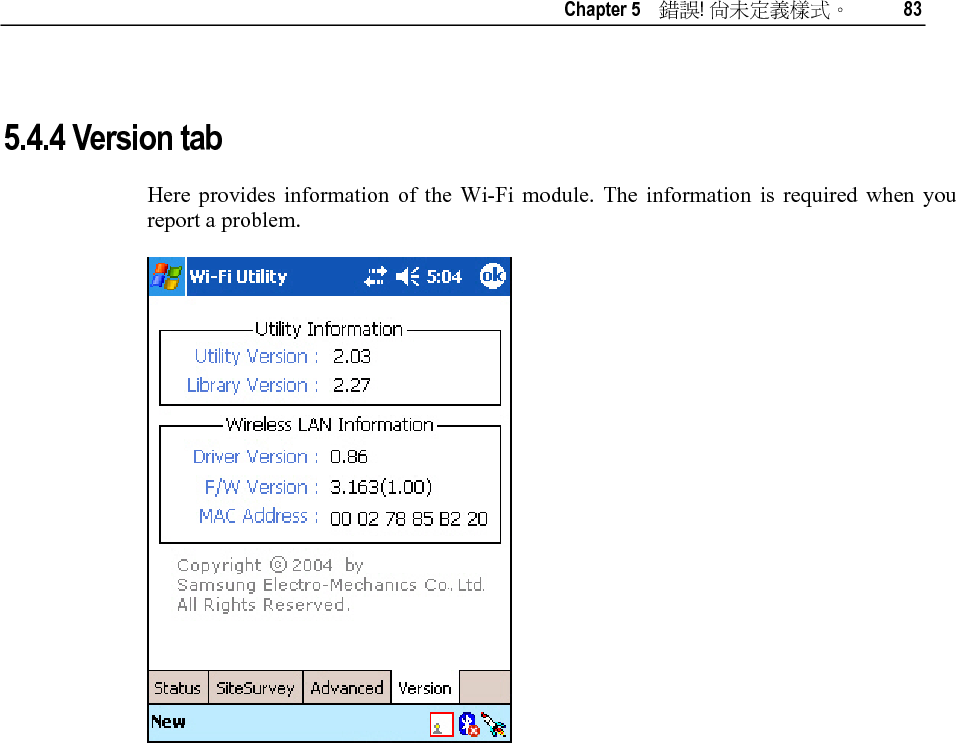
![Chapter 5 ᙑᎄ!ࡸآࡳᆠᑌڤΖ 81 5.4.2 SiteSurvey tab Here lists available networks. For site survey, tap [Refresh].](https://usermanual.wiki/CipherLab/9500.Users-Manual-2/User-Guide-678012-Page-31.png)
![Chapter 6 ᙑᎄ!ࡸآࡳᆠᑌڤΖ 87 6.2 Bluetooth Enabled To enable Bluetooth on 9500... Tap the rocket button on the taskbar, and then select [Bluetooth Power] from the pop-up menu. When the Bluetooth button becomes , it indicates the Bluetooth power is turned on. To enable Bluetooth on PC... This depends on the Bluetooth software installed on your computer. For example, you will need to right-click the Bluetooth icon on your computer, and select [Start the Bluetooth Device] from the shortcut menu. If you want to configure Bluetooth settings, right-click the Bluetooth icon and select [Advanced Configuration]. Note: To disable a local service, go to My Bluetooth Places\My Device. Right-click a service and select [Disable] from the shortcut menu. Disabled services are not available for remote devices (clients).](https://usermanual.wiki/CipherLab/9500.Users-Manual-2/User-Guide-678012-Page-37.png)
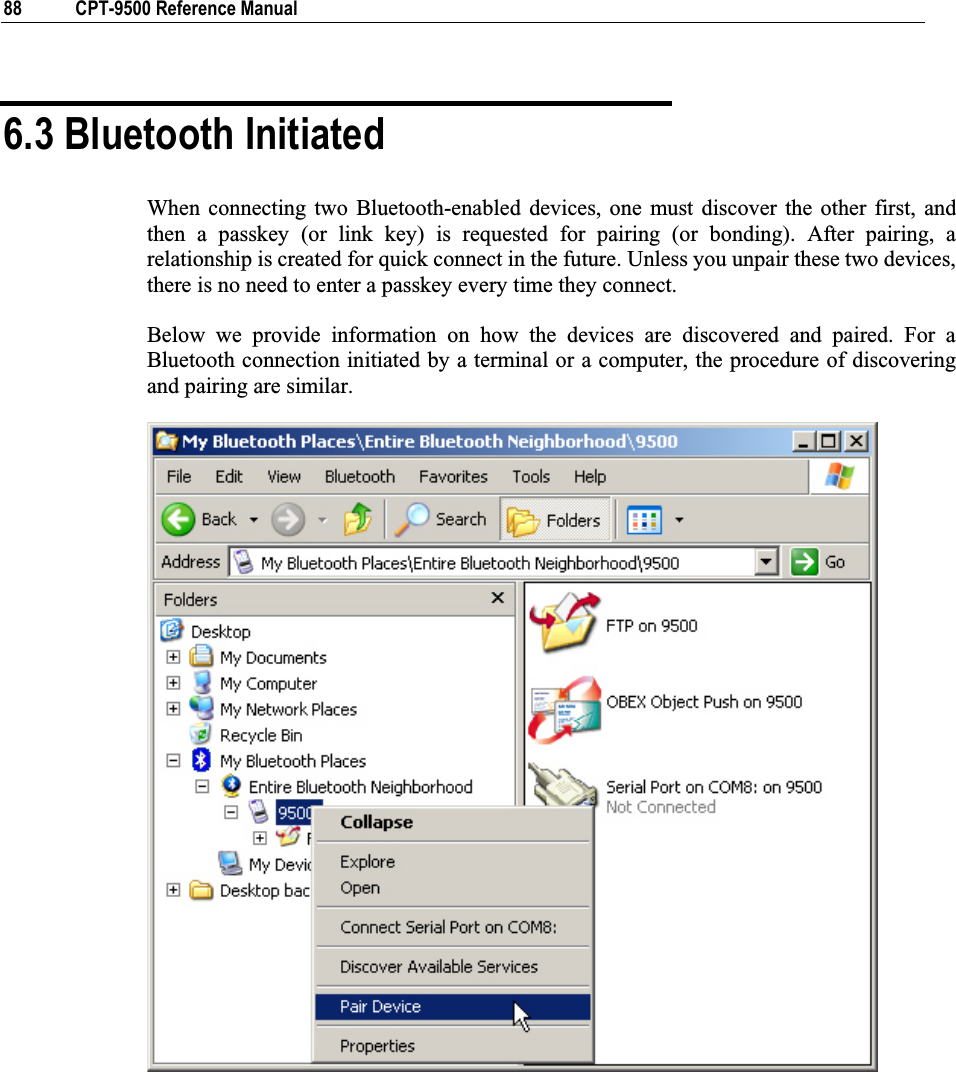
![Chapter 6 ᙑᎄ!ࡸآࡳᆠᑌڤΖ 89 6.3.1 Start a Connection on PC Initiated by a computer... Double click My Bluetooth Places on your desktop, and then choose the task Search for devices in range. (see screenshot above) When the terminal is discovered, right-click the device name representing the terminal and choose [Pair Device]. Note: The terminal will not be found unless [Discoverable] is selected on the Setting tab of Bluetooth Manager. 9500 as a server... The terminal acts as a Server to provide services to a computer. Now your computer can connect to COM8 on the terminal for a serial link. (Serial Port on COM8) send a PIM item to the terminal. (OBEX Object Push service) send a file to the terminal.(FTP service) receive a PIM item from the terminal where Beam Contact is used. receive a file from the terminal where Beam File is used. Note: A file or message received on the terminal will be stored in My Documents folder, while a contact will be stored in the Contacts folder.](https://usermanual.wiki/CipherLab/9500.Users-Manual-2/User-Guide-678012-Page-39.png)
![Chapter 6 ᙑᎄ!ࡸآࡳᆠᑌڤΖ 91 Discover Devices1. In the Pair tab, tap [Search New Device] to discover your computer. 2. It then displays discovered devices. Tap your computer. 3. A Bluetooth status icon appears on the navigation bar, and a balloon pops up to ask permission.](https://usermanual.wiki/CipherLab/9500.Users-Manual-2/User-Guide-678012-Page-41.png)
![92 CPT-9500 Reference Manual Tap [Yes] to add your computer to the frequent device list.](https://usermanual.wiki/CipherLab/9500.Users-Manual-2/User-Guide-678012-Page-42.png)
![Chapter 6 ᙑᎄ!ࡸآࡳᆠᑌڤΖ 93 Pair Devices1. In the Passkey box, enter your pass key for pairing with your computer. Tap [Next]. 2. On your computer: a Bluetooth PIN Code Required balloon is displayed over the notification area when a connection is attempted if Secure Connection is enabled. Click the balloon to proceed.](https://usermanual.wiki/CipherLab/9500.Users-Manual-2/User-Guide-678012-Page-43.png)
![94 CPT-9500 Reference Manual 3. On your computer: a Bluetooth PIN Code Request Dialog box is displayed. In the Bluetooth PIN Code box, enter your passkey as in Step 4. Tap [OK]. 4. After pairing successfully, a dialog box prompts whether you want to register a new Bluetooth serial port for your computer. Tap [No] if you do not want to use the Bluetooth Serial Port service. If you do not want to change the name of your computer, tap [Finish].](https://usermanual.wiki/CipherLab/9500.Users-Manual-2/User-Guide-678012-Page-44.png)
![Chapter 6 ᙑᎄ!ࡸآࡳᆠᑌڤΖ 95 5. The Bluetooth connection has been set up successfully. Tap [ok] to close the window displaying the discovered devices. 6. The paired device will be displayed on the frequent device list. Tap [ok] to close the window. 7. You may proceed to run the application program, e.g. ActiveSync that wishes to use the Bluetooth Serial Port service. If you want to use ActiveSync via Bluetooth, you must not register a COM port in step 4. Note: In case timeout occurs during pairing, try again.](https://usermanual.wiki/CipherLab/9500.Users-Manual-2/User-Guide-678012-Page-45.png)
![96 CPT-9500 Reference Manual Unpair Devices1. The paired device will be displayed on the frequent device list. (Bluetooth Manager>Pair tab) 2. Tap a device that you want to unpair with the terminal. 3. Select [Delete Device]. 4. On your computer, the terminal must be unpaired as well.](https://usermanual.wiki/CipherLab/9500.Users-Manual-2/User-Guide-678012-Page-46.png)
![Chapter 6 ᙑᎄ!ࡸآࡳᆠᑌڤΖ 97 6.4 Bluetooth Applications 6.4.1 ActiveSync via Bluetooth The associated Bluetooth profiles are Serial Port Profile, as well as Synchronization Profile that is based on the Generic Object Exchange Profile. The connection of ActiveSync via Bluetooth must be initiated from the terminal. Note: Microsoft ActiveSync must be installed on your computer. 1. Tap Start > Programs, and select ActiveSync.Then tap [Tools] on the lower left corner and select [Connect via Bluetooth]. The [Options] command will be available now. Tap [Options].](https://usermanual.wiki/CipherLab/9500.Users-Manual-2/User-Guide-678012-Page-47.png)
![98 CPT-9500 Reference Manual 2. In the PC tab, tap [Options]. 3. Tap the drop-down menu to select [Bluetooth Sync] for PC synchronization. Tap [ok].](https://usermanual.wiki/CipherLab/9500.Users-Manual-2/User-Guide-678012-Page-48.png)
![Chapter 6 ᙑᎄ!ࡸآࡳᆠᑌڤΖ 99 4. Tap [Connect via Bluetooth]. 5. Tap a remote device, for example your computer, as the selected device to connect. 6. On your computer, click the Bluetooth Authorization Requested balloon when it pops up. 7. On your computer, the Bluetooth Service Authorization dialog box pops up. Click OK to allow this action. 8. It will display "Connected" when the Bluetooth connection with your computer is set up successfully.](https://usermanual.wiki/CipherLab/9500.Users-Manual-2/User-Guide-678012-Page-49.png)
![102 CPT-9500 Reference Manual 6.4.2 PIM Item Transfer The associated Bluetooth profile is Object Push Profile, which is based on the Generic Object Exchange Profile. The terminal can send a PIM item to your computer, such as a business card, contact, email, etc., and vice versa. Beam File on 95001. Tap Wireless Power Manager and select Bluetooth Power from the pop-up menu. 2. Tap the [Task] key to launch File Explorer. Navigate to a desired file. 3. Tap the file and select [Beam File] from the pop-up menu.](https://usermanual.wiki/CipherLab/9500.Users-Manual-2/User-Guide-678012-Page-52.png)
![Chapter 6 ᙑᎄ!ࡸآࡳᆠᑌڤΖ 103 4. Tap your computer as the device to connect. 5. On your computer, a message indicated the data has been received successfully. Send a PIM Item from Computer1. In Microsoft Outlook on your computer, you can send a PIM item by selecting [Send To Bluetooth] > [9500] from the File menu. This screen varies with the Bluetooth software installed on your computer. For example, some may refer to a functionality called [Push] or [Pull] from the toolbar of Microsoft Outlook.](https://usermanual.wiki/CipherLab/9500.Users-Manual-2/User-Guide-678012-Page-53.png)
![104 CPT-9500 Reference Manual 2. On 9500, a Receiving Data balloon pops up to ask for your authorization. Tap [Yes] to save data. If the PIM item is an e-mail message, it will be save in My Documents folder (MyDevice > My Documents). Tap the [Task] key to launch File Explorer and view data. If the PIM item is a contact, it will be saved in the Contacts folder.](https://usermanual.wiki/CipherLab/9500.Users-Manual-2/User-Guide-678012-Page-54.png)
![Chapter 6 ᙑᎄ!ࡸآࡳᆠᑌڤΖ 105 6.4.3 Send a File from Computer The associated Bluetooth profile is File Transfer Profile, which is based on Generic Object Exchange Profile. 1. Navigate to a desired file on your computer. 2. Right-click the file and select [Send To] > [Bluetooth] > [9500] from the shortcut menu. 3. On 9500, a Receiving Data balloon pops up to ask for your authorization. Tap [Yes] to save data. The file will be save in My Documents (My Device > My Documents). Tap the [Task] key to launch File Explorer and view data.](https://usermanual.wiki/CipherLab/9500.Users-Manual-2/User-Guide-678012-Page-55.png)
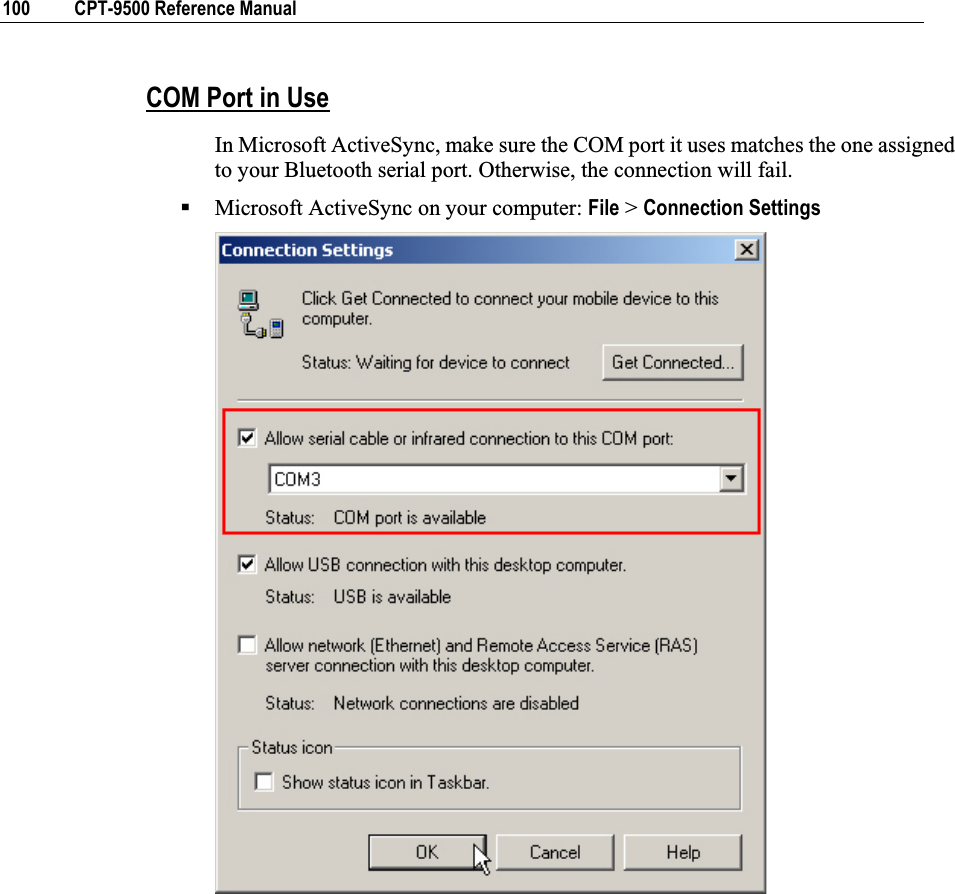
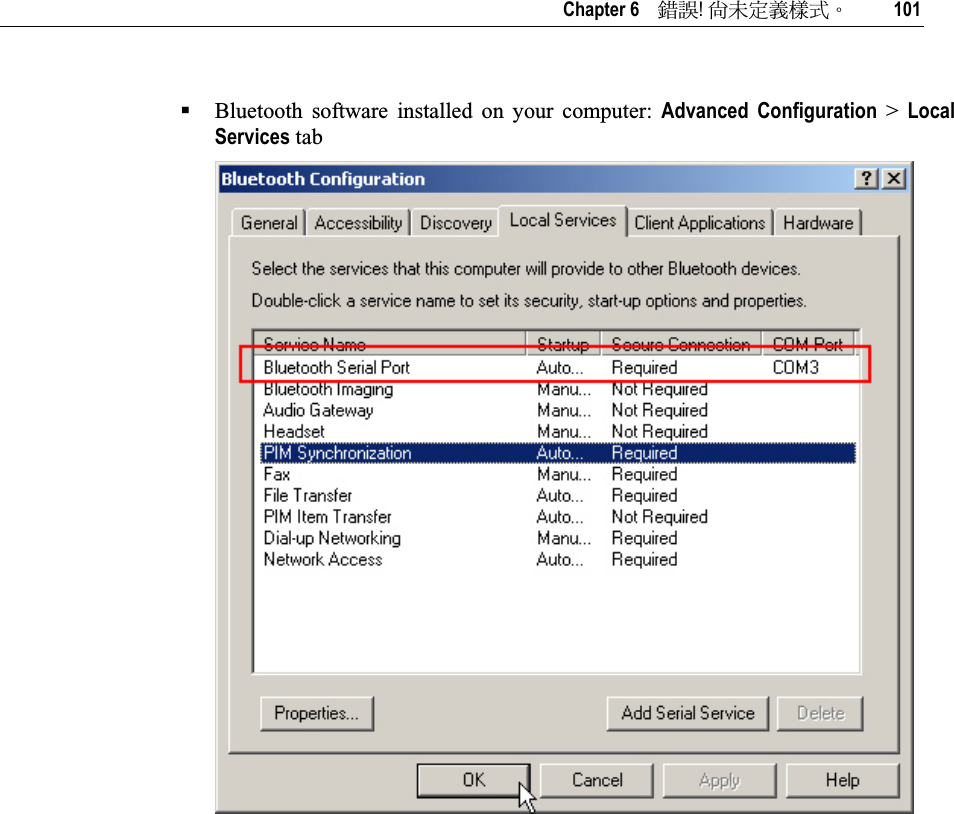
![106 CPT-9500 Reference Manual 6.4.4 Connect to Serial Port (Server) from Computer The associated Bluetooth profile is Serial Port Profile. By default, the terminal has COM 8 registered as a server port. It provides Bluetooth Serial Port service for a connection initiated by a remote device, such as your computer. Note: The Bluetooth settings on your computer must have the Bluetooth Serial Port service listed on the Client Applications tab. Otherwise, the [Serial Port on COM8] on the terminal will not be found. Application programs on this computer that will use this service must be configured to use the Bluetooth Serial Port COM port. Determine the communications port used by this computer.](https://usermanual.wiki/CipherLab/9500.Users-Manual-2/User-Guide-678012-Page-56.png)
![107In This Chapter 7.1 Wi-Fi Enabled & Detected .......................................... 56 7.2 Terminal Services Client ............................................. 56 7.1 Wi-Fi Enabled & Detected To enable Wi-Fi... Tap the rocket button on the taskbar, and then select [WLAN Power] from the pop-up menu. When the Wi-Fi button becomes , it indicates the WLAN power is turned on. Available networks detected... If you are connecting for the first time, wait for an antenna to appear and show the WLAN (802.11b) networks detected. Otherwise, it will automatically connect to the network last time you connected to. CHAPTER 7Set up Wi-Fi Connection](https://usermanual.wiki/CipherLab/9500.Users-Manual-2/User-Guide-678012-Page-57.png)
![108 CPT-9500 Reference Manual 7.1.1 Connect to Detected Network If you have configured WLAN settings before, you may select a network to connect now. When the antenna and Connectivity icons get mixed as , it indicates a successful connection. Meanwhile, the Wi-Fi button becomes .1. Select an available network you want to connect. 2. Select the network you will be connected to through the access point. Work: when connecting to a private network, such as a corporate network at work The Internet: when connecting to your ISP at home 3. Tap [Connect]. Tap [Hide] if you do not want to be connected now. 4. After having established a connection successfully, you may proceed to run the application program, e.g. Pocket Internet Explorer, Terminal Services Client, etc.](https://usermanual.wiki/CipherLab/9500.Users-Manual-2/User-Guide-678012-Page-58.png)
![Chapter 7 ᙑᎄ!ࡸآࡳᆠᑌڤΖ 109 7.1.2 Connect to New Network If you want to connect to a new network, tap [Settings] in the balloon brought up by the antenna icon . It results in the same behavior when you go to Start > Settings > Connections tab > Network Cards.In the Wireless tab, you may configure the following settings: To add a new network: Tap [Add New]. To connect to an existing network: Tap and hold an available network to see a menu. Tap [Connect]. To stop a connection: Tap and hold an available network to see a menu. Tap [Remove Settings].](https://usermanual.wiki/CipherLab/9500.Users-Manual-2/User-Guide-678012-Page-59.png)