CipherLab 9500 Terminal User Manual 9500
CipherLab Co., Ltd. Terminal 9500
Contents
- 1. Users Manual 1
- 2. Users Manual 2
- 3. Users Manual 1 of 2
- 4. Users Manual 2 of 2
Users Manual 2 of 2

Chapter 3 ᙑᎄ!ࡸآࡳᆠᑌڤΖ 51
3.4 Install a New Program
You may install a new program during the ActiveSync operation.
1. When connected, open the Microsoft ActiveSync window on your desktop computer.
2. Click the Explorer button from the toolbar.
3. Navigate to the target folder, either Programs folder or Start Menu folder, depending on
where you wish to access the program.
(My Pocket PC\Windows\Start Menu\Programs or My Pocket PC\Windows\Start Menu)
4. Navigate through file folders on your computer to find the new program.
5. Right-click the program and select [copy] on the pop-up menu.
6. Back to the target folder in step 3, right-click anywhere blank and select [Paste] on the
pop-up menu.
7. On the terminal, go to Start > Programs (or simply tap the Start button). The new
program will appear.
Note: If the Start menu already contains seven programs, the new program will appear in
the Programs folder only.
52 CPT-9500 Reference Manual
3.5 Run a Program
To run a desired program or switch between programs, tap Start and select a program. In
order to use memory in a more efficient way, you are recommended to stop a running
program or exit a program when it is not desired any longer.
At the end of the navigation bar, the X (Close) button is provided for closing an active
window.
Be aware that every time when you tap Close, it actually does not exit the program. The
program is still running on the background, and therefore, the memory is not freed. In
general, the system manages memory automatically, and there is no need to exit a
program to open another or to conserve memory. However, random access memory
(SDRAM) may be used up when running too many programs. If so, it will slow down
the operation or cause program errors. In this case, you should stop one or more running
programs to free memory.
Some programs, such as Swluce and ReadCfg, provide a way to exit. For example, tap
its associated icon from the taskbar, and then tap Exit on the pop-up menu.
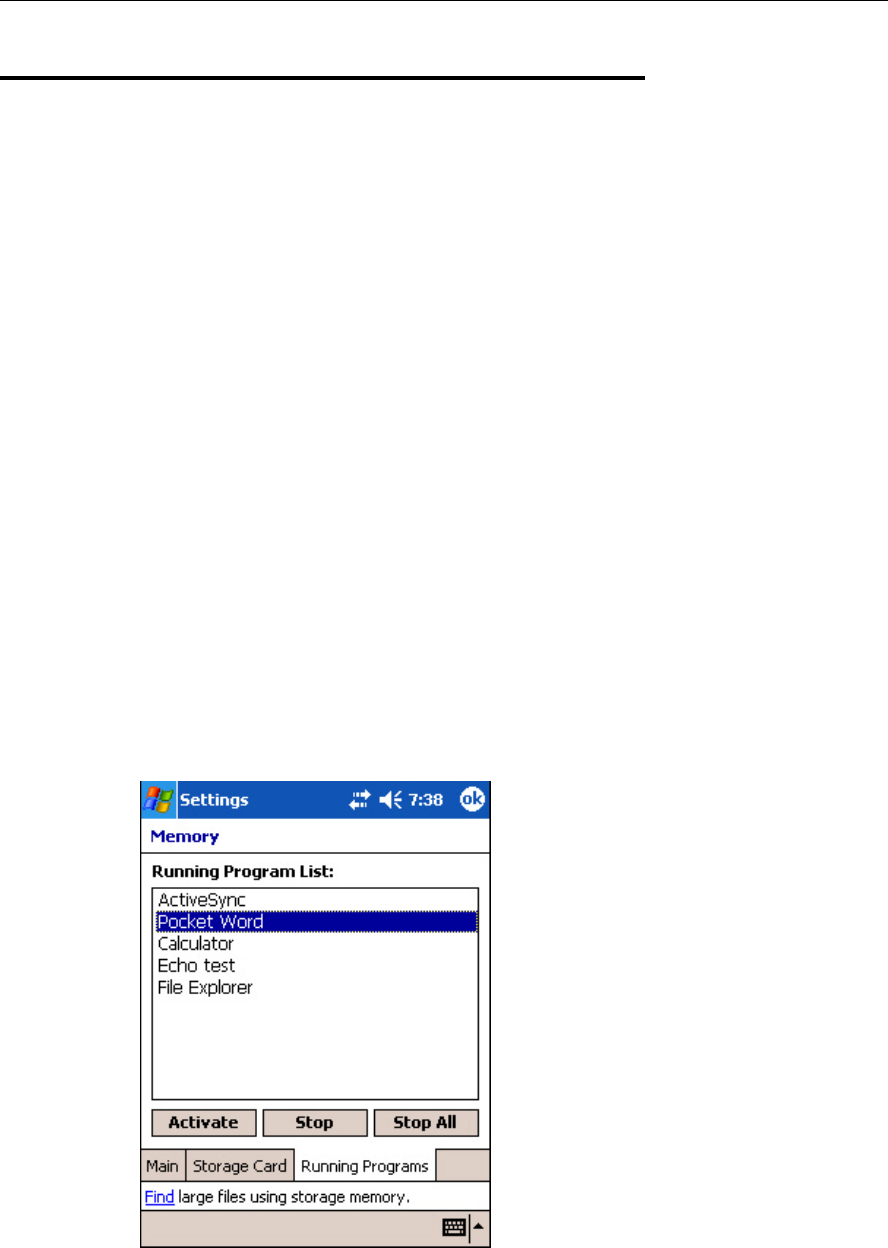
3.5.1 Stop a Running Program
Go to Start > Settings > System tab, and then select Memory. In the Running Programs tab,
select a program that you want to stop. Alternatively, you may select to stop all the
programs that are running.

Chapter 3 ᙑᎄ!ࡸآࡳᆠᑌڤΖ 53
Warning: Always remember to save data before you tap the Close button or stop the
program.
3.5.2 Switch between Programs
This is an alternative to switch between programs. Go to Start > Settings > System tab, and
then select Memory. In the Running Programs tab, select a program that you want to use now.
Then tap the Activate button to switch to that program.
54 CPT-9500 Reference Manual
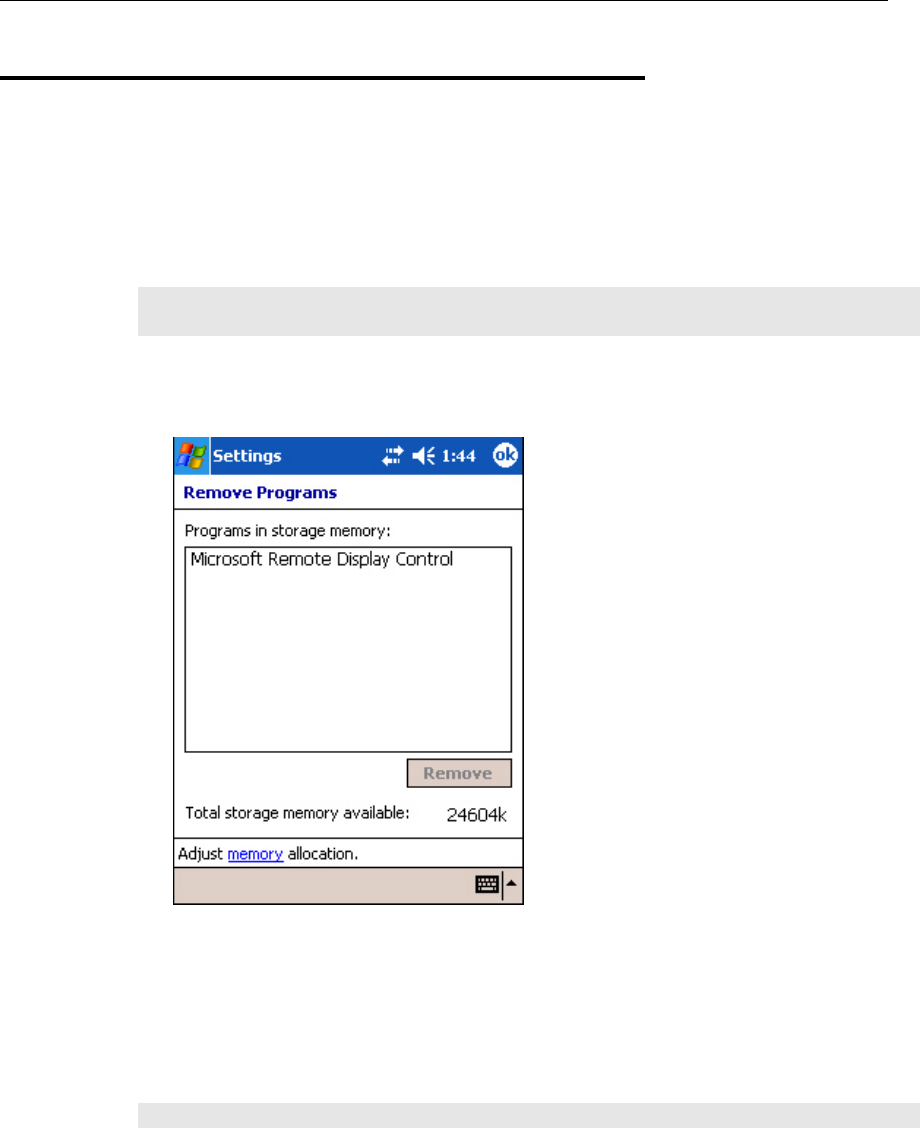
3.6 Remove a User Program
When you install a program, it may be stored in the storage memory of SDRAM. If so, it
will appear in the list of installed programs below.
If a user program is no longer desired, you may remove it from the system.
Note: If the program does not appear in the list of installed programs, you may use File
Explorer to locate it. Tap and hold the program, and select [Delete].
1. Go to Start > Settings > System tab, and then select Remove Programs.
2. Tap the name of the program that you want to delete.
3. Tap [Remove].
4. Tap [Yes] to uninstall the program.
If the program files are still in use, you need to stop the program first.
Go to Start > Settings > System tab > Memory > Running Programs tab.
Note: To free the storage memory, you may need to remove programs as well.

Chapter 3 ᙑᎄ!ࡸآࡳᆠᑌڤΖ 55
3.7 Locate a File
3.7.1 Find a File or an Item
1. Go to Start > Programs, and then select Find.
2. In the Find box, enter the file name, word, or other information you want to search for.
If you have looked for this item before, tap the drop-down menu and select it.
3. In the Type box, select a data type to help narrow your search.
If the data type of your file is other than listed, you may try [Larger than 64 KB].
However, if such file is less than 64 KB, it will not be searchable.
4. Tap [Go]. It will start to search through My Documents folder and its subfolders, as
well as DiskOnChip.
5. In the Results list, tap the item you want to open.
In the sample screen above, the first file is stored in My Documents folder, and the
second one is in DiskOnChip as indicated by its icon.
56 CPT-9500 Reference Manual
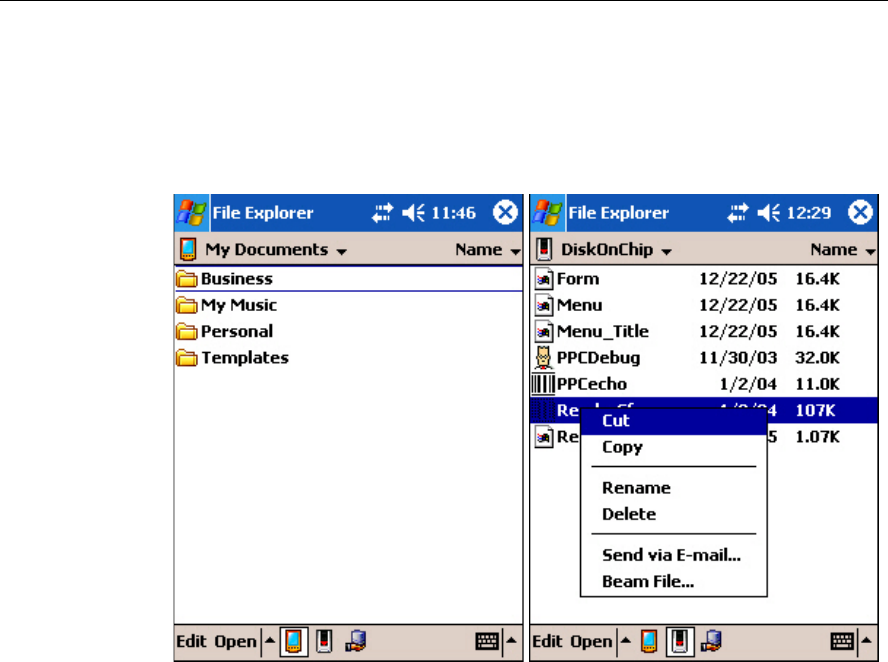
3.7.2 File Explorer
1. Go to Start > Programs, and select File Explorer.
Alternatively, you can press the Task key on the keypad to quick launch File Explorer.
2. Tap the folder list, which is labeled My Documents by default, and then the folder that
you want to view.
3. To open an item, tap it.
To quickly cut, copy, rename, delete, or move an item, tap and hold.
To select multiple items, tap and drag.
Chapter 3 ᙑᎄ!ࡸآࡳᆠᑌڤΖ 57
3.8 Backup and Restore
To best protect your work, you should regularly back up information on your terminal.
You can perform a backup either on your desktop computer or on the terminal.
Use Microsoft ActiveSync on the computer
Use Backup Utility on the terminal
3.8.1 ActiveSync
Use Microsoft ActiveSync to create a backup file that contains all files, databases, personal
information manager (PIM) information, and SDRAM-based programs on your terminal.
The backup file is stored on your desktop computer.
3.8.2 Backup Utility
The program Backup Utility is provided for performing a backup on the terminal. You may
backup your data and/or files to a specific location.

58 CPT-9500 Reference Manual
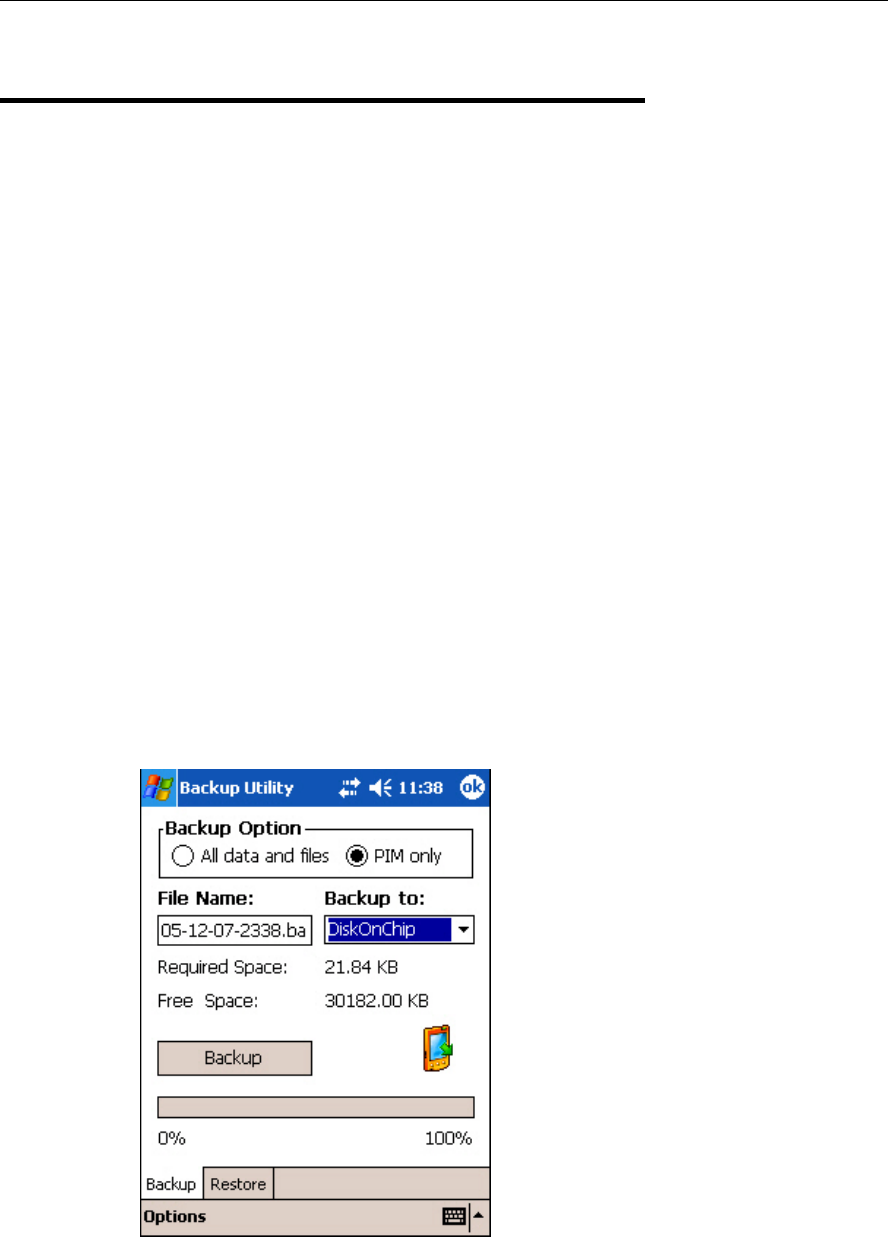
Backup
Backup Option
All data and files
PIM only
When you select to backup all data and files, it means the backup will cover all non-system files and
system registries as well as PIM (i.e. Personal Information Management database, containing
information such as appointments, contacts, and tasks.).
File Name
The default file name is made up by year-month-day-hour&minute for the day.
For example, 06-01-05-1113.bak is a backup file created at 11:13 AM on Jan. 5th, 2006.
Backup to
You may backup your work to one of the following folders.
DiskOnChip (Flash)
My Documents folder (SDRAM)
Memory card if installed (SD or CF)
Warning: If you select to backup to My Documents folder, you may risk having data
erased after a hard reset. It is suggested that you backup critical data to
DiskOnChip.
1. Go to Start > Programs > Utilities folder, and then select Backup Utility.
2. Select to backup all or PIM only.
3. Give a new file name if necessary.
4. Select a destination folder for backup.
5. Tap the Backup button.
Restore
If you ever backup your data and/or files, you are able to restore them to the
terminal. This is helpful when you find data or file damaged, or a hard reset is
performed by accident.
1. Go to Start > Programs > Utilities folder, and then select Backup Utility.
2. Select to backup all or PIM only.
3. Give a new file name if necessary.
4. Select a destination folder for backup.
59
In this chapter, a brief on the system settings is provided for your reference.
For detailed information on Settings, go to Start > Settings > Help.
Note: User settings are stored in SDRAM and will be overwritten by the system defaults
after a hard reset.
In This Chapter
4.1 Personal tab.................................................................. 56
4.2 System tab.................................................................... 56
4.3 Connections tab ........................................................... 56
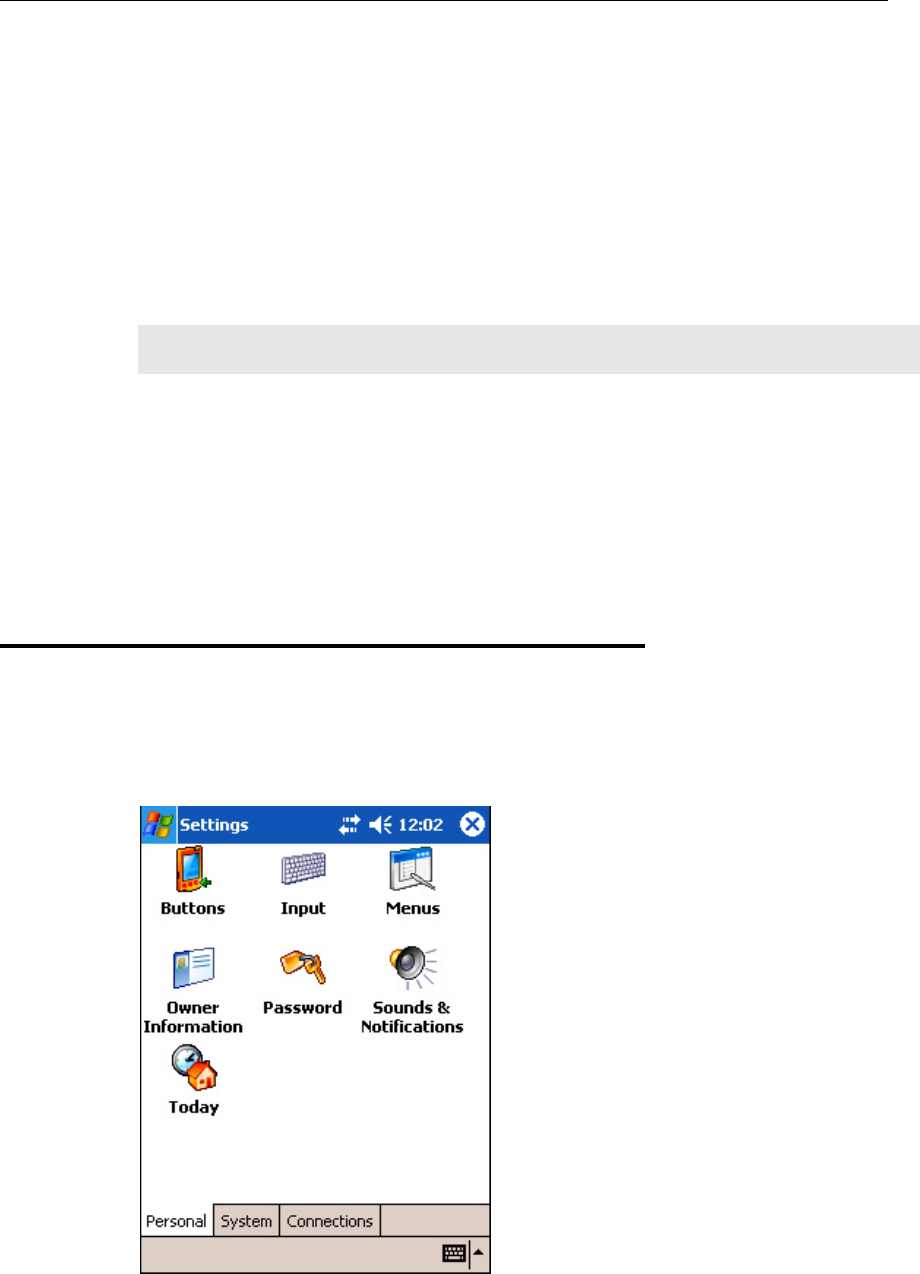
4.1 Personal tab
Go to Start > Settings > Personal tab. Here you may set up your personal profile that
includes personal information, preferred configuration settings, etc.
CHAPTER 4
Settings

60 CPT-9500 Reference Manual
Start > Settings > Personal tab
Buttons Program Buttons tab: Customize [Button 1], the [Task] key on the physical
keypad of your terminal, to open your most used program. By default, pressing
the [Task] key will invoke File Explorer.
Up/Down Control tab: Adjust the delay and repeat rates of the Up/Down control
scrolls.
Input Input Method tab: Customize the input method via soft input panel (SIP). The
same options can be accessed by tapping the arrow next to the SIP button and
then Options.
Word Completion tab: Make use of this feature to facilitate input.
Options tab: More general features. Voice recording is not applicable.
Menus Start Menu tab: Select program shortcuts that will appear on the Start menu.
New Menu tab: Select items that will appear on the New button menu when it is
turned on.
Owner
Information
Identification/Notes tab: Enter your contact information or notes.
Options tab: Select to display your identification information or notes when it is
turned on.
Password Password tab: Apply password protection to limit access to the terminal.
Hint tab: Enter a password hint as a reminder.
Sounds &
Notifications
Sounds tab: Configure sounds for specific actions, events, programs, etc.
Notifications tab: Select to play sounds as notifications for some events.
Today Appearance tab: Customize the theme and background of the Today screen.
Items tab: Select items that will appear on the Today screen, and configure
Today timeout.
Chapter 4 ᙑᎄ!ࡸآࡳᆠᑌڤΖ 61
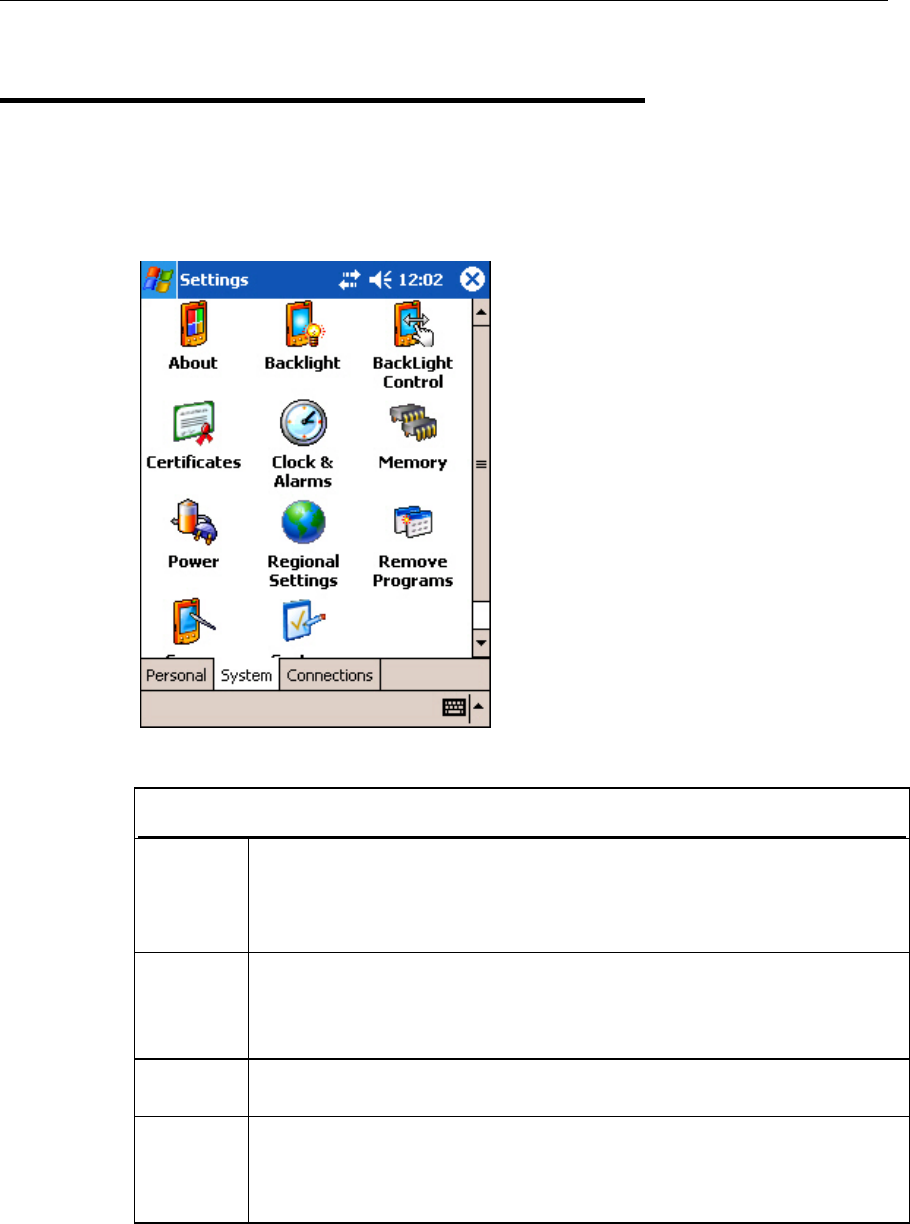
4.2 System tab
Go to Start > Settings > System tab. Here you may verify, and sometimes make changes to,
system parameters. Tap an icon to configure system settings by category.
Start > Settings > System tab
About Version tab: It displays information of OS software, processor, etc.
Device ID tab: You may enter a name and description for identifying the
terminal.
Copyrights tab: It displays important statements on copyrights.
Backlight Battery Power tab: You may configure when to turn on/off the backlight when
on battery power.
External Power tab: You may configure when to turn on/off the backlight when
on external power (the terminal being seated in the cradle for charging).
BackLight
Control
You may use the slider to adjust the brightness of the LCD backlight. In
addition, you may select to auto adjust it by the battery's capacity.
Certificates Personal tab: You may use personal certificates to establish your identity when
logging onto a secured network.
Root tab: You may use root certificates to establish the identity of other
computers such as servers.

62 CPT-9500 Reference Manual
Clock &
Alarms
Time tab: You may have at most two time zones, one is Home-based system
time, and the other can be the place you visit often.
Alarms tab: You may set up at most three alarms to wake you up or as a
reminder.
Memory Main tab: You may use the slider to adjust the SDRAM allocation.
Storage Card tab: You may view the memory occupation of DiskOnChip
(flash-based) or any storage card.
Running Programs tab: You may activate or stop any program from the list.
Power Battery tab: You may view the current charge of main and backup batteries.
Wireless tab: You may configure to turn on/off the wireless signals
individually.
Advanced tab: You may configure to turn off the device when it is idle for a
specific period of time, either on battery or external power.
Regional
Settings
Region tab: You may customize the appearance and formatting to your
geographic region.
Number tab: You may further customize the number formats.
Currency tab: You may further customize the currency formats.
Time tab: You may further customize the time format.
Date tab: You may further customize the date format.
Remove
Programs
You may remove programs that are stored in SDRAM.
Screen Alignment tab: You may perform screen alignment.
Clear Type tab: You may apply Clear Type fonts.
Text Size tab: You may use the slider to adjust the text size.
System
Console
System Information tab: It displays important system information, such as
software version, supported Bluetooth profiles, etc.
Power Manager tab: You may change the CPU speed and apply Key Lock to
prevent unintended operation.
Autorun tab: You may configure the autorun feature of SD/MMC card.
Chapter 4 ᙑᎄ!ࡸآࡳᆠᑌڤΖ 63
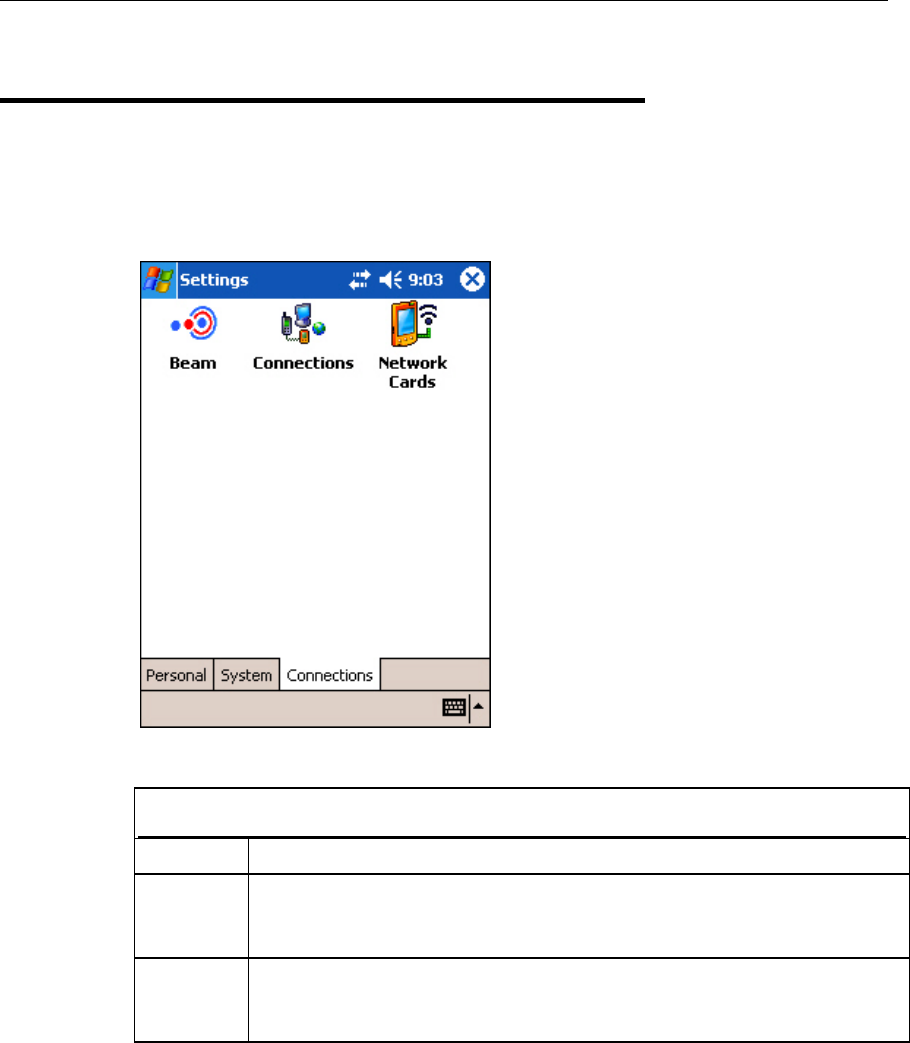
4.3 Connections tab
Go to Start > Settings > Connections tab. Here you may verify or manually set up
connections. Tap an icon to configure network settings by category.
Start > Settings > Connections tab
Beam It is not applicable because the terminal is not equipped with any IrDA port.
Connections Tasks tab: You may configure two groups of connections settings, My ISP and
My Work Network.
Advanced tab: More options.
Network
Cards
Wireless tab (if Wi-Fi power is enabled): You may configure wireless
networks.
Network Adapters tab: You may configure network adapters.

64 CPT-9500 Reference Manual
65
The 9500 terminal provides several utilities which can be made accessible from the Today
screen.
In This Chapter
5.1 ReaderCfg.................................................................... 56
5.2 Wireless Power Manager............................................. 56
5.3 Bluetooth Manager ...................................................... 56
5.4 Wi-Fi Utility ................................................................ 56
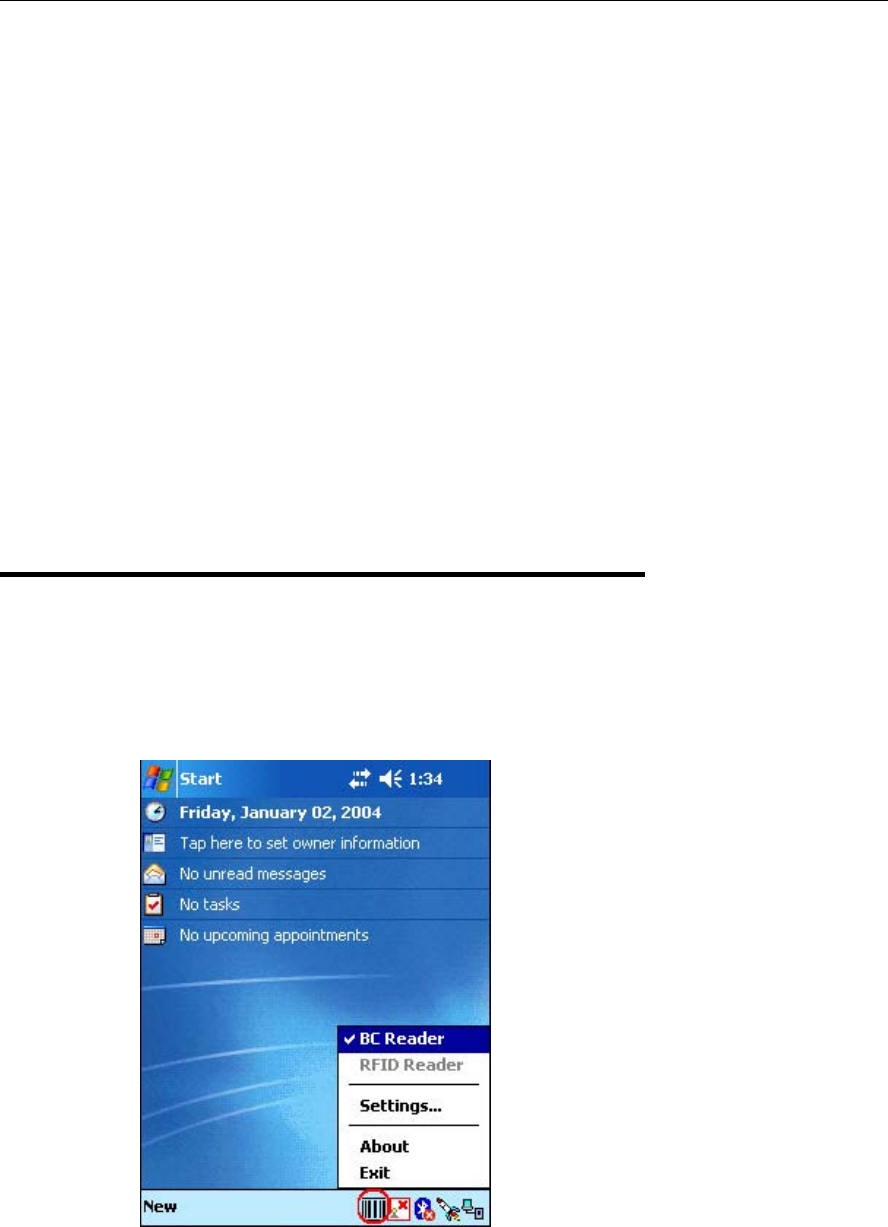
5.1 ReaderCfg
From the Today screen, the barcode button on the taskbar is a shortcut that allows you to
choose and enable the reader, BC Reader and/or RFID Reader. It also allows configuring
reader settings.
CHAPTER 5
Utilities
66 CPT-9500 Reference Manual
Note: The program ReaderCfg will auto detect reader module that is currently installed in
the terminal.
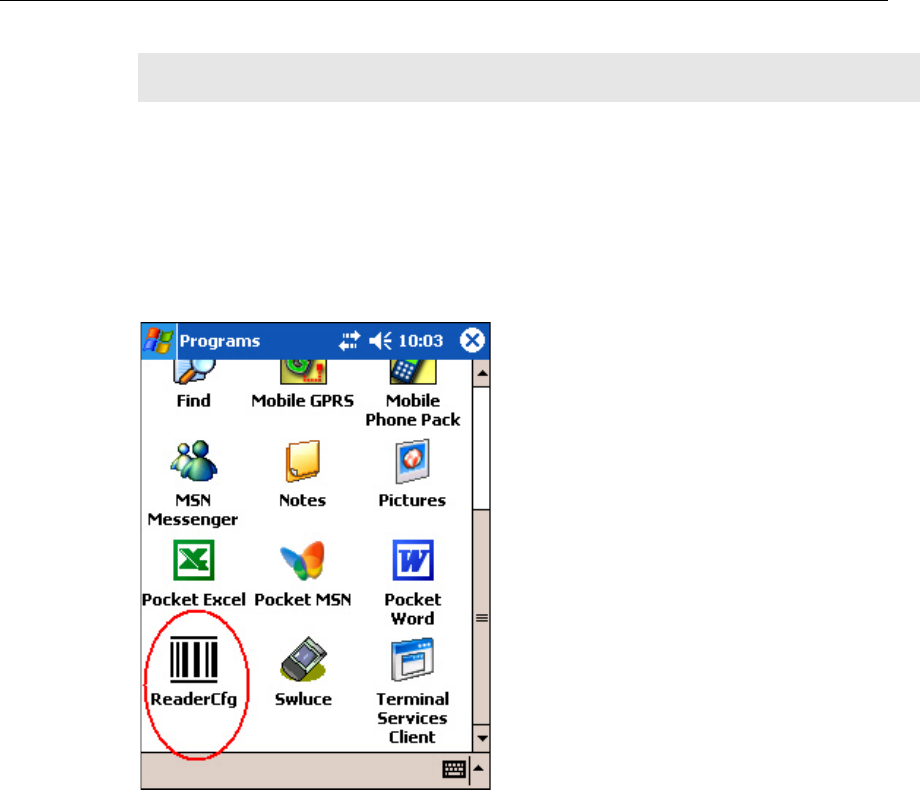
5.1.1 Barcode Button Not Created
If the button is not created on the taskbar, go to Start > Programs and select ReaderCfg. The
barcode button will appear now.
Chapter 5 ᙑᎄ!ࡸآࡳᆠᑌڤΖ 67
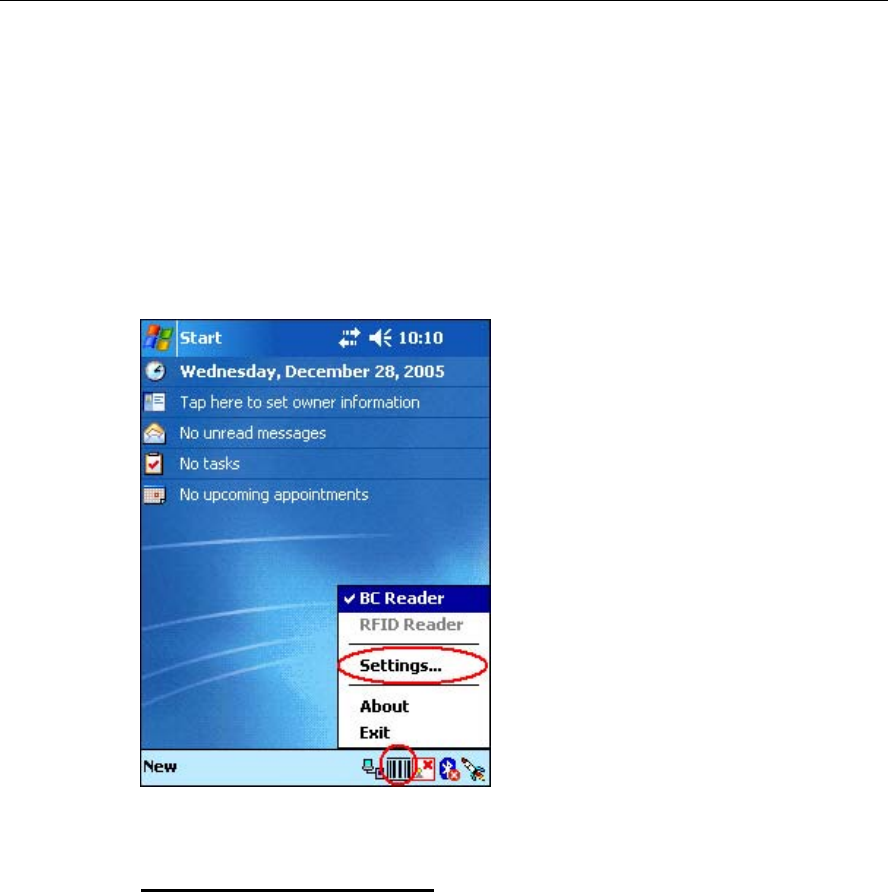
5.1.2 Configure Reader Settings
Tap the barcode button, and then select BC Reader or RFID Reader. If it is ticked, the reader
is enabled. Otherwise, it is disabled.
The default reader is BC Reader for reading barcodes. If the RFID Reader is installed, the
option will be available. If you need to change the factory settings, tap the barcode button,
and then select Settings.
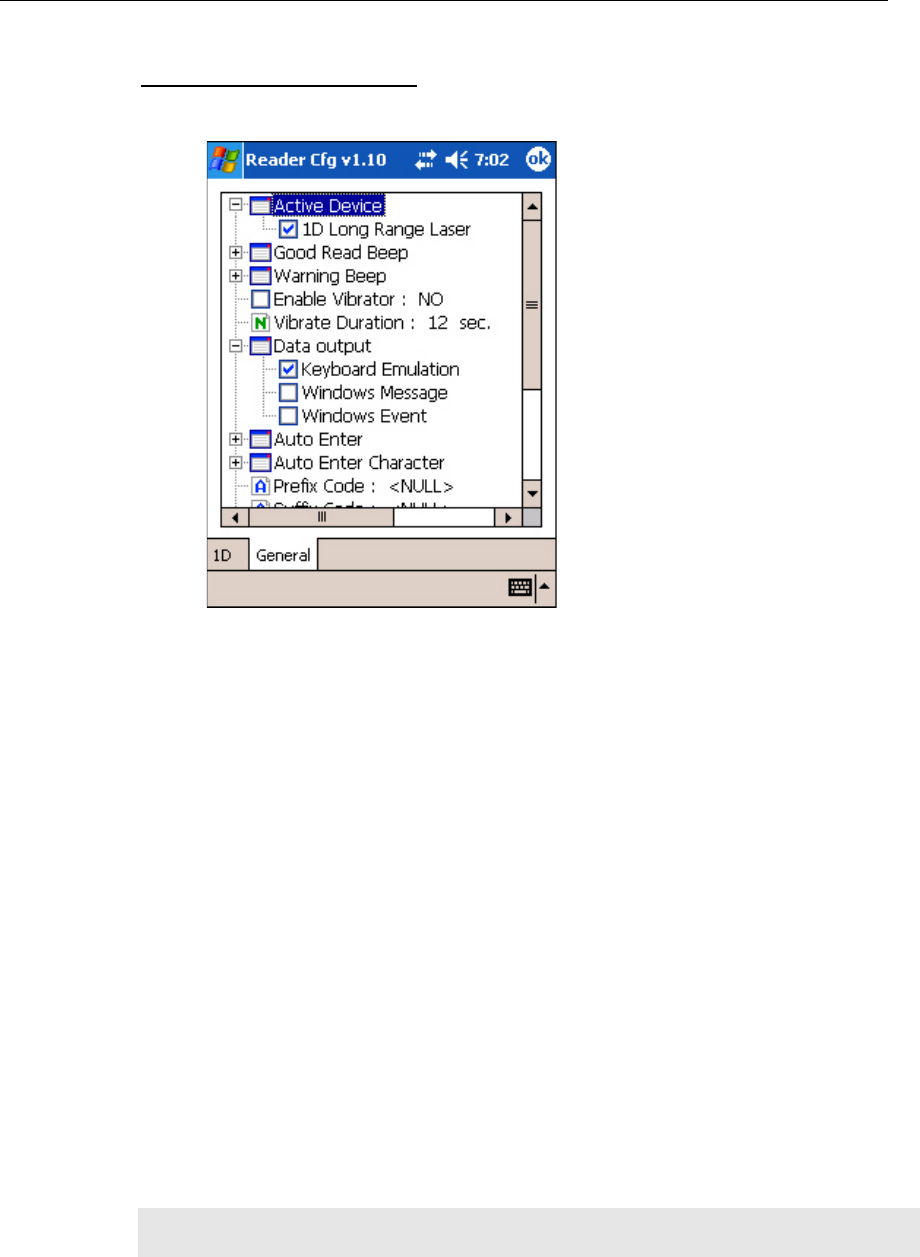
General tab > Active Device
The scan engine can be identified here.
1D Reader, or 1D Long Range Laser, or 2D
RFID
68 CPT-9500 Reference Manual
General tab > Data Output
There are three options for data output after decoding:
Keyboard Emulation
- Data is emulated as typed text and sent to the active Window.
- Simply run your application or Pocket PC built-in program, such as Pocket
Excel, to start with data collection.
Windows Message
- Data is encapsulated in a Windows message (WM_COPYDATA).
- Retrieve the WM_COPYDATA message in your application.
- The decoded data is passed to your application through the IParam parameter.
Windows Event
- Whenever the reader reads a barcode, a Windows event object named
“DecodeEvent” will be signaled and the data will be stored in the Windows
message queue.
- Need to create an event object named “DecodeEvent” in your application so
that the ReaderCfg utility can signal your application using this event object.
- Call Windows API (ReadMsgQueue) in your application to retrieve the
decoded data.
Sample programs are provided for Windows Message & Event programming. For
details, please contact the technical support team of Syntech Information.
Note: For the use of a different program rather than ReaderCfg, a dynamic-link library
(DLL) file is provided.
Chapter 5 ᙑᎄ!ࡸآࡳᆠᑌڤΖ 69
5.2 Wireless Power Manager
The 9500 terminal can be configured with one or a combination of the following wireless
connectivity:
WLAN (802.11b)
Bluetooth
The Wireless Power Manager is a control panel applet, which allows you to choose and
enable the wireless connectivity, WLAN (802.11b) and/or Bluetooth. That is, the power to
the wireless module is turned on and the software driver is installed. After the initialization
process, you are able to configure wireless settings through Bluetooth Manager or Wi-Fi
Utility.
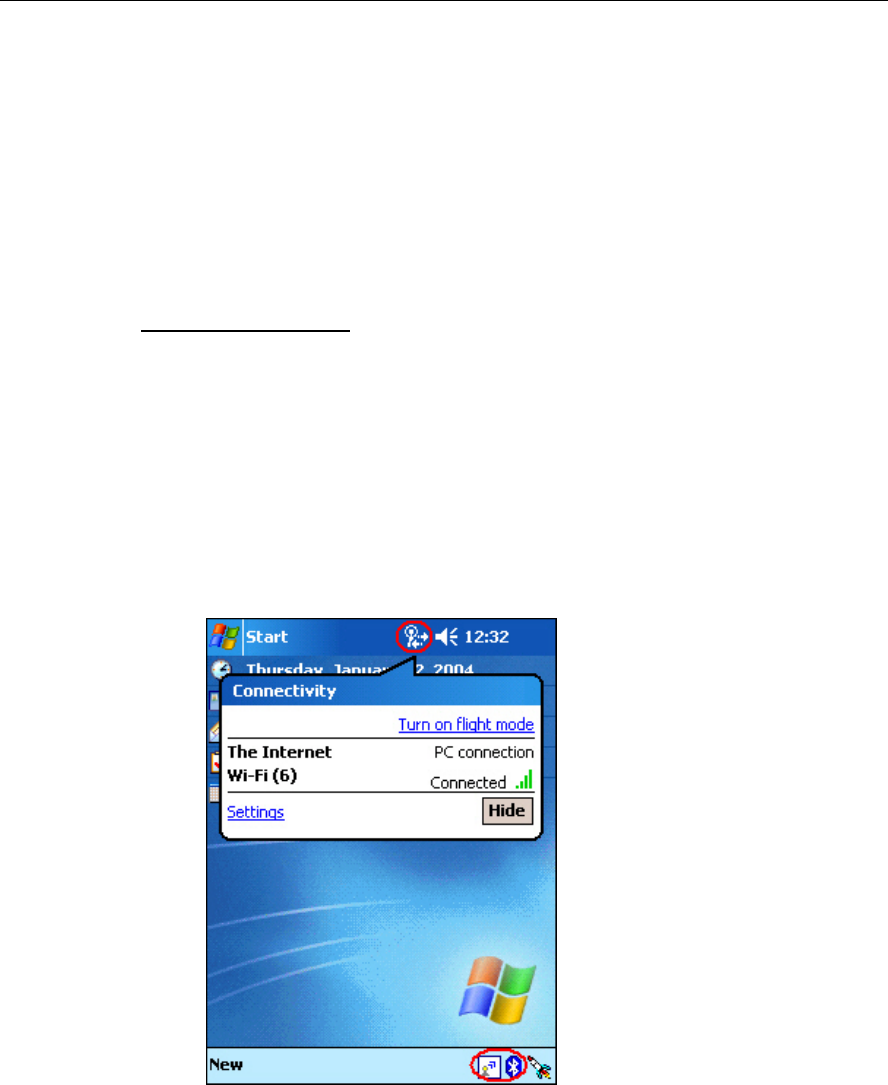
For up-to-date status information on connections, tap the Connectivity button at the top of
Today screen.
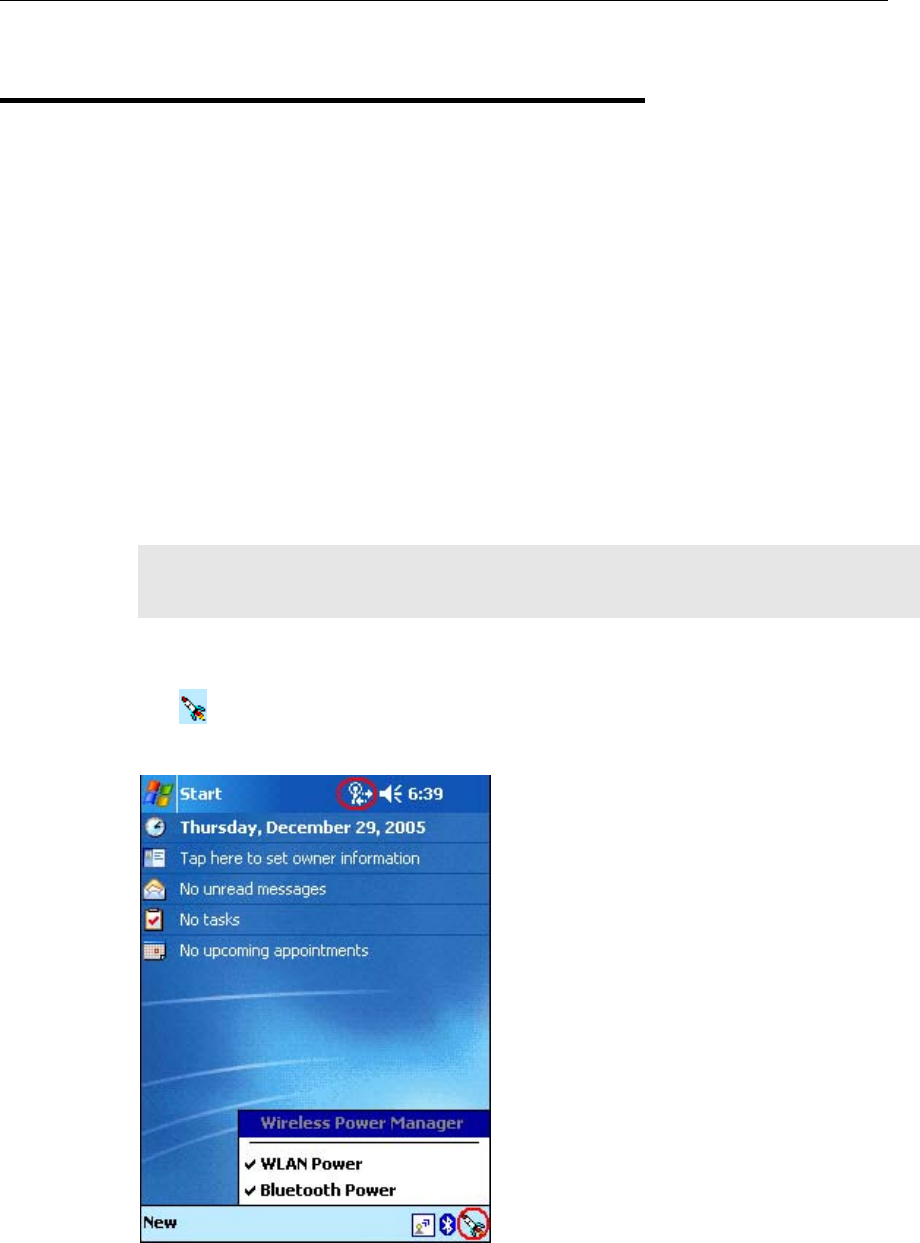
Note: You may need to turn off the wireless power or simply stop the wireless signals at
times, in order to conserve battery power, or in situations where the use of radio is
prohibited, such as on airplanes and in hospitals.
Tap on the taskbar, and then select WLAN Power or Bluetooth Power. If it is ticked, then
the wireless connectivity is enabled. Otherwise, it is disabled.
70 CPT-9500 Reference Manual
It results in the same behavior as you go to Start > Settings > System tab > Power > Wireless
tab.
To disable the wireless connectivity, you may clear the check box of Bluetooth and/or
802.11b.
To enable it again, select any of the check boxes.
Note: The wireless power settings are provided only when the wireless power is turned on
from the Wireless Power Manager.
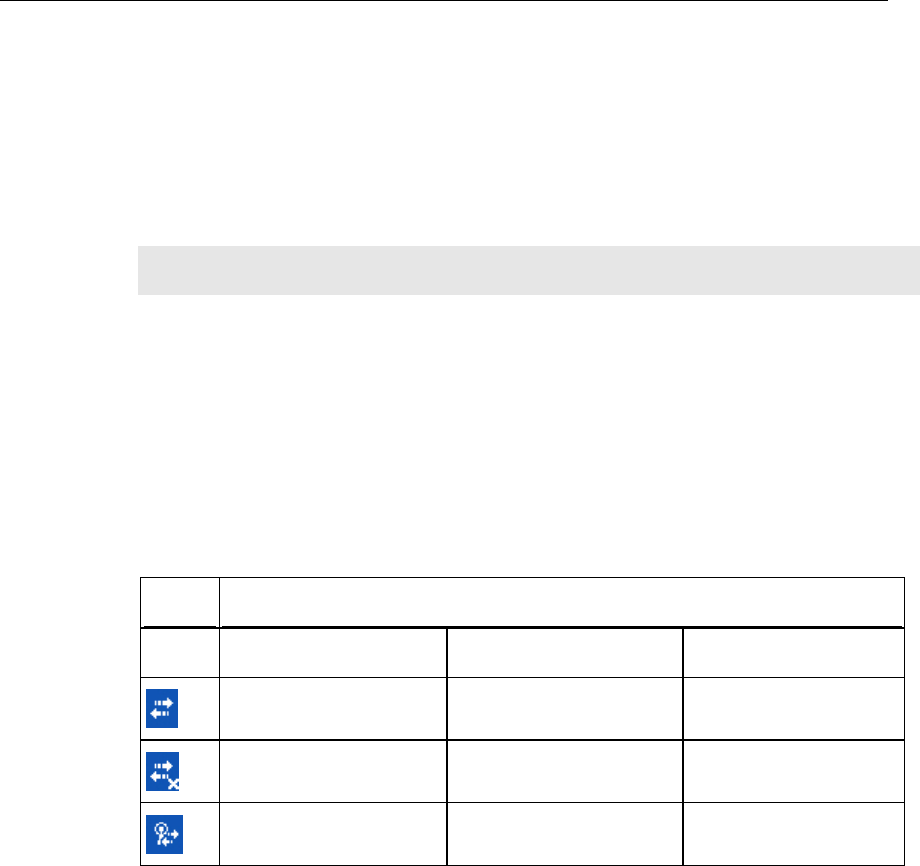
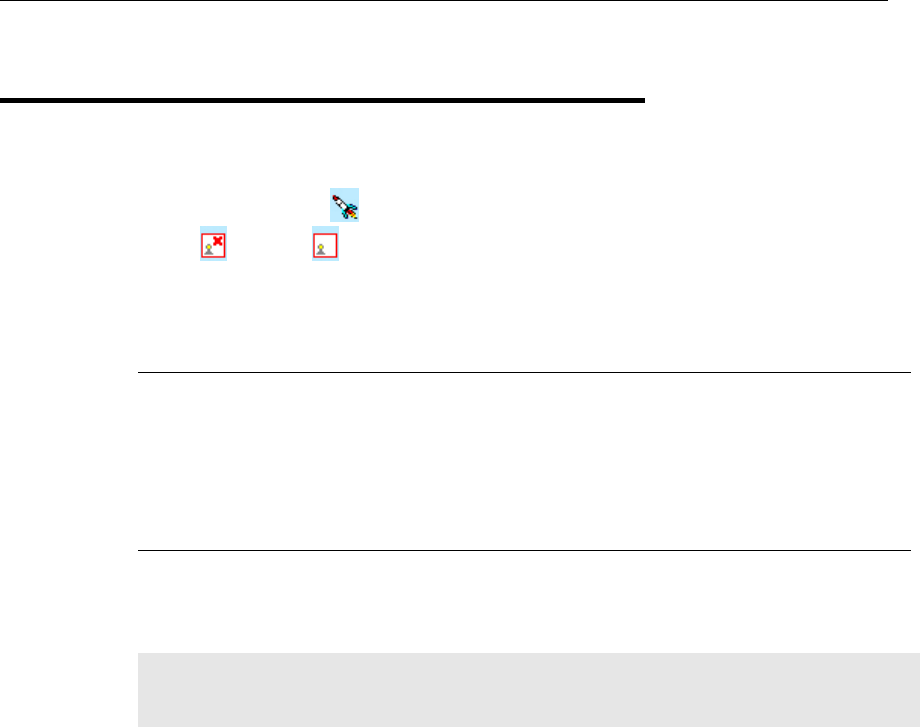
5.2.1 Connectivity Status
For the Connectivity button, its icon may change to indicate different status. However, no
specific icon is used to indicate whether Bluetooth is enabled or not. Instead, you will need
to check the Bluetooth button on the taskbar.
Icon Meaning
USB Connected Bluetooth enabled Wi-Fi enabled
Yes N/A No
No N/A No
Depends N/A Yes
Chapter 5 ᙑᎄ!ࡸآࡳᆠᑌڤΖ 71
5.2.2 Flight Mode
The power to the wireless module is controlled by Wireless Power Manager. This flight
mode setting is provided only when the wireless power is turned on through Wireless Power
Manager.
Turn on flight mode
When the flight mode is turned on, it immediately stops the use any wireless
connections, Bluetooth and Wi-Fi, which could possibly interfere with other
equipment especially when on an airplane or in a hospital. However, you will find
that the wireless power is still enabled (ticked) in Wireless Power Manager.
Tap the Connectivity button, and then tap Turn on flight mode. Wireless signals will
be stopped temporarily and can be recovered later by tapping Turn off flight mode.
It results in the same behavior as you go to Start > Settings > System tab > Power >
Wireless tab, and tap Wireless signals off (Flight mode).
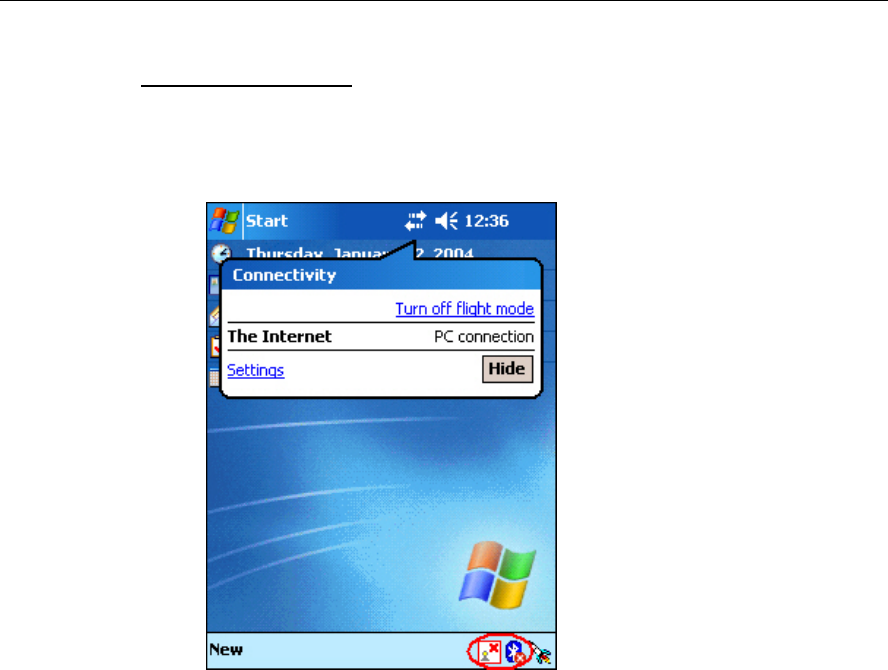
72 CPT-9500 Reference Manual
Turn off flight mode
To restart the wireless connection, tap Turn off flight mode.
It results in the same behavior as you go to Start > Settings > System tab > Power >
Wireless tab, and tap Wireless signals on.
Chapter 5 ᙑᎄ!ࡸآࡳᆠᑌڤΖ 73
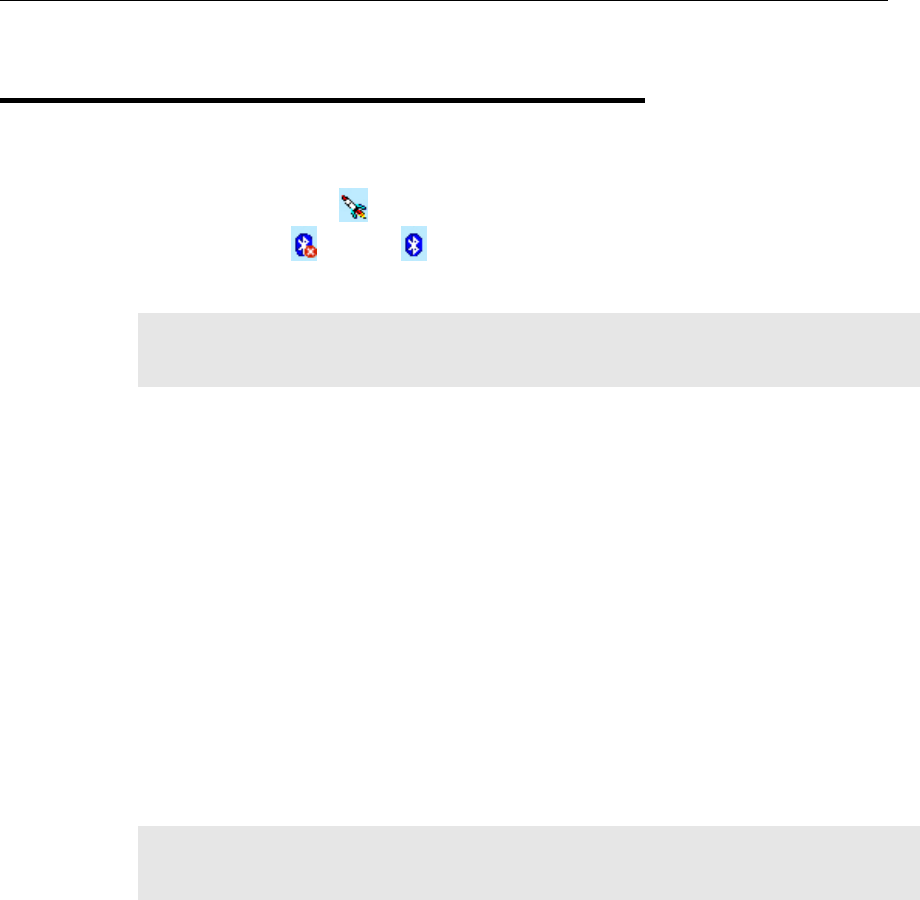
5.3 Bluetooth Manager
Tap the rocket button on the taskbar, and then select [Bluetooth Power]. When the
Bluetooth button becomes , it indicates the Bluetooth power is turned on. You may
tap it to configure the Bluetooth settings.
Note: In Wireless Power Manager, Bluetooth is enabled if it is ticked; otherwise, it is
disabled. However, it may be interfered by the flight mode switching of
Connectivity status.
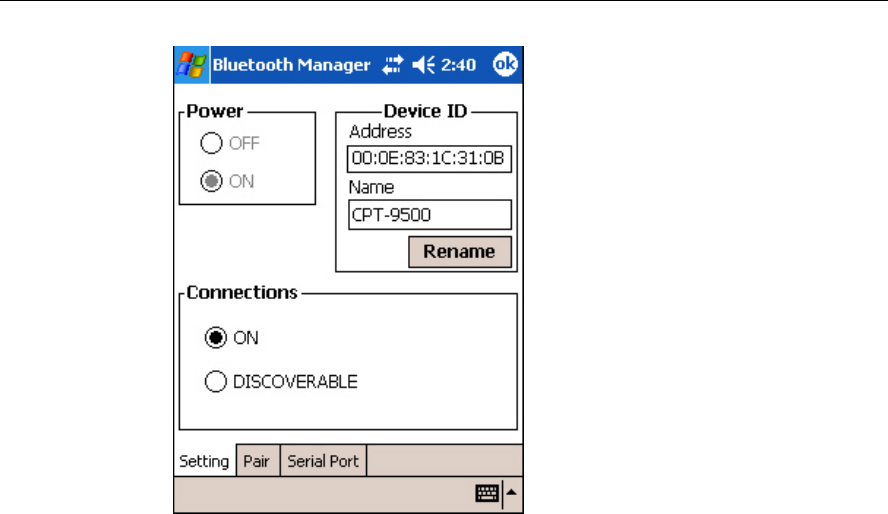
5.3.1 Setting tab
Power
This option is unavailable for it is controlled by Wireless Power Manager. It simply
indicates the Bluetooth power status.
Device ID
You may rename the terminal. Usually a friendly Bluetooth name.
Connections
[ON] is selected by default, for making connection to a remote device. (9500 as Client)
[DISCOVERABLE] must be selected if the terminal wishes to be discovered by other
devices. (9500 as Server)
Note: Select [DISCOVERABLE] if you want the terminal to provide the Bluetooth
services to a remote device at the same time. Any Bluetooth-enabled devices will be
able to discover the terminal within range.
74 CPT-9500 Reference Manual
Chapter 5 ᙑᎄ!ࡸآࡳᆠᑌڤΖ 75
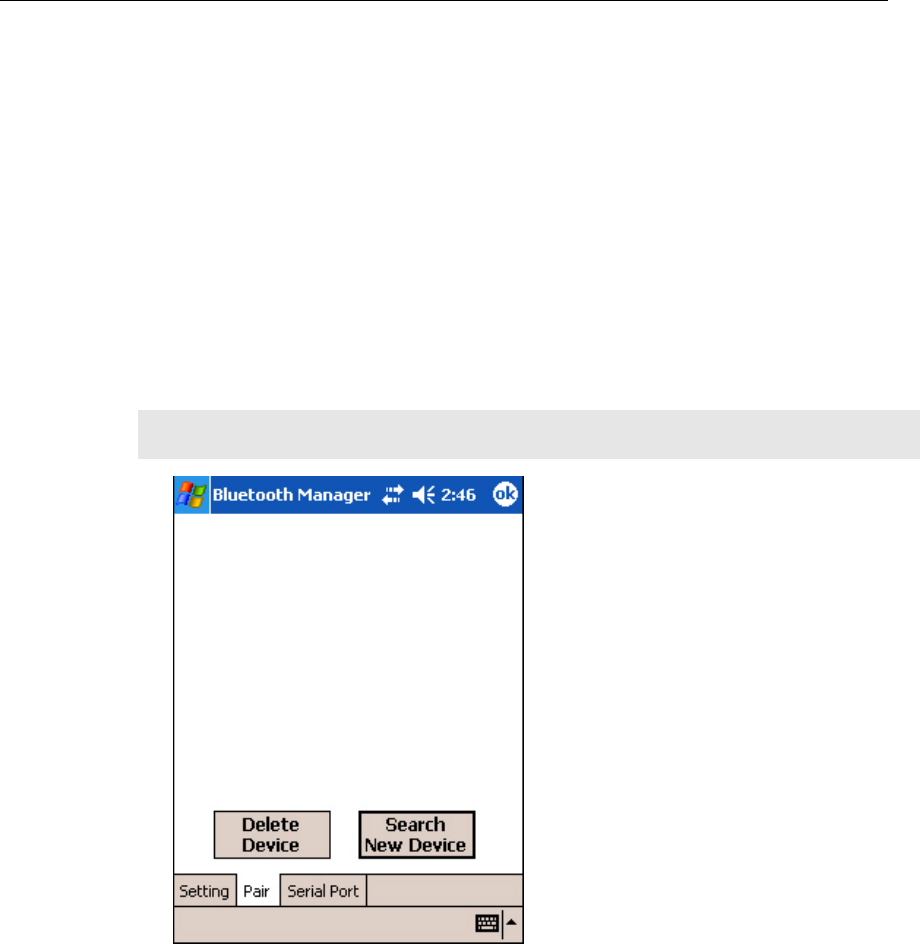
5.3.2 Pair tab
Here is the Bluetooth paired device list, which is identical to the one found under Start >
Settings > Connections tab > Bluetooth > Devices tab. It may show any previously paired
devices.
If it is blank, tap [Search New Device] to discover any Bluetooth-enabled devices
within range. It will generate a list of discovered devices. Select one device from the list.
It will start the pairing procedure to establish a trusted relationship between the device
and the terminal.
To unpair with a device from the paired device list, select the device and tap [Delete
Device].
Note: The terminal must be unpaired on the remote device as well. (Both devices must be
unpaired!)
76 CPT-9500 Reference Manual
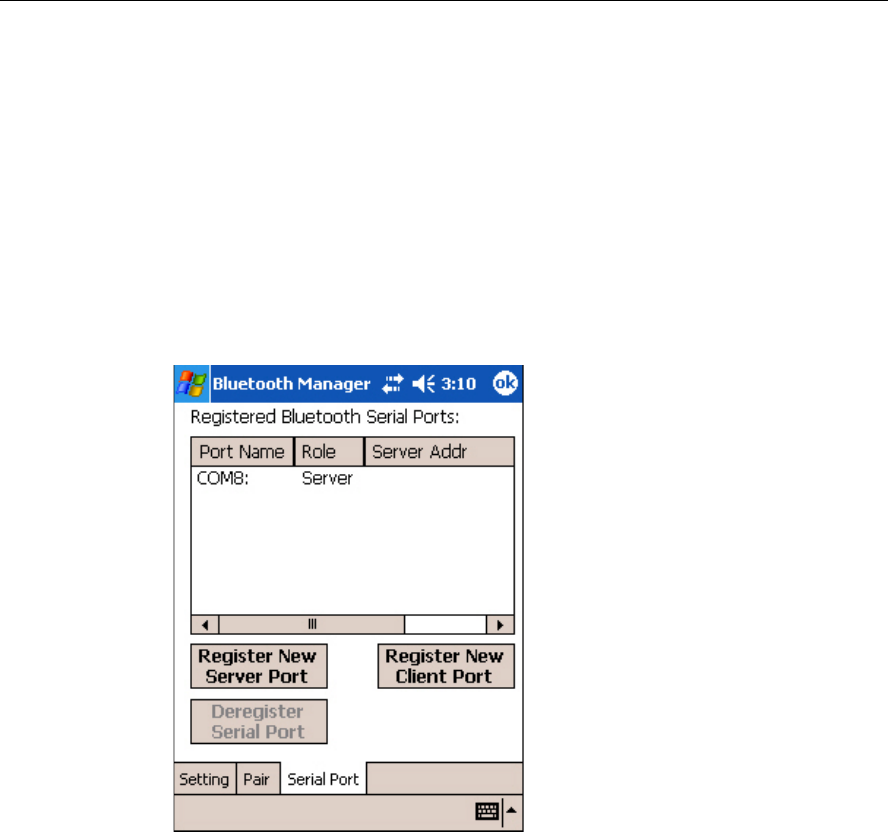
5.3.3 Serial Port tab
At the last stage of establishing a Bluetooth connection, a dialog box prompts to ask
whether you want to register a COM port for the Bluetooth Serial Port service. If you tap
[No] to close that dialog box, you may still register a serial port in this tab.
COM8 is registered as Server Port by default. The connection will be initiated by a
remote device.
Tap [Register New Client Port] for a connection initiated by the terminal.
If you want to delete the registry of a server or client port, select a Port Name from the
list and tap [Deregister Serial Port].
Chapter 5 ᙑᎄ!ࡸآࡳᆠᑌڤΖ 77
5.4 Wi-Fi Utility
Tap the rocket button on the taskbar, and then select [WLAN Power]. When the Wi-Fi
button becomes , it indicates the WLAN power is turned on.
Tap it and select from the pop-up menu:
Utility
Select [Utility] to launch Wi-Fi Utility for configuring WLAN settings.
Different approaches are available to access the WLAN configuration:
Go to Start > Settings > Connections tab > Network Cards.
Tap the Connectivity button and select [Settings]. Tap Network Cards.
Exit
If the Wi-Fi button is not desired to be displayed in the Taskbar any more, you may select [Exit] to
remove the program shortcut.
To create this button again, go to Start > Programs and select Swluce.
Note: In Wireless Power Manager, WLAN is enabled if it is ticked; otherwise, it is
disabled. However, it may be interfered by the flight mode switching of
Connectivity status.
78 CPT-9500 Reference Manual
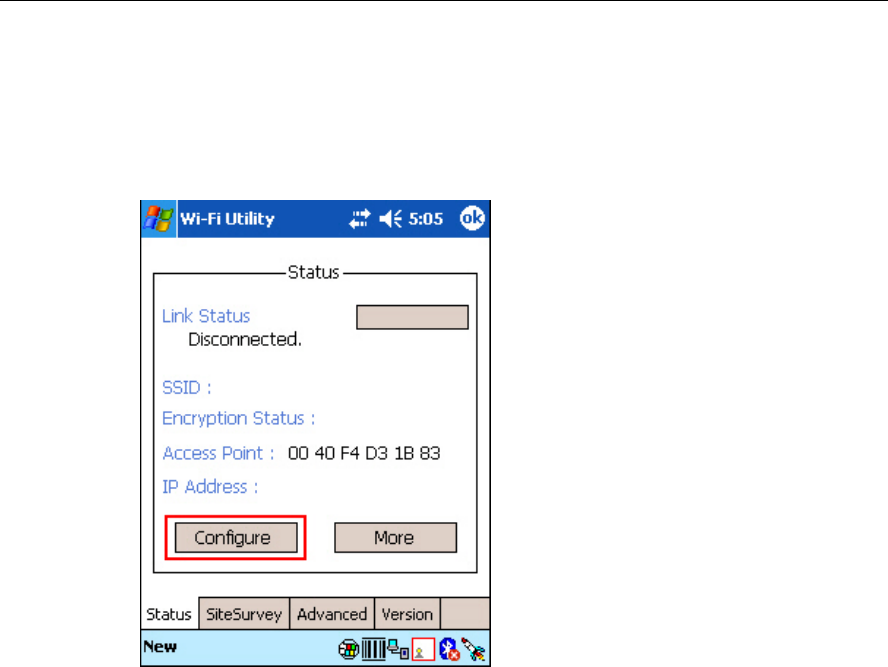
5.4.1 Status tab
For network configuration, tap [Configure]. You may tap [More] to examine signal strength
and network information.
It results in the same behavior when you take one of the following approaches:
Go to Start > Settings > Connections tab > Network Cards.
Tap the Connectivity button and select [Settings]. Tap Network Cards.
Chapter 5 ᙑᎄ!ࡸآࡳᆠᑌڤΖ 79
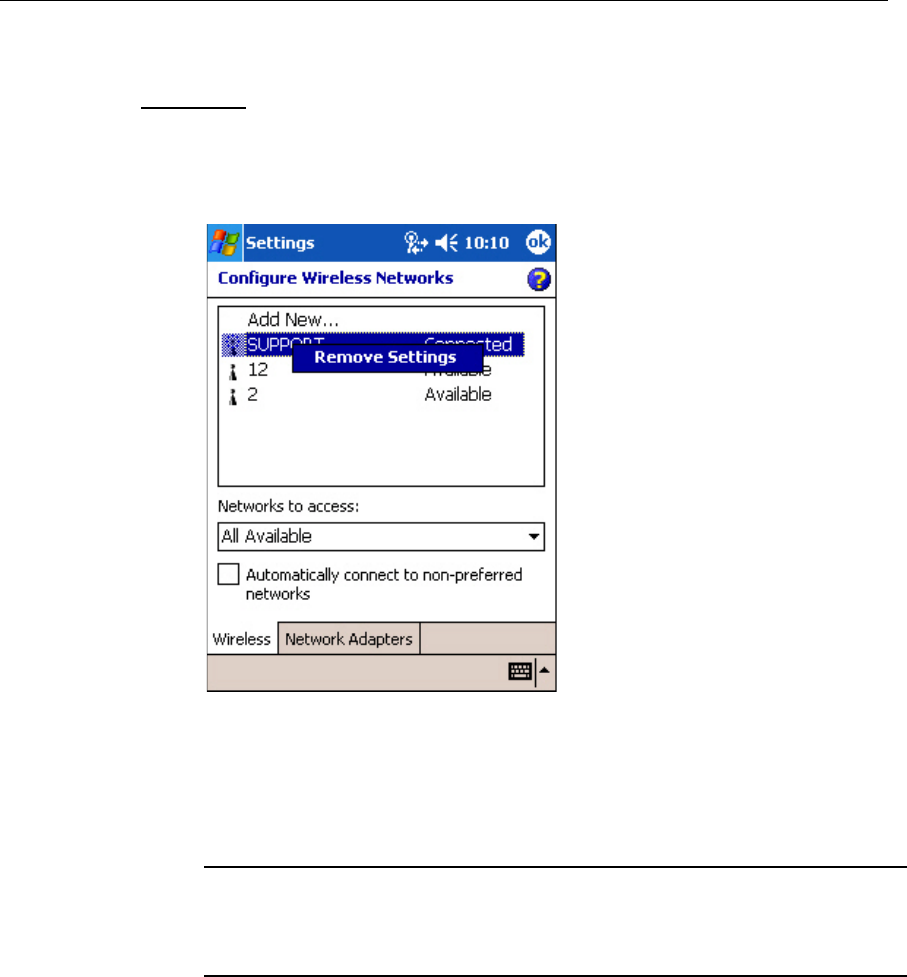
Configure
Wireless tab
Tap and hold a connected item to see a menu. To disconnect a WLAN connection,
select [Remove Settings].
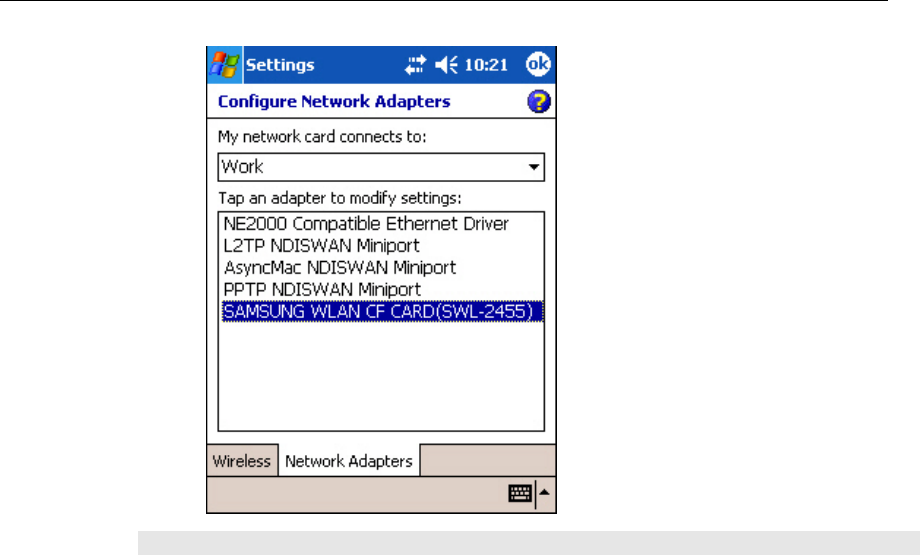
Network Adapters tab
In this tab, you may tap an adapter to modify settings, such as IP address and name
servers. The adapter used for the 802.11b connection is [SAMSUNG WLAN CF
CARD (SWL-2455)].
My network card connects to:
Work: when connecting to a private network, such as a corporate network at work.
The Internet: when connecting to a web site.
Tap an adapter to modify settings:
Because most networks use DHCP, you should not change these settings unless your
network administer instructs you to do so.
80 CPT-9500 Reference Manual
Note: If you select a wrong adapter, it will fail to make any connection.
Chapter 5 ᙑᎄ!ࡸآࡳᆠᑌڤΖ 81
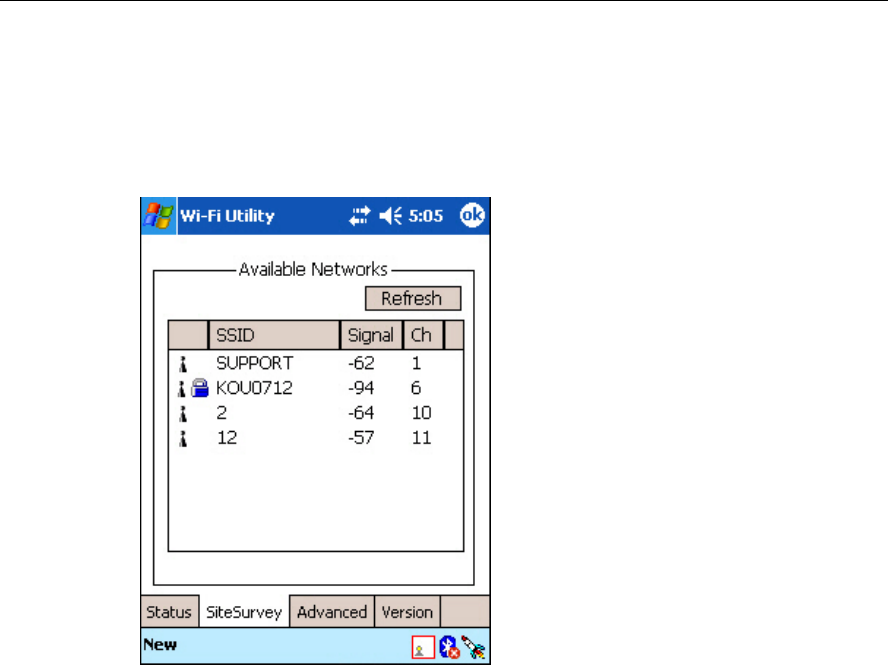
5.4.2 SiteSurvey tab
Here lists available networks. For site survey, tap [Refresh].
82 CPT-9500 Reference Manual
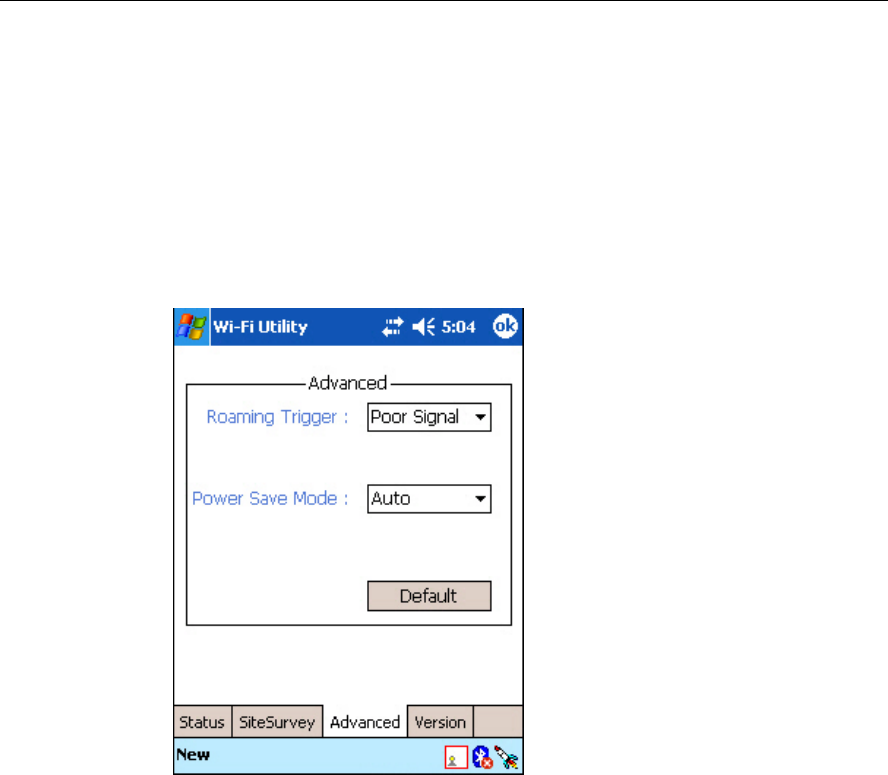
5.4.3 Advanced tab
Roaming Trigger
You may decide the time of roaming, whether when the signal gets poor or no signal at
all.
Power Save Mode
The Power Save Mode may be required to be disabled when connecting to a certain
access point that doesn't support any power-saving mode.
Chapter 5 ᙑᎄ!ࡸآࡳᆠᑌڤΖ 83
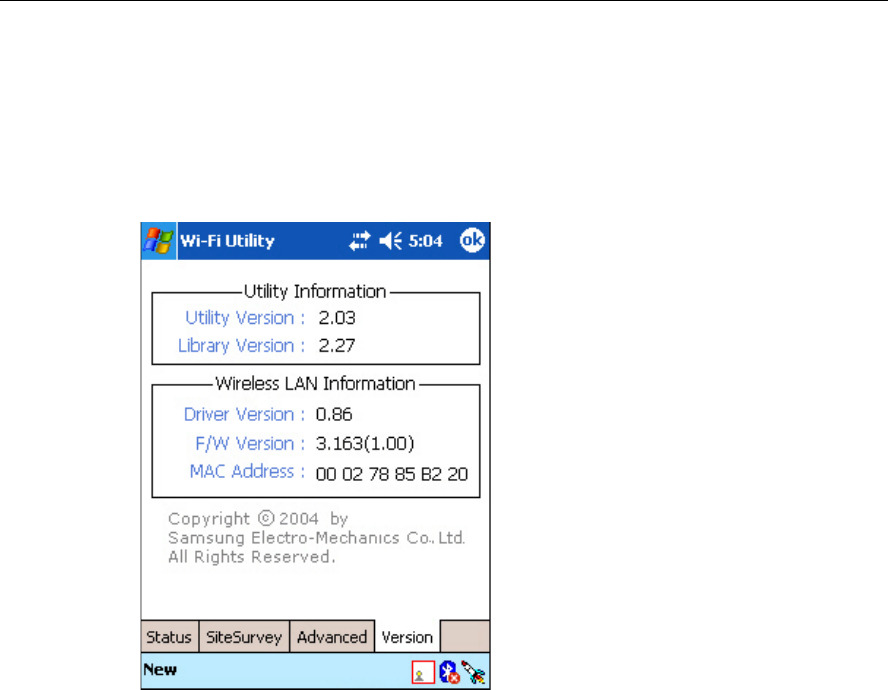
5.4.4 Version tab
Here provides information of the Wi-Fi module. The information is required when you
report a problem.

84 CPT-9500 Reference Manual

85
To set up a Bluetooth connection between a computer and the terminal, you must make sure
that:
The matching Bluetooth services are configured correctly on your computer, such as
availability (Startup Automatically or Manually) and Secure Connection.
The Bluetooth power is enabled both on your computer and the terminal.
The Bluetooth connection is initiated either by your computer or the terminal.
In This Chapter
6.1 Bluetooth Services....................................................... 56
6.2 Bluetooth Enabled ....................................................... 56
6.3 Bluetooth Initiated ....................................................... 56
6.4 Bluetooth Applications ................................................ 56
CHAPTER 6
Set up Bluetooth Connection
86 CPT-9500 Reference Manual
6.1 Bluetooth Services
Bluetooth wireless technology supports a number of profiles (services) for different
applications. Below lists the profiles currently supported on the 9500 terminal.
Generic Object Exchange Profile (GOEP)
Serial Port Profile (SPP)
Synchronization Profile (SYNCH or SP)
Object Push Profile (OPP)
File Transfer Profile (FTP)
Dial-Up Network Profile (DUN)
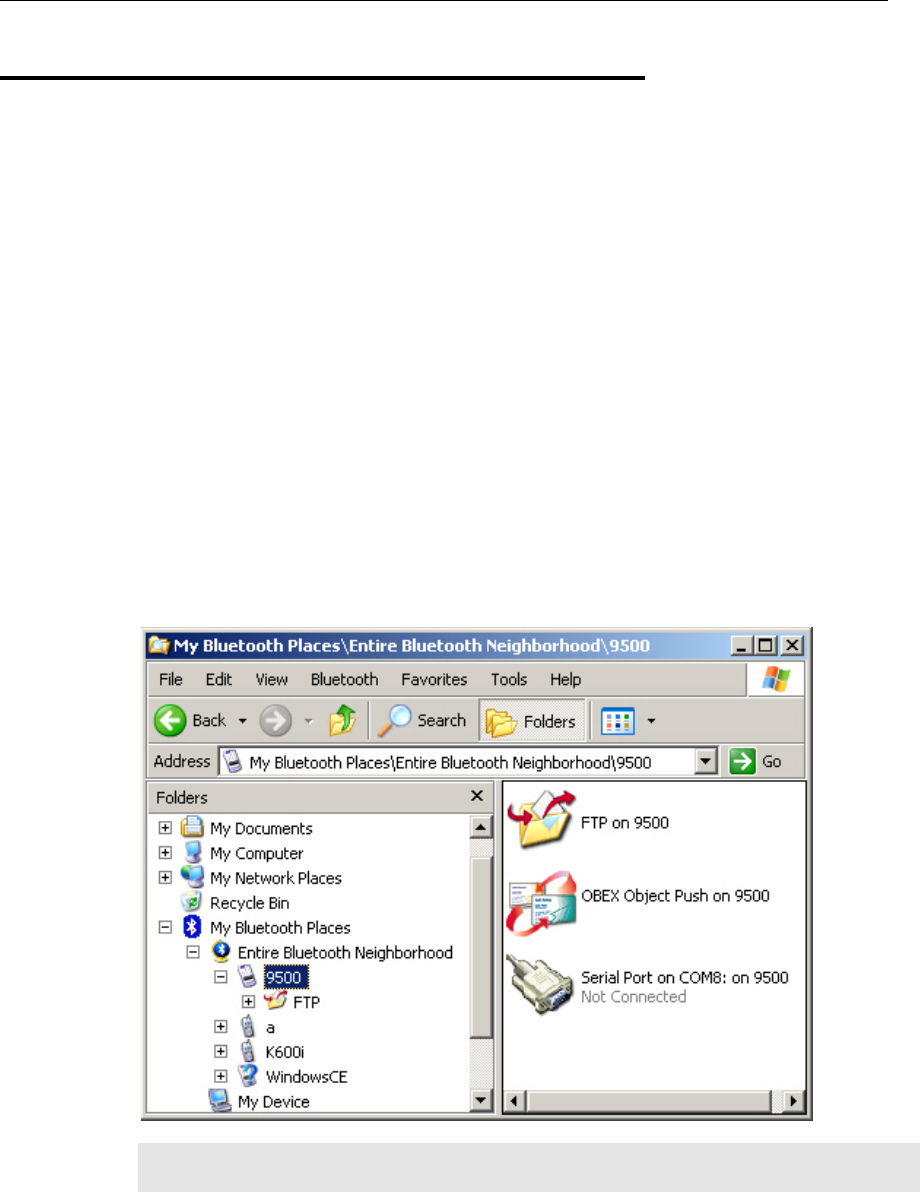
You may discover the services by clicking My Bluetooth Places on the desktop of your
computer. Choose the following Bluetooth tasks: "Search for devices in range" or simply
"View devices in range". Click Entire Bluetooth Neighborhood and select the device name
representing the terminal. The services supported on the terminal will be displayed on the
right pane of the window.
Note: The "Serial Port on COM8" is registered as a server port on the terminal by default,
and can be accessed only when the connection is initiated by the computer.
Chapter 6 ᙑᎄ!ࡸآࡳᆠᑌڤΖ 87
6.2 Bluetooth Enabled
To enable Bluetooth on 9500...
Tap the rocket button on the taskbar, and then select [Bluetooth Power] from the pop-up menu.
When the Bluetooth button becomes , it indicates the Bluetooth power is turned on.
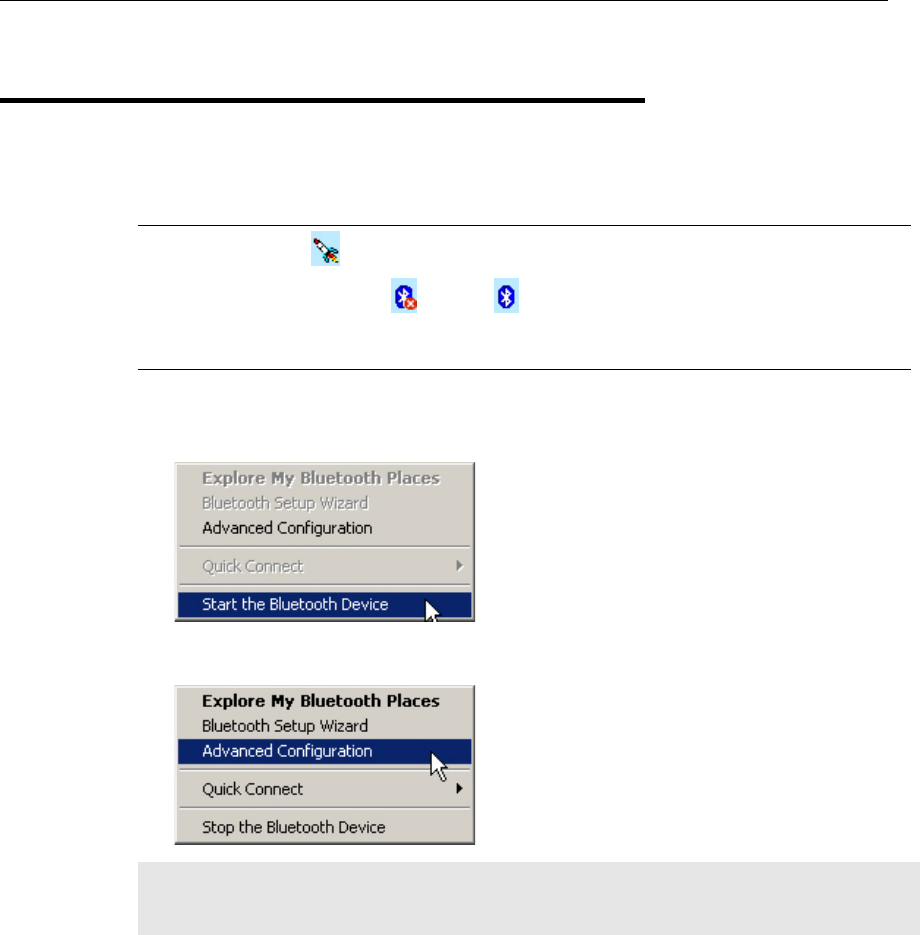
To enable Bluetooth on PC...
This depends on the Bluetooth software installed on your computer.
For example, you will need to right-click the Bluetooth icon on your computer, and select [Start
the Bluetooth Device] from the shortcut menu.
If you want to configure Bluetooth settings, right-click the Bluetooth icon and select
[Advanced Configuration].
Note: To disable a local service, go to My Bluetooth Places\My Device. Right-click a
service and select [Disable] from the shortcut menu. Disabled services are not
available for remote devices (clients).
88 CPT-9500 Reference Manual
6.3 Bluetooth Initiated
When connecting two Bluetooth-enabled devices, one must discover the other first, and
then a passkey (or link key) is requested for pairing (or bonding). After pairing, a
relationship is created for quick connect in the future. Unless you unpair these two devices,
there is no need to enter a passkey every time they connect.
Below we provide information on how the devices are discovered and paired. For a
Bluetooth connection initiated by a terminal or a computer, the procedure of discovering
and pairing are similar.

Chapter 6 ᙑᎄ!ࡸآࡳᆠᑌڤΖ 89
6.3.1 Start a Connection on PC
Initiated by a computer...
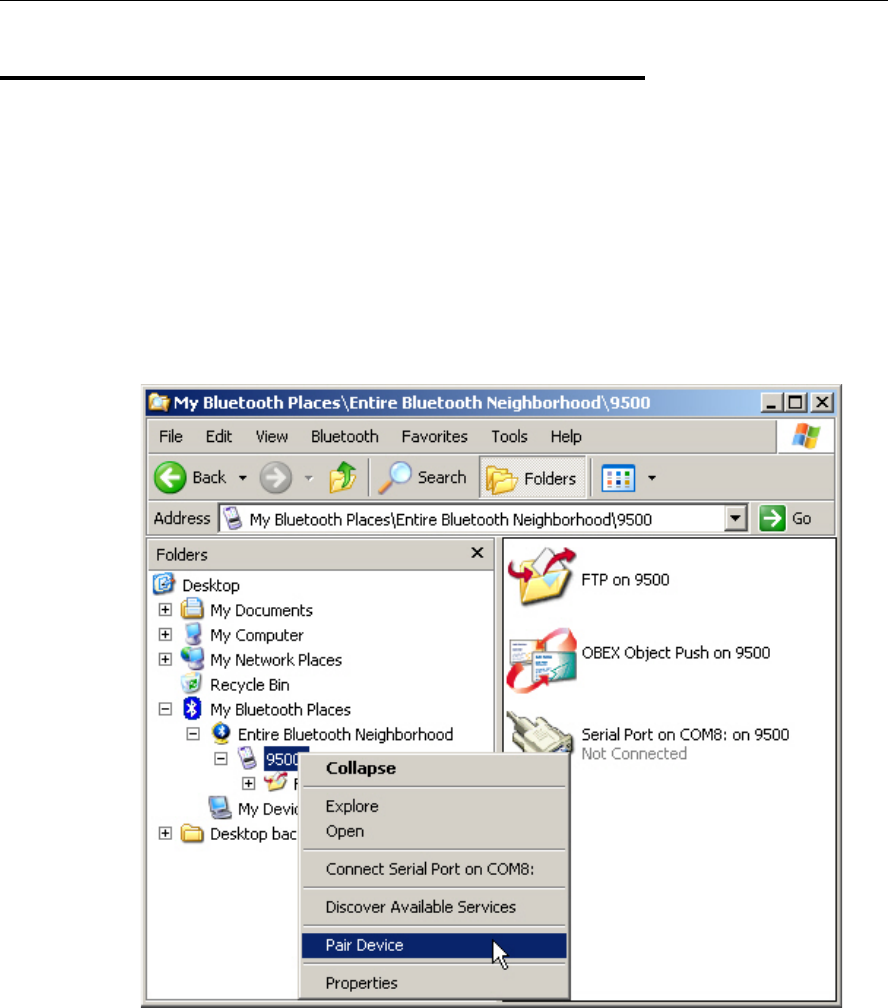
Double click My Bluetooth Places on your desktop, and then choose the task Search for devices
in range. (see screenshot above)
When the terminal is discovered, right-click the device name representing the terminal and
choose [Pair Device].
Note: The terminal will not be found unless [Discoverable] is selected on the Setting tab
of Bluetooth Manager.
9500 as a server...
The terminal acts as a Server to provide services to a computer.
Now your computer can
connect to COM8 on the terminal for a serial link. (Serial Port on COM8)
send a PIM item to the terminal. (OBEX Object Push service)
send a file to the terminal.(FTP service)
receive a PIM item from the terminal where Beam Contact is used.
receive a file from the terminal where Beam File is used.
Note: A file or message received on the terminal will be stored in My Documents folder,
while a contact will be stored in the Contacts folder.

90 CPT-9500 Reference Manual
6.3.2 Start a Connection on 9500
Initiated by 9500...
The wireless serial connection may be used by applications as though a physical serial cable
connected the devices. For some Bluetooth Serial Port application, such as ActiveSync, the
connection must be initiated from the terminal.
Note: Make sure your computer is configured to be discoverable or accessible. Otherwise,
the terminal cannot start a Bluetooth connection and use the Bluetooth services
provided on your computer. Services provided on your computer are recommended
to be configured "Startup Automatically".
9500 as Client...
The terminal acts as a Client and connects to a computer for available applications.
Now your terminal can
synchronize with your computer by using ActiveSync via Bluetooth.
send a PIM item, such as a contact, to your computer by using Beam Contact.
send a file to your computer by using Beam File.
receive a PIM item from your computer and store it in associated folder.
receive a file or message from your computer and store it in My Documents folder.
Note: For ActiveSync operation, make sure the Bluetooth Serial Port service is provided
on your computer.
Chapter 6 ᙑᎄ!ࡸآࡳᆠᑌڤΖ 91
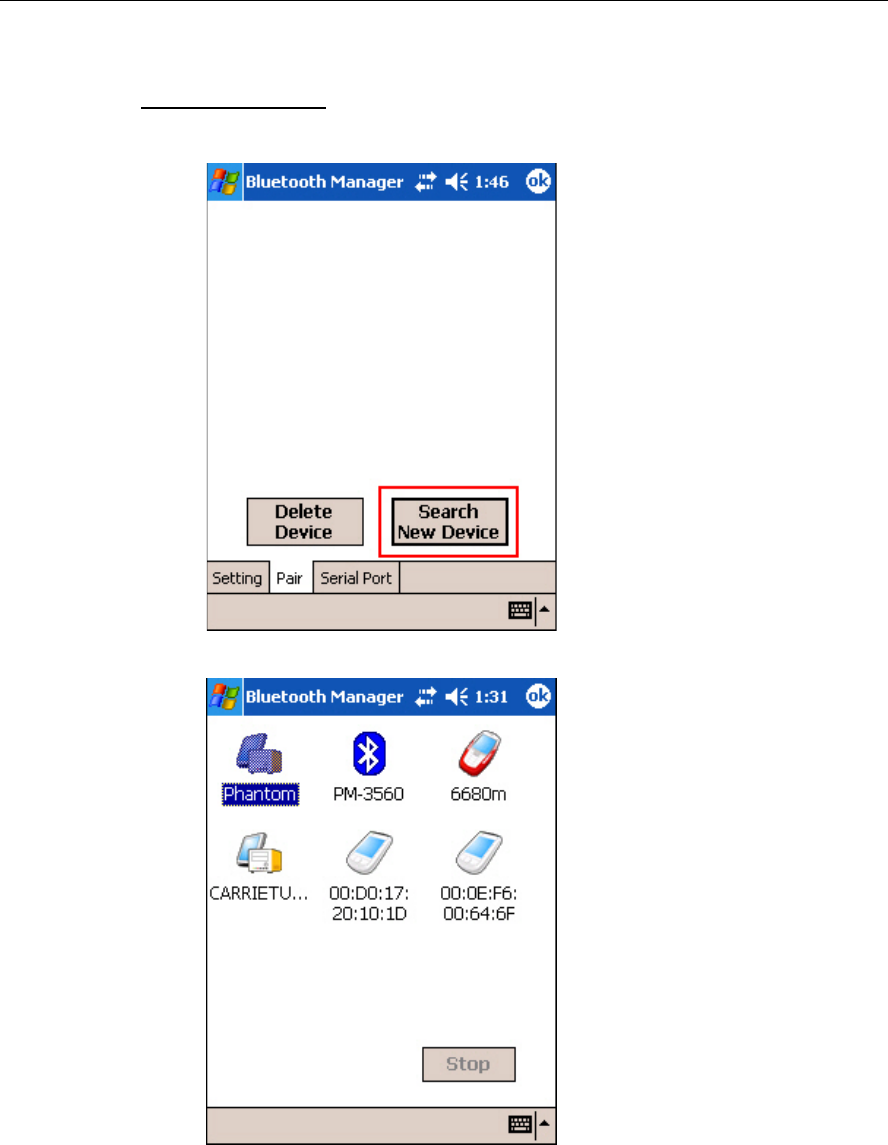
Discover Devices
1. In the Pair tab, tap [Search New Device] to discover your computer.
2. It then displays discovered devices. Tap your computer.
3. A Bluetooth status icon appears on the navigation bar, and a balloon pops up to ask
permission.
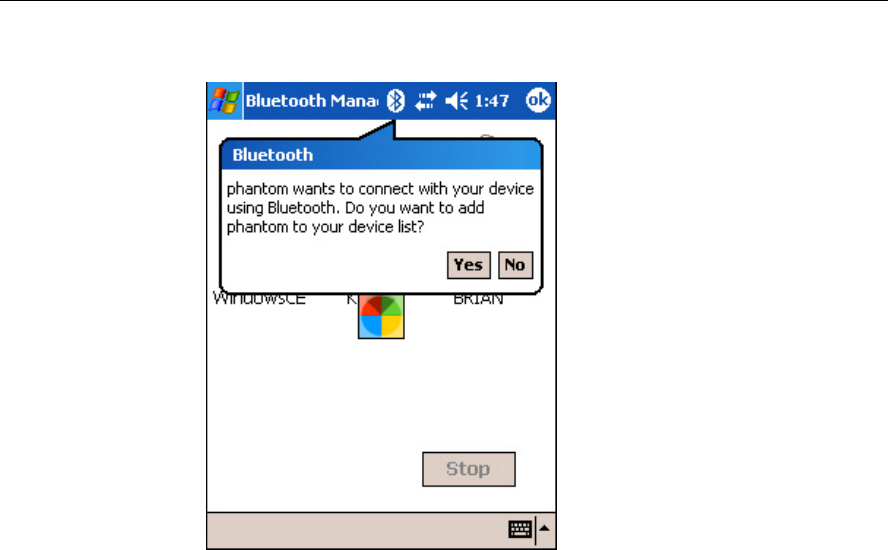
92 CPT-9500 Reference Manual
Tap [Yes] to add your computer to the frequent device list.
Chapter 6 ᙑᎄ!ࡸآࡳᆠᑌڤΖ 93
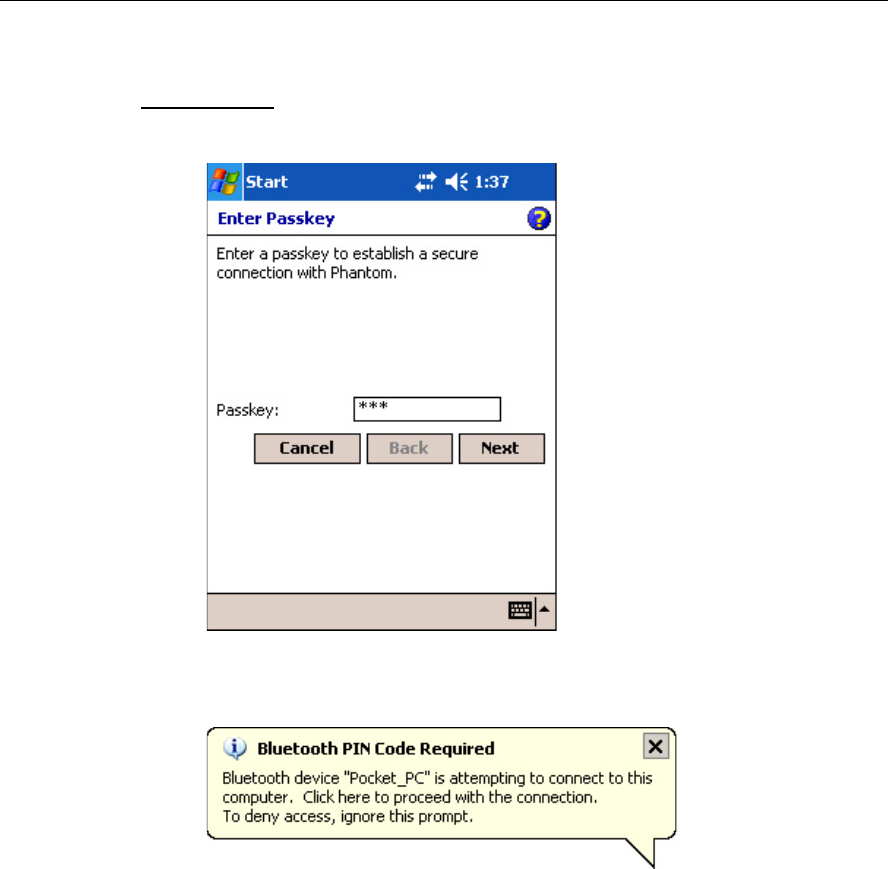
Pair Devices
1. In the Passkey box, enter your pass key for pairing with your computer. Tap [Next].
2. On your computer: a Bluetooth PIN Code Required balloon is displayed over the
notification area when a connection is attempted if Secure Connection is enabled.
Click the balloon to proceed.
94 CPT-9500 Reference Manual
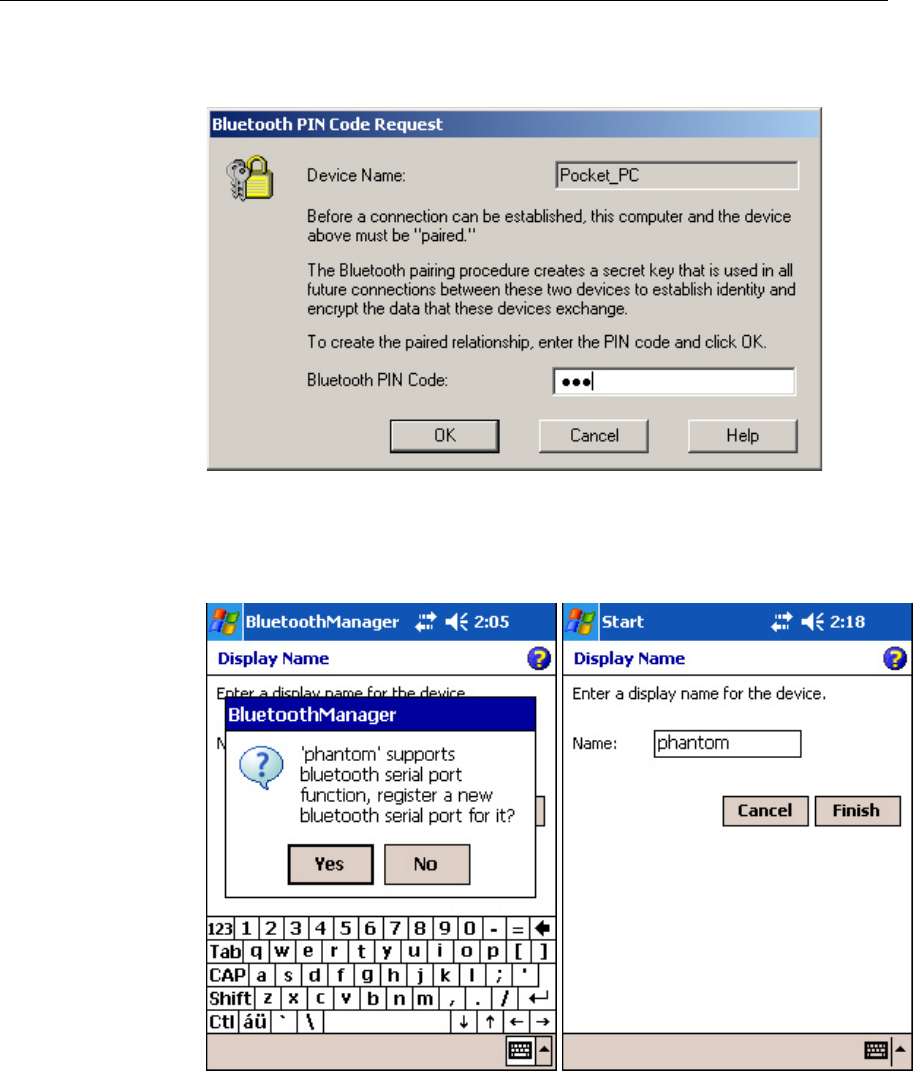
3. On your computer: a Bluetooth PIN Code Request Dialog box is displayed. In the
Bluetooth PIN Code box, enter your passkey as in Step 4. Tap [OK].
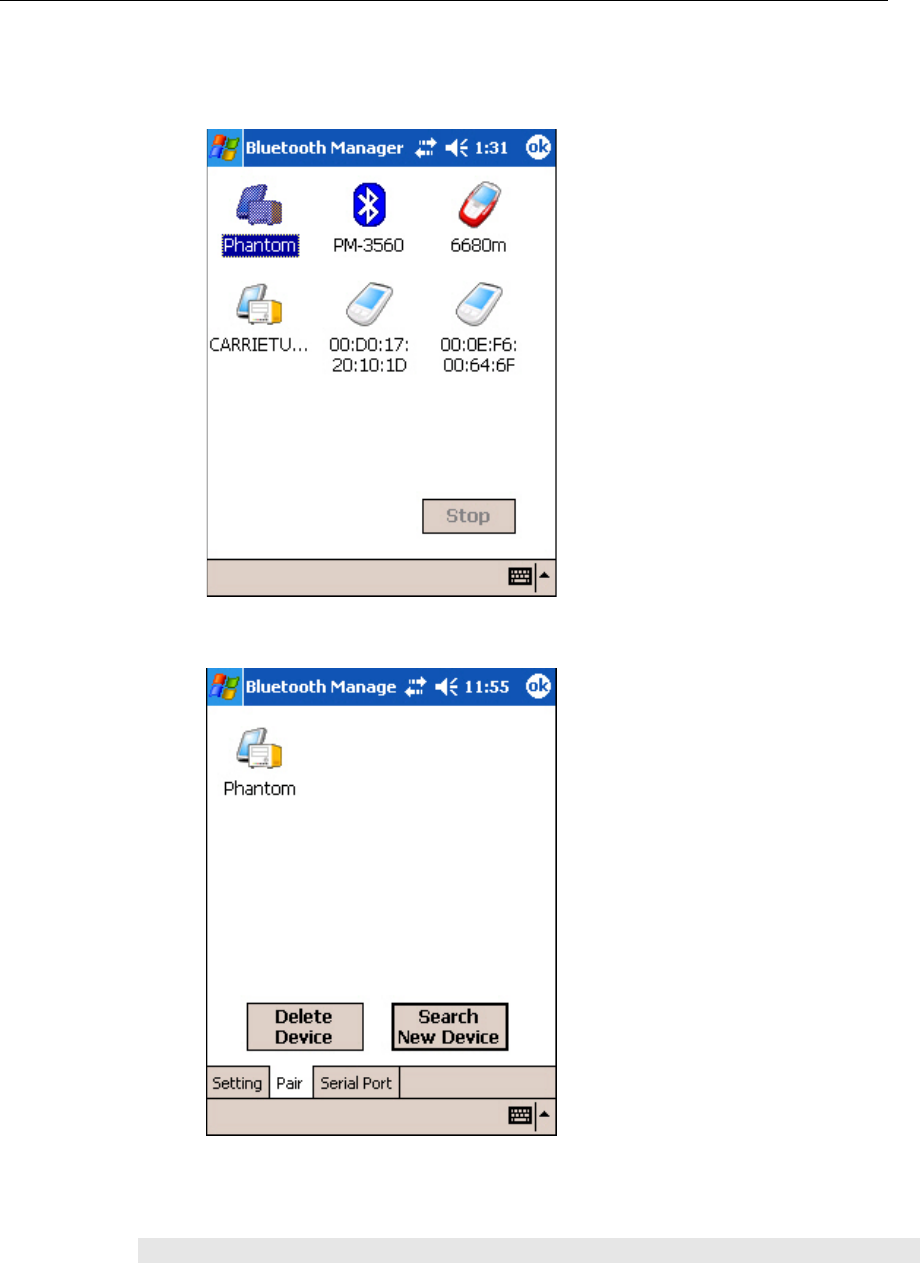
4. After pairing successfully, a dialog box prompts whether you want to register a new
Bluetooth serial port for your computer. Tap [No] if you do not want to use the
Bluetooth Serial Port service.
If you do not want to change the name of your computer, tap [Finish].
Chapter 6 ᙑᎄ!ࡸآࡳᆠᑌڤΖ 95
5. The Bluetooth connection has been set up successfully. Tap [ok] to close the
window displaying the discovered devices.
6. The paired device will be displayed on the frequent device list. Tap [ok] to close the
window.
7. You may proceed to run the application program, e.g. ActiveSync that wishes to use
the Bluetooth Serial Port service. If you want to use ActiveSync via Bluetooth, you
must not register a COM port in step 4.
Note: In case timeout occurs during pairing, try again.
96 CPT-9500 Reference Manual
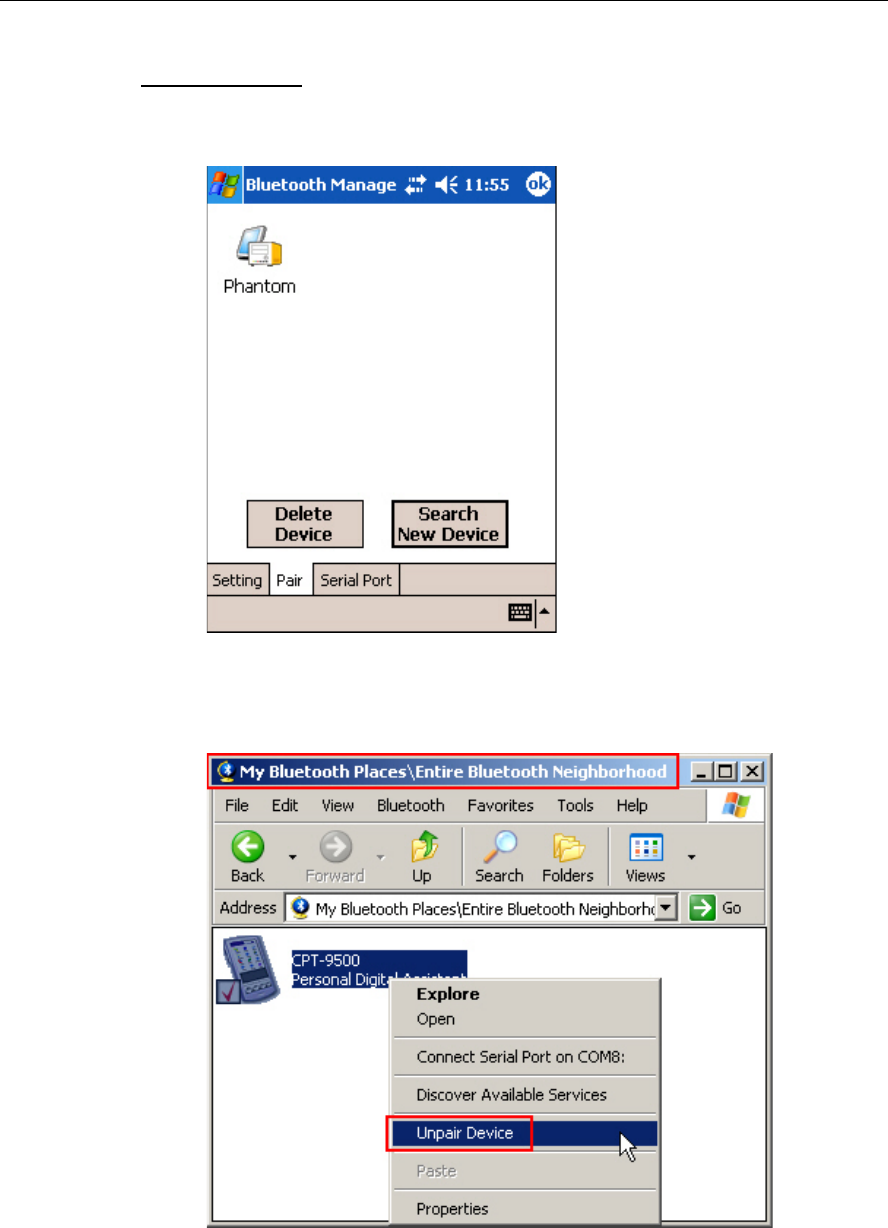
Unpair Devices
1. The paired device will be displayed on the frequent device list. (Bluetooth Manager
>Pair tab)
2. Tap a device that you want to unpair with the terminal.
3. Select [Delete Device].
4. On your computer, the terminal must be unpaired as well.
Chapter 6 ᙑᎄ!ࡸآࡳᆠᑌڤΖ 97
6.4 Bluetooth Applications
6.4.1 ActiveSync via Bluetooth
The associated Bluetooth profiles are Serial Port Profile, as well as Synchronization Profile
that is based on the Generic Object Exchange Profile.
The connection of ActiveSync via Bluetooth must be initiated from the terminal.
Note: Microsoft ActiveSync must be installed on your computer.
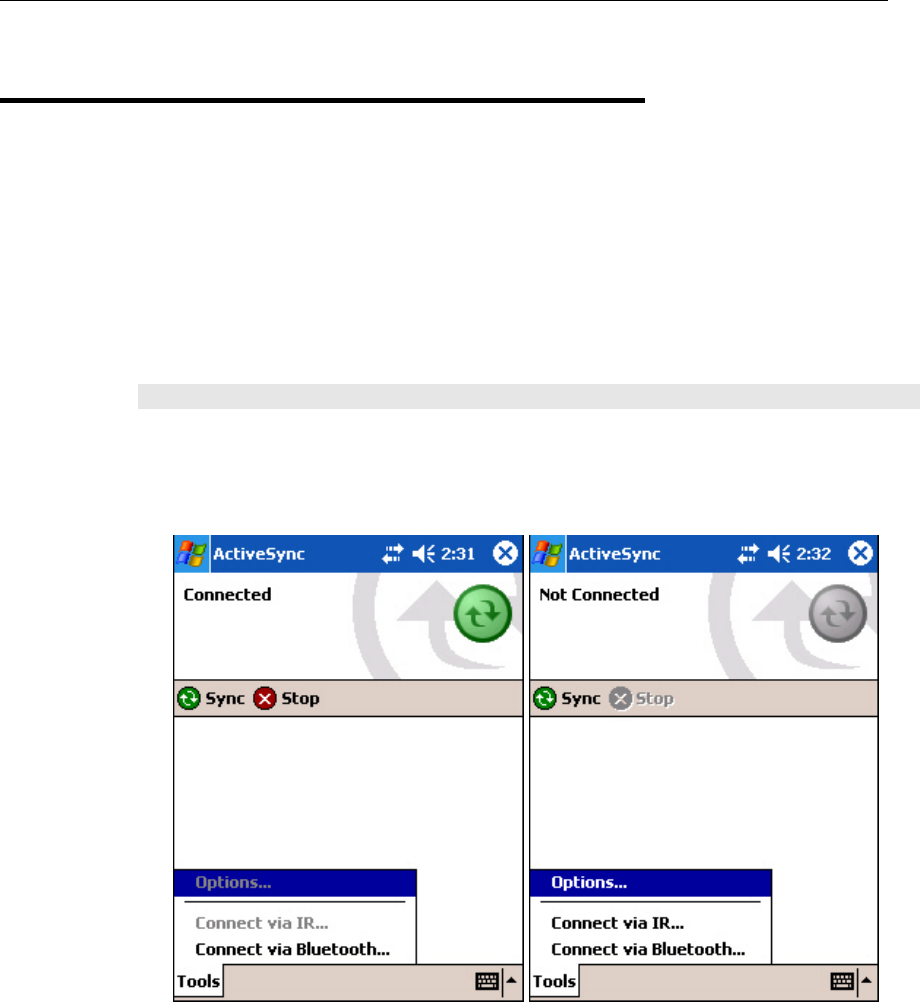
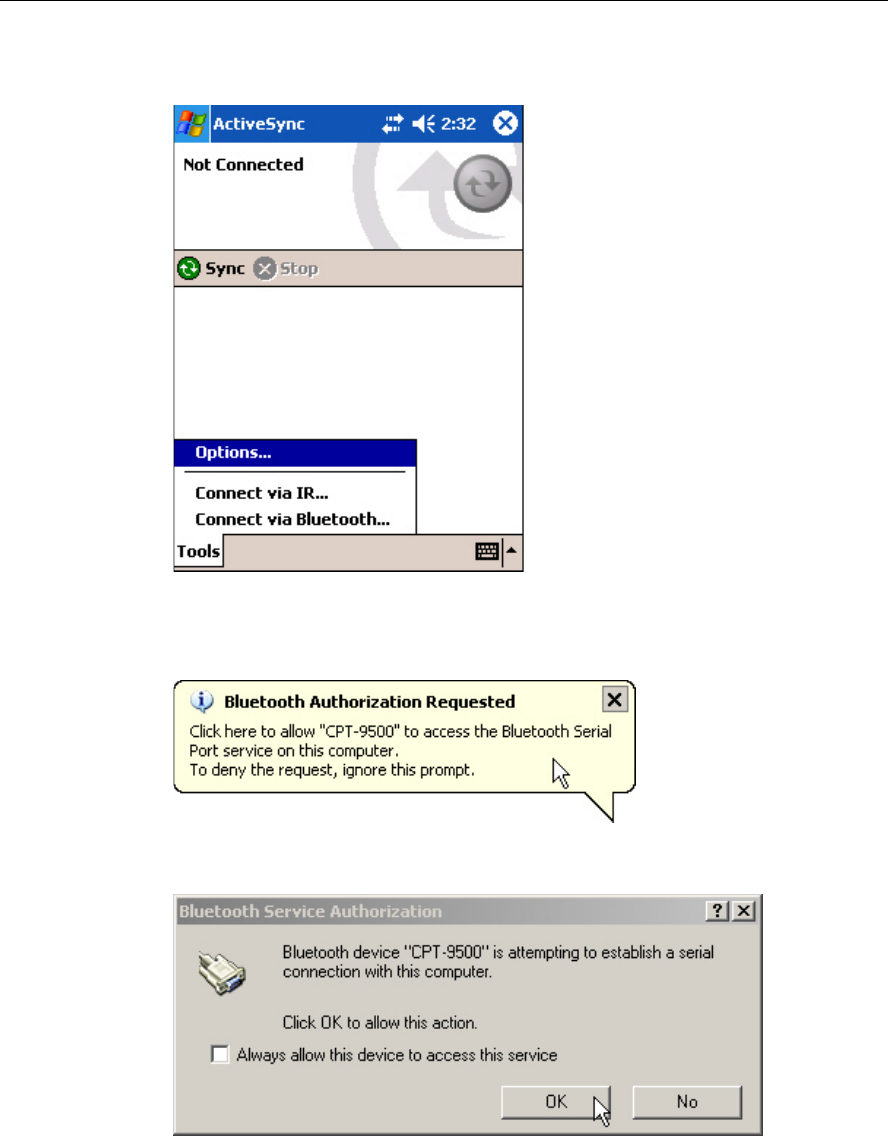
1. Tap Start > Programs, and select ActiveSync.
Then tap [Tools] on the lower left corner and select [Connect via Bluetooth].
The [Options] command will be available now. Tap [Options].

98 CPT-9500 Reference Manual
2. In the PC tab, tap [Options].
3. Tap the drop-down menu to select [Bluetooth Sync] for PC synchronization. Tap [ok].
Chapter 6 ᙑᎄ!ࡸآࡳᆠᑌڤΖ 99
4. Tap [Connect via Bluetooth].
5. Tap a remote device, for example your computer, as the selected device to connect.
6. On your computer, click the Bluetooth Authorization Requested balloon when it pops
up.
7. On your computer, the Bluetooth Service Authorization dialog box pops up. Click OK
to allow this action.
8. It will display "Connected" when the Bluetooth connection with your computer is set up
successfully.
100 CPT-9500 Reference Manual
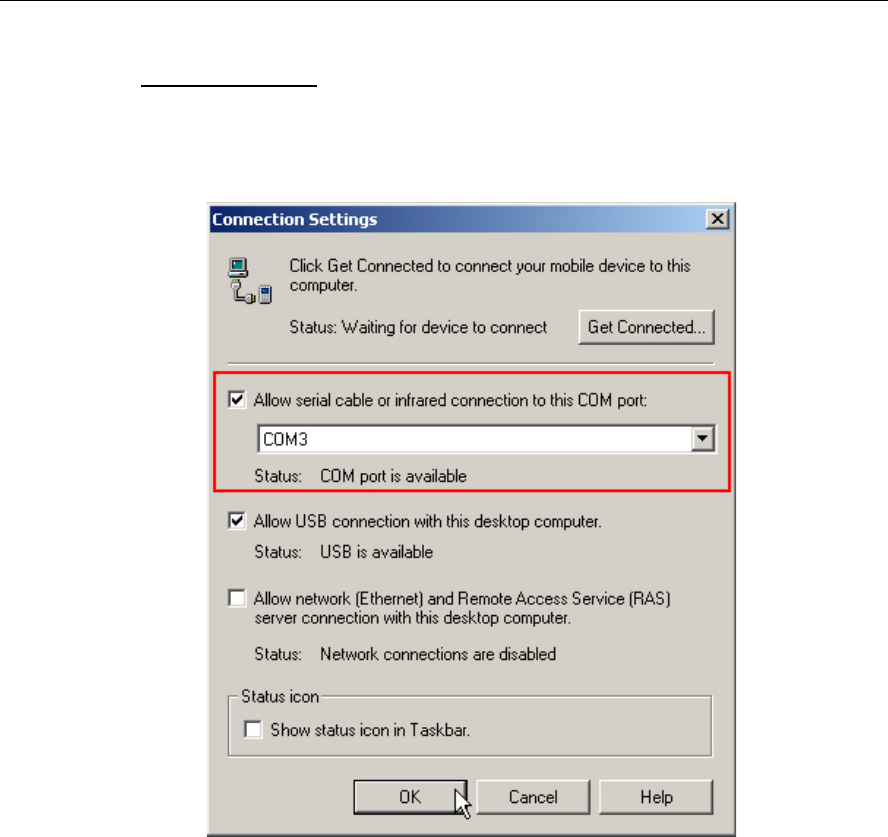
COM Port in Use
In Microsoft ActiveSync, make sure the COM port it uses matches the one assigned
to your Bluetooth serial port. Otherwise, the connection will fail.
Microsoft ActiveSync on your computer: File > Connection Settings
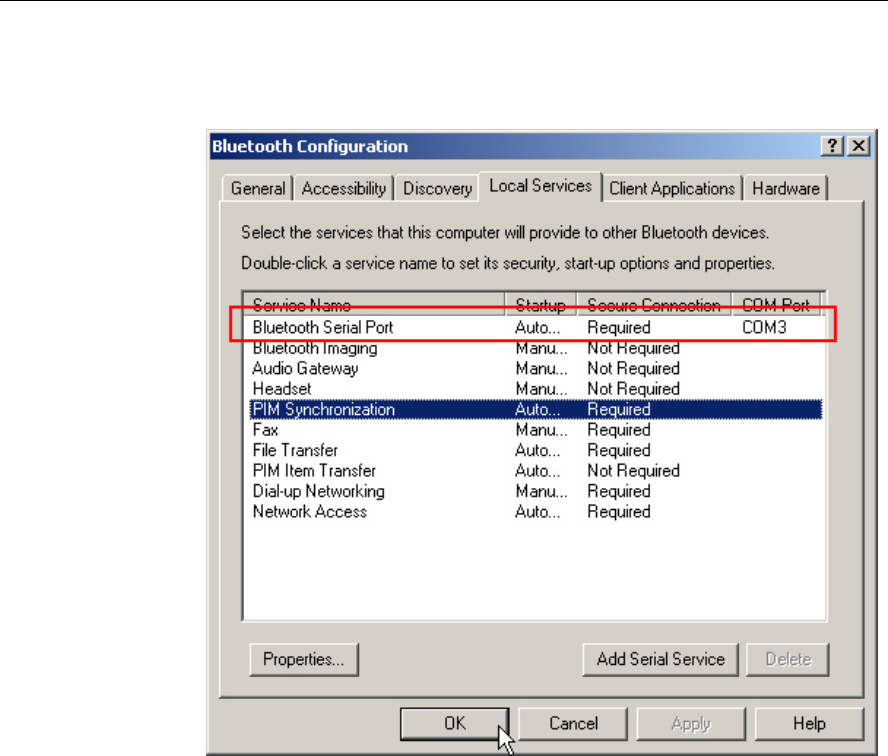
Chapter 6 ᙑᎄ!ࡸآࡳᆠᑌڤΖ 101
Bluetooth software installed on your computer: Advanced Configuration > Local
Services tab

102 CPT-9500 Reference Manual
6.4.2 PIM Item Transfer
The associated Bluetooth profile is Object Push Profile, which is based on the Generic
Object Exchange Profile. The terminal can send a PIM item to your computer, such as a
business card, contact, email, etc., and vice versa.
Beam File on 9500
1. Tap Wireless Power Manager and select Bluetooth Power from the pop-up menu.
2. Tap the [Task] key to launch File Explorer. Navigate to a desired file.
3. Tap the file and select [Beam File] from the pop-up menu.
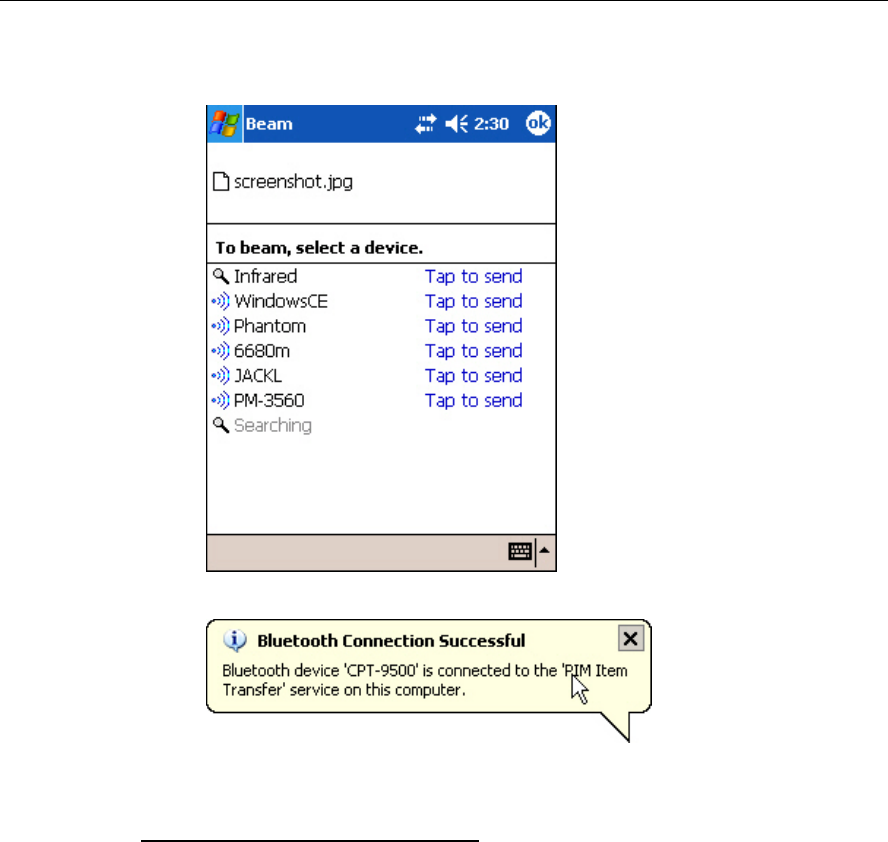
Chapter 6 ᙑᎄ!ࡸآࡳᆠᑌڤΖ 103
4. Tap your computer as the device to connect.
5. On your computer, a message indicated the data has been received successfully.
Send a PIM Item from Computer
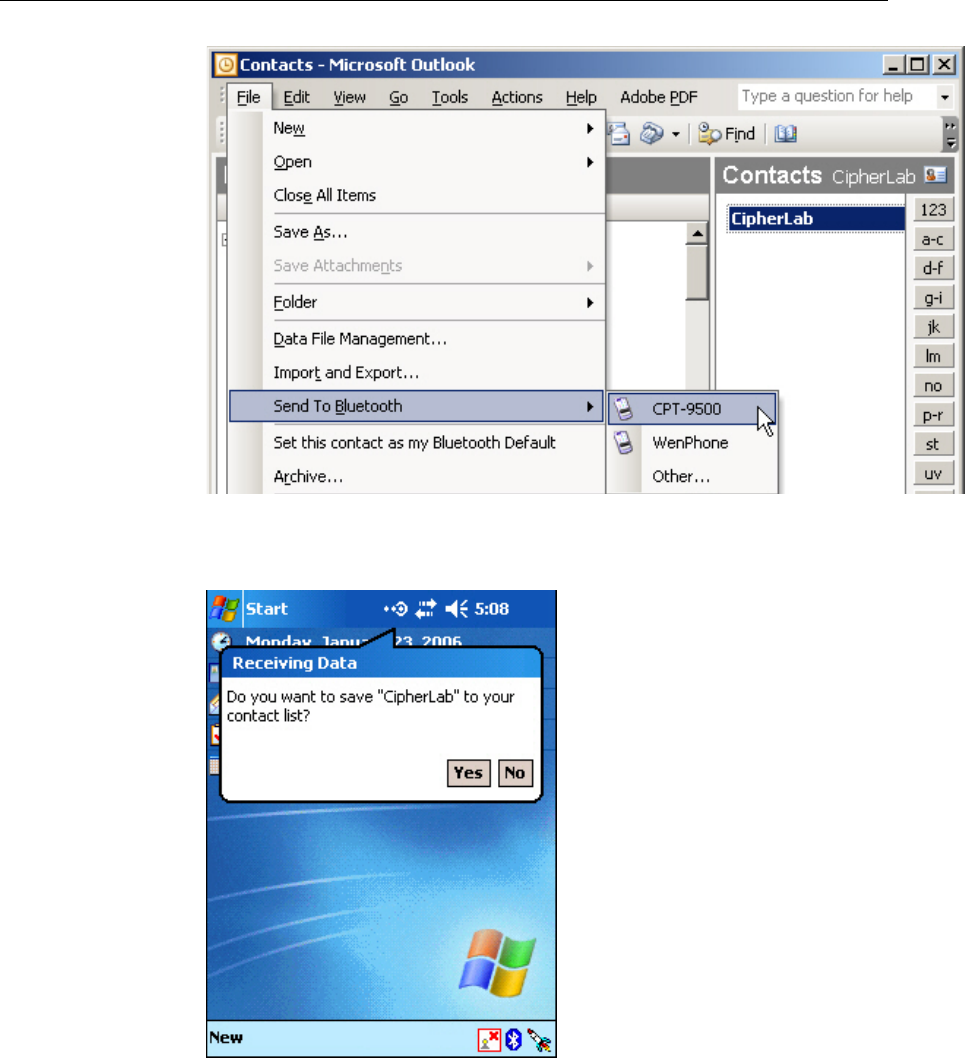
1. In Microsoft Outlook on your computer, you can send a PIM item by selecting
[Send To Bluetooth] > [9500] from the File menu.
This screen varies with the Bluetooth software installed on your computer. For
example, some may refer to a functionality called [Push] or [Pull] from the toolbar
of Microsoft Outlook.
104 CPT-9500 Reference Manual
2. On 9500, a Receiving Data balloon pops up to ask for your authorization. Tap [Yes]
to save data.
If the PIM item is an e-mail message, it will be save in My Documents folder (My
Device > My Documents). Tap the [Task] key to launch File Explorer and view data.
If the PIM item is a contact, it will be saved in the Contacts folder.
Chapter 6 ᙑᎄ!ࡸآࡳᆠᑌڤΖ 105
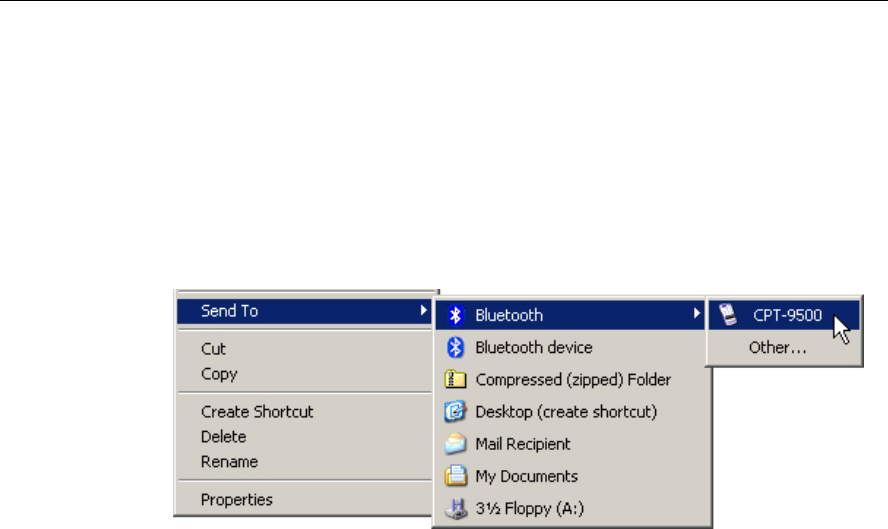
6.4.3 Send a File from Computer
The associated Bluetooth profile is File Transfer Profile, which is based on Generic Object
Exchange Profile.
1. Navigate to a desired file on your computer.
2. Right-click the file and select [Send To] > [Bluetooth] > [9500] from the shortcut menu.
3. On 9500, a Receiving Data balloon pops up to ask for your authorization. Tap [Yes] to
save data.
The file will be save in My Documents (My Device > My Documents). Tap the [Task]
key to launch File Explorer and view data.

106 CPT-9500 Reference Manual
6.4.4 Connect to Serial Port (Server) from Computer
The associated Bluetooth profile is Serial Port Profile. By default, the terminal has COM 8
registered as a server port. It provides Bluetooth Serial Port service for a connection
initiated by a remote device, such as your computer.
Note: The Bluetooth settings on your computer must have the Bluetooth Serial Port
service listed on the Client Applications tab. Otherwise, the [Serial Port on COM8]
on the terminal will not be found.
Application programs on this computer that will use this service must be configured to
use the Bluetooth Serial Port COM port.
Determine the communications port used by this computer.
107
In This Chapter
7.1 Wi-Fi Enabled & Detected .......................................... 56
7.2 Terminal Services Client ............................................. 56
7.1 Wi-Fi Enabled & Detected
To enable Wi-Fi...
Tap the rocket button on the taskbar, and then select [WLAN Power] from the pop-up menu.
When the Wi-Fi button becomes , it indicates the WLAN power is turned on.
Available networks detected...
If you are connecting for the first time, wait for an antenna to appear and show the WLAN
(802.11b) networks detected. Otherwise, it will automatically connect to the network last time you
connected to.
CHAPTER 7
Set up Wi-Fi Connection

108 CPT-9500 Reference Manual
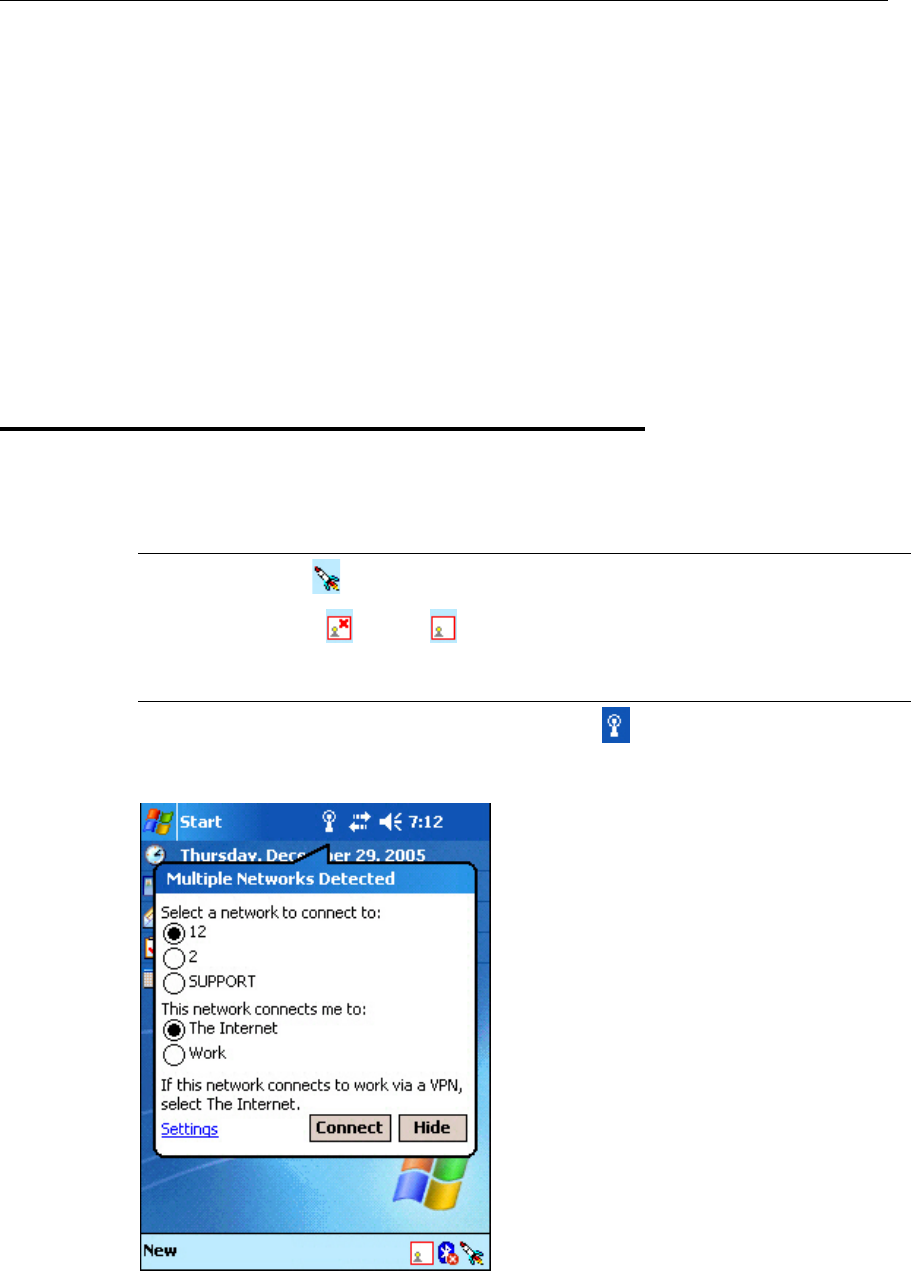
7.1.1 Connect to Detected Network
If you have configured WLAN settings before, you may select a network to connect now.
When the antenna and Connectivity icons get mixed as , it indicates a successful
connection. Meanwhile, the Wi-Fi button becomes .
1. Select an available network you want to connect.
2. Select the network you will be connected to through the access point.
Work: when connecting to a private network, such as a corporate network at work
The Internet: when connecting to your ISP at home
3. Tap [Connect].
Tap [Hide] if you do not want to be connected now.
4. After having established a connection successfully, you may proceed to run the
application program, e.g. Pocket Internet Explorer, Terminal Services Client, etc.
Chapter 7 ᙑᎄ!ࡸآࡳᆠᑌڤΖ 109
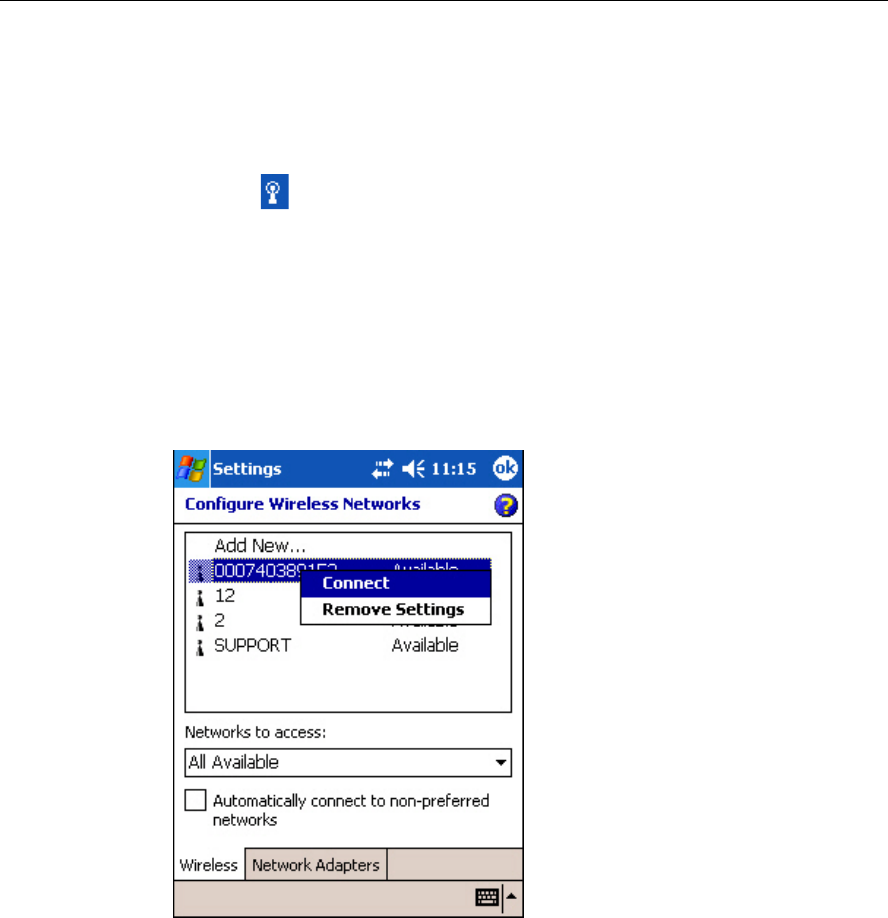
7.1.2 Connect to New Network
If you want to connect to a new network, tap [Settings] in the balloon brought up by the
antenna icon . It results in the same behavior when you go to Start > Settings >
Connections tab > Network Cards.
In the Wireless tab, you may configure the following settings:
To add a new network: Tap [Add New].
To connect to an existing network: Tap and hold an available network to see a menu.
Tap [Connect].
To stop a connection: Tap and hold an available network to see a menu. Tap [Remove
Settings].

110 CPT-9500 Reference Manual
7.2 Terminal Services Client
The Terminal Services Client is a "thin client" that delivers 32-bit Windows 2000
functionality to a wide range of legacy desktop hardware devices. The client displays as a
window within the local desktop environment and contains only the minimum amount of
software necessary to establish a connection to the server and present the user interface. All
other operating system functions, as well as applications, run on the server. The client can
be run on a range of desktop hardware:
Windows-based Terminal devices (embedded).
Intel computers running Windows 95, Windows 98, Windows NT 3.51, Windows NT
4.0, and Intel-based computers running Windows 2000.
Computers running Windows for Workgroups 3.11.

111
General
Main: Rechargeable 3.7 V, 4000 mAh Li-ion battery pack
Backup: Maintains the system running in suspend mode for at least 30
minutes if fully charged
Power
Adapter
(cradle):
Input - AC 110/220 V
Output - DC 6 V, 3.3 A
CPU Intel X-Scale PXA255, up to 400 MHz
ROM: 128 MB non-volatile NAND flash memory
Memory
RAM: 64 MB on-board SDRAM memory
Memory card, SD or CF Type II (optional)
Operating System Windows Mobile 2003 Second Edition
Programming eMbedded Visual C++, eMbedded Visual Tool, Visual Studio .NET, a DLL
for reader configuration, and Windows-based Application Generator (AG)
Physical
Enclosure Material: Rubber & ABS plastic
Dimensions: 230 mm (L) x 91 mm (W) x 63 mm (H)
Weight: Approx. 600 g (One battery pack included)
Reader: One scan engine (CCD/Laser/Long Range Laser/Extra Long
Range Laser/2D), and/or the RFID reader
Input Devices
Keypad: 27-key layout
Rubber keys with LED backlight
Type: Color transflective TFT display with LED backlight
Touch screen
Size: 3.5 inches
Display
Resolution: 240 x 320 pixels
LED: One dual-color LED
Speaker: Low power transducer type, 1 KHz to 4 KHz
Indicators
Vibrator: 9000 ± 2000 RPM, Max. 50 dB
Communications USB
Client:
Peer-to-Peer connection via cradle (ActiveSync)
Specifications

112 CPT-9500 Reference Manual
WPAN /
WLAN:
Bluetooth Class 2
IEEE 802.11b
Secure
Digital:
One SD memory card slot, supports SDIO card
Expansion Slots
Compact
Flash:
One CF Type II card slot for a memory card or peripheral card
Environmental
Operating: 5% to 90% non-condensing
Humidity
Storage: 5% to 95% non-condensing
Temperature Operating: -10 to 50 °C
Storage: -20 to 60 °C
Shock Resistance 1.5 m multiple drops onto concrete
Splash/Dust
Resistance
IP 64
EMC Certification FCC, CE, C-Tick

This equipment has been tested and found to comply with the limits for a Class B
digital device, pursuant to part 15 of the FCC rules. These limits are designed to
provide reasonable protection against harmful interference in a residential installation.
This equipment generates, use and can radiate radio frequency energy and, if not
installed and used in accordance with the instructions, may cause harmful interference
to radio communications. However, there is no guarantee that interference will not
occur in a particular installation. If this equipment does cause harmful interference to
radio or television reception, which can be determined by turning the equipment off
and on, the user is encouraged the interference by one or more of the following
measures:
-Reorient or relocate the receiving antenna.
-Increase the separation between the equipment and receiver.
-Connect the equipment into an outlet on a circuit different from that to which the
receiver is connected.
-Consult the dealer or an experienced radio/TV technician for help.
You are cautioned that changes or modification not expressly approved by the party
responsible for compliance could void your authority to operate the equipment.
The device complies with Part 15 of the FCC Rules. Operation is subject to the
following two conditions: (1) this device may not cause harmful interference and (2)
this device must accept any interference received, including interference that may
cause undesired operation.
This Transmitter has been demonstrated co-location compliance requirements with
Bluetooth/ RFID modules. This transmitter must not be co-location or
operating in conjunction with other antenna or transmitter.