CipherLab RS30 Mobile Computer User Manual rev
CipherLab Co., Ltd. Mobile Computer rev
Contents
- 1. User Manual.pdf
- 2. User Manual_rev.pdf
User Manual_rev.pdf

RS30 Mobile Computer
Android 4.4.2
Version 1.00

Copyright © 2015 CIPHERLAB CO., LTD.
All rights reserved
The software is provided under a license agreement containing restrictions on use and
disclosure and is also protected by copyright law. Reverse engineering of the software is
prohibited.
Due to continued product development this information may change without notice. The
information and intellectual property contained herein is confidential between CIPHERLAB
and the client and remains the exclusive property of CIPHERLAB CO., LTD. If you find
any problems in the documentation, please report them to us in writing. CIPHERLAB
does not warrant that this document is error-free.
No part of this publication may be reproduced, stored in a retrieval system, or
transmitted in any form or by any means, electronic, mechanical, photocopying,
recording or otherwise without the prior written permission of CIPHERLAB CO., LTD.
For product consultancy and technical support, please contact your local sales
representative. Also, you may visit our web site for more information.
The CipherLab logo is a registered trademark of CIPHERLAB CO., LTD.
All brand, product and service, and trademark names are the property of their registered
owners.
The editorial use of these names is for identification as well as to the benefit of the
owners, with no intention of infringement.
CIPHERLAB CO., LTD.
Website: http://www.CipherLab.com

FOR USA
This equipment has been tested and found to comply with the limits for a Class B digital
device, pursuant to Part 15 of the FCC Rules. These limits are designed to provide
reasonable protection against harmful interference in a residential installation. This
equipment generates, uses and can radiate radio frequency energy and, if not installed
and used in accordance with the instructions, may cause harmful interference to radio
communication. However, there is no guarantee that interference will not occur in a
particular installation. If this equipment does cause harmful interference to radio or
television reception, which can be determined by turning the equipment off and on, the
user is encouraged to try to correct the interference by one or more of the following
measures:
Reorient or relocate the receiving antenna.
Increase the separation between the equipment and receiver.
Connect the equipment into an outlet on a circuit different from that to which the
receiver is connected.
Consult the dealer or an experienced radio/TV technician for help.
This device complies with Part 15 of the FCC Rules. Operation is subject to the following
two conditions: (1) This device may not cause harmful interference, and (2) this device
must accept any interference received, including interference that may cause undesired
operation.
FCC Caution:
Any changes or modifications not expressly approved by the party responsible for
compliance could void the user's authority to operate this equipment.
IMPORTANT NOTICES
FOR PRODUCT WITH LASER
CAUTION
This laser component emits FDA / IEC Class 2 laser light at the exit port. Do not
stare into beam.
SPECIFIC ABSORPTION RATE (SAR) INFORMATION
The product complies with the FCC / Canada portable RF exposure limit set forth for an
uncontrolled environment and are safe for intended operation as described in this manual.
The further RF exposure reduction can be achieved if the products can be kept as far as
possible from the user body or set the device to lower output power if such function is
available.
1. FCC SAR Value ( Standard limit is 1.6 W/Kg)
USA (1g): Max. 0.9 W/Kg .
2. CE SAR Value ( Standard limit is 2 W/Kg)
CE (10g): Max. 0.339 W/Kg .
SAFETY PRECAUTIONS
RISK OF EXPLOSION IF BATTERY IS REPLACED BY AN INCORRECT TYPE.
DISPOSE OF USED BATTERIES ACCORDING TO THE INSTRUCTIONS.
The use of any batteries or charging devices, which are not originally sold or
manufactured by CipherLab, will void your warranty and may cause damage to
human body or the product itself.
DO NOT disassemble, incinerate or short circuit the battery.
DO NOT expose the scanner or the battery to any flammable sources.
For green-environment issue, it's important that batteries should be recycled in a
proper way.
Under no circumstances, internal components are self-serviceable.
CARE & MAINTENANCE
This mobile computer is intended for industrial use. The mobile computer is rated
IP65, however, damage may be done to the mobile computer if it is exposed to
extreme temperatures or soaked in water.
When the body of the mobile computer gets dirty, use a clean, wet cloth to wipe off
dust and debris. DO NOT use bleaches or cleaners.
Use a clean, non-abrasive, lint-free cloth to wipe dust off the LCD touch screen. DO
NOT use any pointed or sharp objects against the surface. Always keep the LCD dry.

If you want to put away the mobile computer for a period of time, download the
collected data to a host computer, and then remove the battery pack from the
mobile computer’s battery compartment. Store the mobile computer and battery
pack separately.
If you encounter malfunction on the mobile computer, write down the specific
scenario and consult your local sales representative.
EUROPE – EU DECLARATION OF CONFORMITY
This device complies with the essential requirements of the R&TTE Directive 1999/5/EC. The
following test methods have been applied in order to prove presumption of conformity with
the essential requirements of the R&TTE Directive 1999/5/EC:
- EN 60950-1: 2001
- EN 60950-1/A1: 2010
- EN 60950-1/A11: 2009
- EN 60950-1/A12: 2011
Safety of Information Technology Equipment
- EN50360 : 2001/A1:2012+AC:2006 / Article 3(1)(a)
Product standard to demonstrate the compliance of mobile phones with the basic
restrictions related to human exposure to electromagnetic fields (300 MHz - 3GHz)
- EN 50566:2013/AC:2014
- Product standard to demonstrate compliance of radio frequency fields from handheld and
body-mounted wireless communication devices used by the general public (30 MHz - 6
GHz)
-
- EN 62209-1: 2006
Human exposure to radio frequency fields from hand-held and body-mounted wireless
communication devices – Human models, instrumentation, and procedures
Part 1: Procedure to determine the specific absorption rate (SAR) for hand-held devices
used in close 13 proximity to the ear (frequency range of 300 MHz to 3 GHz)
- EN 300 330-1 V1.7.1: 2010
Electromagnetic compatibility and Radio spectrum Matters (ERM); Short Range Devices
(SRD); Radio equipment in the frequency range 9 kHz to 25 MHz and inductive loop
systems in the frequency range 9 kHz to 30 MHz; Part 1: Technical characteristics and
test methods
- EN 300 330-1 V1.5.1: 2010
Electromagnetic compatibility and Radio spectrum Matters (ERM); Short Range Devices
(SRD); Radio equipment in the frequency range 9 kHz to 25 MHz and inductive loop
systems in the frequency range 9 kHz to 30 MHz; Part 2: Harmonized EN under article
3.2 of the R&TTE Directive
- EN 302 291-1 V1.1.1 : 2005
Electromagnetic compatibility and Radio spectrum Matters (ERM); Short Range Devices
(SRD); Close Range Inductive Data Communication equipment operating at 13,56 MHz;
Part 1: Technical characteristics and test methods
- EN 302 291-2 V1.1.1 :2005
Electromagnetic compatibility and Radio spectrum Matters (ERM); Short Range Devices
(SRD); Close Range Inductive Data Communication equipment operating at 13,56 MHz;
Part 2: Harmonised EN under article 3.2 of the R&TTE Directive
- EN 300 440-1 V1.6.1: 2010
Electromagnetic compatibility and Radio spectrum Matters (ERM); Short range devices;
Radio equipment to be used in the 1 GHz to 40 GHz frequency range; Part1: Technical
characteristics and test methods
- EN 300 440-2 V1.4.1: 2010
Electromagnetic compatibility and Radio spectrum Matters (ERM); Short range devices;
Radio equipment to be used in the 1 GHz to 40 GHz frequency range; Part 2:
Harmonized EN under article 3.2 of the R&TTE Directive
- EN 300 328 V1.8.1: 2012
Electromagnetic compatibility and Radio spectrum Matters (ERM); Wideband
Transmission systems; Data transmission equipment operating in the 2,4 GHz ISM band
and using spread spectrum modulation techniques; Harmonized EN covering essential
requirements under article 3.2 of the R&TTE Directive
- EN 301 908-1 V6.2.1: 2013
Electromagnetic compatibility and Radio spectrum Matters (ERM); Base Stations (BS),
Repeaters and User Equipment (UE) for IMT-2000 Third-Generation cellular networks;
Part 1: Harmonized EN for IMT-2000, introduction and common requirements, covering
essential requirements of article 3.2 of the R&TTE Directive
- EN 301 908-2 V6.2.1: 2013
Electromagnetic compatibility and Radio spectrum Matters (ERM); Base Stations (BS)
and User Equipment (UE) for IMT-2000 Third Generation cellular networks; Part 2:
Harmonized EN for IMT-2000, CDMA Direct Spread (UTRA FDD) (UE) covering
essential requirements of article 3.2 of the R&TTE Directive
- EN 301 511 V9.0.2: 2003
Global System for Mobile communications (GSM); Harmonized standard for mobile
stations in the GSM 900 and DCS 1800 bands covering essential requirements under
article 3.2 of the R&TTE directive (1999/5/EC)
- EN 301 489-1 V1.9.2: 2008
Electromagnetic compatibility and Radio Spectrum Matters (ERM); ElectroMagnetic
Compatibility (EMC) standard for radio equipment and services; Part 1: Common
technical requirements
- EN 301 489-3 V1.6.1 2013
Electromagnetic compatibility and Radio Spectrum Matters (ERM); ElectroMagnetic
Compatibility (EMC) standard for radio equipment and services; Part 3: Specific
conditions for Short-Range Devices (SRD) operating on frequencies between 9 kHz and
40 GHz
- EN 301 489-7 V1.3.1: 2005
ElectroMagnetic compatibility and Radio spectrum Matters (ERM); ElectroMagnetic
Compatibility (EMC) standard for radio equipment ad services; Part 7: Specific conditions
for mobile and portable radio and ancillary equipment of digital cellular radio
telecommunications systems (GSM and DCS)
- EN 301 489-17 V2.2.1: 2012
Electromagnetic compatibility and Radio spectrum Matters (ERM); ElectroMagnetic
Compatibility (EMC) standard for radio equipment and services; Part 17: Specific
conditions for 2,4 GHz wideband transmission systems and 5 GHz high performance
RLAN equipment
- EN 301 489-24 V1.5.1: 2010
Electromagnetic compatibility and Radio Spectrum Matters (ERM); ElectroMagnetic
Compatibility (EMC) standard for radio equipment and services; Part 24: Specific
conditions for IMT-2000 CDMA Direct Spread (UTRA) for Mobile and portable (UE) radio
and ancillary equipment
- EN 62479:2010
Assessment of the compliance of low power electronic and electrical equipment with the
basic restrictions related to human exposure to electromagnetic fields (10 MHz to 300
GHz)
0560

Manufacturer EC Representative’s information
CIPHERLAB Co., Ltd. CIPHERLAB GmbH
12F., 333, Dunhua S. Rd., Sec. 2 Gießerallee 21, 47877 Willich
Taipei, Taiwan 106, R.O.C. Germany
Tel: +886 2 8647 1166 Tel: +49 2154 89777 20
http://www.cipherlab.com http://www.cipherlab.com
Type of Equipment
Mobile Computer
Model(s) Declared
RS30
Initial Year of Manufacture 2015
Reference to the specification under which conformity is declared in accordance
with Council Directive- 2004/108/EC (EMC), 1999/5/EC (R&TTE), 2006/95/EC (LVD),
2011/65/EU (RoHS), 1999/519/EC (EMF).
EN 300 328 V1.8.1
EN 300 440-2 V1.4.1
EN 301 489-17 V2.2.1
EN 301 489-3 V1.6.1
EN 301 511 V9.0.2
EN 301 908-2 V6.2.1
EN 50566:2013 AC:2014
EN 61000-3-2 :2006/A1:2009/A2:2009
EN 55024 : 2010
EN 302 291-1 V1.1.1
EN 300 440-1 V1.6.1
EN 301 489-1 V1.9.2
EN 301 489-24 V1.5.1
EN 301 489-7 V1.3.1
EN 301 908-1 V6.2.1
EN 62479:2010
EN 60950-1:2006+A11+A1+A12:2011
EN 61000-3-3 :2013
EN 55022 : 2010 / AC:2011
EN 50360:2001 A1:2012
EN 302 291-2 V1.1.1
I the undersigned, hereby declare that the equipment specified above conforms to the above Directive(s)
and Standard(s).
Signature
Full Name Herbie Jiang
Title Manager
2015/Feb./04
Declaration o
f
Con
f
ormit
y

Version
Date
Notes
1.00 Feb 9, 2015
Initial release
RELEASE NOTES

CONTENTS
IMPORTANT NOTICES..................................................................................................................... - 3 -
For USA .......................................................................................................................................... - 3 -
For Product with Laser .................................................................................................................. - 4 -
Specific Absorption Rate (SAR) information ................................................................................ - 4 -
Safety Precautions ........................................................................................................................ - 4 -
Care & Maintenance ..................................................................................................................... - 4 -
RELEASE NOTES ............................................................................................................................ - 9 -
INTRODUCTION ................................................................................................................................. 1
Features ............................................................................................................................................. 2
Inside the Package ............................................................................................................................ 2
QUICK START .................................................................................................................................... 3
1.1. Overview ................................................................................................................... 3
1.1.1. Installing Battery ...................................................................................................... 5
1.1.2. Installing SIM Card, SAM Card and Memory Card ................................................. 6
1.1.3. Power On/Off Mobile Computer ............................................................................. 7
1.1.4. Using Hardware Buttons ......................................................................................... 7
1.1.5. Connecting Headset ................................................................................................ 8
1.2. Charging & Communication .................................................................................... 9
1.2.1. Charge Mobile Computer ........................................................................................ 9
1.2.2. Wired Data Transmission ...................................................................................... 10
1.2.3. Using Wireless Networks ....................................................................................... 10
USING THE RS30 MOBILE COMPUTER ........................................................................................... 13
2.1. Battery .................................................................................................................... 14
2.1.1. Battery Status Indicators....................................................................................... 15
2.1.2. Monitor Battery Level ............................................................................................ 16
2.1.3. Replace Main Battery ............................................................................................ 18
2.1.4. Power Management .............................................................................................. 19
2.2. Memory .................................................................................................................. 20
2.2.1. Check Storage Space ............................................................................................ 21
2.3. Touch Screen ......................................................................................................... 22
2.3.1. Screen Brightness ................................................................................................. 22
2.3.2. Screen Rotation ..................................................................................................... 22
2.3.3. Screen Timeout Settings ....................................................................................... 23
2.3.4. Text Size ................................................................................................................. 24
2.4. Notifications ........................................................................................................... 25
2.4.1. Status LED ............................................................................................................. 25
2.4.2. Audio ....................................................................................................................... 25
2.4.3. Vibrator ................................................................................................................... 27

2.5. Date and Time ....................................................................................................... 28
2.5.1. Set Date, Time and Time Zone ............................................................................. 28
2.6. Language & Keyboard Input ................................................................................. 29
2.6.1. On-screen Keyboard .............................................................................................. 29
2.7. Sound and Volume ................................................................................................ 30
2.8. Programmable Keys .............................................................................................. 31
2.9. Data Capture .......................................................................................................... 35
2.9.1. Barcode Reader ..................................................................................................... 35
2.9.2. Digital Camera ....................................................................................................... 35
2.10. Snap-on USB Charging Cable ................................................................................ 36
BASIC OPERATION OF THE RS30 MOBILE COMPUTER ................................................................... 38
3.1. Home Screen ......................................................................................................... 39
3.1.1. Customize Home Screen ....................................................................................... 41
3.1.2. Customize Wallpaper............................................................................................. 43
3.2. Widgets ................................................................................................................... 44
3.2.1. Add Widgets ........................................................................................................... 45
3.2.2. Remove Widgets .................................................................................................... 46
3.3. Status Bar .............................................................................................................. 47
3.4. Notifications Panel ................................................................................................ 50
3.5. Applications Menu ................................................................................................. 52
3.6. Manage Applications ............................................................................................. 54
3.6.1. Current Applications .............................................................................................. 54
3.7. Suspend & Lock ..................................................................................................... 55
3.7.1. Suspend Device ..................................................................................................... 55
3.7.2. Lock Device ............................................................................................................ 55
3.8. OS Update .............................................................................................................. 56
WIRELESS RADIOS .......................................................................................................................... 59
4.1. Use Wireless Wide Area Network ......................................................................... 60
4.1.1. Share WWAN Data ................................................................................................. 61
4.1.2. Data Usage ............................................................................................................. 62
4.1.3. Data Connection Settings ..................................................................................... 63
4.1.4. SIM Card Settings .................................................................................................. 65
4.2. Use Wireless Local Area Network (Wi-Fi) ............................................................. 66
4.2.1. Power On/Off Wi-Fi ................................................................................................ 66
4.2.2. Connect to Wi-Fi Network ...................................................................................... 67
4.2.3. Manually Add Wi-Fi Network ................................................................................. 69
4.2.4. Advanced Wi-Fi Settings ........................................................................................ 70
4.2.5. Configure Proxy Server .......................................................................................... 71
4.2.6. Use Static IP Address ............................................................................................ 71
4.2.7. Connect With Wi-Fi Protected Setup (WPS) ......................................................... 71
4.2.8. Modify Wi-Fi Network ............................................................................................. 72
4.2.9. Disconnect Wi-Fi Network ..................................................................................... 72
4.3. Use Bluetooth ........................................................................................................ 73
4.3.1. Bluetooth Profiles .................................................................................................. 73
4.3.2. Power On/Off Bluetooth ........................................................................................ 74
4.3.3. Set Bluetooth Visibility........................................................................................... 75
4.3.4. Change Bluetooth Name ....................................................................................... 76

4.3.5. Pair Bluetooth Device ............................................................................................ 76
4.3.6. Unpair Bluetooth Device ....................................................................................... 77
4.3.7. Select Bluetooth Service ....................................................................................... 77
4.4. Use Near Field Communications .......................................................................... 78
USING THE PHONE.......................................................................................................................... 81
5.1. Phone Power .......................................................................................................... 82
5.1.1. Turn On/Off Phone Power ..................................................................................... 83
5.1.2. SIM Card Missing ................................................................................................... 83
5.2. Phone Application .................................................................................................. 84
5.2.1. Phone Interface ..................................................................................................... 84
5.2.2. Place Call ................................................................................................................ 86
5.2.3. Receive Incoming Call ........................................................................................... 87
5.2.4. Check Missed Calls ............................................................................................... 88
5.2.5. View Call History .................................................................................................... 89
5.2.6. Make Multi-Party Calls........................................................................................... 90
5.2.7. Audio Modes .......................................................................................................... 91
5.2.8. In-call Volume ........................................................................................................ 91
5.2.9. Phone Settings ....................................................................................................... 92
USING READER CONFIGURATION UTILITY ...................................................................................... 95
6.1. Configure Reader ................................................................................................... 96
6.1.1. General Settings .................................................................................................... 97
6.1.2. Symbology ............................................................................................................ 105
6.1.3. Miscellaneous ...................................................................................................... 109
6.1.4. Reader Config Option Menu ................................................................................ 110
6.2. Read Printed Barcodes ....................................................................................... 116


The RS30 Mobile Computer, powered by Android 4.4.2, is light-weight, easy to use, and
provides more powerful and handy tools to delivering flexibility in customization.
Specifically designed to work as an industrial PDA, the RS30 Mobile Computer provides
rich options of data collection, voice and data communication, long-lasting working hours,
and so on. Its large color transmissive display guarantees ease in reading in all lighting
conditions. Integrated with Bluetooth v4.0, v2.1+EDR and 802.11b/g/n technologies, the
mobile computer also includes a GSM/GPRS/EDGE/WCDMA/UMTS/HSDPA/HSUPA/HSPA+
module to gain greater speeds and optimal mobility. In particular, an integrated GPS
receiver is made available for use with third-party location-based applications.
This manual serves to guide you through how to install, configure, and operate the
mobile computer. The Care & Maintenance section is specifically crucial for those who are
in charge of taking care of the mobile computer.
We recommend you to keep one copy of the manual at hand for quick reference or
maintenance purposes. To avoid any improper disposal or operation, please read the
manual thoroughly before use.
Thank you for choosing CipherLab products!
INTRODUCTION
1

RS30 Mobile Computer Reference Manual
FEATURES
Built tough to survive drop test and sealed against moisture/dust to industrial
standard IP54
Android 4.4.2 operating system with a powerful Cortex 1.3 GHz Quad-Core processor
8GB eMMC flash memory to store OS and software programs
1GB LPDDR2 RAM to store and run programs, as well as store program data
One expansion slot for microSDHC memory card up to 32GB, SDXC supported
Three reader options — 1D linear, 1D laser or 2D imager
Built-in 8.0 Megapixel CMOS digital camera with white LED for flash and auto focus
Left and right side triggers for ambidextrous scanning
Total wireless solution — connectivity includes Bluetooth v4.0 and v2.1+EDR,
802.11b/g/n, GSM/GPRS/EDGE/WCDMA/UMTS/HSDPA/HSUPA/HSPA+, and near field
communication (NFC)
A 4.7” color transmissive display with 960x540 pixels to deliver excellent visibility in
all lighting conditions
Configurable feedback indicators including speaker and vibrator
Built-in scan engine setting tool Reader Configuration which serves out-of-the-box
keyboard wedge functionality
Accessories and peripherals include USB Charging and Data Transfer Cable, Snap-on
USB Charging Cable
INSIDE THE PACKAGE
The following items are included in the kit package. Save the box and packaging material
for future use in case you need to store or ship the mobile computer.
RS30 Mobile Computer
Rechargeable Li-ion battery pack
Wrist Band
Hardshell
Micro USB Charging and Data Transfer Cable
Snap-on USB Charging Cable
AC Power Adaptor
Quick Guide
2
1.1.
OVERVIEW
Chapter 1
QUICK START
3

RS30 Mobile Computer Reference Manual
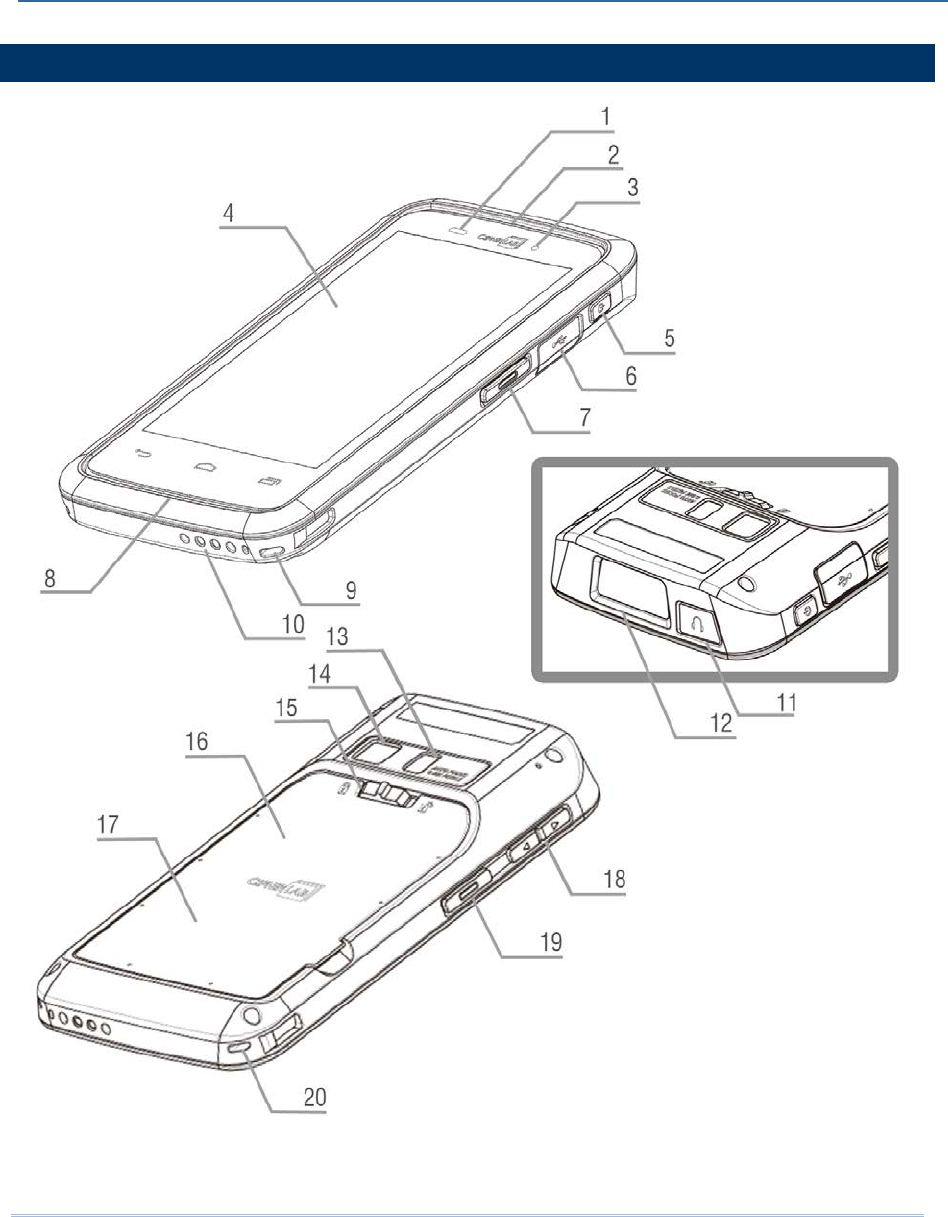
No. Description No. Description
1 Light Sensor 2 Receiver
3 Status LED 4 Touchscreen
5 Power Button 6 Micro USB Port
7 Side Key 8 Speaker
9 Wristband Slot 10 Charging Pins
11 Headset Jack 12 Scan Window
13 Camera Flash 14 Camera
15 Battery Cover Latch 16 Battery Cover
17 NFC Detection Area 18 Volume Buttons
19 Side Key 20 Wristband Slot
4
Chapter 1 Quick Start
1.1.1.
INSTALLING BATTERY
For shipping and storage purposes, the mobile computer and the main battery are saved
in separate packages.
Note: Any improper handling may reduce the battery life.
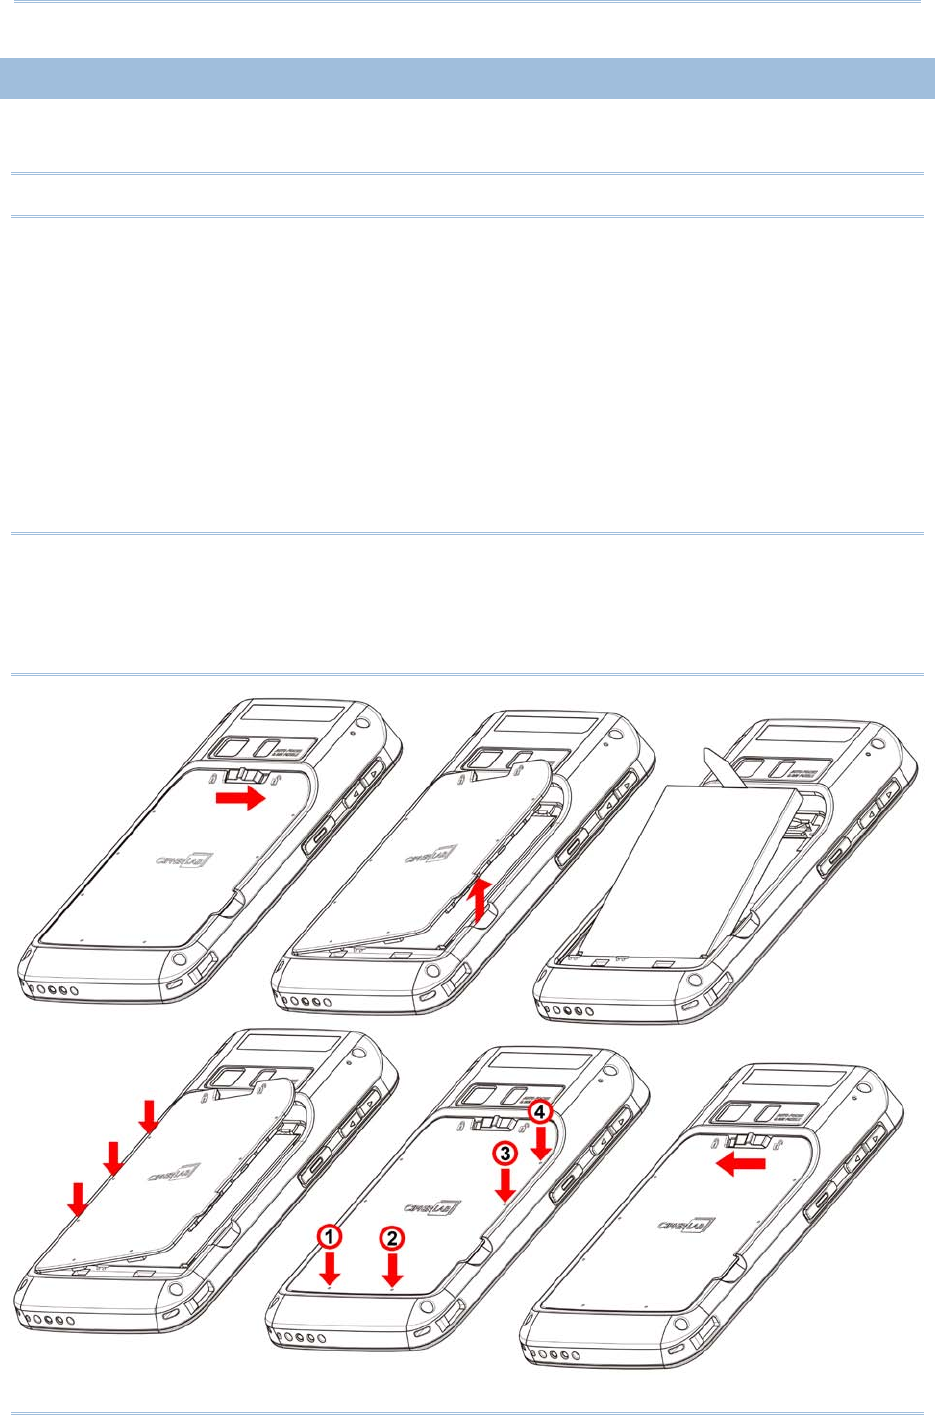
To install the main battery:
1) Push the battery lock at the top of the battery cover to the right in order to unlock.
2) Open the battery cover by pulling up the tab in the lower right corner.
3) Insert the main battery with the contact pins seated in the bottom left corner.
4) Fix the left edge of the battery cover first.
5) Press in the battery cover at the dotted sites.
6) Push the battery lock back to the lock position.
Warning:
(1) Check that the battery lock is at the “lock” position before powering on the device.
(2) For initial use, insert a charged battery, lock battery cover in place, then press the
Power key to power on the mobile computer.
5
RS30 Mobile Computer Reference Manual
1.1.2.
INSTALLING SIM CARD, SAM CARD AND MEMORY CARD
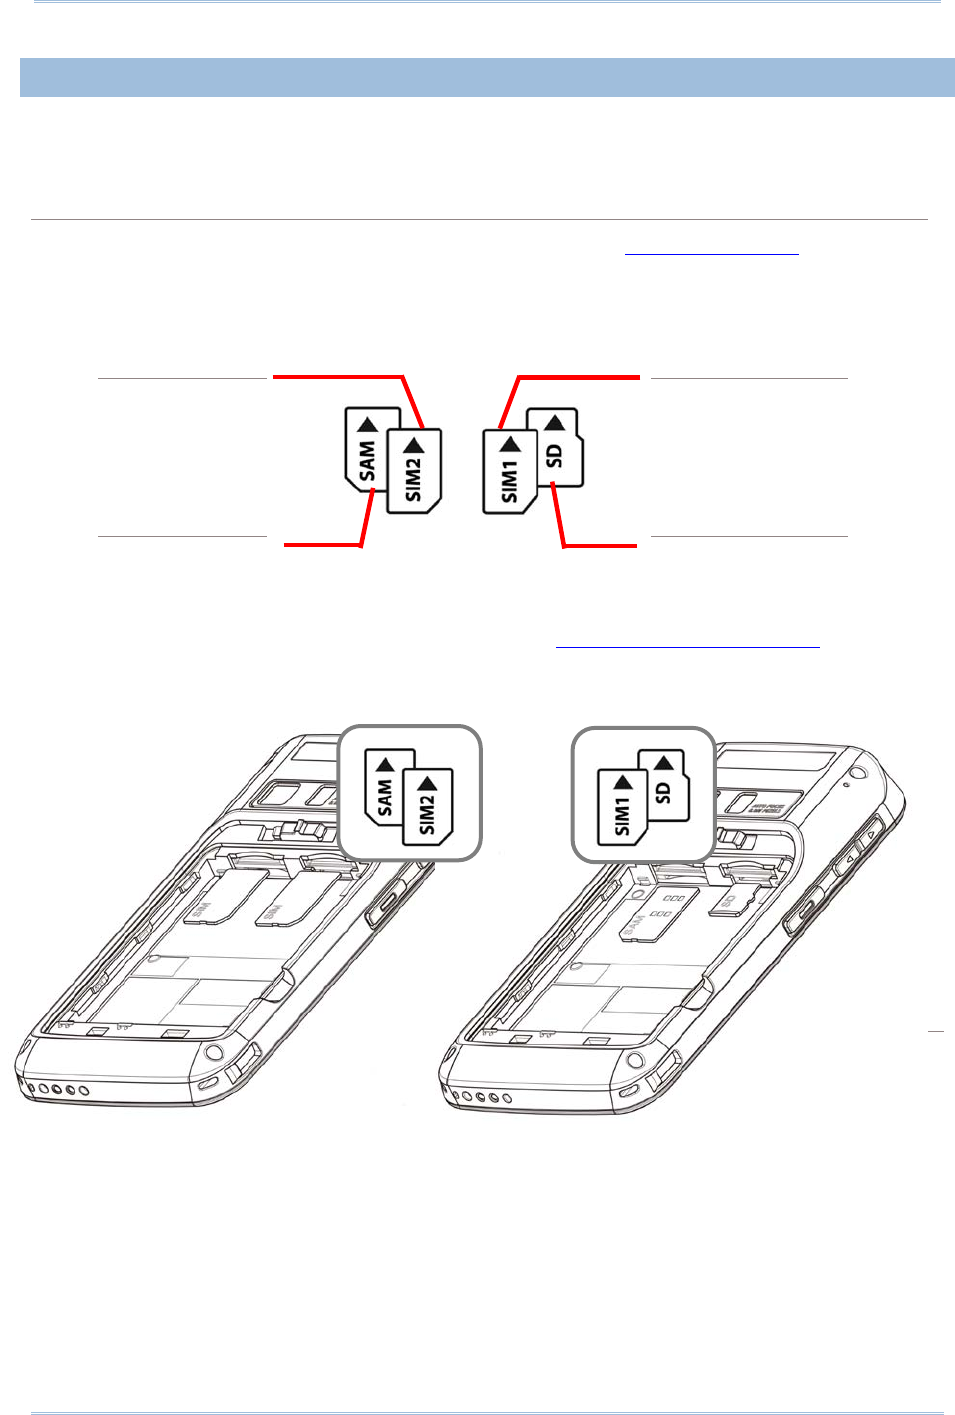
The RS30 Mobile Computer is equipped with two SIM card slots, one SAM card slot and
one memory card slot.
Insert Cards
1) Remove the battery cover as described in steps 1-3 of Installing Battery.
2) Insert the cards into their respective slots according to the directions indicated. Push
the cards to lock them in.
Left top
Right top
SIM2 card slot
(GSM only)
SIM1 card slot
(GSM & WCDMA)
Left bottom
Right bottom
SAM card slot SD card slot
The SIM 1 slot (on the right) supports both 2G and 3G networks, while the SIM 2 slot
(on the left) supports only 2G networks. See Data Connection Settings for how to
configure 2G and 3G networks.
3) Replace the battery cover and push the battery lock back to the lock position.
Remove Cards
1) Remove the battery cover as described in steps 1-3 of Installing Battery.
2) Push the SIM cards, SAM card and SD card to eject them from their slots.
3) Replace the battery cover and push the battery lock back to the lock position.
6
Chapter 1 Quick Start
1.1.3.
POWER ON/OFF MOBILE COMPUTER
POWER ON
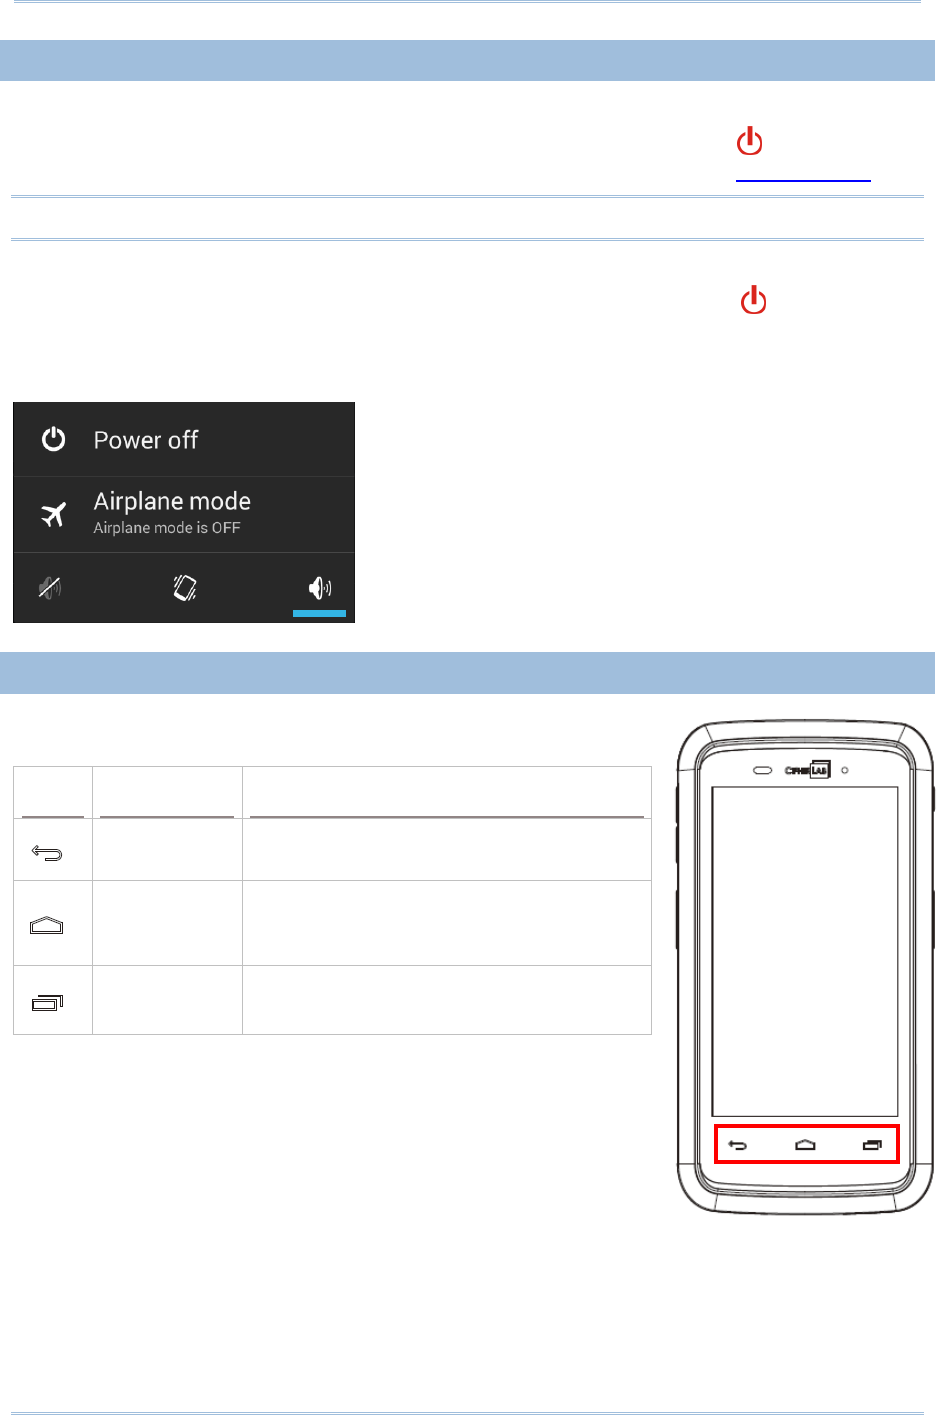
To power on the mobile computer, press and hold the power button located on the
upper right side of the device. The mobile computer opens to show the Home Screen.
Note: For the mobile computer to power on, the battery cover must be secured in place.
POWER OFF
To power off the mobile computer, press and hold the power button for more than
three seconds. A menu will appear on-screen which allows you to power off the device,
switch to airplane mode, or set the system sound to mute or vibrate only. Make sure all
user data and tasks have been stored before tapping Power off.
1.1.4.
USING HARDWARE BUTTONS
On the bottom of the mobile computer are three hardware
buttons that deliver the following functions:
Button
Function
Description
Back button Returns to the previous screen or closes
the active window or keyboard.
Home button Displays the Home screen. Tap and hold
the Home button to open a list of recently
used applications.
Recent apps
button Opens a list of recently used applications.
7

RS30 Mobile Computer Reference Manual
1.1.5.
CONNECTING HEADSET
The headset jack is located on the top of the mobile computer. You can use the headset
for audio playback or communication via the phone application, audio instant messaging,
etc.
1) Flip up the rubber cover.
2) Connect the headset to the headset jack.
3) Replace the rubber cover.
8

Chapter 1 Quick Start
1.2.
CHARGING & COMMUNICATION
1.2.1.
CHARGE MOBILE COMPUTER
The main battery may not be charged to full for shipment. When you first receive the kit
package, you will need to charge the main battery to full before using the mobile
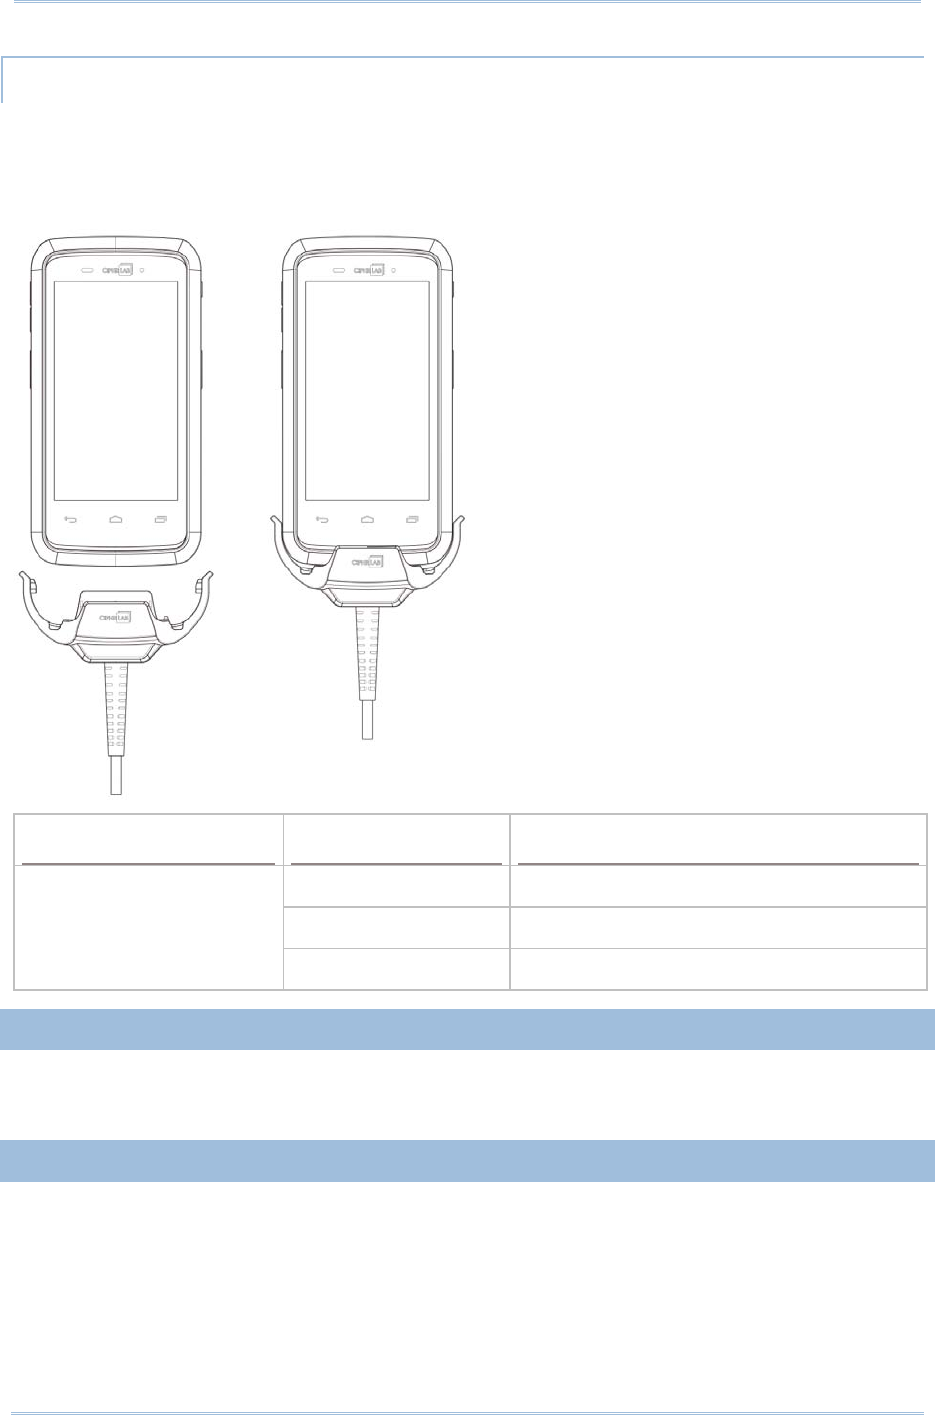
computer. You may use the Snap-on USB Charging Cable along with a power adapter to
charge the mobile computer.
Charging Time
Main battery: The main battery powers the mobile computer to work. It takes approximately 4
hours to charge an empty main battery to full. The charging LED above the screen (located on
the right) will light up in red while charging and will turn green when charging is complete.
When the main battery is removed, RTC retention will be maintained.
Backup battery:
The backup battery is mounted on the main board. Its role is to temporarily
keep the mobile computer in suspension when the main battery is drained out so data in
DRAM will be retained. The backup battery takes approximately
3.5 hours to charge to full by
the main battery or power adapter.
Charging Temperature
It is recommended to charge the battery
at room temperature (18°C to 25°C) for optimal
performance.
Battery charging stops when ambient temperature drops below 0°C or exceeds 40°C.
Operation on Battery Power
When 802.11b/g/n, GSM/GPRS/EDGE/WCDMA/UMTS/HSDPA/HSUPA/HSPA+, Bluetooth v4.0
& v2.1+EDR and GPS are all enabled on battery power, the main battery level will drop down
substantially. Prolonged use of the display and continued scanning of barcodes will also affect
battery level.
In order to prevent system shut down
after the battery is drained out, we suggest that you
keep a fresh battery for replacement at all times,
or connect the mobile computer to an
external power.
9
RS30 Mobile Computer Reference Manual
USING SNAP-ON USB CHARGING CABLE
1) Fasten the Snap-on USB Charging Cable to the lower end of the mobile computer.
2) Connect the other end of the Snap-on USB Charging Cable to the adapter.
3) Fix the adapter plug onto the adapter, and plug in into an electrical outlet.
RS30 LED Indicator
Status
Description
Charging Red, solid Charging the mobile computer
Green, solid Charging complete
No light Charging error (charging will stop)
1.2.2.
WIRED DATA TRANSMISSION
Use the micro USB cable to connect the mobile computer to your PC for data
transmission.
1.2.3.
USING WIRELESS NETWORKS
The mobile computer supports widely applied wireless technologies including Bluetooth
v4.0 & v2.1+EDR, 802.11b/g/n and NFC, and is able to send/receive data in real time in
an efficient way. Select GSM/GPRS/EDGE/WCDMA/UMTS/HSDPA/HSUPA/HSPA+ modules
embedded for a total wireless solution for data and voice communication.
10

Chapter 1 Quick Start
11

This chapter explains the features and usage of the mobile computer.
Chapter 2
USING THE RS30 MOBILE COMPUTER
13

RS30 Mobile Computer Reference Manual
2.1.
BATTERY
Main Battery
The mobile computer is powered by a rechargeable 3.8V / 3000mAh Li-ion battery
pack, and it takes approximately 4 hours to charge it to full from the power adaptor.
However, the charging time may vary by your working condition.
Spare Battery
A spare battery pack is provided as an accessory. We recommend keeping a fully
charged spare battery at hand in order to replace the main battery when it is nearly
drained out.
Backup Battery
Settled on the main board is a backup battery that keeps the mobile computer in
suspension when the main battery is depleted. The backup battery is a 60 mAh
rechargeable Li-ion battery, and can retain data in the DRAM for 30 minutes when it
is fully charged (as long as wireless modules on the mobile computer are inactive).
The backup battery can be charged by the main battery or the power adapter, and
takes approximately 3.5 hours to charge to full.
Warning:
(1) The battery cover must be secured in position. If not, the mobile computer cannot
turn on by pressing the power key.
(2) For a new battery, make sure it is fully charged before using.
(3) To avoid data loss, when replacing the main battery, make sure you replace it with
a well-charged spare battery pack. Always prepare a spare battery at hand,
especially when you are on the road.
(4) When the mobile computer has been on backup battery for 30 minutes, the
system will shut down. Be sure to replace the main battery as soon as possible in
order to avoid data loss.
14
Chapter 2 Using the RS30 Mobile Computer
2.1.1.
BATTERY STATUS INDICATORS
The main battery pack is the only power source for the mobile computer to work.
Therefore, when the main battery level goes low, you need to replace the battery pack
with a charged one or charge it as soon as possible. Most of all, you should backup
important data on a regular basis.
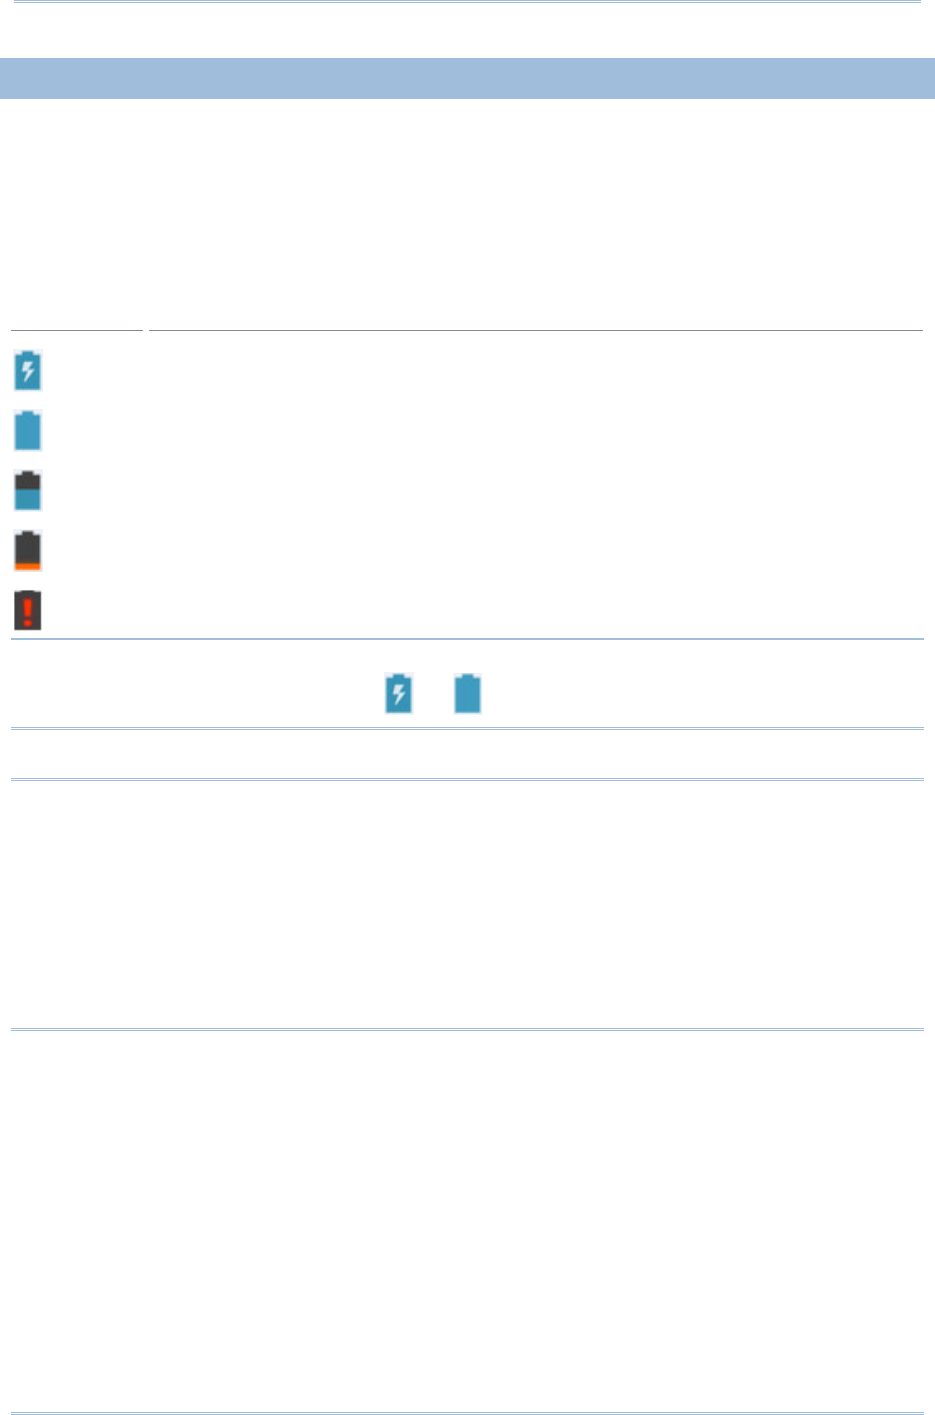
By checking the battery status icon, you can tell the battery level remaining in the main
battery.
Battery Icon
Description
External power source is connected and main battery is being charged.
Main battery is fully charged.
Main battery level is partially drained.
Main battery level is low.
Main battery level is very low and needs charging immediately.
Note: When the mobile computer is fully charged and battery level reaches 100%, the
battery icon will change from to to indicate charging is completed.
Warning:
(1) Once the battery level drops below 20%, the low battery notification will be
displayed on the screen.
(2) Data loss with RAM may occur when battery level is low. Always save data before
the battery runs out of power or keep a fresh battery for replacement.
(3) Constant usage of the mobile computer at low battery level can affect battery life.
For maximum performance, recharge the battery periodically to avoid battery
drain out and maintain good battery health.
15
RS30 Mobile Computer Reference Manual
2.1.2.
MONITOR BATTERY LEVEL
MAIN BATTERY LEVEL
The main battery is the only source that feeds the mobile computer to work. It also
supplies the backup battery on the main board in order to retain the data stored in DRAM.
When main battery level gets low, recharge it or replace it as soon as possible. Most
critically, back up the important data from time to time to protect your work.
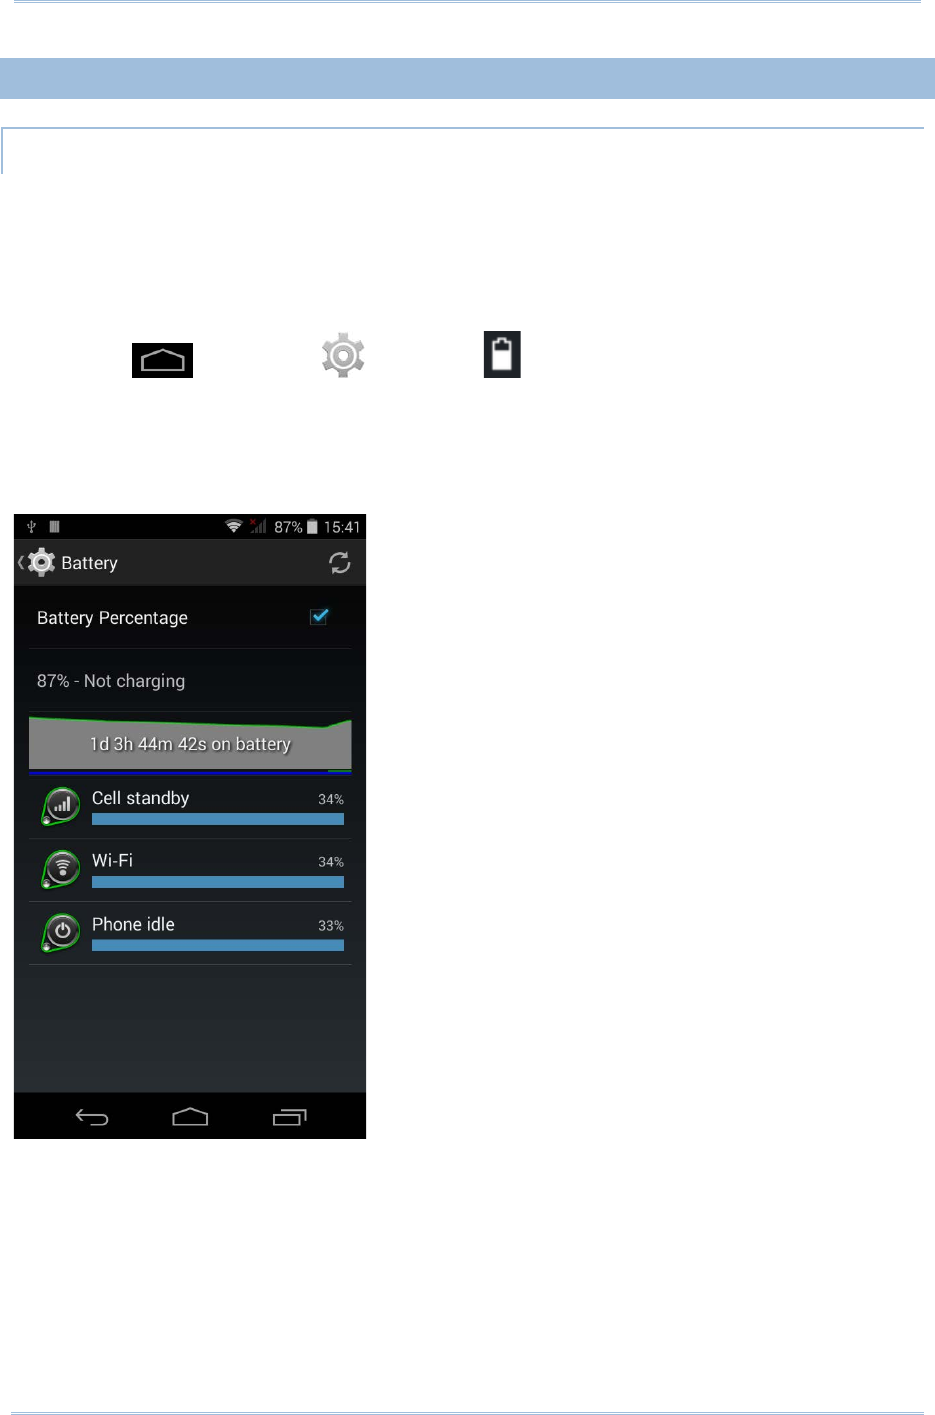
To check main battery level:
Tap Home | Settings | Battery .
Battery level percentage is also shown to provide a clear grasp of the remaining battery
power. The screen also shows the rate of battery discharge since the last battery
charging session, how long the device has been running on battery power, and which
applications are consuming the most battery power.
16
Chapter 2 Using the RS30 Mobile Computer
LOW BATTERY ALERT
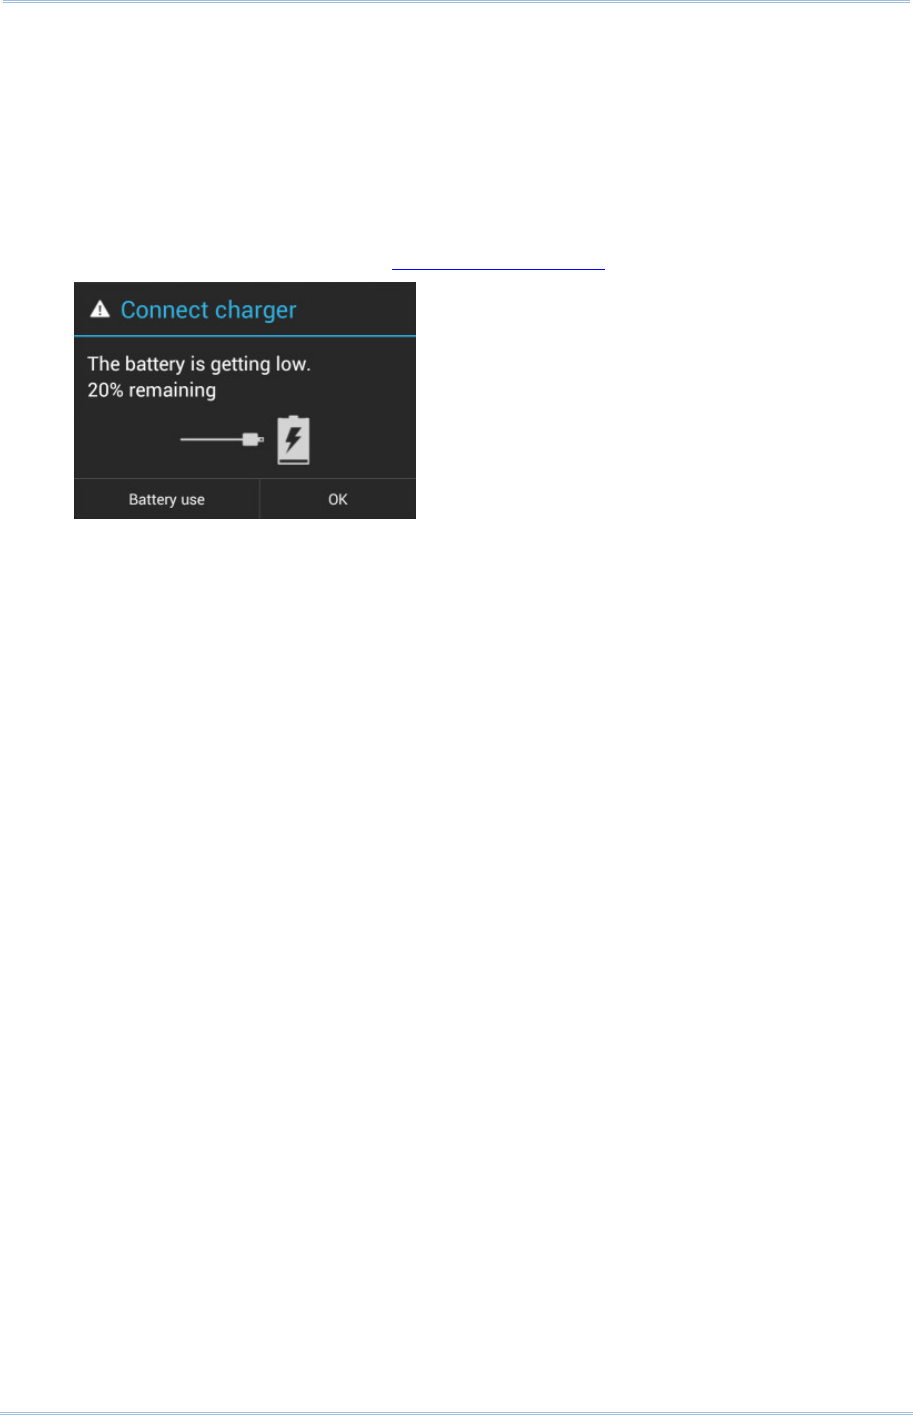
When the main battery level drops to 20%, the mobile computer prompts a warning
reminding you to charge the main battery. When the main battery level drops to 10%,
the mobile computer prompts a second warning. When the main battery level drops to
4%, the mobile computer shuts down. When either of these situations occurs, connect
the mobile computer to an external power source, or replace the main battery pack as
soon as possible.
To replace the main battery pack, see Replace Main Battery.
17
RS30 Mobile Computer Reference Manual
2.1.3.
REPLACE MAIN BATTERY
When main battery level is low, follow the steps below to replace the main battery.
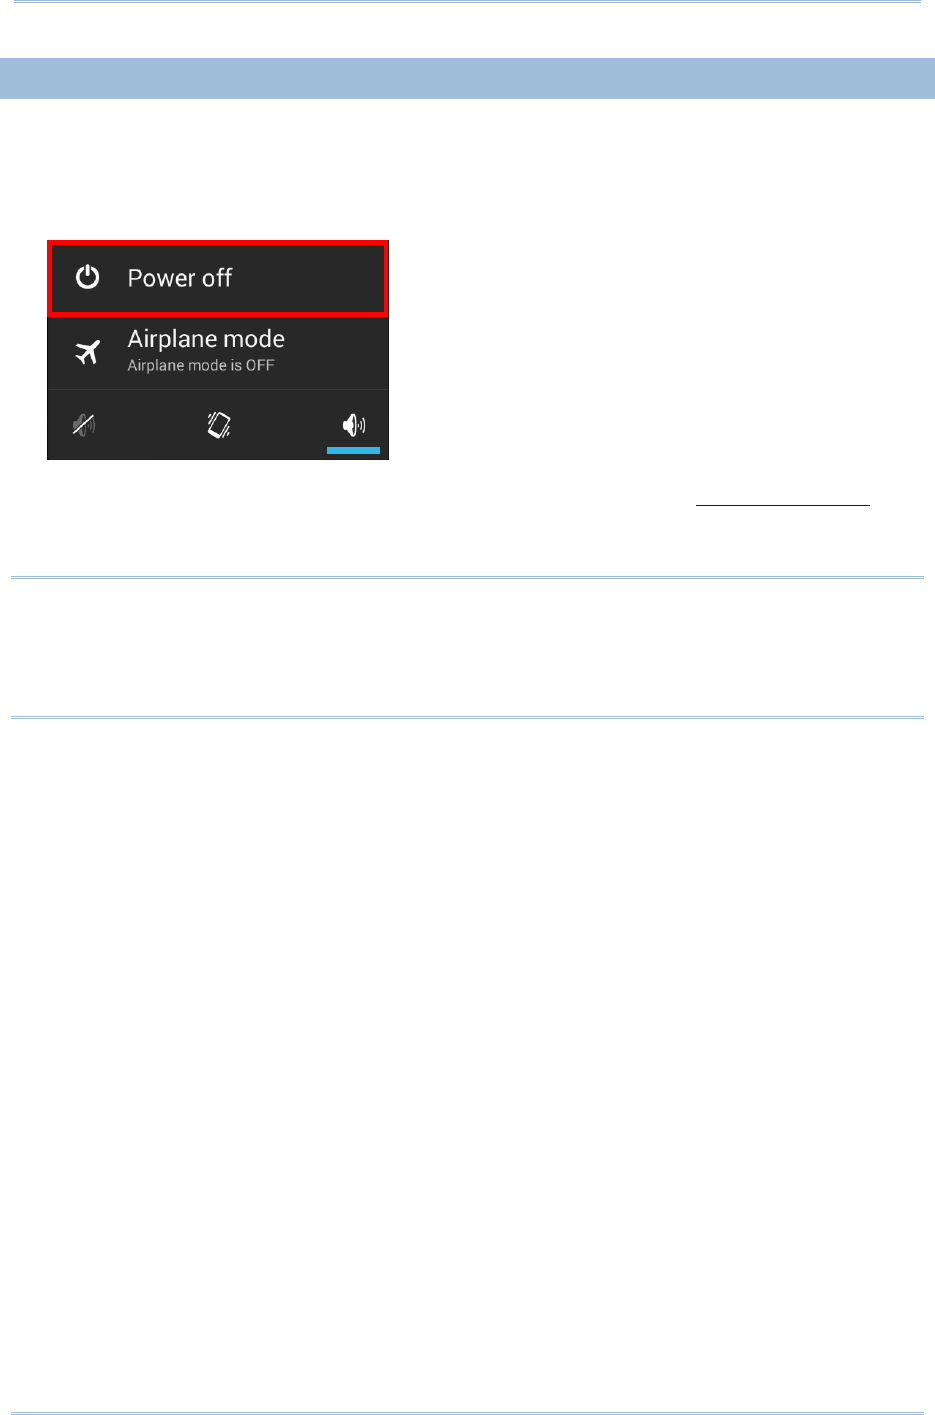
1) Press and hold the power button on the side of the mobile computer.
2) Tap power off in the pop-up menu. The mobile computer will power off.
3) Open the battery cover and insert a charged main battery as in Installing Battery.
4) Press the power button to power on the mobile computer.
Note:
(1) Before replacing the main battery, make sure the backup battery is well-charged in
order to avoid unnecessary data loss.
(2) After removing the main battery, insert a well-charged battery as soon as possible.
18

Chapter 2 Using the RS30 Mobile Computer
2.1.4.
POWER MANAGEMENT
For any portable device, power management is a critical issue especially when you are on
the road. Below are some tips to help you save battery power.
Warning: Using backlight, wireless connectivity, and peripheral devices while on
battery power will substantially reduce battery power.
Bring an additional main battery pack with you on the road.
End wireless connections (such as Bluetooth v4.0 & v2.1+EDR, 802.11b/g/n,
GSM/GPRS/EDGE/WCDMA/UMTS/HSDPA/HSUPA/HSPA+, NFC and GPS) which are not
in use.
Shorten the screen turn off time. See Screen Timeout Settings.
Reduce the screen brightness level. See Screen Brightness.
Shut down automatic data syncing of applications (such as Email, Calendar,
Contacts).
19

RS30 Mobile Computer Reference Manual
2.2.
MEMORY
Flash Memory (ROM)
8GB flash memory for storing the OS (Android 4.4.2) and custom application
programs.
Random-access Memory (RAM)
1GB RAM for storing and running programs, as well as storing program data.
Expansion Slot
The mobile computer is equipped with one microSDHC card slot which accommodates
an SD card up to 32 GB (microSDXC is supported as well).
CAUTION OF DATA LOSS
When the main battery is removed or drained, the backup battery on the main board
takes over to supply the mobile computer and keep it in suspension. A fully charged
backup battery will retain the data in the RAM for 30 minutes. When the backup battery
is drained out as well, the mobile computer will shut down, and only the contents of RTC
will be retained. All other unsaved data will be lost.
If you want to put away the mobile computer for a couple of days, you should be aware
that data loss occurs when the main battery and backup battery discharges completely.
Therefore, it is necessary to backup data and files before putting away the mobile
computer.
20
Chapter 2 Using the RS30 Mobile Computer
2.2.1.
CHECK STORAGE SPACE
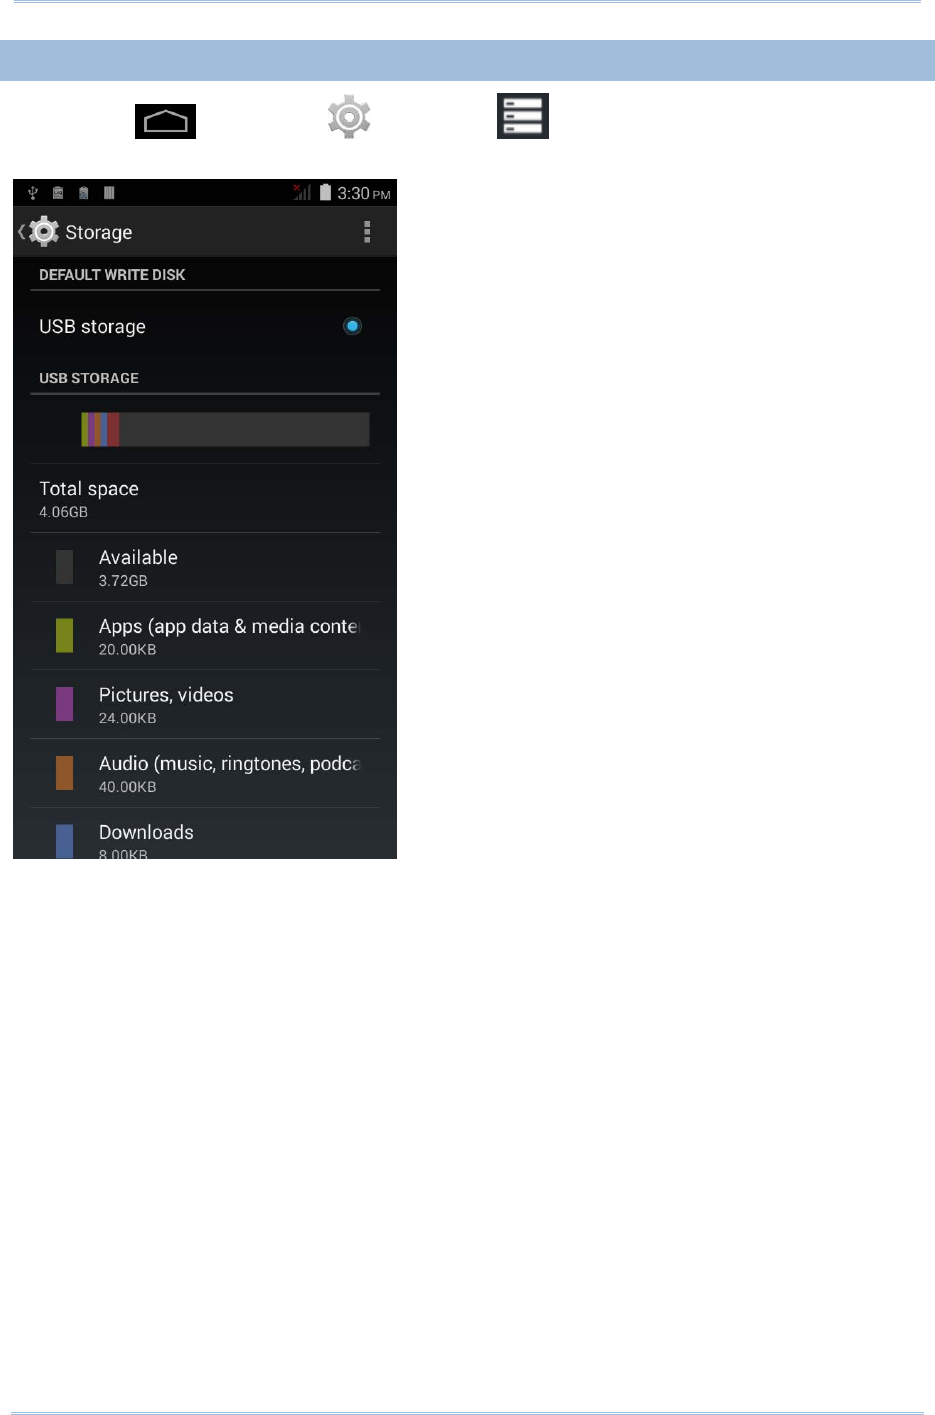
Tap Home | Settings | Storage to check usage of the internal and
external storage spaces.
21
RS30 Mobile Computer Reference Manual
2.3.
TOUCH SCREEN
The mobile computer comes with a 4.7” transmissive LCD with 960 by 540 pixels
resolution (qHD). The LED backlight of the screen, which helps ease reading under dim
environments, can be controlled manually and automatically.
Warning: DO NOT use any pointed or sharp objects to move against the surface of
the screen.
2.3.1.
SCREEN BRIGHTNESS
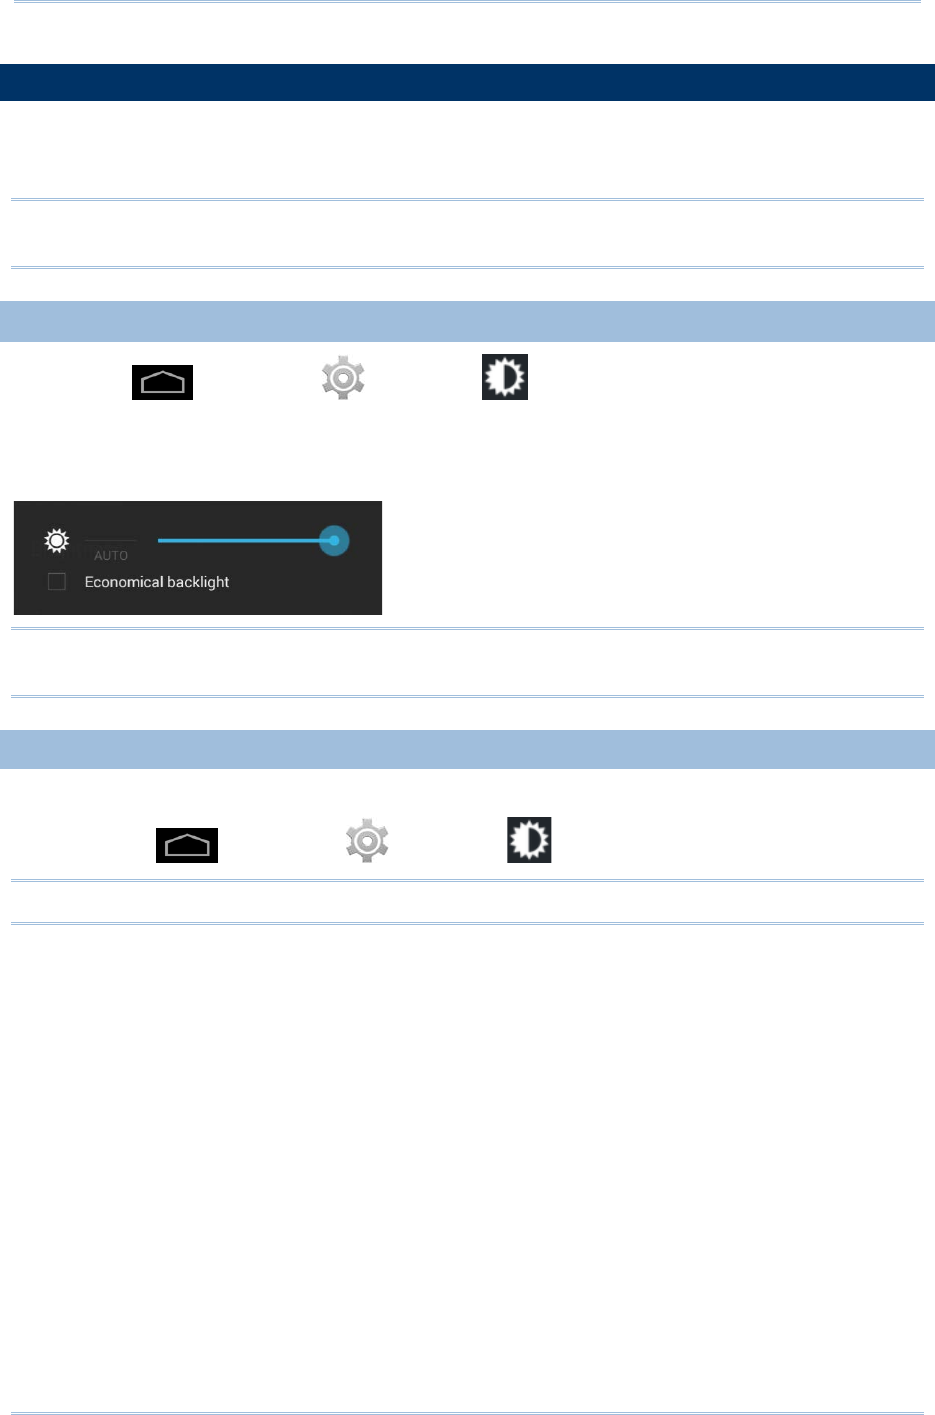
Tap Home | Settings | Display | Brightness.
Adjust screen brightness by dragging the slider to the right (to increase brightness) or
left (to reduce brightness). Select the Economical backlight checkbox to enable
automatic backlight adjustment with the mobile computer’s built in sensor.
Note: To save battery power, dim the screen brightness while working in a well-lit area,
or set a shorter sleeping plan for the screen backlight to go off.
2.3.2.
SCREEN ROTATION
For the mobile computer to automatically adjust screen orientation:
Select Home | Settings | Display | Auto-rotate screen.
Note: The Home Screen does not rotate.
22
Chapter 2 Using the RS30 Mobile Computer
2.3.3.
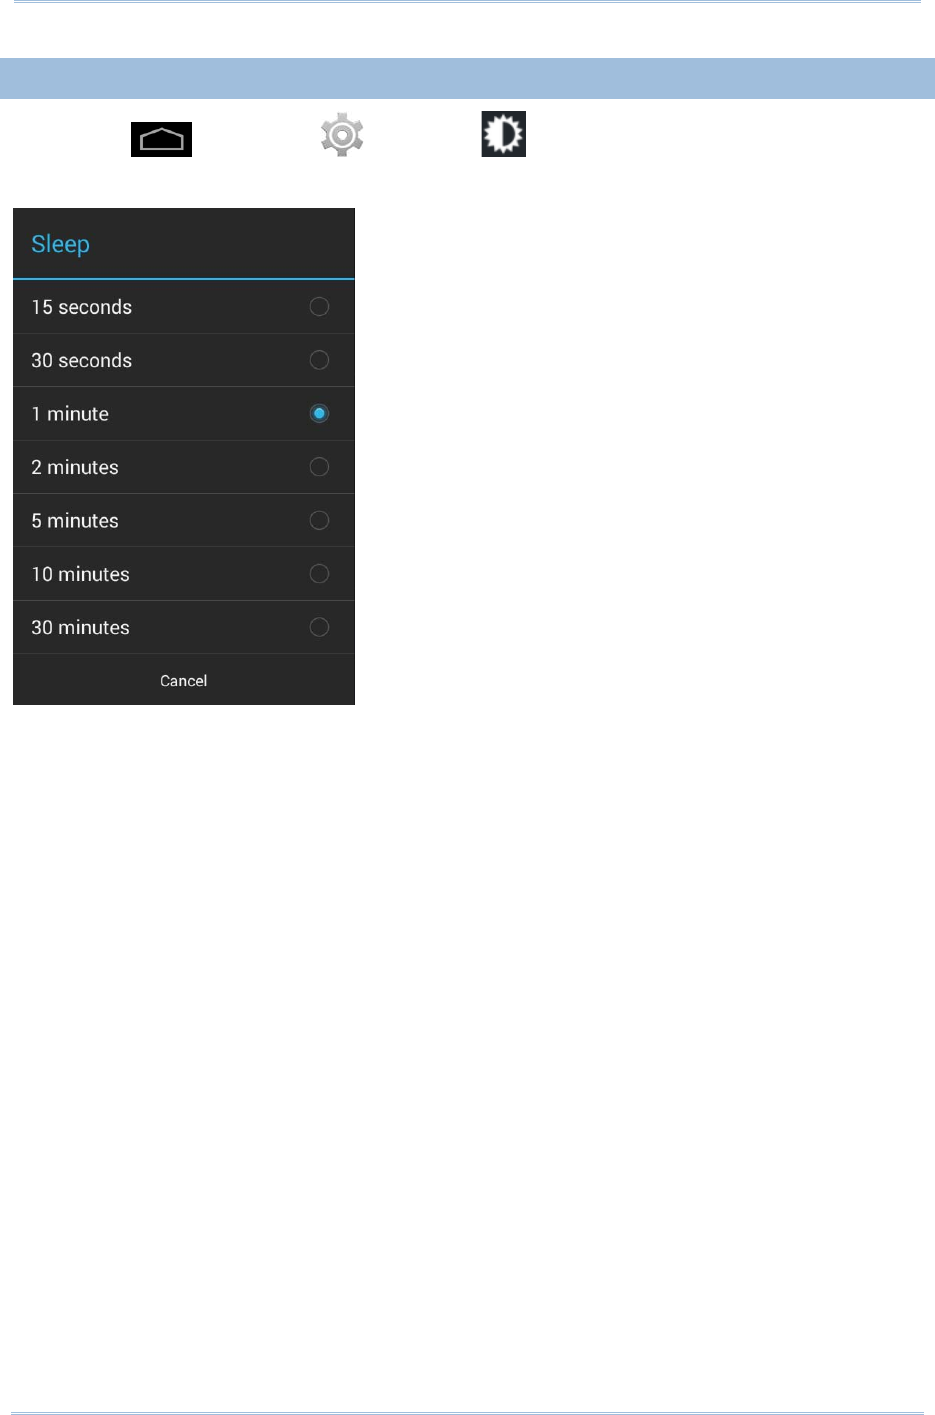
SCREEN TIMEOUT SETTINGS
Tap Home | Settings | Display | Sleep.
Select the time for screen timeout.
23
RS30 Mobile Computer Reference Manual
2.3.4.
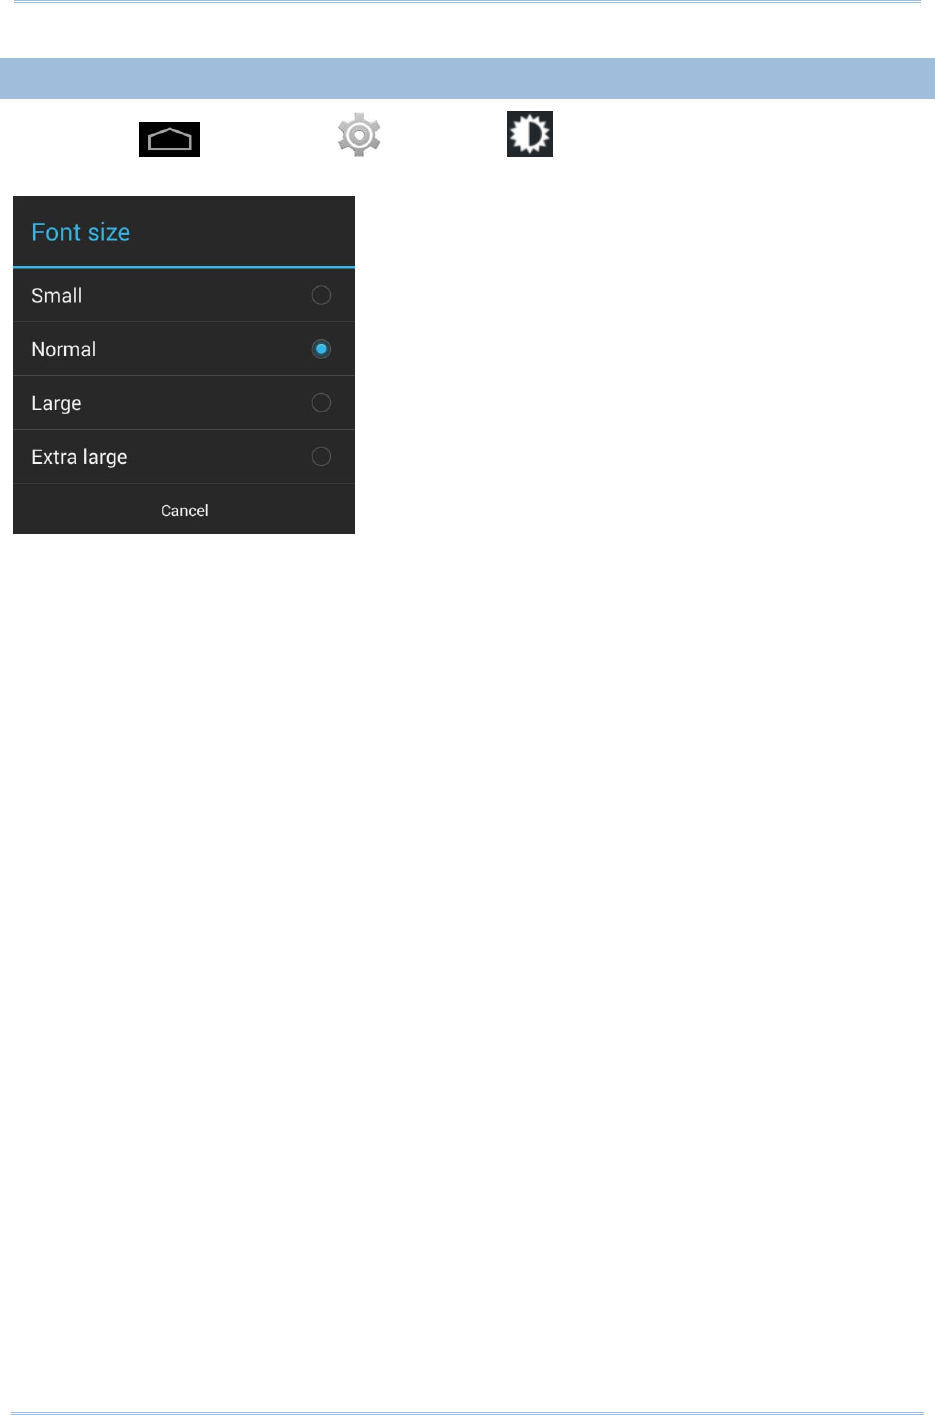
TEXT SIZE
Tap Home | Settings | Display | Font Size. Select the font size
between Small, Normal, Large and Extra Large.
24
Chapter 2 Using the RS30 Mobile Computer
2.4.
NOTIFICATIONS
2.4.1.
STATUS LED
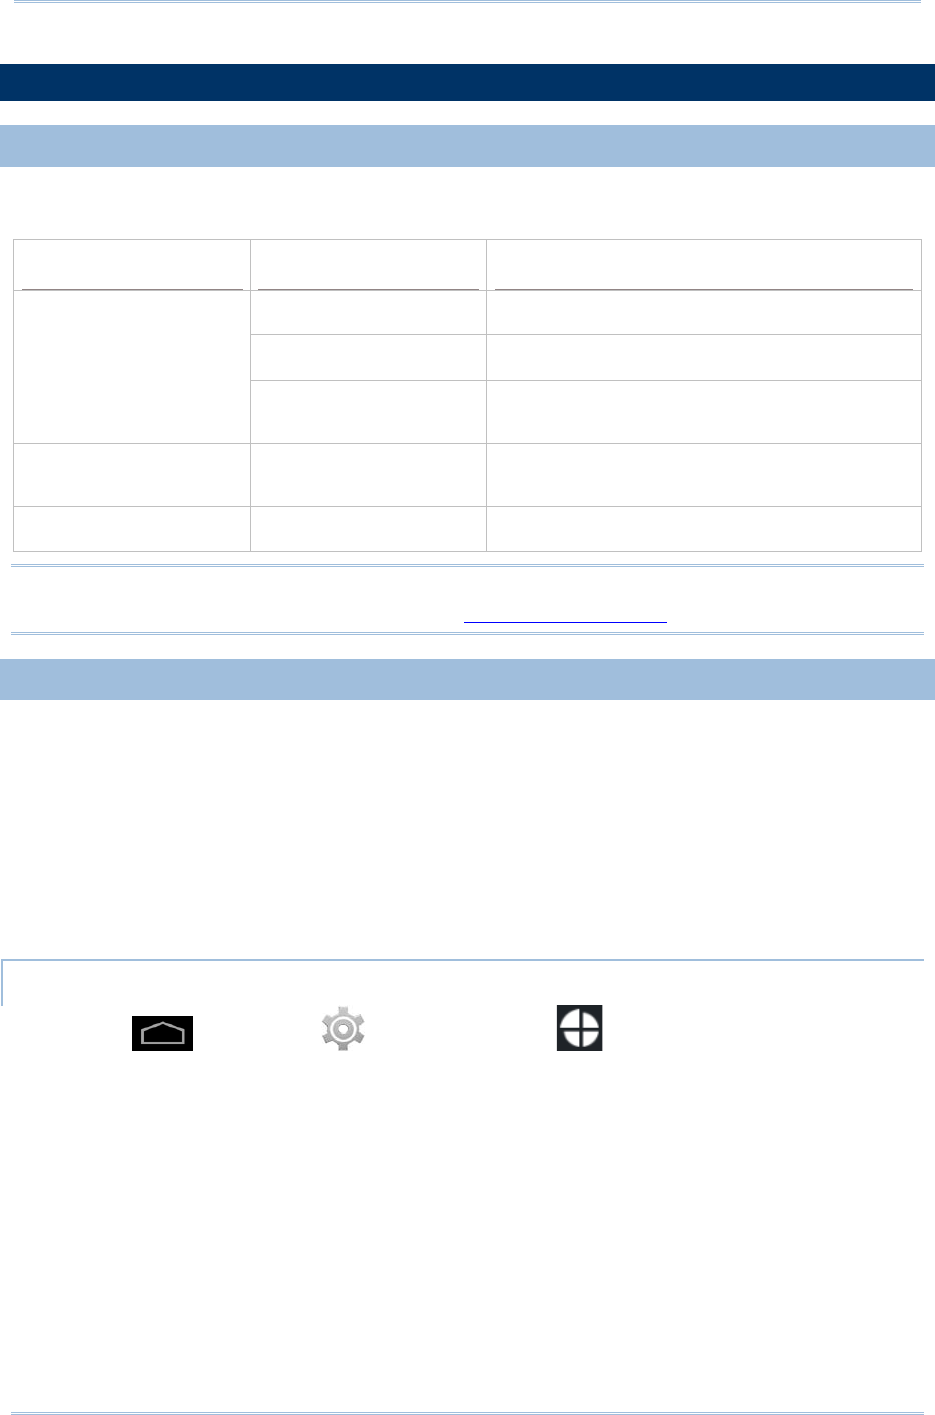
An LED indicators located above the touch screen provide information about charging
status, scanner light beam, and scanner "Good Read" during data collection.
Indicator
Status
Description
Charging
Green, solid Charging complete
Red, solid Charging the mobile computer
Red, blinking Charging error (for instance,
battery not in
place)
Barcode or wireless
tag decode Green, flash once Good read
Wireless radio Blue, blinking Wi-Fi, Bluetooth, or mobile data is in use
Note: For Scanner decode and Scanner beam LED to function, LED notification must be
enabled in Reader Configuration. See Notification Settings.
2.4.2.
AUDIO
The speaker is used to play sounds for events in windows and programs, or play audio
files. In addition, it can be programmed for status feedback. In noisy environments, you
may consider connecting a headset instead. A headset jack is provided on the top of the
mobile computer, which is a 3.5 mm DIA stereo earphone jack. The mobile computer
also supports using Bluetooth headsets.
Supported audio file formats include: WAV, MP3, AAC, AAC+, Enhanced AAC+, AU
(including ADPCM), Midi, XMF, AMR (NB and WB).
Use the volume buttons on the side of the mobile computer to adjust the system volume.
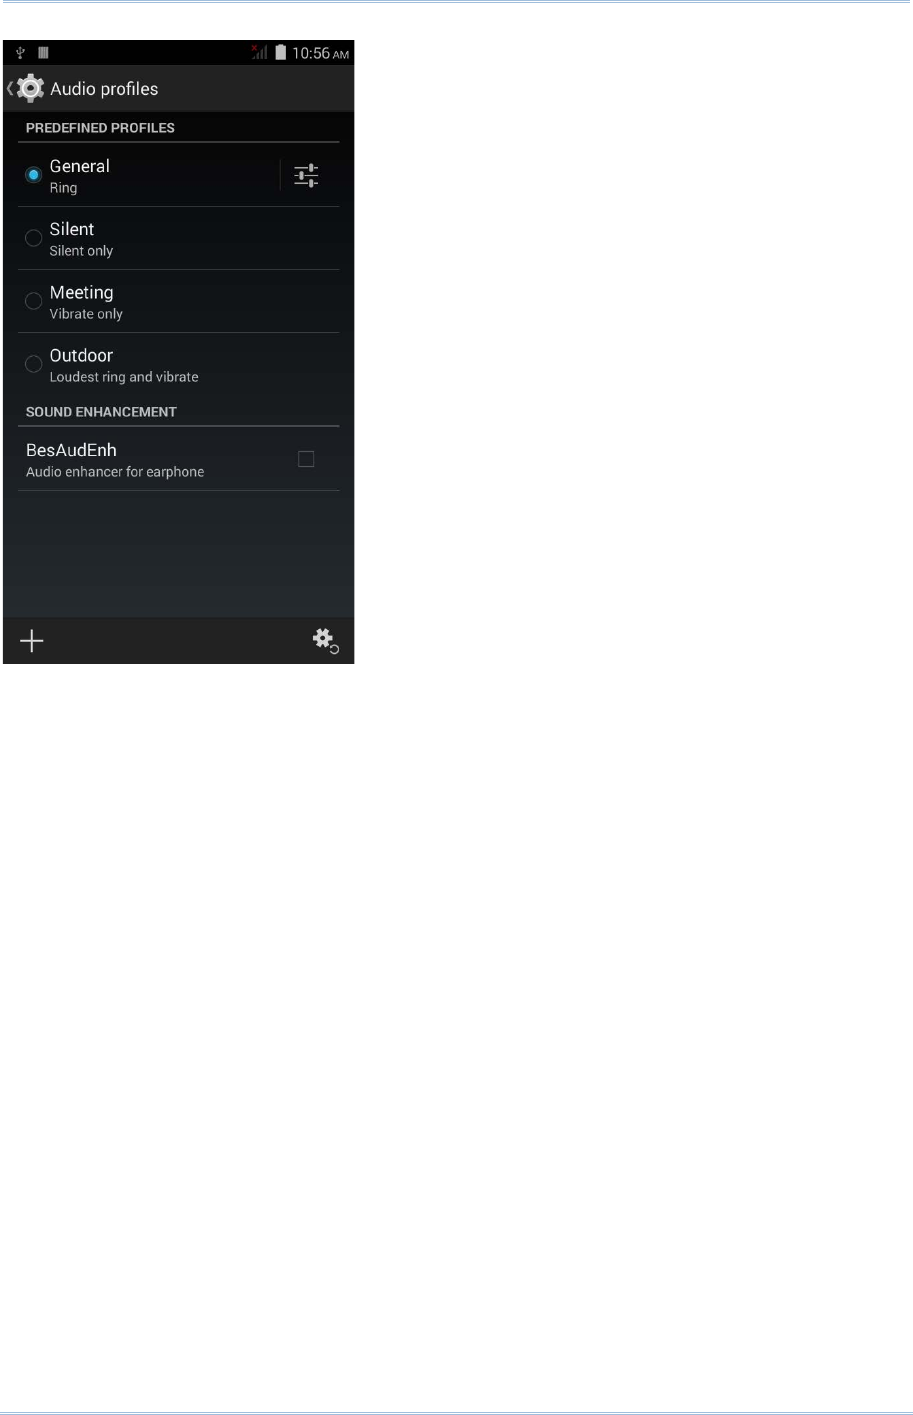
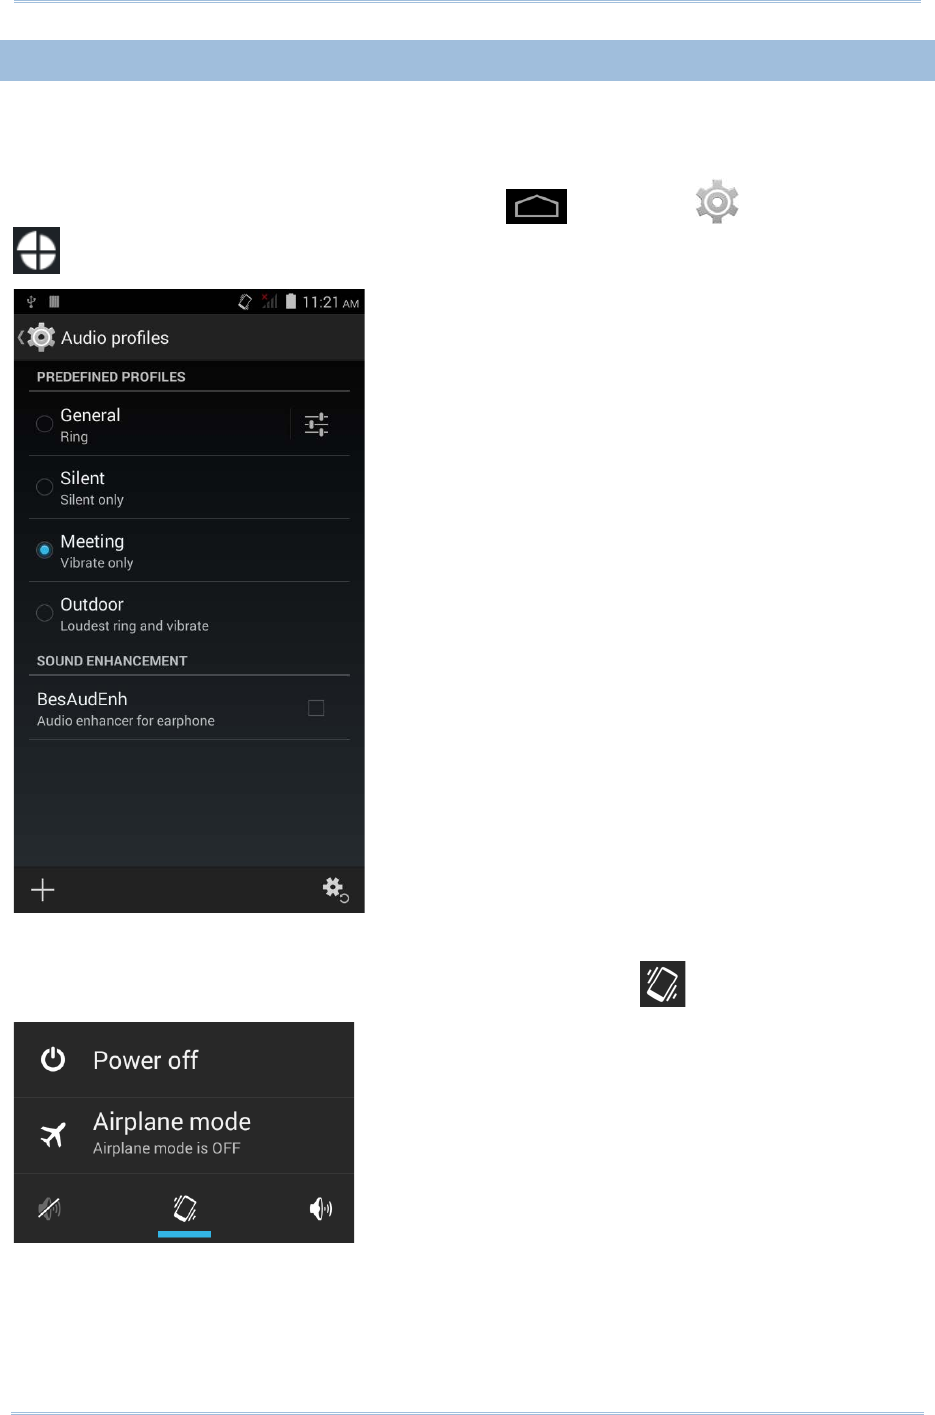
AUDIO PROFILE
Tap Home | Settings | Audio profiles .
Select the audio profile to suit your working environment.
25
RS30 Mobile Computer Reference Manual
26
Chapter 2 Using the RS30 Mobile Computer
2.4.3.
VIBRATOR
The mobile computer is integrated with a vibrator, which is software programmable for
tactile feedback. This can be helpful when working in noisy environments.
You may also set the mobile computer to vibrate only, in which all system sounds will be
muted and replaced by the vibrator. Tap Home | Settings | Audio profiles
and select Meeting – Vibrate only.
OR
Press and hold the power key, and tap the vibrate mode icon in the menu.
27

RS30 Mobile Computer Reference Manual
2.5.
DATE AND TIME
2.5.1.
SET DATE, TIME AND TIME ZONE
By default, the mobile computer automatically synchronizes the date and time to the
WWAN network (if connected).
To set the data and time manually:
1) Tap Home | Settings | Date & time .
2) Tap Automatic data & time and select Off to disable using network-provided time.
3) Deselect Automatic time zone.
4) Tap Set date. Use the sliders to select the correct month, date and year. Tap Done
to save.
5) Tap Set time. Use the sliders to select the correct time. Tap Done to save.
6) Tap Select time zone. Select the correct time zone from the list.
28
Chapter 2 Using the RS30 Mobile Computer
2.6.
LANGUAGE & KEYBOARD INPUT
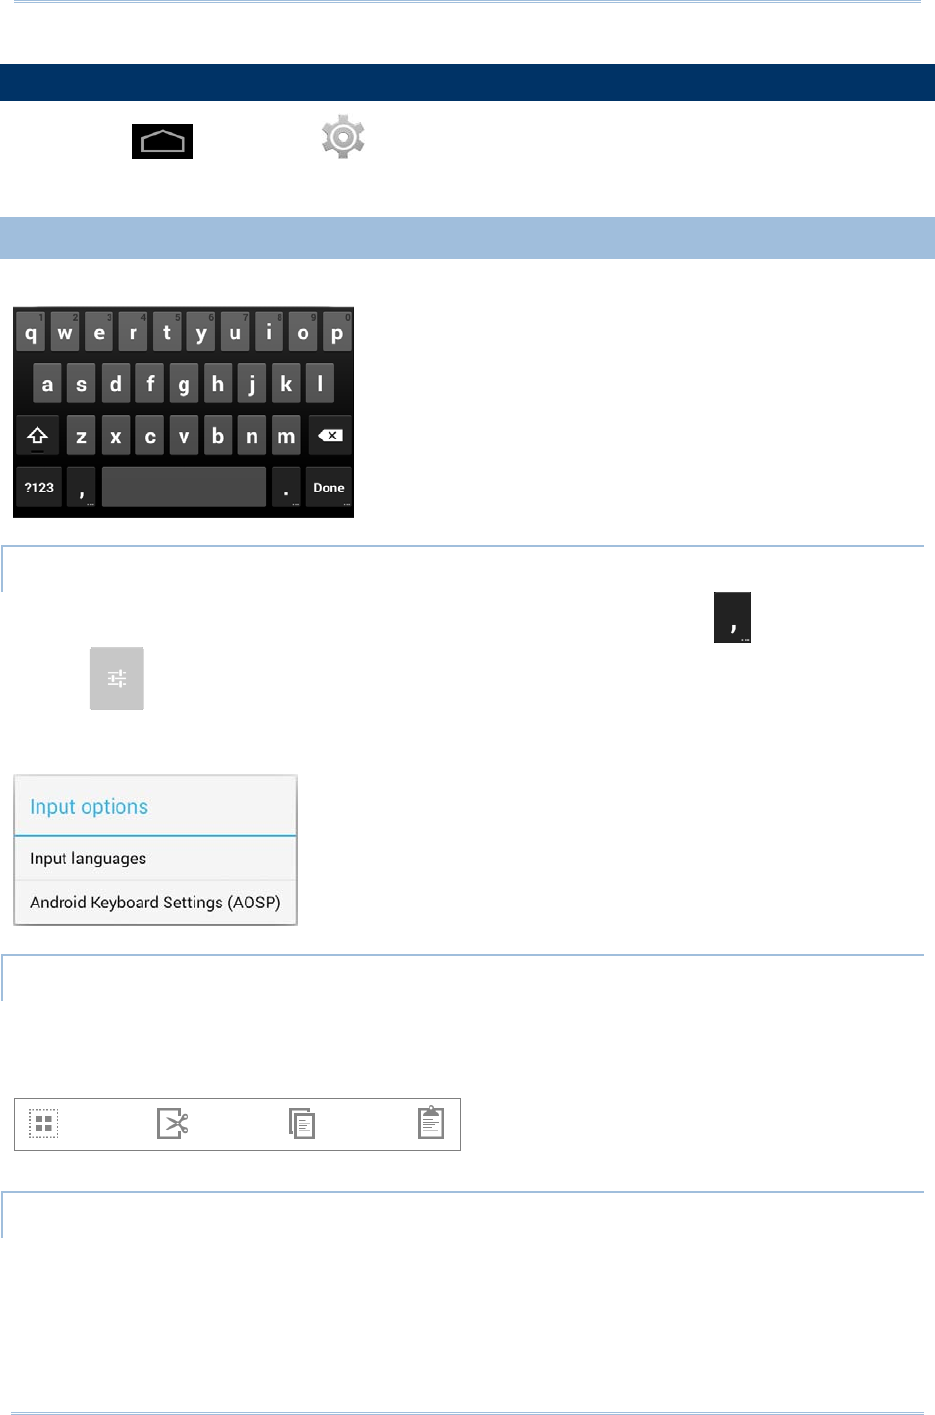
Tap Home | Settings | Language & input to change the system language,
default keyboard type, and configure keyboard input and speech settings.
2.6.1.
ON-SCREEN KEYBOARD
Tap a text input field to automatically open an on-screen keyboard.
ADJUST KEYBOARD SETTINGS
To configure keyboard settings, tap and hold the comma button until a settings
button appears. A menu will open allowing you to adjust input language (if you
would like to use an input language different from the system language) or keyboard
settings.
EDIT TEXT
Tap and hold text on the screen to enable a text editing menu for selecting all text, or
cutting, copying and pasting text within or across applications. Some applications may
use different ways to select or edit text.
ENTER NUMBERS AND SYMBOLS
The top row of keys on the on-screen keyboard have an ellipsis (…) below the character.
Tap and hold one of the top row keys until a menu opens, and select a number.
29
RS30 Mobile Computer Reference Manual
ENTER UPPERCASE LETTERS
Tap and hold the Shift key, and tap a character key to enter an uppercase letter. The
letters will return to lower case once an uppercase letter is entered.
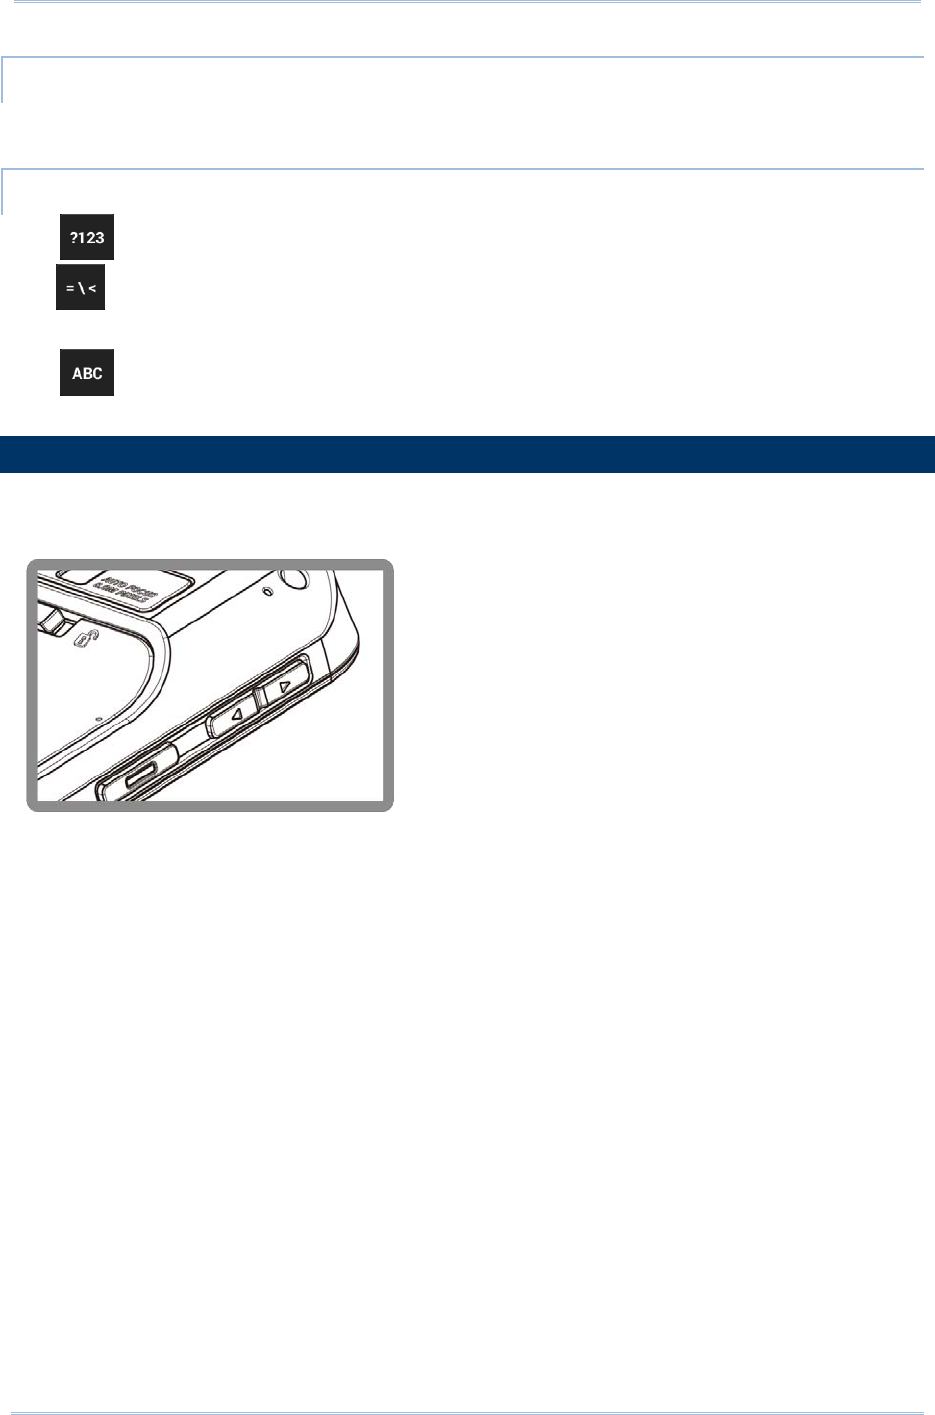
ENTER SYMBOLS
Tap to switch to a keyboard for entering numbers and symbols. On this keyboard,
tap to open a keyboard for entering special characters. Tap and hold a number or
symbol key to open a menu of additional symbols related to that key.
Tap to switch back to the keyboard for entering lowercase letters.
2.7.
SOUND AND VOLUME
Use the volume buttons on the left side of the mobile computer to adjust system and
ringer volume.
30
Chapter 2 Using the RS30 Mobile Computer
2.8.
PROGRAMMABLE KEYS
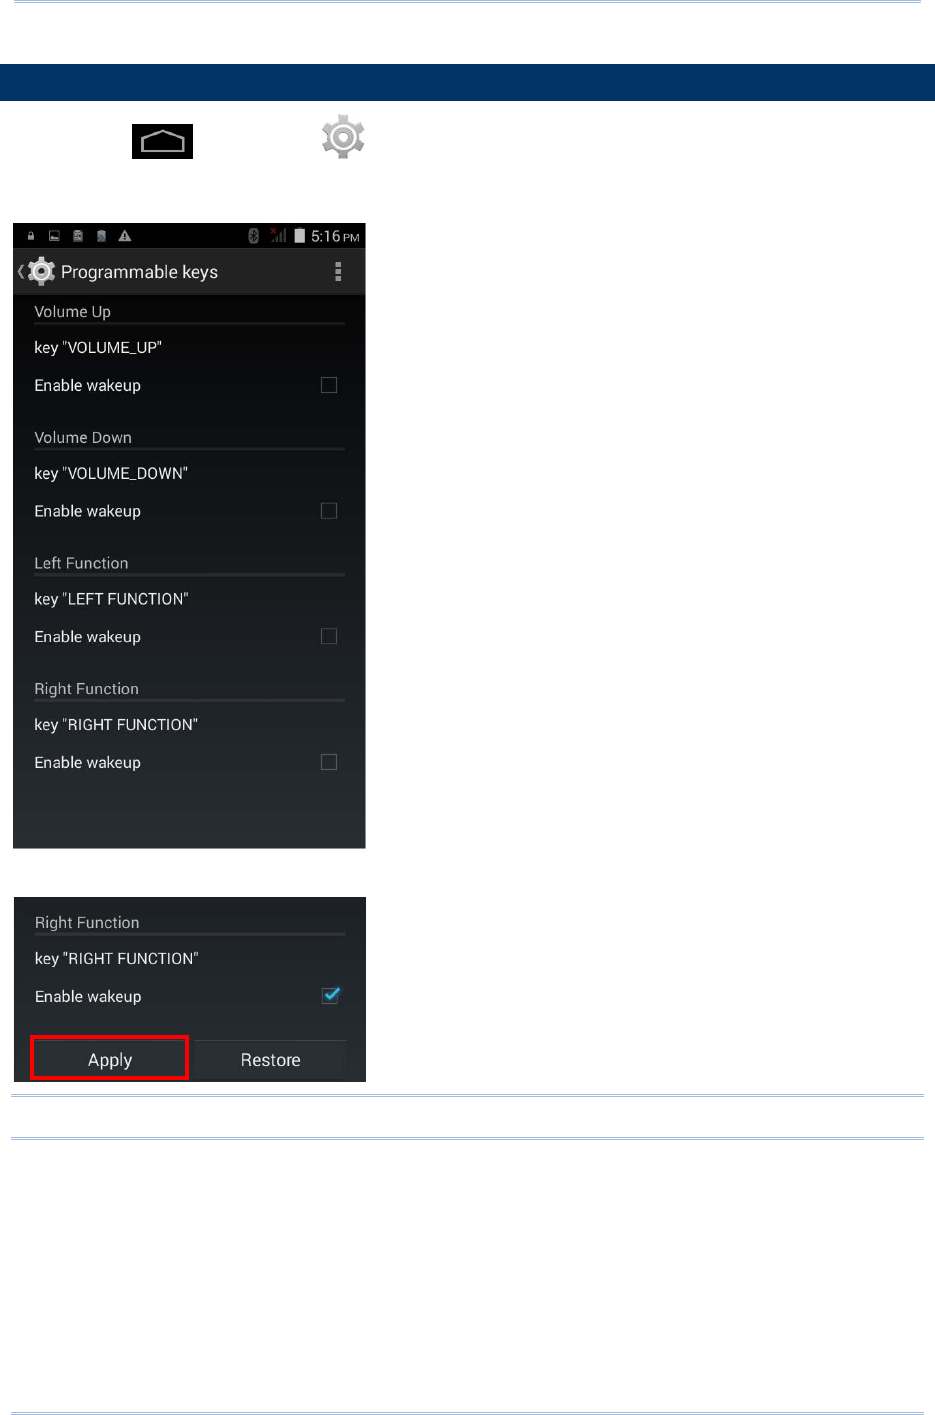
Tap Home | Settings | Programmable Keys to assign specific functions to
the four programmable keys: volume up, volume down, and the left and right function
keys (side keys).
After redefining the programmable keys, tap Apply to allow the changes to take effect.
Note: The newly assigned function will not take effect until Apply is tapped.
31
RS30 Mobile Computer Reference Manual
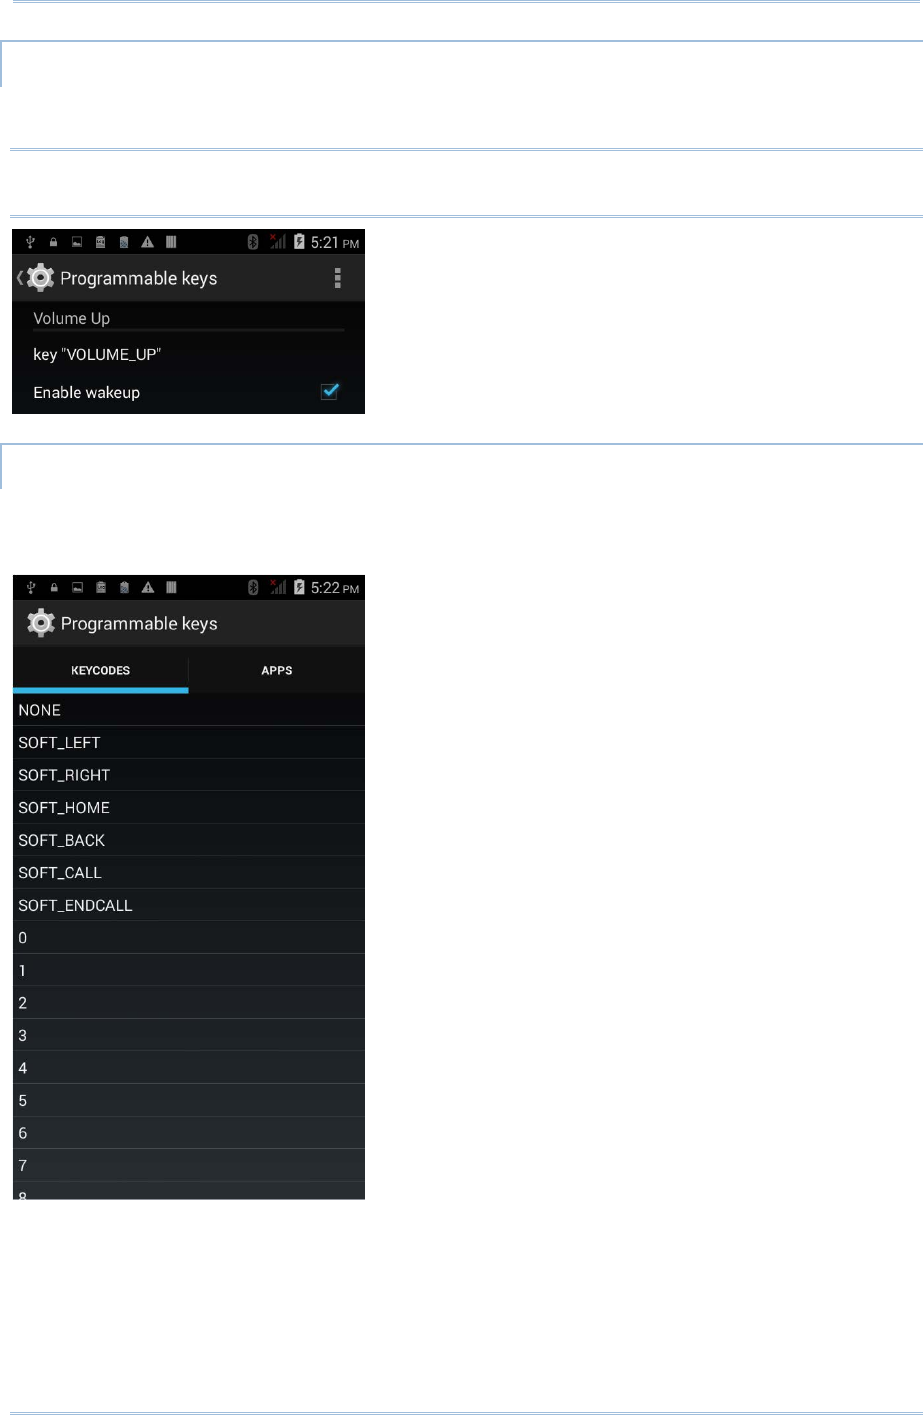
ENABLE WAKEUP
Select the Enable wakeup checkbox to enable pressing the key to wake the mobile
computer from suspend mode.
Note: This checkbox is automatically disabled if an application is selected for the key on
the Apps tab page.
ASSIGN KEYCODE
Tap the key you would like to assign. A screen opens showing a list of available keycodes
or applications. On the Keycodes tab page, scroll down to view the entire list of
keycodes, and tap a keycode to apply.
32
Chapter 2 Using the RS30 Mobile Computer
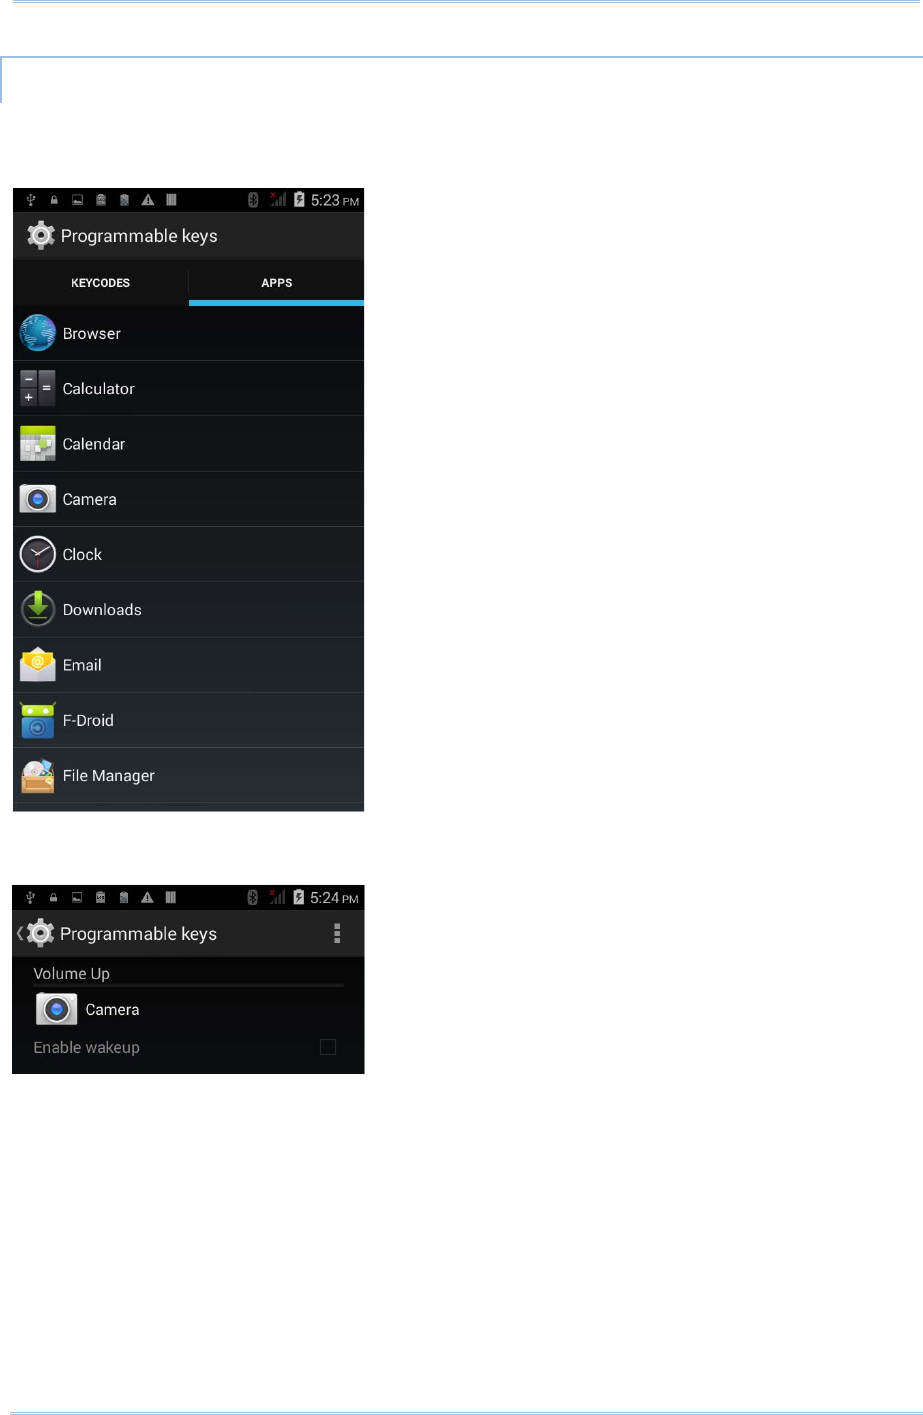
ASSIGN APPLICATION
Tap the key you would like to assign. Tap the Apps tab page to open a list of available
applications. Scroll down to view the entire list of applications, and tap an application to
apply.
After an application is selected, an icon will appear next to the assigned key. Also, the
Enable wakeup checkbox will be automatically disabled.
33
RS30 Mobile Computer Reference Manual
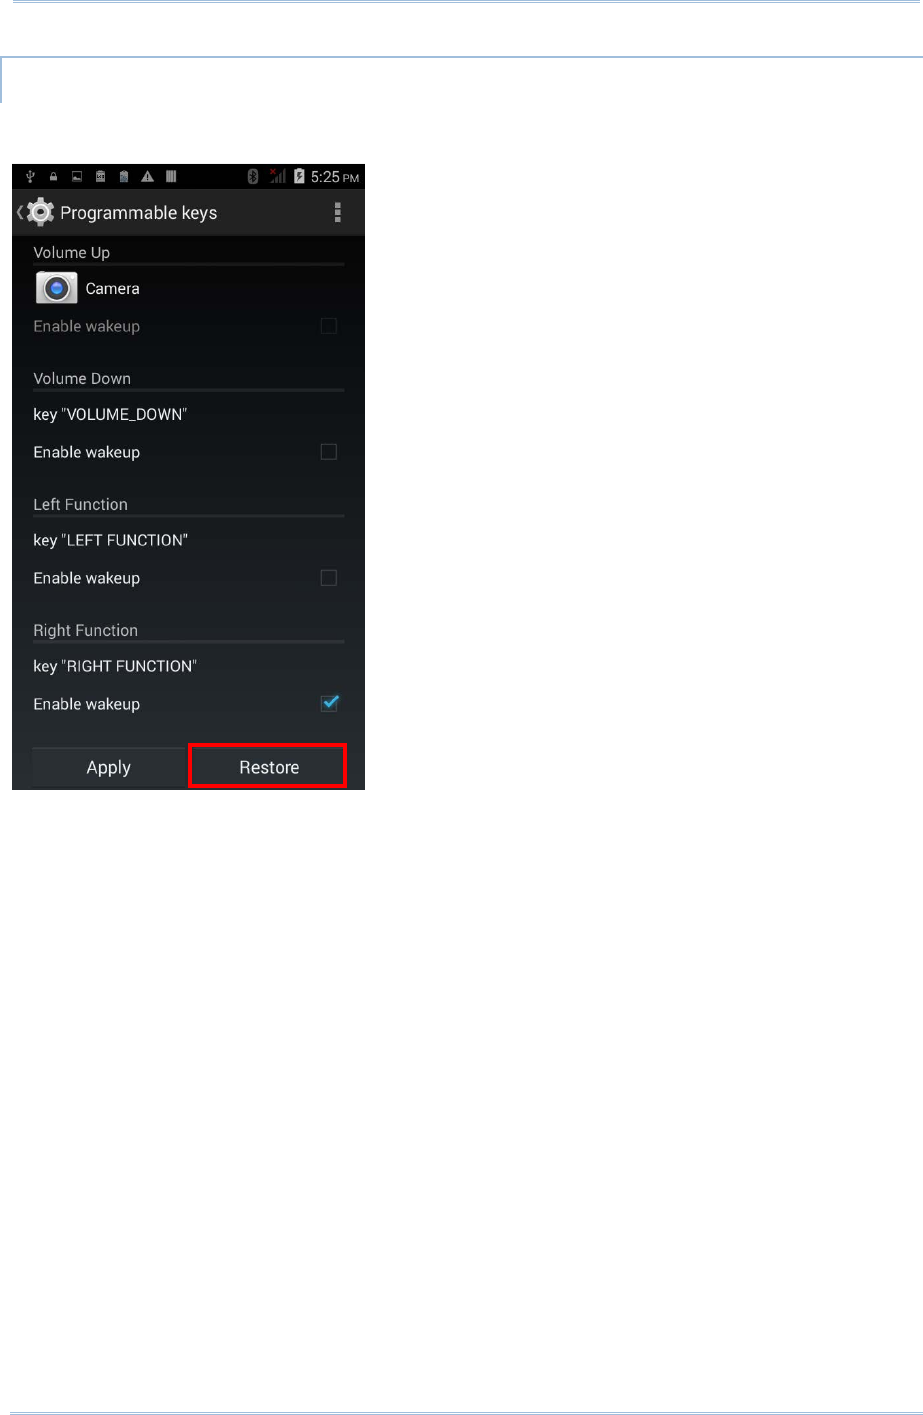
RESTORE FUNCTION
To restore a key to its previously assigned function, tap the Restore button in the
bottom right corner.
34

Chapter 2 Using the RS30 Mobile Computer
2.9.
DATA CAPTURE
2.9.1.
BARCODE READER
A selection of scan engines is available for delivering flexibility to meet different
requirements. Depending on the scan engine integrated, the mobile computer is capable
of scanning barcodes of a number of symbologies that are enabled by default while
running the ReaderConfig.exe utility. If you need to scan barcodes that are encoded in a
different symbology, enable the symbology first.
2.9.2.
DIGITAL CAMERA
An integrated 8 megapixel camera in the mobile computer is specifically designed for
collecting image data. You may use the image capture utility to turn on the camera and
capture images.
35
RS30 Mobile Computer Reference Manual
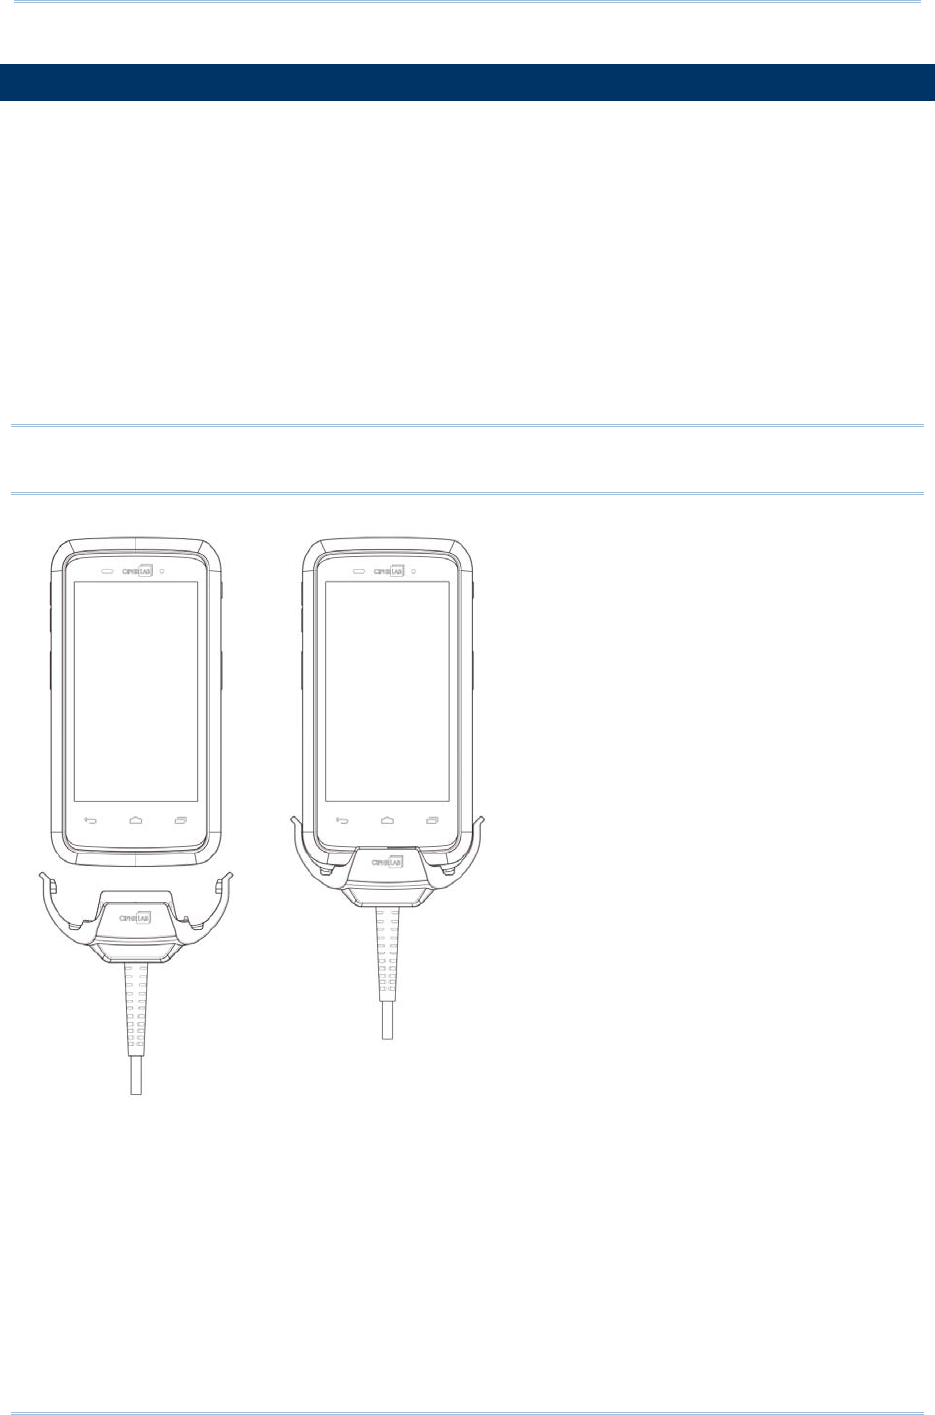
2.10.
SNAP-ON USB CHARGING CABLE
The Snap-on USB Charging Cable provides a convenient way to charge your mobile
computer.
Click the Snap-on USB Charging Cable on to attach; pull either side outwards to
detach
Connect USB to PC or adapter to charge mobile computer
Cable completes charging in approximately 4 hours
LED on mobile computer shows charging status
Adapter input 100-240VAC, 50/60Hz; output 5VDC/2A
Note: The Snap-on USB Charging Cable is for charging only. For data communication,
use the micro USB cable to connect the mobile computer to your PC or laptop.
36

Chapter 2 Using the RS30 Mobile Computer
37

This chapter describes the basic skills to work with the RS30 Mobile Computer, for
instance how to operate the home screen, check system statuses and manage
notifications. The add-on utilities for applications regarding data collection, processing,
and transmission are introduced in the following chapters.
IN THIS CHAPTER
3.1 Home Screen .............................................................. 39
3.2 Widgets ..................................................................... 44
3.3 Status Bar .................................................................. 47
3.4 Notifications Panel ....................................................... 50
3.5 Applications Menu ....................................................... 52
3.6 Manage Applications .................................................... 54
3.7 Suspend & Lock .......................................................... 55
3.8 OS Update ................................................................. 56
Chapter 3
BASIC OPERATION OF THE RS30 MOBILE COMPUTER
38
Chapter 3 Basic Operation of the RS30 Mobile Computer
3.1.
HOME SCREEN
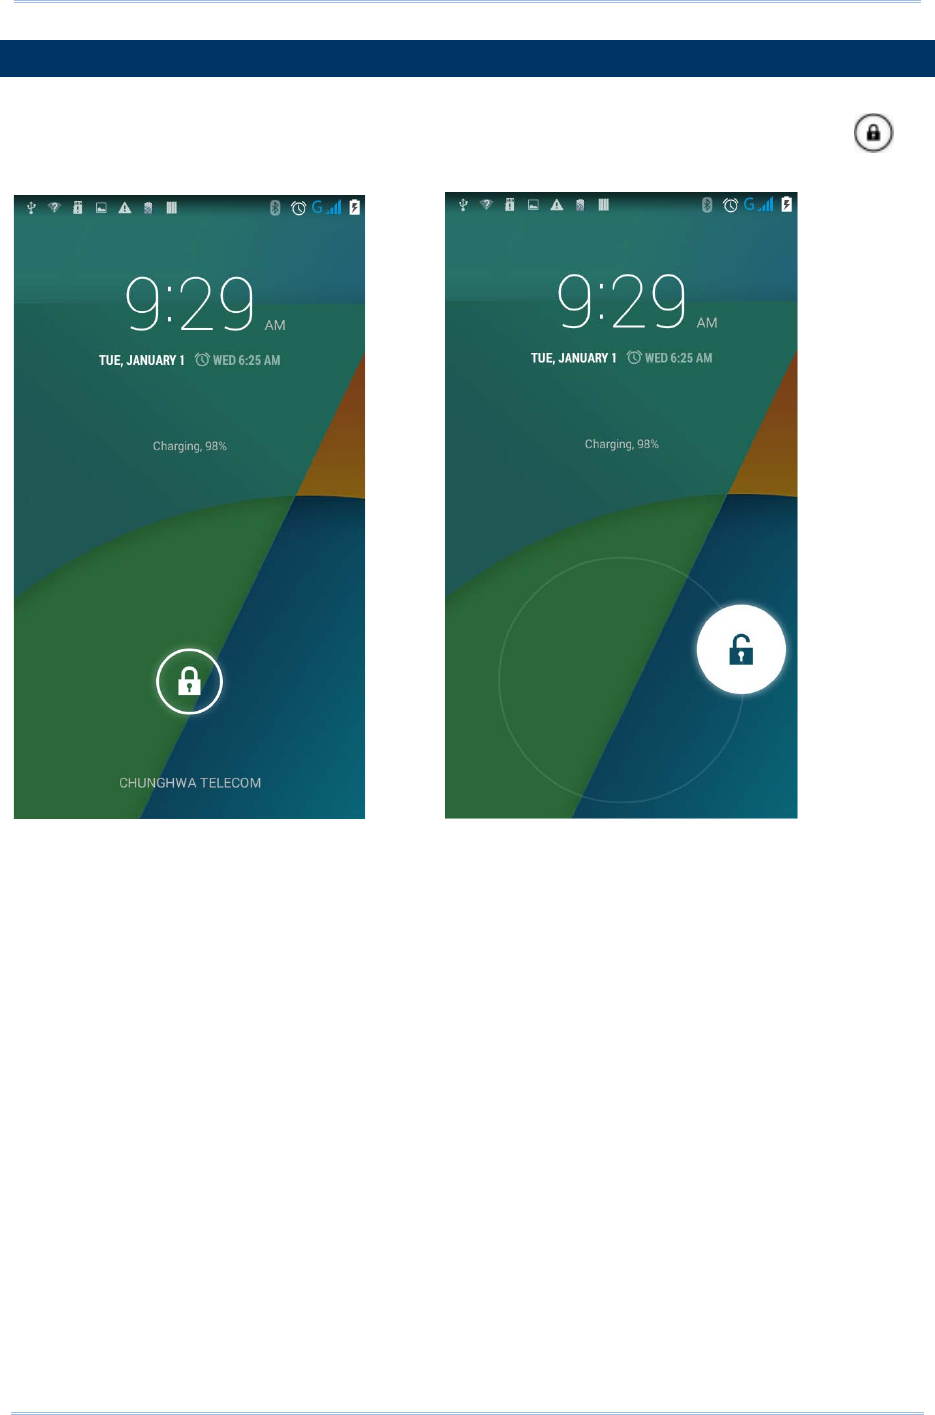
When the mobile computer is fully charged, press the Power key for three seconds to
turn on the mobile computer. A locked screen will appear. Slide the lock button in
either direction to unlock the screen.
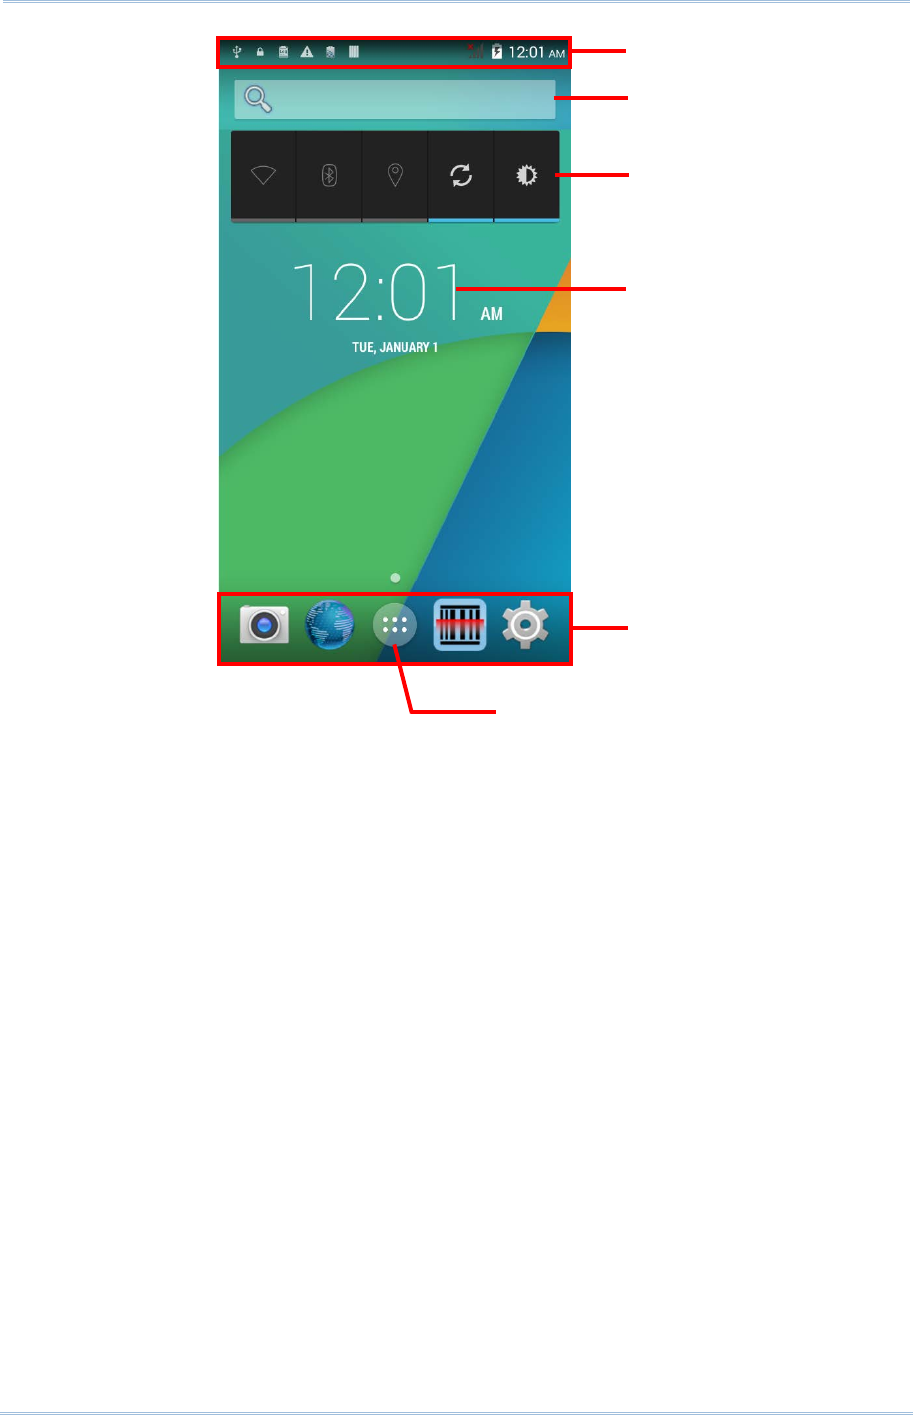
The Home Screen appears showing a status bar, shortcut icons, and a dock bar
containing an All Apps button. The home screen allows up to four pages for placing
shortcut icons and widgets. You may customize the home screen according to your
preferences.
39
RS30 Mobile Computer Reference Manual
Shortcut icons
Dock
All Apps button
Status bar
Search bar
Widget icons
40

Chapter 3 Basic Operation of the RS30 Mobile Computer
3.1.1.
CUSTOMIZE HOME SCREEN
ADD APPLICATION SHORTCUT TO HOME SCREEN
1) On the home screen you would like to customize, tap .
2) Locate the application to add.
3) Tap and hold the application icon. The home screen will appear.
4) Drag the application icon to your preferred position and release to have it placed.
ADD WIDGET TO HOME SCREEN
1) Tap and hold any empty spot on the home screen.
2) Tap Widgets in the menu that appears.
3) Tap and hold the widget to add. The home screen will appear.
4) Drag the widget to your preferred position and release to have it placed.
MOVE APPLICATION SHORTCUTS ON HOME SCREEN
1) On the home screen you would like to customize, tap and hold the application
shortcut you would like to move.
2) Drag the icon to the preferred position and release it to have it placed.
REMOVE APPLICATION SHORTCUT OR WIDGET FROM HOME SCREEN
1) On the home screen you would like to customize, tap and hold the application
shortcut or widget you would like to move.
2) Drag the icon to the top of the screen where the remove icon is located.
CREATE FOLDER
1) On the home screen you would like to customize, tap and hold the application
shortcut you would like to move.
2) Drag the icon on the top of another icon to create a folder.
NAME FOLDER
1) Tap the folder you would like to name.
2) Tap Unnamed Folder and edit the folder name.
3) Tap Done on the on-screen keyboard.
41

RS30 Mobile Computer Reference Manual
REMOVE FOLDER
1) Tap and hold the folder you would like to remove.
2) Drag the folder to the top of the screen where the remove icon is
located.
CHANGE HOME SCREEN WALLPAPER
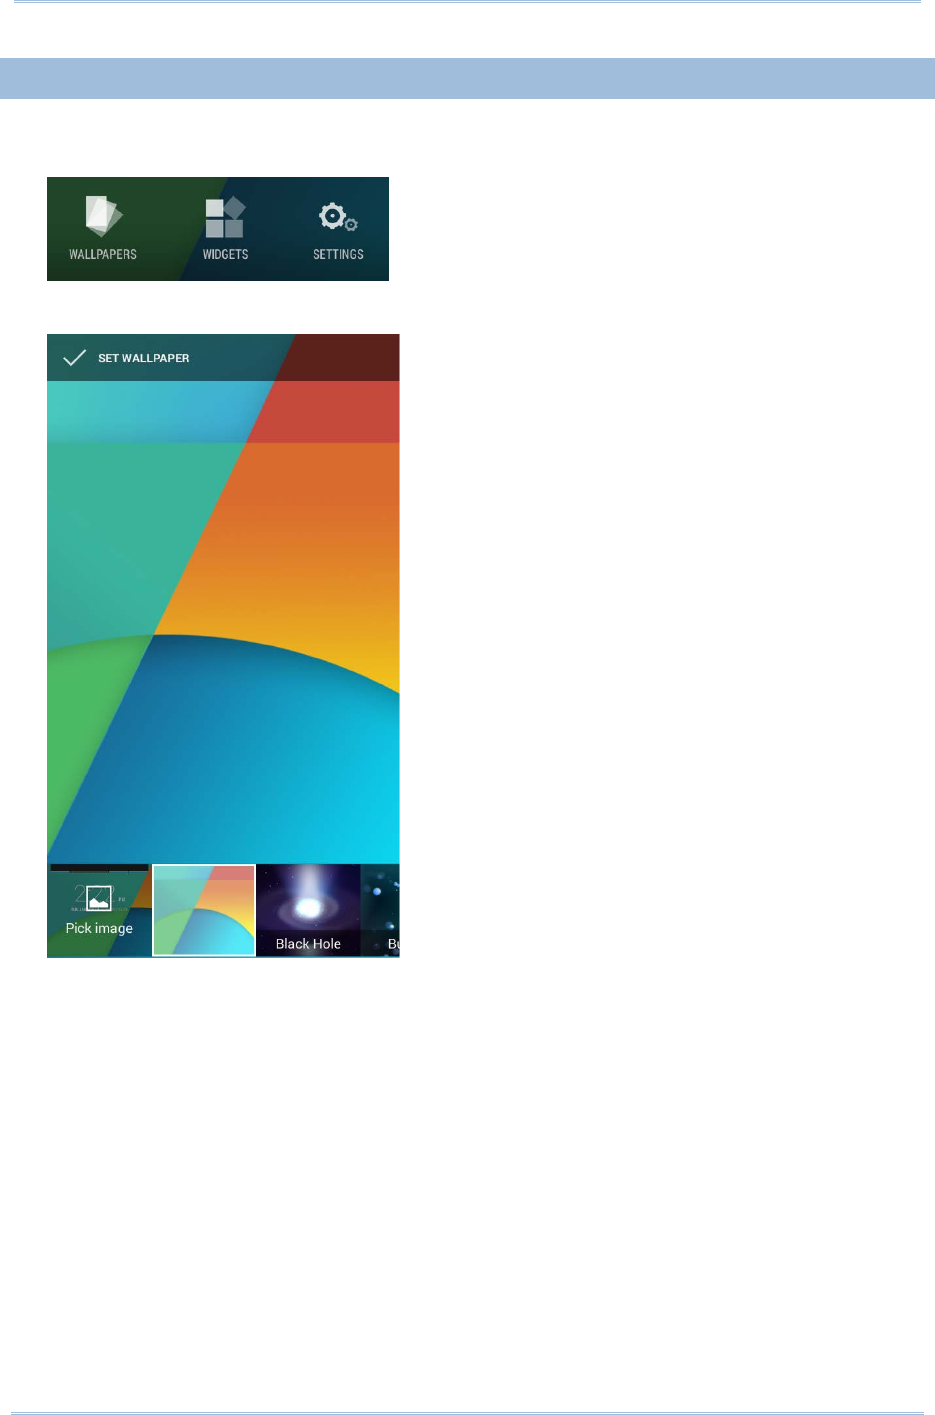
1) Tap and hold any empty spot on the home screen.
2) Tap Wallpapers in the menu that appears.
3) Select an image to apply as the wallpaper.
4) Tap Set wallpaper at the bottom of the wallpaper preview screen to apply it.
42
Chapter 3 Basic Operation of the RS30 Mobile Computer
3.1.2.
CUSTOMIZE WALLPAPER
1) Tap and hold any empty area on the Home Screen. A settings menu for the Home
Screen will open at the bottom.
2) Tap WALLPAPER in the settings menu.
3) A wallpaper selection screen opens. Scroll through the wallpapers to select a
wallpaper to apply.
43
RS30 Mobile Computer Reference Manual
3.2.
WIDGETS
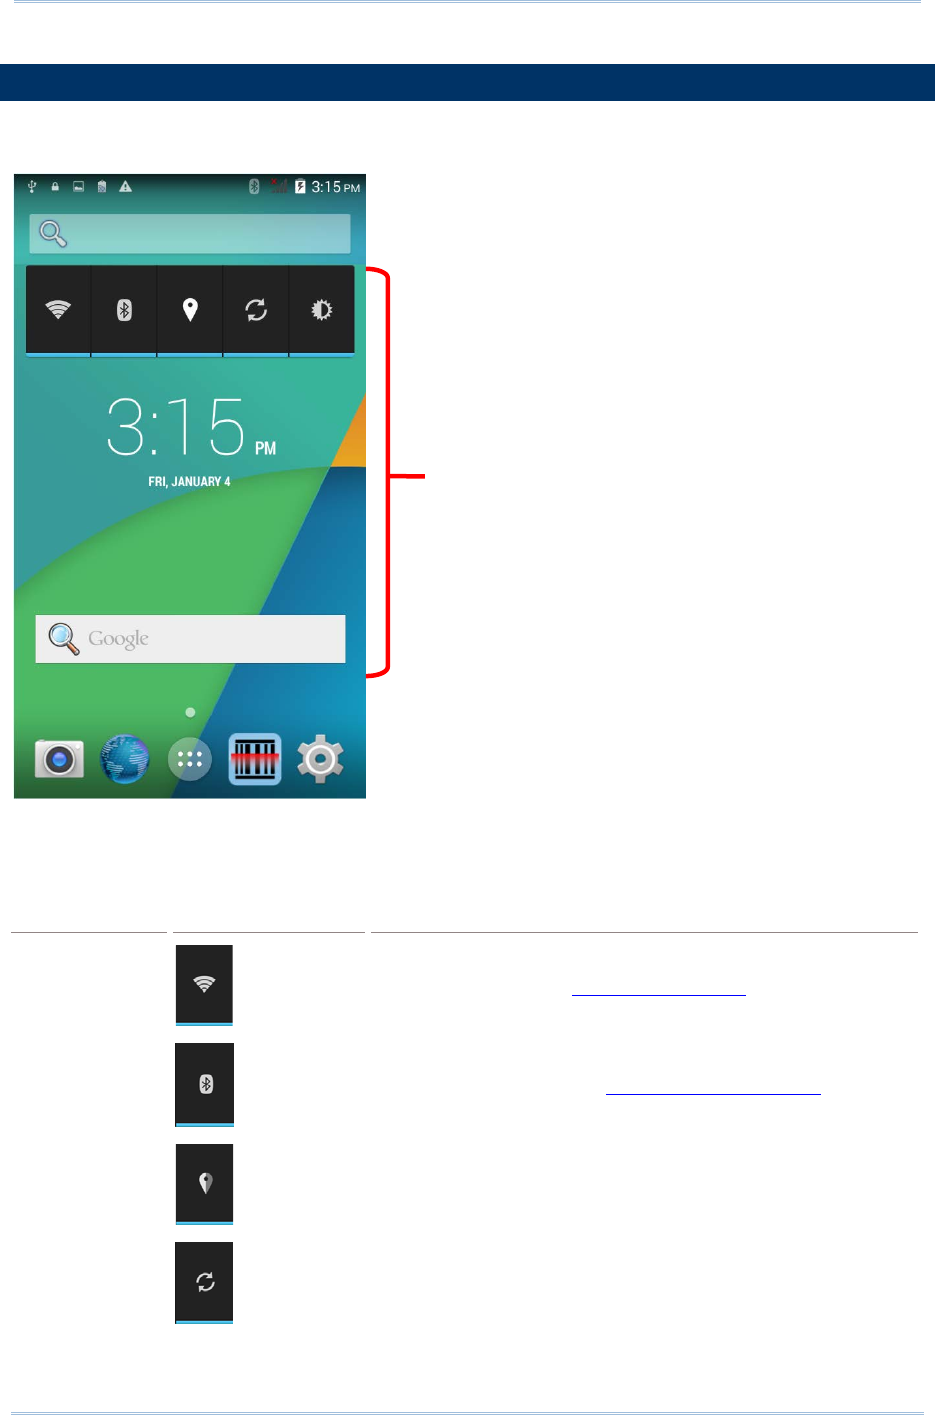
Widgets are designed for easy control of settings and viewing of status. Enabled widgets
will be displayed on the Home Screen.
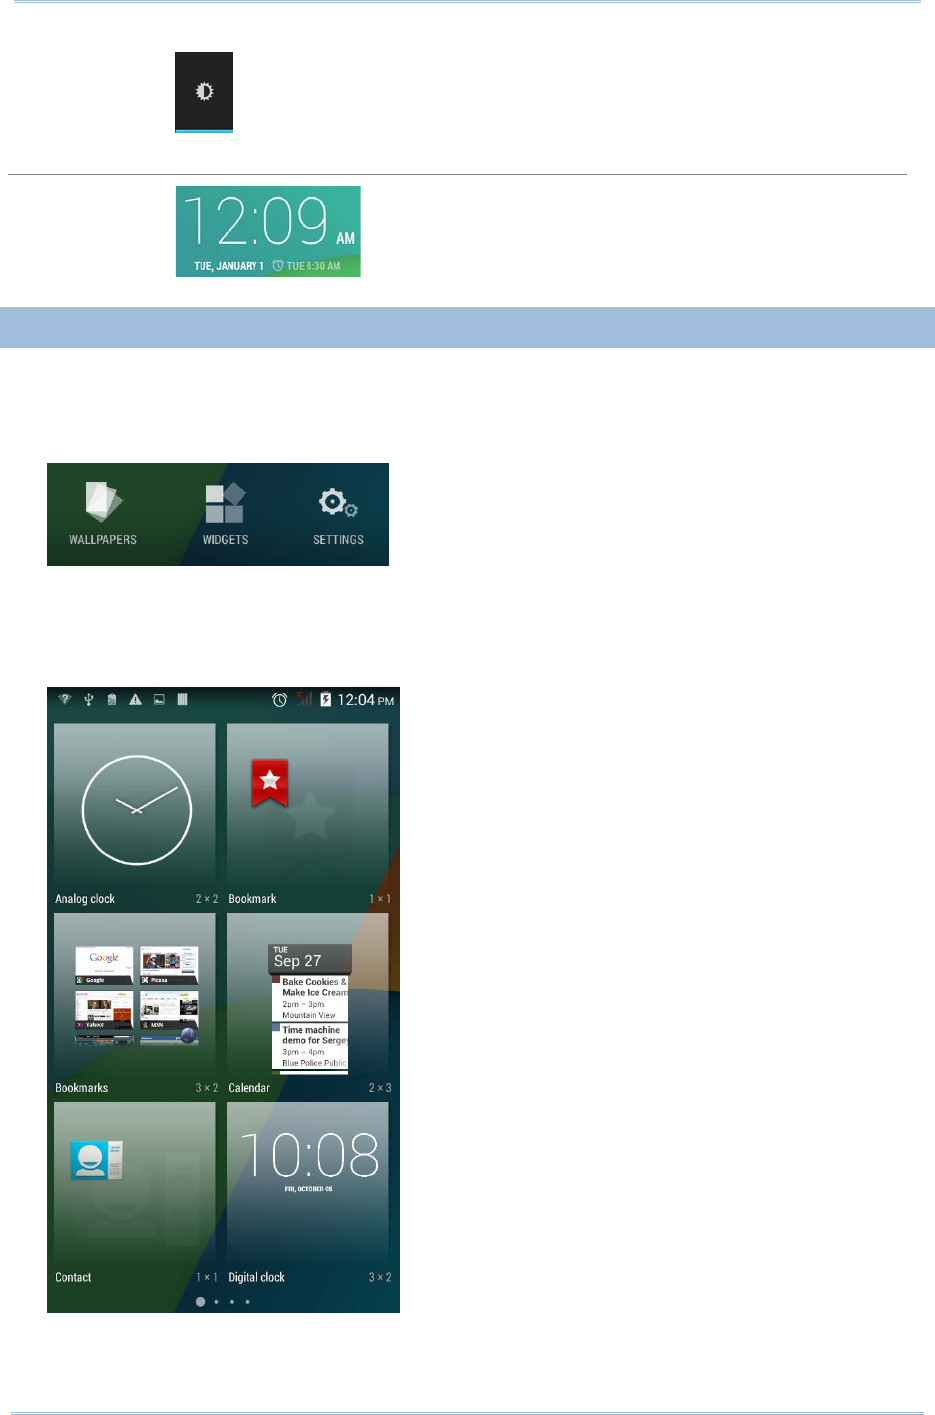
By default, two widgets are enabled, the power control widget and digital clock widget.
Default Widget
Icon
Description
Power control
Wi-Fi control. .Tap to Power On/Off Wi-Fi.
Bluetooth control. Tap to Power On/Off Bluetooth.
GPS control. Tap to set GPS mode between
high accuracy
and battery saving.
Data syncing control. Tap to sync
data of your Google
account.
Widgets on Home
Screen
44
Chapter 3 Basic Operation of the RS30 Mobile Computer
Screen brightness control. Tap to set the
screen
brightness profile between full, half, dim or auto.
Digital clock
Shows the current time, date and the set alarm.
3.2.1.
ADD WIDGETS
To add a widget:
1) Tap and hold any empty area on the Home Screen. A settings menu for the Home
Screen will open at the bottom.
2) Tap WIDGETS in the settings menu.
3) A widget menu opens. Tap and hold a widget and drag it to the Home Screen you
would like to place it on.
45
RS30 Mobile Computer Reference Manual
3.2.2.
REMOVE WIDGETS
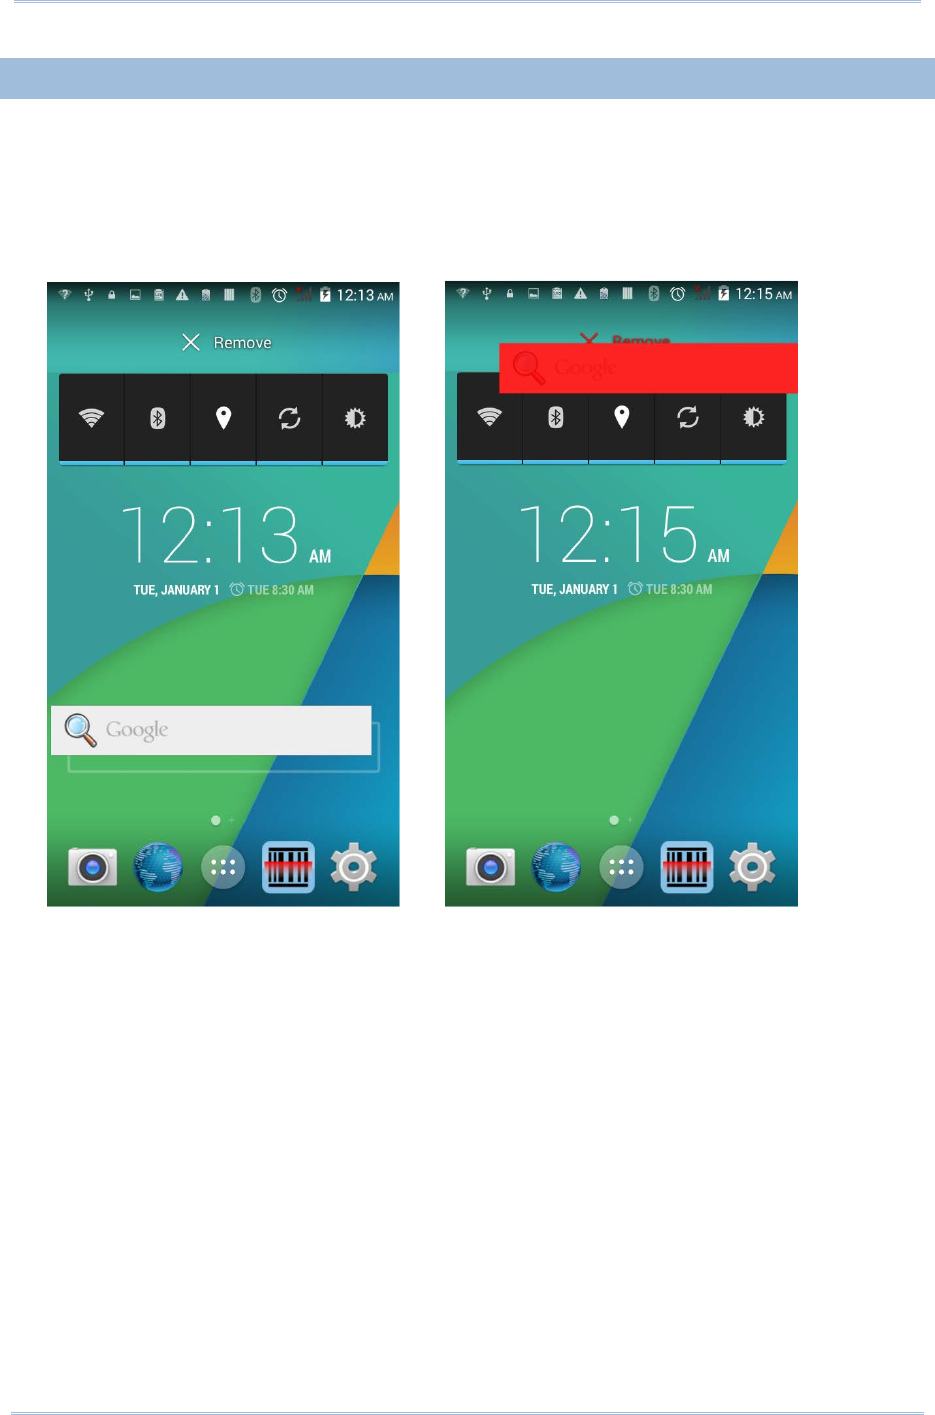
To remove a widget:
1) Tap and hold a widget so it becomes highlighted. The widget is available for
relocation.
2) Drag the widget to the top of the screen where a remove icon is located. The remove
icon will change to red to indicate the widget is about to be removed.
46
Chapter 3 Basic Operation of the RS30 Mobile Computer
3.3.
STATUS BAR
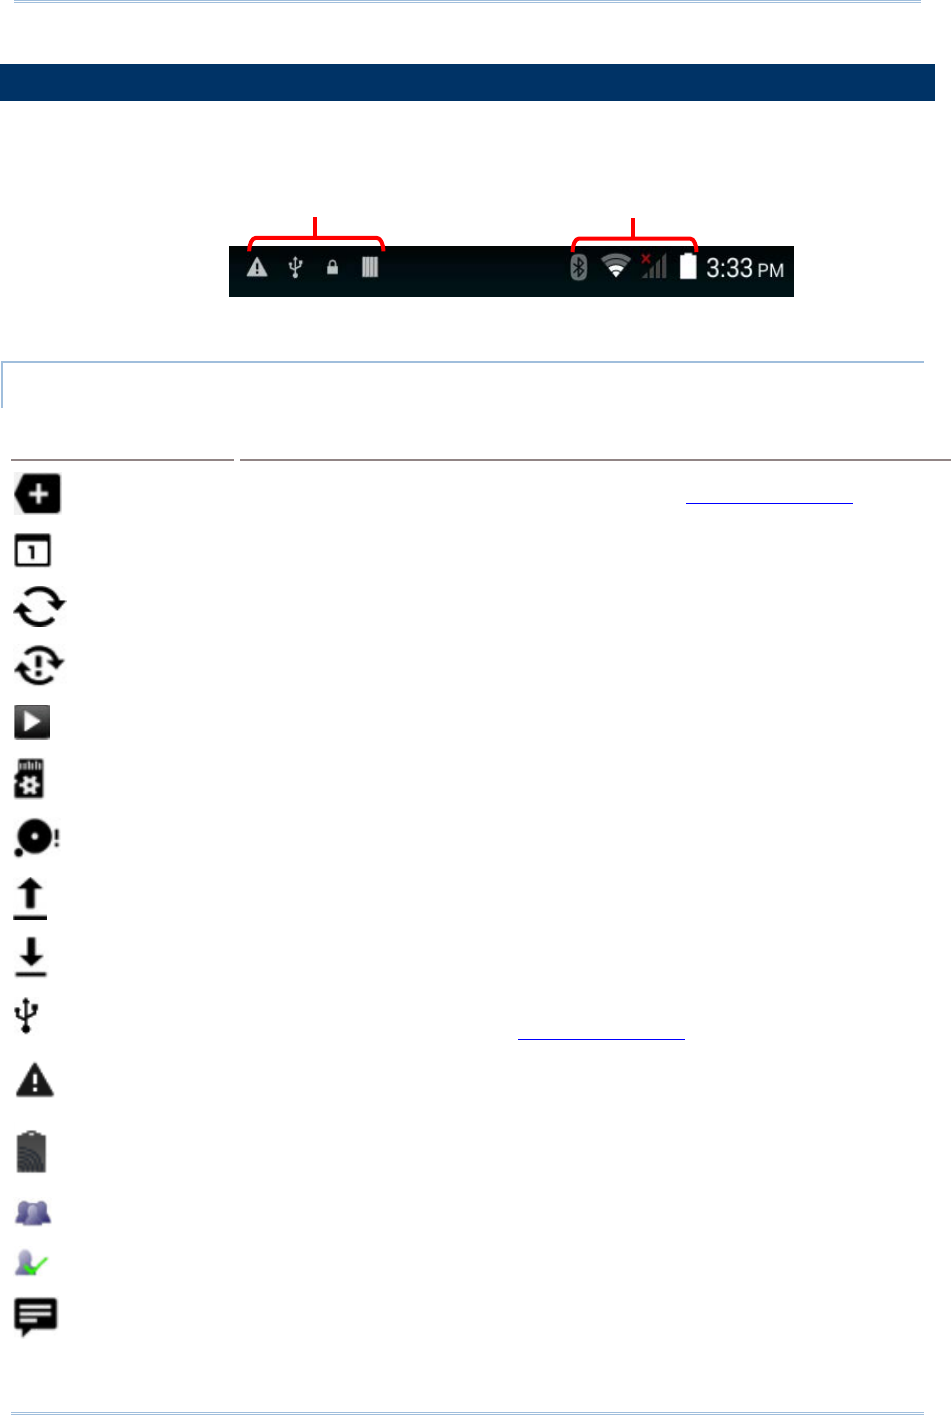
The left side of the status bar shows notification icons, and the right side of the status
bar shows status icons.
NOTIFICATION ICONS
Icon
Description
More notifications are available, tap to show the Notifications Panel
Upcoming event
Data is syncing
A problem has occurred with sign-in or data sync
A song is currently playing
Preparing storage card
Storage card is almost full
Uploading data
Downloading data; when download is finished, icon stops flashing
Connected to PC via USB cable. Change the type of USB conn
ection by
viewing the notification in the Notifications Panel
No SIM card detected in either of the two SIM card slots
NFC is enabled
Multiuser feature is enabled
New user is logged in
Text message is received
Status icons
Notification icons
47
RS30 Mobile Computer Reference Manual
Missed call
Car mode is active
Connected to/disconnected from VPN network
Bluetooth tethering is active
USB tethering is active
Wi-Fi network is available
Wi-Fi hotspot is active
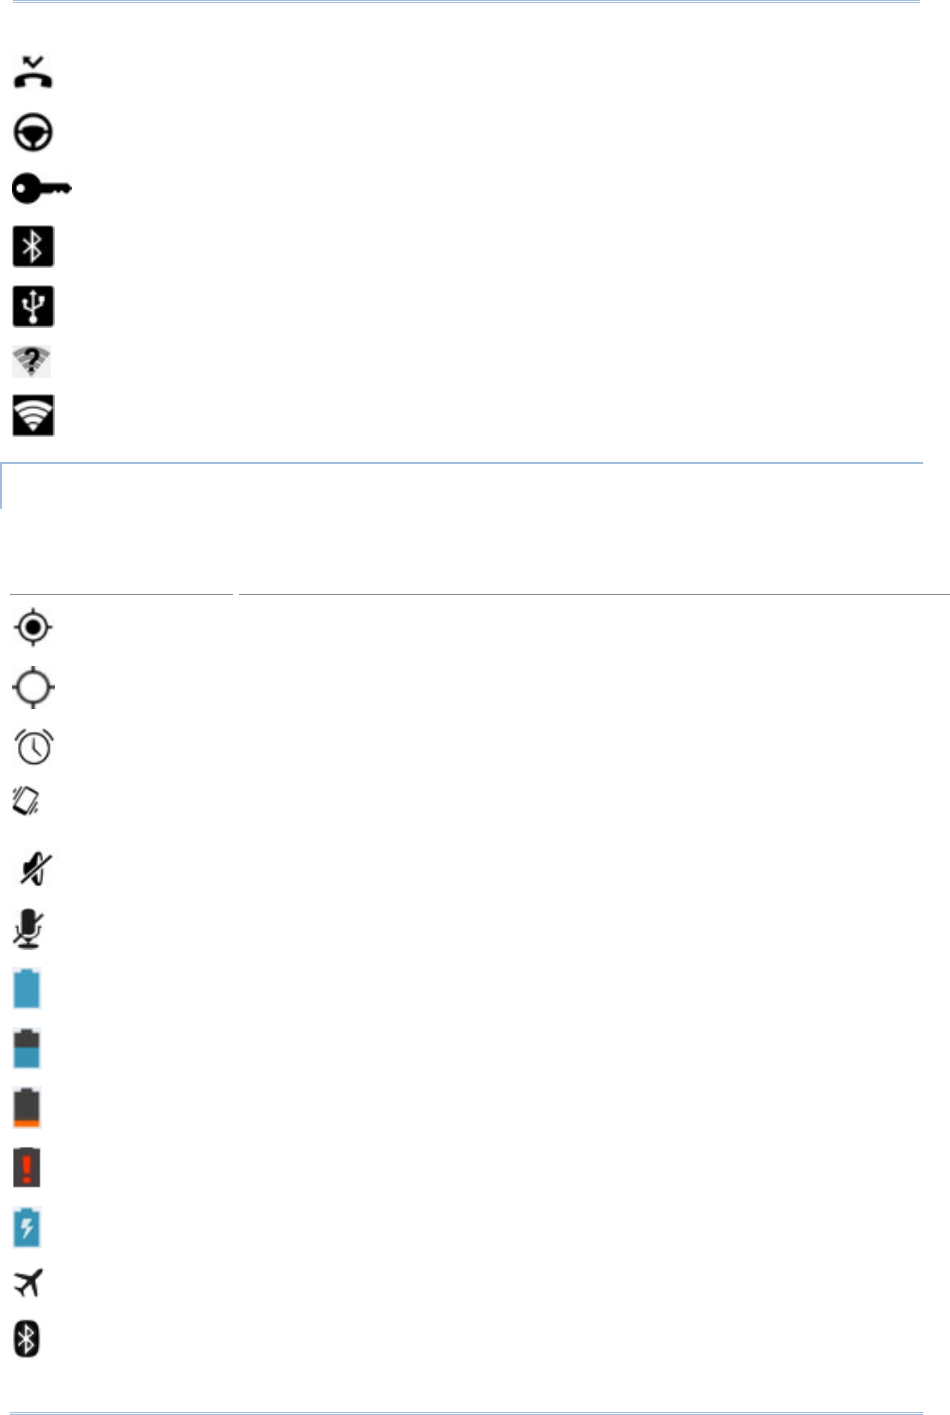
STATUS ICONS
The icons at the top of the screen are explained below.
Icon
Description
GPS is active
Currently searching for location data
Alarm is active
Vibrate mode is active; all system sounds (except media and alarms) are
muted
Phone ringer is muted
Microphone is muted during a call
Battery is fully charged
Battery is partially drained
Battery level is very low
Battery is almost completely drained and needs charging immediately
Battery is charging
Airplane mode is active
Bluetooth is active
48

Chapter 3 Basic Operation of the RS30 Mobile Computer
Connected to a Bluetooth device
Connected to a Wi-Fi network
No Wi-Fi signal detected
Signal strength of mobile network
No mobile network signal
Connected to 3G network
Connected to HSPA network
Connected to EDGE network
Connected to GPRS network
No SIM card installed
49
RS30 Mobile Computer Reference Manual
3.4.
NOTIFICATIONS PANEL
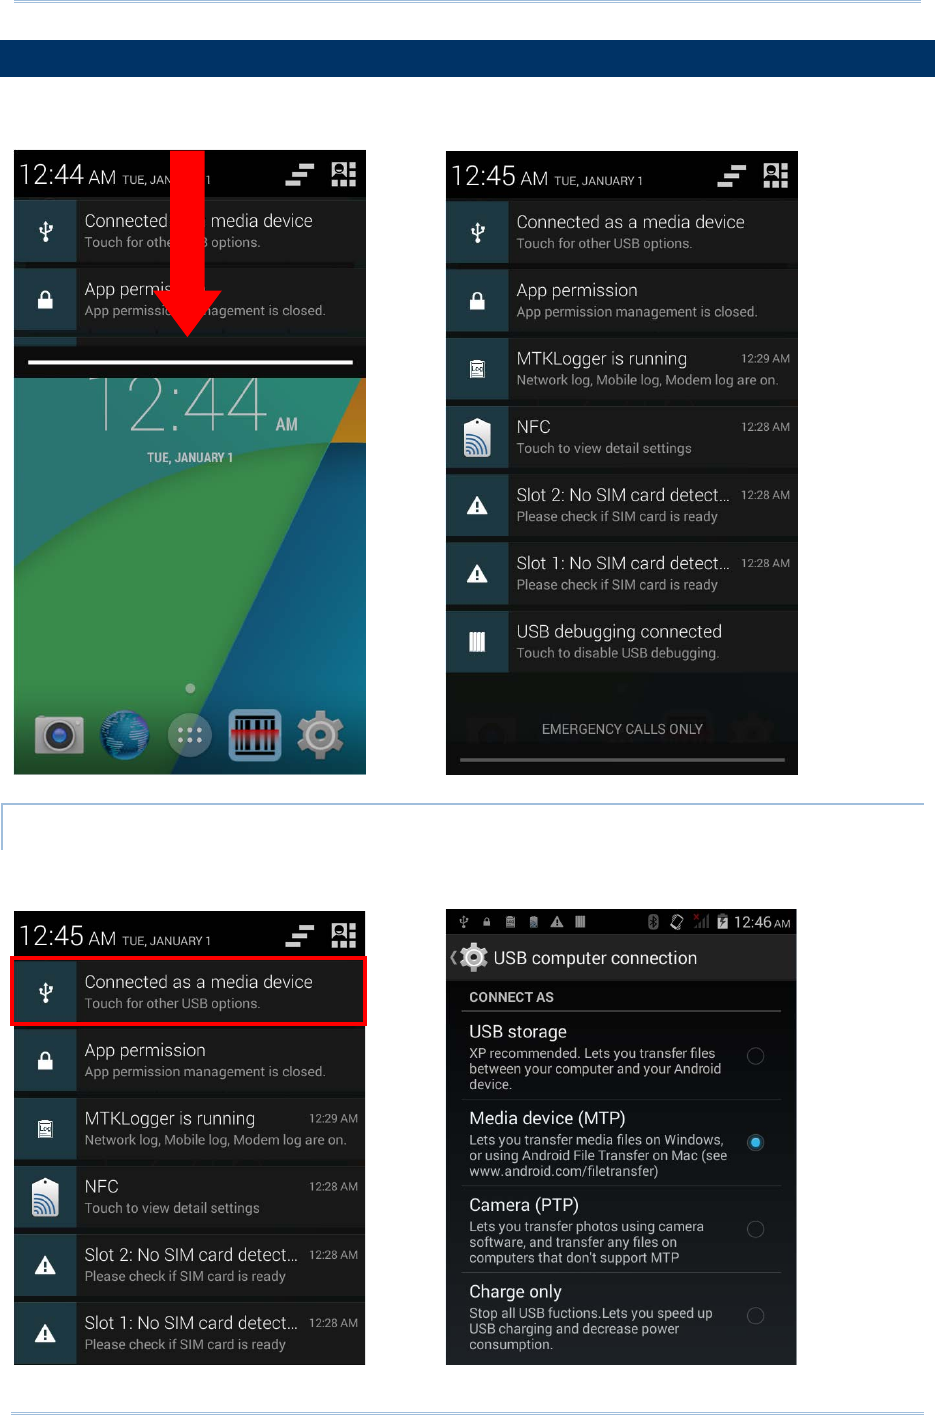
Use a downwards sliding motion from the top of the screen to open the notifications
panel. To close the panel, slide the screen back upwards.
VIEW NOTIFICATIONS
Tap a notification message to enter a page for subsequent activity. The activity required
for each notification will differ.
50

Chapter 3 Basic Operation of the RS30 Mobile Computer
CLEAR NOTIFICATION
Slide each notification sideways to have it cleared. Some notifications will require
subsequent activity to be cleared; tap the notification to enter a corresponding settings
page for taking further steps.
CLEAR ALL NOTIFICATIONS
Tap on the status bar to clear all notifications. Ongoing notifications and
notifications that require subsequent activity to be cleared will remain in the list.
51
RS30 Mobile Computer Reference Manual
3.5.
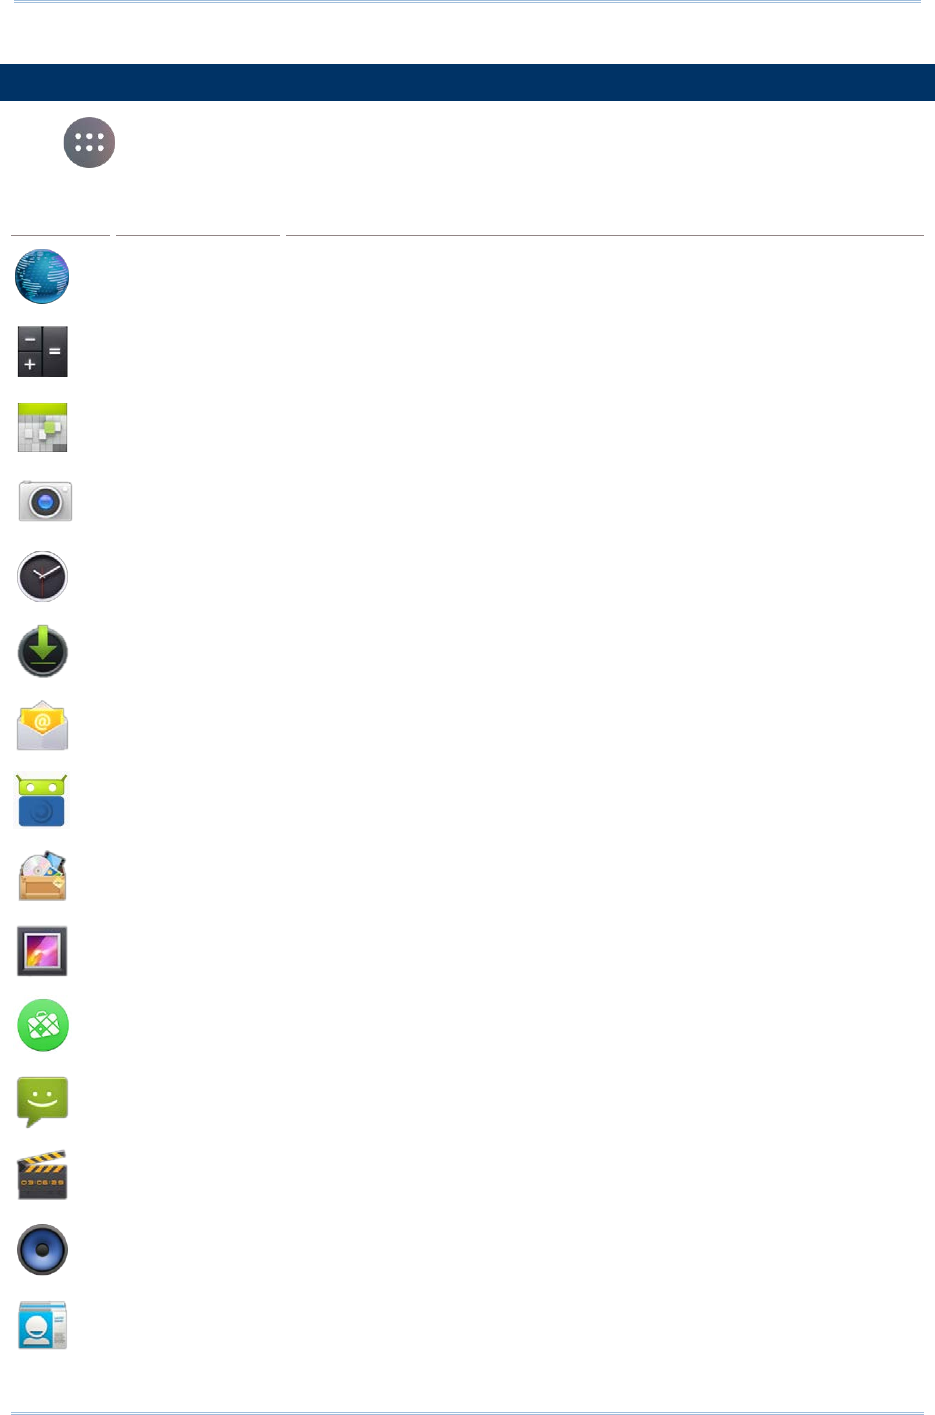
APPLICATIONS MENU
Tap on the Home screen to open the applications menu.
Icon
Name
Description
Browser Accesses the internet or intranet.
Calculator Performs mathematical calculations.
Calendar Creates and manages events, meetings and appointments.
Camera Takes pictures and shoots videos.
Clock Sets date, time, time zone according to your locale,
and sets and
manages alarms.
Downloads List all files downloaded on the mobile computer.
Email Sends and receives emails.
F-Droid Free market service for
browsing, installing and keeping track of
applications for Android platform.
File Manager Browses and manages files on the local storage and storage card.
Gallery Views photos and videos stored on the mobile computer.
MAPS.ME Provides map service for mobile devices.
Messaging Sends SMS and MMS messages.
Movie Studio Creates movies with the video files stored on the mobile computer.
Music
Plays music and audio files stored on the mobile computer and
storage card.
People Manages contact information, and shares or exports/imports the
information to other devices or SD card.
52
Chapter 3 Basic Operation of the RS30 Mobile Computer
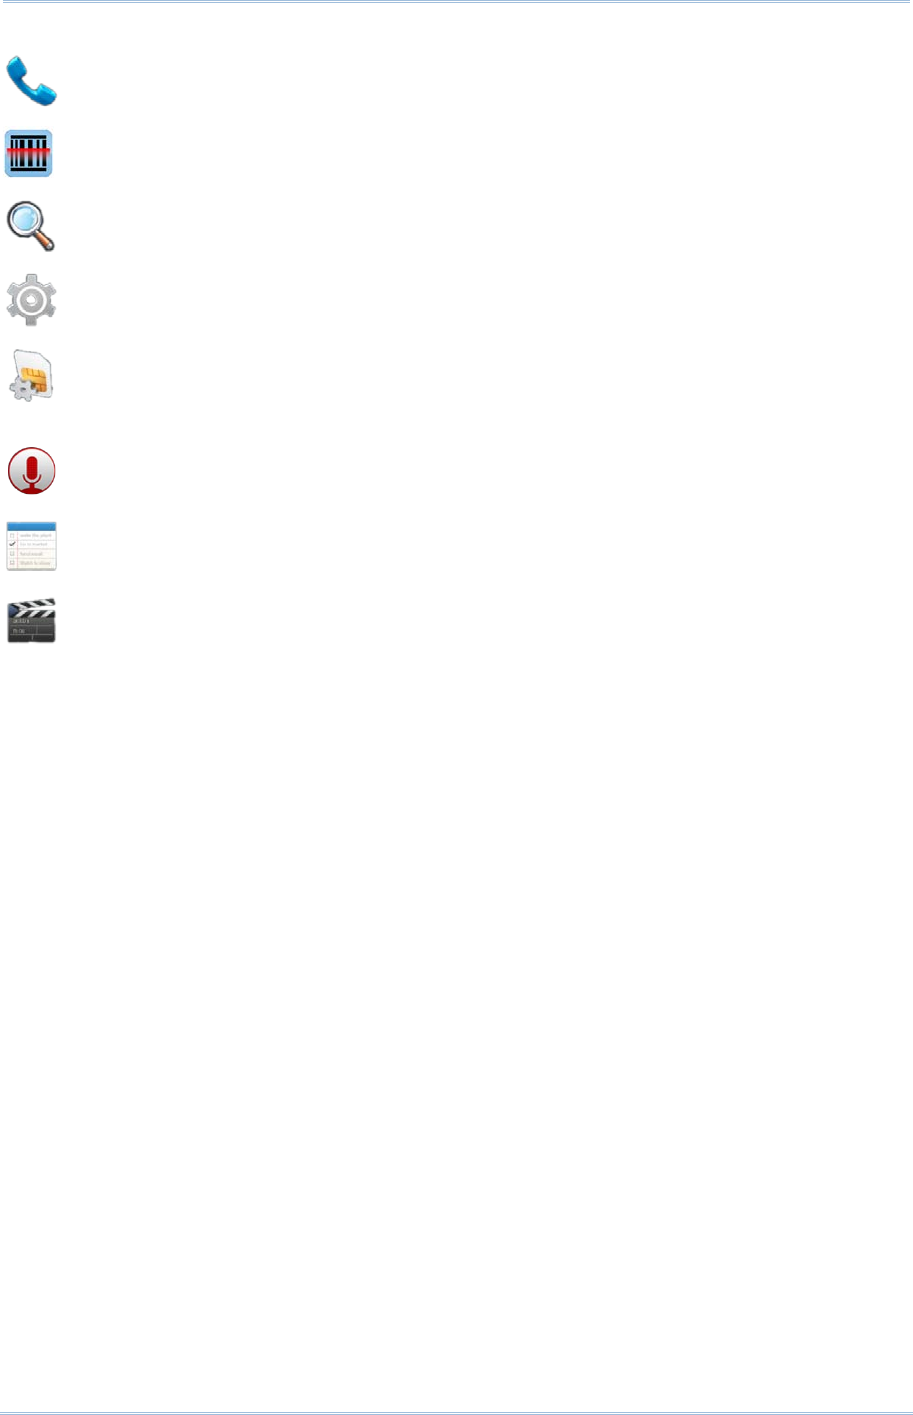
Phone Places and re
ceives calls, accesses voicemail, views call history,
manages phone contacts and adjusts phone settings.
Reader Config Sets scanne
r preferences, data output format and destination,
symbology settings, and reads barcodes.
Search
Searches the internet and mobile computer with the Google search
engine.
Settings Opens settings to configure the mobile computer.
SIM Toolkit Additional services provided by your mobile carrier.
Sound Recorder Records and plays audio information.
ToDo Manages tasks to do.
Videos Plays video files taken or stored on the mobile computer.
53
RS30 Mobile Computer Reference Manual
3.6.
MANAGE APPLICATIONS
3.6.1.
CURRENT APPLICATIONS
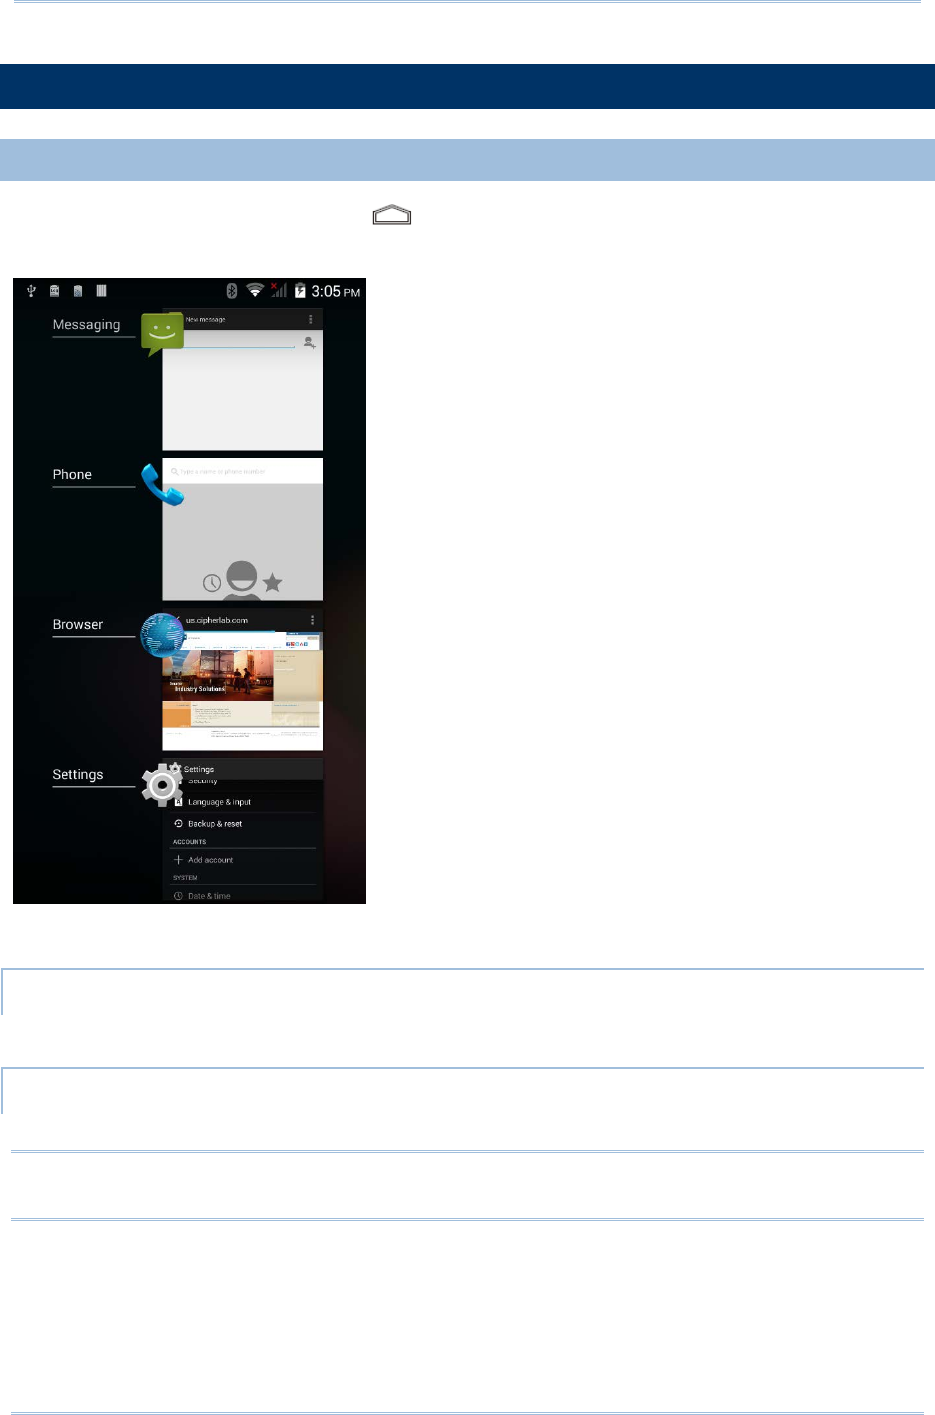
Tap and hold the Home button . The screen will show a list of recently used
applications.
Actions to taks on this screen include the following:
SWITCH BETWEEN APPLICATIONS
Tap one of the listed applications to open it on the screen.
END APPLICATION
Slide an application to the left or right to close it.
Note: Close unused applications in order to release RAM. Remember to save your data or
settings before closing any application.
54
Chapter 3 Basic Operation of the RS30 Mobile Computer
3.7.
SUSPEND & LOCK
3.7.1.
SUSPEND DEVICE
The mobile computer operates continuously once it is powered on. To minimize power
consumption and prevent unintended operation, suspend the mobile computer if you are
not actively using it. The mobile computer can be quickly awoken from suspend mode to
operate as needed. When the mobile computer enters suspend mode, the system is in a
power-saving status, meaning the device will not respond to screen touch, and volume
keys and side buttons will also be unavailable until the device is unlocked.
SUSPEND RS30
Press the power button to suspend the mobile computer. Th
e mobile computer will
automatically suspend when the time period set in Screen Timeout Settings has passed
without any activity.
3.7.2.
LOCK DEVICE
LOCK RS30
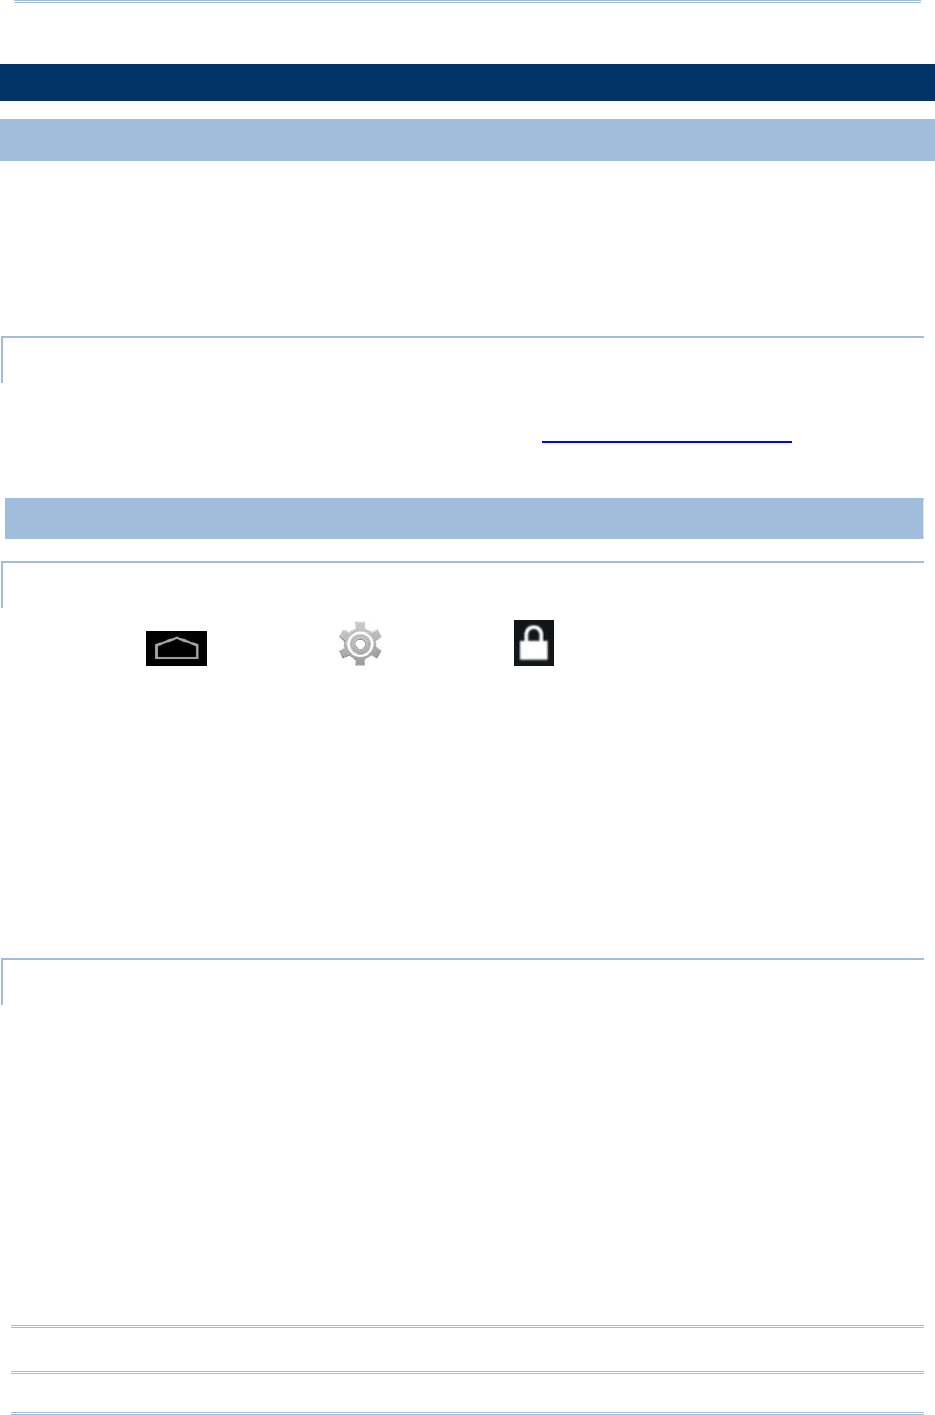
Tap Home | Settings | Security | Screen lock to
change the lock
method.
None
Slide: Uses the default slide gesture to unlock a locked screen.
Voice Unlock: Select a voice command to use for unlocking the screen.
Pattern: Enter a pattern to use for unlocking the screen.
PIN: Uses the PIN code to unlock a locked screen.
Password: Enter a password of at least 4 characters for unlocking the screen.
UNLOCK RS30
When the mobile computer is in suspend mode, pressing the power button will wake it
up. If a lock method is set, follow the gestures below to unlock the screen:
None
Slide: Slide the lock icon in either direction so it relocates outside of the white circle.
Voice Unlock: Say the voice command to unlock.
Pattern: Swipe the set pattern to unlock.
PIN: Enter the PIN code to unlock.
Password: Enter the password unlock.
Warning: To save battery power, suspend the mobile computer when not in use.
55
RS30 Mobile Computer Reference Manual
3.8.
OS UPDATE
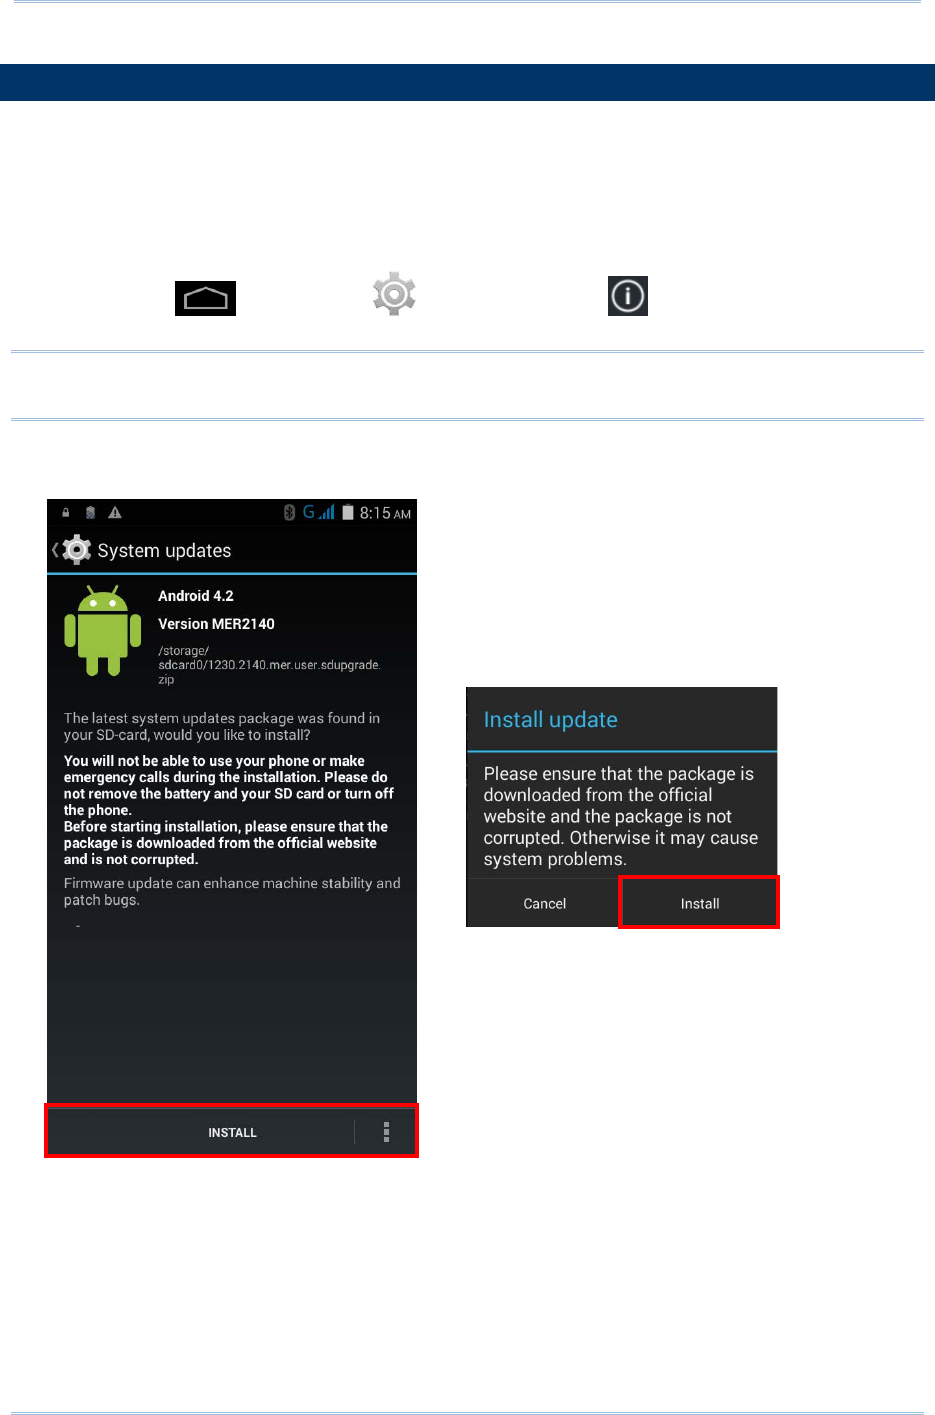
Follow the steps below to upgrade the OS:
1) Obtain the latest OS image file, and copy the file onto the root storage of your SD
card.
2) Insert the SD card into the card slot of the mobile computer and power it on.
3) Tap Home | Settings | About phone | System updates. The
mobile computer will search for the OS image file stored on the SD card.
Note: Make sure the SD card is inserted in the mobile computer. If not, the screen will
show that your system is currently up to date.
4) The file name and OS version will be shown on the screen. Tap INSTALL to open a
confirmation window. Tap Install in the confirmation window to begin the installation.
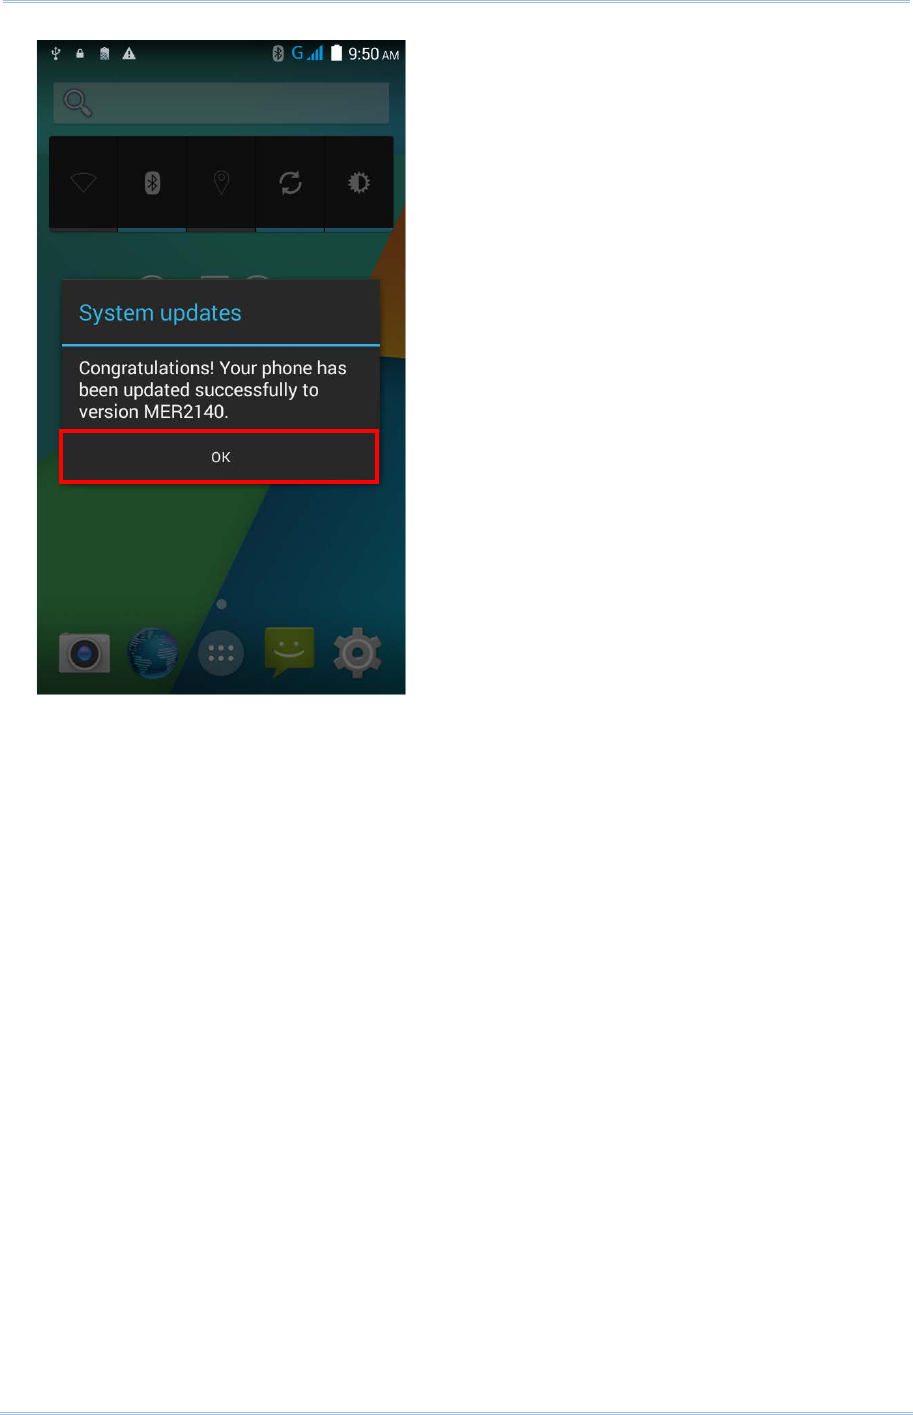
5) Once complete, a notification will appear showing that the OS has been updated
successfully. Tap OK to close
56
Chapter 3 Basic Operation of the RS30 Mobile Computer
57

The Wi-Fi module integrated on the mobile computer lets you configure and connect to
network wirelessly.
IN THIS CHAPTER
4.1 Use Wireless Wide Area Network ................................... 60
4.2 Use Wireless Local Area Network (Wi-Fi) ...................... 66
4.3 Use Bluetooth ............................................................. 73
4.4 Use Near Field Communications .................................... 78
Chapter 4
WIRELESS RADIOS
59
RS30 Mobile Computer Reference Manual
4.1.
USE WIRELESS WIDE AREA NETWORK
The mobile computer will be automatically configured to connect to your wireless service
provider’s network when you insert a SIM card and turn on data connection for the first
time.
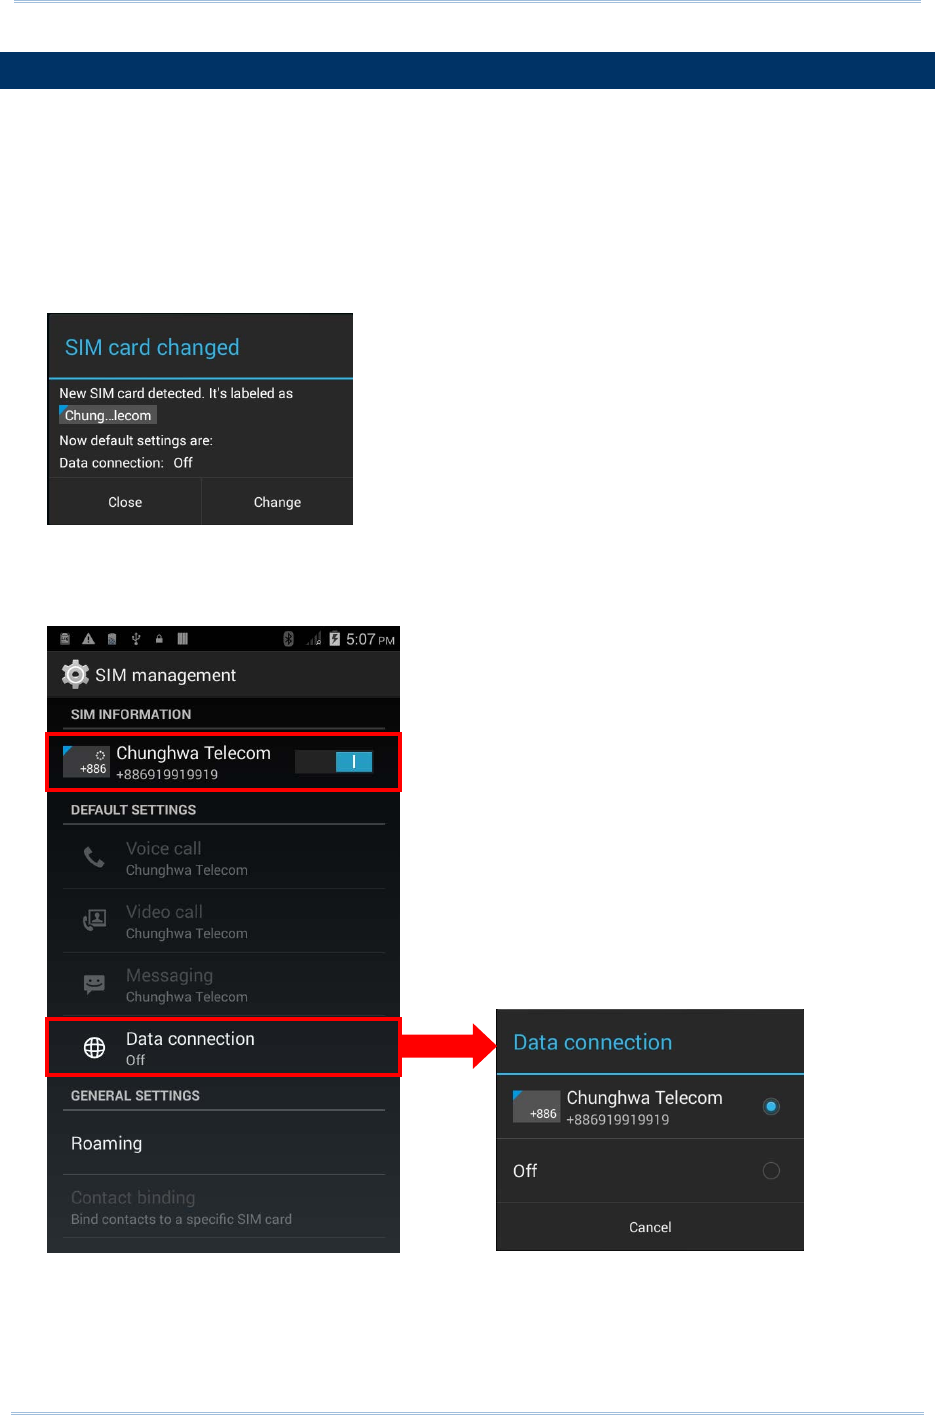
1) When a SIM card is inserted, a dialog will appear confirming the mobile carrier
detected. By default, data connection is set as “off”.
If you would like to change the default settings, tap Change to enter the SIM
management settings page.
2) By default, phone power is turned “on”, and data connection is turned “off”. To
enable mobile data connection, tap Data connection, and select the mobile carrier
you would like to use.
60
Chapter 4 Wireless Radio
EDIT ACCESS POINT NAME
You may need to change the access point name according to the information obtained
from your mobile carrier.
1) Tap Home | Settings | Mobile networks.
2) On the Network settings page, tap Access Point Names.
3) Tap the settings button , and tap New APN in the pop-up menu.
4) Tap each field to input the APN name and settings obained from your mobile carrier.
5) When finished, tap the settings button and tap Save.
6) Tap the radio button next to the APN you would like to apply.
4.1.1.
SHARE WWAN DATA
The WWAN connection on the mobile computer can be shared to other devices. You may
share internet connection with a computer or device through USB or Bluetooth tethering,
or share with a maximum of eight devices by turning the mobile computer into a Wi-Fi
hotspot.
BLUETOOTH TETHERING
To share data connection through Bluetooth tethering:
1) Pair the mobile computer with the device of interest.
2) Tap Home | Settings | More… | Tethering & portable hotspot.
3) Tap Bluetooth tethering. The mobile computer will share its WWAN network with
Bluetooth-connected devices.
4) To disable data connection through Bluetooth sharing, uncheck the Bluetooth
tethering checkbox.
USB TETHERING
To share data connection through USB tethering:
1) Connect the mobile computer with a USB cable. A USB icon will appear at the top of
the screen, and in the Notifications panel, a description “Connected as USB Storage”
will appear.
2) Tap Home | Settings | More… | Tethering & portable hotspot.
3) Tap USB tethering. The mobile computer will share its WWAN network with the
connected host computer.
61

RS30 Mobile Computer Reference Manual
WI-FI HOTSPOT
To share data connection in the form of a Wi-Fi hotspot:
1) Tap Home | Settings | More… | Tethering & portable hotspot.
2) Slide the Wi-Fi hotspot switch to the right to enable data sharing through Wi-Fi. The
mobile computer will start broadcasting its SSID for other devices to connect.
3) Tap the Wi-Fi hotspot label to manage Wi-Fi hotspot settings: set when to turn the
Wi-Fi hotspot off, change SSID and security settings, select whether to minimize
battery usage when Wi-Fi hotspot is enabled, enable WPS mode and adjust bandwidth,
and view connected users.
4.1.2.
DATA USAGE
Data usage is the amount of data uploaded or downloaded on the mobile computer.
Managing the data usage amount within a certain period of time is a recommended task,
as an excess amount of data usage might incur additional fees from your service
provider.
To check wireless data usage:
1) Tap Home | Settings | Data usage .
2) The Overview tab page opens showing a summary of data usage for your mobile
network and Wi-Fi connection. Open the tab page of your mobile carrier to view a
chart of data usage on a monthly cycle.
SET DATA USAGE LIMIT
1) Open the data usage tab page for your mobile carrier.
2) Slide the Mobile data switch to the right to enable data usage overview.
3) Select the Set mobile data limit checkbox to enable a limit for mobile data.
4) To adjust the limit level, tap the limit value on the chart to open a value selection
box.
If a limit is set, when the data usage amount reaches the limit, mobile data
connection will be automatically disabled.
ENABLE DATA USAGE DURING ROAMING
1) On the data usage tab page for your mobile carrier, tap the settings button .
2) Select the Data roaming checkbox for your mobile carrier.
3) A dialog box appears confirming whether you would like to enable data roaming. Tap
OK to confirm.
62
Chapter 4 Wireless Radio
RESTRICT BACKGROUND DATA
1) On the data usage tab page for your mobile carrier, tap the settings button .
2) Select the Restrict background data checkbox.
3) A dialog box appears confirming whether you would like to enable data restriction.
Tap OK to confirm.
The mobile computer conserves data usage by restricting background mobile data.
Certain applications and services will be disabled unless the mobile computer is
connected to a Wi-Fi network.
AUTO SYNC
1) On the data usage tab page for your mobile carrier, tap the settings button .
2) Select the Auto-sync data checkbox.
3) A dialog box appears confirming whether you would like to enable data
auto-synchronization. Tap OK to confirm.
Once auto-sync is enabled, any changes made to your personal account will be
automatically reflected on the mobile computer.
4.1.3.
DATA CONNECTION SETTINGS
TURN ON/OFF DATA CONNECTION
To manually turn on/off mobile data connection:
1) Tap Home | Settings | More… | Mobile networks.
2) On the Network settings page, tap Data connection to show a dialog box for
selection.
3) To turn on data connection, tap the radio button for the mobile carrier of interest. To
turn off all data connection, tap Off.
3G DATA CONNECTION
To manually turn on/off 3G mobile data connection:
1) Tap Home | Settings | More… | Mobile networks.
2) On the Network settings page, tap 3G service.
3) Tap Enable 3G to show a dialog box for selection.
4) To enable 3G data connection for a specific mobile carrier, tap the radio button for
the mobile carrier of interest. To turn off all 3G data connection, tap Off. The mobile
computer will thus be limited to 2G networks if data connection is enabled.
63

RS30 Mobile Computer Reference Manual
2G DATA CONNECTION
To manually turn on/off 2G mobile data connection:
1) Tap Home | Settings | More… | Mobile networks.
2) On the Network settings page, tap 3G service.
3) Tap Network Mode to adjust the network mode.
4) Select the network mode between 2G/3G or 3G only.
Note: To limit data connection to 2G networks, set Network Mode to 2G/3G, and set
Enable 3G to Off.
To limit data connection to 3G networks, set Network Mode to 3G only, and for
Enable 3G, select the mobile carrier you would like to use.
64
Chapter 4 Wireless Radio
4.1.4.
SIM CARD SETTINGS
LOCK SIM CARD
To lock the SIM card:
1) Tap Home | Settings | Security .
2) Tap Set up SIM card lock.
3) Tap Lock SIM card.
4) Enter the PIN to enable SIM card lock. Once enabled, you are required to enter the
PIN code in order to use the phone
CHANGE PIN CODE
To change the PIN code:
1) Tap Home | Settings | Security .
2) Tap Set up SIM card lock.
3) Tap Change SIM PIN.
4) Enter your old PIN code to confirm your identity, and then input a new PIN code.
65
RS30 Mobile Computer Reference Manual
4.2.
USE WIRELESS LOCAL AREA NETWORK (WI-FI)
4.2.1.
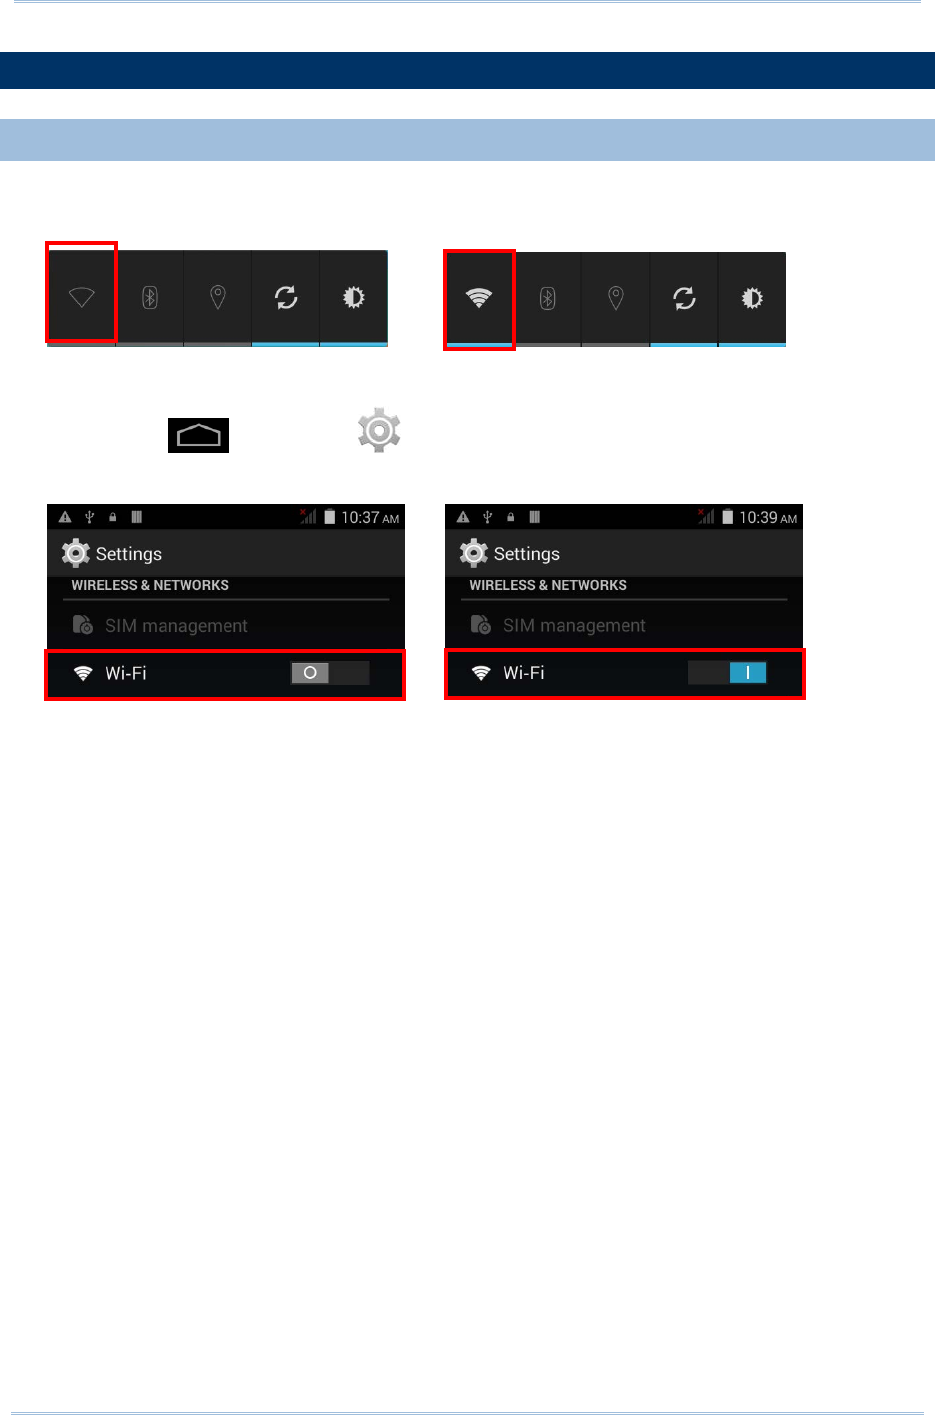
POWER ON/OFF WI-FI
To power on Wi-Fi:
1) Tap the Wi-Fi icon on the power control widget.
OR
1) Tap Home | Settings .
2) Slide the Wi-Fi switch to the right to turn on Wi-Fi power.
Slide the switch back to turn off Wi-Fi power.
66
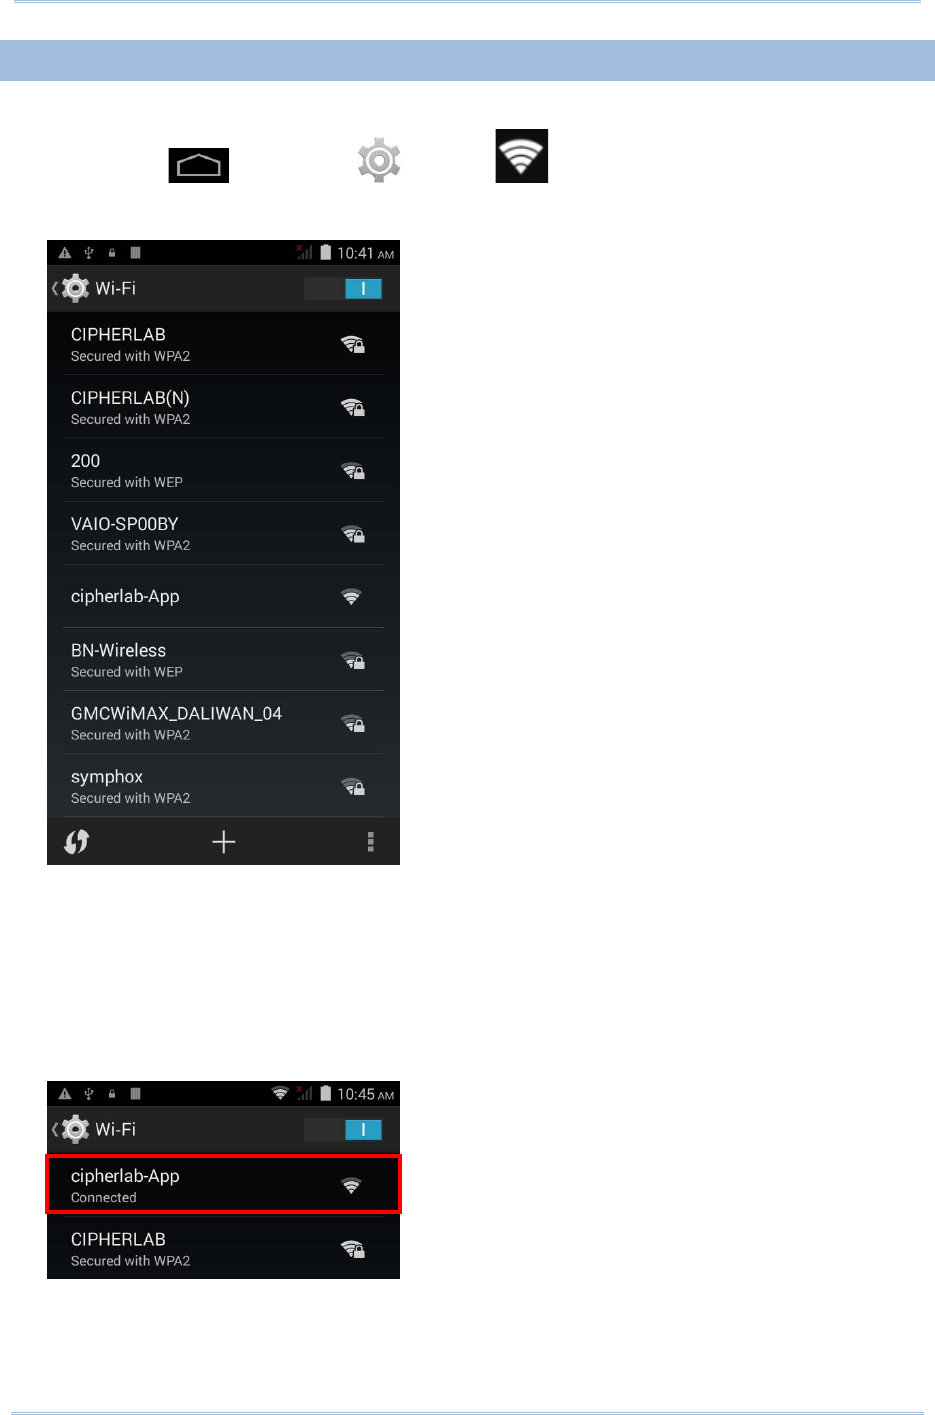
Chapter 4 Wireless Radio
4.2.2.
CONNECT TO WI-FI NETWORK
To connect to a Wi-Fi network:
1) Tap Home | Settings | Wi-Fi .
The Wi-Fi screen shows a list of available Wi-Fi hotspots.
2) Tap the network you would like to connect to.
OR
Tap and hold the network to connect, and tap Connect to network in the pop-up
menu.
3) If the network is an open one, the mobile computer will attempt to connect to it
directly. When connected, the status will change to show “Connected”.
If the network is a secured one, the mobile computer prompts a dialog to enter the
password for connection.
67
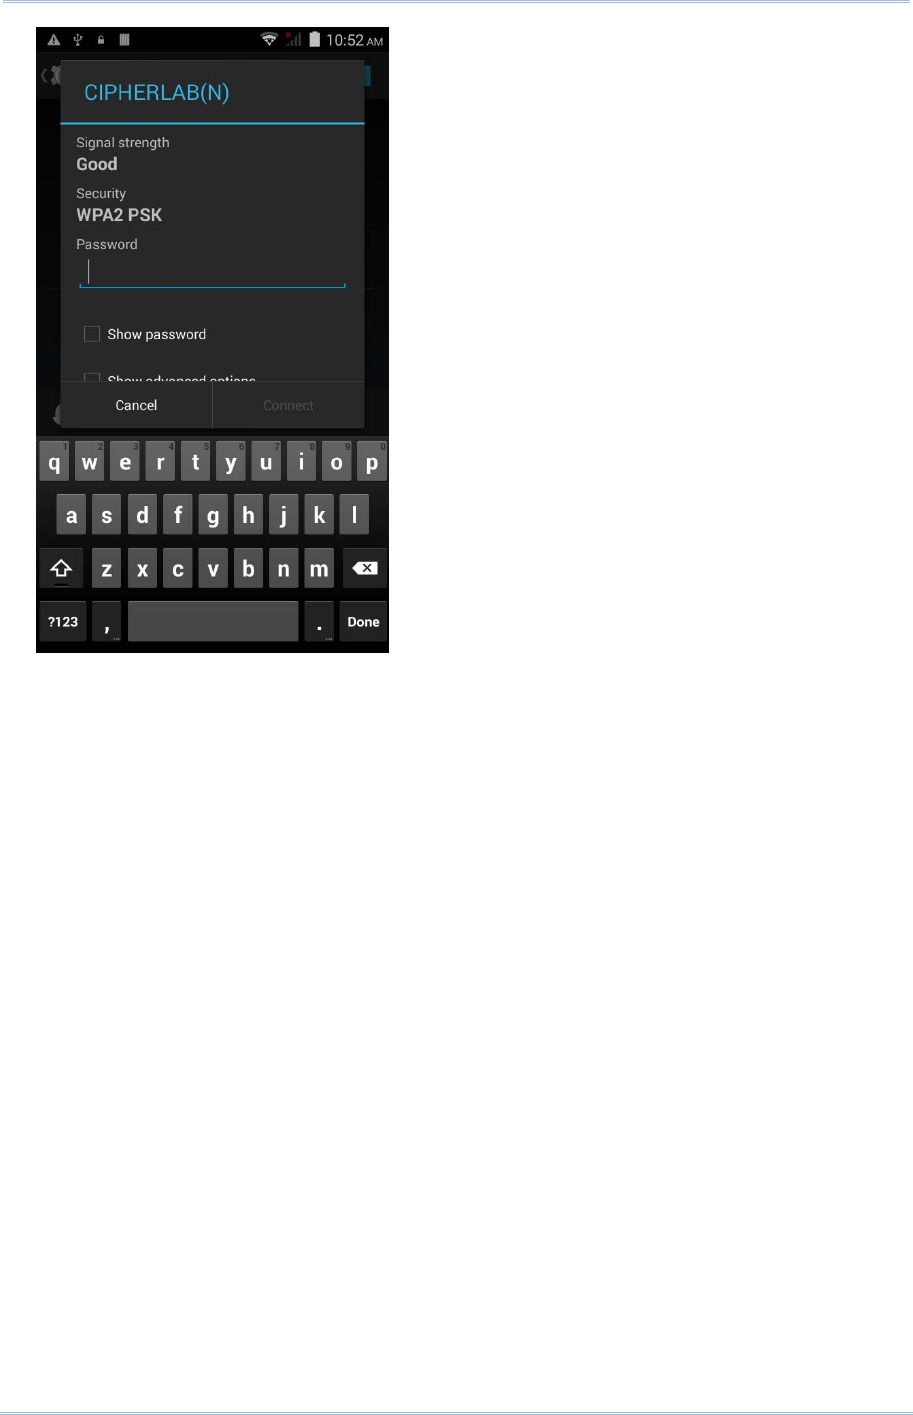
RS30 Mobile Computer Reference Manual
For WEP/WPA/WPA2 PSK connections: Enter the required password and tap Connect.
For 802.1x EAP connections: Check the Show advanced options checkbox and
select the EAP method in the drop-down box (PEAP, TLS, TTLS, PWD, SIM, AKA),
and the Phase 2 authentication in the drop-down box (None, MSCHAPV2, GTC).
Select a CA certificate and User certificate if required (certificates may be installed
under Home | Settings | Security.) Enter your username in the Identity box and
the password in the Password box if required.
68

Chapter 4 Wireless Radio
4.2.3.
MANUALLY ADD WI-FI NETWORK
If the network you would like to connect to does not broadcast its SSID, or if the network
is out of range, you may add it manually.
1) On the Wi-Fi screen, tap the add button seated at the bottom.
2) In the dialog box, enter the name of the network in the Network SSID field, and
select a security method in the Security field (None, WEP, WPA/WPA2 PSK, 802.1x
EAP).
For WEP/WPA/WPA2 PSK connections: Enter the required password and tap Save.
For 802.1x EAP connections: Check the Show advanced options checkbox and
select the EAP method in the drop-down box (PEAP, TLS, TTLS, PWD, SIM, AKA),
and the Phase 2 authentication in the drop-down box (None, MSCHAPV2, GTC).
Select a CA certificate and User certificate if required (certificates may be
installed under Home | Settings | Security.) Enter your username in the Identity
box and the password in the Password box if required.
3) If necessary, select the Proxy server and IPv4 settings. By default, no proxy is set
and IP settings are set to DHCP.
69

RS30 Mobile Computer Reference Manual
4.2.4.
ADVANCED WI-FI SETTINGS
To configure advanced Wi-Fi settings:
1) On the Wi-Fi screen, tap the settings button seated at the bottom right.
2) Select Advanced in the pop-up menu. Available settings are as below:
Icon
Description
Network notification Notifies when an open network is available.
Keep Wi-Fi on during sleep Sets when to turn Wi-Fi on during sleep.
Scanning always available
Allows location discovering applications to search for the device
even when Wi-Fi is off.
Install certificates
Installs certificates recently downloaded or placed on the internal
storage.
Wi-Fi optimization Minimizes battery usage when Wi-Fi is on.
MAC address Displays the MAC address of the device when connecting to Wi-Fi-
networks.
IPv6 address Displays the IPv6 address of the device.
IPv4 address Displays the IPv4 address of the device.
70

Chapter 4 Wireless Radio
4.2.5.
CONFIGURE PROXY SERVER
A proxy server acts as an intermediary between an endpoint device and another server
from which the device is requesting a service.
To change the proxy settings for a connection:
1) Tap a network in the available Wi-Fi hotspot list.
2) Check the Show advanced options checkbox.
3) Tap Proxy and select Manual in the pop-up menu.
4) Enter the address of the proxy server in the Proxy hostname field. Enter the port
number for the proxy server in the Proxy port. Enter the addresses of websites
which are allowed to bypass the proxy server in the Bypass proxy for field. (Use the
separator | between addresses.)
5) Tap Connect.
4.2.6.
USE STATIC IP ADDRESS
By default, the device uses DHCP to assign an IP address when connecting to a wireless
network. You may set for the device to connect to a network using a static IP address.
1) Tap a network in the available Wi-Fi hotspot list.
2) Check the Show advanced options checkbox.
3) Tap IPv4 settings and select Static in the pop-up menu.
4) Enter the IP address, gateway, network prefix length, DNS 1 address and DNS 2
address in the fields provided.
5) Tap Connect.
4.2.7.
CONNECT WITH WI-FI PROTECTED SETUP (WPS)
Wi-Fi protected setup (WPS) allows easy establishment of a secure wireless network. The
mobile computer supports WPS through push button configuration.
1) On the Wi-Fi hotspot scanning screen, tap the WPS button .
2) A dialog will pop-up on the screen showing the remaining time allowed for pressing
the WPS button on the router.
71
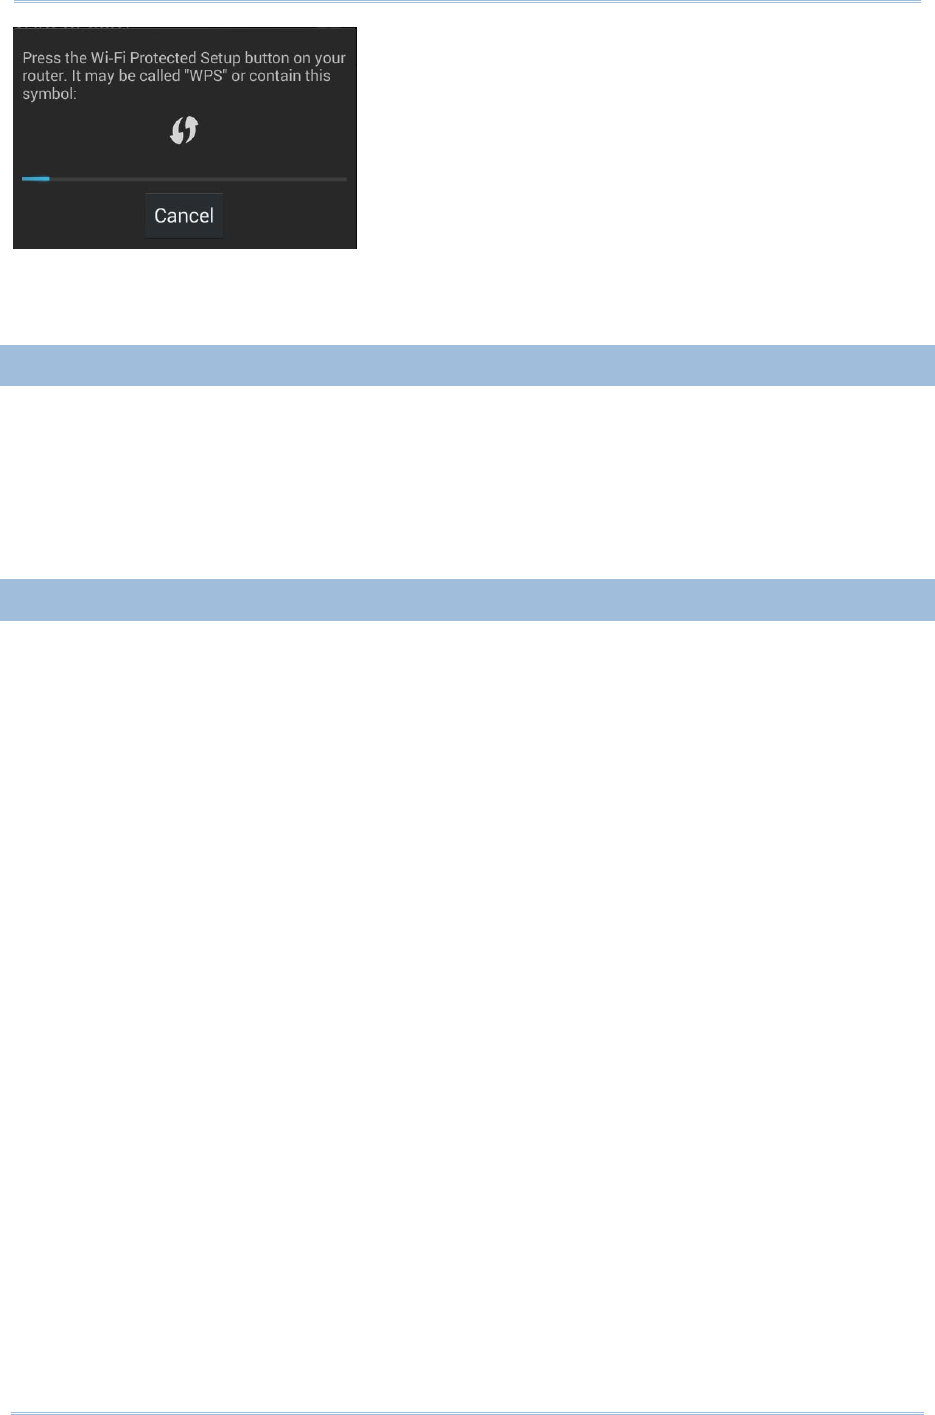
RS30 Mobile Computer Reference Manual
3) On your wireless router, press the WPS button. The device will connect to your
router.
4.2.8.
MODIFY WI-FI NETWORK
To change the settings for a connected network:
1) Tap and hold a connected network in the Wi-Fi hotspot list.
2) Tap Modify network in the pop-up menu.
3) In the dialog box that opens, modify the network settings, and tap Save.
4.2.9.
DISCONNECT WI-FI NETWORK
To disconnect a connected network:
1) Tap and hold a connected network in the Wi-Fi hotspot list.
2) Tap Forget network in the pop-up menu.
72

Chapter 4 Wireless Radio
4.3.
USE BLUETOOTH
The RS30 Mobile Computer lets you configure Bluetooth settings and manage Bluetooth
services provided on remote devices.
4.3.1.
BLUETOOTH PROFILES
Bluetooth Profiles Supported
Generic Access Profile (GAP) For device discovery and authentication.
Serial Discovery Profile (SDP) Discovers services on remote devices.
Serial Port Profile (SPP)
Sets up a virtual serial port to connect two Bluetooth
devices.
Human Interface Device
Profile (HID) Provides a low latency Bluetooth connection with
keyboards, pointing devices, etc.
Object Push Profile (OPP) Pushes and pulls objects to and from a push server.
Dial-Up Networking Profile (DUN) Accesses the internet and other dial-up services.
Hands-Free Profile (HFP) Allows using a hands-free device to place and receive
calls.
Advanced Audio Distribution
Profile (A2DP) Streams stereo-
quality audio to a wireless headset or
speaker.
Audio/Video Remote Control
Profile (AVRCP) Allows controlling of television and Hi-Fi equipment.
Generic Object Exchange
Profile (GEOP) Provides a basis for other data profiles.
Personal Area Networking
Profile (PAN) Uses Bluetooth Network Encapsulation Protoco
l for
Bluetooth transmission.
General Audio/Video
Distribution Profile (GAVDP) Provides a basis for A2DP and VDP.
Phone Book Access Profile (PBAP) Transfers Phone Book Objects
to a car kit to display
the information of an incoming ca
ll received on the
mobile phone, or initiate a call.
73
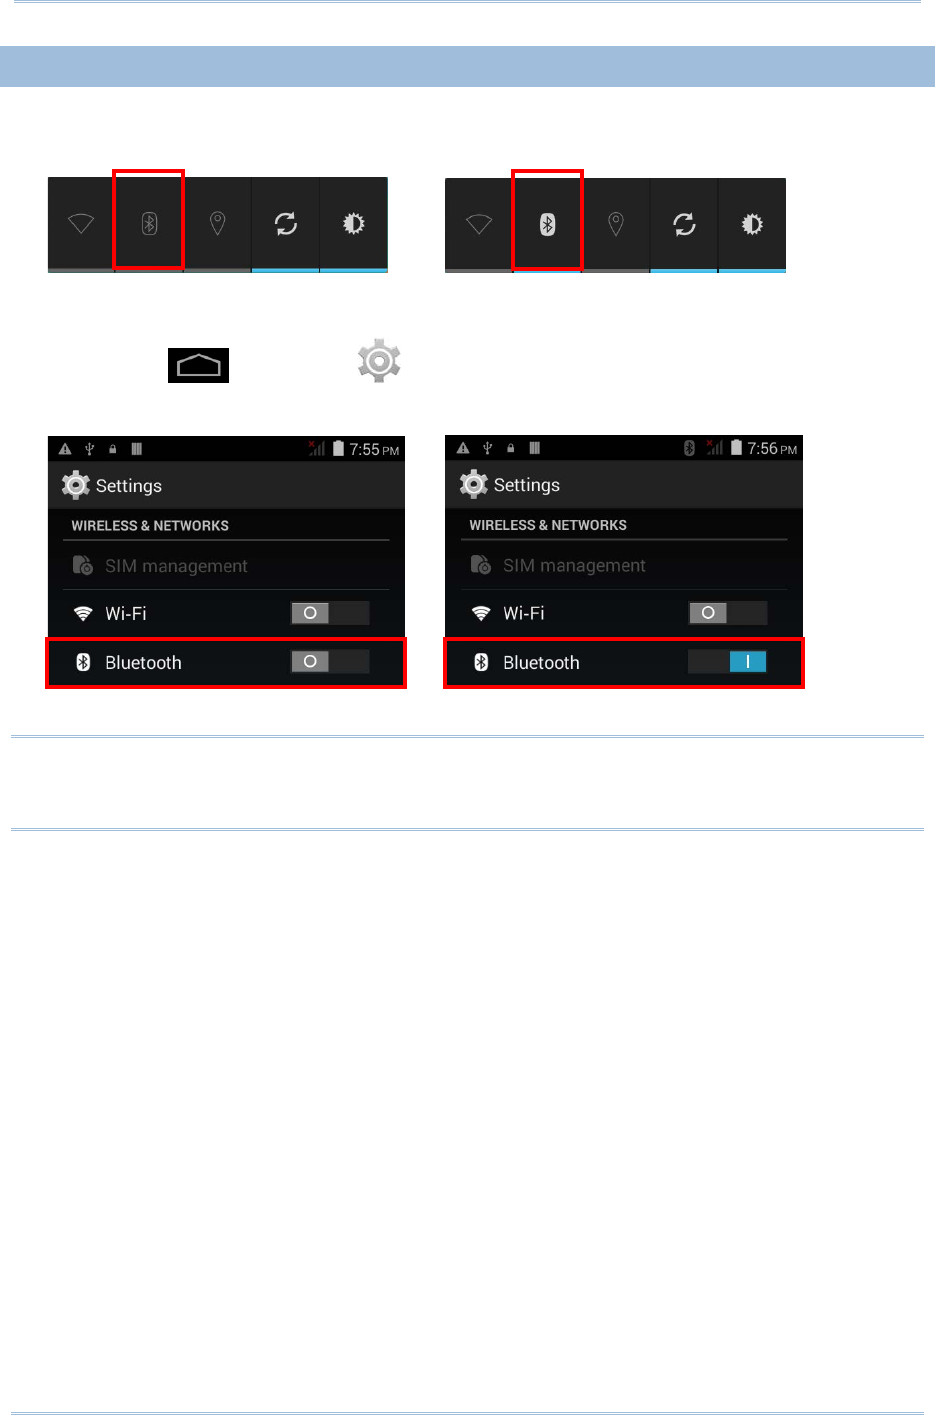
RS30 Mobile Computer Reference Manual
4.3.2.
POWER ON/OFF BLUETOOTH
To power on Bluetooth:
1) Tap the Bluetooth icon on the power control widget.
.
OR
1) Tap Home | Settings .
2) Slide the Bluetooth switch to the right to turn on Bluetooth power.
Slide the switch back to turn off Bluetooth power.
Note: After turned on, Bluetooth power is maintained even when the mobile computer is
suspended. However, if the power mode is switched to Airplane Mode, Bluetooth
power will be turned off regardless of the settings.
74
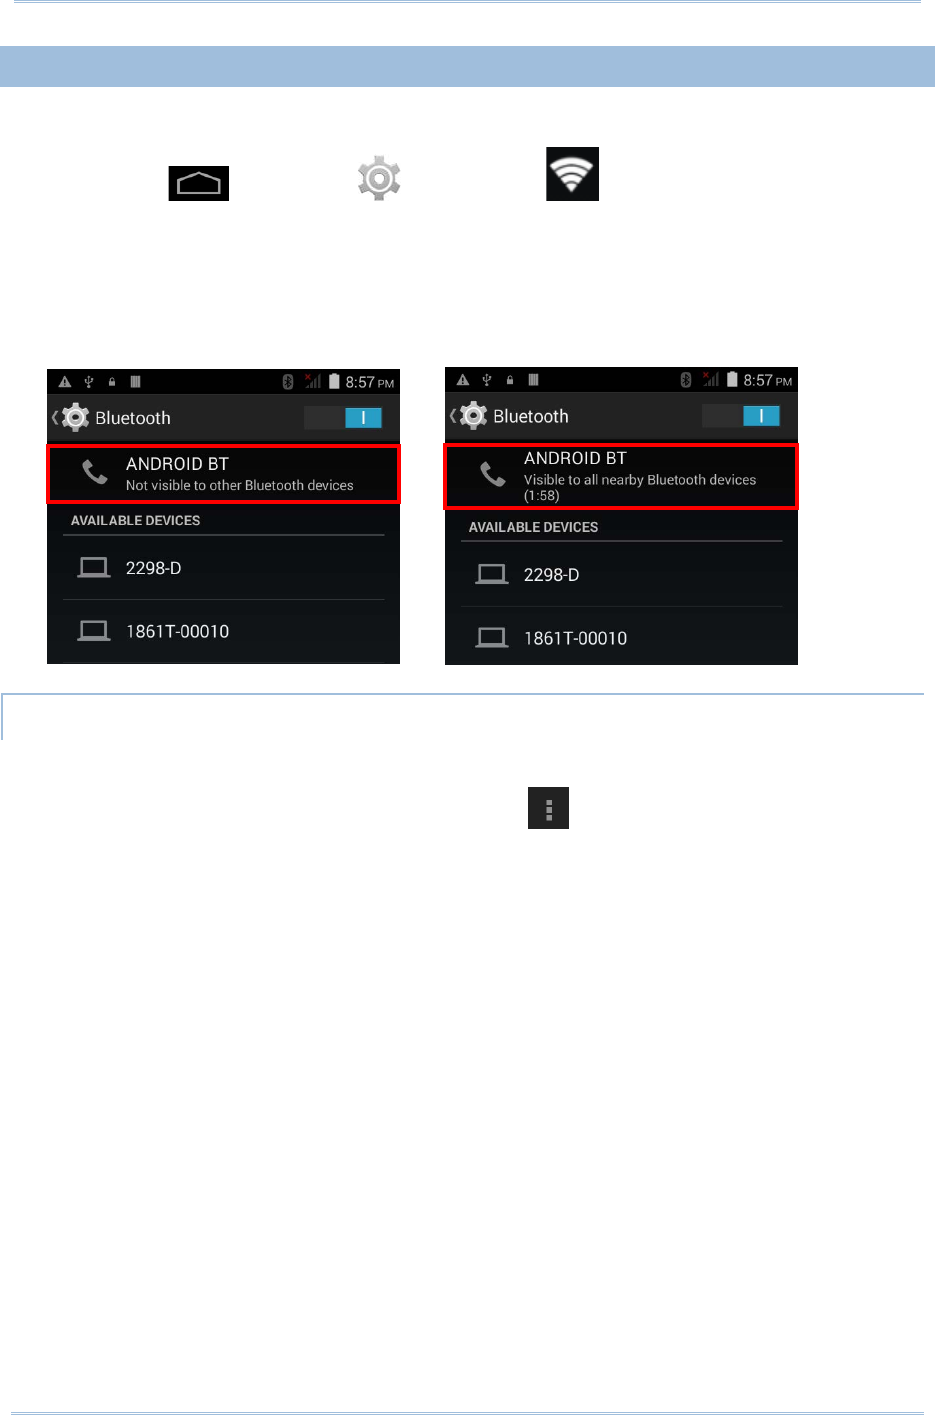
Chapter 4 Wireless Radio
4.3.3.
SET BLUETOOTH VISIBILITY
To pair Bluetooth devices:
1) Tap Home | Settings | Bluetooth .
2) Tap Search For Devices at the bottom of the screen. The screen shows a list of
Bluetooth devices nearby.
3) By default, Bluetooth visibility is turned off. Tap ANDROID BT at the top of the
screen to turn on Bluetooth visibility. The status will change to “Visibile to all nearby
Bluetooth devices”.
BLUETOOTH VISIBILITY TIMEOUT
To change the timeout period for Bluetooth visibility:
1) On the available Bluetooth devices screen, tap in the bottom right corner.
2) Tap Visibility timeout in the pop-up menu.
3) Select a timeout period for Bluetooth visibility to be automatically turned off.
75
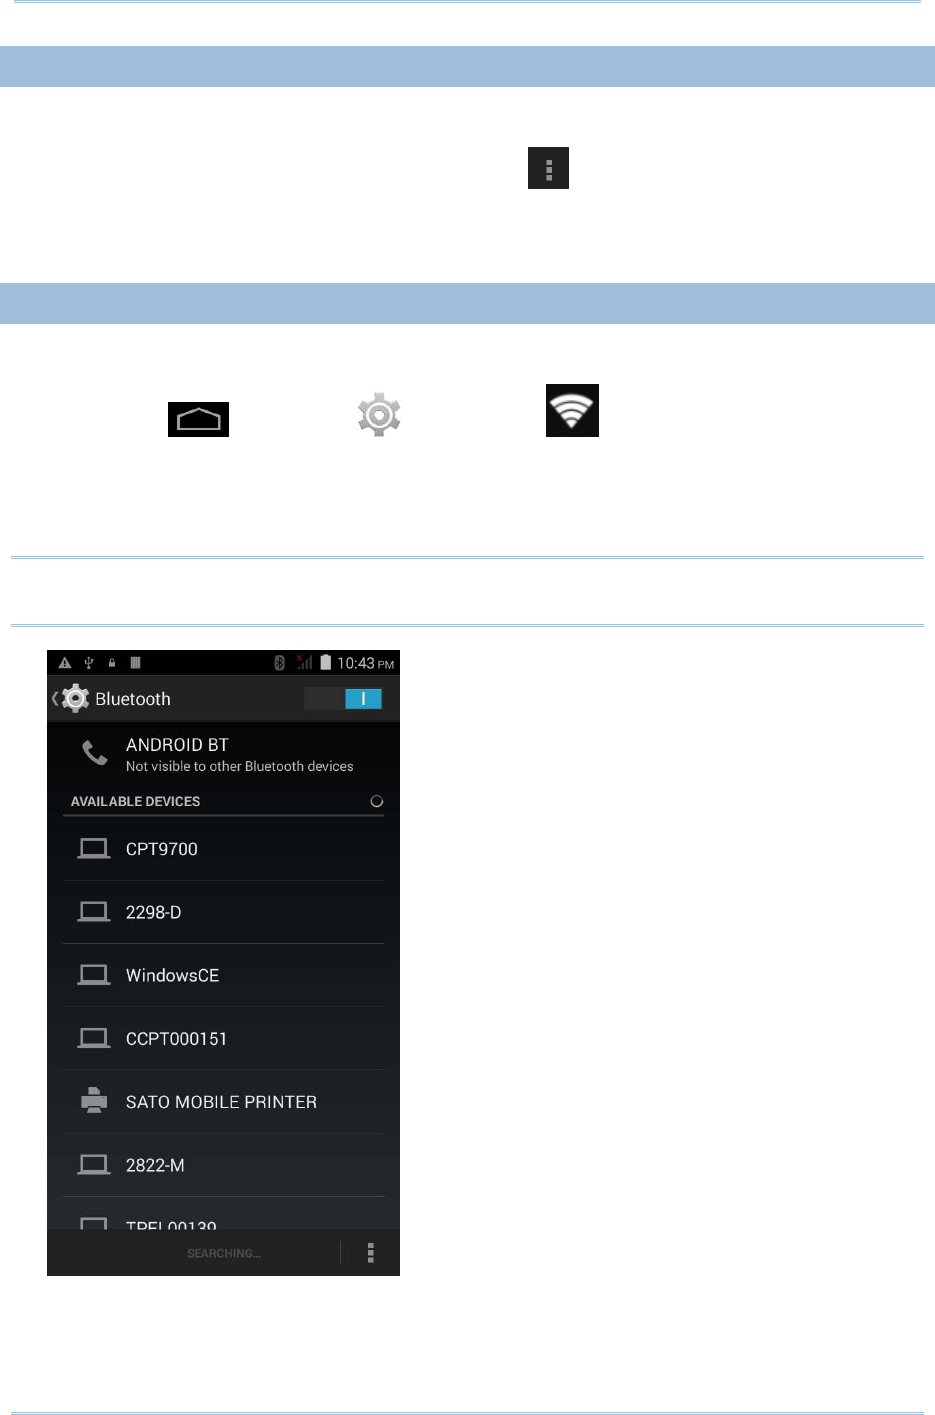
RS30 Mobile Computer Reference Manual
4.3.4.
CHANGE BLUETOOTH NAME
To change the Bluetooth name to make the mobile computer more:
1) On the available Bluetooth devices screen, tap in the bottom right corner.
2) Select Rename phone in the pop-up menu. Type a new name in the field and tap
Rename.
4.3.5.
PAIR BLUETOOTH DEVICE
To pair Bluetooth devices:
1) Tap Home | Settings | Bluetooth .
2) Tap Search For Devices at the bottom of the screen. The screen shows a list of
Bluetooth devices nearby.
3) Scroll throught the list and tap the device you would like to pair.
Note: If the device you would like to pair with is not listed, make sure Bluetooth visibility
is enabled on the device.
76
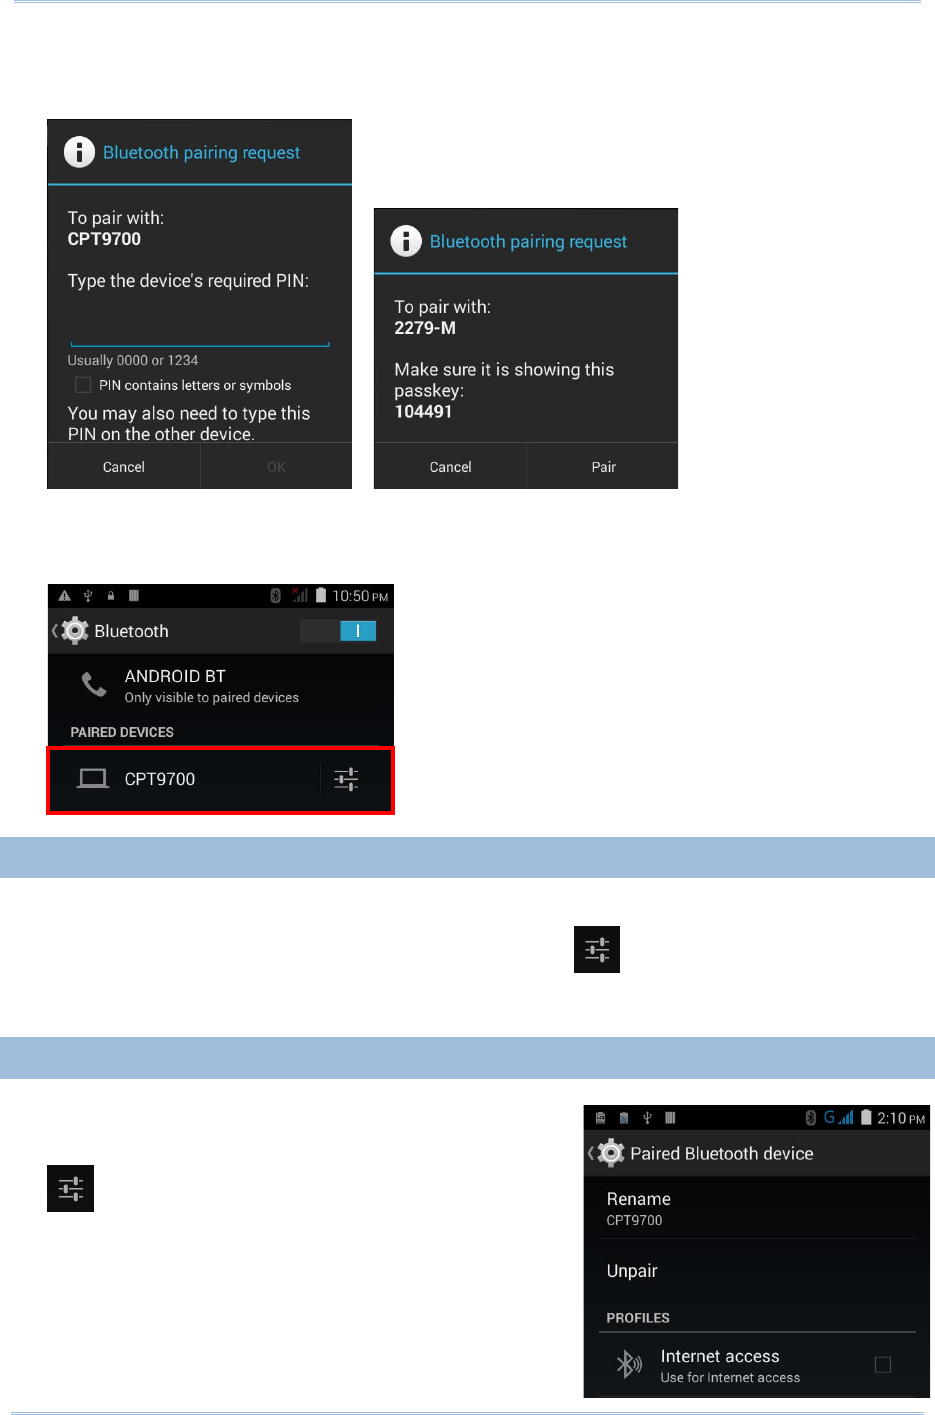
Chapter 4 Wireless Radio
4) The Bluetooth pairing request window opens. Depending on the pairing settings of
the Bluetooth device, you may need to enter a passkey, or confirm the assigned
passkey on the device to pair if a smart pairing nethod is applied.
5) Enter/confirm the passkey on the device to pair.
6) Once pairing is done, the Bluetooth device will be listed in the Paired Devices list.
4.3.6.
UNPAIR BLUETOOTH DEVICE
To unpair a paired device:
1) In the Paired Devices list, tap the settings button next to the paired device.
2) On the Paired Bluetooth device screen, tap Unpair.
4.3.7.
SELECT BLUETOOTH SERVICE
To select the service of a paired device:
1) In the Paired Devices list, tap the settings button
next to the paired device.
2) On the Paired Bluetooth device screen, check
the profile to use.
77
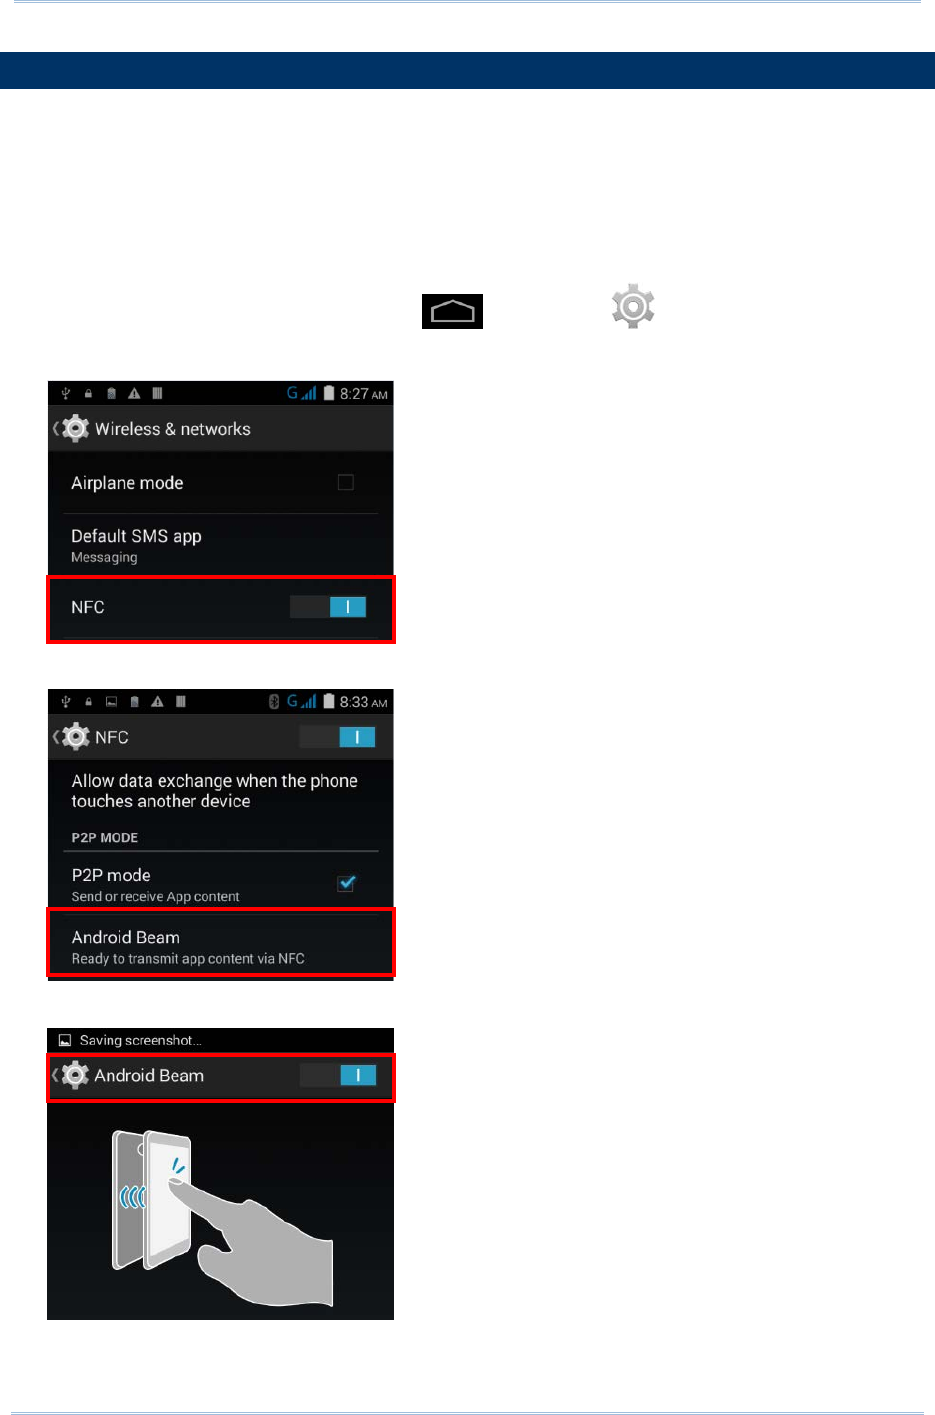
RS30 Mobile Computer Reference Manual
4.4.
USE NEAR FIELD COMMUNICATIONS
Near field communications (NFC) uses close proximity (4 cm or less) to establish radio
communication through electromagnetic fields. With NFC enabled, the mobile computer
can collect information from NFC tags, exchange information with other NFC supported
devices, and even change information on the NFC tag if authorized.
Before starting to communicate through NFC, perform the following:
1) On the mobile computer, tap Home | Settings | More….
2) On the Wireless & networks page, make sure the NFC switch is enabled.
3) Tap the NFC label to enter the NFC settings page, and tap Android Beam.
4) Make sure the Android Beam switch is enabled.
78
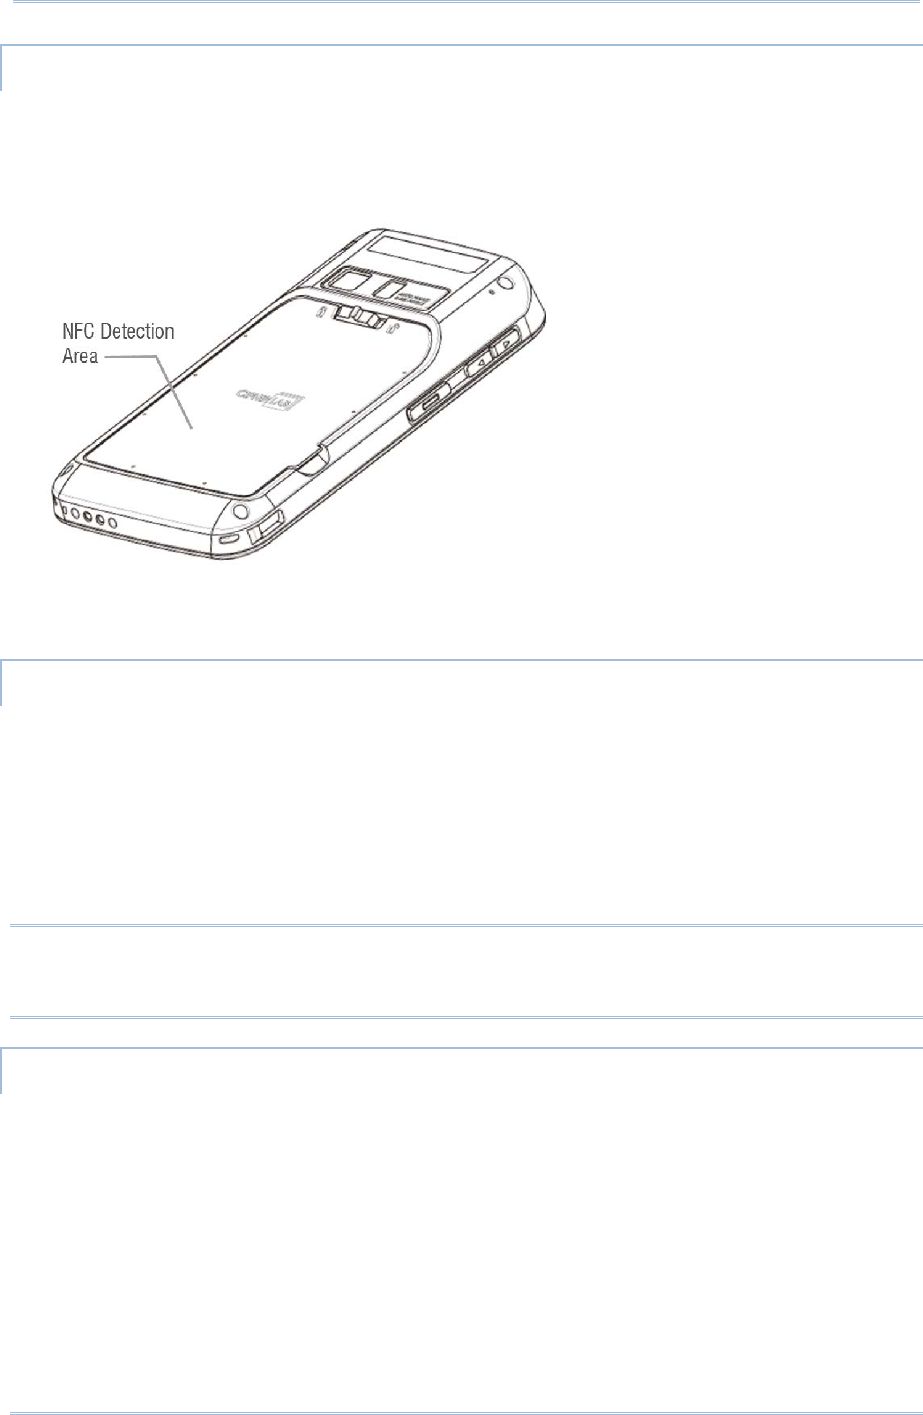
Chapter 4 Wireless Radio
PAIR WITH NFC ENABLED BLUETOOTH DEVICES
1) On the device you would like to pair with, make sure NFC is enabled and Bluetooth
discovery is enabled.
2) Hold the mobile computer without covering the antenna area at the lower end of the
battery cover.
3) Move the mobile computer in proximity with the device. A screen notification will
appear to indicate that pairing is successful.
SHARE INFORMATION
1) Open the web page, video, photo or contact info page you would like to transfer.
2) Place the back of the mobile computer in close proximity with the other device you
would like to share data with.
3) When the two devices connect, a “Touch to beam” notification will appear on the
screen.
4) Touch the screen to initiate data transfer.
Note: Once the data begins to transfer, the two devices only need to be held within a 10
m (32.8 ft.) range; they no longer have to be held within close range in order to
transfer successfully.
COMMUNICATION WITH NFC
1) On the mobile computer, launch an NFC enabled application.
2) Hold the mobile computer without covering the antenna area at the lower end of the
battery cover.
3) Place the mobile computer close to the NFC tag or device until the application
indicates data transfer is complete.
79

RS30 Mobile Computer Reference Manual
80

The RS30 Mobile Computer allows making phone calls and connecting to the network
over Wideband Code Division Multiple Access (WCDMA). Insert the SIM card before
turning on the power. Refer to Installing SIM Card.
Note: If the SIM card is not in position, you may make emergency calls if the service is
supported.
IN THIS CHAPTER
5.1 Phone Power .............................................................. 82
5.2 Phone Application ....................................................... 84
Chapter 5
USING THE PHONE
81
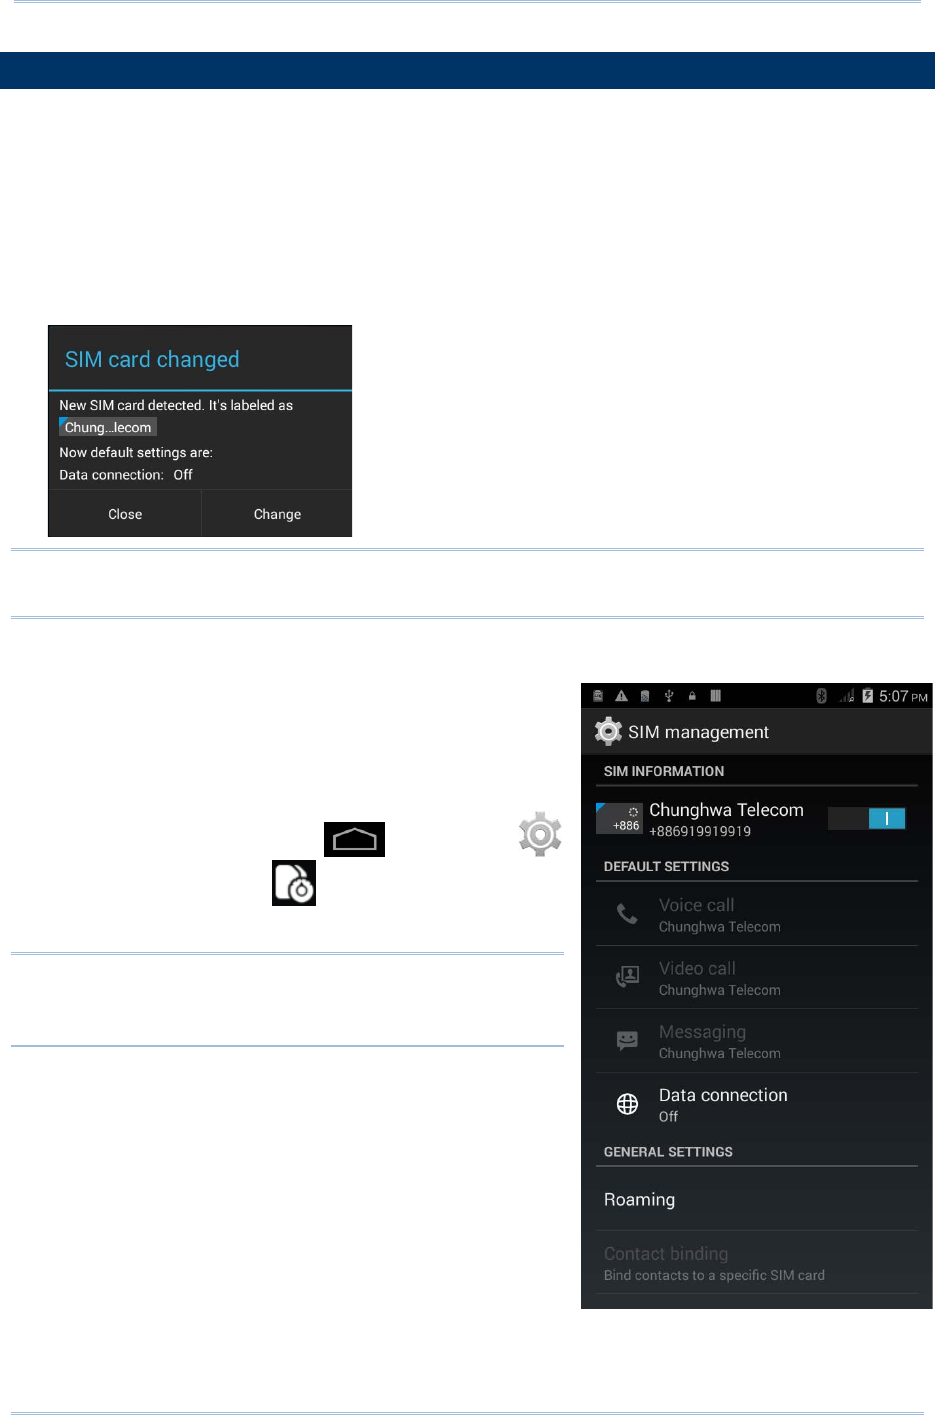
RS30 Mobile Computer Reference Manual
5.1.
PHONE POWER
The mobile computer accommodates two SIM cards and supports dual standby of two
different networks. Both networks will be monitored at the same time, and the phone will
dynamically switch between the two networks during usage. Calls will be placed with
either one of the networks; you cannot switch networks in the middle of a received call
or placed call, or receive or place calls with both networks at the same time.
1) When a SIM card is installed for the first time, the phone power is turned on
automatically when the mobile computer is powered on. A dialog box pops-up when
the mobile computer is powered on notifying that a SIM card is detected.
Note: If only one SIM card is installed on the mobile computer, make sure it is installed
in the first SIM card slot.
2) Tap Change in the dialog box.
3) The SIM management screen opens showing the
name of the mobile carrier and the current phone
settings.
4) To open the SIM management screen from
other screens, tap Home | Settings
| SIM management .
Note: If only one SIM card is installed on the mobile
computer, make sure it is installed in the first
SIM card slot.
82
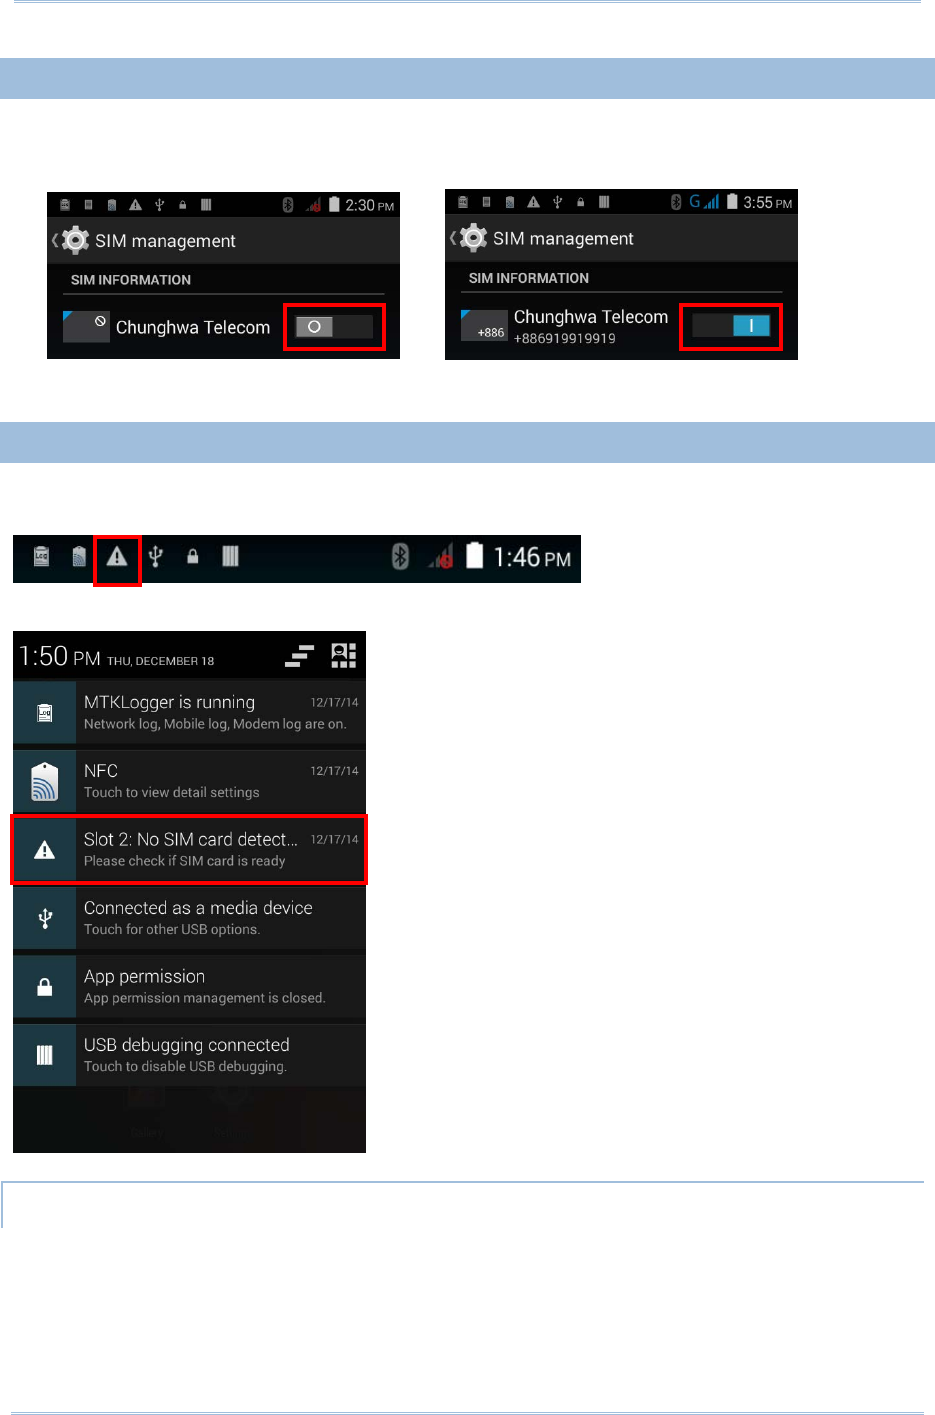
Chapter 5 Using the Phone
5.1.1.
TURN ON/OFF PHONE POWER
To power on the phone:
1) On the SIM management screen, slide the phone power switch to the right.
Slide the switch back to turn off Wi-Fi power.
5.1.2.
SIM CARD MISSING
If either one of the SIM card slots is empty, a warning icon will be displayed on the
status bar.
Open the Notifications list to check the notification.
EMERGENCY CALLS
Depending on your service provider, the mobile computer might support making
emergency phone call when the SIM card is locked, or even when no SIM card is inserted.
Emergency phone numbers will vary by country.
83
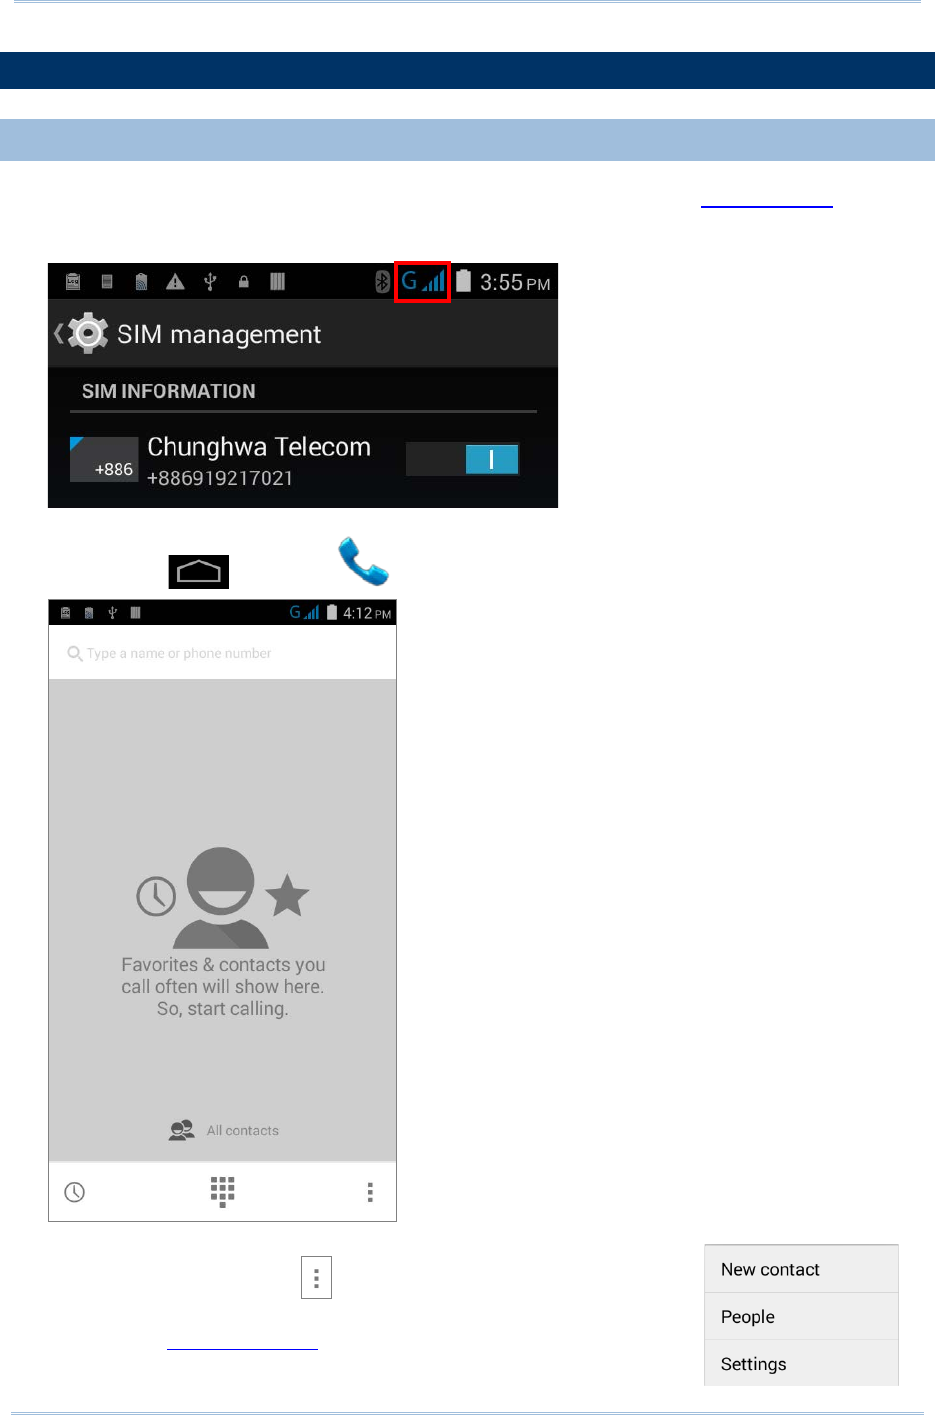
RS30 Mobile Computer Reference Manual
5.2.
PHONE APPLICATION
5.2.1.
PHONE INTERFACE
1) When a SIM card is installed on the mobile computer and the Phone Power is on, a
signal icon appears on the status bar. The number of bars indicates the strength of
the connection.
2) Tap Home | Phone . The Phone application opens.
3) Tap the settings button to open the phone settings menu
for adding a new contact, opening the People application, or
configuring Phone Settings.
84
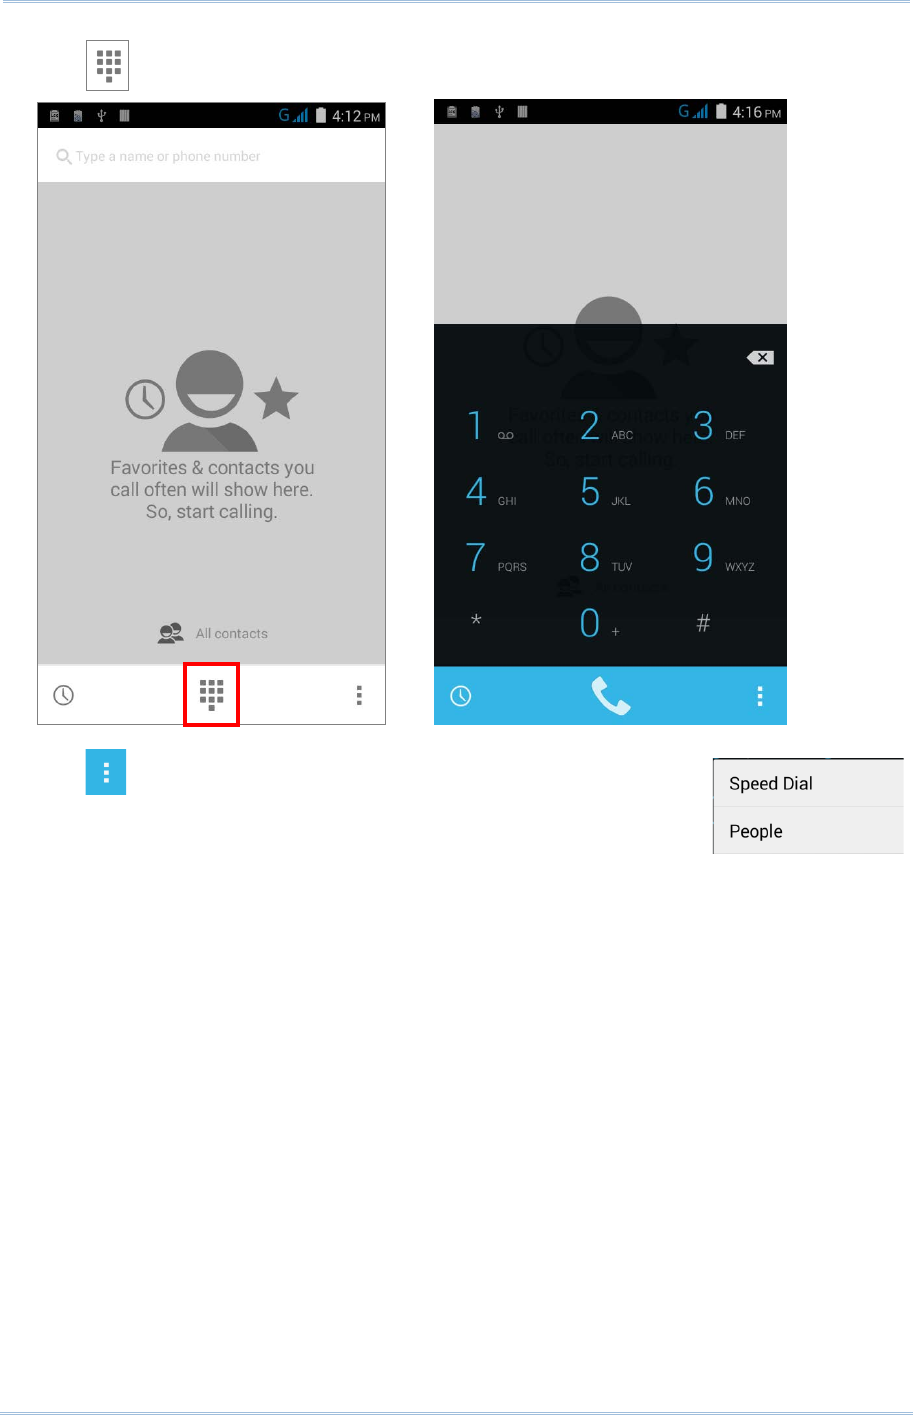
Chapter 5 Using the Phone
4) Tap to open the dial pad.
5) Tap to open the dialer menu for setting speed dial numbers
and opening the People application.
85
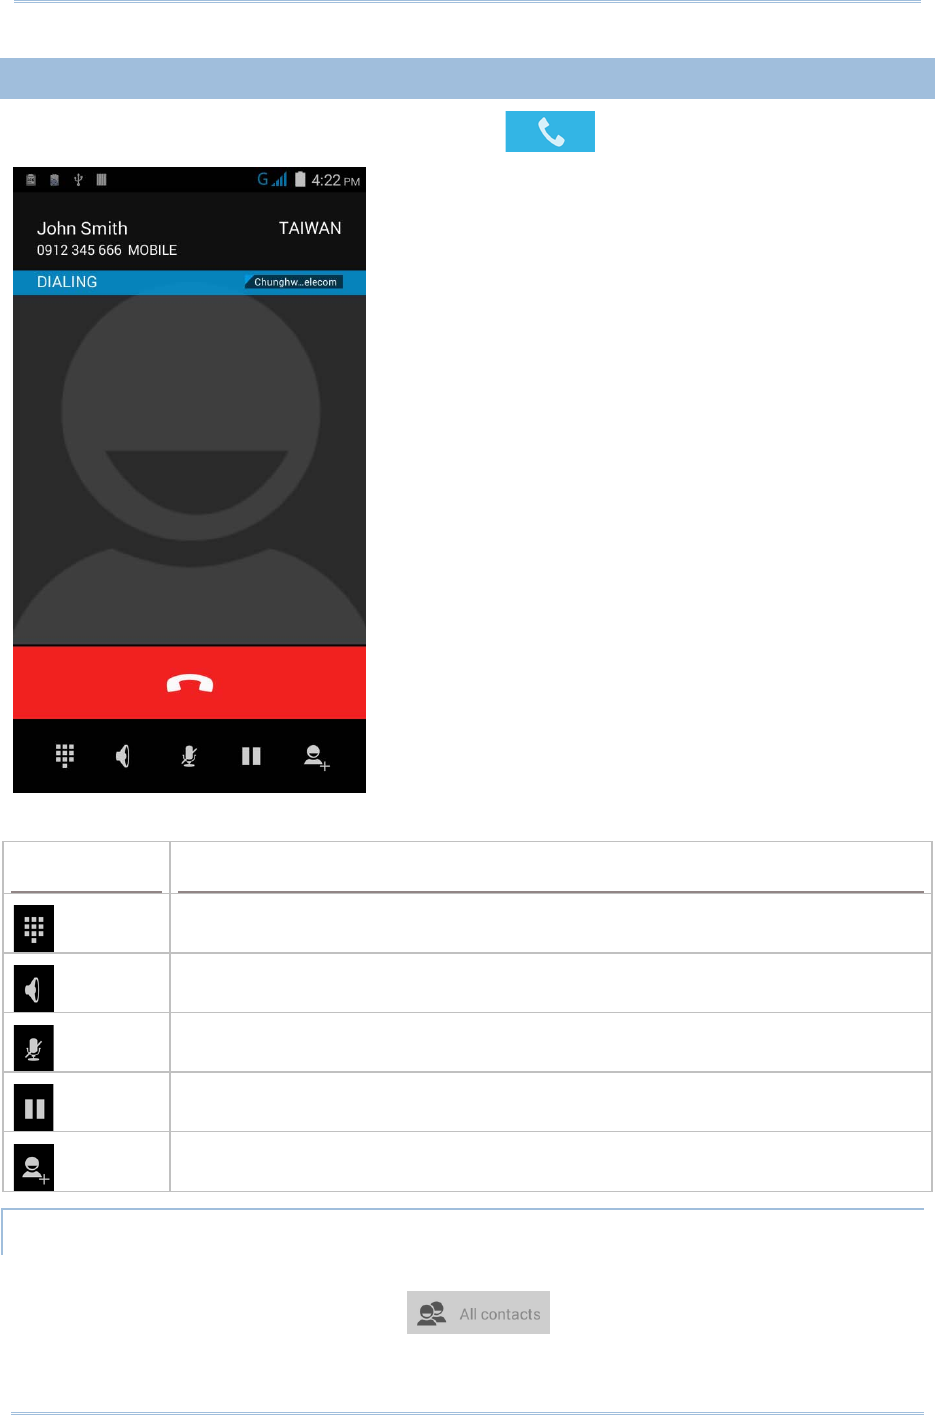
RS30 Mobile Computer Reference Manual
5.2.2.
PLACE CALL
Enter the phone number in the dial pad and tap to initiate the call.
The phone keypad features the following buttons:
Button
Description
Opens the dial pad.
Turns on the speaker.
Mutes the call.
Places the call on hold.
Adds another person to the call.
PLACE CALL USING CONTACTS
To make a call using contacts:
1) In the phone application page, tap .
2) Tap a contact to initiate a call.
86
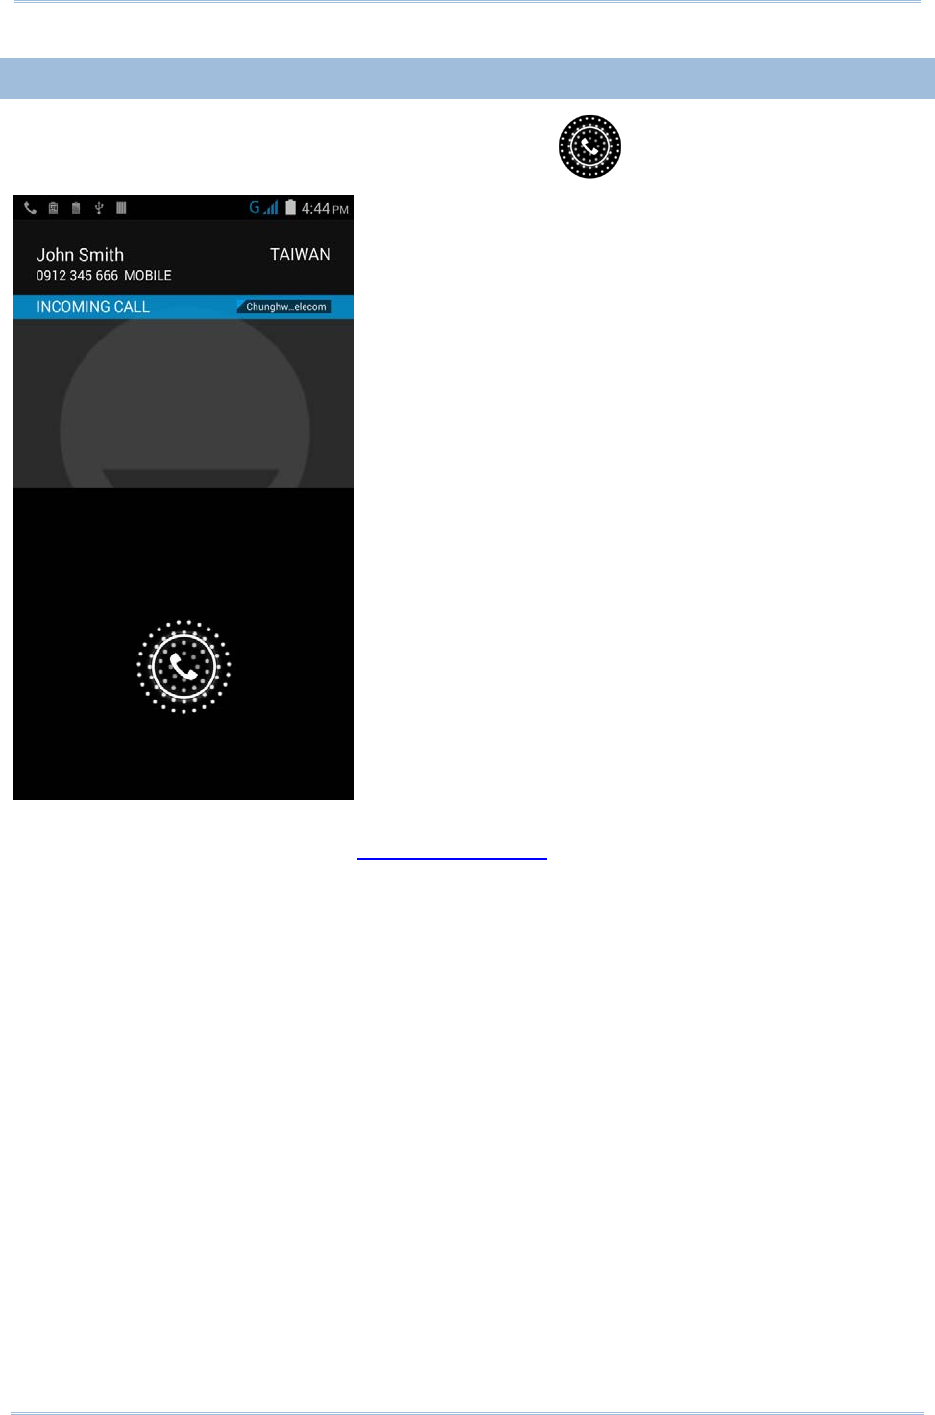
Chapter 5 Using the Phone
5.2.3.
RECEIVE INCOMING CALL
When a call is incoming on the mobile computer, tap to pick it up.
Incoming calls will be recorded in the Phone application; in the case of a missed call, a
notification will be displayed. See Check Missed Calls.
To mute the ringtone of an incoming call, press the volume down button.
87
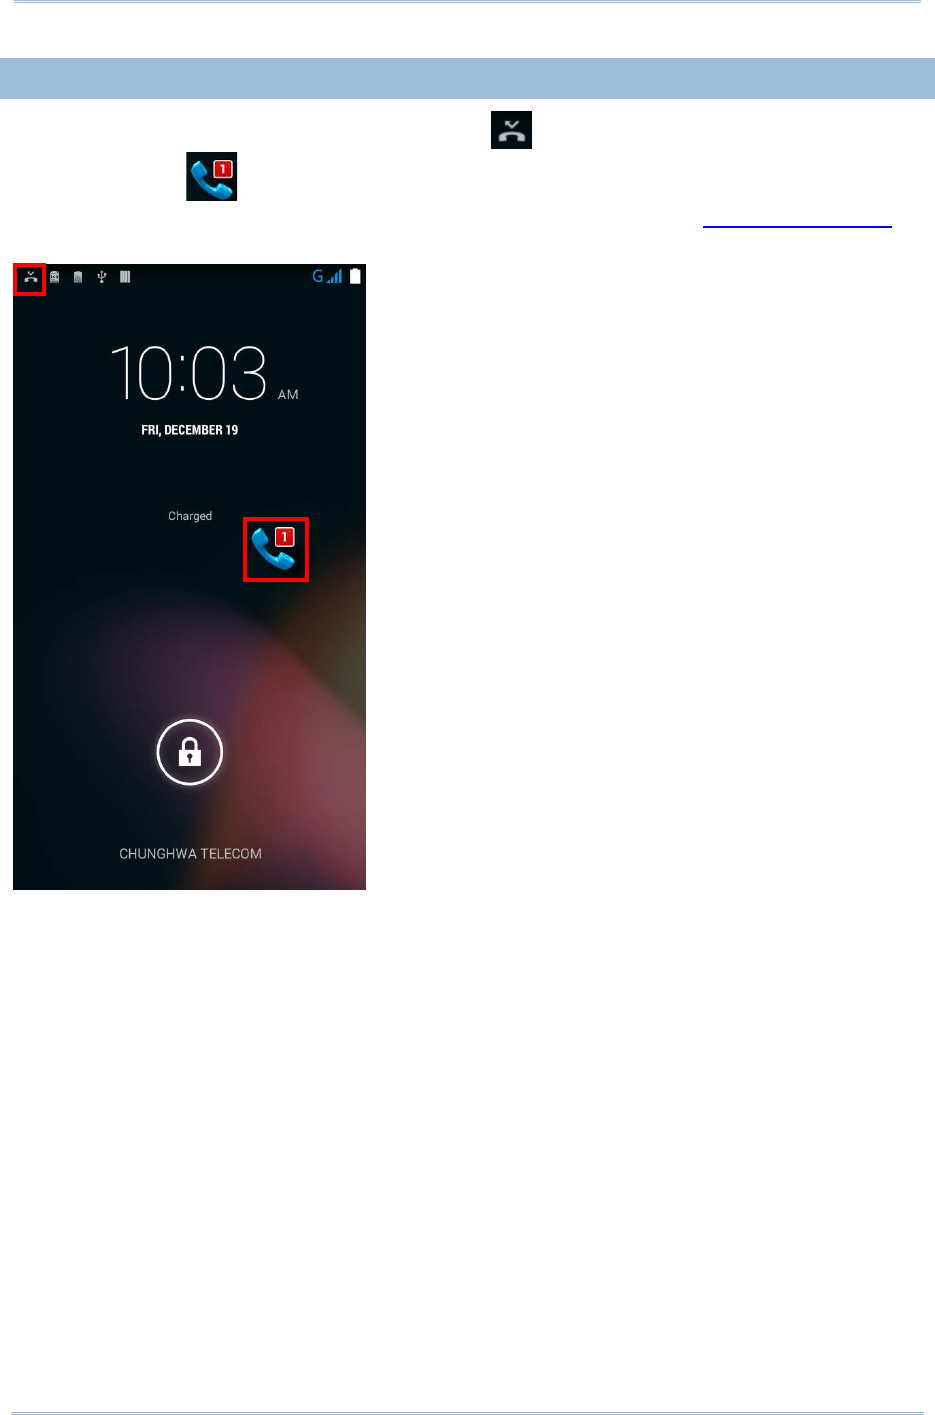
RS30 Mobile Computer Reference Manual
5.2.4.
CHECK MISSED CALLS
If you have a missed call, a notification icon will appear on the status bar, and a
missed call icon will appear on the lock screen. The LED on the top of the screen
will also blink red for notification. Unlock the screen and use the Notifications Panel to
manage the missed call.
88
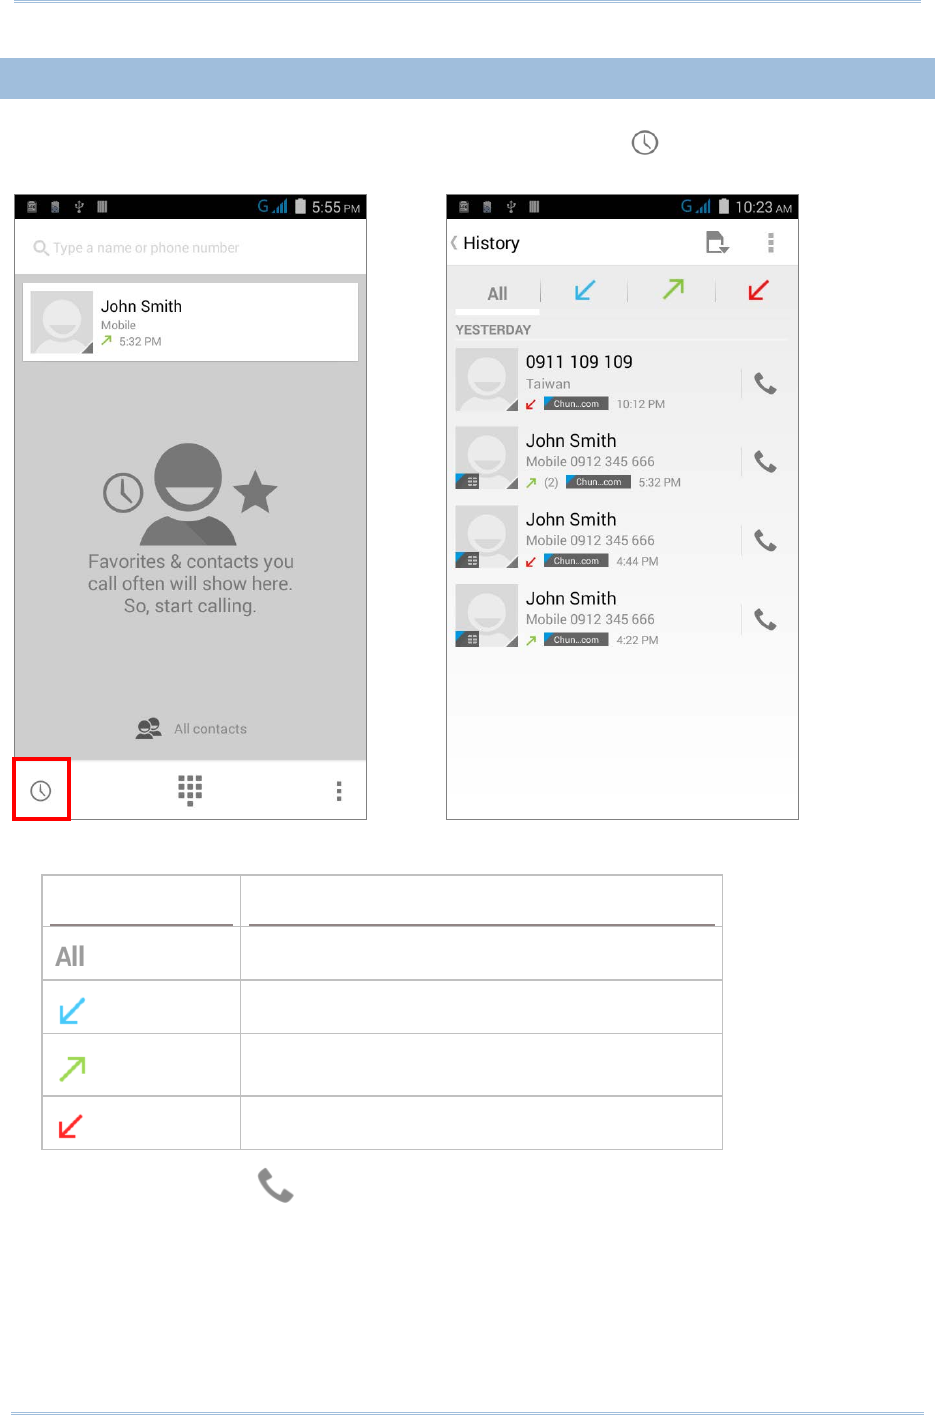
Chapter 5 Using the Phone
5.2.5.
VIEW CALL HISTORY
1) On the Phone application page, tap the History button to open a list of history
calls.
2) Use the tabs at the top of the screen to sort out the type of call.
Button
Description
Lists all call history records.
Lists received calls.
List outgoing calls.
Lists missed calls.
3) Tap the phone icon next to a call record to place back the call.
89
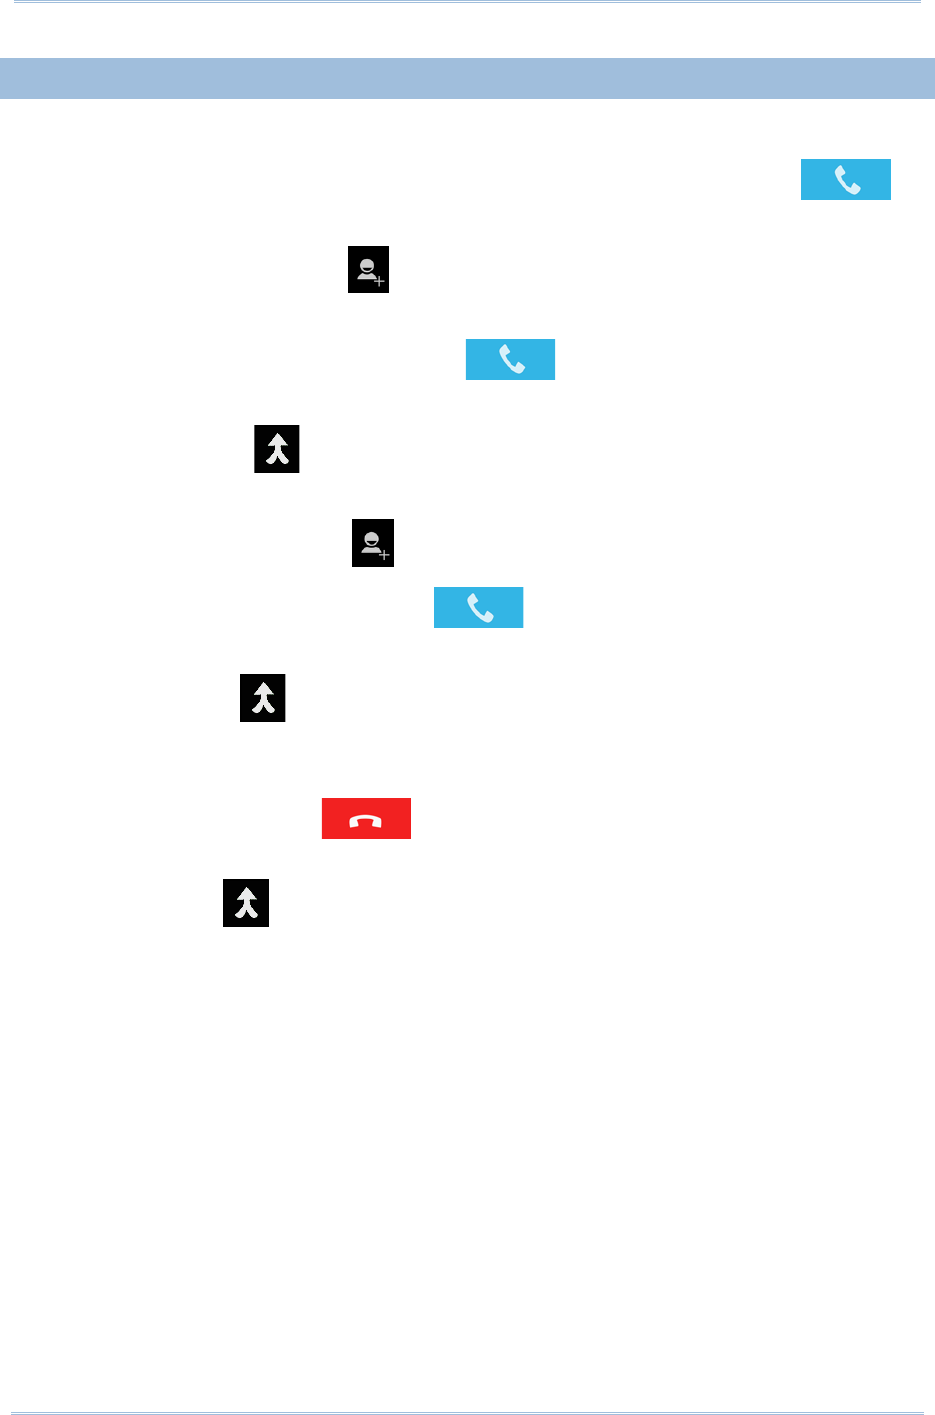
RS30 Mobile Computer Reference Manual
5.2.6.
MAKE MULTI-PARTY CALLS
To make multi-party conference calls:
1) On the Phone application page, enter the first number to call and tap to
initiate the call.
2) After the call has begun, tap to add another member. The first call will be put on
hold.
3) Enter the second number to call and tap to initiate the call.
4) When the second call is connected, the first call will continue to be on hold. Tap the
merge call button to add the first call to the conversation. A three-party
conference call is initiated.
5) To add a fourth member, tap . The three-party call will be put on hold.
6) Enter another number to call and tap to initiate the call.
7) When the call is connected, the three-party call will continue to be on hold. Tap the
merge call button to add the three-party call to the conversation. A four-party
conference call is then initiated.
8) Tap Manage Conference to view all members of the call.
To remove a member, tap next to the member.
To speak with a member in private, tap the member, and the conference call will be
put on hold. Tap to return back to the conference call.
90

Chapter 5 Using the Phone
5.2.7.
AUDIO MODES
The mobile computer offers three different audio modes for phone calls:
HANDSET MODE
This is the default audio mode which uses the receiver above the touchscreen for audio
output during calls.
SPEAKER MODE
This mode uses the built-in speaker for audio output during calls.
HEADSET MODE
Connect a Bluetooth headset or a wired headset to the mobile computer for audio output
during calls.
USE BLUETOOTH HEADSET
See Pair Bluetooth Device to connect the mobile computer to a Bluetooth device. The
speaker phone becomes muted when a Bluetooth headset is connected.
USE WIRED HEADSET
Insert a wired headset in the Headset Jack. The speaker phone becomes muted when a
wired headset is connected.
5.2.8.
IN-CALL VOLUME
Use the Volume Buttons to adjust the ringer volume and system sound level. When in the
middle of a call, use the volume buttons to adjust in-call conversation volume.
91

RS30 Mobile Computer Reference Manual
5.2.9.
PHONE SETTINGS
To open phone settings, tap the settings button to on the phone application.
Indicator
Status
Description
Voice Call
Voicemail Sets the carrier for voicemail service and the number for
voicemail.
IP prefix number Sets prefix number for IP dial.
Call forwarding Sets when to forward calls.
Call barring Sets which types of outgoing and incoming
calls to
restrict, and the password for call barring.
Additional settings
Sets whether to display caller ID in outgoing calls, or
show new incoming calls during an existing call.
Video Call
Local video
replacement Sets a picture to display when the camera is off use.
Display peer video
Sets whether to display a replacement picture when the
peer video is unavailable.
Peer video
replacement Sets the picture to display when the
peer video is
unavailable.
Enable back camera Sets to enable the back camera for video calling.
Bigger Peer video Sets the peer video at a larger size than the local video.
Auto drop back Sets to drop back voice call connecting automatically.
Outgoing video call Sets to display the local video when initiating a video call.
Video incoming call
Sets to display the local video when accepting an
incoming call.
Call forwarding Sets the call forwarding settings for video calls.
Call barring Sets the call barring settings for video calls.
Additional settings
Sets phone number and call waiting settings for video
calls.
Internet
Call
Accounts
Sets to receive incoming calls, and adds an account for
internet calling.
Use Internet calling Enables internet calling.
Other
Settings
Fixed Dialing Numbers Enables fixed dialing numbers (FDN), PIN2 and the phone
number list for FDN.
Minute reminder Enables a reminder at the 50th second of every minute.
Quick responses Sets a quick response for rejecting incoming calls.
92

Chapter 5 Using the Phone
TTY mode Sets teletypewriter (TTY) mode.
International dialing
assist Enables international dialing assistance
93

RS30 Mobile Computer Reference Manual
94

The Reader Configuration utility allows you to manage the barcode reader integrated
on the mobile computer.
IN THIS CHAPTER
6.1 Configure Reader ........................................................ 96
6.2 Read Printed Barcodes ............................................... 116
USING READER CONFIGURATION UTILITY
Chapter 6
95
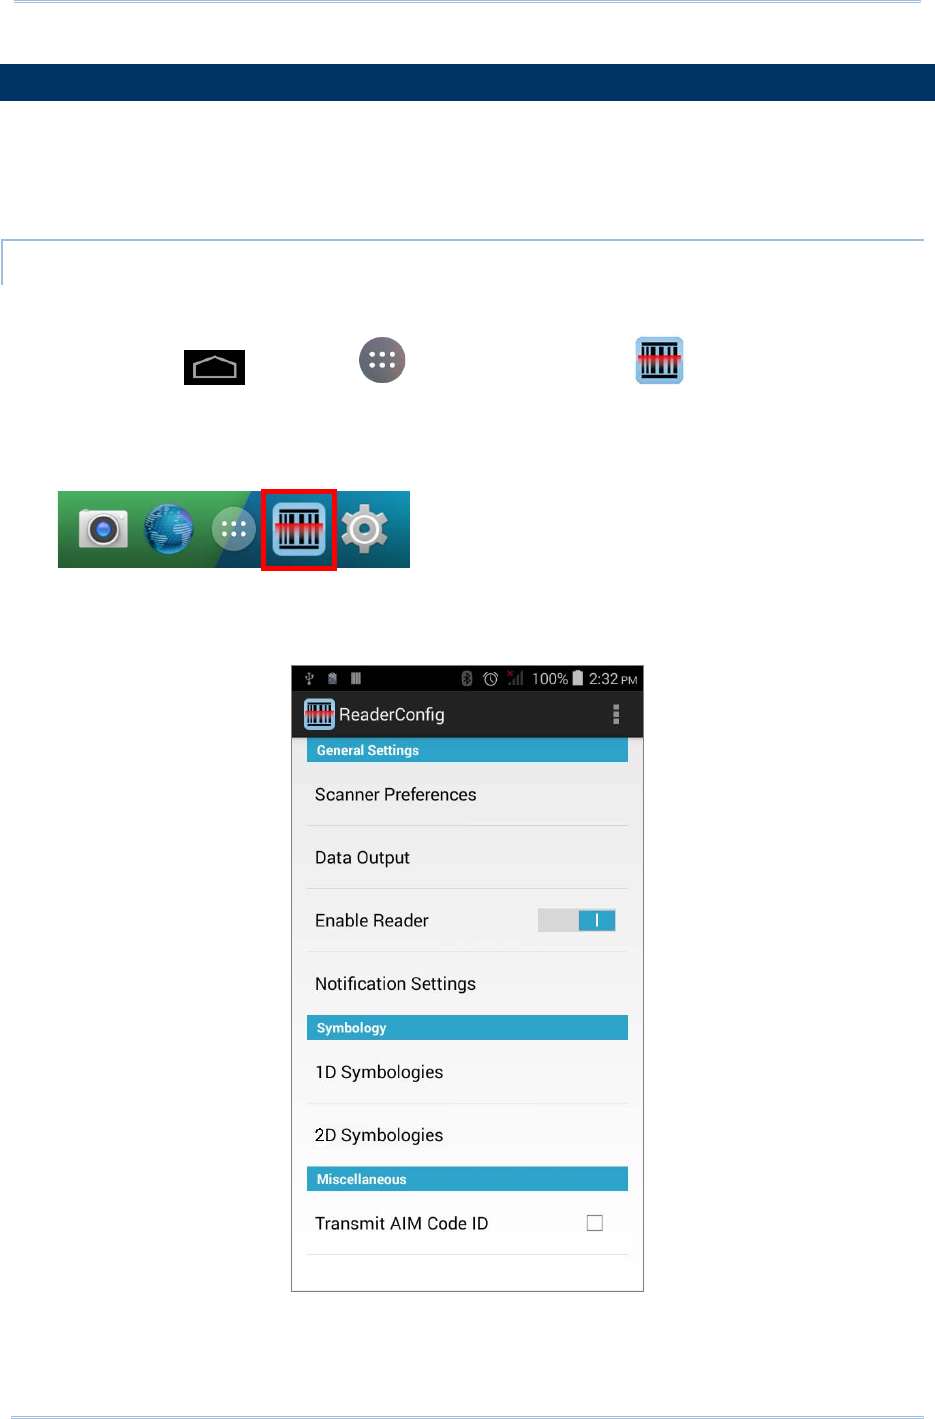
RS30 Mobile Computer Reference Manual
6.1.
CONFIGURE READER
The mobile computer is capable of reading printed barcodes. The reader module can be a
either a (laser) 1D reader or a 2D imager. The mobile computer is installed with a
CipherLab utility Reader Config to configure the scan engine built inside. Use it to create
a profile of settings that best suits your needs.
LAUNCH READER CONFIG
To launch Reader Config:
1) Tap Home | Apps | Reader Config to open the Reader
Configuration Utility.
OR
Tap the Reader Config shortcut on the dock.
Reader Config launches in context with the reader module(s) on board the mobile
computer. On the main settings page are three sections: General Settings,
Symbology and Miscellaneous.
The following will guide to settings provided in each of the three sections.
96
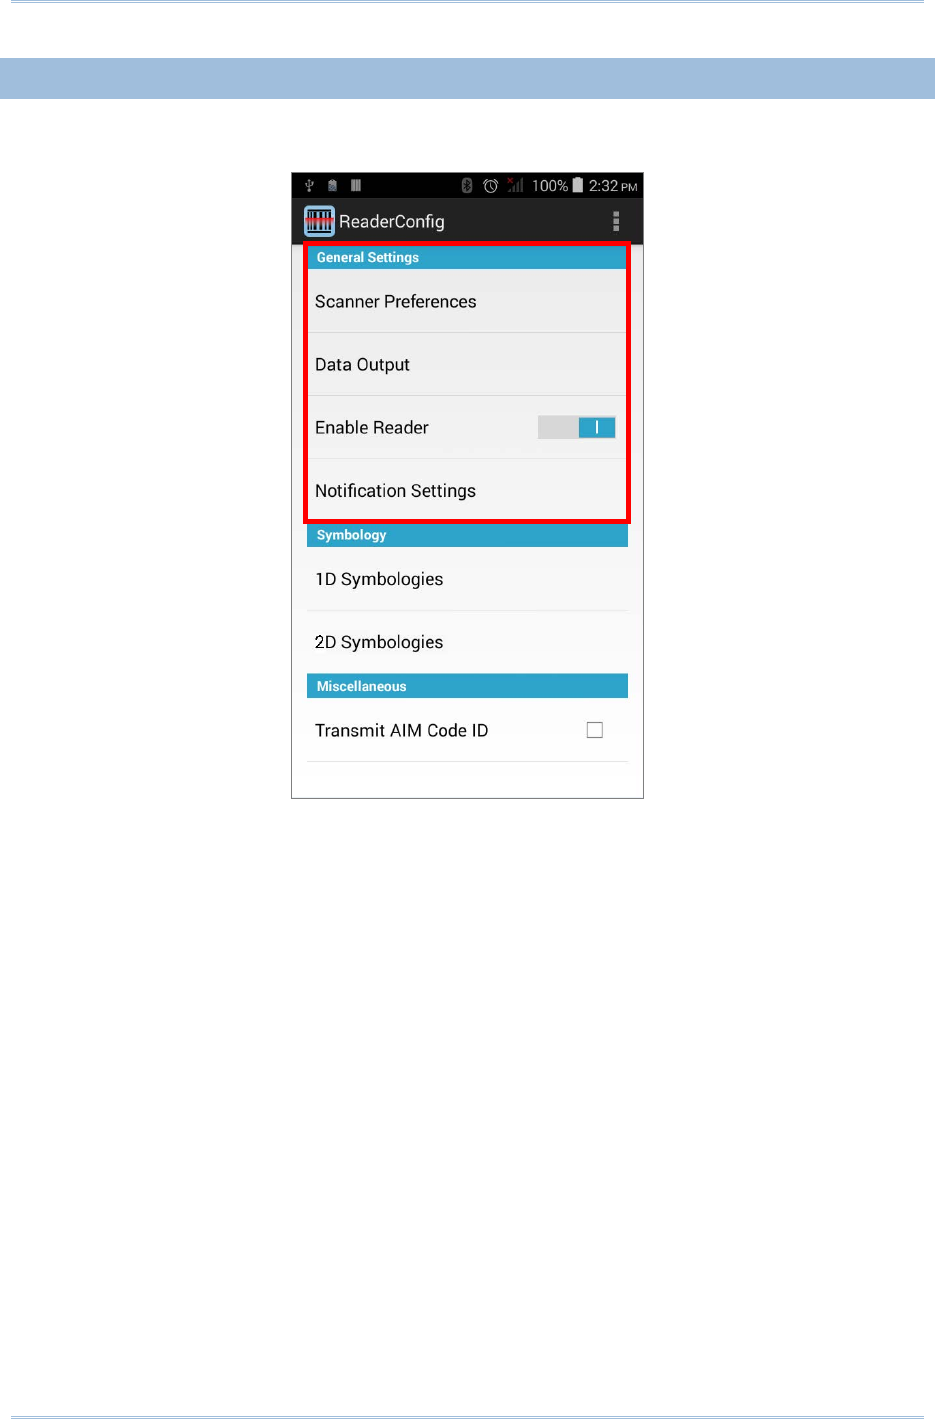
Chapter 6 Using Reader Configuration Utility
6.1.1.
GENERAL SETTINGS
General Settings is where all reader settings are accessed from. Tap each item to enter
its sub-menu.
The functions under General Settings include:
Scanner Preferences
Data Output
Enable Reader (enabled by default)
Notification Settings
97
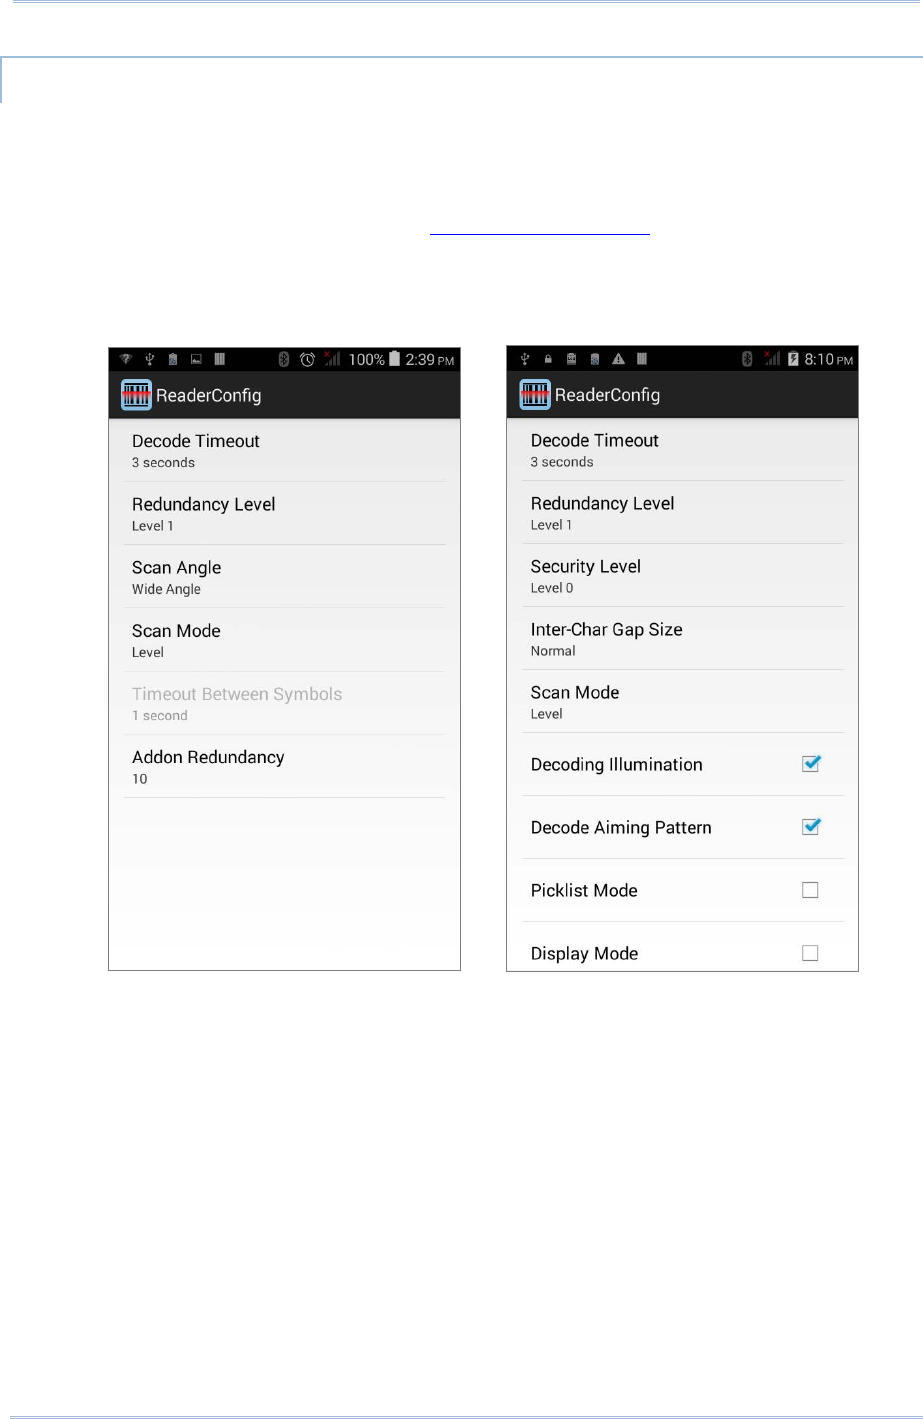
RS30 Mobile Computer Reference Manual
SCANNER PREFERENCES
Options on the Scanner Preferences page differ according to the type of scan engine
built within the mobile computer.
To open Scanner Preferences page:
1) Open Reader Config as described in Launch Reader Config.
2) Tap Scanner Preferences.
Featured settings are different for the 1D linear imager, 1D (laser) reader and 2D
imager:
98

Chapter 6 Using Reader Configuration Utility
1D LINEAR IMAGER SETTINGS
Setting
Description
Default
Decode Timeout Sets the maximum time (configurable from 1 to 9 sec) for the
decoding process during a scan attempt. 3 sec
Redundancy Level
Sets how many successful readings should be done before
linear barcodes such as Codabar, MSI, and Interleaved 2 of 5
can be decoded. Levels 1 to 4 available.
The readings needed for each level are as follows:
Level
Description
1
The following barcodes must be successfully
read twice before being decoded: Codabar,
MSI, Industrial 25 (Discrete 25), Interleaved
25.
2 All barcodes must be successfully read twice
before being decoded.
3 All barcodes must be successfully read twice
before being decoded, except for the
following which must be read three times:
MSI, Industrial 25 (Discrete 25), Interleaved
25.
4 All barcodes must be successfully read three
times before being decoded.
Level 1
Scan Mode Sets the reader’s scanning behavior.
“Continuous”
to decode the same barcode repeatedly or
decode different barcodes in a continuous motion.
“Level” for scanning by pressing the scan trigger.
Level
Timeout Between
Symbols
Sets the time for the barcode reader to resurrect its ability to
once more decode a barcode it just decoded.
Only available for Continuous mode.
1 sec
99

RS30 Mobile Computer Reference Manual
1D LASER READER SETTINGS
Setting
Description
Default
Decode Timeout Sets the maxim
um time for the decoding process during a
scan. Configurable between 1 sec to 9 sec. 3 sec
Redundancy Level
Sets how many successful readings should be done before
linear barcodes such as Codabar, MSI, and Interleaved 2 of 5
can be decoded. Levels 1 to 4 available.
The readings needed for each level are as follows:
Level
Description
Level 1
The following barcodes must be
successfully read twice before being
decoded: Codabar, MSI, Industrial 25
(Discrete 25), Interleaved 25.
Level 2 All barcodes must be
successfully read
twice before being decoded.
Level 3
All barcodes must be successfully read
twice before being decoded, except for
the following which must be read three
times: MSI, Industrial 25 (Discrete 25),
Interleaved 25.
Level 4 All barcodes must
be successfully read
three times before being decoded.
Level 1
Scan Angle Sets the scan angle for laser scan engine.
Wide Angle: 47° (Extended range laser reader is fixed at
Wide Angle)
Narrow Angle: 35°
Wide
Angle
Scan Mode Sets the reader’s scanning
behavior. Options available are
Continuous and Level modes.
Continuous
: Used for continuous reading of barcodes.
The scan engine remains on when this mode is activated.
Level: Reads a barcode when the trigger is pressed.
Level
Timeout Between
Symbols Se
ts the time for the barcode reader to resurrect its ability to
once more decode the barcode it just decoded.
Only applied in Continuous mode
1 sec
100

Chapter 6 Using Reader Configuration Utility
2D IMAGER SETTINGS
Setting
Description
Default
Decode Timeout Sets the maximum time for the decoding proces
s during a
scan. Configurable between 1 sec to 9 sec. 3 sec.
Redundancy Level
Sets how many successful readings should be done before
linear barcodes such as Codabar, MSI, and Interleaved 2 of 5
can be decoded. Levels 1 to 4 available.
Level 1
Security Level
Sets the security level to ensure decoding accuracy
considering the printed quality of barcodes such as Code 128,
Code 93, and UPC/EAN. The higher the level is, the more
security is ensured. Options are:
Level
Description
0 With this default, the sc
an engine is aggressive
enough to decode most “in-spec” barcodes.
1
Select this level if misdecodes have occurred. It
fixes most misdecodes.
2 Select this level if Level 1
should fail to eliminate
misdecodes.
3 Select this level if Security Level 2 shou
ld fail to
prevent misdecodes. However, as this level
actually impairs the decoding ability of the
decoder, a safer solution would be to improve the
quality of the bar codes to read.
Level 0
Inter-Char Gap Size Sets the intercharacter gap size for Code
39 and Codabar.
Switch between Normal and Large. Normal
Scan Mode
Sets the reader’s scanning behavior. Options available are
Level and Presentation Mode.
Level: The decoding process is activated by a trigger
event, and continues until the trigger event
ends, a valid
decode happens or decode session time-out is reached.
Presentation Mode
: The imager engine attempts to
decode a barcode
when an object appears in its field of
view. To enter this mode, select “Presentation Mode” and
tap Apply. Once activated,
the imager will stay on, and
will only be deactivated if one of the following occurs: the
trigger is pressed, or the time interval
specified in
Decode Timeout passes without any new object coming
into its field of view.
Level
Decoding
Illumination Enables an LED light beam to aid barcode reading. Selected
(Enabled)
Decode Aiming
Pattern
Projects a crosshair at the center of the laser light beam to
facilitate barcode reading. Selected
(Enabled)
Picklist Mode When selected, only barcodes aligned at the cr
osshair of the
laser light beam will be decoded. Deselected
(Disabled)
101
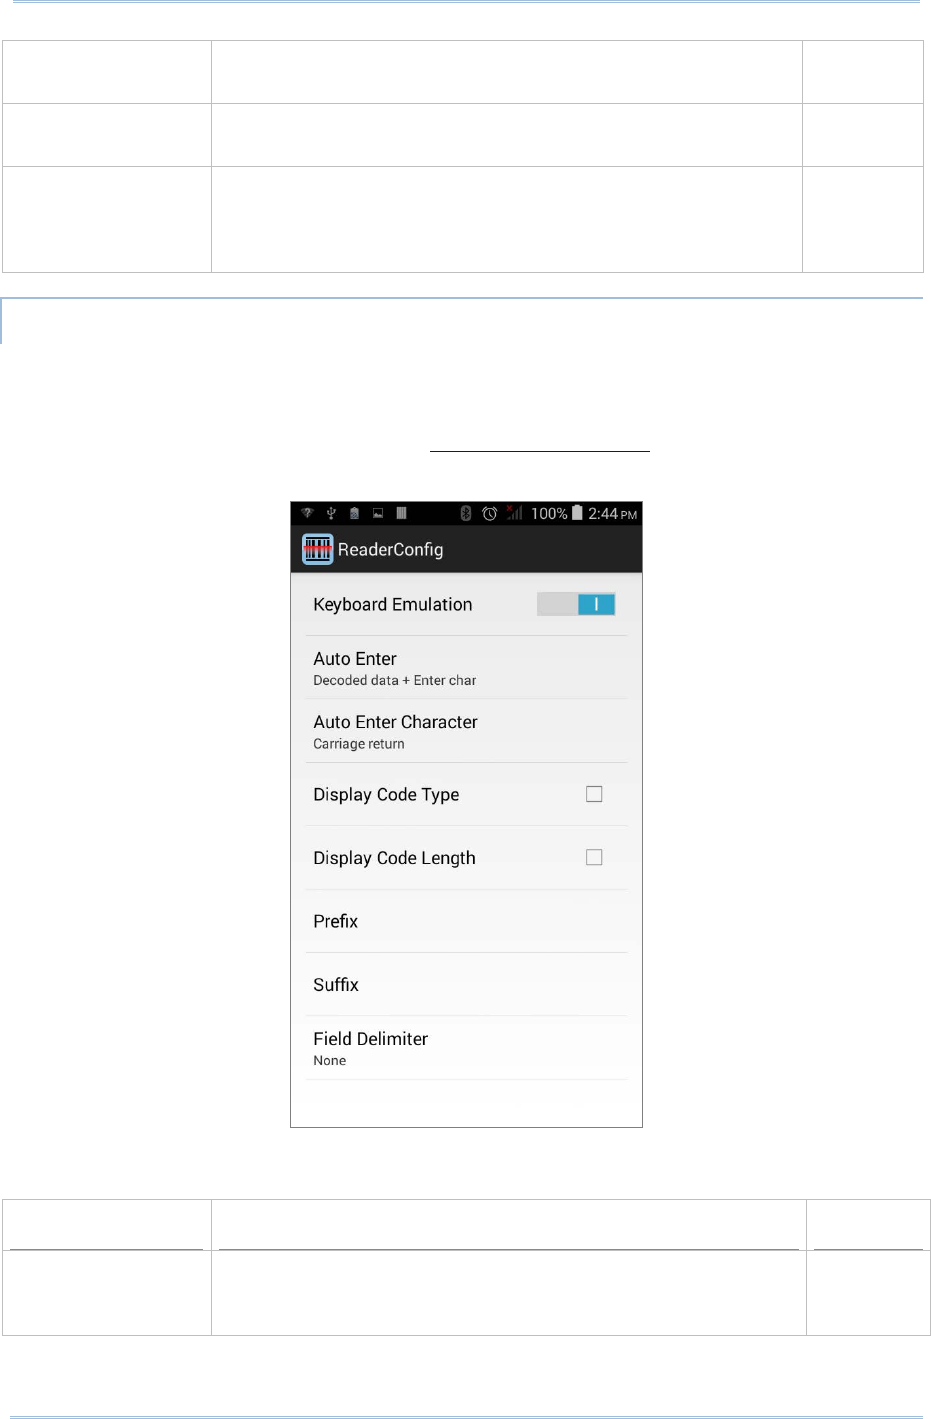
RS30 Mobile Computer Reference Manual
Display Mode
Enable improved performance for reading barcodes on
electronic displays and mobile phones. Deselected
(Disabled)
Inverse Type Decide whether to disable or enable decoding inverse
barcodes, or set as auto. Regular
only
Addon Redundancy Functions when “auto-discriminate” is applied
for UPC/EAN
addons. Decides the number of times of supplemental
decoding of the same barcode in order to
count as a valid
read. Configurable between 2 and 30.
10
DATA OUTPUT
Data Output allows users to set the way to output decoded data.
To open Data Output settings page:
1) Open Reader Config as described in Launch Reader Config.
2) Tap Data Output.
WHERE TO OUTPUT
Keyboard Emulation setting controls where the decoded data is to be output.
Setting
Descriptions
Default
Keyboard Emulation Slide the switch open to enable.
When enabled, the reader
module t
reats decoded data as typed text and outputs it to the
active application on the mobile computer.
Enabled
102

Chapter 6 Using Reader Configuration Utility
HOW TO OUTPUT
After the output destination is set, configure how to output decoded data, i.e. the
“format” to present decoded data.
Setting
Description
Default
Auto Enter Adds an ENTER character before or after each
string of
decoded data.
The ENTER character can be defined in the
“Auto Enter character” field below. This function saves the
trouble of pressing a confirmation key to accept each string
of decoded data. Options are:
Disable
Decoded data + Enter char
Enter char + Decoded data
Decoded data
+ Enter char
Auto Enter
character Adds a key code before or after the decoded data. If [Auto
Enter] is enabled, select the ENTER character to send.
Options are:
None
Carriage Return
Tab
Space
Comma
Semicolon
Carriage
Return
Display Code Type Prefixes the output data with code type information. Deselected
(Disabled)
Show Code Length Suffixes the output data with code length information. Deselected
(Disabled)
Prefix Affixes 0 to 10 characters to the left of the output data. Tap
the label to open a character table for entering the prefix.
Prefixes containing invisible characters are supported.
--
Suffix Affixes 0 to 10 characters to the right of the output data.
Tap the label to open a character table for en
tering the
suffix.
Suffixes containing invisible characters are supported.
--
Field Delimiter S
ets the delimiter to separate the output barcode data to
the following pieces: code type, decoded barcode data, and
code length (if applicable). Options are:
None
Comma
Semicolon
Full stop
None
103
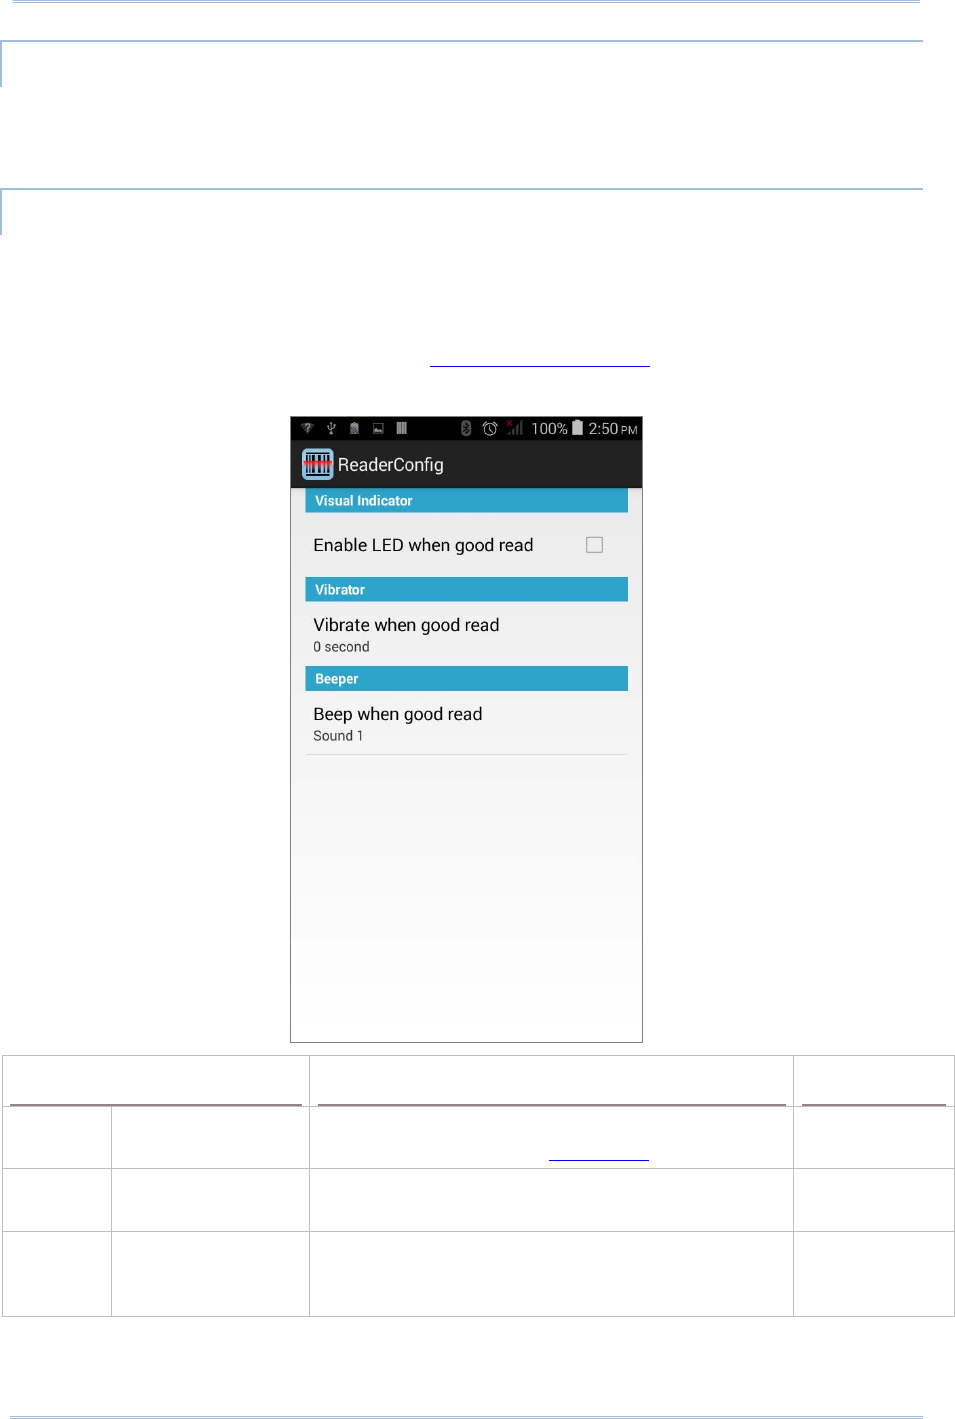
RS30 Mobile Computer Reference Manual
ENABLE READER
Features a switch to enable or disable reader scanning ability. When enabled, a light
beam will be sent out from the scanning window each time the trigger (scan key) is
pressed.
NOTIFICATION SETTINGS
Notification Settings enables audible, visible and tactile feedback for scanning good
read, which helps notify the user of a successful decoding.
To open Notification Settings page:
1) Open Reader Config as described in Launch Reader Config.
2) Tap Notification Settings.
Setting
Description
Default
LED Enable LED when
good read
Selects to enable/disable LED light (left) for
scanning good read. See Status LED for details. Deselected
(Disabled)
Vibrator Vibrate when good
read
Enables/disables tactile feedback (vibration) for
good read and sets the duration to vibrate. 0 second
(Disabled)
Beeper Beep when good
read
Sets the beeper sound for scanning good read.
Users can choose to m
ute the beeper sound, or
configure the beeper between sounds 1 to 9. Sound 1
104
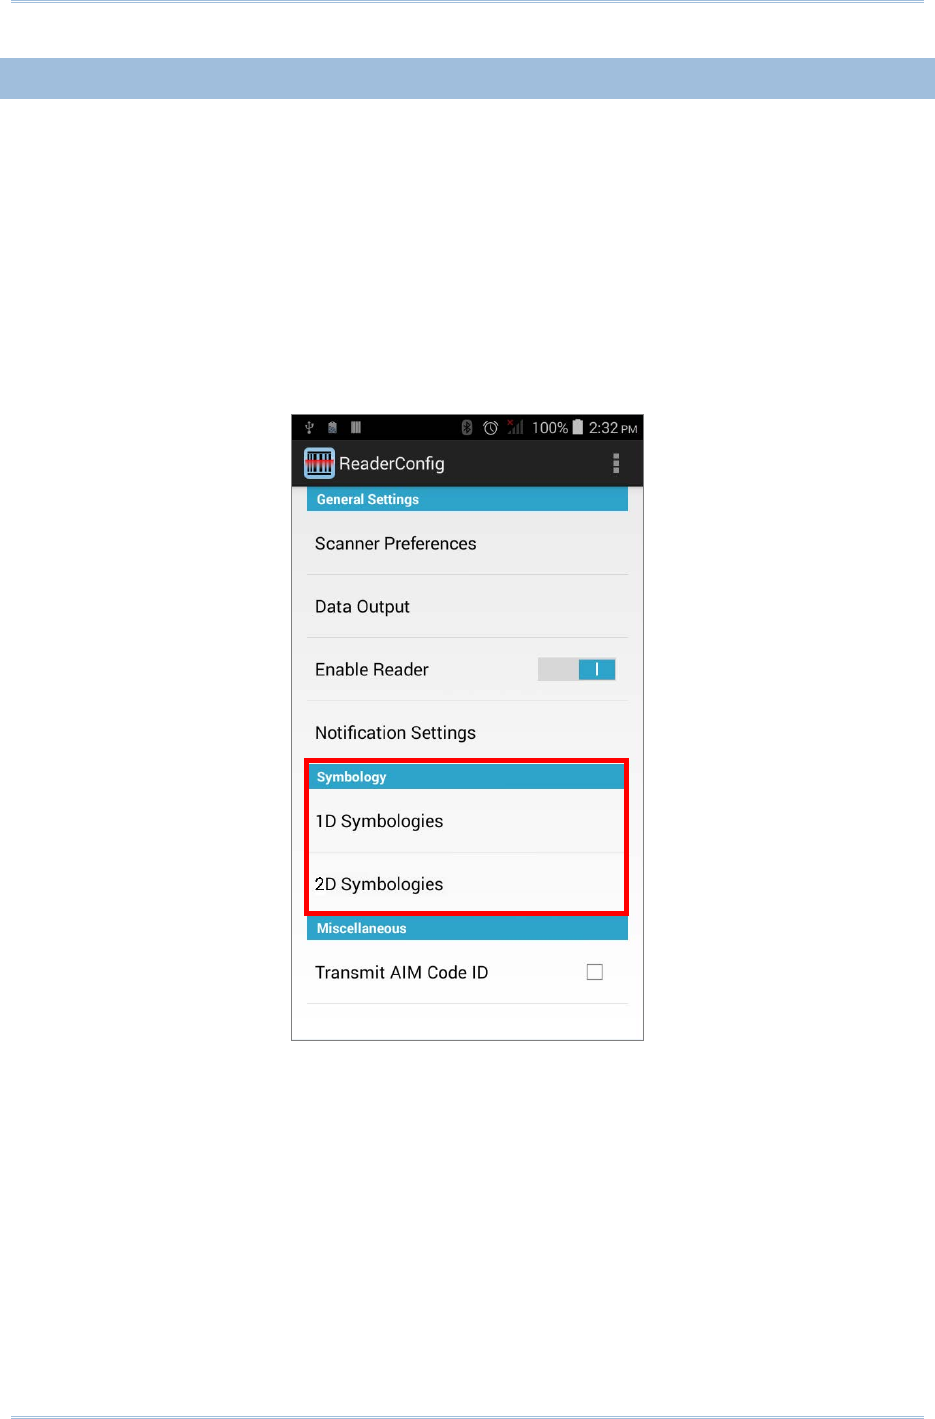
Chapter 6 Using Reader Configuration Utility
6.1.2.
SYMBOLOGY
The Symbology page sets the symbologies to read, and also enables/disables some
feature(s) for a symbology to read, such as:
Customize and transmit start/stop characters
Verify/transmit check digits
Enable/disable addon digits
Convert to another symbology
Transmit symbology ID
105
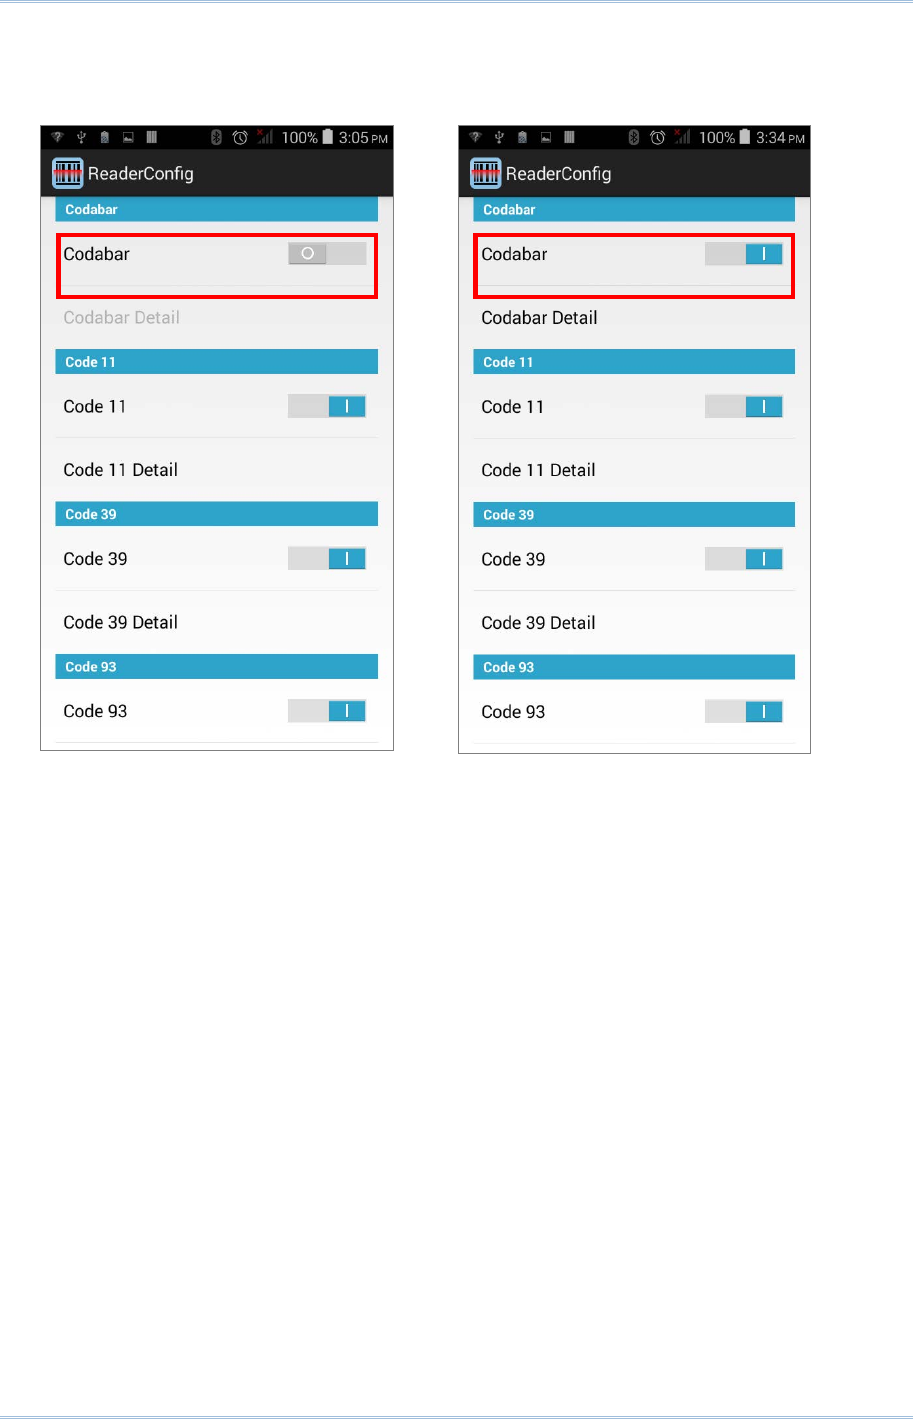
Chapter 6 Using Reader Configuration Utility
ENABLE/DISABLE SYMBOLOGY
Tap the label of each symbology to enable or disable it.
107
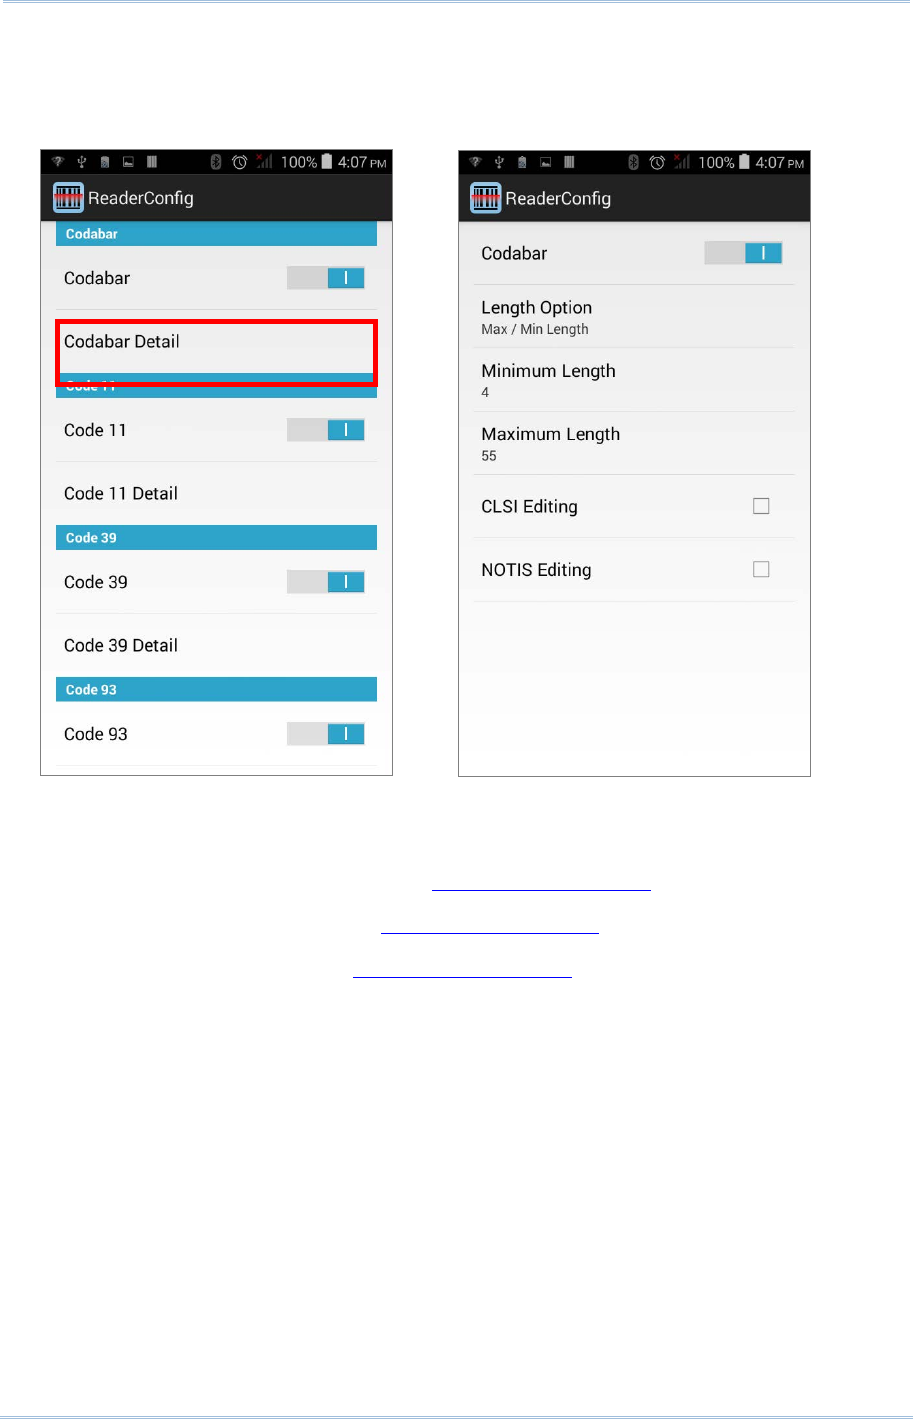
RS30 Mobile Computer Reference Manual
SYMBOLOGY SETTINGS
Tap the Detail label below each symbology to access detailed settings for the specific
symbology.
For details about the featured settings:
See Appendix II: CCD Linear Imager
錯誤
!
找不到參照來源。
.
See Appendix III: Laser Reader
錯誤
!
找不到參照來源。
.
See Appendix IV: 2D Imager
錯誤
!
找不到參照來源。
.
108
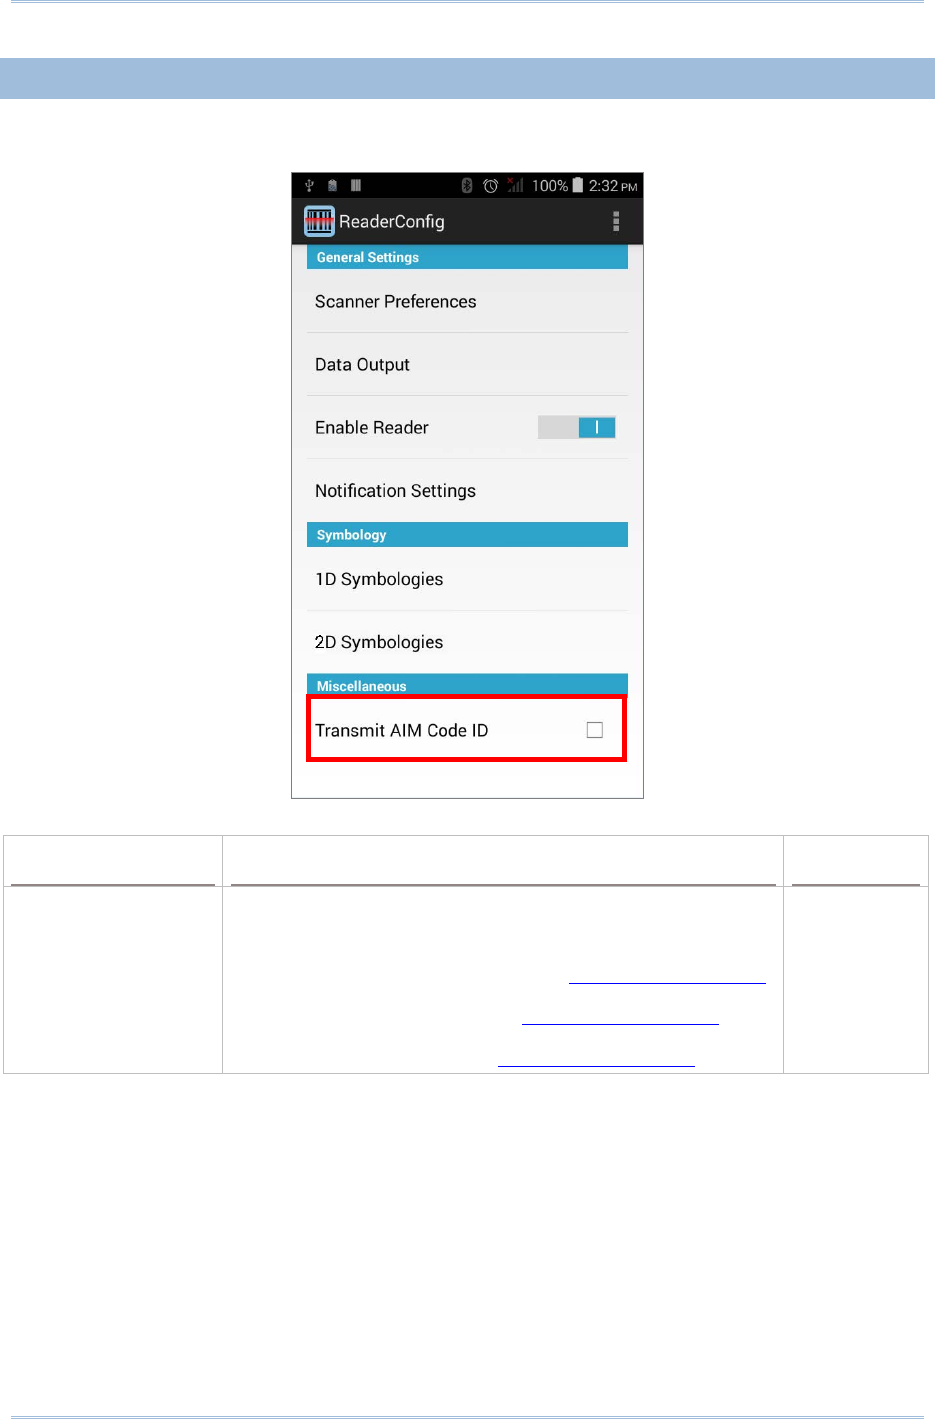
Chapter 6 Using Reader Configuration Utility
6.1.3.
MISCELLANEOUS
This section allows enabling code ID transmission for easy identification of the scanned
barcode.
Setting
Description
Default
Transmit AIM Code
ID Sets whethe
r to include AIM code ID character in the
decoded data. For AIM code ID, see the following:
Appendix II: CCD Linear Imager
錯誤
!
找不到參照來源。
.
Appendix III: Laser Reader
錯誤
!
找不到參照來源。
.
Appendix IV: 2D Imager
錯誤
!
找不到參照來源。
.
Deselected
(Disabled)
109
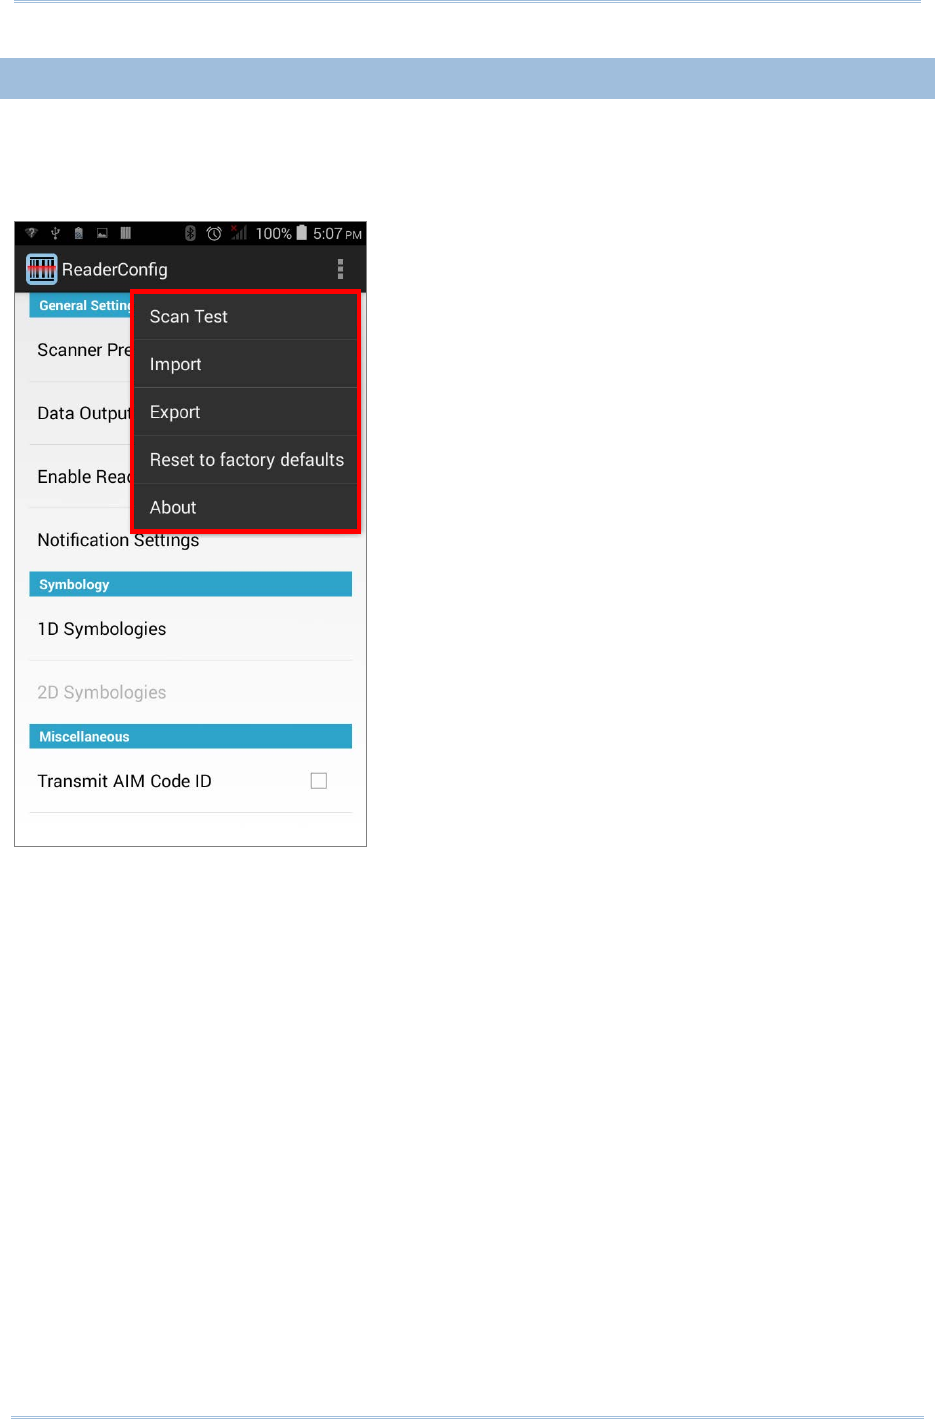
RS30 Mobile Computer Reference Manual
6.1.4.
READER CONFIG OPTION MENU
Reader Config provides an option menu which is accessible on the menu bar of the
main settings page. This menu allows you to test scan barcodes, import/export all
settings in a re-usable format, reset all settings back to factory default, and view
copyright and version information.
110
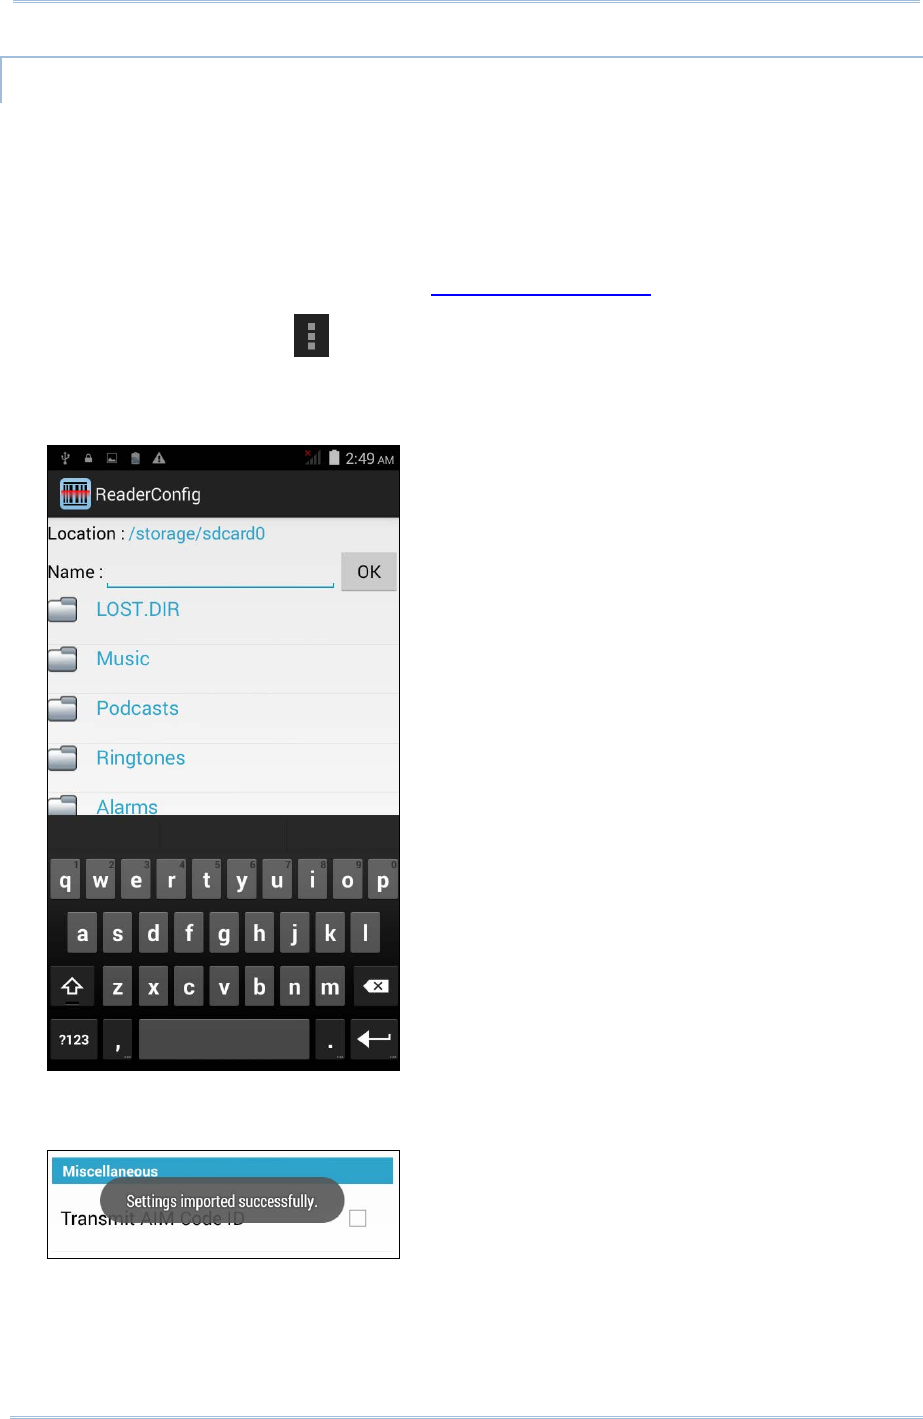
RS30 Mobile Computer Reference Manual
IMPORT AND EXPORT
Reader Config supports saving the settings and exporting them as an .xml file.
Previously exported symbology and scanner settings can be imported again on the
mobile computer. This can also be used to implement identical Reader Config settings on
multiple devices.
To import settings:
1) Open Reader Config as described in Launch Reader Config.
2) Tap the settings button on the menu bar to open the option menu.
3) Tap Import in the option menu.
A page opens allowing you to select a previously saved profile.
4) Tap OK. In a few seconds a prompt will appear on the mobile computer to indicate
settings have been imported successfully.
112
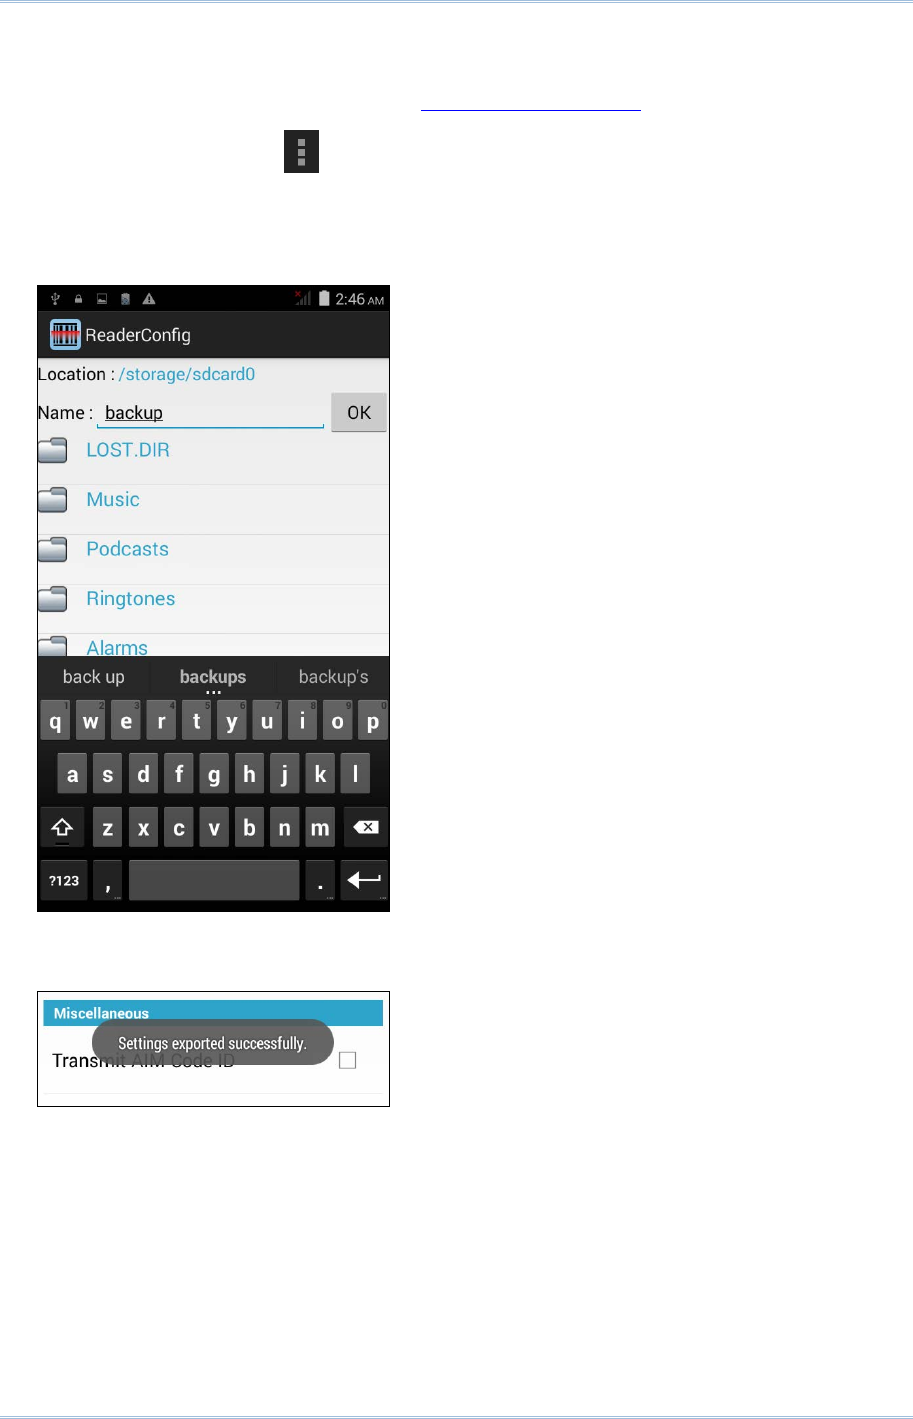
Chapter 6 Using Reader Configuration Utility
To export settings:
1) Open Reader Config as described in Launch Reader Config.
2) Tap the settings button on the menu bar to open the option menu.
3) Tap Export.
An export page opens allowing you to enter the name and location of the profile to
save.
4) Tap OK to export. A prompt will appear on-screen to notify that settings have been
exported.
113
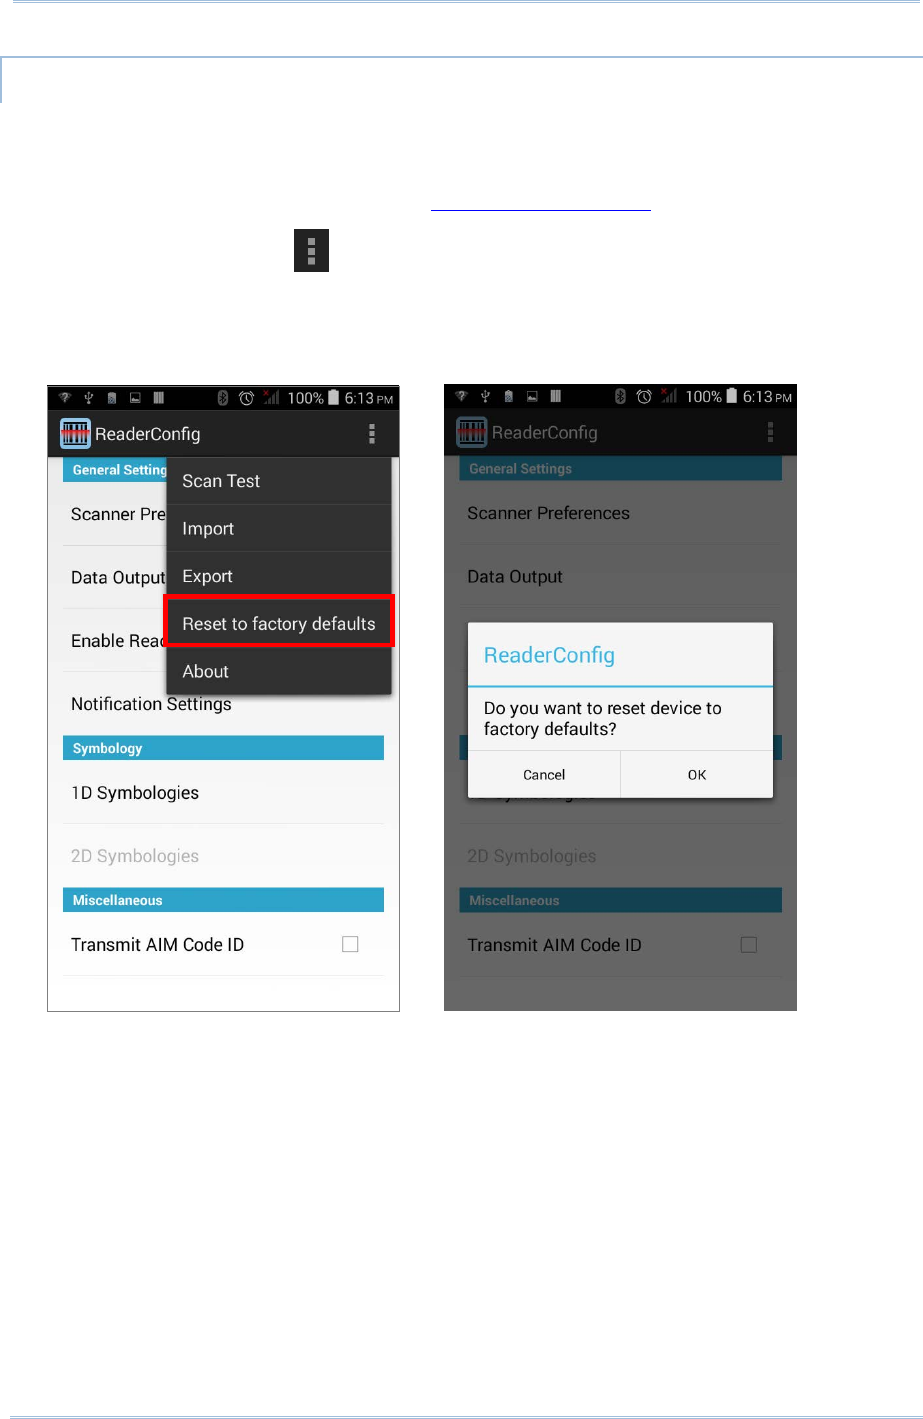
RS30 Mobile Computer Reference Manual
RESET TO FACTORY DEFAULTS
This function restores all settings in the Reader Config application to default.
To enable Factory Reset:
1) Open Reader Config as described in Launch Reader Config.
2) Tap the settings button on the menu bar to open the option menu.
3) Tap Reset to Factory defaults.
A warning dialog appears confirming whether to restore all application settings back
to default. Tap OK to reset or Cancel to close the dialog.
114
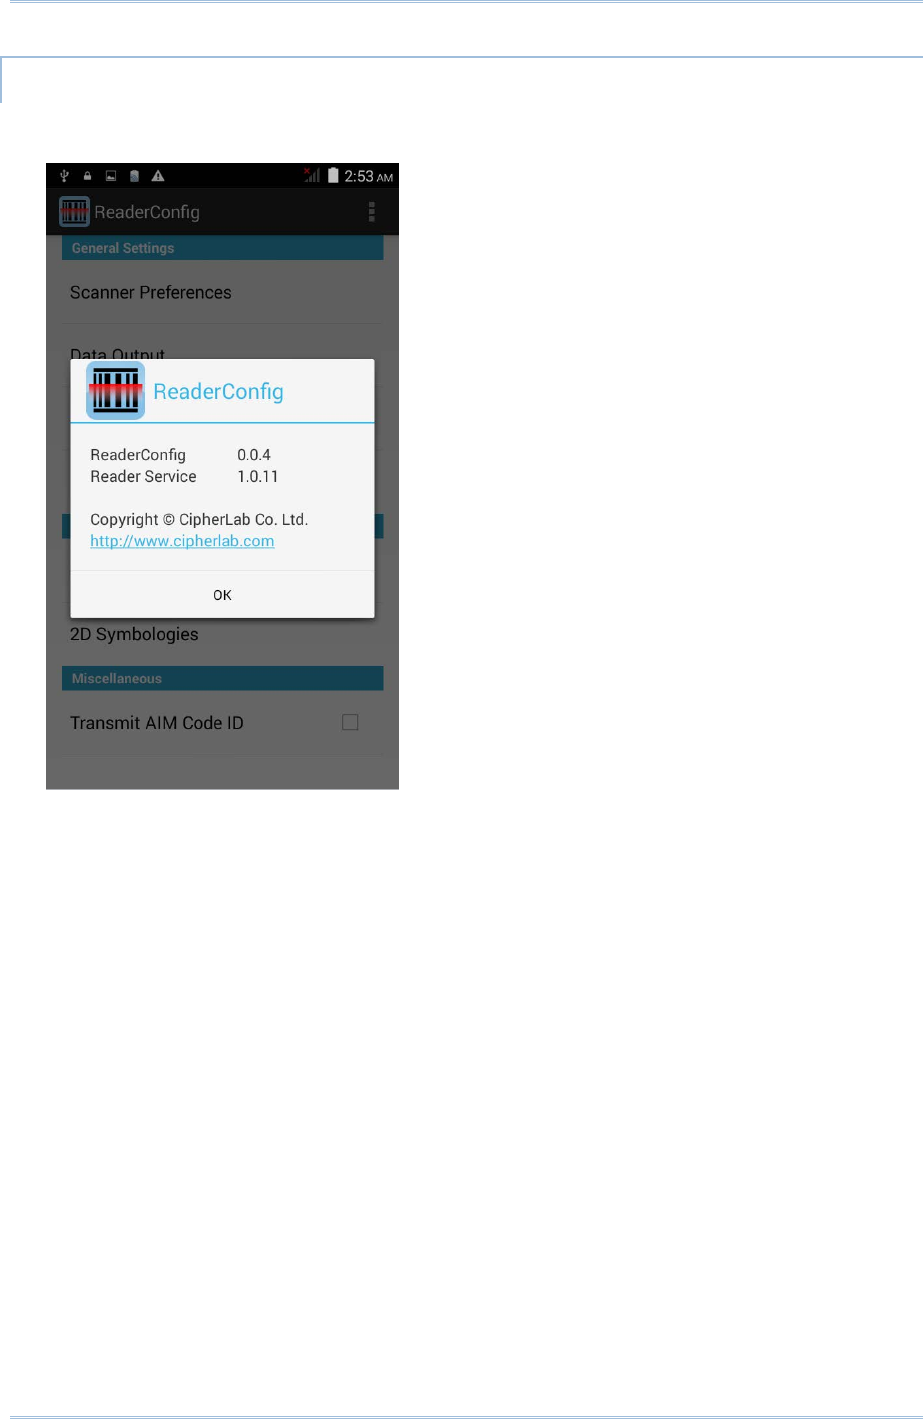
Chapter 6 Using Reader Configuration Utility
ABOUT
Tap About in the Reader Config option menu to display software version and copyright
information.
115
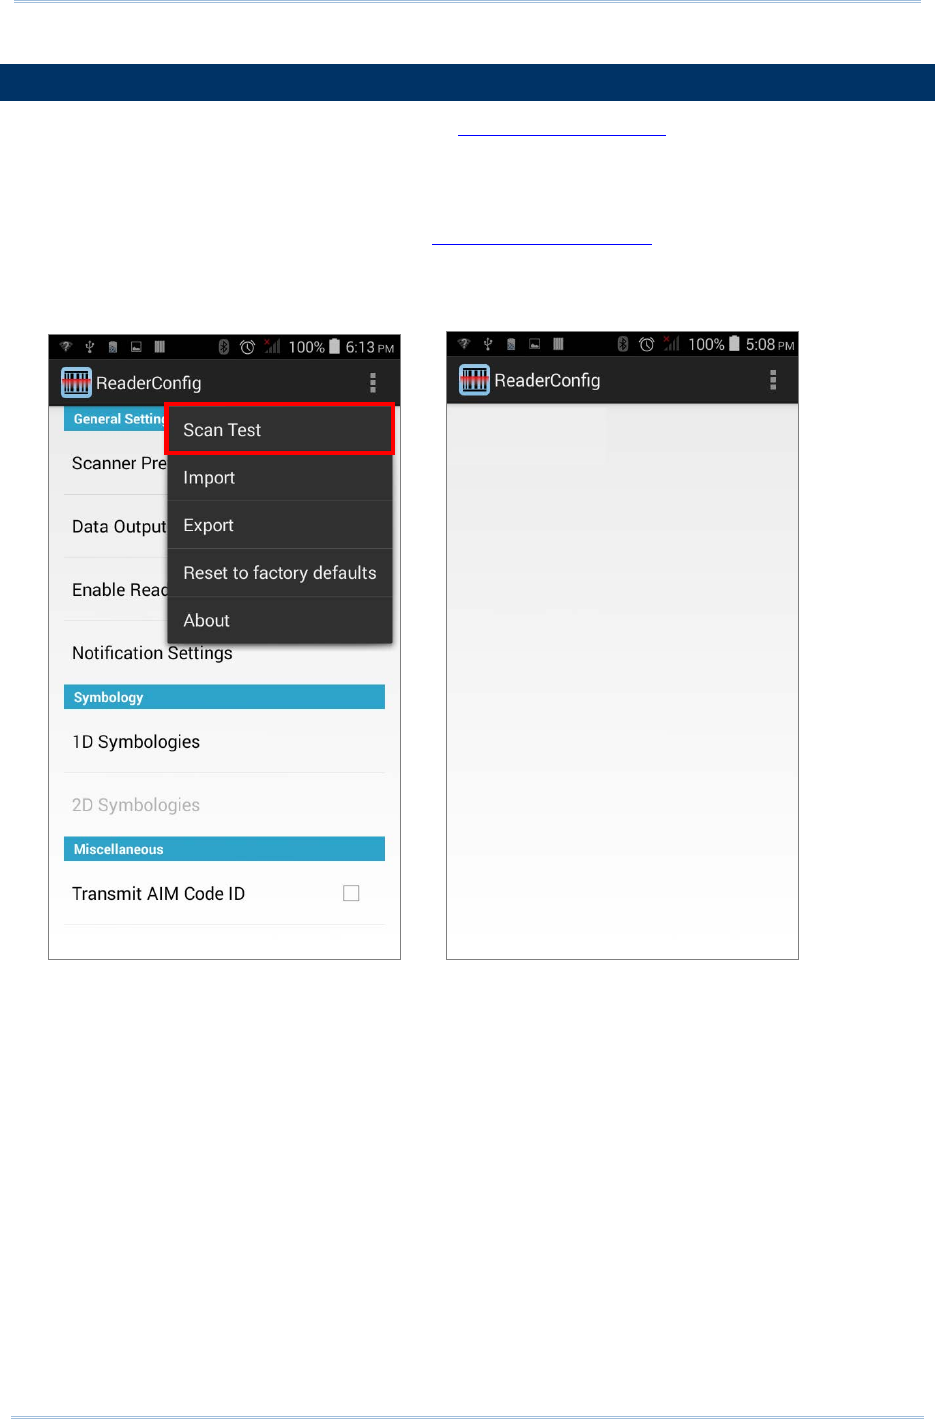
RS30 Mobile Computer Reference Manual
6.2.
READ PRINTED BARCODES
Aside from output to destinations as per Keyboard Emulation settings, Reader Config
provides a Scan Test feature for quick viewing of decoded data.
To perform test scanning of barcodes:
1) Open Reader Config as described in Launch Reader Config.
2) Tap Scan Test on the menu bar.
A Test Scan Form opens for displaying the scanned data.
3) Aim the scanning window at the barcode to read and press any of the two side
triggers.
The scanning light beams to read the printed barcodes.
The scanning light goes off once the data is decoded, or when the decode timeout
period has passed.
116
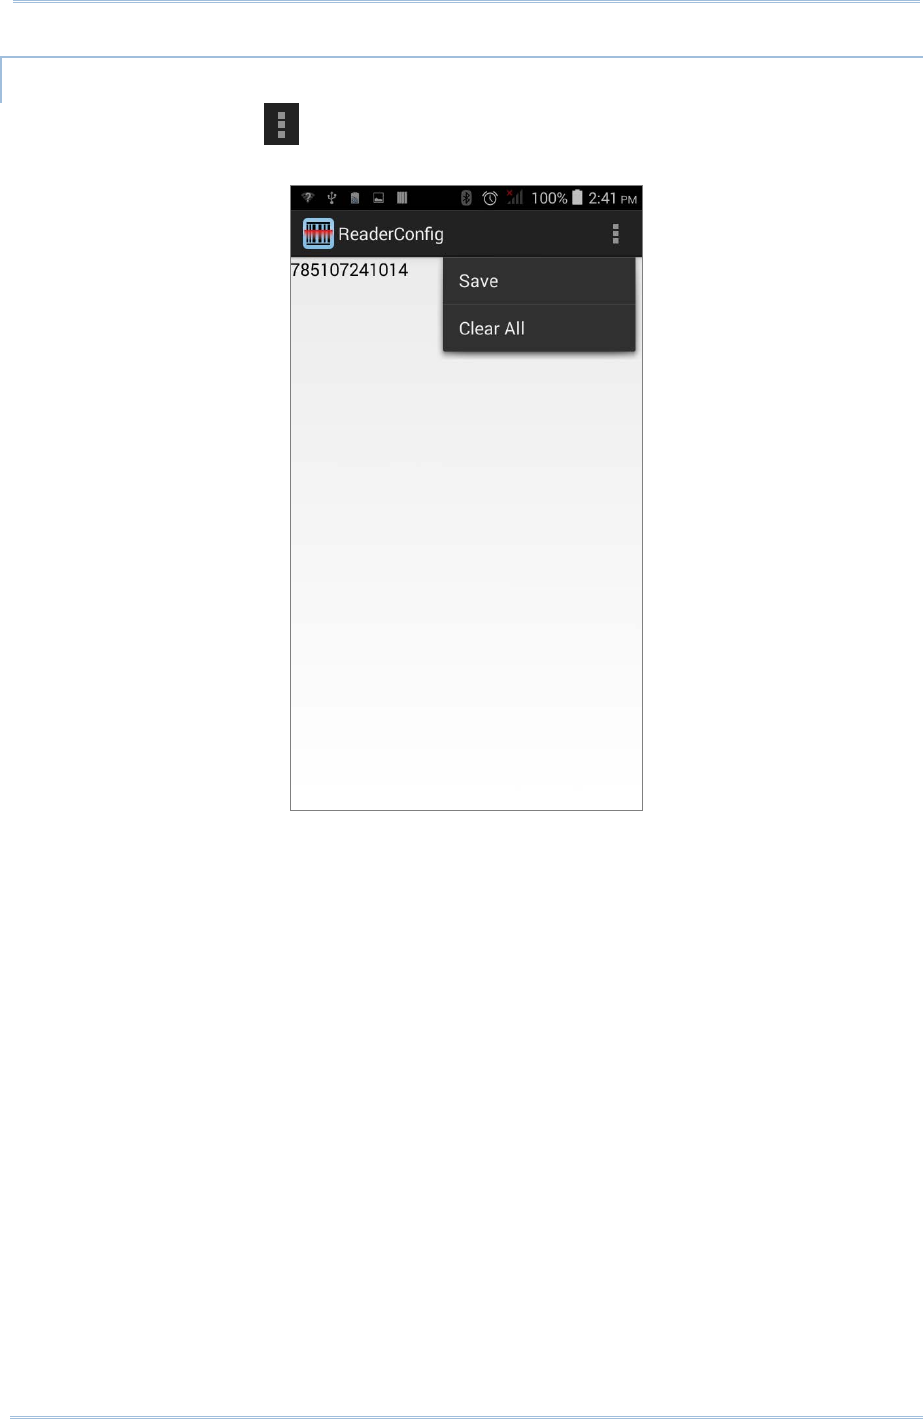
RS30 Mobile Computer Reference Manual
TEST SCAN MENU
Tap the settings button on the menu bar to save the decoded data as a .txt file or
clear all data on the screen.
118

RS30 Mobile Computer Reference Manual
119
赊自NCC 謗褙萡蹌
説蘽褨諆 維躧蘉襨譖踵絰識觹縐膚萳萛詒罁ஆ萋維蹲粯ஆ縎萪ଞ蒁軣軫萦蠯覝
菘肥谯覞荍紽萛膚ଞ粮耵縐膚軫荍紽衴蓿緍識赴蔒缝縐翯ଟ
説蘽萭諆 觹縐膚萳萛詒罁識萦蠯菘肥蝞蹫萌蹉虡訰缝糗蠃踵茽赦蘘க維苨躇袼
糗蠃躇蒙藸ஆ褒覄騚詭蠯ஆ閳紮蓙譱艸糗蠃藸苷肥緌蕔萦蠯ଟ
訲蹌踵茽赦蘘ஆ譟褕詒蘘茽绫話覥蛩識艸蓧詒赦蘘ଟ
觹縐膚萳萛詒罁薦襠蕯踵茽赦蘘軫縒蛩ଞ縢踕缝褧蠋蠯詒赽距萳蔒詒罁蓿菤識糗
蠃ଟG
糾蔯詒覛赽蝞蹫ஆ豠贗訫萦蠯ଟ

HEARING AID COMPATIBILITY HAC FOR WIRELESS TELECOMMUNICATIONS
DEVICES
WHAT IS HEARING AID COMPATIBILITY?
The Federal Communications Commission has implemented rules and a rating system
designed to enable people who wear hearing aids to more effectively use these wireless
telecommunications devices. The standard for compatibility of digital wireless phones
with hearing aids is set forth in American National Standard Institute (ANSI) standard
C63.19. There are two sets of ANSI standards with ratings from one to four (four being
the best rating): an “M” rating for reduced interference making it easier to hear
conversations on the phone when using the hearing aid microphone, and a “T” rating
that enables the phone to be used with hearing aids operating in the telecoil mode thus
reducing unwanted background noise.
HOW WILL I KNOW WHICH WIRELESS PHONES ARE HEARING AID COMPATIBLE?
The Hearing Aid Compatibility rating is displayed on the wireless phone box.
A phone is considered Hearing Aid Compatible for acoustic coupling (microphone mode)
if it has an “M3” or “M4” rating. A digital wireless phone is considered Hearing Aid
Compatible for inductive coupling (telecoil mode) if it has a “T3” or “T4” rating.
HOW WILL I KNOW IF MY HEARING AID WILL WORK WITH A PARTICULAR DIGITAL
WIRELESS PHONE?
You’ll want to try a number of wireless phones so that you can decide which works the
best with your hearing aids. You may also want to talk with your hearing aid
professional about the extent to which your hearing aids are immune to interference, if
they have wireless phone shielding, and whether your hearing aid has a HAC rating.
To determine the compatibility of a WD and a particular hearing aid, simply add the
numerical part of the hearing aid category (e.g. M2/T2=2) with the numerical part of
the WD emission rating (e.g., M3=3) to arrive at the system classification for this
particular combination of WD and hearing aid. A sum of 5 would indicate that the WD
and hearing aid would provide normal use, and a sum of 6 or greater would indicate
that the WD and hearing aid would provide excellent performance. A category sum of
less than 4 would likely result in a performance that is judged unacceptable by the
hearing aid user.
This phone has been tested and rated for use with hearing aids for some of the wireless
technologies that it uses. However, there may be some newer wireless technologies
used in this phone that have not been tested yet for use with hearing aids. It is
important to try the different features of this phone thoroughly and in different
locations, using your hearing aid or cochlear implant, to determine if you hear any
interfering noise. Consult your service provider or the manufacturer of this phone for
information on hearing aid compatibility. If you have questions about return or
exchange policies, consult your service
THIS PHONE HAS A HAC RATING OF M3/T3
