Cisco Linksys BEFW11S4V32 Wireless Access Point Router with 4-Port Switch User Manual Part 2
Cisco-Linksys, LLC Wireless Access Point Router with 4-Port Switch Users Manual Part 2
Contents
- 1. DoC Statement
- 2. Users Manual Part 1
- 3. Users Manual Part 2
Users Manual Part 2

2. Select the Configuration tab
and highlight the TCP/IP
line for the applicable
Ethernet adapter (as shown
in Figure 3-1). If the word
TCP/IP appears by itself,
select that line. (Note: If
there is no TCP/IP line list-
ed, refer to your Ethernet
adapter’s documentation to
install TCP/IP now.) Then,
click the Properties button.
3. Click the IP Address tab
and select Obtain an IP
address automatically (as
shown in figure 3-2).
4. Click the Gateway tab and verify that the Installed Gateway field is blank.
Click the OK button.
Chapter 3: Configuring the PCs
These instructions will help you configure each of your computers to commu-
nicate with the Router.
To do this, you will need to configure your PC’s network settings to obtain an
IP (or TCP/IP) address automatically. Computers use IP addresses to commu-
nicate with each other across a network or the Internet.
You will need to know which operating system your computer is running, such
as Windows 95, 98, Millennium, 2000, or XP. You can find out by clicking the
Start button and then selecting the Settings option. (If your Start menu does-
n’t have a Settings option, you’re running Windows XP. You can select the
Control Panel directly from the Start Menu.) Then, click Control Panel and
double-click the System icon. Click the Cancel button when done.
Once you know which Windows operating system you are running, follow the
directions in this step for your computer’s operating system. If you PC is not
configured with the TCP/IP protocol, you will need to do this for each com-
puter you are connecting to the Router.
The next few pages tell you, step by step, how to configure your TCP/IP set-
tings based on the type of Windows operating system you are using. Once
you've configured your computers, continue to Chapter 4: Configuring the
Router.
1. Click the Start button, click Settings and open the Control Panel. From
there, double-click the Network icon to open the Network screen.
12
Overview
Configuring Windows 95, 98, and Millennium PCs
Figure 3-1
Figure 3-2
Instant WirelessTM Series Wireless Access Point Router with 4-Port Switch
11
5. Click the OK button again. Windows may ask you for the original
Windows installation disk or additional files. Supply them by pointing to
the correct file location, e.g., D:\win98, D:\win9x,
c:\windows\options\cabs, etc. (This assumes that “D” is the letter of your
CD-ROM drive).
6. If Windows asks you to restart your PC, click the Ye s button. If Windows
does not ask you to restart, restart your computer anyway.
Repeat steps 1-6 for each PC on your network. When all of your PCs are
configured, proceed to Chapter 4: Configuring the Router.
1. Click the Start button, click Settings and open the Control Panel. From
there, double-click the Network and Dial-up Connections icon. This will
display the Network screen.
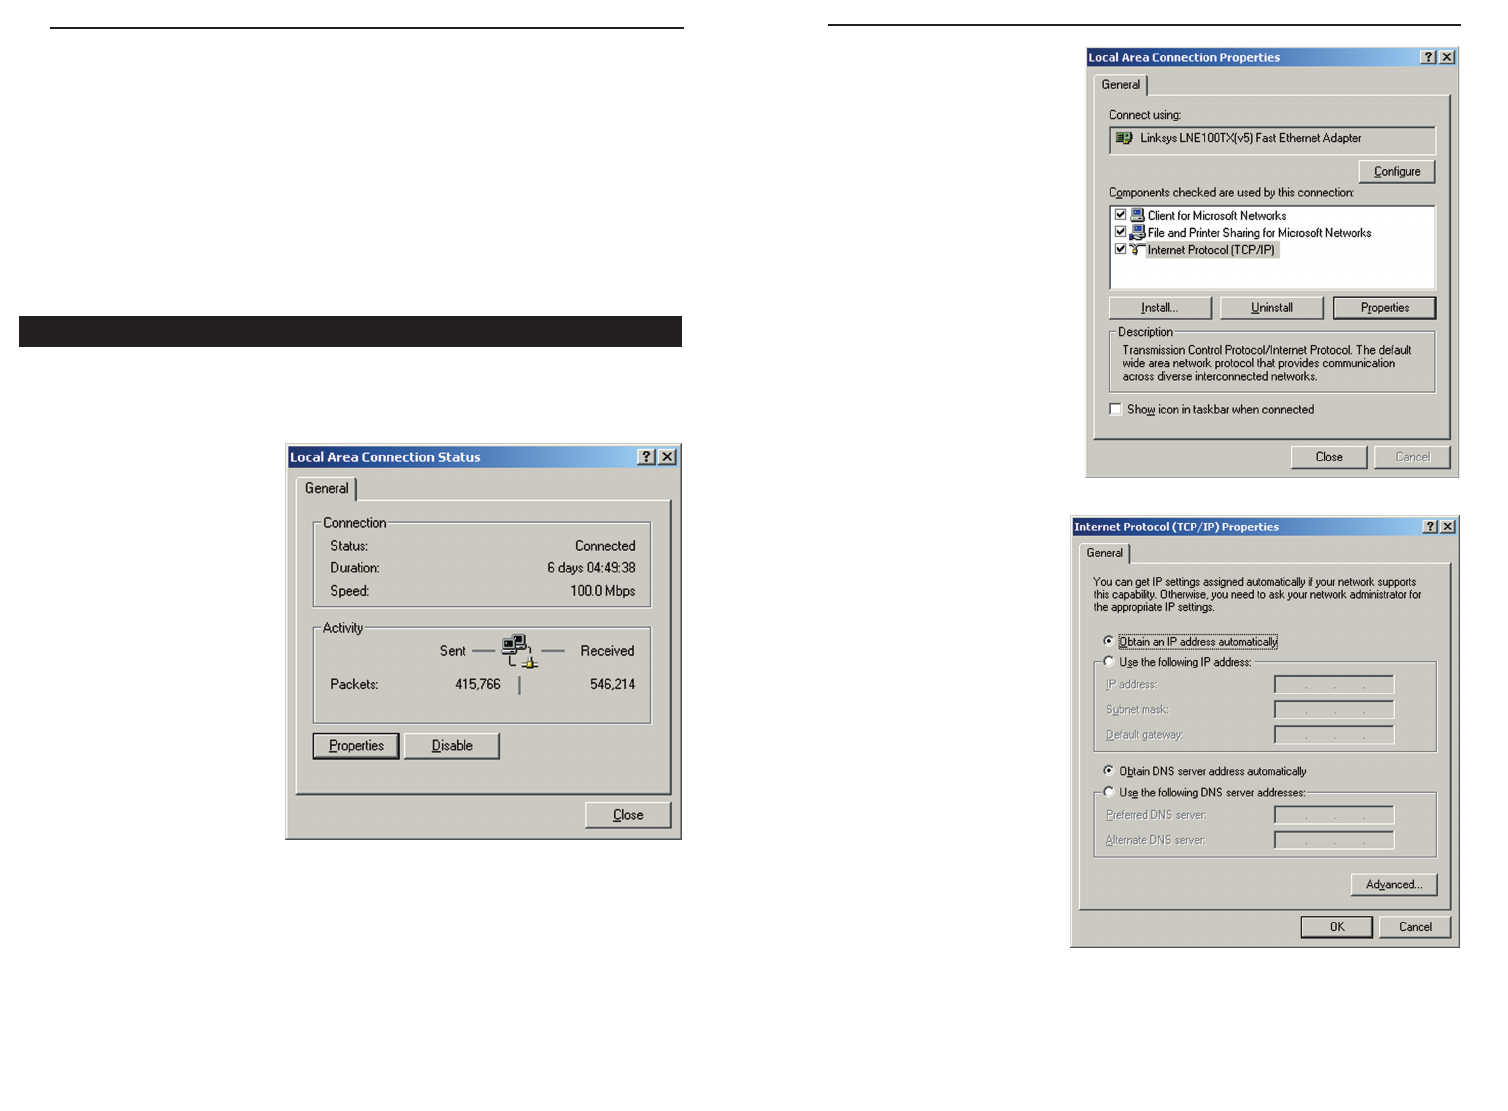
2. Select the Local Area
Connection icon for the
applicable Ethernet
adapter (usually it is the
first Local Area
Connection listed).
3. When the Local Area Connection Status screen appears, click the
Properties button. (See Figure 3-3.)
4. Select Internet Protocol
(TCP/IP) (as shown in
Figure 3-4) and click the
Properties button.
5. Select Obtain an IP
address automatically
and verify that Obtain
DNS server address
automatically is select-
ed (as shown in Figure
3-5). Then, click the OK
button and click the OK
button on the subse-
quent screens to com-
plete the PC’s configura-
tion.
Repeat steps 1-5 for each PC on your network. When all of your PCs are
configured, proceed to Chapter 4: Configuring the Router.
Configuring Windows 2000 PCs
Figure 3-3
Figure 3-4
Figure 3-5
Instant WirelessTM Series Wireless Access Point Router with 4-Port Switch
13 14

© Copyright 2002 Linksys,All Rights Reserved.
Printed in the USA.
http://www.linksys.com
FCC STATEMENT
The Instant Wireless™ Wireless Access Point Router with 4-Port Switch has been tested
and complies with the limits for a Class B digital device, pursuant to Part 15 of the FCC
Rules. These limits are designed to provide reasonable protection against harmful
interference
in a residential installation. This equipment generates, uses, and can radiate
radio frequency energy and, if not installed and used according to the instructions, may
cause harmful interference to radio communications. However, there is no guarantee that
interference will not occur in a particular installation. If this equipment does cause harmful
interference to radio or television reception, which is found by turning the equipment
off and on, the user is encouraged to try to correct the interference by one or more of the
following measures:
• Reorient or relocate the receiving antenna
• Increase the separation between the equipment or devices
• Connect the equipment to an outlet other than the receiver’s
• Consult a dealer or an experienced radio/TV technician for assistance
FCC Caution: Any changes or modifications not expressly approved by the party
responsible for compliance could void the user's authority to operate this equipment.
IMPORTANT NOTE:
FCC Radiation Exposure Statement:
This equipment complies with FCC radiation exposure limits set forth for an uncontrolled
environment. This equipment should be installed and operated with minimum distance 20cm
between the radiator & your body.
This transmitter must not be co-located or operating in conjunction with any other antenna or
transmitter.