Cisco Linksys WRT55AG Dual-Band Wireless A+G Broadband Router User Manual WRT55AG ug Rev NC
Cisco-Linksys, LLC Dual-Band Wireless A+G Broadband Router WRT55AG ug Rev NC
UserManual.wiki
>
Cisco Linksys
>
WRT55AG User Manual
>
User manual part 4
Contents
1.
User manual part 1
2.
User manual part 2
3.
User manual part 3
4.
User manual part 4
5.
User Manual part 5
6.
User manual part 5
User manual part 4
Navigation menu
Upload a User Manual
Namespaces
Wiki Guide
HTML
PDF
Info
Views
User Manual
Discussion / Help
Navigation
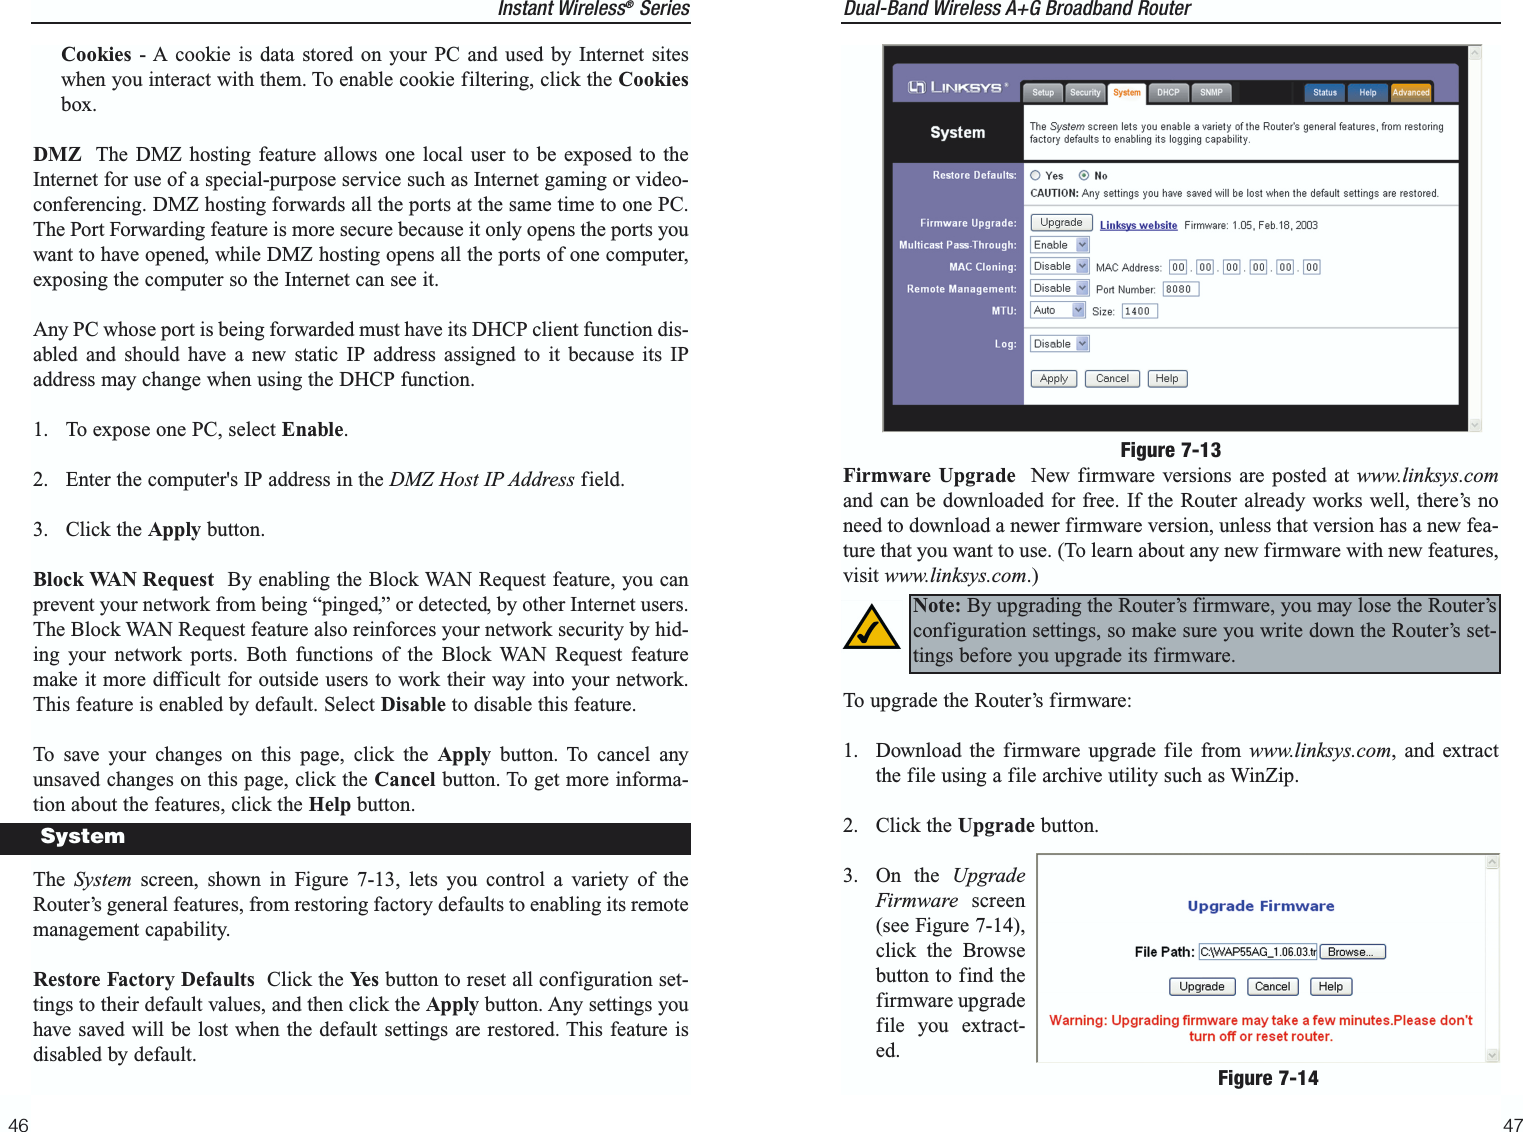
![Dual-Band Wireless A+G Broadband Router 5GHz, 802.11a (WEP)The 5GHz, 802.11a (WEP) screen, shown in Figure 7-9, allows you to config-ure your 5GHz,802.11a WEPsettings. WEPencryptionshould alwaysbe enabled toincrease thesecurity of yourwireless net-work.Default Transmit Key Select which WEP key (1-4) will be used when theRouter sends data. Make sure the receiver is using the same key.WEP Encryption Keys 1-4 offer 64-bit, 128-bit, or 152-bit encryption; selectthe type of encryption you want from the drop-down box. To disable WEPEncryption, select Disable.Passphrase (Complete this field when using 64-bit or 128-bit encryption.)Instead of manually entering WEP keys, you can enter a Passphrase. ThisPassphrase is used to generate one or more WEP keys. It is case-sensitive andshould not be longer than 16 alphanumeric characters. This Passphrase functionis compatible with Linksys wireless products only. [If you want to communi-cate with non-Linksys wireless products, enter the WEP key(s) manually on thenon-Linksys wireless products.] After you enter the Passphrase, click theGenerate button to create WEP keys. Keys 1-4 WEP keys enable you to create an encryption scheme for wirelessLAN transmissions. Manually enter a set of values. (Do not leave a key fieldblank, and do not enter all zeroes. These are not valid key values.) Keys 1-4offer 64-bit, 128-bit, or 152-bit encryption.If you are using 64-bit WEP encryption, then the key must be exactly 10 hexa-decimal characters in length. If you are using 128-bit WEP encryption, then thekey must be exactly 26 hexadecimal characters in length. If you are using 152-bit WEP encryption, then the key must be exactly 32 hexadecimal characters inlength. Valid hexadecimal characters are “0”-“9” and “A”-“F”.41Figure 7-9Instant Wireless®Series5GHz, 802.11aThe 5GHz, 802.11a portion of the Setup screen, shown in Figure 7-8, allowsyou to configure your 5GHz, 802.11a wireless network settings.Mode If you do not have any 802.11a devices in your network, you can dis-able this broadcasting by selecting Disable.Channel Select the appropriate channel from the list provided to correspondwith your network settings, between 36 and 64. All devices in your wirelessnetwork must use the same channel in order to function correctly. If you wantthe Router to automatically scan for a clear channel, then click the checkbox.SSID The SSID is the network name shared among all points in a wirelessnetwork. The SSID must be identical for all points in the wireless network. Itis case-sensitive and must not exceed 32 characters (use any of the characterson the keyboard). Make sure this setting is the same for all points in your wire-less network. For added security, you should change the default SSID (linksys)to a unique name.WEP (Encryption) An acronym for Wired Equivalent Privacy, WEP is anencryption method used to protect your wireless data communications. WEPuses 64-bit, 128-bit, or 152-bit keys to provide access control to your networkand encryption security for every data transmission. To decode a data trans-mission, each device in a network must use an identical key. Higher encryptionlevels offer higher levels of security, but due to the complexity of the encryp-tion, they may decrease network performance. To enable WEP, click the radiobutton beside Enable. Click the Edit WEP Settings button to configure theWEP keys for your 5GHz, 802.11a wireless network (see Figure 7-9).Check all the values, and click the Apply button to save your 5GHz, 802.11asettings. To cancel any changes you’ve entered on this page, click the Cancelbutton. To get more information about the features, click the Help button.40Figure 7-8](https://usermanual.wiki/Cisco-Linksys/WRT55AG.User-manual-part-4/User-Guide-310130-Page-1.png)

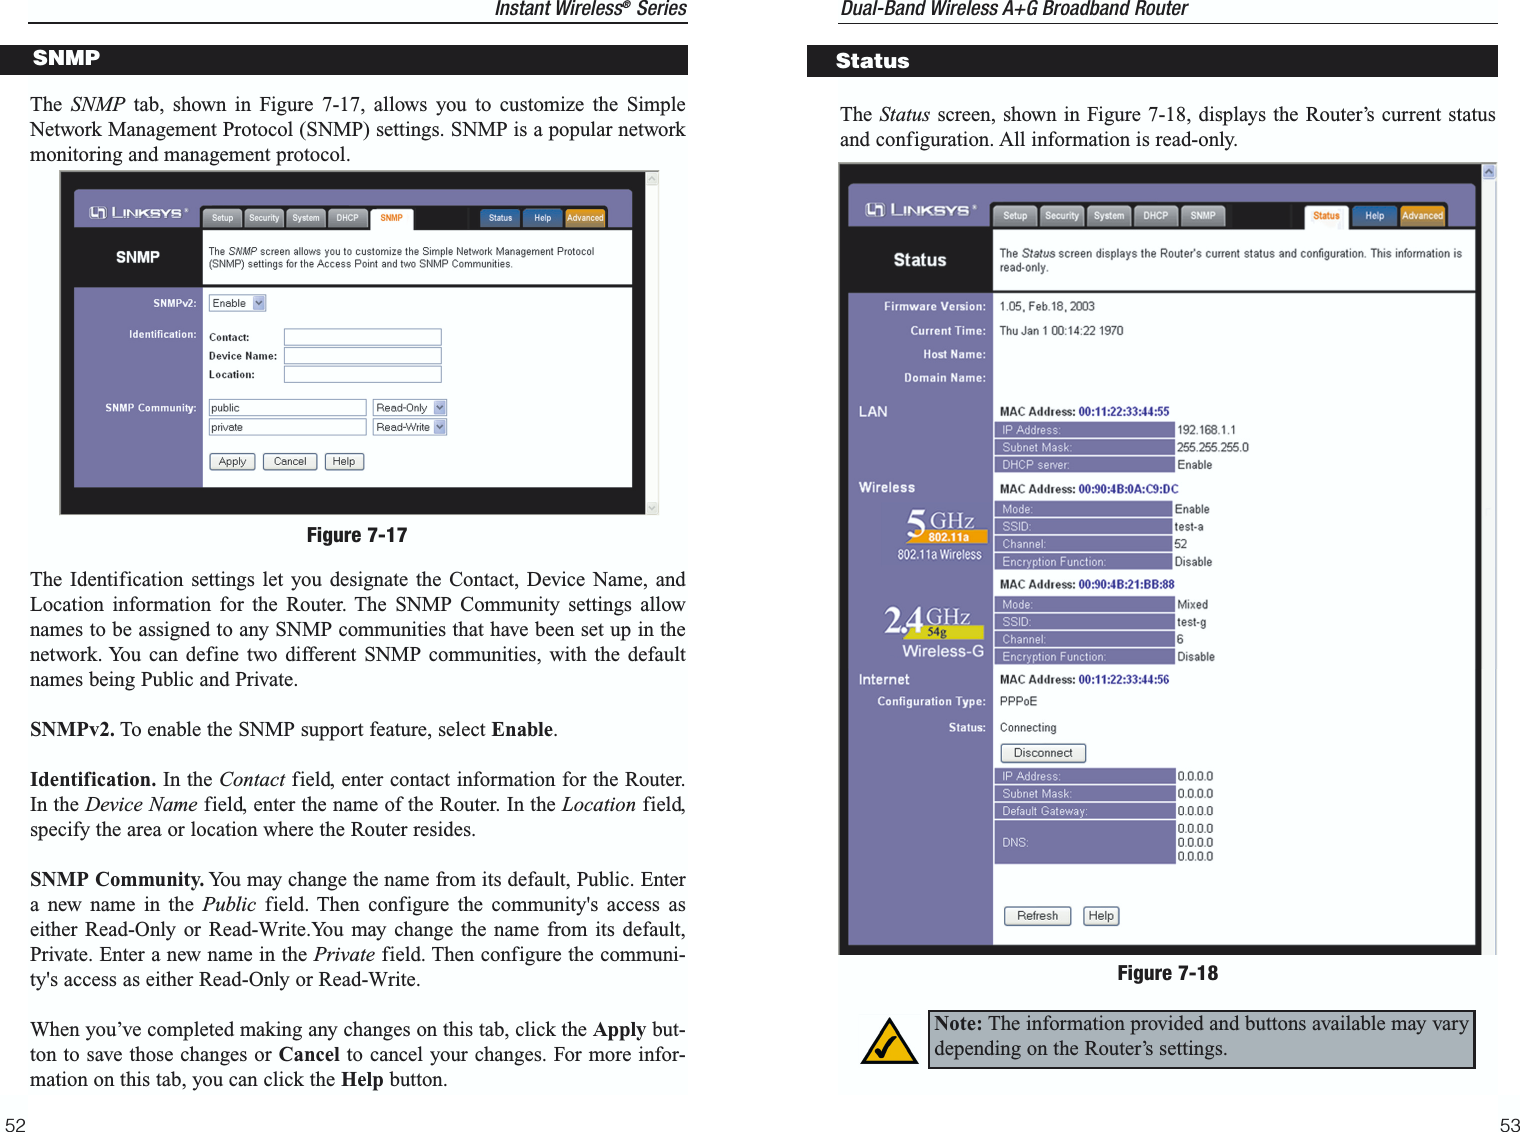
![Dual-Band Wireless A+G Broadband Router 4544L2TP - Layer Two Tunneling Protocol is an extension of the Point-to-PointTunneling Protocol (PPTP) used by to enable the operation of a virtual pri-vate network (VPN) over the Internet.PPTP - Point-to-Point Tunneling Protocol is the method used to enableVPN sessions to a Windows NT 4.0 or 2000 server. To allow PPTP tunnelsto pass through the Router, PPTP Pass-Through is enabled by default. Todisable PPTP Pass-Through, uncheck the box next to PPTP.Web Filters Using the Web Filters feature, you may enable up to four specif-ic filtering methods.Proxy - Use of WAN proxy servers may compromise the Router's security.Denying Proxy will disable access to any WAN proxy servers. To enableproxy filtering, click the Proxy box. Java - Java is a programming language for websites. If you deny Java, yourun the risk of not having access to Internet sites created using this pro-gramming language. To enable Java filtering, click the Java box. ActiveX - ActiveX is a programming language for websites. If you denyActiveX, you run the risk of not having access to Internet sites created usingthis programming language. To enable ActiveX filtering, click the ActiveXbox. Figure 7-12Instant Wireless®SeriesPassphrase Instead of manually entering WEP keys, you can enter aPassphrase. This Passphrase is used to generate one or more WEP keys. It iscase-sensitive and should not be longer than 16 alphanumeric characters. ThisPassphrase function is compatible with Linksys wireless products only. [If youwant to communicate with non-Linksys wireless products, enter the WEPkey(s) manually on the non-Linksys wireless products.] After you enter thePassphrase, click the Generate button to create WEP keys. Keys 1-4 WEP keys enable you to create an encryption scheme for wirelessLAN transmissions. Manually enter a set of values. (Do not leave a key fieldblank, and do not enter all zeroes. These are not valid key values.) Keys 1-4offer 64-bit or 128-bit encryption.If you are using 64-bit WEP encryption, then the key must be exactly 10 hexa-decimal characters in length. If you are using 128-bit WEP encryption, then thekey must be exactly 26 hexadecimal characters in length. Valid hexadecimalcharacters are “0”-“9” and “A”-“F”.Check all the values, and click theApply button to save your 2.4GHz, Wireless-G WEP settings.To apply any of the settings you change on this page, click the Apply button.To cancel any changes you’ve entered on this page, click the Cancel button. Toget more information about the features, click the Help button.The Security screen, shown in Figure 7-12, allows you to change the Router’ssecurity settings. You should change the factory default password, which isadmin, to your own as soon as possible. All users who try to access the Router’sweb-based utility or Setup Wizard will be prompted for the Router’s password.Router Password The new Password must not exceed 32 characters in lengthand must not include any spaces. Enter the new Password in the second field toconfirm it.VPN Pass-Through Virtual Private Networking (VPN) is typically used forwork-related networking. For VPN tunnels, the Router supports IPSec Pass-Through and PPTP Pass-Through. IPSec - Internet Protocol Security (IPSec) is a suite of protocols used toimplement secure exchange of packets at the IP layer. To allow IPSec tun-nels to pass through the Router, IPSec Pass-Through is enabled by default.To disable IPSec Pass-Through, uncheck the box next to IPSec.Security](https://usermanual.wiki/Cisco-Linksys/WRT55AG.User-manual-part-4/User-Guide-310130-Page-3.png)