Cisco Systems 89450476 UC Phone User Manual PDF for entire User Guide
Cisco Systems Inc UC Phone PDF for entire User Guide
Contents
- 1. Users Manual-1
- 2. Users Manual-2
Users Manual-1

EFT DRAFT - CISCO CONFIDENTIAL
Americas Headquarters
Cisco Systems, Inc.
170 West Tasman Drive
San Jose, CA 95134-1706
USA
http://www.cisco.com
Tel: 408 526-4000
800 553-NETS (6387)
Fax: 408 527-0883
Cisco Unified IP Phone User Guide
for Cisco Unified Communications
Manager 8.5 (SCCP and SIP)
For Cisco Unified IP Phone 8941 and 8945
EFT DRAFT - CISCO CONFIDENTIAL

Cisco Unified IP Phone 8941 and 8945 User Guide for Cisco Unified Communications Manager 8.5 (SCCP) 1
EFT DRAFT - CISCO CONFIDENTIAL
Contents
Your Phone 1
Cisco Unified IP Phone 8941 1
Phone Connections 1
Footstand 3
Buttons and Hardware 4
Phone Screen 7
Phone with a Single Line 7
Phone with Multiple Lines 8
Power-Save Mode 11
Handset Rest 11
Cisco Unified IP Phone 8945 12
Phone Connections 12
Bluetooth 14
Footstand 15
Buttons and Hardware 16
Phone Screen 19
Phone with a Single Line 19
Phone with Multiple Lines 20
Power-Save Mode 23
Handset Rest 23
Applications 25
Phone Applications 25
Call History 25
View Call History 26
View Call Record Details 26
Filter Call History 26
Dial From Call History 27
Edit Number From Call History 27
2OL-23119-01
EFT DRAFT - CISCO CONFIDENTIAL
Clear Call History 27
Delete Call Record From Call History 28
Preferences 28
Ringtones 28
Brightness 28
Camera Settings 29
Bluetooth 30
Accessories 30
View Accessories List 30
View Accessory Details 30
Add Bluetooth Accessory 31
Delete Bluetooth Accessory 31
Connect Bluetooth Accessory 32
Disconnect Bluetooth Accessory 32
Administrator Settings 32
Phone Information 32
View Phone Information 33
Contacts 35
Phone Contacts 35
Corporate Directory 35
Search for and Dial a Contact 35
Search for and Dial a Contact While on a Call 36
Personal Directory 36
Personal Directory Options 36
Fast-Dial Codes with Personal Directory 38
Messages 41
Voice Messages 41
Personalize Your Voicemail 41
Check for Voice Messages 41
Listen to Voice Messages 42
Calling Features 43
Feature Buttons and Softkeys 43
Agent Greeting 44
Cisco Unified IP Phone 8941 and 8945 User Guide for Cisco Unified Communications Manager 8.5 (SCCP) 3
EFT DRAFT - CISCO CONFIDENTIAL
Answer 44
Answer Your Oldest Call First 45
Auto Answer 45
Auto Answer with Your Headset 45
Auto Answer with Your Speakerphone 45
Barge 45
Add Yourself to a Call on a Shared Line 45
Call Back 45
Set up a Call Back Notification 46
Call Forward All 46
Forward Calls on Your Phone 47
Call Park 47
Park and Retrieve a Call Using Park 48
Park and Retrieve a Call Using Assisted Directed Call Park 48
Park and Retrieve a Call Using Manual Directed Call Park 48
Call Pickup 49
Answer a Call Using Pickup 50
Answer a Call Using Group Pickup and a Group Pickup Number 50
Answer a Call Using Group Pickup and a Phone Number 50
Answer a Call Using Other Pickup 50
Call Waiting 51
Respond to a Call Waiting Notification 51
Conference 51
Add Another Party to Your Call to Create a Conference 51
Join Calls Together in a Conference 52
Swap Between Calls Before Completing a Conference 52
View Conference Participants 52
Remove Conference Participants 52
Divert 53
Divert a Call 53
Do Not Disturb 53
Turn DND On and Off 54
Extension Mobility 54
Enable Extension Mobility 54
4OL-23119-01
EFT DRAFT - CISCO CONFIDENTIAL
Fast Dial 54
Place a Call with a Fast-Dial Button 55
Hold 55
Hold and Resume a Call 55
Swap Between Holding and Active Calls 55
Put a Call on Hold by Answering a New Call 55
Determine if a Shared Line is on Hold 56
Remote Hold 56
Hold Reversion 56
Respond to a Hold Reversion Notification 56
Hunt Groups 56
Sign In and Out of a Hunt Group 57
Intercom 57
Place a Dedicated Intercom Call 57
Place a Dialable Intercom Call 57
Receive an Intercom Call 58
Line Status 58
Line Status Indicators 58
Malicious Call Identification 59
Trace a Suspicious Call 59
Meet Me 59
Host a Meet-Me Conference 59
Join a Meet-Me Conference 60
Mobile Connect 60
Turn On or Off Mobile Connect to All Your Remote Destinations From Your Desk Phone 60
Switch an In-Progress Call on Your Desk Phone to a Mobile Phone 61
Switch an In-Progress Call From a Mobile Phone to Your Desk Phone 61
Hand Off an In-Progress Call From a Mobile Phone to Your Desk Phone 61
Mute 61
Mute Your Phone 62
Mute Your Video 62
On-hook Dialing 62
Dial a Number On Hook 62
Plus Dialing 62
Cisco Unified IP Phone 8941 and 8945 User Guide for Cisco Unified Communications Manager 8.5 (SCCP) 5
EFT DRAFT - CISCO CONFIDENTIAL
Dialing an International Number 63
Privacy 63
Enable Privacy on a Shared Line 63
Quality Reporting Tool 63
Report Problems on Your Phone 64
Redial 64
Redial a Number 64
Secure and Nonsecure Indication Tone 64
Shared Lines 65
Silent Monitoring and Recording 65
Speed Dial 65
Place a Call with a Speed-Dial Button 66
Place a Call with a Speed-Dial Code 66
Use a Speed-Dial Code On Hook 66
Use a Speed-Dial Code Off Hook 66
Transfer 66
Transfer a Call to Another Number 67
Swap Between Calls Before Completing a Transfer 67
Web Dialer 67
Use Web Dialer with Cisco Directory 67
Use Web Dialer with Another Online Corporate Directory 68
Set Up, View, or Change Web Dialer Preferences 68
Sign Out of Web Dialer 69
User Options 71
User Options Web Pages 71
Sign In and Out of User Options Web Pages 71
Device 72
Select a Device From the User Options Web Pages 72
Customize Do Not Disturb Options 72
Line Settings 73
Set Up Call Forwarding Per Line 73
Change the Voice Message Indicator Setting Per Line 73
Change the Audible Voice Message Indicator Setting Per Line 74
6OL-23119-01
EFT DRAFT - CISCO CONFIDENTIAL
Change the Ring Settings Per Line 74
Change or Create a Line Text Label for Your Phone Display 74
Speed Dial on the Web 75
Set Up Speed-Dial Buttons 75
Set Up Speed-Dial Codes 75
Phone Services 75
Subscribe to a Service 76
Search for Services 76
Change or End Services 76
Change a Service Name 76
Add a Service to an Available Programmable Feature Button 76
User Settings 77
Change Your Browser Password 77
Change Your PIN 77
Change the Language for Your User Options Web Pages 77
Change the Language for Your Phone Display 78
Directory 78
Personal Address Book 78
Add a New PAB Entry 78
Search for a PAB Entry 78
Edit a Personal Directory Entry 79
Delete a Personal Directory Entry 79
Assign a Feature Button for Personal Address Book 79
Fast Dials 79
Assign a Feature Button for Fast Dial 80
Assign a Fast Dial Code to a PAB Entry 80
Assign a Fast Dial Code to a Phone Number Without Using a PAB Entry 80
Search for a Fast Dial Entry 80
Edit a Fast Dial Phone Number 80
Delete a PAB Entry 81
Mobility Settings 81
Add a New Remote Destination 81
Create an Access List 82
Plugins 83
Access Plugins 83
Cisco Unified IP Phone 8941 and 8945 User Guide for Cisco Unified Communications Manager 8.5 (SCCP) 7
EFT DRAFT - CISCO CONFIDENTIAL
FAQs and Troubleshooting 85
Frequently Asked Questions 85
Troubleshooting Tips 87
Personal Directory 88
User Options 88
Product Safety, Security, Accessibility, and Related Information 91
Safety and Performance Information 91
Power Outage 91
External Devices 91
Bluetooth Wireless Headset Performance 92
FCC Compliance Statements 92
FCC Part 15.21 Statement 92
FCC RF Radiation Exposure Statement 92
FCC Receivers and Class B Digital Statement 93
Cisco Product Security 93
Accessibility Features 93
Additional Information 94
Warranty 111
Cisco One-Year Limited Hardware Warranty Terms 111
Index 1
8OL-23119-01
EFT DRAFT - CISCO CONFIDENTIAL

Cisco Unified IP Phone 8941 and 8945 User Guide for Cisco Unified Communications Manager 8.5 (SCCP) 1
EFT DRAFT - CISCO CONFIDENTIAL
Your Phone
This chapter describes the features of the Cisco Unified IP Phones 8941 and 8945.
Cisco Unified IP Phone 8941
The Cisco Unified IP Phone 8941 provides these features:
• Phone connections
• Footstand
• Buttons and hardware
• Phone screen
• Power-save mode
• Handset rest
Phone Connections
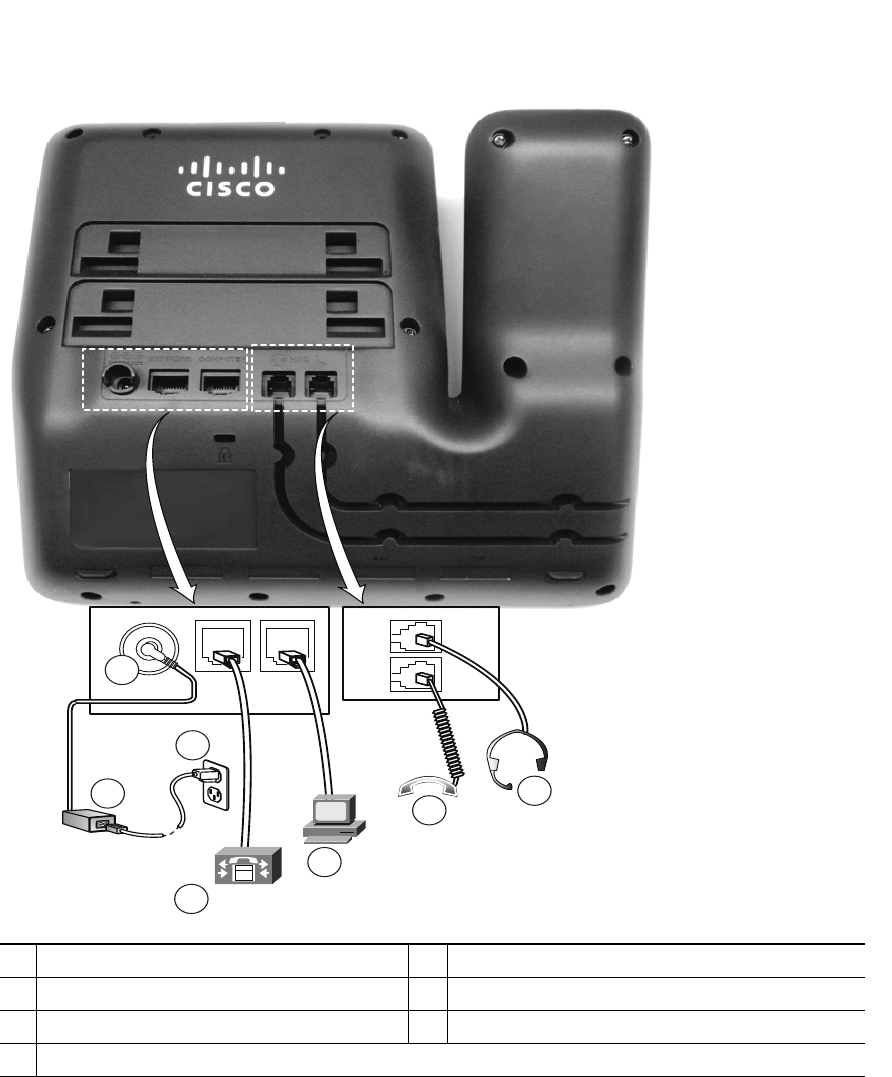
Your system administrator can help you connect your phone to the corporate IP telephony network.
2OL-23119-01
EFT DRAFT - CISCO CONFIDENTIAL
1DC adapter port (DC48V) 5Computer port (10/100/1000 PC) connection
2AC-to-DC power supply (optional) 6Handset connection
3AC power wall plug (optional) 7Analog headset connection (headset optional)
4Network port (10/100/1000 SW) with IEEE 802.3af and 802.3at power enabled
236959
2
3
4
5
6
7
1
Your Phone
Cisco Unified IP Phone 8941 and 8945 User Guide for Cisco Unified Communications Manager 8.5 (SCCP) 3
EFT DRAFT - CISCO CONFIDENTIAL
Footstand
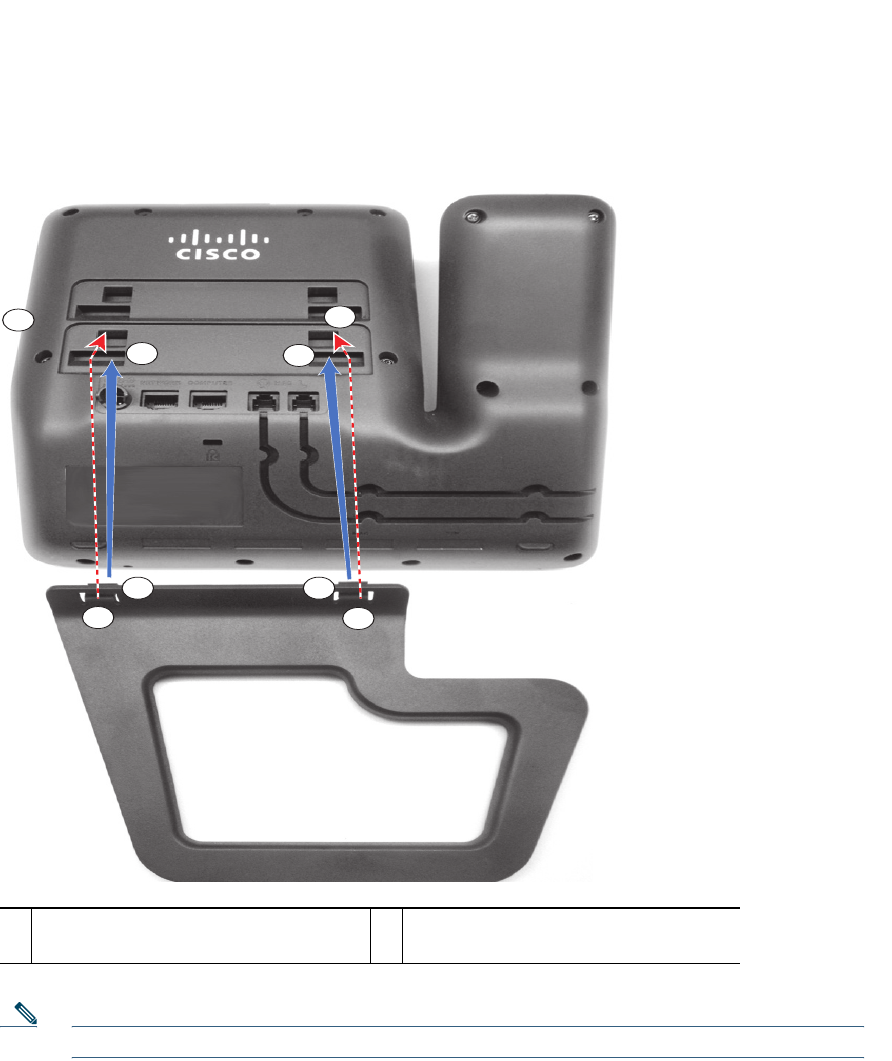
If your phone is placed on a table or desk, connect the footstand to the back of the phone.
Note Connecting and disconnecting the footstand may require a little more force than you expect.
1Insert the curved connectors into the
lower slots.
2Lift the footstand until the connectors
snap into the upper slots.
236960
1
1
22
22
1
1
4OL-23119-01
EFT DRAFT - CISCO CONFIDENTIAL
Buttons and Hardware
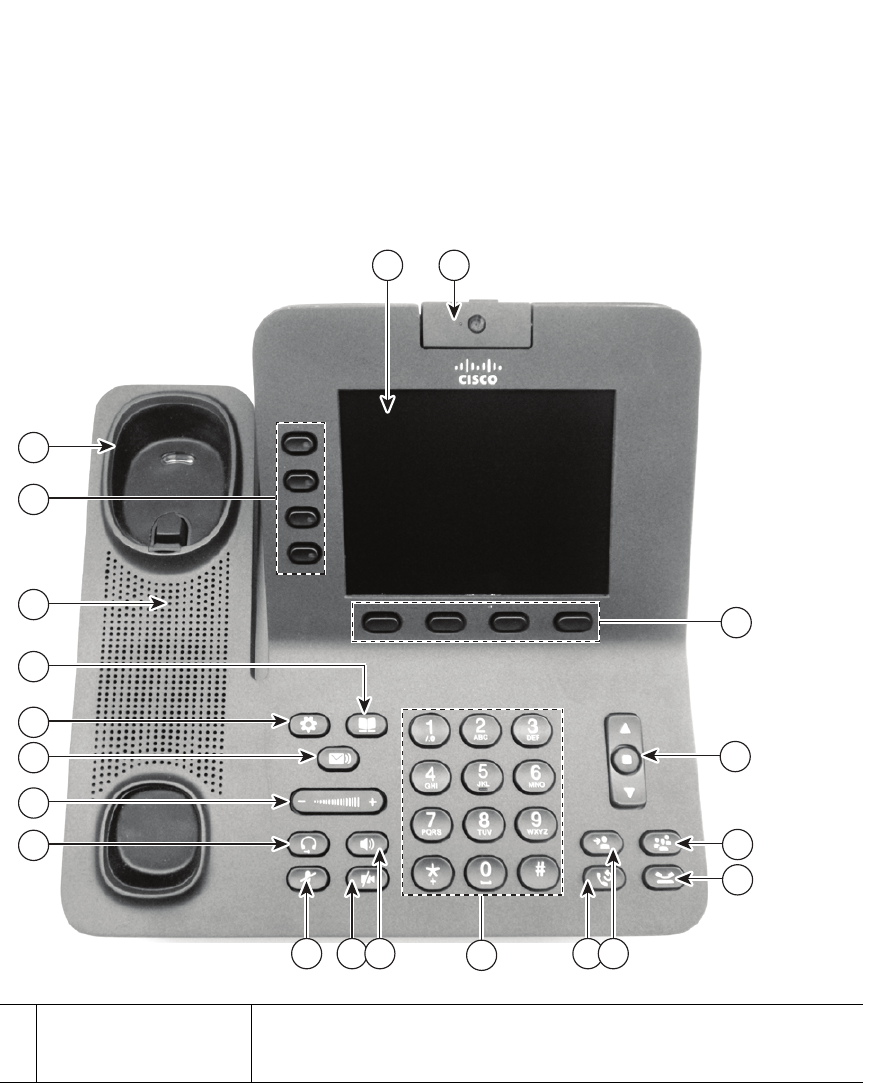
Your phone provides quick access to your phone lines, features, and call sessions. The Programmable
Feature buttons (left side) is used to view calls on a line or access features such as speed dial or All
Calls. (These buttons are also called Line buttons.)
1Phone screen Shows information about your phone, including directory number, call
information (for example caller ID, icons for an active call or call on
hold) and available softkeys.
1 2
12 11 810 7
9
14
13
18
20
19
15
16
17
4
6
5
3
236961
Your Phone
Cisco Unified IP Phone 8941 and 8945 User Guide for Cisco Unified Communications Manager 8.5 (SCCP) 5
EFT DRAFT - CISCO CONFIDENTIAL
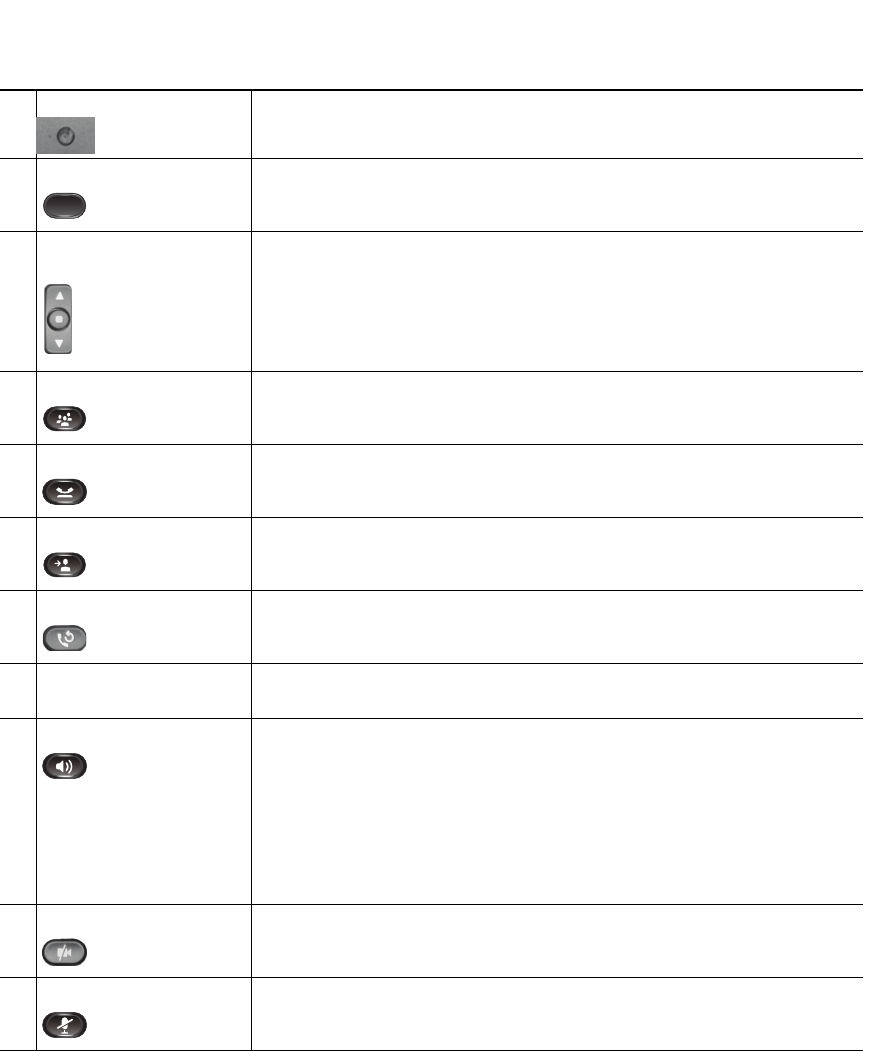
2Video Camera Connects to your Cisco Unified IP Phone and allows you to make a
point-to-point video call with another Cisco Unified IP Phone.
3Softkey buttons Allows you to access the softkey options (for the selected call or menu
item) displayed on your phone screen.
4Navigation pad and
Select button
The two-way Navigation pad allows you to scroll through menus,
highlight items, and move within a text input field.
The Select button (center of the Navigation pad) allows you to select a
highlighted item as well as wake up the phone from deep sleep mode.
The Select button is lit (white) when the phone is in power-save mode.
5Conference button Creates a conference call.
6Hold button Places a connected call on hold.
7Transfer button Transfers a call.
8Redial button Redials a call.
9Keypad Allows you to dial phone numbers, enter letters, and choose menu
items (by entering the item number).
10 Speakerphone button Selects the speakerphone as the default audio path and initiates a new
call, picks up an incoming call, or ends a call. During a call, the button
is lit green.
The speakerphone audio path does not change until a new default
audio path is selected (for example, by picking up the handset).
If external speakers are connected, the Speakerphone button selects
them as the default audio path.
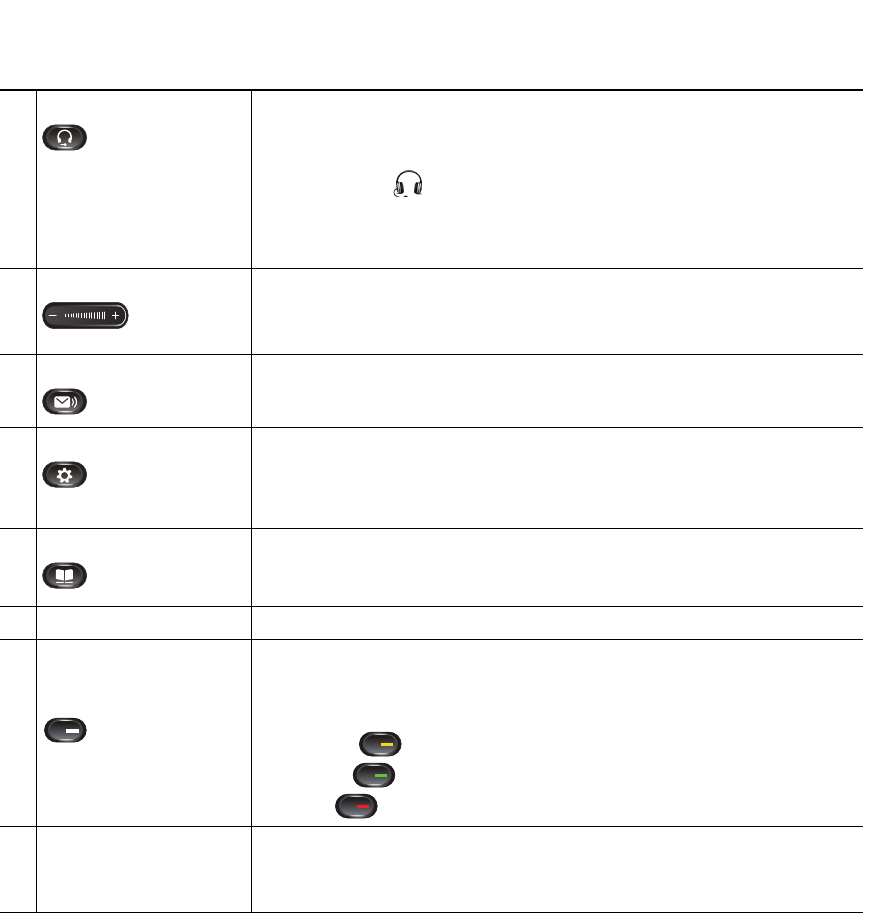
11 Video Mute button Mutes video from the phone screen during a video call.
12 Mute button Toggles the microphone on or off during a call. When the microphone
is muted, the button is lit red.
6OL-23119-01
EFT DRAFT - CISCO CONFIDENTIAL
13 Headset button Selects the headset as the default audio path and initiates a new call,
picks up an incoming call, or ends a call. During a call, the button is
lit green.
A headset icon in the phone screen header line indicates the
headset is the default audio path. This audio path does not change
until a new default audio path is selected (for example, by picking up
the handset).
14 Volume button Controls the handset, headset, and speakerphone volume (off hook)
and the ringer volume (on hook).
Silences the ringer on the phone if an incoming call is ringing.
15 Messages button Auto-dials your voicemail system (varies by system).
16 Applications button Opens the Applications menu. Depending on how your system
administrator sets up the phone, use it to access applications such as
call history, preferences, administrator settings, and phone
information.
17 Contacts button Opens the Contacts menu. Depending on how your system
administrator sets up the phone, use it to access personal directory or
corporate directory.
18 Phone Speaker Speaker for the phone.
19 Programmable feature
buttons (also called
Line buttons)
Each corresponds with a phone line, speed dial, and calling feature.
Pressing a button for a phone line displays the active calls for that line.
Color LEDs indicate the line state:
• Amber —Ringing call on this line
• Green —Active or held call on this line
• Red —Shared line in-use remotely
20 Handset rest To rest the phone handset.
When there is an incoming call, the LED in the handset rest flashes red.
If there is a new voice message, the LED is lit red.
Your Phone
Cisco Unified IP Phone 8941 and 8945 User Guide for Cisco Unified Communications Manager 8.5 (SCCP) 7
EFT DRAFT - CISCO CONFIDENTIAL
Phone Screen
The way that your system administrator sets up your phone determines what is displayed on your
phone screen.
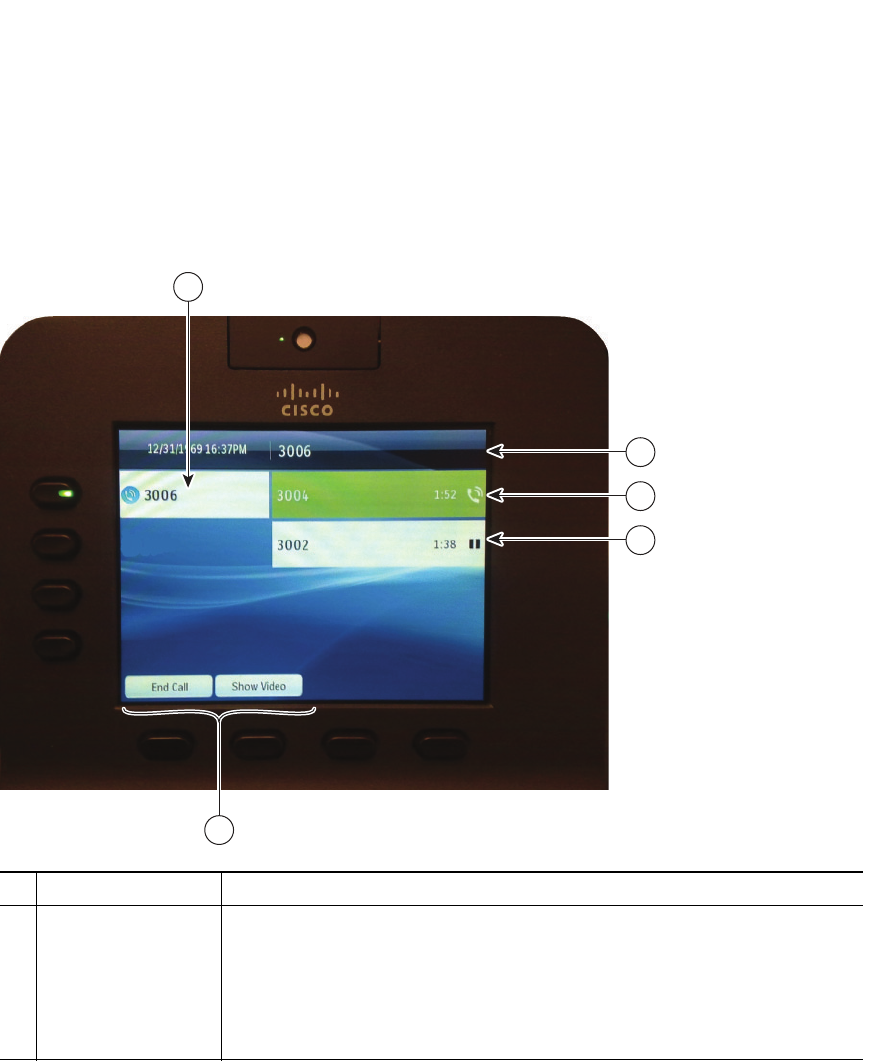
Phone with a Single Line
1Line label Displays the line phone information.
2Header Displays the date and time, and information (such as phone number) about
the selected line.
(If you are on a call and highlight the header instead of a call, the softkeys
that display are the same as those that display when the phone is idle. This
is useful, for example, if you want to access the Forward All or New Call
softkeys while you are on a call.)
236998
1
5
2
3
4

8OL-23119-01
EFT DRAFT - CISCO CONFIDENTIAL
Phone with Multiple Lines
If you have multiple lines, it is recommended that you use the All Calls button to view all calls on
all lines.
If you handle many calls at one time, it is recommended that you use the Answer button to answer the
oldest incoming call without having to scroll down the call list and select the call.
For more information, see your system administrator.
3Session button label
(for connected call)
Displays information (such as phone number and duration) about a
connected call on the line.
The timer counts the call duration in minutes and seconds (MM:SS) until
the call exceeds 60 minutes. Then the timer counts hours and minutes
(HH:MM).
4Session button label
(for held call)
Displays information (such as phone number and duration) about a held
call on the line.
Pressing the corresponding session button resumes the held call.
The timer counts the call duration in minutes and seconds (MM:SS) until
the call exceeds 60 minutes. Then the timer counts hours and minutes
(HH:MM).
5Softkeys Softkey options for the selected (highlighted) call only.
If you select a different call (by pressing a feature button or the Navigation
pad, or by answering a ringing call), the softkey options may change.
Your Phone
Cisco Unified IP Phone 8941 and 8945 User Guide for Cisco Unified Communications Manager 8.5 (SCCP) 9
EFT DRAFT - CISCO CONFIDENTIAL
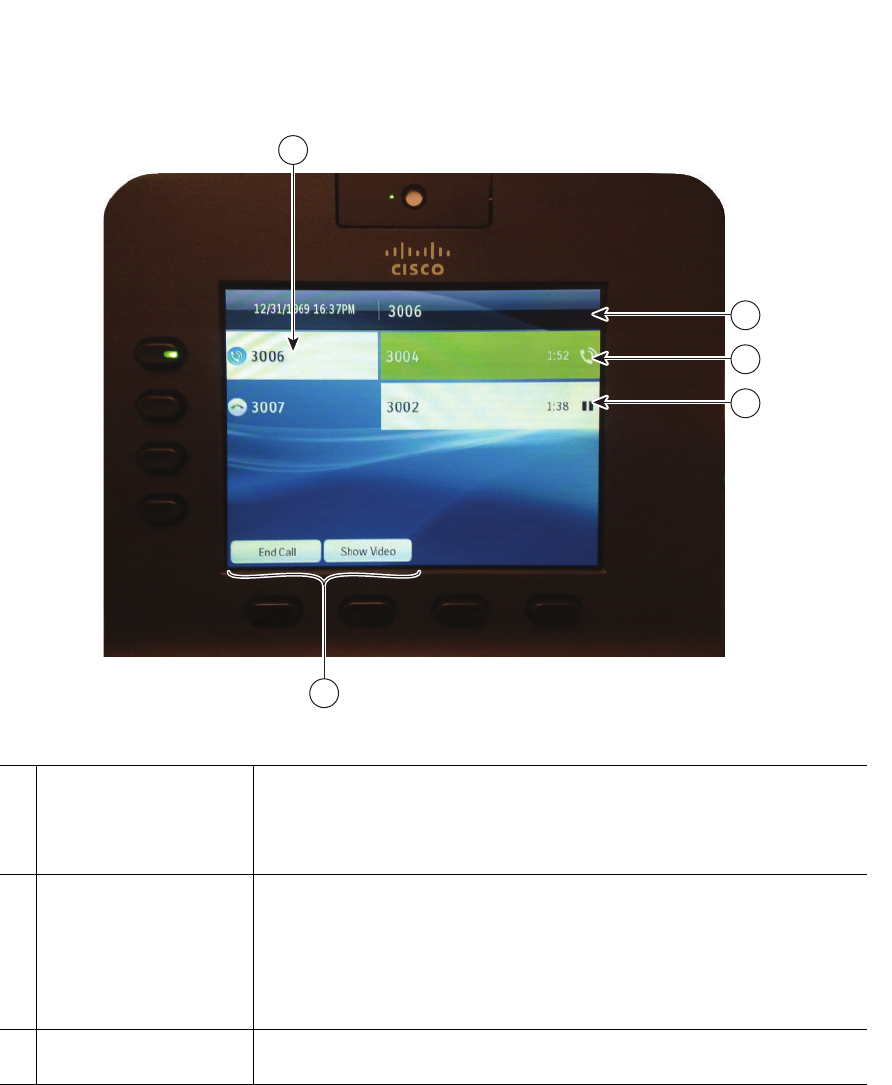
1Primary line label Displays information about the primary phone line.
Look for the blue icon on the line label to see which line is selected. In
this case, the primary line is selected, and the information displayed is
for the primary line only.
2Header Displays the date and time, and information (such as phone number)
about the selected line.
(If you are on a call and highlight the header instead of a call, the
softkeys that display are the same as those that display when the phone
is idle. This is useful, for example, if you want to access the Forward
All or New Call softkeys while you are on a call.)
3Session label (with
Connected Call icon)
Displays information (such as call status and duration) about a
connected call associated with the selected line.
236999
1
5
2
3
4

10 OL-23119-01
EFT DRAFT - CISCO CONFIDENTIAL
4Session labels
(with Held Call icons)
Display information (such as call status and duration) about held calls
associated with the selected line.
Calls are displayed on the right side of the phone screen from the oldest
(at the top) to the newest.
Pressing the session button next to a Held Call icon resumes the held
call for that session.
5Softkeys Softkey options for the selected call only.
If you select a different call (by pressing a feature button or the
Navigation pad, or by answering a ringing call), the softkey options
may change.
Your Phone
Cisco Unified IP Phone 8941 and 8945 User Guide for Cisco Unified Communications Manager 8.5 (SCCP) 11
EFT DRAFT - CISCO CONFIDENTIAL
Power-Save Mode
Depending on how your system administrator sets up your phone, the phone display may go into a
power-save mode (the phone screen appears blank and the Select button is lit white).
To turn on the phone display, press any button or pick up the handset.
Handset Rest
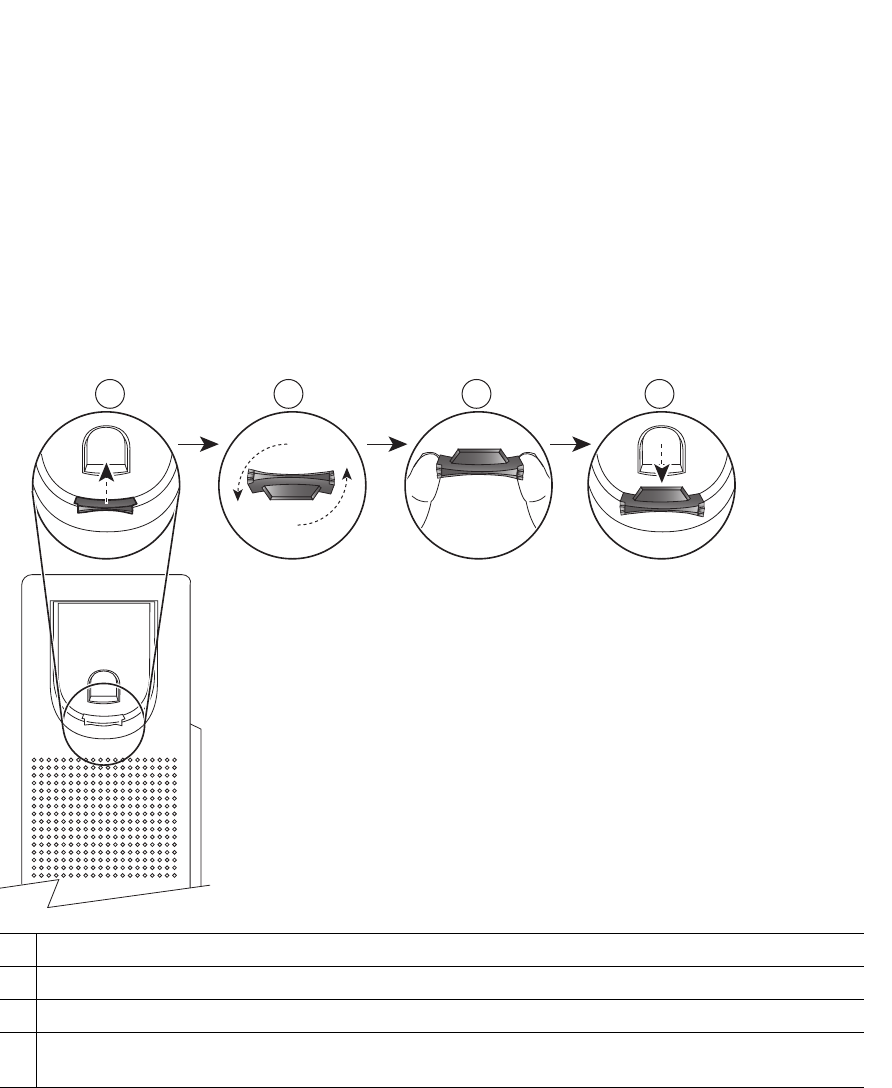
Your system administrator may have mounted your phone on a wall. With a wall-mounted phone, you
may need to adjust the handset rest to ensure that the receiver does not slip out of the cradle.
1Remove the handset from the cradle and pull the plastic tab from the handset rest.
2Rotate the tab 180 degrees.
3Hold the tab between two fingers, with the corner notches facing you.
4Line up the tab with the slot in the cradle and press the tab evenly into the slot. An extension
protrudes from the top of the rotated tab. Return the handset to the handset rest.
21 3
192897
4

12 OL-23119-01
EFT DRAFT - CISCO CONFIDENTIAL
Cisco Unified IP Phone 8945
The Cisco Unified IP Phone 8945 provides these features:
• Phone connections
• Bluetooth
• Footstand
• Buttons and hardware
• Phone screen
• Power-save mode
• Handset rest
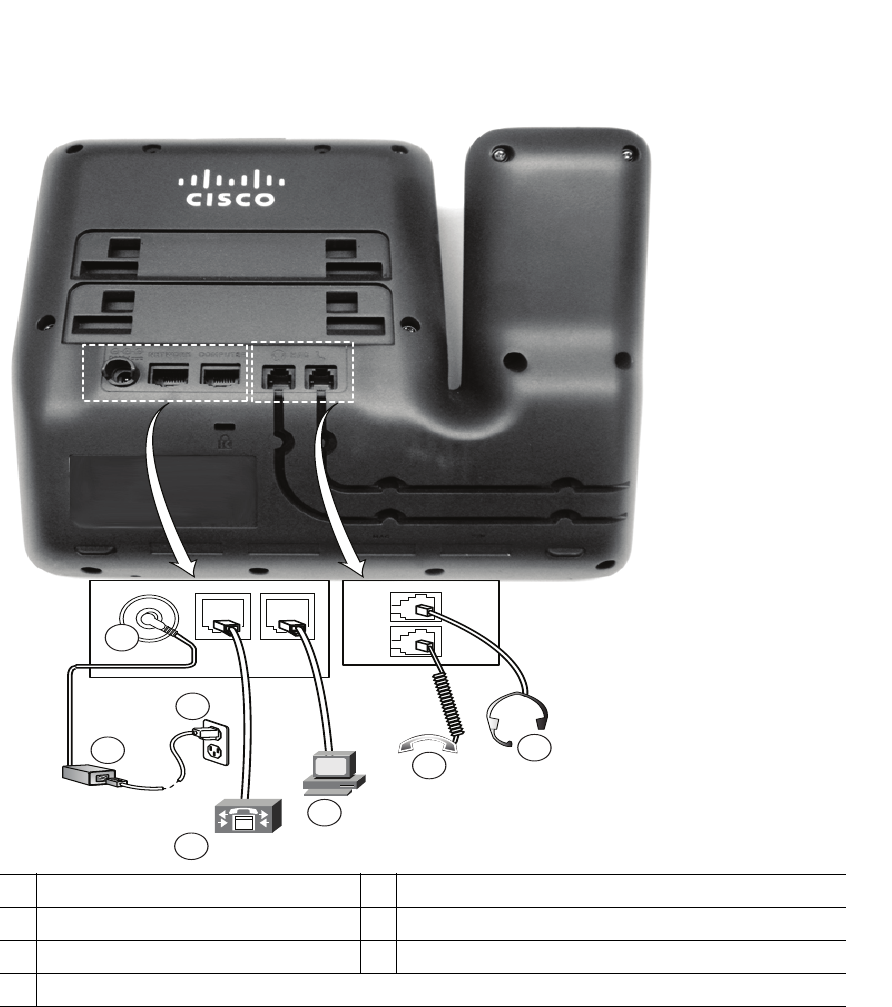
Phone Connections
Your system administrator can help you connect your phone to the corporate IP telephony network.
Your Phone
Cisco Unified IP Phone 8941 and 8945 User Guide for Cisco Unified Communications Manager 8.5 (SCCP) 13
EFT DRAFT - CISCO CONFIDENTIAL
1DC adapter port (DC48V) 5Computer port (10/100/1000 PC) connection
2AC-to-DC power supply (optional) 6Handset connection
3AC power wall plug (optional) 7Analog headset connection (headset optional)
4Network port (10/100/1000 SW) with IEEE 802.3af and 802.3at power enabled
236959
2
3
4
5
6
7
1

14 OL-23119-01
EFT DRAFT - CISCO CONFIDENTIAL
Bluetooth
Your phone supports Bluetooth Class 2 technology when the headsets support Bluetooth. You can add
and pair up to five Bluetooth headsets to your phone, but the last Bluetooth headset connected
becomes the default for use with the phone.
Related Topics
Bluetooth Headsets, page 97
Your Phone
Cisco Unified IP Phone 8941 and 8945 User Guide for Cisco Unified Communications Manager 8.5 (SCCP) 15
EFT DRAFT - CISCO CONFIDENTIAL
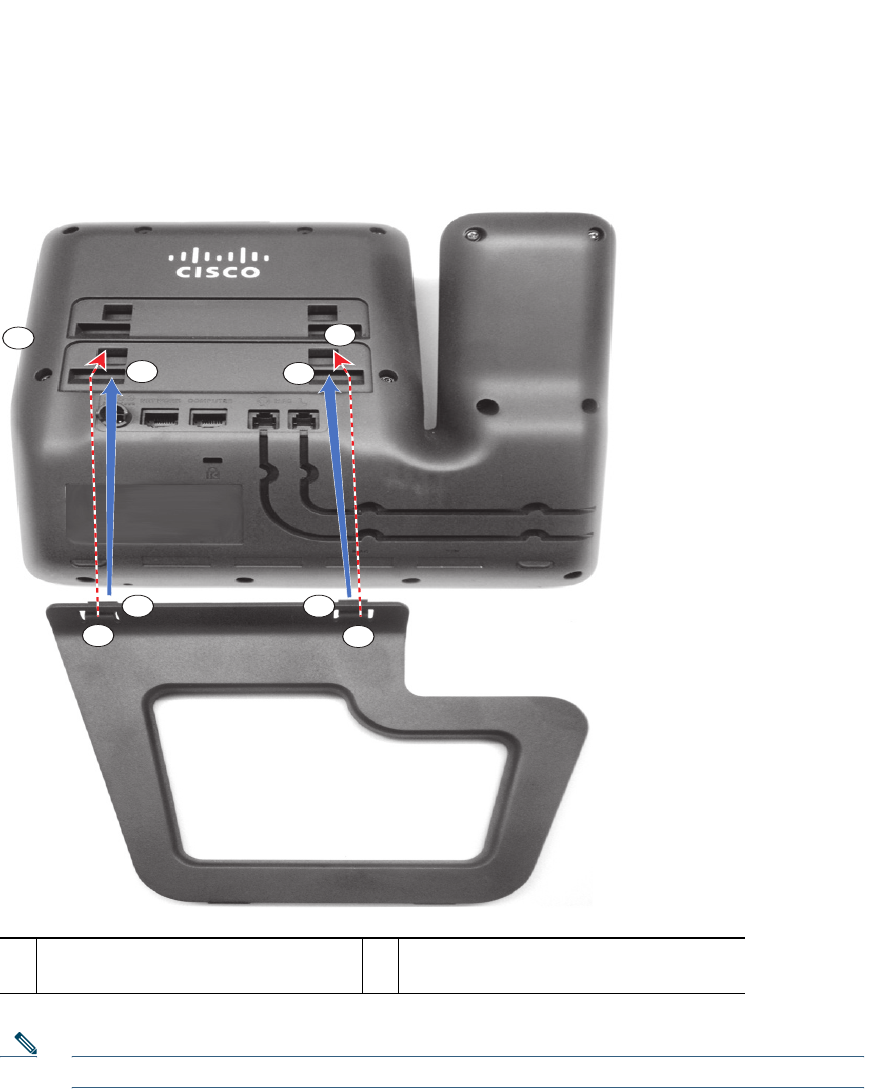
Footstand
If your phone is placed on a table or desk, connect the footstand to the back of the phone.
Note Connecting and disconnecting the footstand may require a little more force than you expect.
1Insert the curved connectors into the
lower slots.
2Lift the footstand until the connectors
snap into the upper slots.
236960
1
1
22
22
1
1
16 OL-23119-01
EFT DRAFT - CISCO CONFIDENTIAL
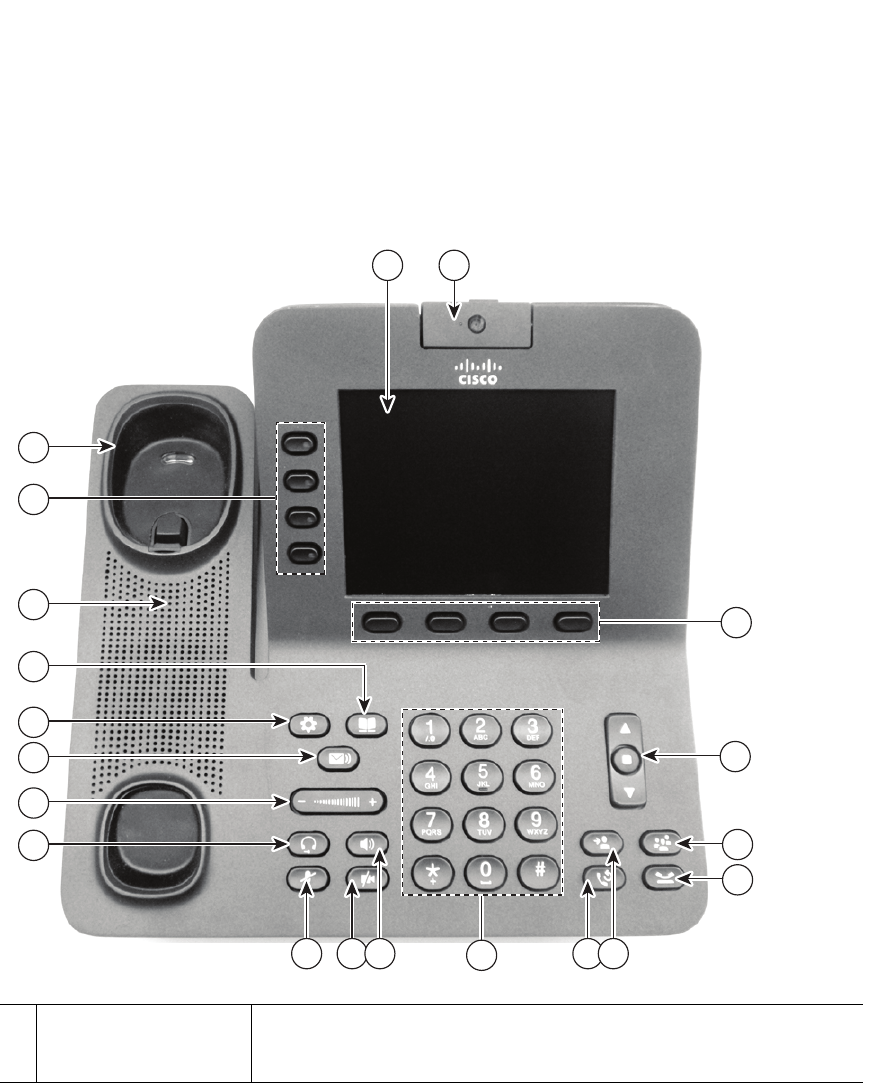
Buttons and Hardware
Your phone provides quick access to your phone lines, features, and call sessions. The Programmable
Feature buttons (left side) is used to view calls on a line or access features such as speed dial or All
Calls. (These buttons are also called Line buttons.)
1Phone screen Shows information about your phone, including directory number, call
information (for example caller ID, icons for an active call or call on
hold) and available softkeys.
1 2
12 11 810 7
9
14
13
18
20
19
15
16
17
4
6
5
3
236961
Your Phone
Cisco Unified IP Phone 8941 and 8945 User Guide for Cisco Unified Communications Manager 8.5 (SCCP) 17
EFT DRAFT - CISCO CONFIDENTIAL
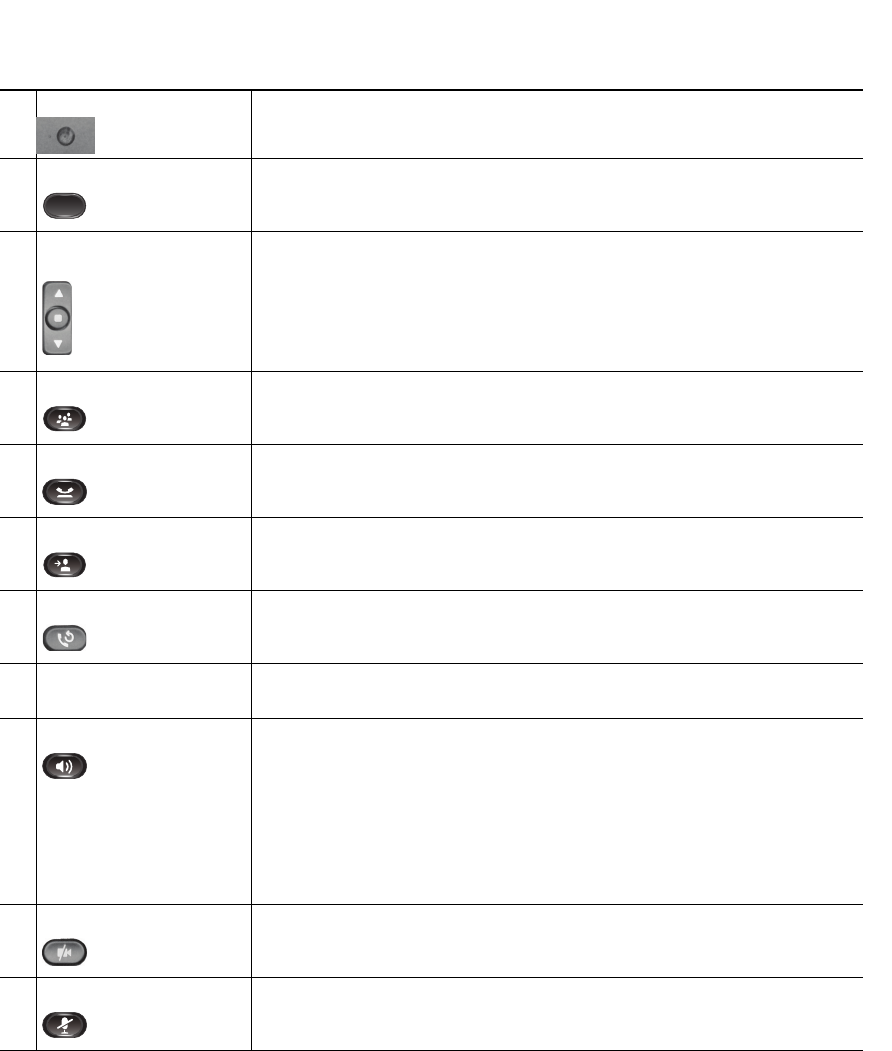
2Video Camera Connects to your Cisco Unified IP Phone and allows you to make a
point-to-point video call with another Cisco Unified IP Phone.
3Softkey buttons Allows you to access the softkey options (for the selected call or menu
item) displayed on your phone screen.
4Navigation pad and
Select button
The two-way Navigation pad allows you to scroll through menus,
highlight items, and move within a text input field.
The Select button (center of the Navigation pad) allows you to select a
highlighted item as well as wake up the phone from deep sleep mode.
The Select button is lit (white) when the phone is in power-save mode.
5Conference button Creates a conference call.
6Hold button Places a connected call on hold.
7Transfer button Transfers a call.
8Redial button Redials a call.
9Keypad Allows you to dial phone numbers, enter letters, and choose menu
items (by entering the item number).
10 Speakerphone button Selects the speakerphone as the default audio path and initiates a new
call, picks up an incoming call, or ends a call. During a call, the button
is lit green.
The speakerphone audio path does not change until a new default
audio path is selected (for example, by picking up the handset).
If external speakers are connected, the Speakerphone button selects
them as the default audio path.
11 Video Mute button Mutes video from the phone screen.
12 Mute button Toggles the microphone on or off during a call. When the microphone
is muted, the button is lit red.
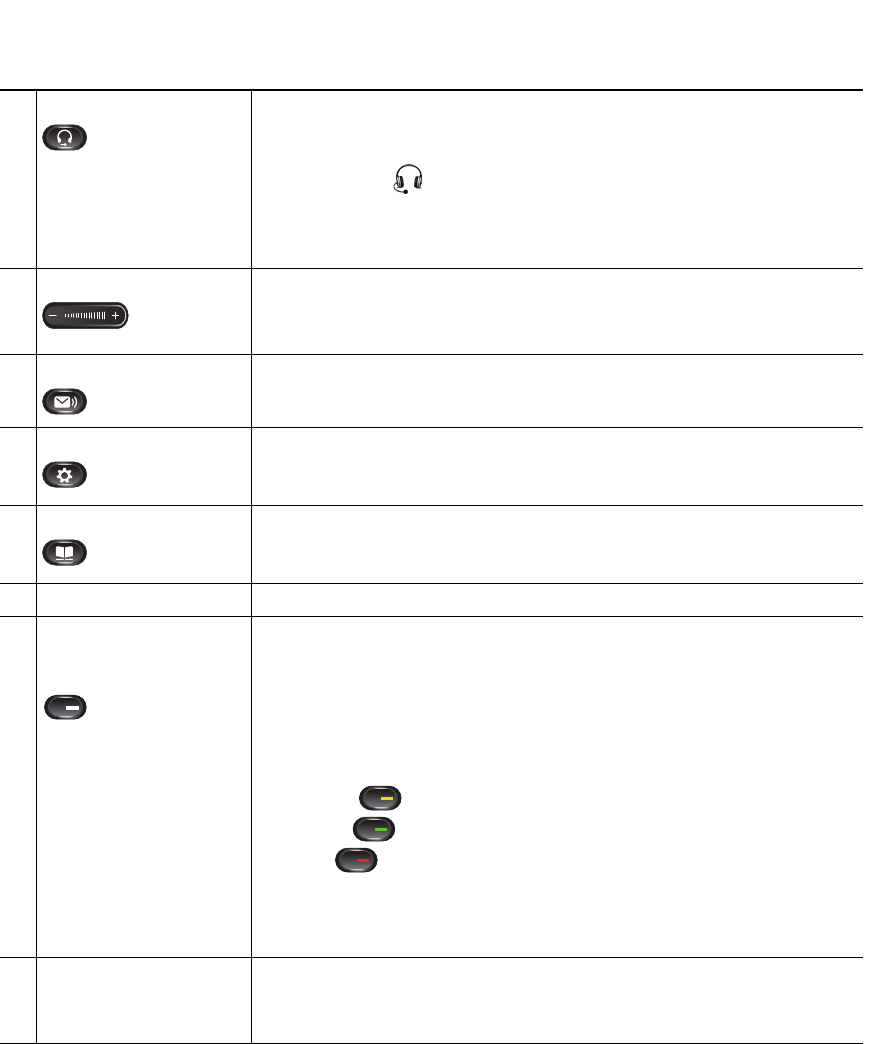
18 OL-23119-01
EFT DRAFT - CISCO CONFIDENTIAL
13 Headset button Selects the headset as the default audio path and initiates a new call,
picks up an incoming call, or ends a call. During a call, the button is
lit green.
A headset icon in the phone screen header line indicates the
headset is the default audio path. This audio path does not change
until a new default audio path is selected (for example, by picking up
the handset).
14 Volume button Controls the handset, headset, and speakerphone volume (off hook)
and the ringer volume (on hook).
Silences the ringer on the phone if an incoming call is ringing.
15 Messages button Auto-dials your voicemail system (varies by system).
16 Applications button Opens/closes the Applications menu. Depending on how your system
administrator sets up the phone, use it to access applications such as
call history, preferences, and phone information.
17 Contacts button Opens/closes the Contacts menu. Depending on how your system
administrator sets up the phone, use it to access personal directory,
corporate directory, or call history.
18 Phone Speaker Speaker for the phone.
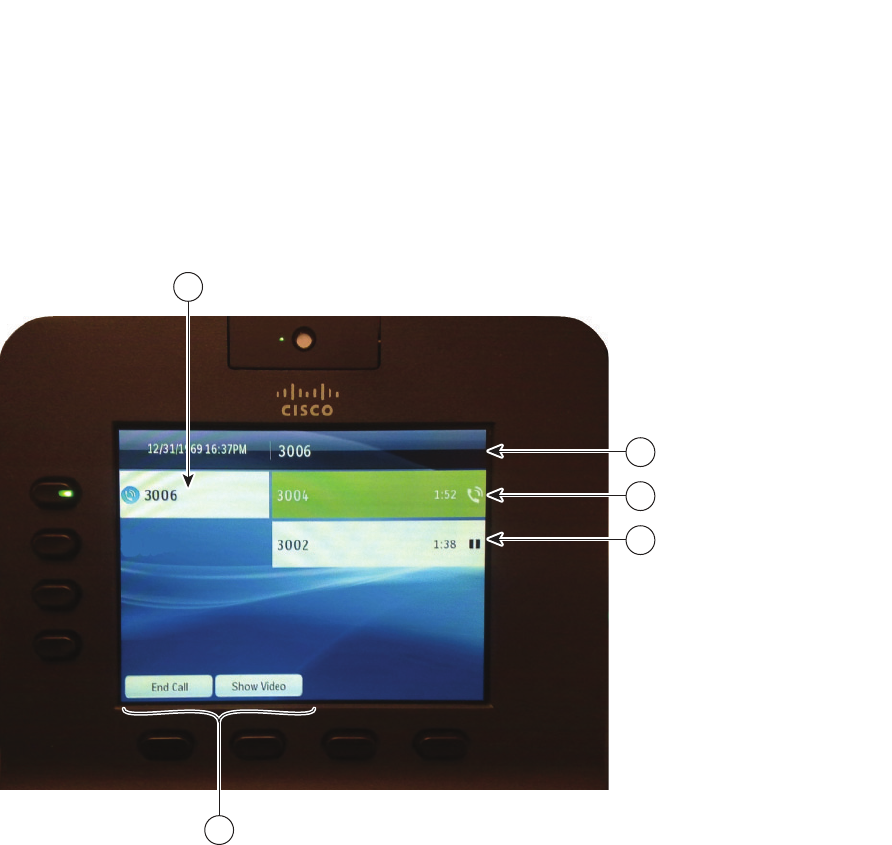
19 Programmable feature
buttons (also called
Line buttons)
Each corresponds with a phone line, speed dial, and calling feature.
Pressing a button for a phone line displays the active calls for that line.
If you have multiple lines, you may have an All Calls button that
displays a consolidated list of all calls from all lines (oldest at the top).
Then it is recommended that you keep your phone in the All Calls view.
Color LEDs indicate the line state:
• Amber —Ringing call on this line
• Green —Active or held call on this line
• Red —Shared line in-use remotely
(The positions of the session buttons and feature buttons can be
reversed on phones that use a locale with a right-to-left reading
orientation, such as Hebrew and Arabic.)
20 Handset rest To rest the phone handset.
When there is an incoming call, the LED in the handset rest flashes red.
If there is a new voice message, the LED is lit red.
Your Phone
Cisco Unified IP Phone 8941 and 8945 User Guide for Cisco Unified Communications Manager 8.5 (SCCP) 19
EFT DRAFT - CISCO CONFIDENTIAL
Phone Screen
The way that your system administrator set up your phone determines what is displayed on your
phone screen.
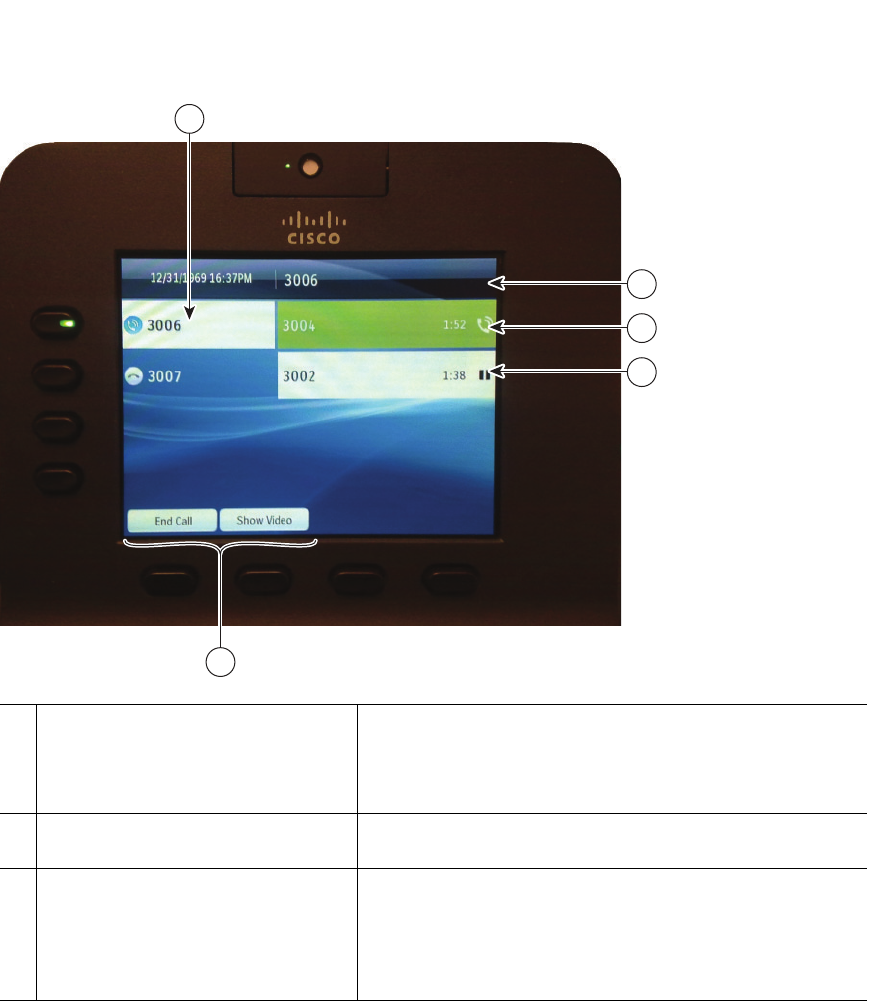
Phone with a Single Line
236998
1
5
2
3
4

20 OL-23119-01
EFT DRAFT - CISCO CONFIDENTIAL
Phone with Multiple Lines
If you have multiple lines, it is recommended that you use the All Calls button to view all calls on
all lines.
If you handle many calls at one time, it is recommended that you use the Answer button to answer the
oldest incoming call without having to scroll down the call list and select the call.
For more information, see your system administrator.
1Line label Displays the line phone information.
2Header Displays the date and time, and information (such as phone number)
about the selected line.
3Session button label (for
connected call)
Displays information (such as phone number and duration) about a
connected call on the line.
The timer counts the call duration in minutes and seconds (MM:SS)
until the call exceeds 60 minutes. Then the timer counts hours and
minutes (HH:MM).
4Session label
(for held call)
Displays information (such as phone number and duration) about a
held call on the line.
Pressing the corresponding session button resumes the held call.
The timer counts the call duration in minutes and seconds (MM:SS)
until the call exceeds 60 minutes. Then the timer counts hours and
minutes (HH:MM).
5Softkeys Softkey options for the selected (highlighted) call only.
If you select a different call (by pressing a feature button or the
Navigation pad, or by answering a ringing call), the softkey options
may change.
Your Phone
Cisco Unified IP Phone 8941 and 8945 User Guide for Cisco Unified Communications Manager 8.5 (SCCP) 21
EFT DRAFT - CISCO CONFIDENTIAL
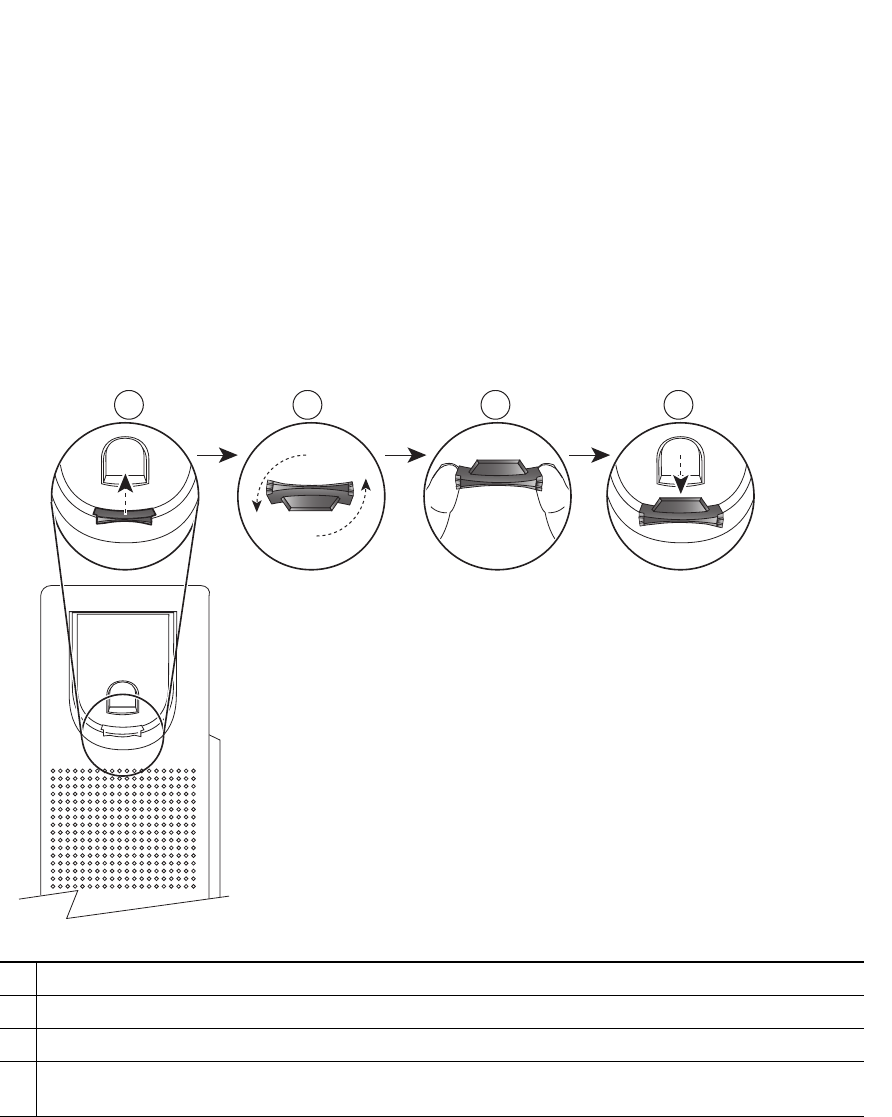
1Primary line label Displays information about the primary phone line.
Look for the blue icon on the line label to see which line is
selected. In this case, the primary line is selected, and the
information displayed is for the primary line only.
2Header Displays the date and time, and information (such as
phone number) about the selected line.
3Session label (with Connected
Call icon)
Displays information (such as call status and duration)
about a connected call associated with the selected line.
The timer counts the call duration in minutes and seconds
(MM:SS) until the call exceeds 60 minutes. Then the timer
counts hours and minutes (HH:MM).
236999
1
5
2
3
4

22 OL-23119-01
EFT DRAFT - CISCO CONFIDENTIAL
4Session label (with Held Call icon) Display information (such as call status and duration)
about held calls associated with the selected line.
Calls are displayed on the right side of the phone screen
from the oldest (at the top) to the newest.
Pressing the session button next to a Held Call icon
resumes the held call for that session.
The timer counts the call duration in minutes and seconds
(MM:SS) until the call exceeds 60 minutes. Then the timer
counts hours and minutes (HH:MM).
5Softkeys Softkey options for the selected call only.
If you select a different call (by pressing a feature button
or the Navigation pad, or by answering a ringing call), the
softkey options may change.
Your Phone
Cisco Unified IP Phone 8941 and 8945 User Guide for Cisco Unified Communications Manager 8.5 (SCCP) 23
EFT DRAFT - CISCO CONFIDENTIAL
Power-Save Mode
Depending on how your system administrator set up your phone, the phone display may go into a
power-save mode (the phone screen appears blank and the Select button is lit white).
To turn on the phone display, press any button or pick up the handset.
Handset Rest
Your system administrator may have mounted your phone on a wall. With a wall-mounted phone, you
may need to adjust the handset rest to ensure that the receiver does not slip out of the cradle.
1Remove the handset from the cradle and pull the plastic tab from the handset rest.
2Rotate the tab 180 degrees.
3Hold the tab between two fingers, with the corner notches facing you.
4Line up the tab with the slot in the cradle and press the tab evenly into the slot. An extension
protrudes from the top of the rotated tab. Return the handset to the handset rest.
21 3
192897
4

24 OL-23119-01
EFT DRAFT - CISCO CONFIDENTIAL

Cisco Unified IP Phone 8941 and 8945 User Guide for Cisco Unified Communications Manager 8.5 (SCCP) 25
EFT DRAFT - CISCO CONFIDENTIAL
Applications
Phone Applications
Phone applications allow you to access the following:
• Call History
• Preferences
• Accessories (For Cisco Unified IP Phone 8945 only.)
• Administrator Settings (for system administrators only).
• Phone Information
Call History
Call History allows you to view information about the last 150 calls on your phone. Individual calls
and call groups are listed chronologically from the most recent call to the oldest one. (If your phone
has multiple lines, calls on all lines are added together. The oldest calls over the 150-call limit are
dropped from the history.)
In the Call History screen, the line information, such as “Line: 5623,” is shown in the upper
right corner to indicate the line name or number for which the call history is displayed.
For each call record or call group, an icon to the left of the caller ID shows the call type:
• Received—
• Placed—
• Missed—
If the caller ID is unavailable, “Unknown” is displayed, and the phone number is listed.
Calls for the same caller ID and phone number are grouped together only when if they occur in
chronological order and do not have calls associated . For each group, the time of the latest call and
the number of calls, such as “(3),” are displayed:
• Incoming (Received) and outgoing (Placed) calls are grouped together.
• Missed calls are grouped together in a separate group.
For each individual card record or call group, the phone number is listed in blue and is contact sensitive
for touch dialing.

26 OL-23119-01
EFT DRAFT - CISCO CONFIDENTIAL
Hunt group and multiparty calls show an icon to the right of the caller ID that differentiates the call
from a normal call, and these calls are not grouped even when they are next to each other in the list.
A (plus) + symbol on entries in call history, redial, or call directory indicates that your phone is set up
to list international calls. For more information, see your system administrator.
View Call History
1. Press the Applications button .
2. Select Call History. (Use the Navigation pad and Select button to scroll and select a call record or
call group.)
3. Press the Exit softkey to return to the Applications screen.
View Call Record Details
1. Press the Applications button .
2. Select Call History. (Use the Navigation pad and Select button to scroll and select.)
3. Select a call record or group and press the Details softkey (you may need to press More
softkey first).
–
For each individual call, the Details screen displays the line information in the upper right
corner, such as “Line: 5782,” and the call name, call number, alternate number (if available),
call disposition (call type), call duration, and time of the call.
–
For each call group, the details shown are the same as for an individual call. The only
difference is that the multiple call-related information is shown, such as call disposition (call
type), call duration, and time of call, because this is a group of calls (Placed/Received or
Missed). (In a group of Missed calls, individual records show no call duration.)
–
For each multiparty or hunt group call, the Details screen displays the line information in the
upper right corner. For the caller ID and number listed at the top of the screen, the call name,
call number, alternate number, and as applicable, the hunt group information, if available.
4. Press the return softkey to return to the Call History screen.
5. Press the Exit softkey to return to the Applications screen.
6. While on a connected call, press the Show Details softkey to show the Call Details screen. This
screen displays single call information and call duration and is updated each second.
Filter Call History
1. Press the Applications button .
2. Select Call History. (Use the Navigation pad and Select button to scroll and select.)
The default view in Call History is for “All Calls,” which is shown at the top of the screen. The
line information, such as “Line: 5623,” is shown in the upper right corner.

Applications
Cisco Unified IP Phone 8941 and 8945 User Guide for Cisco Unified Communications Manager 8.5 (SCCP) 27
EFT DRAFT - CISCO CONFIDENTIAL
3. To sort calls for a specific phone line, select that phone line and view the individual calls or calls
groups for that line.
4. To sort by missed calls for the selected line, press the Missed Calls softkey.
5. Press the Exit softkey to return to the Applications screen.
Dial From Call History
1. Press the Applications button .
2. Select Call History. (Use the Navigation pad and Select button to scroll and select.)
3. From the Call History screen, select the call record that you want to dial and do one of
the following:
–
Press the Call softkey.
–
Pick up the handset.
–
Press the Select button.
–
Press the Speakerphone button or Headset button .
4. When the phone is in idle, you can press the up arrow on the Navigation pad to display the Call
History screen.
Edit Number From Call History
1. Press the Applications button .
2. Select Call History. (Use the Navigation pad and Select button to scroll and select.)
3. Highlight the call record that you want to edit.
4. Press the EditDial softkey. (You may need to press More softkey first.)
5. Press the up or down arrow on the Navigation bar to move the cursor to the desired location.
6. Press the softkey to delete numbers on the left of the cursor.
7. Press the Call softkey to dial the new edited number.
8. Press the return softkey to return the Call History screen.
Clear Call History
1. Press the Applications button .
2. Select Call History. (Use the Navigation pad and Select button to scroll and select.)
3. Press the Clear List softkey to clear the entire call history on the phone.
4. Press the Exit softkey to return to Applications screen.

28 OL-23119-01
EFT DRAFT - CISCO CONFIDENTIAL
Delete Call Record From Call History
1. Press the Applications button .
2. Select Call History. (Use the Navigation pad and Select button to scroll and select.)
3. Highlight the individual call record or call group that you want to delete.
4. Press the Delete softkey. (You may need to press More softkey first.)
For a call group, pressing Delete deletes all calls in the group. A Delete Record alert message
appears to verify that you want to delete the entire group of calls.
5. Press the Cancel softkey if desired.
6. Press the Exit softkey to return to Applications screen.
Preferences
Preferences allows you to set user preferences for the following items:
• Ringtone
• Brightness
• Camera Settings
• Bluetooth
Ringtones
You can choose the ringtone, per line, that your phone plays to indicate an incoming call. For
information about adding custom ringtones to your phone, see your system administrator.
Change Ringtone for a Line
1. Press the Applications button .
2. Select Preferences. (Use the Navigation pad and Select button to scroll and select.)
3. Select Ringtone.
4. Highlight a ringtone.
5. Press Select button or Edit softkey.
6. Press the Play softkey to play the sample ringtone.
7. Press the Set softkey to apply the ringtone.
8. Press the return softkey to return to the Preferences screen.
Brightness
You can adjust your phone screen brightness level.

Applications
Cisco Unified IP Phone 8941 and 8945 User Guide for Cisco Unified Communications Manager 8.5 (SCCP) 29
EFT DRAFT - CISCO CONFIDENTIAL
Adjust the Brightness
1. Press the Applications button .
2. Select Preferences. (Use the Navigation pad and Select button to scroll and select.)
3. Select Brightness.
–
To increase brightness, press the up arrow on the Navigation pad.
–
To decrease brightness, press the down arrow on the Navigation pad.
4. Press the Save softkey to set the brightness, or press the Cancel softkey to exit.
Camera Settings
You can change the phone camera settings by selecting the available options - Auto Transmit Video
and Brightness.
Enable Auto Transmit Video
You can transmit the video automatically whenever a call is initiated or accepted.
Note If a video transmission is in progress, the camera LED turns green and when on video mute it
turns red. The LED is turned off when the camera is not in use.
1. Press the Applications button .
2. Select Preferences. (Use the Navigation pad and Select button to scroll and select.)
3. Select Camera Settings > Auto Transmit Video option.
4. Click Yes to enable automatic video transmission and No to disable the feature.
5. Press the Apply softkey to apply the feature, or press the return softkey to return to the Set-up
screen.
Adjust Brightness
You can set the brightness of the camera.
1. Press the Applications button .
2. Select Preferences. (Use the Navigation pad and Select button to scroll and select.)
3. Select Camera Settings > Brightness option.
4. Select Brightness.
–
To increase brightness, press the up arrow on the Navigation pad.
–
To decrease brightness, press the down arrow on the Navigation pad.
5. Press the Save softkey to set the brightness, or press the Exit softkey to return to the Setup screen.

30 OL-23119-01
EFT DRAFT - CISCO CONFIDENTIAL
Bluetooth
If your system administrator has set up the Bluetooth feature for your phone, you can turn it on and
off from your phone.
Turn On Bluetooth
(For Cisco Unified IP Phone 8945 only.)
1. Press the Applications button .
2. Select Preferences. (Use the Navigation pad and Select button to scroll and select.)
3. Select Bluetooth.
4. Press the Yes softkey. The Bluetooth icon appears on the phone screen header.
To add a Bluetooth accessory from this screen, select Bluetooth again.
Turn Off Bluetooth
(For Cisco Unified IP Phone 8945 only.)
1. Press the Applications button .
2. Select Preferences. (Use the Navigation pad and Select button to scroll and select.)
3. Select Bluetooth.
4. Press the No softkey.
The Bluetooth icon disappears from the phone screen header.
Accessories
You can connect external hardware to your phone using either the headjack or Bluetooth. The
accessory list, by default, contains an analog headset that can be set up to enable wideband.
View Accessories List
1. Press the Applications button .
2. Select Accessories. (Use the Navigation pad and Select button to scroll and select.)
A list of phone accessories is displayed.
3. Press the Exit softkey to return to the Applications screen.
View Accessory Details
1. Press the Applications button .
2. Select Accessories. (Use the Navigation pad and Select button to scroll and select.)

Applications
Cisco Unified IP Phone 8941 and 8945 User Guide for Cisco Unified Communications Manager 8.5 (SCCP) 31
EFT DRAFT - CISCO CONFIDENTIAL
A list of phone accessories is displayed.
3. Select an accessory from list and press the Details softkey.
The phone screen displays the details of selected accessory. The information displayed on the
phone screen depends on the accessory selected. Most of the accessories provide these details:
–
Device Name
–
Device Type
–
Configured Status
4. Press the Setup softkey to configure the selected accessory for your phone.
5. Press the Exit softkey to return to the Applications screen.
Add Bluetooth Accessory
(For Cisco Unified IP Phone 8945 only.)
Before You Begin
Before you add a Bluetooth accessory, it must be discoverable by the phone. Look for a flashing LED
on a Bluetooth accessory as an indication that it is discoverable. For more information, see the
documentation from the Bluetooth accessory manufacturer.
1. Press the Applications button .
2. Select Accessories. (Use the Navigation pad and Select button to scroll and select.)
3. Select Add Bluetooth Accessory.
The phone searches for discoverable accessories that are supported. When an accessory is found,
it is added to the list in the Adding Bluetooth Accessory screen.
4. Select the accessory and press the Connect softkey.
5. The phone automatically attempts to connect the accessory using a Bluetooth device PIN of
“0000.” If your accessory requires a different PIN and the Adding PIN screen appears, enter the
PIN for your accessory.
When the connection is completed, the Bluetooth active icon appears on the phone screen
header and a checkmark appears next to the connected accessory.
Delete Bluetooth Accessory
(For Cisco Unified IP Phone 8945 only.)
1. Press the Applications button .
2. Select Accessories. (Use the Navigation pad and Select button to scroll and select.)
3. Select a Bluetooth accessory and press the Delete softkey.
The Bluetooth accessory will be disconnected (if it was connected) and removed from the
Accessories list.

32 OL-23119-01
EFT DRAFT - CISCO CONFIDENTIAL
Connect Bluetooth Accessory
(For Cisco Unified IP Phone 8945 only.)
Before You Begin
Before you can connect a Bluetooth accessory, it must be already added as an accessory to the phone.
1. Press the Applications button .
2. Select Accessories. (Use the Navigation pad and Select button to scroll and select.)
3. Select a Bluetooth accessory and press the Connect softkey.
When the connection is completed, the Bluetooth active icon appears on the phone screen
header and a checkmark appears next to the connected accessory.
Disconnect Bluetooth Accessory
(For Cisco Unified IP Phone 8945 only.)
1. Press the Applications button .
2. Select Accessories. (Use the Navigation pad and Select button to scroll and select.)
3. Select a Bluetooth accessory and then press the Disconnect softkey.
Administrator Settings
For information on accessing and changing the Administrator Settings, see your system administrator.
Phone Information
Phone Information allows you to view the model information for your phone:
• Model Number
• IP Address
• Host Name
• Active Load
• Last Upgrade
• Active Server
• Stand-by Server

Applications
Cisco Unified IP Phone 8941 and 8945 User Guide for Cisco Unified Communications Manager 8.5 (SCCP) 33
EFT DRAFT - CISCO CONFIDENTIAL
View Phone Information
1. Press the Applications button .
2. Select Phone Information. (Use the Navigation pad and Select button to scroll and select.)
3. Press the Exit softkey to return to the Applications screen.
34 OL-23119-01
EFT DRAFT - CISCO CONFIDENTIAL

Cisco Unified IP Phone 8941 and 8945 User Guide for Cisco Unified Communications Manager 8.5 (SCCP) 35
EFT DRAFT - CISCO CONFIDENTIAL
Contacts
Phone Contacts
The Cisco Unified IP Phone 8941 and 8945 provide you with access to corporate and personal contacts
using these directories:
• Corporate Directory
• Personal Directory
You may see other directories listed in Contacts. For more information, see your system administrator.
Corporate Directory
The corporate directory contains corporate contacts that you can access on your phone. Your system
administrator sets up and maintains the directory.
You can dial calls from your corporate directory:
• When you are not on another call.
• When you are on another call.
Search for and Dial a Contact
1. Press the Contacts button .
2. Select Corporate Directory. (Use the Navigation pad and Select button to scroll and select.)
3. Select one or all of these search criteria to search for a co-worker:
–
First Name
–
Last Name
4. Enter the search criteria information, press the Submit softkey, and select a contact.
5. To dial, perform any of these actions:
–
Press the Dial softkey.
–
Press the Select button.
–
From the keypad, press the number that is displayed in the upper right-hand corner of the
contact label.
–
Press the Speakerphone button .

36 OL-23119-01
EFT DRAFT - CISCO CONFIDENTIAL
–
Press the Headset button .
–
Pick up the handset.
Search for and Dial a Contact While on a Call
1. Press the Contacts button .
2. Select Corporate Directory. (Use the Navigation pad and Select button to scroll and select.)
3. Select one or both of these search criteria to search for a co-worker:
–
First Name
–
Last Name
4. Enter the search criteria information and press the Search softkey.
5. Press the Dial softkey. The first call gets automatically put on hold while the second call
gets dialed.
Personal Directory
The personal directory contains a list of your personal contacts. You can assign fast-dial codes to your
personal directory entries for fast dialing.
There are two ways you can set up and maintain your personal directory:
• Phone—Using your phone, you can:
–
Set up and use Personal Directory
–
Assign and use fast-dial codes
• User Options Web Pages—Using User Options web pages, you can also set up and use your
personal directory.
Related Topics
User Options, page 71
Personal Directory Options
From your phone, you can use personal directory options to:
• Sign in and out
• Add an entry
• Search for an entry
• Dial a number
• Delete an entry
• Edit an entry

Contacts
Cisco Unified IP Phone 8941 and 8945 User Guide for Cisco Unified Communications Manager 8.5 (SCCP) 37
EFT DRAFT - CISCO CONFIDENTIAL
Sign In and Out of Personal Directory
1. Press the Contacts button .
2. Select Personal Directory. (Use the Navigation pad and Select button to scroll and select.)
3. Enter your user ID and PIN (provided by your system administrator) and then press the
Submit softkey.
4. Select Log Out.
5. Press the Select softkey.
6. Press the OK softkey to sign out.
You are logged out automatically after a certain amount of time. This time limit can vary. For more
information, see your system administrator.
Add a Personal Directory Entry
1. Press the Contacts button .
2. Sign in to Personal Directory.
3. Select Personal Address Book; the Search for an entry screen displays.
4. Press the Submit softkey.
5. Press the New softkey (you may need to press the More softkey first).
6. Enter the nickname information (you can also enter a name).
7. Press the Phones softkey and enter the phone numbers.
Include any required access codes such as a 9 or 1.
8. Press the Submit softkey to add the entry to your personal directory.
Search for an Entry in Personal Directory
1. Press the Contacts button .
2. Sign in to Personal Directory.
3. Select Personal Address Book.
4. Select one, all, or none of these criteria to search for an entry:
–
Last Name
–
First Name
–
Nickname
5. Enter the search criteria information and then press the Submit softkey. The name displays.

38 OL-23119-01
EFT DRAFT - CISCO CONFIDENTIAL
Dial a Number from Personal Directory
1. Press the Contacts button .
2. Sign in to Personal Directory.
3. Select Personal Address Book and search for an entry.
4. Select the personal address book entry that you want to dial.
5. Press the Dial softkey.
Delete a Personal Directory Entry
1. Press the Contacts button .
2. Sign in to Personal Directory.
3. Select Personal Address Book and search for an entry.
4. Press the Select softkey.
5. Press the Edit softkey.
6. Press the Delete softkey. (You may need to press the More softkey first.)
7. Press the OK softkey to confirm the deletion.
Edit a Personal Directory Entry
1. Press the Contacts button .
2. Sign in to Personal Directory.
3. Select Personal Address Book and search for an entry.
4. Press the Select softkey.
5. Press the Edit softkey.
6. Modify the entry information.
7. Press the Phones softkey to modify a phone number.
8. Press the Update softkey.
Fast-Dial Codes with Personal Directory
Using the phone, you can:
• Assign a fast-dial code to a Personal Directory entry
• Place a call using a fast-dial code
• Delete a fast-dial code

Contacts
Cisco Unified IP Phone 8941 and 8945 User Guide for Cisco Unified Communications Manager 8.5 (SCCP) 39
EFT DRAFT - CISCO CONFIDENTIAL
Assign a Fast-Dial Code to a Personal Directory Entry
1. Press the Contacts button .
2. Sign in to Personal Directory. (Use the Navigation pad and Select button to scroll and select.)
3. Select Personal Address Book.
4. Enter the name information and press the Submit softkey.
5. Press the Select softkey and then press the FastDial softkey.
6. Select a number and press the Select softkey.
7. Scroll to an unassigned fast-dial index.
(You may have to press the Next softkey to get to more fast-dial indexes.)
8. Press the Select softkey.
Place a Call Using a Fast-Dial Code
1. Press the Contacts button .
2. Sign in to Personal Directory.
3. Select Personal Fast Dials and scroll to a fast-dial code.
(You may have to press the Next softkey to get to more fast-dial codes.)
4. Select the fast-dial code you want to dial and press the Dial softkey.
Delete a Fast-Dial Code
1. Press the Contacts button .
2. Sign in to Personal Directory.
3. Select Personal Fast Dials and search for a fast-dial code.
4. Select the fast-dial code that you want to delete and press the Remove softkey.
(You may need to press the More softkey first.)
5. Select the index to delete.
6. Press the Remove softkey.
40 OL-23119-01
EFT DRAFT - CISCO CONFIDENTIAL
Cisco Unified IP Phone 8941 and 8945 User Guide for Cisco Unified Communications Manager 8.5 (SCCP) 41
EFT DRAFT - CISCO CONFIDENTIAL
Messages
Voice Messages
Voice messages are stored on your voicemail system. Your company determines the voicemail system
your phone uses.
You can:
• Personalize your voicemail
• Check for voice messages
• Listen to voice messages
Personalize Your Voicemail
Press the Messages button , then follow the voice prompts.
Check for Voice Messages
Check for voice messages in any of these ways:
• Look for a solid red light on your handset.
You can set up the visual message waiting lamp using your User Options Web pages.
• Look for a Message icon on a line label.
The red background indicates that there are new voice messages.
When you select a line with a Message icon, a Voicemail icon displays on the right side of the
phone screen.
Depending on your voicemail system, you might see a count of your new voice messages on the
Message icon and Voicemail icon .
If there are more than 99 new voice messages, the message count is replaced by a plus (+) sign.
If call forwarding is set up on a line that has new voice messages, the Call Forward icon
replaces the Message icon on the line label.
• Listen for a stutter tone (if available) from your handset, headset, or speakerphone when you place
a call.

42 OL-23119-01
EFT DRAFT - CISCO CONFIDENTIAL
The stutter tone is line-specific. You hear it only when using the line that has new voice messages.
You can set up audible message waiting tones using your User Options Web pages.
Related Topics
• Change the Audible Voice Message Indicator Setting Per Line, page 74
• Change the Voice Message Indicator Setting Per Line, page 73
Listen to Voice Messages
1. To listen to voice messages, do one of the following:
• Press the Messages button .
• Select a line with a Message icon and press the Session button next to the
Voicemail icon .
2. Follow the prompts to listen to your voice messages.
After you listen to your new voice messages, the message indicators are updated on the phone
screen. If there are no new voice messages, the Message icon is removed from the line label, and
the Voicemail icon is removed from the right side of the phone screen.

Cisco Unified IP Phone 8941 and 8945 User Guide for Cisco Unified Communications Manager 8.5 (SCCP) 43
EFT DRAFT - CISCO CONFIDENTIAL
Calling Features
Feature Buttons and Softkeys
Depending on how your system administrator set up your phone, some features included in this guide
may not be available to you.
This table provides information about some of the features that are available on softkeys and dedicated
feature buttons and some that your system administrator sets up on programmable feature buttons.
Feature Name
Dedicated
Feature
Button
Programmable
Feature
Button Softkey
Answer X
Call Back X X
Call Forward All X X
Call Park X X
Call Park Line Status X
Call Pickup X
Call Pickup Line Status X
Conference X X
(available while
on a conference
only)
Divert X
Do Not Disturb X
Group Pickup X
Hold X
Hunt Groups X
Intercom X
Malicious Call Identification
(MCID)
X

44 OL-23119-01
EFT DRAFT - CISCO CONFIDENTIAL
Agent Greeting
The Agent Greeting feature allows an agent to create and update a prerecorded greeting that plays at
the beginning of a call, such as a customer call, before the agent begins the conversation with the caller.
The agent can prerecord a single greeting or multiple ones as needed.
When a customer calls, both callers hear the prerecorded greeting. The agent can remain on mute until
the greeting ends or answer the call over the greeting.
For more information, see your system administrator.
Answer
Answer allows you to answer the oldest call that is available on all line appearances on your phone,
including Hold Reversion and Park Reversion calls that are in an alerting state. Incoming calls are
always given priority over Held or Park Reversion calls.
Your system administrator sets up the Answer button depending on your call-handling needs and work
environment. This feature is typically set up for users who have multiple lines.
Meet Me X
Mobile Connect X
Mute (Audio) X
Mute (Video) X
Other Pickup X
Privacy X
Quality Reporting Tool (QRT) X
Redial X
Speed Dial X X
Speed Dial Line Status X
Transfer X X
(available during
a transfer only)
Feature Name
Dedicated
Feature
Button
Programmable
Feature
Button Softkey

Calling Features
Cisco Unified IP Phone 8941 and 8945 User Guide for Cisco Unified Communications Manager 8.5 (SCCP) 45
EFT DRAFT - CISCO CONFIDENTIAL
Answer Your Oldest Call First
To answer the oldest incoming call first, press the Answer button.
Auto Answer
Auto Answer prompts your phone to automatically answer incoming calls after one ring.
Your system administrator sets up Auto Answer to work with either your speakerphone or headset.
Auto Answer with Your Headset
If Auto Answer with Headset is active and configured, the Headset button is illuminated and
headset connected, incoming call is answered with the headset. Otherwise, calls ring normally and you
must manually answer them. To keep the Headset button illuminated, use buttons and softkeys
(instead of the Headset button) to place and end calls. Your administrator has to set headset as the
default audio path for auto answer.
Auto Answer with Your Speakerphone
Keep the handset in the cradle and the Headset button unlit. Otherwise, calls ring normally and
you must manually answer them.
Barge
The barge feature allows you to add yourself to non-private calls on a shared line. You can convert
the call into a conference and add new participants.
Add Yourself to a Call on a Shared Line
Press the red line button for the shared line. You are added to the call.
Call Back
Call Back allows you to receive an audio and visual notification on your phone when a busy or
unavailable party becomes available.
Call Back, which is available as a softkey, may also be available as a feature button. See your system
administrator for additional information.
46 OL-23119-01
EFT DRAFT - CISCO CONFIDENTIAL
Set up a Call Back Notification
1. Press the Callback softkey while listening to the busy tone or ring sound.
A confirmation screen displays on the phone.
2. Press the Exit softkey to exit the confirmation screen, if desired.
Your phone alerts you when the line is free.
3. Press the Dial softkey to place the call again, if desired.
Call Forward All
Call Forward All allows you to forward calls from any line on your phone to another number.
You can set up Call Forward All directly on your phone for any line. To set up Call Forward All
remotely, go to your User Options web pages.
There are two types of call-forwarding features that your system administrator may set up on
your phone:
• Unconditional call forwarding (Call Forward All)—Applies to all calls that you receive.
• Conditional call forwarding (Call Forward No Answer, Call Forward Busy, Call Forward No
Coverage)—Applies to certain calls that you receive, according to conditions, and is accessible
only from your User Options web pages.
When forwarding calls from your phone:
• Enter the call forward target number exactly as you would dial it from your phone. For example,
enter an access code or the area code, if necessary.
• Call forwarding is phone-line specific. If a call reaches you on a line where call forwarding is not
enabled, the call will ring as usual.
• Your system administrator can set up other call-forward options that do the following:
–
Allow calls placed from the call forward target number to your phone to ring through, rather
than be forwarded.
–
Prevent you from creating a call-forward loop or exceeding the maximum number of links in
a call forwarding chain.
Related Topics
Set Up Call Forwarding Per Line, page 73

Calling Features
Cisco Unified IP Phone 8941 and 8945 User Guide for Cisco Unified Communications Manager 8.5 (SCCP) 47
EFT DRAFT - CISCO CONFIDENTIAL
Forward Calls on Your Phone
1. On any idle line from which you want to forward your calls, press the Forward All softkey.
2. Enter a phone number, or select an entry from the Call History list. (Depending on how your
voicemail system is set up, you may be able to press the Messages button to forward all calls
to voicemail.)
Visual confirmation displays for a few seconds to confirm the number to which your calls will be
forwarded.
3. To verify that your calls are forwarded, look for:
–
A Forward All icon in the line label.
–
The forwarding information in the header.
4. To cancel call forwarding, press the Forward Off softkey.
To set up conditional call forwarding, go to your User Options Web pages.
Call Park
Call Park allows you to use your phone to park (temporarily store) a call, which you can then retrieve
from another phone (such as a phone at a coworker’s desk or in a conference room).
There are two ways you can park a call:
• Park—Allows you to park an active call that you answered on your phone, and retrieve it using
another phone in the Cisco Unified Communications Manager system.
• Directed Call Park—Allows you to park and retrieve an active call in two different ways:
–
Assisted Directed Call Park—Allows you to park an active call by pressing a feature button,
which your system administrator sets up as a speed dial line.
With this type of directed call, you can monitor the status of the line (in-use, idle, or Do Not
Disturb) using Line Status indicators.
–
Manual Directed Call Park—Allows you to park an active call by transferring it to a Directed
Call number, which your system administrator sets up.
You retrieve the call at another phone by dialing a park retrieval prefix number (provided by
your system administrator) and then dialing the Directed Call number you used to park
the call.
Your system administrator sets up either the Directed Call Park or the Park feature on your phone,
but not both.
Related Topics
Line Status, page 58

48 OL-23119-01
EFT DRAFT - CISCO CONFIDENTIAL
Park and Retrieve a Call Using Park
1. During a call, press the Park softkey, then hang up.
Your phone displays the number where the system parked the call. The parked call is put on hold,
and you can press the Resume softkey to resume the call on your phone.
2. From any other Cisco Unified IP Phone in your network, enter the number where the call is parked
to retrieve the call.
If you do not retrieve the call within a certain amount of time (set by your system administrator)
you will receive an alert tone, at which time you can:
–
Press the Answer softkey to answer the call on your phone.
–
Retrieve the call from another phone.
If you fail to retrieve or answer the call within a specified amount of time, the call is redirected to
another destination (set up by your system administrator), such as voicemail. If the call gets
redirected, it can no longer be retrieved by using Call Park.
Park and Retrieve a Call Using Assisted Directed Call Park
1. During a call, press a Directed Call Park button displaying an idle Line Status indicator.
2. Retrieve the call, from any other Cisco Unified IP Phone in your network as follows:
a. Enter the park retrieval prefix.
b. Dial the Directed Call number.
For example, if the park retrieval prefix is “99” and the Directed Call number is “1234,”
enter 991234.
If you do not retrieve the call within a certain amount of time (set by your system administrator)
you will receive an alert tone, at which time you can:
–
Press the Resume softkey to resume the call on your phone.
–
Retrieve the call from another phone.
If you fail to retrieve or resume the call within a specified amount of time, the call is directed to
another destination (set up by your system administrator), such as voicemail.
Park and Retrieve a Call Using Manual Directed Call Park
1. During a call, press the Transfer button .
2. Enter the Directed Call number where you will park the call.
3. Press Transfer again to finish parking the call, then hang up.