Cisco Systems DX700976 Desktop Telepresence Device User Manual
Cisco Systems Inc Desktop Telepresence Device Users Manual
Contents
- 1. Users Manual
- 2. Compliance Manual
- 3. Complaince Manual
Users Manual
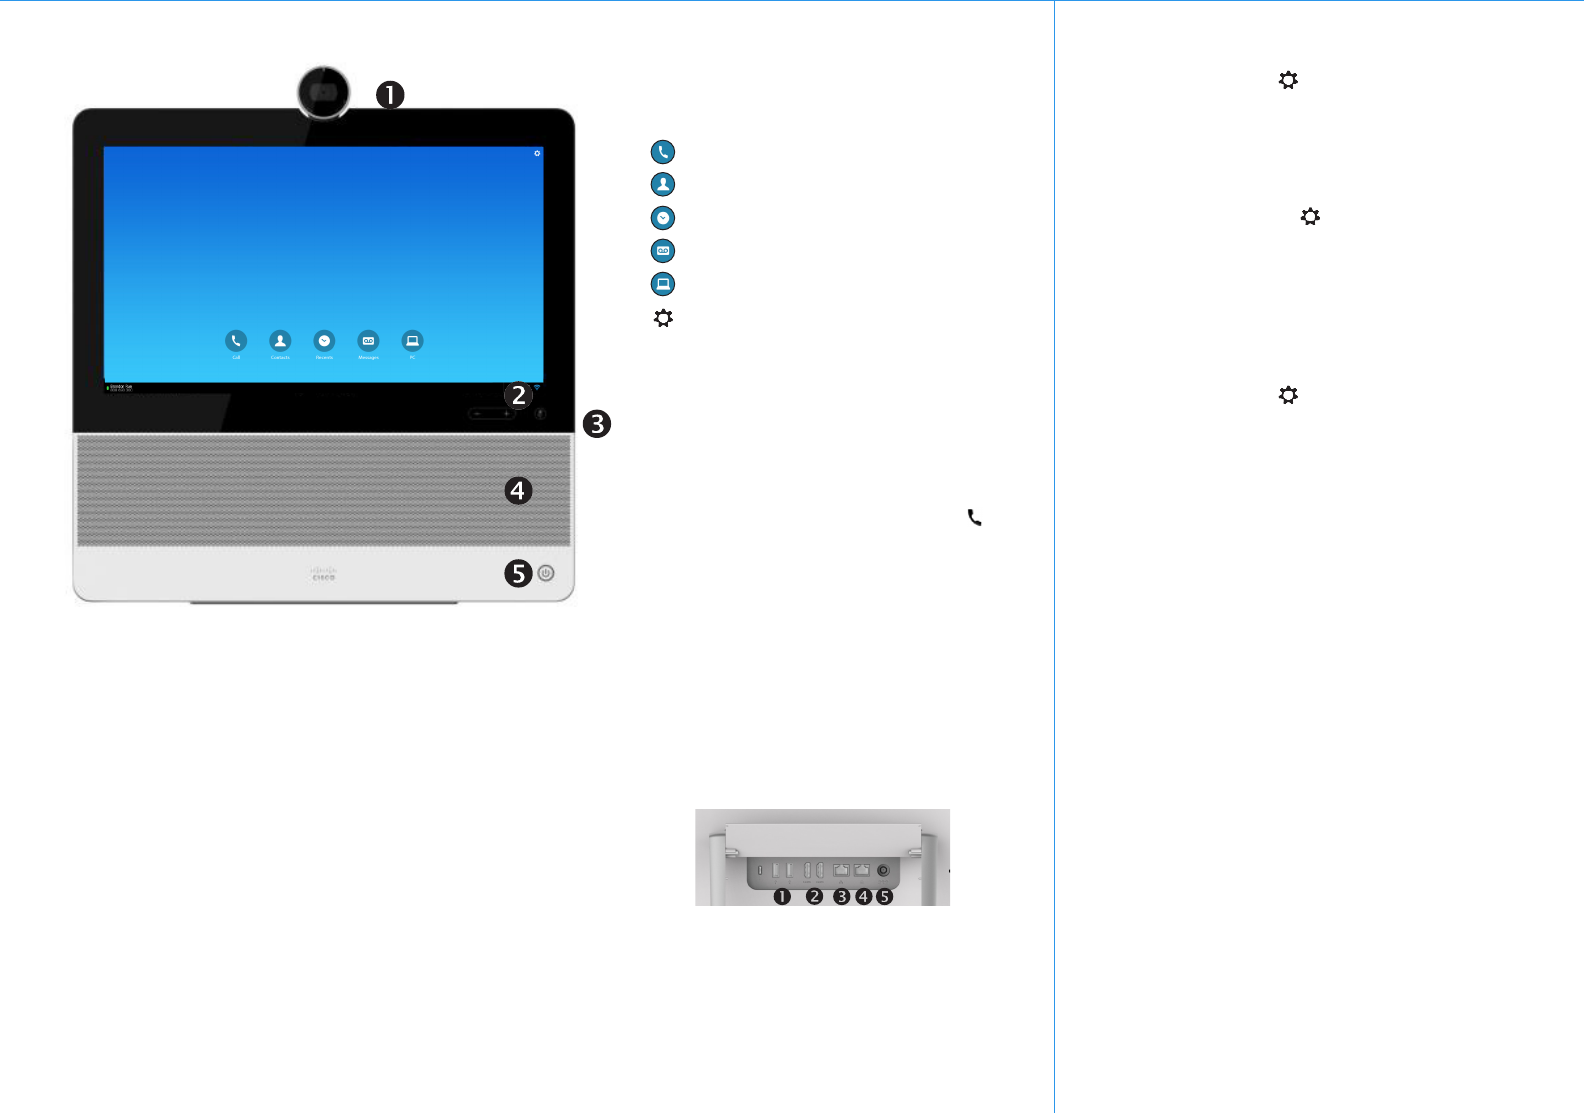
Front View and Home Screen
Rear View
Cisco DX70 Quick Reference Guide
Draft 2014.02.14
REVIEW DRAFT—CISCO CONFIDENTIAL
1. USB ports
2. HDMI sockets (future use)
3. Connect your PC LAN here to let your DX70
and PC share a common LAN connection
4. LAN connection
5. Power supply socket.
Phone Only Mode
Standard Mode
Show Self View
Tap the Settings icon ( ) in the upper right corner and
select Self view from the menu.
Forward All Calls
1. Tap the Settings icon ( ) in the upper right corner and
select Forward all calls.
2. You will be prompted to specify a target phone number.
3. To cancel Forward all calls, repeat the process.
Turn On Do Not Disturb
Tap the Settings icon ( ) in the upper right corner and
select Do not disturb. Available only when feature has been
activated by your Administrator.
Mute a Call
Press the Microphone mute button on the right side of the
system. To unmute a call, press again.
Stop Your Video Transmission
Turn the camera shutter counter-clockwise. To resume
video transmission, turn shutter clockwise.
Voicemail
The Message Waiting Icon (MWI) light indicates that you
have a new voice message.
To view your voice messages:
1. Tap Recents.
2. Tap Call voicemail.
Play voice message:
Tap Play.
If your system operates in Standard Mode, you must
start the Phone App to use the system as a phone.
To start the Phone App tap the Phone icon ( ) in the
left corner of the black bottom bar. The Phone icon is
shown in Standard Mode only.
The usual Android navigation buttons (Back, Home
and Recently Used Apps)will be shown when the
Phone App is running.
Note! The descriptions provided in this document
assume that the system either is in Phone Only Mode
or that the Phone Application is running.
Place calls
Access your list of Contacts
Display the list of Recent calls
Display any Voice Mail (Messages)
View PC (if applicable)
Display the Settings menu
(icon in upper right corner).
If your system operates in Phone Only Mode
(modes are set up by your Administrator), the
following functions are available:
Camera with privacy shutter, turn counter-clockwise to
shut and clockwise to open
Microphone mute button and loudspeaker volume
controls
SD card slot and connectors for headset and USB.
Loudspeaker
Power On/O.
EFT DRAFT - CISCO CONFIDENTIAL DO NOT DISTRIBUTE
Americas Headquarters
Cisco Systems, Inc.
170 West Tasman Drive
San Jose, CA 95134-1706, USA
http://www.cisco.com
Cisco and the Cisco logo are trademarks or registered trademarks
of Cisco and/or its aliates in the U.S. and other countries. To
view a list of Cisco trademarks, go to this URL:www.cisco.com/
go/trademarks.
Third-party trademarks mentioned are the property of their
respective owners. The use of the word partner does not imply a
partnership relationship between Cisco and any other company.
(1110R)
© 2014 Cisco Systems, Inc. All rights reserved.
Google, Google Play, Android and other marks are trademarks of
Google Inc.
The terms HDMI and HDMI High-Denition Multimedia Interface,
and the HDMI Logo are trademarks or registered trademarks of
HDMI Licensing LLC in the United States and other countries.
REVIEW DRAFT—CISCO CONFIDENTIAL
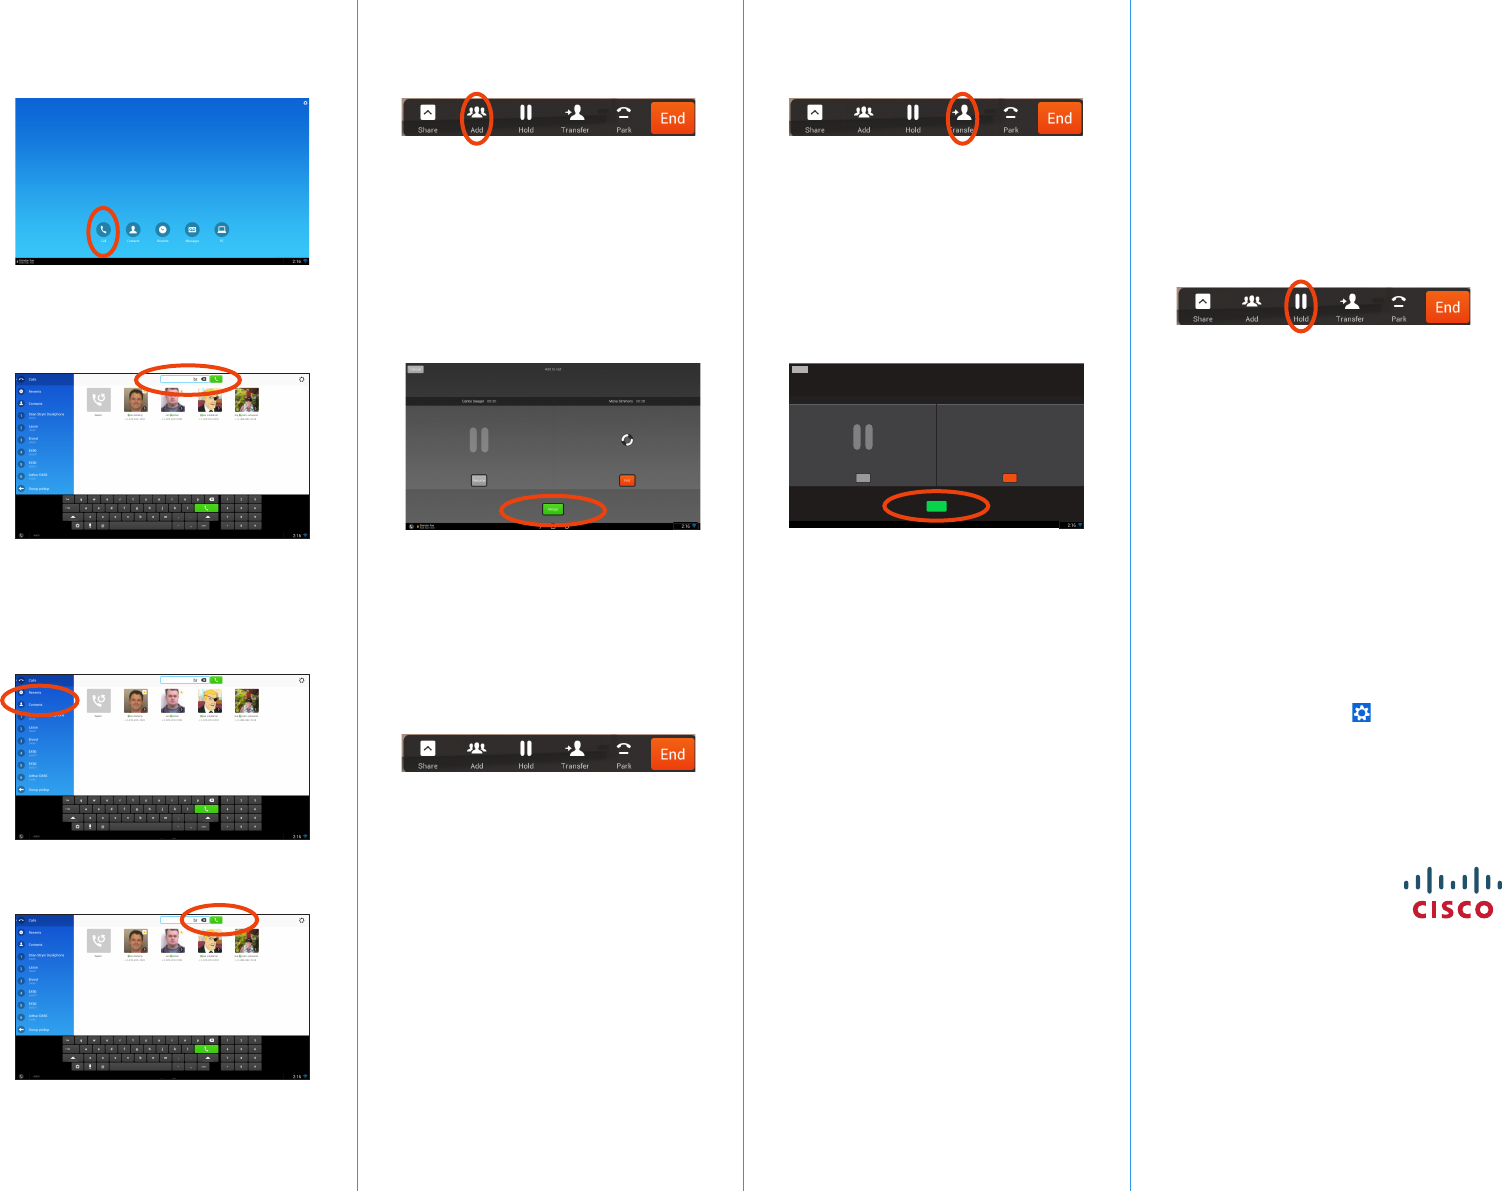
Place a Call Create a Conference
Tap Calls as shown.
Tap the Search or call eld at the top.
This will cause the virtual keyboard to
appear.
Type in name or number. Possible matches
will appear as you type. Alternatively, tap
Recents or Contacts in the left column to
select whom to call from any of those lists
(just tap the one to call).
Tap the green Call button to place the call.
From a call, tap Add.
Tap the Search or call to add eld. This
will invoke the virtual keyboard unless you
have an external keyboard connected.
Tap the Search or call to add eld. This
will invoke the virtual keyboard unless you
have an external keyboard connected.
From a call, tap Transfer.
Key in the name or number. Possible
matches will occur as you type. Tap Call.
Key in the name or number. Possible
matches will occur as you type. Tap Call.
Current call will be put on hold. Tap Merge
to combine the calls into a conference.
Current call will be put on hold. Tap
Transfer to complete the task.
Repeat 1–4 to include more participants.
Leave a Conference
Transfer a Call
Any conference participant may leave the
conference any time by tapping End. This
will not aect the conference as such.
Place a Call on Hold
An active call goes on hold whenever you pick
up an incoming or held call, start a new call,
initiate a transfer or a conference.
You may also deliberately put a call on hold:
Make sure that the call you want to put
on hold is highlighted.
Tap Hold.
Tap the green Resume button to get the
call back.
Call History
To view your call history, tap Recents in the left
column.
Add Recents to Contacts
You may add any entry from Recents to your list
of Contacts.
1. Select an entry in Recents.
2. Tap the Settings icon (
) in the upper right
corner.
3. Tap Add to Contacts.
4. Tap again to undo.
1. 1.
3. 3.
3.
2.
2.
1.
1.
2.
4. 4.
5.
2.
3.3.
4.
18:00
Susan Noble 00:12 Mona Simmons Calling
Resume End
Transfer
Brandon Rue 18:00
808 690 300
Transfer : Susan Noble
Cancel
EFT DRAFT - CISCO CONFIDENTIAL
DO NOT DISTRIBUTE