Cisco Systems DX800956 Desktop Telepresence Device User Manual Users Manaul
Cisco Systems Inc Desktop Telepresence Device Users Manaul
Contents
- 1. Users Manaul
- 2. Users Manual Compliance Info
- 3. Users Manual
Users Manaul

1
D1510401 User Guide
Cisco Collaborate Desk DX80
Produced: April 2014, All contents © 2014
Cisco Systems, Inc. All rights reserved.
User
Guide
Cisco
DX80
EFT Draft 1—Cisco Condential—Do Not Distribute

2
D1510401 User Guide
Cisco Collaborate Desk DX80
Produced: April 2014, All contents © 2014
Cisco Systems, Inc. All rights reserved.
EFT Draft 1—Cisco Condential—Do Not Distribute
What’s in this guide
Contents
Introduction
Introduction ........................................................................... 4
Best Practice ........................................................................ 4
Introduction ........................................................................... 5
Tour the DX80 ..................................................................... 5
Set Up Your Phone for the First Time ................................. 6
Security ................................................................................ 7
Set a PIN Code or Password to Restrict Access................ 7
If You Forget Your PIN Code or Password .......................... 8
Lock and Unlock Screen .................................................... 9
Set or Change Screen-Lock Timeout ...............................10
Calling Tasks
Common Call Tasks .............................................................12
Answer Call .......................................................................12
Disconnect Call .................................................................13
Hold and Resume ..............................................................14
Place Call ...........................................................................15
Place Call Using Contacts or Recents ...............................16
Place Call Using Speed Dials ............................................17
Video Call Basics ...............................................................18
Activating Selfview ............................................................19
Visual Voicemail .................................................................. 20
Send a Voicemail .............................................................. 20
Listen to a Voicemail ..........................................................21
Reply to a Voicemail ......................................................... 22
Forward a Voicemail ......................................................... 23
Delete a Voicemail ............................................................ 24
Call Park ............................................................................. 25
Store and Retrieve Active Call with Call Park ................... 25
Call Transfer ........................................................................ 26
Transfer a Call ................................................................... 26
Ad Hoc Conference ............................................................ 27
Create Conference ........................................................... 27
Meet Me Conference ......................................................... 28
Start or Join a Meet Me Conference ................................ 28
WebEx Meetings
Start a Scheduled WebEx Meeting .....................................31
Contacts
Contacts ............................................................................. 33
Make Someone a Contact From Call History ................... 33
Make Someone a Favorite ................................................ 34
Allocating Numbers to Speed Dial ................................... 35
Camera
Setting the Camera Exposure Level ................................... 37
Settings
Gain Access to the Settings ............................................... 39
All entries in the table of contents are
clickable hyperlinks that will take you
to the corresponding article.
To go between chapters, you may
also click on any of the icons in the
sidebar.

3
D1510401 User Guide
Cisco Collaborate Desk DX80
Produced: April 2014, All contents © 2014
Cisco Systems, Inc. All rights reserved.
EFT Draft 1—Cisco Condential—Do Not Distribute
Introduction
i

4
D1510401 User Guide
Cisco Collaborate Desk DX80
Produced: April 2014, All contents © 2014
Cisco Systems, Inc. All rights reserved.
EFT Draft 1—Cisco Condential—Do Not Distribute
Other Tips
Best Practice
Introduction
A successful video conference provides
a face-to-face meeting, even if the
participants are miles or continents apart.
Keep in mind that it still is a meeting—
normal etiquette and dress code apply
even here.
General
• Consider setting the unit to Automatic
Answer, but mute the microphone for
privacy reasons, if possible.
• Do not forget to rehearse “the noble
art of operating a video system” to the
extent needed.
In the meeting room
• Make sure that you do not experience
obstacles blocking the view to the
microphone at all times.
• Noise sources like computers placed
on the table should always be placed
away from the microphone of your unit.
The noise from such sources is often
perceived as surprisingly loud by the
remote participants.
• Pay attention to the background your
system will provide to the remote
participants. If the camera captures
the corridor outside your oce, people
passing by may distract your remote
participants. This applies as well to
curtains with a distinct texture pattern
and, in particular, to curtains moving due
to draught in the room.
• If you are going to share content
some of the participants will normally
make use of duo video. That implies
the use of two video streams, one
showing the presentation and the other
showing the presenter—or the group of
presenters. Smaller systems may force
you to choose between showing the
presentation or the presenter.
• For duo video some attention is needed.
Duo video is sometimes shown side–by–
side with half the screen showing the
presentation and the other half showing
the presenter. Provide the impression
that you seem to look towards the
presentation instead of the impression
that you sit with your back towards it,
when all is viewed on the remote monitor.
If in doubt, look straight into the camera
to avoid this situation.
Brightness control
To adjust brightness, colors or other
settings of your system, use the
touch pad. Adjust the monitor to suit
the conditions of the conference
room.
5
D1510401 User Guide
Cisco Collaborate Desk DX80
Produced: April 2014, All contents © 2014
Cisco Systems, Inc. All rights reserved.
EFT Draft 1—Cisco Condential—Do Not Distribute
Introduction
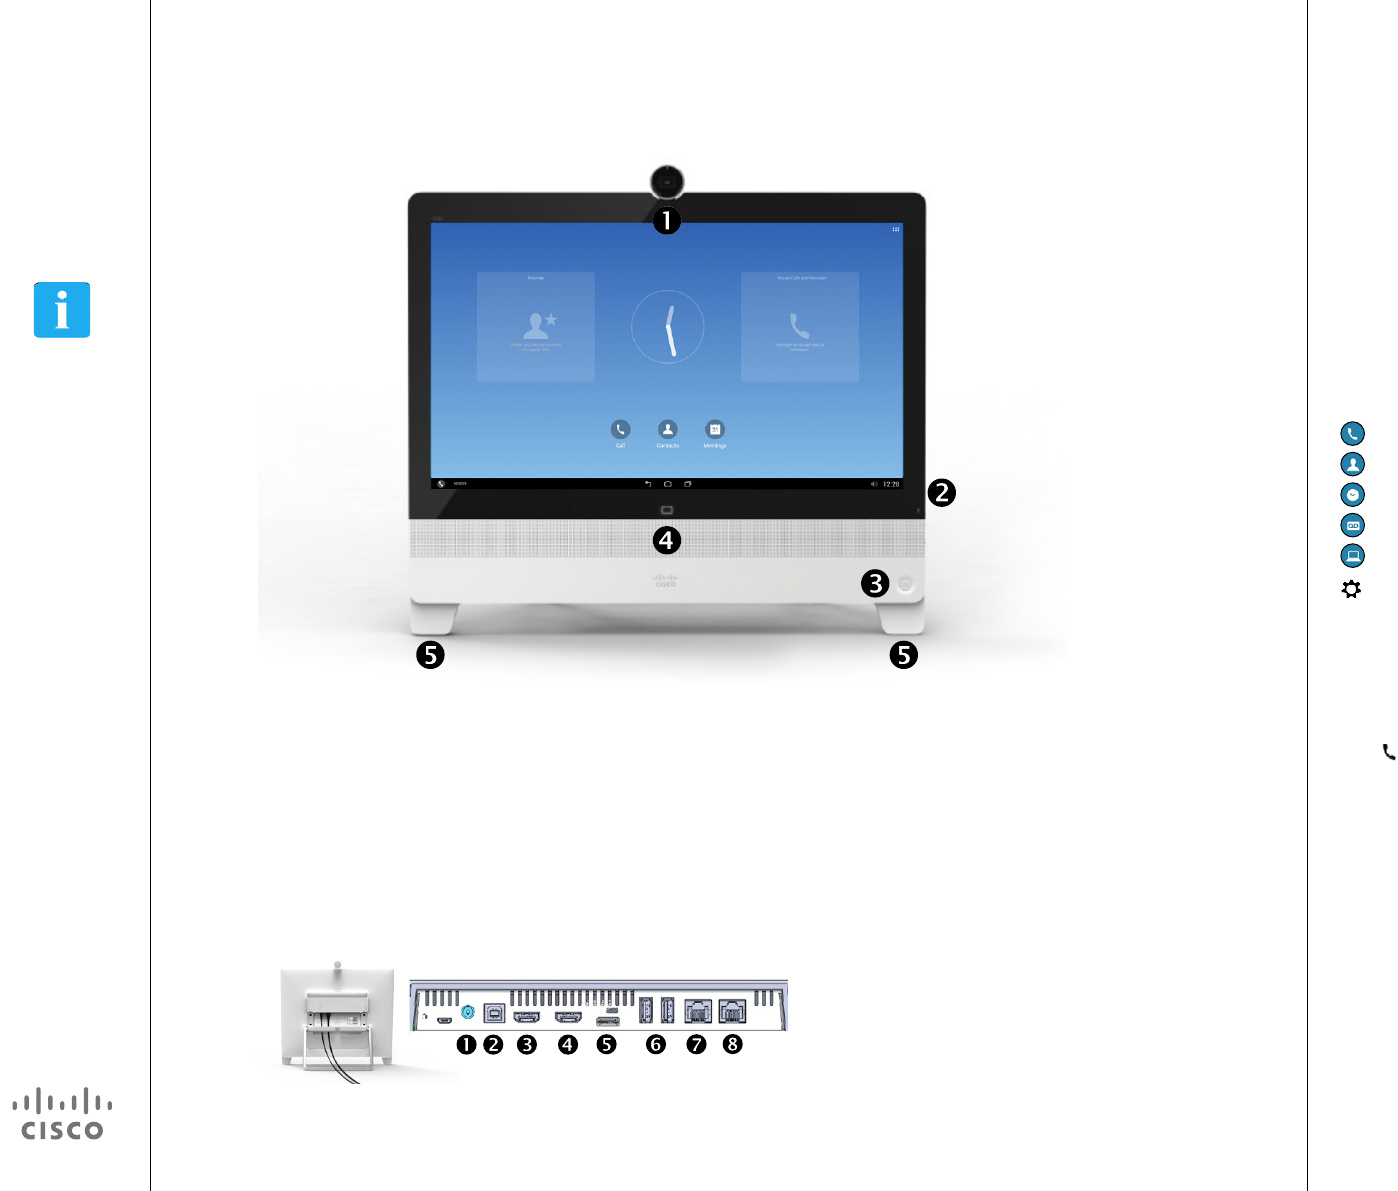
Tour the DX80
Camera with privacy shutter, turn counter-clockwise
to shut and clockwise to open
Microphone mute button, loudspeaker volume
controls and USB socket on the right side of the unit
Power On/O
Loudspeaker
Microphone in each leg.
Power Supply
USB computer connection
HDMI computer connection
HDMI external monitor connection
SD card slot and Kensington lock
USB ports
Connect your computer LAN here to let your
DX80 and computer share a common LAN
connection
LAN connection.
About Operating Modes
Your DX80 may operate in one of
two modes; Phone Only Mode or
Standard Mode. In Standard Mode
the DX80 acts as an Android tablet.
Operating modes are set up by your
Administrator.
Phone Only Mode: Provides access
to the following functions:
Place calls
Access your list of Contacts
Display the list of Recent calls
Display any Voice Mail (Messages)
View PC (if applicable)
Display the Settings menu
(icon in upper right corner).
Standard Mode: Requires that you
start the Phone App before you can
use the system as a phone.
To start the Phone App tap the Phone
icon ( ) in the left corner of the black
bottom bar. The Phone icon is shown
in Standard Mode only.
The usual Android navigation buttons
(Back, Home and Recently Used
Apps) will be shown when the Phone
App is running.
Note! The descriptions provided in
this document assume that the system
either is in Phone Only Mode or that
the Phone Application is running.
6
D1510401 User Guide
Cisco Collaborate Desk DX80
Produced: April 2014, All contents © 2014
Cisco Systems, Inc. All rights reserved.
EFT Draft 1—Cisco Condential—Do Not Distribute
Introduction
Set Up Your Phone for the First Time
When you start the system for the rst time,
you will be invited to run a wizard. Just tap
Get started, as outlined.
Enter your Username and tap Continue.
Finally, it is time to make yourself at home.
You will now be invited to put your favorite
apps as shortcuts on your screen.
At rst, you will be prompted to log into
WebEx. Enter your WebEx username and
tap Next.
You will then be prompted to enter
username and password for your Voicemail.
And then you are done!
You will now be prompted sign in to WebEx
Messenger or CUCM IM and Presence.
Tap the one that applies to you.
To let your contacts and calendar get synced
up, you need to provide your Email address
and the corresponding password.
About Setup
Provided that self-provisioning is
allowed in your organization, your
DX80 will automatically prompt you to
enter the usernames and passwords
needed for the appropriate accounts.
Note! This wizard will not appear for
units running in Phone Only Mode.
After you have run this wizard you will,
in most cases, be prompted to provide
a PIN code or password to restrict
access to your unit. This is described
on the following page.
If you for some reason should want
to run this wizard at a later stage, you
must perform a Factory Reset. All user
specied settings will then be erased
and you will be able to start all over
again.
7
D1510401 User Guide
Cisco Collaborate Desk DX80
Produced: April 2014, All contents © 2014
Cisco Systems, Inc. All rights reserved.
EFT Draft 1—Cisco Condential—Do Not Distribute
Security
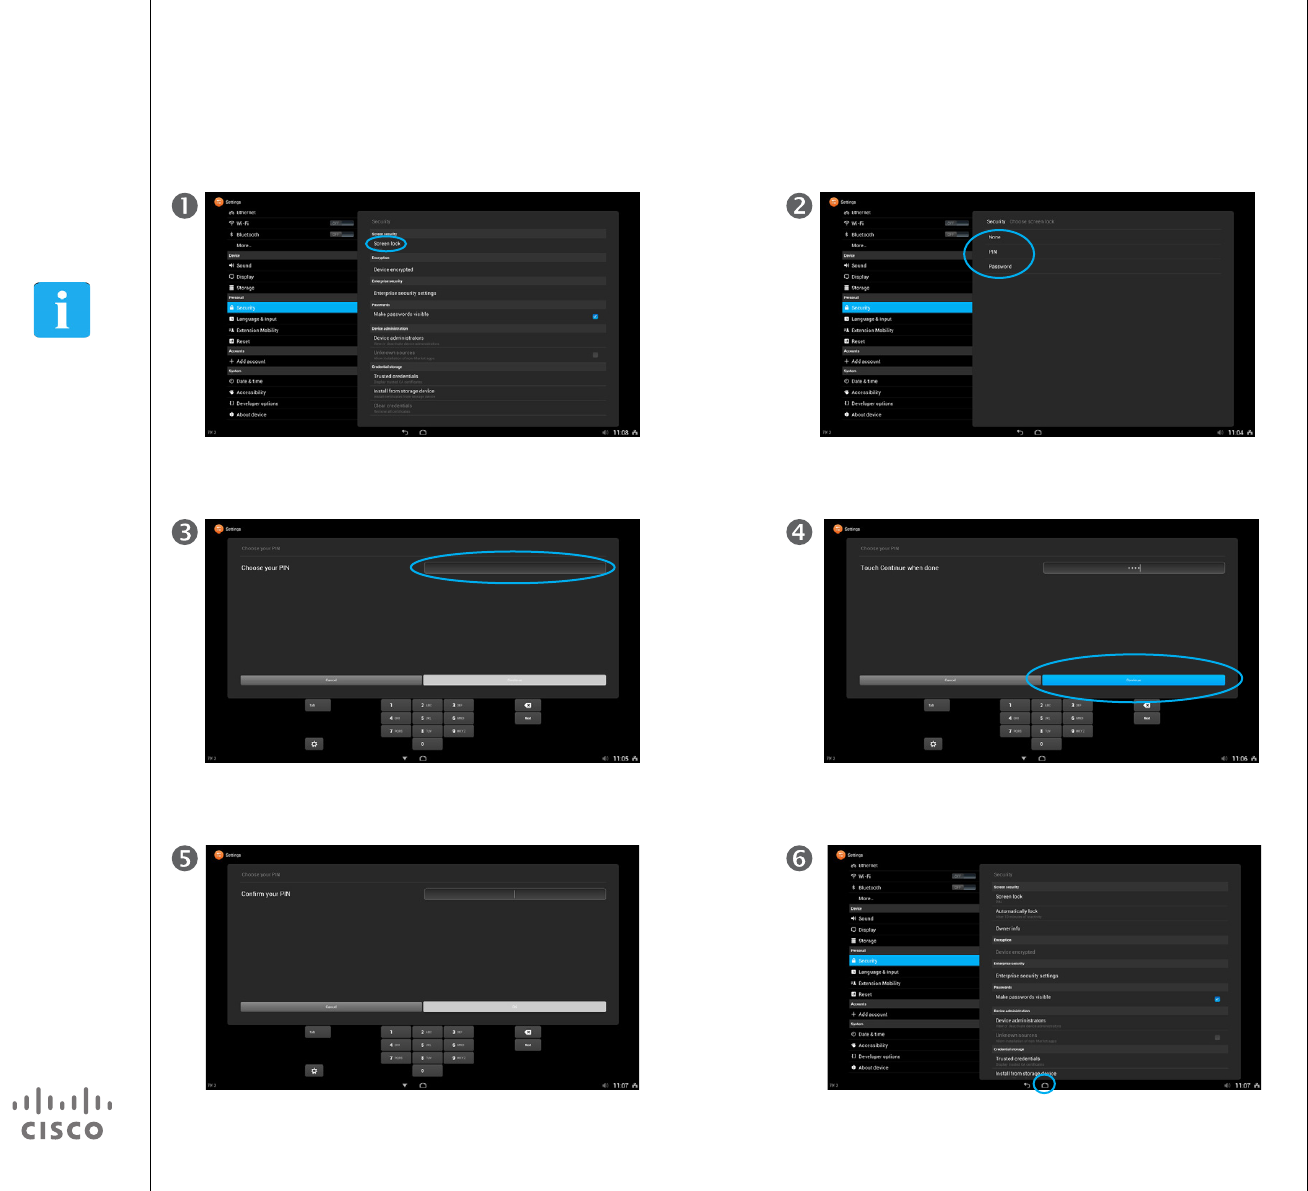
Set a PIN Code or Password to Restrict Access About PIN and Password
The system will normally prompt you
to enter a PIN code or password to
prevent unrestricted access to your
system.
The example shown here assumes
that you opt for a PIN code rather
than a password, but the procedure
is the same in both cases, apart
from the fact that a password
typically consists of a mixture of
alphanumerical characters.
Tap Screen lock as outlined.
Using PIN as example, the system will prompt you to enter
a four digit PIN code.
In order to prevent an unintended lock-out of yourself, you
will now be prompted to conrm your PIN code. Enter the
PIN code, followed by tapping OK.
Tap PIN or Password. Selecting None (if possible) will
create a vulnerable system and cannot be recommended.
Tap Continue when done.
Tap Home when done.
8
D1510401 User Guide
Cisco Collaborate Desk DX80
Produced: April 2014, All contents © 2014
Cisco Systems, Inc. All rights reserved.
EFT Draft 1—Cisco Condential—Do Not Distribute
Security
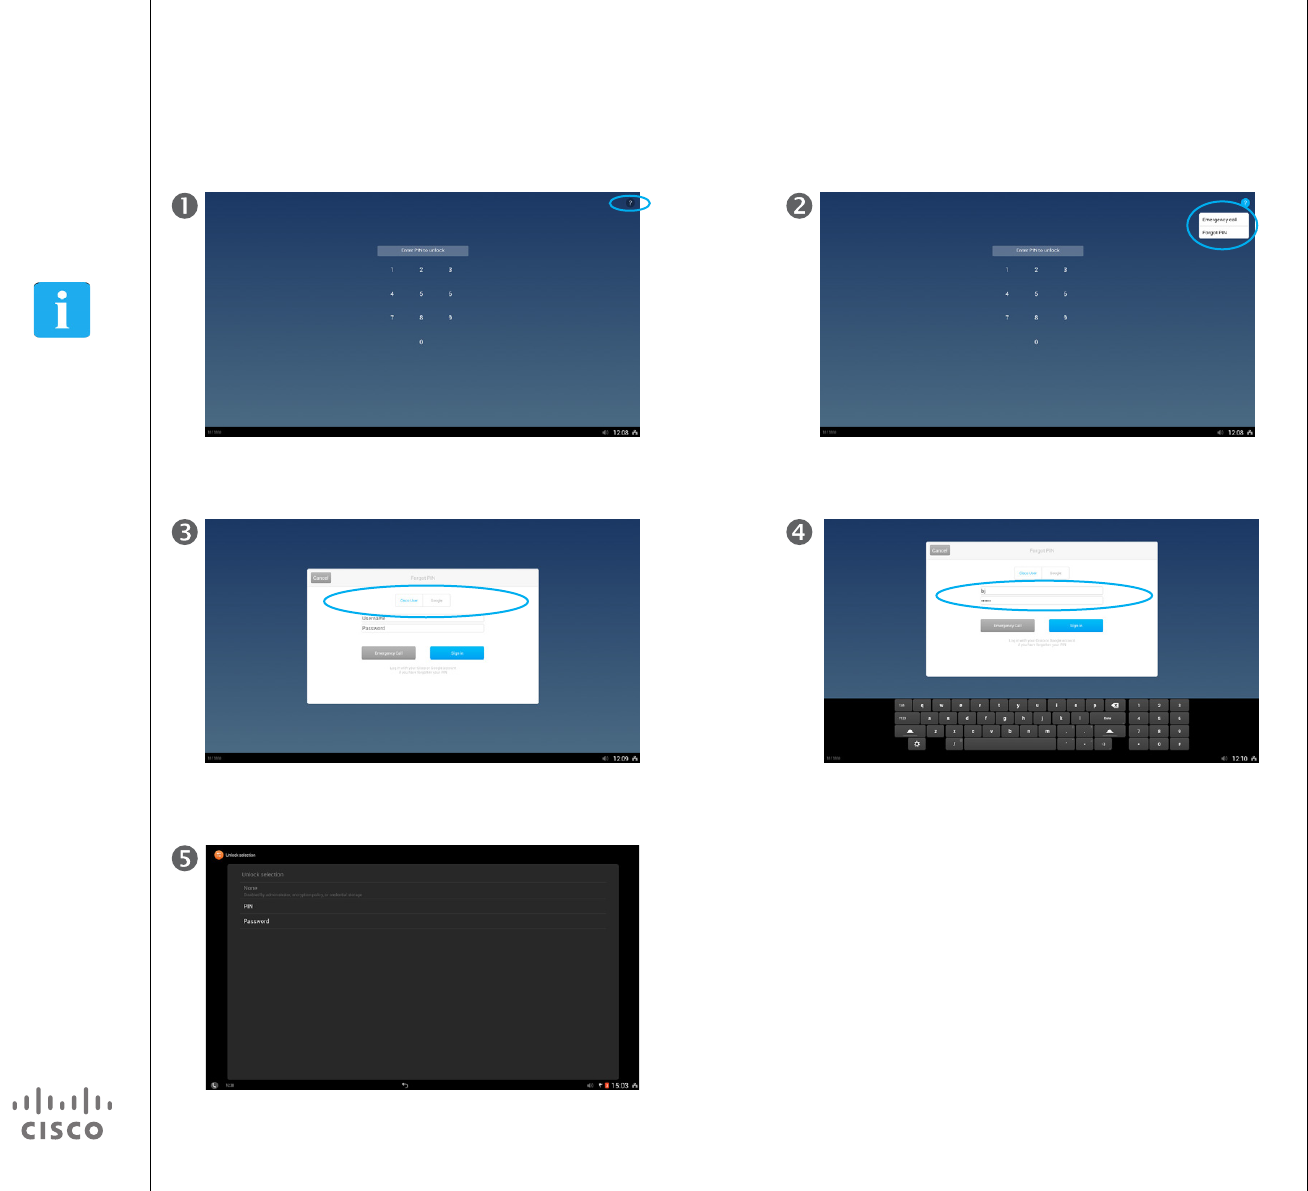
If You Forget Your PIN Code or Password Reset PIN or Password
If you happen to forget your PIN
code or password, you may have
the system reset the PIN code or
password for you.
Once it has been reset, you may
enter a new PIN code or password
by following the procedure given on
the previous page.
To do this successfully, you must
log in using either your Cisco User
account or your Google account.
The example shown here uses the
Cisco User account as example, but
the procedure is the same if you
opt for using the Google account
instead.
Emergency calls. Note that locked
screens still let you place emergency
calls. Tap the ? in the upper right
corner.
If you realize that you have forgotten you PIN code or
password, tap ? in the upper right corner, as outlined.
You will now need to log in with your credentials. Tap Cisco
User or Google.
Your PIN code / password will now be reset and a new be
entered, see the previous page for more on that.
Tap Forgot PIN.
Enter username and password.
9
D1510401 User Guide
Cisco Collaborate Desk DX80
Produced: April 2014, All contents © 2014
Cisco Systems, Inc. All rights reserved.
EFT Draft 1—Cisco Condential—Do Not Distribute
Security
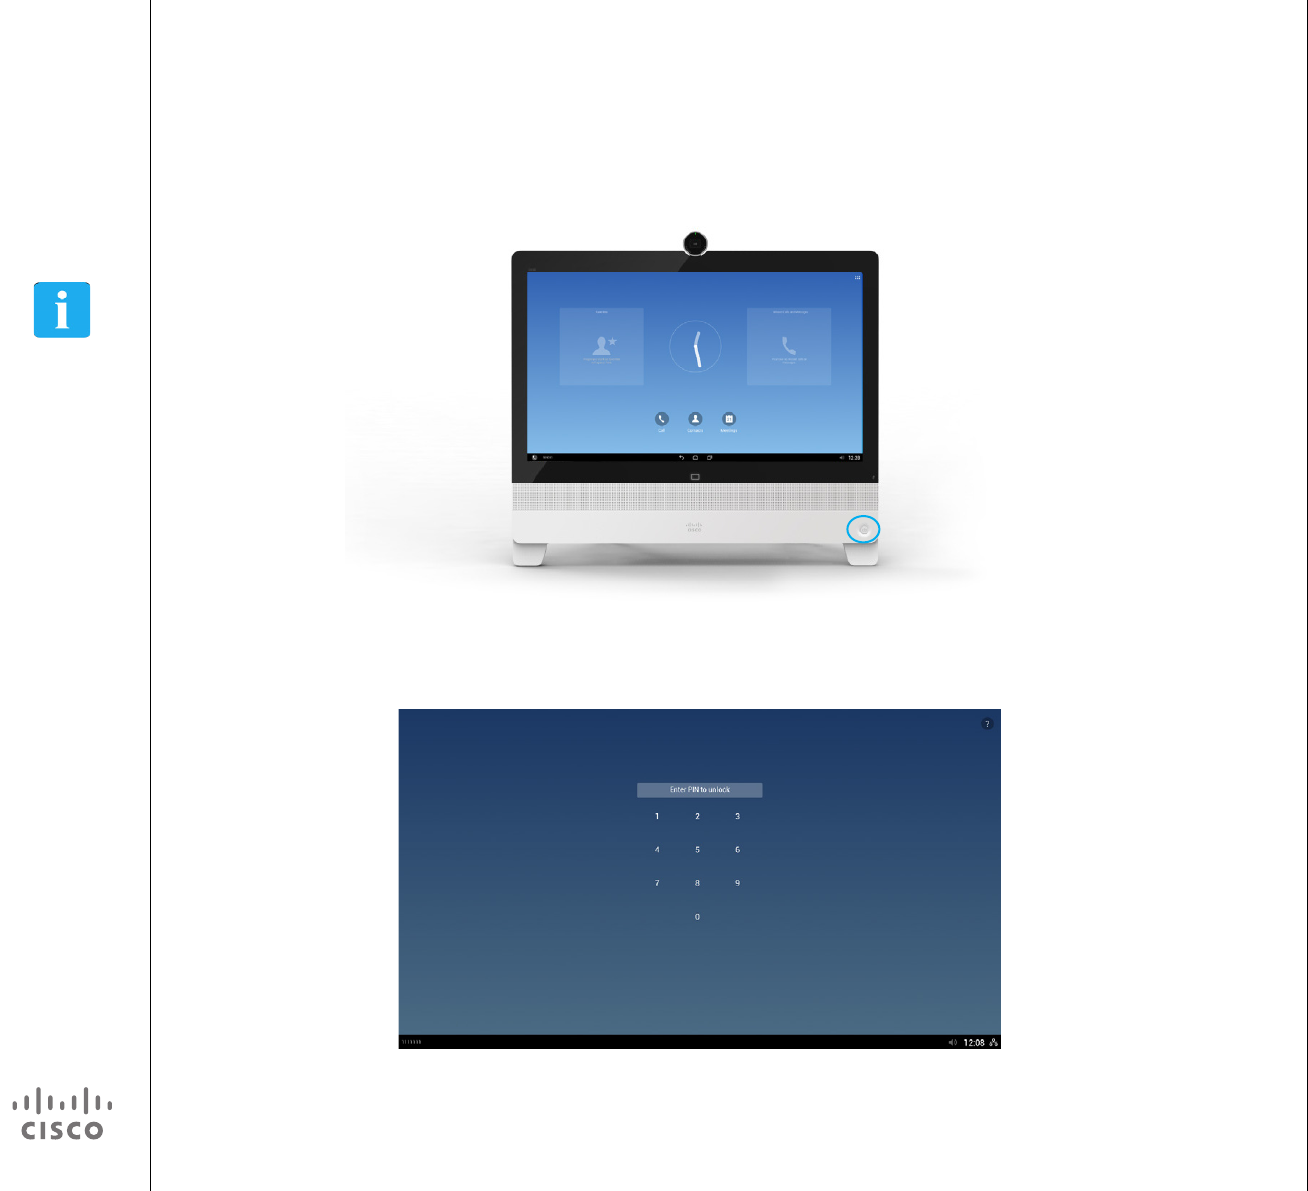
Lock and Unlock Screen About Locking Screen
To lock the screen, press the
Power button briey
To unlock the screen
enter your PIN code or
password.
Screen locking is a way to block
unauthorized access to your system.
Make sure your screen is locked
whenever you leave your system for
a while.
You may set up the screenlock to
be activated automatically after a
certain time of inactivity. This is
described on the following page.
Emergency calls. Note that locked
screens still let you place emergency
calls. Tap the ? in the upper right
corner.
10
D1510401 User Guide
Cisco Collaborate Desk DX80
Produced: April 2014, All contents © 2014
Cisco Systems, Inc. All rights reserved.
EFT Draft 1—Cisco Condential—Do Not Distribute
Security
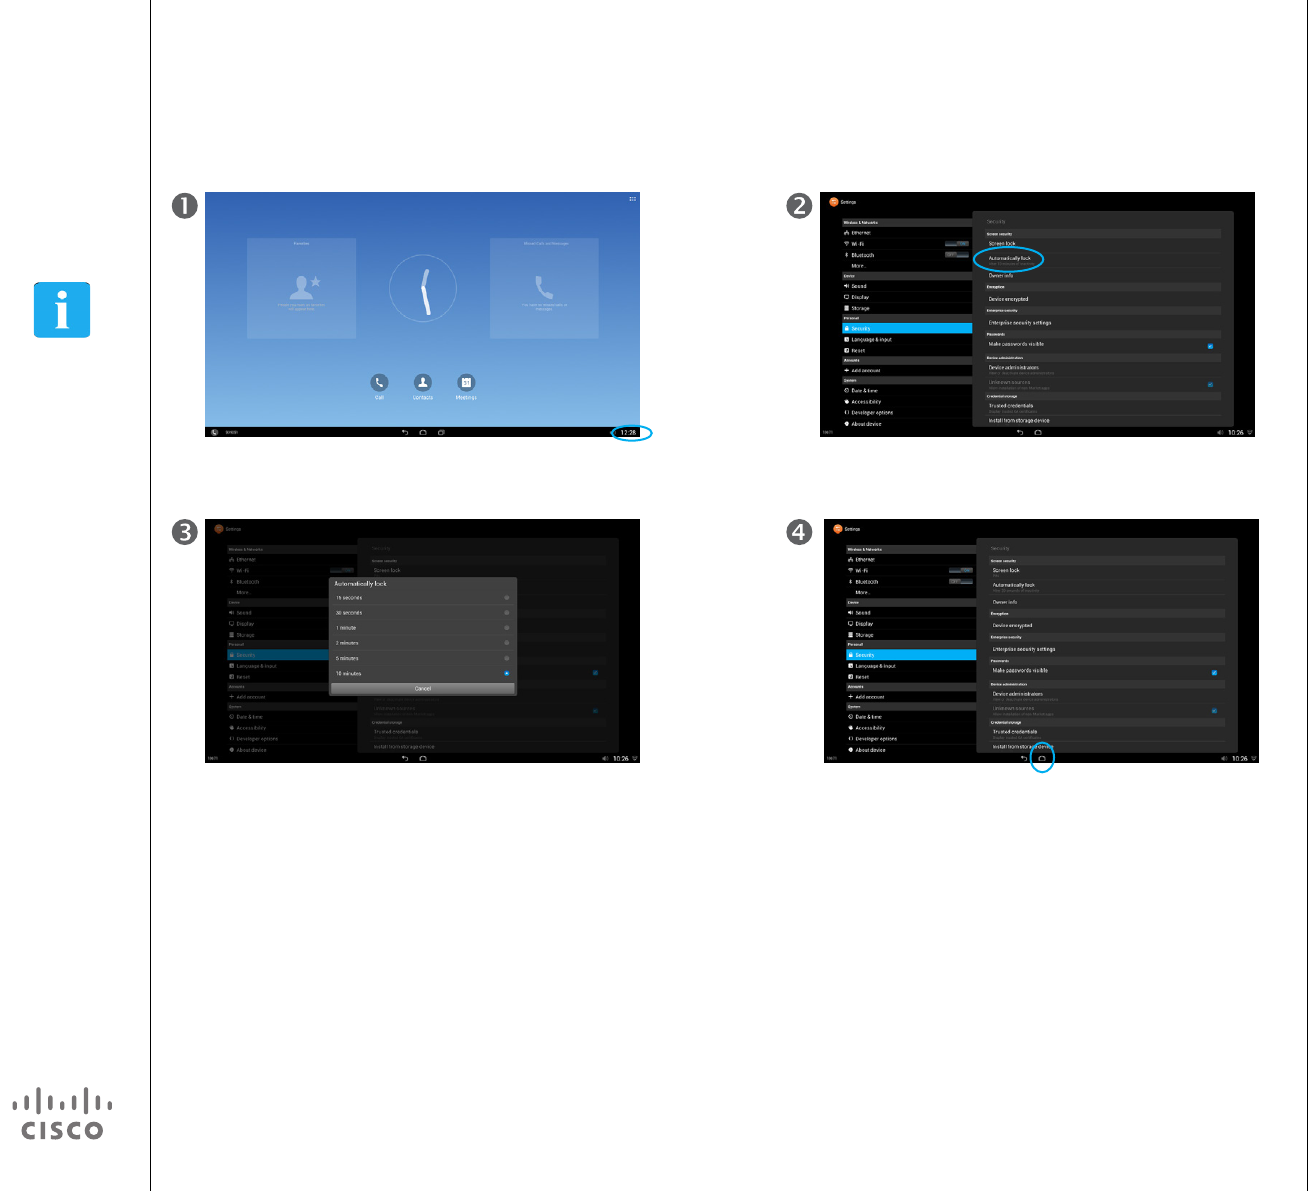
Set or Change Screen-Lock Timeout Setting Timeout
Screen locking is a way to block
unauthorized access to your system.
Make sure your screen is locked
whenever you leave your system for
a while.
You may set up the screenlock to
be activated automatically after a
certain time of inactivity.
Emergency calls. Note that locked
screens still let you place emergency
calls. Tap the ? in the upper right
corner.
Tap in the lower right corner, as outlined and then tap the
Settings icon, as outlined.
Select a timeout value.
Tap Security and then tap Automatically lock.
Tap Home to exit the Settings.

11
D1510401 User Guide
Cisco Collaborate Desk DX80
Produced: April 2014, All contents © 2014
Cisco Systems, Inc. All rights reserved.
Calling Tasks
EFT Draft 1—Cisco Condential—Do Not Distribute
12
D1510401 User Guide
Cisco Collaborate Desk DX80
Produced: April 2014, All contents © 2014
Cisco Systems, Inc. All rights reserved.
EFT Draft 1—Cisco Condential—Do Not Distribute
Common Call Tasks
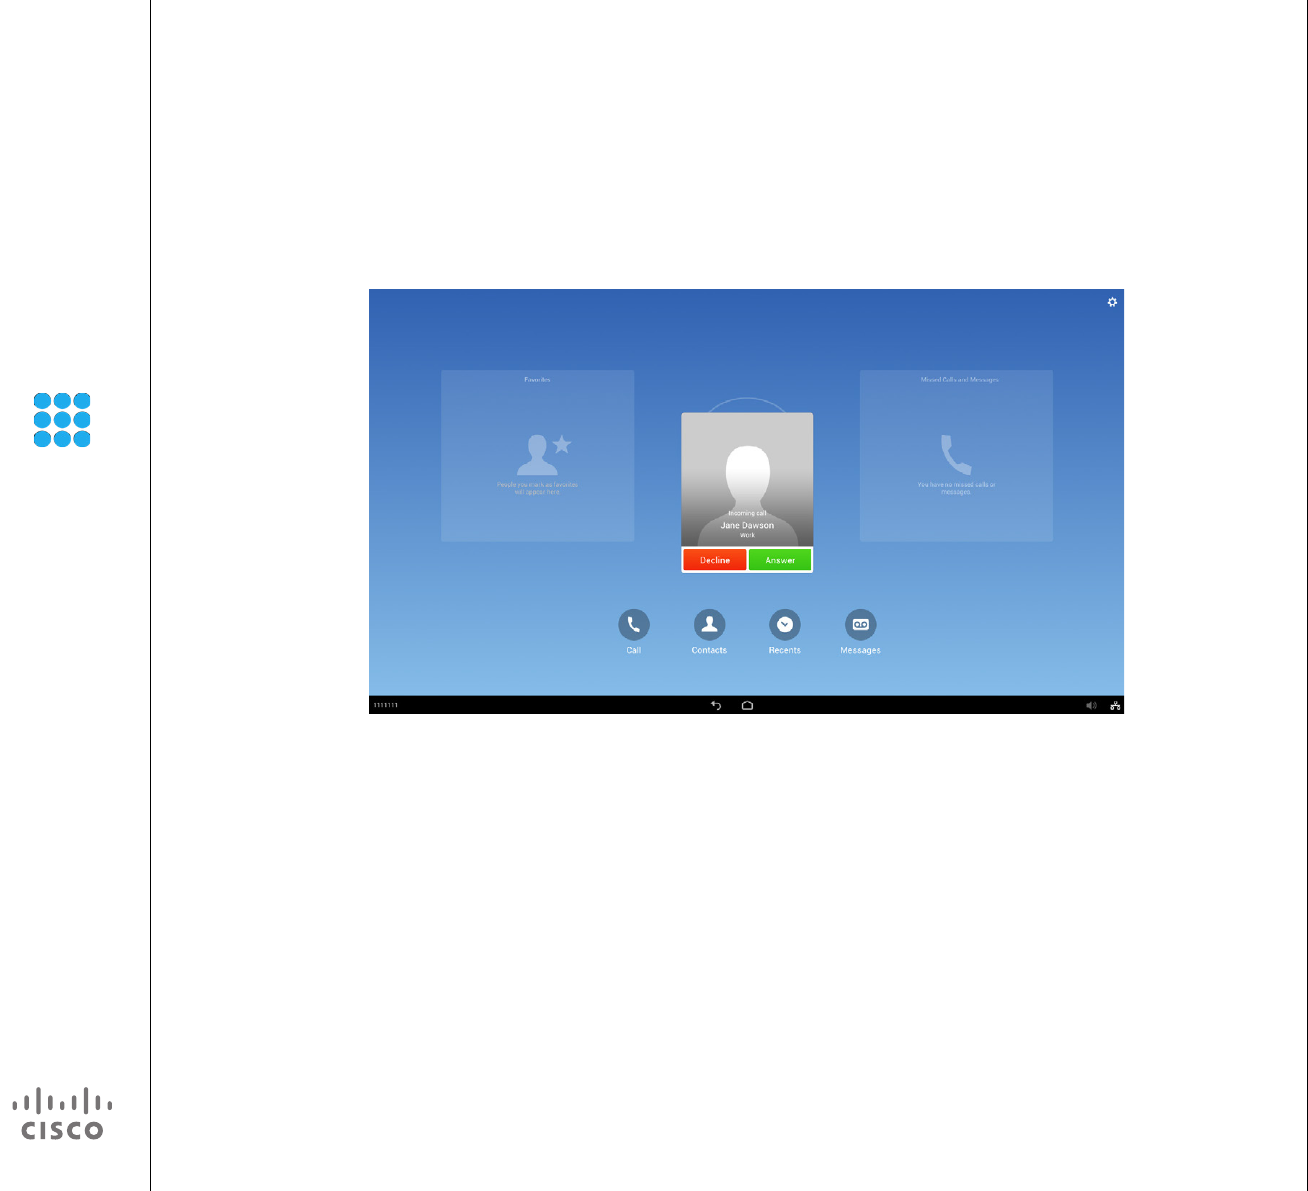
Answer Call A Few In-Call Tips
• If parties on a call hear a beep, the
call may be monitored or recorded.
Contact your system administrator
for more information.
• If you work in a contact center
or similar environment, you
can create, update, and delete
your own prerecorded greeting
that plays automatically if Agent
Greeting is congured on your
phone. For more information,
contact your system administrator.
• A Call Chaperone user cannot
answer an incoming call while calls
are chaperoned.
Already in a call? If you are already
in a call when someone calls you,
the current call will be put on hold
if you answer the new call. If you
decline the new call, things will not
change.
Tap Answer to accept the call and Decline to reject it.
13
D1510401 User Guide
Cisco Collaborate Desk DX80
Produced: April 2014, All contents © 2014
Cisco Systems, Inc. All rights reserved.
EFT Draft 1—Cisco Condential—Do Not Distribute
Common Call Tasks
Disconnect Call
To disconnect yourself from an ongoing call, tap End.
More Than One Call?
If you have more than one call active
and you want to hang up one of
the calls, but preserve another call
on the same line, you may need to
remove the call that you want to end
from hold rst.
14
D1510401 User Guide
Cisco Collaborate Desk DX80
Produced: April 2014, All contents © 2014
Cisco Systems, Inc. All rights reserved.
EFT Draft 1—Cisco Condential—Do Not Distribute
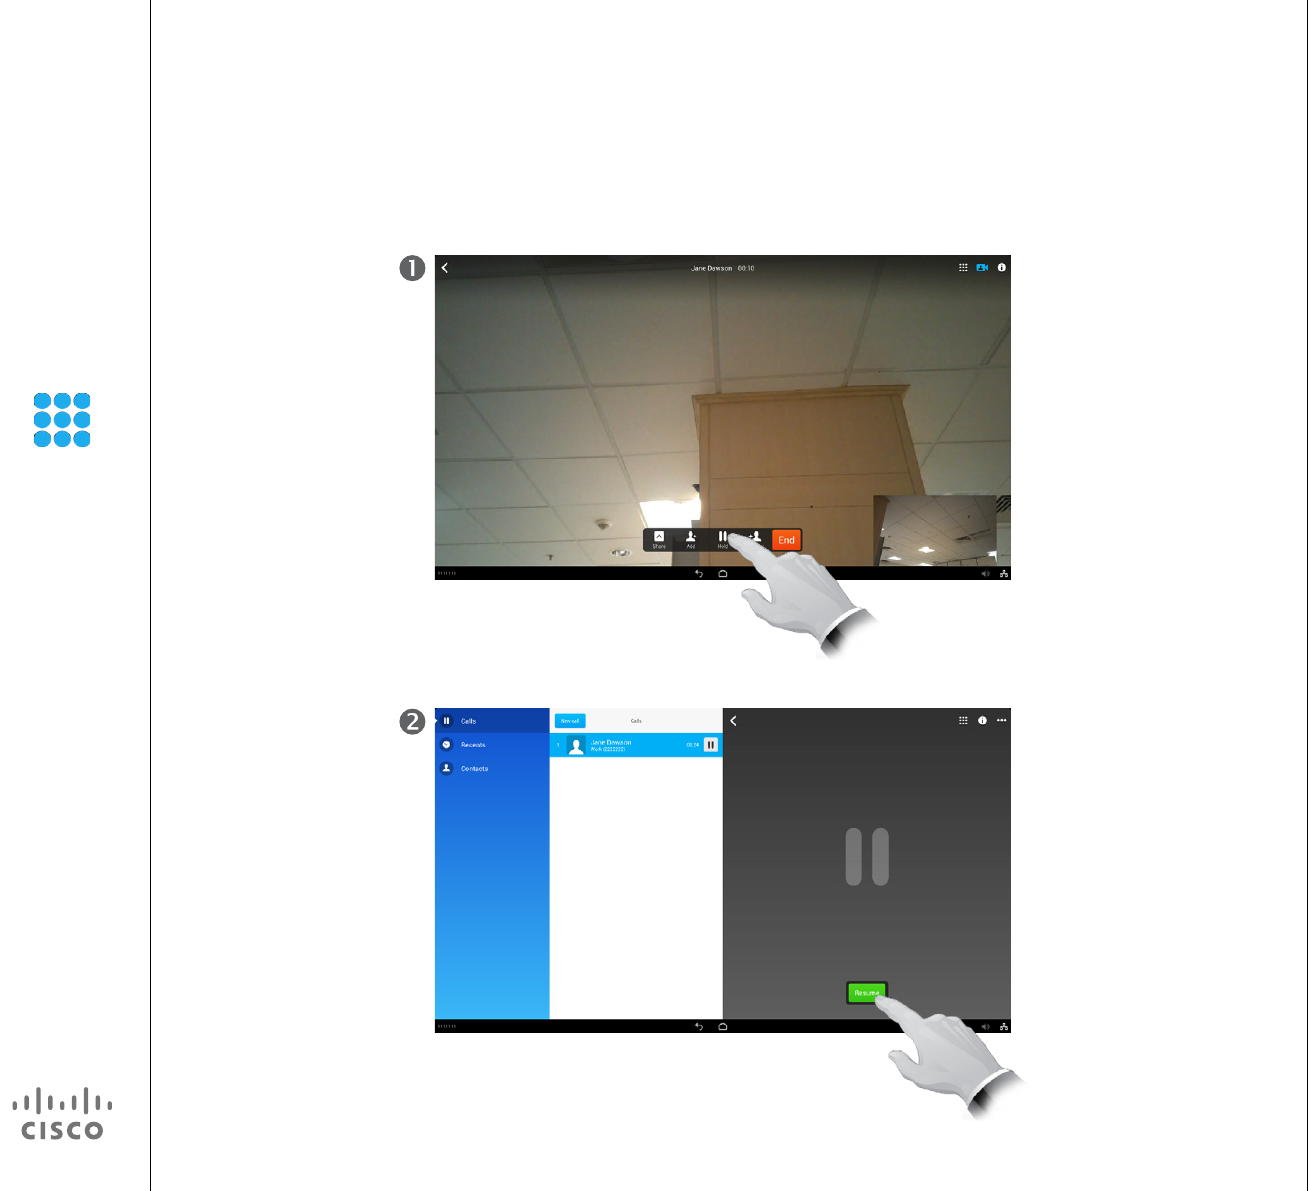
You can hold and resume calls. This
can be used to call someone while a
call already is active.
When you put a call on hold, the
Hold icon appears on the right in the
call information area. With a shared
line, when another phone places a
call on hold, the phone displays the
Remote Hold icon.
If the Hold Reversion feature is
enabled for your phone, a call that
you put on hold reverts to ringing
after a certain time. The reverting
call remains on hold until you
resume it or until Hold Reversion
times out. Your phone indicates the
presence of a reverting call by the
following actions:
• Alerts you at intervals with a single
ring (or ash or beep, depending
on your phone line setting).
• Briey displays a Hold Reversion
message in the status bar at the
bottom of the phone screen.
• Displays the animated Hold
Reversion icon next to the caller ID
for the held call.
About Hold and Resume
Common Call Tasks
Hold and Resume
In a call, tap Hold as outlined.
Your screen will now look as shown, and music will
normally be played while the call remains on hold. To
resume the call, tap Resume, as outlined.
15
D1510401 User Guide
Cisco Collaborate Desk DX80
Produced: April 2014, All contents © 2014
Cisco Systems, Inc. All rights reserved.
EFT Draft 1—Cisco Condential—Do Not Distribute
Common Call Tasks
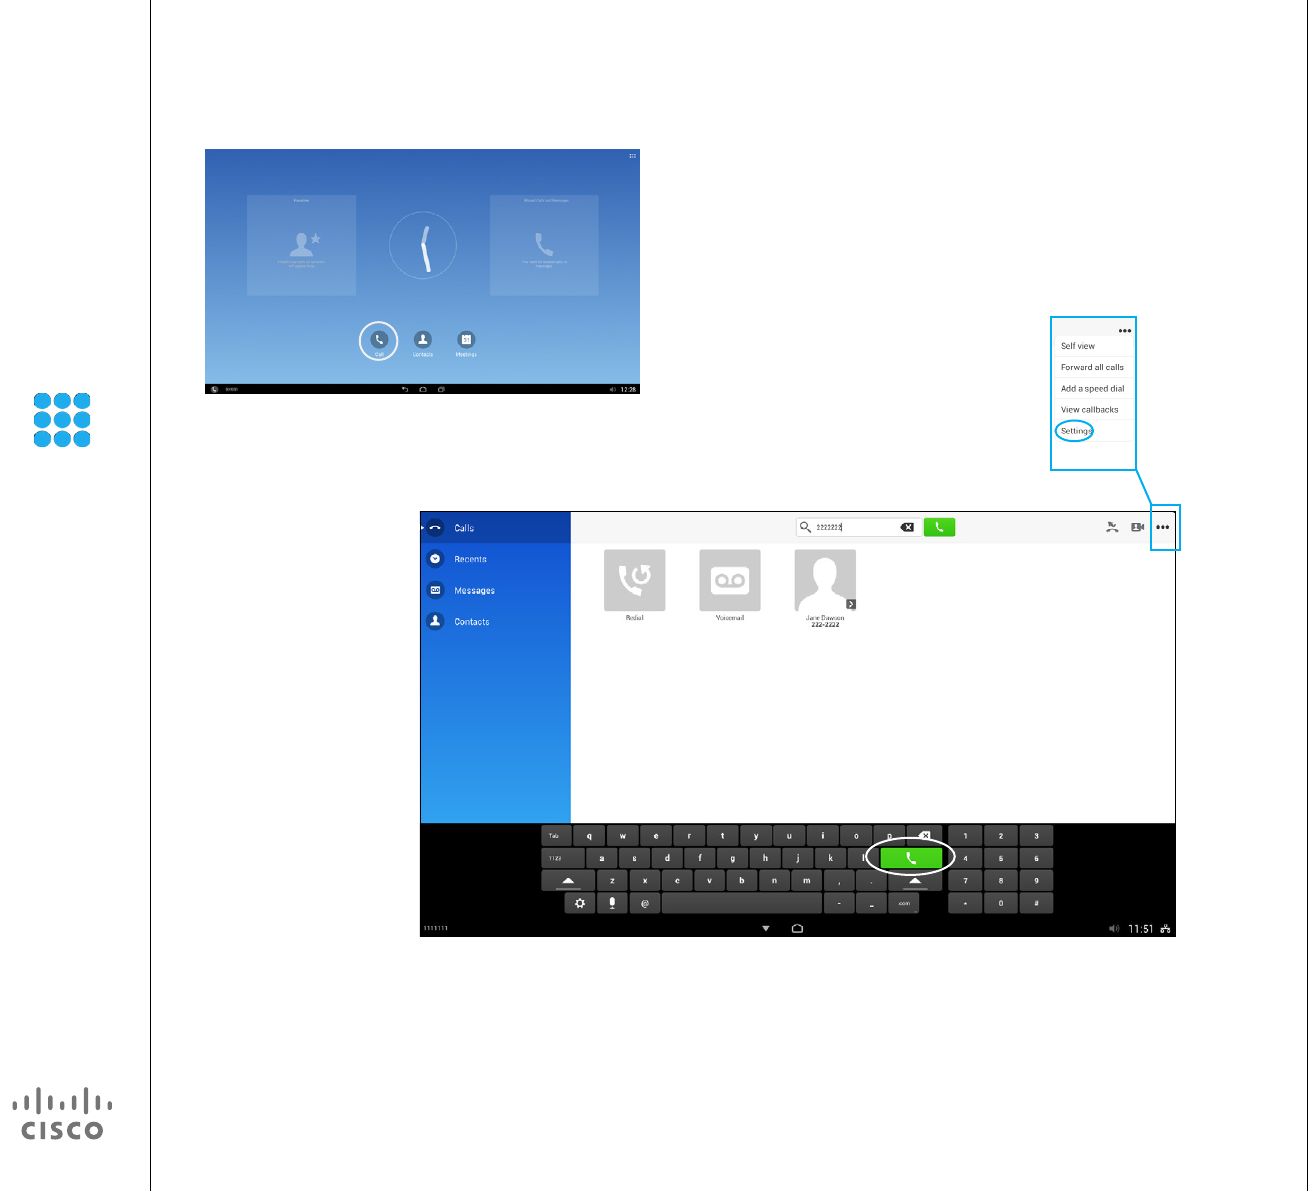
Place Call About Placing Calls
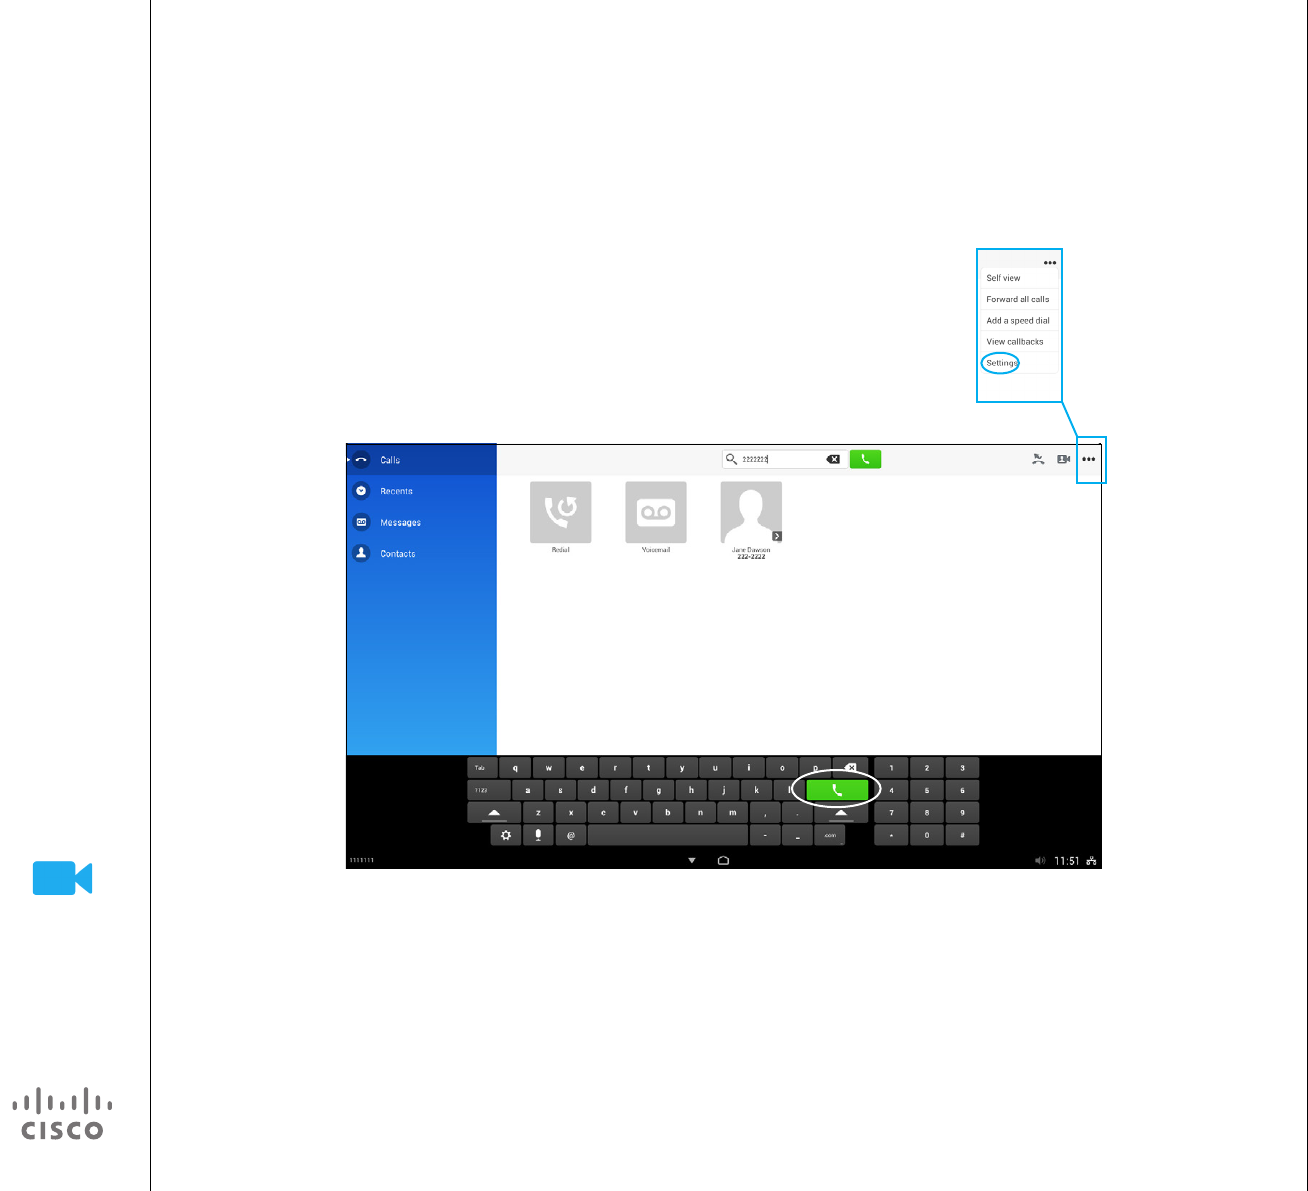
Tap the Call icon, as outlined, if needed.
Use the virtual keyboard to enter name, number or address and then tap the green Call button.
You may call someone who is not
listed in your list of contacts by
keying in their name, address or
number using the virtual keyboard of
the screen.
Anyone you have previously called
will appear in the Recents list (until
you clear that list).
Any matches found in the Recents
list or in the Contacts list will appear
as you type, provided that you have
set up the system to do so (see the
left illustration for more on this).
To have the system
show search results
while dialing, activate
Predictive Dialing in
the Settings menu
accessed from here.
16
D1510401 User Guide
Cisco Collaborate Desk DX80
Produced: April 2014, All contents © 2014
Cisco Systems, Inc. All rights reserved.
EFT Draft 1—Cisco Condential—Do Not Distribute
Common Call Tasks
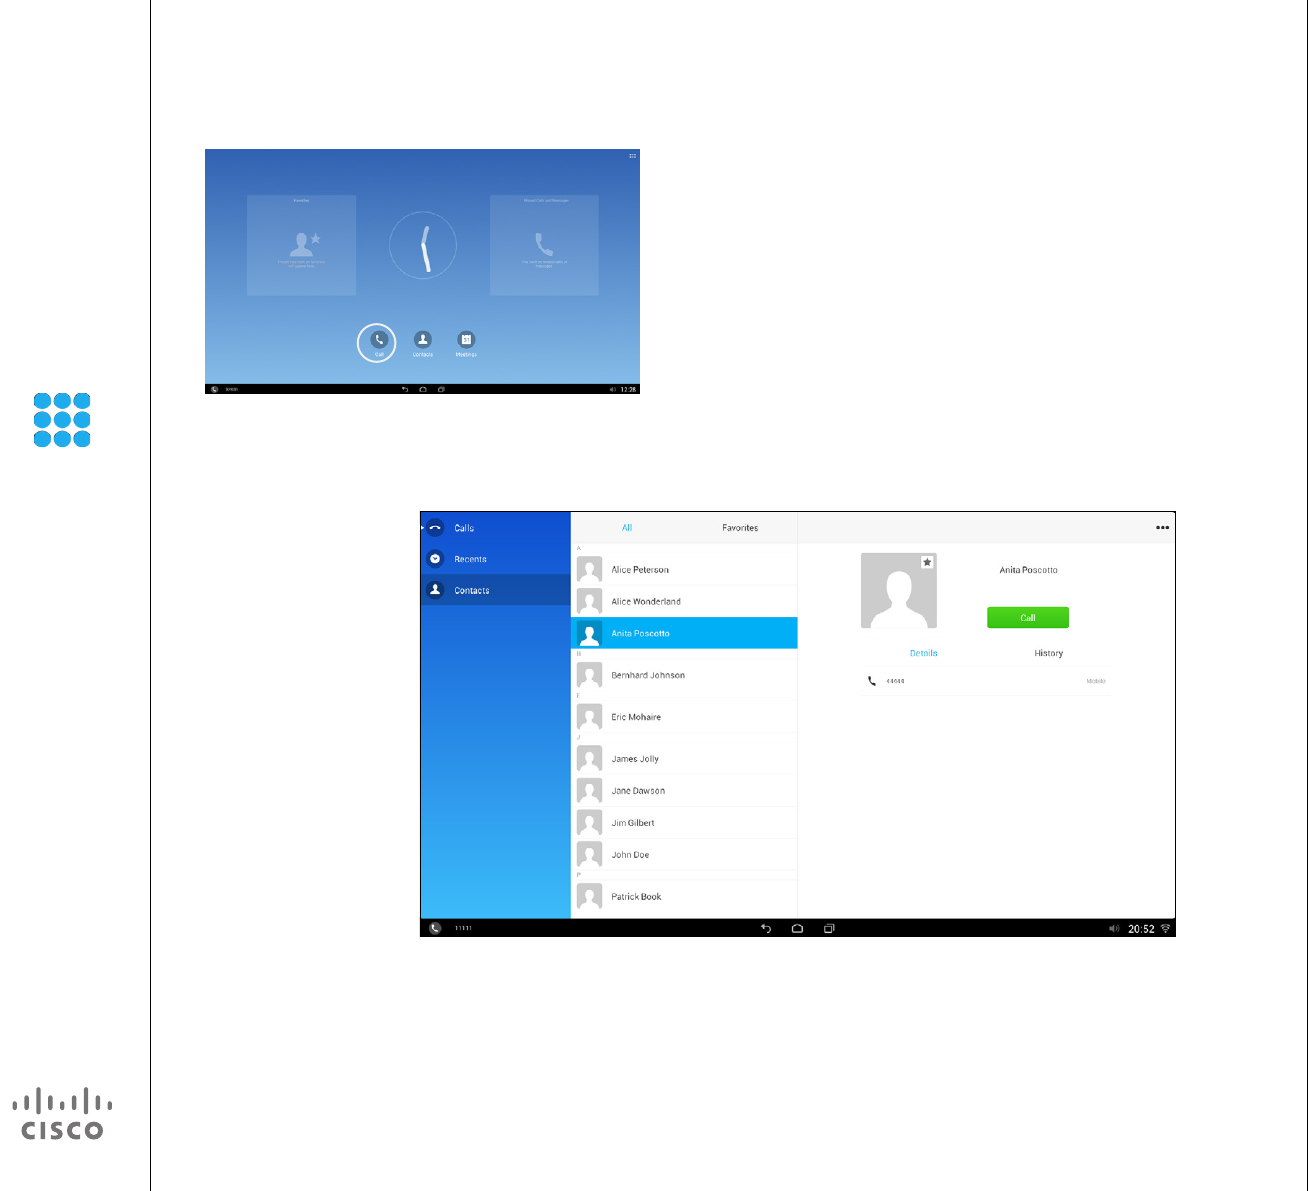
Place Call Using Contacts or Recents About Using Lists
Tap the Call icon, as outlined, if needed.
Either tap Recents or Contacts and scroll the list vertically Tap the green Call button to place the call.
To locate an entry in the Contacts or
Recents list, scroll through that list in
the same way as on a smart phone
(i.e. by swiping your nger vertically
in the required direction).
17
D1510401 User Guide
Cisco Collaborate Desk DX80
Produced: April 2014, All contents © 2014
Cisco Systems, Inc. All rights reserved.
EFT Draft 1—Cisco Condential—Do Not Distribute
Common Call Tasks
Place Call Using Speed Dials About Speed Dial
When you have dened Speed Dials
(see the section Contacts for more),
these will appear in the left column
of your Call menu. Tap a Speed
Dial entry to place a call using the
feature.

18
D1510401 User Guide
Cisco Collaborate Desk DX80
Produced: April 2014, All contents © 2014
Cisco Systems, Inc. All rights reserved.
EFT Draft 1—Cisco Condential—Do Not Distribute
Common Call Tasks
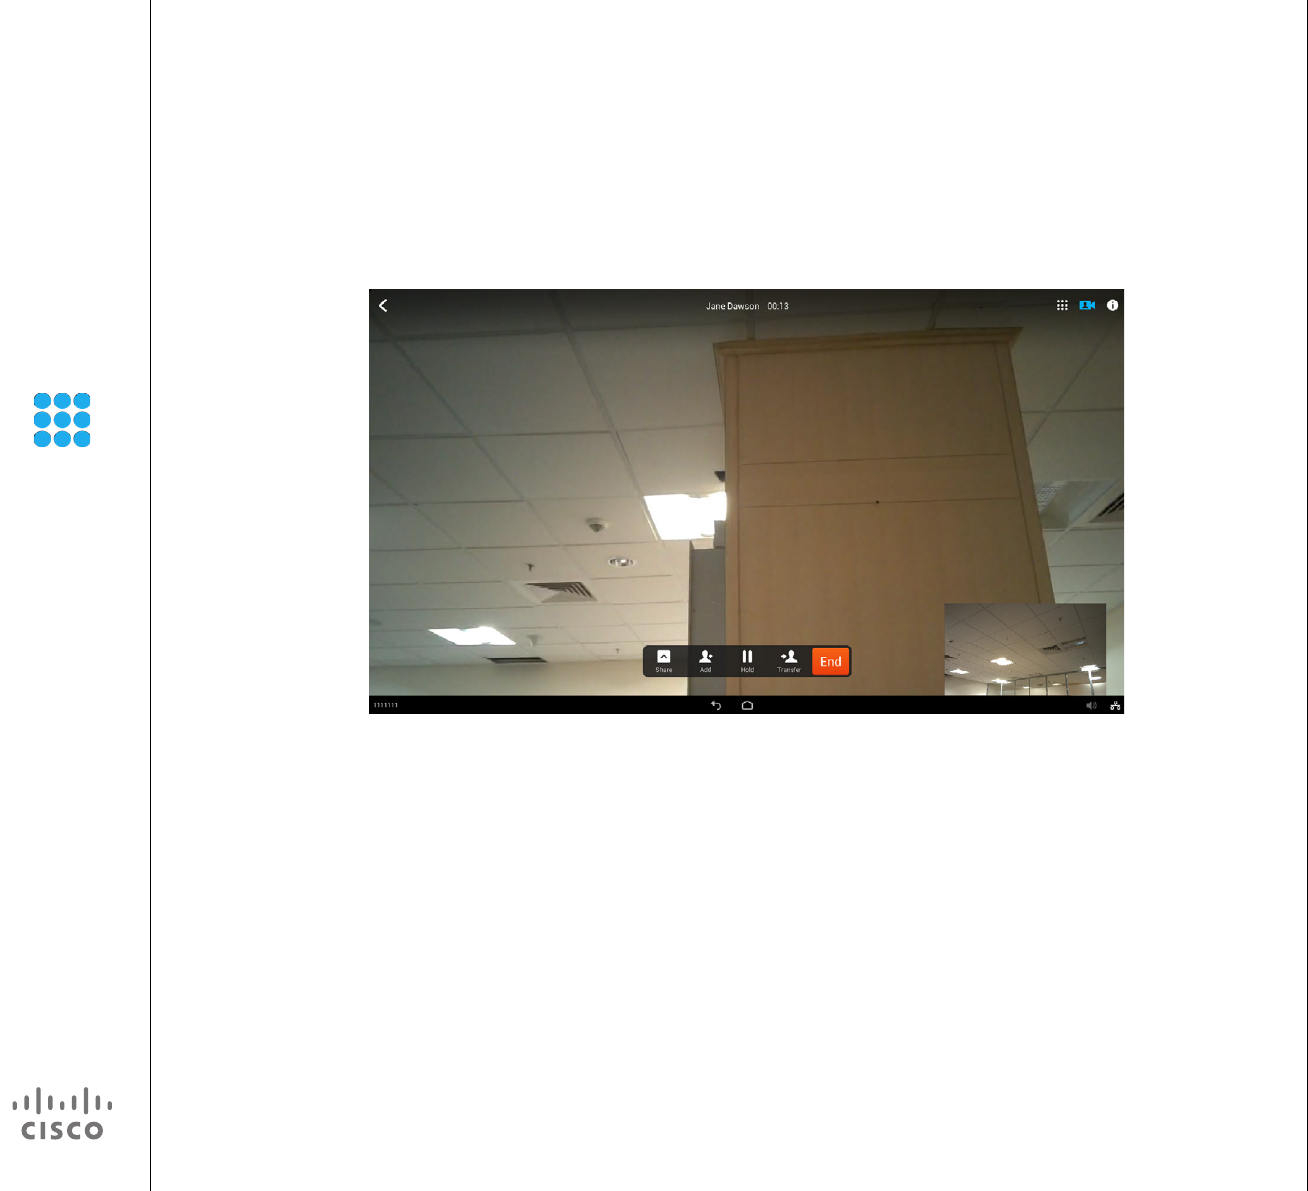
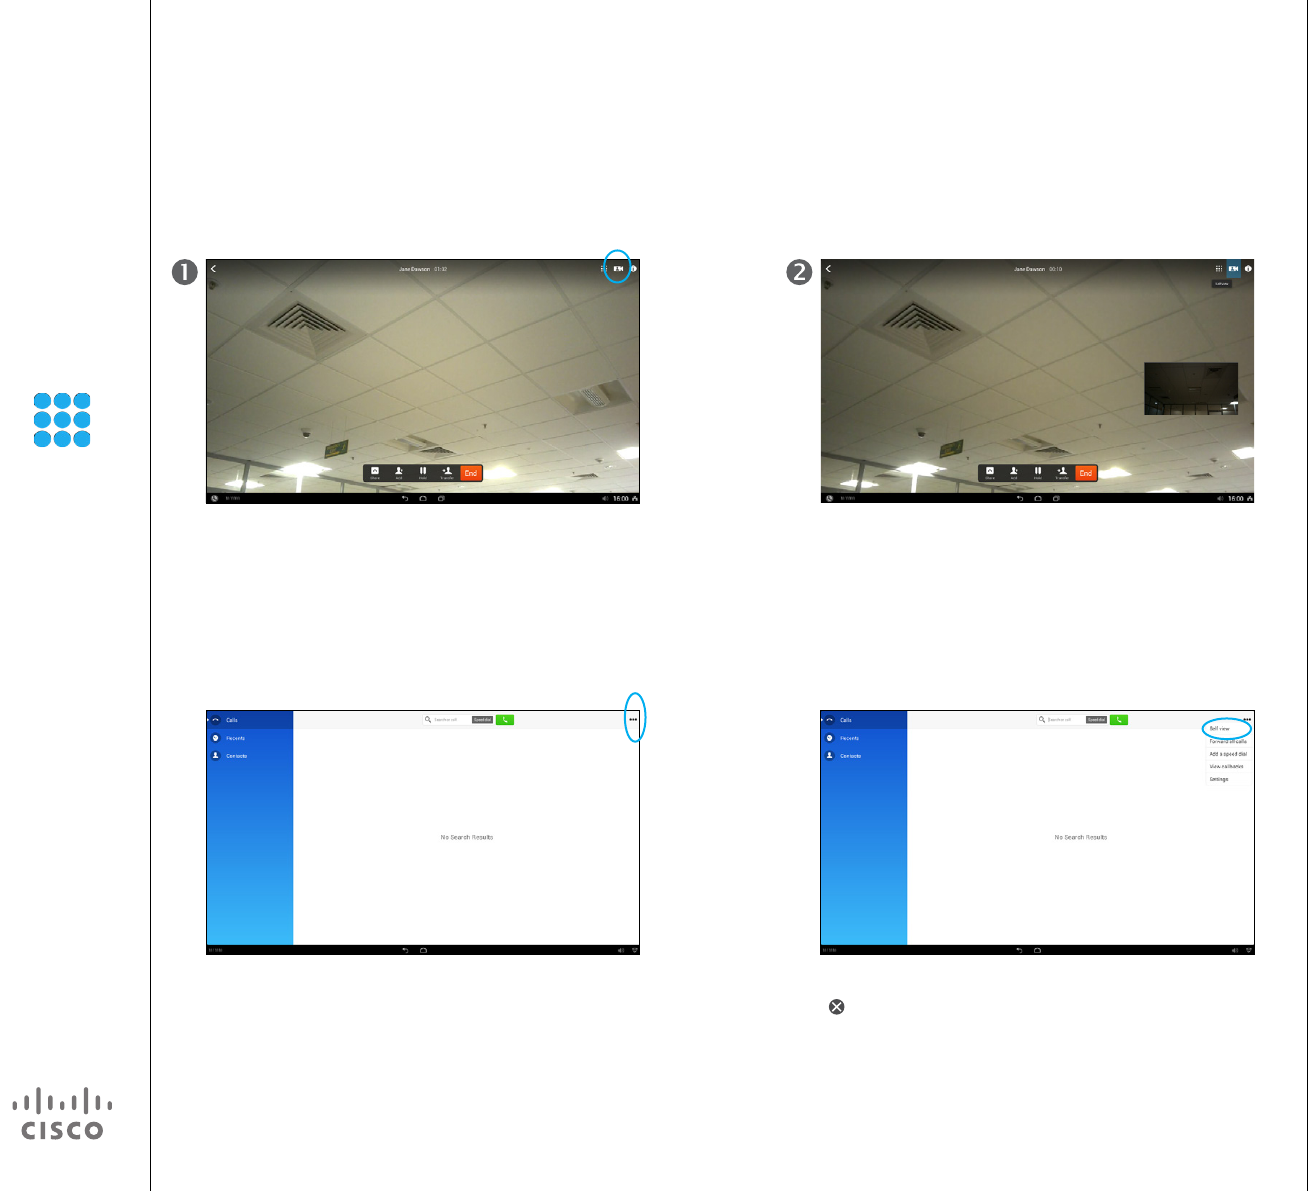
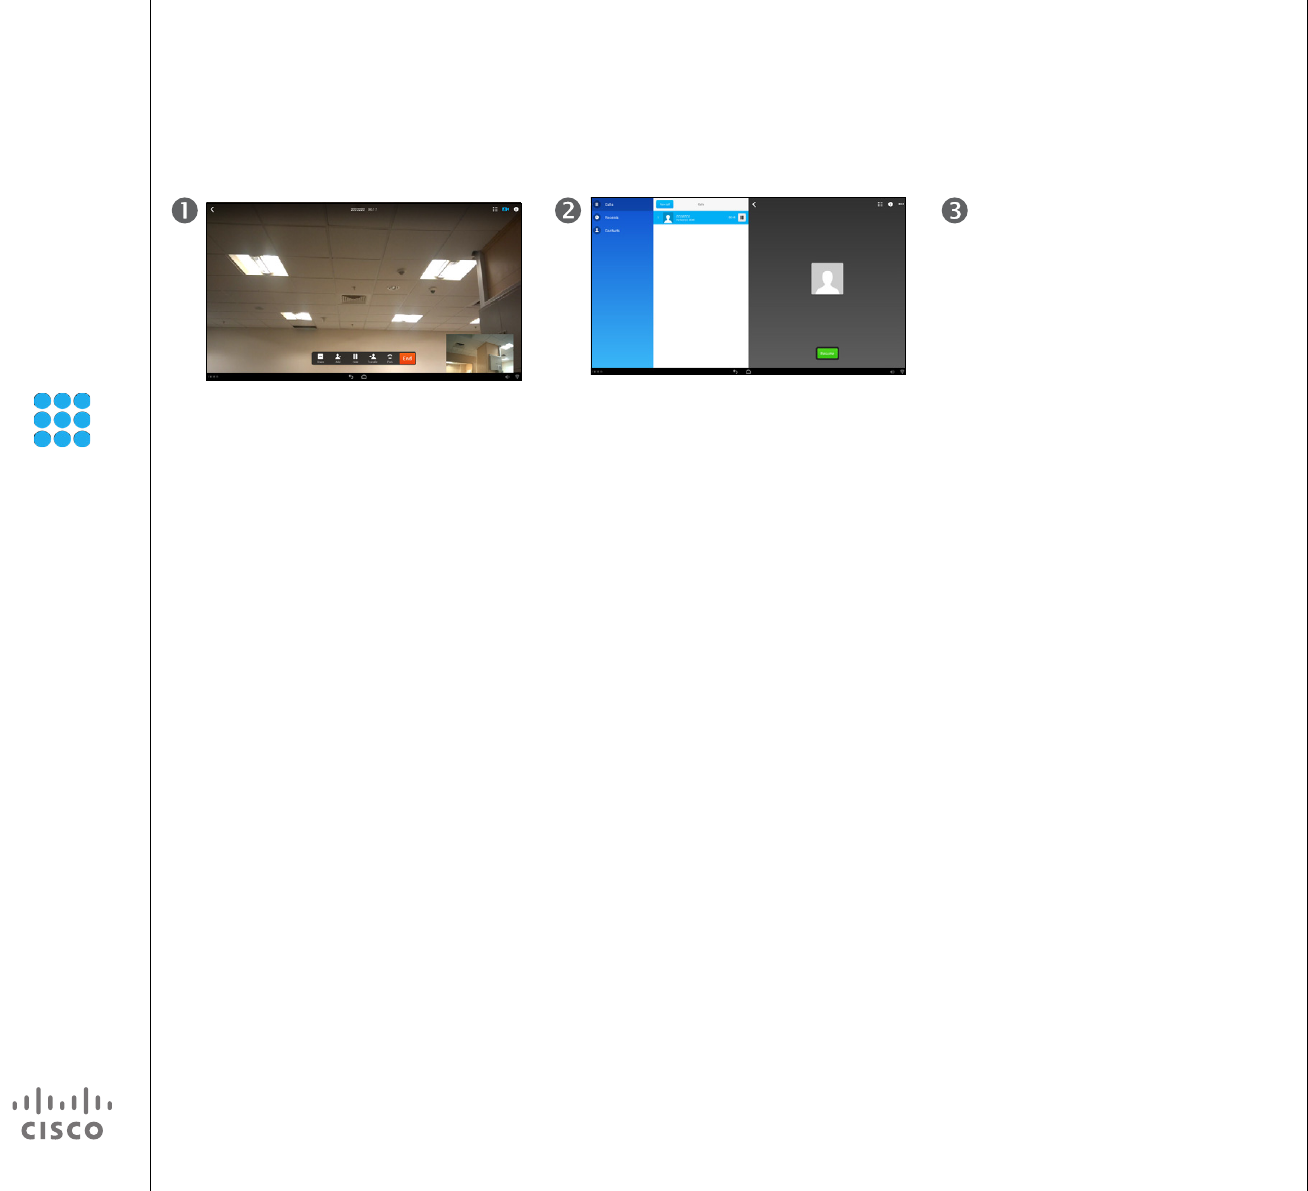
Video Call Basics About Video Calls
Video calls should be regarded as an
extension of regular phone calls.
You may adjust some camera
settings, such as exposure and
bandwidth allocated to your call. This
is discussed in the Settings section.
Place a call, as outlined.
You are now in a video call if the called system permits it. If
you want to see what others see from your system tap the
Selfview icon (marked by a blue circle in the upper right
corner).
Wait for the call to connect.
Tap End to terminate the call.
19
D1510401 User Guide
Cisco Collaborate Desk DX80
Produced: April 2014, All contents © 2014
Cisco Systems, Inc. All rights reserved.
EFT Draft 1—Cisco Condential—Do Not Distribute
Common Call Tasks
Activating Selfview About Selfview
The selfview shows what others see
from your system, i.e. your outgoing
video.
Note that you will see a mirror image
of the outgoing video.
The selfview image may be moved
about your screen. To do this, place
your nger on the selfview image
and drag it to the new position.
In a call, tap the Camera icon, as outlined. The selfview image will appear as a picture in picture, as
shown. Tap the icon again to remove the selfview image.
In a call:
Outside a call:
Inside the Call menu, tap More (...) to show the drop-down
menu. Tap Selfview. The selfview will be full screen. Tap Remove
( ) (not shown) to stop showing the selfview.
20
D1510401 User Guide
Cisco Collaborate Desk DX80
Produced: April 2014, All contents © 2014
Cisco Systems, Inc. All rights reserved.
EFT Draft 1—Cisco Condential—Do Not Distribute
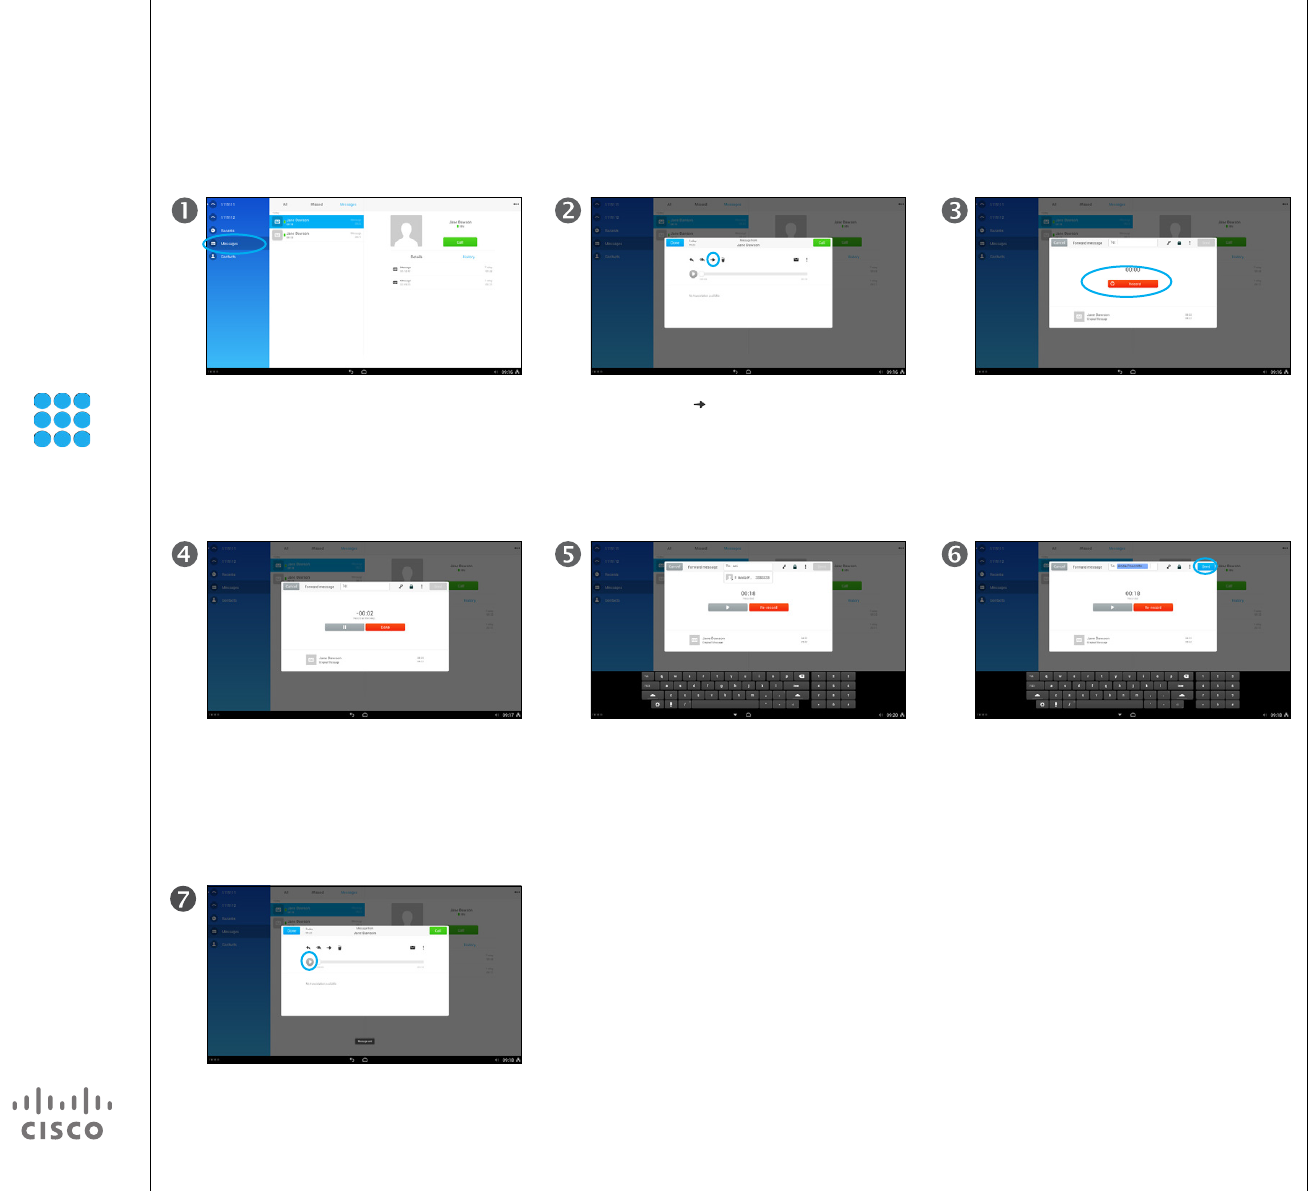
Visual Voicemail
Send a Voicemail
Tap Messages in the left column, then
tap More (...) in the upper right corner, as
outlined.
When your message is complete, tap Done.
The display will now return to display a list of
the Messages.
Select New Message from the drop-down
list.
You may record again, if needed. Otherwise,
enter the name, number or address of the
receiver.
Tap Record.
Once completed, tap Send, as outlined.
About Visual Voicemail
The Visual Voicemail tool lets you
manage your voice messages.
21
D1510401 User Guide
Cisco Collaborate Desk DX80
Produced: April 2014, All contents © 2014
Cisco Systems, Inc. All rights reserved.
EFT Draft 1—Cisco Condential—Do Not Distribute
Visual Voicemail
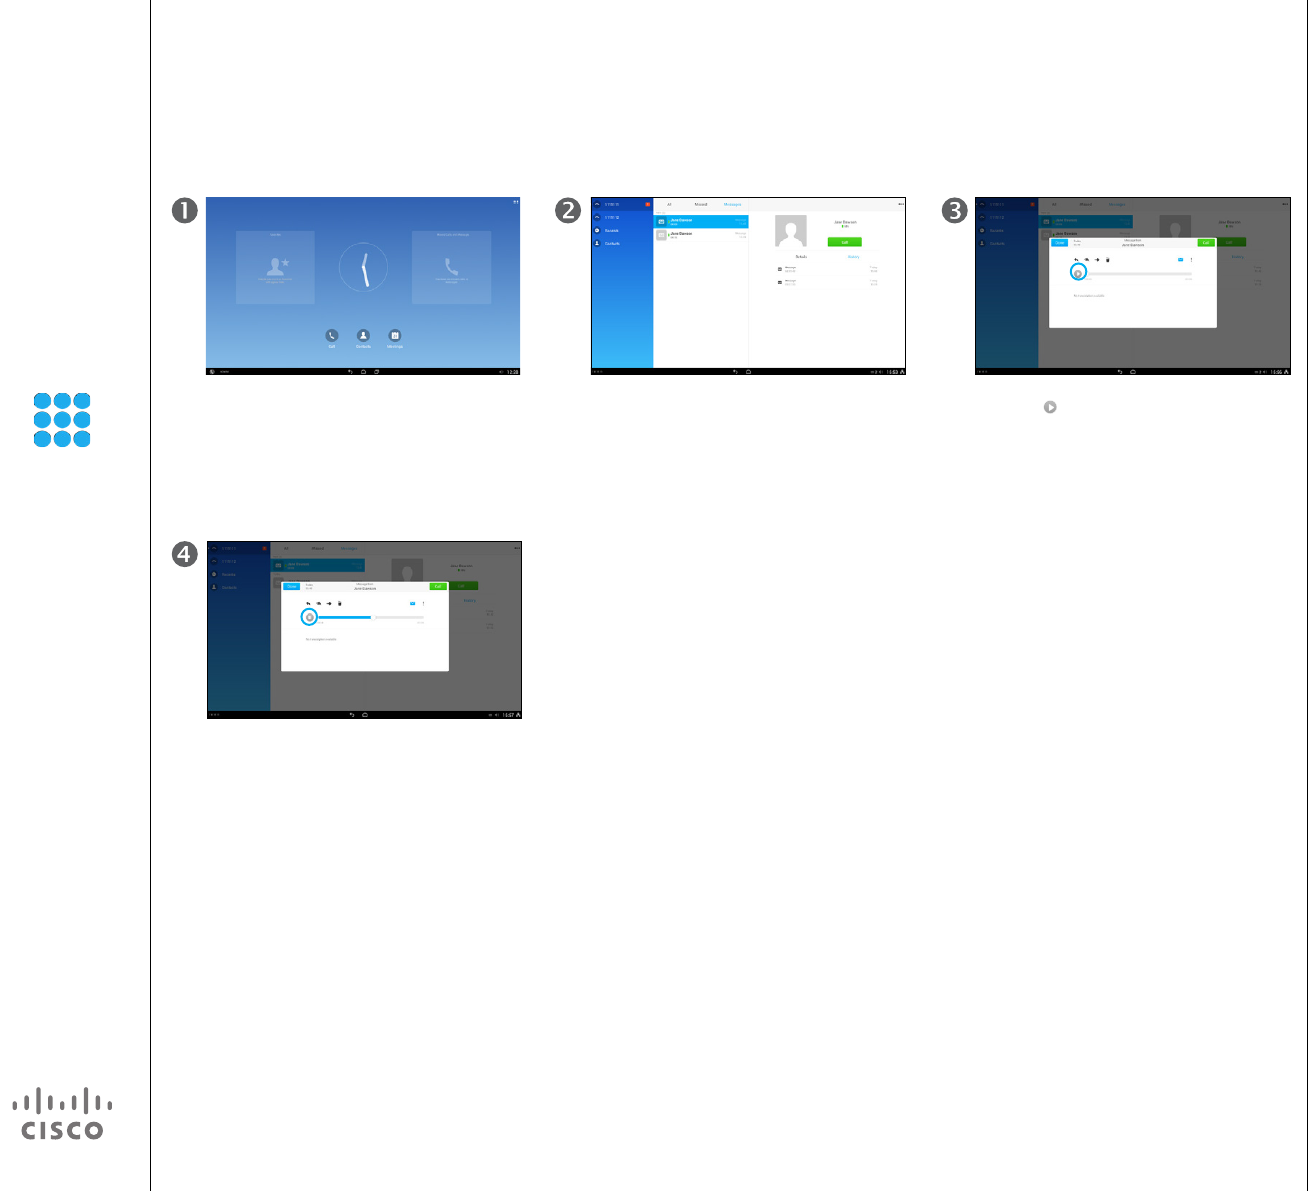
Listen to a Voicemail About Visual Voicemail
The Visual Voicemail tool lets you
manage your voice messages.
Tap Messages, as outlined. New Voicemails are indicated by the red
square in the left column. If there are more
than one, select the one you are going to
listen to.
Tap Play ( ) to listen to the voice message.
Tap Pause, as outlined to temporarily
halt the playback.
22
D1510401 User Guide
Cisco Collaborate Desk DX80
Produced: April 2014, All contents © 2014
Cisco Systems, Inc. All rights reserved.
EFT Draft 1—Cisco Condential—Do Not Distribute
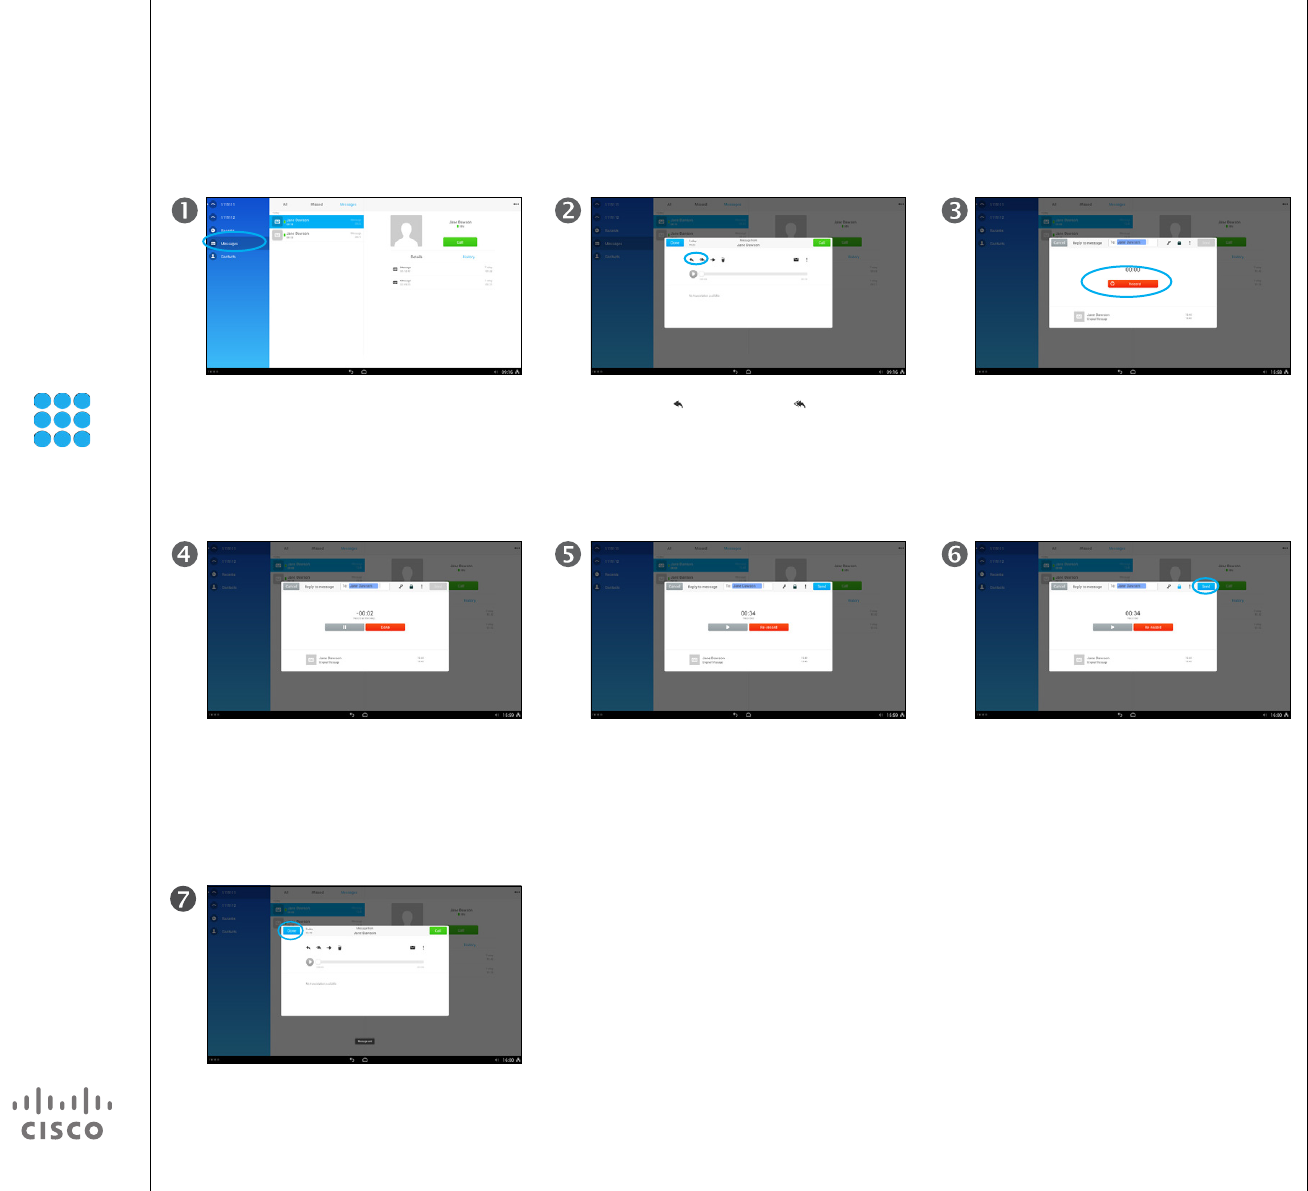
Visual Voicemail
Reply to a Voicemail
Tap Messages, as outlined and select a
voicemail.
Tap Done when the recording has been
made.
Tap Reply ( ) or Reply All ( ).
Re-record, if needed.
Tap Record.
Tap Send.
Tap Done.
About Visual Voicemail
The Visual Voicemail tool lets you
manage your voice messages.
If a Voicemail has been sent to a
multitude of recipients, you may use
the Reply All feature to reach them
all with a single reply.
23
D1510401 User Guide
Cisco Collaborate Desk DX80
Produced: April 2014, All contents © 2014
Cisco Systems, Inc. All rights reserved.
EFT Draft 1—Cisco Condential—Do Not Distribute
Visual Voicemail
Forward a Voicemail
Tap Messages, as outlined and select a
voicemail.
Tap Done when the recording has been
made.
Tap Forward ( ).
Select the recipient, as outlined. You may
also re-record, if needed.
Record a message, if needed.
Tap Send.
Tap Done to nish the forwarding.
About Visual Voicemail
The Visual Voicemail tool lets you
manage your voice messages.
When you forward a message, you
may also include your own message.
24
D1510401 User Guide
Cisco Collaborate Desk DX80
Produced: April 2014, All contents © 2014
Cisco Systems, Inc. All rights reserved.
EFT Draft 1—Cisco Condential—Do Not Distribute
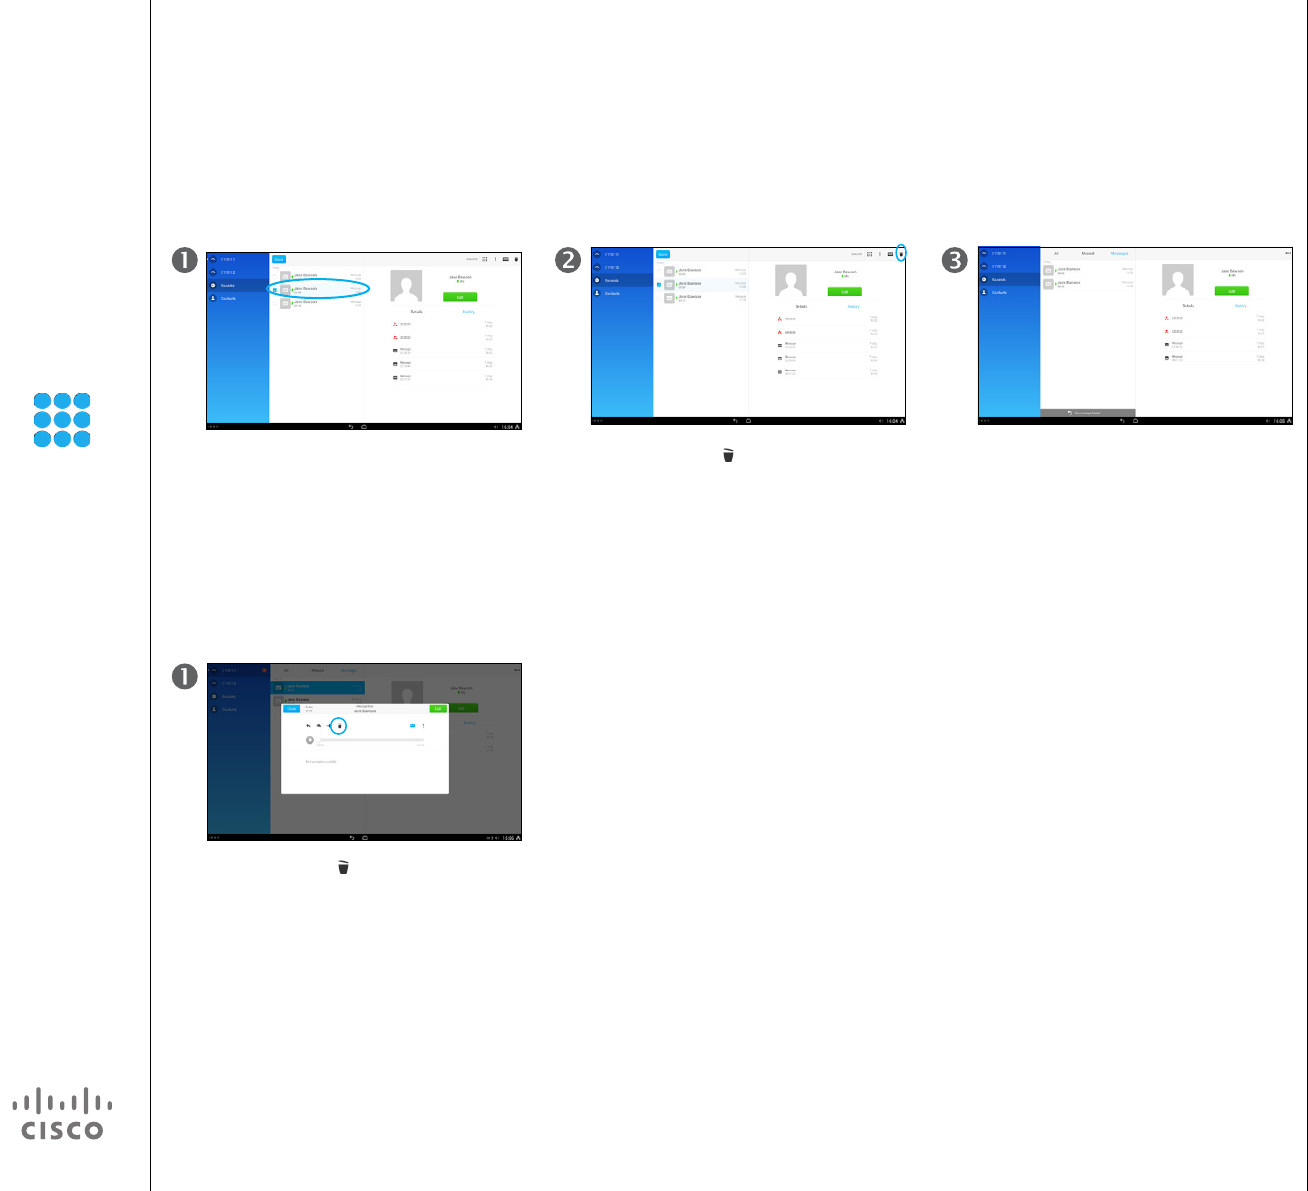
Visual Voicemail
Delete a Voicemail
Tap Messages and select the message to
be deleted, as outlined.
Tap Recycle Bin ( ) in the upper right
corner, as outlined.
The Voicemail has now been deleted.
Tap Recycle Bin ( ), as outlined to
delete the Voicemail.
Delete a Voicemail from the list:
Delete a Voicemail from the playback panel:
About Visual Voicemail
The Visual Voicemail tool lets you
manage your voice messages.
Messages can either be deleted
directly from the list of messages
or while you are inside the Playback
menu.
25
D1510401 User Guide
Cisco Collaborate Desk DX80
Produced: April 2014, All contents © 2014
Cisco Systems, Inc. All rights reserved.
EFT Draft 1—Cisco Condential—Do Not Distribute
Call Park
Store and Retrieve Active Call with Call Park About Call Park
You park a call when you want
to store the call so that you or
someone else can retrieve it
from another phone in the Cisco
Unied Communications Manager
system (for example, a phone at a
coworker’s desk or in a conference
room).
In a call tap Park, as outlined. Make a note of the number needed to
retrieve the parked call. If your Administrator
has created a xed number for this, use that
number, which you may want to have stored
as a speed dial number.
To retrieve the call from any other
phone, just call that number.
26
D1510401 User Guide
Cisco Collaborate Desk DX80
Produced: April 2014, All contents © 2014
Cisco Systems, Inc. All rights reserved.
EFT Draft 1—Cisco Condential—Do Not Distribute
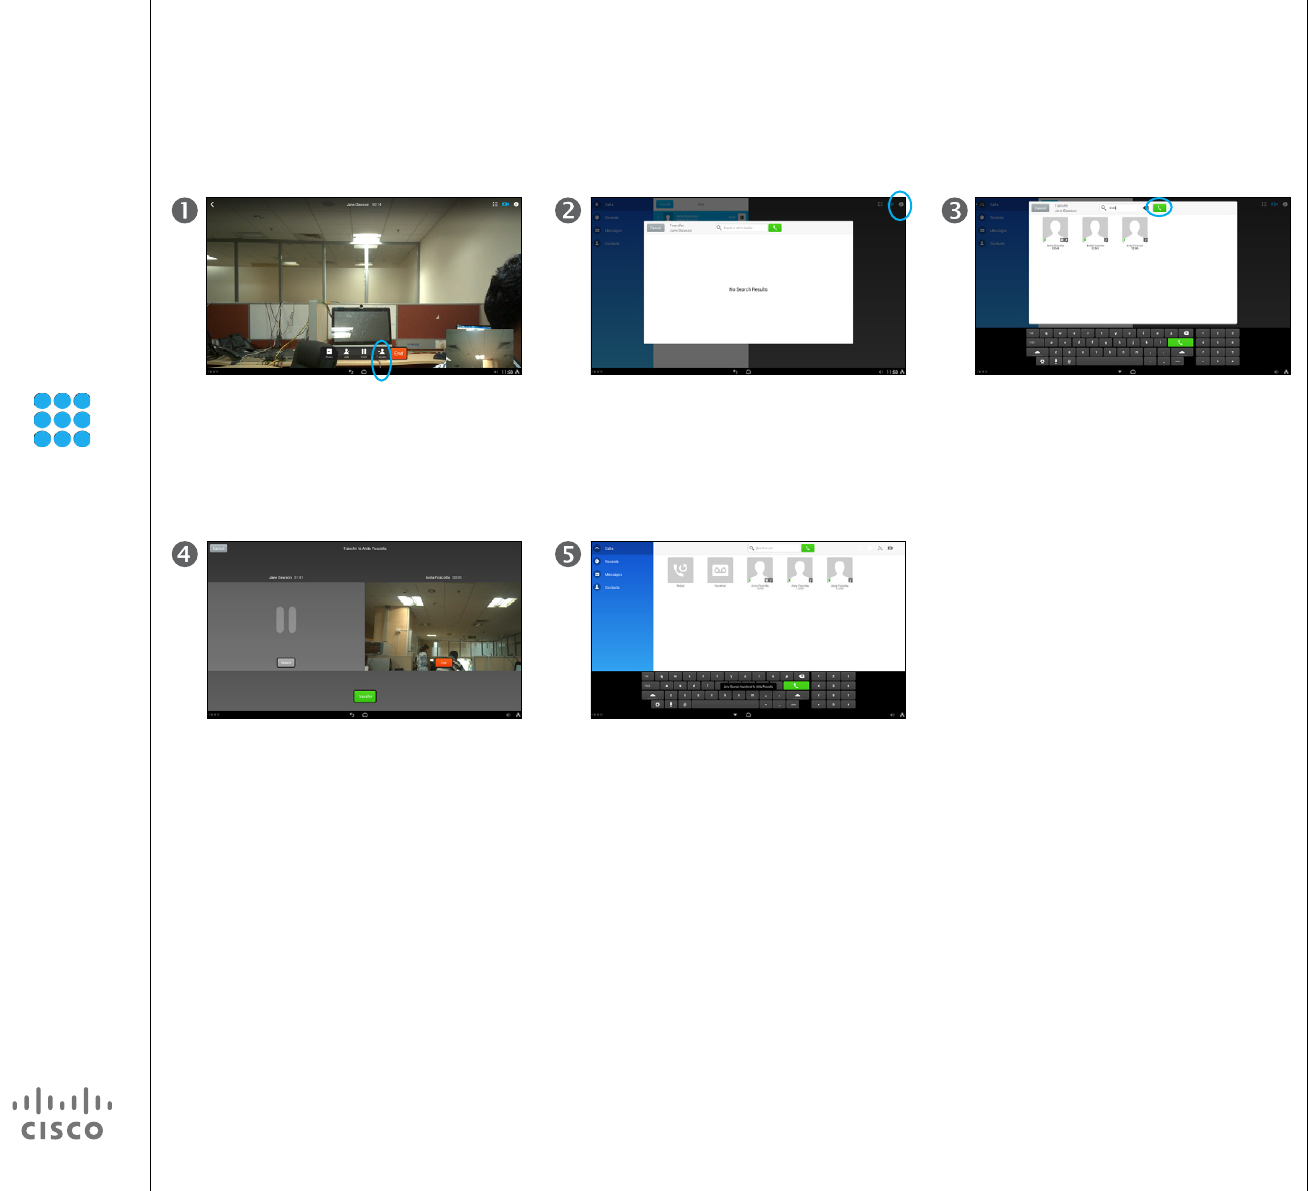
Call Transfer
Transfer a Call
In a call, tap Transfer, as outlined.
Talk to the new recipient, if necessary. Then
tap Transfer.
Enter the name, number or address (URI) of
the recipient.
The call will now be transferred.
Tap the green Call icon.
About Call Transfer
Transfer redirects a call. The target is
the name, number or address (URI)
to which you want to transfer the call.
Note that you cannot use the transfer
function to redirect a call that is on
hold. Tap Resume to remove the
call from hold before transferring it.
27
D1510401 User Guide
Cisco Collaborate Desk DX80
Produced: April 2014, All contents © 2014
Cisco Systems, Inc. All rights reserved.
EFT Draft 1—Cisco Condential—Do Not Distribute
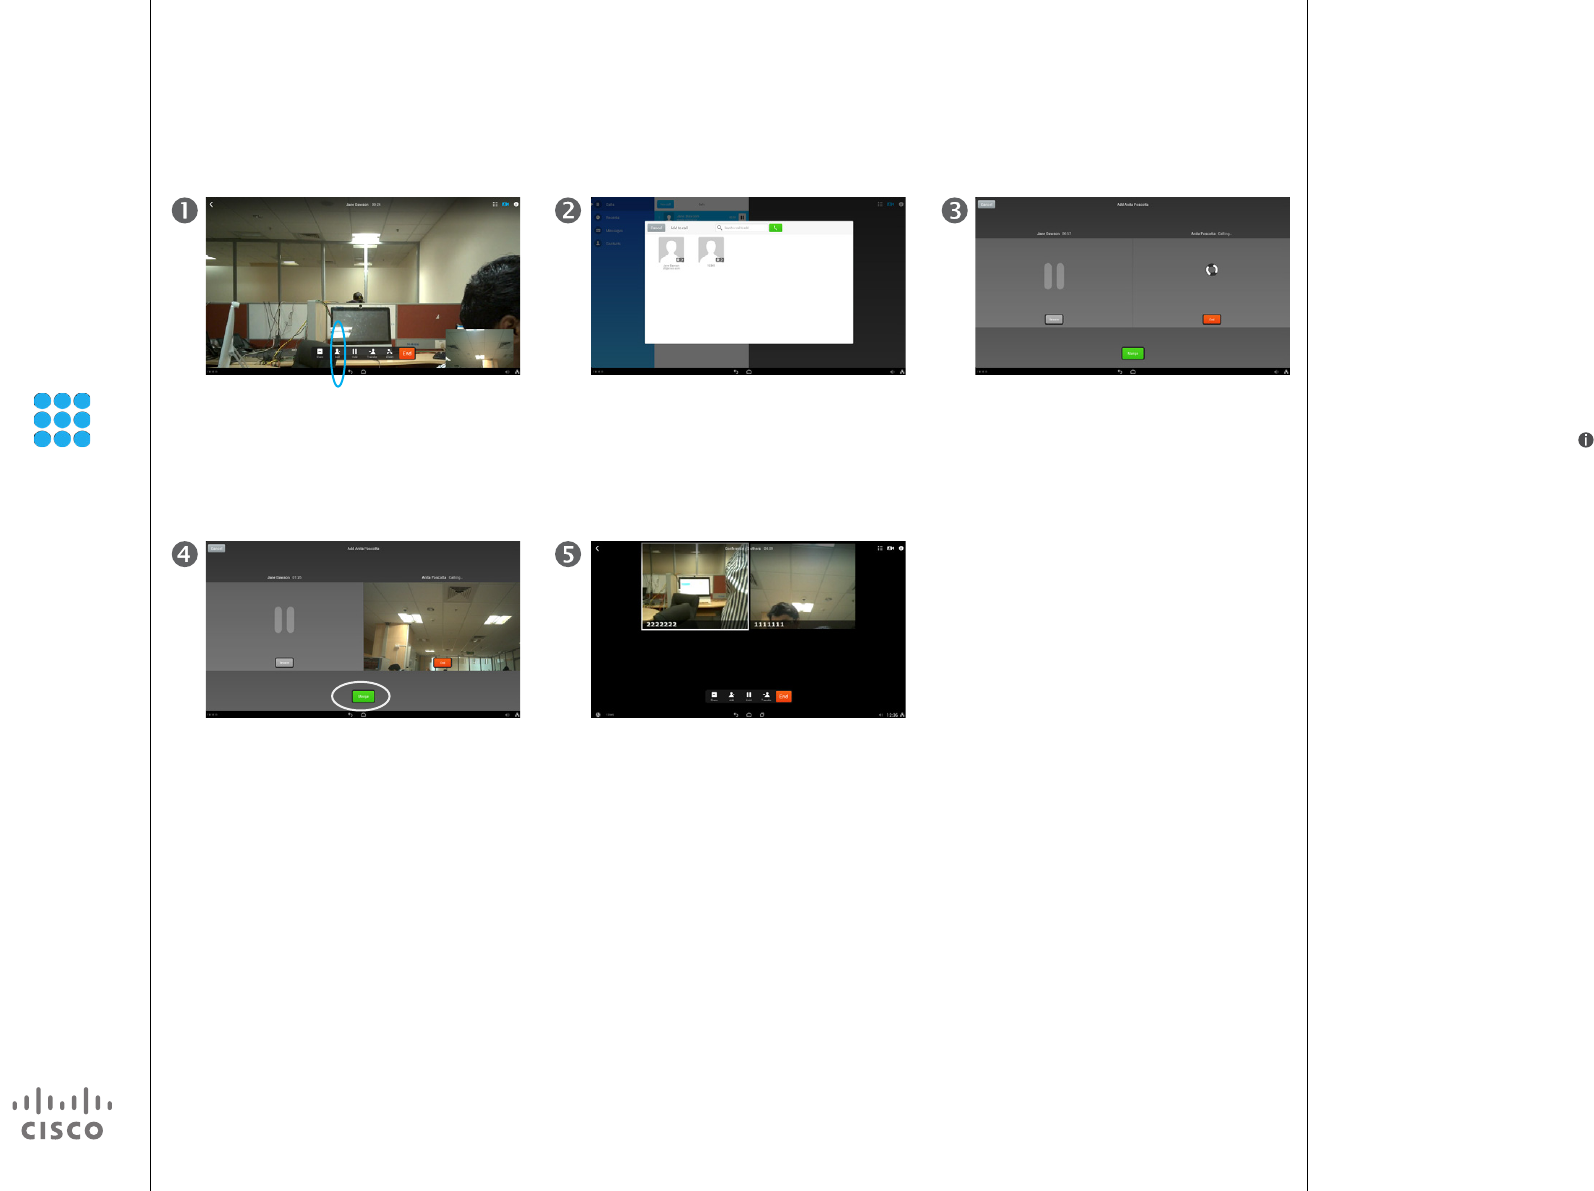
Ad Hoc Conference
Create Conference About Create Conference
To expand an ongoing call into a
conference, just add participants.
These participants can be added
by dialing their number, name or
address; or by using the list of
Contacts; or any mixture of these
two methods.
If you tap the information icon ( )
appearing in the upper right corner
during the conference, you will gain
access to the list of participants.
Participants are listed in the order in
which they join the conference with
the most recent additions at the top.
Tip: To remove any conference
participant, highlight the participant
and tap End Call.
You can remove participants only if
you initiated the conference call.
In a call, tap Add, as outlined. Call another in the usual way. The one you were in call with will now be
put on hold, while the new recipient is
called.
Once, the new recipient answers, tap
Merge to generate the conference.
Tap End to terminate the conference.

28
D1510401 User Guide
Cisco Collaborate Desk DX80
Produced: April 2014, All contents © 2014
Cisco Systems, Inc. All rights reserved.
EFT Draft 1—Cisco Condential—Do Not Distribute
Meet Me Conference
Start or Join a Meet Me Conference About Meet Me
Conference
Meet Me conferencing enables
you to start or join a conference by
calling the conference number as
opposed to call specic recipients
one by one to create a conference.
• If you call a secure Meet Me
conference number from a
nonsecure phone, your phone
displays the message Device Not
Authorized.
• A Meet Me conference ends when
all participants hang up.
• If the conference initiator disconnects,
the conference call continues until all
participants hang up.
Note that the participants cannot
join the conference until the initiator
starts the conference.
Start a Meet Me Conference:
Join a Meet Me Conference Started by Someone Else:
Dial the Meet Me conference number
that the conference initiator provides.
If you hear a busy tone, the conference
initiator has not joined the conference.
Wait a minute and then try your call again.
Tap Call, as outlined. This will open the Call menu Tap Meet Me, as outlined.
Tap the green Call button. You have initiated a Meet Me conference.

29
D1510401 User Guide
Cisco Collaborate Desk DX80
Produced: April 2014, All contents © 2014
Cisco Systems, Inc. All rights reserved.
EFT Draft 1—Cisco Condential—Do Not Distribute
Share
Content
Sharing of content is not supported in this version

30
D1510401 User Guide
Cisco Collaborate Desk DX80
Produced: April 2014, All contents © 2014
Cisco Systems, Inc. All rights reserved.
EFT Draft 1—Cisco Condential—Do Not Distribute
WebEx
Meetings
Your video system may be
connected to a management
system capable of scheduling video
meetings for you. Any meetings
scheduled will then appear in a List
of Meetings on your Touch device.
31
D1510401 User Guide
Cisco Collaborate Desk DX80
Produced: April 2014, All contents © 2014
Cisco Systems, Inc. All rights reserved.
EFT Draft 1—Cisco Condential—Do Not Distribute
Cisco WebEx is a standalone
application, but also integrates into
the Calendar, Phone, Chat, and
Contacts applications.
During a Cisco WebEx meeting,
participants can join the audio
conference, see who is in the
meeting, view shared presentations,
and chat with everyone or privately.
A pop-up at the bottom of the
screen identies the current speaker.
Schedule a New WebEx
Meeting
You may schedule a new WebEx
meeting. You do this by means of the
Calendar application.
Meeting List Basics
WebEx Meetings
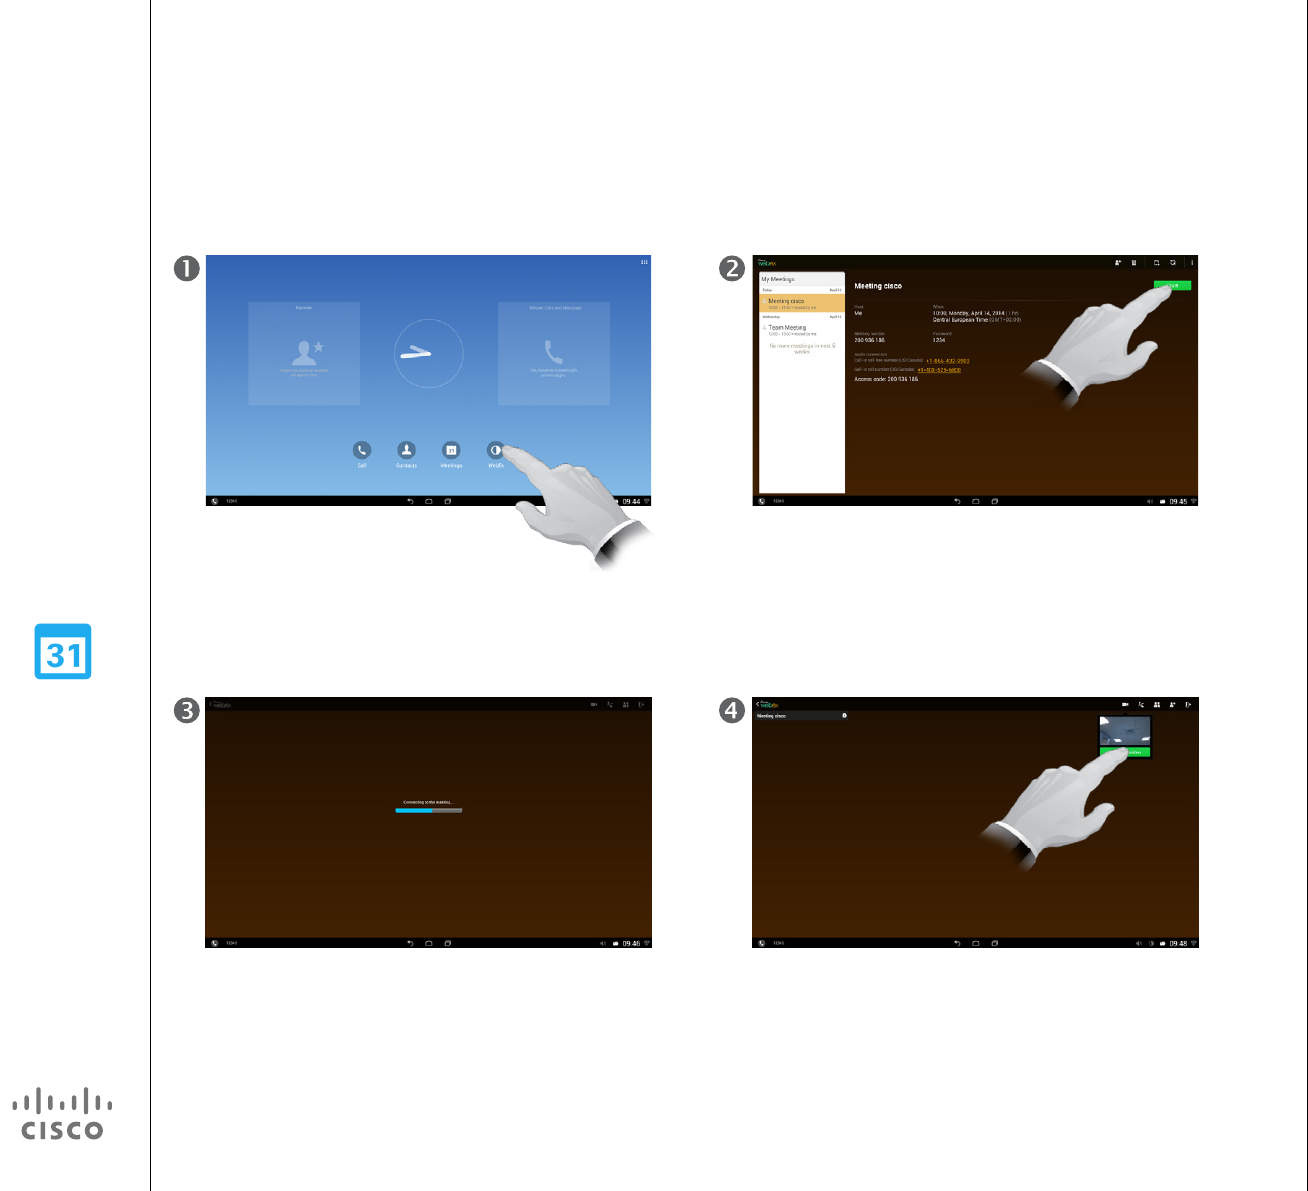
Start a Scheduled WebEx Meeting
Tap WebEx, as outlined.
The system will now connect you to the conference.
The list of upcoming scheduled meetings will now appear in
the left column. When it is time to join, tap Start, as outlined.
If you want to activate your video, tap Start my video, as
outlined. If your selfview blocks important real estate on
the screen, tap and hold and then move the selfview.

32
D1510401 User Guide
Cisco Collaborate Desk DX80
Produced: April 2014, All contents © 2014
Cisco Systems, Inc. All rights reserved.
EFT Draft 1—Cisco Condential—Do Not Distribute
Contacts
Contacts consists of three parts;
a Directory, which typically is your
corporate phone book; Recents
which is a list of recent calls and
nally Favorites, which is your
personalized list of people you call
frequently or otherwise need to get
easy access to.
33
D1510401 User Guide
Cisco Collaborate Desk DX80
Produced: April 2014, All contents © 2014
Cisco Systems, Inc. All rights reserved.
EFT Draft 1—Cisco Condential—Do Not Distribute
The Contacts serves as your phone
book. You may also turn someone
into a Favorite to make them appear
on the Home screen of the phone
app.
About Contacts
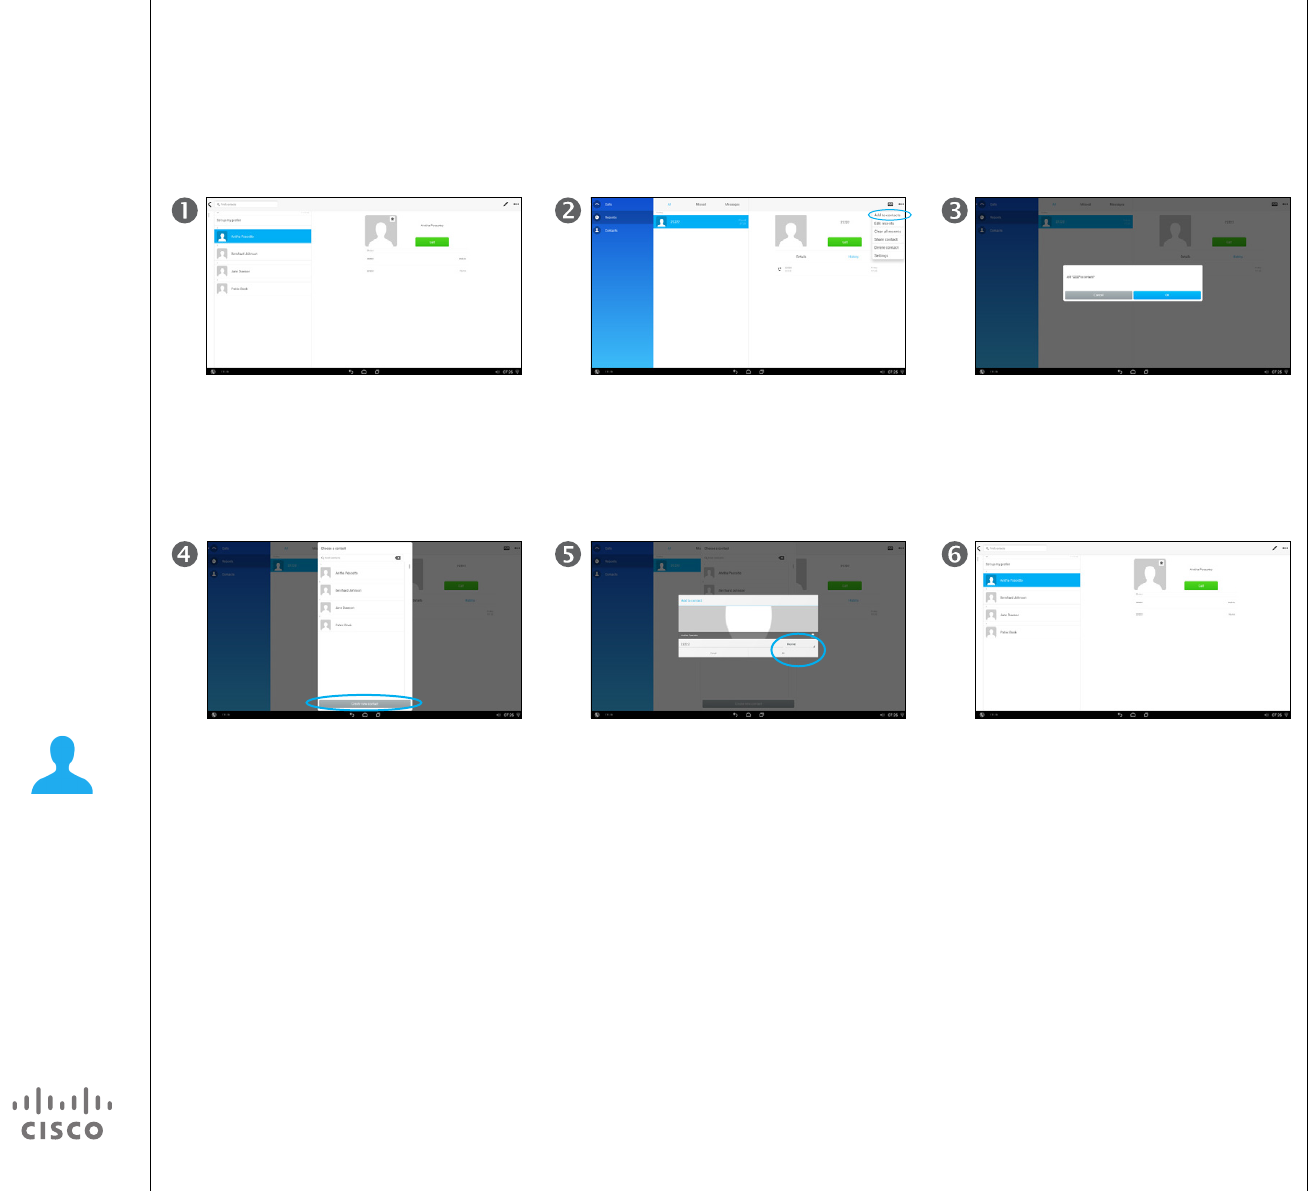
Make Someone a Contact From Call History
Contacts
Select the person to become a contact in
Recents, as outlined
You may now either associate the person
with an entry already existing in your list
of contacts (e.g. mobile phone number in
addition to oce phone number). This you
do by clicking on that contact. Otherwise,
to create a completely new contact, tap
Create new contact.
Tap More (...) in the upper right corner to
show the drop-down menu and then tap
Add to Contacts.
You may now specify what this entry
represents (e.g. Home, mobile etc.) Once
done tap OK.
Tap OK to conrm that you want to add the
person to the list of Contacts.
You’re done.
34
D1510401 User Guide
Cisco Collaborate Desk DX80
Produced: April 2014, All contents © 2014
Cisco Systems, Inc. All rights reserved.
EFT Draft 1—Cisco Condential—Do Not Distribute
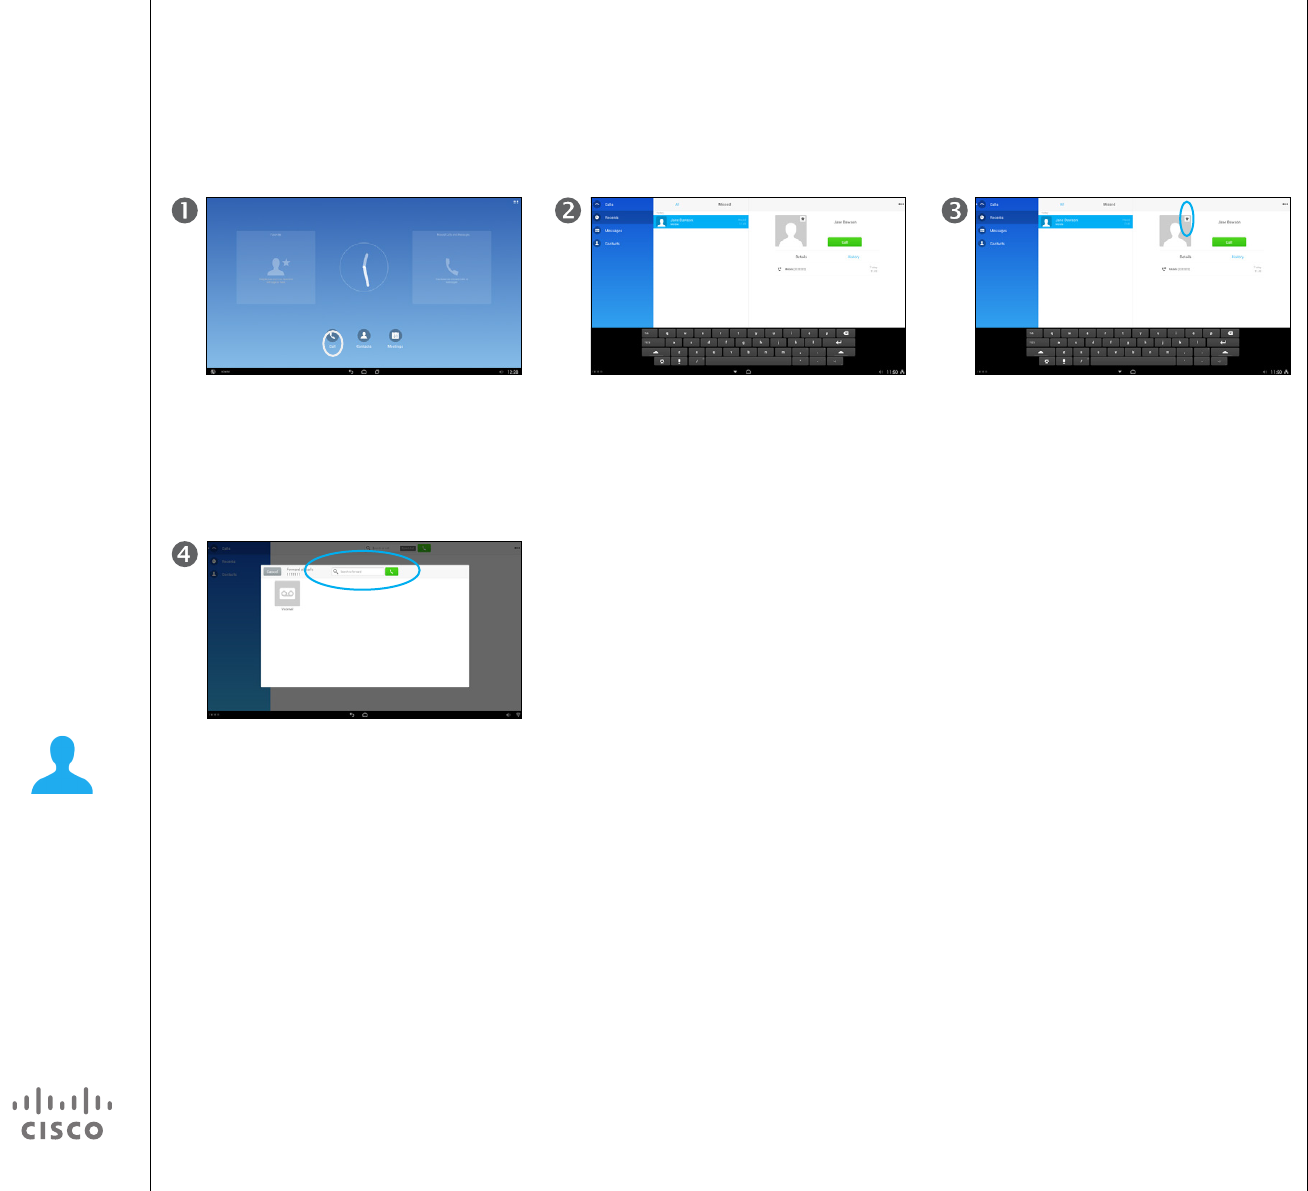
Make Someone a Favorite
Contacts
Tap Call, as outlined.
To demote someone from the list of
Favorites, tap the asterisk again. The color
of the asterisk will then change back from
yellow to gray.
Select Recents or Contacts (left column)
and then select the avatar to turn into a
Favorite.
Tap the little * in the upper right corner to
turn this entry into a Favorite. The color of
the asterisk will change from gray to yellow.
The Contacts serves as your phone
book. You may also turn someone
into a Favorite to make them appear
on the Home screen of the phone
app.
About Contacts
35
D1510401 User Guide
Cisco Collaborate Desk DX80
Produced: April 2014, All contents © 2014
Cisco Systems, Inc. All rights reserved.
EFT Draft 1—Cisco Condential—Do Not Distribute
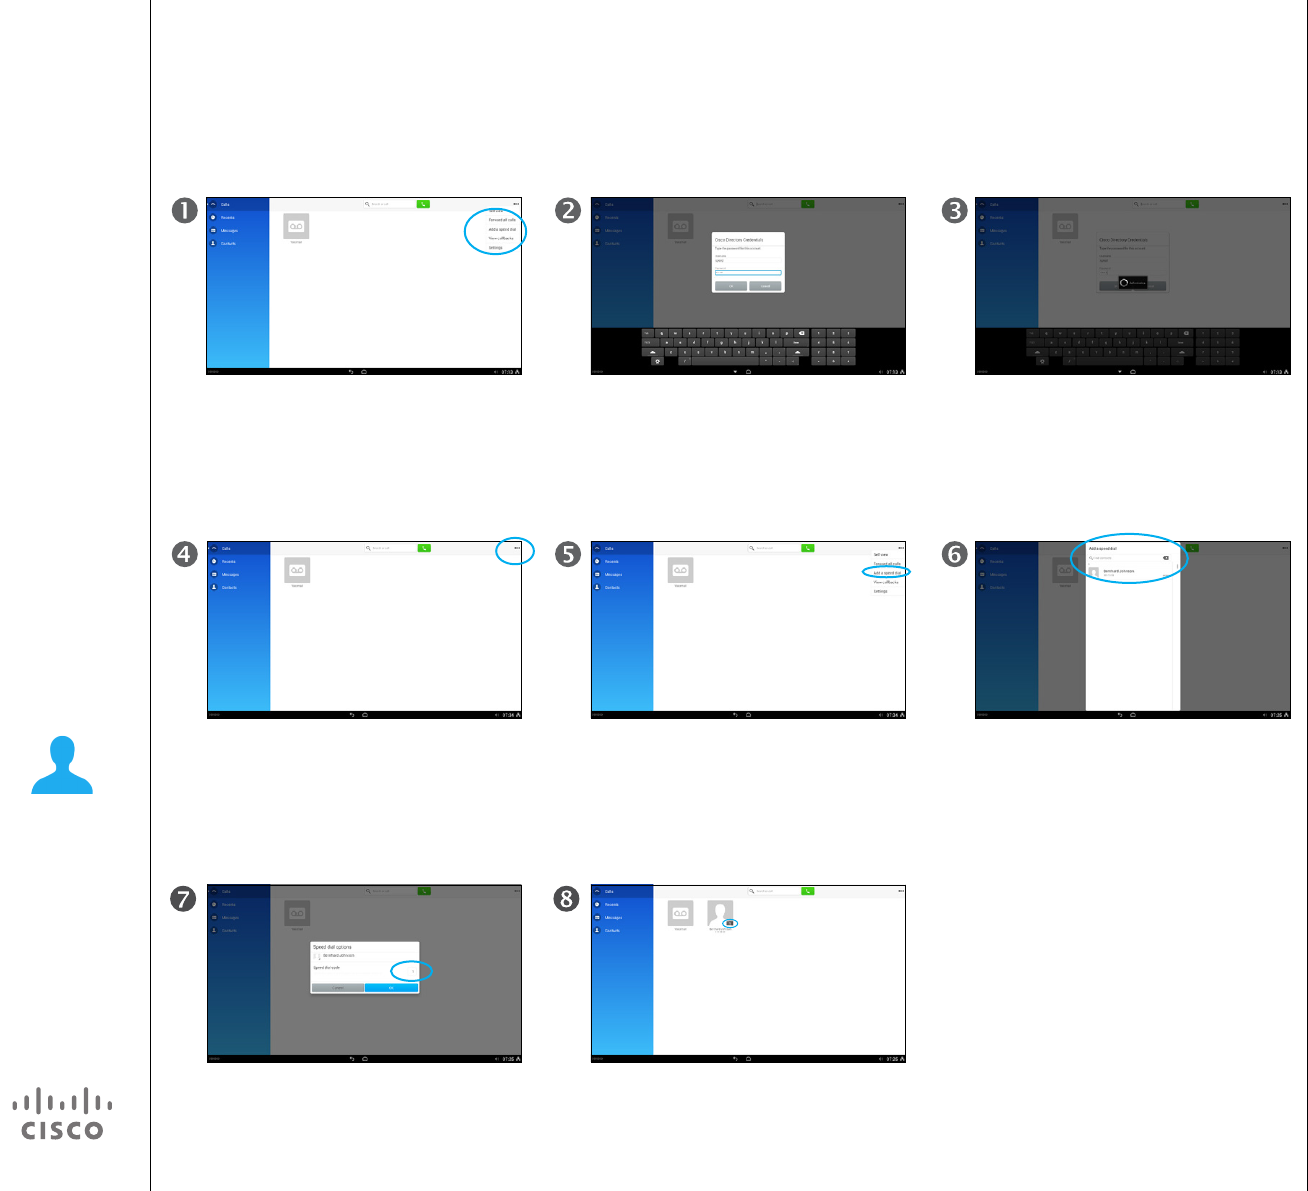
Tap Calls to invoke the display shown here
and then tap More (...), followed by Add a
speed dial in the drop-down menu.
Tap More (...) again.
Once located, specify the Speed dial code to
be associated with this person. In this example
1 is used as speed dial code. Tap OK to leave
menu putting changes into eect.
You will now be prompted to log into the
system using you username and password.
Tap Add a speed dial in the drop-down
menu.
The speed dial allocation and the
corresponding code is indicated as shown.
Authentication will then take place.
Locate whom to allocate to a speed dial.
Allocating Numbers to Speed Dial
Contacts
Speed Dial is a convenient shortcut
to contacts that you use often. You
allocate a speed dial code (typically
a number) to the entry and use that
to call that person.
How to utilize already allocated
speed dial settings is shown in the
chapter Calling Tasks.
About Speed Dial

36
D1510401 User Guide
Cisco Collaborate Desk DX80
Produced: April 2014, All contents © 2014
Cisco Systems, Inc. All rights reserved.
EFT Draft 1—Cisco Condential—Do Not Distribute
Camera
37
D1510401 User Guide
Cisco Collaborate Desk DX80
Produced: April 2014, All contents © 2014
Cisco Systems, Inc. All rights reserved.
EFT Draft 1—Cisco Condential—Do Not Distribute
Camera
Setting the Camera Exposure Level About Camera Settings
You can set the cameras exposure
level in the Settings menu associat-
ed with the Call window.
You can adjust the
camera’s exposure
level by means of
the Settings menu
accessed from here.
38
D1510401 User Guide
Cisco Collaborate Desk DX80
Produced: April 2014, All contents © 2014
Cisco Systems, Inc. All rights reserved.
EFT Draft 1—Cisco Condential—Do Not Distribute
Settings
39
D1510401 User Guide
Cisco Collaborate Desk DX80
Produced: April 2014, All contents © 2014
Cisco Systems, Inc. All rights reserved.
EFT Draft 1—Cisco Condential—Do Not Distribute
Settings
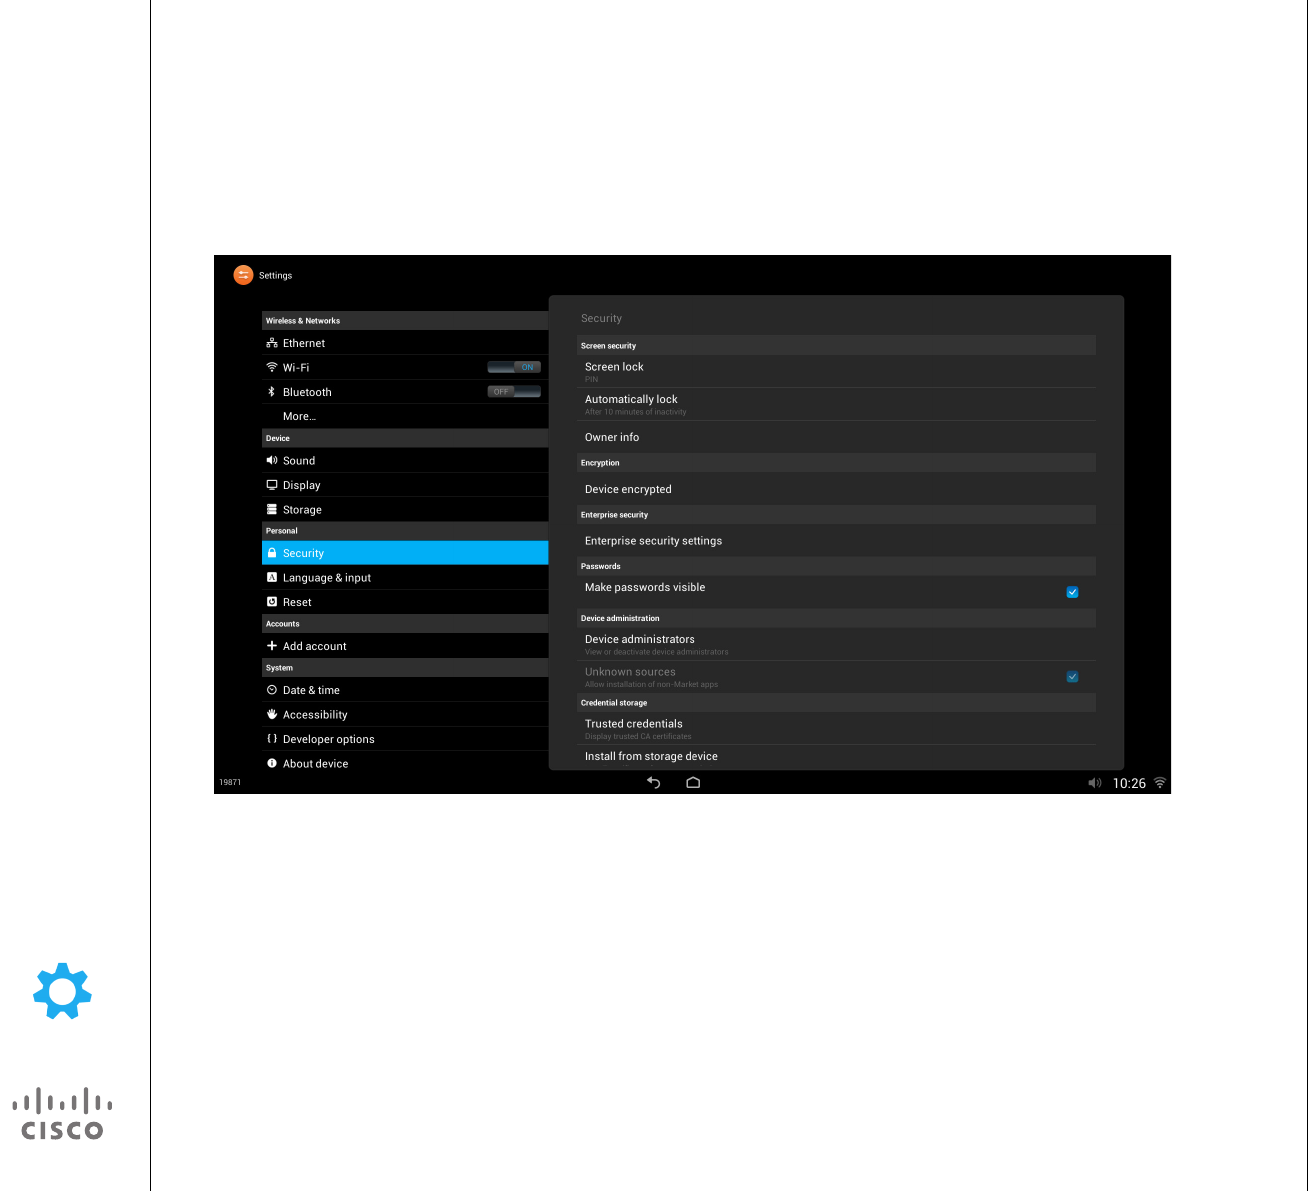
Gain Access to the Settings
There are several types of Settings
available with your DX80.
There are System Settings, like those
shown here, and there are context
sensitive settings applying to your
current task.
Care must be taken when altering
the System Settings to avoid that the
system stops working. If in doubt,
contact your video support team.
About Settings

Cisco has more than 200 oces worldwide. Addresses, phone numbers, and fax numbers are listed on the Cisco Website at www.cisco.com/go/oces.
Cisco and the Cisco Logo are trademarks of Cisco Systems, Inc. and/or its aliates in the U.S. and other countries. A listing of Cisco’s trademarks can be found at www.cisco.com/go/trademarks. Third party trademarks mentioned are the
property of their respective owners. The use of the word partner does not imply a partnership relationship between Cisco and any other company. (1005R)
Americas Headquarters
Cisco Systems, Inc.
San Jose, CA
Asia Pacic Headquarters
Cisco Systems (USA) Pte. Ltd.
Singapore
Europe Headquarters
Cisco Systems International BV Amsterdam,
The Netherlands