Clarion FB275BT Car Stereo with FM/SD Card/Bluetooth combination User Manual 07US MIRAGE cv indd
Clarion (M) Sdn Bhd Car Stereo with FM/SD Card/Bluetooth combination 07US MIRAGE cv indd
UserManual.wiki
>
Clarion
>
FB275BT User Manual
User Manual
Navigation menu
Upload a User Manual
Namespaces
Wiki Guide
HTML
PDF
Info
Views
User Manual
Discussion / Help
Navigation
![4FB275BT / FB275BTBBe sure to unfold and read the next page.Veuillez déployer et vous référer à la page suivante.Cerciórese de desplegar y de leer la página siguiente.3. HANDLING MEMORY CARD Do not leave the card in vehicle where there is high temperature or direct sunlight or where electromagnetic waves or electro-static are easily generated.SD/MMC Memory Card When the card is being read, do not re-move the card. After eject operation, always remove the memory card from the slot; otherwise, the flip down panel may not be closed prop-erly. After usage, store the supplied memory card in the enclosed case. Do not allow dirt, dust or water to enter it. Do not bend or drop the card. The card or the recorded content may be damaged. Do not touch the terminals on the back of the card with your fingers.This equipment has been tested and found to comply with the limits for a Class B digital device, pursuant to Part 15 of the FCC Rules.These limits are designed to provide reasonable protection against harmful interference in a resi-dential installation.This equipment generates, uses, and can radiate radio frequency energy and, if not installed and used in accordance with the instructions, may cause harmful interference to radio communica-tions. However, there is no guarantee that inter-ference will not occur in a particular installation.If this equipment does cause harmful interfer-ence to radio or television reception, which can be determined by turning the equipment off and on, the user is encouraged to consult the dealer or an experienced radio/TV technician for help.2. PRECAUTIONSUSE OF CONTROLS, ADJUSTMENTS, OR PERFORMANCE OF PROCEDURES OTHER THAN THOSE SPECIFIED HEREIN, MAY RESULT IN HAZARDOUS RADIATION EXPOSURE.THE COMPACT DISC PLAYER SHOULD NOT BE ADJUSTED OR REPAIRED BY ANYONE EXCEPT PROPERLY QUALIFIED SERVICE PERSONNEL.CHANGES OR MODIFICATIONS TO THIS PRODUCT NOT APPROVED BY THE MANU-FACTURER WILL VOID THE WARRANTY AND WILL VIOLATE FCC APPROVAL.INFORMATION FOR USERS: CAUTION !English38EnglishFB275BT / FB275BTB6. DCP (Detachable Control Panel)The control panel can be detached to prevent theft. When detaching the control panel, store it in the DCP (Detachable Control Panel) case to prevent scratches.We recommend taking the DCP with you when leaving the car.2. Press in the [RELEASE] button.3. Pull the DCP toward you and remove it.Removing the DCP1. Press the [SRC] button for 1.5 seconds or lon-ger to switch off the power.∗ The flip down panel can only be opened up to 65˚, please do not forcibly push to open fur-ther. The DCP can easily be damaged by shock. After removing it, be careful not to drop it or subject it to strong shocks. The connector connecting the main unit and the DCP is an extremely important part. Be careful not to damage it by press-ing on it with fingernails, pens, screwdriv-ers, etc. CAUTION !Note: If the DCP is dirty, wipe off the dirt with a soft, dry cloth only.4. Close the HOLD FLAP.Attaching the DCP1. Insert the right side of the DCP into the main unit.2. Insert the left side of the DCP to attach into the main unit.Storing the DCP in the DCP caseHold the DCP, in the orientation as shown in the figure below, and put it into the supplied DCP case. (Ensure the DCP is in the correct orientation.)FB275BT / FB275BTBSD Logo is a trademark.The Bluetooth® word mark and logos are owned by the Bluetooth® SIG, Inc. and any use of such marks by Clarion Co.,Ltd. is under license. Other trademarks and trade names are those of their respective owners.Warning:Changes or modifications to this equipment not expressly approved by the party responsible for compliance could void the userʼs authority to operate the equipment. Operation is subject to the following two conditions:(1) this device may not cause interference, and (2) this device must accept any interference, including interference that may cause undesired operation of the device.](https://usermanual.wiki/Clarion/FB275BT/User-Guide-846986-Page-3.png)
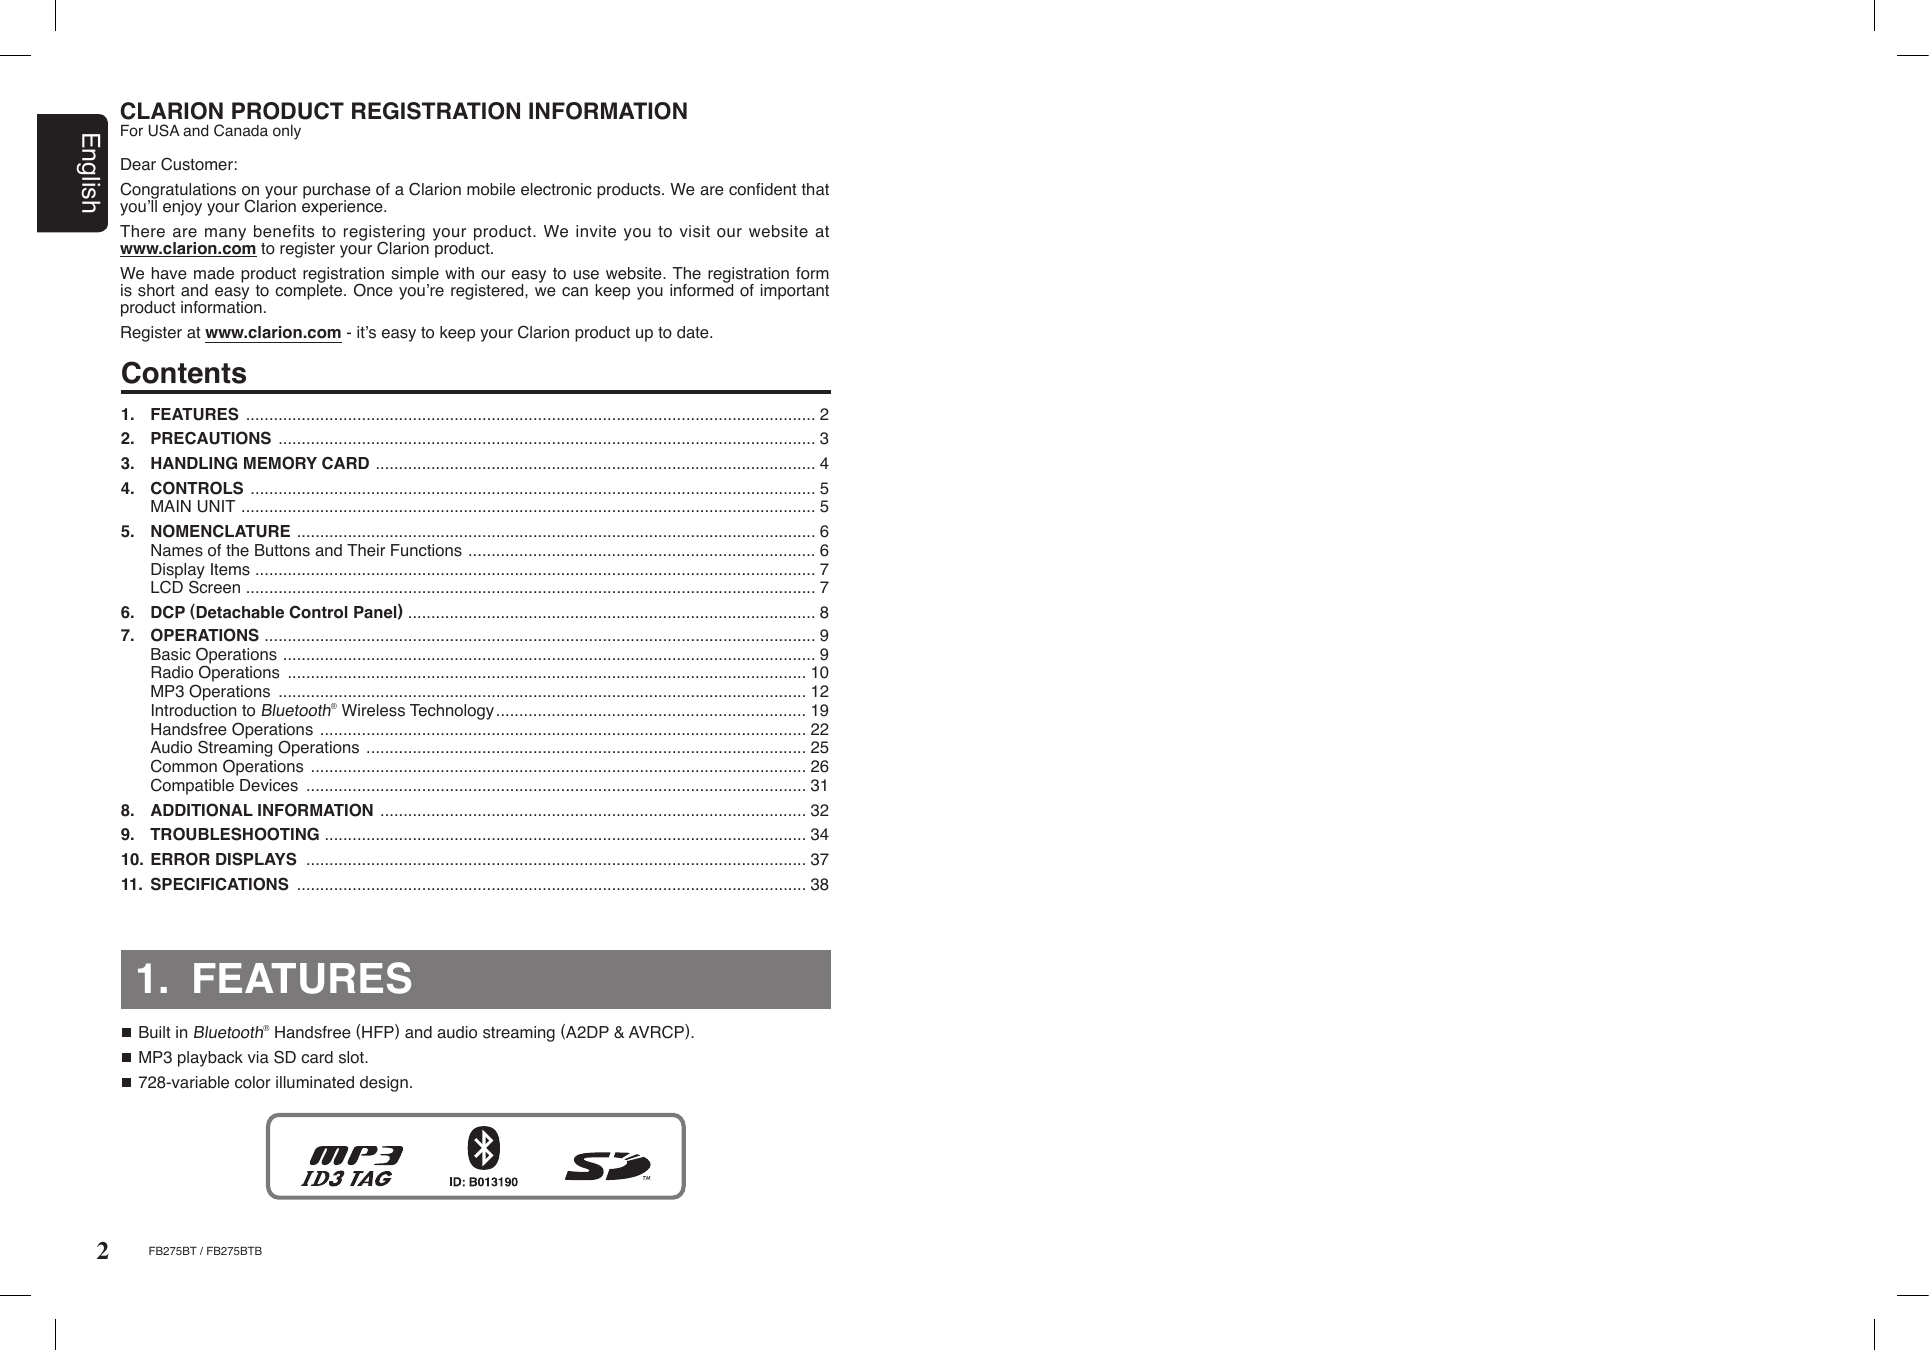
![[RELEASE] button Deeply push in the button to unlock the flip down panel.[ISR] button Recall ISR radio station in memory. Press and hold for 1.5 seconds or longer: Store current station into ISR memory (Radio mode only).[DIRECT] buttons Store a station into memory or recall it directly while in the Radio mode. Store a telephone number into memory or recall it directly while in the Telephone mode.[ ] button Reject an incoming call or end a call. Cancel current operation.English6FB275BT / FB275BTB5FB275BT / FB275BTBEnglish4. CONTROLS / COMMANDES / CONTROLESMAIN UNIT / APPAREIL PRINCIPAL / UNIDAD PRINCIPAL Note: Be sure to unfold this page and refer to the front diagrams as you read each chapter.Remarque: Veuillez déplier cette page et vous référer aux schémas quand vous lisez chaque chapitre.Nota: Cuando lea los capítulos, despliegue esta página y consulte los diagramas.Français Español[RPT] button Perform track repeat play while in the SD mode. Press and hold the button for 1.5 seconds or longer to perform folder repeat play while in the SD mode.[ , ] buttons Seek a station while in the Radio mode or select a track when listening to a SD/BT Audio mode. These buttons are also being used to make various settings.[DISP] button During SD mode, switch the display indication in the following order: Track Name Folder Name Title Tag Album Tag Artist Tag Track Name... Press and hold the button for 1.5 seconds or longer to enter the Adjustment mode. 5. NOMENCLATURESD/MMC MEMORY CARD SLOT SD/MMC memory card insertion slot.Notes: Be sure to read this chapter referring to the front diagrams of chapter “4. CONTROLS” on page 5. SD is the abbreviation of Secure Digital Card while MMC is the abbreviation of Multimedia card.Names of the Buttons and Their Functions[ ] knob Adjust the volume by turning the knob clockwise or counterclockwise. Press and hold the knob for 1.5 seconds or longer to perform auto store in the Radio mode. Play or pause a track while in the SD/BT Audio mode. Press and hold the knob for 1.5 seconds or longer to perform manual navigation in the SD mode. Perform next level adjustment or selection in the Adjustment mode. Perform various settings.[SRC] button Press the button to turn on the power. Press and hold the button for 1.5 seconds or longer to turn off the power. Switch the Operation mode among the Radio mode, SD mode, BT Audio mode and AUX mode.[ ] button Accept an incoming call or make outgoing call.[BND] button Switch the band while in the Radio mode. Press and hold the button for 1.5 seconds or longer to toggle seek/manual tuning. Play the first track in current folder while in the SD mode. Press and hold the button for 1.5 seconds or longer to play the first track in the memory card.[RDM] button Perform track random play while in the SD mode. Press the button to toggle track random/folder random/card random/random off while in the SD mode. Press and hold the button for 1.5 seconds or longer to perform quick random folder play.[ ], [ ] buttons Select the folder in the SD mode.With the FLIP DOWN PANEL opened / Ouvrez le PANNEAU RABATTABLE / Apertura del PANEL ABATIBLE[1] button Restart current track in the SD mode.INTERNAL MIC Built-in internal microphone.In extreme cold, the screen movement may slow down and the screen may darken, but this is normal. The screen will recover when it returns to normal temperature.Please take note that reflection of the screen cover may increase due to direct sunlight exposure, thus this might decrease the visibility of the LCD screen.Display ItemsLCD Screen∗ Some of the modes will change the whole display such as volume, Adjustment mode and file navigation.7FB275BT / FB275BTBEnglishFENTE DE CARTE MÉMOIRE SD/MMCRANURA PARA TARJETA DE MEMORIA SD/MMC](https://usermanual.wiki/Clarion/FB275BT/User-Guide-846986-Page-4.png)
![9EnglishFB275BT / FB275BTBNote: Be sure to read this chapter referring to the front diagrams of chapter “4. CONTROLS” on page 5.7. OPERATIONS CAUTION !Basic OperationsBe sure to lower the volume before switch-ing off the unit power or the ignition key. The unit remembers its last volume setting. If you switch the power off with the volume up, when you switch the power back on, the sud-den loud volume may hurt your hearing and damage the unit. Turning on/off the power1. Press the [SRC] button.2. The illumination and display on the unit light up. The unit automatically remembers its last Operation mode and will automatically switch to display that mode.3. Press and hold the [SRC] button for 1.5 sec-onds or longer to turn off the power for the unit.∗ A welcome animation will be displayed at the first time. This animation can be turned on or off in the Adjustment mode.Notes: Be careful about using this unit for a long time without running the engine. If you drain the carʼs battery too much, you may not be able to start the engine and this can reduce the service life of the battery. The unit will automatically prevent from being turned on the power for a few seconds after power off for internal protection purposes. Selecting a mode1. Press the [SRC] button to change the Opera-tion mode.2. Each time you press the [SRC] button, the Op-eration mode changes in the following order: Radio mode SD mode (BT Audio mode) (AUX mode) Radio mode...Switching the displayPress the [DISP] button to select the desired dis-play.When the [DISP] button is pressed at the first time, the current display type will be displayed. Further pressing the [DISP] button will switch the display in the following order:Notes: There will be screen wipe transition in between if animation is enabled in Adjustment mode. If the SD mode is selected when no SD memory card is inserted, the display shows “NO CARD”. SD mode“TRACK” “FOLDER” “TITLE” “ALBUM” “ARTIST” “TRACK” ... ∗ Once selected, the preferred display becomes the display default. When a function adjustment such as volume is made, the screen will momentarily switch to that functionʼs display, then revert back to the preferred display several seconds after the adjustment.∗ AUX mode is only available if AUX is enabled in ADJ mode while BT Audio mode will only be available if there is A2DP connection. And the following title will be displayed for a moment each time the mode changes.](https://usermanual.wiki/Clarion/FB275BT/User-Guide-846986-Page-5.png)
![10EnglishFB275BT / FB275BTB DX SEEKWhen the [ ] button is pressed, search will be performing in the direction of higher frequencies. When the [ ] button is pressed, search will be performed in the direction of lower frequencies.∗ When seek tuning starts, “DX” appears in the display.Radio OperationsListening to the radio1. Press the [SRC] button and select the Radio mode, then the radio will be on.2. To select a preset band, press the [BND] but-ton, then select one of the preset bands such as FM1, FM2 or FM3. Every time the [BND] button is pressed, the display will change as: FM1 FM2 FM3 FM1...3. Press the [ , ] button to tune in the desired station.∗ Initial frequency display is “87.50MHz”.Seek tuningThere are 2 types of seek tuning: DX SEEK and LOCAL SEEK.DX SEEK can automatically tune in to receivable broadcast stations; LOCAL SEEK can tune in to only broadcast stations with a good reception sensitivity.1. Press the [BND] button and select the desired FM band.∗ Press and hold the [BND] button for 1.5 seconds or longer to switch to Auto Seek mode. Make sure “SEEK TUNE” is displayed briefly.2. Press the [ , ] button to start automatic station tuning. When the [ ] button is pressed, search will be performing in the direction of higher fre-quencies. When the [ ] button is pressed, search will be performed in the direction of lower frequencies.Basic OperationsAUX functionThis system has AUX RCA input in the rear panel where you can listen to sounds and music from external devices connected to this unit.1. Connect the external music player to the AUX RCA input. 2. Enable the AUX function in Adjustment mode. Please refer “Setting AUX function” on page 27 for more details.3. Press the [SRC] button to select the AUX mode to activate the AUX function.Note: Volume can be adjusted through the unit. Please refer chapter “Common Operations” on page 26 for more operation controls.Adjusting the volumeTurning the [ ] knob clockwise in-creases the volume; turning it counterclockwise decreases the volume. “VOLUME 0” to “VOLUME 33” will be displayed depends on the volume level.∗ Factory default setting for volume is “VOLUME 13”.](https://usermanual.wiki/Clarion/FB275BT/User-Guide-846986-Page-6.png)
![11EnglishFB275BT / FB275BTB LOCAL SEEKIf the button is pressed and held in position for 1.5 seconds or longer, local seek tuning will be enabled. Broadcast stations with good reception sensitivity are selected.∗ When local seeking starts, “LO” appears in the display.Recalling a preset stationA total of 18 preset positions (6-FM1, 6-FM2, 6-FM3) exists to store individual radio stations in memory. Pressing the corresponding [DIRECT] button recalls the stored radio frequency auto-matically.1. Press the [BND] button and select the desired FM band.2. Press the corresponding [DIRECT] button to recall the stored station.∗ Press and hold one of the [DIRECT] buttons for 1.5 seconds or longer to store that station into preset memory. Note: If there is no preset channel stored, “- -EMPTY- -” is displayed briefly and reverts to previous frequency display.Radio Operations Step tuningPress the [ , ] button to perform manual tuning.Manual tuningThere are 2 ways available: Quick tuning and step tuning.When you are in the step Tuning mode, the fre-quency changes one step at a time. In the Quick Tuning mode, you can quickly tune the desired frequency.1. Press the [BND] button and select the desired FM band.∗ Press and hold the [BND] button for 1.5 seconds or longer to switch to Manual Seek mode. Make sure “MANUAL TUNE” is displayed briefly.2. Tune into a station. Quick tuningPress and hold the [ , ] button for 1.5 sec-onds or longer to begin station tuning.Manual memory function1. Press the [BND] button, to select a band you want to store in the memory.2. Press the [ , ] button to tune into a desired station.3. Press and hold one of the [DIRECT] buttons for 1.5 seconds or longer to store the current station into preset memory and “SAVED” will be displayed briefly. Preset memory functionPreset memory function can store up to 18 sta-tions: Six stations for each of FM1, FM2, and FM3.∗ Factory default setting is empty for all channels.Auto storeAuto store is a function for storing up to 6 stron-gest stations that are automatically tuned in sequentially. If 6 receivable stations cannot be received, a previously stored station remains un-overwritten at the memory position.1. Push and hold the [ ] knob for 1.5 seconds or longer. The stations with good reception are stored automatically to the preset channels.Notes: The stations are stored in FM3 even if FM1 or FM2 was chosen for storing stations. The auto store procedure may take up to 40 sec-onds to complete.Instant station recall (ISR)Instant station recall is a special radio preset that instantly accesses a favorite radio station at a touch of a button. The ISR function even oper-ates with the unit in other modes.](https://usermanual.wiki/Clarion/FB275BT/User-Guide-846986-Page-7.png)
![12EnglishFB275BT / FB275BTBMP3 OperationsWhat is SD/MMC card?The MultiMediaCard (MMC) and Secure Digital (SD) are flash memory (non-volatile) card format that are used to store large capacity of data in a compact and slim size of media. SD memory cards are based on the older MultiMediaCard (MMC) format with additional features such as write protection switch. Memory card that can be played are limited to those recognized as SD or MMC; operation is not guaranteed with all SD memory card from all manufacturers. For SD/MMC memory card compatibility, please consult your nearest Clarion dealer for more information. To prevent the accidental loss of data, always back up important data to your computer. Audio files playable on this unit are limited to MP3 files. AAC, WMA or other audio formats are not supported. This unit doesnʼt support SDHC (Secure Digital High Capacity) and SDIO (input/output) cards. This unit supports SD memory card up to 2GB based on SD Association standard.What is MP3?MP3 is an audio compression method and clas-sified into audio layer 3 of MPEG standards. This audio compression method has penetrated into PC users and become a standard format. This MP3 features the original audio data compres-sion to about 12 percent of its initial size with a high quality sound. This means that several mu-sic CDs can be recorded on a SD card to allow a long listening time∗.∗ Depends on the SD card storage capacity. Recalling a station with ISRIn any mode, press the [ISR] button to turn on the radio function and tune the selected radio station. “ ” appears in the display and the “ ” indicator lit on. Press the [ISR] button again to return to the previous mode.Notes: ISR mode cannot be accessed during Adjustment/Manual Navigation/Telephone mode. If there is no station stored in ISR, “- -EMPTY- -” is displayed briefly and reverts to previous mode display. “ISR” indicator will not be lit on.Radio Operations ISR memory1. Select the station that you wish to store in ISR memory during Tuner mode.2. Press and hold the [ISR] button for 1.5 sec-onds or longer to store the current station into memory and “SAVED” will be displayed briefly.](https://usermanual.wiki/Clarion/FB275BT/User-Guide-846986-Page-8.png)
![14EnglishFB275BT / FB275BTBMP3 Operations Never insert foreign objects into the SD/MMC memory card slot as it may cause the unit to break down. Do not insert memory card other than specify. It may be impossible to extract these cards from the unit and such damage will not be covered by the warranty on this product. If the memory card is not inserted easily, there may be another memory card in the slot or the unit may require service. This unit is designed for playing SD/MMC card only. Do not forcibly insert the memory card to the slot with incorrect direction (label side facing down or reverse direction) as this will damage the memory card as well as the SD/MMC MEMORY CARD SLOT. Do not leave a memory card unattended in an automobile. Exposure to direct sunlight or high temperatures may cause deforma-tion or other malfunction of the memory card. When the memory card is subjected to electrostatic or electric noise, this may result in the loss of data. CAUTION !Loading a memory card1. Press the [RELEASE] button to flip down the panel.2. Insert a memory card into the SD/MMC MEM-ORY CARD SLOT with the label side facing up.3. Close the flip down panel. “Loading...” appears in the display, the memory card plays automati-cally after loading. Playback will begin from the first file recorded on the memory card.Notes: Sound will be muted when panel is flipped. “FLIPPED” will be displayed. Always insert the memory card fully by pushing it into the slot. Incomplete insertion may cause the memory card not be recognized and flip down panel will not be able to close. Depending on the number of tracks and folder structure recorded, some amount of time may be required until all tracks are read into the unit. Thus, please refer chapter “Folder structure” on page 13 for recommended folder hierarchy and optimal performance. It is best to avoid folders without MP3 files in memory card as this will increase loading time.](https://usermanual.wiki/Clarion/FB275BT/User-Guide-846986-Page-10.png)
![15EnglishFB275BT / FB275BTBEject function1. Press the [RELEASE] button to flip down the panel.2. Push the memory card slowly to eject and remove it when ejected.3. Close the flip down panel after removing the memory card.Notes: SD memory card may pop out during removal. If you remove a memory card such as Micro/Mini SD and leaving the SD memory card adapter attached to the unit, it may be hard to remove the adapter alone from the unit later. Thus, always remove both the memory card and adapter together if you are using a memory card adapter. Do not remove the memory card when the panel is not fully flipped as this may damage the memory card as well as the unit. Remove the card only when it is fully flipped. Do not drop the memory card into the space of the flipped down panel. CAUTION !MP3 OperationsListening to a memory card already loaded in the unitPress the [SRC] button to select the SD mode. “ ” indicater will light on.When the unit enters the SD mode, play starts automatically.∗ If there is no memory card loaded, the indication “NO CARD” appears in the display.∗ If there is no MP3 file is detected, the indication “NO MP3” appears in the display.∗ The mode changes each time the [SRC] button is presssed.Pausing play1. Push the [ ] knob to pause play. “ ” appears in the display.2. To resume track play, push the [ ] knob again. “ ” appears in the display.Display titlesThis unit can display title data for the memory card.1. Press the [DISP] button to display current title type.2. To select the next type, press the [DISP] button again. The arrangement is shown below.3. Relevant information will be displayed after showing the title type.](https://usermanual.wiki/Clarion/FB275BT/User-Guide-846986-Page-11.png)
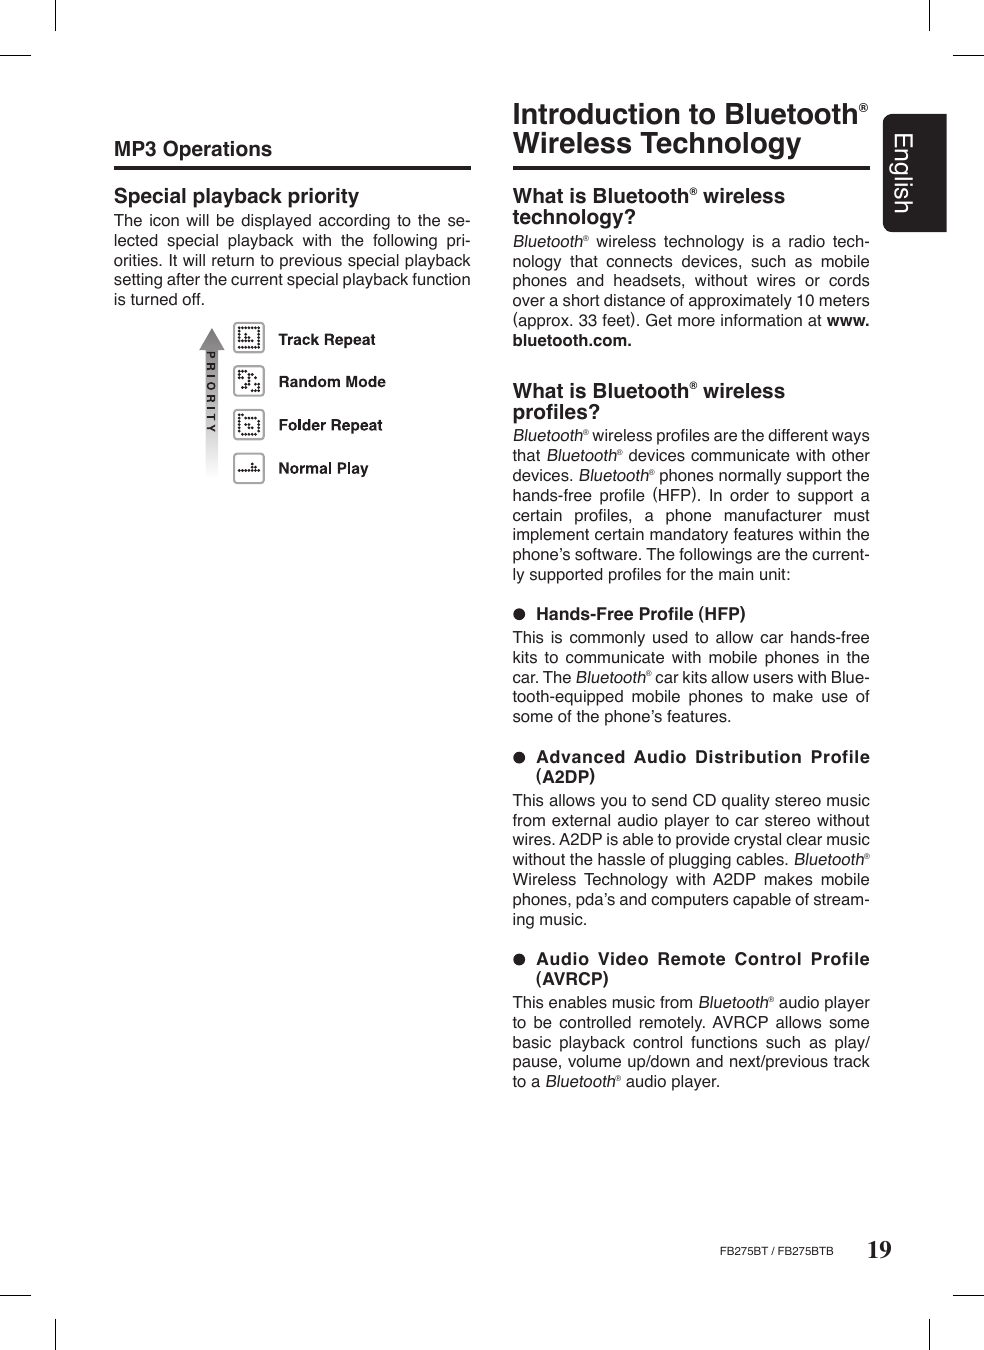
![16EnglishFB275BT / FB275BTB3. Press the [ , ] button to select a track.Notes: Press the [ ] button while in the final folder will shift to the first folder. Press the [ ] button while in the first folder will shift to the last folder. Press the [ ] button will always play the last track of previous folder. Folder without a MP3 file is not selectable. Press and hold the [ , ] button for 1.5 seconds or longer will also perform as folder down/up.Folder selectThis function allows you to select a folder con-taining MP3 files and start playing from the first track in the folder.1. Press the [ ] or [ ] button.2. Press the [ ] button to move the next folder.Press the [ ] button to move the previous folder.MP3 OperationsNotes: If no Artist information, “NO ARTIST” will be dis-played. If a MP3 file encode with ID3 TAG header but not consist of any TAG information, “unknown” will be displayed and change according to the following display:- If no Album information, the folder name will be displayed.- If no Title information, the filename will be dis-played. Supports ID3 Tags v2.3 and v2.4. Earlier ID3 tags version is ignored but the track is playable. Only ASCII characters can be displayed in Tags. UNICODE ID3 (Chinese, Japanese and etc) is not supported. If ID3 TAG has Japanese, Chinese or other non-supported characters, “∗” will be displayed as substitution. The folder name will be displayed as “(Root)” which the file allocates in the root directory. Track-down1. Press the [ ] button to move to the begin-ning of the previous track.2. Each time the [ ] button is pressed, play-back proceeds to previous track in the reverse direction.Selecting a track Track-up1. Press the [ ] button to move ahead to the beginning of the next track.2. Each time the [ ] button is pressed, the track advances ahead to the beginning of the next track.MP3 playing orderWhen selected for playing folder/track up down functions, files and folders are always accessed in alphabetical order. Due to this, the order in which they are expected to be played may not match the order in which they are actually played. If you do not want the tracks to play in alphabeti-cal order, then you can prefix them with 00, 01, 02 etc. to force them to play in a certain order.Please refer chapter “Folder structure” on page 13 for recommended folder/file hierarchy.Notes: Previous track across multiple sub-folders may not be always return to the previous song you listen as it will return to the last valid MP3 files of the parent folder. Fast forward/fast backward is not supported in this unit.](https://usermanual.wiki/Clarion/FB275BT/User-Guide-846986-Page-12.png)
![17EnglishFB275BT / FB275BTBMP3 OperationsManual navigationAlternatively, you can use the Manual Naviga-tion mode to select folder and files. Track will be played directly when the specific track is se-lected.1. Push and hold the [ ] knob for 1.5 seconds or longer in SD mode to enter Manual Navigation mode.2. Press the [ , ] button to select folder or track navigation.3. Turn the [ ] knob to select folder or track.∗ The track play will take effect immediately.4. Push the [ ] knob again or press the [ ] button to exit the mode.Folder Navigation : Search the folders that contains tracks.Track Navigation : Search tracks within the selected folder.Notes: During searching next/previous folder in folder navigation, amount of time will be required depends on the complexity of folder structure. Animated dots “.....” may be appeared in folder navigation during complex folder searching. “Loading...” will be displayed if Manual Navigation mode is exit during this searching. If no operation is performed for more than 10 sec-onds, the Manual Navigation mode is cancelled and returns to the previous display.Restarting current trackThis function allows user to play the beginning of the current song again.1. Press the [1] button to move to the beginning of the current track. CAUTION !Track will be automatically restarted after telephone interrupt, audio streaming, DCP flipped and power cycle.Top functionReturn to the first track of the memory card or the folder currently being played back, and start playing.1. Press the [BND] button to play from the first track of the current folder.2. Press and hold [BND] button for 1.5 seconds or longer to play the first track of the memory card.Note: These operations will cancel track repeat play and all Random modes.Repeat mode Track repeat playThis function allows you to play the current track repeatedly.1. Press the [RPT] button to perform track repeat play.2. Press the [RPT] button again to cancel track repeat play. The “ ” indicator lights in the display when track repeat play is enabled.Note: Any track/folder selection, card changing and power cycle will cancel track repeat play.Special playback functionsBy default, all special playback functions are turned off and “ ” will be displayed. All the special playback functions will be memo-rized once activated (except Track repeat play) even after power off.](https://usermanual.wiki/Clarion/FB275BT/User-Guide-846986-Page-13.png)
![18EnglishFB275BT / FB275BTBMP3 OperationsRandom modeThere are 3 types of Random mode. When the [RDM] button is pressed at the first time, the cur-rent Random mode will be displayed. Further pressing the [RDM] button will switch the Ran-dom mode in the following order: Folder repeat playThis function allows you to play all tracks in the current folder repeatedly.1. Press and hold the [RPT] button for 1.5 sec-onds or longer to perform folder repeat play. “RPT FLDR ON” will be displayed briefly.2. Press and hold the [RPT] button for 1.5 sec-onds or longer to cancel folder repeat play. “RPT FLDR OFF” will be displayed briefly. The “ ” indicator lights in the display when folder repeat play is enabled.Note: This function will cancel other previous special play-back functions such as track repeat and Random mode.“RDM TRACK”“RDM FOLDER”“RDM CARD”“RDM OFF”The “ ” indicator lights in the display. Track random playThis function allows you to play the tracks of cur-rent folder randomly.1. Press the [RDM] button to select “RDM TRACK”.Notes: It will go to next folder after all the tracks in that folder have been played. However, this will depend on folder repeat setting. Any track/folder selection will always perform as next random track/folder. Quick random folder playThis function will perform a single jump to a ran-dom folder but do not affect current Random or Folder Repeat settings.1. Press and hold the [RDM] button for 1.5 seconds or longer to perform quick random folder play. To cancel random play1. Press the [RDM] button to select “RDM OFF”. Folder random playThis function allows you to play all the tracks al-phabetically in a random folder.1. Press the [RDM] button to select “RDM FOLDER”.Note: This function will require some amount of time depends on the complexity of folder hierarchy. Always use the folder hierarchy as recommened in chapter “Folder structure” on page 13 for optimal performance. Card random playThis function allows you to play all the tracks of all the folders in a random order.1. Press the [RDM] button to select “RDM CARD”.Notes: This function will require some amount of time depends on the complexity of folder hierarchy. Always use the folder hierarchy as recommened in chapter “Folder structure” on page 13 for optimal performance. Any track/folder selection will always perform as next random track/folder.](https://usermanual.wiki/Clarion/FB275BT/User-Guide-846986-Page-14.png)
![21EnglishFB275BT / FB275BTB The same device may connect as both A2DP/AVRCP and HFP partner. This normally happens to mobile phone with wireless music streaming capability. However, using the same device will cause the A2DP/AVRCP to be disconnected when there is an incoming call or making a call. User may need to manually resume playback via audio player in phone depends on the type of phones. However, some phones will automatically resume to BT Audio mode after telephone interrupt. Please refer chapter “Audio Streaming Opera-tions” on page 25 for music streaming functional-ity.Please refer “Bluetooth® adjustment” on page 29 for other Bluetooth® related adjustment.Introduction to Bluetooth® Wireless Technology Connecting Bluetooth® deviceYour device/phone will normally connect auto-matically to the unit after pairing. However, some phones will not allow automatic connection to the unit after pairing; please use the phone to manu-ally connect to the unit.If Automatic Connection is enabled in Adjustment mode, the unit will try to connect to the previous-ly connected phone when entering Telephone mode or during power up. Connection can be established at any Source mode. If connection is unsuccessful, automatic connection will stop. Please refer “Automatic connection” on page 30 to enable this feature. The “ ” indicator will light on upon successful connection.Notes: Auto connection only works for HFP. User may need to manually connect for A2DP. This will depends on the Bluetooth® audio player. It is recommended to connect to HFP to unit be-fore audio streaming and connect one device at a time.Disconnecting Bluetooth® device1. Press and hold the [ ] button for 1.5 sec-onds or longer to disconnect all Bluetooth® devices. “CLOSING CONNECTIONS” will be displayed and “ ” indicator lights off.Notes: Turning off the unit power and deleting any Bluetooth® device in Adjustment mode will also disconnect the current device. Alternatively, user can use the phone to manually disconnect the device. However some devices will automatically reconnect once disconnect. Please refer your device owner's manual for more de-tails. Please refer “Compatible Devices” on page 31 to make sure your device is compatible.](https://usermanual.wiki/Clarion/FB275BT/User-Guide-846986-Page-17.png)
![22EnglishFB275BT / FB275BTBIncoming callWhenever your car stereo is operating, the car stereo is in standby mode awaiting the next call, when an incoming call arrives the car stereo will mute automatically and the ring tone is repro-duced through your carʼs speaker. The Car stereo will temporarily switch to Tele-phone Interrupt mode and caller ID will be dis-played in the car stereo.Notes: Car stereo will be automatically set as default speaker output everytime when there is an incom-ing call. Some phones choose to present the audio despite being told to route it to the car stereo. This duplica-tion of audio is a device problem/feature but does not impair functionality. During incoming call, caller ID and “Calling...” will be displayed. Caller ID and CLIP (Calling Line Identification Presentation) is dependent on mobile phone and service provider. However, incoming call with private telephone numbers (CLIR- Calling Line Identification Restriction) will not be displayed. Deleting a digit1. During Telephone Numbers Edit mode, turn the [ ] knob to select a blank digit.2. Push the [ ] knob to delete cur-rent digit.Note: Digits on the right side (if there is any) will be shifted to the left.Handsfree Operations CAUTION ! Telephone numbers edit mode 1. Press the [ ] button to enter Telephone mode.2. Press the [ , ] button to select “MEMORY 1” to “MEMORY 6”.3. Push the [ ] knob to edit the num-bers. A blinking cursor on current digit will be displayed.4. Turn the [ ] knob to select a num-ber.5. Push the [ ] knob to go to next number input.6. Push the [ ] knob at a blank or the last 16th digit (“ ” indicator will be dis-played) will store the numbers into memory.Notes: “+” can be allowed in the first digit only. Maximum digit range: 16 digits. Push and hold the [ ] knob for 1.5 seconds or longer at a non-blank digit will store the numbers into memory as well. Press the [ ] button at anytime will cancel current operation and exit the Edit mode without saving the numbers. If no operation is performed for more than 10 seconds, the Edit mode is cancelled and returns to the previous display.Storing a preset telephone numbersThis function allows you to make direct call from the unit. There are 6 preset telephone numbers can be stored in the unit.Please avoid performing this operation while you are driving as you may lose your concen-tration on the road. Always be sure to park your vehicle and apply the parking brake in order to perform this operation. Clearing all digits1. During Telephone Numbers Edit mode, turn the [ ] knob to select a blank digit.2. Push and hold the [ ] knob for 1.5 seconds or longer to clear all digits on the right side.Note: Digits on the left side will remain as it is. In order to clear all the digits, always select the first character and perform the above operation.](https://usermanual.wiki/Clarion/FB275BT/User-Guide-846986-Page-18.png)
![23EnglishFB275BT / FB275BTB Rejecting a callThis function allows you to reject an incoming call directly from the car stereo. 1. Press the [ ] button to reject an incoming call.2. The display returns to previous mode. Call via voice dialing2-1. Select “VOICEDIAL”3-1. Press the [ ] button again to activate voice dialing.3-2. Speak the contact name clearly towards the internal/external microphone to perform voice dialing.Notes: This is dependent on mobile phone. Please make sure your mobile phone supports voice dialing in order to use this feature. Please refer to your mobile phone ownerʼs manual if this function is supported. “CALL FAIL” will be displayed if it is not supported or the call is unsuccessful. Please use an external microphone (optional) for better voice reception if necessary. Ending a callThis function allows you to end a call conversa-tion directly from the car stereo. 1. Press the [ ] button to end the call.2. The display returns to previous mode.Note: “CALL END” will be displayed when ending a conversation.Alternatively, you may also answer/reject/end the call by using your phoneʼs keypad. However, it is recommended to always perform those opera-tions from the main unit.Making a callThere are few ways to make outgoing call.If no phone is connected, the car stereo will not be able to make an outgoing call. The car stereo will try to reconnect to the last connected device if Auto Connection is enabled in Adjustment mode. This is dependent on mobile phones. Please make sure your phone is connected with the “ ” indicator light is on.There are 2 display icons at the top row of dis-play when entering Telephone mode. : Call can be activated. : Call cannot be activated. Please connect your phone. 1. Press the [ ] button to enter Telephone mode.2. Press the [ , ] to select the following “VOICEDIAL” “LN REDIAL” “MEMORY 1” “MEMORY 2” “MEMORY 3” “MEMORY 4” “MEMORY 5” “MEMORY 6”3. Press the [ ] button again to perform outgo-ing call.Note: “Dialing” will be displayed when making a call. Telephone numbers will be displayed if using the preset telephone numbers dialing. Answering a callUser can answer an incoming call directly from the car stereo.1. Press the [ ] button to pick up an incoming call.2. The display switch to Telephone Interrupt mode.Notes: During conversation, “ ” and call time elapsed will be displayed. During an incoming call, some phones may auto-matically pick up the call when it connects to this unit.Handsfree Operations Call via last dialed number (Redial)A call can be made with the last number dialed. When the phone is connected, redial can be performed according to the phone last dialed number. Each phone has its own redial number. If thereʼs no redial number, operation will not be performed.](https://usermanual.wiki/Clarion/FB275BT/User-Guide-846986-Page-19.png)
![24EnglishFB275BT / FB275BTB Call via preset telephone numbers2-1. Select “MEMORY 1” to “MEMORY 6”.3-1. Press the [ ] button again to make call.Alternatively, user can make outgoing call directly by pressing the corresponding preset telephone numbers.1. Press the [ ] button to enter Telephone mode.2. Press the corresponding [DIRECT] button to make outgoing call.Note: The preset telephone numbers will be the same for all paired devices.Alternatively, you may also make a call by us-ing your phoneʼs keypad. However, it is recom-mended to always make a call from the main unit as some phones may not work well using the phoneʼs keypad with this unit.MicrophoneThe unit is fitted with an internal microphone that should provide acceptable performance when fitted to vehicles with low levels of background noise. For optimum performance Clarion recom-mends the use of an external microphone fitted as near as possible to the driver.Please refer “Selecting microphone input” on page 30 for switching to internal/external the mi-crophone.Handfree VolumeThe unit implements an acoustic echo canceller to reduce the echo heard by the remote caller. Under normal circumstances the unit operates in full-duplex mode meaning that both parties can speak at the same time.If the volume in the vehicle is set too high, the echo canceller will revert to half-duplex mode when only one party can talk at a time. The vol-ume should be adjusted to be just loud enough. The unit also implements Noise Dependent Vol-ume that increases the volume as the noise in the vehicle increases.Adjusting the volume for handsfreeTurning the [ ] knob clockwise in-creases the volume; turning it counterclockwise decreases the volume. “VOLUME 1” to “VOLUME 16” will be displayed depends on the volume level.∗ Factory default setting for volume is “VOLUME 8”.When the unit is connected to a mobile phone and a call is in progress, turning off the vehicle ignition key (“ACC” or ACCESSORY) switch will not end the call. The unit will remain active un-til the call has ended at which point the unit will power OFF. It is therefore safe to pull over and stop the engine during a call without the inconve-nience of dropping the call.Handsfree Operations2-1. Select “LN REDIAL”3-1. Press the [ ] button again to redial the last dialed number.](https://usermanual.wiki/Clarion/FB275BT/User-Guide-846986-Page-20.png)
![25EnglishFB275BT / FB275BTBAudio Streaming OperationsNote: Be sure to read the chapter “Pairing with an ex-ternal Bluetooth® audio player (A2DP support)” before proceeding.Play/Pause a track1. Push the [ ] knob to pause play. “ ” appears in the display.2. To resume track play, push the [ ] knob again. “ ” appears in the display.Notes: During music streaming playback, “STREAMING...” will be shown on the display. Information about tracks (e.g. the elapsed playtime, song title, etc.) cannot be displayed on this unit. When A2DP device is disconnected, “NO STREAM” will be shown on the display and return to Radio mode. Some Bluetooth® audio players may not have play/pause synchronized with this unit. Please make sure both device and main unit are in the same play/pause status in BT AUDIO mode. What is audio streaming?Audio streaming is a technique for transferring audio data such that it can be processed as a steady and continuous stream.Users can stream music from their external audio player to their car stereo wirelessly and listen to the tracks through the carʼs speakers.Please consult your nearest Clarion dealer for more information on the product of wireless au-dio streaming transmitter offered.Selecting a track Track-up1. Press the [ ] button to move to the begin-ning of the next track.2. Each time the [ ] button is pressed, play-back proceeds to another track in the advanc-ing direction. Track-down1. Press the [ ] button to move the to begin-ning of the previous track.2. Each time the [ ] button is pressed, play-back proceeds to previous track in the reverse direction.Notes: Playing order will depend on Bluetooth® audio player. When [ ] button is pressed, some A2DP de-vices will restart the current track depends on the duration of playback. Please avoid operating your connected mobile phone while audio streaming as this may cause noise or sound choppy on the song playback. Audio streaming may or may not resume after telephone interrupt as this is depen-dent on mobile phone. System will always return to Radio mode if audio streaming is disconnected. CAUTION !](https://usermanual.wiki/Clarion/FB275BT/User-Guide-846986-Page-21.png)
![26EnglishFB275BT / FB275BTB Adjusting the fader 2 - 1 . Select “FADER”. 3 - 1 . Turn the [ ] knob clockwise em-phasizes the sound from the front speakers; turning it counterclockwise emphasizes the sound from the rear speakers. The display changes as follows: “FRONT XX” will be displayed where “XX” is the value from 1 to 12. “REAR XX” will be displayed where “XX” is the value from 1 to 12.Notes: When Fader is 0, “CENTER” will be displayed instead. The factory default setting is “CENTER”. Adjusting the balance 2 - 1 . Select “BALANCE”. 3 - 1 . Turn the [ ] knob clockwise emphasizes the sound from the right speak-er; turning it counterclockwise emphasizes the sound from the left speaker. The display changes as follows: “RIGHT XX” will be displayed where “XX” is the value from 1 to 12. “LEFT XX” will be displayed where “XX” is the value from 1 to 12.Notes: When Balance is 0, “CENTER” will be displayed instead. The factory default setting is “CENTER”.Common OperationsAudio mode Adjusting the bass 2 - 1 . Select “BASS”. 3 - 1 . Turn the [ ] knob clockwise emphasizes the bass; turning it counterclock-wise attenuates the bass.Adjustment modeThere are 5 categories of Adjusment mode: Audio mode (Bass, Treble, Balance, Fader and Loudness) Additional Source mode (AUX Input) Clock∗ Adjustment mode Display∗ Adjustment mode Bluetooth®∗ Adjustment mode∗ Item that has 2nd level adjustmentDuring Telephone Interrupt mode, only Balance and Fader can be adjusted. Adjustment mode is unaccessible during Telephone mode and vice versa. 1 . Press and hold the [DISP] button for 1.5 sec-onds or longer to enter the adjustment selection display. 2 . Press the [ , ] button to select the “item name”. “BASS” “TREBLE” “BALANCE” “FADER” “LOUDNESS” “AUX INPUT” “CLOCK” “DISPLAY” “BLUETOOTH” 3 . Push the [ ] knob to enter 2nd level adjustment or turn the [ ] knob to select the “desired setting value” depends on the selected item.Notes: A “ ” will be displayed and “ ” will light on when an item has 2nd level adjustment. After completing settings, press and hold the [ ] button for 1.5 seconds or longer to return to the previous mode. If no operation is performed for more than 10 seconds, the Adjustment mode is cancelled and returns to the previous display.Notes: The factory default setting is “0”. The value range is -7 to +7. Adjusting the treble 2 - 1 . Select “TREBLE”. 3 - 1 . Turn [ ] knob clockwise empha-sizes the treble; turning it counterclockwise attenuates the treble.Notes: The factory default setting is “0”. The value range is -7 to +7.](https://usermanual.wiki/Clarion/FB275BT/User-Guide-846986-Page-22.png)
![27EnglishFB275BT / FB275BTB Adjusting the loudnessThe loudness effect does not adjust the low sound area like the normal sound adjustment function, but emphasizes the deep bass sound area to provide you with a dynamic sound. 2 - 1 . Select “LOUDNESS”. 3 - 1 . Turn the [ ] knob to select “ON” or “OFF”. ON : Loudness effect enabled. OFF : Loudness effect disabled.Note: The factory default setting is “OFF”.Common Operations Setting the clock modeThis setting allows user to select either 12 or 24 hour system.1. Select “CLK MODE”.2. Turn the [ ] knob to select the options.“CLK EN” “CLK MODE” “CLK SET”Clock adjustment 2 - 1 . Select “CLOCK”. 3 - 1 . Push the [ ] knob. 3 - 2 . Press the [ , ] button to select the “item name”. 3 - 3 . Push or turn the [ ] knob de-pends on selected item.Setting AUX functionThis option allows user to enable or disable the AUX function. AUX function will be available in source mode selection if turned on. Otherwise, it will be hidden from the Source mode selection. 2 - 1 . Select “AUX INPUT”. 3 - 1 . Turn the [ ] knob to select “ON” or “OFF”. ON : Aux function is turned on. OFF : Aux function is turned off.Note: The factory default setting is “OFF”. ON : Clock is enabled and manually set by user. OFF : Clock is disabled.Note: The factory default setting is “OFF”. “12 HR” “24 HR” 12 HR : 12 hour mode. 24 HR : 24 hour mode.Note: The factory default setting is “12 HR”. Adjusting the clock This adjustment allows the clock to be set by user.1. Select “CLK SET”.2. Push the [ ] knob.3. Press the [ , ] button to select the hour or the minute.4. Turn the [ ] knob to set the cor-rect time. 5. Press the [ ] button to exit the setting.Notes: The factory default setting is “00:00” for 24 hour mode. The clock is updated in realtime. Setting the clock enableThis setting allows the clock to be displayed at the bottom of display in all Source modes.1. Select “CLK EN”.2. Turn the [ ] knob to select “ON” or “OFF”.](https://usermanual.wiki/Clarion/FB275BT/User-Guide-846986-Page-23.png)
![28EnglishFB275BT / FB275BTBCommon Operations Setting user color mode1. Select “USER COL”.2. Turn the [ ] knob to enter the setting.3. Press the [ , ] button to move the cursor for adjusting the R, G or B value. The value of R is adjustable by default.4. Turn the [ ] knob to select from 0 to 8. Adjustment will be updated in realtime.Note: The factory default setting for user color R, G and B (R: red, G: green, B: blue) are “8”. Setting the animation effectYou can turn on or off the animation effect in this unit.1. Select “ANIMATION”.2. Turn the [ ] knob to select “ON” or “OFF”. Adjusting the display contrastYou can adjust the display contrast to match the angle of installation of the unit.∗ The factory default setting is “9”. (Adjustment level: 0 to 14)1. Select “CONTRAST”.2. Turn the [ ] knob to adjust the contrast. Setting the method for title scrollSet how to scroll in MP3 title.∗ The factory default setting is “ON”.1. Select “SCROLL”.2. Turn the [ ] knob to select “ON” or “OFF”. ON : To scroll continunously. OFF : Scroll function is disabled. It will only scroll for once. Setting the color line illumination1. Select “COLOR”.2. Turn the [ ] knob to select the color, the type changes in the following or-ders: COL. SCAN OFF BLUE SURF BLUE WHITE AQUA GREEN LIME ORANGE RED PINK PALE PINK VIOLET PURPLE USER COL. COL. SCAN ...“SCROLL” “CONTRAST” “ILLUM”“COLOR”“USER COL.” “ANIMATION” 3 - 3 . Push or turn the [ ] knob de-pends on selected item. Adjusting the display and line illuminationYou can adjust the display illuminations (Display backlight intensity) at night (key illumination on). The adjustment level is from 1 to 9.∗ The factory default setting for key illumination on is “3”.1. Select “ILLUM”.2. Turn the [ ] knob to adjust the illumination.Notes: The new settings will be stored in memory. Display illumination is fixed at “9” for key illumination off (Daytime). “N/A” will be displayed.Display adjustment 2 - 1 . Press the [ , ] button and select “DISPLAY”. 3 - 1 . Push the [ ] knob to enter next level adjustment. 3 - 2 . Press the [ , ] button to select the “item name”.](https://usermanual.wiki/Clarion/FB275BT/User-Guide-846986-Page-24.png)
![29EnglishFB275BT / FB275BTBBluetooth® adjustment 2 - 1 . Press the [ , ] button and select “BLUETOOTH”. 3 - 1 . Push the [ ] knob. 3 - 2 . Press the [ , ] button to select the “item name”. ON : Welcome animation and screen wipe transition at Source mode are enabled. OFF : Animation effect is disabled.Common Operations Deleting a device1. Select “DEL. DEV.”. 2. Turn the [ ] knob to select a device to be deleted.3. Push the [ ] knob. A delete con-firmation is prompted.4. Turn the [ ] knob to select “YES” or “NO”.5. Push the [ ] knob to confirm the selection.“ADD DEV.” “EDIT DEV.” “DEL. DEV.” “AUTO CONN” “MIC” 3 - 3 . Push or turn the [ ] knob de-pends on selected item. Adding a new device (Pairing mode)1. Select “ADD DEV.”.2. Push the [ ] knob. ∗ The “ ” indicator will be blinking. The display shows “Pairing...” and the car stereo is currently in Pairing mode.Note: The pairing timeout is 3 minutes. Editing a device name1. Select “EDIT DEV.”.2. Turn the [ ] knob to select a device name to be edited.3. Push the [ ] knob. ∗ The display shows the device name.Notes: If there is no device connected, “(no devices)” will be shown in the display. “All” option will be available if there is more than one device connected. Deleting pairing information in the main unit only stops the unit from being connect to the other de-vice. It does not stop the other device from trying to connect to main unit. Please delete the pairing information of the main unit from the phone/device as well. Always make sure pairing information on both device and main unit have been deleted before starting a new pairing activity. Deleting a device will disconnect any current Bluetooth® connection. User will need to manually re-connect if necessary.4. Turn the [ ] knob to edit a char-acter.5. Press the [ ] button or push [ ] knob to go to next character. Press the [ ] button to return to previous character.6. Push the [ ] knob at the last blank character to store the name.Notes: Push and hold the [ ] knob for 1.5 seconds or longer at any position will store the name as well. If there is no device connected, “(no devices)” will be shown in the display.](https://usermanual.wiki/Clarion/FB275BT/User-Guide-846986-Page-25.png)
![30EnglishFB275BT / FB275BTBCommon Operations Checking the unit version2-1. Select “VERSION”. Restoring to factory default settingThis function allows user to restore the unit to the factory default setting.System Menu1. Press and hold [ ] and [ ] buttons si-multaneously for 1.5 seconds or longer.2. Press the [ , ] button to select an item.“VERSION” “FACT. RST”3. Press the [ ] button to exit the menu. Selecting microphone input1. Select “MIC”.2. Turn the [ ] knob to select one of the following: INTERNAL : Built-in microphone will be used. EXTERNAL : An external microphone will be used.Note: The factory default setting is “INTERNAL”.2-1. Select “FACT. RST”.2-2. Push the [ ] knob. A reset con-firmation is prompted.2-3. Turn the [ ] knob to select “YES” or “NO”.2-4. Push the [ ] knob to confirm the selection.Notes: All pairing information and preset memories will be cleared. User will have to manually perform those setting again. Once reset, system will automatically turn off and re-power on. Clock time will not be reset with this operation. The clock time reset is done with the following steps.1. Turn off the power.2. Press the [RELEASE] button and remove the DCP.3. Press the reset button with a thin rod. Automatic connectionThis function allows the unit to be connected au-tomatically with previously connected device dur-ing power up or entering Telephone mode. The Bluetooth® wireless function in your phone has to be turned on to establish automatic connection.1. Select “AUTO CONN”.2. Turn the [ ] knob to select “ON” or “OFF”. ON : Auto connection enabled. OFF : Auto connection disabled.Notes: The factory default setting is “OFF”. Please enable this feature only if your phone is supported.](https://usermanual.wiki/Clarion/FB275BT/User-Guide-846986-Page-26.png)