Clarion FZ709 Car Stereo with FM/USB/MP3/Bluetooth/Hands Free combination (2.4GHz Transceiver) User Manual 09US INV2 cv indd
Clarion (M) Sdn Bhd Car Stereo with FM/USB/MP3/Bluetooth/Hands Free combination (2.4GHz Transceiver) 09US INV2 cv indd
Clarion >
User Manual
![FZ70956FZ709EnglishMAIN UNIT / APPAREIL PRINCIPAL / APPARECCHIO PRINCIPALENote: Be sure to unfold this page and refer to the front diagrams as you read each chapter.Remarque: Veuillez déplier cette page et vous référer aux schémas quand vous lisez chaque chapitre.Nota: Assicurarsi di aprire questa pagina e fare riferimento a questi diagrammi quando si legge ciascun capitolo.CONTROLS/ LES COMMANDES/ CONTROLLIEnglish Français Español3. 4. NOMENCLATURENote: Be sure to read this chapter referring to the front diagrams of chapter “3. CONTROLS” on page 5.Names of the Keys and Their FunctionsVue de l’appareil Pilote Par DessousVista Inferior de la Unidad FuenteSlider’s Key OperationSlideTouch & hold slider [ ] will increase volume continu-osly.Touch & hold slider [ ] will decrease volume continu-osly.Touch and release [ ] once will increase the volume 1 step.Touch and release [ ] once will decrease the volume 1 step.Touch & hold [ ] will to scroll down items continuosly.Touch & hold [ ] will to scroll up items continuosly.Touch and release [ ] once will scroll up items 1 step.Touch and release [ ] once will scroll down items 1 step.7FZ709English[ ] slider Select a station while in the Radio mode. Select the folder while in the USB mode. End a call or reject an incoming call. This key is used to make various settings. [ ] key Switch Title display. Touch and hold the key for 1 second or longer to switch the display layout (Title mode Indicator mode Clock).[ ] key Recall ISR radio station in memory. Touch and hold the key for 2 seconds or longer: Store current station into ISR memory (Radio mode only).[ ] key Touch the [ ] key to power on the unit. Touch and hold the key for 1 second or longer to turn off the power. Switch to Source menu.[ ] key Switch to ADJ menu.[ ]/[ ] key Seek a station while in the Radio mode. Select a track while in the USB mode. Touch and hold the key for 1 second or longer to enter the Fast-forward or Fast backward mode while in USB mode.[ ] key Play or pause a track while in the USB mode. Toggle Mute on/off while in the Radio mode. Touch and hold the key for 2 seconds or longer to memory new value during setting mode. Dial the selected phone number thorugh call method.[ ] slider Adjust the volume.[ ] key Switch the band, or seek tuning or manual tuning while in the Radio mode. Switch to List Search, or Top folder while in the USB mode. Switch between last menu level and Play display, or Top iPod menu while in the iPod mode. [USB PORT] USB memory device insertion port (at rear panel).[AUX] input The input jack for connecting an external device (at rear panel).](https://usermanual.wiki/Clarion/FZ709/User-Guide-1154848-Page-4.png)
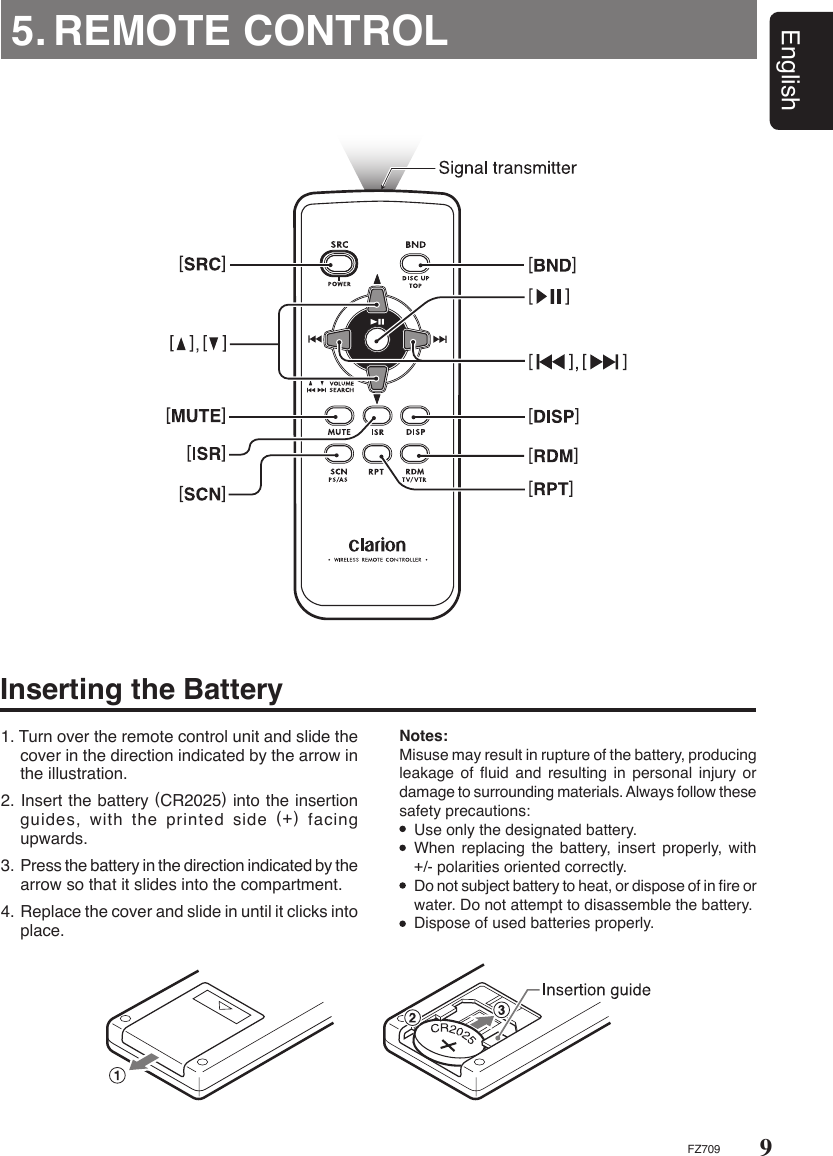
![10EnglishFZ709∗ Some of the corresponding buttons on the main unit and remote control unit have different functions.∗ TV/VTR is not supported in this model.Functions of Remote Control Unit ButtonsiPod menuNo function.Toggle repeat on/off.Random play.Press and hold the button for 1 second or longer to perform folder random play.Radio/SatelliteModeButton USB iPodPress the button to power on.Press and hold the button for 1 second or longer: Power off.Switch among radio, Satellite radio receiver, USB, BT Audio, AUX and iPod.[SRC]Switch reception band. Play the first track.Top play.[BND]Increase and decrease volume (in all modes).Move preset channels up and down.Move tracks up and down.Press and hold the button for 1 second or longer: Fast-forward/fast-backward. No function. Switch between playback and pause.Turn mute on and off.Recall ISR radio station in memory.Press and hold for 2 seconds or longer: Store current station into ISR memory (Radio mode only).Switch among main display, title display.Preset scan.Press and hold the button for 2 seconds or longer: Auto store.Scan play.Press and hold the button for 1 second or longer to perform folder scan play.No function. Repeat play.Press and hold the button for 1 second or longer to perform folder repeat play.No function. Random play.Press and hold the button for 1 second or longer to perform folder random play.[ ] , [ ][ ] , [ ][ ][MUTE][ISR][DISP][SCN][RPT][RDM]No function.AUXBT AudioMove tracks up and down. No function.No function.No function.No function.No function.No function.](https://usermanual.wiki/Clarion/FZ709/User-Guide-1154848-Page-6.png)
![11EnglishFZ709Note: Be sure to read this chapter referring to the front diagrams of chapter “2. CONTROLS” on page 3.6. OPERATIONS CAUTION !Basic OperationsBe sure to lower the volume before switching off the unit power or the ignition key. The unit remembers its last volume setting. If you switch the power off with the volume up, when you switch the power back on, the sudden loud volume may hurt your hearing and damage the unit.Please operate this unit by the finger. It is not possible to operate it normally with gloves worn. Turning on/off the powerNote: Be careful about using this unit for a long time without running the engine. If you drain the car’s battery too far, you may not be able to start the engine and this can reduce the service life of the battery.1. Touch the [ ] key to power on the unit.2. The unit automatically remembers its last Operation mode and will automatically switch to display that mode.3. Touch and hold the [ ] key for 1 second or longer to turn off the power for the unit.Note: System check The first time this unit is turned on after the wire connections are completed, it must be checked what equipment is connected. When the power is turned on, the “SYSTEM CHECK” appears in the display. This unit will switch to Radio mode after system check. Selecting a mode1. Touch the [ ] key to switch to Source menu.2. Touch the corresponding key beside the Source mode name to enter into desired mode.3. There are 6 selections in the Source menu: ∗ iPod can connect to this unit via USB SLOT.∗ SIRIUS and XM mode only available when a Satellite Radio Receiver is connected through the CeNET cable.Adjusting the volume1. Slide up along the [ ] slider or touch the [ ] key to increases the volume.2. Slide down along the [ ] slider or touch the [ ] key to decreases the volume.∗ The volume level is from 0 (minimum) to 33 (maximum).Switching the title display1. Touch the [ ] key to switch the title display.2. Each time you touch the [ ] key, the display switches in the following order: Tuner/AUX/BT modeNo Title display. iPod modeTRACK (ALBUM) ALBUM (ARTIST) ARTIST (TRACK) TRACK (ALBUM) USB modeALBUM (TRACK) ARTIST (TITLE) ARTIST (TRACK) FOLDER (TRACK) FOLDER (TITLE) ALBUM (TRACK) SAT modeCHANNEL (CATEGORY) CATEGORY (TITLE) TITLE (ARTIST) ARTIST (RADIO TEXT) RADIO TEXT (CHANNEL) CHANNEL (CATEGORY)](https://usermanual.wiki/Clarion/FZ709/User-Guide-1154848-Page-7.png)
![12EnglishFZ709Basic Operations Setting the BEAT EQThis unit is provided with 4 types of sound tone effects stored in memory. Select the one you pre-fer.∗ The factory default setting is “OFF”. 3 - 1 . Select “BEAT EQ”. 3 - 2 . Touch [ ] key to enter detail setting stage. 3 - 3 . During detail setting stage, each time your slide along [ ]slider or touch [ ]/[ ] key, the tone effect changes in the following order: “OFF” “BASS BOOST” “IMPACT” “EXCITE” “CUSTOM” OFF : No sound effect BASS BOOST : Bass emphasized IMPACT : Bass and treble emphasized EXCITE : Bass and treble emphasized mid emphasized CUSTOM : User custom1 . Touch the [ ] key to switch to ADJ menu.2 . Select “SOUND” in the menu to enter Sound Adjustment mode.3 . Slide along the [ ] slider or touch [ ]/ [ ] key, the Sound Adjustment mode changed as following order: “BEAT EQ” (“BASS” “MID” “TREBLE”)∗1 “BBE MP”∗2 “BALANCE” “FADER” “M-BEX” “HPF” “S-W LPF” “S-W VOL” “BEAT EQ”...Notes:∗1 : BASS/MID/TREBLE are only available if “CUSTOM” is selected in “BEAT EQ”.∗2 : BBE MP is only available if “USB” is selected in source mode and the “OUTPUT FORM” is set to “DIGITAL”. (Please refer to page 25)To change sound settingSwitching the display layout1. Touch the [ ] key for more than 1 second to switch display layout.2. Each time you touch the [ ] key for more than 1 second, the display layout switches in the following order: Title mode Indicator mode Clock Example: iPod Sound adjustmentsYou can adjust a sound effect or tone quality to your preference.∗ Once selected, the preferred title display becomes the display default. When a function adjustment such as volume is made, the screen will momen-tarily switch to that function’s display, then revert back to the preferred title display several seconds after the adjustment.∗ If the button operation is performed with the screen saver function on, the operation display correspond-ing to the button operation is shown for about 30 seconds and the display returns to the screen saver display. For details, refer to the subsection “Turning the screen saver function on or off” in section “Common Operations”.](https://usermanual.wiki/Clarion/FZ709/User-Guide-1154848-Page-8.png)
![13EnglishFZ709When “BASS BOOST”/“IMPACT”/“EXCITE” is set:“BASS BOOST”/“IMPACT”/“EXCITE” will appear after the “BEAT EQ” item in the sound Adjust-ment mode. 3 - 3 - 1 . Select the item and touch [ ] key to enter detail setting stage. 3 - 3 - 2 . Slide along [ ] slider or touch [ ]/[ ] key to adjust the setting in the range of -3 to +3.∗ The factory default setting is “0”. 3 - 3 - 3 . After completing settings, touch the [ENT] key to return to the 1st selected item.Basic Operations 3 - 3 . Touch [ ]/[ ] key to select Gain(“G”), center frequency(“F”) or Q factor(“Q”). 3 - 4 . Slide along [ ] slider or touch [ ]/[ ] key to adjust the value.∗ The factory default setting: G : “0” (Adjustment range: +7 to -7) F : “500Hz” (Adjustment range: 500/1k/2k) Q : “1.0” (Adjustment range: 0.7/1.0/1.4/2.0) Adjusting the midThis adjustment can be performed only when the BEAT EQ is set to “CUSTOM”. 3 - 1 . Select “MID”. 3 - 2 . Touch [ ] key to enter detail setting stage. 3 - 5 . After completing settings, touch the [ENT] key to return to the 1st selected item. 3 - 3 . Touch [ ]/[ ] key to select Gain(“G”), center frequency(“F”) or Q factor(“Q”). 3 - 4 . Slide along [ ] slider or touch [ ]/[ ] key to adjust the value.∗ The factory default setting: G : “0” (Adjustment range: +7 to -7) F : “50Hz” (Adjustment range: 50/100/200) Q : “1.0” (Adjustment range: 0.7/1.0/1.4/2.0) Adjusting the bassThis adjustment can be performed only when the BEAT EQ is set to “CUSTOM”. 3 - 1 . Select “BASS”. 3 - 2 . Touch [ ] key to enter detail setting stage.When “CUSTOM” is set: 3 - 3 - 1 . Slide along [ ] slider or touch [ ]/[ ] key to select the “BASS”, “MID” or “TRE-BLE” mode to adjust.](https://usermanual.wiki/Clarion/FZ709/User-Guide-1154848-Page-9.png)
![14EnglishFZ709Basic Operations Adjusting the trebleThis adjustment can be performed only when the BEAT EQ is set to “CUSTOM”. 3 - 1 . Select “TREBLE”. 3 - 2 . Touch [ ] key to enter detail setting stage. 3 - 3 . Touch [ ]/[ ] key to select Gain(“G”), center frequency(“F”) or Q factor(“Q”). 3 - 4 . Slide along [ ] slider or touch [ ]/[ ] key to adjust the value.∗ The factory default setting: G : “0” (Adjustment range: +7 to -7) F : “10kHz” (Adjustment range: 5k/10k/15k) Q : “1.0” (Adjustment range: 0.7/1.0/1.4/2.0) Setting the BBE MP (Sound Enhancement and Restoration for compressed audio files)BBE MP (Minimized Polynomial Non-Linear Sat-uration) Process improves digitally compressed sound, such as MP3, by restoring and enhancing the harmonics lost through compression. BBE MP works by regenerating harmonics from the source material, effectively recovering warmth, detail and nuance.∗ This function is effective for the audio files in the USB/iPod mode, but it is ineffective for the video in the USB/iPod mode. 3 - 1 . Select “BBE MP”. 3 - 2 . Touch [ ] key to enter detail setting stage. 3 - 3 . Slide along [ ] slider or touch [ ]/[ ] key to select the value in sequence of “OFF” “ON”∗ The factory default setting is “OFF”. 3 - 5 . After completing settings, touch the [ENT] key to return to the 1st selected item. 3 - 5 . After completing settings, touch the [ENT] key to return to the 1st selected item.](https://usermanual.wiki/Clarion/FZ709/User-Guide-1154848-Page-10.png)
![15EnglishFZ709 Adjusting the fader 3 - 1 . Select “FADER”. 3 - 2 . Touch [ ] key to enter detail setting stage. 3 - 3 . Slide along [ ] slider or touch [ ]/[ ] key to adjust the balance of the rear and front speakers.∗ The factory default setting is “CENTER”. (Adjustment range: FRONT 12 to REAR 12) 3 - 4 . After completing settings, touch the [ENT] key to return to the 1st selected item. Adjusting the balance 3 - 1 . Select “BALANCE”. 3 - 2 . Touch [ ] key to enter detail setting stage. 3 - 3 . Slide along [ ] slider or touch [ ]/[ ] key to adjust the balance of the right and left speakers.∗ The factory default setting is “CENTER”. (Adjustment range: RIGHT 12 to LEFT 12) 3 - 4 . After completing settings, touch the [ENT] key to return to the 1st selected item.When “ON” is set: 3 - 3 - 1 . Touch [ ] key to enter detail setting stage. 3 - 3 - 2 . Slide along [ ] slider or touch [ ]/[ ] key to select the value in sequence of “HIGH” “MID” “LOW”∗ The factory default setting is “MID”. 3 - 4 . After completing settings, touch the [ENT] key to return to the 1st selected item.Basic Operations Adjusting the subwoofer output volumeYou can adjust the volume output from the unit’s subwoofer output terminal.This adjustment can be performed only when the “S-W LPF” is set to “60”, “90” or “120”. 3 - 1 . Select “S-W VOL”. 3 - 2 . Touch [ ] key to enter detail setting stage. 3 - 3 . Slide along [ ] slider or touch [ ]/[ ] key to increases or decreases the subwoofer volume.∗ The factory default setting is “0”. (Adjustment range: +6 to -6)∗ When the volume level is more than 30, the subwoofer volume adjustment value can not reach +6.Note: During SOUND Adjustment mode, if no operation is performed for more than 10 seconds, this mode can be cancelled and return to previous mode. Setting the subwooferYou can set the low pass filter of subwoofer. 3 - 1 . Select “S-W LPF”. 3 - 2 . Touch [ ] key to enter detail setting stage. 3 - 3 . Slide along [ ] slider or touch [ ]/[ ] key to select the setting in sequence “THROUGH” “60” “90” “120”∗ The factory default setting is “THROUGH”. Adjusting the high pass filter 3 - 1 . Select “HPF”. 3 - 2 . Touch [ ] key to enter detail setting stage. 3 - 3 . Slide along [ ] slider or touch [ ]/[ ] key to select the setting in sequence “60” “90” “120” “THROUGH”∗ The factory default setting is “THROUGH”.∗ This is supported only with amplifiers equipped with this function. Output is not supported from RCA cables. Adjusting the M-BEX 3 - 1 . Select “M-BEX”. 3 - 2 . Touch [ ] key to enter detail setting stage. 3 - 3 . Slide along [ ] slider or touch [ ]/[ ] key to turn on or turn off the MAGNA BASS EXTEND effect.∗ The factory default setting is “OFF”. (Adjustment range: ON/OFF) 3 - 4 . After completing settings, touch the [ENT] key to return to the 1st selected item.](https://usermanual.wiki/Clarion/FZ709/User-Guide-1154848-Page-11.png)
![16EnglishFZ709Radio Mode OperationsListening to the radio1. Touch the [ ] key to switch to Source menu.2. Select “TUNER” to enter Radio mode.3. To select a preset band, touch the [ ] key and then select one of the preset bands such as FM1, FM2, FM3 or AM1. Every time the [ ] key is touched, the band switches in the following order: FM1 FM2 FM3 AM1 FM1...4. Touch the [ ]/[ ] key to tune in the desired station.Seek tuning1. Touch the [ ] key and select the desired band (FM or AM).∗ If is lit in the display, touch and hold the [ ] key for 1 second or longer. in the display goes off and seek tuning is now avail-able.2. Touch the [ ]/[ ] key to start automatic sta-tion tuning. When the [ ] key is touched, the station is sought in the direction of higher frequencies; if the [ ] key is touched, the station is sought in the direction of lower frequencies.TuningThere are 3 types of tuning mode available, seek tuning, manual tuning and preset tuning.Manual tuningThere are 2 ways available: Quick tuning and step tuning.When you are in the step Tuning mode, the fre-quency changes one step at a time. In the Quick Tuning mode, you can quickly tune the desired frequency.1. Touch the [ ] key and select the desired band (FM or AM).∗ If is not lit in the display, touch and hold the [ ] key for 1 second or longer. is lit in the display and manual tuning is now avail-able.2. Tune into a station.TUNER OPTION Step tuningTouch the [ ]/[ ] key to perform manual tun-ing. Quick tuningTouch and hold the [ ]/[ ] key for 1 second or longer to begin station tuning.Radio functionYou need to enter the TUNER OPTION to per-form the Radio function. Preset memory functionPreset memory function can store up to 24 sta-tions: Six stations for each of FM1, FM2, FM3, and AM1. 1 . During Tuner mode, touch the [ ] key to switch to ADJ menu.2 . Select “OPTION” in the menu to enter Tuner Option mode.3 . Slide along [ ] slider or touch [ ]/[ ] key, the TUNER OPTION mode changed as following order: “P.CH MEMORY” “PRESET SCAN” “AUTO STORE” “TITLE INPUT” “P.CH MEMORY”... Manual memory function 3 - 1 . Select “P.CH MEMORY”. 3 - 2 . Touch [ ] key to enter detail setting stage. 3 - 3 . Slide along [ ] slider or touch [ ]/[ ] key to select the preset channel number to be stored. 3 - 4 . Touch [ENT] key for 2 seconds to store the frequency into the selected preset channel. 3 - 5 . “MEMORY” is displayed for 2 seconds before revert to main display.](https://usermanual.wiki/Clarion/FZ709/User-Guide-1154848-Page-12.png)
![17EnglishFZ709Method 1: 3 - 1 . Select “P.CH MEMORY”. 3 - 2 . Touch [ ] key to enter detail setting stage. 3 - 3 . Slide along [ ] slider or touch [ ]/[ ] key to select the desired preset station. 3 - 4 . Touch [ENT] key for less than 1 second to recall the stored radio frequency.Method 2:1. Touch the [ ] key to select the desired band.2. Slide along [ ] slider or touch [ ]/[ ] key to select the desired preset station.3. Touch [ENT] key to recall the stored radio frequency. Preset scanPreset scan receives the stations stored in pre-set memory in order. This function is useful when searching for a desired station in memory. 3 - 1 . Select “PRESET SCAN”. 3 - 2 . Touch [ENT] key to start scan preset chan-nel. 3 - 3 . When a desired station is tuned in, touch the [ ]/[ ] key to continue receiving that station. Radio Mode Operations Auto storeAuto store is a function for storing up to 6 stations that are automatically tuned in sequentially. If 6 receivable stations cannot be received, a previ-ously stored station remains un-overwritten at the memory position. 3 - 1 . Select “AUTO STORE”. 3 - 2 . Touch [ENT] key to start performing auto store function. 3 - 3 . The stations with good reception are stored automatically to the preset channels.∗ If auto store is performed in the FM bands, the stations are stored in FM3 even if FM1 or FM2 was chosen for storing stations.∗ “AUTO STORE” will appears in the display.Recalling a preset stationA total of 24 preset positions (6-FM1, 6-FM2, 6-FM3, 6-AM1) exists to store individual radio sta-tions in memory. There are 2 methods to recall a preset station. ISR memory1. Select the station that you wish to store in ISR memory.2. Touch and hold the [ ] key for 2 seconds.Instant station recall (ISR)Instant station recall is a special radio preset that instantly accesses a favorite radio station at a touch of a key. The ISR function even operates with the unit in other modes. Recalling a station with ISRIn any mode, touch the [ ] key to turn on the radio function and tune the selected radio sta-tion.Touch the [ ] key again to return to the previous mode.Entering titlesTitles up to 10 characters long can be stored in memory and displayed for Radio stations. 3 - 1 . Select “TITLE INPUT”. 3 - 2 . Touch [ ] key to enter detail setting stage. 3 - 3 . Touch [ ]/[ ] key to move the cursor. 3 - 4 . Slide along [ ] slider or touch [ ]/[ ] key to input the text. 3 - 5 . Touch and hold the [ENT] key for 2 seconds or longer to store the title into memory.∗ Entered titles will be deleted when back up power is disconnected.](https://usermanual.wiki/Clarion/FZ709/User-Guide-1154848-Page-13.png)

![20EnglishFZ709Connecting a USB memory device1. Connect the USB memory device to the USB slot. Playback will begin from the first file recorded on the device.∗ If the device is not recognized, touch the [ ] key to switch to the Source menu and select the source to the device.∗ Always insert the device fully into the connector. Incomplete connections may cause the device not to be recognized.∗ Depending on the number of tracks recorded, some amount of time may be required until all tracks are read into the unit.∗ The order in which tracks are recorded may differ depending on the device connected (the actual playback order may not be the same as that indicated on your computer’s display).USB OperationsTo listen to tracks on a connected USB memory device1. Touch the [ ] key to switch to the Source menu and select the “USB”. When USB memory device is selected, playback (except DRM files) will begin from the location at which playback was previously stopped.∗ When a USB memory device is connected the USB mode will be displayed.∗ When a USB memory device is disconnected and then reconnected, playback will begin from the previous position where playback is stopped.∗ When a USB memory device is disconnected and then a different USB memory device is connected, playback will begin from the first file recorded on the device.To stop play1. Touch the [ ] key and switch the function to a source other than the USB memory device. CAUTION !Do not remove the USB memory device when the USB mode is selected, since it may result in loss or damage to data on the USB memory device.Always backup and save important data on your computer.2. Remove the USB memory device from the USB slot.Selecting a track Track-up 1. Touch the [ ] key to move to the beginning of the next track.2. Each time the [ ] key is touched, playback proceeds to another track in the advancing direction. Track-down1. Touch the [ ] key to move to the beginning of the current track.2. Touch the [ ] key twice to move to the begin-ning of the previous track.Fast-forward/fast-backward Fast-forward Touch and hold the [ ] key for 1 second or lon-ger. Fast-backwardTouch and hold the [ ] key for 1 second or lon-ger.Top functionTouch the [ ] key for 1 second or longer, then the USB memory device will start playing the first track of current folder.Pausing play1. Touch the [ ] key to pause play. “PAUSE” appears in the display.2. To resume play, touch the [ ] key again.USB OPTIONOther various play functions1 . During USB mode, touch the [ ] key to switch to ADJ menu.2 . Select “OPTION” in the menu to enter USB Option mode.3 . Slide along [ ] slider or touch [ ]/[ ] key, the USB Option mode changed as following order: “SCAN” “REPEAT” “RANDOM” “SCAN”...Note: During trick play, “TRICK OFF” will be appeared before “SCAN” item.](https://usermanual.wiki/Clarion/FZ709/User-Guide-1154848-Page-16.png)
![21EnglishFZ709USB Operations All scan playThis function allows you to locate and play the first 10 seconds of the first track of all the fold-ers. 3 - 1 . Select “SCAN”. 3 - 2 . Touch [ ] key to enter detail setting stage. 3 - 3 . Slide along [ ] slider or touch [ ]/[ ] key to select “ALL”. 3 - 4 . Touch the [ENT] key, “ALL SCAN” will be displayed for 2 seconds. 3 - 5 . During scan, will keep blinking.∗ All scan play starts from the first track of next folder. Scan playThis function allows you to locate and play the first 10 seconds of all the tracks in current folder. 3 - 1 . Select “SCAN”. 3 - 2 . Touch [ ] key to enter detail setting stage. 3 - 3 . Slide along [ ] slider or touch [ ]/[ ] key to select “TRACK”. 3 - 4 . Touch the [ENT] key, “TRACK SCAN” will be displayed for 2 seconds. 3 - 5 . During scan, will keep blinking.∗ Scan play starts from the next track after the track currently being played.∗ Scan play will proceed to next folder after all the tracks in the current folder have been scanned. To cancel trick play 3 - 1 . Select “TRICK OFF”. 3 - 2 . Touch [ENT] key to cancel trick play. 3 - 3 . Display will return to playback display. All repeat playThis function allows you to play all tracks in the MP3/WMA/AAC current folder repeatedly. 3 - 1 . Select “REPEAT”. 3 - 2 . Touch [ ] key to enter detail setting stage. 3 - 3 . Slide along [ ] slider or touch [ ]/[ ] key to select “ALL”. 3 - 4 . Touch the [ENT] key, “ALL REPEAT” will be displayed for 2 seconds. 3 - 5 . lights in the display. Random playThis function allows you to play all tracks of cur-rent folder in a random order. 3 - 1 . Select “RANDOM”. 3 - 2 . Touch [ ] key to enter detail setting stage. 3 - 3 . Slide along [ ] slider or touch [ ]/[ ] key to select “TRACK”. 3 - 4 . Touch the [ENT] key, “TRACK RANDOM” will be displayed for 2 seconds. 3 - 5 . lights in the display. All random playThis function allows you to play all the tracks of all the folders recorded on an USB in a random order. 3 - 1 . Select “RANDOM”. 3 - 2 . Touch [ ] key to enter detail setting stage. 3 - 3 . Slide along [ ] slider or touch [ ]/[ ] key to select “ALL”. 3 - 4 . Touch the [ENT] key, “ALL RANDOM” will be displayed for 2 seconds. 3 - 5 . lights in the display. Repeat playThis function allows you to play the current track repeatedly. 3 - 1 . Select “REPEAT”. 3 - 2 . Touch [ ] key to enter detail setting stage. 3 - 3 . Slide along [ ] slider or touch [ ]/[ ] key to select “TRACK”. 3 - 4 . Touch the [ENT] key, “TRACK REPEAT” will be displayed for 2 seconds. 3 - 5 . lights in the display.](https://usermanual.wiki/Clarion/FZ709/User-Guide-1154848-Page-17.png)
![22EnglishFZ709Select iPod mode1. Connect your iPod to the USB connector. The system will automatically detect the connected device and change to the USB mode (iPod mode) and start playback after a while.USB OperationsFolder Select This function allows you to select a folder con-taining MP3/WMA/AAC files and start playing from the first track in the folder.1. Slide along [ ] slider or touch [ ]/[ ] key. Touch [ ] key to move the next folder. Touch [ ] key to move the previous folder.∗ Touch [ ] key while in the final folder will shift to the first folder.∗ Folder without a MP3/WMA/AAC file is not selectable.∗ Folder name will be displayed for a while.iPod OperationsThis section describes operations when connect-ed to an Apple iPod via the USB slot.Notes: See the iPod Owner’s Manual for details regarding operation conditions. The unit will not operate, or may operate improperly with unsupported versions. For a list of compatible Apple iPod unit with the this model, please contact your Clarion dealer or www.clarion.com.Connecting an iPodWhen an iPod is connected to the USB slot, “Shuffle” set on the iPod will become as follows: “Shuffle (Albums)” play Random play “Shuffle (Songs)” play All random playThe iPod have iPod menu which can toggle with Play mode by touching the [ ] key for 1 second or longer.If iPod supports video capability, the following screen will be displayed first before switching to the iPod menu.Touch [ENT] key to enter music menu or video menu. When an iPod is already connected1. Touch the [ ] key to switch to the source menu.2. Touch the "USB" to select the iPod mode. The system changes to the USB mode (iPod mode), and starts playback from the previous position.](https://usermanual.wiki/Clarion/FZ709/User-Guide-1154848-Page-18.png)
![23EnglishFZ709Note: The following operations in Play mode operate the same as in USB mode: ∗ Track selection: [ ],[ ]∗ Fast-forward/fast-backward: [ ],[ ]∗ Pause: [ ]See “USB Operations” (page 18) for details.iPod OPTION1 . During USB mode, touch the [ ] key to switch to ADJ menu.2 . Select “OPTION” in the menu to enter iPod Option mode.3 . Slide along [ ] slider or touch [ ]/[ ] key, the iPod Option mode changed as following order: “REPEAT” “RANDOM” “OUTPUT FORM” “SIMPLE MODE” “REPEAT”...Note: During trick play, “TRICK OFF” will be appeared before “REPEAT” item.Other various play functions (in Play mode)Notes: These functions are not supported when in the iPod menu. The Random function set on the iPod remains the same after attachment/detachment of the iPod. The Repeat function on the iPod will be changed when you connect/disconnect the iPod to the unit. Repeat playPlay back one track repeatedly. 3 - 1 . Select “REPEAT”. 3 - 2 . Touch [ ] key to enter detail setting stage. 3 - 3 . Slide along [ ] slider or touch [ ]/[ ] key to select “ON”. 3 - 4 . Touch the [ENT] key, “REPEAT ON” will be displayed for 2 seconds. 3 - 5 . lights in the display. Repeat offThis function allows you to play all tracks in the current folder repeatedly. 3 - 1 . Select “REPEAT”. 3 - 2 . Touch [ ] key to enter detail setting stage. 3 - 3 . Slide along [ ] slider or touch [ ]/[ ] key to select “OFF”. 3 - 4 . Touch the [ENT] key, “REPEAT OFF” will be displayed for 2 seconds. Random playPlay all albums within a selected category, in ran-dom order. (Corresponds to “Shuffle (Albums)” command on iPod.) 3 - 1 . Select “RANDOM”. 3 - 2 . Touch [ ] key to enter detail setting stage. 3 - 3 . Slide along [ ] slider or touch [ ]/[ ] key to select “TRACK”. 3 - 4 . Touch the [ENT] key, “TRACK RANDOM” will be displayed for 2 seconds. 3 - 5 . lights in the display. All random playPlay all tracks within a selected category, in ran-dom order. (Corresponds to “Shuffle (Songs)” command on iPod.) 3 - 1 . Select “RANDOM”. 3 - 2 . Touch [ ] key to enter detail setting stage. 3 - 3 . Slide along [ ] slider or touch [ ]/[ ] key to select “ALL”. 3 - 4 . Touch the [ENT] key, “ALL RANDOM” will be displayed for 2 seconds. 3 - 5 . lights in the display. To cancel trick play 3 - 1 . Select “TRICK OFF”. 3 - 2 . Touch the [ENT] key to cancel trick play. 3 - 3 . Display will return to playback display.Note: When playing the last track within a selected category in Random mode, if ACC is switched off then on again, playback will begin from a different track.iPod Operations](https://usermanual.wiki/Clarion/FZ709/User-Guide-1154848-Page-19.png)
![24EnglishFZ709iPod Operations Selecting category from the iPod music menu1. Touch and hold the [ ] key for 1 second or longer.2. Select to switch to music menu or video menu.3. If “MUSIC” is selected from the list, iPod music menu categories will be displayed.Notes: If the iPod does not support video, the iPod music menu categories will be displayed directly. Repeat and Random mode operations are not supported when in the iPod menu. In iPod menu, if you touch the [ ]/[ ] or touch [ ]/[ ] key fast, playback may not be performed.4. Slide along [ ] slider or touch [ ]/[ ] key to select the category.5. There are 6 categories in the iPod music menu: Playlists Artists Albums Songs Genres Composers6. Touch [ ]/[ ] key to switch between layer.7. When the track name display is showing, touch the [ENT] key. Playback will begin from the first track in the selected category, and the iPod menu will be canceled.∗ Subfolders may be displayed, depending on the category. In this case, use the [ ]/[ ] key to switch between subfolders, then use the [ENT] key to select the desired subfolder.∗ When the track name display is showing, touch the [ ] key will return to the currently playing folder name display.8. Slide along [ ] slider or touch [ ]/[ ] key to select a track within a category. iPod menu ABC searchThis function searches the subfolders for desired alphabetical letters.1. During iPod menu, slide along [ ] slider or touch [ ]/[ ] key and select the desired category.2. Touch the [ ] key for 1 second or longer.∗ A small window for alphabet selection will be displayed.3. Select the alphabet by slide along [ ] slider or touch [ ]/[ ] key and touch [ENT] key to perform search.4. “SEARCHING” will be displayed.∗ During search, touch the [ENT] key to cancel search. Selecting category from the iPod video menu1. Touch and hold the [ ] key for 1 second or longer.2. Select to switch to music menu or video menu.3. If “VIDEO” is selected from the list, iPod video menu categories will be displayed.Note: Repeat and Random mode operations are not supported when in the iPod menu.4. Slide along [ ] slider or touch [ ]/[ ] key to select the category.5. The categories in the iPod video menu is de-pend on the iPod.∗ During video files playback, if ACC is switched off then switched on again, or if iPod is discon-nected, playback cannot be resumed. ∗ Random play cannot be selected in iPod video mode. There is no album in the video menu.∗ Please set the language setting in the iPod to English as this unit can only display English.](https://usermanual.wiki/Clarion/FZ709/User-Guide-1154848-Page-20.png)
![25EnglishFZ709iPod Operations Output FormThis function is to select digital output or ana-log output from this unit. This setting is for video playback via iPod 5G. When you connect other than iPod 5G or when you play only audio files, please set this setting to “DIGITAL”. If you set this setting to “ANALOG”, optional iPod video cable CCA723 is required.∗ The factory default setting is “DIGITAL”. 3 - 1 . Select “OUTPUT FORM”. 3 - 2 . Touch [ ] key to enter detail setting stage. 3 - 3 . Slide along [ ] slider or touch [ ]/[ ] key to select “DIGITAL” or “ANALOG”. 3 - 4 . After completing settings, touch the [ENT] key to return to the 1st selected item.Note: The setting will only take effect after disconnecting and re-connecting the iPod. Select Simple Control modeThis function is to select the mode to operate the iPod contents.∗ The factory default setting is “OFF”. 3 - 1 . Select “SIMPLE MODE”. 3 - 2 . Touch [ ] key to enter detail setting stage. 3 - 3 . Slide along [ ] slider or touch [ ]/[ ] key to select “ON” or “OFF”. ON To operate iPod contents from iPod. OFFTo operate iPod contents from this unit. 3 - 4 . After completing settings, touch the [ENT] key to return to the 1st selected item.Notes: During iPod Simple mode ON, “iPod Mode” will be displayed as below and cannot switch to other display layout: During Simple Mode On, do not operate from iPod and this unit at the same time. iPod 5G and iPod nano 1G cannot select both digital output and simple control mode on at the same time.∗ Output form: Digital and Simple mode: OFF - Default∗ Output form: Digital and Simple mode: ON - Not selectable∗ Output form: Analog and Simple mode: ON/OFF - Requires CCA723 cable During Simple Mode On, please do not change the repeat setting to “OFF” in the iPod. About title displayThis unit supports the display of title information transmitted from a connected iPod. Character code information is UTF-8; display-able characters include English alphanumerics, some symbols, and some umlaut characters. Unsupported characters will be replaced by asterisks (∗).](https://usermanual.wiki/Clarion/FZ709/User-Guide-1154848-Page-21.png)
![26EnglishFZ709Satellite Radio OperationsThis function is available when a Satellite Radio Tuner is connected.This unit can control the following Satellite Radio Tuner through the CeNET Translator Adapter. XM Satellite Mini Tuner (Which needs Universal CeNET Translator Adapter) SIRIUS Satellite Universal Tuner (Which needs CeNET Translator: CLA-SC1)Note: The function is differ depending to the connected receiver, they are distinguished by the following notations: - “XM”: for an XM Satellite Radio Tuner - “SIRIUS”: for a SIRIUS Satellite Radio TunerSelecting a Satellite Radio mode1. Touch the [ ] key to switch to Source menu.2. Select the “SIRIUS” or “XM” to changes to the specified Satellite Radio mode.Selecting a band1. Touch the [ ] key to select a band. This changes the reception band as follows: “XM”: XM1 XM2 XM3 XM1 ... “SIRIUS”: SR1 SR2 SR3 SR1 ... Information displayed during receptionThe following information is displayed when the satellite radio cannot be received normally. When the tuner is turned on the first time or after a reset: “UPDATING” When a channel is being tuned in (no signal is yet received): XM: “LOADING”, SIRIUS: “ACQUIRING” A channel without a broadcast has been selected: XM: “CH UNAVAIL”, SIRIUS: “INVALID CH” A channel not covered by your contract: XM: “UPDATING”, SIRIUS: “CALL 888” “539-SIRI” (alternated) Step tuning1. Touch the [ ] or [ ] key. Quick tuning1. Touch and hold the [ ] or [ ] key for 1 second or longer. Channel selection1. Channels are selected with the [ ] or [ ] key.∗ For details see the following operation descrip-tions.Note: The audio output is muted and other button opera-tions are not accepted during channel selection.Satellite functionYou need to enter the SAT OPTION to perform the Satellite function.SAT OPTION1 . During Sirius or XM mode, touch the [ ] key to switch to ADJ menu.2 . Select OPTION in the menu to enter SAT OPTION mode.3 . Slide along [ ] slider or touch [ ]/[ ] key, the SAT OPTION mode changed as following order: “P.CH MEMORY” “PRESET SCAN” “CATEGORY SCAN” “P.CH MEMORY”... Displaying channel labels1. Touch the [ ] key to select the desired chan-nel label. CATEGORY TITLE ARTIST RADIO TEXT Tuning modeThere are two channel selection modes: quick tuning mode and step tuning mode. Recalling a preset stationA total of 18 satellite radio stations can be stored. “XM”: 6-XM1, 6-XM2 and 6-XM3 “SIRIUS”: 6-SR1, 6-SR2 and 6-SR3](https://usermanual.wiki/Clarion/FZ709/User-Guide-1154848-Page-22.png)
![27EnglishFZ709Notes: When the category selection mode is entered, the category of the last received channel is displayed first. The category selection mode is canceled when no channel with the selected category can be found. If the [ ]/[ ] key are not touched within 7 sec-onds, the category selection mode is canceled, and resumes to the Channel mode.Satellite Radio OperationsThis allows you to store your favorite satellite ra-dio stations in memory for later recall.There are 2 methods to recall a preset station.Method 1: 3 - 1 . Select “P.CH MEMORY”. 3 - 2 . Touch [ ] key to enter detail setting stage. 3 - 3 . Slide along [ ] slider or touch [ ]/[ ] key to select the desired preset station. 3 - 4 . Touch [ENT] key for less than 1 second to recall the stored radio frequency.Method 2:1 . Touch the [ ] key to select the desired band.2 . Slide along [ ] slider or touch [ ]/[ ] key to select the desired preset station.3 . Touch [ENT] key to recall the stored radio frequency. Preset memory1. Touch the [ ] key to select the desired band. 3 - 1 . Select “P.CH MEMORY”. 3 - 2 . Touch [ ] key to enter detail setting stage. 3 - 3 . Slide along [ ] slider or touch [ ]/[ ] key to select the preset channel number to be stored. 3 - 4 . Touch [ENT] key for 2 seconds to store the frequency into the selected preset channel. 3 - 5 . “MEMORY” is displayed for 2 seconds before revert to main display. Receiving stations selected by categorySatellite Radio allows you to select broadcast channel category (contents).1. Touch the [ ] key for more than 1 second to select the category selection mode.∗ If touch for more than 1 second again, returns to the channel selection mode.2. Slide along [ ] slider or touch [ ]/[ ] key to change the category item.3. Touch the [ ] or [ ] key to tune in a station. Presetting a categoryTouch the [ ] key for more than 1 second to select the category selection mode. 3 - 1 . Select “P.CH MEMORY”. 3 - 2 . Touch [ ] key to enter detail setting stage. 3 - 3 . Slide along [ ] slider or touch [ ]/[ ] key to select the preset category number to be stored. 3 - 4 . Touch [ENT] for 2 seconds to store the cat-egory into the selected preset memory. 3 - 5 . “MEMORY” is displayed for 2 seconds before revert to main display.Notes: When the name of a channel stored in memory is changed by a broadcasting channel, the display may show a channel name that differs from the stored name. A channel stored in memory may be discontinued at the option of the broadcasting channel. If no operation is performed for more than 1 second, category seek tuning can automatically tune in a receivable broadcast channel category. Recalling a preset categoryTouch the [ ] key for more than 1 second to select the category selection mode. 3 - 1 . Select “P.CH MEMORY”. 3 - 2 . Touch [ ] key to enter detail setting stage. 3 - 3 . Slide along [ ] slider or touch [ ]/[ ] key to select the desired preset category. 3 - 4 . Touch [ENT] for less than 1 second to recall the preset category.](https://usermanual.wiki/Clarion/FZ709/User-Guide-1154848-Page-23.png)
![28EnglishFZ709 Scan functionThere are two scan modes: the category scan mode and the preset scan mode.During scanning channels are displayed in ab-breviated form, the display mode cannot be switched. Preset scan (PRESET SCAN)A preset scan scans the channels (up to 18 chan-nels) stored in the preset memory about every 10 seconds. 3 - 1 . Select “PRESET SCAN”. 3 - 2 . Touch [ENT] to start scan preset channel. 3 - 3 . When a desired station is tuned in, touch the [ ]/[ ] key to continue receiving that station. Category scan (CATEGORY SCAN)In a category scan, broadcast channels in the same category as the current channel are se-lected about every 10 seconds. 3 - 1 . Select “CATEGORY SCAN”. 3 - 2 . Touch [ENT] key to start category scan. 3 - 3 . When a desired channel is tuned in, touch the [ ]/[ ] key to stay in that channel. Note: Category scanning is not available when no cat-egory is defined for the current channel.Satellite Radio OperationsBluetooth® OperationsThe Bluetooth® interface allows you to utilize your car’s built-in audio system for wireless mo-bile phone or music handsfree communication.This unit will be able to retrieve phonebook con-tacts, perform outgoing call, receive incoming call and listen to music.Note: When an audio device is paired, the following operations are the same as USB mode:∗ Play/Pause∗ Track up/downSee “USB Operations” (page23) for details.Basic OperationsCALL METHOD1 . Touch the [ ] key to switch to ADJ menu.2 . Select “TEL” in the menu.3 . Touch the [ ] key to select “CALL” to enter TEL menu.4 . Slide along [ ] slider or touch [ ]/[ ] key, the call method changed as following order: “PHONE BOOK” “HISTORY” “REDIAL” “DIAL NUMBER” “PHONE BOOK”...Note: “CALL” will only appear if paired mobile phone is connected. Call from PhonebookUser can search the contact name in the phone-book and make call.Alternatively, user can call from mobile phone.](https://usermanual.wiki/Clarion/FZ709/User-Guide-1154848-Page-24.png)
![29EnglishFZ709Bluetooth® Operations 4 - 1 . Select “PHONE BOOK”. 4 - 2 . Touch the [ ] key to enter the contact name mode (In this case, slide along [ ] slider or touch [ ]/[ ] key to select the desired contact name). 4 - 3 . When the contact name is displayed, touch the [ ] key to view details. 4 - 4 . When contact name or contact details is displayed, touch the [ENT] key to call the mobile phone number. Redial a CallYou can call a last dialed number of the phone. 4 - 1 . Select “REDIAL”. 4 - 2 . Touch the [ENT] key to redial the last number of the phone. Dial Number CallOutgoing call can be made by entering telephone numbers.Telephone number uses 0, 1, 2, 3, 4, 5, 6, 7, 8, 9, ∗, #, and +. Received/Dialled/Missed Call HistoryYou can browse and call from Received/Dialled/Missed Call History. 4 - 1 . Select “HISTORY”. 4 - 2 . Touch the [ ] key to enter the contact name mode (In this case, slide along [ ] slider or touch [ ]/[ ] key to select the desired contact name). 4 - 3 . When the contact name is displayed, touch the [ ] key to view details. 4 - 4 . When contact name or contact details is displayed, touch the [ENT] key to call the mobile phone number.Note: Only calls after phone connected with this unit will be displayed in the history list. There is no synchronization history calls between connected phone and this unit. TEL OPTION1 . Touch the [ ] key to switch to ADJ menu.2 . Select “TEL” in the menu.3 . Touch the [ ] key to select “OPT” to enter TEL OPTION mode.4 . Slide along the [ ] slider or touch [ ]/ [ ] key, the TEL OPTION mode changed as following order: “PAIRING” “SELECT” “DELETE” (“DISCONNECT” “ADD PHONEBOOK”) “DEL PHONEBOOK” “DEL HISTORY” “BOOK TYPE” “MIC GAIN” “RING VOL” “TONE SELECT” “NOISE CANCEL” “AUTO ANSWER” “AUTO CONNECT” “PASS KEY” “ADDRESS” “VERSION” “BT NAME” “PAIRING”...Notes: When user pairing at first time, “BOOK TYPE” is displayed before “PARING”. By select book type once, it appear later in the option list. The “DISCONNECT” will only appear if paired mobile phone is connected. The “ADD PHONEBOOK” will only appear if paired mobile phone is connected and selected Book Type has reserved memory for storing contacts. Answering a call1. You can answer an incoming call by touching any key (except slide along the [ ] slider. End a call1. You can reject an incoming call or end an on-going call by sliding down the [ ] slider. 4 - 1 . Select “DIAL NUMBER”. 4 - 2 . Touch the [ ] key to enter the dial mode. 4 - 3 . Touch the [ ] or [ ] button to move the cursor. 4 - 4 . Slide along [ ] slider or touch [ ]/[ ] key to select the numbers. 4 - 5 . Touch the [ENT] key to call the mobile phone number.](https://usermanual.wiki/Clarion/FZ709/User-Guide-1154848-Page-25.png)
![30EnglishFZ709Bluetooth® Operations PAIRINGThis option is used to perform Bluetooth® pairing with the mobile phone and audio.Up to a maximum of 5 mobile phones and an au-dio device can be paired. 4 - 1 . Select “PAIRING”. 4 - 2 . Touch the [ ] key to enter detail setting stage. 4 - 3 . Slide along [ ] slider or touch [ ]/[ ] key to select “TELEPHONE” or “AUDIO” and then touch the [ENT] key. 4 - 4 . When you select “TELEPHONE”, slide along [ ] slider or touch [ ]/[ ] key to select “MEMORY 1” to “MEMORY 5”. 4 - 5 . Touch the [ENT] key to enter pairing mode. SELECTThis is a setting for user to select one of the paired mobile phones. 4 - 1 . Select “SELECT”. 4 - 2 . Touch the [ ] key to view the paired mobile phones list. 4 - 3 . Slide along [ ] slider or touch [ ]/[ ] key to choose one of the 5 mobile phones. 4 - 4 . Touch the [ENT] key to connect. Connected device will be able to use all the functional-ities provided.Notes: Make sure Bluetooth setting on the mobile phone is turned on during connection request. “ ” indicator will appear if Bluetooth® device is connected. “ ” and “ ” indicator will only appear if sup-ported by the mobile phone.1 . During BT mode, touch the [ ] key to switch to ADJ menu.2 . Select “OPTION” in the menu to enter the BT OPTION mode.3 . Slide along the [ ] slider or touch [ ]/ [ ] key, the BT OPTION mode changed as following order: “PAIRING” “DELETE” “PASS KEY” “ADDRESS” “VERSION” “PAIRING”...BT OPTION ADD PHONEBOOK This option is used to add contacts from the mobile phone. User can choose 2 methods of phonebook download: send contacts via phone and retrieve contacts via this unit. DISCONNECTThis option is used to disconnect the currently connected device. 3 - 1 . Select “DISCONNECT”. 3 - 2 . Touch the [ ] key, “DISCONNECT?” is dis-played. 3 - 3 . Touch the [ENT] key for 2 seconds to discon-nect the connected device. DELETEThis is a setting for user to delete one of the paired devices from the list.In TEL OPTION: 4 - 1 . Select “DELETE”. 4 - 2 . Touch the [ ] key to view the paired mobile phones list. 4 - 3 . Slide along [ ] slider or touch [ ]/[ ] key to choose one of the 5 mobile phones. 4 - 4 . Touch the [ENT] key, “DELETED?” is dis-played. 4 - 5 . Touch the [ENT] key for 2 seconds to delete the paired device. In BT OPTION: 3 - 1 . Select “DELETE”. 3 - 2 . Touch the [ ] key, “DELETED?” is dis-played. 3 - 3 . Touch the [ENT] key for 2 seconds to delete the paired device. Note: After a device has been deleted, paired device will not automatically rearrange in the list.](https://usermanual.wiki/Clarion/FZ709/User-Guide-1154848-Page-26.png)
![31EnglishFZ709Bluetooth® OperationsRetrieve Contacts Via This Unit: Transfer all contacts from mobile phone to unit: 3 - 1 . Select “ADD PHONEBOOK”. 3 - 2 . Touch the [ ] key, slide along [ ] slider or touch [ ]/[ ] key to select “DOWNLOAD ALL”. 3 - 3 . Touch [ENT] key to request mobile phone transfers all contacts to unit. 3 - 4 . “RECEIVING” is blinking.Notes: When the “COMPLETED” appears, add phone book is succeed. Total contacts that can be stored depend on the selected Book Type.Send Contacts Via Phone: Use mobile phones to send selected con-tacts: 3 - 1 . Select “ADD PHONEBOOK”. 3 - 2 . Touch the [ ] key, slide along [ ] slider or touch [ ]/[ ] key to select “VIA PHONE”. 3 - 3 . Touch [ENT] key to enter standby mode, “STAND BY” is blinking. 3 - 4 . During standby mode, use the last connected mobile phone to send contacts to the unit. DELETE PHONEBOOKThis is a setting for user to delete one or the en-tire phone numbers. 3 - 1 . Select “DEL PHONEBOOK”. 3 - 2 . Touch the [ ] key, the current connected phone is displayed. 3 - 3 . Touch the [ENT] key to enter selection mode. 3 - 4 . Slide along [ ] slider or touch [ ]/[ ] key to select “ALL DELETE” or “1 DELETE” and touch [ENT] key. 3 - 5 . When you select “ALL DELETE”, touch the [ENT] key to proceed. 3 - 6 . When you select “1 DELETE”, slide along [ ] slider or touch [ ]/[ ] key to select one of the desired phone number and touch [ENT] key. 3 - 7 . Touch the [ENT] key for 2 seconds to de-lete. DELETE HISTORYThis option used to delete the call history. 3 - 1 . Select “DEL HISTORY”. 3 - 2 . Touch the [ ] key, “DELETE?” is dis-played. 3 - 3 . Touch the [ENT] key for 2 seconds to de-lete. BOOK TYPEThe unit provides 3 types of phone book which are stored in memory.∗ The factory default setting is “TYPE 3”. 3 - 1 . Select “BOOK TYPE”. 3 - 2 . Touch the [ ] key to enter detail setting stage. 3 - 3 . Slide along [ ] slider or touch [ ]/[ ] key to select the setting in sequence “TYPE1”, “TYPE 2” or “TYPE 3”. 3 - 4 . “ALL MEMORY IS DELETED” is dis-played. 3 - 5 . Touch [ENT] key for 2 seconds to change setting.TYPEPHONEMEMORY 1MEMORY 2MEMORY 3MEMORY 4MEMORY 51 2 3250 pieces 200 pieces 100 pieces250 pieces 100 pieces 100 pieces0 piece 100 pieces 100 pieces0 piece 50 pieces 100 pieces0 piece 50 pieces 100 piecesNote: Once setting is changed, all previous stored phone-book data will be cleared.](https://usermanual.wiki/Clarion/FZ709/User-Guide-1154848-Page-27.png)
![32EnglishFZ709Bluetooth® Operations ONAutomatic connection is enabled. OFFAutomatic connection is disabled. AUTO CONNECTThis function allows this unit to be connected automatically with previously connected device upon powering up this unit.∗ The factory default setting is “ON”. 3 - 1 . Select “AUTO CONNECT”. 3 - 2 . Touch the [ ] key to enter detail setting stage. 3 - 3 . Slide along [ ] slider or touch [ ]/[ ] key to select “ON” or “OFF”. TONE SELECTThis option is used to select tone.∗ The factory default setting is “INTERNAL”. 3 - 1 . Select “TONE SELECT”. 3 - 2 . Touch the [ ] key to enter detail setting stage. 3 - 3 . Slide along [ ] slider or touch [ ]/[ ] key to select “INTERNAL” or “AUTO”. INTERNALOnly built-in ringing tone of this unit will be used. AUTOEither in-band ringing tone or built-in tone will be used depends on the phone. RING VOLThis option is used to change the ringing volume by each paired mobile phone device.The unit can be performed only when the “TONE SEL” model is set to “INTERNAL”.∗ The factory default setting is 5. (Adjustment level: 1 to 10) 3 - 1 . Select “RING VOL”. 3 - 2 . Touch the [ ] key to enter detail setting stage. 3 - 3 . Slide along [ ] slider or touch [ ]/[ ] key to change the ringing volume. MIC GAINMIC gain can be set by each paired mobile phone device. Each registered device has unique MIC gain setting. 3 - 1 . Select “MIC GAIN”. 3 - 2 . Touch the [ ] key to enter detail setting stage. 3 - 3 . Slide along [ ] slider or touch [ ]/[ ] key to change the MIC gain setting.∗ The factory default setting is 3. (Adjustment level: 1 to 5) NOISE CANCELThis option is used to set noise volume in this unit.∗ The factory default setting is “LOW”. 3 - 1 . Select “NOISE CANCEL”. 3 - 2 . Touch the [ ] key to enter detail setting stage. 3 - 3 . Slide along [ ] slider or touch [ ]/[ ] key to select “LOW” or “HIGH”. AUTO ANSWERThis is a setting to determine whether any in-coming call will be automatically or manually answered.∗ The factory default setting is “OFF”. 3 - 1 . Select “AUTO ANSWER”. 3 - 2 . Touch the [ ] key to enter detail setting stage. 3 - 3 . Slide along [ ] slider or touch [ ]/[ ] key to select “ON” or “OFF”. ONAny incoming call is automatically answered in 5 seconds. OFFUser needs to manually answer the call.](https://usermanual.wiki/Clarion/FZ709/User-Guide-1154848-Page-28.png)
![33EnglishFZ709Bluetooth® Operations Common Operations1. Slide along [ ] slider or touch [ ]/[ ] key to choose 1~6 to input the security code.∗ After input first digit, “0000” will stop blinking.2. Touch [ ] key to go on with the next digit.Security codeThis unit can deter theft by checking registered security code if security code is registered. The security code is registered in the Adjustment mode “CODE” item.For first time installation, no security code is re-quired. If security code is registered, changing or discon-necting the vehicle battery will cause the security code input to be requested for activation. “INPUT 0000” will be displayed and “0000” is blinking. CAUTION !If entered code is wrong, "----" will be displayed for a given period during which no operation can be performed. After the locking peroid, "INPUT 0000" will be displayed again. For mistakes less than 7 times, the locking time will be 15 seconds; from 7th time onwards, the locking time will be 15 minutes.3. Touch [ ] key to confirm during finish input the 4 security code.4. Successful password input will power ON the unit. PASS KEYUser can set new 4 digits of pass key that range from 0 to 9 for pairing authentication security. This new pass key will be used for subsequent pairing mode with other Bluetooth® device.∗ The factory default setting is “1234”. 3 - 1 . Select “PASS KEY”. 3 - 2 . Touch the [ ] key to enter detail setting stage. 3 - 3 . Slide along [ ] or [ ] key to move the cur-sor. 3 - 4 . Slide along [ ] slider or touch [ ]/[ ] key to select the desired digits. 3 - 5 . Touch [ENT] key for 2 seconds to store in memory. 3 - 6 . “MEMORY” is displayed.Note: Both Bluetooth® device and this unit must have the same pass key in order for pairing to be success-ful. ADDRESSThis will hold the unique Bluetooth® address. The address is 12 figures. 3 - 1 . Select “ADDRESS”. 3 - 2 . Touch the [ ] key, the Bluetooth® address appears in the display. VERSIONThis will display the software version of the Bluetooth®. 3 - 1 . Select “VERSION”. 3 - 2 . Touch the [ ] key, the Bluetooth® version appears in the display. BT NAMEThis will hold the unit's name for pairing pur-pose. 3 - 1 . Select “BT NAME”. 3 - 2 . Touch the [ ] key, the unit's name appears in the display.](https://usermanual.wiki/Clarion/FZ709/User-Guide-1154848-Page-29.png)
![34EnglishFZ709Adjustment Mode1. Touch the [ ] key to switch to ADJ menu.2. Select “SETTING” in the menu to enter setting mode.3. Each time you slide along the [ ] or touch [ ]/[ ] key, the setting mode changed as following order: “CLOCK EDIT” “DISP BRIGHT” “BEEP” “CODE” “SCREEN SAVER” “AUTO SCROLL” “SCROLL SPEED” “DIMMER” “BLINKING LED” “AMP CANCEL” “SYSTEM CHECK”∗ If no operation is performed for more than 10 seconds, ADJ mode is cancelled and the display returns to the previous mode. Setting the display brightnessYou can adjust the display brightness to match the angle of installation of the unit.∗ The factory default setting is “5”. (Adjustment level: 1 to 8) 3 - 1 . Select “DISP BRIGHT”. 3 - 2 . Touch [ ] key to enter detail setting stage. 3 - 3 . Slide along [ ] slider or touch [ ]/[ ] key to adjust the value. Setting the clock 3 - 1 . Select “CLOCK EDIT”. 3 - 2 . Touch [ ] key to enter detail setting stage. 3 - 3 . Slide along the [ ] or touch [ ]/[ ] key to adjust the value. 3 - 4 . Touch [ ] key to switch to minute adjustment or touch [ ] key to switch to hour adjust-ment. 3 - 5 . During finish adjustment, touch [ENT] key for 2 seconds to memory the new setting value. Setting the beep∗ The factory default setting is “ON”. 3 - 1 . Select “BEEP”. 3 - 2 . Touch [ ] key to enter detail setting stage. 3 - 3 . Slide along [ ] slider or touch [ ]/[ ] key to select “ON” or “OFF”.When no code is registered 3 - 3 . Slide along [ ] slider or touch [ ]/[ ] key to adjust the value. 3 - 4 . Touch [ ]/[ ] key to set the previous or next digit. Setting the code 3 - 1 . Select “CODE”. 3 - 2 . Touch [ ] key to enter detail setting stage.Notes: If both the dimmer and the car’s illumination are turned on, “ILLUMI ON” and the adjustment value will be displayed. If the dimmer is turned on and the car’s illumination is turned off, “ILLUMI OFF” and the adjustment value will be displayed. If the dimmer is turned off, only the adjustment value will be displayed. The display brightness level setting during dimmer and car’s illumination are turned on has indepen-dent adjustment value.Common Operations](https://usermanual.wiki/Clarion/FZ709/User-Guide-1154848-Page-30.png)
![35EnglishFZ709Common Operations 3 - 6 . If successfully delete the registered code, “DELETED” will be displayed for 2 seconds and back to 1st item. 3 - 7 . If unsuccessfully delete the registered code, “FAILED” will be displayed for 2 seconds and back to the “INPUT 0000” display. Turning the screen saver function on or offThis unit is provided with the screen saver func-tion which allows you to show various kinds of patterns in the operation status indication area of the display in a random order. You can turn on or off this function. If the button operation is performed with the screen saver function on, the operation display corresponding to the button op-eration is shown for about 30 seconds and the display returns to the screen saver display.∗ The factory default setting is “ON”. 3 - 1 . Select “SCREEN SAVER”. 3 - 2 . Touch [ ] key to enter detail setting stage. 3 - 3 . Slide along [ ] slider or touch [ ]/[ ] key to select “ON” or “OFF”. 3 - 5 . During finish adjustment, touch [ENT] key for 2 seconds to confirm.When code is registered 3 - 3 . Slide along [ ] slider or touch [ ]/[ ] key to input the registered code. 3 - 4 . Touch [ ]/[ ] key to set the previous or next digit.Note: White down your personal code in case you forget it. 3 - 6 . “MEMORY XXXX” will be displayed for 2 sec-onds where “XXXX” is the entered digits. 3 - 5 . During finish adjustment, touch [ENT] key for 2 seconds to memory the new setting value.](https://usermanual.wiki/Clarion/FZ709/User-Guide-1154848-Page-31.png)
![36EnglishFZ709Common Operations Setting the scroll speedThis function allows you to adjust the speed of the title scroll.∗ The factory default setting is “3”. 3 - 1 . Select “SCROLL SPEED”. 3 - 2 . Touch [ ] key to enter detail setting stage. 3 - 3 . Slide along [ ] slider or touch [ ]/[ ] key to adjust the speed value. (Parameter range: 1~5) OFF To scroll just 1 time. ON To scroll automatically. Setting the method for title scrollSet how to scroll in MP3/WMA/AAC title.∗ The factory default setting is “ON”. 3 - 1 . Select “AUTO SCROLL”. 3 - 2 . Touch [ ] key to enter detail setting stage. 3 - 3 . Slide along [ ] slider or touch [ ]/[ ] key to select “ON” or “OFF”. Setting the dimmer controlYou can set the dimmer control “ON” or “OFF”.∗ The factory default setting is “ON”. 3 - 1 . Select “DIMMER”. 3 - 2 . Touch [ ] key to enter detail setting stage. 3 - 3 . Slide along [ ] slider or touch [ ]/[ ] key to select “ON” or “OFF”. Anti-theft indicatorThe red Anti-theft indicator is a function for pre-venting theft.∗ The factory default setting is “OFF”. 3 - 1 . Select “BLINKING LED”. 3 - 2 . Touch [ ] key to enter detail setting stage. 3 - 3 . Slide along [ ] slider or touch [ ]/[ ] key to select “ON” or “OFF”. Selecting AUX IN sensitivityMake the following settings to select the sensi-tivity when sounds from external devices con-nected to this unit are difficult to hear even after adjusting the volume.∗ The factory default setting is “MID”.1. During AUX mode, touch the [ ] key to switch to ADJ menu.2. Select OPTION in the menu to enter AUX OP-TION mode.3. Select “AUX SENSE” and touch [ ] key to enter detail setting stage.4. Slide along [ ] slider or touch [ ]/[ ] key to select “HIGH”, “MID” or “LOW”.Note: When AUX mode is selected, AUX IN sensitivity can be set.AUX functionThis system has an external input jack on the rear panel so you can listen to sounds and music from external devices connected to this unit. Performing a system checkThis function allows you to perform a system check from the adjust mode when required. 3 - 1 . Select “SYSTEM CHECK”. 3 - 2 . Touch [ENT] key. “SYSTEM CHECK” ap-pears in the display. 3 - 3 . After finish checking, this unit will switch to previous mode. OFF Use for inside AMP. ON Use with connected AMP. Setting the external amplifierWhen an external amplifier is used, the noise can be decreased by turning off the power supply of the internal amplifier.∗ The factory default setting is “OFF”. 3 - 1 . Select “AMP CANCEL”. 3 - 2 . Touch [ ] key to enter detail setting stage. 3 - 3 . Slide along [ ] slider or touch [ ]/[ ] key to select “ON” or “OFF”.](https://usermanual.wiki/Clarion/FZ709/User-Guide-1154848-Page-32.png)