Climax Technology Co MOBILE Mobile-Lite User Manual
Climax Technology Co Ltd Mobile-Lite Users Manual
Users Manual
November17th,2014
Table of Contents
1.INTRODUCTION..................................................................................................................1
1.1.MOBILE LITE SERIES............................................................................................................1
1.2.WHAT’S IN THE BOX..............................................................................................................1
2.SYSTEM OVERVIEW..........................................................................................................5
2.1.IDENTIFYING THE PARTS.......................................................................................................5
2.2.LED INDICATORS..................................................................................................................6
2.3.POWER SUPPLY....................................................................................................................6
3.GETTING STARTED – SETTING UP MOBILE LITE.........................................................7
3.1.SIM CARD INSERTION...........................................................................................................7
3.2.CHARGING MOBILE LITE.......................................................................................................7
3.3.HARDWARE INSTALLATION – PC PROGRAMMING TOOL CONNECTION...............................8
3.4.SOFTWARE INSTALLATION – PC PROGRAMMING TOOL CONNECTION..............................10
4.PROGRAMMING MOBILE LITE.......................................................................................11
4.1.PC PROGRAMMING TOOL (INSTALLERS ONLY).................................................................11
4.1.1.Profile............................................................................................................................13
4.1.2.SMS Program..............................................................................................................15
4.1.3.APN................................................................................................................................15
4.1.4.Report Setting.............................................................................................................16
4.1.5.Setting...........................................................................................................................21
4.1.6.Miscellaneous.............................................................................................................24
4.1.7.Firmware......................................................................................................................26
4.2.SMS REMOTE PROGRAMMING...........................................................................................28
5.LEARNING IN A RF PENDANT........................................................................................29
6.OPERATION.......................................................................................................................30
6.1.ANSWERING INCOMING CALLS...........................................................................................30
6.2.CURRENT OPERATION CONDITION.....................................................................................30
6.3.LOCATING MOBILE LITE......................................................................................................31
6.4.ALARM ACTIVATION............................................................................................................31
6.5.SLEEP MODE.......................................................................................................................35
6.6.REBOOTING AND FACTORY RESETTING MOBILE LITE.......................................................36
6.7.VOICE PROMPTS.................................................................................................................38
7.APPENDIX.........................................................................................................................39
7.1.SMS REMOTE PROGRAMMING COMMANDS TABLE...........................................................39
7.2.CONTACT ID COMMUNICATIONS PROTOCOL AND FORMAT...............................................41
7.3.SIA DIGITAL COMMUNICATION STANDARD.........................................................................43
7.4.MPTP PROTOCOL..............................................................................................................43
7.5.CSV IP................................................................................................................................43
1
1. Introduction
1.1. Mobile Lite Series
Mobile Lite is a light, portable and richly featured cellular medical alarm with
GPS positioning, cell locator and GSM/3G network that protect you wherever
you go. The device is capable of playing voice prompts to raise the users’
self-awareness and reporting events via Speech, SMS and IP protocols to
directly communicate with the monitoring centers.
1.2. What’s in the Box
Your Mobile Lite package includes the following items:
Items
Mobile Lite
Charging Cradle (CT-5)
Belt Clip Case
Micro-USB cable
AC Adapter
CD-ROM containing:
- Mobile Lite Installation and Operation Guide
- USB Driver Installer
- PC Programming Tool
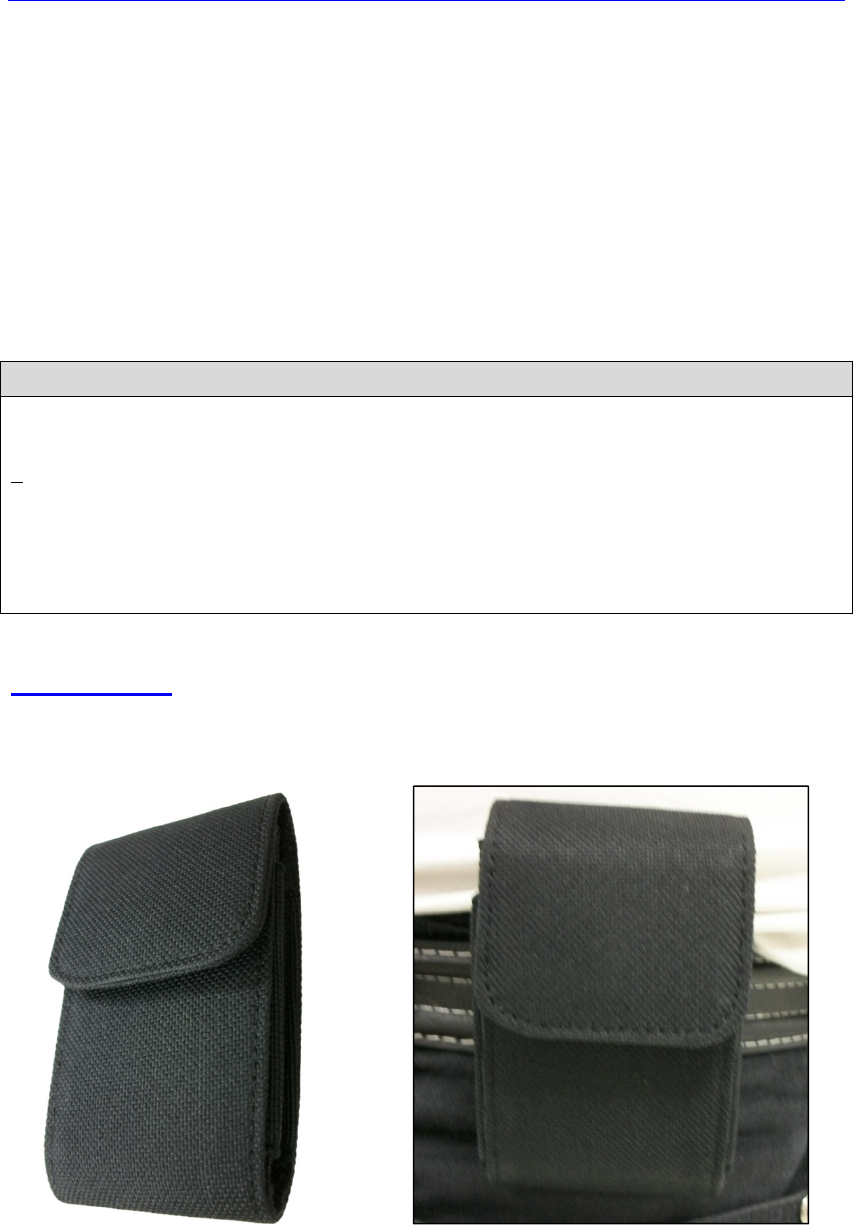
Belt Clip Case
Mobile Lite comes with a Belt Clip Case. It is designed to protect Mobile Lite
and for the user to conveniently carry Mobile Lite around.
2
Micro-USB Cable
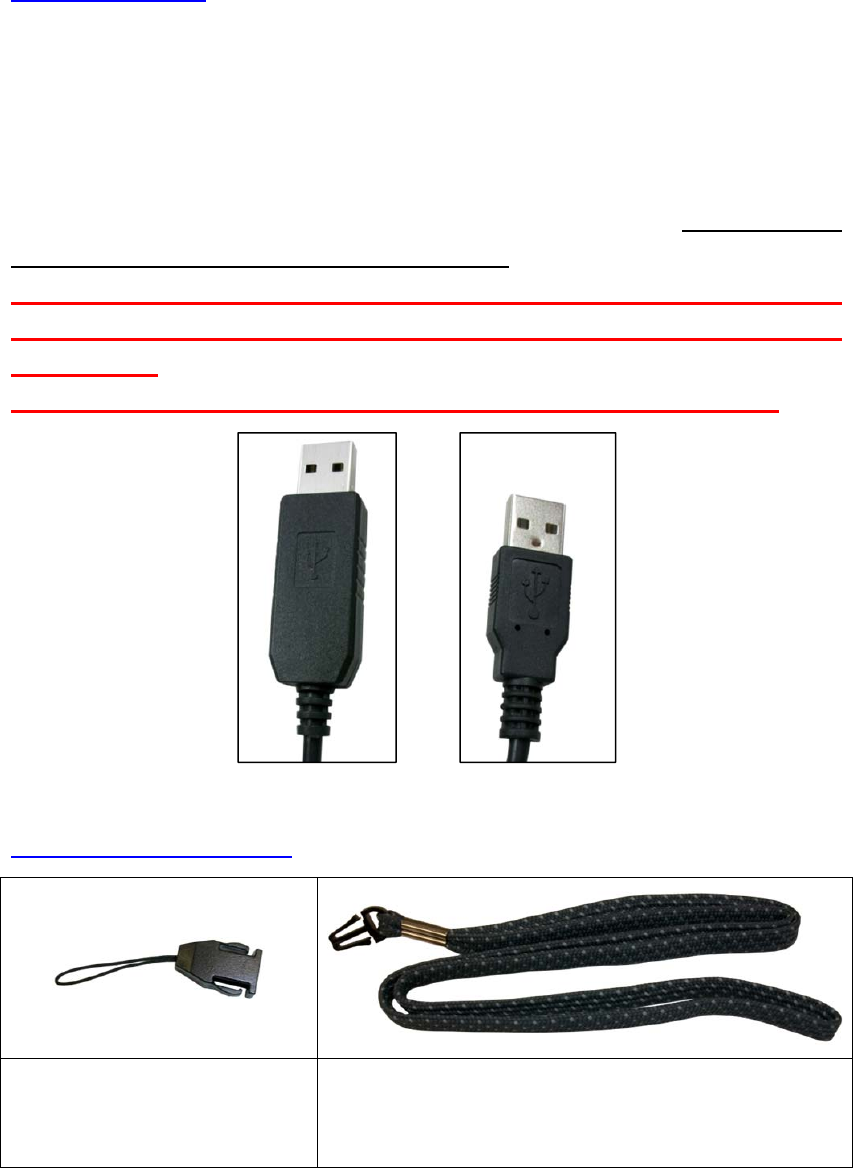
Mobile Lite has a micro USB port for charging or programming.
For charging Mobile Lite via connecting to charging cradle, a regular USB
cable is provided.
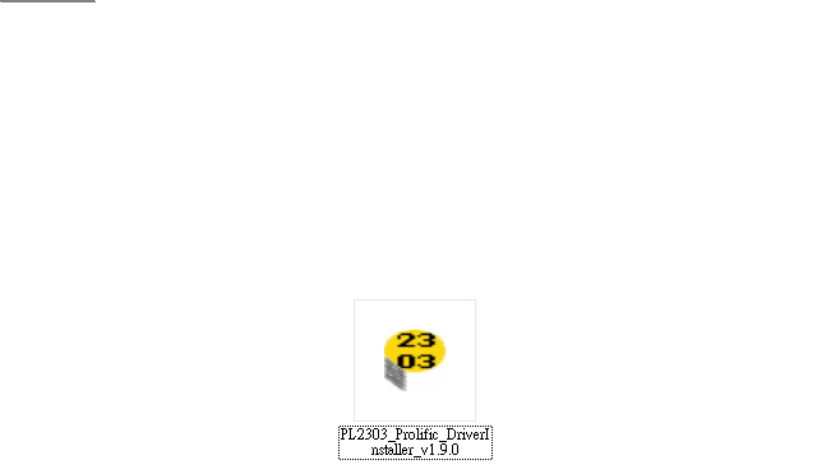
For connecting Mobile Lite to computer for programming, a special
programming USB cable is required. The USB end of programming cable is
larger than regular cable. For more information, refer to 3.3. Hardware
Installation – PC Programming Tool connection.
Always use the Programming micro USB cable for connection Mobile
Lite to computer. Never use a regular micro USB cable for computer
connection.
If Programming cable is not provided, please contact your supplier.
Lanyard and Attachment
Lanyard Hole Attachment
String with Female
Release Buckle
Lanyard with Male Release Buckle
Programming
Micro-USB Cable Regular Micro-USB
Cable
3
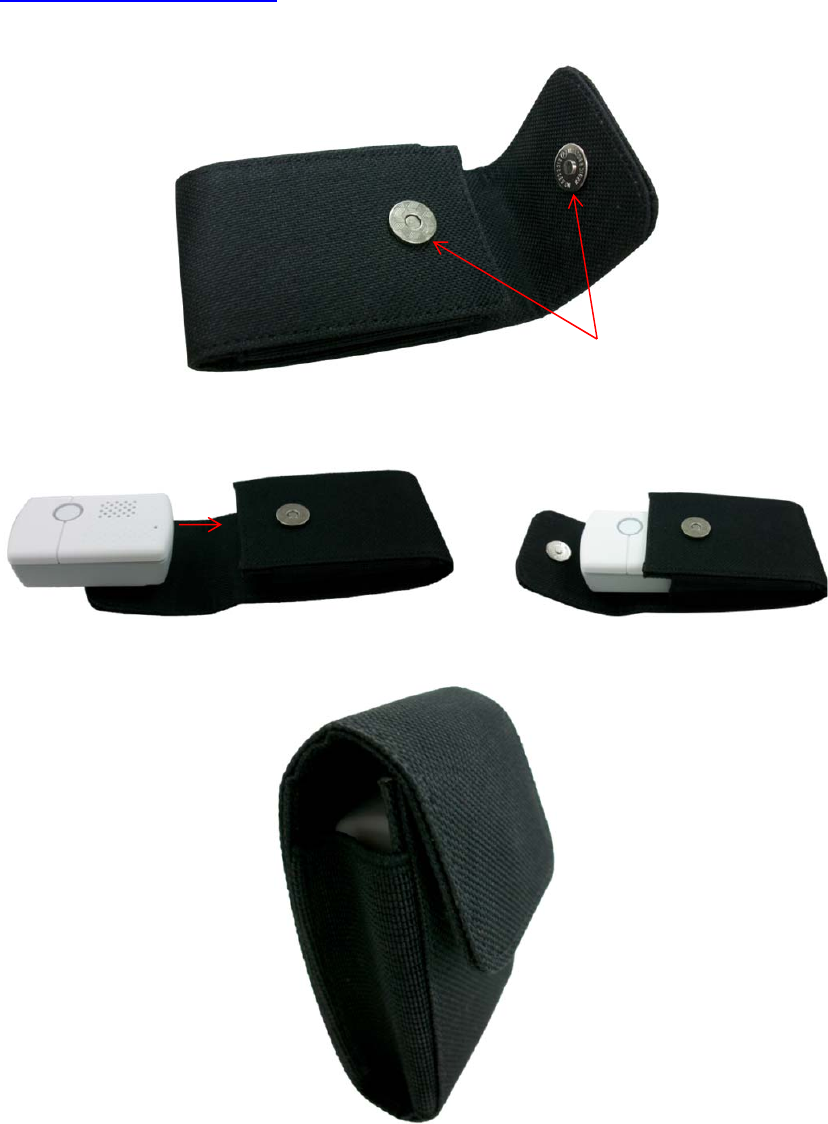
Using the Belt Clip Case
Step 1. Open the cover of the case by separating the Magnetic Button.
Step 2. Insert Mobile Lite into the case.
Step 3. Close the cover of the case by attaching the Magnetic Button.
Magnetic Button
4
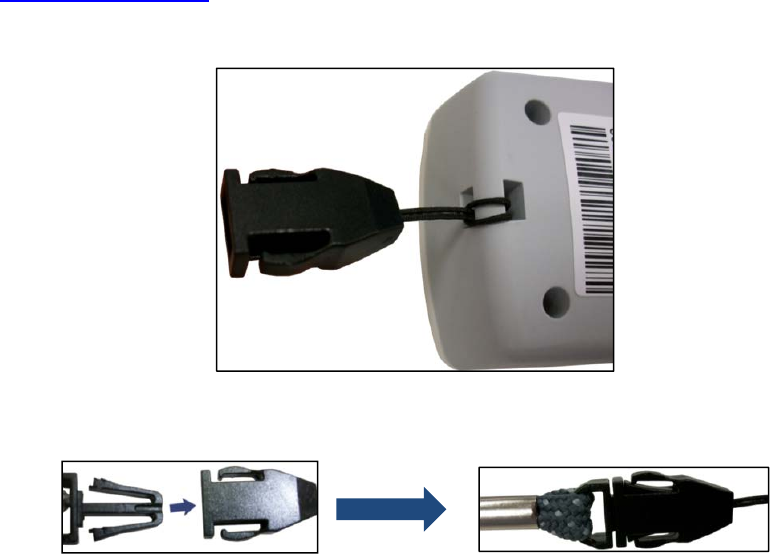
Using the Lanyard
Step 1. Attach the Release Buckle to the Lanyard Hole Attachment String.
Step 2. Click the Male and Female Release Buckle together.
Step 3. Put the lanyard around the neck of the user.
5
2. System Overview
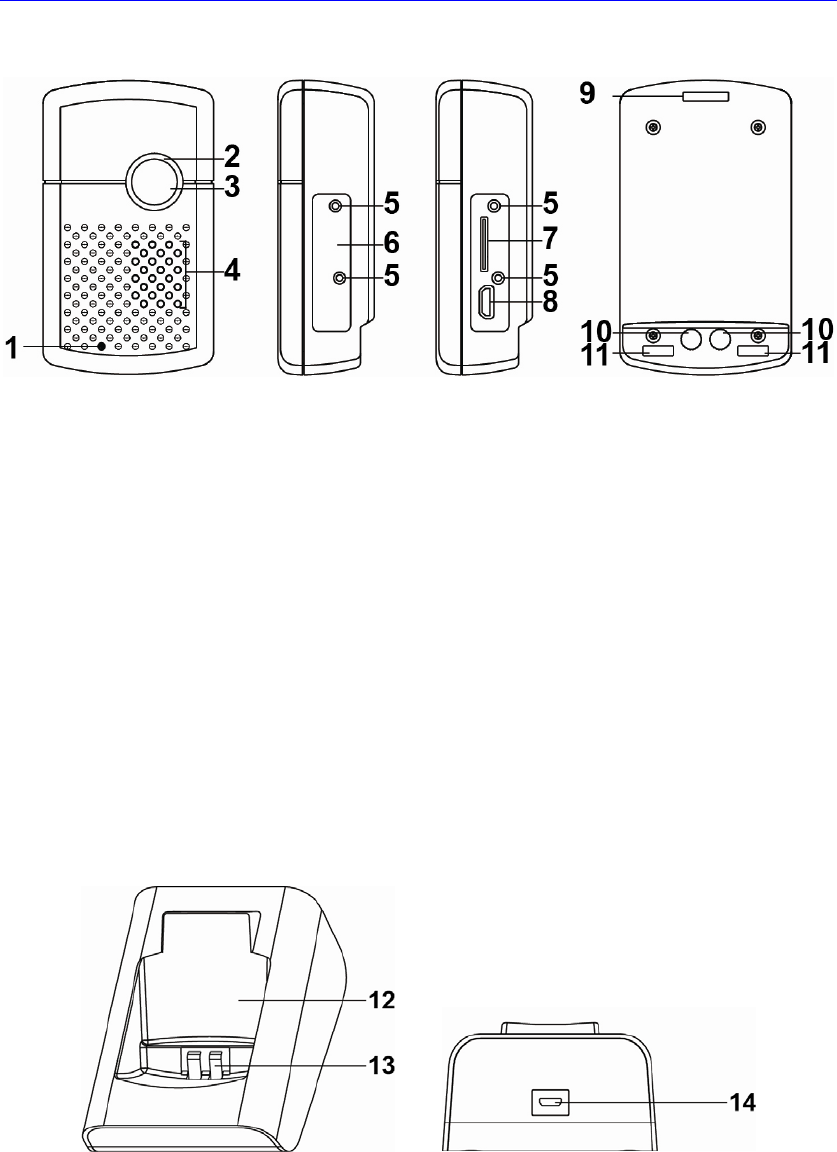
2.1. Identifying the Parts
1. Microphone
2. LED Indicator (Green (Top), Amber (Middle) and Red(Bottom)
3. Active Button
4. Speaker
5. Protective Cover Screw Holes
To stabilize SIM Card and USB Protective Cover onto Mobile Lite.
6. SIM Card and USB Protective Cover
7. Micro SIM Card Slot
8. Micro USB Jack
9. Lanyard Hole
For the Lanyard Hole Attachment String to stabilize onto Mobile Lite.
10. Charging Contact Plates
11. Anti-Slide Magnets
12. Charging Cradle
13. Cradle Charging Contact Plates
14. Cradle USB Jack

6
2.2. LED indicators
LED Behavior Indication
Green LED (Top) On Mobile Lite is being charged.
1 flash every 2 seconds Mobile Lite operating
normally
Amber LED (Middle) Flashing quickly GSM/3G fault
Red LED (Bottom) Flashing quickly Mobile Lite low on battery
When Mobile Lite is being charged, the Red LED will not indicate the battery
status.
2.3. Power Supply
Mobile Lite is powered by rechargeable battery.
The typical charging time is ~4 hours.
To Charge Mobile Lite, please refer to 3.2. Charging Mobile Lite.
When Mobile Lite is low on battery, the LED will flash quickly in Red color.
Mobile Lite makes a low battery report to the CMS when it is running low
on battery.
Mobile Lite makes a battery restored report to the CMS when its battery is
fully recharged.
7
3. Getting Started – Setting up Mobile Lite
3.1. SIM Card Insertion
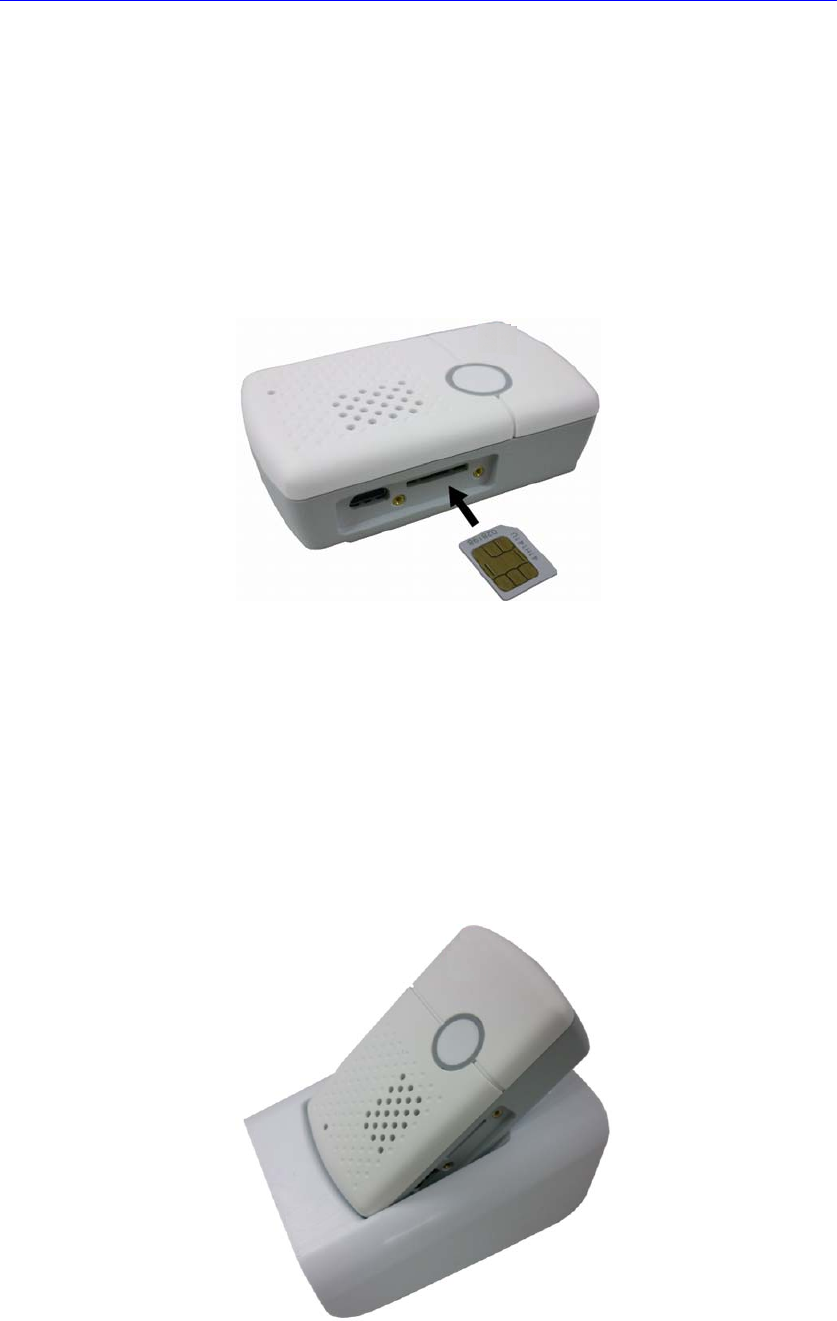
Step 1. Loosen the Protective Cover Fixing Screws using a Philips
screwdriver and remove the SIM Card and USB Protective Cover.
Step 2. Hold Mobile Lite with its front side facing you. Insert a micro SIM card
into the SIM card slot with the chip side of the SIM card facing you as
shown in the picture below.
Please make sure that the micro SIM card PIN code is deactivated
and all SMS messages removed before insertion.
Step 3. Replace the Protective Cover and tighten the Protective Cover Fixing
Screws using a Philips screwdriver.
3.2. Charging Mobile Lite
Step 1. Place Mobile Lite into the Charging Cradle. Please make sure that the
Charging Contact Plates (of both Mobile Lite and the cradle) are in
contact with each other. The Anti-Slide Magnets should help align
Mobile Lite into the Charging Cradle.
8
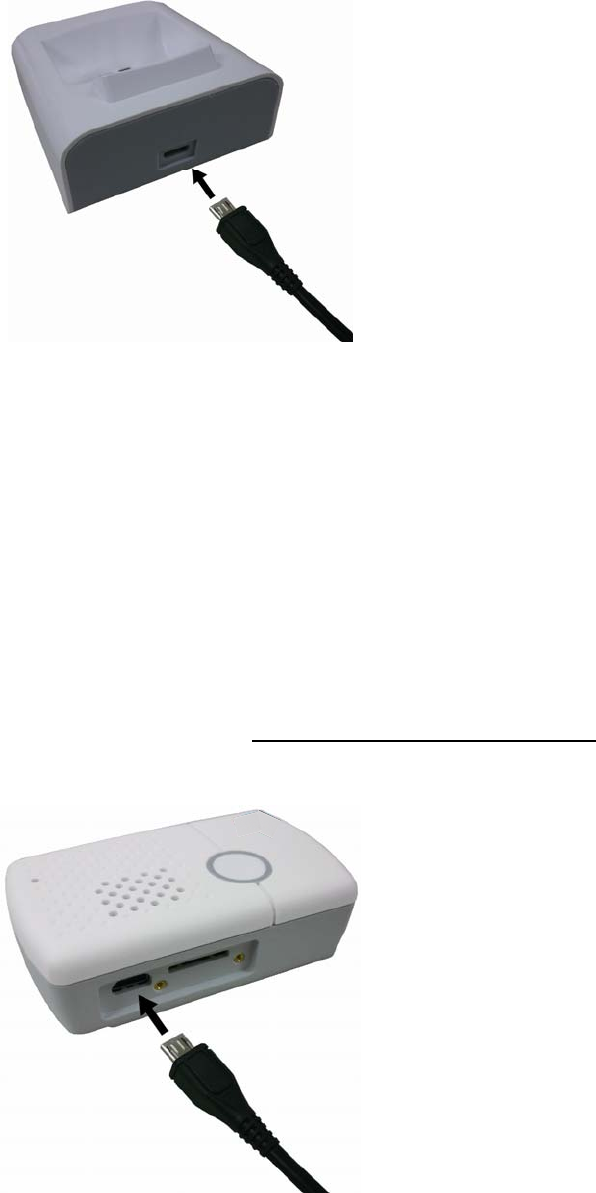
Step 2. Insert the device/cradle end of the Micro-USB Cable into the
Micro-USB jack as shown in the picture:
Step 3. Insert the programming/charging end of the USB cable into the AC
Adapter and plug the adapter into a power socket.
3.3. Hardware Installation – PC Programming Tool
Connection
To use PC Programming Tool for programming Mobile Lite, follow the
hardware installation steps below:
Step 1. Loosen the Protective Cover Fixing Screws using a Philips
screwdriver and remove the SIM Card and USB Protective Cover.
Step 2. Insert the device/cradle end of the Programming Micro-USB Cable
into the Micro-USB jack as shown in the picture:
9
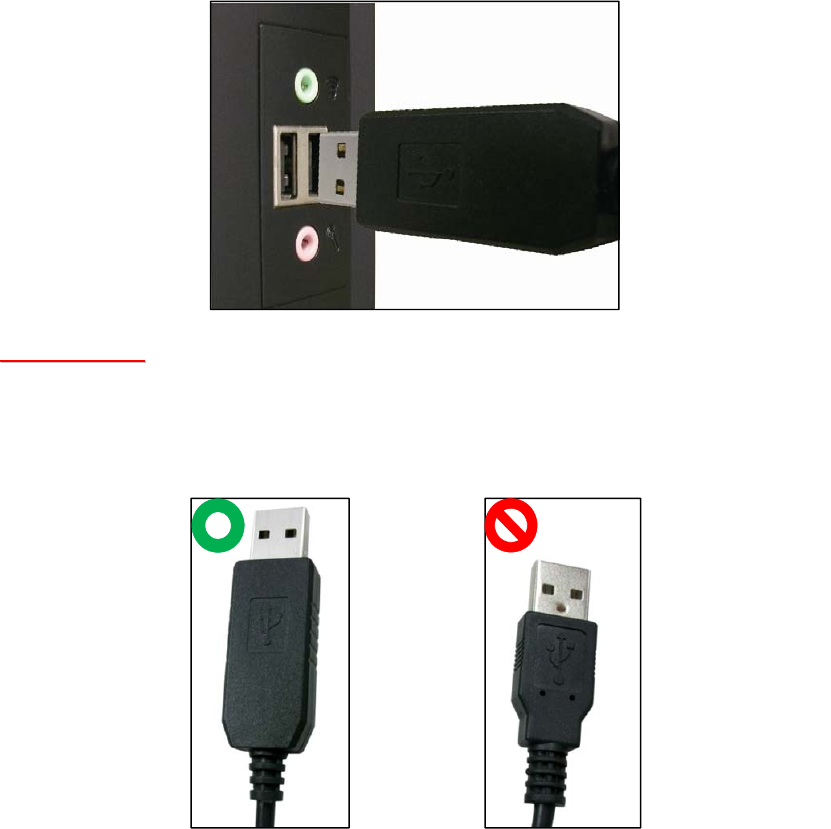
Step 3. Insert the programming/charging end of the Programming Micro-USB
Cable into a computer USB port as shown in the picture below:
<
<W
WA
AR
RN
NI
IN
NG
G>
>
If programming cable is not provided, please contact your supplier.
DO NOT attempt to connect Mobile Lite to computer with a regular
Micro-USB cable.
Programming
Micro-USB Cable Regular Micro-USB
Cable
10
3.4. Software Installation – PC Programming Tool Connection
Mobile Lite can be programmed via USB port connection of a computer using
the PC Programming Tool software (using the Programming Micro-USB
Cable).
If the computer cannot recognize the USB connection, please try installing the
USB driver as instructed below.
<
<N
NO
OT
TE
E>
>
Please only use the PC Programming Tool on Windows XP or
Windows 7 operating systems.
Step 1. Make sure Mobile Lite and the computer is connected properly
(please refer to 3.3. Hardware Installation)
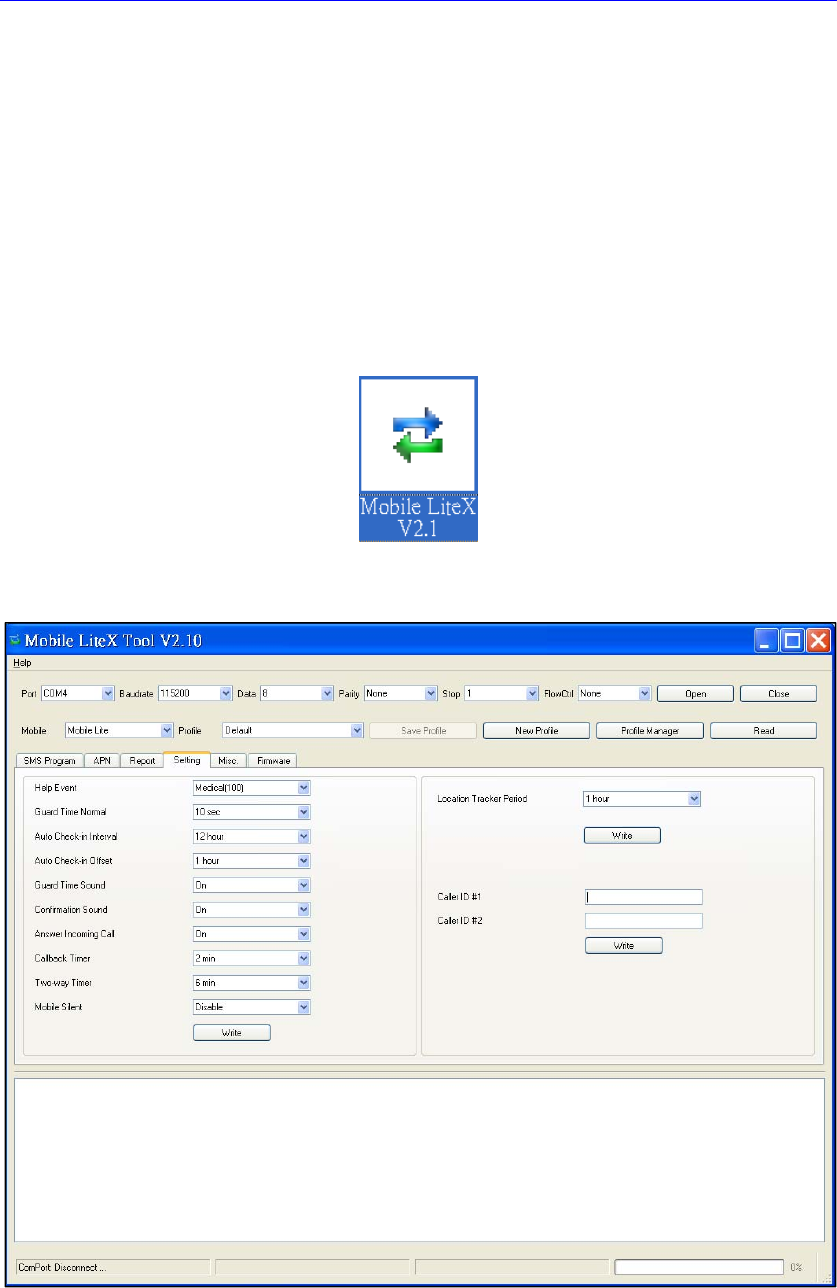
Step 2. Insert the supplied CD-ROM into your CD-ROM drive and find the
“USB Driver” folder. Double Click the
“PL2303_Prolific_DriverInstaller_v1.9.0” file and follow the on-screen
instruction to complete installing the driver.
11
4. Programming Mobile Lite
Mobile Lite can be programmed by sending SMS commands to the device or
using a PC Programming Tool.
4.1. PC Programming Tool (Installers Only)
For system setting programming with PC Programming Tool software via USB
port, follow instruction below.
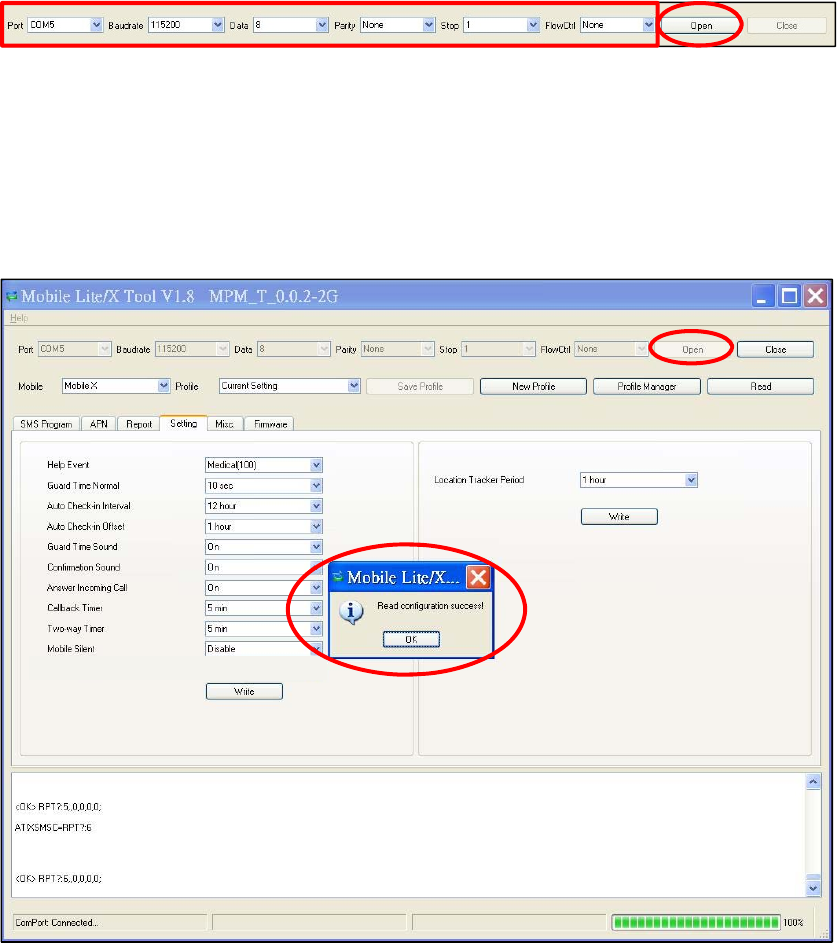
Step 1. Find and open the “PC Programming Tool” folder in the supplied
CD-ROM. Click “Mobile LiteX Vx.x.exe” to execute the programming
tool.
The following configuration screen will be opened.
12
Step 2. Select the following settings in the top section of the configuration
screen and click “Open.”
Port: Select the COM port generated for Mobile Lite after
installing the USB Driver (the USB port connected to Mobile
Lite).
Baud rate: 115200
Data: 8
Parity: None
Stop: 1
FlowCtrl: None
Step 3. Read Configuration
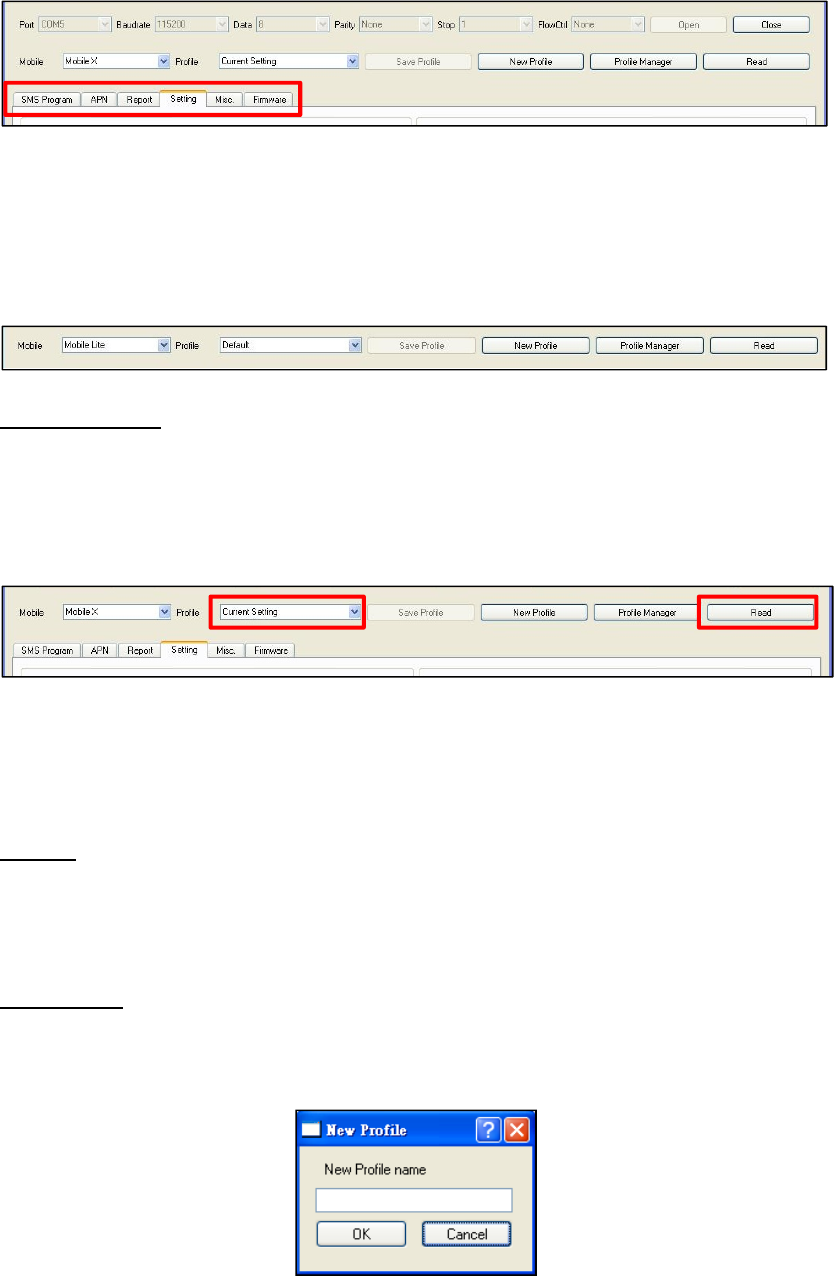
To start configuring Mobile Lite settings, click on “Open”. A Read configuration
success message will pop up, click “OK” to proceed:
13
The current Mobile Lite setting will be displayed. Click on different tabs to see
and edit Mobile Lite functions.
4.1.1. Profile
The Profile function allows you to create and edit different setting profiles
which can be easily accessed in the future for quick programming.
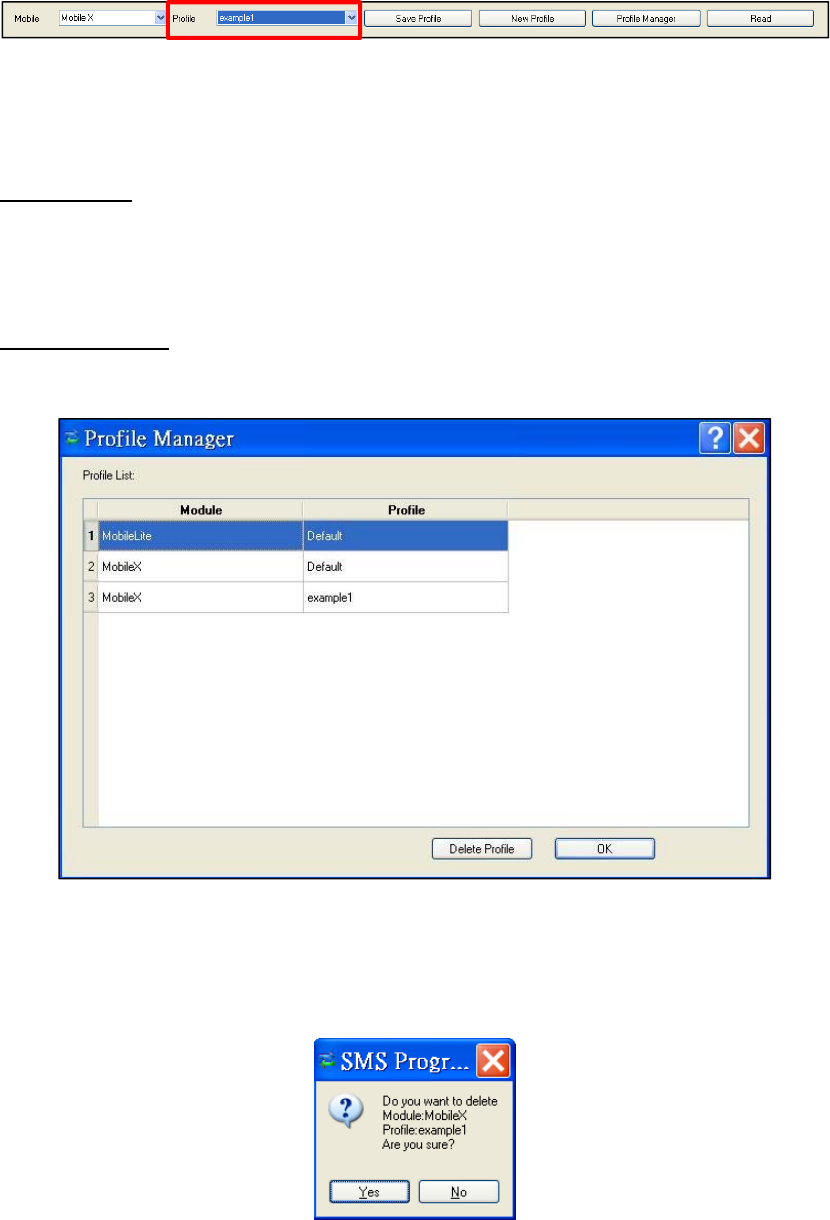
Current Setting
After reading the configuration of Mobile Lite, the Profile scroll down bar will
now display “Current Setting” indicating PC Programming Tool is now
displaying the current Mobile Lite configurations. Selecting different tabs will
show the current values of each setting.
If you select a different profile from the drop down menu, the “Current Setting”
profile will disappear to indicate the PC Programming Tool is no longer
displaying Mobile Lite’s current configuration. To access Current Setting again,
click on “Read”.
Default
When “Default” is selected, the PC Programming Tool will display default
configurations of Mobile Lite, you can use this profile to return Mobile Lite to its
default setting.
New Profile
To create a new profile, click on “New Profile”. A pop-up window will prompt
you to enter a profile name:
14
After entering a profile name, the profile scroll down bar will show the new
profile name:
After editing the settings, click “Save Profile” to save the profile settings. A
pop-up window will indicate the profile has saved. You can use this profile in
the future to apply the same setting to other Mobile Lite.
Apply profile
If you wish to apply all the configuration of a profile into Mobile Lite, go to each
individual page and click on all the “Write” buttons to make sure all settings are
programmed into Mobile Lite.
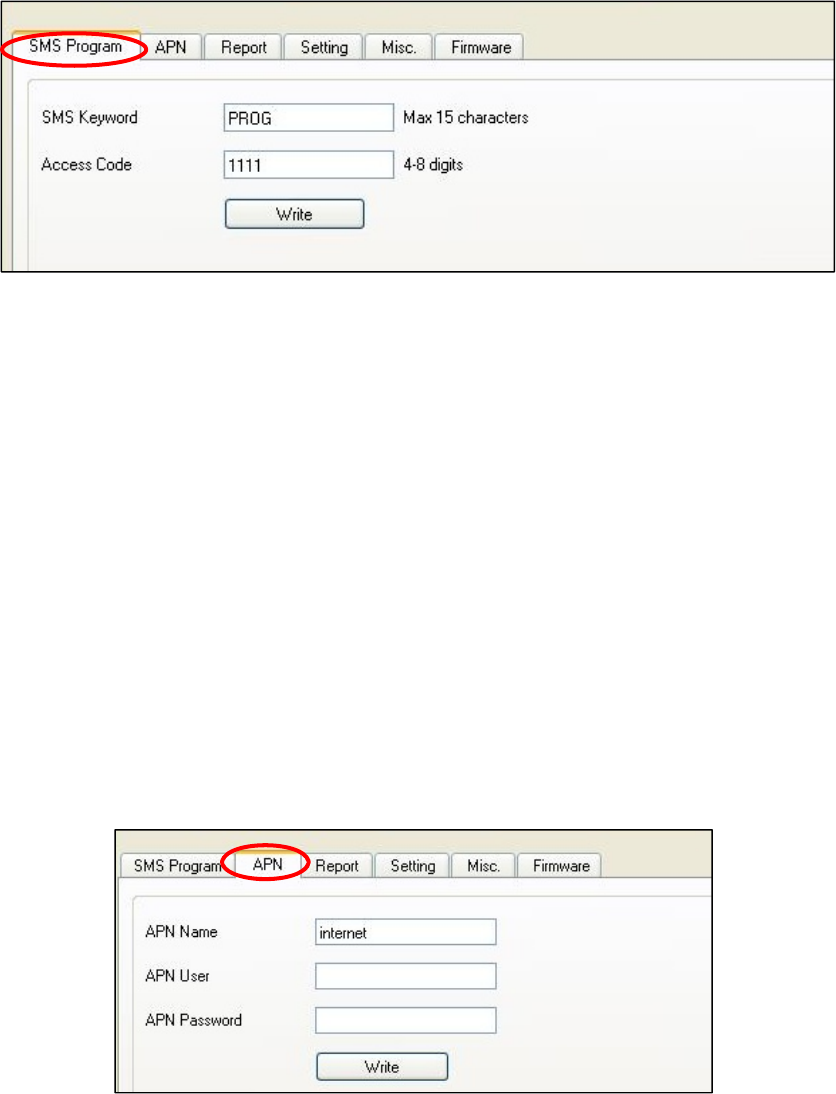
Profile Manager
Click on “Profile Manager” to manage the profiles:
Delete Profile
Select a profile and click on “Delete Profile”. A pop-up window will ask you to
confirm the selection:
Select “Yes” to delete the profile, or “No” to return to the previous page.
15
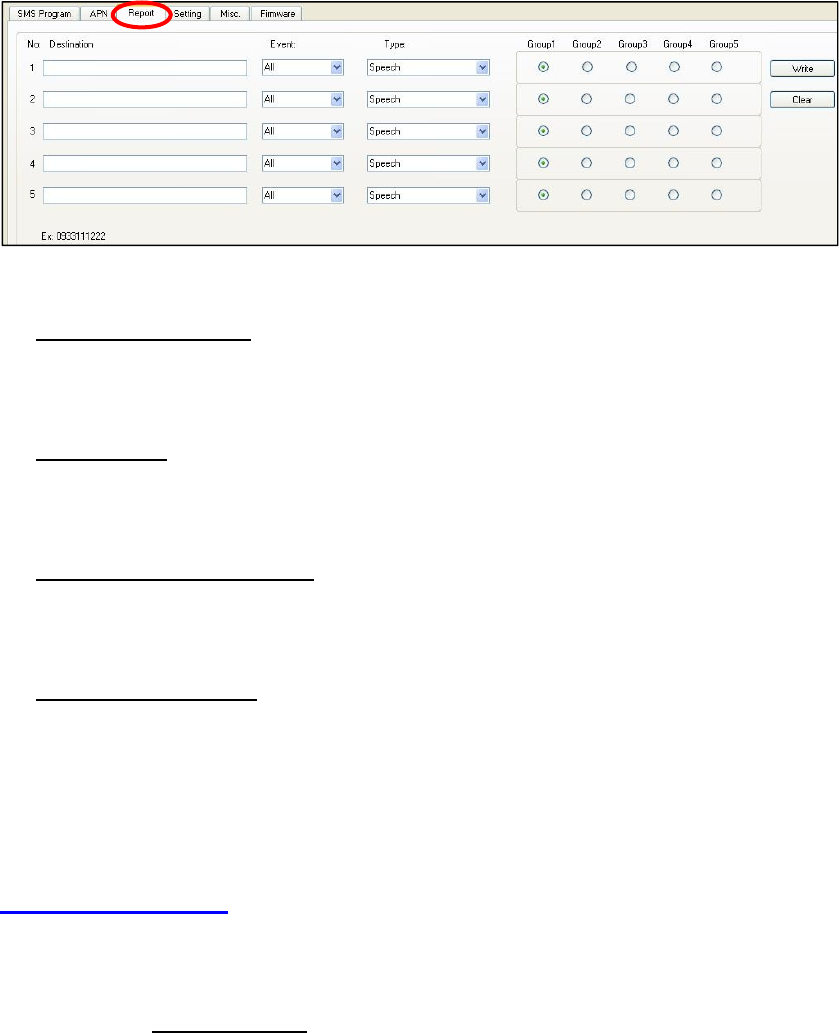
4.1.2. SMS Program
This tab allows the user to program SMS Keyword (15 characters max.) and
Access Code 1 (4-8 digits) which are used for SMS Programming feature.
Enter the information and click “Write” to complete programming. Please note
that SMS Keyword is case-sensitive. For detail information, please refer to 4.2.
SMS Programming.
SMS Keyword: PROG (default)
Access Code: 1111 (default)
4.1.3. APN
The APN setting must be completed for Mobile Lite to report events via GPRS /
3G network.
Click “APN” to set APN Name, APN User and APN Password and click “Write”
to confirm.
APN Name: The name of an access point for GPRS. Please ask your SIM
card service provider for your APN.
APN User: Offered by your SIM card service provider. Please ask your
service provider for your GPRS username. If no username is required, you
may skip this step.
APN Password: Offered by your SIM card service provider. Please ask
your service provider for your GPRS password. If no password is required,
you may skip this step.
16
4.1.4. Report Setting
The “Report” tab allows the user to configure report settings.
Mobile Lite reports over 3 media: Speech channel, IP/GPRS and SMS Text
message.
Mobile Lite supports many different reporting formats. When reporting, it will
transmit both event information and location information. (except for Speech
Reporting)
5 Report Indexes are available as shown in the picture below:
4 programmable settings are available per Report Index:
1. Report Destination
Enter a report destination. The format of the report destination will depend
on the Reporting Format (Type). Please see Report Destinations below.
2. Event Filter
Select an event filter. The event filter determines which events are reported
to the selected Report Destination.
3. Reporting Format (Type)
Select a reporting format. The reporting format determines how the events
are reported to the Report Destination.
4. (Reporting) Groups
Assign the Report Index to a Reporting Group. The Reporting Group
determines the sequence of reporting.
Click “Write” to the apply the settings to Mobile Lite.
Report Destinations
After Report Format is determined, enter the Report Destinations according to
the designated Report Format:
IP/GPRS Report Format: AccountNumber@server:port

17
IP/GPRS Reporting: When activated, Mobile Lite will send an event
information report (and location information in SIA-supported format) to a
receiver.
AccountNumber: Enter 4 to 8 alphanumeric letters for CMS to identify who
reported the event.
Server: Enter either the IP address or the domain name as shown below:
Example: 0001@59.124.123.66:50123
Port: Enter a port number for the server.
Speech reporting and SMS Text Report Format: PhoneNumber
Example: 0912345678
Speech Reporting: When activated, Mobile Lite user can talk directly to
the call recipient (e.g. CMS personnel).
SMS Text Reporting: When activated, Mobile Lite sends a SMS text
message to the recipient. The message contains event information and a
location link. If the recipient’s receiver device supports map function,
he/she can click on the link to locate Mobile Lite.
<
<N
NO
OT
TE
E>
>
If SMS_MPTP is selected, the format is:
AccountNumber@PhoneNumber
Example: 0001@0912345678
AccountNumber: Enter 4 to 8 alphanumeric letters for CMS to identify
who reported the event.
Mobile Lite also supports XML report format, please contact the supplier if
you wish to report using XML Reporting Format.
If two-way communication is required after an IP or SMS report, it is
recommended that the user programs a Speech Report. Alternatively, the
user can also utilize Callback operation (refer to 6.4. Alarm Activation).
Event Filter
This parameter determines which events are reported to the selected Report
Destination.
3 options: “All”, “Emergency” and “Status”. When an event is triggered, it will
be reported to the reporting destination according to the setting. If set to All,
the panel will report all events regardless of event type.
For example:
Mobile Lite being low on battery is a “status” event. If report index 3 and 5

18
are set as “status” and index 4 as “all” in event filters, this status event will
be reported to destinations 3, 4, and 5.
For more information, refer to 8. Appendix for event code types.
Reporting Format (Type)
The available reporting format includes:
Speech: Mobile Lite reports over the Speech channel to allow the user to talk
directly to the call recipient.
CID over IP: Mobile Lite reports digital CID event codes over IP/GPRS TCP
Protocol.
SIA_CID over IP: Mobile Lite reports digital CID event codes and location
information over IP/GPRS TCP Protocol in SIA format.
SIA over IP: Mobile Lite reports digital SIA event codes and location
information over IP/GPRS TCP Protocol.
SIA_CID over UDP: Mobile Lite reports digital CID event codes and location
information over IP/GPRS UDP Protocol in SIA format.
SIA over UDP: Mobile Lite reports digital SIA event codes and location
information over IP/GPRS UDP Protocol.
CSV over IP: Mobile Lite reports digital CID event codes over IP/GPRS TCP
Protocol in CSV format.
SMS TEXT: Mobile Lite sends a SMS text message containing event
information and a location link.
SMS MPTP: Mobile Lite sends a SMS message containing MPTP event
codes and a location link.
Group
The Reporting Group determines the sequence of reporting.
One Report Index can only be assigned to one Group.
Reporting within a Group:
If there are multiple Report Indexes programmed within a Group:
Mobile Lite will report according to the numeric order (e.g. 1 > 2 > 3, etc.)
of the Report Index in a Group. Report will stop when one report is
successful and Mobile Lite will regard reporting to this Group successful.
For example, if Report Index 1 and 4 is assigned to Group 1, Mobile Lite
will stop reporting if reporting to Index 1 is successful. If reporting to Index
1 failed, Mobile Lite will carry on reporting to Index 4.

19
If all reporting in a group failed, Mobile Lite will retry reporting to all Report
Indexes within this group for 5 times (or until one of the reports is
successful). If all the retry fails, Mobile Lite will regard reporting to this
Group unsuccessful.
From the example above, suppose all report failed, the report sequence
would be:
1 > 4 > 1 > 4 > 1 > 4 > 1 > 4 > 1 > 4
Reporting Cycle
If multiple groups are assigned to the same event type (emergency or
status), Mobile Lite will report according the group numeric order from the
first programmed Group to the last programmed group. This report
sequence is one reporting cycle.
Reporting behavior depends on the event type:
Emergency Events:
- When reporting to the first group is successful, Mobile Lite will
still report to the next group until all groups have been tried.
For example, Groups 1 and 3 are assigned to Emergency Events:
If Group 1 is successful, Mobile Lite will still report to Group 3.
If reporting to Group 3 is successful, Mobile Lite will terminate
reporting.
If reporting to Group 3 is unsuccessful (going through all the Report
Index within the group for 5 times), Mobile Lite will also terminate
reporting.
- When reporting to the first group failed (going through all the
Report Index within the group for 5 times), Mobile Lite will start
reporting to the next group. When reporting to the second
group succeeded, Mobile Lite will terminate reporting.
- If reporting to all the programmed groups failed in a reporting
cycle, Mobile Lite will wait for 5 minutes. After 5 minutes,
Mobile Lite will retry as it starts another reporting cycle. It will
continue retrying until recognizing at least one successful
report.
Example 1, if Groups 1 and 3 are programmed for “Emergency”
reports, and assuming NO successful report:
Group 1 > Group 3 > Wait 5 minutes > Group 1 > Group 3 > Wait 5
minutes > Group 1 > Group 3 > Wait 5 minutes > Group 1 > Group
3 > Wait 5 minutes > … Continues Reporting

20
Example 2, if Groups 1 and 3 are programmed for “Emergency”
reports, and assuming NO successful report until Group 1 is
successful after several retries:
Group 1 > Group 3 > Wait 5 minutes > Group 1 > Group 3 > Wait 5
minutes > Group 1 (Success!) > Group 3 > Stops reporting whether
Group 3 succeeded or not.
Status Events:
Mobile Lite will only go through one reporting cycle for Status reports.
For example, if Groups 1 and 3 are programmed for “Status” reports:
Group 1 > Group 3 > Stops reporting whether Groups 1 and 3
succeeded or not
21
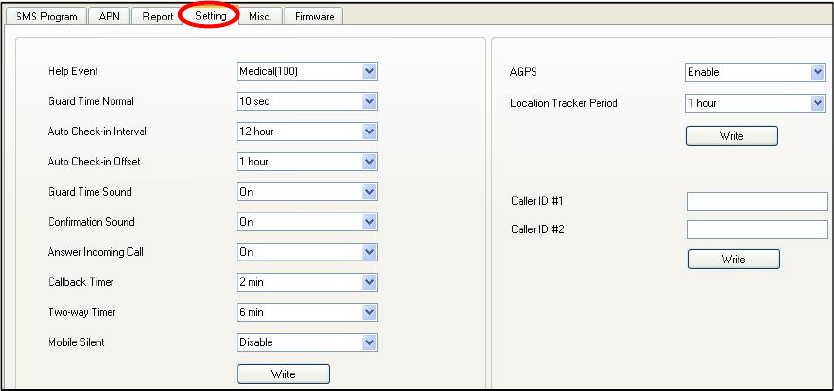
4.1.5. Setting
The Setting tab allows you to program general configuration for Mobile Lite.
Click “Write” when you have completed all settings to confirm.
Help Event (Selecting an event code):
You can select the event code to be sent to the CMS when the Active
Button of Mobile Lite is pressed. Choose your preferred event code in
the box after “Help Event” and click “Write.”
There are three options for the event code:
- 100: Medical
- 101: Emergency
- 120: Panic
Guard Time Normal:
The Guard Time will begin to count down when the Active Button on
Mobile Lite is pressed. If a false alarm is triggered, it can be
canceled during guard time by pressing and holding the Active
Button for 5 seconds.
After the Guard Time has expired, Mobile Lite will begin report, the
alarm event cannot be cancelled after Guard Time has expired.
Auto Check-In Interval:
You can select the length of the interval between auto check-in
reports.
There will be no auto check-in report if you select “Disable.”
Whenever Mobile Lite is programmed, the auto check-in timer will be
reset.
22
Auto Check-In Offset:
After Mobile Lite is rebooted, reset or programmed, the system will
start counting the time for the first Auto check-in report.
Mobile Lite will send the first check-in report according to the setting
of Auto Check-In Offset time. Afterwards, Mobile Lite will send
reports according to the setting of Auto Check-in Interval
Guard Time Sound:
Select “on” to enable beeps during guard time or “off” to disable the
beeping sound during guard time.
Confirmation Sound:
Select “on” to enable confirmation beeps during reporting or “off” to
disable confirmation beeps during reporting.
Answering Incoming Calls:
When this function is set to “On”, Mobile Lite will ring when there is
an incoming call. Press the Active Button to answer the call.
When this function is set to “Off”, Mobile Lite remains silent when
there is an incoming calls.
Callback Timer:
After an alarm is reported to all the reporting destinations and at
least one of them is successful, Mobile Lite will start a waiting period
(callback time) to auto answer any incoming calls from the CMS.
When the CMS calls back within the callback timer, Mobile Lite will
auto answer the call (after the first ring) and wait for the Access
Code (default: 1111) and # key entry within 15 seconds.
When the correct Access Code is received, Mobile Lite will open a
full-duplex communication to allow the CMS to speak to Mobile Lite
user directly. Use DTMF commands to switch communication type.
The Access Code (and the # key) must be entered within 15 seconds
or the system will disconnect the call automatically.
Press DTMF (9) on Mobile Lite to terminate the call.
When callback timer is up, the system will automatically exit the
waiting mode and return to idle mode.
Two-Way Timer:
After the system makes a report to the CMS, a communication
channel (from Follow-on or Callback function) is established. The
duration of the communication is conditioned by the Two-Way Timer
setting.
23
Pressing any DTMF key (except DTMF 9) will reset the
communication time to the preset duration.
Mobile Silent
When this function is set to “On”, silent mode is turned on where all
sounds are silent.
When this function is set to “Off”, silent mode is turned off.
When Mobile Silent is enabled, a Listen-in only communication will
be established regardless of the current Follow-on setting. The call
recipient can enter DTMF keys to change communication types
(please refer to 6.4. Alarm Activation for more details).
AGPS
Select “Enable” to use Assisted GPS function to track the position of
Mobile Lite (Default).
Select “Disable” to stop using Assisted GPS function.
Location Tracker Period
Select a time interval for the periodic location update of Mobile Lite.
Caller ID: Caller ID #1 & Caller ID #2
The device will instantly pick up the call if the incoming caller ID
matches with the number(s) programmed in this function.
The device will match the numbers starting from the last digit. For
example, if a number string 321 is programmed, the device will
instantly pick up any call that has a caller ID of 321 as the last 3
digits.
Up to 15 numeric digits are allowed per setting.
24
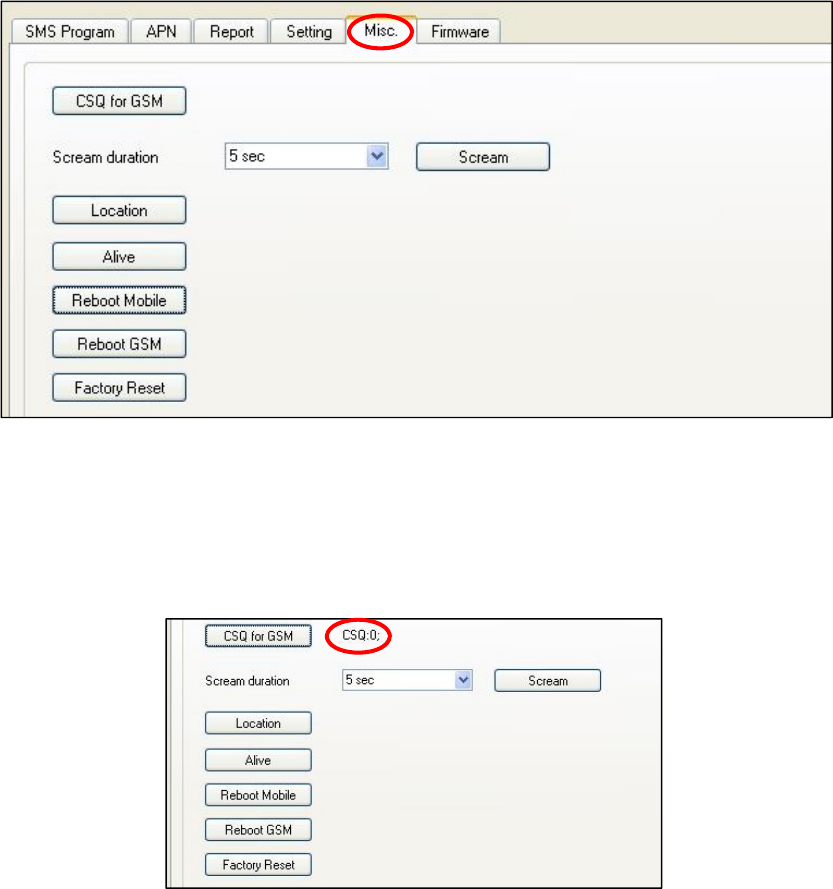
4.1.6. Miscellaneous
Click on the “Misc.” tab to program miscellaneous options:
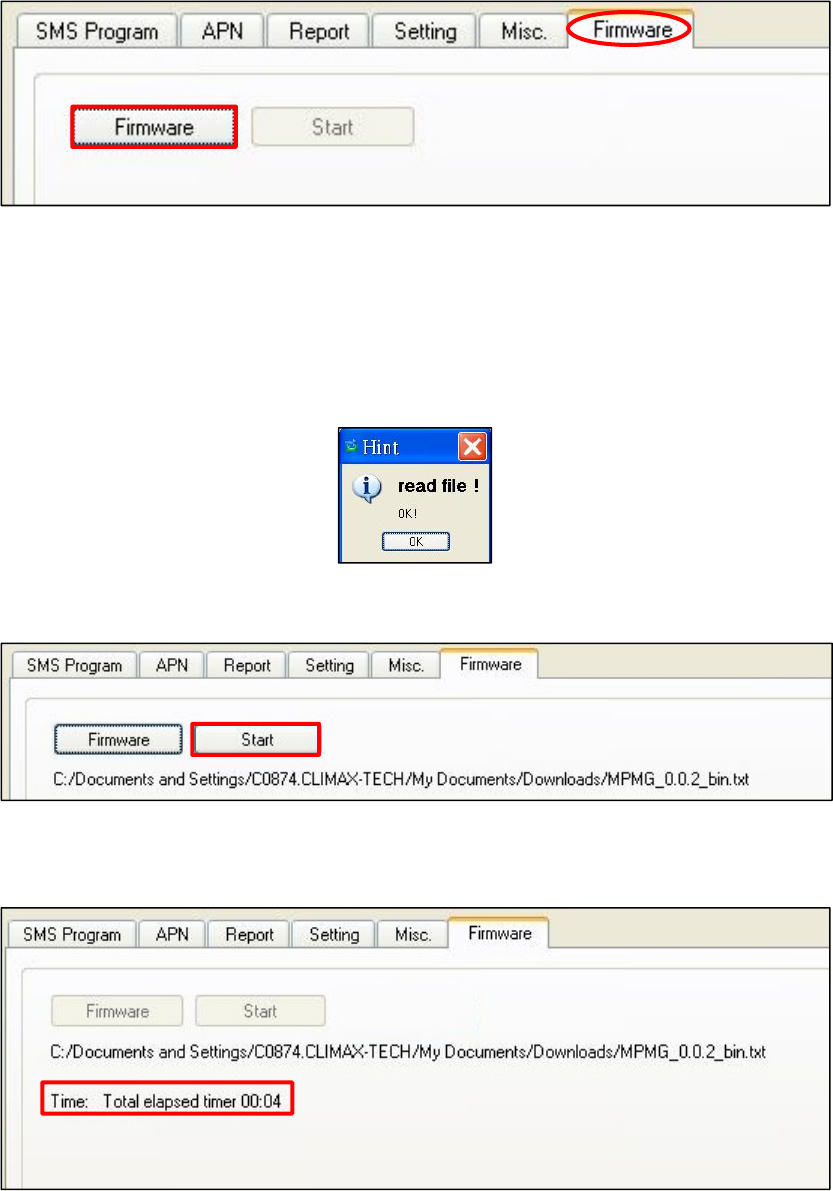
CSQ for GSM
When pressed, Mobile Lite will return the GSM signal strength.
The scale ranges from 0-30. The greater the number, the greater the
signal strength.
Scream Duration
Select a duration and click on the Scream button. Mobile Lite will
emit a series of long beeps for the duration. A location information
will also be sent to the reporting destination(s).
Location
Clicking on this button will send the location information to the
reporting destinations.
Alive
To check whether Mobile Lite is operational.
25
Reboot Mobile
Clicking on “Reboot Mobile” will reboot Mobile Lite. This will not
remove any programmed parameters on Mobile Lite.
Reboot GSM
Clicking on “Reboot GSM” will reboot the mobile service module
and reconnect to the mobile network. This will not remove any
programmed parameters on Mobile Lite.
Factory Reset
Factory Resetting Mobile Lite will clear all programmed parameters
(e.g. report setting).
26
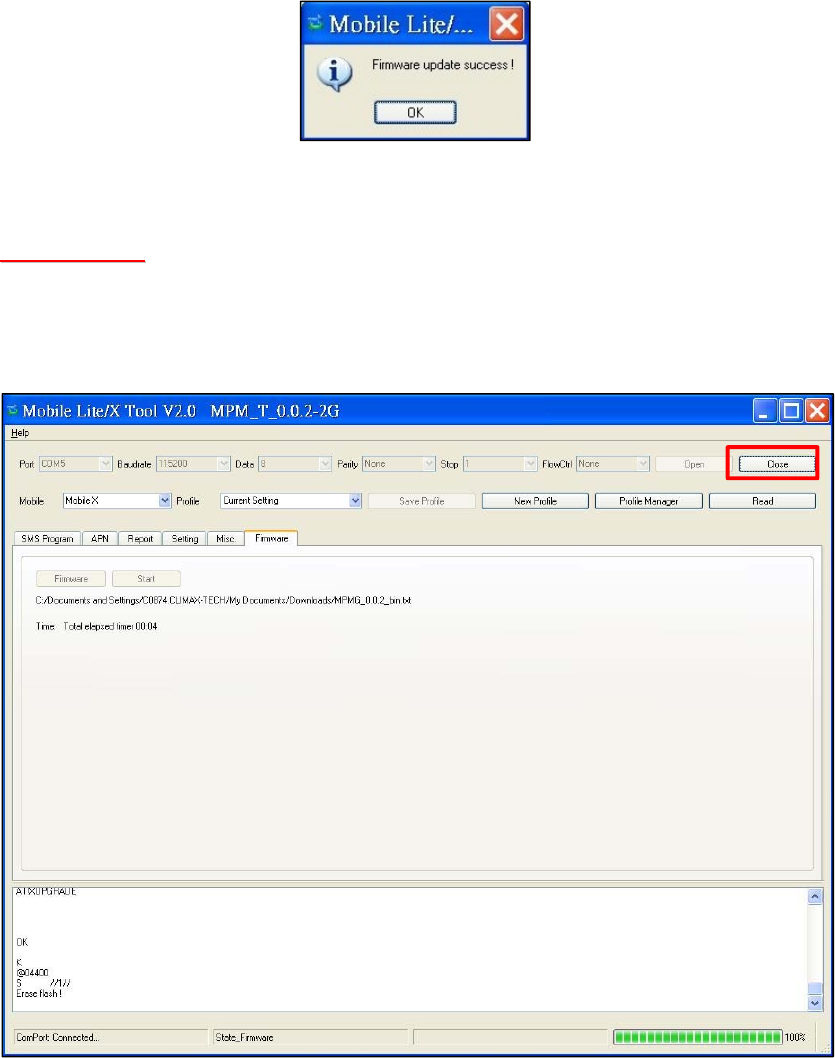
4.1.7. Firmware
Below displays the Firmware tab:
To update the firmware of Mobile Lite:
Step 1. Clicking on the “Firmware”.
Step 2. Select the provided firmware and click on “Open”. A small
window will pop-up with the message “Read file ! OK!”. Click on the
“OK” button.
Step 3. Click on the “Start” button to start firmware update.
Total elapsed time will be displayed to show how long the updating
process has elapsed.
27
Step 4. When updating process is completed, a message “Firmware
update success!” will be displayed in a pop-up window.
Step 5. Click on “OK” and the programming tool will read the
settings of Mobile Lite again.
<
<W
WA
AR
RN
NI
IN
NG
G>
>
During updating process, please DO NOT disconnect Mobile Lite from
the computer nor clicking on the “Close” button of the programming
tool.

28
4.2. SMS Remote Programming
Step 1. Enter the SMS screen on your mobile phone or smartphone.
Step 2. Enter the programming command (see the SMS remote programming
commands tables below).
Step 3. Enter a colon (:).
Step 4. Enter SMS Keyword (default is PROG).
Step 5. Enter a comma (,).
Step 6. Enter the Access Code (default is 1111).
Step 7. Enter a comma (,).
Step 8. Enter the parameter(s).
Step 9. The composition of the command is completed. You can send the
command to Mobile Lite now.
<
<N
NO
OT
TE
E>
>
If the SMS message text format of your mobile phone is not English,
please change it to English for SMS remote programming.
Example: To set IPOG as the keyword, you can send the following command:
SUPPR:PROG,1111,IPOG
SUPPR = Programming command
: = Colon
PROG = SMS Keyword
, = Comma
1111 = Access Code
, = Comma
IPOG = Programmed parameter
<
<N
NO
OT
TE
E>
>
You can compose multiple commands in one SMS text message by using
“;” to separate each command.
Please refer to the Appendix for the 8.1. SMS Remote Programming
Commands Table.

29
5. Learning in a RF pendant
Please follow the steps below to learn in a pendant. Mobile Lite can learn in a
WTR pendant, Panic Button or a fall sensor. Mobile Lite can be activated by
WTR, PB or Fall Sensor to make an emergency call.
Step 1. Press the Active Button of Mobile Lite for 8 seconds (On the fifth
second, Mobile Lite will emit 1 beep), Mobile Lite will emit one beep to
indicate it has entered learning mode.
Step 2. Press the Active Button of the RF pendant. The LED of the pendant
will blink to indicate it is sending a signal to Mobile Lite.
<
<N
NO
OT
TE
E>
>
One Mobile Lite can only learn in one pendant.
Step 3. Mobile Lite will emit 2 beeps when it receives the signal from the
pendant to indicate it has learned in the pendant.
Step 4. Press the Active Button on Mobile Lite once to exit learning mode.
Mobile Lite will emit two beeps to indicate it has exited learning mode.
<
<N
NO
OT
TE
E>
>
When Mobile Lite is in learning mode, pressing Mobile Lite’s Active Button
twice will cause Mobile Lite to remove the learned-in pendant and exit
learning mode at the same time.

30
6. Operation
6.1. Answering Incoming Calls
Mobile Lite will ring when there is an incoming call.
The user can press Mobile Lite’s Active Button to pick up the call.
If the number of the incoming call matches any of the Caller ID, Mobile
Lite will instantly pick up the call.
Once Mobile Lite has answered the call, it will open two-way voice
communication.
Press a DTMF key for over 1 second to enable a designed shortcut
function.
- Enter (1) to talk only.
- Enter (2) to open two-way voice communication.
- Enter (3) to listen in only.
- Enter (9) to hang up. You can also put the handset back to the base
cradle to end the call.
Press Mobile Lite’s Active Button for 5 seconds to hang up.
The caller can press either DTMF (9) key, Active Button of RF device, or
put the handset back to the base cradle to hang up.
Pressing any DTMF (except DTMF 9) can reset the communication time
to the preset duration.
6.2. Current Operation Condition
Mobile Lite uses its LED to remind the user of its Current Operation Condition.
LED indicators:
LED Behavior Indication
Green LED (Top) On Mobile Lite is being charged.
1 flash every 2 seconds Mobile Lite operating
normally
Amber LED (Middle) Flashing quickly GSM/3G fault
Red LED (Bottom) Flashing quickly Mobile Lite low on battery
When Mobile Lite is being charged, the Red LED will not indicate the battery
status.

31
6.3. Locating Mobile Lite
There are three ways to identify the current location of Mobile Lite:
1. Send the location SMS command LOC (please refer to 4.2. SMS
Remote Programming):
The sender of the SMS command will receive a confirmation message
(but no location information).
The location information is sent to the reporting destinations.
2. Activate an alarm:
When an alarm is activated, Mobile Lite will also report its destination
along with the alarm report(s).
Event information will be reported to Speech, CID over IP and CSV over
IP reporting formats but not location information.
For IP-related reporting (except CID over IP and CSV over IP), the
location will be included in the report (format depends on the reporting
type).
For SMS-related reporting, Mobile Lite will also send a location link. If the
receiver is a device that can use the link, click on it to display the location
on an application or software.
6.4. Alarm Activation
When the user presses the Active Button of Mobile Lite or the learnt-in RF
device (WTR, Fall Sensor or PB) for help, Mobile Lite will emit a voice
prompt “Emergency Call was pressed” as it enters guard time.
When a fall is detected from the learnt-in Fall Sensor, Mobile Lite will enter
guard time.
Mobile Lite will continuously emit a voice prompt “Help call in progress”
during guard time.
During guard time, the user can cancel the alarm reporting by pressing the
Active Button of Mobile Lite for 5 seconds or pressing the Active Button of
the learnt-in RF device for a duration determined by the device (please
refer to the device user manual). If cancelling was successful, Mobile Lite
will emit a voice prompt “Help call cancelled”.
You cannot cancel alarm reporting after guard time has expired.
Mobile Lite will also report its destination along with the alarm report
(please refer to 6.3. Locating Mobile Lite)
Confirmation Beeps

32
After guard time expires, Mobile Lite will summon help based on the
programmed reporting methods. When Mobile Lite is reporting, it will emit
confirmation beeps (1 beep every second).
For Speech Reporting, if the call recipient picks up the call, Mobile Lite will
pause emitting confirmation beeps. Mobile Lite will start emitting
confirmation beeps again when it resumes reporting (e.g. to the next
report destination).
GPRS Reporting Method
If Access Point Name, Username and Password are programmed, Mobile
Lite can report using GPRS reporting (please refer to 4.1. PC
Programming Tool or 4.2. SMS Remote Programming on how to
program these settings).
Access Point Name (APN): The name of an access point for GPRS.
Please ask your SIM card service provider for your APN.
Username: Offered by your SIM card service provider. Please ask your
service provider for your GPRS username. If no username is required, you
may skip this step.
Password: Offered by your SIM card service provider. Please ask your
service provider for your GPRS password. If no password is required, you
may skip this step.
All IP-related reporting types are reported using this method.
Location information is not supported by CID_IP or CSV_IP reporting
types but is sent to all other IP-related reporting types.
Callback Operation
After reporting an alarm successfully to the CMS, Mobile Lite will enter
callback mode by default. User can choose to turn on/off the Callback
feature (Please refer to 4.1.5. Setting).
<
<N
NO
OT
TE
E>
>
Mobile Lite will enter callback mode only after all groups have been
reported to and at least one report was successful.
Mobile Lite will wait 5 minutes (by default) for CMS personnel to call back
after reporting (available callback interval settings are 3 min / 5 min / 10
min / 15 min / 20 min / 30 min).
When the CMS calls back within the period, Mobile Lite will auto answer
the call after 2 beeps and wait for the Access Code (default is 1111) and #
key entry within 15 seconds.

33
When the correct Access Code and # key entry is received, the caller can
talk to the user using Mobile Lite.
If the number of the incoming call matches any of the Caller ID, Mobile
Lite will instantly pick up the call, emit one beep (at the caller handset) and
open a two-way communication.
The CMS can call back multiple times during the callback period.
The caller can use the following DTMF commands to control the call:
- Enter (1) for talk-only mode.
- Enter (2) for two-way voice communication.
- Enter (3) for listen-in only mode.
- Enter (9) to hang up.
- Put the handset back to the base cradle to end the call.
- Press and hold the Active Button of Mobile Lite for 5 seconds, or press
Active Button of RF device once to end the call.
- Press any DTMF key except for the designated hang-up key (9) to
reset the communication time to its preset duration. When a DTMF key
is pressed, its designed shortcut function will also be executed along
with the communication time reset.
<
<N
NO
OT
TE
E>
>
If you wish to enable a designed shortcut function, please press the DTMF
key for at least 1 second.
Speech Reporting Method
If speech reporting method is selected, Mobile Lite will dial the
programmed number for reporting. It will establish a two-way voice
communication between the call recipient and Mobile Lite user.
The CMS can remotely control Mobile Lite during the voice
communication period (follow-on period) using the DTMF commands
below:
- Enter (1) for talk-only mode.
- Enter (2) for two-way voice communication.
- Enter (3) for listen-in only mode.
- Enter (9) to hang up.
- Put the handset back to the base cradle to end the call.
- Press and hold the Active Button of Mobile Lite for 5 seconds, or press
the Active Button of RF device once to end the call.
- Press any DTMF key except for the designated hang-up key (9) to
reset the communication time to its preset duration. When a DTMF key
is pressed, its designed shortcut function will also be executed along
with the communication time reset.
<
<N
NO
OT
TE
E>
>

34
If you wish to enable a designed shortcut function, please press the DTMF
key for at least 1 second.
At 20 and 10 seconds before the communication time expires, Mobile Lite
will emit 1 beep via the telephone handset to alert the user.
If the call recipient needs more talk time, he can press any key except for
(9) to reset the communication time to its preset duration.
If no DTMF command is pressed during the speech period, the call will
automatically hang up and be recorded as an unsuccessful report. Each
phone number will be retried up to a maximum of 5 times accordingly.
Report Sequence
The Reporting Group determines the sequence of reporting.
One Report Index can only be assigned to one Group.
Reporting within a Group:
If there are multiple Report Indexes programmed within a Group:
Mobile Lite will report according to the numeric order (e.g. 1 > 2 > 3, etc.)
of the Report Index in a Group. Report will stop when one report is
successful and Mobile Lite will regard reporting to this Group successful.
For example, if Report Index 1 and 4 is assigned to Group 1, Mobile Lite
will stop reporting if reporting to Index 1 is successful. If reporting to Index
1 failed, Mobile Lite will carry on reporting to Index 4.
If all reporting in a group failed, Mobile Lite will retry reporting to all Report
Indexes within this group for 5 times (or until one of the reports is
successful). If all the retry fails, Mobile Lite will regard reporting to this
Group unsuccessful.
From the example above, suppose all report failed, the report sequence
would be:
1 > 4 > 1 > 4 > 1 > 4 > 1 > 4 > 1 > 4
Reporting Cycle
If multiple groups are assigned to the same event type (emergency or
status), Mobile Lite will report according the group numeric order from the
first programmed Group to the last programmed group. This report
sequence is one reporting cycle.
Reporting behavior depends on the event type:
Emergency Events:
- When reporting to the first group is successful, Mobile Lite will
still report to the next group until all groups have been tried.

35
For example, Groups 1 and 3 are assigned to Emergency
Events:
If Group 1 is successful, Mobile Lite will still report to Group 3.
If reporting to Group 3 is successful, Mobile Lite will terminate
reporting.
If reporting to Group 3 is unsuccessful (going through all the
Report Index within the group for 5 times), Mobile Lite will also
terminate reporting.
- When reporting to the first group failed (going through all the
Report Index within the group for 5 times), Mobile Lite will start
reporting to the next group. When reporting to the second
group succeeded, Mobile Lite will terminate reporting.
- If reporting to all the programmed groups failed in a reporting
cycle, Mobile Lite will wait for 5 minutes. After 5 minutes,
Mobile Lite will retry as it starts another reporting cycle. It will
continue retrying until recognizing at least one successful
report.
Example 1, if Groups 1 and 3 are programmed for “Emergency”
reports, and assuming NO successful report:
Group 1 > Group 3 > Wait 5 minutes > Group 1 > Group 3 >
Wait 5 minutes > Group 1 > Group 3 > Wait 5 minutes > Group
1 > Group 3 > Wait 5 minutes > … Continues Reporting
Example 2, if Groups 1 and 3 are programmed for “Emergency”
reports, and assuming NO successful report until Group 1 is
successful after several retry:
Group 1 > Group 3 > Wait 5 minutes > Group 1 > Group 3 >
Wait 5 minutes > Group 1 (Success!) > Group 3 > Stops
reporting whether Group 3 succeeded or not.
Status Events:
Mobile Lite will only go through one reporting cycle for Status
reports.
For example, if Groups 1 and 3 are programmed for “Status”
reports:
Group 1 > Group 3 > Stops reporting whether Groups 1 and 3
succeeded or not.
6.5. Sleep Mode
Mobile Lite can enter Sleep Mode to conserve power.

36
While under normal operation mode, press the Active Button for 5 seconds to
enter / exit Sleep Mode.
When Mobile Lite enters Sleep Mode, all functions, including the LED
indicators, will be disabled during this time. Mobile Lite will emit a voice
prompt “Power Off” as an indication of it entering Sleep Mode.
The user can only program Mobile Lite for the duration using PC
Programming Tool. As the GSM/3G module is also disabled, SMS
commands will not be able to program Mobile Lite for the duration.
Mobile Lite will only start to function when it exits Sleep Mode (pressing
the Active Button for 5 seconds). Mobile Lite will emit a voice prompt
“Power On” as an indication of it exiting Sleep Mode.
<
<N
NO
OT
TE
E>
>
After exiting Sleep Mode, Mobile Lite will connect to the mobile network. It
will emit a “GSM Signal” voice prompt and a number voice prompt to
indicate its signal strength.
6.6. Rebooting and Factory Resetting Mobile Lite
Rebooting Mobile Lite
Step 1. Press Mobile Lite’s active button for 15 seconds in any mode to enter
reset mode. All LED will turn on for 1 second.
Step 2. Press the active button once within 10 minutes. After 3-5 seconds, all
LED will turn on briefly to indicate rebooting successful.
<
<N
NO
OT
TE
E>
>
These steps will only reboot Mobile Lite and will not remove any
programmed parameters in the device.
After rebooting, Mobile Lite will connect to the mobile network. It will emit a
“GSM Signal” voice prompt and a number voice prompt to indicate its
signal strength.
Factory reset
Mobile Lite will clear all programmed parameters when the following steps are
taken.
Step 1. Press Mobile Lite’s active button for 15 seconds in any mode to enter
reset mode. All LED will turn on for 1 second.
Step 2. Quickly press the Active Button twice within 1 second in the 10-
minute reset mode to restore Mobile Lite to factory settings. The 2

37
quick presses must be completed in 1 second. After 3-5 seconds, all
LED will turn on for another second.
<
<N
NO
OT
TE
E>
>
All reporting settings in Mobile Lite will be removed after a factory reset.
After reseting, Mobile Lite will connect to the mobile network. It will emit a
“GSM Signal” voice prompt and a number voice prompt to indicate its
signal strength.

38
6.7. Voice Prompts
Below is a quick reference chart of all the voice prompts of Mobile Lite and the
conditions under which they are played.
No Voice Prompt Condition
1 Emergency call was pressed. Plays once when the Active Button of Mobile
Lite or the Active Button of the learnt-in RF
pendant is pressed.
2 Help call in progress Plays every 2-3 seconds during guard time.
3 Help call cancelled Plays once when pressing the Active Button of
Mobile Lite for 5 seconds during guard time
4 Alarm received. Please stand by. Plays once when Speech report has reached
the recipient
5 Mobile Lite battery is low. Please
charge it.
Plays twice when Mobile Lite is low on battery
6 Power On Plays when Mobile Lite exits sleep mode by
pressing the Active Button for 5 seconds.
7 Power Off Plays when Mobile Lite enters sleep mode by
pressing the Active Button for 5 seconds.
8 GSM Signal “Number”
“Number” = One, Two, Three, Four or
Five
Plays when Mobile Lite just connects to a
mobile network. The number behind “GSM
Signal” is an indication of its signal strength.
“One” = Weakest. “Five” = Strongest.

39
7. Appendix
7.1. SMS Remote Programming Commands Table
Item Command Example & Usage Default
Make Unit
Scream
SCREAM SCREAM:PROG,1111,60
To set the length of Mobile Lite’s beeping period (5-60 seconds) to
help the search for Mobile Lite when the device is lost
This command will also request for location information.
--
Locating
via SMS
LOC LOC:PROG,1111
To locate Mobile Lite user via SMS
--
Mobile
connectio
n Reset
RSTG RSTG:PROG,1111
To reset mobile communication
--
GPRS
APN,
username
&
password
APN APN:PROG,1111,internet,,
To set GPRS APN, username and password (31 characters max.
for APN, 31 characters max. for username, 31 characters max. for
password)
APN: Internet
Username and
password: empty
Report
settings
RPT RPT:PROG,1111,1,0933111222,1,0,0,1
To configure report settings (index number, report destination,
group, type, miscellaneuous and event filter)
Report Index: 1-5
Report destination: Depending on the reporting format
Group: 1-5
Type: 0 = Speech, 10 = CID_IP, 11 = CID_SIA_IP, 12 = SIA_IP, 13
= SIA_CID_UDP, 14 = SIA_UDP, 16 = CSV_IP, 18 = XML, 31 =
SMS_TEXT, 32 = SMS_MPTP
Miscellaneous: Enter 0 for this parameter
Event filter: 255 = all, 1 = status, 4 = emergency
No report
destination
Keyword
setting
KEYWD KEYWD:PROG,1111,IPOG
To set the keyword
15 characters max. for the keyword
PROG
Access
Code
ACCES ACCES:PROG,1111,1,1234
To set the Access Code (index number, code)
8 digits max. for the Access Code
1111 for user 1
Guard
time
settings
GUDT GUDT:PROG,1111,10
To set the length of the guard time period
Guard time: 5 = 5 sec, 10 = 10 sec, 15 = 15 sec, 20 = 20 sec, 25 =
25 sec, 30 = 30 sec
10
Auto
check-in
reports
TESTC TESTC:PROG,1111,720,60
To configure the settings of auto check-in reports
Interval: 0 = disable, 240 = 4 hrs, 360 = 6 hrs, 480 = 8 hrs, 720 =
12 hrs, 1440 = 1 day, 2880 = 2 days, 4320 = 3 days, 5760 = 4
days, 7200 = 5 days, 8640 = 6 days, 10080 = 1 week, 21600 = 15
days , 43200 = 30 days
Offset time: 60 = 1 hr, 120 = 2 hrs, 240 = 4 hrs, 360 = 6 hrs, 480= 8
hrs, 720 = 12 hrs
720, 60

40
Item Command Example & Usage Default
Callback
time
CBTI CBTI:PROG,1111,5,5
To set Callback time and Two-way time
Duration: 0 = disable, 3 = 3 min, 5 = 5 min, 10 = 10 min, 15 = 15
min, 20 = 20 min, 30 = 30 min
Two-way time: 1 = 1 min, 3 = 3 min, 5 = 5 min, 30 = 30 minute
5, 5
Factory
reset
FTSET FTSET:PROG,1111
To execute a factory reset
--
Location
function
GEOTR GEOTR:PROG,1111,,0,5
To configure the location function
AGPS: 0 = disabled and 1 = enabled
CellLocate: 0 = disabled and 1 = enabled (Always ON no matter
the selection)
Tracking period: 0 = disabled, 5 = 5 minutes, 10 = 10 minutes, 15 =
15 minutes, 20 = 20 minutes, 30 = 30 minutes, 60 = 60 minutes
1,1,60
To set the
CID event
code for
the red
help
buttons
BTNEV BTNEV:PROG,1111,100
To set the CID event code sent when Mobile Lite’s red help button
is pressed.
100 = medical event
101 = personal emergency
120 = panic report
101
To enable/
disable
voice
prompts
during
guard time
and
confirmati
on beeps
SNDCR
SNDCR:PROG,1111,1,1
To enable/disable voice prompts during guard time and
confirmation beeps
1 = enable
0 = disable
1, 1
To reboot
Mobile Lite
RESET RESET:PROG,1111
To restart Mobile Lite
--
To check
whether
Mobile Lite
is
operationa
l
ECHO ECHO:PROG,1111 --
To obtain
SIM Card
signal
strength
CSQ CSQ:PROG,1111 --
Incoming
call alert
ANSIN ANSIN:PROG,1111,1
Enable/disable ringing sound for incoming call.
Disable = 0, Enable = 1
1
To enable
/ disable
silent
mode
SILENT SILENT:PROG,1111,1
Enable/disable mobile silent mode
Disable = 0, Enable = 1
0
Set Caller
ID
CALID CALID:PROG,1111,1,0227942014
Parameter 1: Select Caller ID: 1 = ID #1, 2 = ID #2
Parameter 2: Caller ID number: Enter a number up to 15 digit long
--
For more information on reporting, please refer to 4.1.4. Report Setting.

41
7.2. Contact ID Communications Protocol and Format
Mobile Lite can communicate with the CMS receiver using the Contact ID
protocol. The CMS can receive the event codes using SMS or IP reporting
methods.
The form of the CID message is:
ACCT MT QXYZ GG CCC
Where:
ACCT = 4 Digit Account number (0-9, B-F)
MT = Message Type. This 2-digit sequence is used to identify the Contact ID
message to the receiver. It may be transmitted as either 18 (preferred) or
98 (optional). New receiver implementations shall accept either an 18 or
a 98. Note that some older receivers may not accept 98.
Q = Event qualifier, which gives specific event information:
1 = New Event or Opening
3 = New Restore or Closing
6 = Previously reported condition still present (Status report)
XYZ = Event code (3 Hex digits 0-9, B-F)
GG= Group or Partition number (2 Hex digits 0-9, B-F). Use 00 to indicate that
no specific group or partition information applies.
CCC = Zone number (Event reports) or User # (Open/Close reports) (3 Hex
digits 0-9, B-F). Use 000 to indicate that no specific zone or user information
applies.
S = 1 Digit Hex checksum calculated such that:
(Sum of all message digits + S) MOD 15 = 0
<
<N
NO
OT
TE
E>
>
A ‘0’ shall be transmitted as a 10 and valued as a 10 for checksum
purposes even though it is displayed and printed as ‘0’.
The category to which each event belongs is shown in the brackets following
every event description. The event filter (please refer to 4. Programming
Mobile Lite – SMS Remote Programming for details about the event filter)
will process events according to the categories to which events are assigned.
For example, in the case of “100 – Mobile Lite Emergency (medical)”, “medical”
means the category to which the event “Mobile Lite Emergency” is assigned.
<
<N
NO
OT
TE
E>
>
Apart from CID_IP and CSV_IP reporting types, Mobile Lite will report its
current location along with other reports.

42
Event Codes:
100 – Mobile Lite Emergency (emergency)
When the Active Button of Mobile Lite is pressed (“Help Event” set as
100).
101 – Personal Emergency (emergency)
When the Active Button of Mobile Lite is pressed (“Help Event” set as
101).
When the Active Button of the learnt-in Fall Sensor, WTR or Panic
Button is pressed.
102 – Inactivity (emergency)
When a fall is detected from Fall Sensor and no activity was detected
after fall detection.
When a fall is detected from the learnt-in Fall Sensor.
120 – Panic (emergency)
When the Active Button of Mobile Lite is pressed (“Help Event” set as
120).
When a fall is detected from the learnt-in Fall Sensor.
302 – Mobile Lite Low on Battery (status)
When Mobile Lite is low on battery.
384 – RF Device Low on Battery (status)
When the learnt-in RF Fall Sensor, WTR or Panic Button is low on
battery.
602 – Auto Check-In Report (status)
When Mobile Lite makes an auto check-in report to the CMS.
643 – Location Accuracy Deviation (status)
When the margin of error for locating Mobile Lite is too great.
644 – Location Positioning Timed Out (status)
When Mobile Lite locating process timed out.
645 – Location Positioning After an Alarm Is Triggered (emergency)
When the location of Mobile Lite is sent after an alarm is triggered.
646 – Location Positioning Command (status)
When the SMS command “LOC” is sent for Mobile Lite to update its
location.
647 – Periodic Location Positioning (status)
When Mobile Lite sends a periodic Location update according to the
preset interval.
43
648 – Location Scream (status)
When a user requests Mobile Lite to scream.
7.3. SIA Digital Communication Standard
Please refer to the document SIA Digital Communication Standard – Internet
Protocol Event Reporting (ANSI/SIA DC-09-2012A) published by the Security
Industry Association for details. An example of an event reported in the
SIA/CID format is as follows:
<0A><61><A4>004D"ADM-CID"0033L0#9999[#9999|1100 00
000][X121E35.057831][Y25N03.900375][P2772]<0D>
Where:
“ADM-CID” means that the content of this message is in the CID format.
0033 for <seq>
L0 for <Lpref>
#9999[#9999|1100 00 000]
9999 = account number
1100 00 000 = CID data (QXYZ GG CCC)
[X...] and [Y...] are location data.
[P...] stands for the margin of error of cell location.
7.4. MPTP Protocol
Please refer to Benefon Corporation’s “MPTP specification description for all
Benefon GSM/GPS products” for details.
7.5. CSV IP
The message composition for CSV IP reporting includes username and
password before the message.
The form of the message is similar to CID reporting:
ACCT,MT,QXYZ,GG,CCC
Where:
ACCT = 4 Digit Account number (0-9, B-F)
MT = Message Type. This 2-digit sequence is used to identify the Contact ID
message to the receiver. It may be transmitted as either 18 (preferred) or
98 (optional). New receiver implementations shall accept either an 18 or
a 98. Note that some older receivers may not accept 98.
44
Q = Event qualifier, which gives specific event information:
1 = New Event or Opening
3 = New Restore or Closing
6 = Previously reported condition still present (Status report)
XYZ = Event code (3 Hex digits 0-9, B-F)
GG= Group or Partition number (2 Hex digits 0-9, B-F). Use 00 to indicate that
no specific group or partition information applies.
CCC = Zone number (Event reports) or User # (Open/Close reports) (3 Hex
digits 0-9, B-F). Use 000 to indicate that no specific zone or user information
applies.
100 – Mobile Lite Emergency (emergency)
When the Active Button of Mobile Lite is pressed (“Help Event” set as
100).
101 – Personal Emergency (emergency)
When the Active Button of Mobile Lite is pressed (“Help Event” set as
101).
When the Active Button of the learnt-in Fall Sensor, WTR or Panic
Button is pressed.
102 – Inactivity (emergency)
When a fall is detected from Fall Sensor and no activity was detected
after fall detection.
When a fall is detected from the learnt-in Fall Sensor.
120 – Panic (emergency)
When the Active Button of Mobile Lite is pressed (“Help Event” set as
120).
When a fall is detected from the learnt-in Fall Sensor.
302 – Mobile Lite Low on Battery (status)
When Mobile Lite is low on battery.
384 – RF Device Low on Battery (status)
When the learnt-in RF Fall Sensor, WTR or Panic Button is low on
battery.
602 – Auto Check-In Report (status)
When Mobile Lite makes an auto check-in report to the CMS.
643 – Location Accuracy Deviation (status)
When the margin of error for locating Mobile Lite is too great.
644 – Location Positioning Timed Out (status)
When Mobile Lite locating process timed out.
645 – Location Positioning After an Alarm Is Triggered (emergency)
When the location of Mobile Lite is sent after an alarm is triggered.
45
646 – Location Positioning Command (status)
When the SMS command “LOC” is sent for Mobile Lite to update its
location.
647 – Periodic Location Positioning (status)
When Mobile Lite sends a periodic Location update according to the
preset interval.
648 – Location Scream (status)
When a user requests Mobile Lite to scream.
Federal Communication Commission Interference Statement
This equipment has been tested and found to comply with the limits for a Class B
digital device, pursuant to Part 15, 22, 24 of the FCC Rules. These limits are designed
to provide reasonable protection against harmful interference in a residential
installation.
This equipment generates, uses and can radiate radio frequency energy and, if not
installed and used in accordance with the instructions, may cause harmful interference
to radio communications. However, there is no guarantee that interference will not
occur in a particular installation. If this equipment does cause harmful interference to
radio or television reception, which can be determined by turning the equipment off
and on, the user is encouraged to try to correct the interference by one of the
following measures:
. Reorient or relocate the receiving antenna.
. Increase the separation between the equipment and receiver.
. Connect the equipment into an outlet on a circuit different from that to which the
receiver is connected.
. Consult the dealer or an experienced radio/TV technician for help.
FCC Caution: To assure continued compliance, any changes or modifications not
expressly approved by the party responsible for compliance could void the user's
authority to operate this equipment. (Example - use only shielded interface cables
when connecting to computer or peripheral devices).
FCC Radiation Exposure Statement
This equipment complies with FCC RF radiation exposure limits set forth for an
uncontrolled environment.
This transmitter must not be co-located or operating in conjunction with any other
antenna or transmitter.
This device complies with Part 15, 22, 24 of the FCC Rules. Operation is subject to
the following two conditions:
(1) This device may not cause harmful interference, and (2) This device must accept
any interference received, including interference that may cause undesired operation.